USER MANUAL Microwave Air Fryer BDK03 PowerXL
PowerXL™ products that excel
MICROWAVE AIR FRYER

Owner's Manual
Save These Instructions - For Household Use Only
MODEL: BDK03
Before installing and operating your new PowerXL Microwave Air Fryer™, read this manual thoroughly and follow all listed safeguards.
Visit TristarCares.com for tutorial videos, product details, and more.
Guarantee Information Inside

Table of Contents
IMPORTANT SAFEGUARDS 4
Precautions to Avoid Possible Exposure to Excessive Microwave Energy 5
Grounding Instructions 6
Countertop Use 7
Parts & Accessories 8
Turntable Installation 9
The Control Panel 10
Using the Accessories 11
Programming 12
Microwave Programming 12
Air Fry Programming 13
Bake Programming 14
Defrost 14
Defrost Chart 14
Instructions for Use 15
Cookware in the Microwave 16
Materials to Avoid in the Appliance 16
Material/Container Test 17
Microwave Function 18
Air Fry Function 18
Bake Function 19
Micro Menu Function 19
AF Button Function 19
Using the Lock Function 19
Cooking Guidelines & Tips 20
Recipes 21
Troubleshooting 24
Cleaning & Storage 26
Frequently Asked Questions 26
Money-Back Guarantee 27
BEFORE YOU BEGIN
The PowerXL Microwave Air Fryer ™ will provide you many years of delicious family meals and memories around the dinner table. But before you begin, it's very important that you read this entire manual, making certain that you are totally familiar with this appliance's operation and precautions.

WARNING
PREVENT INJURIES! CAREFULLY READ ALL INSTRUCTIONS BEFORE USE!
When using electrical appliances basic safety precautions should be followed, including the following:

To reduce the risk of burns, electric shock, injury to persons, or exposure to excessive owave energy:
- Read all instructions before using the appliance.
- Read and follow the specific warning in the "PRECAUTIONS TO AVOID POSSIBLE EXPOSURE TO EXCESSIVE MICROWAVE ENERGY" section.
- This appliance must be grounded. Connect only to properly grounded outlet (see the "GROUNDING INSTRUCTIONS" section).
- Install or locate this appliance only in accordance with the "Countertop Use" section.
- Some products, such as whole eggs and sealed containers - for example, closed glass jars - can explode and should not be heated in this appliance.
- Use this appliance only for its intended use as described in this manual. This appliance is specifically designed to heat or cook food. It is not designed for industrial or laboratory use.
- Do not use corrosive chemicals or vapors in this appliance.
- Do not allow children to use appliance without close supervision.
- Do not operate this appliance if it has a damaged cord or plug, if it is not working properly or if it has been damaged or dropped.
- This appliance should be serviced only by qualified service technicians. Contact Customer Service using the information located on the back of this manual.
-
Do not cover or block any openings on the appliance.
-
Do not store or use this appliance outdoors.
- Do not place or use this product near water, such as near or above a kitchen sink, in a wet basement, near a swimming pool, or similar locations.
- Do not immerse cord or plug in water.
- Keep cord away from heated surfaces.
- Do not let cord hang over edge of table or counter.
- Place the front surface of the door 3 inches or more from the countertop edge to avoid accidental tipping of the appliance during normal usage.
- Maintain clearances for appliance: 3 inches on each side, 12 inches on top, and 3 inches from the rear.
- Do not store anything on top of the appliance.
- Oversized food or oversized metal cookware should not be used in this appliance because they increase the risk of electric shock and could cause a fire.
- When cleaning the front of the door and the area behind the door, use only mild, nonabrasive soaps or detergents applied with a sponge or soft cloth.
- Do not clean with metal scouring pads. Pieces can fall off the pad and touch electrical parts, which involves a risk of electric shock.
- Do not cover the microwave rack or any part of the appliance with metal foil. This will cause overheating of the appliance.
-
To reduce the risk of injury from use:
a. Do not overcook food. Carefully attend appliance when paper, plastic, or other combustible materials are placed inside the appliance to facilitate cooking.
b. Remove wire twist-ties from paper or plastic bags before placing bag in the appliance.
c. If materials inside the appliance ignite, keep appliance door closed, turn appliance off, and disconnect the power cord, or shut off power at the fuse or circuit breaker panel.
d. Do not use the interior for storage purposes. Do not leave paper products, cooking utensils, or food in the appliance when not in use.
e. Do not use the microwave function without food in the appliance.
-
Liquids such as water, coffee, or tea can be overheated beyond the boiling point without appearing to be boiling. This is called delayed eruptive boiling. Visible bubbling or boiling when the container is removed from the microwave appliance is not always present. THIS COULD RESULT IN VERY HOT LIQUIDS SUDDENLY BOILING OVER WHEN THE CONTAINER IS DISTURBED OR A UTENSIL IS INSERTED INTO THE LIQUID.
- To reduce the risk of injury to persons:
a. Do not use straight-sided containers with narrow necks. Use a wide-mouth container.
b. Stir liquid both before and halfway through heating it.
c. Do not overheat liquid.
d. Use extreme care when inserting a spoon or other utensil into a container. This may also cause delayed eruptive boiling.
e. After heating, allow the container to stand in the microwave appliance for a short period of time before removing the container.
f. Be careful when opening containers of hot food. Use potholders and direct steam away from your face and hands.
g. Vent, pierce, or slit containers, pouches, or plastic bags to prevent build-up of pressure.
h. Be careful when touching the turntable, door, or walls of the appliance, which may become hot during use.
i. Do not use paper products when the appliance is operated in the air fryer or oven mode.
- Cook meat and poultry thoroughly - meat to at least an internal temperature of 160° F/ 71° C and poultry to at least an internal temperature of 180° F/ 82° C.
- Make sure all cookware used with the microwave function in this appliance is suitable for microwaving (see the "Materials to Avoid in the Appliance" section).
- Do not store any materials, accessories, or containers inside the appliance when not in use.
Use of the accessories:
a. Remove the Air Frying Rack and Baking Pan from the appliance when not in use.
b. Use potholders when handling the cooking accessories. They may be hot.
c. Be sure that the accessories are positioned properly inside the appliance. The Air Frying Rack and Baking Pan must always be placed on the Glass Tray.
d. DO NOT USE THE AIR FRY RACK AND BAKING PAN WITH THE MICROWAVE FUNCTION.
- This appliance is for home use only. If the appliance is used improperly or for professional or semi-professional purposes or if it is not used according to the instructions in the user manual, the guarantee becomes invalid and Tristar will not be held liable for damages.
PRECAUTIONS TO AVOID POSSIBLE EXPOSURE TO EXCESSIVE MICROWAVE ENERGY
- Do not attempt to operate this appliance with the door open as this can result in harmful exposure to microwave energy. It is important not to break or tamper with the safety interlocks.
- Do not place any object between the appliance front face and the door or allow soil or cleaner residue to accumulate on sealing surfaces.
- Do not operate the appliance if it is damaged. It is particularly important that the appliance door closes properly and that there is no damage to the door (for example, make sure that it is not bent); hinges and latches (for example, make sure that they are not broken or loosened); door seals and sealing surface.
- The appliance should not be adjusted or repaired by anyone except properly qualified service personnel. If the microwave unit is not kept clean, its surface could be degraded and lead to a hazardous situation.

WARNING:
For California Residents
This product can expose you to Bisphenol A, which is known to the State of California to cause birth defects or other reproductive harm. For more information, go to www.P65Warnings.ca.gov.
SAVE THESE INSTRUCTIONS - FOR HOUSEHOLD USE ONLY
Using the Power Cord
- A short power-supply cord is provided to reduce the risk of becoming entangled or tripping over a longer cord.
- This appliance has been designed for use with a 3-prong, 120V dedicated electrical outlet only.
- Plug into a 3-prong wall outlet with no other appliances on the same outlet. Plugging other appliances into the outlet may cause the circuit to overload.
Electric Power
If the electrical circuit is overloaded with other appliances, your new appliance may not operate properly. It should be operated on a dedicated electrical circuit.

WARNING
- NEVER put anything on top of the appliance.
- NEVER cover the air vents on the top, back, and side of the cooking appliance.
- ALWAYS use oven mitts when removing anything hot from the appliance.
- NEVER rest anything on the door while it is open.
- DO NOT leave the door open for an extended period.
- ALWAYS ensure that nothing is protruding from the appliance before closing the door.
- ALWAYS close the door gently; NEVER slam the door closed. ALWAYS hold the handle of the door when opening and closing the door.
GROUNDING INSTRUCTIONS
This appliance must be grounded. In the event of an electrical short circuit, grounding reduces the risk of electric shock by providing an escape wire for the electric current. This appliance is equipped with a cord with a grounding wire and grounding plug. The plug must be plugged into an outlet that is properly installed and grounded. Consult a qualified electrician or serviceman if the grounding instructions are not completely understood or if doubt exists as to whether the appliance is properly grounded. If it is necessary to use an extension cord, use only a 3-wire extension cord that has a 3-pronged grounding plug and a 3-slot receptacle that will accept the plug on the appliance.
Longer cord sets or an extension cord should not be used unless the following precautions are followed:
- The marked electrical rating of the cord set or extension cord should match the rating of the appliance.
- The extension cord must be a grounding-type 3-wire cord.
- The longer cord should not drape over any surfaces where it can be pulled on by children or tripped over.
IMPORTANT
Before initial use, remove and hand wash the cooking accessories. Then, wipe the outside and inside of the appliance with a warm, moist cloth and mild detergent. Next, preheat the appliance by operating the "Air Fry" function for at least 3 minutes to allow the manufacturer's protective coating of oil to burn off (the smell produced by this step is normal). Allow the appliance to cool. Finally, wipe the appliance with warm, soapy water and a dishcloth after this burn-in cycle.
CAUTION: Upon first use, the appliance may smoke or emit a burning odor due to oils used to coat and preserve the heating elements.
Appliance Specifications
| Model Number | Supply Power | Rated Power | Capacity | Turntable Diameter Temperature | External Dimensions |
| BDK03 120V ~60Hz | Input Microwave: 1500WOutput Microwave: 1000WOutput Grill: 1150WOutput Air Fry: 1800W | 1 Cubic Foot 12.4 inches | Air Fry:300°F/149°C-425°F/218°CBake:100°F/38°C-425°F/218°C | 20.47" x 20" x 12.83" |
Countertop Use
Remove all packing material and accessories. Examine the oven for any damage, such as dents or a broken door. Do not use if the appliance is damaged.
Microwave Exterior: Remove any protective film found on the appliance's exterior surface. Do not remove the light brown cover that is attached to the oven cavity to protect the magnetron and interior components.
- Select a level surface that provides enough open space for the intake and/or outlet vents. A minimum clearance of 3.0 inches (7.5cm) is required between the appliance and any adjacent walls. One side must be open.
- Leave a minimum clearance of 12 inches (30cm) above the appliance.
- Do not remove the legs from the bottom of the appliance.
- Blocking the intake and/or outlet openings can damage the appliance.
- Place the appliance as far away from radios and televisions as possible. This appliance's operation of microwave oven may cause interference with your radio or TV reception.
- Plug your appliance into a standard household outlet. Be sure the voltage and the frequency is the same as the voltage and the frequency on the rating label.
WARNING: Do not use this appliance over a range cooktop or other heat-producing appliance even if the appliance is cold. If used near or over a heat source, the appliance could damage other property, could cause personal injuries, and could void the guarantee.

Parts & Accessories
NOTE: Unpack all contents from the packaging. Contents vary by model. Check all packaging material carefully for parts. Please remove any clear or blue protective film on the components. Ensure that all packaging material is removed from the interior of the appliance.


natural_image
Pure diagram of an oval structure with red markers and connecting lines, no text or symbols present
natural_image
Black circular baking pan with smooth surface (no text or symbols)
Parts & Accessories
- MAIN UNIT: Features sturdy construction throughout.
- GLASS DOOR: Sturdy, durable glass keeps heat in and helps ensure even heat distribution to food. NEVER cook with this door in the open position.
- DOOR HANDLE: Always use the handle and avoid touching the Glass Door. The Door may become very hot during the cooking process and can cause injury.
- CONTROL PANEL: Use the Control Panel to use the cooking presets and set the cooking time and temperature (see "The Control Panel" section).
- TURNTABLE ASSEMBLY: Food, containers, and cooking accessories must always be placed on the Turntable Assembly when using all the appliance's cooking modes. Remove the assembly components only to clean or to move the appliance.
5a. TURNTABLE RING: Used to assemble the turntable so that food rotates during the cooking process.
5b. GLASS TRAY: Used to assemble the turntable. The glass tray assembly is ALWAYS required for all cooking modes.
5c. TURNTABLE SHAFT: Used for rotating the Glass Tray when cooking food.
-
AIR FRY RACK: Use for air frying onion rings, mozzarella sticks, French fries, and more. Cannot be used with Microwave mode and must always be placed on the Glass Tray.
-
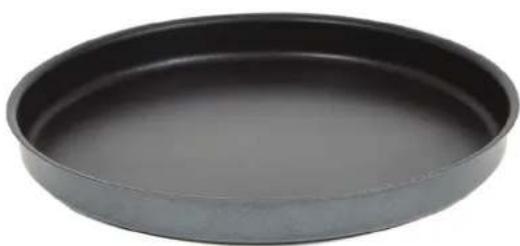
BAKING PAN: Use for baking pizzas and baked goods. Cannot be used with Microwave mode and must always be placed on the Glass Tray. May be sold separately.
Turntable Installation
All food and food containers should be placed on the Glass Tray when cooked in this appliance. If the Glass Tray or the Turntable Ring are damaged, contact Customer Service using the contact information located on the back of this manual. To assemble the turntable:
- Place the Turntable Ring in the groove on the bottom of the inside of the appliance (see Fig. i).
- Place the Glass Tray on top of the Turntable Ring (see Fig. ii). Ensure that the Glass Tray is right side up.
! WARNING
The metal components of this appliance will get extremely hot during use. Great care should be taken to avoid personal injury. Wear protective oven mitts or gloves.
Oversized metal utensils and accessories, including the Air Fry Rack and Baking Pan, should not be used with this appliance's microwave function.

natural_image
Close-up of a transparent glass appliance with a central circular component and decorative patterns (no visible text or symbols)
FIG. i

natural_image
Close-up of a stainless steel microwave oven interior with perforated grating and vented dish (no text or symbols visible)
FIG. ii
The Control Panel
A. INDICATORS

Microwave Air Fry


Fan Bake

Indicates the selected/active function and when the fan is active.
B. TEMPERATURE AND TIME DISPLAY: Displays cooking times, temperatures, and weights.
C. PRESETS: Indicates the active preset when using the Control Knob to scroll through the available presets.
D. FUNCTIONS: Use to initially select a cooking function. You must select a cooking function to select from the corresponding presets.
E. CONTROL KNOB: Rotate the Control Knob to scroll through available presets or the active (blinking) setting, and press the Control Knob to begin or resume the cooking process. During the cooking process, press the Control Knob to add 30 seconds to the cooking time. The Control Knob can also be used to confirm settings, such as the clock/timer on the appliance.
F. TEMPERATURE AND TIME BUTTONS: Use to adjust the cooking time and temperature when using the Air Fry and Bake functions.
NOTE: The cooking time and temperatures of the cooking presets are not adjustable.
G. PRESET MENU BUTTONS: Use to select additional presets from the preset menu (see the "Preset Cooking Chart" section) or to adjust the clock.
Micro Menu: Refer to the "Preset Cooking Chart" section for preset cooking times and temperatures. Air Fry Menu: Refer to the "Preset Cooking Chart" section for preset cooking times and temperatures. Clock/Timer Button: Press once to set the current time on the appliance. Press twice to set the timer on the appliance. Use the Control Knob to adjust and confirm the selected time.
H. STOP/LOCK BUTTON: Press the STOP/Lock Button to stop the cooking process at any time. When the cooking process is stopped, press the STOP/Lock Button to cancel the current cooking timer and enter standby mode. Hold to lock or unlock the appliance (see "Using the Lock Function" section).
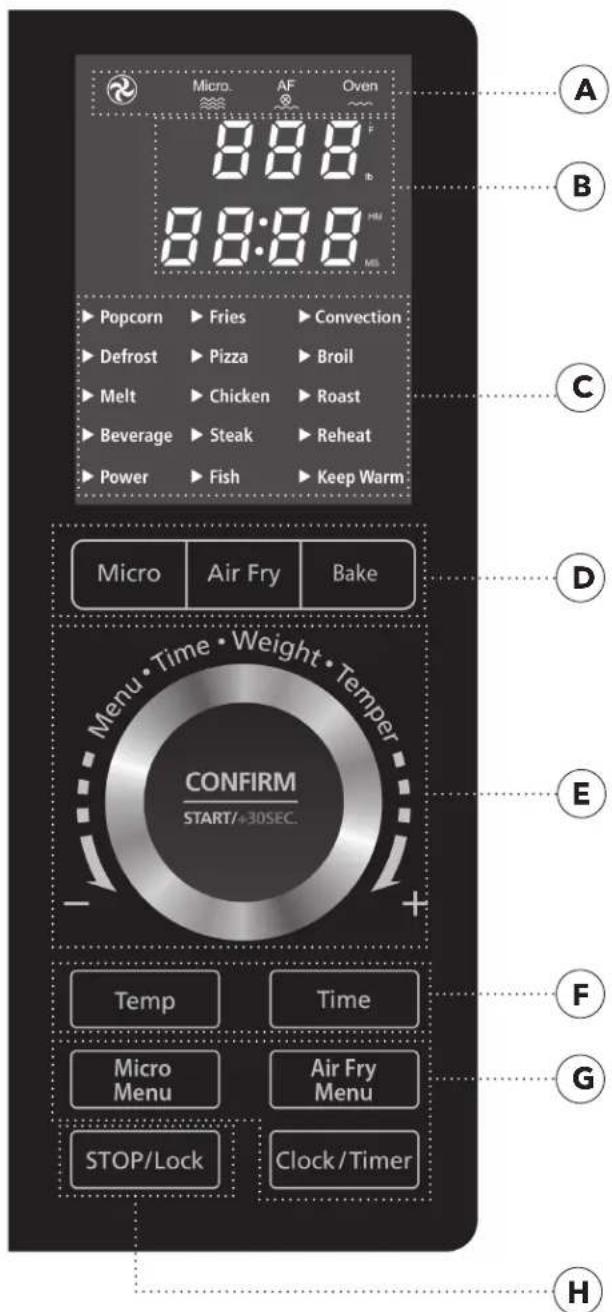
STANDBY MODE: When no cooking program is running, the appliance is in standby mode. In standby mode, only the time is displayed; the other icons are not illuminated.
Using the Accessories
Using the Air Fry Rack
- Assemble the turntable (see the "Turntable Installation" section).
- Place food on the Air Fry Rack. Place the Air Fry Rack on the Tray (see Fig. iii). The Air Fry Rack can be flipped so that food can be placed closer to or farther from the top heating element.
- Choose a cooking mode, time, and temperature.
Press the Control Knob to begin the cooking process.
NOTE: Do not use the Air Fry Rack with the microwave function.
Using the Baking Pan
- Assemble the turntable (see the "Turntable Installation" section)
- Place food on the Baking Pan. Place the Baking Pan on the Glass Tray (see Fig. iv) or on the Air Fry Rack (see Fig. v).
- Choose a cooking mode, time, and temperature. Press the Control Knob to begin the cooking process.

natural_image
Interior view of an oven with a circular vent and metal grate, no visible text or symbols
FIG. iii

natural_image
Interior view of a stainless steel kitchen oven with a perforated grater and dish (no text or symbols visible)
FIG. iv

natural_image
Interior view of a microwave oven with a black lid and red indicator lights, no visible text or symbols
FIG. v
Microwave Programming
When the door of the appliance is opened, you will see a compact version of these programming charts that shows the name of the function, the code that is displayed on the Control Panel when the function is selected, and the weights of the foods that are cooked with each function.
The presets marked with a double asterisk ( ** ) have a built-in preheating function that heats the appliance to the set temperature before the cooking timer starts counting down. For other functions, you can preheat by adding 3 minutes to the cooking time and adding your food after 3 minutes have elapsed.
| Function Preset | Default Power | Power Range | Weight/ Quantity | Default Time | Time Range | Panel Display |
| Microwave Microwave 100% 10-100% N/A 30 secs. 30 secs.-95 mins. |
| Microwave Popcorn 100% 100% | | | 2.75 oz | 2 mins. 15 secs. | | |
| | 3.2 oz | 2 mins. 30 secs. | N/A | |
| | 3.5 oz | 2 mins. 50 secs. | | |
| Microwave Defrost | Varies (see "Defrost Chart" section) | Varies (see "Defrost Chart" section) | | Varies (see "Defrost Chart" section) | N/A | |
| Microwave Melt 100% 100% | | | 8 oz butter | 1 mins. 20 secs. | | BU1 |
| | 16 oz butter | 2 mins. | | BU2 |
| | 2 oz chocolate | 2 mins. 30 secs. | N/A | CH1 |
| | 4 oz chocolate | 3 mins. | | CH2 |
| | 8 oz chocolate | 3 mins. 30 secs | | CH3 |
| Microwave Beverage 100% 100% | | | 4 oz | 1mins. | | |
| | 8 oz | 1 mins. 40 secs. | N/A | |
| | 12 oz | 2 mins. 20 secs. | | |
| Microwave | Variable Power(see the "Microwave Function" section) | 100% 10%-100% 30 secs. 30 secs.-95 mins. | | | | |
| Micro Menu Microwave Function | Deodorization(see the "Cleaning & Storage" section) | 0 5 mins. 5 mins. | C1 | | | | |
| Micro Menu Microwave Function | Dinner Plate | 100% 100% | | 5 oz | 1 mins. 30 secs. | | |
| 8 oz | 2 mins. 10 secs. | | |
| 12 oz | 3 mins. 10 secs. | N/A | C2 |
| 15 oz | 4 mins. 10 secs. | | |
| 21 oz | 5 mins. 40 secs. | | |
| Micro Menu Microwave Function | Soup | 100% 100% | | 8 oz | 2 mins. | | |
| 16 oz | 4 mins. | N/A | C3 |
| 24 oz | 6 mins. | | |
| Micro Menu Microwave Function | Potato | 100% 100% | | 8 oz | 5 mins. | | |
| 16 oz | 9 mins. | N/A | C4 |
| 24 oz | 12 mins. | | |
| Micro Menu Microwave Function | Vegetable | 100% 100% | | 4 oz | 2 mins. 10 secs. | | |
| 8 oz | 4 mins. | N/A | C5 |
| 16 oz | 5 mins. 30 secs. | | |
| Micro Menu Microwave Function | Oatmeal | 100%/50% | 100%/50% | 28 oz | 6 mins./4 mins. | N/A | C6 |
NOTE: Press the Control Knob at any time during the cooking process to add 30 seconds to the cooking timer.
Air Fry Programming
The presets marked with a double asterisk ( ** ) have a built-in preheating function that heats the appliance to the set temperature before the cooking timer starts counting down. For other functions, you can preheat by adding 3 minutes to the cooking time and adding your food after 3 minutes have elapsed.
| Function Preset | Default Temperature | Temperature Range | Weight/ Quantity | Default Time | Time Range | Panel Display |
| Air Fry Air Fry 400° F/204°C | | 300°F/149°C, 325°F/163°C, 350°F/177°C, 375°F/190°C, 400°F/204°C, 425°F/218°C | N/A 20 mins. 30 secs. -95 mins. |
| Air Fry | French Fries | 425°F/218°C | N/A | 8 oz. | 22 mins. | N/A | |
| Air Fry | Pizza** | 400°F/204°C | N/A | 11" pizza | 10 mins. | N/A | |
| Air Fry | Chicken | 425°F | N/A | 8 oz. | 18 mins. | N/A | |
| Air Fry | Steak** | 425°F | N/A | 8 oz. | 7 mins. | N/A | |
| Air Fry | Fish | 425°F | N/A | 8 oz. | 12 mins. | N/A | |
| Air Fry Menu Air Fry Function | Frozen Steak Fries | 425°F/218°C | N/A | 11 oz. | 24 mins. | N/A | A01 |
| Air Fry Menu Air Fry Function | Frozen Onion Rings | 425°F/218°C N/A 7 oz. 12 mins. N/A | A02 | | | |
| Air Fry Menu Air Fry Function | Frozen Chicken Nuggets | 425°F/218°C | N/A | 12 oz. | 20 mins. | N/A | A03 |
| Air Fry Menu Air Fry Function | Frozen Chicken Wings | 425°F/218°C | N/A | 18 oz. | 21 mins. | N/A | A04 |
| Air Fry Menu Air Fry Function | Frozen Fish Sticks | 425°F/218°C N/A 9 oz. 20 mins. N/A | A05 | | | |
| Air Fry Menu Air Fry Function | Bacon | 425°F/218°C | N/A | 4 pcs | 9 mins. | N/A | A06 |
| Air Fry Menu Air Fry Function | Vegetable | 400°F/204°C | N/A | 11 oz. | 16 mins. | N/A | A07 |
| Air Fry Menu Air Fry Function | AF Eggs (hard) | 375°F/190°C | N/A | 5 pcs | 18 mins. | N/A | A08 |
| Air Fry Menu Air Fry Function | Roast Chicken | 375°F/190°C | N/A | 16 oz. | 35 mins. | N/A | A09 |
| Air Fry Menu Air Fry Function | Breaded Shrimp | 425°F/218°C N/A 8 oz. 18 mins. N/A | A10 | | | |
| Air Fry Menu Air Fry Function | Pizza Slice | 400°F/204°C | N/A | 2 pcs. | 9 mins. 30 secs. | N/A | A11 |
| Air Fry Menu Air Fry Function | Cake | 300°F/149°C | N/A | 16 oz. | 45 mins. | N/A | A12 |
| Air Fry Menu Air Fry Function | Cookie | 325°F/163°C | N/A | 6 oz. | 12 mins. | N/A | A13 |
NOTE: Press the Control Knob at any time during the cooking process to add 30 seconds to the cooking timer.
Bake Programming
The presets marked with a double asterisk ( ** ) have a built-in preheating function that heats the appliance to the set temperature before the cooking timer starts counting down. For other functions, you can preheat by adding 3 minutes to the cooking time and adding your food after 3 minutes have elapsed.
| Function Preset | Default Temperature | Temperature Range | Default Time | Time Range |
| Bake Bake** 350°F/177°C | | 100°F/38°C, 150°F/65°C, 250°F/121°C, 275°F/135°C, 300°F/149°C, 325°F/163°C, 350°F/177°C, 375°F/190°C, 400°F/204°C, 425°F/218°C | 30 mins. 30 secs.-95 mins. | |
| Bake Convection** 375°F/190°C | | 100°F/38°C, 150°F/65°C, 250°F/121°C, 275°F/135°C, 300°F/149°C, 325°F/163°C, 350°F/177°C, 375°F/190°C, 400°F/204°C. 425°F/218°C | 30 mins. | |
| Bake | Broil** | 425°F/218°C | 400°F/204°C, 425°F/218°C | 10 mins. | 30 secs.-95 mins. |
| Bake Roast** 375°F/190°C | | 100°F/38°C, 150°F/65°C, 250°F/121°C, 275°F/135°C, 300°F/149°C, 325°F/163°C, 350°F/177°C, 375°F/190°C,400°F/204°C, 425°F/218°C | 25 mins. | |
| Bake Reheat 250°F/121°C | | 100°F/38°C, 150°F/65°C, 250°F/121°C, 275°F/135°C, 300°F/149°C, 325°F/163°C, 350°F/177°C, 375°F/190°C, 400°F/204°C , 425°F/218°C | 15 mins. | |
| Bake | Keep Warm | 160°F/71°C | 160°F/71°C | 2 hrs. | 1-4 hrs. |
NOTE: Press the Control Knob at any time after preheating to add 30 seconds to the cooking timer.
Defrost
- Press the Micro Button and then turn the Control Knob to the Defrost preset. Press the Control Knob to confirm the setting.
- You can scroll though the DEF1-DEF6 settings by turning the Control Knob (see the Defrost Chart).
- Press the Control Knob to confirm the setting.
- Turn the Control Knob to select the defrost weight (4-100 oz).
- Press the Control Knob to start defrosting.
- Turn food over when unit beeps twice.
- When the timer is complete, the appliance will beep five times and display "0:00."
Defrost Chart
| Defrost Code | Food | Default Weight |
| DEF1 | Vegetable | 4 oz |
| DEF2 | Fruit | 4 oz |
| DEF3 | Chicken | 4 oz |
| DEF4 | Fish | 4 oz |
| DEF5 | Meat | 4 oz |
| DEF6 | Broth | 4 oz |
NOTE: Default time varies according to weight.
Before First Use
- Read all material, warning stickers, and labels.
- Remove all packing materials.
- Hand-washing is recommended. Wash all parts and accessories used in the cooking process with warm, soapy water.
-
Never wash or submerge the cooking appliance in water. Wipe the inside and outside of the cooking appliance with a clean, moist cloth. Rinse with a warm, moist cloth.
-
Before cooking food, preheat the appliance by operating the "Air Fry" function for at least 3 minutes to allow the manufacturer's protective coating of oil to burn off (the smell produced by this step is normal). Allow the appliance to cool. Finally, wipe the appliance with warm, soapy water and a dishcloth after this burn-in cycle.
Setting the Clock
- Press the Clock/Timer Button once. The LED Panel will show "00:00."
- Turn the Control Knob to adjust the hour setting from 1 to 12.
-
Press the Clock/Timer Button to confirm the hour setting.
-
Turn the Control Knob to adjust the minute setting from 0 to 59.
- Press the Clock/Timer Button to confirm the time setting.
Setting the Kitchen Timer
-
Press the Clock/Timer Button twice. The LED Panel will show "00:00."
-
Turn the Control Knob to adjust the kitchen timer from 30 seconds to 95 minutes.
- Press the Control Knob to start the kitchen timer.
Cookware in the Microwave
It is not necessary to buy new cookware. Many pieces already in your kitchen can be used successfully in your new appliance. The charts below will help you decide
which cookware and coverings should be used with each feature. Make sure the utensil does not touch the interior walls during the cooking process.
Cookware Microwave Air Fry Bake
| Heat-resistant glass, glass-ceramic | Yes Yes Yes |
| Metal No Yes Yes | | | |
| Microwave-safe plasticsNote: Use only microwaveable cookware that is safe to 450° F/232°C. | Yes | No | No |
| Plastic films and wraps | Yes | No | No |
| Paper products | Yes | No | No |
| Straw, wicker, and wood | No | No No | |
| Aluminum foil:Use as shielding only. Small smooth pieces may be used to cover thin parts of poultry to prevent overcooking. Arcing can occur if foil is too close to oven walls.The foil should be at least 1 inch (2.5cm) away from the oven walls. | No Yes Yes | | |
| Dinnerware:Microwave safe only. Follow manufacturer's instructions.Do not use cracked or chipped dishes. | Yes | No | No |
| Oven cooking bags:Follow manufacturer's instructions. Do not close with metal tie.Make slits to allow steam to escape. | Yes Yes Yes | | |
| Wax paper:Use as a cover to prevent splattering and retain moisture inside. | Yes | No | No |
Materials to Avoid in the Appliance
Material Reasons
| Aluminum Tray | May cause arcing and could cause a fire in the oven. Transfer food to microwave-safe dish. |
| Food carton with metal handle | May cause arcing and could cause a fire in the oven. Transfer food to microwave-safe dish. |
| Metal or metal-trimmed utensils | Metal shields the food from microwave energy. Metal trim may cause arcing and could cause a fire in the oven. |
| Metal Twist Ties May cause arcing and could cause a fire in the oven. |
| Paper Bags May cause a fire when using the air fryer or oven function. |
| Plastic foam | Plastic foam may melt or contaminate the liquid inside when exposed to high temperature. |
| Wood Wood will dry out when used in the microwave oven and may split or crack. |
Containers

CAUTION
PERSONAL INJURY HAZARD
Tightly-closed containers could explode. Closed containers should be opened and plastic pouches should be pierced before cooking.
See the instructions in the "Cookware in the Microwave" and "Materials to Avoid in the Appliance" sections.
There may be certain non-metallic materials that are not safe to use for microwaving. If in doubt, you can test the utensil in question by following the instructions in the "Material/Container Test" section.
Material/Container Test
- Fill a microwave-safe container with 1 cup (250 ml) of cold water and the container.
- Set the appliance to microwave mode and cook on maximum power for 1 minute. NOTE: Do not microwave the container for more than 1 minute.
- Carefully feel the container. If the container is warm, do not use the container in microwave mode.
- Do not exceed 1 minute cooking time to not overheat the container.
Preventing Arcing
Arcing is sparks or electric flashes that crackle or pop. Arcing can produce heat that is quite intense and can damage the interior of the microwave or containers being used in the microwave. It can also cause fire.
Arcing occurs when metal containers are used in the microwave and can also occur with the use of metal skewers, metal clamps, or twist ties for plastic bags. To prevent arcing, use the charts to determine which materials are microwave safe, or follow instructions from container/wrap manufacturer.
Plastic Cookware
Plastic cookware designed for microwave cooking is very useful, but should be used carefully. Even microwave-safe plastic may not be as tolerant of overcooking conditions as are glass or ceramic materials and may soften or char if subjected to short periods of overcooking. In longer exposures to overcooking, the food and cookware could ignite.
Follow these guidelines:
- Use microwave-safe plastics only and use them in strict compliance with the cookware manufacturer's recommendations.
- Do not microwave empty containers.
- Do not permit children to use plastic cookware without adult supervision.
Microwave Function
- Press the Micro Button to set the appliance to the Microwave function.
- Press the Temp Button and then turn the Control Knob to select a power level (1-10).
- Press the Time button and then turn the Control Knob to adjust the cooking time (30 seconds-95 minutes).
- Press the Control Knob to begin the cooking process.
- Press the Control Knob at any time during the cooking process to add 30 seconds to the cooking time.
Fast Microwave
Turning the Control Knob after pressing the Micro Button allows you to cycle through the Microwave presets from Popcorn to Variable Power (see the "Microwave Programming" section).
Display Level Power
| P10 10 100% |
| P9 9 90% |
| P8 8 80% |
| P7 7 70% |
| P6 6 60% |
| P5 5 50% |
| P4 4 40% |
| P3 3 30% |
| P2 2 20% |
| P1 1 10% |
Fig. vi. The ten different microwave power levels.
Air Fry Function
- Press the Air Fry Button to set the appliance to the Air Fry function.
- Press the Temp Button and then turn the Control Knob to cycle between the available cooking temperatures (300°F/149°C, 325°F/163°C, 350°F/177°C, 375°F/190°C, 400°F/204°C, 425°F/218°C).
NOTE: If the appliance is not preheated, add 3 minutes to the cooking time.
-
Press the Time Button and then turn the Control Knob to adjust the cooking time (30 seconds-95 minutes).
-
Press the Control Knob to confirm the cooking time and start the timer.
- Press the Control Knob at any time during the cooking process to add 30 seconds to the cooking time.
Fast Air Fry
Turning the Control Knob after pressing the Air Fry Button allows you to cycle through the Air Fry presets from French Fries to Fish (see the "Air Fry Programming" section).
Bake Function
- Press the Bake Function Button to set the appliance to the Bake function. Do not add food or accessories yet.
- Press the Temp Button and then turn the Control Knob to adjust the cooking temperature (100°F/38°C, 150°F/65°C, 250°F/121°C, 275°F/135°C, 300°F/149°C, 325°F/163°C, 350°F/177°C, 375°F/190°C, 400°F/204°C, 425°F/218°C).
- Press the Time Button to adjust the cooking time (30 seconds-95 minutes).
-
Press the Control Knob to begin the preheating process. The Fan Icon will flash to indicate that the appliance is preheating.
-
When the appliance has preheated, the Fan Icon will stop flashing and the appliance will display "Add Food." Open the door, insert your food and accessories, and close the door. Press the Control Knob to start the timer.
Fast Bake
Turning the Control Knob after pressing the Bake Button allows you to cycle through all available Bake presets (see the "Bake Programming" section).
- Press the Micro Menu Button.
- Turn the Control Knob to scroll through the presets (C1-C6; see the "Microwave Programming" section).
-
The Display will show the weight options. Turn the Control Knob to scroll through the displayed weights.
-
Press the Control Knob to confirm the setting and begin the cooking cycle.
- Press the Control Knob at any time during the cooking process to add 30 seconds to the cooking time.
NOTE: Pressing the Control Knob increases the cooking time in 30-second increments.
- Press the Air Fry Menu button
-
Turn the Control Knob to cycle through the 13 preset functions (A01-A13; see the "Air Fry Programming" section for preset times and temperatures).
-
Once an air frying setting has been selected, press the Control Knob to begin the cooking process.
-
Press the Control Knob at any time during the cooking process to add 30 seconds to the cooking time.
Using the Lock Function
When the appliance is in standby mode (see "The Control Panel" section), hold the STOP/Lock Button for 3 seconds to lock and unlock the appliance.
Cooking Guidelines & Tips
Internal Temperature Meat Chart
Use this chart and a food thermometer to ensure that meat, poultry, seafood, and other cooked foods reach a safe minimum internal temperature.
*For maximum food safety, the U.S. Department of Agriculture recommends 165° F/74° C for all poultry; 160° F/71° C for ground beef, lamb, and pork; and 145° F/63° C, with a 3-minute resting period, for all other types of beef, lamb, and pork. Also review the USDA Food Safety Standards.
Food Type Internal Temp.*
| Beef & Veal | Ground 160°F (71°C) |
| Steaks, roasts: medium 145°F (63°C) |
| Steaks, roasts: rare 125°F (52°C) |
| Chicken & Turkey | Breasts 165°F (74°C) |
| Ground, stuffed 165°F (74°C) |
| Whole bird, legs, thighs, wings 165°F (74°C) |
| Fish & Shellfish Any type 145°F (63°C) |
| Lamb | Ground 160°F (71°C) |
| Steaks, roasts: medium 140°F (60°C) |
| Steaks, roasts: rare 130°F (54°C) |
| Pork | Chops, ground, ribs, roasts 160°F (71°C) |
| Fully cooked ham 140°F (60°C) |
Tips
- Foods that are smaller in size usually require a slightly shorter cooking time than larger ones.
- Large sizes or quantities of food may require a longer cooking time than smaller sizes or quantities.
- Flipping or turning food halfway through the cooking process ensures that the food is evenly cooked.
-
Snacks normally cooked in an oven can also be cooked in the appliance.
-
Use premade dough to prepare filled snacks quickly and easily. Premade dough also requires a shorter cooking time than homemade dough.
- Air frying/baking tip: Adding a bit of vegetable oil to fresh potatoes is suggested for a crispier result. When adding oil, do so just before cooking and add only a small amount onto the potatoes.
- Air frying/baking tip: A baking tin or oven dish can be placed on the Air Fry Rack inside the appliance when cooking foods such as cakes or quiches. Using a tin or dish is also recommended when cooking fragile or filled foods.

natural_image
Close-up of a bowl of shredded food garnished with chopped green onions, placed on a woven mat (no text or symbols visible)
1 lb frozen hash browns
3 tbsp butter
34 cup sour cream
3/4 cup mayonnaise
1 ½ cups shredded cheddar cheese, plus more for topping shredded Parmesan cheese
12 tsp salt
12 tsp garlic powder
14 tsp ground black pepper
-
Place the frozen hash browns in a microwave-safe bowl. Press the Defrost button and set the defrost time to 10 mins.
-
Place the defrosted hash browns in a colander to drain.
-
Place the butter in a microwave-safe bowl. Press the microwave button, melt butter for 10-15 secs.
-
Combine all the ingredients in a bowl.
-
Pour the mixture into a greased casserole dish.
-
Sprinkle some additional cheddar over the top of the mixture.
-
Place the dish on the Air Fry Rack. Press the Air Fry button and set the temperature to 350° F/175°C and the cooking time to 20 mins.
-
Press the Control Knob to begin the cooking cycle. Cook until golden brown.

natural_image
Plate of braised salmon fillets with chili peppers and green onions, served on a checkered tablecloth (no text or symbols visible)
2 tbsp light brown sugar
14 cup orange juice
2 tbsp lemon juice
2 tbsp red wine vinegar
2 tsp olive oil
2 cloves garlic, minced
1 scallion, chopped finely
salt & ground black pepper, to taste
-
Combine all the ingredients except the salmon, salt, and ground black pepper in a saucepan over low heat. Bring to a boil and then lower to a simmer. Reduce for 15 mins., stirring often.
-
Rub each salmon filet with olive oil and season with the salt and ground black pepper.
-
Place the salmon on the Baking Pan.
-
Place the Baking Pan on the Air Fry Rack. Press the Air Fry button and set the temperature to 375° F/190°C, and the cooking time to 10 mins. Press the Control Knob to begin the cooking cycle.
-
Once the cooking cycle has finished, brush the salmon with the sauce.
-
Return the salmon to the appliance. Press the Broil button. Press the Control Knob to begin the cooking cycle. Remove the salmon once the glaze begins to caramelize (3-4 mins.).
-
Serve with the sauce and chopped scallions.

natural_image
Close-up of a pizza with cheese and herbs on a wooden surface, no visible text or symbols
WHITE PIZZA
1 thin-crust pizza dough
2 cloves garlic, sliced thinly
12 tsp red pepper flakes
9 slices fresh mozzarella
14 cup ricotta cheese
2 tsp extra virgin olive oil
14 tsp of sea salt
14 tsp black pepper
-
In a bowl, mix the ricotta cheese, salt, pepper, and red pepper flakes
-
Roll the pizza dough in the Baking Pan.
-
Place the Baking Pan on the Air Fry Rack. Press the Air Fry button and set the cooking temperature to 375° F/191°C and the cooking time to 10 mins. Flip the dough after 5 mins.
-
Remove the Baking Pan.
-
Spread the ricotta mixture on the crust. Lay out the sliced garlic, fresh mozzarella. drizzle with olive oil.
-
Return the Baking Pan to the Air Fry Rack. Press the Air Fry button and set the cooking temperature to 375° F/191°C and the cooking time to 8 mins.
-
Let the pizza cool for 5 mins. before cutting.
STUFFED BAKED SWEET POTATO
2 tbsp. pecans, crushed
1 pinch cinnamon
1 pinch nutmeg
1 pinch sea salt
1 pinch black pepper
2 sweet potatoes
-
In a bowl, mix the pecans, cinnamon, nutmeg, salt, and black pepper together. Reserve the mixture.
-
Poke holes in each sweet potato with a fork several times to allow steam to escape. Place the potatoes in a microwave-safe dish on the Glass Tray in the Microwave Air Fryer.
-
Press the Microwave button and set the cooking time to 4 mins. After 4 mins., use tongs to flip over each sweet potato (an extra 1-2 mins. may be required depending on the size of the potatoes). The sweet potato is done when you can poke a fork into it and there is little resistance.
-
Remove the sweet potatoes to a cutting board and then slice the top of the sweet potato. Use a towel to pinch the ends of each potato carefully and push in until the top slice opens up.
-
Press the Broil button and set the cooking time to 3 mins.
-
Sprinkle the pecan mixture on top of openings of the sweet potatoes and top with the mini marshmallows
-
Place the loaded sweet potatoes on top of the Air Fry Rack on the Glass Tray. Press the Control Knob and cook until the marshmallows begin to brown (2-3 mins.).
Topping Alternatives
-
Top with a pat of butter, salt, and black pepper, to taste.
-
Top with shredded Jack cheese. Place on the Air Fry Rack on the Glass Tray. Press the Broil button. Broil until the cheese is melted (3-4 mins.). Garnish each sweet potato with diced chives, 2 tbsp. cooked and diced bacon, and a dollop of sour cream.
TERIYAKI GARLIC WINGS
4 oz Buffalo wing sauce
1 oz soy sauce
1 tbsp. chopped garlic
1 tbsp. chopped cilantro
1 ½ lb frozen wings
1 tsp. onion powder
½ tsp. black pepper
-
In a bowl mix the wing sauce, soy sauce, garlic, and cilantro together. Reserve the sauce.
-
Place the wings in a microwave-safe bowl on the Glass Tray. Press the Defrost button, turn the Control Knob to DEF3, and press the Control Knob to confirm. Turn the Control Knob to 24 oz and press the Control Knob
to confirm. Transfer the wings to a clean bowl. Toss the wings with the onion powder and black pepper.
- Place the wings in the Baking Pan and place the Baking Pan on the Air Fry Rack on the Glass Tray.
- Press the Air Fry button and set the cooking temperature to 425° F/218°C and the cooking time to 25 mins.
- When the cooking cycle is complete, toss the wings with the sauce.
- Return the wings to the Baking Pan on the Air Fry Rack on the Glass Tray. Press the Air Fry button and set the cooking temperature to 400°F/204°C and the cooking time to 3-5 mins. to glaze the wings.

natural_image
Steamed bull cut on a wooden cutting board with garnish, no visible text or symbols
ITALIAN ROULADE OF BEEF
1 1 ½-lb flank steak, butterflied
14 cup basil pesto
12 lb. provolone, sliced
3 roasted red peppers
1 tsp sea salt
1 tsp ground black pepper.
1. Place the steak on a cutting board and spread the pesto all over one side of the steak.
2. Layer the cheese and roasted peppers on the steak.
3. Roll the steak up and tie it with string about five times from one end to the other.
4. Season the roulade with the salt and ground black pepper.
5. Place the roulade on the Baking Pan and place the Baking Pan on the Air Fry Rack on the Glass Tray. Press the Air Fry button, and set the cooking temperature to 400°F/204°C and the cooking time to 15-20 mins. (depending on your desired doneness; see step 6).
-
Cook the roulade to the desired doneness (use a meat thermometer to measure the internal temperature):
-
Rare: 125° F / 50° C
• Medium rare: 135°F/60°C
• Medium: 145°F/65°C
• Well done: 165°F/75°C
-
Let the roulade rest for 10 mins. before slicing.

natural_image
Close-up of a wooden pie with red fruit filling, served on a patterned plate (no text or symbols visible)
CHERRY PIE
1 store-bought pie crust
2 15-oz cans cherry pie filling
1 egg, beaten for egg wash raw sugar, for garnish
- Place a layer of the pie dough into a lightly greased 8-in. pie pan.
- Trim the dough, leaving 1 in. over the side of the pan.
- Fold the excess dough inward to create a thick crust.
- Create a scalloped edge using your thumbs and pointer finger.
- Refrigerate the dough for 15 mins.
- Fill the shell with the cherry filling. You may have some left over.
- Cut the remaining pie crust into strips. Create a lattice over the filling.
- Brush the lattice with the egg wash and sprinkle with the sugar.
- Place the pie pan on the Air Fry Rack. Press the Air Fry button and set the cooking temperature to 350° F/ 175° C and the cooking time to 45 mins. Press the Control Knob to begin the cooking cycle.
Troubleshooting
Appliance not working as expected? Review the chart for possible causes and solutions. Go to www.Tristarcares.com or contact Customer Service for unanswered questions.
Problem Possible Cause Solution
| Oven will not start | Electrical cord for oven is not plugged in. Plug power cord into wall socket. |
| Door is open. Close the door and try again. |
| Wrong operation is set. Check instructions. |
| Arcing or sparking | Materials to be avoided in microwave oven were used. Use microwave-safe cookware only. |
| The oven is operated when empty Do not operate with oven empty. |
| Spilled food remains in the cavity. Clean cavity with wet towel. |
| Unevenly cooked foods | Materials to be avoided in microwave oven were used. Use microwave-safe cookware only. |
| Food is not defrosted completely. Completely defrost food by using a longer defrost time. |
| Cooking time, power level is not suitable. Use correct cooking time, power level. |
| Too much food is attempted to be cooked. Cook smaller quantities of food |
| Overcooked foods | Cooking time, power level is not suitable. Use correct cooking time, power level. |
| Undercooked foods | Materials to be avoided in microwave oven were used. Use microwave-safe cookware only. |
| Food is not defrosted completely. Completely defrost food by using a longer defrost time. |
| Oven ventilation ports are restricted. Check to see that oven ventilation ports are not restricted. |
| Cooking time, power level is not suitable. Use correct cooking time, power level |
| Too much food is attempted to be cooked. Cook smaller quantities of food |
| Improper defrosting | Materials to be avoided in microwave oven were used. Use microwave-safe cookware only. |
| Cooking time, power level is not suitable. Use correct cooking time, power level. |
| Food is not turned or stirred. Turn or stir food. |
Problem Possible Cause Solution
| The appliance does not work | The appliance is not plugged in. Plug power cord into wall socket. |
| The appliance has not been turned on by setting the preparation time and temperature. | Set the temperature and time. |
| The appliance is plugged into an outlet that is shared with other devices. | Plug the appliance into a dedicated power outlet. |
| Food not cooked | The appliance is overloaded. Use smaller batches for more even cooking. |
| The temperature is set too low. Raise temperature and continue cooking. |
| Food is not fried evenly | Some foods need to be turned during the cooking process. Check halfway through process and turn food if needed. |
| Foods of different sizes are being cooked together. Cook similar-sized foods together. |
| White smoke coming from appliance | Oil is being used. Wipe down to remove excess oil. |
| Accessories have excess grease residue from previous cooking. | Clean the components and appliance interior after each use. |
| French fries are not fried evenly | Wrong type of potato being used. Use fresh, firm potatoes. |
| Potatoes not blanched properly during preparation. Use cut sticks and pat dry to remove excess starch. |
| Too many fries are being cooked at once. Cook less than 2 1⁄2 cups of fries at a time. |
| Fries are not crispy | Raw fries have too much water. | Dry potato sticks properly before misting oil.Cut sticks smaller. Add a bit more oil. |
Radio Interference
Operation of the microwave oven may cause interference to your radio, television, or similar equipment. Interference can be reduced or eliminated by taking the following measures:
- Clean the door and sealing surface of the oven.
- Reorient the receiving antenna of radio or television.
-
Relocate the appliance with respect to the receiver.
-
Move the appliance away from the receiver.
- Plug the appliance into a different outlet so that the appliance and the receiver are on different branch circuits.
Cleaning & Storage
Cleaning
Clean the appliance after each use. Remove the power cord from the wall socket and be certain the appliance is thoroughly cooled before cleaning.
- Wipe the outside of the appliance with a warm, moist cloth and mild detergent.
- To clean the door, gently scrub both sides with warm, soapy water and a damp cloth.
DO NOT soak or submerge the appliance in water or wash in the dishwasher.
- Clean the inside of the appliance with hot water, a mild detergent, and a nonabrasive sponge. Do not scrub the heating coils because they are fragile and
may break. Then, rinse the appliance thoroughly with a clean, damp cloth. Do not leave standing water inside the appliance.
- If necessary, remove unwanted food residue with a nonabrasive cleaning brush.
- Caked-on food on accessories should be soaked in warm, soapy water to remove the food easily. Hand-washing is recommended.
- If any other service needs to be performed, contact Customer Service using the contact information on the back of this manual.
Deodorization Preset
Use the Deodorization Preset to remove strong smells after cooking. Clean the inside of the appliance before using the Deodorization Preset.
-
Press the Micro Menu Button. The LED Panel will show "C1."
-
Press the Control Knob to confirm the preset. The LED Panel will show "5:00."
- Press the Control Knob to begin the deodorization process.
Storage
- Unplug the appliance and let it cool thoroughly.
-
Make sure all components are clean and dry.
-
Place the appliance in a clean, dry place.
Frequently Asked Questions
-
Does the appliance need time to heat up?
Preheating is needed when you are cooking from a cold start when using the Bake or Air Fry cooking function. Add 3 minutes to the cooking time to compensate when preheating is necessary (preheating is automatic with the Bake function and Pizza/Steak presets).
-
Why isn't my food cooking or heating evenly?
Cooking for too short a period of time, even at high temperatures, may result in food left unevenly heated throughout. Try cooking for a longer time at a lower power or temperature.
- What happens if the appliance still does not work after I have tried all the troubleshooting suggestions?
Never attempt home repair. Contact Customer Service and follow the procedures set forth by the manual. Failure to do so could render your guarantee null and void.
PowerXL™ products that excel MICROWAVE AIR FRYER
90-Day Money-Back Guarantee
The PowerXL Microwave Air Fryer is covered by a 90-day money-back guarantee. If you are not 100% satisfied with your product, return the product and request a replacement product or refund. Proof of purchase is required. Refunds will include the purchase price, less processing and handling. Follow the instructions in the Return Policy below to request a replacement or refund.
Replacement Guarantee Policy
Our products, when purchased from an authorized retailer, include a 1-year replacement guarantee if your product or component part does not perform as expected, the guarantee extends only to the original purchaser and is not transferable. If you experience an issue with one of our products within 1 year of purchase, return the product or the component part for replacement with a functionally equivalent new product or part. The original proof of purchase is required, and you are responsible to pay to return the unit to us. In the event a replacement unit is issued, the guarantee coverage ends six (6) months following the receipt date of the replacement unit or the remainder of the existing guarantee, whichever is later. Tristar reserves the right to replace the unit with one of equal or greater value.
Return Policy
If, for any reason, you would like to replace or return the product under the money-back guarantee, your order number can be used as the return merchandise authorization number (RMA). If the product was purchased in a retail store, return the product to the store or use "RETAIL" as the RMA. Return your product to the address provided below for a replacement, which will incur no additional processing and handling fees, or for the refund of your purchase price, less processing and handling. You are responsible for the cost of returning the product. You can locate your order number at www.customerstatus.com. You can call customer service at 973-287-5106 or email info@tvcustomerinfo.com for any additional questions. Pack the product carefully and include in the package a note with (1) your name, (2) mailing address, (3) phone number, (4) email address, (5) reason for return, and (6) proof of purchase or order number, and (7) specify on the note whether you are requesting a refund or replacement. Write the RMA on the outside of the package.
Send the product to the following return address:
PowerXL Microwave Air Fryer
Tristar Products
500 Returns Road
Wallingford, CT 06495
If the replacement or refund request has not been acknowledged after two weeks,
please contact Customer Service at 973-287-5106.
Refund
Refunds requested within the money-back guarantee timeframe will be issued to the payment method used at purchase if the item was purchased directly from Tristar. If the item was purchased from an authorized retailer, proof of purchase is required, and a check will be issued for the item and sales tax amount. Processing and handling fees are non-refundable.
PowerXL™ products that excel
MICROWAVE AIR FRYER
We are very proud of the design and quality of our PowerXL Microwave Air Fryer TM .
This product has been manufactured to the highest standards. Should you have any questions, our friendly customer service staff is here to help you.
For parts, recipes, accessories, and everything PowerXL, go to tristarcares.com or scan this QR code with your smartphone or tablet:

To contact us, email us at info@tvcustomerinfo.com or call us at 973-287-5106.

Distributed by:
Tristar Products, Inc.
Fairfield, NJ 07004
© 2021 Tristar Products, Inc.
Made in China
PXL_MAF_IB_TP_ENG_V4_210224