
84" Interactive Flat Panel Display - Interactive screen VESTEL - Free user manual and instructions
Find the device manual for free 84" Interactive Flat Panel Display VESTEL in PDF.


| Product Type | 84" Interactive Flat Panel Display |
| Screen Size | 84" diagonal (213.4 cm) |
| Panel Technology | TFT 84" UHD 2D LCD |
| Resolution | 3840 x 2160 (4K UHD) |
| Brightness | 350 cd/m² |
| Contrast Ratio | 1400:1 |
| Response Time | 5 ms (G2G) |
| Viewing Angle | 178° horizontal / 178° vertical |
| Touch Technology | Infrared (IR) |
| Touch Points | Up to 6 simultaneous touches |
| Processor (Optional) | AMD A10-5750M Quad Core APU |
| Memory (Optional) | DDR3 So-DIMM, up to 16 GB |
| Storage (Optional) | mSata / SSD (various capacities) |
| Audio Output | 2 x 15 W internal speakers |
| Ports | 2x USB 2.0, 2x USB 3.0, 1x USB 2.0 (touch), 2x HDMI, 1x VGA, 1x Audio In, 1x Audio Out, 1x RS-232, 1x RJ45 Ethernet |
| Power Supply | 220-240 V AC, 50/60 Hz, 2500 mA |
| Power Consumption | Approx. 550 W (max.) |
| Operating Temperature | 20 °C to 35 °C |
| Storage Temperature | -20 °C to 55 °C |
| Safety Compliance | Class A device, WEEE compliant |
| Cleaning Instructions | Use a soft, damp cloth; avoid chemical cleaners |
Frequently Asked Questions - 84" Interactive Flat Panel Display VESTEL
User questions about 84" Interactive Flat Panel Display VESTEL
0 question about this device. Answer the ones you know or ask your own.
Ask a new question about this device
Download the instructions for your Interactive screen in PDF format for free! Find your manual 84" Interactive Flat Panel Display - VESTEL and take your electronic device back in hand. On this page are published all the documents necessary for the use of your device. 84" Interactive Flat Panel Display by VESTEL.
USER MANUAL 84" Interactive Flat Panel Display VESTEL
natural_image
Blank gray rectangle with thin border, no text or symbols presentContent
Important Security Information....5
System Features....6
Introduction....7
Marks Used in That Manual 8
The vent holes of the product 9
- CHAPTER:....10
2.CHAPTER: 11
INFORMATION ABOUT USAGE OF "INTERACTIVE BOARD" and ITS FUNCTIONS Turning on and off your "INTERACTIVE BOARD"....11
RS232 Command Table....12
Definition of Source Transition....15
Definition of Source Transition by Button Chart ....15
Source Switching with remote control Description 15
3.CHAPTER: 17
Using the Touch Screen with External Battery 17
Touch Screen Installation....17
3.1.1. About installation....17
Touch Screen Configuration Instructions....18
3.2.1. Opening Touch Screen Configuration....18
3.2.2. Calibration ....18
- CHAPTER 24
Connecting the USB devices....24
Updating of internal devices....24
Voice in "INTERACTIVE BOARD" 25
- CHAPTER 26
Processing System (Optional)....26
Windows 8 (Optional)....26
Drivers (Optional) 26
Screen Resolution of "INTERACTIVE BOARD" 27
Network Connection....29
Windows 8.1 System Recovery (Optional)....30
6.CHAPTER....32
SYSTEM BIOS INFORMATION USING BIOS ACTIVELY....32
MAIN MENU 33
Antropi Teach Installation (Optional) 34
- CHAPTER: 36
Power Management....36
- CHAPTER 37
USING YOUR "INTERACTIVE BOARD" MORE EFFICIENTLY 37
Securing your "INTERACTIVE BOARD" 37
Daily Maintenance....37
- PART: 38
TROUBLESHOOTING....38
Prior points to be controlled....38
FREQUENTLY-ASKED QUESTIONS....39
Restarting the "INTERACTIVE BOARD" product....42
Depending on the model you buy, the "INTERACTIVE BOARD" may not be the same with the images in that manual.

CAUTION

Do not leave a static image displayed for prolonged period of time. If a static image is displayed continuously for a long period of time, that image may cause image sticking on the display. This condition is not permanent, but may require a considerable amount of operational display time to dissipate, depeding upon the degree of image stick. 120 minutes of continuous motion display will eliminate most image sticking effects at normal room temperature (not lower than 10 C).
As the nature of the TFT technology, you may see some amount of bright, dark, red, green and blue dots and sparklings on the screen, those do not affect the performance of the computer and are not accepted as a defect.

Warning
This is a class A. In a domestic environment this may cause radio interference in which case the user may be required to take adequate measures.

Important Security Information
-
Please read this manual carefully before using the "INTERACTIVE BOARD".
-
Please keep that manual for further use.
-
Unplug your product before starting to clean. Do not use liquid or aerosol cleaners. Use a damp cloth for cleaning. If that does not help, please use LCD display cleansers.
-
To prevent breakdown, do not use non-advised accessories.
-
When unplugging the appliance, always pull directly on the plug. Do not pull from the cable when unplugging the appliance.
-
Make sure you do not place anything on the power cord or step on it.
-
Please do not place your "INTERACTIVE BOARD" product near wash basins, sinks, water pans, pools etc.
-
The holes are designed to provide the system to work constantly and prevent the appliance from overheat. For the same reason, please do not place your "INTERACTIVE BOARD" on beds, sofas, carpets and similar surfaces. Please do not place the monitor near or on a heat source, instead, fix your appliance as an installed furniture.
-
Please leave 5 cm space between the "INTERACTIVE BOARD" and walls or other furnitures.
-
That "INTERACTIVE BOARD" can only be started by the defined power source on its rating plate. For further information, please contact with your dealer.
-
As a safety precaution, a three-wired grounding plug is given with the "INTERACTIVE BOARD". If you cannot plug the appliance, please apply your electrician to change the plug. As a safety precaution, please do not make any change on the grounding plug.
-
Please provide the plug and socket to supply the needed power for appliance.
-
Please place the "INTERACTIVE BOARD" in a position that electric cables cannot be affected by the operations on the product.
-
Follow all warnings and instructions marked on the product.
-
To prevent the risk of fire or electric shock, please do not overuse the plugs and extension cords. Please do not open the lid of the monitor to service yourself. If the required service needs are not met by an authorized service, dangerous voltage and other risks may occur.
-
Please plug out the appliance and contact the authorized service personnel:
- When the cable is worn off or harmed.
- If the "INTERACTIVE BOARD" has been dropped or the cabinet has been damaged.
- If the performance of "INTERACTIVE BOARD" is changed or the appliance needs to be repaired.
-
Electric cable is the main appliance to cut of the electric.
-
If you will not use "INTERACTIVE BOARD" for a while, please unplug the cable.
-
Put the "INTERACTIVE BOARD" on a well-ventilated place and prevent from bright light, overheat and damp.
-
"INTERACTIVE BOARD" should be kept in -20 C°\~55 C°. Otherwise, the appliance may be damaged permanently.

NOTE:
Depending on the products model you have bought, the appearance of your "INTERACTIVE BOARD"
may not be the same with the one displayed in this manual.
System Features
Processor
• AMD A10 - 5750M Quad Core APU
Chipset
• AMD A75 Hudson Chipset
Memory / Graphics Controller
• AMD Radeon HD 8650G
Memory
• DDR3 So-Dimm type,
• Memory module support up to 16 GB
Data Storage
- mSata and SSD hard disk with different capacities
Panel and Resolution
• 84-high-resolution panel
- 1920x1080
Touch screen
- Touch screen allowing multiple touch support
• Infrared touch screen technology
Audio
• High Definition Audio
• Double Internal Audio, 2x15 watt
- External microphone
• External earphone outlet
Network Connection
10/100/1000 Mbps internal Ethernet connection (RJ45 input)
1 half-mini slot (Integrated Wi-Fi module) for Wireless connection
Input/Output Ports
2 x USB 2.0 input (For embedded PC use, on embedded PC) (max. 900mA) (Optional)
2 x USB 3.0 input (For embedded PC use, on embedded PC) (max. 900mA)
1 x USB 2.0 input (For external use of touch screen with PC) (max. 500mA)
2 x HDMI In (HDMI 1.3)
1 x VGA input
1 x Sound input
1 x Sound output input
1x RS-232 Port
Keyboard and Muse (optional)
- USB "keyboard" and USB "mouse"
Power
220-240V AC, 50-60Hz, 2500mA
Introduction
This instruction manual is intended to help you operate your "INTERACTIVE BOARD" product in a proper way and get a better performance.
Chapter 1. Meeting "INTERACTIVE BOARD"
Chapter 2. Using "INTERACTIVE BOARD". Instructions for using the product and its functions
Chapter 3. Usage of the Touch Screen
Chapter 4. Connecting other equipment to "INTERACTIVE BOARD" and sound
Chapter 5. Usage of Starboard Software (Optional)
Chapter 6. Power of the "INTERACTIVE BOARD"
Chapter 7. Using your "INTERACTIVE BOARD" product more efficiently
Chapter 8. Troubleshooting
Marks Used in That Manual
Some words and phrases are written in a different format to get your attention.

Note: It is used to emphasize the useful information and critical points about the product.

Important!
Important instructions are to be read carefully in order to prevent any damage to yourself, stored data and computer parts.
Safety Precautions
Please read the recommended safety precautions carefully for your safety.

Warning!
Unplug the system when you will not use for a long time.
Cleaning

Important!
Disconnect your product from the power supply before cleaning it.
Do not clean "INTERACTIVE BOARD" when it is on. Use a soft and damp cloth to clean the surface of product. Do not use chemical cleaners to clean the screen. To clean the display screen, do not use chemical cleaners. Do not apply the cleaner directly on the "INTERACTIVE BOARD".
The vent holes of the product
The vent holes on "INTERACTIVE BOARD" provides the product to work effectively by preventing overheat. Do not block these openings in anyway.

Important!
- Do not put any objects in the vent holes of your product. To put any objects in the vent holes of the product may cause fire or short circuit of the inner parts of your product.
Heat & Fire
Do not put your "INTERACTIVE BOARD" product near fire or any kinds of high temperature source like heaters.
Lightening
In order to prevent a potential electrical shock, remove your products power cords during lightning.
Repair
Unless a basic implementation on the product is specified by the producers' technical department on a document, do not repair your "INTERACTIVE BOARD" by yourself. Otherwise, your guarantee may get suspended and you may risk your health or your product. In case of need, consult your authorized service.
Do not shake the "INTERACTIVE BOARD". Ensure that it stays in a balanced stance on its position.
Do not throw or drop any object on your "INTERACTIVE BOARD" product.
Do not interfere on your products screen or any other surface with a sharp object.
Do not keep your "INTERACTIVE BOARD" product in a humid environment.
Do not keep your "INTERACTIVE BOARD" product in an extremely cold environment.
Do not keep your "INTERACTIVE BOARD" product in an extremely hot environment.

Important!
There should be an easily accessible network plug near the product.
1. CHAPTER:
MEETING THE "INTERACTIVE BOARD"
Congratulations for buying our the 84" INTERACTIVE BOARD product!
The "INTERACTIVE BOARD" combines the 84" LED monitor and touch-screen features and offers a modern design that can be easily adapted to all working conditions.
All components of INTERACTIVE BOARD product are used easily and so user friendly. Besides having a compact design, this product supports several functional features. Touch screen and high definition speakers are two of these features.
"INTERACTIVE BOARD" has a powerful information processing system.

Note: The information here should be used as reference, the definitions or images in that manual may be different from your "INTERACTIVE BOARD".
Display:
natural_image
Blank gray rectangle with thin border, no text or symbols presentDepending on the model, the product image may be different from the product you buy.
2.CHAPTER:
INFORMATION ABOUT USAGE OF "INTERACTIVE BOARD" and ITS FUNCTIONS
Turning on and off your "INTERACTIVE BOARD"
- Turning on the system
After ensuring that the "INTERACTIVE BOARD" is plugged, press the power button of the appliance for a time shorter than 1 second.
- Turning off the "INTERACTIVE BOARD"
"When you complete your work or want to have a break, you can turn the "INTERACTIVE BOARD" off
| Situation | Method | What is required to continue |
| Turning off the system completely | In order to prevent data loss, please turn off your system by following the procedure in your operating system. In case your system does not respond to the procedural shut down because of resource conflicts, you can turn off your "INTERACTIVE BOARD" by holding down the power button for 4 seconds. Keep in mind that your unsaved data will be lost in this situation. | Pressing the power button |

Important!
While turning the appliance off in computer mode, turn off the system certainly by using turn off by processing system. Out of compulsory circumstances, the appliance should not be turned off by unplugging from the network. To turn the appliance off by directly pulling the plug may cause permanent breakdown in the system. When a permanent breakdown is detected in the system, the appliance should be turned to factory settings by applying the steps in Recovery Chapter.
Panel
• 84 Ultra high-resolution Panel
• 3840*2160 resolution
| Panel type | TFT 84” UHD 2D LCD | |
| Active area: | 1904,000 (Y) x 1096,000 (D)// | |
| Visual angle | Horizontal | 178° |
| Perpendicular | 178° | |
| Max. brightness | 350 cd/m2 | |
| Max. contrast | 1400:1 | |
| Response time | 5 ms G2G | |
| Max. Resolution | 3840 x 2160 | |
| Y-Frequency | 244KHz ~ 280 KHz // | |
| D-D-Frequency | 95Hz ~ 104Hz (nominal: 100Hz) | |
| Function Name | Function Type | Command Data (HEX) | Additional Information | ||||||||
| OPS ON / OFF | OFF | BE EF | 03 | 06 00 | 2A D3 | 01 00 | 00 60 | 00 00 | |||
| ON | BE EF | 03 | 06 00 | BA D2 | 01 00 | 00 60 | 01 00 | ||||
| GET | BE EF | 03 | 06 00 | 19 D3 | 02 00 | 00 60 | 00 00 | 1D 00 00: OFF | 1D 00 01: ON | ||
| SOURCE | OPS | BE EF | 03 | 06 00 | FE D2 | 01 00 | 00 20 | 00 00 | |||
| HDMI 1 | BE EF | 03 | 06 00 | OE D2 | 01 00 | 00 20 | 03 00 | ||||
| HDMI 2 | BE EF | 03 | 06 00 | OE D2 | 01 00 | 00 20 | 03 01 | ||||
| VGA | BE EF | 03 | 06 00 | 6E D2 | 01 00 | 00 20 | 01 00 | ||||
| GET | BE EF | 03 | 06 00 | CD D2 | 02 00 | 00 20 | 00 00 | 1D 00 01: PC | 1D 00 02: HDMI 1 // 1D 00 03: HDMI 2 | 1D 00 04: VGA | |
| BUTTON | BE EF | 03 | 06 00 | 19 D3 | 02 00 | 00 60 | 04 00 | ||||
| BRIGHTNESS | GET | BE EF | 03 | 06 00 | 89 D2 | 02 00 | 03 20 | 00 00 | 1D 00 XX value | ||
| INCREMENT | BE EF | 03 | 06 00 | EF D2 | 04 00 | 03 20 | 00 00 | ||||
| DECREMENT | BE EF | 03 | 06 00 | 3E D3 | 05 00 | 03 20 | 00 00 | ||||
| SET | BE EF | 03 | 06 00 | 89 D2 | 03 00 | 03 20 | 01 XX default value: 0x5D | range: 0x5D-0x1E | |||
| RESET | BE EF | 03 | 06 00 | 58 D3 | 06 00 | 00 70 | 00 00 | ||||
| VOLUME | GET | BE EF | 03 | 06 00 | 31 D3 | 02 00 | 01 20 | 00 00 | 1D 00 XX value | ||
| INCREMENT | BE EF | 03 | 06 00 | 57 D3 | 04 00 | 01 20 | 00 00 | ||||
| DECREMENT | BE EF | 03 | 06 00 | 86 D2 | 05 00 | 01 20 | 00 00 | ||||
| SET | BE EF | 03 | 06 00 | 31 D3 | 03 00 | 01 20 | 01 XX default value: 0x10 | range: 0x1D-0x00 | |||
| SCREEN ON / OFF | OFF | BE EF | 03 | 06 00 | FB D8 | 01 00 | 20 30 | 00 00 | |||
| ON | BE EF | 03 | 06 00 | 6B D9 | 01 00 | 20 30 | 01 00 | ||||
| GET | BE EF | 03 | 06 00 | C8 D8 | 02 00 | 20 30 | 00 00 | 1D 00 00: OFF | 1D 00 01: ON | ||
| VGA | ON | BE EF | 03 | 06 00 | 32 D4 | 01 00 | 19 20 | 01 00 | Only VGA | ||
| OFF | BE EF | 03 | 06 00 | A2 D5 | 01 00 | 19 20 | 00 00 | Only VGA | |||
| KEYPAD LOCK | ON | BE EF | 03 | 06 00 | 93 97 | 01 00 | 11 24 | 01 00 | |||
| OFF | BE EF | 03 | 06 00 | 03 96 | 01 00 | 11 24 | 00 00 | ||||
| GET | BE EF | 03 | 06 00 | 30 96 | 02 00 | 11 24 | 00 00 | 1D 00 00: OFF | 1D 00 01: ON | ||
| Remote Controller Lock | OFF | BE EF | 03 | 06 00 | E7 96 | 01 00 | 16 24 | 01 00 | |||
| ON | BE EF | 03 | 06 00 | 77 97 | 01 00 | 16 24 | 00 00 | ||||
| GET | BE EF | 03 | 06 00 | 44 97 | 02 00 | 16 24 | 00 00 | 1D 00 00: OFF | 1D 00 01: ON | ||
| OSD Menu | ON | BE EF | 03 | 06 00 | 6A 63 | 01 00 | 00 37 | 01 00 | |||
| OFF | BE EF | 03 | 06 00 | FA 62 | 01 00 | 00 37 | 00 00 | ||||
| Contrast | GET | BE EF | 03 | 06 00 | FD D3 | 02 00 | 04 20 | 00 00 | 1D 00 XX value | ||
| SET | BE EF | 03 | 06 00 | FD D3 | 03 00 | 04 20 | 01 XX default value: 0x9E | range: 0xB2-0x4E | |||
| INCREMENT | BE EF | 03 | 06 00 | 9B D3 | 04 00 | 04 20 | 00 00 | ||||
| DECREMENT | BE EF | 03 | 06 00 | 4A D2 | 05 00 | 04 20 | 00 00 | ||||
| Monitor | ON | BE EF | 03 | 06 00 | 19 D3 | 02 00 | 00 60 | 02 00 | |||
| OFF | BE EF | 03 | 06 00 | 19 D3 | 02 00 | 00 60 | 01 00 | ||||
| GET | BE EF | 03 | 06 00 | 19 D8 | 03 00 | 00 60 | 07 00 | 1D 00 00: OFF | 1D 00 01: ON | ||
| Mute | ON | BE EF | 03 | 06 00 | D6 D2 | 01 00 | 02 20 | 01 00 | |||
| OFF | BE EF | 03 | 06 00 | 46 D3 | 01 00 | 02 20 | 00 00 | ||||
| GET | BE EF | 03 | 06 00 | 75 D3 | 02 00 | 02 20 | 00 00 | 1D 00 00: OFF | 1D 00 01: ON | ||
| Color Temperature | INCREMENT | BE EF | 03 | 06 00 | OB F5 | 10 00 | B0 30 | 03 00 | 9300K, 6500K, 5000K, 7500K, USER | ||
| DECREMENT | BE EF | 03 | 06 00 | CB F8 | 01 00 | B0 30 | 13 00 | 9300K, 6500K, 5000K, 7500K, USER | |||
| GET | BE EF | 03 | 06 00 | C8 F5 | 02 00 | B0 30 | 00 00 | 1D 00 XX value | 00=9300K, 01=6500K, 02=5000K, 03=7500K, 04=USER | ||
| Clock | INCREMENT | BE EF | 03 | 06 00 | 19 D4 | 03 00 | 00 60 | 03 00 | Only VGA | ||
| DECREMENT | BE EF | 03 | 06 00 | 19 D5 | 03 00 | 00 60 | 04 00 | Only VGA | |||
| GET | BE EF | 03 | 06 00 | 19 D7 | 03 00 | 00 60 | 06 00 | 1D XX XX value | |||
| H-Position | INCREMENT | BE EF | 03 | 06 00 | 97 B2 | 04 00 | 01 21 | 00 00 | Only VGA | ||
| DECREMENT | BE EF | 03 | 06 00 | 46 B3 | 05 00 | 01 21 | 00 00 | Only VGA | |||
| GET | BE EF | 03 | 06 00 | F1 B2 | 02 00 | 01 21 | 00 00 | 1D XX XX value | |||
| V-Position | INCREMENT | BE EF | 03 | 06 00 | 6B B3 | 04 00 | 00 21 | 00 00 | Only VGA | ||
| DECREMENT | BE EF | 03 | 06 00 | BA B2 | 05 00 | 00 21 | 00 00 | Only VGA | |||
| GET | BE EF | 03 | 06 00 | CD B3 | 02 00 | 00 21 | 00 00 | 1D 00 XX value | |||
| Color Temp Gain R | INCREMENT | BE EF | 03 | 06 00 | 52 F4 | 04 00 | B1 30 | 00 00 | |||
| DECREMENT | BE EF | 03 | 06 00 | 83 F5 | 05 00 | B1 30 | 00 00 | ||||
| GET | BE EF | 03 | 06 00 | 34 F4 | 02 00 | B1 30 | 00 00 | 1D 00 XX value | |||
| Color Temp Gain G | INCREMENT | BE EF | 03 | 06 00 | 16 F4 | 04 00 | B2 30 | 00 00 | |||
| DECREMENT | BE EF | 03 | 06 00 | C7 F5 | 05 00 | B2 30 | 00 00 | ||||
| GET | BE EF | 03 | 06 00 | 70 F4 | 02 00 | B2 30 | 00 00 | 1D 00 XX value | |||
| Color Temp Gain B | INCREMENT | BE EF | 03 | 06 00 | EA F5 | 04 00 | B3 30 | 00 00 | |||
| DECREMENT | BE EF | 03 | 06 00 | 3B F4 | 05 00 | B3 30 | 00 00 | ||||
| GET | BE EF | 03 | 06 00 | BC F5 | 02 00 | B3 30 | 00 00 | 1D 00 XX value | |||
| Auto Position | EXECUTE | BE EF | 03 | 06 00 | 91 D0 | 06 00 | BA 20 | 00 00 | |||
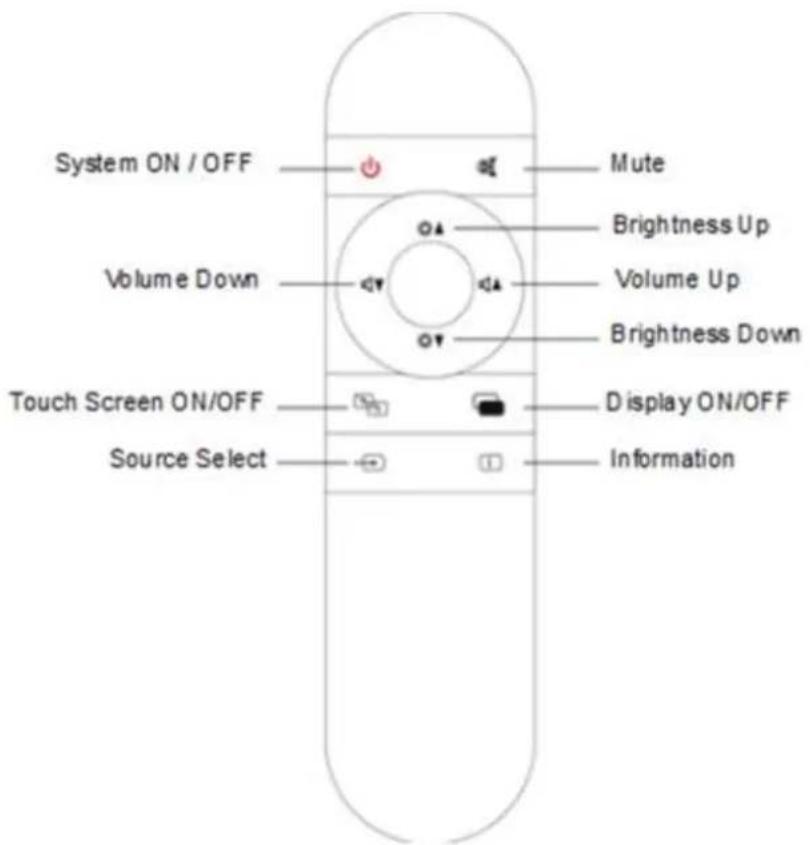
Function Buttons and Remote Control
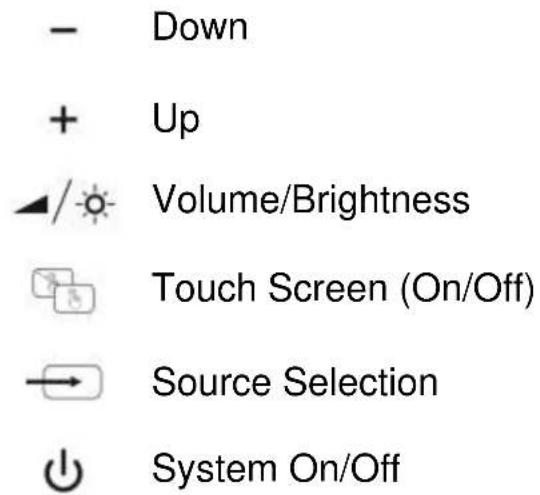
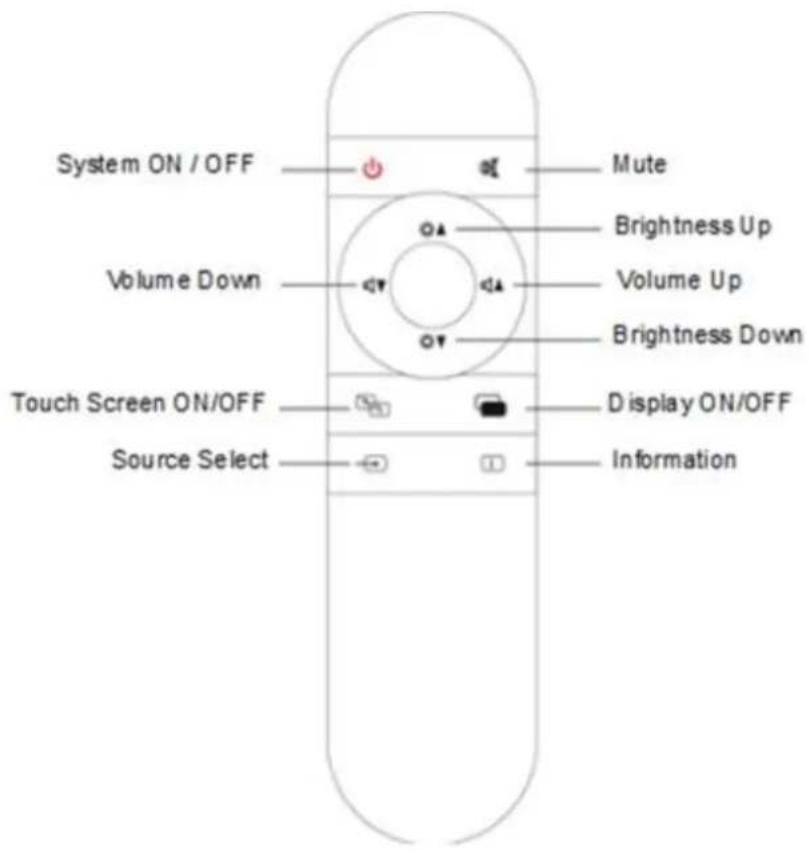
"INTERACTIVE BOARD" has 6 function buttons. These buttons and the remote controls are displayed in the next page:

Important!
To activate or inactivate the keypad located in the front, press the touch screen for 4 seconds.

Important!
The empty batteries should be replaced with the equivalent new batteries.
Definition of Source Transition
Definition of Source Transition by Button Chart
Press the source “→” button to reach the TV menu by button chart. The menu will be displayed as below. The desired mode can be selected by choosing up or down by brightness or voice buttons on the button chart.
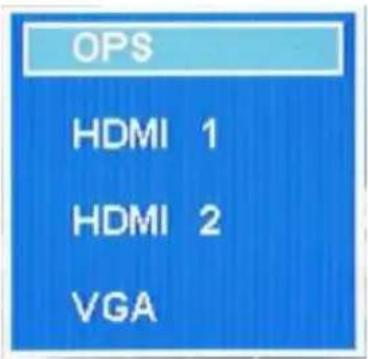
Source Switching with remote control Description
TV menu can be reached by the source button on the remote control. The chosen source can be displayed by pressing "OK" on the current mode or the user waits for 5 seconds for automatic transition.
If the chosen source has no signal, a warning is displayed as below.
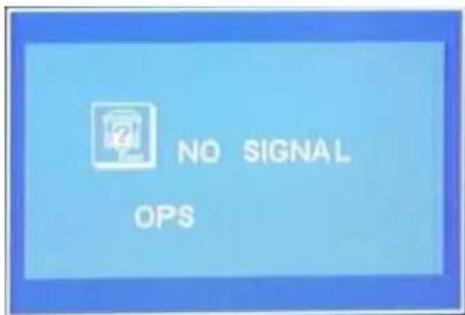
3.CHAPTER:
Touch screen
84" touch screen with the feature of multi-spot touch (6 spot at the same time) and infrared technology.
Using the Touch Screen with External Battery
Touch screen is integrated with Embedded Computer Module. IF you want to use the touch screen when an external source is connected via HDMI or VGA, please connect the external source to "INTERACTIVE BOARD" via a USB-USB cable. Connect that cable to the displayed UB input as shown. Touch screen will be active in a short time. "To use the touch screen by an external source may require a driver. In this case, the chosen required touch screen driver should be loaded to external source device from the CD given with that device."
Touch screen controls the currently displayed image on the screen. If "Embedded Computer" is being used as source, touch screen controls the "Embedded Computer". If an external source is connected via HDMI or VGA and chosen as image, if touch screen is connected that source via USB, touch screen is automatically transferred to control that source.
WARNING: To active the touch screen feature of the Interactive Board, the processing system should be started.
WARNING: The touch screen feature of your Interactive Board is not supported for MacOs processing system.
Touch Screen Installation
3.1.1. About installation
- Before starting installation, ensure that all drives as display chart and USB are installed correctly. The usage of standard drivers given by manufacturers is recommended.
- The multi-spot touch screen should be connected before installation.
- Close the antivirus programme and Trojan preventing programme before installation (as 360 antivirus and 260 safeguard).
- If the used driver has been installed in the computer before, please unload the installation completely and, if needed, delete the old installation files.
- Standard USB extension cord should be used as USB connector cable.
- If you use Windows XP processing system, you should first install Microsoft.net Framework 2.0.
- After the VGA and HDMI connections of the screen and server connections are unplugged and plugged again, the USB connection of touch screen should also be unplugged and plugged again. Otherwise, touch system will not function properly.
- After the USB connection is ready, the driver will be loaded automatically and the touch screen will be ready to use.
Touch Screen Configuration Instructions
3.2.1. Opening Touch Screen Configuration
(1)Click "Touch-screen Configuration" in the Start menu;
(2) The touch screen configuration window pops up:
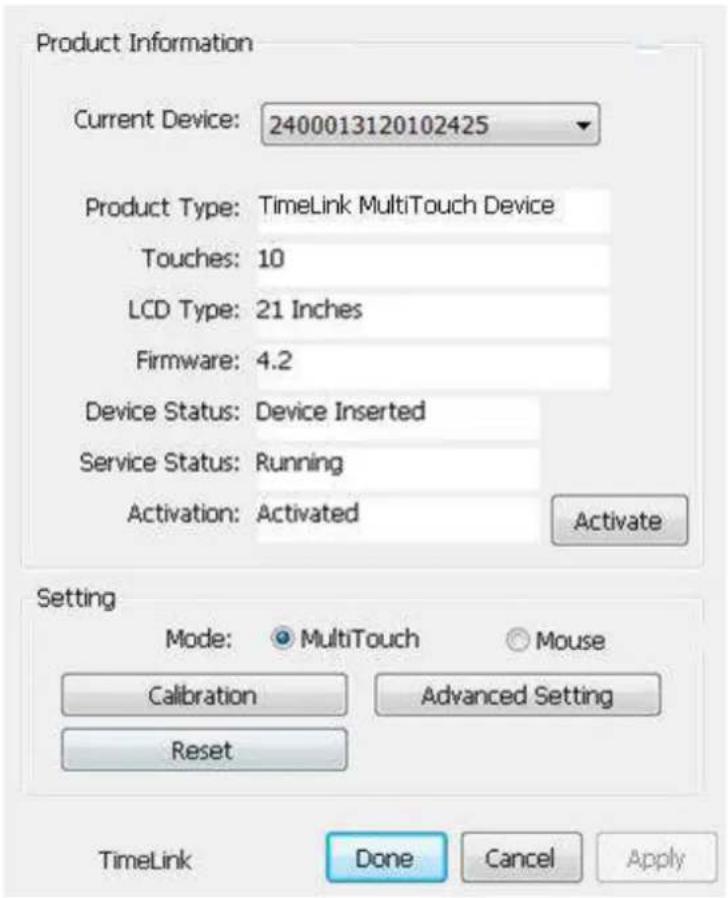
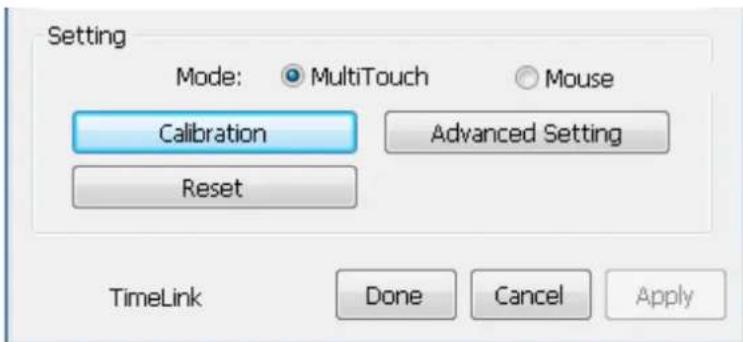
Touch Screen Configuration Interface
3.2.2. Calibration
(1) Function description
Sometimes due to the hardware installation, the finger clicking position and the cursor position after clicking have larger deviation, and using this feature can calibrate the cursor position after clicking. [Note] Only click the nine cross points with a finger on the black screen for calibrating.
(2) Operation sequence
A. Click the "Calibration" button on the Basic Settings panel;
B. The screen turns to black, and only a red spot and eight white spots appear in the screen;
C. Click the red spot by hand (Note: Clicking at the center of the red spot, the closer to the center, the more accurate the coordinates are). After clicking, the red spot appears in the remaining three corners counterclockwise in turn, please click on the red spot in sequence until the black disappears and the confirmation window pops up;
D. Click Finish to accept the calibration; click Cancel or do not click (the calibration window will automatically disappear after 5 seconds), and this calibration is invalid.
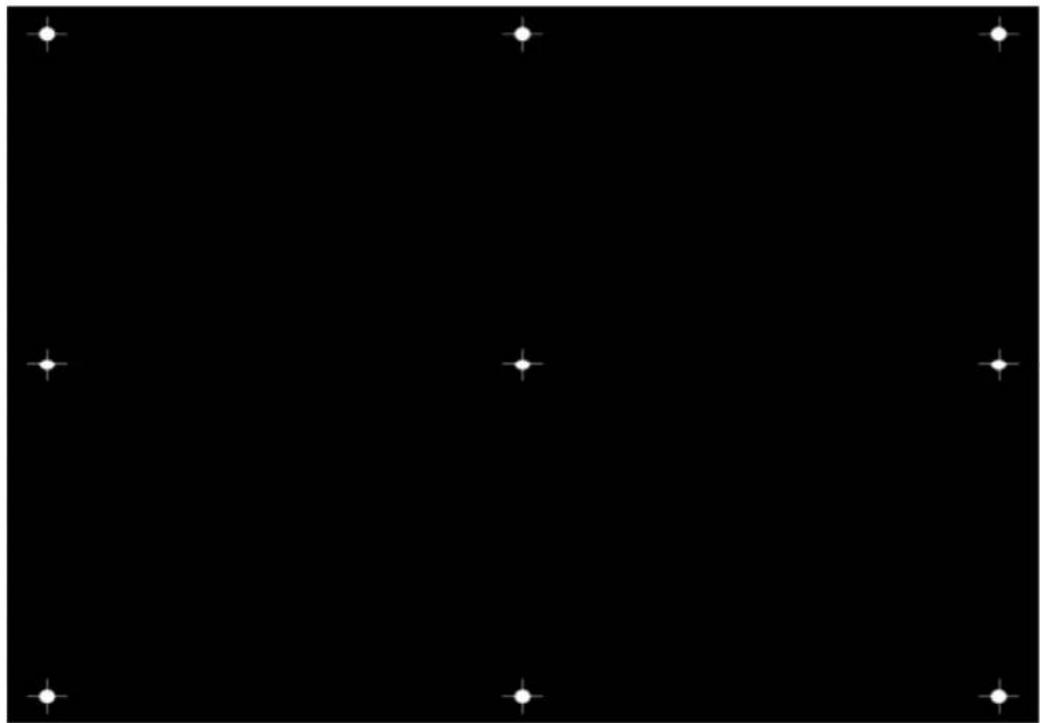
natural_image
Pure black background with a grid of white star-like markers at the top and bottom corners (no text or symbols)Calibration screen
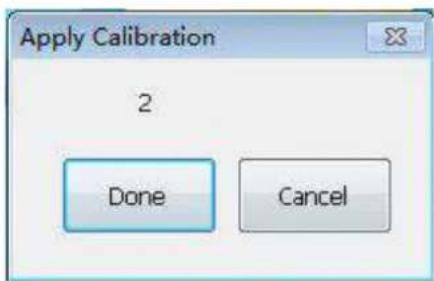
Calibration verification
In the Settings panel, select "Multi-touch" or "Mouse" for operating mode, and then click "Apply" or "Done" to confirm, or else the setting will be failed.
Click the "Advanced Settings" button on the Basic Settings panel to pop up the Advanced Settings window, set the appropriate data and click "Done", and the system will save the data, or click the "Cancel" button to cancel the data setting.
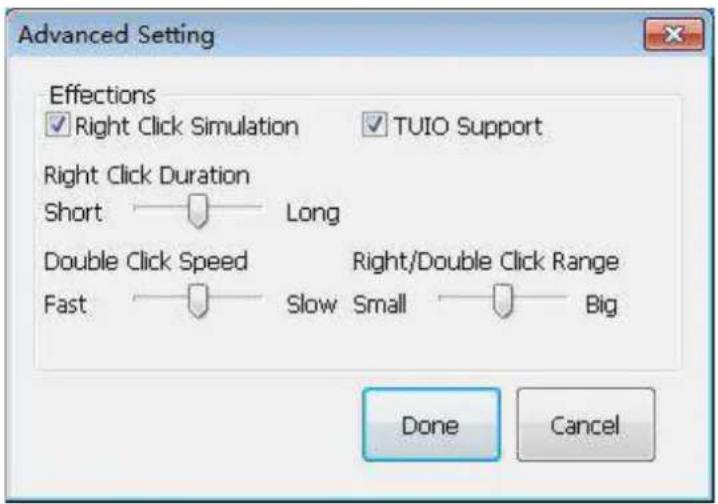
Advanced Settings
Click the "Reset" button on the Settings panel to pop up the confirmation window, and click "Yes" to restore the factory settings, or click "No" to cancel.
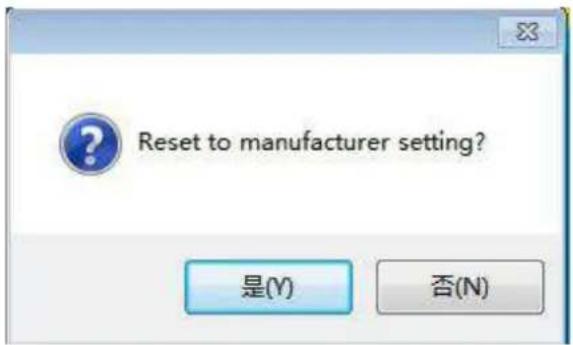
Depending on the model, the product image may be different from the product you buy.
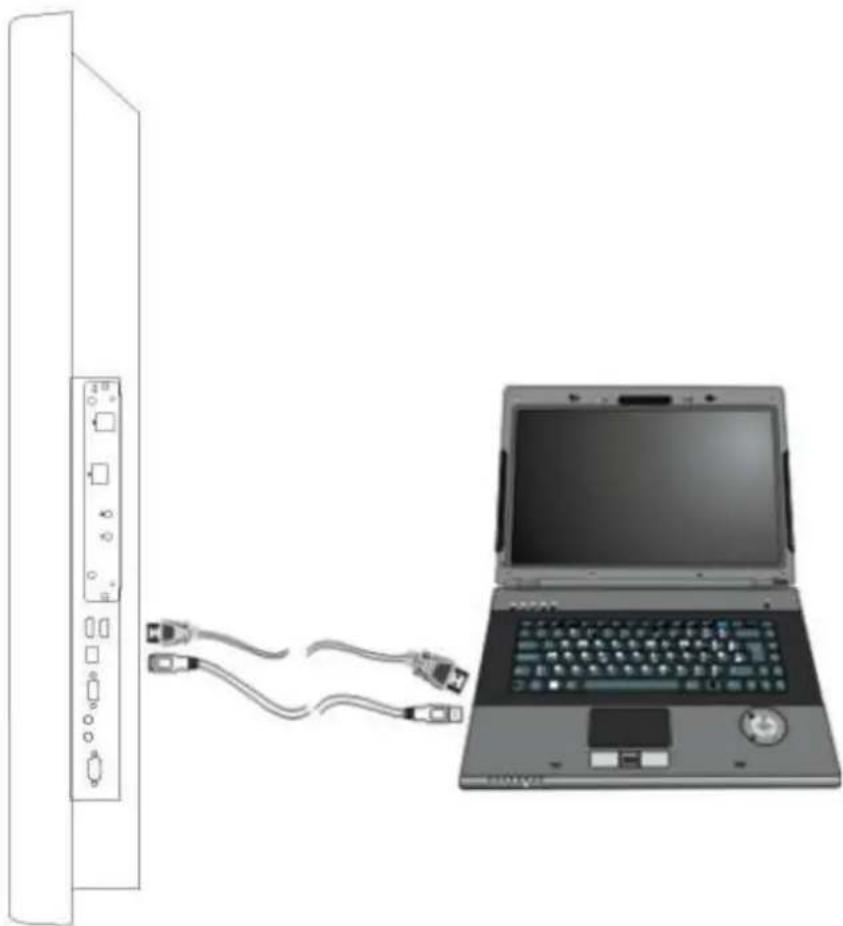
natural_image
Illustration of a laptop connected to two USB cables from a vertical panel (no text or symbols visible)Image transfer by an external source via HDMI
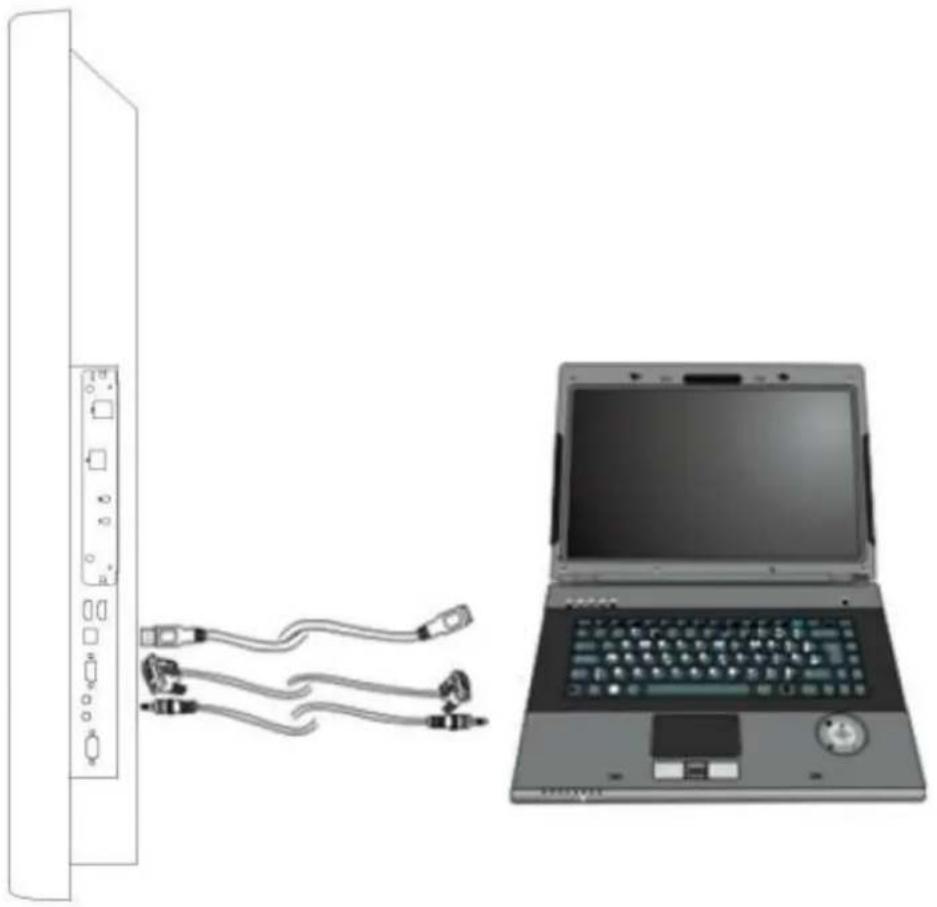
natural_image
Illustration of a laptop connected to two cables with connectors, next to a vertical panel (no text or symbols visible)Image transfer by an external source via VGA

Important!
To transfer image and voice transfer via VGA at the same time, except for the VGA cable, a voice transfer cable should be also used as shown (3.5 mm stereo).
4. CHAPTER
_CONNECTION OF OTHER DEVICES ON "INTERACTIVE BOARD" AND SOUND You can increase the efficiency of your device, you can connect other peripheral devices on the "INTERACTIVE BOARD". Please read the instruction manuals of these peripheral units provided by their manufacturers while using them. In this section, installation of the following devices is described:
- USB Devices
Connecting the USB devices
- "INTERACTIVE BOARD" has 2 USB2c0 (Optional) and 2 UB3.0 input for USB devices as keyboard, mouse, printer, scanner, digital camera, etc.
- USB (Universal Serial Bus) is developed for industrial standard computers. It supports Pnp (Plug and Play) technology; so you do not need to close "INTERACTIVE BOARD" while connecting or disconnecting the USB devices.
Updating of internal devices
If you want to change the temporary memory (RAM) module on your "INTERACTIVE BOARD", to prevent a potential malfunction in computer, please contact with technical department for details. Please do not change any parts without getting help from a professional. These transactions should be realized by service centre.
Usage of External Sources with Interactive Board (HDMI-VGA)
When you want to use the external sources with Interactive Board, please ensure that the connections are made as defined in the manual.
- Plug the cable of the desired external device (HDMI1 – HDMI2 – VGA).
- Plug the USB cable transferring the touch screen feature to external source.
Note: To connect via VGA, do not forget to plug the external source cable transferring the voice function of source to the Interactive Board.
Please be sure that you have transferred the image of the external source to Interactive Board.
In settings of the screen features of your external source, in the section about displaying options;
There are double image (displaying the external source image on both Interactive Board and external source) and single image options. (Displaying on only external device or Interactive Board)
Choose the Internal Board as single display device via the screen features of the connected external source. Displaying the transferred image on only Interactive Board will provide you the best solution.
To use external source, to plug the Interactive Board is enough. You can use external sources without connecting the Embedded PC. Your device will detect the transferred external source automatically. If you connect the external source to Interactive Board while the Embedded PC is active, your device will not detect the external source automatically.
To pass to external source, press the source selection button shown as “☐”.
Voice in "INTERACTIVE BOARD"

Important!
Before use the voice function of "INTERACTIVE BOARD", please be sure that voice driver given with the device is installed. In case of any sound distortions during recording, please decrease microphone volume.
The voice function of the "INTERACTIVE BOARD" includes below:
- Digital audio and analogue mixer support
- Realtek High Definition sound codec support
- Sound control via function buttons
The methods of playing and recording sound depend on the operating system in use. Please refer to the instructions in your operating systems support points for these methods.
5. CHAPTER
Processing System (Optional)
Windows 8 (Optional)
Drivers (Optional)
A Driver CD is also given to you with 4K(3840x 2160). The drivers in that CD are updated drivers providing your device to function properly. Copies of drivers in the CD are also in D index of your device. You can get the updated drivers from the Service Centre. You should install the drivers of your processing system.
V1.0
DRIVER DVD

Chipset / Graphics

Audio
Ethernet

Wireless
Touch Screen
Screen Resolution of "INTERACTIVE BOARD"
Screen resolution of "INTERACTIVE BOARD" is adjusted in two ways.
• Via operating system;
Click right on your mouse and choose screen resolution.
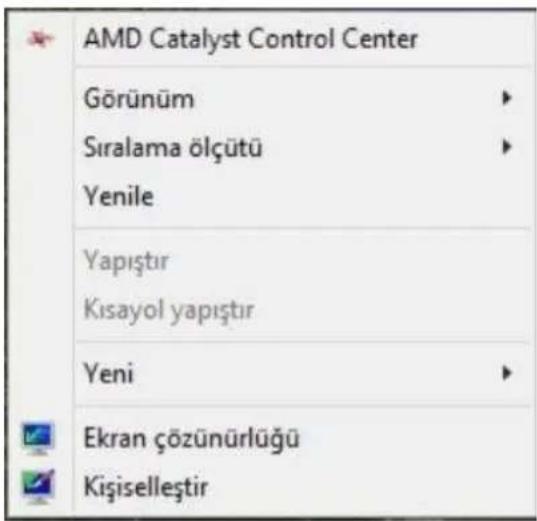
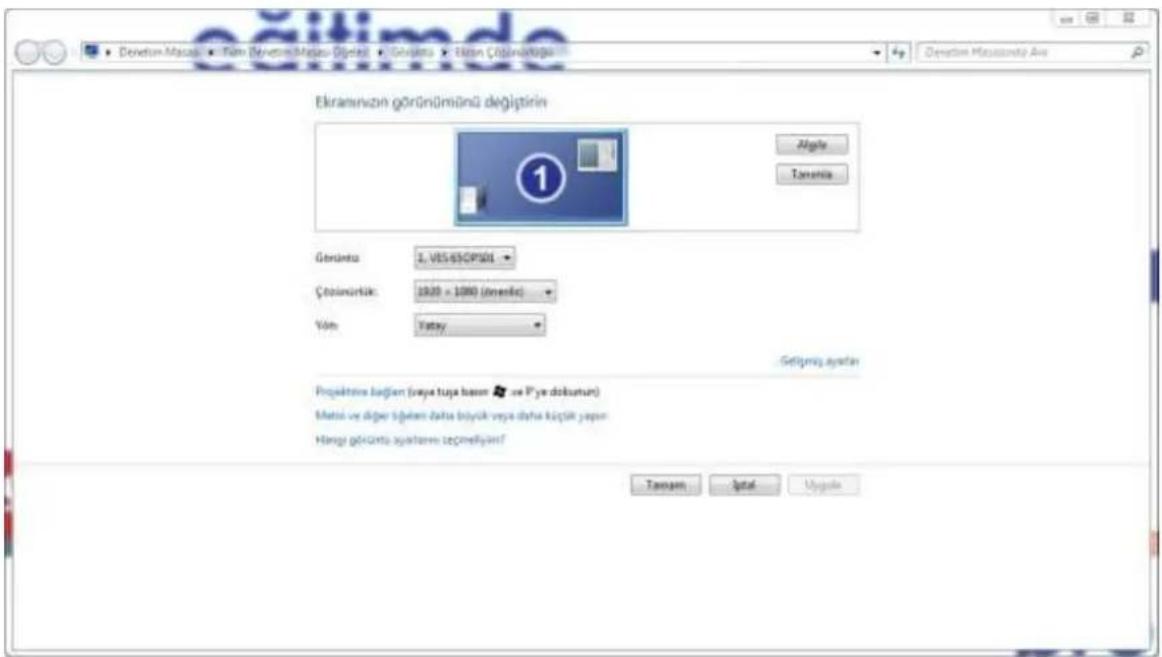
Adjust the screen resolution as 1920x1080 form the graphic chart. The smart board turns the 2k resolution (1920x1080) to 4K (3840x 2160).
• Via the screen chart control panel;
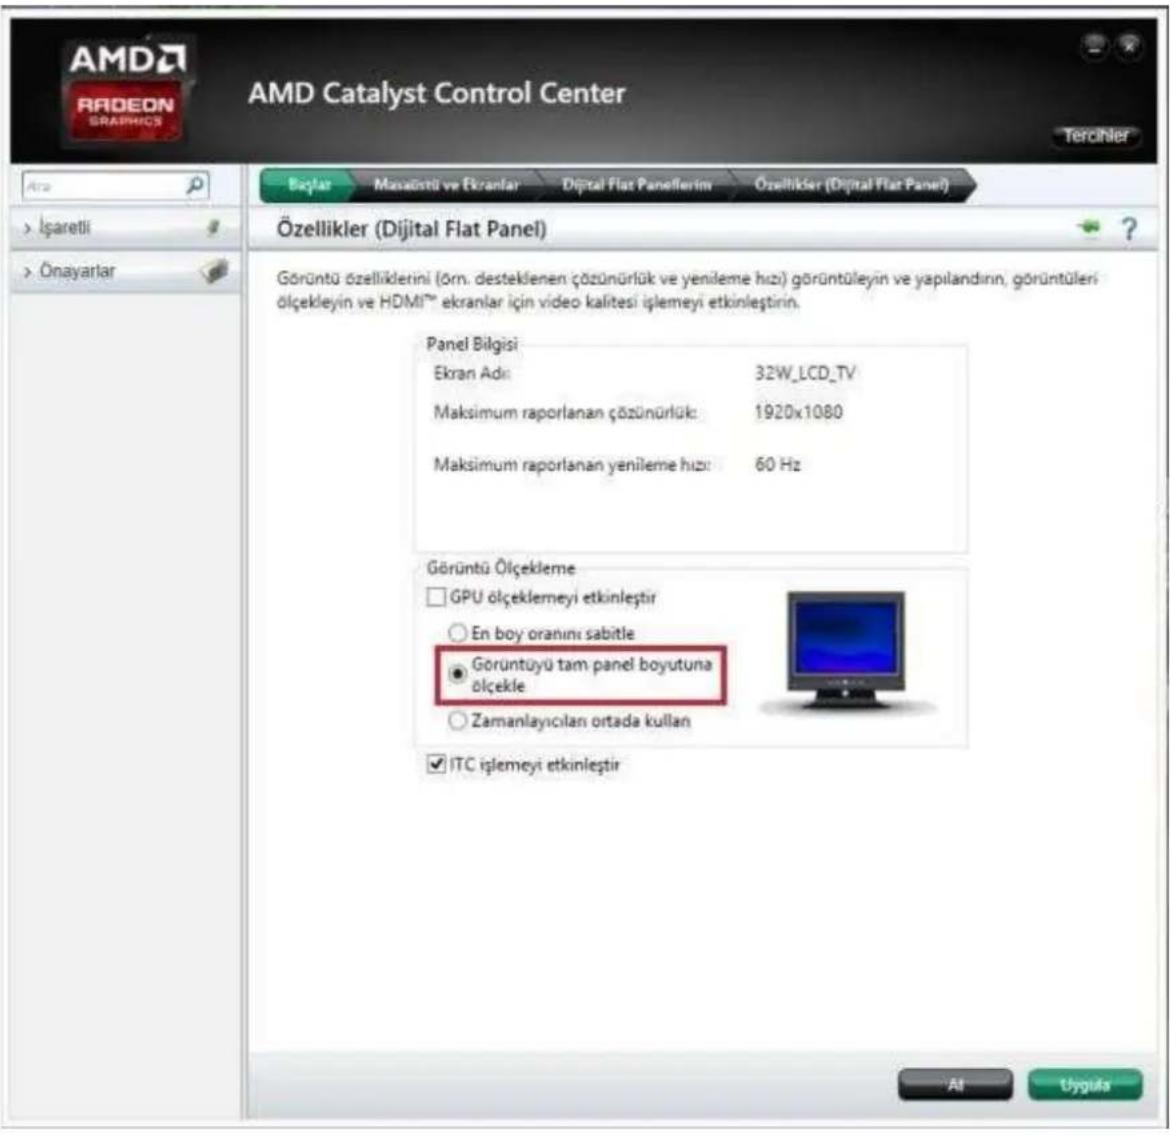
If the resolution will be adjusted via the control panel, the "Scaling" tab certainly should be selected as "Save Screen Scaling". The calibration of your touch screen will be distorted if that option is not selected.
Using the Network Connection Option
Your "INTERACTIVE BOARD" product has a 10/100/1000 Lan module and it connects "INTERACTIVE BOARD" to other computers on the network. It supports a data transfer rate up to 10/100/1000 Mbps. The integrated network module is accompanied by a RJ-45 connector.

Wireless Network Connection
Wireless network connection, which enables users to connect wireless networks, provides great convenience for data transfer. Be sure that chipset driver software is installed. Install the relevant device driver.
G Processing system
Depending on the salesroom and customer preference, system may be installed with 8 or Linux Pardus 2011. Selections and language may vary with respect to the region of sale. Hardware and software support may vary with respect to the installed operating system. System instabilities and incompatibilities arising from operating systems are not warranted.

Note: Any customer related problem in the processing system is not included in warranty.
Windows 8.1 System Recovery (Optional)
- To display the charm bar, move the pointer to right top. As an alternative, you can also press Win+C buttons together.
- Now, click on the Settings and choose "Change PC settings".
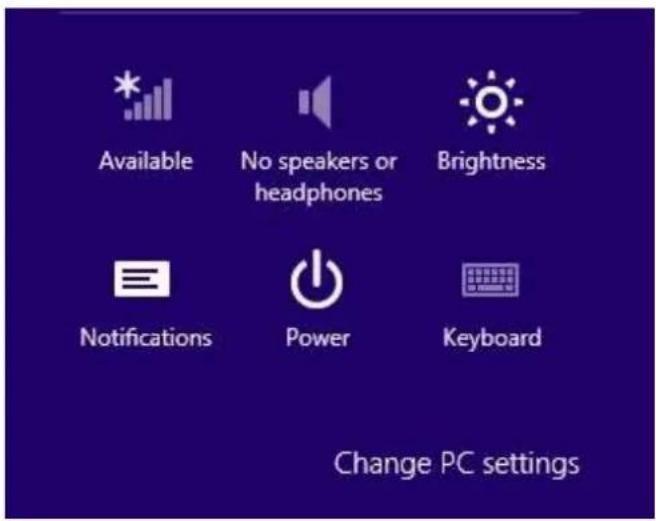
- It'll open new Metro Control Panel screen. Click on "Update and recovery" tab and in right-side pane, you'll see "Remove everything and reinstall Windows" option.
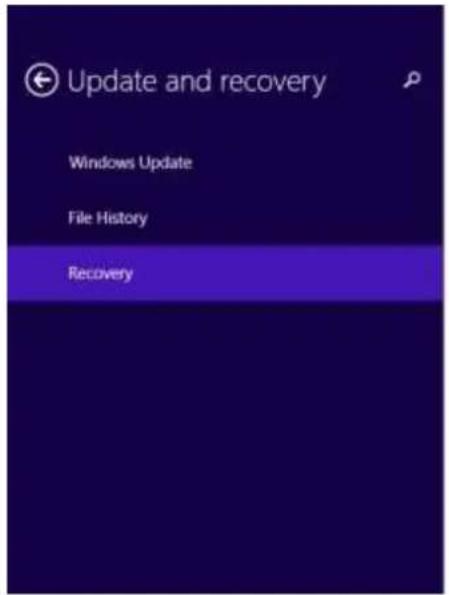
Refresh your PC without affecting your files
If your PC isn't running well, you can refresh it without losing your photos, music, videos, and other personal files.
Get started
Remove everything and reinstall Windows
If you want to recycle your PC or start over completely, you can reset it to its factory settings.
Get started
Advanced startup
Start up from a device or disc (such as a USB drive or DVD), change your PC's firmware settings, change Windows startup settings, or restore Windows from a system image. This will restart your PC.
Restart now
- Click on "Get started" button and Windows will show you Reset PC wizard.
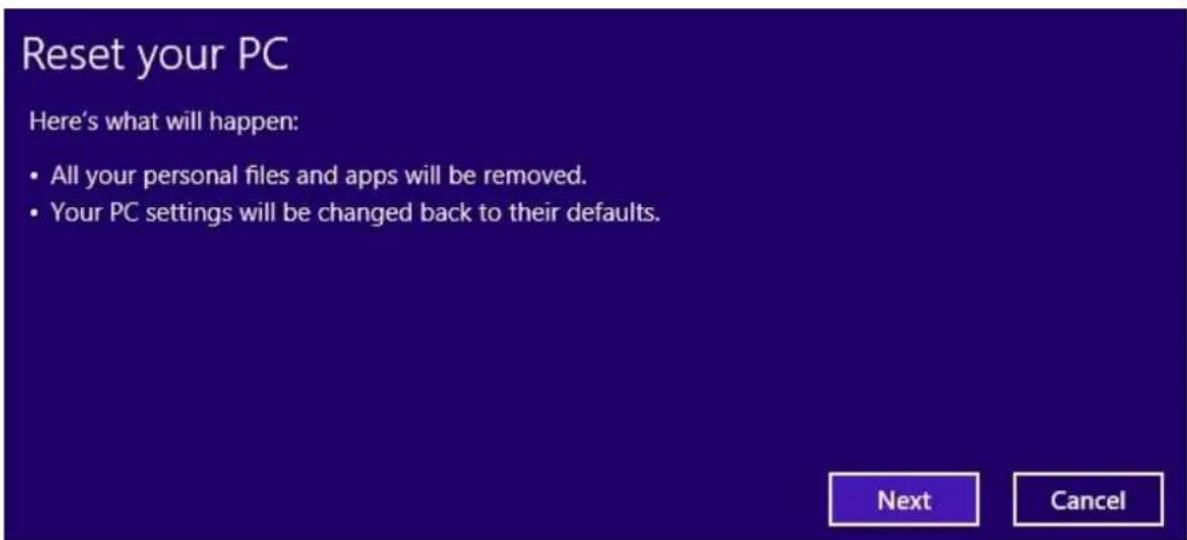
- Just follow the instructions given on screen and your Windows 8 computer will reset to default settings i.e. it'll reinstall Windows from scratch.
Note: You will need to reinstall the drivers and Touch Service from the supplied DVD.
6.CHAPTER
SYSTEM BIOS INFORMATION USING BIOS ACTIVELY
Using BIOS actively
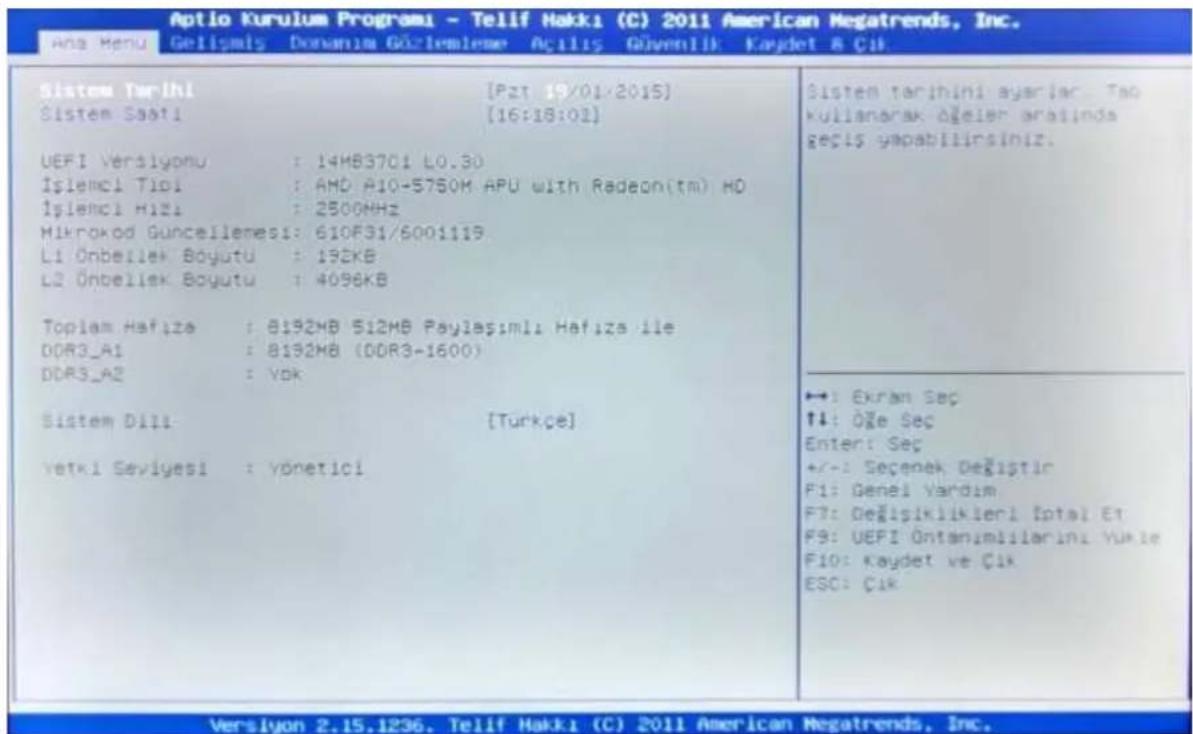
This section explains points on the integrated software of your Interactive Monitor. This BIOS (Basic Input Output System) software cluster, critical for your device, is stored on a chip on the mainboard. With this software, your hardware shall be matched with the selected operating system and the system shall be prepared in coordination. BIOS includes both POST (Power On Self Test) and Aptio Installation Software sections. POST provides methods for system control during system restart and SCU provides configuration of your Interactive Monitor.
Using Aptio Installation Software
With the Aptio Installation Software, sub-systems such as system configuration, basic features, startup configuration and power management may be adjusted. These adjustments are stored in permanent CMOS memory and is protected even if your system is shut down.
Note: Images given below are for reference purposes only. Different adjustment menus may be available on the you have as per different versions. Please consider the Bios information available on your .
Settings
In order to enter Aptio Installation Software, you shall press "DEL" key when you see the Bios logo while your system is starting up. Usually, Bios logo is displayed for just a few seconds when you turn on your system. If your Interactive Monitor system is on, turn off your system with the "Restart" option and press "DEL" key when you see the Bios logo. Aptio Installation Software menu shall be displayed instantly.
| Keyboard Key | Function |
 | Enables you to make a selection between menus and options. |
 | 1) Opens the options is menu checkboxes.2) Changes the values. |
| Enter | 1) You need to press enter at the point where you want to go to a sub-menu.2) Enables you to open and close the sub window. |
| Tab | Enables you to shift from one area to another. |
| Esc | 1) Enables you to exit from the main menu.2) Enables you to return to main menu when you are in a sub-menu.3) Enables you to close the window when you are in a sub-window. |
There are 6 main menus on Aptio Installation Software. These are: Main Menu, Advanced, Chipset, Boot, Safety and Save and Exit.
MAIN MENU
Main menu is the first menu displayed when you enter the Bios. You may see the basic information for your computer system and change the Bios language here. Definitions for titles in the main menu:
Bios Displays the Bios version
System Language Enables you to set the system configuration.
System Date Enables you to set the system configuration.
System Time Displays system time
Antropi Teach Installation (Optional)
- Antropi Teach is displayed in full screen to provide more usable space.
- Antropi Teach controls the updates when first opened.
- If there is an update, the user is informed by a warning.
Overview
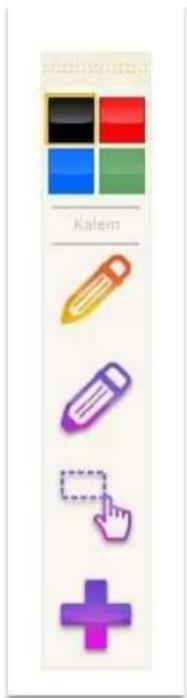
When Antropi Teach is active, there is portable main toolbar on left. That toolbar can be moved to anywhere on the screen and be specialized. Colours are displayed by keeping the top of the toolbar. Before using pen, you can adjust the colour and shape of the pen by touching on the desired colour.
Under the colour buttons, there is a button showing thin pin and thick pin pen and other tools. All drawings with thin and thick pin pens are vectorial and enhanced by real time curve fitting. You can chose any object drawn on or added to the screen by choosing device. So, you can move the selected object to anywhere on screen, resize or access the additional features to change the object.
There is an invisible recycle bin on bottom edge of the screen.
This enables the shapes, visual and auditory objects to delete easily. Choose an object to delete via the choosing device and drop when the cleaner changes its colour and becomes apparent.
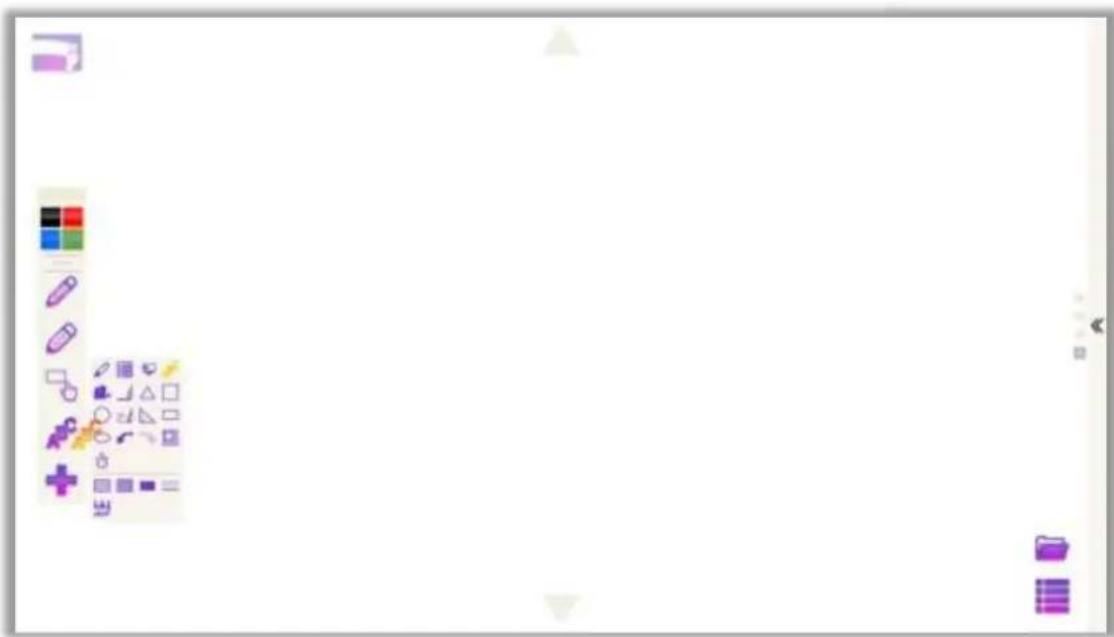
natural_image
Blank white canvas with tool icons and selection bar at bottom left (no text or symbols on main elements)File Options
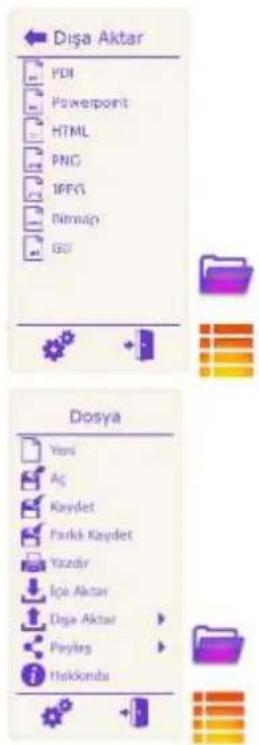
Antropi Teach has advanced file options. Antropi Teach can save the current files in its unique format (*.ants) and open the files in that format. Except for the ANTS, Antropi Teach supports all other common file formats. The files created by Antropi Teach can be exported as PDF, HTML, JPG, PNG, or GIF. For all supported formats, touch the export option in the file menu.
Antropi Teach can import supportive materials or media files. For example, to add a photo, an audio file or a PDF, touch the import option in the file menu. The desired file can be chosen and imported via the opened window.
IMPORTANT: If the file you want to import into Antropi Teach requires a special programme to be opened, that program should be installed in your computer. For example, to import a file with XLS extension, an office programme should be installed in your computer to open that file. The files studied on file menu of Antropi Teach may be printed or shared via e-mail. The file can be shared in the unique file format of Antropi Teach (*ANTS) or PDF. So, your computer should have e-mail requester.
6. CHAPTER:
Power Management
In this section, we will describe how you may use your power settings in most effective way. Please read carefully the power management instructions below. This will ensure security and best performance of your system.
Following titles are covered under this section:
• Power management
• Critical points for power saving
You can adjust your power options in Power Management under Control Panel of Windows operating system:
| Result | Situation |
| Shutting down the hard disk | In case your system is unused for a given period |
| Turning off the screen | In case your system is unused for a given period |
| During hibernate mode: hard disk, screen and temporary memory (ram) voltage will be turned off for energy saving | In case your system is unused for a given period Press the power button |
| During sleep mode: both hard disk and screen will be shut down | In case your system is unused for a given period Press the power button |

Note: For more information about power management configuration, please refer to the nt operating systems support pages.
• Critical points for power saving
You may do the following to provide some additional power saving apart from your "INTERACTIVE BOARD" automatic power saving:
• Enabling power management
• Decreasing the screen brightness as far as possible
- Turning off the "INTERACTIVE BOARD" when it is not used
7. CHAPTER
USING YOUR "INTERACTIVE BOARD" MORE EFFICIENTLY
Paying attention to the following points with respect to your "INTERACTIVE BOARD" will provide a stable performance and also prolong its life. Following titles are covered under this section:
• Securing your "INTERACTIVE BOARD" Daily maintenance of your
- product
Securing your "INTERACTIVE BOARD"
The methods described here will help you protect your "INTERACTIVE BOARD" and your data.
• Using antivirus software
Especially after internet and e-mails became used widespread, the computers are now harmed easily by viruses. It is essential and recommended to use anti-virus software in order to prevent this harm.
Daily Maintenance
• Environmental factors
The working temperature of "INTERACTIVE BOARD" is 20 -35 degrees (Celsius). Do not directly expose your "INTERACTIVE BOARD" to humidity, high temperature, fire, direct sun light and dust while using it. The vent holes of your "INTERACTIVE BOARD" will allow it perform safer without system overheating. Do not cover these holes or do not prevent air flow with an object. Please place "INTERACTIVE BOARD" at least 15 cm far from electrical devices generating magnetic area, as speakers.
- General points
Do not put heavy objects on "INTERACTIVE BOARD". The screen is extremely sensitive and may be damaged.
Never use hard cleaning materials on your screen. Do not touch the screen with sharp objects.
Do not disable the “backlight” setting from power management. Its automatic turn off is one of the factors ensuring its long-life.
- Points to be taken into consideration while cleaning the product
The system should be active while "INTERACTIVE BOARD" is being cleaned. Use a soft and damp cloth to clean the surface of product. Do not use chemical cleaners to clean the screen. To clean the display screen, do not use chemical cleaners. Do not apply the cleaner directly on the "INTERACTIVE BOARD".
8. PART:
TROUBLESHOOTING
Some troubleshooting issues are mentioned in this chapter under the following titles:
• Prior points to be cared Frequently asked
- questions
- Restarting your system
Prior points to be controlled
When a problem occurs, it is very important to diagnose this problem in the correctly. Try to find out what it is. Determine what causes the problem and under which category it falls. Please check that your BIOS is up-to-date and your BIOS settings are set to optimum. Check if the device settings are correct. Check the cable connections of your external devices. Be sure that drivers of your devices are installed properly. Write down the error codes and messages displayed on the screen, if possible. Contact technical support to get support.
Dear Customer;
TFT LCD Display technology is used in this product.
In TFT-LCD products, displayed image is created by coloured light spots called pixels.
Each pixel is composed of 3 sub-pixels [fixed colored (red, green, blue) light spots.
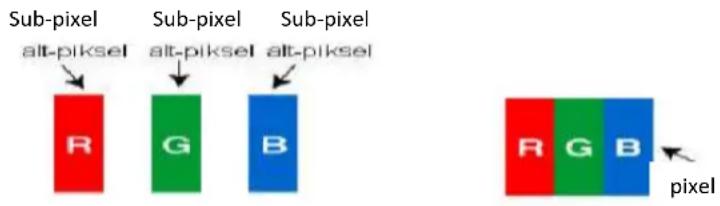
The sub-pixels in question may cause “spot errors” by staying permanently on or off because of their production technologies. Errors that are bigger than half of a sub-pixel ( >50% ) are considered as "spot errors".
Please take the explanation below regarding a possible sub-pixel error into consideration.
This problem may arise during production of the product, but it may also be caused by misuse (pressure on the screen, operation in high temperature environments).
There are two main sub-pixel errors.
Type 1: Permanently on sub-pixel or pixel (may appear red, green, blue or white)
Type 2: Permanently off sub-pixel or pixel (appears black).
Summary table below is determined according to ISO 134062 standards for sub-pixel errors.
| Type | Explanation | Pieces | Note |
| Type1 | Random (5mm or larger distances) | x 3 | Within Criteria |
| 2 adjacent sub-pixels | x 3 | Within Criteria | |
| 3 adjacent sub-pixels | 1 | Within Criteria | |
| Adjacent 4 or more pixels | Criteria is | ||
| Type2 | Random (5mm or larger distances) | x 3 | Within Criteria |
| 2 adjacent sub-pixels | x 3 | Within Criteria | |
| 3 adjacent sub-pixels | 2 | Within Criteria | |
| Adjacent 4 or more pixels | Criteria is | ||
| Type1 and Type2 Total | 5 pc | Within Criteria | |
FREQUENTLY-ASKED QUESTIONS
Hardware problems
Symptom: "INTERACTIVE BOARD" does not recognize the new equipment.
Check the following:
Check that the relevant driver is installed properly. Carefully read the explanations in the manual of the hardware. Ensure that all cables are connected correctly and properly. Be sure that the external device powered.
Hard disk problems
Symptom: Hard disk does not appear at Bios information.
Check the following:
Check that your BIOS settings are adjusted properly. Hard disk module may be malfunctioning. Consult technical support to get support.
Symptom: The hard disk runs more and more slowly
Check the following:
Data written on your hard disk can be defragmented by the “Defragment” in the system tools under operating system. Performing a virus scan is also important since viruses may decrease a hard disks performance.
Symptom: The numeric characters that are generally on the right of the keypad do not write.
Check the following:
Make sure that the "Num Lock" indicator led is on.
Network problems:
Symptom: The system cannot access the network
Check the following:
Be sure that the network driver is installed correctly. Connect the network cable properly. Check that your systems network settings are adjusted correctly. Make sure you enter the correct user name or password. Check that the correct network protocols and settings are activated. Consult the network manager if your problem is not solved.
Printing problems
Symptom : The printer
does not work.
Check the following:
"Be sure that power is supplied to printer and the printer is ready" Please check that both data and power cords are connected properly and steadily. Check that the printer driver is installed properly. Reading the printer's manual at this point may be helpful. Check that the printer is properly activated under the operating system.
Symptom: The printer is printing faulty characters.
Check the following:
Check that its driver is properly installed and its data and power cords are properly connected.
Software Problems
Symptom: The appliances do not work.
Check the following:
Be sure that the application is installed properly. In case you receive any error messages, refer to the manual provided with the application. Search the error over the internet. This will give you a general idea about the problem.
Sound Issues
Symptom: There is no voice from "INTERACTIVE BOARD".
Check the following:
Be sure that sound volume is not low and sound is not muted. Ensure that the sound driver and its application is installed properly. Check that your product is not in Hibernate mode. Check cable connections in case you use an external speaker.
Symptom: Recording function does not work.
Check the following:
Adjust playback and recording volume. Be sure that the recording source device is working properly.
Symptom: The external microphone and audio devices do not work.
Check the following:
Make sure that the cables are properly and firmly connected. Check that the driver is installed. Check sound settings and whether the system is muted or not.
Issues about turning on the system
Symptom: The system cannot be opened when needed.
Check the following:
Be sure that power cable is connected firmly.
USB device issues
Symptom: USB device doesn't work
Check the following:
Make sure that "the correct driver is installed for the USB device"
Other Issues:
Symptom: System hour and date is not correct.
Check the following:
You can adjust system clock and date from BIOS or operating system. If the system clock and date is not displaying the value you have entered every time you turn the system on, your BIOS battery may be dead and you may need to change it. Consult to the technical service regarding this matter.
Restarting the "INTERACTIVE BOARD" product
If your "INTERACTIVE BOARD" system is frozen or stopping frequently because of an error, you may need to restart your system.
In case the product does not respond to an attempt to shut down from the operating system, hold down the power button for 4 seconds.

Important!
Shutting "INTERACTIVE BOARD" down as described above results in loss of all unsaved data.

Warning!
This is an A class device. This device may cause radio interference in households and in similar places. Therefore, user shall take the required precautions.
Specifications and this manual may be modified without prior notification.
Complies with WEEE Regulation.
Producing Company
Vestel Elektronik Tic. San. A.S.
Manisa Turkey
Tel: +90 236 2130660

The lifetime of your device stated and declared by the Consumer Protection and Market Surveillance General Directorate under T.R. Ministry of Customs and Commerce (the period for retaining parts required for the proper functioning of the device) is 5 years.
- Content
- CAUTION
- Warning
- Important Security Information
- NOTE:
- System Features
- Processor
- Chipset
- Memory / Graphics Controller
- Memory
- Data Storage
- Panel and Resolution
- Touch screen
- Audio
- Network Connection
- Input/Output Ports
- Keyboard and Muse (optional)
- Power
- Introduction
- Marks Used in That Manual
- Important!
- Safety Precautions
- Warning!
- Cleaning
- The vent holes of the product
- Heat & Fire
- Lightening
- Repair
- CHAPTER:
- MEETING THE "INTERACTIVE BOARD"
- Display:
- 2.CHAPTER:
- INFORMATION ABOUT USAGE OF "INTERACTIVE BOARD" and ITS FUNCTIONS
- Turning on and off your "INTERACTIVE BOARD"
- - Turning on the system
- - Turning off the "INTERACTIVE BOARD"
- Panel
- Function Buttons and Remote Control
- Definition of Source Transition
- Definition of Source Transition by Button Chart
- Source Switching with remote control Description
- 3.CHAPTER:
- Using the Touch Screen with External Battery
- Touch Screen Installation
- About installation
- Touch Screen Configuration Instructions
- Opening Touch Screen Configuration
- Calibration
- CHAPTER
- Connecting the USB devices
- Updating of internal devices
- Usage of External Sources with Interactive Board (HDMI-VGA)
- Voice in "INTERACTIVE BOARD"
- CHAPTER
- Processing System (Optional)
- Windows 8 (Optional)
- Drivers (Optional)
- DRIVER DVD
- Screen Resolution of "INTERACTIVE BOARD"
- Using the Network Connection Option
- G Processing system
- Windows 8.1 System Recovery (Optional)
- Refresh your PC without affecting your files
- Remove everything and reinstall Windows
- Advanced startup
- 6.CHAPTER
- SYSTEM BIOS INFORMATION USING BIOS ACTIVELY
- Using BIOS actively
- Using Aptio Installation Software
- Settings
- MAIN MENU
- Antropi Teach Installation (Optional)
- Overview
- File Options
- CHAPTER:
- Power Management
- CHAPTER
- USING YOUR "INTERACTIVE BOARD" MORE EFFICIENTLY
- Securing your "INTERACTIVE BOARD"
- Daily Maintenance
- PART:
- TROUBLESHOOTING
- Prior points to be controlled
- Dear Customer;
- There are two main sub-pixel errors.
- FREQUENTLY-ASKED QUESTIONS
- Hardware problems
- Check the following:
- Hard disk problems
- Network problems:
- Printing problems
- Software Problems
- Sound Issues
- Issues about turning on the system
- USB device issues
- Other Issues:
- Restarting the "INTERACTIVE BOARD" product
- Producing Company
Brand : VESTEL
Model : 84" Interactive Flat Panel Display
Category : Interactive screen