
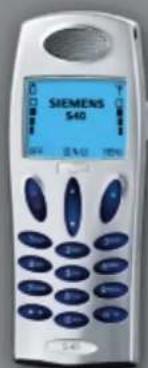
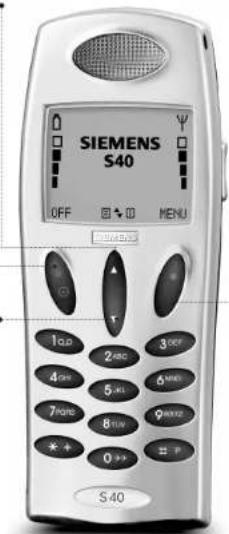
S40 - Hi-Fi SIEMENS - Free user manual and instructions
Find the device manual for free S40 SIEMENS in PDF.


| Product Type | GSM Mobile Phone |
| Model | Siemens S40 |
| Network Compatibility | GSM 900 / 1800 / 1900 MHz |
| Weight | 97 g |
| Dimensions (H x W x D) | 112 x 44 x 22 mm |
| Battery Type | Li-Ion 650 mAh |
| Talk Time | Up to 360 minutes |
| Standby Time | Up to 260 hours |
| Operating Voltage | 3.7 V |
| Display | Monochrome graphic display |
| Keypad | Alphanumeric with side keys |
| Phonebook | Address book and SIM-based phonebooks |
| Messaging | SMS with T9 predictive text |
| Connectivity | IrDA (infrared) for data transfer |
| WAP Browser | Yes (Wireless Application Protocol) |
| Additional Features | Calculator, calendar, dictating machine, alarm, vibrator |
| Power Consumption | Max 650 mA |
| Operating Temperature | 10°C to +55°C |
| Safety | RF exposure guidelines, avoid pacemaker interference |
| Repairability | Replaceable battery, SIM card accessible |
Frequently Asked Questions - S40 SIEMENS
User questions about S40 SIEMENS
0 question about this device. Answer the ones you know or ask your own.
Ask a new question about this device
Download the instructions for your Hi-Fi in PDF format for free! Find your manual S40 - SIEMENS and take your electronic device back in hand. On this page are published all the documents necessary for the use of your device. S40 by SIEMENS.
USER MANUAL S40 SIEMENS
All rights reserved.
Subject to availability.
Rights of modification reserved.
Siemens Aktiengesellschaft
http://www.my-siemens.com
Ref. No.: A31008-H6400-A1-1-7619
Printed in Germany
(7910.2400 GB / 02.02)

natural_image
Solid blue circle on a dark background (no text or symbols)User Guide

Menu overview
List menu
apples.org
Outgoing calls
Answered cells
MESSD CA15
Pacific Books
519103
(2017)
C. 2017
Michael
(1) É operation
LAMP Bypass
Messages
On/OFF
.
Address and phone book entries
Complete survey of keypen functions and display symbols or pp. 74–77.
- Setup menu
Network services
Cal tivert
121 Baring
el bank
Gelina name presentar, or
Cell detection
Closed user group
Network selection
Selection
Premised in
Network types
1
Tones setup
blues are too
Broadcast tone
You want to care
key line
Sher, Hous Termination
Factory settings
Phone setup
Language
H3
Beckliff
На келев Семель
Signal diode
Graphics
DATE: 10
Call setup
Cater ID
spoon calling
Союти в close
(1) 2017年1月1日
Call timers and charge
recoming cal setup
□the sensitivity
Message setup
Sand SHS setup
arcenost setup
WALI, no answer, set up
Text input setup
Calendar setup
Set time
Set sale
Sunday 14th and late. Set kind of choice
Диропус аттиса
Security
PIN code input and charge
Change IN 2 x00e
519-1350
Change network, password
Enriched Nature of Evaluation and
Dated daily on/off
Kapacal lock
une lock
Body Worn Operation
To ensure optimal performance of your phone's antenna and compliance with all applicable FCC RF exposure guidelines, body worn operation of this phone is restricted to the use of bell-clips, holders or similar accessories that have no metallic components and that provide at least 100% separation between the bank of the phone and the user's body. Use of other accessories could void your warranties and cause RF exposure in excess of FCC guidance.
Siemens service
Abu Dhabi Siemens Service Center 26423800
Australia Siemens 1800E22414
Austria ^* , Siemens ..... 0517075004
Bangladesh Siegure 01252447
Belgium: Simpson, France 570412374
Bergam...Stell-613....../01/22
Buchel...Hodolf...02/13081
Bulgaria. Drnite 02739488
China....Siemens....02150318149
Croatia...Siemens....016105381
Czech Rep. Siemens 0233032727
Denmark * Siemens 35259600
Dubai * Siemens San Jose Center 0425E0169
Inland. Smith & Ireland. 1213007
- 2017年1月1日
made .... Siemens .... .. EIT described
(SON) 116925695
Inconesia . Dian Graha Elektu... . 021461508
Ireland • Siemens ..... 1850777277
Italy Siemens 0266764400
Jordan E.A. Kettaneo 07055266
Kuwait NGEECO 1918743
Latvia...Siemens....7501114
Lebanco F.A. Kattaneh 0143043
Lithuania...Siemens....7391779
Luxembourg Siemens 43843390
Malaysia Siemase 7573875184
Morocco SETHI S.A. 75031927
Mauritius Ireland Elyth 2116712
Not yet ... Still there. 2270456
Oman ..... Siemens Service Center . 7910 12
Pakistar...Siemens....0215673565
Philippines..Siemens....28149886
Poland Siemens 0800220390
Portugal* Siemens 800653204
Russia... Siemens.... 0357372951
Saudi Arabia, Semuros 078515094
Company Corcor JMLA10
D. 1.2.3.4.5.6.7.8.9.10.11.12.13.14.15.16.17.18.19.20.21.22.23.24.25.26.27.28.29.30.31.32.33.34.35.36.37.38.39.40.41.42.43.44.45.46.47.48.49.50.51.52.53.54.55.56.57.58.59.60.61.62.63.64.65.66.67.68.69.70.71.72.73.74.75.76.77.78.79.80.81.82.83.84.85.86.87.88.89.90.91.92.93.94.95.96.97.98.99.100
SIRAK TAP: SORIERS ..... 07.3.002763
Slovenia .... Silionis .... 114/1633a
South Africa, Siemens....3860101157
Spain.....Somens.....902115061
Sweden *... Siemens....087509911
Switzerland. Siemens 012120090
Taiwan .... Siemens.... 0225186504
Thailand Siemens 027155100
Turkey Siemens 0216571899
United Kingd. * Siemens ..... [290]33411
USA Siemens 1-377 687 1871
Vietnam...Oatcom....45637241
Internet
http://www.my-siemens.com
Contents
| Important | Missed events | 32 | |
| safety instructions | 4 | IrDA operation | 33 |
| WAP browser | 34 | ||
| Getting started | 5 | Messages | 37 |
| Battery and charging 6 SIM card 8 | Setup menu | 43 | |
| Calling | 9 | Overview 44 | |
| Redialling a number 10 | Network services | 46 | |
| Silent mode 10 | Network selection | 50 | |
| Keypad lock 10 | Tones setup | 52 |
Address and
| phone books | 11 | Message setup | 61 |
| Text input 12 | Calendar setup | 65 | |
| Storing entries 14 | Security | 66 | |
| Finding an entry 16 | |||
| Reset phone memory 18 | Conversation menu | 69 | |
| Overview | 70 |
List menu
| Overview 20 | Further information | 73 | |
| Call lists 22 | Keypad functions | 74 | |
| Address and phone book editing 23 | Display symbols 76 | ||
| Technical specifications | 78 | ||
| Status 27 | Accessories | 80 | |
| Calculator | 28 | ||
| Dictating machine | 29 | Index | 81 |
| Calendar | 30 |
Facts & Tips
- Your new GSM mobile telephone
is designed for use in GSM 900, GSM 1800 and GSM 1900 networks.
• The telephone will automatically connect to the available network type. Furthermore, handover between GSM 900 and 1300 takes place automatically and seamlessly during conversation.
Important safety instructions
Please observe the following guidelines. Breaking these rules may be dangerous or illegal.

Mobile phones must be switched off at all times on board an aircraft.

Do not activate near gas stations, fuel depots, chemical plants or blasting operations.

Avoid use in hospitals; medical electronics, e.g. pacemakers and hearing aids, can be affected.

Minor interference may affect TVs, radios, PCs, etc.

Avoid pointing active infrared port at eyes.

Do not hold the phone in your hand while driving.

Do not dismantle phone or battery.

Use only specified batteries and chargers, as using third party products can damage the phone or invalidate type approvals.

Unusable batteries should be disposed of in accordance with relevant legislation.

Do not use phone in high humidity environments, and do not use alcohol or other fluids to clean the phone.

Keep the phone in a safe place out of children's reach.

Use only ORIGINAL Siemens accessories to avoid damage to your phone.
Cardiac pacemakers:
In order to avoid interference, people with cardiac pacemaker shall not carry a mobile close to the upper part of the body when the phone is switched on. A minimum distance of 20 cm between pacemaker and mobile phone shall be kept. Accordingly, the phone shall never be carried in a shirt pocket or a carry cord.
When using the phone, place it at your ear opposite to the pacemaker. If you have any reason to suspect that interference is taking place, turn off your phone or remove it from yourself immediately.
Battery and charging
Insert battery
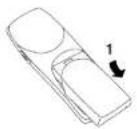
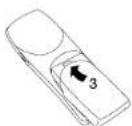
Remove the battery lid by pressing and sliding it towards yourself.
② Insert the battery. Please make sure that the contact pins are facing against each other.
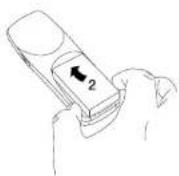
3 Slide the battery lid back into position.
Facts & Tips
- When removing the battery your phone should always be switched off.
- The on/off key is the left-hand function key on your phone.
Charge battery
1 Insert the charger plug at the bottom of the telephone, and it will start charging immediately.
② Fully charging the battery takes up to 120 minutes.
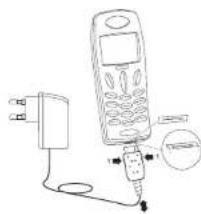
Remove charger
Press 1 and pull out the charger plug.
Facts & Tips
- When your battery needs recharging, the phone will emit a short warning tone and inform you in the display that the battery needs charging, and the LED on top of the telephone will emit a fast red flash.
- If you don't connect the charger within a short while, the telephone will switch off automatically.
-
If the battery is completely discharged, it may take up to 15 minutes before any information is shown in the display.
• The phone will inform you when the charger has been connected correctly. -
During charging the top icon of the battery indicator will animate a charging sequence changing from
to When the battery is fully charged, the top icon will turn permanently into and the indicators beneath it will be filled.
• In the Setup menu under Graphics you can choose other kinds of battery indicator symbols.
• To maintain an accurate battery capacity indication, it is recommended to let the battery discharge completely from time to time. - It is possible to use your phone during charging.
SIM card
Insert SIM card
Before you can make a call with your mobile phone, you need to insert the SIM card.
1 Switch off your phone. Remove the battery lid and the battery.
② Open the SIM card holder by sliding the catch towards yourself and lifting the holder.
3 Insert the SIM card in the holder with its cut-off corner pointing up and left.
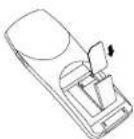
4 Close the holder and slide the catch back into place.
5 Insert the battery, attach the battery lid to the phone and switch the phone on.
6 Enter PUK or PIN code, if requested, and confirm by pressing (×OK×).
The phone will display a welcome greeting.
Facts & Tips
- Please remember that your SIM card must support 3V technology to work with this phone.
• The SIM card is your link to the net work operator. The SIM card carries your phone number, your phone books and a lot of other information that will follow your SIM card if you put it in another phone. - Please note that if you insert a new or another SIM card in your phone it might take a little while before you see the address and phone book symbol 📄 the display.
- In this user guide you can see the full capability of your phone, but the availability of some of the features depends on your network operator and/or your SIM card. These features are marked with this symbol in the user guide.
- Most networks allow you to make emergency calls both with and without a SIM card inserted.
Calling
Making a call
① Enter the phone number and press ⚙(CALLx).
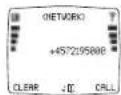
2 Press END() to end the call.
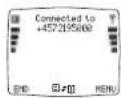
Answering a call
1 Press (a ANSWERs), when the phone rings.
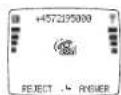
2 Press END to end the call.
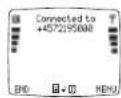
Facts & Tips
- When making an international call, first enter "1" (hold down one second) followed by the relevant national country code and then the telephone number.
- An incoming call is indicated by a ringing tone if enabled, a ringing symbol in the display, and a fast green flash in the LED.
- Use the side key on the right-hand of your telephone to increase and decrease the speaker volume.
- Your phone is equipped with an internal antenna which is placed in the upper back part of the phone. To achieve optimum speech quality and maximum talk time, always hold your phone by its lower part during a call. If you carry the phone in a pocket, the back of the phone should always face away from your body.
Getting started
Redialling a number
Press to one second, and the latest dialed number will be redialed automatically.
If you wish to use this feature, activate the speed dial function first. See p. 58.
Silent mode
You can disable all selected tones:

Press


Press

The symbol will be seen in the display.
Just press these two keys again in the same order to revert to your original settings.
Keypad lock
To avoid making calls accidentally while carrying your phone, you can lock the keypad:

Press

MENU*

Press

The keypad lock is, however, automatically disabled:
• during an incoming call until you have finished the conversation
- when the telephone is placed in a handsfree car kit
Just press these two keys again in the same order to unlock the keypad.
Set clock
In order to activate the clock you must set the time and date. See p. 65 for more information.
Pressing the loft-hand function key briefly in stand-by position will display the time, date and week number.
Facts & Tips
• Take notice of the display texts. The display text right above the function keys and will inform you of
the current function of the key at any time.
- Please note that the menus are dynamic. This means that your phone does not always give you all the options listed in this user guide. This is because your phone shows an option only if it is available. For instance you cannot choose to see the list of missed calls if you have not missed any calls.
- All tones can also be disabled in the Setup menu under Tones setup.
- In the Setup menu under Security you can set the keypad to lock automatically.
- It is possible to make emergency calls when the keypad lock is activated.
Address and phone books
Learn how to store and find entries in your address and phone books.
Text input
Using the keypad
Each key on your phone's keypad contains a number of characters.
The keypad can be operated in 4 ways: Alphanumeric wheel and grid modes; T9 mode, which is very useful in connection with SMS messages; and digits-only mode.
Switching between the different modes is done by pressing the side key on the right-hand side of the phone.
Press "CLEAR" briefly to delete one character.
Press "CLEAR" for one second to delete the entire text.
ABC wheel mode
The characters available on each key will depend on the keypad language you have selected for your phone (see p. 64). The keypad language is standard set to the GSM default alphabet, giving you the following characters.
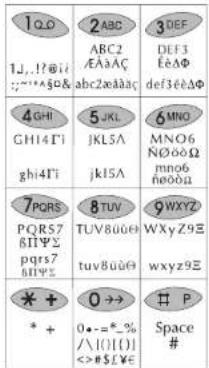
Having selected English as keypad language, the following characters will be available on each key:
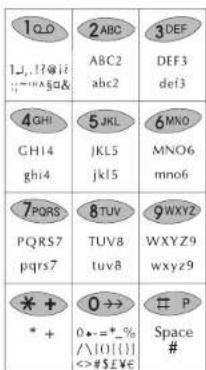
Press once to enter the first character, twice to enter the second character, etc.
Press 9 times if you want to enter a capital letter. To activate the caps lock function, press 8+ times. Press it once again to deactivate the function.
ABC grid mode
Press the relevant key for the intended letter, e.g. B. Now a table is shown in the display. Press the key corresponding to the intended letter (B = 2).
Which characters available on each key will depend on the key pad language you have selected for your phone lsee p. 641. Additional language specific characters are accessed by pressing ▼
The first letter will always be capitalized, which is indicated by the symbol in the upper right-hand corner of the display. The second letter will automatically be lower-case. Press you want to enter a capital letter again.
The caps lock function is enabled by pressing RRC . As long as the caps lock is active, the sym-
bol will be seen in the upper right-hand corner of the display. Press to disable the caps lock function.
Press you want to enter digits. Press the relevant key to enter the intended digit.
To get punctuation and symbols press .You now to five different pages, each containing up to 9 symbols. You can scroll through the pages using the arrow keys. Press the relevant key to enter the intended symbol, e.g., on page one, 7 corresponds to "@".
79 mode
T9* Text Input is a feature enabling you to more easily use SMS messaging. The T9 feature allows you to compose text messages with only one keypress per letter. See p. 40.
123 mode
In this mode you can enter only digits.
Have
access
Facts & Tips
- Please observe that changing the menu language of your phone will not affect the keypad language and the T9 language as they are totally independent. Changing the keypad and T9 language is done manually in the Messago Setup menu.
- When you change the menu language of your phone, it is advisable to change the keypad language accordingly.
Address book
Your telephone contains a complete address book similar to the address book on a PC.
Just follow the instructions below to store an entry. See on p. 12 how to use the keypad on your phone.
Storing information in your address book
① Enter the phone number and press ▼.
2 Select »Address book« by pressing »SELECT«.
3 Press ▼ to select w you want to store the number as a
- Home number
• Office number - Mobile number
- Fax number
- Data number
and confirm by pressing »SELECT«.
4 Press »SELECT« to access the name box.
5 Enter the name and press "OK".
6 Press ▼ move to the next box.
You can enter information about
- Group (see p. 25)
• Other phone numbers than the one entered - E-mail address
- Address
• Birthday
7 Press »SELECT« to access the box where you want to enter information.
8 Enter the information and press »OK«.
9 When you have entered all the information you want, press "SAVE".
The telephone will now ask you whether you want to store the new entry.
If you press »YES«, the phone will store the new entry.
If you press »NO«, the phone will ask you whether you want to go back to the entry.
- If you press »NO« at this stage, all new data will be discarded and deleted.
- If you press »YES«, the phone will revert to 5 for possible changes.
Phone books
Your telephone contains a number of phone books, which are stored on your SIM card. The plain numbers phone book is always available, whereas your SIM card determines the availability of the other phone books.
Storing an entry
① Enter the phone number and press ▼.
2 Press again to select the phone book in which you want to store the number
- Plain numbers
- Fixed numbers
- Own numbers
- Barred numbers
and confirm by pressing "OK".
3 Enter the name and press »OK«.
Plain numbers
This is an easy-to-use phone book where you just store names and telephone numbers. If you store the names and numbers from your address book in the plain numbers phone book, you will be able to dial these numbers if you use your SIM card in another phone.
Fixed numbers
With the help of this extra phone book you can restrict the use of your phone to only numbers stored in this special phone book.
To activate/deactivate fixed dialing, see under Security in the setup menu on p. 67.
Own numbers
This is simply an extra phone book where you can store your own telephone number(s).
How many numbers you can store depends on your SIM card. Normally, you will have the same
options as in your other phone books, but your network operator may have imposed some restrictions.
Service numbers
This service number phone book typically contains customer care, hotline service numbers, etc. The contents are defined by your network operator and cannot be changed by you.
Your network operator may have given this phone book another name.
Information numbers
Numbers stored in this phone book are typically numbers for taxis, airports, hotels, weather forecasts, news, etc. The contents are defined by your network operator and cannot be changed by you.
Phone books
Barred numbers
In this phone book you can store numbers that it should not be possible to call from the phone.
To activate/deactivate barred dialling, see under Security in the setup menu on p. 67.
Prefix phone numbers
In prefix numbers the first digits in the number are the prefix (the same for e.g. the whole company), and the last digits are related to a specific person or office.
If you want to store the prefix part of such a phone number in your phone book, this is done in exactly the same way as when you store a normal phone number in your phone book. Only, instead of each of the additional digits that vary from time to time, you enter a x?x. This is done by holding down the # key for approx. 2
If you want to call a prefix number you must enter the digits to replace the "7" after having pressed »OK« (See ⑤ the next column).
Finding an entry in your address and phone books
① Go to the address and phone book entry list: ▼
② Scroll through entries: ▼ and ▲.
3 Press »SELECT« to access a group.
4 Having found the desired name: Press «DETAIL» to see the numbers stored.
5 Calling a number: seconds Select »OPTION«, »Call« and press »OK«
Hold down "DETAIL" or
Just press the relevant speed dial number (1=Home, 2=Office, etc).
Facts & Tips
Both address and phone books
- Calling Line Identification (CLI) is a network feature which displays the caller's phone number in your phone's display. If the caller is one of the entries stored in your phone book, his/her name will appear in your display.
- When storing a phone number start entering it with a "+" (hold down
for one second) followed by the national country code, and you can use your phone abroad without worrying about international codes.
- In the Call setup menu you can activate the speed dial function enabling you to call a number by pressing only one key.
- Use the side key for quick scrolling through your address and phone book entries. Each keystroke brings you to the first entry beginning with the next letter in the alphabet. Of course, you can also use the arrow keys to scroll from one entry to the next.
Address book only
- Entries stored in the address book are marked by 📞
• The number of entries that can be stored in your address book depends on the length of the entries.
• The address book is located in the internal memory of the phone and consequently you will not have access to it if you use your SIM card in another telephone.
- You can also synchronize your address book with the address book in Microsoft Outlook on a PC by means of the enclosed CD-ROM. To do this, install the synchronization programme (XTND Connect PCI) on your computer.
Phone books only
- Remember that indicates that the option depends on your SIM card and therefore may not be available.
- Entries stored in the phone books on your SIM card are marked by a
in front of them.
- Phone book entries contain only a name and a phone number.
- The maximum number of entries and the length of phone book entries will depend on the capacity of the SIM card.
- When there is no more memory capacity left in either of the phone books, the option «Add entry» will disappear from the display.
• In order to access fixed and barred numbers you need to have a PUK 2 code from your network operator and to use a PIN 2 code of your own choice.
Reset phone memory
Because your phone can synchronize with different platforms, outside factors might spoil the phone's functioning. If this happens, you can reset the phone memory.
Proceed in the following way:
1 Switch off your phone.
2 Remove the SIM card.
3 Switch on your phone again.
4 Press * # 337 #
The resetting lasts for approx. 1 minute. During this period the LED on top of the phone will light and the display will indicate that the memory is being reset. When the LED and the display switch off the resetting is completed.
5 Insert your SIM card and switch on your phone again.
Note: Resetting the phone memory means that your address book entries, memos, events, own ring-
ing tones and own WAP profile set-
tings are lost. However, this is also
an easy way to delete all of the
above-mentioned items if you
should want to do so.
Other ringing tones and WAP profiles than your own ones will be reset to the default factory settings.
List menu

General
Enter the List menu: ▲ Scroll through the options: ▼ and ▲
Select an option: Press "SELECT" or "OK"
Go back one level: Press "EXIT"
Go back to standby: Hold down »EXIT«
Here is a brief overview of the options that you may see when you enter the List menu. Please remember that the menus are dynamic.
The options are described in detail on the following pages.
Applications (SAT) T
- The availability, name and functions of this menu depend completely on your network operator and/or your SIM card. If this menu item is available on your SIM card, you will always see it as the first menu in the List menu. The menu is typically used for providing information like news, weather forecasts, lottery or banking services.
Outgoing calls
• View names/phone numbers of your latest outgoing calls
Answered calls
• View names/phone numbers of your latest answered calls
Missed calls
• View names/phone numbers of you latest calls received but not answered
Phone books
- Access to different options with your address and phone books
Status
• View the status of your SIM card, address and phone books, memos, and messages
Calculator
- Use your phone as a standard calculator
Dictating machine
• Find, add or delete memos
Calendar
• View your events
- New event
• View week planner
- Go to other date
- Delete events automatically after a certain period
- Delete all events at once
Missed events
• View the events you have missed
IrDA operation
- Receiving
• Synchronization and data - Send business card
WAP browser
- Access to the Internet
Messages
- Inbox for received SMS messages
- Outbox for SMS messages ready to be sent
- Sent messages
- Drafts for unspecified messages ready to be sent
- Send new messages
- Favourite messages
- Read broadcast messages
- Check your voice mail
Facts & Tips
- Remember that indicates that the option depends on your SIM card and therefore may not be available.
Call lists

First
Enter the List menu
by pressing ▲
Select one of the following options
Outgoing calls
See a list of your last dialled telephone numbers. The number of phone numbers shown depends on your SIM card.
Answered calls
See a list of the last 10 calls you
have received and answered.
Missed calls
See a list of the last 20 calls that you received, but did not answer.
Direct access to the list of missed calls
When you have missed one or more calls, the symbol 🏠
shown in your standby display together with the number of missed calls. You get direct access to the list of missed calls simply by pressing ▲.
Options in call lists
Having selected a number from one of the call lists you can press »OPTION« and
- Call the number
- Delete the number.
- Save the number in your address book or in one of the phone books.
Facts & Tips
- As the telephone registers only identified calls in the list, the number of missed calls shown on the standby display and the number of phone numbers actually listed may differ.
- If you call a number from the list of missed calls, that number will be removed from the list, but you can retrieve it from the list of outgoing calls.
• The detailed view of a missed call will contain the name and/or phone number, the date and time of the call, as well as the number of times the caller has called.
Address and phone book editing

First
Enter the List menu
by pressing ▲
Select »Phone books«
Select »Address book« or one of the phone books
Add entry
Select »Add entry« if you want to add a new entry (See pp. 14-15).
View entries
This provides a variety of options, such as calling, editing or moving the entries. These options are described in greater detail in the following.
Having selected »View entries« you must place the cursor on the entry you want to view.
2 Press "DETAIL" to see the contents of the entry.

Press »OPTION«
4 Select one of the following options.
- Call: If the entry is stored in your address book and contains more than one number, you will have to specify whether you want to call the home, the office or the mobile phone number.
- Edit: You can edit the contents of the entry, e.g. change the office phone number. Use the arrow keys to move from one edit box of the entry to another.
Select the edit box you want to edit, make your corrections and press »OK«. Use »CLEAR« to delete faulty characters and enter the correct ones via the keypad. Press »SAVE« when you have finished your corrections.
The telephone will ask you to confirm the changes. If you press »YES« the changes are stored automatically.
If you press »NO«, the phone will ask you whether you want to go back to the entry.
If you press »NO« at this stage, all new data will be discarded and deleted.
If you press "YES", the phone will revert to 4
Facts & Tips
- You can also add entries simply by pressing after entering a phone number in standby mode.
- You can also view entries in your address and phone books simply by pressing in standby mode.
• Service and info number phone books cannot be edited.
Address and phone book editing

First
Enter the List menu
by pressing ▲
Select "Phone books"
Select »Address book« or one
of the phone books
View entries (continued)
- Move: Entries can be moved from your address book to one of your phone books. Only the name and the relevant phone number will be moved. You have to specify which phone number (home, office, mobile) you want to move and to which phone book you want to move it. Entries can also be moved from one of your phone books to your address book or to another phone book. When moving an entry, you will always be able to edit the name.
• Copy Just as you can move entries, you can copy your address book entries to one of your phone books, and from one of your phone
books to the address book or to another phone book. When copying an entry you will always be able to edit the name.
- Delete: If you want to delete an entry stored both in your address book and in one of your phone books, you will have to delete it in both books. If you delete only the address book entry, it will still remain in the phone book...
- Send: You can send the contents of an address book or phone book entry to another mobile telephone via IrDA (infrared interface).
- Print: It is possible to print out an address or phone book entry via IrDA.
Facts & tips
- When communicating via IrDA, the recommended distance for optimum transmission between your mobile phone and the receiving unit is 10 pantimetra.

First
Enter the List menu
by pressing ▲
Select «Phone books» and
then »Groups«
Groups
You can organise the entries in your address book that your phone book entries in groups, such as family, business, etc. This makes searching easier.
Create new group

and confirm by pressing »OK«

Give the group a name and
confirm by pressing "OK".
You can now add entries to the group and select a ringing tone for the group, enabling you to hear from which group the call comes.
A list showing all your entries in your address book and a list of available ringing tones are presented.
Options in groups
Having selected a group you can press »OPTION« and:
• View contents: All entries in
the group will be listed. Pressing
“DETAIL” and then “OPTION” again will give you access to further options (pp. 23-2/1).
- Add entry: Once you have
selected this option, all entries stored in your address book will be listed. Select the entry you want to add to the group.
- Move: Move the entry to another group or out of the group. Select the entries you want to move and press »MOVE«.
Select »Other group« if you want the entries to be assigned to a group. Otherwise, select »No group«.
- Rename group: Edit the name via the keypad and confirm the new name by pressing »OK«. The contents of the group will not be affected by the renaming process.
- Delete group: If you delete a group, its entries will remain in your address book, but will no longer be assigned to a group.
Facts & Tips
- Choose a group name which is short and unambiguous as like Business, Family or Friends.
- Groups are marked by a front of them.
Address and phone book editing

First
Enter the List menu
by pressing ▲
Select »Phone books« and then »Groups«
Groups (continued)
- Ringing tone: You can change the ringing tone used for the group.
- Add to group:
If the selected entry is not already assigned to a group, "Add to groups" will be displayed. Specify the group to which you want the entry to be assigned and press SELECT. The phone will confirm that the entry has been added to the specified group.
- Remove from group: If you do not want the entry to be assigned to a group any longer, press »OK«, and the phone will inform you that the entry has been removed from the group.
- Change group: This option is available only if you have created more than one group.
If the selected entry is assigned to a group, the option »Change groups« will be displayed. Select the group to which you want to move the entry. Press »SELECT«, and the phone will confirm that the entry has been moved to another group.
Facts & Tips
- When calling a number or receiving a call from a number which is assigned to a group, both the names of the caller and the group will be shown in the display.
Status

First
Enter the List menu
by pressing ▲
Select »Status«
Status
In this menu you can see the status of your SIM card, address and phone books, memos, and messages.
SIM card This submenu shows you the status of your phone books and SMS messages. See how many entries you have stored and how many storage locations are free.
Phone This submenu shows you the status of your address book, your messages, and your calendar. See how many entries, messages, and events you have stored, and how many groups you have created. The free capacity will be shown as a percentage.
Dictating machine This submenu shows you the status of your momos. See how many momos you have stored and the total time consumption. The free capacity will be shown as a percentage.
Calculator

First First
Enter the List menu
by pressing ▲
Select «Calculator»
In this mode, your telephone acts as a normal calculator. The equals sign (=) is found on the right hand function key.
Enter the first number you want to use in your calculation and hold down the relevant key for one second to access the desired arithmetic operation.
Key Operation
1 Addition (+)
2 Multiplication (*)
3 Square function (x 4)
4 Subtraction (-)
5 Division (1)
6 Square root (v)
7 Percentage (%)
8 Fractions (1/x)
9 Exponent |E|
* M+ or decimal point (press briefly)
0 M=
# MR or -/+ (neg./pos.) (press briefly)
If you store a number in the memory, this is indicated in the upper left corner of the display by M= and the number stored.
The memory is reset each time you switch off your phone.
Quick survey
By pressing once or twice you can open a list showing which arithmetic operator is placed on which key. An arithmetic operation can then be selected directly from the list by briefly pressing the assigned key.
To exit the quick survey and return to the calculator just press the left function key.
Facts & Tips
- The calculator will remain active in the display for 3 minutes. If you want to get back to standby mode, press "CLEAR" and hold down "EXIT" for one second.
Dictating machine

Enter the List menu
by pressing ▲
Select × Dictating machine
Dictating machine
Your phone contains a dictating machine with an effective capacity to record 5 minutes of speech. The number of memos that can be stored depends on the length of the memos. Memos can be recorded and played back whether or not you are in the middle of a conversation.
Check memos Enter this submenu if you want to check or edit your memos. Pressing »OPTION« gives you the following possibilities:
- Play back the memo
- Extend the memo. If there is more memory left, you can add speech to an existing memo. Press «OPTION» at any time and the
new speech will automatically be added at the end of the existing memo.
- Edit the title of the memo.
- Delete the memo.
Record new memo Enter this sub-menu to record a new memo.
1 Press »OK«, and the recording starts automatically.
To make a pause, press ▼ To continue recording, press ▼ again.
2 Press »STOP« to end the recording.
The phone now suggests a title for your memo. You can accept the suggested title by pressing «OK» or you can delete it by holding down «CLEAR» and enter a new title of your own choice. Press «OK» when you have entered your own title.
To cancel a recording, after you have started it, press "CANCEL".
Delete all memos Enter this sub menu to delete all your memos.
Facts & Tips
- In the upper right-hand corner of the display you can see the recording time in minutes and seconds.
• The memory status bar just above the function key text lines indicates how much memory you have left.
• An incoming call will interrupt recording and play back of a memo.
- In the List menu under »Status« you can see how many memos you have stored and the total time consumed.
• In the description of the Conversation menu on p. 71, you can see how to record an ongoing conversation.
List menu
List menu
Calendar

First
Enter the List menu
by pressing ▲
Select «Calendar»
Calendar
Use your phone to remind you of different events such as meetings, phone calls to be made, birthdays, etc. To ensure the proper functioning of the calendar it is an absolute condition that you set the actual date and time in the Calendar Setup menu (p. 65). The calendar is active even when the telephone is switched off.
View events Each date under which one or more events are stored will be listed, shown with the day of the week and the date. Use the arrow keys to scroll through the dates. If a date is highlighted for more than 2 seconds, the times of the first events on that date will be displayed.
Press »SELECT« to read the event details.
In addition to reading the event details, you can press »OPTION« and:
- Delete the event.
- Edit the event.
- Send the event to another mobile phone or a PC via IrDA.
- Print the event via IrDA.
New event When adding a new event, you can choose among the following event types:
»Custom setup»
*1 hour meeting*
«Standard alarm»
«Birthday»
«Wake up alarm»
In the custom setup you can define any setting to suit your requirements. The options available are: Set start time/date and set end time/date, enter event text, select
recurring frequency, select tone pattern, and define advance notice for the event.
You can decide that a »Custom setups« or a »Wake up alarm« event should be recurring (repeated).
This is useful if you have a weekly meeting, if you want to be reminded about e.g. a birthday every year or if you want to use your phone as an alarm clock.
You can select one from among 6 predefined recurring frequencies or you can specify a date/time until which you want the event to be repeated, or select »No end date« to have the event repeated continuously.
If you want to change the current time and/or date settings, see the description in the Setup menu on p. 65
Being notified of an event
An occurring event will be indicated by in the display, the phone
will emit a ringing tone and the
LED on the top of the phone will
flash green very fast. If the phone is swichted on, the trembler will be activated if you have selected this option in the Tones setup menu. (See p. 64).
The first line of the event text will be visible in the display. Use ▼ see more of the text.
The phone will continue ringing for one minute if you do not acknowledge the event by pressing »OK«.
The event will automatically be deleted after a certain period of time specified by you, unless you have selected that you don't want it to be deleted (See p. 65).
Postponing an event
Press »REMIND« if you do not have the time to read the event text right now. The symbol will be seen in the display after one minute. The digit above the symbol indicates the number of postponed events. The event will recur after 10 minutes. The phone will repeat the event twice. Press to see the
contents of the events you have postponed. (See p. 32 for further information)
Show week View your appointments for a whole week. Use the arrow keys to scroll through the weeks. If you want to change the daily start and end times of your calendar you can do so in the "Start of day" option in the Setup menu (p. 651).
Go to date Select a specific date. The events occurring on or after the specified date will be listed as described under »View events«.
Delete events Select this option to delete all events older than a certain period specified by you.
Delete all Select this option to delete all events at once.
Facts & Tips
• The Symbol in front of the time/date indication (Display time/date function must be activated) in the standby display shows that an event is occurring on that date.
• A recurring event will be marked by
to the left of the starting time. If you want to delete a recurring event, the telephone will ask you for confirmation to delete it.
- A v in the upper right corner of the display indicates that the week shown is the current week.
• The number between the arrow keys at the bottom of the display indicates the number of the week shown.
- You can also synchronize your calendar with the calendar in Microsoft
Outlook on your PC by means of the enclosed CD ROM. To do this, install the synchronization programme
IXTND Connect PCI on your computer.

First First
Enter the List menu
by pressing ▲
Select «Missed events»
Missed events
If an event occurs and you do not acknowledge it the missed event symbol will be seen in the display. The digit above the symbol indicates the number of missed events. The event will occur after 10 minutes. The phone will repeat the event twice. Press to see the contents of the events you have missed.
Use the arrow keys to scroll through the dates of the missed events. After 2 seconds the receipt time of the missed events of the highlighted date will be listed. Press »SELECT«. After 2 seconds the text of the first missed event of the date selected will be displayed. Use the arrow keys to scroll through the missed event times, if you do not want to read the first one.
Press »SELECT» again and then »OK». The event will now be deleted from »Missed events«, but you can always find it again in »View events« under »Calendar« in the List menu as long as the event hasn't been deleted here.
If you have accessed the missed events by pressing ▲but not read the event text and pressed «OK» they will remain in «Missed events» in the List menu.
Facts & Tips
- Remember that this menu is dynamic. This means that if there are no missed events, the menu will not be visible in the List menu.
IrDA operationMissed events

Enter the List menu
by pressing ▲
The built-in IrDA modem allows wireless communication to take place between your phone and computer, provided your computer is equipped with an IrDA interface as well, and provided you have installed the necessary IrDA drivers in advance.
The CD-ROM supplied with the telephone will provide you with the required software and information.
When communicating via IrDA, the recommended distance for optimum transmission between your mobile phone and the computer is 10 centimetres.
You may operate your phone as follows:
Receiving In order to receive messages, etc. via the infrared interface, you have to activate the IrDA port in this submenu.
If a connection is established successfully, the IrDA port will automatically be deactivated 1 minute after the end of the transmission.
If no connection is established within 1 minute, the InCA port will automatically be deactivated, and you will have to activate it again to be able to receive a message.
Synch and data Select this sub-menu to activate the synchronization and data capability.
Send business card The information defined by you in your Owner ID in the Setup menu (see p. 57) can be sent as a business card to another device via IrDA.
Facts & Tips
- When your phone is connected to a data cable it is not possible to send and receive via IrDA.
WAP browser

First
Enter the List menu by pressing ▲
Select »Browser Menu«
Browser Menu
Your phone supports WAP (Wireless Application Protocol) based services. WAP is a technology designed to provide you with wireless access to the Internet.
The contents of the individual services depend on the network service provider, and you must follow the provider's instructions to make use of the services. Typical WAP applications are news, weather forecasts, online banking, flight schedules, etc.
Before you can use the WAP services via the telephone, you must set up the WAP connection settings in the Message setup menu (p. 63). Your network service provider may have already set your Internet access profiles for you.
In the following description, a »cards« refers to what you see in one screen on the display. You can scroll through different cards by means of the arrow keys. A collection of cards which belong together is referred to as a »deck«.
Activating the WAP browser
The WAP browser will be activated automatically when you have selected »Browser Menu« in the List menu.
The first time you activate the WAP browser, it will take a few seconds before the Home dock is presented to you, as the WAP browser needs to contact the gateway and maybe calculate a security key.
After this first activation the Home deck will be stored in the WAP browser memory cache allowing immediate display without connection to the gateway.
The phone will inform you whether the data transmission between your phone and the gateway is secure (encrypted) or not.
Navigating with the WAP browser
When the connection to the gateway has been established, the Home deck will be shown in the display.
Some of the listed selection cards have a number in front of them. To select a card, scroll through the items by means of the arrow keys and confirm by pressing »Link«, or press the corresponding number key. Use the arrow keys to scroll up and down in the actual card.
Go to link
When one or more lines are underlined, a link is selected. Press the right-hand function key to display the card corresponding to the link. The text above the right function key may vary from card to card.
Go to previous card or deck Press »BACK«.
Go to Home deck
Hold down »BACK« for 1 second.
Exit the browser
Press »QUIT« when the Home deck is displayed, or hold down »BACK« for more than 2 seconds. You can also exit the browser by holding down the side volume-up key on the right-hand side of the phone.
Some cards give access to an option menu where you can find more functions. Press »OPTION« to enter the menu.
Using the WAP browser menu
The browser menu is accessed by means of the volume-down side key on the right-hand of the telephone. The browser menu includes the following sub-menus:
Reload
Reload one or more cards from the server or from the internal memory of the phone in order to update old cards.
Home
Return to your Home deck.
Bookmarks
A list of often visited cards enabling you to get fast access to these cards as you don't have to enter the full URL address each time you want the card to be displayed.
Available only when you are connected to a Phone.Com. gateway.
Mark site
Mark the current card to add it to the list of bookmarks.
Available only when you are connected to a Phone.Com. gateway.
Facts & Tips
- The Home deck is your WAP service main menu.
- The cache is a special memory where the cards you have visited during an Internet session are stored. When you return to a previously visited card, the browser will display it from the cache instead of retrieving it again from the server, which results in a much shorter access time.
- The WAP browser feature is undergoing continuous development and tests. We therefore reserve the right to make changes and improvements of the descriptions in this user guide without prior notice.
WAP browser

First
Enter the List menu by prossing ▲
Select «Browser Monu» and press the volume-down side key on the right-hand side of the phone.
About Phone.Com
See the current UP, Browser and RSA version.
Advanced
Here you find the following sub- menus:
Show URL Each deck has a URL address (Uniform Resource Locator). Select «Show URL» to see the URL address of the selected deck.
Homepage Enter the URL for a new Home deck.
Set UP link Select WAP gateway in profiles with more than one gateway. Depends on your network operator.
Offline service Specific downloadable Phone Com services (e.g. mail or calendar), which can be used when you are offline. If necessary, the services will be updated when you are online again.
Outbox Contains messages from the Offline service ready to be sent.
Restart UP browser Deletes the previously visited cards stored in the cache and will bring you back to your home deck.
Encryption List of actions for verifying and resetting the security key used to encrypt secure connections.
Facts & Tips
• The scroll bar at the right hand side of the display indicates the amount of text before and after that actually
shown in the display.
• The data online indicator is flashing only during a data call. Under Display symbols on p. 77 you can see other indicators related to the WAP browser.
• The editor modes ABC
79 cannot be used when operating the WAP browser. However, a special symbol entry mode is available. To access this mode, press »OPTION«, and then »More«.
- When operating with entry cards, press ▼ move the cursor to the right, and ▲ to the left. Holding down the keys will move the cursor 1 line down or up, repeatedly.
Messages

First
Enter the List menu
by pressing ▲
Select »Messages«
Messages
Your phone can receive and send messages via the network. Messages are stored on your SIM card. Entering this menu lets you access the following features:
Inbox The messages you receive are automatically stored in the «Inbox». Select the message and scroll through it by using the arrow keys.
- Direct access to your inbox
When you receive a new message the symbol appears in the middle of your standby display. You can access your inbox directly simply by pressing ▲
The unread messages indicator will be shown in your standby
display while you have one or more unread messages.
- Immediate SMS messages
Your network might send you some or all your messages as immediate SMS message. An immediate SMS message will immediately appear directly in your display when received, and you can read the entire message by scrolling through it by means of the arrow keys. An immediate SMS message will not be automatically stored in your inbox, but you can save it by pressing »SAVE«.
If you want to reject and delete the message, press EXIT.
Facts & Tips
• The standby display will display symbols to show if there are voice mails or other messages waiting for you on the network. The digit above the symbol indicates the number of waiting messages.
- If your message memory is full, you will be asked to delete some messages to free up capacity. Specify whether you want to delete messages in your Inbox, Outbox, Drafts or Sort Items. The symbol will be flashing until you have deleted one or more messages.
- Read about message tones in the description of the Tones menu on p. 52.
Messages

First
Enter the List menu
by pressing ▲
Select »Messages«
Outbox If you have entered an SMS message, but do not want to send it right away, you can store it in the Outbox by selecting »Save message«.
Sent items The messages you send are automatically stored under »Sent items« from where they can always be retrieved again.
Drafts If you do not want to send your message right away and have not yet decided how to send it, select «Save message», and your message is automatically stored in «Drafts».
Options with your messages
In addition to reading your messages, you can select the message, press »OPTION« and:
- Delete it
- Send a reply (only in inbox)
- Forward it to another phone number
• Edit it before sending it - Print it via IrDA
- Call back the sender (only in inbox)
New message To send a message you have to specify certain parameters if those have not already been specified by your network operator. Enter the Message setup menu to set up these parameters once and for all - otherwise you will be asked to specify them each time you wish to send a message.
By default, your phone is set to use the Wheel mode editor when composing your message. However, you may find it more convenient to switch to the built in 19 ^® text input feature. 19 ^® enables you
to compose text messages with only one keystroke per character, (See p. 40).
Once you have selected »New Message«, you can start entering your message.
2 Press »OK« when you have completed your message.
3 Select whether you want to send the message as an SMS message or via IrDA.
4 Press »YES« to send the message. Press »NO« to store it in your Outbox.
5 Select »Save message« if you want the unspecified message to be stored in »Drafts«.
- Send as SMS
To be able to send SMS messages you have to enter your network operator's telephone number for this special service and to set up different parameters for your messages. Enter the Setup menu to set up those parameters once and for all. See p. 61.
- Send via IrDA
If you select »Send via rIDA«, your phone will automatically activate the rIDA port. If a connection is established successfully, the rIDA port will automatically be deactivated after the end of the transmission. If no connection is established within 1 minute, the rIDA port will automatically be deactivated and you will have to try again.
Facts & Tips
- If while writing a message you are interrupted by an incoming call, your message will be stored automatically in «Drafts».
- When communicating via IrDA, the recommended distance for optimum transmission between your mobile phone and the receiving unit is 10 portimetro.
Messages
T9 ^4 text input feature
This is a feature enabling you to more easily use SMS messaging. Unlike the conventional way of entering/editing texts where you have to press one key up to several times to enter the desired letter, the T9 feature allows you to compose text messages with only one keystroke per letter.
T9 Text Input compares your keystrokes to words in its own linguistic database and displays the most commonly used matching word.
Example: Try to type «Call office» by pressing the following keys in order.
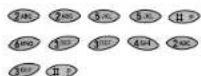
As you saw, the displayed word changed as you typed it. Therefore, always type to the end of the word before you start editing.
If the displayed word is the one you intended, just press insert a space before the next word and continue entering the next word.
If the displayed word is not the one you intended, use the arrow keys ▲ and ▼ to scroll the alternative word choices. When you see the correct word, press 📄 to insert a space before the next word and continue entering the next word.
When you have completed your message, press «ACCEPT» to confirm the last word and then «OK» to send the message.
The first letter will always be capitalized, which is indicated by the symbol in the upper right-hand corner of the display. The second letter will automatically be lowercase. Press
if you want to enter an upper-case letter again.
If you want to activate the caps lock function, press 📄
While the caps lock is active the symbol will be seen in the display. To disable the caps lock function, just press to. To enter digits into your message, press 0
A grid of digits appears and you can press the digit you want to enter. In T9 mode, periods, hyphens are apostrophes are automatically inserted in the highlighted word by pressing
Additional punctuation and symbols can also be accessed by pressing. You will now have access to five different pages containing up to 9 symbols each. You can scroll through the pages by using the arrow keys. You select the intended symbol by pressing the relevant key, e.g. on page one 7 corresponds to “@”. Just press EXIT to return to your text message if you do not want to enter an additional punctuation.
Typing words not found in the T9 linguistic database
While in T9 mode, press the side key until the ABC indicator appears in the display.
2 Type the word.
3 Press the side key until the 79 indicator appears in the display again, and continue using T9 mode.
Adding words to the
T9 linguistic database
Follow steps 1 to 2 as described above. When you have completed the word you want to store, press the side key to return to T9 mode. The word is automatically stored in the database.
Writing compound words
Long, compound words may not be in T9's linguistic database, but often their individual parts are available. Enter the first part of the word,
press »ACCEPT« and then enter the second part.
The memory of the database can be filled. When this happens, words which are never or rarely used will be deleted to make room for the words you want to store.
Different T9 languages
The 19 linguistic database is offered in a variety of languages and is independent of the language of your phone. Normally you will probably set your phone to your local language, but from time to time it might be convenient to select other languages.
Selection of the T9 language is explained in the Setup menu under Message setup (p. 64).
Disabling the T9 feature
If your normal local language is not supported by the T9 database, you have to enter your text messages in the conventional way with multiple presses per letter, and if this is the case, it may be convenient to disable the T9 feature.
Messages

First
Enter the List menu
by pressing ▲
Select »Messages«
Favourites Instead of entering your own message you can make use of the »Favourites« which are standard messages already stored in your phone. You only need to insert the name, place or time in the empty spaces. The cursor automatically points to the first empty space. Once you have filled this in, you can move the cursor to the next empty space simply by pressing »NEXT«.
Broadcasts
Broadcasts are
general messages which are sent to a group of subscribers, typically containing local weather reports, sports results, etc.
A broadcast message is scrolled twice over the display. If you do not see the message when it is received, you can read it later on by
If you do not store a broadcast message, it will be deleted when you switch off your telephone – even if the message has not been read.
In addition to reading a broadcast, you can select it, press »OPTION« and:
- store it for reading it later on - forward it to another phone number
If you want to receive broadcast messages, you have to enter the Setup menu (see p. 62) to set up this feature.
List menu
Voice mail
Some networks
offer a voice mail function where you can listen to your voice mails just by selecting the submenu oVoice mails.
Other networks send you an SMS message when you receive a new voice mail, and you will then have to call your network operator's voice mail number to listen to it.
Facts & Tips
- If you have selected Roaming, i.e. if you are abroad and connected to a foreign network, you may be able to receive broadcasts from other networks, too.
• The phone will show the broadcast ID number, allowing you to identify the kind of message received.
• The phone will show on which line your voice mail is located.
Setup menu
Find out how to set your phone according to your own personal wishes and needs.
Setup menu

General
Enter the Setup menu
Press "MENU"
Scroll through the options:
▼ and ▲
Select an option
Press "SELECT" or "OK"
Go back one level:
Press "EXIT"
Go back to standby
Hold down »EXIT«
Here is a brief overview of the
options that may be available when
you enter the Setup menu.
The options are described in
detail on the following pages.
Network services
- Call divert
- Call barring
- Call waiting
- Call back
- Calling name presentation
- Call deflection
- Closed user group
Network selection
• Automatic/manual selection
- Preferred list
• Country selection
• Selection of network type
Tones setup
- Ringing tone
- Message tone
- Broadcast tone
• Composer (your own tone)
- Delete own or downloaded ringing tones
• Key tone
- Silent mode
• Trembler
- Factory settings
Phone setup
- Language
• IrDA
- Backlight
- Handstree
• Greeting
• Signal diode
• Graphics
- Owner ID
Call setup
- Outgoing call ID
- Speed dial
- Caller access
• Automatic redial
• Any key answer
- Timer & charge
- Incoming call setup (fax/data)
- Line selection
Message setup
- Send SMS setup
- Broadcast setup
- Sorting of messages
- WAP browser setup
- Text input setup
Calendar setup
- Set time
- Set date
• Display time and date
- Define start of day
- Remove events automatically
Security
• PIN code on/off and change of PIN code
- Change PIN2 code
• SIM lock or/off
- Change network password
• Encryption indication or/off
- Fixed dialling on/off
- Barred dialling on/off
- Keypad lock
• Line lock
Facts & Tips
• Remember that indicates that
the option depends on your SIM card
and therefore may not be available.
Setup menu
Setup menu
Network services

First
Enter the Setup menu by pressing "MENU"
Select »Network services«
Call divert
If you want to divert your incoming calls to another phone number, you have to:
1 Select one of the five call divert options.
2 Register your call divert
Different options of call divert
All calls Divert all calls made to your phone.
If unanswered This is an umbrella function that covers the next three options at the same time, i.e. it diverts calls to your phone
- if your line is busy
- if you do not reply
- if there is no contact to the net work
If busy Divert your calls if your phone is busy.
If no reply Divert your calls if you do not reply.
If no contact Divort your calls if there is no contact to the network.
Status Check if your phone is diverted in any of the possible ways.
Cancel all Cancel all your call diverts.
Register your call divert
Having selected one of the five above call divert options, you must select a Register to register it with the network operator. Your telephone will guide you through the following stops:
Teleservice type
Specify whether you want the call divert to apply to all services, speech, data or fax services.
Divert delay
(only if you have selected to divert "If no reply" or "If unanswered"). Specify the period of time that should elapse before the call is diverted. You can choose "Default delay" or select a period from 5 to 30 seconds.
Number
Enter the phone number you want to divert to or select a number in your phone book using ▼On! some networks you can press ▲ and your calls will be diverted to your voice mail (see p. 42).
Deactivation/activation
On some networks you have the possibility of activating and deactivating your call divert. This means that when you have registered a call divert, you can select to deactivate it, and then at a later moment activate it again. Your telephone will then remember your last registration and you will not have to select divert delay and phone number again.
You access the activating/deactivating option by selecting the call divert you want to activate/deactivate and then select «Deactivate» or «Activate».
Facts & Tips
- If you have chosen to have all calls diverted, the call divert indicator will be shown in the display.
- Your selection of a specific kind of call divert allows you not only to register it. At this level, you also have the possibility of deactivating/activating the call divert, seeing the status for this specific kind of call divert by selecting «Status» and cancelling this specific kind of call divert by selecting «Cancel».
- If you try to deactivate/activate a call divert and your network does not allow this option, your display will tell you that the service is not available. In that case you must cancel a call diversion by selecting "Cancel". Next time you want your incoming calls diverted, select "Register"
Network services

First
Enter the Setup menu
by pressing "MENU"
Select »Network services«
Call barring
You can set up call barring for different types of outgoing and incoming calls to restrict the use of your phone. To make use of this service you need to get a specific password from your network operator, and then:
1 Select one of the call barring options below.
2 Activate your call barring.
Different options for call barring
Outgoing calls gives you three new options:
- All calls: Bar all outgoing calls
• International: Bar all outgoing international calls
• Roaming calls: Bar outgoing calls when you are connected to a foreign network (this still leaves you the possibility of making calls to your home country).
Incoming calls gives you two new options:
• All calls: Bar all incoming calls.
• Roaming calls: Bar incoming calls when you are connected to a foreign network.
Status Check if your phone is barred in any of the above mentioned ways.
Deactivate Cancel all your call bar rings.
Activate your call barring
Once you have selected the kind of call barring you want, activate it by pressing «OK». Specify whether you want the call barring to apply to all services, or to the speech, data or fax services. You will then be asked to enter the 4-digit password provided by your network operator.
Call waiting
Activate aCall waitingx if you want to be notified by a special ringing tone in case somebody is calling you while you are already having a conversation. You then have the option of answering or rejecting the new call.
Call back
Some networks offer the possibility of automatically establishing a connection to a busy subscriber when the number is no longer engaged. The phone will inform you that the subscriber is busy and ask you whether you want to call back.
Select »Status« to see how many phone numbers are still waiting to be called back.
Select "Cancel" if you want to cancel the remaining phone numbers to be called back.
Calling name presentation (CNAP)
Some networks offer the possibility of showing the name of your caller even though his number is not stored in your phone book.
To find out whether this service is available or not, select the option «CNAP» and then «Status».
Call deflection
On some networks you can subscribe to this feature which lets you forward an incoming call to another phone number. Press ✗, followed by the other phone number to have an incoming call forwarded to the number entered instead of answering the call.
To find out whether this service is activated or not, select the option "Call deflection" and then "Status".
Closed user group
This is a network feature by which the use of your telephone is restricted to certain phone numbers within a group defined by the network operator and the owner of the SIM card.
- Do not confuse call barring with the barred number phone book (p. 16). The barred number phone book only relates to the barring of specific numbers entered by you.
- Please note that during roaming, your phone can get in contact only with co-operating networks (except for emergency calls).
- Your selection of a specific kind of call barring allows you not only to activate it. At this level, you can also see the status of the kind of call barring chosen by selecting «Status», or cancel the chosen kind of call barring by selecting «Cancel».
- You may be a member of different closed user groups. Each group has its own ID number. The network defines which group is your default user group. You have the option of calling outside the group – although perhaps at a higher charge.
Network selection

First
Enter the Setup menu
by pressing "MENU"
Select »Network selection«
Selection mode
Phoning abroad requires the use of a foreign network. You can select the network manually or let your telephone do it automatically. Entering »Selection mode« gives you these options:
Automatic Let your phone find an available network automatically. Your phone will always try to reach your home network first, then alternatively find another available network. You have the possibility of establishing a preferred list (see below), indicating the order of preference in which your phone should select a network.
Manual Your phone will always start searching for the network with which it was in contact when it was last switched off. If the phone cannot locate this network, it will present some alternative networks in the display, and you must then select one manually.
Set preferred list
Enter a list of networks in your own order of preference and store them on your SIM card.
To do this, select the empty location where you want to store the new network. Pressing »EDIT« will open a list of networks. Find the network you wish to store in your preferred list, and press »SELECT«.
Country selection
If you choose automatic network selection, you can restrict your phone to connecting only to networks selected from the «Use country list». In «View list» you can select which countries you want to allow. You can delete countries from the list by pressing «EDIT», followed by «DELETE».
Network types
Select whether your phone should start searching for a GSM 900, GSM 1800 or GSM 1900 network. If you select all 3 network types the telephone will automatically start searching for the network that offers the best connection.
Facts & Tips
- If you want to add a network that is not shown on the list of networks, select "Specify" and enter the country code and network number of the network.
• The country list can contain 15 different countries. The country of your home network will always be the first one on the list and cannot be deleted.
- Select «Unlimited» in the country list and you will be able to connect to all available networks.
Tones setup
First
Enter the Setup menu
by pressing »MENU«
Select »Tones setup«
The Tones menu offers you different options in relation to the following tones:
Ringing tone
Message tone
Broadcast tone
Volume Select whether you want the volume to be high, medium, low or off. The ringing tone can also be set to »Escalating«.
Pattern You can select between 42 different tone patterns and melodies composed by yourself.
Composer
You can compose up to 20 melodies to be used as additional ringing tones.
View melodies To edit or delete an existing melody, select the melody, press »OPTION« and select whether you want to edit or delete it. It's also possible to edit only the title of the melody.
Create melody The notes are inserted via the keypad. Press * to see which note is located on which key. The keys below have special functions:
8 Plays back the melody
9 Changes the note/rest length (1/16, 1/8, 1/4, 1/2)
0 Deletes a note or a rest
# Inserts a rest
The cursor is moved by means of the arrow keys. A new note is
inserted to the right of the cursor and is marked in black. After 1/2 a second the cursor moves to the right of the inserted note. As long as the note is active (black) it can be edited.
Display indications:
The top bar indicates the position of the cursor relative to the total length of the composition.

The number of the currently active note.

Note length (1/16)
Note (C)
Sharp (共
Octave (6)
Note and rest lengths are shown by symbols of different lengths, 1/16 being the shortest and 1/2 being the longest. The black line indicates an octave.
Special side key functions:
Short press up:
Moves the note up one semitone
Long press up:
Moves the note up one octave
Short press down:
Moves the note down one semi-
tone
Long press down:
Moves the note down one octave
When you insert a note or a rest, the length will always be 1/16.
Press the relevant key again, and the length will be changed into 1/8; press it twice, and it will be
changed into 1/4 etc.
You cannot overwrite an inserted note or rest. You have to delete the old one before you can insert a now.
When you have completed your composition, you can press
»OPTION« and:
- Save: Give your melody a name and press »SAVE«. If you do not want to give the melody a name of your own choice, it will be stored under the name »My melody 1«.
If you press »EXIT« after completing your composition, you will be asked whether you want to leave the composer without saving your new/edited melody
Press "NO" to return to the composer editor where you can make further corrections, if required.
Press »YES« to leave the composer without saving anything.
- Clear all: Select this option if you regret your composition and want to start composing your melody from scratch again. In this way you will not have to delete the inserted notes/rests individually.
Facts & Tips
- The standard ringing tones entered by the manufacturer cannot be edited or deleted.
- Remember that for entries stored in your address book you can assign a specific ringing tone to the group enabling you to hear from which group the call comes.
• The maximum length of a melody is 250 notes and/or rests. The digit at the bottom of the display tells you how many you have left.
Tones setup

First
Enter the Setup menu
by pressing »MENU«
Select »Tones setup«
Create melody (Continued)
- Play back speed: Choose
between 5 different standard play back speeds. The speed selected here will be the one which is used if you press «8» when composing or editing a melody.
- Tones sound: Select whether you want to hear the tones or not when composing your melody. Even if you have switched the tones sound off, you will still be able to listen to your composition by pressing 8 (Play back).
Delete
This submenu is available only if you have composed one or more melodies or downloaded ringing tones from the enclosed CD-ROM.
Key tone
Select whether you want a tone to be heard when you press a key. You can select between 7 different tones, DTMF and off.
Silent mode
Choose whether you want the selected tones to be on or off.
Trembler
Select whether you want the built-in trembler to be active at incoming calls, messages, or events.
Factory settings
Ringing tone
-volume: Medium
- pattern, line 1: Standard 2
- pattern, line 2: British 1
Message tone
- volume: Medium
- pattern: Simple 1
Broadcast tone
-volume: Medium
- pattern: Discreet
Key tone: Off
Trembler
- Line 1: On
- Line 2: On
- Messages: Off
- Broadcasts: Off
- Events: On
Facts & Tips
- If you are interrupted while composing your melody, e.g. by an incoming call, your composition will be stored under the name «Backup».
- Remember that you can disable all selected tones by pressing »MENU« and then must press these keys again in the same order to revert to your original settings.
- Press »MENU« and then rapidly twice, and all tones will be off for 15 minutes. Press »MENU« and then in a trice and all tones will be off for 30 minutes etc. In this way you can disable all tones for a period of up to 10 hours. The display will inform you of the duration remaining. All selected tones are automatically enabled again when the chosen period ends.
- Returning to the factory settings will not affect the ringing tone assigned to a group in your address book.
Phone setup

First
Enter the Setup menu
by pressing »MENU«
Select »Phone setup«
Language
Select »Language« to change the menu language of your phone.
IrDA
Under »IrDA Nickname« you can enter an ID name by which you want other IrDA devices to identify your mobile phone.
By selecting »Printer« and then »Setup« you get the option to define the protocol language of the printer you want to use.
If you select »Test page«, a standard test page will automatically be sent to the printer.
Backlight
To save your battery and thus increase both conversation and standby times you can choose to have the backlight permanently switched off.
Handsfree (Car kit & headset)
This option is effective only if your phone is connected to a handsfree device. See specific user guides for further information.
Greeting
Make a welcome greeting on your phone according to your own wishes. Press »EDIT« and delete the old greeting by holding down »CLEAR«. Enter the new greeting via the keypad, and confirm by pressing »OK«. (This function may not be available on all networks).
Signal diode
The LED on the top of the phone provides information about the following:
- Green flash
In contact with a network
- Fast green flash
Incoming ca
• Very fast green flashes
Now information, c.g. a missed call or a now message.
• Red flash
No contact with a network
- Fast red flash
Low battery
Select individually whether you want these indicators to be active or not.
Graphics
This submenu allows you to choose between different symbols for the battery and the signal strength indicators.
This is also where you adjust the contrast of the display.
Owner ID
You can store an owner ID in your phone to be shown when you switch on the phone. Select
«Define» to enter the necessary information, which corresponds to an address book entry. You can also select an entry from your address book or one of your phone books to be stored as your owner ID.
Select »Show at power up« to activate/deactivate the function. When the function is activated press »OWNER« during the power up phase to see the contents of your owner ID.
You can change an existing Owner ID by selecting »Edit«.
The contents of the Owner ID can be sent as a business card via IRDA (see p. 33).
Facts & Tips
- If, by mistake, you select a language which you do not understand, you can always return to the original SIM card language by pressing the following keys: QFQ, in sladdby mode.
- When you change the menu language of your phone, it is advisable to change the keypad language accordingly.
• The owner ID is stored in the internal memory of the phone and will thus not be shown in the display if you use your SIM card in another phone.
Call setup

First
Enter the Setup menu
by pressing "MENU"
Select »Call setup«
Outgoing call ID
Select »Outgoing call ID« to choose whether or not the persons you call should be able to see your phone number.
Speed dial
Activate »Speed dial« to make it possible to call numbers in your address or phone books from the standby display by pressing only one key.
Select »Define« and specify which phone number you want to assign to the keys 1 to 9.
If you should later want to change something in the sequence of the allocated speed dial numbers, press "SELECT" and then select "Modify".
If you want to remove the phone
number from the allocated speed dial key, select »Remove«.
Caller access
This feature allows you to limit the number of callers from which you will accept calls. You can select whether you want to receive calls from »All callers«, from a »Single caller« or from a »Group of callers«. Having selected »Single callers« or »Group of callers»you will be asked to define the entries or groups from which you will accept calls.
As long as the caller access feature is activated, you will see this symbol ▶the display.
If you receive a call from a number from which you don't allow calls, the call will automatically be rejected. You will be informed about the rejected call by the bol in the display.
Facts & Tips
- Deactivating »Speed dial« enables you to enter letters, symbols and digits in the standby display and thus enter a USSD message containing both letters and digits.
- USSD (Unstructured Supplementary Service Data) is a feature completely defined by your network which allows direct communication between you and your network. An example of using USSD could be if entering a certain code of digits and/or letters terminated by it tells your network to send you a list of charges.
- If Caller access is activated you can deactivate it by pressing »MENU«
and press the two keys again in the same order to reactivate the feature.
Auto redial
If you have activated Auto redial and the phone number you are calling is busy or your call is not answered, the phone makes up to 10 automatic redial attempts.
A special redialling success tone is heard when the attempt is successful. To cancel the auto redial attempts, just press the left-hand function key.
Any key answer
You can answer an incoming call by pressing any key you like, except the left-hand function key and the arrow key, by selecting »Any key answer on«.
Time and charge
The time and charge menu offers you the possibility of checking the duration and cost of your calls.
However, the call charge feature may not be supported by all network operators.
Status Here you can see the duration and cost of your latest incoming and outgoing call, you total incoming and total outgoing calls and a total of all calls. You also see the remaining credit, if any, (only if you have prepaid your call charge). To reset your time just press "RESET".
Display Select whether or not the call timer should be shown in the display during a conversation.
Setup Enter the unit price for your calls (check with your network operator) and enter the currency of your call charge. It is also possible to enter a maximum call charge limit; no more phone calls can be made when this maximum has been reached.
Facts & Tips
- Do not confuse Auto redial with the call back function described on p. 49. In the Call back function, the network automatically connects you to the busy subscriber when he is no longer engaged.
- Resetting of timers and setup of call charge may require you to enter your PIN2 code.
Call setup

First First
Enter the Setup menu
by pressing »MENU«
Select »Call setup«
Call types (fax/data)
This menu is relevant only if you are using your phone for fax and data communications!
The settings on this menu should be changed only in connection with fax and data transmissions, if necessary. Fax and data transmissions can be made via IrDA or by means of a separate data cable (optional).
At www.siemens.com/s40 you
will find a modem setup programme enabling you to change the receiving data transfer speed into high speed (HSCSD).
Line selection
Some network operators offer Alternate Line Service. This allows you to use two separate speech lines and phone numbers on the same telephone. If you have two separate lines, you can switch between these by entering this sub menu.
Facts & Tips
- Fax transmission supported is Fax Class 1.
- When your phone is connected to a data cable it is not possible to send and receive via IRDA.
- In the standby display a small number on the left or right hand side of the signal strength indicator informs you whether you are on line one or line two (only if you have Alternate Line Service).
Message setup

Enter the Setup menu
by pressing »MENU«
Select »Message setup«
Send SMS setup
To be able to send and receive SMS messages you must store the name and number of the service centre of your network operator. However, many network operators will already have stored this information and some other necessary parameters for you on your SIM card.
Service centre The service centre is where your SMS messages are forwarded to the recipient. Selecting this submenu gives you the following options:
View centres: A list of already defined service centres will be presented to you. Press »OPTION« if you want to edit or delete one of the service centres.
Under the edit option you can change the name and number of the service centre, enter a destination number to which you want your messages to be sent, change the validity time and teleservice type.
Add new centre: Contact your network operator to get the service centre number if it is not stored on your SIM card, and then proceed as follows:
1 Select »Add new centre« and press »OK«.
2 Pross ×EDIT
3 Enter the service centre name and press »OK«.
4 Enter the service centre number, destination number, and select the validity time and teleservice type in the same way.
5 Press »SAVE«.
Default centre: Select the service centre through which you want your messages to be sent. If you select »No default«, you will be asked to enter the service centre number, validly time and teleservice type each time you send a message.
Facts & Tips
- Remember to add "1" and the national code before the number of your service centre so you can also send SMS messages from abroad.
- If you often send messages to the same number it is an advantage to store this as your xDestination num-borx. You will thus only have to conf-mirn and not reenter the number each time you want to send a message.
• The validity time is the period of time that an SMS message will remain with your service centre if for some reason it cannot be delivered right away.
Message setup

First
Enter the Setup menu by pressing »MENU« Select »Message setup«
Send SMS setup (Continued)
Reply path For messages that have to be sent to the recipient via several service centres, some networks offer the feature of forwarding a reply, if any, back to you through the same chain of service centres. This is called a reply path, and activating it may speed up the delivery time for a reply.
Contact your network operator for further information.
Confirmation Select »Confirmation onx if you want a confirmation from the network operator when your message has been sent to the recipient.
If the message has not been sent you will get the information that it is either queued or not delivered.
The period during which you can receive this kind of confirmation corresponds to the validity time selected by you in the Massage setup menu.
Signature You can add a signature to be sent automatically at the end of your SMS messages.
Broadcast setup
To be able to receive broadcasts you must enter Broadcast setup which gives you the following options:
Activation Select whether you want the broadcast function to be activated.
Channels Set up a list covering the kind of information you wish to receive. The phone will show you various options for storing the individual channels.
Pressing »EDIT« will give you a range categories from which you
can select the one(s) you want to receive.
Language Some network operators offer broadcast messages in different languages. Select between different languages or simply select all languages.
Sorting
Specify whether your messages in your inbox, outbox or sent items should be sorted by date and time, by subject or by sender.
Facts & Tips
- For more information on broadcasts, see p. 42.
Browser Menu
The connection to the WAI ^3 gateway is established as a data call via an access point. You must enter the dial number of this access point in the »Profile setup« below.
Communication between the access point and the gateway takes place automatically when you have entered the IP address of the gateway as mentioned below.
It is likely that your network operator has already stored this information in your phone. If not, you must select the "Profile setup" menu and enter the data yourself.
Display setup Select whether you want the title of the displayed card to be shown in the first line of the display or not.
Profile setup This is where you set up your WAP connection. You can store up to 8 different profiles, each with an individual setup.
- Add profile: Select this submenu to add a new profile. Enter any of the following parameters:
Note: The minimum number of parameters required are dial-up number and IP address.
• The name of the profile
• The supplied dial up number
• The connection type (analog or ISDN)
• The data speed (9600 or 14440)
• The supplied user name
• The supplied password
• The IP address (use the key for decimal commas)
• The part number
- The name of your Homepage for this profile. (Like the start page on your PC).
- The idle time. Set the period (in seconds) after which you will be disconnected after your last keystroke.
• View profiles: Select this sub-menu to view any stored profiles. Press »SELECT« to view the contents of a specific profile.
By pressing »OPTION« you can choose to edit or delete the selected profile.
Facts & Tips
- Contact your network operator or special WAP gateway provider for further information on how to set up the WAP browser.
- Permission to view, add or change the WAP profiles might be restricted by your network operator.
Setup menu
Setup menu
Message setup

First
Enter the Setup menu by pressing »MENU« Select »Message setup«
Text input setup
In this submenu you have various options related to the different text editors and to the keypad.
T9 editor Select whether you want the T9 text input feature to be activated or deactivated.
T9 language Here you can change the language of the T9 text input. The default language is English.
Startup mode Select the text editor mode which you want to be the default for entering information in your address and phone books or writing messages. If you have deactivated the T9 text input feature it will not be an option here.
Keypad alphabet Set the keypad to a language corresponding to the alphabet of your local language or another language of your own choice.
Facts & Tips
• To benefit the most from the T9 text input you should choose the same language for T9 and for the keypad. Otherwise T9 will not be able to store new words in the linguistic database.
- When you change the menu language of your phone, it is advisable to change the keypad language accordingly.
Calendar setup

First
Enter the Setup menu by pressing »MENU« Select »Calendar setup«
Calendar
You can select to have the time and date shown in the standby display by entering this menu. You have the following options:
Time Select »Set time« to set and/or edit the current time. Enter the current hour or use the arrow keys to edit the displayed hour. Press »NEXT« and enter the minutes or use the arrow keys to edit them. Select »Set time format« to specify whether you want a 12- or 24-hour display. If you have selected a 12-hour display, you can switch between am and pm with the arrow keys.
Date Select aSet date to set and/or edit the current date. Enter the current date or use the arrow keys to edit the displayed date. Press aNEXT and enter the month or use the arrow keys to change it. Press aNEXT to jump to the year and enter/edit it. Select aSet date format to specify the sequence in which you want the date to be shown, e.g. date, month and year.
Display Select whether you want the time and/or the date to be shown in the display.
Start of day If the start and end times of the day in your calendar do not fit with your actual working day, you can change them according to your wishes by selecting «Start of days» and then «End of days». The times selected will be used in the «Show week» option in the List menu (p. 31).
Remove events You can choose that all events should be removed automatically from your calendar after a certain period specified by you.
Facts & Tips
- As long as the time/date function is active, all outgoing, incoming and missed calls as well as messages, memes and events will be time/date stamped.
- The time/date indication in the display will disappear if the battery runs completely out of power. You must then set time and date again.
- A recurring event cannot be removed automatically.
- You will not be notified when an event is removed automatically.
Security

First
Enter the Setup menu
by pressing »MENU«
Select «Security»
Entering the Security menu gives you different possibilities of preventing misuse of your SIM card and your telephone, e.g. if your phone is lost or stolen.
PIN code
Activate PIN Select whether your PIN code should be on or off. The PIN code is a 4 to 8 digit code which must be entered each time you switch on your phone.
Change PIN Change your PIN code.
Change PIN2
Change your PIN2 code (used on some SIM cards to access special functions).
SIM lock
Link your telephone and your SIM card together by activating the SIM lock. You will be asked to enter a 8 to 16 digit code of your own choice.
This means that if for instance your phone is stolen, it cannot be used together with another SIM card.
Network password
Change your network password (used if you subscribe to a call barring service).
Facts & Tips
- If you enter an invalid PIN code three times, your SIM card will be blocked, and to unlock it you have to enter the PUK code supplied by your network operator. This procedure prevents unauthorised persons from working out your PIN code by repeatedly entering different combinations of numbers.
- For your own sake, remember to write down your SIM lock code to be able to deactivate the lock at a later time. You have 10 attempts before the phone is blocked.
• The phone will inform you how many tries you have left before the SIM card is blocked. If you enter an invalid PUK code 10 times, your SIM card will be permanently blocked and you have to contact your network operator.
Encryption indication
Get a warning in the display and a sound alarm, if you connect to a network which does not support encryption.
Fixed dialling
Select whether you want the fixed dialling function to be on or off only available if you have defined and stored numbers in the fixed dialling phone book (p. 15).
If you have selected *Fixed dialing on*, you will have access only to the numbers stored in the fixed dialing phone book when you press ▼.
Your plain numbers phone book will not be visible in the List menu and can thus not be accessed. Of course, it remains on the SIM card and can be accessed again by selecting »Fixed dialling off«.
Your address book will be visible in the List menu, but if you wish to call a number from the address book which is not stored in the
Fixed dialling phone book you will be informed that it is not possible to make the call.
Barred dialling
Select whether you want the barred dialling function to be on or off only available if you have defined and stored numbers in the barred dialling phone book (p. 16).
Facts & Tips
- Encryption means that the network encrypts conversations to make it difficult for unauthorised persons to listen in on them.
- Contact your network operator for further information on PUK2 and PIN2 codes.
Setup menu
Security

First
Enter the Setup menu
by pressing "MENU"
Select «Security»
Keypad lock
To avoid making calls accidentally, you can lock the keypad. In this submenu you have the following options:
Activate Activates the keypad lock.
Auto lock You can set your keypad to lock automatically when you are not using the phone. You will be able to select a delay for the auto lock function.
Lock code You can add a lock code to the keypad lock function so that only you can unlock the keypad by entering a 4- to 16-digit code. When the keypad is locked, you will be asked to enter the keypad lock code before you can use the keypad.
Line lock
If you have Alternate Line Service on your SIM card, you can restrict outgoing calls to use only one of these lines.
Activate the line lock in this sub menu and enter a 4- to 16-digit lock code of your own choice. To shift back to the other line you have to re-enter this code.
Facts & Tips
- It is possible to make emergency calls even though the keypad lock is activated.
- For your own sake, remember to write down your keypad lock code. You have 10 tries to enter the correct keypad lock code. The phone will inform you how many tries you have left before the keypad lock is blocked. If you reach this maximum, remove and reinsert the battery, and you have another 10 tries.
- Remember that you can also activate the keypad lock by pressing »MENU« and then □Press »UNLOCK« and □ disable the keypad lock.
• The keypad lock is disabled automatically during an incoming call or if the phone is placed in a handsfree car kit.
Conversation menu
See everything about the possibilities that you have during a conversation.
Conversation menu

First
This menu is available only when you are actually talking on the phone.
Enter the Conversation menu: Press «MENU»
Scroll through the options: ▼ and ▲
Select an option: Press »OK«
This menu offers you different kinds of options for use during a conversation.
Microphone on/off
Select »Microphone off« to turn off the microphone during a conversation. You can still hear everything your caller says, but the caller will be unable to hear you.
Select »Microphone one to activate the microphone again.
Hold a call
You can make a second call without having to end a call that is currently active. Enter the second phone number and press »CALL«.
If you have activated call waiting (see p. 48), you can also answer a new incoming call without having to end the currently active call. When you hear the special ringing tone in your loudspeaker, just press «ANSWER». In both cases, the first call will automatically be put on hold. You can also put calls on hold manually by selecting «Hold call».
Continue a call
When you want to retrieve a call which has been put on hold, just select »Continue call«.
Switch between calls
If you have a call on hold and an active call, you can switch between these two by selecting «Switch calls».
Drop active call
You can end an active call by selecting »Drop active«. If you also have a call put on hold, this call will remain on hold until you retrieve it to continue conversation.
Drop held call
You can end a call which has been put on hold by selecting »Drop held«.
Conference call
If you have an active call and a call on hold at the same time, you can select »Join calls« to enable all of you to make a conference call.
Private call
If you have joined all calls and want to have a private conversation with one of the callers, select «Private». The other calls will be put on hold.
Transfer call 1
If you have an active call and a call on hold, you can connect the two by selecting »Transfer« call. In that way, the two parties can talk together while you withdraw from the conversation.
Record conversation
You can record an ongoing conversation by selecting »Record call«.
The name (if the entry is stored in your address or one of your phone books) or the phone number of the other party will be displayed.
Facts & Tips
• The status of the call determines which menu items are visible and available for you to select.
- You also have the option of calling a number in your address or phone book during conversation by pressing
▼ and select the entry you want to call.
- You also have the option of sending an SMS message during a conversation by pressing ▲ enter the List menu.
- Please be aware that you can only have one call on hold at a time.
• A conference call can be made between 6 different callers including yourself.
Further information
Get an overview of the keypad functions and the display symbols on your phone.
Keypad functions
Function keys with text line in display
The left-hand function key turns your phone on and off. When the phone is on, the function of these keys varies, depending on whether you are in standby or menu mode. The text line at the bottom of the display will inform you of the current function of each key at any time.
Arrow key up/down
Used to scroll through menus, address and phone books, lists, messages, events, etc.
Voice mail key
Press for one second to get quick access to your voice mail (only if the number is stored by you or your network operator).
International numbers
Press for one second to insert a "+" before international phone numbers. The key is also used to shift between lower and upper case during text entry.
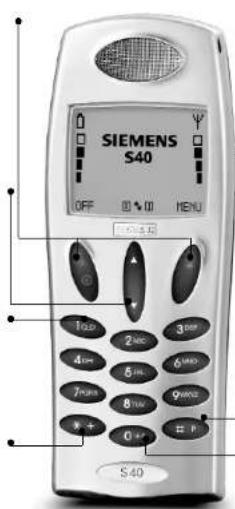
- Side key
Has the same functions as the arrow keys. In addition, the side key is used for controlling the volume level during conversation, shifting between different editor modes, accessing the WAP browser menu, moving frequencies and octaves in the Composer, and quick scrolling through address and phone book entries.
• Extension numbers and prefix numbers
Press for one second to insert a pause "P" between the main number and the extension number.
Press for two seconds to insert a "?" for each varying digit in a prefix phone number (for storing in your phone book.
Latest outgoing call
Press for one second and the call is made automatically (only if you have activated speed dial).
Display symbols

Battery level
The more bars displayed, the better the battery capacity. See page 7 for more information.

Battery low
Your battery needs recharging. The percentage tells you how much capacity you have left.

Signal strength
The more signal bars dis played, the better the radio connection.

List menu

Address and phone book entries
The individual entries have different identification symbols.

Address book entry

Phone book entry

Group folder for address book entries

Scrolling
Arrows mean that there are more functions which you can access by scrolling up or down.
Calling indicators

Incoming call

Incoming tax

Incoming data call

Missed calls
The digit indicates how many calls you have missed.

Caller access
The Caller access feature is activated.
Message indicators

New SMS message

New voice mail

Unread message
On: There are still unread messages. Flashing: The memory is full.

SMS message in inbox

Call diversion
On: All calls to your mobile phone are diverted to another telephone number. Flashing: The status of your call diverts is unknown.
Event indicators

Occurring/Missed event
git indicates how many you have missed.

Recurring event

Event occurs today
WAP connection indicators

Ongoing data call
Network available

Network not available

Microphone off

Volume level
Indicates volume level when adjusting. Ringing tone off

All tones off
Indicates that all tones have been disabled.

Calculator
List of arithmetic operators in the calculator menu.
Text input symbols

Alphanumeric grid mode

Alphanumeric wheel mode

T9 text input mode

Numeric mode

Caps lock indicator

Upper case indicator
Display and keypad backlight
The backlight switches on automatically when you press a key. In standby mode, the light will automatically switch off if no key is pressed for 10 seconds or more.
Technical specifications
This product uses frequency bands whose use is harmonized within the European Community area. This product is intended to be connected to the Pan-European GSM public telecommunications network.
• GSM900 Class 4 (2 Watts)
Frequency range
880-960 MHz
• GSM1800 Class 1 (1 Watt)
Frequency range
1710-1880 Mhz
• GSM1900 Class 1 (1 Watt)
Frequency range
1850-1990 Mhz
Weight:
97 g
Size:
112×44×22mm
Operating voltage:
3.7V
Power consumption:
Max. 650 mAh
Operating temperature:
10° +55° calcius
Standby time:
Up to 260 hours
Talk time:
Up to 360 minutes
Licenses:
T9 Text Input ^® is a registered trademark of Tegic Communications.
T9 is licensed under one or more of the following U.S. Patents: 5,818,437, 5,953,541, 5,187,480, 5,945,928, 6,011,554 and additional patents are pending worldwide.
Your WAP browser is licensed from:


Any attempt to modify, translate, reverse-engineer, de-compile or disassemble any part of the Phone.Com Software is prohibited.
Declaration of Conformity
Vwc.
Siemens Mobile Phones A/S
Industrivej 30
DK 9490 Pandrup
Denmark
declare under sole responsibility that the product:
Siemens S40
manufactured by
Flextronics International Denmark A/S
Industrivej 30
DK-9490 Pandrup
Denmark
to which this declaration relates, is in conformity with the following standards and/or other normative documents:
• EN 301 419-1
• EN 301 419 2
Draft EN 301 511
• EN 60 950
• ETS 300 342-1
• ES 59 005 (following the provisions of EC Council Recommendation 1999/519/EEC)
We hereby declare that tests have been conducted, test results evaluated and that the above named product is in conformity with the essential requirements of Directive 1999/5/FFC.
The conformity assessment procedure referred to in Article 10(5) and detailed in Annex V of Directive 1989/5/EEC has been followed with the involvement of the Notified Body:
BABT
Claremont House
34 Molesey Road
Walton-on-Thames
KT 12 480
United Kingdom
Identification mark: 0168
The technical documentation relevant to the above equipment will be held at
Siemens Mobile Phones A/S
Industrivej 3D
DK-9490 Pandrup
Denmark
Pandrup, October 16, 2000

Oluf Kristensen Manfred Heier
Regulatory Affairs Managing Director
Further information
81
Accessories
Original
Siemens accessories

- Car Kit Comfort Plus
- Car Charger
- Data Cable
• Li-Ion 650 mAh Battery - Travel Charger
- Desktop Charger
- Headset with PTT
See the enclosed accessory folder
for more detailed information.
You can buy original Siemens
accessories at
http://www.my-siemens.com
You can also order by phone:
France 01 70 200 006
Ireland 18 90 260 760
Sweden 087 526 527
United Kingdom 020 77 441 447
Also in countries marked with an
astrisk * (see last inner page of the cover) you can call the phone number shown.

Index
| Address book 14 | Charge | 59 | Delete events | 31, 65 | Getting started 5 | Language | Move an entry | 24 | |||
| Adjust contrast | 56 | Call waiting | 48 | Dictating machine | 29 | Graphics 56 | - Keypad | 64 | Mulling the microphone | 70 | |
| Alarm (events) | 30 | Caller access | 58 | Disabling all tones | 10, 54 | Greeting 56 | - Phone | 56 | |||
| Answered calls | 22 | Calling | 9 | Display date | 65 | Go to date 32 | -T9 text input | 64 | Network password | 66 | |
| Answering a call | 9 | Calling Line ID (CLI) | 17 | Display symbols | 76 | Groups 26 | Last number redial | 10 | Network selection 50 | ||
| Any key answer | 59 | Calling name presentation | 49 | Display texts | 10 | Line lock | 68 | Network services | 46 | ||
| Applications (SAT) | 20 | Car kit | 56 | Display time | 65 | Handsfree (Car kit & headset) 56 | Link, Go to | 34 | Notwork types 50 | ||
| Automatic rocial | 59 | Change group | 24 | Diverting calls | 46 | Holding a call 70 | Line selection 60 | ||||
| Change PIN code | 66 | Drafts | 38 | Home clock, Go to 34 | List menu | 19 | Options during conversation | 70 | |||
| Backlight | 56, 77 | Charge battery | 7 | Dropping a hold call | 70 | Outbox | 38 | ||||
| Barring calls | 48 | Clock 65 | Dropping an active call | 70 | Immediate SMS messages 37 | Making a call | 9 | Outgoing calls | 22 | ||
| Barred dialling 67 | Closed user group 49 | Duration of last call | 59 | Important safety instructions 4 | Maximum call charge | 59 | Outgoing call ID | 58 | |||
| Barred numbers | 16 | Composer | 52 | Duration of total calls | 59 | Inbox 37 | Memos | 29 | Own numbers | 15 | |
| Battery | 6 | Conference calls | 70 | Information numbers 15 | Message setup | 61 | Own ringing tone | 52 | |||
| Battery indicator | 7 | Confirmation | 62 | Edit an old message | 38 | Insert SIM card 8 | - Broadcast | 62 | Owner ID | 57 | |
| Bookmarks | 35 | Continuing calls | 70 | Edit an entry | 23 | Internal antenna 9 | - SMS | 61 | |||
| Broadcast setup | 62 | Contrast | 56 | Emergency calls | 8, 10 | International calls | 9, 74 | - Text input | 64 | Phone book editing | 23 |
| Broadcast tone | 52 | Conversation menu | 69 | Encryption indication 67 | IrDA | 33, 39, 56 | - WAP browser | 63 | Phone books | 15 | |
| Broadcasts | 42 | Copy an entry | 24 | Events | 31 | Messages | 37 | Phone setup | 56 | ||
| Business card | 33 | Country selection | 50 | Exit the WAP browser | 35 | Joining calls | 70 | - Broadcasts | 42 | PIN code | 66 |
| Create new group | 25 | Extension numbers | 75 | - Favourites | 42 | PIN2 code | 66 | ||||
| Calculator | 28 | Currency/Call charge | 59 | Keypad 12 | - SMS | 37 | Plain numbers 15 | ||||
| Calendar 30 | Factory settings, tones | 55 | Keypad alphabet | 64 | - Voice mail | 42 | Postpone an event | 31 | |||
| Call back | 49 | Data/fax transmission | 60 | Favourite messages | 42 | Keypad lock | 10, 68 | Message tone | 52 | Preferred list | 50 |
| Call barring | 48 | Date and time | 65 | Fax/data transmission | 60 | Keypad lock code | 68 | Microphone on/off | 70 | Prefix telephone numbers | 16 |
| Call deflection 49 | Delete a group 26 | Find an entry | 16 | Key tone 54 | Missed calls | 22 | Private calls | 70 | |||
| Call divert | 46 | Delete a message | 37 | Fixed dialling | 67 | Missed events | 32 | Profile setup (WAP) | 63 | ||
| Call setup | 58 | Delete an entry | 24 | Fixed numbers 15 | PUK code | 66 |
Index
Index
PUK2 code 66
Putting a call on hold 70
Quick scrolling 17
Reading a message 37
Broadcast 42
SMS 37
Recording a conversation 30, 71
Recurring event 30
Redialling a number 10, 59
Remaining call charge 59
Remove charger 7
Remove event automatically 65
Remove from group 26
Rename a group 25
Reply path 62
Reset phone memory 18
Reset timers & charge 59
Ringing tone
Roaming 48
[Non-Text]
SAT (Applications) 20
Security 66
Select language
Keypad
Phone 56
T9 text input 64
Selection of network 50
Selection of network type 50
Send business card 33
Send message as SMS 39
Send message via IrDA 39
Sending a new message 38
Sent items 38
Service centre (SMS)
Service numbers 15
Set date 65
Set time 65
Set start/end of day
Setup menu 43
Show timer & credit 59
Show week 32
Signal diode 56
Signature 62
Silent mode 10,54
SIM card 8
SIM lock 66
Sorting of messages 62
Speed dial 58
Status 27
Store an entry 14, 15
Switching between calls 70
Time and charge 59
Time and date 65
Tones 52
Transferring calls 71
Trembler 54
T9 text input 40
Unit price 59
Using your keypad 12
USSD 58
Voice mail 42
View contents of a group 25
View entries in address or
phone books 23
View events 30
Volume control 9
WAP | Wireless Application
Protocol 34
WAP card 34
WAP deck 34
Welcome greeting 56
Who is calling 17
[Non-Text]
[Non-Text]
[Non-Text]
- Menu overview
- List menu
- Address and phone book entries
- - Setup menu
- Network selection
- Phone setup
- Call setup
- Message setup
- Calendar setup
- Security
- Body Worn Operation
- Siemens service
- Internet
- Facts & Tips
- Important safety instructions
- Cardiac pacemakers:
- Battery and charging
- Insert battery
- Charge battery
- Remove charger
- SIM card
- Insert SIM card
- Calling
- Making a call
- Answering a call
- Getting started
- Redialling a number
- Silent mode
- Keypad lock
- Set clock
- Address and phone books
- Text input
- Using the keypad
- ABC wheel mode
- ABC grid mode
- mode
- mode
- Address book
- Storing information in your address book
- Phone books
- Storing an entry
- Plain numbers
- Fixed numbers
- Own numbers
- Service numbers
- Information numbers
- Barred numbers
- Prefix phone numbers
- Finding an entry in your address and phone books
- Both address and phone books
- Address book only
- Phone books only
- Reset phone memory
- General
- Applications (SAT) T
- Outgoing calls
- Answered calls
- Missed calls
- Status
- Calculator
- Dictating machine
- Calendar
- Missed events
- IrDA operation
- WAP browser
- Messages
- Call lists
- First
- Direct access to the list of missed calls
- Options in call lists
- Address and phone book editing
- Add entry
- View entries
- View entries (continued)
- Groups
- Create new group
- Options in groups
- Groups (continued)
- - Add to group:
- First First
- Key Operation
- Quick survey
- Being notified of an event
- Postponing an event
- IrDA operationMissed events
- Browser Menu
- Activating the WAP browser
- Navigating with the WAP browser
- Go to link
- Go to previous card or deck Press »BACK«.
- Go to Home deck
- Exit the browser
- Using the WAP browser menu
- Reload
- Home
- Bookmarks
- Mark site
- About Phone.Com
- Advanced
- Options with your messages
- - Delete it
- - Send as SMS
- - Send via IrDA
- T9 4 text input feature
- Typing words not found in the T9 linguistic database
- Adding words to the
- T9 linguistic database
- Writing compound words
- Different T9 languages
- Disabling the T9 feature
- Broadcasts
- Broadcasts are
- Voice mail
- Some networks
- Setup menu
- Network services
- Tones setup
- Call divert
- Different options of call divert
- Register your call divert
- Teleservice type
- Divert delay
- Number
- Deactivation/activation
- Call barring
- Different options for call barring
- Activate your call barring
- Call waiting
- Call back
- Calling name presentation (CNAP)
- Call deflection
- Closed user group
- Selection mode
- Set preferred list
- Country selection
- Network types
- Ringing tone
- Message tone
- Broadcast tone
- Composer
- Display indications:
- Special side key functions:
- Create melody (Continued)
- - Play back speed: Choose
- Delete
- Key tone
- Trembler
- Factory settings
- Key tone: Off
- Language
- IrDA
- Backlight
- Handsfree (Car kit & headset)
- Greeting
- Signal diode
- Graphics
- Owner ID
- Outgoing call ID
- Speed dial
- Caller access
- Auto redial
- Any key answer
- Time and charge
- Call types (fax/data)
- Line selection
- Send SMS setup
- Send SMS setup (Continued)
- Broadcast setup
- Sorting
- Text input setup
- PIN code
- Change PIN2
- SIM lock
- Network password
- Encryption indication
- Fixed dialling
- Barred dialling
- Line lock
- Conversation menu
- Microphone on/off
- Hold a call
- Continue a call
- Switch between calls
- Drop active call
- Drop held call
- Conference call
- Private call
- Transfer call 1
- Record conversation
- Further information
- Keypad functions
- Function keys with text line in display
- Arrow key up/down
- Voice mail key
- International numbers
- - Side key
- • Extension numbers and prefix numbers
- Latest outgoing call
- Display symbols
- Battery level
- Battery low
- Signal strength
- Address book entry
- Phone book entry
- Group folder for address book entries
- Scrolling
- Calling indicators
- Incoming call
- Incoming tax
- Incoming data call
- Message indicators
- New SMS message
- New voice mail
- Unread message
- SMS message in inbox
- Call diversion
- Event indicators
- Occurring/Missed event
- Recurring event
- Event occurs today
- WAP connection indicators
- Ongoing data call
- Network available
- Network not available
- Microphone off
- Volume level
- All tones off
- Text input symbols
- Alphanumeric grid mode
- Alphanumeric wheel mode
- T9 text input mode
- Numeric mode
- Caps lock indicator
- Upper case indicator
- Display and keypad backlight
- Technical specifications
- Weight:
- Size:
- Operating voltage:
- Operating temperature:
- Standby time:
- Talk time:
- Licenses:
- Declaration of Conformity
- Siemens Mobile Phones A/S
- Siemens S40
- BABT
- Oluf Kristensen Manfred Heier
- Accessories
- Original
- Siemens accessories
- http://www.my-siemens.com
- Index
Brand : SIEMENS
Model : S40
Category : Hi-Fi