
FAST 840-PPP - Router SAGEM - Free user manual and instructions
Find the device manual for free FAST 840-PPP SAGEM in PDF.


| Product Type | ADSL2+ Router with 4-Port Ethernet Switch |
| Dimensions (W x D x H) | 180 x 120 x 35 mm |
| Weight | 300 g |
| Power Supply | 12V DC, 1A via external adapter |
| ADSL Standards | ADSL2+, ANSI T1.413, ITU G.992.1/2/3/5 |
| Routing Protocols | NAT, DHCP, PPTP, L2TP, PPPoE, Static IP |
| Firewall Features | SPI, DoS protection, IP/Port filtering, MAC filtering |
| LAN Ports | 4 x 10/100 Mbps Auto-MDIX |
| WAN Ports | 1 x RJ11 (ADSL line) |
| Wireless | None (wired only) |
| Management | Web interface (HTTP), Telnet, SNMP |
| LED Indicators | Power, ADSL, Ethernet (4), Internet |
| Operating Temperature | 0°C to 40°C |
| Humidity | 10% to 85% non-condensing |
| Certifications | CE, FCC, RoHS |
| Maintenance | Clean with dry cloth; do not use liquids or solvents |
| Safety Precautions | Place in well-ventilated area; avoid water and heat sources |
| Spare Parts | Power adapter, RJ11 cable, Ethernet cable (available from Sagem support) |
| Reparability | User-replaceable power adapter; internal components not serviceable by user |
| General Information | Brand: Sagem, Model: FAST 840-PPP, Category: Router, Year: ~2005 |
Frequently Asked Questions - FAST 840-PPP SAGEM
User questions about FAST 840-PPP SAGEM
0 question about this device. Answer the ones you know or ask your own.
Ask a new question about this device
Download the instructions for your Router in PDF format for free! Find your manual FAST 840-PPP - SAGEM and take your electronic device back in hand. On this page are published all the documents necessary for the use of your device. FAST 840-PPP by SAGEM.
USER MANUAL FAST 840-PPP SAGEM
Sagem Communication closely follows all technological changes and is continually striving to improve its products for the benefit of its customers. It therefore reserves the right to change its documentation accordingly without notice.
All the trade marks mentioned in this guide are registered by their respective owners:
- SAGEM F@st™ is a registered trade mark of. Sagem Communication,
- Windows ^TM and Internet Explorer ^TM are registered trade marks of Microsoft Corporation,
- Apple® and Mac®OS are registered trade marks of Apple Computer Incorporation.
- SAGEM is a registered trade mark of SAFRAN group.
Contents
Contents 0-1 and 0-2
1. Introduction 1-1
1.1 Overview 1-3
1.2 System requirements 1-5
2. Connecting the SAGEM F@st™ 800 / 840 2-1
2.1 Connecting the SAGEM F@st™ 800 / 840 modem 2-2
2.1.1 Connecting the SAGEM F@st™ 800 2-2
2.1.2 Connecting the SAGEM F@st™ 840 2-4
3. Installation in Microsoft Windows®3-1
3.1 Installing the SAGEM F@st ™ 800 / 840 3-2
3.2 Connecting / Disconnecting to / from the Internet 3-4
3.2.1 Connecting to the Internet 3-4
3.2.2 Disconnecting from the Internet 3-5
3.3 Status information for the SAGEM F@st ^TM 800 / 840 modem 3-6
3.3.1 Checking installation of the SAGEM F@st ™ 800 / 840 3-6
3.3.2 "Diagnostics" tools 3-7
3.4 Uninstalling the SAGEM F@st ^TM 800 / 840 3-9
4. Installation in Mac OS 8.6 or Mac OS 9.x 4-1
4.1 Installing the SAGEM F@st ^TM 800 / 840 4-2
4.2 Connecting / Disconnecting to / from the Internet 4-4
4.2.1 Connecting to the Internet 4-4
4.2.2 Disconnecting from the Internet 4-5
4.3 Status information for the SAGEM F@st ^TM 800 / 840 modem 4-6
4.3.1 Checking installation of the SAGEM F@st ™ 800 / 840 4-6
4.3.2 "Diagnostics" tools 4-8
4.3.2.1 "Operation" screen 4-9
4.3.2.2 "Statistics" screen 4-11
4.3.2.3 "Configuration" screen 4-12
4.4 Uninstalling the SAGEM F@st ™ 800 / 840 4-14
5. Installation in Mac OS X 5-1
5.1 Installing the SAGEM F@st ™ 800 / 840 5-2
5.2 Connecting / Disconnecting to/from the Internet 5-4
5.2.1 Connecting to the Internet 5-4
5.2.2 Disconnecting from the Internet 5-9
5.3 Status of the SAGEM F@st ™ 800 / 840 modem 5-10
5.3.1 Checking installation of the SAGEM F@st ™ 800 / 840 5-10
5.3.2 "Diagnostics" tools 5-11
5.4 Uninstalling the SAGEM F@st ^TM 800 / 840 5-12
A. Appendix A - SAGEM F@st™ 800 / 840 troubleshooting A-1
A.1 Front panel LEDs A-2
A.1.1 "ADSL" LED blinking A-2
A.1.2 "ADSL" and "PWR" LEDs off A-3
A.1.3 "ADSL" LED off and "PWR" LED on A-3
A.1.4 "ADSL" LED on steady and "PWR" LED on A-3
B. Appendix B Safety instructions B-1
B.1 Safety instructions B-2
C. Appendix C Technical Specifications C-1
C.1 Equipment specifications C-2
C.2 Software specifications C-4
C.3 PC and Mac compatibility C-4
D. Appendix D Glossary D-1
E. Appendix E Environment E-1
E.1 E 2002/96/CE (EEEW) directive, related to environment preservation E-2
1. Introduction
This chapter : ➤ Gives an overview of the SAGEM F@st ™ 800 / 840 modem § 1.1
➢ Sets out the system requirements § 1.2
Notice

Warning icon, used in this guide

Information icon, used in this guide
Safety instructions
Before making any connections, refer to the safety instructions in Appendix A of this User Guide.
1.1 Overview
natural_image
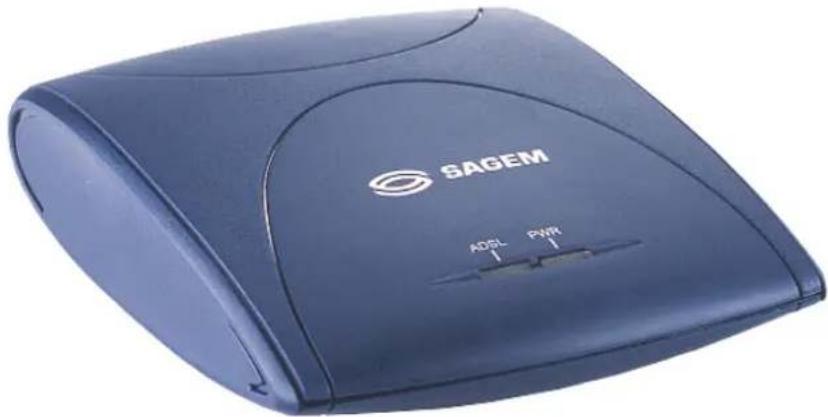
Blue BAGEM device with AC/DC ports and control buttons (no visible text beyond branding)The SAGEM ADSL modem exists in two models :
The SAGEM F@st™ 800,
The SAGEM F@st™ 840.
The SAGEM F@st™ 800 modem is designed for Internet connection by the switched analog telephonic network (PSTN)
The SAGEM F@st™ 840 modem is designed for Internet connection by the integrated service digital network (ISDN).
In the next sections of this User Guide, we will use the general term SAGEM F@st™ 800/840 to designate these two modems. However, we will notify you of notable differences every time it will be necessary.
The SAGEM F@st™ 800 / 840 is an ADSL over ISDN modem used to browse the Internet with ease at speeds of up to 8 Mbit/s. The modem's purpose is to transmit data between a terminal (PC or Mac) connected by a USB interface and an Internet Access Provider (IAP), via an ADSL link.
The SAGEM F@st™ 800 / 840 supports the following encapsulations:
- PPPoA in VCMUX mode,
- PPPoA in LLC mode,
- PPPoE in VCMUX mode,
- PPPoE in LLC mode.
The modem has the advantage of being powered via the USB interface and therefore does not needs a main power unit or a power cable.
The SAGEM F@st™ 800 / 840 has the following two interfaces:
USB interface
➢ Remote network interface (ADSL)
1 - Introduction
Both interface ports are at the rear of the modem casing:
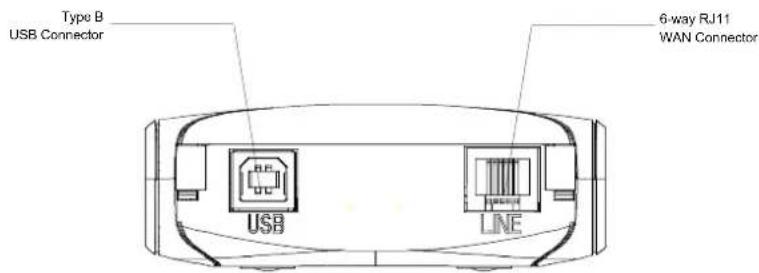
There are two LEDs on the casing, the lefthand one labeled "ADSL" and the righthand one "PWR" (see Appendix A - Troubleshooting, for interpreting the LEDs).
Contents of package
The package in which the SAGEM F@st™ 800 / 840 is supplied contains
One SAGEM F@st™ 800 / 840 modem
One Type A / Type B USB cable
One RJ11/RJ11 line cable (for SAGEM F@st™ 800 only)
One RJ45/RJ11 line cable (for SAGEM F@st™ 840 only)
One CD-ROM
▶ Two or three microfilters (optional).
Note: This is not an exhaustive list. The package may also contain safety instructions and other documents.
The CD-ROM contains:
- the Windows® and Macintosh drivers for the SAGEM F@st™ 800 / 840 modem.
- the SAGEM F@st™ 800 / 840 modem User Guide in pdf format.
- the Acrobat® Reader™ software for reading pdf files.
Incomplete or damaged contents
If the package you receive is incomplete or contains damaged items, contact the Internet Access Provider (IAP) supplying your SAGEM F@st™ 800 / 840 modem
1.2 System requirements
The SAGEM F@st™ 800 / 840 modem requires:
Telephone line
➢ Telephone line supporting ADSL transmission.
➢ Splitters compliant with ADSL standards (for use with a telephone or fax type analog terminal).
➢ Subscription to an Internet Access Provider (for connection to the Internet).
Computer with
The minimum configuration of your computer must be:
USB port
For Windows XP Pentium II, 400 MHz, 128 Mb RAM
For Windows 2000 Pentium II, 266 MHz, 64 Mb RAM
For Windows ME Pentium II, 233 MHz, 64 Mb RAM
For Windows 98FE Pentium II, 166 MHz, 32 Mb RAM
For Windows 98SE Pentium II, 166 MHz, 32 Mb RAM
For MacOS 8.6 - 9.x Power PC G3, 233 MHz, 64 Mb RAM
For MacOS X Power PC G3, 233 MHz, 128 Mb RAM
Free space on your computer
30 Mb
A WEB browser
Internet Access Provider
To access the Internet, the Internet Access Provider (IAP) must supply you:
one user name
one password
2. Connecting the SAGEM F@st™ 800 / 840
This chapter : ➤ Describes how to connect the SAGEM F@st™ 800 modem. § 2.1.1
➢ Describes how to connect the SAGEM F@st™ 840 modem. § 2.1.2
2.1 Connecting the SAGEM F@st™ 800 / 840 modem

Do not connect your modem to your computer with the USB cable before you have installed the drivers from the CD-ROM.
Only use the ADSL line cable supplied with your equipment for the connection to the remote network :
RJ11 / RJ11 for the SAGEM F@st ^TM 800 (PSTN),
RJ45 / RJ11 for the SAGEM F@st ^TM 840 (ISDN).
2.1.1 Connecting the SAGEM F@st™ 800
The connections must be made in the following order:
1 Connect one end of the line cable to the telephone socket
2 Connect the other end of the line cable to the LINE connector on the modem
If using an input splitter or microfilters, their outputs must also be fitted with RJ11 connectors. If not, contact your Operator for an adapter or a specific cable.
3 Connect the "flat" connector at one end of the USB cable to one of the type A USB ports on the computer (or on the HUB if appropriate), marked with the following symbol:

4 Connect the "square" connector at the other end of the USB cable to the USB connector on the rear panel of the modem, when prompted by the driver installation software.
Connecting analog terminals
Splitters are required when using the SAGEM F@st™ 800 and analog terminals on the same telephone line.
There are two types of configuration that use different splitters.
In most cases, your Operator will provide you with the information you need to choose between the two options.
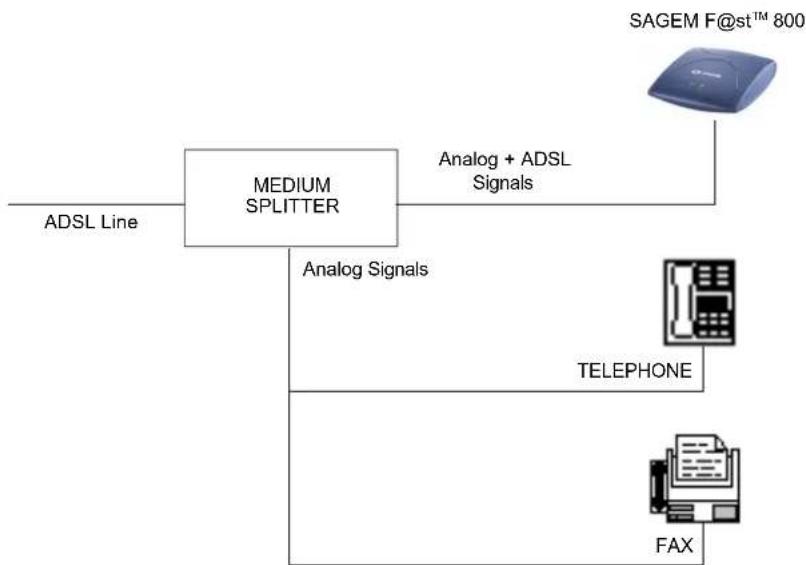
Configuration with input splitter
flowchart
graph TD
    A["ADSL Line"] --> B["MEDIUM SPLITTER"]
    B --> C["Analog Signals"]
    B --> D["Analog + ADSL Signals"]
    B --> E["TELEPHONE"]
    B --> F["FAX"]
    G["SAGEM F@st™ 800"] --> B
Your Operator will tell you how many analog terminals can be connected.
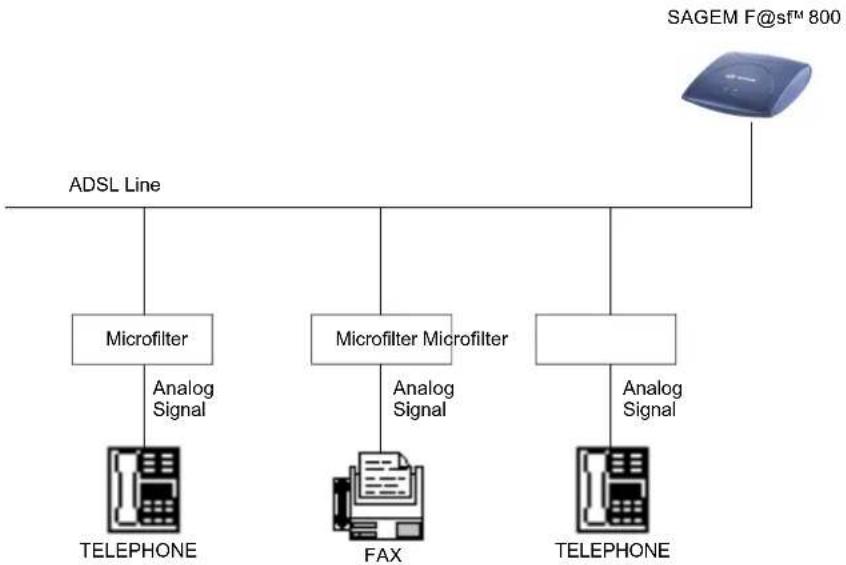
Configuration with distributed splitters (microfilters)
flowchart
graph TD
    A["SAGEM F@sfTM 800"] --> B["ADSL Line"]
    B --> C["Microfilter"]
    C --> D["TELEPHONE"]
    B --> E["Microfilter Microfilter"]
    E --> F["FAX"]
    B --> G["TELEPHONE"]
    C --> H["Analog Signal"]
    E --> I["Analog Signal"]
    G --> J["Analog Signal"]
The configuration with microfilters requires one microfilter for each analog terminal.
Your Operator will tell you how many analog terminals can be connected.
2.1.2 Connecting the SAGEM F@st™ 840
The connections must be made in the following order:
1 Connect the RJ45 connector of the cable to the input splitter
2 Connect the RJ11 connector of the cable to the LINE connector on the modem
If using an input splitter or a microfilter, their outputs must also be fitted with RJ45 connectors. If not, contact your Operator for an adapter or a specific cable.
3 Connect the "flat" connector at one end of the USB cable to one of the type A USB ports on the computer (or on the HUB if appropriate), marked with the following symbol:

4 Connect the "square" connector at the other end of the USB cable to the USB connector on the rear panel of the modem, when prompted by the driver installation software.
Connecting analog terminals
An input splitter is required when using the SAGEM F@st™ 840 and analog terminals on the same telephone line.
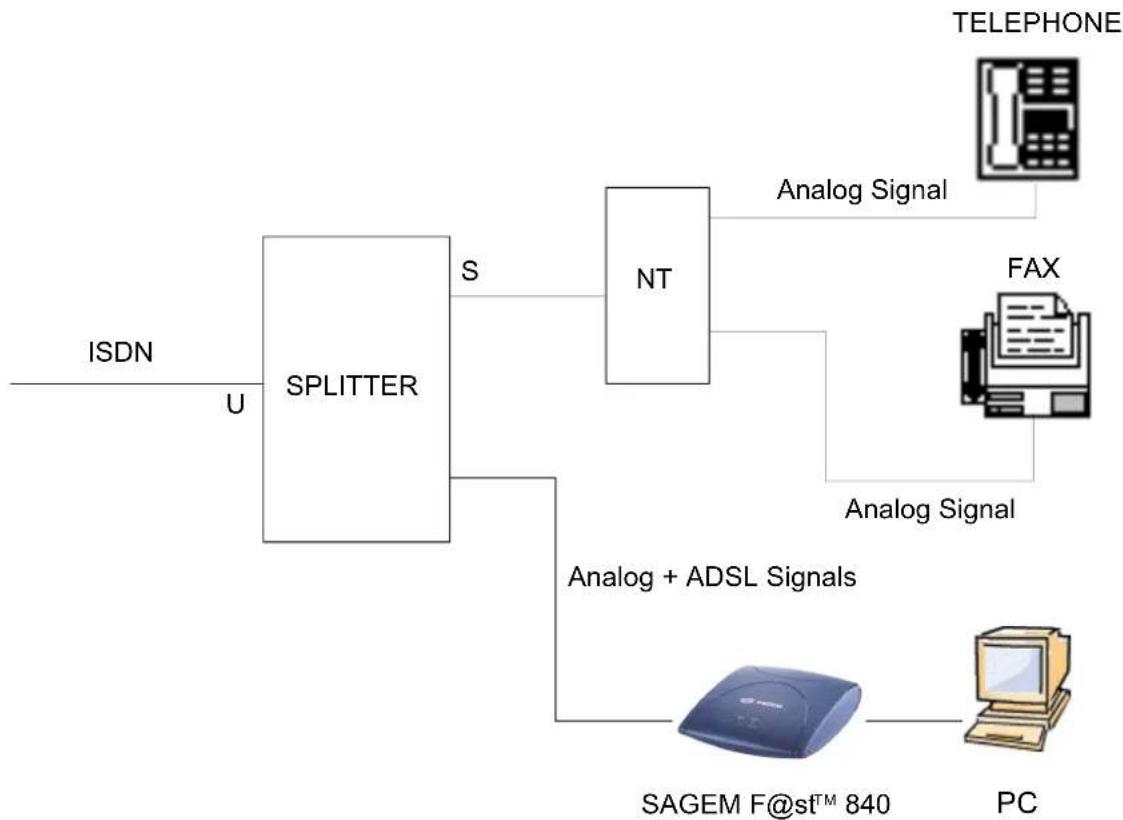
flowchart
graph TD
    A["ISDN"] --> B["SPLITTER"]
    B --> C["NT"]
    C --> D["TELEPHONE"]
    C --> E["FAX"]
    C --> F["Analog Signal"]
    B --> G["Analog + ADSL Signals"]
    G --> H["SAGEM F@st™ 840"]
    H --> I["PC"]
Your Operator will tell you how many analog terminals can be connected.
3. Installation in Microsoft Windows®
This chapter : ➤ Describes how to install the SAGEM F@st ™ 800 / 840. § 3.1
➢ Describes how to Connect/Disconnect to/from the Internet. § 3.2
➢ Describes the status information for the SAGEM F@st ^TM § 3.3 800 / 840.
➢ Describes how to uninstall the SAGEM F@st ^TM 800 / 840. § 3.4

The procedures for installing, checking installation and uninstalling described below have been carried out arbitrarily using Windows® XP. There may be slight differences when installing in other Windows® operating systems (98FE, 98SE, ME and 2000).
3.1 Installing the SAGEM F@st ™ 800 / 840
1 Insert the CD-ROM in the appropriate drive on your computer; the screen opposite appears. Click "Install the modem".
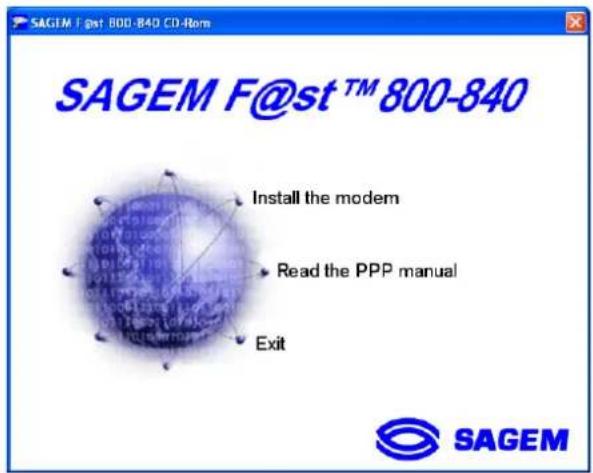
Note: If this screen does not appear, from the Start menu, select Run, and then enter: "
This allows your computer to run installation.
2 After the files have been copied to the hard disk in your computer, the following screen appears. Connect the USB cable to the SAGEM F@st™ 800 / 840 modem via the USB connector on the rear panel.
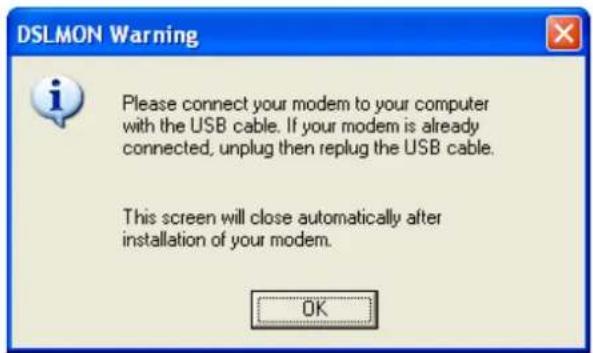
3 Windows® then proceeds to install the various software components. Please wait until an end-of-installation message appears or until Windows® prompts you to restart your computer.
Note: After connecting the modem, in Windows® 98 FE or SE, the operating system may ask for the Windows® installation CD-ROM. If so, insert this CD-ROM to continue installation.
4 When installation is finished, the following screen appears; click OK
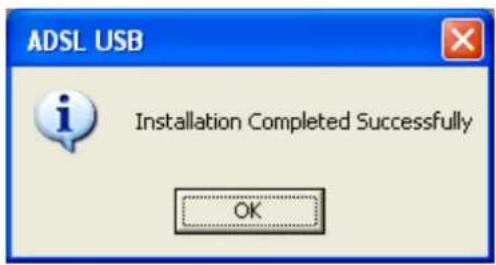
Note: Depending on the configuration of the PC and of the installed operating system, Windows® may also prompt you to restart your computer. This restart operation is necessary for your modem to operate correctly.
5 You can now check the installation of your modem by following the instructions in section 3.3.1.
3.2 Connecting / Disconnecting to / from the Internet
3.2.1 Connecting to the Internet
1 The installation software created an "ADSL" icon on the Windows® XP desktop. Double-click this icon.

ADSL
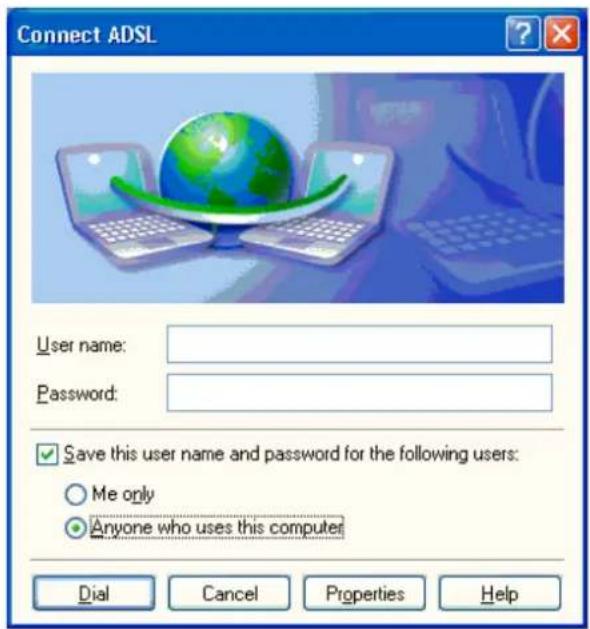
2 The connection screen appears.
3 Enter your "User name" and your "Password". These data are delivered to you by your Internet Access Provider (IAP).
4 Check the "Save this user name and password for the following users:" box and, if you want, select "Anyone who uses this computer".
5 Click "Dial" to set up the connection.
6 Open your navigator and access the Internet.
3.2.2 Disconnecting from the Internet
1 Double-click the "ADSL" icon on the Windows® desktop:
or
Click the connection icon in the Windows® task bar:

ADSL
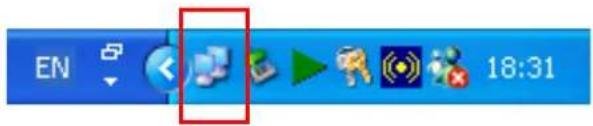
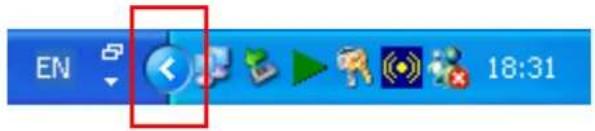
Note: Depending on how your PC is configured, the connection icon may be hidden in the status area. To reveal the icon, you need to click the left-pointing arrow indicated below:
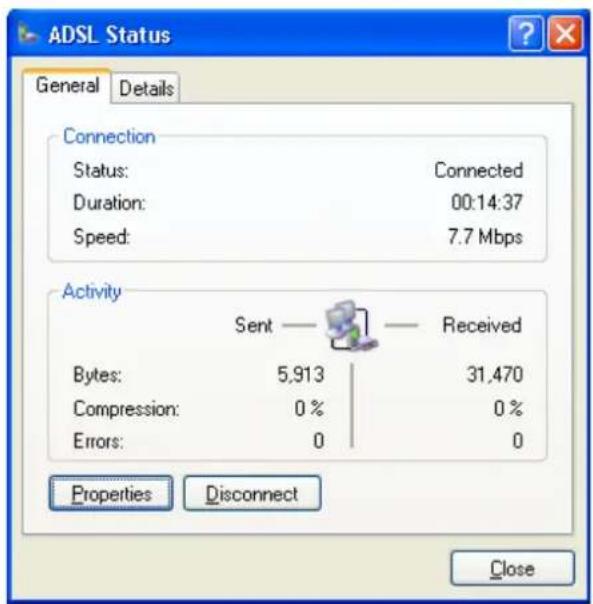
2 The following screen appears. Select the General tab, and then click "Disconnect".
3.3 Status information for the SAGEM F@st ™ 800 / 840 modem
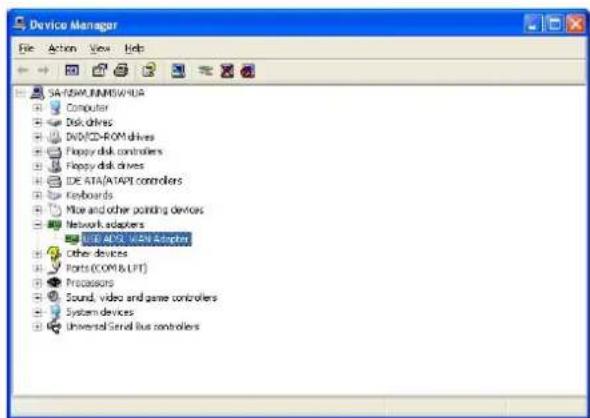
3.3.1 Checking installation of the SAGEM F@st ™ 800 / 840
1 From the Start menu, select Control Panel, and then double-click System; the System Properties window appears.
2 Select the Hardware tab, and then click the Device Manager... button in the Device Manager area..
3 The Device Manager screen appears. Click the PLUS (+) symbol beside the "Network adapters" folder to reveal the list of installed network adapters.
4 Check that the USB ADSL WAN Adapter is present.
3.3.2 "Diagnostics" tools

This application lets you monitor the status of the ADSL line.
1 A f t e r having installed the modem and connected it to the PC using its USB cable, the diagnostics icon shown opposite (framed) appears toward the right end of the task bar at the bottom of your desktop. Double-click the Diagnostics icon.
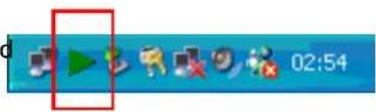
Note: If the Diagnostics icon does not appear in the task bar, from the Start menu select: All Programs / SAGEM F@st™ 800-840 / DSLMON.

This tool is run automatically when Windows® is started.
The color of the icon indicates the current status of the modem (see next table)
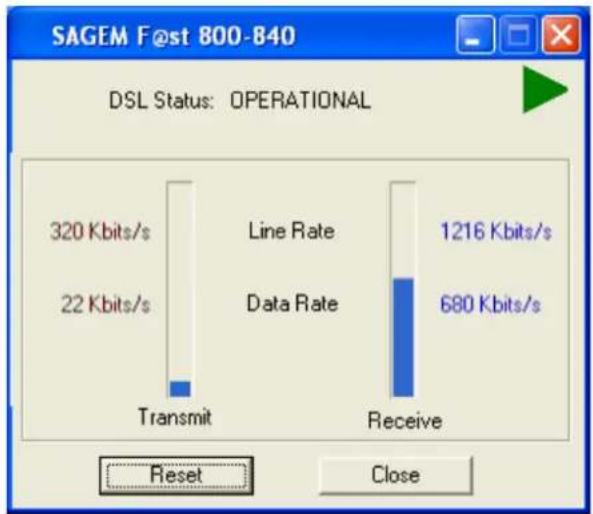
2 The following SAGEM F@st 800-840 diagnostics screen appears.
bar
SAGEM F@st 800-B40 DSL Status: OPERATIONAL | Category | Line Rate (Kbits/s) | Data Rate (Kbits/s) | | :--- | :--- | :--- | | Transmit | 320 | 22 | | Receive | 1216 | 680 | Reset | Close | DSL Status: OPERATIONALThe meanings of the various fields are explained in the table below.
| Field Description | |||
| DSL status | Not detected | The computer has not detected the presence of the modem on one of its dedicated USB ports | |
 | Green struck through red | ||
 | Red | Not synchronized | ADSL link not synchronized. A connection to the Internet cannot be set up |
 | Yellow | Synchronizing | The computer has detected the presence of the modem on one of its dedicated USB ports and ADSL synchronization is in progress |
 | Green | Operational | ADSL link synchronized. A connection to the Internet can be set up |
| Line RateTransmitData Rate | Upstream or outgoing rate (data sent to the Internet) negotiated by the ADSL link (in kbit/s)User's instantaneous transmit rate (in kbit/s) | ||
| Line RateReceiveData Rate | Downstream or incoming rate (data received from the Internet) negotiated by the ADSL link (in kbit/s)User's instantaneous receive rate (in kbit/s) | ||
Version information
Using the right mouse button, click the diagnostics icon or the title bar of the diagnostics screen, and then select "About...". The information screen opposite appears.
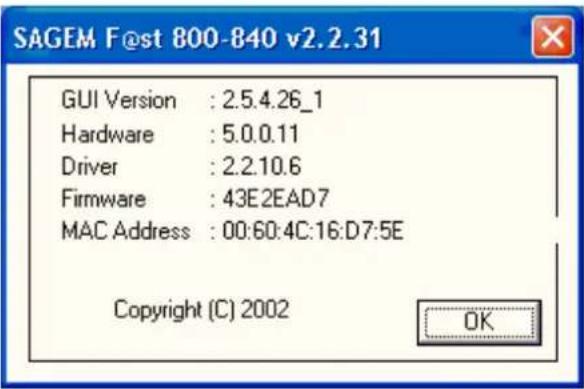
| SAGEM F@st 800-840 vx.y.z | Product version (v2.2.31 for example) |
| Field Description | |
| GUI Version | Displays the diagnostics application version |
| Hardware | Displays the chipset version |
| Driver | Displays the modem driver version |
| Firmware | Displays the version of the code in the modem |
3.4 Uninstalling the SAGEM F@st ™ 800 / 840
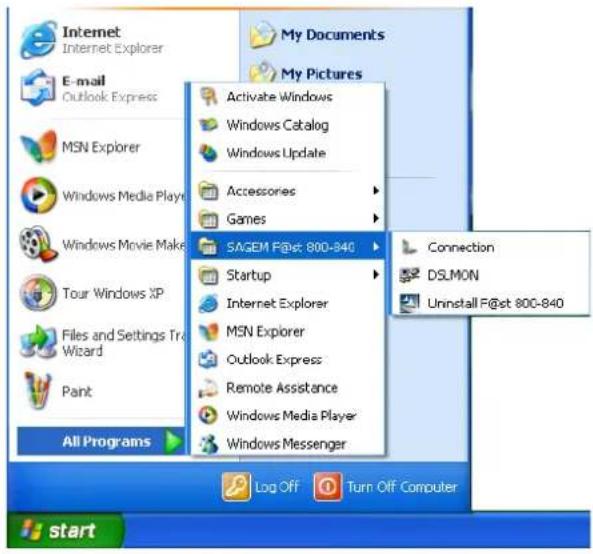
1 Using the left mouse button, click the Start menu in the task bar.
Select All programs (Programs in Windows® 98FE, 98SE, ME and 2000), SAGEM F@st 800-840, then Uninstall F@st 800-840
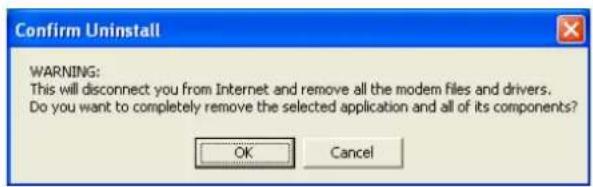
2 The following screen appears. Click OK
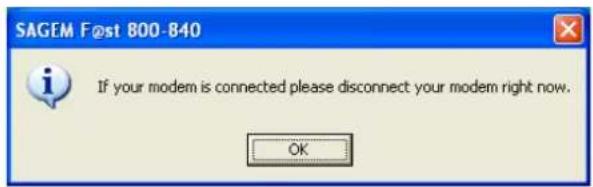
3 The following screen appears. Disconnect your modem if necessary and then click OK. Uninstallation is finished.
4. Installation in Mac OS 8.6 or Mac OS 9.x
This chapter : ➤ Describes how to install the SAGEM F@st ™ 800 / 840. § 4.1
➢ Describes how to Connect/Disconnect to/from the Internet. § 4.2
➢ Describes the status information for the SAGEM F@st ^TM § 4.3 800 / 840.
➢ Describes how to uninstall the SAGEM F@st ^TM 800 / 840. § 4.4
Note: The SAGEM F@st™ 800 / 840 can be installed in the following operation systems:
- MacOS 8.6,
- MacOS 9.x,
- MacOS X (10.1, 10.2 and 10.3),
- MacOS X 10.4 Tiger.

This chapter covers installation in the MacOS 8.6 or MacOS 9.x operation systems only.
The procedures for installing, Connecting / Disconnecting, checking installation and uninstalling described below have been carried out arbitrarily in MacOS 9.2.2.
4.1 Installing the SAGEM F@st ™ 800 / 840
1 Insert the CD-ROM in the appropriate drive on your computer; an icon appears in the desktop.
Double-click this icon to show the content of the CD-ROM.
2 Double-click on the OS 8.6 - 9.x icon to run the installing program.
3 The following installation screen appears.

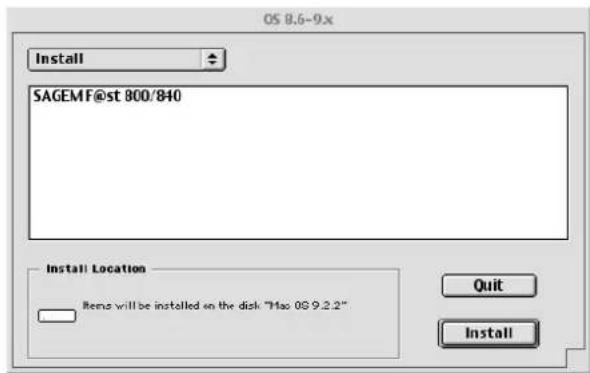
4 The screen opposite appears. Connect the USB cable to the SAGEM F@st™ 800 / 840 modem via the USB connector on the rear panel.

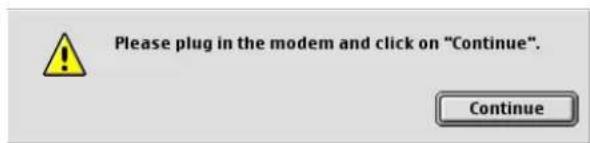
5 The installation is finished. The screen proposing that your computer is restarted appears.

6 A triangular icon indicating the modem status is created in the control strip.
7 At the end of the installation process, the diagnostics tool icon is created on the desktop

8 You can now check the installation of your modem by following the instructions in section 4.3.1.
4.2 Connecting / Disconnecting to / from the Internet
4.2.1 Connecting to the Internet
1 Click the Remote access icon on the control strip at the bottom of the desktop to display the list of commands associated with this icon.
Note: Before connection, the remote access status is Inactive.
Select Open Remote Access.
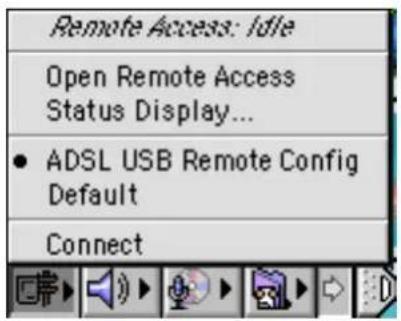
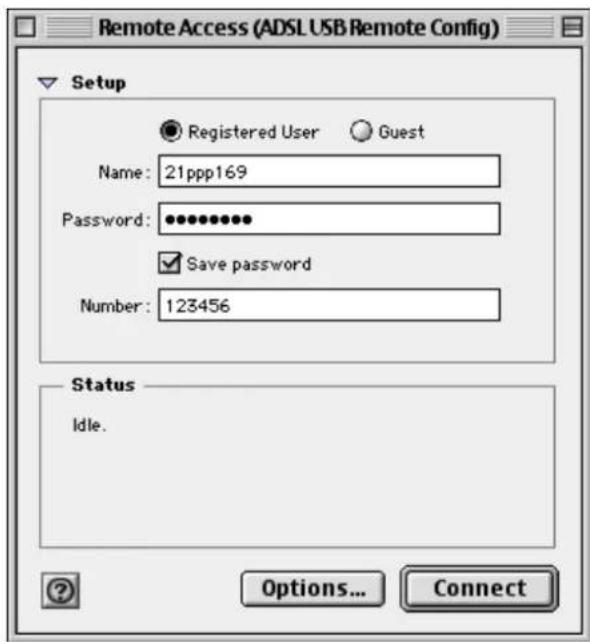
2 The Remote Access screen appears.
3 Enter your "User name" and your "Password". These data are delivered to you by your Internet Access Provider (IAP).
4 Check the "Save password" box for the following users if you want.
Note: The Number field must contain "123456"
5 Click Connect to set up the connection and access the Internet.
6 Open your navigator and surf the Internet.
Note: For the first connection, you must follow the procedure described above.
However, for subsequent connections, simply opening a browser will connect you directly to the remote network.
4.2.2 Disconnecting from the Internet
1 Click the Remote access icon on the control strip to display the list of commands associated with this icon.
Note: After connection, the remote access status is Connected.
Select Open Remote Access.
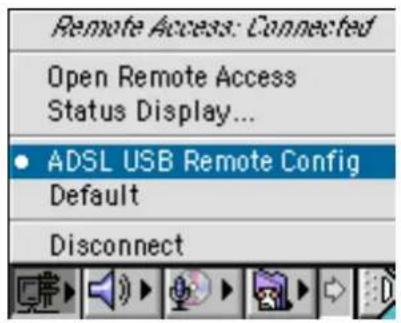
2 The Remote Access screen appears.
Click the Disconnect button to disconnect the modem.
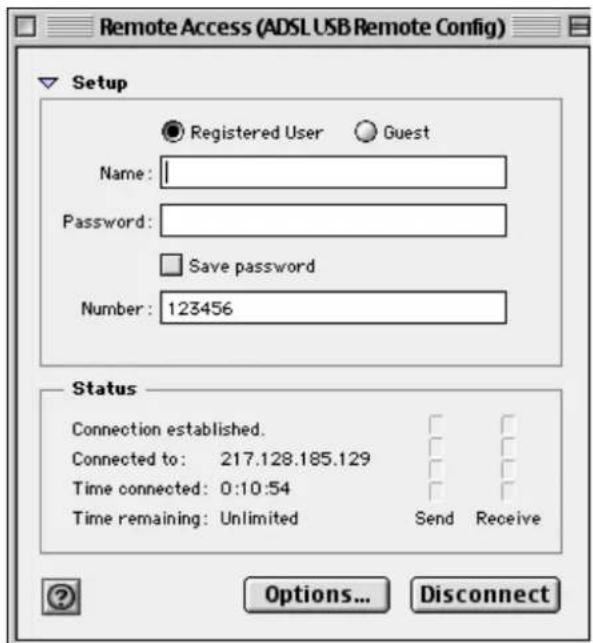
Note: To check that the procedure has been successful, select Open Remote Access; the Remote Access screen appears. This screen should display the "Inactive" status and the Connect button.
4.3 Status information for the SAGEM F@st ™ 800 / 840 modem
4.3.1 Checking installation of the SAGEM F@st ™ 800 / 840
1 Click the Remote Access icon on the control strip at the bottom of the desktop to display the list of commands associated with this icon.
Click Open Remote Access.
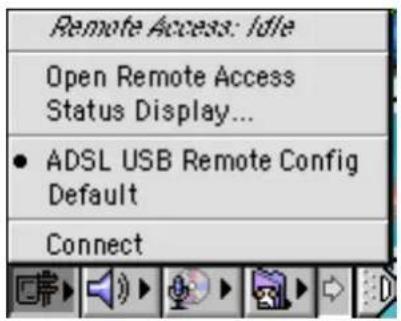
2 Click the Remote Access menu on the menu bar at the top of the desktop to display the list of commands associated with this menu.
Click the Modem command.
The "Connect via:" field should display: ADSL USB Modem.
In the Settings area, the "Modem" field should display the name of your modem: ADSL USB Modem
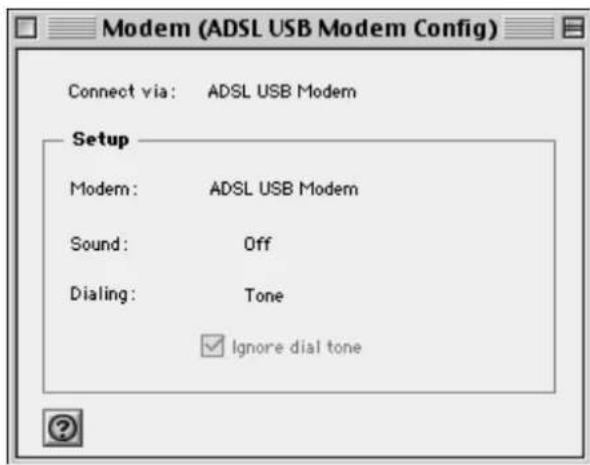
In the opposite case, to modify these greyed fields (disabled), proceed as follows:
- Select Remote Access / Modem in the menu bar; a window appears and the menu bar is modified.
- Select File / Configurations in the new menu bar ; a window appears.
- Select "Default" in the scroll list, then click "Make Active".
You can now select ADSL USB Modem in the drop-down lists of the Connect via and Modem fields.
3 Click the Remote Access menu on the menu bar at the top of the desktop to display the list of commands associated with this menu.
Click the TCP/IP command.
The "Connection" field should display: PPP.
In the Settings area, the "Configuration" field should display: Using PPP server
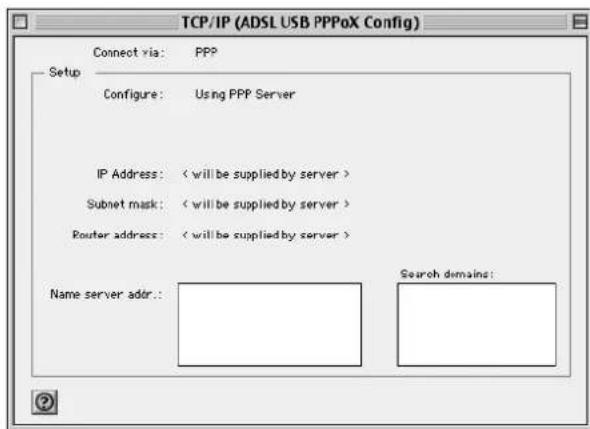
In the opposite case, to modify these greyed fields (disabled), proceed as follows:
- Select Remote Access / TCP/IP in the menu bar; a window appears and the menu bar is modified.
- Select File / Configurations in the new menu bar ; a window appears.
- Select "Default" in the scroll list, then click "Make Active".
You can now select PPP in the drop-down list of the Connect via field and Using PPP Server from the list of the Configure field.
4.3.2 "Diagnostics" tools

This application lets you monitor the status of the ADSL line and configure the SAGEM F@st™ 800 / 840 modem. This application is present on all Operation Systems listed at § 1.2 - System requirements.
1 A f t e r having installed the modem and connected it to the Macintosh using its USB cable, the diagnostics icon appears on your desktop.

Double-click the diagnostics tool icon, or
Click the triangular icon in the control strip.
2 The diagnostics screen appears.
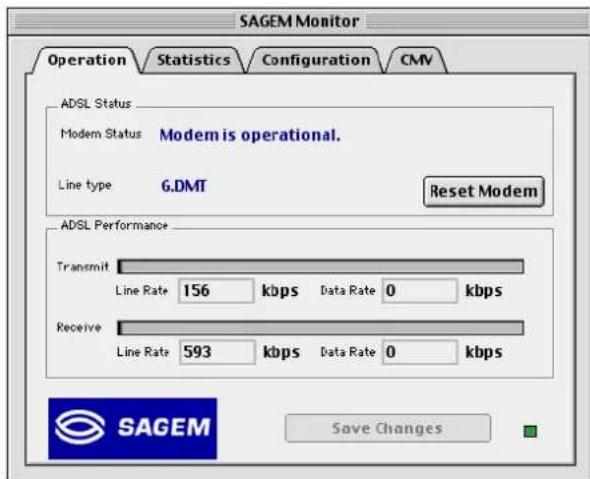

In each of the tabbed screens, the bottom right corner has a square icon, the background color of which indicates the status of the modem (see table below).
In each of the tabbed screens, toward the bottom center, there is a Save Changes button. When you make the change, this button becomes "active". Click this button to register the changes; a window prompting you to restart appears. Click OK, then restart your computer.
4.3.2.1 "Operation" screen
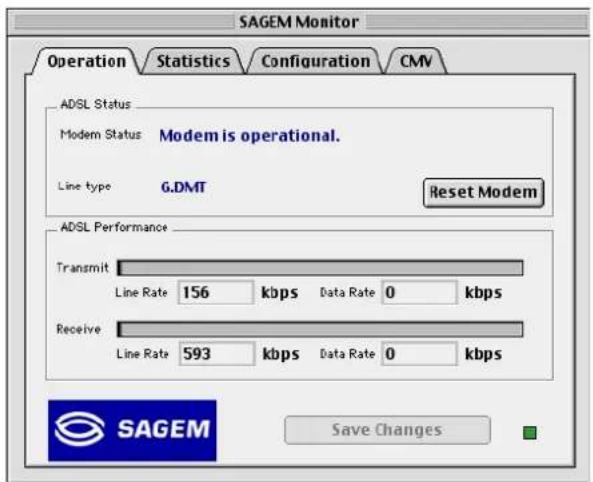
"ADSL status" area
| Field Description | |||
| Modem status | modem is unplugged from USB | The computer has not detected the presence of the modem on one of its dedicated USB ports | |
 | Black Modem is unplugged from USB | ||
 | Red The modem is waiting for the driver to respond | ADSL synchronization in progress | ADSL link not synchronized. A connection to the Internet cannot be set up |
 | Yellow ADSL synchronization in progress | The computer has detected the presence of the modem on one of its dedicated USB ports and ADSL synchronization is in progress | |
 | Green The modem is operational | ADSL link synchronized. A connection to the Internet can be set up | |
| Line type | G.DMTG.LITEANSI T1.413 | ||
| Reset Modem | Click this button to reset the modem. | ||
"ADSL performance" area
| Field Description | |
| Line Rate | Upstream or outgoing rate (data sent to the Internet) negotiated by the ADSL link (in kbit/s) |
| Transmit | |
| Data Rate | User's instantaneous transmit rate (in kbit/s) |
| Line Rate | Downstream or incoming rate (data coming from the Internet) negotiated by the ADSL link (in kbit/s) |
| Receive | |
| Data Rate | User's instantaneous receive rate (in kbit/s) |
4.3.2.2 "Statistics" screen
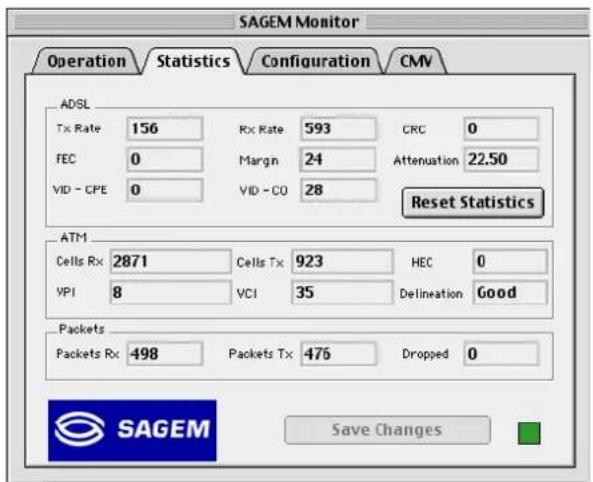
"ADSL" area
| Field Description | |
| Tx Rate | Indicates the upstream or outgoing rate (data sent to the Internet) negotiated by the ADSL link (in kbit/s) |
| FEC | Indicates the number of FEC errors since the connection was set up |
| VID - CPE | Indicates the VID (identifier) of the ADSL equipment at the network operator end (ATU-C) |
| Rx Rate | Indicates the downstream or incoming rate (data coming from the Internet) negotiated by the ADSL link (in kbit/s) |
| Margin | Indicates the current margin (in dB) |
| VID - CO | Indicates the VID of the ADSL equipment at the subscriber end (ATU-R) |
| CRC | Indicates the number of CRC errors since the start of transmission |
| Attenuation | Indicates the current attenuation (in dB) |
| Reset Statistics | This button updates all these counter statistics |
"ATM" area
| Field Description | |
| Cells Rx | Indicates the number of cells received since the connection was set up |
| VPI | Indicates the VPI used in the ATM cell header |
| Cells Tx | Indicates the number of cells transmitted since the connection was set up |
| VCI | Indicates the VCI used in the ATM cell header |
| HEC | Indicates the number of HEC errors since the connection was set up |
| Delineation | Indicates the ATM Delineation status (good or bad) |
"Packets" area
| Field Description | |
| Packets Rx | Indicates the number of AAL5 packets received since the connection was set up |
| Packets Tx | Indicates the number of AAL5 packets transmitted since the connection was set up |
| Lost | Indicates the number of AAL5 lost since the connection was set up |
4.3.2.3 "Configuration" screen
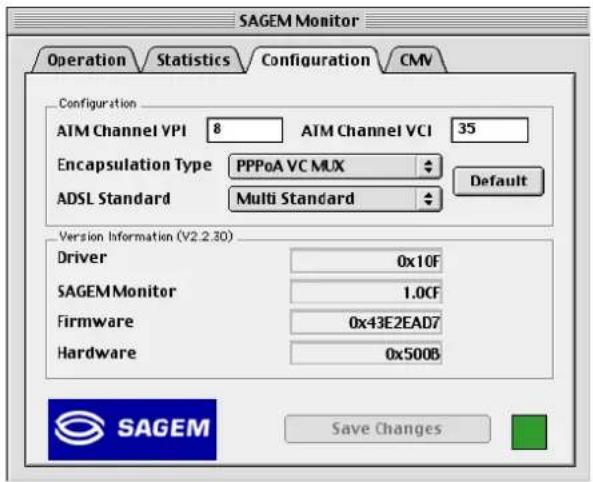
"Configuration" area
| Field Description | |
| ATM Channel VPI | Displays the value 8 by default. This field can be used to enter a VPI value between 0 and 255 |
| ATM Channel VCI | Displays the value 35 by default. This field can be used to enter a VCI value between 0 and 65535 |
| Encapsulation Type PP | PoA LLC |
| PPPoA VCMUX (Default value) | |
| PPPoE LLC | |
| PPPoE VCMUX | |
| ADSL Standard ANSI TI | 413 |
| G.DMT | |
| G.LITE | |
| Multi Standard (Default value) | |
"Version information" area
| Version Information (Vx.y.z) | Product version (V2.2.30, for example) |
| Field Description | |
| Driver | Displays the modem driver version |
| SAGEM Monitor | Displays the diagnostics application version |
| Firmware | Displays the version of the code in the modem |
| Hardware | Displays the chipset version |
4.4 Uninstalling the SAGEM F@st ™ 800 / 840
1 Insert the CD-ROM in the appropriate drive on your computer; an icon appears in the desktop.
Double-click this icon to show the content of the CD-ROM.
2 Double-click on the OS 8.6 - 9.x icon to run the Install / Uninstall program.
3 The following screen appears.
At top left, select Uninstall from the list Uninstall, and then at bottom right click Uninstall
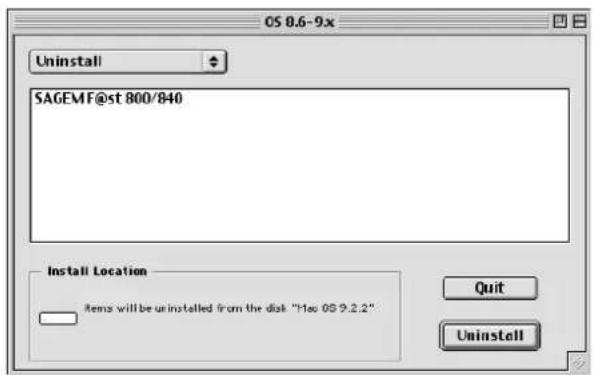
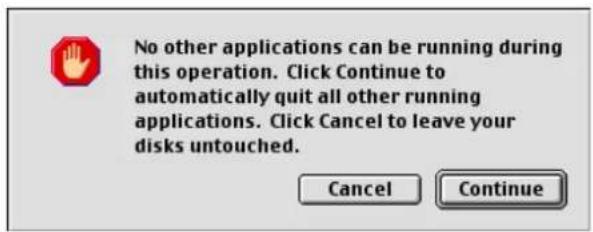
4 The following screen appears.
Click Continue
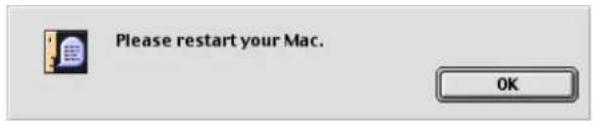
5 When the software has been uninstalled, you are prompted to restart your computer.
Click OK
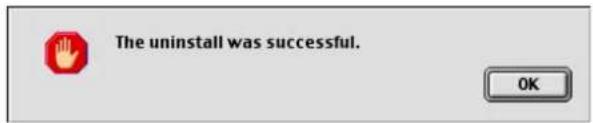
6 Uninstallation was successful.
Click OK
You can now restart your computer.
5. Installation in Mac OS X
This chapter : ➤ Describes how to install the SAGEM F@st ™ 800 / 840. § 5.1
➢ Describes how to Connect/Disconnect to/from the Internet. § 5.2
➢ Describes the status information for the SAGEM F@st ^TM § 5.3 800 / 840.
Describes how to uninstall the SAGEM F@st ^TM 800 / 840. § 5.4
Note: The SAGEM F@st™ 800 / 840 can be installed in the following operating systems:
- MacOS 8.6,
- MacOS 9.x,
- MacOS X (10.1, 10.2 and 10.3),
- Mac OS X 10.4 Tiger.

This chapter covers installation in the Mac OS X operating system only.
The procedures for installing, Connecting/Disconnecting, checking installation and uninstalling described below have been carried out arbitrarily in Mac OS X 10.4.1 version.
5.1 Installing the SAGEM F@st ™ 800 / 840
1 Insert the CD-ROM in the appropriate drive on your computer; an icon appears in the desktop.
Double-click this icon to show the content of the CD-ROM.
2 Double-click on the Mac OS X icon to run the installation program.
3 The installation screen opposite appears. Enter your name and "User" password or a phrase and click OK.
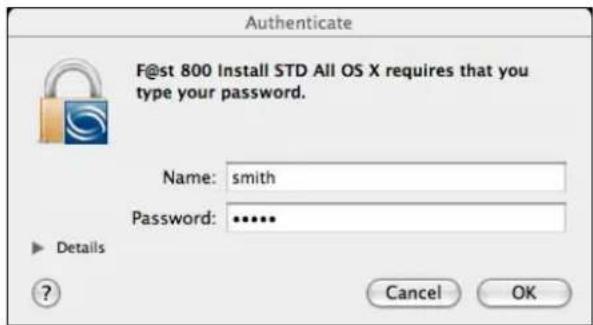
Note: You must have "Administrator" rights to install the modem.
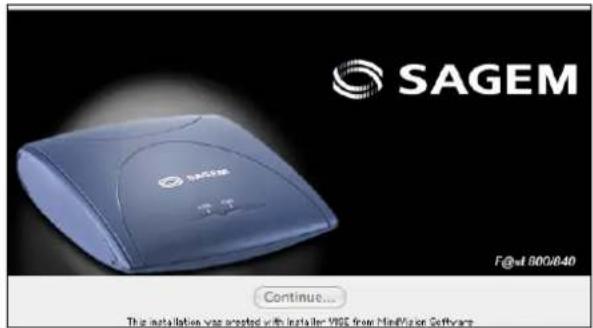
4 The installation home screen opposite appears.
Click Continue
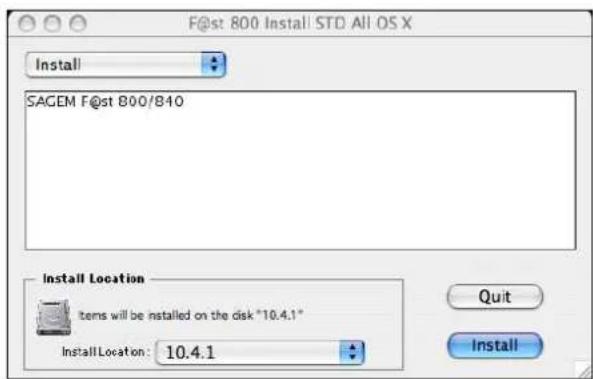
5 The screen opposite appears.
Click Install to continue installation
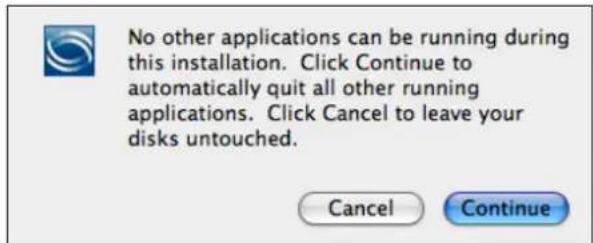
6 The installation software then displays a message indicating that a restart of your computer will be necessary to install the modem.
Continue to start installation.
7 When the files have been copied to the hard disk, the screen opposite appears.
Connect the USB cable to the SAGEM F@st™ 800 / 840 modem using the rear connector marked
USB, and then click Continue

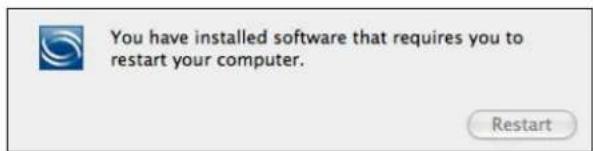
8 The installation is finished. The screen prompting you to restart your computer appears.
Click Restart
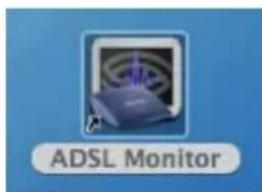
9 At the end of the installation process, the diagnostics tool icon is created on the desktop
10 You can now check the installation of your modem by following the instructions in section 5.3.1.
5.2 Connecting / Disconnecting to/from the Internet
5.2.1 Connecting to the Internet
This procedure is in two phases:
- Configuring access to the Internet (PPPoA or PPPoE) (steps 1 to 8),
- Connecting to the Internet proper (steps 9 and 10).
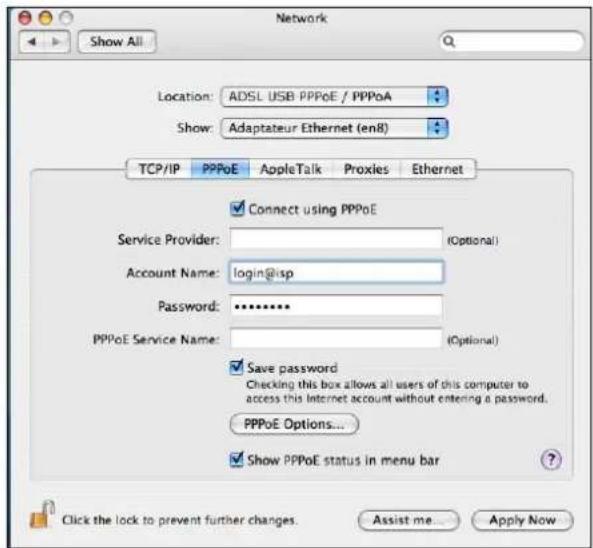
1 Click the Apple (Apple) menu in the menu bar, select the "System Preferences" submenu from the drop-down list, and click the "Network" icon.
The screen opposite appears.
The Location: field must dispay ADSL USB PPPoE / PPPoA
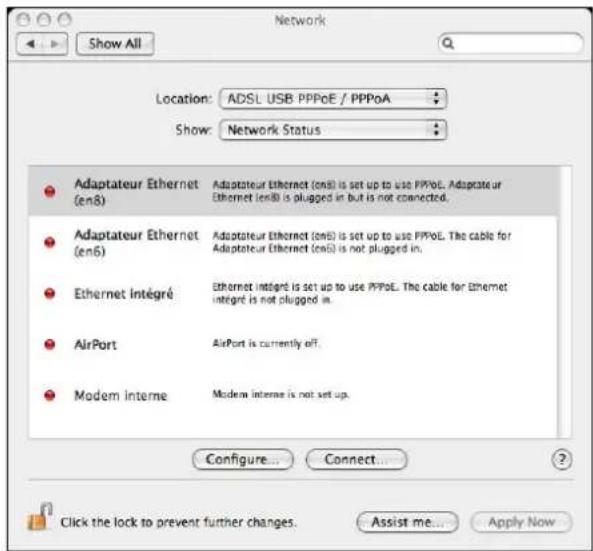

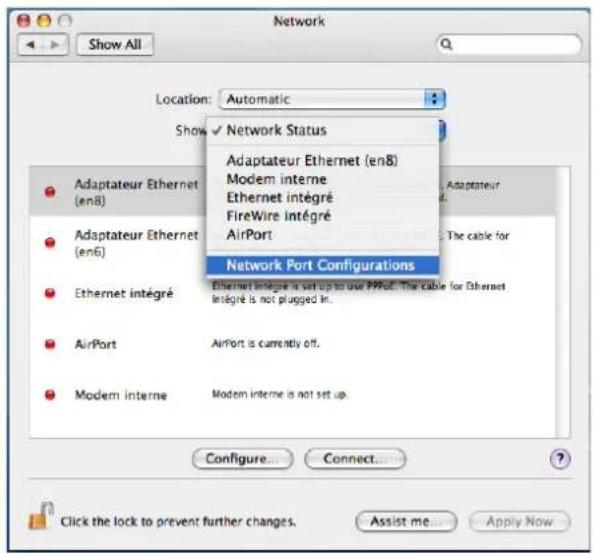
If "ADSL USB PPPoE / PPPoA" does not appear in the Location: field, you must imperatively carry out the following operations:
Click in the "Show:" field, the scroll list displays the sub-menus as shown on the opposite screen.
Select "Network Port Configurations" to open the next window.
Check that the new network interface "Adaptateur Ethernet (en x)" is well located in the first line in the network port configuration field.
If it is not the case, click the new adaptor, and by going on pressing the mouse, slide it in the first place.
If necessary, tick off the corresponding box, in the "On" column.
Click Apply Now, before going to step No 2.
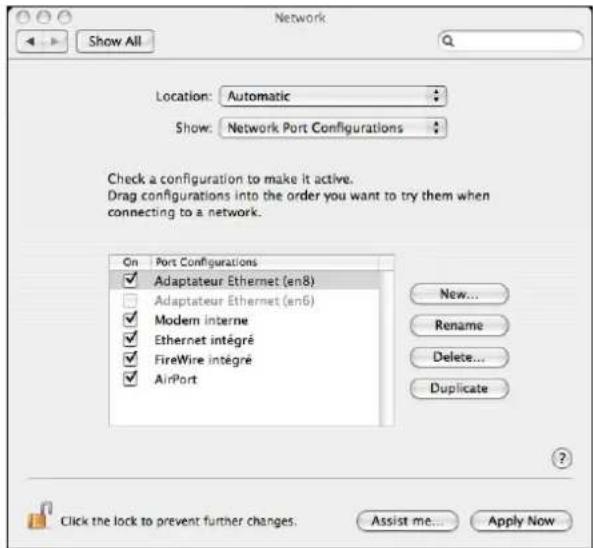
2 In the Show: field, select Ethernet Adaptor (enx) where "x" is a figure given to your new network adapter by the Operating System. The screen opposite appears
3 Select the PPPoE tab; the appropriate panel appears
4 Check the "Connect using PPPoE" box
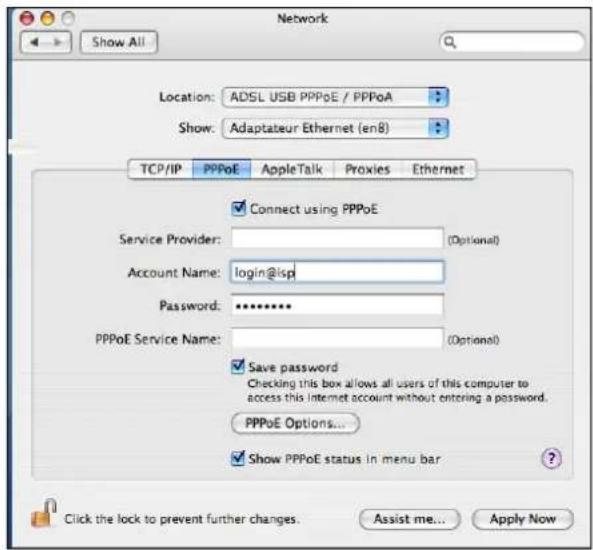
5 In the Name field, enter your "Account name"
6 Enter your "Password"
Note : Your "Account name" and "Password" are delivered to you by your Internet Service Provider (ISP).
7 If you wish,
Check the "Save password" box for subsequent users,
Check the "show PPPoE status in menu bar" box (advisable).
8 Click Apply Now for your entries to take effect.

When connecting for the first time, you must follow the procedure above. For subsequent connections, simply set up the Internet connection by following steps 9 and 10 below.
9 On the desktop, double-click the icon representing your Mac OS X hard disk. Open the Applications folder, and double-click the Internet Connect icon:

Internet Connect
(see note)
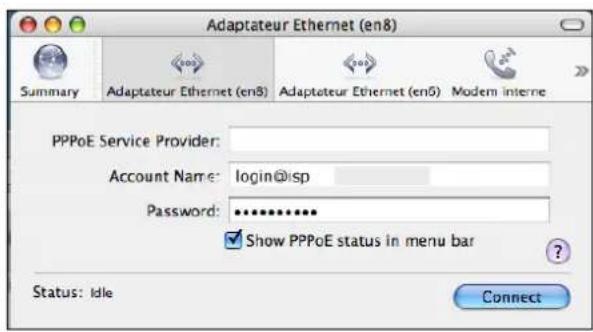
The screen opposite appears.
In the upper control strip, select Ethernet Adaptor (enx) related to your ADSL modem.
Check that the information in the "Account Name" and "Password" fields is correct.
Click Connect
to set up the
connection.
Note: If the connection is not set up, an incorrect Ethernet Adaptor, Name or Password may be the cause.
Note : In Mac OS 10.1, the connection icon is the next :
In Mac OS 10.2, the connection icon is the next :
In Mac OS 10.3, the connection icon is the next :

Internet Connect

Internet Connect

Internet Connect
10 Open your browser and access the Internet.

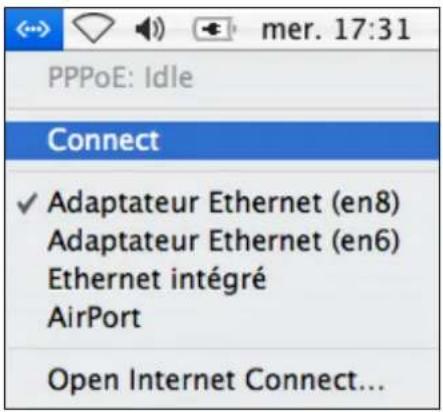
If you have checked the "Show PPPoE status in menu bar" box (see step 7), you can also do the following:
Click the connection icon in the menu bar.
Select Connect.
5.2.2 Disconnecting from the Internet
1 On the desktop, double-click the icon representing your Mac OS X hard disk. Open the Applications folder and then double-click the Internet Connect icon:

Internet Connect
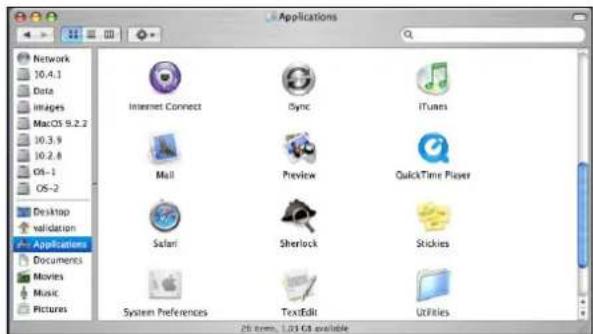
The screen opposite appears.
Click the
Disconnect button to
disconnect the modem
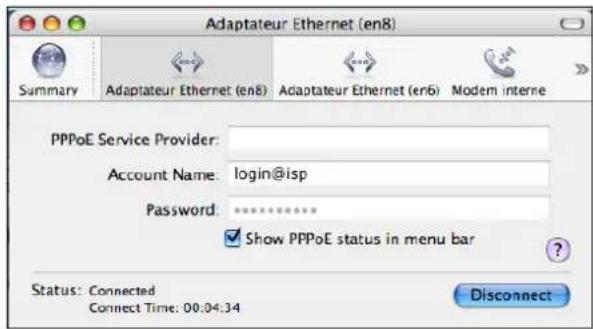
Note: To show that the procedure has been successful, this screen should show the "Idle" status and the Connect button.

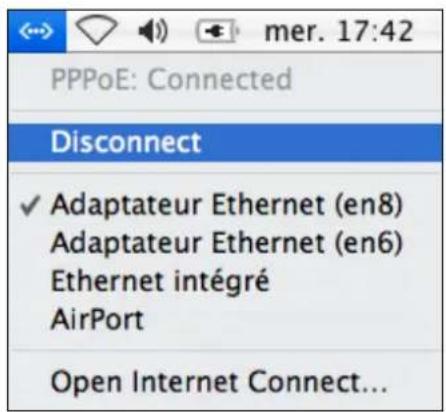
If you have checked the "Show PPPoE status in menu bar" box (see step 7), you can also do the following:
Click the connect icon in the menu bar.
Select Disconnect

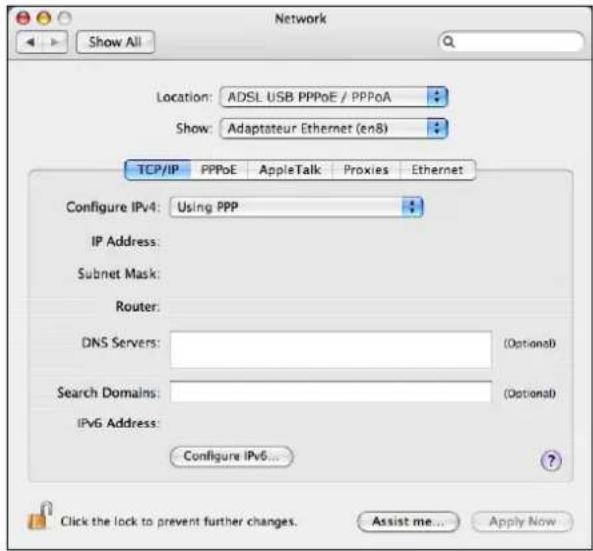
Click the Apple (Apple) menu in the menu bar, select "System Preferences" and then click the "Network" icon.
The screen opposite appears. The Location: field should show ADSL USB PPPoE / PPPoA, except in the case mentioned § 5.2.1-⚠ of step No1.
If the network port is well set, a different display is not prejudicial to the good running of the modem.
The Show: field should display "Ethernet adaptor (en x)", where "x" is a number assigned by the operating system.
If it is not the case, click in the Show: field and then select that adaptor in the scroll list.
Select the TCP/IP tab. In the panel, the Configure: field should show Using PPP
2 Select the PPPoE tab and the panel opposite appears.
Make sure that the "Connect using PPPoE" box is checked and that the "Name" and "Password" fields are completed.
5.3.2 "Diagnostics" tools

This application lets you monitor the status of the ADSL line and configure the SAGEM F@st™ 800 / 840. This application is present on all the operating systems listed in section 1.2 - System requirements.
The "ADSL Monitor" diagnostic tool was added to the "Applications" directory on your hard disk when the modem drivers were installed. You can access it directly by double-clicking the "ADSL Monitor" shortcut created on your desktop.
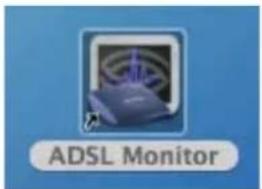
The functionalities of this tool are the same as described in section 4.3.2 for MacOS 8.6 and MacOS 9.x.
5.4 Uninstalling the SAGEM F@st ™ 800 / 840
1 Insert the CD-ROM in the appropriate drive on your computer; an icon appears in the desktop.
Double-click this icon to show the content of the CD-ROM.
2 Double-click on the Mac OS X icon to run the Install / Uninstall program.
3 The Authenticate screen opposite appears.
Enter your name and "User" password or a phrase and then click OK.
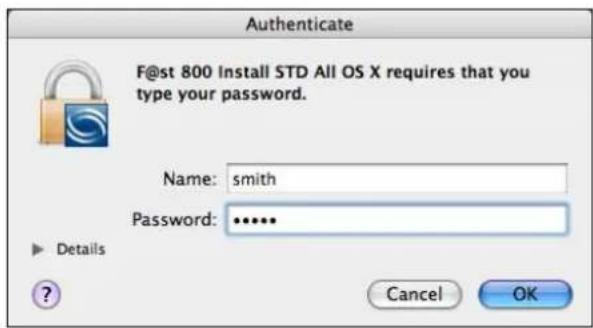
Note: You must have "Administrator" rights to uninstall the modem.
4 The Uninstallation home screen opposite appears.
Continue... Click
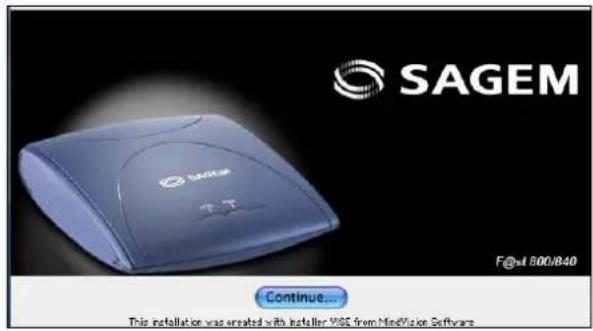
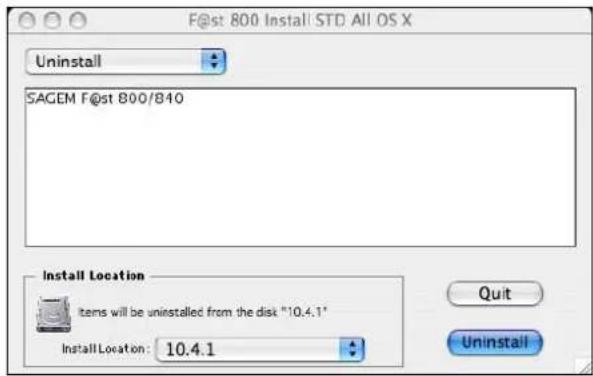
5 The screen opposite appears.
At top left, select Uninstall from the list.
Then at bottom right, click Uninstall
6 Uninstallation is complete.
Click OK

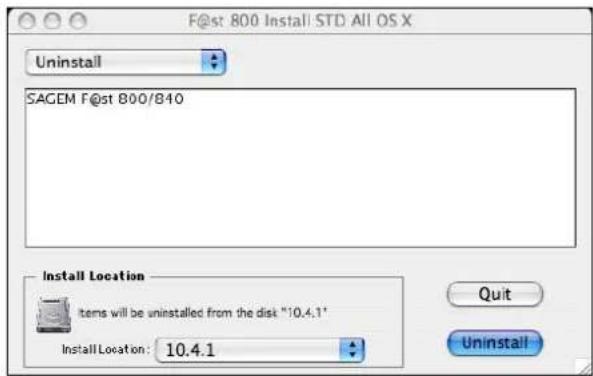
7 The screen opposite reappears.
Click Quit to close the uninstallation window.
You can now restart your computer.
A. Appendix A - SAGEM F@st™ 800 / 840 troubleshooting
This appendix is intended to help the user resolve the various fault conditions that may be encountered when installing or using the SAGEM F@st 800 / 840. The LEDs on the front of the modem are provided for this purpose.
A.1 Front panel LEDs
The front panel of the SAGEM F@st 800 / 840 modem has two supervision LEDs:
| Marking ADSL PWR | ||
| Assignment | Presence of WAN access Presence of power + USB | |
| Color | Green Green | |
| Continuously on | ADSL connection set up SAGEM F@st 800 / 840 powered up | |
| Off | ADSL connection not set up SAGEM F@st 800 / 840 not powered up or not detected on the USB bus of your computer (see section A.1.2) | |
| Flashing | ADSL connection being set up (see section A.1.1) | - |
A.1.1 "ADSL" LED blinking
This indicates that the SAGEM F@st™ 800 / 840 is attempting to connect to the remote connection DSLAM. The indicator remains in this state while the modem is not connected to an active ADSL line.
ADSL connection takes less than a minute after connection to the ADSL line.
If, after the connection time, the LED is still flashing:
- Check that the SAGEM F@st™ 800 / 840 is connected correctly to the ADSL line (either directly or via a splitter or microfilter).
- Check that the miniature RJ11 connector pins are not dirty or damaged.
- Check with your Internet Access Provider (IAP) that ADSL mode is definitely activated on the telephone line that you want to use.
- Disconnect and then reconnect the USB cable.
- Restart your computer (PC or Mac).
- Check with your Internet Access Provider (IAP) that the ADSL link provided on this line is compliant with one of the three transmission standards supported by the SAGEM F@st™ 800 / 840:
- ANSI T1.413 Issue 2 (for SAGEM F@st™ 800 only),
- G.992.1 (G.dmt),
- G.992.2 (G.lite).
A.1.2 "ADSL" and "PWR" LEDs off
➢ Check that the USB cable is connected correctly to your computer (or to a HUB).
Check that the drivers are correctly installed (refer to the modem status in Windows® (see section 3.3) or in Mac (according to your operation system, see section 4.3 or 5.3)).
Note: If your computer is connected to a HUB, disconnect all connected devices to isolate your modem.
If no further clue emerges enabling you to solve the problem:
Reinstall the modem in Windows® (see section 3.1) or in Mac (according to your operation system, see section 4.1 or 5.1).
A.1.3 "ADSL" LED off and "PWR" LED on
➢ Check that the line cable is connected correctly to your modem and to the telephone line.
➢ Check with your Internet Access Provider (IAP) that the ADSL service is definitely enabled on your telephone line.
A.1.4 "ADSL" LED on steady and "PWR" LED on
The modem is synchronized but the PPP link with your Internet Access Provider (IAP) is not set up. Check:
- that the PPP "user name" and "password" you have entered are those given to you by your Internet Access Provider (IAP).
- that the VPI / VCI parameters and encapsulation mode are similar to those of your Internet Access Provider (IAP). If not, contact your Internet Access Provider (IAP).
B. Appendix B
Safety instructions
B.1 Safety instructions

READ THE FOLLOWING INSTRUCTIONS CAREFULLY
Environment
The SAGEM F@st™ 800 / 840 must be installed and used inside a building (for desktop use).
The ambient temperature must not exceed 45^ C.
The SAGEM F@st™ 800 / 840 must not be exposed to strong sunlight or to a strong heat source.
The SAGEM F@st™ 800 / 840 must not be placed in an environment subject to significant steam condensation.
The SAGEM F@st™ 800 / 840 must not be exposed to water splashes.
The SAGEM F@st™ 800 / 840 must not be covered.
Maintenance
Do not open the casing. This action is reserved only for qualified personnel and only when approved by your operator.
- Cleaning: Do not use liquid or aerosol-based cleaning agents.
Power source
The modem is powered via the USB port on your PC. Check that the USB cable supplied with the hardware is not damaged (cable and plugs).
Safety levels
USB port SELV 1
LINE port TNV-3 ^2

Products bearing this symbol are compliant with EMC regulations and with the Low Voltage Directive published by the Commission of the European Communities (CEC).
CE declaration of conformity
Sagem Communication declares that the SAGEM F@st ^TM 800 / 840 product is compliant with the requirements of European directives 1995/5/CE and with the main requirements of directives 89/336/CEE dated 03/05/1989 and 73/23/CEE dated 19/02/1973.
The CE declaration of conformity for the SAGEM F@st ^TM 800 / 840 is made in the context of the R&TTE directive.
C. Appendix C
Technical Specifications
C.1 Equipment specifications
Mechanical
Dimensions Width 85 mm
Depth 105 mm
Thickness 32 mm
Weight 90 g
USB interface
Bit rate < 12 Mbit/s
Standard USB 1.1
Data Asynchronous
Transmission mode Bidirectional
Power consumption < 2.5 W
Connector USB - Type B socket
ADSL interface
Transmission code DMT
Standards supported T1.413 Issue 2 (for SAGEM F@st ^TM 800 only)
G.992.1 (G.DMT)
G.992.2 (G.Lite)
G.Handshake (Multimode)
Maximum upstream rate 896 kbit/s
Maximum downstream rate 8160 kbit/s
Latency Simple latency (fast or Interleaved)
Environmental specifications
Storage
Standard ETS 300 019-1-1, class T1.2
Temperature -25°C to +55°C
Relative humidity 10 to 100%
Transport
Standard ETS 300 019-1-2, class T2.3
Temperature -40°C to +70°C
Relative humidity 10 to 100%
Operation
Standard ETS 300 019-1-3, class T3.2
Temperature -5°C to +45°C
Relative humidity 5 to 85%
Pressure 84 hPa to 106 hPa (880 to 1060 mbar)
Solar radiation 700 W/m²
Mechanical environment
Transport Class T2.3
Operation Class T3.2
Physical/chemical environment
Transport Class T2.3
Operation Class T3.2
C.2 Software specifications
ATM
Signaling PVC
Adaptation layer AAL5
Number of VCs 1
OAM management OAM F4 and F5
Quality of service UBR
Encapsulation protocols
RFC 2364 (PPPoA) VCMUX or LLC
RFC 2516 (PPPoE) VCMUX or LLC
C.3 PC and Mac compatibility
PC
Windows® 98 FE
Windows® 98 SE
Windows® 2000
Windows® Millénium
Windows® XP
Mac
OS 8.6
| AAL5 | ATM Adaptation Layer type 5 |
| ADSL | Asymmetric Digital Subscriber Line. Telephone line with asymmetric rates (upstream rate: 32 to 896 kbit/s; downstream rate: 32 to 8160 kbit/s) |
| ARP | Address Resolution Protocol. Protocol used to determine an IP address from a Ethernet address |
| ATM | Asynchronous Transfer Mode |
| ATU-C | ADSL Termination Unit Central office end. This refers to ADSL equipment at the switching center end (of the network operator) |
| ATU-R | ADSL Termination Unit Remote terminal end. This refers to ADSL equipment (modem + splitter) installed at the subscriber's premises |
| CO | Central Office |
| CPE | Customer Premises Equipment (Terminal) |
| CRC | Cyclic Redundancy Check: Error detection method |
| DMT | Discrete Multi Tone: Transmission method using 256 carriers |
| DSLAM | Digital Subscriber Line Access Multiplexer |
| FEC | Forward Error Correction |
| HEC | ATM cell Header Error Control |
| ID | Identifier |
| ISDN | Integrated Service Digital Network |
| LAN | Local Area Network |
| LLC | Logical Link Control (Encapsulation with header) |
| MAC | Medium Address Control |
| NT | Network Terminal |
| OAM | Operation, Administration and Maintenance |
| PPP | Point to Point Protocol |
| PPPoA | PPP over ATM |
| PPPoE | PPP over Ethernet |
| PSTN | Public Switched Telephonic Network |
| RARP | Reverse Address Resolution Protocol. Protocol used to determine the physical address of a machine from its IP address |
| RFC | Request For Comments |
| RJ11 | Standard 6-way miniature connector |
| RJ45 | Standard 8-way miniature connector |
| UBR | Unspecified Bit Rate. Widely used service class |
| USB | Universal Serial Bus. This Bus supports a nominal bit rate of up to 12 Mbit/s |
| VC | Virtual Channel |
| VCI | Virtual Channel Identifier |
| VCMUX | Encapsulation (without header) |
| VID | Vendor ID |
| VP | Virtual Path |
| VPI | Virtual Path Identifier |
| WAN | Wide Area Network |
E. Appendix E
Environment
E.1 E 2002/96/CE (EEEW) directive, related to environment preservation
ENVIRONMENT
Preservation of the environment as part of a sustainable development logic is an essential concern of Sagem Communication.
Sagem Communication's aim is to operate systems safeguarding the environment and consequently it has decided to integrate environmental performance considerations in the life cycle of its products, from manufacturing to commissioning, use and disposal.

PACKAGING
The presence of the logo (green dot) means that a contribution is paid to an approved national organization to improve packaging recovery and recycling infrastructures.
To facilitate recycling, please respect the sorting rules set up locally for this kind of waste.
BATTERIES
If your product contains batteries, they must be disposed of at appropriate collection points.

THE PRODUCT
The crossed-out waste bin marked on the product means that the product belongs to the family of electrical and electronic equipment.
In this respect, the European regulations require you to dispose of it selectively:
- At sales points on purchasing similar equipment,
- At the collection points made available to you locally (drop-off center, selective collection, etc.).
In this way, you can participate in the re-use and upgrading of Electrical Electronic Equipment Waste, which can have an effect on the environment and health.
- Contents
- Introduction 1-1
- Connecting the SAGEM F@st™ 800 / 840 2-1
- Installation in Microsoft Windows®3-1
- Installation in Mac OS 8.6 or Mac OS 9.x 4-1
- Installation in Mac OS X 5-1
- Connecting / Disconnecting to/from the Internet 5-4
- Status of the SAGEM F@st ™ 800 / 840 modem 5-10
- Uninstalling the SAGEM F@st TM 800 / 840 5-12
- Appendix A - SAGEM F@st™ 800 / 840 troubleshooting A-1
- A.1 Front panel LEDs A-2
- Appendix B Safety instructions B-1
- B.1 Safety instructions B-2
- Appendix C Technical Specifications C-1
- Appendix D Glossary D-1
- Appendix E Environment E-1
- Introduction
- Notice
- Overview
- - Introduction
- Contents of package
- System requirements
- Telephone line
- Computer with
- USB port
- Free space on your computer
- A WEB browser
- Internet Access Provider
- Connecting the SAGEM F@st™ 800 / 840
- Connecting the SAGEM F@st™ 800 / 840 modem
- Connecting the SAGEM F@st™ 800
- Connecting analog terminals
- Connecting the SAGEM F@st™ 840
- Installation in Microsoft Windows®
- Installing the SAGEM F@st ™ 800 / 840
- Connecting / Disconnecting to / from the Internet
- Connecting to the Internet
- Disconnecting from the Internet
- Status information for the SAGEM F@st ™ 800 / 840 modem
- Checking installation of the SAGEM F@st ™ 800 / 840
- "Diagnostics" tools
- Version information
- Uninstalling the SAGEM F@st ™ 800 / 840
- Installation in Mac OS 8.6 or Mac OS 9.x
- Installing the SAGEM F@st ™ 800 / 840
- Connecting / Disconnecting to / from the Internet
- Connecting to the Internet
- Disconnecting from the Internet
- Status information for the SAGEM F@st ™ 800 / 840 modem
- Checking installation of the SAGEM F@st ™ 800 / 840
- "Diagnostics" tools
- "Operation" screen
- "ADSL status" area
- "Statistics" screen
- "Configuration" screen
- Uninstalling the SAGEM F@st ™ 800 / 840
- Installation in Mac OS X
- Installing the SAGEM F@st ™ 800 / 840
- Connecting / Disconnecting to/from the Internet
- Connecting to the Internet
- Disconnecting from the Internet
- "Diagnostics" tools
- Uninstalling the SAGEM F@st ™ 800 / 840
- Appendix A - SAGEM F@st™ 800 / 840 troubleshooting
- A.1 Front panel LEDs
- A.1.1 "ADSL" LED blinking
- A.1.2 "ADSL" and "PWR" LEDs off
- A.1.3 "ADSL" LED off and "PWR" LED on
- A.1.4 "ADSL" LED on steady and "PWR" LED on
- Appendix B
- Safety instructions
- B.1 Safety instructions
- READ THE FOLLOWING INSTRUCTIONS CAREFULLY
- Environment
- Maintenance
- Power source
- Safety levels
- CE declaration of conformity
- Appendix C
- Technical Specifications
- C.1 Equipment specifications
- Mechanical
- USB interface
- ADSL interface
- Environmental specifications
- Mechanical environment
- Physical/chemical environment
- C.2 Software specifications
- ATM
- Encapsulation protocols
- C.3 PC and Mac compatibility
- PC
- Mac
- Appendix E
- E.1 E 2002/96/CE (EEEW) directive, related to environment preservation
- PACKAGING
- BATTERIES
- THE PRODUCT
Brand : SAGEM
Model : FAST 840-PPP
Category : Router