
MP-390 - Mp3 player TEAC - Free user manual and instructions
Find the device manual for free MP-390 TEAC in PDF.


| Product Type | MP3 Player with Video, Photo, E-book, FM Radio, Voice Recording |
| Brand | Teac |
| Model | MP-390 |
| Dimensions | 79 mm x 46 mm x 12 mm |
| Weight | 52 g |
| Display | 2.0-inch TFT color screen |
| Storage Capacity | 1 GB, 2 GB, or 4 GB (built-in) |
| Expandable Storage | MicroSD card slot (supports up to 4 GB card) |
| Audio Formats | MP3 (8-320 kbps), WMA (32-384 kbps), DRM-WMA, DRM9 |
| Video Format | AVI (XviD) |
| Photo Format | JPEG (max resolution 3520 x 2816) |
| Recording Format | WAV (High: 16 kbps/16 kHz; General: 16 kbps/8 kHz) |
| Battery Type | Built-in rechargeable lithium-ion battery |
| Battery Life | Up to 8 hours (audio playback) |
| Charging Time | Approximately 3 hours via USB |
| FM Tuner | Yes, with FM recording and preset stations |
| Voice Recorder | Yes, built-in microphone |
| Speaker | Built-in speaker |
| USB Interface | USB 2.0 |
| Operating System Support | Windows 98/SE/Me/2000/XP/Vista (98 requires driver) |
| Signal-to-Noise Ratio | >90 dB |
| Accessories Included | Stereo earphones, USB cable, basic operation manual, user manual on CD, software CD |
Frequently Asked Questions - MP-390 TEAC
User questions about MP-390 TEAC
0 question about this device. Answer the ones you know or ask your own.
Ask a new question about this device
Download the instructions for your Mp3 player in PDF format for free! Find your manual MP-390 - TEAC and take your electronic device back in hand. On this page are published all the documents necessary for the use of your device. MP-390 by TEAC.
USER MANUAL MP-390 TEAC
To ensure the smooth handling of your warranty please write the serial number of your device into the box. In the case of warranty you are expected to send it together with a copy of your invoice to your nearest TEAC sales representative.
natural_image
Simple line drawing of a trash bin with two crossed lines and a solid black bar below (no text or symbols)Disposing of the Product
Your device should not be placed in municipal waste. Please check local regulations for disposal of electronic products.
- Changes in specifications and features may be made without notice or obligation.
● Copyright © 2007, TEAC Europe GmbH. All rights reserved. Edition: September 2007 - Company and product names provided herein are trademarks of their respective companies.
Content
Cautions 4
Notice 4
Key Features 5
System Requirements 5
Package Content 5
Before Using 6
Driver 6
Connect to a PC and download audio files....6
Removing the player from the PC safely 6
Charging the battery 7
Keys Description 8
Power On/Off 8
MicroSD Card Slot 9
Basic Operation 10
Playing Music....11
Enter the music mode 11
Folder navigation....11
Playing Videos....11
Viewing Photos....12
Reading E-book 12
Reading....12
Using bookmark....12
Browsing all files....13
Voice Recording....13
Record....13
Play recordings....13
Deleting File 14
FM Radio 14
Search Station 14
Save station 14
Listen to Station 15
Delete station....15
Record FM program 15
Playing Game 15
Customizing Settings....16
Convert and Play Video Files (Windows Vista coming soon) 18
Install the AVI Converter 18
Conversion....19
Firmware Upgrade (Windows Vista coming soon)....21
Installation of the Upgrade Tool 21
Upgrading the firmware 21
Converting Image File (Windows Vista coming soon)....23
Converting steps....23
Digital Rights Management File (DRM9) Protection 24
Troubleshooting....25
Technical Specifications 27
Warranty 28
Cautions
- Do not subject the device to severe impact or drop it from high position.
- Do not use the player in extreme hot or cold, dusty or damp field. Do not expose it to direct sunshine.
● Back up the data frequently in case of accident data loss. - Avoid using the player in strong magnetic field.
- Keep the device away from water or other liquids. In the event that water or other liquids enter the device, power off the product immediately, and clean the device.
- Do not use chemical solutions to clean the device in order to avoid corrosion. Clean it with a dry cloth.
- We are not responsible for damages or lost data caused by malfunction, misusing, repairing the device or battery replacement.
- Do not attempt to disassemble, repair or modify the product. This will invalidate guarantee.
- The design of the player or actual display may be different from what is shown in this manual. It should be subject to the actual display or design.
Notice
- Make sure all keys are enabled before operation. If they are locked, hold down the ▶II and VOL button to unlock them.
- Please charge the battery immediately when the display indicates low battery, or the device will be powered off automatically.
- Please disconnect the player from PC properly to avoid data loss.
- The transfer rate displayed on the PC may be different depending on the operating system. Exact transfer rate should be subject to the player's indication.
- When the recorded voice file is too large, the response of the device may be slow.
Key Features
- MP3&WMA player
- AVI video player
- JPEG image viewer
- Folder navigation
- Voice recorder
● FM tuner - FM encoding
● Removable storage device - MicroSD card slot
● Built-in rechargeable lithium-ion battery - Customized settings
● Built-in speaker
System Requirements
- Hardware:
IBM PC & Compatible PC, Notebook with USB interface - Operating System:
Windows98/SE, Windows Me, Windows2000/XP, Windows Vista
Package Content
Please check the package for the following items. If any one of them is missing, please contact the vendor:
- Main Unit
- Stereo earphones
- USB cable
● Basic Operation Manual - User Manual (on CD)
- CD with Software
Before Using
Driver
Windows2000/XP/ME/Vista
This player is plug & play for WIN2000/XP/ME/Vista OS.
Windows98/SE
For Windows98/SE, you are required to install a driver (available from TEAC by request) before connection.
Connect to a PC and download audio files
To connect the player with the PC for transferring files:
- Plug the larger end of the USB cable to the USB port of the PC, and plug the smaller end to the USB port of the player.
- When the “💡” icon appears at the right bottom of the PC screen, double click “My Computer” on the desktop, you see a removable disk which indicates the player. Just use the removable disk as a regular local disk, copying files from or to it.
Removing the player from the PC safely
For Windows2000/XP
- Left click the 📋 icon at the right hand corner of the taskbar.
- Click the pop-up mini-window with message of "Safely Remove the USB Mass Storage Device – Drive (X:, Y:)".
- When you are prompted to remove the device, pull out the player.
For Windows98
Please make sure the data transfer is completed before ging the MP3 player.
Charging the battery
The device has a rechargeable built-in lithium-ion battery. It is charged via USB connection. You are required to charge it when you use it for the first time. It takes about 3 hours to fully charge the battery.
To charge the battery, connect the larger end of the USB cable to the USB interface of PC, and connect the other smaller end of the USB cable to the USB interface of this player. The device is connected to PC and being charged. If you want to know the charge progress, disconnect the device safely by clicking the "💡" icon. You see an animating battery icon indicating charge progress. When the icon becomes green, the battery is fully charge.
Notice: The device is not available during charging.
Note:
For maximum performance, lithium-ion batteries need to be used often. If you don't use the device often, be sure to recharge the battery at least once per month.
Keys Description
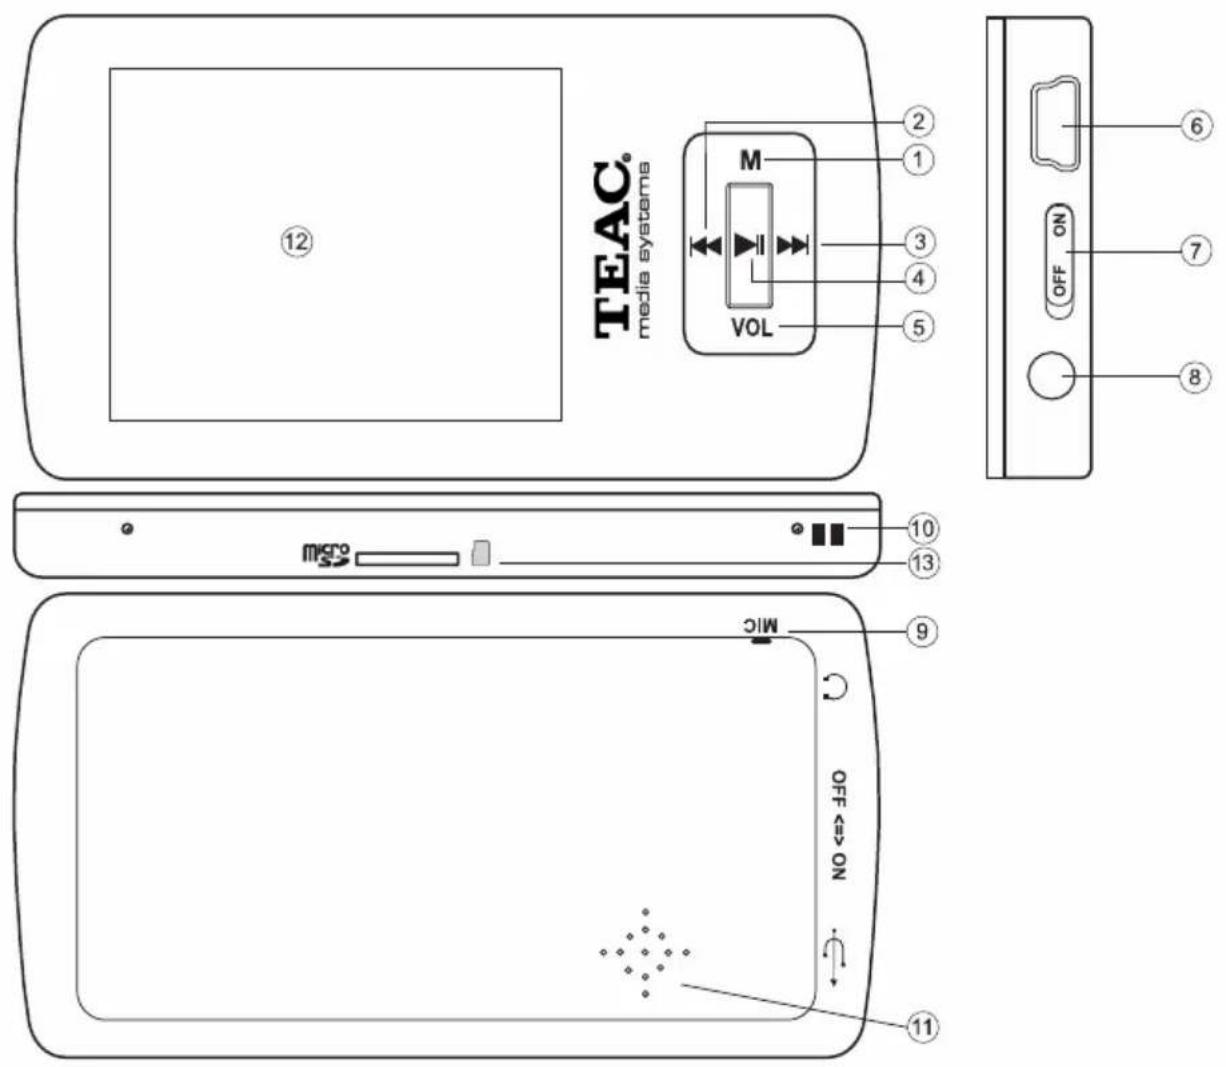
① M Menu key
② Move to the previous item.
③ ▶▶ Move to the next item.
④ ▶Play, turn on/off
⑤ VOL Setting the volume
⑥ USB port
⑦ POWER Power switch
⑧ Earphone Jack
⑨ MIC Internal microphone
⑩ Neck strap slot
⑪ Built-in speaker
⑫ 2.0" TFT Display.
⑬ MicroSD Card Slot
Power On/Off
To power on:
- Switch on the POWER button.
- Press and hold the ▶II key until you see prompt on the display.
To power off:
-
Press and hold the ▶II key until you see prompt on the display.
-
Switch off the POWER button.
Note:
This player has a power-saving feature which enables the device to power off automatically if it is idle for about 3 minutes.
MicroSD Card Slot
After connecting the player to the computer, you will find two portable devices. One is the built-in memory device and the other one is the device associated to the MicroSD card.
The player supports direct playing of songs/videos on MicroSD cards. Insert the card into the slot. The contacts have to be arranged in the direction of the screen.
To use a memory card:
-
Press and hold the M button to display the main menu.
-
Select "Explorer" and press the M button to enter the folder browser mode.
-
In the folder browser mode, you see two folders named Internal Memory and SD Card. To play the audio/video files stored on the memory card, access the SD Card folder (with ◀ or ▶ and then press the M button). Now you have access to the files on the memory card as usual.
To take out the card, push the MicroSD card slightly into the case. After it is ejected partially you can take it out.
Note: Please don't insert in or take out when the player is powered on. Otherwise, it will cause file loss.
Basic Operation
| Function | Operation |
| Play/Pause | Press the ▶II button to play or pause. |
| Adjust Volume | 1. Shortly press the VOL button to see a volume adjustment icon animating (blinking).2. Press the ◀/▶ button to decrease or increase volume.3. Press the VOL button to confirm. |
| Move to the previous file | Shortly press the ◀ button. |
| Move to the next file | Shortly press the ▶ button. |
| Fast Forward Press | and hold the ▶ button. |
| Rewind Press and | hold the ◀ button. |
| Lock/unlock buttons | Hold down the ▶II and VOL button simultaneously. |
| A-B Repeat To repeat | at a specified section of a track,1. During playing, shortly press the VOL button to enter A-B repeat mode (a volume adjustment icon is blinking).2. Press the M button to select the start point (A-).3. Press the M button again to select the end point (A-B).To stop A-B repeat, press the M button, and press the VOL button to exit. |
Playing Music
Enter the music mode
Press and hold the M button to display the main menu. Use the ◀ / ▶ button to select "Music" menu, and press the M button to confirm selection. Now you are in the MUSIC mode, refer music playing to the basic operations.
Folder navigation
To navigate through folders:
- In the music mode, shortly press the M button to enter folder navigation mode.
- Press the ◀◀ / ▶▶ button to select a folder or track, and press the M button to confirm selection.
- If you like to switch between memory card and internal memory press the VOL key repeatedly until the two folders Internal Memory and SD Card appear.
Playing Videos
- Press and hold the M button to display the main menu.
- Use the ◀ / ▶ button to select "Video" menu, and press the M button to enter the video player mode.
- Press the ◀ / ▶ button to search a video file that you want to play, and press the M button to play. For detail information about playing, see the "Basic Operation" section.
Note: During playing, you can shortly press the M button to enter folder navigation mode.
Note: This player can only play AVI videos. For other formats, you need to use the converting tool included on the driver CD to convert them. For detail information about the converter, see AVI Converter Quick User Guide on the CD.
Viewing Photos
To view photos,
- Press and hold the M button to display the main menu.
- Select "Photo" and press the M button to confirm.
- Press the ◀◀ / ▶▶ button to select a folder or image, and press the M to confirm.
- Select the photo that you want to display and press the M button to enlarge it to full screen.
- In the full screen mode, you can press the ◀◀ / ▶▶ button to display the previous or the next photo, press ▶▶▶ to start auto slide show (by setting the time interval between 1 and 5 in "Settings/Auto slide show/Photo") or press the M button to enter folder navigation mode.
Note: Some images may not be displayed. Try to use an image viewer (ACDSee for example) to convert them. See "Convert image file" for details.
Reading E-book
Reading
- Press and hold the M button to display the main menu.
- Select "E-book" and press the M button to confirm.
- Press the ◀◀ / ▶▶ button to select a .txt file, and press the M button to open the selected file.
- Press the ◀◀ / ▶▶ button to page up/down, or press the ▶▶ button to page down automatically (by setting the time interval between 1 and 5 in "Settings/Auto Slide show/Text").
- During reading, you can use the bookmark to mark the page for resuming reading later. For information about bookmark, see next section.
Using bookmark
- Go to the page that you want to mark.
-
Press and hold the VOL button to show up a "Save BookMark" window for saving bookmark.
-
Press the ◀◀ / ▶▶ button to select a line of the menu and press the M button to confirm. The bookmark is saved. It starts from the first line of current page.
- To read the page that you marked, shortly press the VOL button to show up the "Load BookMark" window. Select the bookmark and press the M button to confirm. You will be guided to that page.
Note: Some TXT file may not be read. This may because its format is not supported. Skip it or reload another file.
Browsing all files
To browse all files stored in the player,
- Press and hold the M button to display the main menu.
- Select "Explorer", and press the M button to enter the browser mode.
- Press ◀◀ / ▶▶ button to select a file that you want to view, and press the M button to play or display it.
Voice Recording
Record
- Press and hold the M button to display the main menu.
- Select "Record", and press the M button to enter the recorder mode.
- Shortly press the ▶II button to start recording. During recording, you can press the ▶II button to pause/resume recording.
- Shortly press the M button to stop and save recording.
Play recordings
To play the recording, switch to the MUSIC mode, enter folder navigate mode, search and play the recording file.
Deleting File
To delete a file,
- In the folder navigation mode, select the file that you want to delete.
- Press and hold the VOL button until a dialogue box shows up.
- Use the ◀◀ / ▶▶ button to select "Yes" and press the M button to confirm.
FM Radio
On the main menu, select "FM Radio" and press the M button to turn on the FM radio.
Search Station
- Shortly press the M key to show the submenus. You see the menu items displayed on upper left and right corner. Menu in red is highlighted and selected, while menu in black is not. You can press the ◀◀ / ▶▶ button to switch highlighted menu.
- Switch to the "auto" or "manual", and press the M button to activate auto-search or manual-search mode. In the Manual mode, press the ◀/▶I button to tune in stations.
Save station
To save the found station,
- Shortly press the M button to activate the submenus.
- Press the ◀◀ / ▶▶ button to switch to the "Save" and press the M button to confirm.
- Press the ◀◀ / ▶▶ button to select an empty location for the station, and press the ▶▶ button to continue.
- Press the ◀◀ / ▶▶ button to select "Yes" or "No", and press the ▶▶ button to confirm.
- Press the M button to hide the channel list.
Listen to Station
To listen to saved station,
- Shortly press the M button to activate submenus.
- Press the ◀◀ / ▶▶ button to switch to the "preset" menu and press the M button to enter the PRESET mode.
- In the PRESET mode, press the ◀◀ / ▶▶ button to select a saved station for listening.
Delete station
- Shortly press the M button to activate submenus.
- Press the ◀◀ / ▶▶ button to switch to the "delete" menu and press the M button to continue.
- Press the ◀◀ / ▶▶ button to select the station that you want to delete, and press the ▶▶ button to continue.
- Press the ◀◀ / ▶▶ button to select "Yes" or "No", and press the ▶▶ button to confirm.
Record FM program
When you are listening to a station, you can press and hold the VOL button to record your favourite programs. For detail information about recording, see "Record" section.
Playing Game
This player provides a popular and funny game - Tetris World. To activate the game, on the main menu, select "Game" and press the M button to enter the gaming mode. Basic operation is as follows:
Start/pause game
Move the block left and right
Rotate the block
Insert the block
Press ▶II button the
Press VOL and M button
Press ◀ button the
Press ▶▶l button the
Customizing Settings
To customize the player settings:
- On the main menu, select the "Settings" item and press the M button to enter the system settings mode.
- Press the ◀ / ▶ button to select setting item and press the M button to confirm or press the VOL button to cancel/ return.
| Music | Repeat Mode | Once (Play current track once and then stop) |
| Repeat One (Repeat current track) | ||
| Folder Once (Play all audio files in the current folder and stop after playing) | ||
| Folder Rep. (Repeat all audio files in the current folder) | ||
| Normal (Play all audio files stored in the player and stop after playing all) | ||
| Repeat All (Repeat all audio files stored in the player) | ||
| Intro (Play the first 10 seconds of every audio file) | ||
| Play Mode | Order (Play audio files in order) | |
| Shuffle (Play audio files randomly) | ||
| Preset EQ | Normal, 3D, Rock, Pop, Classical, Bass, Jazz, User EQ | |
| User EQ (User-defined equalizer setting) | 1. Press the VOL button to switch EQ column. 2. Press the ◀ / ▶ button to adjust value. 3. Repeat pressing the VOL button until the cursor is on the Yes button, and then press the M button to confirm. 4. Go to the EQ Select menu, and select User EQ to enable the equalizer setting. | |
| Stereo SW(Enable or disable stereo effect) | On, Off FM Radio | |
| FM region China | Europe, Japan, U.S.A. | |
| REC Quality High | Quality, General Quality Record | |
| REC Volume | +1、+2、+3、+4、+5 | |
| Auto slide show | Text (Set interval between the previous and the next page when the device is in auto page up/down mode.) | |
| Photo (Set interval between the previous and the next slide in auto slide show mode.) | ||
| Display | Backlight 5 seconds | 10 seconds, 15 seconds, 20 seconds, 30 seconds, Always On. |
| Brightness Set the brightness of the screen between 1 and 5 | ||
| Backlight Mode | NormalPower Save (Turn off the screen when there is no activity within a certain time) | |
| System | About Information about the product | |
| Upgrade Upgrade the firmware | ||
| Load Default Restore the player to default setting | ||
| Sleep Timer | OFF, 10Minute, 15Minute, 30Minute, 60Minute, 120Minute(Set the continuous playing time before the player is turned off automatically.) | |
| Language Select language in which the on-screen text is displayed | ||
Convert and Play Video Files (Windows Vista coming soon)
Before you download videos to the device, make sure they are AVI files and can be played by the device. If not, convert them using the included converting tool on the driver CD. The following steps show how to convert.
Install the AVI Converter
-
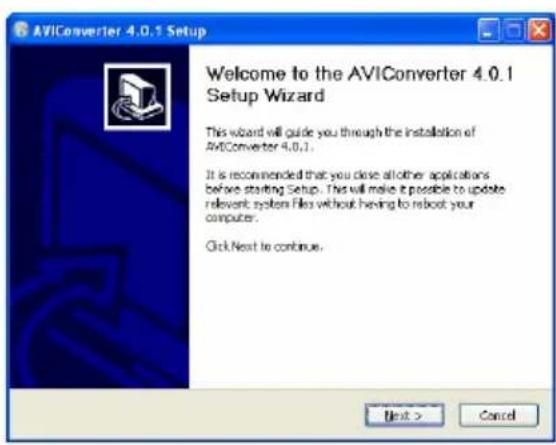
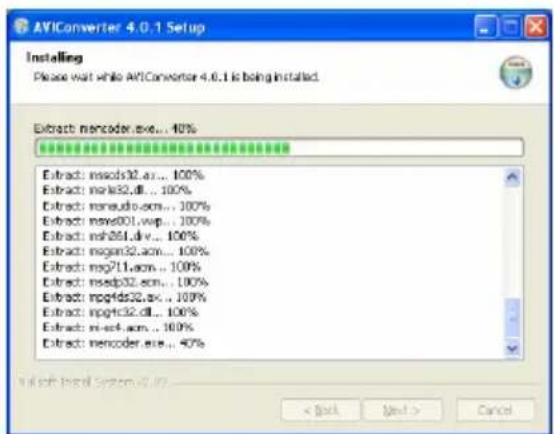
Insert the provided installation disk into the CD-ROM drive, select and run "AVIConverter package Setup.exe" program, enter installation interface, then click [Next] button to display as follows:
-
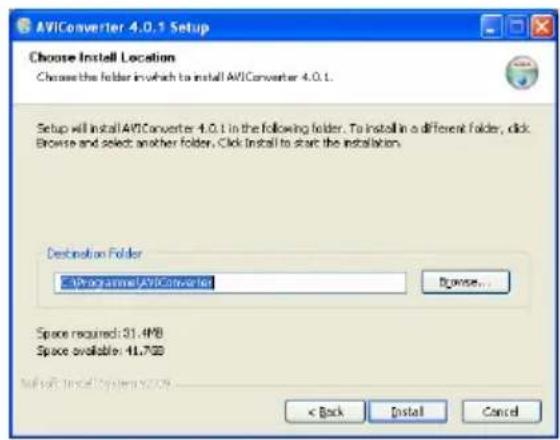
After selecting the installation routine, click [Install] button until the completion of installation.
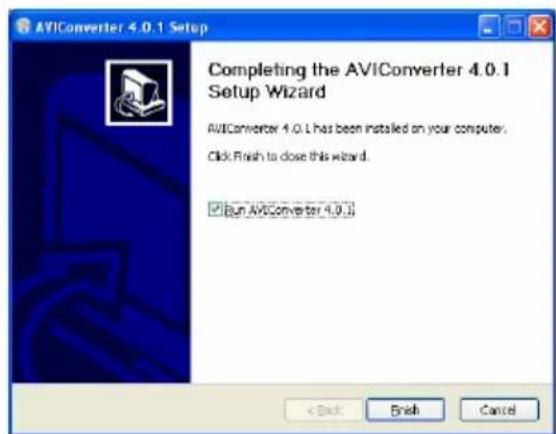
- After the installation, click [Finish] button to finish the software installation.
Conversion
- Run the "AVIConverter" program.
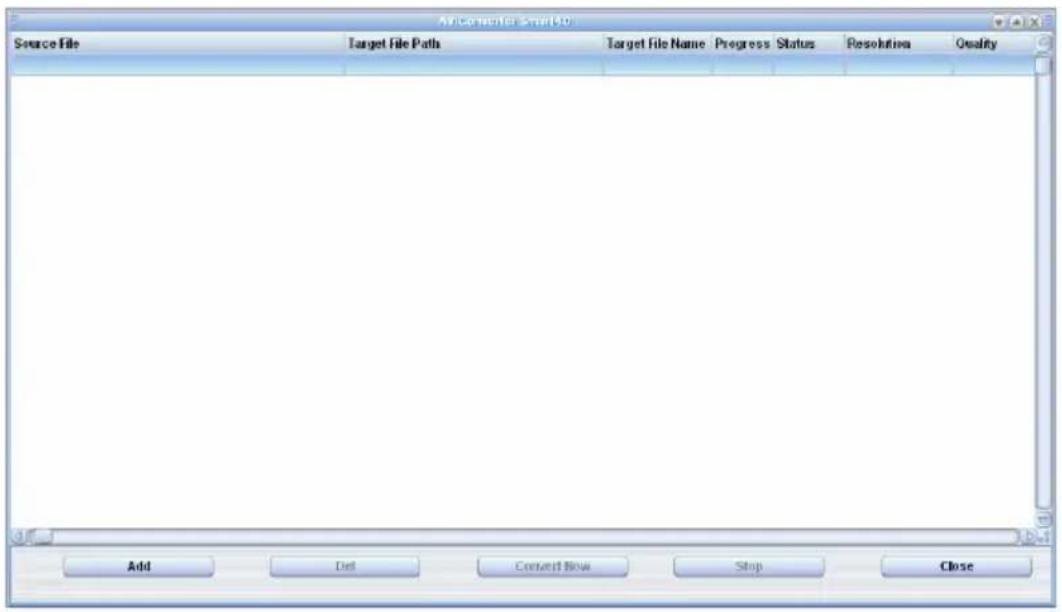
- Click Add button to display "Conversion Setting" window.
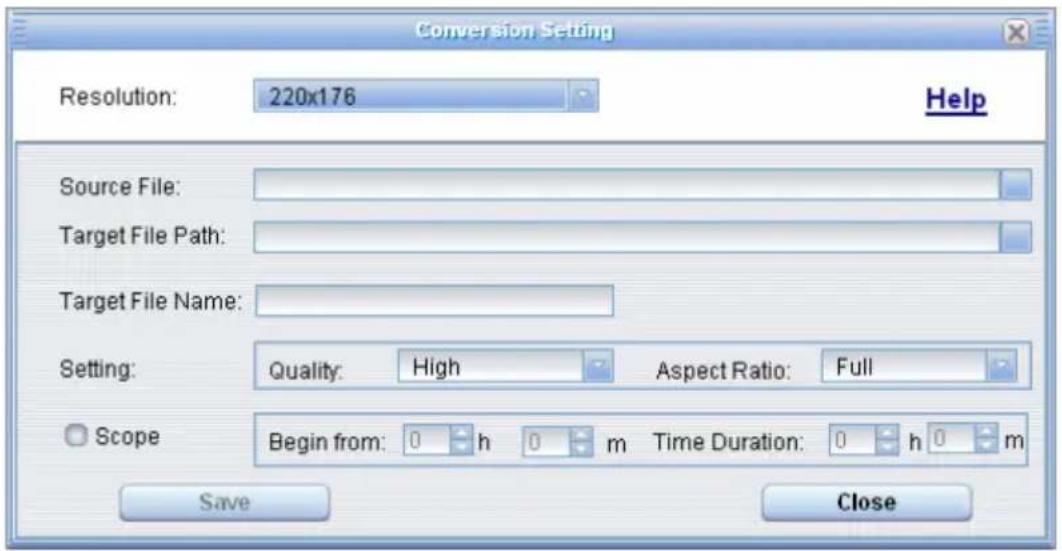
- For the "Source File" field, specify the file that you want to convert by clicking the button on the right.

- For the "Target File Path" field, specify the destination where the converted file is saved.

- Set the conversion quality in the "Quality" field and display mode in the "Aspect Ratio" filed.

- Click Save to save your setting. To convert another file, repeat the steps above.
- Click Close button to close the setting window.
- Click Convert Now to start converting.
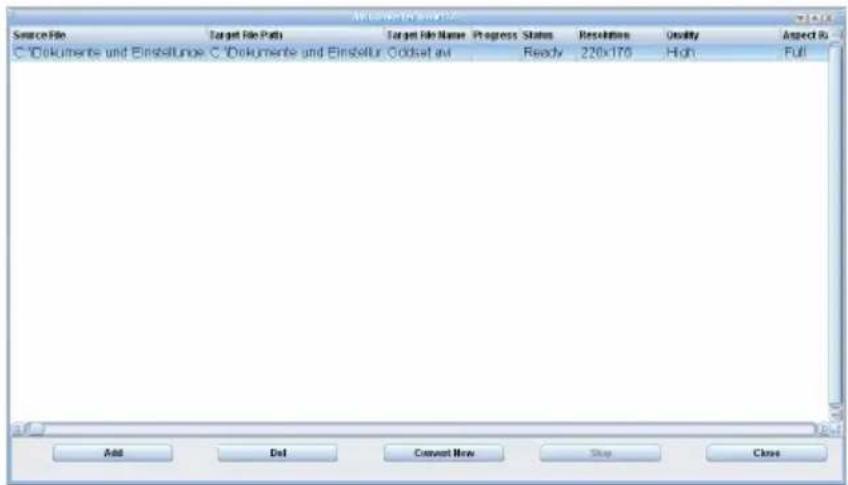
- After finishing the conversion (Progress = 100%, Status = Ok), click to exit.
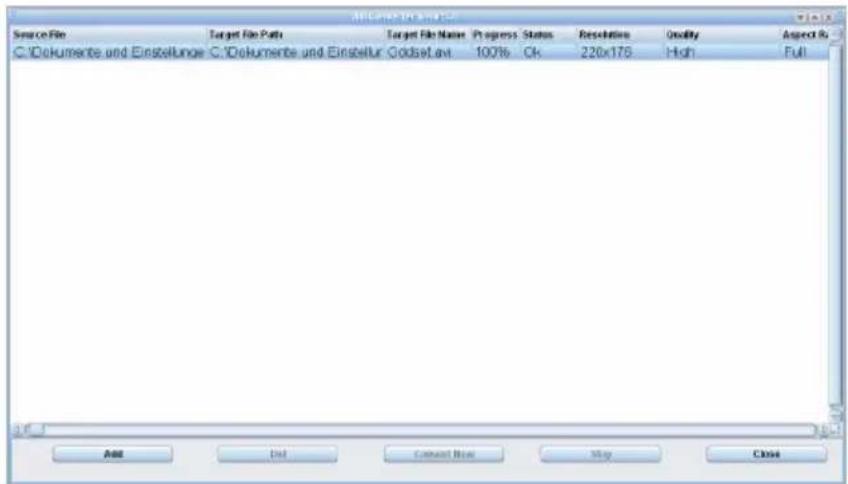
- The successfully converted AVI video file can be played.
Firmware Upgrade (Windows Vista coming soon)
You can upgrade the player to get the newest version of software by the following steps:
Installation of the Upgrade Tool
- Insert the software CD into the CD-ROM of a computer.
- Double click the Upgrade folder to open it.
- Run Setup.exe to install the upgrade tool.
- Follow on-screen prompts to complete installation.
Upgrading the firmware
- Switch off the Player.
- Hold down the M button while connecting the device to a computer via USB interface.
- Release the button after the connection is successful.
- Please ensure that the Rockchip driver was loaded (if the icon is clicked the message "Safely remove rockusb Device" must appear. Do NOT click on this message, because otherwise upgrading may fail!).
- Select "Program files" → "FirmwareUpdate" from the Start menu. You will see the following window:
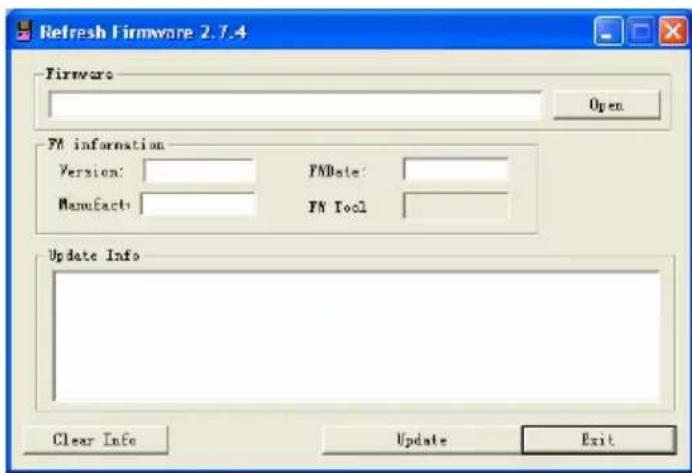
- With Open you can specify the firmware upgrading file provided by the vendor (available for instance at www.teac.de).
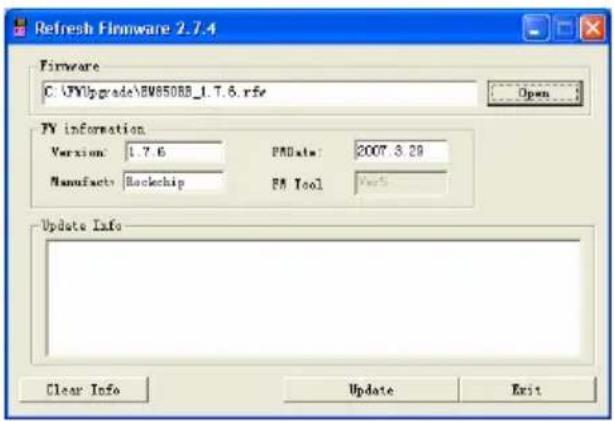
- Click Update to start upgrading. The process may take up to 6 minutes.
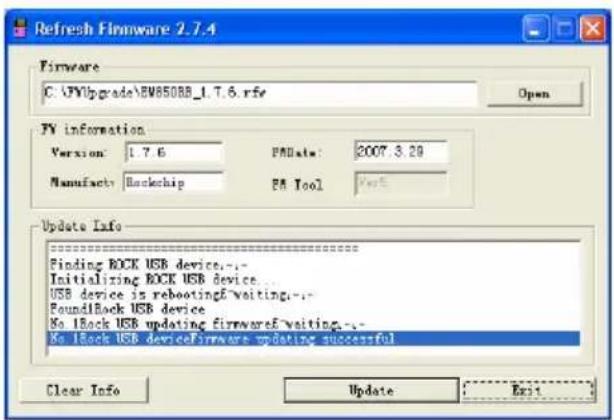
- Click Exit to finish upgrading.
- Safely remove the player from the PC.
- Switch on the Player. It will automatically initialize settings.
Converting Image File (Windows Vista coming soon)
Converting steps
Run the ACDSee program, select the image that you want to convert, and click "Tool" → "Convert".
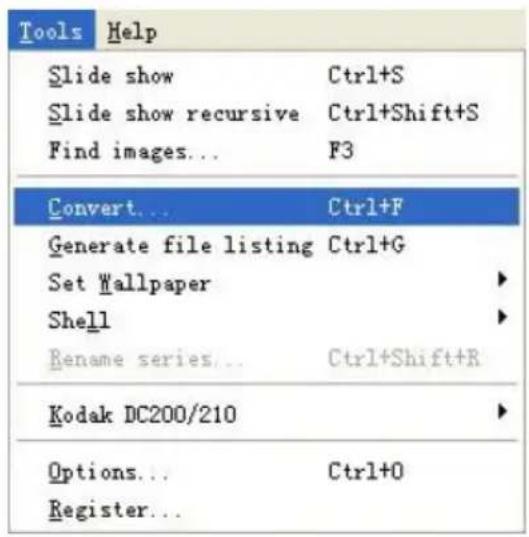
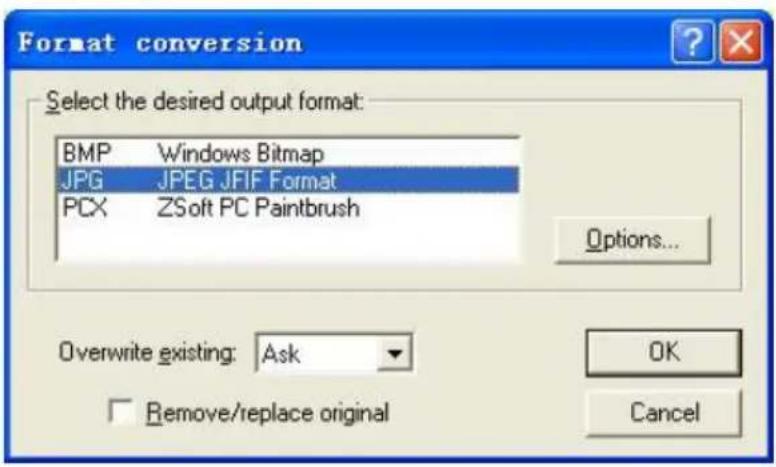
Select "JPG JPEG JFIF Format" and then click "Options".
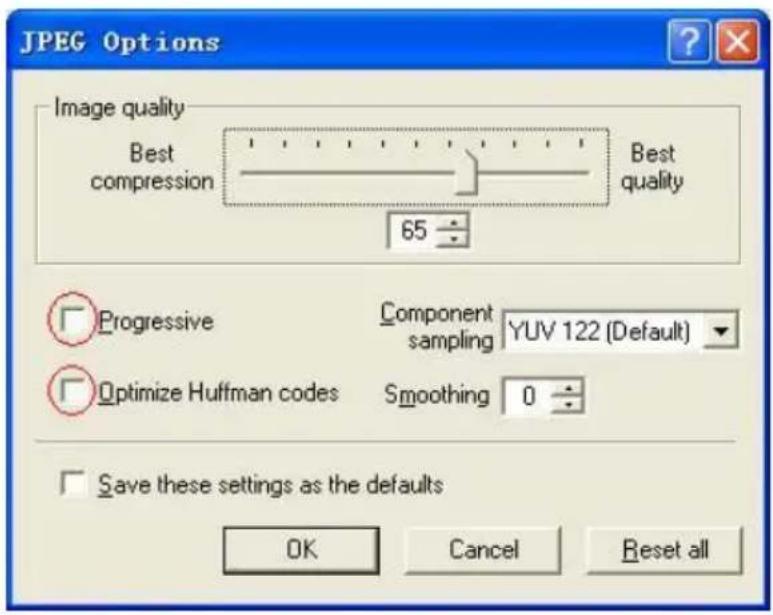
Deselect the options circled in red and then press "OK" button to confirm.
Digital Rights Management File (DRM9) Protection
This player supports DRM9 file protection (WMA), to play DRM9 protected files:
- Download songs protected by DRM9 from relevant websites to your PC or notebook.
- Open the downloaded files using Windows© Media Player. Follow the instructions from Windows© Media Player to play back the files.
- Connect the player to PC or notebook by USB cable.
- Copy the DRM9 protected songs to the player using Windows© Media Player. In Windows© Media Player use „Copy to CD or Device“ to copy the files to the MP3 Player.
- Playback files on player as described in this User Manual.
Troubleshooting
| Problem | Possible Cause | Solution |
| The LCD displays nothing when the device is started. | Battery is too low. Charge the battery. | |
| The keys are locked. | Unlock the Hold switch by holding down the ▶II and VOL button. | |
| The player has no response when the Play button is pressed to play an audio. | The keys are locked by Hold switch | Unlock the Hold switch by holding down the ▶II and VOL button. |
| No sound when playing an audio file. | The volume is too low. Adjust | the volume. |
| Bad audio file. Delete or skip | the file. | |
| The player cannot be connected to the PC. | The USB interface is not supported by PC's motherboard. | Update or replace the PC's mother-board. |
| The displayed time is changing constantly. | The bit rate of the MP3 file is changing during playback. | Try to use fixed bit rate to compress the MP3 file. |
| The PC has error when you plug and unplug the player. | The player is disconnected from the PC abruptly while transferring files. | Do not disconnect the player from the PC when transferring files. |
| Total memory displayed on the player is not in accordance with the marked amount. | Part of memory is used to store programs and display characters. | |
| Problem | Possible Cause | Sol |
| Some of MP3 files cannot be played properly. | The MP3 file is compressed by a standard, such as MPEG I Layer 1 or Layer 2 that the player does not support. | 1. Delete the unsupported MP3 files.2. Use MPEG I Layer 3 standard to compress the unsupported MP3 files. |
| The video cannot be played. | The file format is not supported. | Make sure the video is in AVI format. If not, use the provided converting tool to convert it. |
| The video data is corrupted | Skip it or reload another file | |
| The photo cannot be displayed | The file format is not supported | Try to use an image editor (ACDSee for example) to convert it. See “Appendix – Converting image file” for details. |
| The image resolution is beyond limitation of the device. | The device supports a maximum resolution of 3520 X 2816. Make sure resolution of the image does not excess this limitation. | |
| The TXT file cannot be read | The file format is not supported. | Skip it or reload another file. |
Solution
Technical Specifications
| Item | Specification |
| Capacity 1GB, 2GB, 4GB | |
| Battery Type Rechargeable Lithium Battery | |
| Battery Life Up to 8 hours | |
| LCD Display 2.0-inch TFT screen | |
| Earphone Power 5mW+5mW | |
| Video Format AVI (XviD) | |
| Audio Format MP3, WMA, DRM-WMA, DRM9 | |
| Photo Format JPEG | |
| Image Resolution 3520 X 2816 (max.) | |
| Record Format WAV (High: 16kbps/16KHz; General: 16kbps/8KHz) | |
| Bit Rate MP3: 8-320kbps; WMA: 32-384kbps | |
| SNR | >90dB |
| USB Port USB2.0 | |
| Operating Temperature | 0°C ~ +55°C |
| Storage Temperature | -20°C ~ +55°C |
| Operational Relative Humidity | 20% ~ 90% (40°C) |
| Storage Relative Humidity | 20% ~ 93% (40°C) |
| Dimensions | 79mm x 46mm x 12mm |
| Weight | 52g |
WARRANTY
Model Serial Number
Owner's name
Address
Dealer's name Date of purchase
Dealer's address
Warranty Period
TEAC Europe GmbH, hereinafter called TEAC, warrants this product against any defect in material and workmanship for two (2) years from the date of purchase by the original retail purchaser. According to the following terms this TEAC
product will be repaired without charge of labor and materials by the authorized TEAC service stations, by the authorized TEAC dealers and/or their authorized service stations. TEAC, the authorized TEAC service stations, the authorized
TEAC dealers and/or their authorized service stations may decide whether the defective product will be repaired or replaced as a whole or partially. The TEAC dependencies, the authorized TEAC service stations, the authorized TEAC
replaced as a whole of particularly. The VLTs Deutschland, the authorized VLTs service stations, the authorized VLTs dealers and/or their authorized service stations will also honor this warranty in the other EC and EFTA member states based on the terms in this warranty conditions.
based on the terms in this warranty conditions.
What is Covered and What is Not Covered.
Except as specified below, this warranty covers any defects in materials and workmanship of this product. The following
are not covered by the warranty:
- Damage to or deterioration of the external cabinet.
-
Any unit that has been altered or on which the serial number has been defaced, modified, or removed.
-
Damage, deterioration or malfunction resulting from:
(a) accident, misuse, abuse or neglect:
(b) failure to follow instructions supplied with the product:
(c) any shipment of the product. Any damage arising of transportation is the liability of the freight company. Any damage arising of transportation and any implicit and explicit risks are the liability of the freight company. This is
expressively not a liability of TEAC;
(d) repair or attempted repair by anyone not authorized by TEAC to repair this product;
(e) causes other than product defects, including lack of technical skill, competence of experi cially damages which may arise of incidental use respectively by improper ventilation.
(f) damages caused by improper or incorrect installation of software.
(g) periodic check-ups.
(h) maintenance respectively repair of parts due to normal wear and tear,
(i) adoptions or adjustments to the product in order to conform to different national technical or safety standards of
any country other than the one for which the product was originally designed and manufactured.
These warranty terms do not affect any statutory rights of consumers which were granted by the respective national laws.
TEAC Europe GmbH
DSPD
Bahnstraße 12
65205 Wiesbaden-Erbenheim
TEAC Europe GmbH, DSPD:
- Disposing of the Product
- Content
- Cautions
- Notice
- Key Features
- System Requirements
- Package Content
- Before Using
- Windows2000/XP/ME/Vista
- Windows98/SE
- Connect to a PC and download audio files
- Removing the player from the PC safely
- For Windows2000/XP
- For Windows98
- Charging the battery
- Notice: The device is not available during charging.
- Note:
- Keys Description
- Power On/Off
- To power on:
- To power off:
- MicroSD Card Slot
- Playing Music
- Enter the music mode
- Folder navigation
- Playing Videos
- Viewing Photos
- To view photos,
- Reading E-book
- Reading
- Using bookmark
- Browsing all files
- Voice Recording
- Record
- Play recordings
- Deleting File
- FM Radio
- Search Station
- Save station
- Listen to Station
- Delete station
- Record FM program
- Playing Game
- Customizing Settings
- Convert and Play Video Files (Windows Vista coming soon)
- Install the AVI Converter
- Conversion
- Firmware Upgrade (Windows Vista coming soon)
- Installation of the Upgrade Tool
- Upgrading the firmware
- Converting Image File (Windows Vista coming soon)
- Converting steps
- Digital Rights Management File (DRM9) Protection
- WARRANTY
- TEAC Europe GmbH
Brand : TEAC
Model : MP-390
Category : Mp3 player