
MP-470 - Mp3 player TEAC - Free user manual and instructions
Find the device manual for free MP-470 TEAC in PDF.


| Product Type | MP3 Player |
| Brand | TEAC |
| Model | MP-470 |
| Display | 2.0-inch TFT color, 176x220 pixels |
| Audio Formats | MP3, WMA, WAV |
| Video Format | AVI (MPEG-4 XviD, 220x176, 30fps) |
| Photo Format | JPEG |
| FM Radio | Yes, with manual and preset tuning |
| E-Book Reader | TXT format |
| Storage | Internal flash (capacity varies by model) |
| Battery Type | Rechargeable Lithium Polymer |
| Battery Life | Up to 8 hours |
| Charging | Via USB cable (PC or self-powered USB hub) |
| Connectivity | USB 2.0, acts as removable disk |
| Audio Output | 3.5mm stereo headphone jack |
| Controls | Touchpad with backlit keys |
| Equalizer Modes | Normal, Classic, Jazz, Rock, Pop, Bass, SRS WOW |
| System Requirements | Windows 98SE/ME/2000/XP/Vista, Mac OS X |
| Dimensions | 95 mm x 42 mm x 10 mm |
| Weight | 57 g |
| Operating Temperature | -5°C to +40°C |
| Firmware Upgrade | Yes, via TEAC website |
| Warranty | 2 years from date of purchase |
Frequently Asked Questions - MP-470 TEAC
User questions about MP-470 TEAC
0 question about this device. Answer the ones you know or ask your own.
Ask a new question about this device
Download the instructions for your Mp3 player in PDF format for free! Find your manual MP-470 - TEAC and take your electronic device back in hand. On this page are published all the documents necessary for the use of your device. MP-470 by TEAC.
USER MANUAL MP-470 TEAC
To ensure the smooth handling of your warranty please write the serial number of your device into the box. In the case of warranty you are expected to send it together with a copy of your invoice to your nearest TEAC sales representative.
natural_image
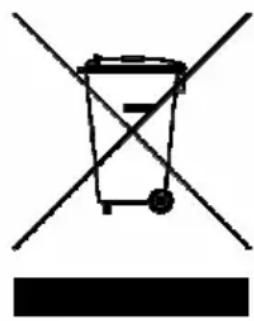
Simple line drawing of a trash bin with two crossed lines and a solid black bar below (no text or symbols)Disposing of the Product
Your device should not be placed in municipal waste. Please check local regulations for disposal of electronic products.
- Changes in specifications and features may be made without notice or obligation.
● Copyright © 2008, TEAC Europe GmbH. All rights reserved. Edition: July 2008 - Company and product names provided herein are trademarks of their respective companies.
Content
Important Notice 4
Safety Precautions....4
Battery 5
Earphone 5
Conneting to a PC 6
Important 6
Key Features 7
System Requirements 7
Package Content....7
Before Using 8
Driver 8
Connect to a PC and download audio files....8
Removing the player safely from the PC 9
Charging the battery 10
Keys Description....11
Switching On/Off 12
Key Lock....12
Reset 12
Hints According to User Interface 12
Using the Touchpad Controls....13
Main Menu 13
Explorer Key Functions....14
Quick Option Menu Key Functions 14
Basic Operation....15
Playing Music....16
Music Explorer Screen 16
Music Mode....16
Quick Option Menü Music 17
Viewing Photos 18
Picture Mode 18
Quick Option Menu Picture (Photo) 19
Playing Movies 20
Video Mode 20
Quick Option Menu Movie....21
Video Conversion....21
Minimum System Requirements ...... 21
Installation 22
Converting Video....22
FM Radio 25
Radio Mode 25
Quick Option Menu Radio 26
Reading an E-Book....27
E-Book Mode 27
Manual Mode display 27
Auto Mode display 27
Adding a bookmark 27
Quick option Menu Ebook 28
Explorer 28
Customized Settings 29
Firmware Upgrade....30
Troubleshooting 31
Technical Specifications....33
Warranty 34
Important Notice
This product is protected by certain intellectual property rights of Microsoft. Use or distribution of such technology outside of this product is prohibited without a license from Microsoft.
Content owners use Windows Media digital rights management technology (WMDRM) to protect their intellectual property, including copyrights. This device uses WMDRM software to access WMDRM-protected content. If the WMDRM software fails to protect the content, content owners may ask Microsoft to revoke the software's ability to use WMDRM to play or copy protected content. Revocation does not affect unprotected content. When you download licenses for protected content, you agree that Microsoft may include a revocation list with the licenses. Content owners may require you to upgrade WMDRM to access their content. If you decline an upgrade, you will not be able to access content that requires the upgrade.
Safety Precautions
- Do not disassemble, repair or modify the player by yourself. Refer servicing to qualified personnel only.
- Keep the player clean and never store it close to heat sources or dirty, humid or rainy places and avoid direct sunlight.
- If the surface is dirty, please clean it with soft cloth wet with clean water or soft cleaning fluids and never clean the case with alcohol or aggressive diluents.
- Never use the player in extremely dry environment to avoid static discharging.
- Never apply heavy impact on the player like dropping it or placing it on a magnet.
Battery
- The battery used in this device may cause a fire or chemical burn if mistreated. Do not disassemble, incinerate, or heat the battery.
- Do not dispose the player in fire to avoid explosion because the player has built-in battery.
- Do not touch the player with bare hands if the built-in battery is leaking. In this case, contact service center for help since the liquid may remain in the player. If your body or clothes has been contacted with the battery liquid, wash it off thoroughly with water. Also, if some of liquid gets into your eyes, do not rub your eyes but immediately wash them with clean water, and consult a doctor.
- Do not connect the player to a power source other than that indicated in this manual or on the label as this may result in the risk of fire or electric shock.
Earphone
- Never use the player during driving a car or using other vehicles to avoid traffic accidents. This is also content of the law of some countries. Even while walking it may be dangerous especially when crossing the street. Please do not listen in extremely high volume to avoid any dangers. Wherever potential risks may arise, please do not use the player to ensure your safety.
- Hearing experts advise against the constant use of personal stereos played at high volume. Constant exposure to high volumes can lead to hearing loss. If you should experience ringing in the ears or hearing loss, discontinue use and seek medical advice.
- Please insert the earphone prior to turn on the player, which can not only avoid damaging the earphone but keep the player in good condition also. Turn off the player when it is not used.
Conneting to a PC
- Never disconnect the player from PC during downloading, uploading and formatting to avoid failures and losses of data.
- When the player is used as removable disk, please follow strictly the given file download and upload procedures. Our company does not resume any responsibility for any data losses due to misuse.
Important
- Please charge the battery immediately when the display indicates low battery, or the device will be powered off automatically. In this case, all settings will be saved.
- Please disconnect the player from PC properly to avoid data loss.
- Battery service life may be various from different using conditions, manufacturer and manufacturing time.
- Avoid losses of data by regularly making backups of your data.
- In both power on and power off state, the player may be charged by the connection to PC via the USB line.
Note:
If the product suddenly has no response or powers off, an electrostatic discharge may be the cause. In this circumstance, please follow the procedures below for recovery:
- Turn off the unit by pushing and holding the slide button at the right (Power off position) for 15 seconds.
- Turn on the unit again
Key Features
● 2.0 inch TFT color screen, 176x220 pixels resolution
● MP3 and WMA player
● AVI video player
- JPEG picture viewer (jpg)
- Folder navigation
● FM radio
- Several equalizer modes
● Appears as removable disk on the PC
● Firmware upgradeable
● Rechargeable Lithium Polymer battery integrated
● ID3 tag display showing artist / song title / lyrics
- User specified settings
- Touchpad controls with backlight
System Requirements
- IBM PC & Compatible PC, Notebook, Apple Macintosh with USB interface
- Operating System: Windows98SE, Windows ME, Windows2000/XP, Windows Vista Macintosh OS X
Package Content
Please check the package for the following items. If any one of them is missing, please contact your vendor.
- MP-470 Player
- Stereo earphones
- USB cable
● Basic Operation Manual - User Manual (on CD)
- CD with Software
Before Using
Driver
Windows2000/XP/ME/Vista, Macintosh OS X
This player is plug & play for WIN2000/XP/ME/Vista OS and Macintosh OS X.
Windows98/SE
For Windows98/SE, you are required to install a driver (available from TEAC by request) before connection.
Connect to a PC and download audio files
To connect the player with the PC for transferring files:
-
Plug the larger end of the USB cable to the USB port of the PC, and plug the smaller end to the USB port of the player.
-
Windows: It may take Windows several minutes to recognize and set up the device the first time it is connected depending on your hardware configuration. When the "💡" icon appears at the right bottom of the PC screen, double click "My Computer" on the desktop, you see a removable disk, which indicates the player. Just use the removable disk as a regular local disk, copying files from or to it.
If you are using media management software such as iTunes, Winamp, or Windows Media Player, please refer to their documentation for support.
- Macintosh: Open a finder window. Click on the Removable Disk icon located on the left side of the finder window. Files can be copied from/to the removable disk as usual.
Removing the player safely from the PC
Windows2000/XP
- Left click the 📋 icon at the right hand corner of the taskbar.
- Click on the pop-up mini-window with message of "Safely Remove the USB Mass Storage Device – Drive (X:)".
- When you are prompted to remove the device, pull out the player.
Windows98
Please make sure the data transfer is completed before using the MP3 player.
Macintosh
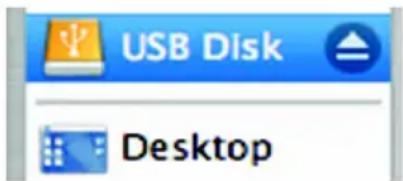
- On the left side of the Finder Window, identify the appropriate Removable Disk icon.
- Click on the "Eject" arrow on the right of the Removable Disk icon.
- Disconnect the USB cable from the player and your computer.
Charging the battery
The unit is equipped with a rechargeable Lithium Polymer battery. If the icon □ is displayed the battery has to be charged. Please charge the player with the provided USB cable at the PC. Upon initial use, the battery should be charged fully (12 hours) to ensure optimal performance and battery life.
To charge the battery, connect the larger end of the USB cable to the USB interface of PC, and connect the other smaller end of the USB cable to the USB interface of this player. The charging starts immediately after the connection is made.
Important:
- Do not connect the player to a power source other than that which is indicated here or on the label as this may result in the risk of fire or electric shock.
- If the player gets unusually hot during charging, or you will note any strange behaviour, disconnect the player immediately from PC or charging unit and contact your local dealer.
- When connected to a USB hub, the hub must be self-powered to charge the player's battery.
Keys Description
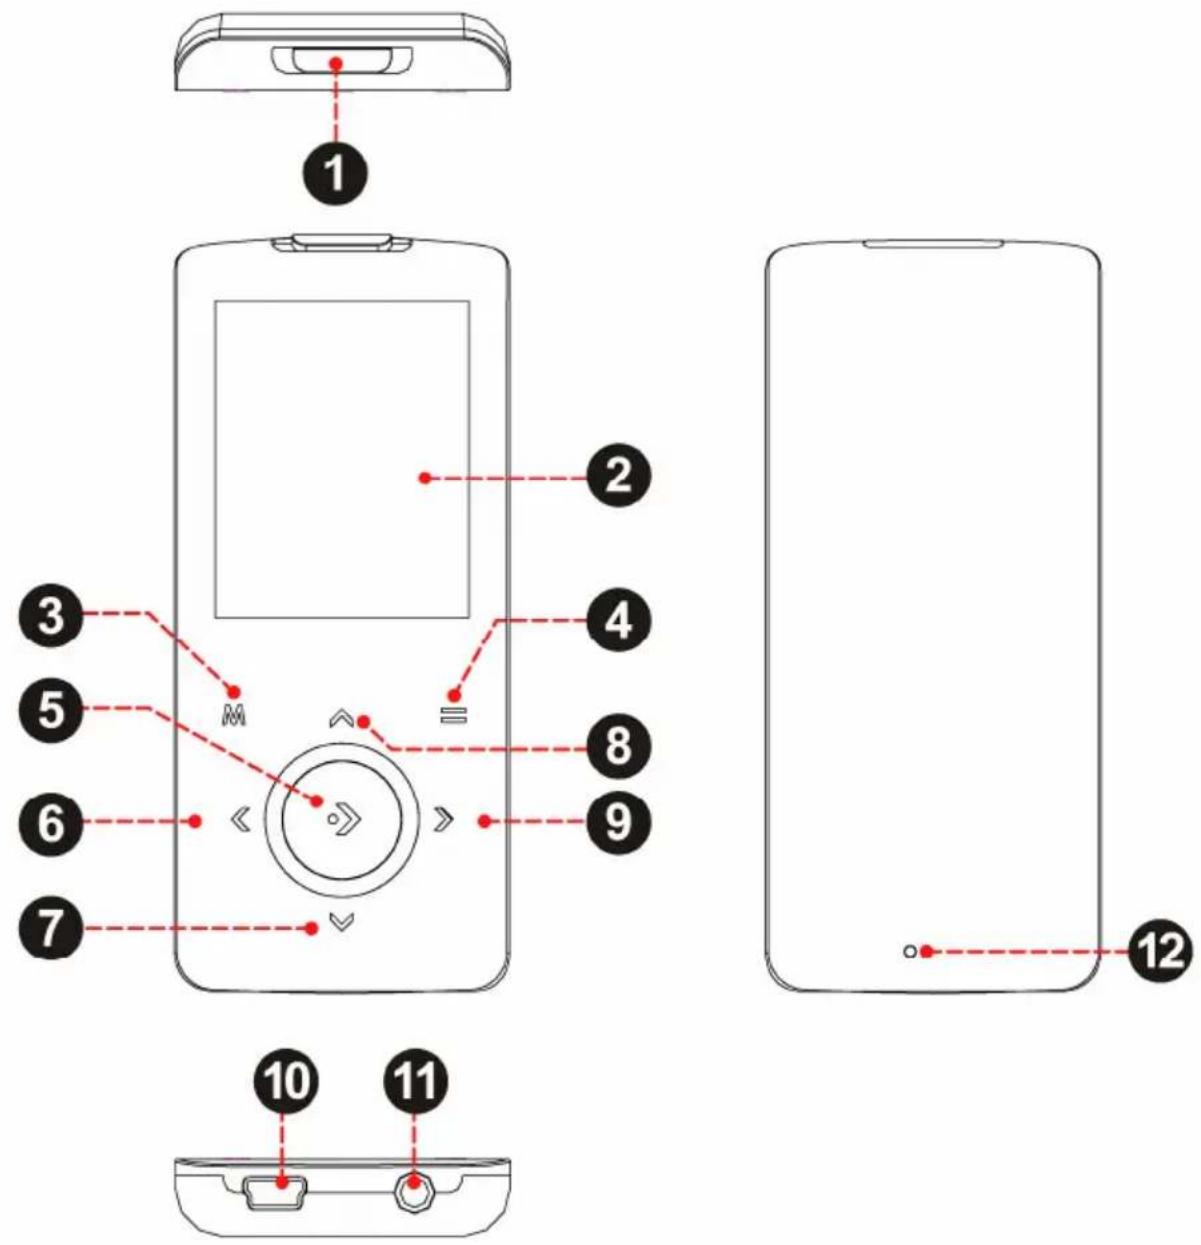
① On/Off slider / HOLD key
② 2.0" TFT display
③ MMenu key
④ Option key
⑤ Play, pause, stop, Confirm
⑥ «Previous item / Left
⑦ Volume down / Down
⑧ Volume up / Up
⑨ Next item / Right
⑩ USB interface
⑪ Earphone jack
⑫ RESET Reset hole
Switching On/Off
Switching On:
Move the On/Off slider ① to the right and hold it until the screen turns on.
Switching Off:
Move the On/Off slider ① to the right until the shut off picture appears.
Key Lock
To lock the keys please move the HOLD key ① to the left (in the direction of the arrow) until it locks. If a key is touched, a locking symbol is shown on the display. To unlock the keys the HOLD key ① has to be moved to the middle position.
Reset
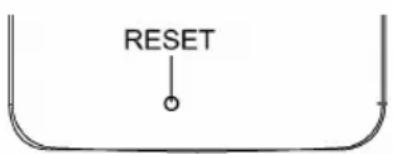
If the behavior of the player seems not to respond normally (usually very seldom), it can be reset with a small cylindrical pin.
In this case, the player should not be connected to a PC or charging equipment.
Hints According to User Interface
The player offers a consistent user interface. Regardless of the selected mode (music, picture viewer, video, etc.) the way of selecting menus or modes is identical.
After the player is turned on, it will be in the main menu. If a function is selected, it opens the explorer window (except FM radio function). The explorer displays a list containing all available objects (songs, pictures, videos, etc.). After one of these objects was selected and the play function is started, it is possible to open a menu by touching the ≡ key, which contains all options, which are associated to the respective mode (Quick Option menu). In example in music mode the equalizer, repeat functions and some other option can be set.
Using the Touchpad Controls
Your player comes equipped with a touch-sensitive control pad. To use the controls, touch the arrow keys on the front of the player lightly just as you would a button and the controls will light up. If you touch and hold a key, it will register as a continuous button touch.
Main Menu
The main menu offers seven functions. « and » allow to navigate to the desired function. Touching » activates it. Touch and hold M until you are back in the main menu.
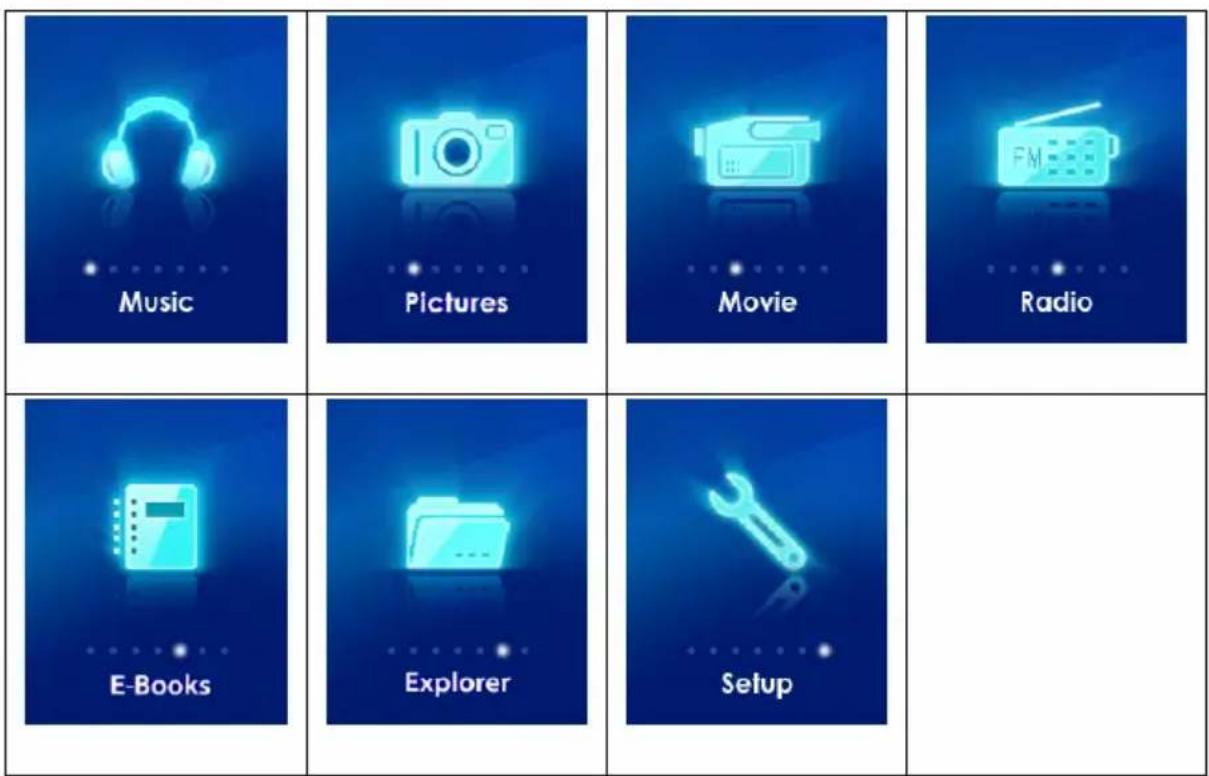
Explorer Key Functions
| Key | Function |
| ∨ | Move the selection down. |
| ^ | Move the selection up. |
| <> | Display folder contents if a folder is selected.If a file is selected, activate the file (track, picture, video, text). |
| « | Return to the previous screen. |
| Hold M Return to Main | Menu. |
Quick Option Menu Key Functions
The options associated to any of the modes can be called by touching and holding the ≡ key.
| Key | Function |
| ∨ | Move the selection down. |
| ∧ | Move the selection up. |
| ○ | Confirm a selection |
| « | Return to the previous screen. |
Basic Operation
| Function | Operation |
| Play/Pause | Touch the ➕ button to play or pause. |
| Adjust volume (Music, Movie, and Radio mode) | ∧: Touch: increase volume (≫ in movie mode)Touch and hold: increase volume continuously∨: Touch: decrease volume (≪ in movie mode)Touch and hold: decrease volume continuously |
| Previous (title, picture, video, main menu option) | Shortly touch the « button. (∧ in movie mode) |
| Next (title, picture, video, main menu option) | Shortly touch the » button. (♥ in movie mode) |
| Fast Forward | Touch and hold the » button. (♥ in movie mode) |
| Rewind | Touch and hold the « button. (∧ in movie mode) |
| Move to main menu | Touch and hold the M button to display the main menu |
| Explorer navigation | ∧ or ♥allow to select an object, a folder or a file. |
| Return to explorer | To return to explorer from any mode, touch M shortly. (Musik, Photo and E-Book mode only) |
| Call Quick Option menu | Touch and hold ≡ to access the quick option menus. |
| Confirm selection | Touch play button ➕ to confirm and enter the selected item. |
| A-B Repeat | To repeat a specified section of a track during playing:1. Shortly touch the ≡ button to select the start point (A-).2. Touch the ≡ button again to select the end point (A-B).To stop A-B repeat, touch the ≡ button.Note: The A-B repeat function can only be used within the same track. |
Playing Music
Touch and hold M until the main menu is displayed. Select with « or » "Music" and confirm with » The Music Explorer screen will appear.
Music Explorer Screen
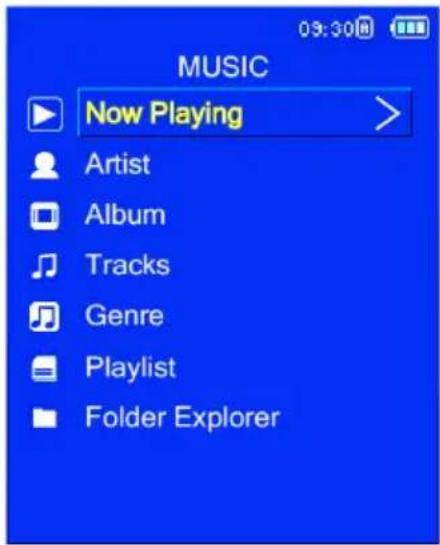
To access the Now Playing screen, select the Now Playing option from the main Music Explorer screen.
If your music files contain ID3 song information tags, you will be able to view your tracks by Artist, Album, or Genre. To view all files (including those that do not contain ID3 information), select Tracks or use the Folder Explorer option.
To use the keys please proceed as described in the paragraph "Hints According to User Interface/Explorer Key Functions".
Music Mode
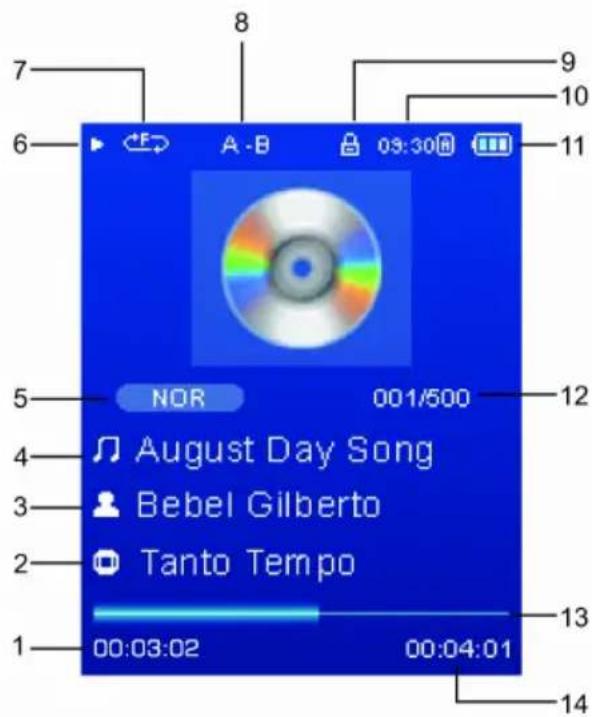
1 Elapsed Time
2 Album
3 Artist
4 File Name
5 Equalizer
6 Play Status
7 Play Mode
8 A-B Repeat Indicator
9 Lock Icon
10 Time Clock
11 Battey Level
12 Current track / Total tracks
13 Progress Bar
14 Total Time
Proceed as described in the section "Hints According to User Interface/Basic Operation".
Quick Option Menü Music
Touch and hold ≡to access the Quick Option menu during music playback.
| Favorite. | Add a song to your "Favorite" playlist.You can access your playlists by selecting the "Playlists" option from the Music Explorer screen. | |
| Equalizer Normal | Classic, Jazz, Rock, Pop, Bass, SRS SRS WOW® improves the dynamic audio performance of compressed and uncompressed audio by expanding the size of the audio image and creating a deep, rich bass response. | |
| Repeat | Normal Play all saved music files in order once. | |
| Repeat One Play the current or selected file repeatedly. | ||
| Repeat All Play all the music files in order repeatedly. | ||
| Random Play all the files in random repeatedly. | ||
| Lyric | On, OffThe lyrics format has to be .LRC.The name of the lyrics file and the name of the music file have to be equal.Lyrics files have to be in the same folder as the associated music files. | |
To use the keys please proceed as described in the paragraph "Hints According to User Interface/Quick Option Menu Key Functions".
Viewing Photos
Touch and hold M until the main menu is displayed. Select with « or » "Pictures" and confirm with ◦. The Photo Explorer screen will appear.
To use the keys please proceed as described in the paragraph "Hints According to User Interface/Explorer Key Functions".
Hint:
You can toggle between file list browser and thumbnail presentation by shortly touching the ≡ key.
Select the "ALL PICTURES" option to view all of the pictures on your player regardless of which folder they are in.
Picture Mode
To use the keys please proceed as described in the paragraph "Hints According to User Interface/Basic Operation".
Additionally there are two other key functions:
| Key | Function |
| Rotates the picture clockwise in steps of 90 deg. | |
| Start or stop slideshow mode.You can change the duration of time between pictures during Slideshow mode from the Quick Option menu. |
Quick Option Menu Picture (Photo)
Touch and hold ≡to access the Quick Option menu while a picture is displayed.
| Brightness Allows to adjust brightness in five steps. | ||
| Slideshow Turn slideshow mode on. | ||
| Show Timer Set interval between the previous and the next slide in auto slide show mode. | ||
| Zoom | Magnify the picture (Zoom In or Zoom Out).While the picture is magnified:Use the arrow keys (», «, ») to pan around the magnified picture.Touch ➡ to return to Normal (100%) magnification. | |
| Rotate Rotates pictures selectable by 90°, 180° or 270°. | ||
| View Mode | Adjust the orientation of the player during picture display: | |
| Horizontal | Hold the player horizontally. The direction of the control keys (», «) will change in this mode. | |
| Auto Hold | the player vertically. | |
To use the keys please proceed as described in the paragraph "Hints According to User Interface/Quick Option Menu Key Functions".
Playing Movies
Touch and hold M until the main menu is displayed. Select with « or » "Movies" and confirm with ▶. The Movie Explorer screen will appear.
To use the keys please proceed as described in the paragraph "Hints According to User Interface/Explorer Key Functions".
Video Mode
natural_image
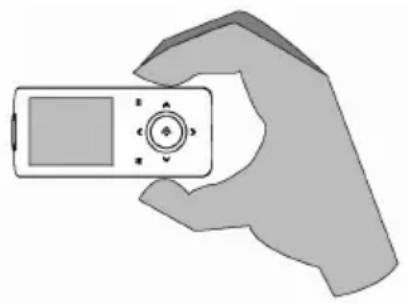
Illustration of a hand holding a remote control device (no text or symbols visible)When a movie is playing, hold the player horizontally.
Important Notice:
The direction of the control keys (», «, ) with change in this mode:
| Function | Operation |
| Adjust volume | ▸: Touch: increase volumeTouch and hold: increase volume continuously▸: Touch: decrease volumeTouch and hold: decrease volume continuously |
| Previous movie Shortly touch the button. | |
| Next movie Shortly touch the button. | |
| Fast Forward Touch and hold the button. | |
| Rewind Touch and hold the button. | |
To use the other keys please proceed as described in the paragraph "Hints According to User Interface/Basic Operation".
Quick Option Menu Movie
Touch and hold ≡to access the Quick Option menu while a movie is being played.
Brightness Allows to adjust brightness in five steps.
Important: This player is only able to play AVI videos that have been converted with the provided converting tool. The converting tool can support ASF, AVI, MPG, MP4, RM, VOB files, etc.
Video Conversion
Use the video conversion software utility included on the Installation CD to create video files that are suitable for playback on the player.
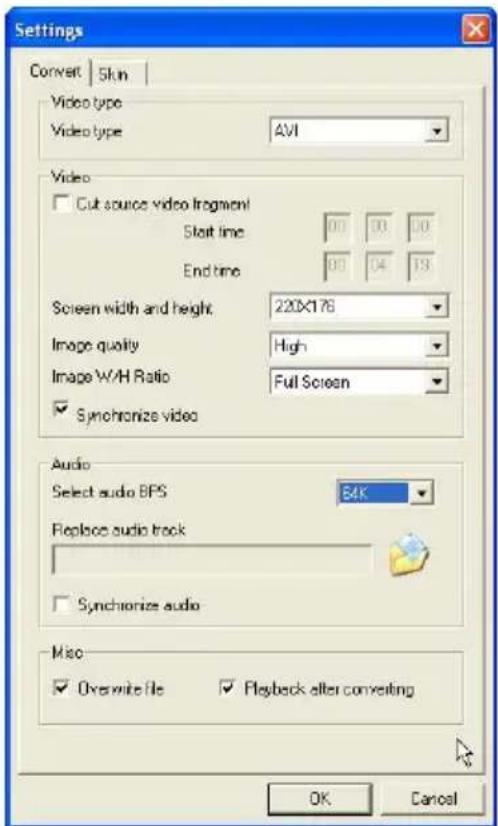
Your player supports XviD-encoded AVI files with the following specifications: 220 x 176 resolution at 30 frames per second (fps).
Important notice:
The video conversion software is included for your convenience and is compatible with Microsoft Windows operating systems only. There are many other video conversion utilities available for download or purchase on the internet. Because the program is licensed free of charge, there is no warranty for the program, to the extent permitted by applicable law.
Because the program is licensed free of charge, there is no warranty for the program, to the extent permitted by applicable law.
Minimum System Requirements
OS Support: Microsoft 2000/XP/Vista (32-bit only)
CPU: Pentium class equivalent or better
Memory (RAM): > 64MB
Free HD Space: 10MB
Video: 24-bit color adapter
WMP: Windows Media Player 9 or better
Installation
- Locate the MP3 Player Utilities setup file on the Installation CD: setup.exe.
- Double-click the file to start the installation process.
- Follow the on-screen instructions to complete the installation process.
Converting Video
To start the program, locate the Video Converter program in your Windows Start menu.
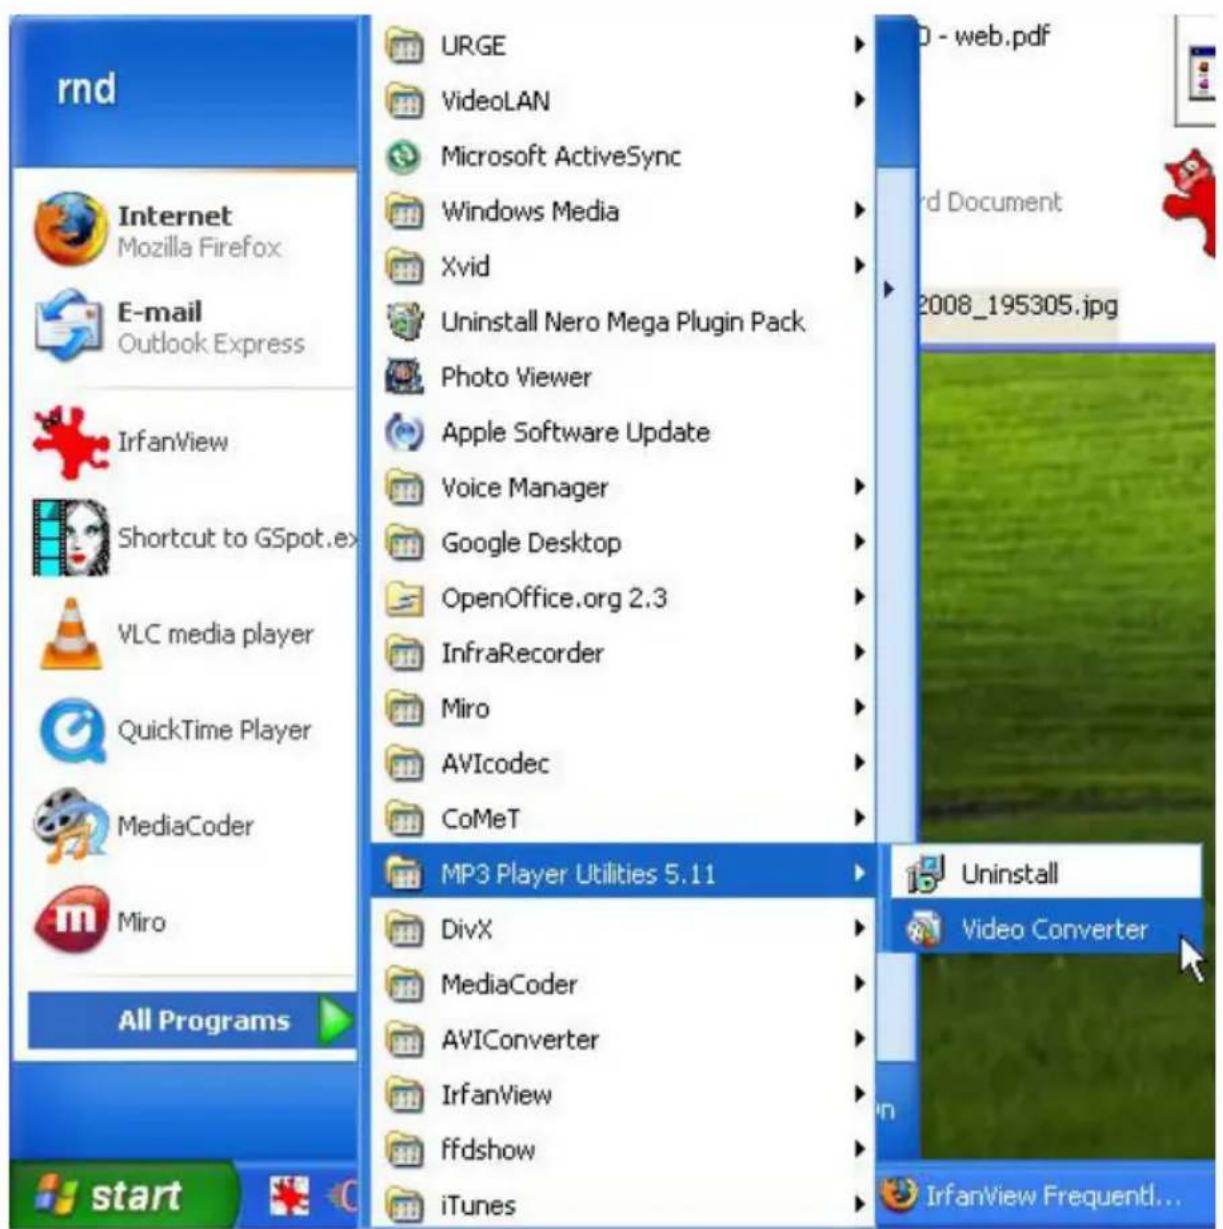
The application window shown below will appear.
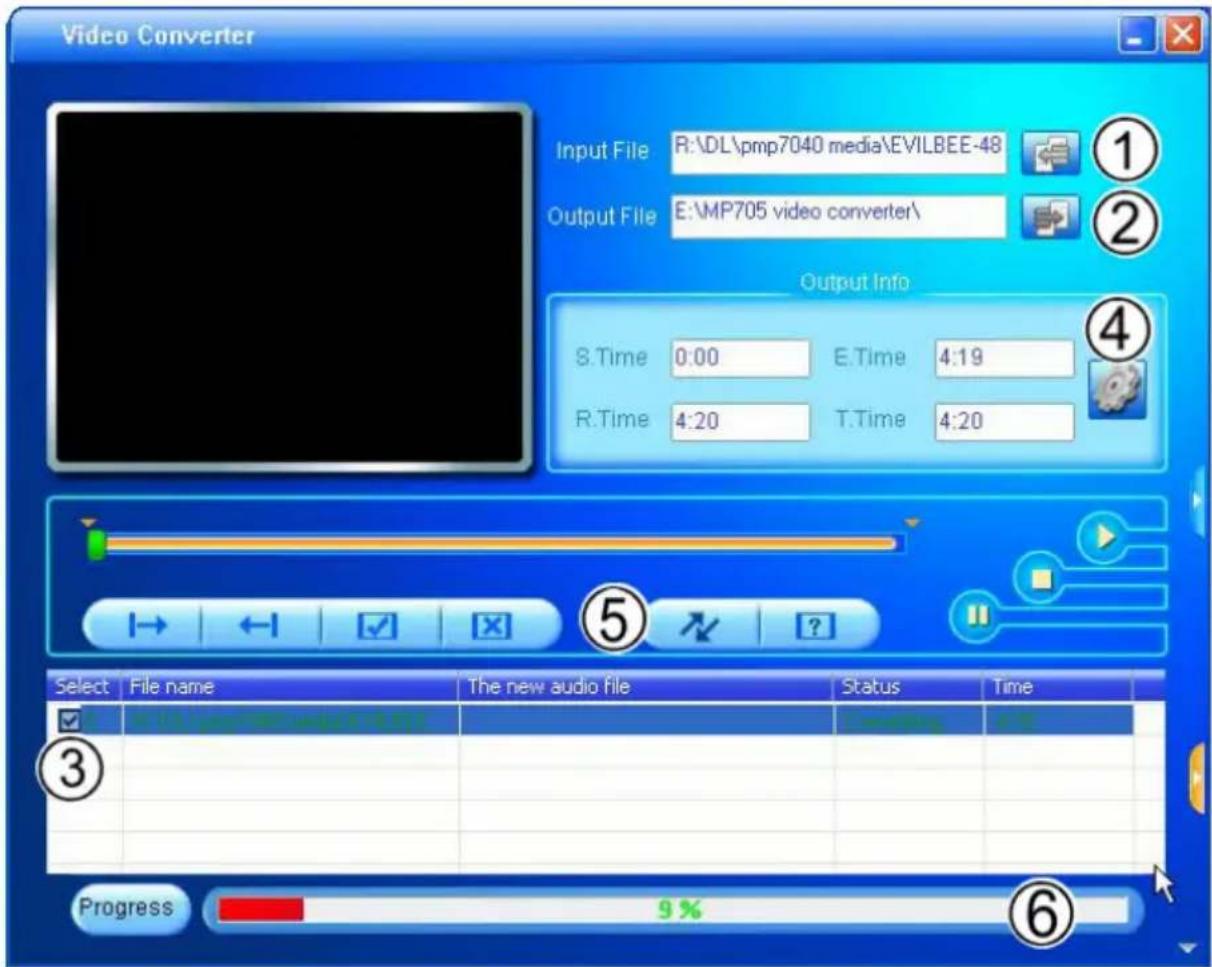
- Click the "Input File" button to select the source video file to convert.
● The source file must be one of the following video types: AVI, RM, RMVB, MPG, MPEG, MP4, ASF, WMV, MKV, DAT, or VOB.
- DirectX 9.0, Media Player 9.0, and other codecs must be installed to support all media types.
-
Click the "Output File" button to choose a name and location for the completed file after conversion.
-
This conversion will be added to the Job Queue. Repeat Steps 1 and 2 to continue adding conversion jobs until you are finished.
-
[Optional] Click the "Settings" button to change the conversion options. Do not change these settings if you are not familiar with digital video conversions.
- Click the "Convert" button to begin converting all of the files in the Job Queue.
- The progress bar displays the progress of the conversion job. When the progress bar reaches "100%", the conversion job has been completed.
FM Radio
Important:
Earphone cable serves as an extended antenna, so please keep it plugged in.
Select "Radio" in the main menu. Then touch M to start the FM radio.
Radio Mode
Upon entering FM Radio mode, you can tune to stations manually or to preset stations.
Note: You must save preset stations prior to using preset tuning mode. See the Quick Option Menu section below for details.
- Touch M to change between tuning modes:
- Manual: Touch « or » to tune to stations manually. To auto-seek to the next available broadcast station, touch and hold « or ».
- Preset: Touch « or » to tune to the next Preset Station. You must save Preset Stations prior to using this tuning method.
- Touch ≧ or ⬆ to adjust the volume level.
- Touch » to mute the volume.
- Touch and hold ≡ to access the Quick Option menu.
- Touch and hold M to return to the Main menu.
Quick Option Menu Radio
Touch and hold to access the Quick Option menu.
| Add/Delete Preset | Save or delete the current station to/from the Preset Station list. |
| FM Preset View | the Preset Station list. Select a preset from the list to tune to the station. |
| Sensitivity Set the sensitivity of the Auto Scan feature. | |
| Auto Scan Scan for all stations in broadcast reception range. The player will automatically seek and save all frequencies with a broadcast signal to the Preset Station list.Note: The auto scan feature will overwrite any previously stored Preset Stations. | |
| Area Set the FM frequency range area (US/World, Europe/Others, Japan). | |
Reading an E-Book
Touch and hold M until the main menu is displayed. Select with « or » "E-Books" and confirm with ◎. The E-Book Explorer screen will appear.
To use the keys please proceed as described in the paragraph "Hints According to User Interface/Explorer Key Functions".
E-Book Mode
The player can display text files with manual control or as a "slideshow" (text files automatically advance to the next page). Touch 🔊 to toggle between Auto and Manual Mode.
Manual Mode display
To display a text file, select and confirm the file from the EBook List.
| Key | Function |
| ^ | Skip back one line. |
| ∨ | Skip forward one line. |
| » | Skip to the next page. |
| « | Skip to the previous page. |
| M | Return to the EBook List. |
Auto Mode display
Select a file from the EBook List and touch 📋 to confirm. Touch 🔊 to start the slideshow. Touch 🔊 again to stop the slide-show.
Note: You can change the duration of time between the text files in the Quick Options menu.
Adding a bookmark
Touch ☐ save the current location as a bookmark tag. "Tag has been saved!" will appear on the screen.
Quick option Menu Ebook
Touch and hold to access the Quick Option menu.
| Bookmark Open (go to) or delete a bookmark. | |
| Auto Page Set the duration between pages in Auto Mode. |
Explorer
Enter Explorer mode to view all folders and files loaded on your player.
Touch and hold M until the main menu is displayed. Select with « or » "Explorer" and confirm with ◦. If a compatible file is selected and confirmed, the file will be played in its corresponding mode.
Music Mode: MP3, WMA
Video Mode: AVI
Photo Mode: JPEG
EBook Mode: TXT
To use the keys please proceed as described in the paragraph "Hints According to User Interface/Explorer Key Functions".
Customized Settings
To customize the player settings:
- In the main menu, select the "Setup" item and touch ➕ to enter the system settings mode.
- Touch ⬆ or ⬇ to select setting item. Confirm with ⬆. Touching the key ◀ brings you one level up into the next menu.
| Sound | Equalizer Normal, Classic, Jazz, Rock, Pop, Bass, SRS | |
| Repeat Normal: Play all saved music files in order once.Repeat One: Play the current or selected file repeatedly.Repeat All: Play all the music files in order repeatedly.Random: Play all the files in random repeatedly. | ||
| Lyric | On, Off | |
| Time | Sleep Set the duration of time (in minutes) that the player will remain on when it is idle. The setting of "OFF" will disable the Power Saving feature. | |
| Date & Clock | Set the internal clock of the player.Touch ↗ or ↕ to select a field to adjust.Touch << or >> to adjust the selected field. | |
| Display | Backlight Adjust | The duration of time (in seconds) that the backlight will remain on after a key touch. A setting of "Always On" will keep the backlight on continuously. |
| Brightness Adjust | the brightness of the display. | |
| Language Select language in which the on-screen text is displayed | ||
| System | Music Auto Play | When Auto Play is set to ON, you player will automatically resume playback when it wakes from standby. |
| Default | Restore all of the player's settings to their factory-default state. | |
| Information | Information about the product | |
Firmware Upgrade
From time to time, TEAC may release firmware upgrades to improve the performance of the Player or to add additional features. Please check the TEAC website periodically at www.teac.de to see if new firmware has been released for your player.
If you are experiencing abnormal behavior with your player, you may choose to restore (format) your player before updating its firmware.
Before using this function, please first backup all data in the player. Confirm that the BATTERY charge is sufficient. Do not interrupt the firmware upgrade process – doing so could damage your player and render it inoperable. See the documentation that is included with the firmware upgrade file for detailed instructions.
Troubleshooting
| Problem | Possible | Cause So |
| Cannot power on. | Battery is too low. | Charge the battery. Try charging the player overnight (8 hours). |
| Re-initialize player (press reset hole with metal pin). | ||
| The player has no response when the buttons are touched. | The keys are locked. Unlock the keys. | |
| Player "hangs". | Re-initialize player (press reset hole with metal pin). | |
| Cannot be downloaded from PC. | Unsupported operating system | Ensure that your computer is running a supported operating system. |
| The player is connected through a USB hub. | Try connecting the player directly to your computer. | |
| No connection between player and PC | Check if the USB cable is correctly connected and in good condition. | |
| No more free memory in the player | Delete files which were not longer needed. | |
| No sound when playing an audio file. | The volume is too low. Adjust the volume. | |
| Bad audio file. Delete or skip the file. | ||
| The sound quality of the music is poor | Bad audio file. Delete or skip the file. | |
| The bit rate of the file is too low. | The higher the bit rate of the file, the better it will sound. The minimum recommended bitrate is 128kbps for MP3s and 96kbps for WMAs | |
| Headphone is not connected correctly. | Ensure that the headphones are attached securely to the player. | |
ution
| Problem | Possible | Cause |
| The player will not play my music file | The file format is not supported. | Skip it or reload another file. |
| The file may be copy-protected and you no longer have authorization to play this file. | If you feel this is in error, please contact the service from which you downloaded the file. | |
| Onscreen text looks weird. | Incorrect language setting. | Set in Setup/Language correct language. |
| Re-initialize player (press reset hole with metal pin). | ||
| The video cannot be played. | The file format is not supported. | Make sure the video file is converted to MTV format with the provided converter tool. |
| The video data is corrupted | Skip it or reload another file | |
| The photo cannot be displayed | The file format is not supported | Try to use an image editor. |
| The TXT file cannot be read | The file format is not supported. | Skip it or reload another file. |
| Poor FM reception | Earphone is not connected to the earphone jack. | Connect the ear-phone. The earphone cord functions as an antenna. |
| Electric devices near the player. | Turn off the power of the electric devices. If it is effective, move and use the player away from those electric devices. | |
| The player has malfunctioned | Player "hangs". | Re-initialize player (press reset hole with metal pin). |
| Try updating the player's firmware. Please refer to the Firmware Upgrades section of this manual for instructions. | ||
lution
Technical Specifications
| Item | Specification |
| Capacity The MP-470 is available | with several different capacities. Please refer to the values on the packaging. |
| Battery Type Rechargeable Lithium Polymer-Battery | |
| Battery Life Up to 8 hours | |
| LCD Display 2.0-inch colour TFT display | |
| Audio Output 3.5mm Stereo (Headphone) | |
| Video Format AVI (MPEG-4 (XviD): 220x176, 30fps) | |
| Audio Format MP3, WMA, WAV | |
| Photo Format JPG | |
| Image Resolution 176 X 220 | |
| USB Port USB2.0 | |
| Operating Temperature -5°C .. +40°C | |
| Dimensions | 95 mm x 42 mm x 10 mm |
| Weight | 57 g |
WARRANTY
Model Serial Number
Owner's name
Address
Dealer's name Date of purchase
Dealer's address
Warranty Period
TEAC Europe GmbH, hereinafter called TEAC, warrants this product against any defect in material and workmanship for two (2) years from the date of purchase by the original retail purchaser. According to the following terms this TEAC
product will be repaired without charge of labor and materials by the authorized TEAC service stations, by the authorized TEAC dealers and/or their authorized service stations. TEAC, the authorized TEAC service stations, the authorized
TEAC dealers and/or their authorized service stations may decide whether the defective product will be repaired or replaced as a whole or partially. The TEAC dependencies, the authorized TEAC service stations, the authorized TEAC
replaced as a whole of particularly. The VLTs Deutschland, the authorized VLTs service stations, the authorized VLTs dealers and/or their authorized service stations will also honor this warranty in the other EC and EFTA member states based on the terms in this warranty conditions.
based on the terms in this warranty conditions.
What is Covered and What is Not Covered.
Except as specified below, this warranty covers any defects in materials and workmanship of this product. The following
are not covered by the warranty:
-
Damage to or deterioration of the external cabinet. 2. Any unit that has been altered or on which the serial number has been deferred, modified, or removed.
-
Any unit that has been altered of on which the serial 3. Damage, deterioration or malfunction resulting from:
(a) accident, misuse, abuse or neglect:
(b) failure to follow instructions supplied with the product;
(c) any shipment of the product. Any damage arising of transportation is the liability of the freight company. Any damage arising of transportation and any implicit and explicit risks are the liability of the freight company. This is expressly not a liability of TEAC;
expressively not a liability of TEAC, (d) repair or attempted repair by anyone not authorized by TEAC to repair this product;
(d) repair of attempted repair by anyone not authorized by TEAO to repair this product, (e) causes other than product defects, including lack of technical skill, competence or experience of the user. Espe-
cially damages which may arise of incidental use respectively by improper ventilation.
(f) damages caused by improper or incorrect installation of software,
(g) periodic check-ups,
(h) maintenance respectively repair of parts due to normal wear and tear,
(i) adoptions or adjustments to the product in order to conform to different national technical or safety standards of
any country other than the one for which the product was originally designed and manufactured.
These warranty terms do not affect any statutory rights of consumers which were granted by the respective national laws.
TEAC Europe GmbH
DSPD
Bahnstraße 12
65205 Wiesbaden-Erbenheim
TEAC Europe GmbH, DSPD:

- Disposing of the Product
- Content
- Important Notice
- Safety Precautions
- Battery
- Earphone
- Conneting to a PC
- Important
- Note:
- Key Features
- System Requirements
- Package Content
- Before Using
- Driver
- Windows2000/XP/ME/Vista, Macintosh OS X
- Windows98/SE
- Connect to a PC and download audio files
- Removing the player safely from the PC
- Windows2000/XP
- Windows98
- Macintosh
- Charging the battery
- Important:
- Switching On/Off
- Switching On:
- Switching Off:
- Key Lock
- Reset
- Hints According to User Interface
- Using the Touchpad Controls
- Main Menu
- Quick Option Menu Key Functions
- Playing Music
- Music Explorer Screen
- Music Mode
- Quick Option Menü Music
- Viewing Photos
- Hint:
- Picture Mode
- Quick Option Menu Picture (Photo)
- Playing Movies
- Video Mode
- Important Notice:
- Quick Option Menu Movie
- Video Conversion
- Installation
- Converting Video
- FM Radio
- Radio Mode
- Quick Option Menu Radio
- Reading an E-Book
- E-Book Mode
- Manual Mode display
- Auto Mode display
- Adding a bookmark
- Quick option Menu Ebook
- Explorer
- Customized Settings
- Firmware Upgrade
- WARRANTY
- TEAC Europe GmbH
Brand : TEAC
Model : MP-470
Category : Mp3 player