
RRCD 1300 - Radio GRUNDIG - Free user manual and instructions
Find the device manual for free RRCD 1300 GRUNDIG in PDF.


| Product type | Radio with CD and cassette player |
| Brand | Grundig |
| Model | RRCD 1300 |
| Dimensions (W x H x D) | 400 x 235 x 195 mm |
| Weight | 2.8 kg |
| Power supply (mains) | 230 V, 50/60 Hz |
| Power supply (battery) | 6 x 1.5 V IEC R20/UM1/D size |
| Backup batteries | 2 x 1.5 V IEC R6/UM3/AA |
| Max. power consumption (operation) | 25 W |
| Max. power consumption (standby) | < 2 W |
| Output power (music signal) | 2 x 3 W |
| Output power (sine wave) | 2 x 1.5 W |
| Headphone jack | 3.5 mm stereo |
| Radio frequency bands | FM 87.5 - 108.0 MHz, MW 522 - 1620 kHz |
| CD frequency response | 20 Hz - 16 kHz |
| CD signal-to-noise ratio | ≥ 65 dB |
| Tape speed | 4.76 cm/s |
| Ultra Bass System (UBS) | Yes, switchable |
| Tape head cleaning interval | Every 50 hours of use |
| Laser class | Class 1 (safe under normal use) |
| Spare parts available | Replacement mains lead sets (UK: 8290-991-224, Euro: 8290-991-316) |
| Safety notes | Do not open casing; avoid moisture; disconnect during thunderstorms |
Frequently Asked Questions - RRCD 1300 GRUNDIG
User questions about RRCD 1300 GRUNDIG
0 question about this device. Answer the ones you know or ask your own.
Ask a new question about this device
Download the instructions for your Radio in PDF format for free! Find your manual RRCD 1300 - GRUNDIG and take your electronic device back in hand. On this page are published all the documents necessary for the use of your device. RRCD 1300 by GRUNDIG.
USER MANUAL RRCD 1300 GRUNDIG
CD TAPE/OFF Switches between the CD, TAPE and RADIO input sources. RADIO Switches off the device.
+ VOLUME – Adjusts the volume.
UBS Switches the Ultra Bass System on and off.
Headphone jack for connecting a headphone set with a jack plug ( 3.5 mm) on the left side of the device. This automatically switches off the loudspeakers.
AC\~ Socket for connecting the power cord (on the back of the device).
Radio unit (RRCD 1300)
ANTENNA Telescopic antenna for FM (VHF) reception.
FM MW Frequency band switch FM (VHF) and MW (medium wave) (on the right side of the device).
TUNING For tuning to radio stations (on the right side of the device).
MONO STEREO Switches between Mono and Stereo reception (on the back of the BEAT CUT 0 1 device)
Radio unit (RRCD 1310)
ANTENNA Telescopic antenna for FM (VHF) reception.
BAND Frequency band switch FM (VHF) and MW (medium wave).
▶| SKIP |◀| Press briefly to change the frequency up and down in steps. Press and hold down to start a forward or reverse search.
PROG/MEM For storing radio stations as presets.
▶II Selects the next preset position. PRESET UP Selects the next preset number when saving radio stations.
STOP ■/ Selects the previous preset position. PRESET DOWN Selects the previous preset number when saving radio stations.
REPEAT/ST. MONO Switches between mono and stereo reception
CD unit (RRCD 1300)
OPEN Opens the CD compartment.
PLAY/PAUSE▶II Starts and pauses playback.
▶▶Press briefly to select the next or previous track.
Press and hold down to start a forward or reverse search.
STOP ■ Ends playback, deletes track memories.
PROG For saving tracks when creating a memory.
REPEAT For repeating a track or the entire CD.
CD unit (RRCD 1310)
OPEN Opens the CD compartment.
▶ II Starts and pauses playback.
PRESET UP
▶ SKIP ▶ Press briefly to select the next or previous track.
Press and hold down to start a forward or reverse search.
STOP ■/ Ends playback.
PRESET DOWN
PROG/ For storing tracks when creating a track memory.
MEM
REPEAT/ For repeating a track or the entire CD.
ST. MONO
Tape unit
Indicates the tape direction.
■ Pauses recording and playback.
■ ▲ Ends playback/recording of the tape
and opens the tape compartment.
◀ Fast forwards the tape to the end.
▶▶ Rewinds the tape to the beginning.
Starts playback.
Starts recording.
BEAT CUT 0 1 Suppresses whistling noises when recording from MW radio stations (on the back of the device).
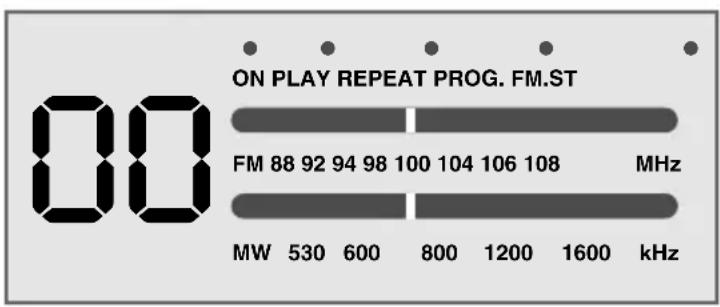
Displays (RRCD 1300)
other
| Frequency Range | Value | | --------------- | ----- | | 00 MHz | 00 | | 88–92 MHz | 88 | | 92–94 MHz | 92 | | 94–98 MHz | 94 | | 98–100 MHz | 98 | | 100–104 MHz | 100 | | 104–106 MHz | 104 | | 106–108 MHz | 106 | | 108 MHz | 108 | | 1200 kHz | 1200 | | 1600 kHz | 1600 |☐ In CD mode: shows the total number of tracks and the current track. Flashes when playback is paused.
ON • Operation indicator. Lights up red during operation.
PLAY • In CD mode: lights up during playback. Flashes when playback is paused.
REPEAT In CD mode: flashes when a track is repeated. Lights up when the whole CD is repeated.
PROG. In CD mode: flashes when a track memory is saved. Lights up when a track memory is played.
FM.ST • In radio mode: an FM stereo station is being received.
FM 88 ... In radio mode: Frequency scale for the FM (VHF) frequency band.
108 MHz
MW 530 ... In radio mode: Frequency scale for the MW (medium wave) frequency band.
1600 kHz
Displays (RRCD 1310)

STEREO MONO REPEAT MEMORY
00:0.00 00 In radio mode: shows the frequency, shows the preset number.
In CD mode: shows the total number of tracks and the total playing time; shows the current track and the elapsed playing time; flashes when play-back is paused.
In tape mode: indicates TAPE as the input source.
FM In radio mode: FM (VHF) frequency band indicator.
MW In radio mode: MW (medium wave) frequency band indicator.
MHz In radio mode: in combination with the FM frequency indicator.
kHz In radio mode: in combination with the MW frequency indicator.
MEMORY In radio mode: flashes when a radio station is saved, lights up when tuned to a stored radio station.
In CD mode: flashes when a track memory is created. Lights up when a track memory is played back.
REPEAT In CD mode: flashes when a track is repeated. Lights up when the whole CD is repeated.
MONO In radio mode: the device is switched to mono reception.
STEREO In radio mode: an FM stereo station is being received.
Power supply
Mains operation
Note:
Check that the mains voltage on the type plate (on the bottom of the device) corresponds to your local mains supply. If this is not the case, contact your specialist dealer.
1 Plug the mains cable supplied into the »AC \~« socket on the back of the device.
2 Plug the power cord into the wall socket.
Caution:
The only way to disconnect the device from the mains supply is to pull out the plug.
Battery operation
1 Open the battery compartment on the bottom of the device by pressing the mark and removing the lid.
2 Insert six batteries (6 x 1.5 V, type IEC R20/UM1/D size), observing the polarity marked on the lid of the battery compartment.
Notes:
Remove the batteries when they are flat or when you know that the device will not be used for a long period of time.
The manufacturer accepts no liability for damage resulting from leaking batteries.
The batteries are switched off during mains operation.
Environmental note:
Batteries, including those which contain no heavy metals, may not be disposed of with household waste. Please dispose of used batteries in an environmentally responsible manner. Find out about the legal regulations which apply in your area.
Putting in backup batteries (RRCD 1310)
During mains operation, the back-up batteries ensure that stored settings are not lost in the case of a power failure or when the device is briefly disconnected from the mains.
1 Open the backup battery compartment inside the battery compartment by pressing the catch and removing the lid.
2 When inserting the batteries (2 x 1.5 V, type IEC R6/UM3/AA), observe the polarity marked on the base of the battery compartment.
Additional information for units sold in the UK.
Units sold in the UK are suitable for operation from a 240V ac, 50Hz mains supply.
The range of multi-system receivers is built to work in most European countries. However, the mains plug and socket system for the UK differs from many European countries.
This appliance has been supplied with a fitted, non-removable, approved converter plug for use in the UK. This converter plug is fitted with a 5A rated fuse.
In case this appliance is supplied with a moulded 2-pin Euro plug only, which is unsuitable for UK operation, this must be cut off and immediately disposed of. An approved 13A, 3-pin UK plug should then be fitted by a qualified electrician.
Note:
The severed Euro plug must be destroyed to avoid a possible shock hazard should it be inserted into a socket elsewhere.
If a non-rewireable 3-pin plug or a rewireable 13A (BS1363) 3-pin plug is used, it must be fitted with a 5A ASTA or BSI approved BS1362 fuse. If any other type of plug is used it must be protected by a 5A fuse either in the plug, or at the distribution board. If this type of plug becomes defective, ensure that the fuse is removed before disposal, to eliminate potential shock hazard.
If it is necessary to change the fuse in the non-rewireable plug, the correct type and rating (5A ASTA or BSI approved BS1362) must be used and the fuse cover must be refitted. If the fuse cover is lost or damaged, the lead and plug must not be used until a replacement is obtained. Replacement fuse covers should be obtained from your dealer.
Important:
The wires in the mains lead are colour coded in accordance with the following code:
BLUE - NEUTRAL
BROWN - LIVE
As the colours of the wires in the mains lead of your appliance may not correspond with the coloured marking identifying terminals in your plug, proceed as follows:
Connect the BLUE coloured wire to plug terminal marked with the letter "N" or coloured black.
Connect the BROWN coloured wire to the plug terminal marked with the letter "L" or coloured red.
In no circumstance must any of the wires be connected to the terminal marked with the letter "E", earth symbol "m", coloured green, or green & yellow.
Replacement mains lead sets can be obtained from your local dealer, or by contacting Grundig Consumer Relations (01788 570088)
Moulded 3-pin lead set, suitable for UK use:
Ref: Leadset UK 8290-991-224
Moulded 2-pin Euro lead set, not suitable for UK use:
Ref: Leadset Euro 8290-991-316
CARE AND SAFETY
To ensure that this device provides you with long-term satisfaction and enjoyment, please observe the following instructions.
This device is designed for the playback of audio signals. Any other use is expressly prohibited.
Protect the device and the CDs from rain, moisture (dripping or splashing water), sand and heat. Do not leave it next to heaters or inside parked cars in the sun.
Make sure there is adequate ventilation when positioning the device. There must be a free space of at least 10 cm behind the device. Do not place objects on the ventilation slots.
Do not place any objects containing liquids (for example, vases) on the device. Do not insert any foreign bodies in the CD compartment of the device.
Do not place any objects such as burning candles on the device.
Bringing the device in from the cold can cause condensation on the CD lens, which prevents it from playing. Give the device time to warm up.
The CD part contains self-lubricating bearings, which must not be oiled or greased.
Never open the device casing under any circumstances. No warranty claims are accepted for damage resulting from improper handling.
Thunderstorms are a danger to all electrical devices. Even if the device is switched off, it can be damaged by a lightning strike to the mains. Always remove the mains plug during an electrical storm.
Do not use any cleaning agent, as this may damage the casing. Clean the device with a clean, moist leather cloth.
Please note when deciding where to put the device that furniture surfaces are covered by various types of lacquer and plastic, most of which contain chemical additives. These may cause corrosion to the feet of the device, thus resulting in stains on the surface of the furniture which can be difficult or impossible to remove.
General information on laser devices
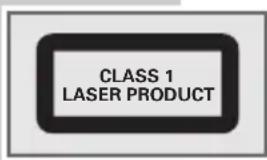
You will find a symbol similar to the one shown here on the bottom of the device.
CLASS 1 LASER PRODUCT means that the laser is designed in such a way as to ensure that the maximum permissible emission value cannot be exceeded under any circumstances.
If operating devices or methods other than those specified here are employed, it may lead to dangerous exposure to emissions.
Invisible laser radiation is emitted if the CD compartment is opened and the safety locking mechanism is shorted. Do not expose yourself to this radiation.
GENERAL FUNCTIONS
Switching on and off
1 Switch on the device with the required input source by moving the switch to the »CD TAPE/OFF RADIO« position.
2 Move the »CD TAPE/OFF RADIO« switch to the »TAPE/OFF« position to switch off the device.
Selecting the input source
1 Select the input source (CD, TAPE or RADIO) using »CD TAPE/OFF RADIO«.
Adjusting the volume
1 Adjust the volume with »+ VOLUME -«.
Switching the Ultra Bass System on and off
This function boosts the bass frequencies.
1 Switch the Ultra Bass System on and off with »UBS«.
Listening with headphones
1 Connect the headphones to the headphones socket » 📤« (ø 3.5 mm) on the left of the device.
– This switches off the loudspeakers.
RADIO MODE
Antennas
1 For FM stations (VHF) extend the telescopic antenna »ANTENNA«.
Note:
If the FM signal is too strong, it is advisable to push in the telescopic antenna.
2 The radio has a built-in rod antenna for MW reception. Turn the device around to direct the antenna.
Selecting the radio input source
1 Move the »CD TAPE/OFF RADIO« switch to the »RADIO« position.
Selecting radio stations (RRCD 1300)
1 Select the frequency band (FM or MW) with »FM MW« (on the right side of the device).
2 Select the radio station using »TUNING« (on the right side of the device).
- The frequency is displayed on the frequency scale.
Setting and storing radio stations (RRCD 1310)
Automatic station search
1 Select the frequency band (FM or MW) using »BAND«.
2 Activate the station search by pressing »SKIP |«« or »SKIP ▶»|« until the frequency display changes to rapid run-through.
– The search stops when a programme is found.
Manual station search
1 To move the frequency forward in steps, briefly press »SKIP |«« or »SKIP ▶»|« several times.
– The frequency changes in steps of 50 kHz.
Storing stations on station positions
You can store up to 15 stations in the FM and MW frequency bands (for example nine FM and six MW stations).
1 Select the frequency band (FM or MW) using »BAND«.
2 Press »SKIP |«« or »SKIP ▶»|« to select the station.
3 Press »PROG/MEM« briefly to activate the memory function.
4 Select the preset number with »PRESET UP« or »STOP/PRESET DOWN«.
5 Press »PROG/MEM« to save the station.
6 To store more stations, repeat steps 2 to 5.
Note:
You can replace a station on a preset with a new one by carrying out steps 2 to 5 as described above.
Selecting a preset position
1 Select the frequency band (FM or MW) using »BAND«.
2 Select the station preset position with »PRESET UP« or »STOP/PRESET DOWN«.
Stereo/mono reception
If the radio is receiving FM stereo stations, the stereo indicator »FM.ST •« lights up (RRCD 1300) or »STEREO« appears in the display (RRCD 1310). However, if the signal from the FM stereo station is weak, you can improve the sound quality by switching to mono reception.
1 Use »MONO STEREO« (RRCD 1300, on the back of the device) or »REPEAT/ST. MONO« (RRCD 1310) to switch to mono reception.
2 Use »MONO STEREO« (RRCD 1300, on the back of the device) or »REPEAT/ST. MONO« (RRCD 1310) to switch to stereo reception.

The device is suitable for music CDs displaying the logo shown here (CD-DA) and for CD-Rs and CD-RWs with audio data.
When burning CD-R and CD-RWs with audio files, various problems may arise which could lead to interference in playback. This can be caused by faulty software or hard-
ware settings or by the CD being used. Should such problems arise, contact the customer services of your CD burner or software manufacturer or look for relevant information, for example on the Internet. When you are making audio CDs, observe all legal guidelines and ensure that the copyright of third parties is not infringed.
Always keep the CD compartment closed to prevent dust from collecting on the laser optics. Do not attach adhesive labels to CDs. Keep the surfaces of CDs clean. You can play standard 12 cm CDs as well as 8 cm CDs on your device. An adapter is not necessary.
Selecting the CD input source
1 Move the »CD TAPE/OFF RADIO« switch to the »CD« position.
2 Press »OPEN« to open the CD compartment.
3 Insert a CD in the compartment with its label facing upwards.
4 Close the lid of the CD compartment.
- The device reads the content of the CD. The display shows the number of tracks (RRCD 1300) or the number of tracks and the total playing time (RRCD 1310).
CD playback
1 Press »PLAY/PAUSE ▶II« to start playback.
– Playback begins with the first track.
- Display: the current track number (RRCD 1300) or the current track number and the elapsed playing time (RRCD 1310).
- Playback stops at the end of the CD.
2 Press »PLAY/PAUSE ▶II« to pause playback pause.
3 Press »PLAY/PAUSE ▶II« to resume playback.
4 Press »STOP ■« to end playback.
5 Press »OPEN« to open the CD compartment and take out the CD.
6 Close the CD compartment.
Repeating the current track
1 Press »SKIP ◀◀« briefly during playback.
- The track is repeated from the beginning.
Selecting another track
1 During playback, keep pressing »SKIP |«« or »SKIP»« until the number of the track you want to hear appears in the display.
- Playback of the selected track starts automatically.
Note:
You can also select tracks in the stop position. However, you must then start playback of the track with »PLAY/PAUSE▶II«.
Searching for a passage within a track
1 During playback, press »SKIP |«« or »SKIP >>|« and hold it down until you find the passage you want to hear.
- Playback starts when you release »SKIP |«« or »SKIP ▶▶|«.
Note:
During the search the volume is reduced.
Repeating a track (Repeat One)
1 During playback, press »REPEAT« once.
- The current track is repeated.
2 To quit the function, press »REPEAT« twice.
Repeating all tracks (Repeat All)
1 During playback, press »REPEAT« twice.
– The whole CD is played back repeatedly.
2 To end this function, press »REPEAT« once.
Creating a track memory
You can store up to 20 tracks (RRCD 1300) or up to 16 tracks (RRCD 1310) of the current CD in a particular order and then play them back. A track may be stored more than once. Programming is only possible in the stop position.
Selecting and storing tracks (RRCD 1300)
1 Press »PROG« to call up the function.
- Display: »0 I« for the track selection and »PROG. •« flash.
2 Select the track by pressing » |«« or »▶▶|«.
3 Press »PROG« to save the track.
- The new memory position is briefly displayed, then »02« for the track selection and »PROG.●« flash.
4 To store more tracks, repeat steps 2 to 3.
Selecting and storing tracks (RRCD 1310)
1 Press »PROG/MEM« to call up the function.
- Display: »Pr:01« for the first preset position, »MEMORY« flashes.
2 Select the track by pressing »SKIP |«« or »SKIP ▶▶|«.
3 Press »PROG/MEM« to save the track.
4 To store more tracks, repeat steps 2 to 3.
Playing back a track memory
1 Start the track memory by pressing »PLAY/PAUSE ▶II«.
- Playback begins with the first programmed track.
2 Press »STOP ■« to end playback.
3 To play the track memory again, press »PROG/MEM« and afterwards »PLAY/PAUSE ▶II«.
Changing the track selection
1 In stop mode, keep pressing »PROG/MEM« until the number of the track you want to replace appears in the display.
2 Select the number of the new track by pressing »SKIP |« or »SKIP ▶|«.
3 Press »PROG/MEM« to save the new track.
Adding tracks
1 In stop mode, keep pressing »PROG/MEM« until the track number shown in the display is zero (RRCD 1300) or »----« appears (RRCD 1310).
2 Select the number of the new track by pressing »SKIP |« or »SKIP ▶|«.
3 Press »PROG/MEM« to save the new track.
Deleting the track memory
The CD must be in the stop position.
1 Press »OPEN/CLOSE« to open the CD compartment or
- press »CD TAPE/OFF RADIO« to switch the device to »RADIO«.
- Press »CD TAPE/OFF RADIO« to switch the device to »TAPE/OFF«.
TAPE MODE
Selecting the tape input source
1 Move the »CD TAPE/OFF RADIO« switch to the »TAPE« position.
2 Press » ■ ▲« to open the tape compartment.
3 Insert a tape in the compartment with the open side facing up and the full reel on the right side.
4 Close the tape compartment.
Tape playback
1 Press » ◀« to start playback.
– Playback ends at the end of the side of the cassette.
2 Press »ll« to pause playback.
Press »ll« to resume playback.
3 End playback by pressing » ■ ▲«
4 Press » ■ ▲« again to open the tape compartment and take out the cassette.
Fast forward and rewind
1 Press » ◀◀◀« or »▶▶◀ when the tape is in the stop position.
- »◀◀◀« fast forwards to the end of the tape, »▶▶◀ « rewinds to the beginning of the tape.
2 Press » ■ ▲ « at the required position on the tape.
Tape recording
Erase protection
Every new recording overwrites the existing recording on the tape.
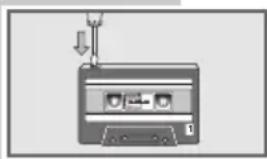
You can protect your own tapes against accidental erasure by breaking the safety tabs on the top of the tape.
Pre-recorded commercial music tapes are already protected against accidental erasure.
If you want to record on to a protected tape, cover the opening with adhesive tape.
Notes:
Only use NORMAL-type cassettes (IEC I) for recording. CHROME (IEC II) or METAL (IEC IV) tapes are not suitable.
The Ultra Bass System does not affect recording.
Recording from the radio
1 Put in a cassette with the protection tabs intact and press » ◀◀◀ « or »▶▶ « to find the position on the tape.
2 Move the »CD TAPE/OFF RADIO« switch to the »RADIO« position and select the radio station.
3 Press » ● « to start recording.
- The » ◀ button is automatically engaged.
- The device automatically stops recording at the end of the tape.
natural_image
Illustration of a cassette tape with a downward arrow above it (no text or symbols)TAPE MODE
4 Press »ll« to pause recording.
Press »ll« to resume recording.
5 To break off recording, press » ■ ▲«.
Recording from a CD
1 Put in a cassette with the protection tabs intact and press » ◀◀◀ « or »▶▶◀ to find the position on the tape.
2 Move the »CD TAPE/OFF RADIO« switch to the »CD« position.
3 Pause the CD during playback at the required position by pressing »PLAY/PAUSE ▶II«.
4 Press » ● « to start recording.
- The »◀« button is automatically engaged. CD playback starts automatically.
- The device automatically stops recording at the end of the tape.
CD synchro recording
1 Put in a cassette with the protection tabs intact and press » ◀◀◀ « or »▶▶◀ to find the position on the tape.
2 Move the »CD TAPE/OFF RADIO« switch to the »CD« position.
3 Press » ● « to start recording.
- The »◀« button is automatically engaged. Playback starts automatically from the beginning of the CD or the beginning of the stored music program, if you first pressed »PROG/MEM«.
- The device automatically stops recording at the end of the tape.
Cleaning the tape drive
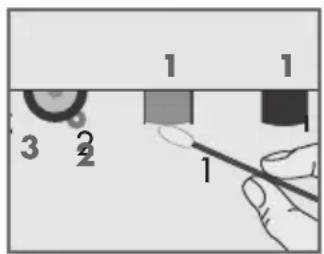
To guarantee good recording and playback quality, clean the parts shown (1, 2, 3) after every 50 hours of use, or once a month.
Open the tape compartment, moisten a cotton swab with alcohol or a special head-cleaning fluid and clean the idler (3), the capstan (2) and the magnetic heads (1). Close the cassette compartment. You can also play a cleaning cassette to clean the magnetic heads (1).
Protect your cassettes from humidity, dust, heat and cold.
Do not store your cassettes near devices with strong magnetic fields such as television sets or stereo speakers.
After using a cassette, put it back in its protective case.
Technical data
This device is noise-suppressed according to the applicable EU directives.
This product fulfils the European directives 89/336/EEC, 73/23/EEC and 93/68/EEC.
This device conforms to the safety regulation DIN EN 60065 (VDE 0860) and therefore the international safety regulation IEC 60065.
Never open the device casing. The manufacturer will not accept any liability for damage resulting from improper handling.
The type plate is located on the bottom of the device.
Power supply
Mains operation: 230 volts, 50/60 Hz
Battery operation: 6 x 1.5 V IEC
(R20/UM1/D-Size)
Back-up batteries: 2 x 1.5 V IEC (R6/UM3/AA)
Max. power consumption
Operation: 25
Standby: < 2 W
Output
DIN 45324, 10% THD
Music signal power: 2 x 3 W
Sine wave power: 2 x 1.5 W
Stereo headphone jack: 3.5 mm ∅
Radio unit
Frequency bands
FM 87.5 ...108.0 MHz
MW 522 ... 1620 kHz
CD unit
Frequency response: 20 Hz ... 16 kHz
Noise voltage ratio: ≥65 dB
Tape unit
Sound recording medium: Compact cassette according to DIN 45516
Track position: International quarter-track
Tape speed: 4.76 cm/sec.
Motor: DC motor
Frequency range: 125 Hz ... 10 kHz
Noise voltage ratio: ≥42 dB
Band speed fluctuation: ≤0.35 %
Dimensions and weight
W x H x L: 400 x 235 x 195 mm
Weight: 2.8 kg
Technical and design modifications reserved.
Troubleshooting
If a fault occurs, first refer to this information before you take the device for repair.
If you are unable to rectify the fault using the information given here, contact your local dealer or service specialist.
Under no circumstances should you attempt to repair the device yourself, as this would invalidate the guarantee.
| PROBLEM | POSSIBLE CAUSE | REMEDY |
| GENERAL INFORMATIONNo sound | The volume setting is too lowThe headphones are connectedThe batteries are flatThe batteries are incorrectly insertedThe mains cable is incorrectly connected | Turn up the volumeUnplug the headphonesReplace the batteriesInsert then correctlyConnect the mains cable properly |
| The device does not respond to button commands. | Static electrical discharge | Switch off the device, disconnect the mains cable and plug it in again after a few secondsRemove any batteries |
| RADIOPoor radio reception | Weak radio antenna signalInterference from electrical devices such as televisions, video recorders, computers, neon lamps etc. | VHF (FM): tilt and turn the telescopic antenna, switch to mono reception.MW: turn whole deviceKeep radio recorder away from electrical devices |
| CDPlayback will not start | The CD is damaged or dirty | Replace or clean the CD |
| The CD player skips tracks | A stored track memory is being playedThe RANDOM function is activated | Switch to normal playback or deleteSwitch off the RANDOM function |
| CD-Rs or CD-RWs are not being played back, or being played back incorrectly | The CD is faulty or the software or hardware settings were incorrect during burning | Check the components of your CD burner/burner software or change the CD you are using |
| TAPEPoor cassette playback sound quality | Dust and dirt on magnetic heads, capstans or idlers | Clean the magnetic heads, capstan and idler |
| No cassette recording | Recording protection tab has been broken off | Cover the opening with adhesive tape |
- Radio unit (RRCD 1300)
- Radio unit (RRCD 1310)
- CD unit (RRCD 1300)
- CD unit (RRCD 1310)
- PRESET UP
- PRESET DOWN
- MEM
- MONO
- Tape unit
- Displays (RRCD 1310)
- Power supply
- Mains operation
- Note:
- Caution:
- Battery operation
- Notes:
- Environmental note:
- Putting in backup batteries (RRCD 1310)
- Additional information for units sold in the UK.
- Important:
- CARE AND SAFETY
- General information on laser devices
- GENERAL FUNCTIONS
- Switching on and off
- Selecting the input source
- Adjusting the volume
- Switching the Ultra Bass System on and off
- Listening with headphones
- RADIO MODE
- Antennas
- Selecting the radio input source
- Selecting radio stations (RRCD 1300)
- Setting and storing radio stations (RRCD 1310)
- Automatic station search
- Manual station search
- Storing stations on station positions
- Selecting a preset position
- Stereo/mono reception
- Selecting the CD input source
- CD playback
- Repeating the current track
- Selecting another track
- Searching for a passage within a track
- Repeating a track (Repeat One)
- Repeating all tracks (Repeat All)
- Creating a track memory
- Selecting and storing tracks (RRCD 1300)
- Selecting and storing tracks (RRCD 1310)
- Playing back a track memory
- Changing the track selection
- Adding tracks
- Deleting the track memory
- TAPE MODE
- Selecting the tape input source
- Tape playback
- Fast forward and rewind
- Tape recording
- Erase protection
- Recording from the radio
- Recording from a CD
- CD synchro recording
- Cleaning the tape drive
- Technical data
- Max. power consumption
- Output
- Radio unit
- Frequency bands
- CD unit
- Dimensions and weight
- Troubleshooting
Brand : GRUNDIG
Model : RRCD 1300
Category : Radio