
DR1100 - Radio HAMA - Free user manual and instructions
Find the device manual for free DR1100 HAMA in PDF.


| Product Type | DAB+/FM Radio |
| Brand | Hama |
| Model | DR1100 |
| Dimensions (L x W x H) | 246 x 86.5 x 126 mm |
| Weight | 1.26 kg |
| Power Supply (Mains) | AC 100-240V~60/50Hz |
| Battery Operation | 4 x 1.5V AA batteries (optional) |
| Output Power | 2 x 2 W |
| Frequency Range (DAB) | 174 - 240 MHz |
| Frequency Range (FM) | 87.5 - 108 MHz |
| Antenna | Telescopic, adjustable |
| Display | LCD with backlight (3 levels) |
| Presets | 10 for DAB, 10 for FM |
| Alarm Function | 2 independent alarms with radio or tone, snooze (5 min) |
| Sleep Timer | Adjustable (up to 90 minutes in steps) |
| Headphone Output | 3.5 mm stereo jack |
| Package Contents | Radio, power cable, operating instructions |
| Care & Maintenance | Clean with slightly damp, lint-free cloth; avoid aggressive agents |
| Safety Notes | Read manual, keep away from children, do not modify, use only specified power |
| Recycling | Dispose according to local regulations (WEEE, battery directive) |
Frequently Asked Questions - DR1100 HAMA
User questions about DR1100 HAMA
0 question about this device. Answer the ones you know or ask your own.
Ask a new question about this device
Download the instructions for your Radio in PDF format for free! Find your manual DR1100 - HAMA and take your electronic device back in hand. On this page are published all the documents necessary for the use of your device. DR1100 by HAMA.
USER MANUAL DR1100 HAMA
Operating Instructions
Bedienungsanleitung
Mode d'emploi
Operating Instructions
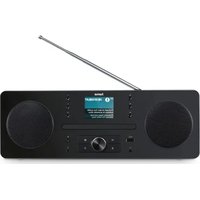
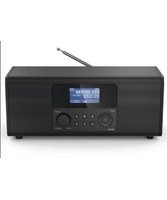
Controls and Displays (Pic.1)
- STANDBY button
- INFO button
- SLEEP button
- Carrying handle
- LCD display
- Jog MODE/SELECT dial
- ALARM 1 button
- SNOOZE/BACKLIGHT button
- DAB/FM button
- MENU button
- VOLUME/SELECT control
- PRESET (Favourites) buttons
- ALARM 2 button
- Headphone output
- Battery compartment cover
-
Power input (100-240V\~, 50/60Hz)
-
Telescopic antenna for DAB/FM reception
Thank you for choosing a Hama product.
Take your time and read the following instructions and information completely. Please keep these instructions in a safe place for future reference. If you sell the device, please pass these operating instructions on to the new owner.
1. Explanation of Warning Symbols and Notes

Warning
This symbol is used to indicate safety instructions or to draw your attention to specific hazards and risks.

Note
This symbol is used to indicate additional information or important notes.

Risk of electric shock
This symbol indicates product parts energized with a dangerous voltage of sufficient magnitude to constitute a risk of electric shock.
2. Package Contents
• DAB+/FM radio
• Power cable
• These operating instructions
3. Safety Notes
- The product is intended for private, non-commercial use only.
- Protect the product from dirt, moisture and overheating and use it in dry rooms only.
- As with all electrical devices, this device should be kept out of the reach of children.
- Do not drop the product and do not expose it to any major shocks.
- Do not operate the product outside the power limits given in the specifications.
- Keep the packaging material out of the reach of children due to the risk of suffocation.
- Dispose of packaging material immediately according to locally applicable regulations.
- Do not modify the device in any way. Doing so voids the warranty.

Risk of electric shock
- Do not open the device or continue to operate it if it becomes damaged.
- Do not use the product if the AC adapter, adapter cable or power cable is damaged.
- Do not attempt to service or repair the device yourself. Leave any service work to qualified experts.

Warning – Batteries:
- When inserting batteries, note the correct polarity (+ and - markings) and insert the batteries accordingly. Failure to do so could result in the batteries leaking or exploding.
- Do not allow children to change batteries without supervision.
- Do not mix old and new batteries or batteries of a different type or make.
- Remove the batteries from products that are not being used for an extended period
- Do not short-circuit batteries.
- Do not charge batteries.
- Do not throw batteries in a fire.
- Keep batteries out of the reach of children.
4. Getting started

Note - Note - Optimal reception
This product has a built-in DAB+/FM telescopic antenna that can be adjusted for optimal reception by using the hinged joint at the base of the antenna. Note:
• Always fully pull out the antenna.
- For optimal reception we recommend positioning the antenna vertically
- Connect the enclosed power cable to the power input of your radio.
- Connect the power cable to a properly installed power socket.

Warning
- Only connect the product to a socket that has been approved for the device. The electrical socket must always be easily accessible.
- Disconnect the product from the network using the power button – if this is not available, unplug the power cord from the socket.
As soon as the radio is connected to the mains for the first time it enters standby mode. The display backlight is active for several seconds and displays the time.
- Press STANDBY to switch on the radio.

Note – Switching on for the first time
- The radio automatically switches on in DAB mode and runs the Auto Scan function.
- During Auto Scan the display shows the message 'Scanning', a progress bar and the number of stations currently found. (F1) (F2)
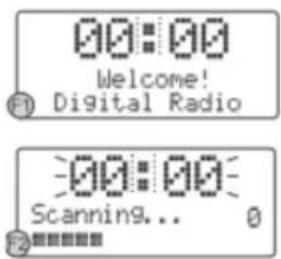
• After the Auto Scan process has completed press MODE/SELECT and turn VOLUME/SELECT to select a station that you want to listen to from those found.
- Press SELECT to listen to your chosen station.

Note - Auto Scan
- If Auto Scan is unable to find any stations, switch the radio to the Tune Select menu.
- Turn VOLUME/SELECT to choose between Manual Tune or Auto Scan.
- Press SELECT to confirm your choice.
4.2 Switching on with battery power
- Disconnect the mains cable from the radio.
- Open the battery compartment cover on the rear of the radio and insert four 1.5V AA batteries in the right direction into the battery compartment.
- Close the battery compartment cover.
- Press STANDBY to switch on the radio.

Note - Battery operation
- During battery operation the STANDBY button acts as an on/off switch.
- The display is completely deactivated if the radio is switched off.
- In order to save electricity the backlight of the display turns off after around 5 seconds if the radio's controls are not used.
- The quality of the batteries used determines how long the radio will run for.
• We recommend using high-quality alkaline batteries. - The alarm function cannot be used during battery operation.
5. Clock, alarm and timer function
It is not necessary to set the time on the radio and in fact not even possible as the radio receives the local time via the DAB signal and sets itself automatically accordingly. This is not always possible in FM mode since not all stations make time data available.


Note – Alarm function features
- The alarm function is only available during mains operation.
- The radio offers two alarm times that can be set individually.
- The alarm can be set to a ring tone or to a previously tuned radio station (DAB+/FM).
- The alarm function is only available during mains operation.
5.1 Setting the alarm time and type
- Press and hold whichever of the two ALARM buttons (1 or 2) you want until the display shows Alarm (1 or 2) Setting (Time). (F9)

- Turn VOLUME/SELECT to set the hour of your desired alarm time.
- Press SELECT to save the setting.
- Turn VOLUME/SELECT to set the minute of your desired alarm time.
- Press SELECT to save the setting. After saving the minute you are automatically taken to alarm type settings.
- Turn VOLUME/SELECT to choose the preset (see section...) DAB or FM station that you want to wake up to.
- Press SELECT to save the setting.
- Turn VOLUME/SELECT to choose the ring tone (1 or 2) for the alarm.
- Press SELECT to save the setting.
- Turn VOLUME/SELECT, to adjust the volume of the alarm (1 - 20) with which you want to be woken up (F10).

Press SELECT to save the setting.

Note
- You have now completed setup for the alarm time and type.
- Repeat the complete process for the other alarm (1 or 2) if desired.
5.2 Activate alarm function
- Switch on the alarm function by repeatedly pressing the corresponding Alarm button (1 or 2). Every time the button is pressed, the sequence shown here is advanced one step.

- Do not press Alarm again if the display shows the desired alarm type. The alarm is now activated and the display shows a bell icon along with the number 1 or 2 for the selected alarm.
• The alarm sounds at the set time.
- Press STANDBY/ON if you wish to switch off the alarm.
- Press Alarm 1 or 2 to display the respective alarm status.

Note
• Take care that the volume has been set at a sufficient level if you wish to be woken up by a DAB+ or FM station.
5.3 Automatic repeat of alarm and switching off alarm function
The alarm will automatically repeat every day at the set time for as long as the alarm function is switched on. Press ALARM (1 or 2) repeatedly until the display shows the message 'Alarm off' in order to switch of the relevant alarm function (1 or 2).
5.4 Snooze function

Note
- The snooze function, like the alarm function, is only available during mains operation.
- The snooze function only works on the currently active alarm. If the second one sounds during the one-hour activity of the first alarm, this second has to be interrupted separately with the snooze function.
- Press SNOOZE if you wish to interrupt the alarm but not fully switch it off. The alarm sounds again after around 5 minutes' silence. An active snooze function is indicated by 'Zz' on the display.


5.5 Timer function

Note
- The timer function is only available during mains operation.
- The display indicates an activated timer function using the letter S and a number. The number reflects the chosen time period (e.g. S6 = timer active, automatic shut-off after 60 minutes).
• To check on timer status press INFO repeatedly in order to show the relevant information on the display. -
The radio automatically switches off after the chosen time period.
-
Press SLEEP to switch on the timer function. The display shows 'Sleep Timer' and switches on using the standard time period of 90 minutes.
- Press SLEEP again to choose another time period after which the radio should switch off automatically.
- You can select from the following sequence, where the numbers represent the possible shut-off times in minutes:

6. Operation of DAB/FM radio
6.1 Automatic DAB station search
The automatic DAB station search scans the DAB III band for stations with reception. Following the search all interference-free stations that have been found and can be received are saved in alphabetical order.
- Press MENU to open the Tune Select menu.
- Turn VOLUME/SELECT to select Autoscan and confirm the selection with SELECT.
The automatic DAB station search starts automatically and is shown on the display by 'Scanning...' and a progress bar. (F2)
- Press JOG MODE/SELECT and then turn VOLUME/SELECT to view all located stations in alphabetical order.
- Press SELECT to choose a station to play.
6.2 Manual DAB station search
- Press MENU to open the Tune Select menu.
- Turn VOLUME/SELECT to select Manual tune and confirm the selection with SELECT.
- Turn VOLUME/SELECT to scan through the DAB channels.
The display has a reception range of 5A to 13F and displays the associated frequencies. (F5)
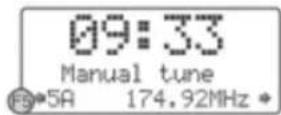
- Press SELECT to choose a frequency. The station name and station group (ensemble/multiplex) are displayed.
- Press SELECT to choose a station to play.
6.3 Additional DAB information
A > after the displayed station name indicates that this station offers additional information.
- Press INFO repeatedly to display additional information in the following order:
![graph LR A["Time/Date"] --> B["Frequency"] B --> C["Audio Bit Rate"] C --> D["Signal strength"] D --> E["DLS"] E --> F["Programme Type"] F --> G["Ensemble/Multiplex(Group name)"] G --> A](/content/2026/05/846964/images/0725c16a3d6c6eeb0fab253839fe6955527f17de3a4ef0ae1b0b768ed5786502.jpg)
Time/Date:
Time and date are updated automatically by the broadcast information. If no time/date information is available the display just shows
Frequency:
The frequency of the station received is displayed.
Audio bit rate:
The currently received digital bit rate of the received station is displayed.
Signal strength:
The signal strength of the received station is displayed via a bar and its length.
DLS:
Dynamic Label Segment displays additional information from the station about the programme as a scrolling ticker.


Programme type:
The style of the programme received is displayed. If no programme information is available the display just shows
Ensemble/Multiplex (Group name):
Ensemble/Multiplex is a combination of various stations that broadcast on a shared frequency. Usually these stations have something in common in terms of their local origin, their style of music or the information they provide.
6.4 Automatic FM station search
- Press DAB/FM to switch to traditional, analogue FM reception. The display then shows FM and the current frequency.
- Press and hold JOG MODE/SELECT until the automatic station search starts.

While scanning the display shows 'Searching...' (F6). If a station is found, the search stops and the station plays.
- Start the search again as described above in order to search for other stations.
6.5 Manual FM station search
• Drücken Sie JOG MODE/SELECT.
- Press JOG MODE/SELECT
- Turn VOLUME/SELECT to tune to a specific frequency as soon as the display shows
6.6 Mono/stereo mode
While a station is playing, press MENU in order switch between Auto and Mono.

Note
- This device has a default setting of Auto mode, and so automatically switches between stereo and mono depending on the signal strength received.
• However, reception situations may occur where the reception quality or clarity can be improved if automatic tuning using the above specified method is manually overridden.
6.7 Saving and accessing presets
Both DAB and FM mode can each save up to 10 stations as 'Presets'. In this way you can quickly access your preferred stations.
- Tune the radio to the station that you want to save as a preset.
- Press and hold PRESETS, until Empty preset is shown on the display and the number belonging to this empty preset is displayed.(F7)

- Turn VOLUME/SELECT to select a preset number.
- Confirm your choice with SELECT, this saves the tuned station as this preset. As confirmation the display shows the message, Preset # saved'. (F8)

• To access a preset press Presets and use VOLUME/SELECT to choose the desired preset number. The station saved here previously will play automatically if you do not use the controls for a few seconds.
7. Additional functions
7.1 Display light
This radio has a display light that can be dimmed to three different levels.
- Press SNOOZE/BACKLIGHT repeatedly until the desired level of brightness is reached.
7.2 Displaying firmware version of radio
Press and hold INFO longer than 2 seconds in order to display the current firmware version of your radio.
7.3 Reverting to factory settings
- Connect the enclosed power cable to the power input of your radio.
- Connect the power cable to a properly installed power socket.
- Press STANDBY to switch on the radio.
- Press and hold MENU until the display shows the message, Press SELECT to confirm reset'.
- Press SELECT. The display shows the message 'Restarting...' and then goes into standby mode.
- Switch on the radio as described in section 4.1 and perform the subsequent steps for setup and station search.


Warning
- All saved DAB and FM presets are wiped when reverting to factory settings.
7.4 Headphone connection
On the rear of the radio is a headphone connection (14), which is suitable for headphones with a 3.5mm stereo jack. When headphones are being used the built-in speakers are deactivated automatically.

Warning - high volume
• Always keep the volume at a reasonable level. Loud volumes, even over short periods, can cause hearing loss.
8. Care and Maintenance
- Only clean this product with a slightly damp, lint-free cloth and do not use aggressive cleaning agents.
9. Warranty Disclaimer
Hama GmbH & Co. KG assumes no liability and provides no warranty for damage resulting from improper installation/mounting, improper use of the product or from failure to observe the operating instructions and/or safety notes.
10. Service and Support
Please contact Hama Product Consulting if you have any questions about this product. Hotline: +49 9091 502-115 (German/English) Further support information can be found here: www.hama.com
- Technical Data
| Voltage | AC: 100-240V~60/50Hz / DC6V: 1.5V(UM3)x4 |
| Output power | 2 W x 2 |
| Frequency range | DAB 174 - 240MHz / FM 87.5 - 108MHz |
| Dimensions | 246 (L) x 86.5 (B) x 126 (H) mm |
| Weight | 1.26 kg |
12. Recycling Information
Note on environmental protection:
After the implementation of the European Directive 2002/96/EU and 2006/66/EU in the national legal system, the following applies: Electric and electronic devices as well as batteries must not be disposed of with household waste. Consumers are obliged by law to return electrical and electronic devices as well as batteries at the end of their service lives to the public collecting points set up for this purpose or point of sale. Details to this are defined by the national law of the respective country. This symbol on the product, the instruction manual or the package indicates that a product is subject to these regulations. By recycling, reusing the materials or other forms of utilising old devices/Batteries, you are making an important contribution to protecting our environment.
Ensemble/Multiplex (Group name):
Ensemble/Multiplex (Group name) :
All listed brands are trademarks of the corresponding companies. Errors and omissions excepted, and subject to technical changes. Our general terms of delivery and payment are applied.


- OPERATING INSTRUCTIONS
- CONTROLS AND DISPLAYS (PIC.1)
- EXPLANATION OF WARNING SYMBOLS AND NOTES
- WARNING
- NOTE
- RISK OF ELECTRIC SHOCK
- PACKAGE CONTENTS
- SAFETY NOTES
- WARNING – BATTERIES
- GETTING STARTED
- NOTE - NOTE - OPTIMAL RECEPTION
- NOTE – SWITCHING ON FOR THE FIRST TIME
- NOTE - AUTO SCAN
- 4.2 SWITCHING ON WITH BATTERY POWER
- NOTE - BATTERY OPERATION
- CLOCK, ALARM AND TIMER FUNCTION
- NOTE – ALARM FUNCTION FEATURES
- 5.1 SETTING THE ALARM TIME AND TYPE
- 5.2 ACTIVATE ALARM FUNCTION
- 5.3 AUTOMATIC REPEAT OF ALARM AND SWITCHING OFF ALARM FUNCTION
- 5.4 SNOOZE FUNCTION
- 5.5 TIMER FUNCTION
- OPERATION OF DAB/FM RADIO
- 6.1 AUTOMATIC DAB STATION SEARCH
- 6.2 MANUAL DAB STATION SEARCH
- 6.3 ADDITIONAL DAB INFORMATION
- TIME/DATE
- FREQUENCY
- AUDIO BIT RATE
- SIGNAL STRENGTH
- DLS
- PROGRAMME TYPE
- ENSEMBLE/MULTIPLEX (GROUP NAME)
- 6.4 AUTOMATIC FM STATION SEARCH
- 6.5 MANUAL FM STATION SEARCH
- 6.6 MONO/STEREO MODE
- 6.7 SAVING AND ACCESSING PRESETS
- ADDITIONAL FUNCTIONS
- 7.1 DISPLAY LIGHT
- 7.2 DISPLAYING FIRMWARE VERSION OF RADIO
- 7.3 REVERTING TO FACTORY SETTINGS
- 7.4 HEADPHONE CONNECTION
- WARNING - HIGH VOLUME
- CARE AND MAINTENANCE
- WARRANTY DISCLAIMER
- SERVICE AND SUPPORT
- RECYCLING INFORMATION
- NOTE ON ENVIRONMENTAL PROTECTION
Brand : HAMA
Model : DR1100
Category : Radio