
IR250 - Radio HAMA - Free user manual and instructions
Find the device manual for free IR250 HAMA in PDF.


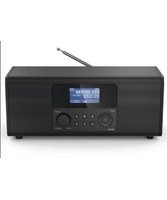
| Product Type | Internet Radio / Network Audio Player with built-in two-channel loudspeakers |
| Brand | Hama |
| Model | IR250 |
| Display | 128 x 64 dot matrix LCD |
| Supported Wi-Fi Standards | IEEE 802.11b/g (2.4 GHz) |
| Wireless Security | WEP, WPA, WPA2 (PSK) |
| Supported Audio Formats | MP3, WMA |
| Speaker Power | 2 x 5 W |
| Power Adapter Input | 100-240 V~, 50/60 Hz, 0.5 A |
| Power Adapter Output | 12 V DC, 1.5 A |
| Power Consumption (Standby) | 1.5 W |
| Connections | AUX IN (3.5 mm), Line-out (3.5 mm), LAN (RJ45), DC IN |
| Dimensions (L x H x D) | 218 x 115 x 126 mm |
| Net Weight (without adapter) | approx. 2.3 kg |
| Operating Temperature | +5°C to +35°C |
| Remote Control Battery | 1 x CR2025 (included) |
| Functions | Internet radio, UPnP media streaming, DLNA, AUX input, dual alarms, sleep timer, equalizer, weather info |
| Care and Cleaning | Clean housing with a slightly damp cloth; do not use aggressive or abrasive cleaners |
| Safety | Read safety instructions; avoid moisture; do not open; use only supplied adapter |
| Spare Parts and Repairability | Contact Hama support; only original spare parts guarantee safety |
| General Information | CE compliant; indoor use only in France |
Frequently Asked Questions - IR250 HAMA
User questions about IR250 HAMA
0 question about this device. Answer the ones you know or ask your own.
Ask a new question about this device
Download the instructions for your Radio in PDF format for free! Find your manual IR250 - HAMA and take your electronic device back in hand. On this page are published all the documents necessary for the use of your device. IR250 by HAMA.
USER MANUAL IR250 HAMA
Information on this user manual 40
Liability disclaimer 40
Copyright 40
Explanation of Warning Symbols....41
Intended use....41
Safety 42
Danger from electric current 42
Handling batteries 42
Safety precautions....43
Setup and function 44
Front of the device....44
Back of the device....45
Remote control 46
Setting up and connection 48
Safety information....48
Checking contents and packaging 48
Requirements for the place of use....48
Electrical connection....49
Mains connection 49
Network connection 49
Wireless network 49
Additional connections....50
Connecting an external music output source....50
Startup 50
Insert the battery into the remote control 50
Switching the device ON and OFF....51
Switching on....51
Switching off....51
Operating 51
Initial startup 52
Menu navigation ....53
My mediaU (1) 53
Internet Radio (2) 54
Media Center (3)....55
AUX (4) 55
Information Center (5)....56
Settings (6)....56
My mediaU management (6.1). 56
Network (6.2) 56
Date and time (6.3) 56
Alarm (6.4) 56
Language (6.5)....57
Dimmer (6.6) 57
Energy management (6.7) 57
Sleep timer function (6.8)....57
Buffer (6.9) 57
Weather (6.10) 57
Local station setting (6.11)....57
Playback settings (6.12)....57
DLNA settings (WIFI stream) (6.13)....57
Equaliser (6.14) 58
Resuming playback (6.15)....58
Software update (6.16)....58
Resetting to default settings (6.17) 58
DLNA Digital Living Network Alliance (6.12)....59
DLNA (WIFI stream) (Smart-Phone, Tablet)....59
DLNA (WIFI stream) (Windows PC)....60
Troubleshooting....61
Troubleshooting chart....61
Appendix 63
Support and contact information 63
Notes on the EC Declaration of Conformity....63
Operating restrictions....63
Technical data 64
IR250 menu scheme 65
Introduction
Foreword
The IR250 is used for playing back music via PC, Internet or networks.
Please read the information contained in this booklet to familiarise yourself quickly with the device and be able to make full use of its functions.
Information on this user manual
These operating instructions are an integral part of the IR250 internet radio (hereinafter also referred to as the "device") and provide important information on the intended use, safety, connection and operation of the device.
Take your time and read the following instructions and information completely. Keep these operating instructions in a safe place for future reference, and pass them on to any future owners of the device.
Liability disclaimer
All technical information, data and instructions on installation, operation of the device contained in this user manual represent the current status at the time of printing and are based on the best possible knowledge gained by experience and know-how.
The manufacturer assumes no liability for damage or injury resulting from failure to observe the user manual, use for other than the intended purpose, unprofessional repairs, unauthorised modifications or use of non-approved spare parts.
Copyright
These operating instructions are protected by copyright.
Any duplication or reprinting, in whole or in part as well as reproduction of any illustrations, even in modified form is only permitted with the written approval of the manufacturer.
Unless otherwise indicated, all trademarks and logos mentioned are trademarks of Hama GmbH & Co KG and are protected by law. Microsoft, Windows and the Windows logo are trademarks of Microsoft Corporation. All other product and company names are trademarks of the respective owner.
34
IR250
Explanation of Warning Symbols
DANGER
A warning of this category indicates an impending dangerous situation.
If the dangerous situation is not avoided, it may lead to serious injury or even death.
▶ Follow the instructions in this warning to avoid the danger of serious injury or even death.
WARNING
A warning of this category indicates a potentially dangerous situation.
If the dangerous situation is not avoided, it may lead to injuries.
▶ Follow the instructions in this warning to avoid the risk of injury.
NOTE
▶ A note contains additional information to simplify the use of the device.
Intended use
This device is only intended for the playback of audio files via PC, Internet or networks and external MP3 players.
WARNING
Danger from use for other than the intended purpose!
If not used for its intended purpose or used in any other way, the device may be or become a source of danger.
▶ Only use the device for its intended purpose.
▶ Observe the procedures described in this user manual.
No claims of any kind will be accepted for damage or injury resulting from use of the device for other than its intended purpose.
IR250
35
Safety
This device complies with the prescribed safety regulations. However, improper use can result in personal injury and/or damage to the device.
Danger from electric current
DANGER
Danger to life from electric current!
Contact with live wires or components can lead to serious injury or even death!
Observe the following safety precautions to avoid danger from electric current:
▶ Do not use this device if the mains adapter, power cable or plug is damaged.
▶ Do not open the housing of the device. Danger from electric current if live connections are touched and/or the electrical and mechanical configuration is changed.
Handling batteries
WARNING
Danger resulting from improper use!
To ensure safe handling of the battery in the remote control, pay attention to the following safety precautions:
▶ Do not throw the battery into fire
▶ Do not short circuit the battery.
▶ Do not attempt to recharge the battery.
▶ Check the battery regularly. Leaking battery acid can cause permanent damage to the device. Be particularly careful when handling a damaged or leaking battery. Danger of acid burning! Wear protective gloves.
▶ Keep batteries out of the hands of children. If swallowed, consult a doctor immediately.
▶ Remove the battery from the remote control when the device is not to be used for a longer period of time.
36
IR250
Safety precautions
Observe the following safety instructions to ensure safe handling of the device:
■ Inspect the device for visible signs of damage before use. Do not use a damaged device.
■ Do not allow children to play with the device.
■ Persons are unable to operate the device due to their physical, mental or motor response abilities may only use the device under supervision or instruction by a responsible person.
■ Do not open the device. Unauthorised opening and repairs can lead to considerable danger for the user of the device. Only allow qualified persons to carry out repairs. Improper repairs will invalidate the guarantee.
■ Repairs to the device during the guarantee period may only be carried out by service centres authorised by the manufacturer, otherwise the guarantee will become invalid in the event of damage or subsequent damage.
■ Defective parts may only be replaced with original spare parts. Only original spare parts guarantee that the safety requirements are met.
■ Protect the device against moisture and penetration by liquids. If the device comes into contact with liquids, disconnect it from the power supply immediately.
■ Clean the housing of the device with a slightly damp cloth. Do not use any aggressive or abrasive cleaning agents or solvents.
■ Do not pull the power cable to remove the plug from the mains socket.
■ Do not place any objects on the device.
■ Electronic devices are delicate so avoid knocks and blows.
■ Disconnect the mains adapter from the mains socket in the event of faults or during thunderstorms.
Setup and function
Front of the device

① LCD display:
Displaying the menu text, the music information and the information set.
② Control panel:
You can use these buttons in combination with the OK/NAVIGATE rotary push button (4) to access the operating system and the device's settings.
③ VOLUME/STANDBY rotary push button:
Rotary button for setting the volume and activating standby mode.
4 OK/NAVIGATE rotary push button:
Rotary push button for setting and selecting the menu options.
Back of the device
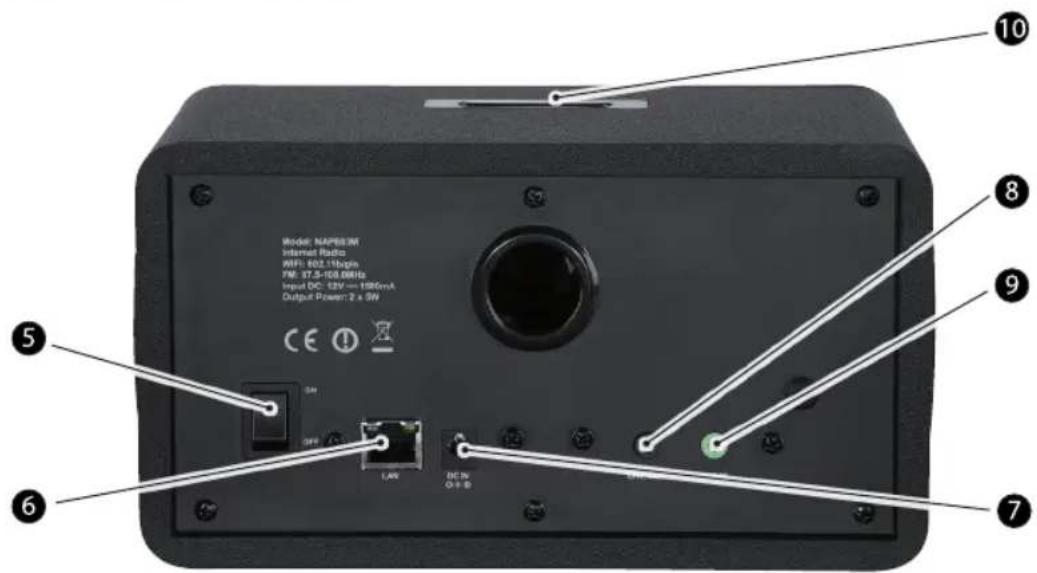
⑤ Power switch:
For completely switching off the radio. The backup battery ensures that settings are maintained.
6 LAN socket (RJ45):
For connecting to a cable-based network.
⑦ DC IN socket (12 V/1.5 A):
Power cable socket for the included adapter.
⑧ Line-out, 3.5 mm:
For connecting external speakers or playback devices.
9 AUX IN:
Input socket for audio devices with 3.5 mm jack plugs (e.g. MP3 players, smartphones, tablet PCs, etc.).
⑩ Snooze/timer button:
Button for setting the shutdown time and activating the snooze function.
IR250
39
Remote control
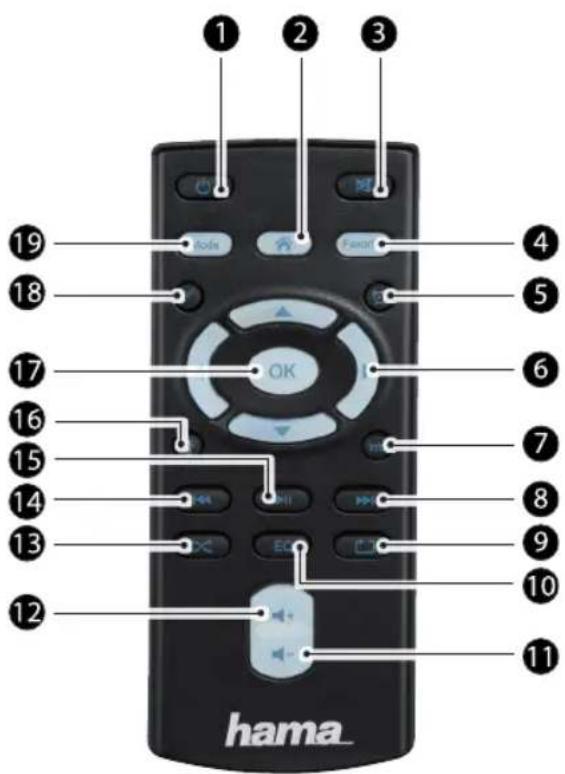
| No.: | Function |
| 1 | ON/OFF switch (standby mode). |
| 2 | Home, you can use this button to go to the main menu. |
| 3 | Mute, this button switches off audio output. Pressing it again or pressing buttons 11/12 reactivates audio output. |
| 4 | Favourites, press this key to go to the My favourites menu (2.1). |
| 5 | Alarm, press the key to go directly to the Alarm menu (6.4). |
| 6 | Cursor buttons ▲ / ▼ / ◀ / ▶ to navigate the menus. |
| 7 | Info, press this key to display information on the music title. |
| 8 | Fast forward, press this key to change to the next title or radio station. |
| 9 | Repeat, press this key to repeat the title in UPnP mode. |
| 10 | EQ (Equaliser), press this key to go to the sound settings menu (6.13). |
| 11 | Press this key to decrease the output volume. |
| 12 | Press this key to increase the output volume. |
| 13 | Shuffle, press this key to set random selection in UPnP mode. |
40
IR250
| 14 | Rewind, press this key to change back to the previous title. |
| 15 | Pause, press this key to respectively stop or continue playback in UPnP mode. |
| 16 | Not assigned |
| 17 | OK, press this key to confirm your selection. |
| 18 | Sleep, sleep mode setting, the remaining time to standby appears in the display. |
| 19 | Mode, use this key to select the playback mode. |
Setting up and connection
Safety information
DANGER
▶ Never play with packaging material. Risk of suffocation.
▶ Pay attention to the instructions on the requirements for the setup location as well as the electrical connection of the device to avoid injury or damage to property.
Checking contents and packaging
The device is supplied as standard with the following components:
- Internet radio
- Stereo audio cable, equipped with a 3.5 mm jack plug at each end
- Remote control
• 1 CR 2025 battery for the remote control - Mains adapter
- User manual
NOTE
▶ Check for visible signs of damage or missing items on delivery. Report incomplete or damaged items to your supplier/retailer immediately.
NOTE
▶ If possible, keep the original packaging throughout the warranty period so that the device can be duly packed in case of a warranty claim.
Requirements for the place of use
For safe and trouble-free operation of the device, the installation location must satisfy the following requirements:
■ The device must be set up on a solid, flat and horizontal surface.
■ The device is designed for operation within an ambient temperature range of +5°C to +35°C.
■ Do not use the device in a hot, wet or very humid environment.
■ Do not expose the device to direct sunlight.
■ Do not install the device in the vicinity of magnetic fields.
■ Make sure that there is sufficient space for ventilation.
IR250
■ The mains socket must be easily accessible and enable fast disconnection in the event of an emergency.
■ A WLAN connection must be in the vicinity (WLAN router) in order to use the Internet radio.
Electrical connection
■ Always use the mains adapter supplied to connect the device to the mains supply.
■ Before connecting the device, compare the connection data (voltage and frequency) on the rating plate with those of your mains adapter. The data must correspond in order to avoid damage to the device.
■ Protect the adapter cable from hot surfaces and sharp edges.
■ Make sure that the power cable is not stretched tightly or twisted.
■ Do not allow the adapter cable to hang over edges (danger of tripping).
■ If the device is not to be used for a longer period of time, disconnect the mains adapter from the mains supply.
Mains connection
◆ Insert the mains adapter plug into the DC IN socket (7) on the back of the device.
◆ Insert the mains adapter into the mains socket.
Network connection
Wireless network
◆ Before starting, check that your WLAN is function properly.
NOTE
▶ WiFi enables wireless data transmission between devices. However, walls or other obstacles may influence the range. Therefore, try to find the best location within the above mentioned distance to avoid interruption and interference while operating the device.
▶ Information on the WLAN/WiFi network connection can be obtained from the user manual of the router manufacturer.
IR250
43
Additional connections
Connecting an external music output source
◆ To connect an external music source with a cable, use the cable supplied with 2 x 3.5 mm jack plugs.
◆ Connect the cable to the AUX-IN socket (9) on the back of the device.
Now connect the music output device by inserting the free end of the 3.5 mm plug into the corresponding socket of your music source.
◆ Switch the Internet radio to AUX mode (see Menu scheme, page 29) and enjoy your music.
Startup
Insert the battery into the remote control
NOTE
▶ The battery supplied was inserted into the remote control at the factory.
▶ Remove the plastic film from the battery compartment before using for the first time.
To insert a new battery, proceed as follows:
◆ Pull the battery compartment out of the remote control.
◆ Remove the used battery and replace with a CR2025 lithium cell.
◆ Make sure that the battery is inserted according to polarity (the positive end pointing to the back of the remote control).
◆ Push the battery compartment back into the remote control.
NOTE
▶ Change the battery if the range of the remote control decreases or if the device no longer reacts to all commands.
Switching the device ON and OFF
Switching on
After connecting to the mains supply, switch on the device using the ON/OFF switch (5) on the back of the device (ON).
Switching off
Move the ON/OFF switch (5) on the back of the device into the off position to switch off the device.
NOTE
▶ Pressing the Standby button (1) on the remote control switches the device to standby mode.
▶ Pull the mains adapter out of the mains socket so that no electricity is consumed.
Operating
Each function of the device is selected via a menu consisting of several levels (see Menu scheme, page 29).
You will be guided through the menu with the help of the display information.
The Home button on the control panel of the internet radio (2) takes you to the menu. Alternatively, you can get there by pressing the Home button (2) on the remote control.
6 items are available in the main menu. Use the OK/Navigate rotary push button or the ▲ and ▼ buttons on the remote control to move up and down in the menus.
The ◀ and ▶ buttons take you a level higher (◀) or lower (▶) in the menu structure (see Menu Schema, p. 29).
Pressing the Home button in the device's control panel or on the remote control always takes you straight to the main menu.
Learn how to use the menu before operating the device.
IR250
45
Initial startup
Switch on the device. After a few seconds, you will be prompted to select the operating language of the device.
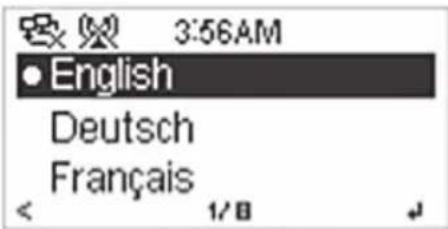
Select the appropriate language using ▲ and ▼, and confirm by pressing OK on the remote control (17) or on the device (4).
◆ Confirm the Check network display with Yes and OK.
◆ Confirm the following Configure network message with Yes and OK.
◆ The device will now search for available WLAN network connections within range.
◆ Select your own network using ▲ and ▼ and confirm by pressing OK. For information about your network router and using it to connect to the internet, please consult the documentation from the manufacturer of your router.
Now enter the network key/the password for your network by using ◀ and ▶ on the remote control to position the cursor, and ▲ and ▼ to enter the letters/numbers/characters, or use the OK/ Navigate rotary push button (4) and the ◀ and ▶ buttons on the device's control panel.
◆ Confirm your input with OK.
NOTE
▶ If you press ▲, the characters start with Aa-Zz, followed by special characters and then numbers. By pressing ▼, you can start with the numbers. These entries can also be made using the OK/NAVIGATE rotary push button (4).
▶ It is possible to store the information from several WLAN routers.
Once you have successfully logged in, you will automatically be directed to the Internet radio option in the main menu.
Menu navigation
NOTE
▶ Links in this section refer to the section Menu scheme, on page 29 of this user manual.
▶ Changes to the settings must be confirmed by pressing OK (17) on the remote control or the OK/NAVIGATE rotary push button (4) on the device.
My mediaU (1)
MyMedia You is a platform, which allows you to manage your favourite radio stations and increases the operating convenience of your device. Maintenance of the stations does not take place on the device itself but via the Internet platform www.mediayou.net. Registration on this website is free. You require a valid email address and need to enter a password for your account. After registering on this website, you can use MediaU.
To connect the device with the account, navigate to the system information menu (4.3). Make a note of the twelve-digit MAC address of the device to enter this as serial number at MediaU. If you wish to register more than one device, you can assign an individual name to its respective MAC address.
The radio stations that are maintained as your favourites on the website (these can be added to the favourites list by clicking + displayed next to each station) will then be displayed under MymediaU on your device.
NOTE
In order for the changes made in the Internet to take effect, the service must be deactivated and then reactivated under Settings: My mediaU Management (6.1).
▶ Please be aware that further costs may be incurred depending on the type of account in the Internet.
IR250
47
Internet Radio (2)
After setting up the network connection, you will be located in the Internet radio item (2) in the main menu. Here you can set and listen to the desired and available radio stations.
◆ Press the ▶ key in the Internet radio menu item (2). Here you have the choice between the submenus: My Favourites (2.1), music radio stations (2.2), local stations (2.3), recently heard radio stations (2.4) and service (2.5).
◆ The Radio station/Music menu item (2.2) provides you with the option of filtering radio stations according to specific criteria.
Select Worldwide top 20 to receive the 20 most popular Internet radio stations from all over the world. Select Genre to filter the radio stations according to classical, rock or pop music for example. Radio stations of these genres will then be preferentially presented.
◆ Select Country/Region to find radio stations with local or country-specific information.
◆ The Local station menu item (2.3) offers you stations from all over the country sorted according to region.
◆ Choose one of the available positions and select your favourite station.
Under the Service item (2.5), it is possible to search for and add radio stations by entering their name or web address. When you find a new radio station, you can use ▶ add it to your favourites and press OK. As soon as you have added a station to your list of favourites, the station appears in the My Favourites menu (2.1) for quick selection.
NOTE
▶ If you have saved more than one radio station under your favourites, you can switch between these stations using ▲ and ▼ on the remote control, even while listening to the radio.
Media Center (3)
You can use the Media Centre menu item to play music from your PC on your device via the WLAN network. Note that the UPnP service must be installed on your PC for this function. Using the current version (V11 or later) of Windows Media Player, you can select media sharing in the Media Library.
Share the track on your PC that you want to play on the internet radio.
◆ Ensure that the PC and your device are in the same network.
In your device's media centre menu, select UPnP. You can find and play the music you shared there.
■ More information about the UPnP service and sharing music files is available online.
AUX (4)
The AUX menu item activates the input for an external media source, such as an MP3 player. As soon as you have connected a media source to the AUX input (9), you can start playback on your device.
NOTE
▶ Before connecting an external device to the Internet radio, make sure that you set to a medium volume first and subsequently adjust to your taste during playback.
▶ If you change the sound properties under the Equaliser setting in the Settings menu item (6.13), this will also apply to the music played back via the AUX input.
Information Center (5)
The Information Center menu item provides you with information on the weather (5.1), financial world (5.2) and system information (5.3).
The weather information can be filtered according to country, state and town. You can also display the weather information during standby operation. You can also use ◀ and ▶ on the remote control to open a forecast for the next few days.
Settings (6)
The Settings menu includes 16 more items you can use to adjust your device to your requirements.
My mediaU management (6.1)
■ Use the account set up at www.mediayou.net based on the settings you make here. For more information, see www.mymediayou.net.
Network (6.2)
■ Make settings for connecting to the network with your router or position the device in a new/another location.
Date and time (6.3)
■ These options are used for setting up the time, date and display options for the time (12/24h display) and date.
Alarm (6.4)
■ Two alarms can be set. The snooze function (6.4.3) specifies the time, after which your Internet radio wakes you again. You can also make changes to the settings for the alarm mode.
NOTE
The Internet radio alarm sound only functions when the device is connected to the Internet. If the Internet connection fails, the device switches automatically to the melody/beep alarm sound.
50
IR250
Language (6.5)
■ The menu language is set under this menu item.
Dimmer (6.6)
■ The display brightness during operation and in standby mode is set under this menu item.
Energy management (6.7)
■ This function switches the device to standby mode if the menu is opened and no entry is made after the selected period of time, or if there is no Wi-Fi network available.
Sleep timer function (6.8)
■ This function switches the device to standby mode after a preselected time.
Buffer (6.9)
■ You can set the buffer time for the audio data received. The device reads the data in advance for the set amount of time to prevent interruption in the music playback.
Weather (6.10)
■ The weather settings are used to configure the weather data display (6.9.2) and the location (6.9.3) for which you want weather information. You can also set whether the weather information will still be displayed in standby mode (6.9.1). In standby mode, you can view the weather forecast by pressing the ◀ and ▶ buttons on the device or the remote control.
Local station setting (6.11)
■ This menu item is for setting the location of your device. With the factory settings, this information is obtained from the internet.
Playback settings (6.12)
■ The playback settings modify the behaviour during playback via UPnP for example.
DLNA settings (WIFI stream) (6.13)
■ The display names displayed during connection of a DLNA-capable playback device can be modified with the help of the DLNA settings (see DLNA page 24).
IR250
51
Equaliser (6.14)
■ The equaliser allows you to adjust the sound output to your individual taste. These settings affect all playback options.
Resuming playback (6.15)
■ Here you can set whether the device continues with playback after the standby time has elapsed.
Software update (6.16)
■ The software update option checks whether new software is available in the Internet for your Internet radio. This can then be installed.
Resetting to default settings (6.17)
■ The Reset to default item resets your Internet radio to the default settings.
NOTE
▶ If you select this option, all previous settings will be lost. You must also register on your WLAN network again in order to listen to music from the Internet.
52
IR250
DLNA Digital Living Network Alliance (6.12)
DLNA (WIFI stream) (Smart-Phone, Tablet)
Using the DLNA function, which is fully compatible with Wi-Fi streaming, you can play music from a DLNA-compatible music source (smartphone, tablet PC) on the internet radio. The DLNA standard allows you to control all playback functions via the output source (smartphone, tablet PC).
In order to control the Internet radio again, you must deactivate the DLNA function (6.13). To use the DLNA function, proceed as follows:
◆ Activate the DLNA function (6.13) on your Internet radio.
◆ Find out which operating system is used by your smartphone or tablet.
◆ Download the required software for your smartphone or tablet in the corresponding App store (AppStore or Android Market).
NOTE
▶ We recommend Twonky Mobile for your Android system. Other programmes are also available so try them out to find the most suitable software. We recommend Awox MediaCTRL for Apple systems. Various other programmes are also available for Apple systems. Try out the software to find the most suitable for your purposes.
◆ Connect your smartphone or tablet with the Internet radio and enjoy your music.
NOTE
The default name of your internet radio is iRadio. If you want, you can personalise it using the DLNA settings (6.13).
DLNA (WIFI stream) (Windows PC)
You can also use your Windows PC as a music source for the DLNA function. You requires Windows 7 and the current Windows media player for playback. To set this up, proceed as follows:
◆ Activate the DLNA function (6.13) on your Internet radio.
◆ Go to Start → Settings → Network and Sharing Center → Media Streaming Options on your Internet radio and enable sharing of the music data.
◆ Open the Windows media player and set up sharing of the music. Control over remote management of the Internet radio must be activated under the Stream item.
Subsequently right-click the music title that you wish to hear and select the Playback option via iRadio.
NOTE
▶ Further information on setting up your PC can be found in the Internet.
54
IR250
Troubleshooting
Troubleshooting chart
Before sending the device to customer service, use the following table to check whether you can remedy the problem yourself.
| Fault | Possible cause | Remedy |
| Device cannot be switched on | Power adapter not properly connected | Make sure the power adapter is plugged into the mains socket and connected to the device. |
| No voltage from the mains socket | Check the fuses. | |
| ON/OFF switch (6) not switched on | Move the ON/OFF switch (6) to the ON position. | |
| Defective device | Contact customer service. | |
| Remote control does not work | Too far away | Ensure that the remote control is not too far away from the device. |
| Battery is flat | Replace the battery in the remote control; pay attention to correct polarity when inserting the new battery! | |
| No sound can be heard | Device switched to mute | Press the MUTE button (3) on the remote control to cancel the mute setting. |
| Volume set too low | Increase the volume. |
IR250
55
| Fault | Possible cause | Remedy |
| No network connection | No IP address | Set the IP address on the device. |
| DHCP function not active on the router | Activate the DHCP function on the router and re-establish connection with the device. | |
| Firewall is active in the network | Configure the programme to allow access. | |
| No WLAN connection | No WLAN-available | Check availability of the WLAN connection. |
| Distance to router too great. | Place the device nearer to the router. | |
| Wrong password | Enter a correct WEP/WPA password. | |
| Station not found | No network-access | Check the settings for network access and the firewall. |
| Selected station not available | Try again later or select another station. | |
| Link to selected station has changed or is no longer available | Test the link | |
| The entered link is not correct | Correct link to station added. | |
| No alarm | Alarm function is not activated | Activate alarm function. |
| No sound can be heard | Same remedy as "No sound can be heard". (page 25). | |
| Alarm set with STATION (but station not available) | Establish network connection or set different alarm type. |
56
IR250
NOTE
▶ If you cannot resolve the problem with the steps described above, please contact after-sales service.
Appendix
Support and contact information
For defective products:
In the event of product complaints, please contact your retailer or Hama product support.
Internet/World Wide Web:
Product support, new drivers or production information can be found at www.hama.com.
Support hotline – Hama product support:
Tel. +49 (0) 9091 / 502-115
Fax +49 (0) 9091 / 502-272
Notes on the EC Declaration of Conformity
The declaration of conformity in accordance with the R&TTE Directive 99/5/EC can be found under www.hama.com
Operating restrictions
This device may only be used indoors in France!
CE
IR250
57
Technical data
| ModelModel no. | IR250 WiFi-Internet Radio |
| Description | Internet Radio/Network Audio Player with built-in two-channel loudspeakers |
| Display | 128 x 64 point matrix |
| Supported networks | IEEE 802.11b/g wireless (WLAN) |
| WLAN key | WEP, WPA, WPA2 (PSK) |
| Transmission pro-tocol | NTP Network Time ProtocolRTSP Real Time Streaming ProtocolMMS Microsoft Media Streaming ProtocolHTTP Hyper Text Transfer Protocol |
| Supported playback formats | WMA Windows Media AudioMP3 MPEG Layer 3 Audio |
| Mains adapter | Input: 100 – 240 V~; 50/60 Hz; 0.5 A |
| Output: 12 V; 1.5 A | |
| Power consumption in standby mode | 1.5 W |
| Loudspeaker-power | 2 x 5 W |
| Connections | LINE IN 3.5 mm input socket, LAN (RJ45) 10/100 Mb |
| Operating tempera-ture | +5 °C to +35 °C |
| Dimensions(L x H x D) | 218 x 115 x 126 mm |
| Net weight(without mains adapter) | approx. 2.3 kg |
58
IR250
IR250 menu scheme
| My mediaU (1) | ||
| Internet Radio (2) | Favourite station (1.1) | Submenu |
| Local station (1.2) | ||
| Add manually (1.3) | ||
| Media Center (3) | My favourites (2.1) | Submenu |
| Music radio stations (2.2) | ||
| Local station (2.3) | ||
| Recently heard stations (2.4) | ||
| Service (2.5) | ||
| AUX (4) | UPnP (3.1) | Submenu |
| My playback list (3.2) | ||
| Delete my playback list (3.3) | ||
| Information Center (5) | ||
| Weather information (5.1) | Submenu | |
| Financial information (5.2) | ||
| System information (5.3) | ||
IR250
59
Settings (6)
My mediaU management (6.1)
Submenu
Network (6.2)
Wireless network settings (6.2.1)
Manual configuration (6.2.2)
Check network during switching on (6.2.3)
Submenu
Date & time (6.3)
Date format (6.3.1)
Summer/winter time (6.3.2)
GMT time (6.3.3)
Submenu
Alarm (6.4)
Alarm 1 (6.4.1)
Alarm 2 (6.4.2)
Snooze alarm (6.4.3)
Alarm volume (6.4.4)
Submenu
Language (6.5)
Submenu
60
IR250
| Dimmer (6.6) | |
| Energy management (6.7) | Submenu |
| Sleep timer (6.8) | Submenu |
| Buffer (6.9) | Submenu |
| Weather (6.10) | Submenu |
| Local station settings (6.11) | Displays during standby (6.10.1) |
| Temperature unit (6.10.2) | |
| Local settings (6.10.3) | |
| Submenu | |
| Playback settings (6.12) | Submenu |
| DLNA settings (6.13) | Submenu |
| Equaliser (6.14) | Submenu |
| Resuming playback (6.15) | Submenu |
| Software update (6.16) | Submenu |
| Resetting to default set- tings (6.17) | |
GB Note on environmental protection:
After the implementation of the European Directive 2002/96/EU and 2006/66/EU in the national legal system, the following applies:
Electric and electronic devices as well as batteries must not be disposed of with household waste. Consumers are obliged by law to return electrical and electronic devices as well as batteries at the end of their service lives to the public collecting points set up for this purpose or point of sale. Details to this are defined by the national law of the respective country. This symbol on the product, the instruction manual or the package indicates that a product is subject to these regulations. By recycling, reusing the materials or other forms of utilising old devices/Batteries, you are making an important contribution to protecting our environment.

All listed brands are trademarks of the corresponding companies. Errors and omissions excepted, and subject to technical changes. Our general terms of delivery and payment are applied.
CE
00054814/10.13


- MENU NAVIGATION ....53
- DLNA DIGITAL LIVING NETWORK ALLIANCE (6.12)....59
- TROUBLESHOOTING....61
- APPENDIX 63
- IR250 MENU SCHEME 65
- INTRODUCTION
- FOREWORD
- INFORMATION ON THIS USER MANUAL
- LIABILITY DISCLAIMER
- COPYRIGHT
- EXPLANATION OF WARNING SYMBOLS
- DANGER
- WARNING
- NOTE
- INTENDED USE
- SAFETY
- DANGER FROM ELECTRIC CURRENT
- DANGER TO LIFE FROM ELECTRIC CURRENT
- HANDLING BATTERIES
- DANGER RESULTING FROM IMPROPER USE
- SAFETY PRECAUTIONS
- SETUP AND FUNCTION
- FRONT OF THE DEVICE
- ⑤ POWER SWITCH
- 6 LAN SOCKET (RJ45)
- ⑦ DC IN SOCKET (12 V/1.5 A)
- ⑧ LINE-OUT, 3.5 MM
- 9 AUX IN
- ⑩ SNOOZE/TIMER BUTTON
- REMOTE CONTROL
- SETTING UP AND CONNECTION
- SAFETY INFORMATION
- CHECKING CONTENTS AND PACKAGING
- REQUIREMENTS FOR THE PLACE OF USE
- ELECTRICAL CONNECTION
- MAINS CONNECTION
- NETWORK CONNECTION
- WIRELESS NETWORK
- ADDITIONAL CONNECTIONS
- CONNECTING AN EXTERNAL MUSIC OUTPUT SOURCE
- STARTUP
- INSERT THE BATTERY INTO THE REMOTE CONTROL
- SWITCHING THE DEVICE ON AND OFF
- SWITCHING ON
- SWITCHING OFF
- OPERATING
- INITIAL STARTUP
- MENU NAVIGATION
- MY MEDIAU (1)
- INTERNET RADIO (2)
- MEDIA CENTER (3)
- AUX (4)
- INFORMATION CENTER (5)
- SETTINGS (6)
- MY MEDIAU MANAGEMENT (6.1)
- NETWORK (6.2)
- DATE AND TIME (6.3)
- ALARM (6.4)
- LANGUAGE (6.5)
- DIMMER (6.6)
- ENERGY MANAGEMENT (6.7)
- SLEEP TIMER FUNCTION (6.8)
- BUFFER (6.9)
- WEATHER (6.10)
- LOCAL STATION SETTING (6.11)
- PLAYBACK SETTINGS (6.12)
- DLNA SETTINGS (WIFI STREAM) (6.13)
- IR250
- EQUALISER (6.14)
- RESUMING PLAYBACK (6.15)
- SOFTWARE UPDATE (6.16)
- RESETTING TO DEFAULT SETTINGS (6.17)
- DLNA DIGITAL LIVING NETWORK ALLIANCE (6.12)
- DLNA (WIFI STREAM) (SMART-PHONE, TABLET)
- DLNA (WIFI STREAM) (WINDOWS PC)
- TROUBLESHOOTING
- TROUBLESHOOTING CHART
- APPENDIX
- SUPPORT AND CONTACT INFORMATION
- NOTES ON THE EC DECLARATION OF CONFORMITY
- OPERATING RESTRICTIONS
- IR250 MENU SCHEME
- GB NOTE ON ENVIRONMENTAL PROTECTION
Brand : HAMA
Model : IR250
Category : Radio