
WKC 1703 RDS - Car radio GRUNDIG - Free user manual and instructions
Find the device manual for free WKC 1703 RDS GRUNDIG in PDF.


| Product Type | Car Stereo / Autoradio with RDS and Cassette Player |
| Brand | Grundig |
| Model | WKC 1703 RDS |
| Radio Frequency Ranges | RDS I, RDS II, RDS III (FM with RDS), FM (without RDS) |
| Preset Memory | 6 memory buttons per range (total 18 presets) |
| Autostore Function | Automatic storage of RDS stations in each RDS range |
| Cassette Player | Plays C60 and C90 cassettes; fast forward; auto stop at end |
| Output Power | 4 x 5W RMS (DIN 45324); 4 x 10W peak |
| Speaker Impedance | 4 Ω |
| Power Supply | 12V DC, negative ground; fuse 5A (DIN 72581) |
| Anti-Theft System | Release System (RS) for unit removal; electronic coding with personal code |
| Security LED | Flashes when coding is activated and unit is off; can be switched on/off |
| RDS Functions | Program Service (station name), Alternative Frequencies (AF), Traffic Program (TP), Enhanced Other Network (EON) |
| Traffic Announcement Function | Automatic playback of traffic reports at minimum volume; search for TP stations |
| Audio Controls | Volume, Fader (front/rear), Balance (left/right), Bass, Treble |
| Stereo/Mono | Manual switching via MONO button |
| Telephone Mute | Connection for car phone or CB radio; mutes audio during use |
| Aerial | 150Ω impedance; connection via ISO socket |
| Illumination | Control buttons illuminated when headlights are on (terminal 58) |
| Dimensions (Approx.) | Standard 1-DIN (180 x 50 x 160 mm) – not specified in manual |
| Weight (Approx.) | 1.2 kg – not specified in manual |
| Maintenance | Clean recording head every 50-100 hours with cleaning cassette; clean screen with soft anti-static cloth |
Frequently Asked Questions - WKC 1703 RDS GRUNDIG
appears. After 3 seconds <----> appears. Enter your 4-digit code using buttons 1-4, then press FM until appears. The coding is now activated. or is shown). User questions about WKC 1703 RDS GRUNDIG
0 question about this device. Answer the ones you know or ask your own.
Ask a new question about this device
Download the instructions for your Car radio in PDF format for free! Find your manual WKC 1703 RDS - GRUNDIG and take your electronic device back in hand. On this page are published all the documents necessary for the use of your device. WKC 1703 RDS by GRUNDIG.
USER MANUAL WKC 1703 RDS GRUNDIG
Maintenance and care 1
Please note 2
Identity card 2
Installation of the device 2
Traffic safety 2
Aerial 2
Code label 2
On/off switch 3
Telephone connection (mute) 3
Release System (RS) 3
Coding 3
SECURITY LED display 3
Amplifier at a glance 4
Cassette at a glance 4
Radio at a glance 5
Selecting a range 5
Autostore in the RDS range 5
Tuning radio stations/programmes
Search function 5
Tuning radio stations manually 5
Storing radio stations/programmes ..... 6
Calling up stored
radio stations/programmes 6
Radio traffic report
function.... 6
Stereo broadcasts 6
Display 6
Coding 7
Installation and removal 8
Important information 10
Reception conditions 10
Traffic Program (TP) 10
Enhanced Other Network (EON) 10
All technical and optical changes reserved!
MaintenanceandCare
The total construction of the unit guarantees maintenance-free operation over a long period of time.
If a problem should arise, please consult your nearest dealer.
See also »If a problem should arise« (at the end of this booklet).
Do not expose cassettes to high temperatures (see the manufacturer's instructions) and after use, put back into cassette cases.
Clean the screen only with a soft, dust-binding and anti-static cloth. Polish and cleaning solution can damage the surface of the screen.
The recording head must be free of dust and particles so as to avoid loss of the treble responses
You should therefore clean the recording head with a cleaning cassette after every 50 to 100 operating hours.
Please note
Identity card
The identity card of your unit has a unit type, a serial number, and a code number (the illustration is to be found at the end of this booklet).
The serial number is identical to the number embossed onto the frame.
The card facilitates criminal investigation by the police in case of theft and gives evidence of ownership for a speedy settlement of the insurance claim.
Keep the card in a safe place out of reach of unauthorized persons.
Code label
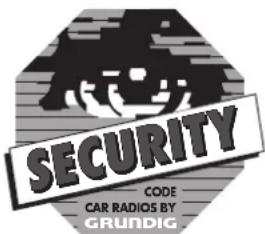
The illustration is to be found at the end of this booklet. The code label, which is clearly visible on the car window, shows potential thieves:
This unit is worthless for thieves!
Installation of the device
These operating instructions assume that your car radio has been correctly connected and installed by your dealer.
If you wish to install the device yourself, you should read the information in "Installation and removal" on page 8 and refer to the illustrations at the end of these instructions.
Traffic safety
Familiarize yourself with the various functions of your car radio before starting off on a journey (for example, learn how to store a station).
Volume:
Operating your radio at high volume while driving can endanger you and others. Therefore, always adjust the volume so that you can still safely hear noises around you and outside the car.
Aerial
Your car radio is designed for a connection to a 150Ω-aerial (impedance).
Extending the aerial cable to the rear of the car can, for example, impair signal reception.
Switching on and off
Ignition/starter switch
You can use the car's ignition/starter switch to switch the radio on and off with the -multi-function control (see supply voltages/+12 V stand by voltage, page 9).
- Car radio
You can use the or multi-function control to switch the radio on and off when the car radio – is turned on with the ignition/starter switch or – is not connected to the ignition/starter switch.
Telephone connection (mute)
Connect the car telephone or CB radio with the telephone connection of the car radio (see supply voltages/telephone connection, page 9).
Your car radio is "muted" during the car phone or the CB radio's operation.
Release system (RS)
The most effective anti-theft measure:
When you leave your vehicle, take the unit with you.
The double anti-theft measure:
"Activate" the coding of the unit (page 7). The unit is in the vehicle and, after being removed, secure.
Removing the unit
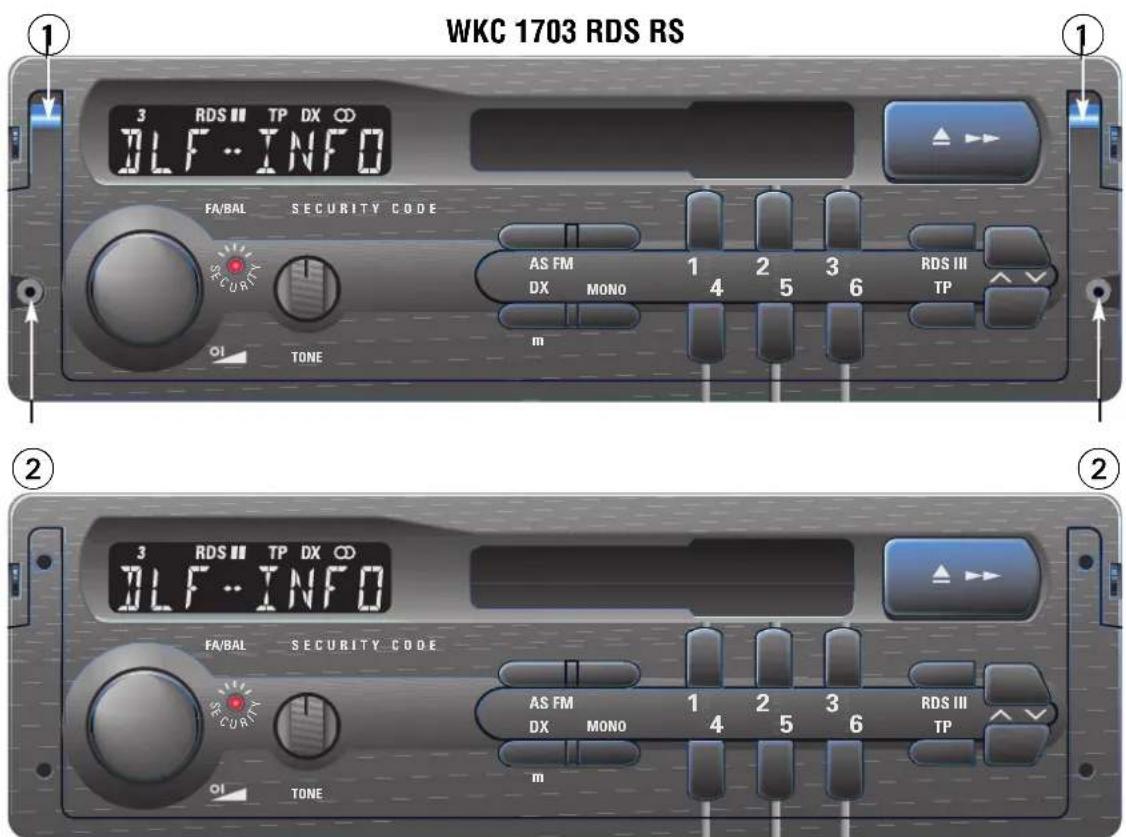
To swing out the carrying strap, press one of the pressure points① (illustration is located on the fold-out page at the beginning of the pamphlet).
Insert the unit
until the car radio catch engages. When the coding is activated: it can be put into operation again (page 7). Afterwards, run the automatic test if an RDS programme was heard last.
Blocking the release system
Screw the threaded screws into both openings ② of the carrying strap with an allen key wrench (illustration is located on the fold-out page at the beginning of the pamphlet). The unit cannot be removed.
Coding
Your personal code number (code no.) is found on your unit's identity card.
When you have "activated" the coding of your unit:
As soon as you have removed the unit or separated it from your car battery supply (permanent plus, terminal 30), it is then electronically blocked. Only you are able to unlock it again and put it into operation by entering your personal code number (Putting into operation again, page 7).
Therefore: you must activate the code (page 7).
SECURITY LED display
The LED display flashes under the display if,
– the car radio is turned on,
– the coding is activated (page 7) and
– the LED display function is switched on (page 7).
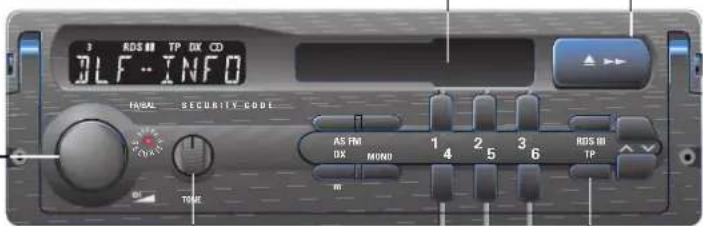
The amplifier at a glance
The cassette at a glance
Switching the unit off/on
off ↩ on
The display is dark: unit is switched off.
Volume 01 (volume)
Turn the multi-function control:
volume - ↙ volume +
Volume front ↔ rear (fader)
Press the multi-function control and turn:
front softer ↻ rear softer
Volume left ↔ right (balance)
Pull out (engage) the multi-function control and turn:
right softer ↩ left softer
Press the multi function control (engage).
Cassette tapes used in a car radio are subjected to high temperatures. For this reason, use only quality C 60 und C 90 cassette tapes from well-known manufacturers.
Radio operation → cassette tape operation Insert the cassette into the tape compartment until it locks into place: ▲ is on display.
Fast forward
Press the ▲▶▶ button until it engages.
To stop: gently press the button and let go (disengages).
Cassette operation → radio operation
Press the ▲ button until it engages.
Tone
less treble ↩ less bass
At the end of the tape automatic: cassette operation → radio operation
Radio traffic report function (page 6),
When >TP< is on the display
(TP on/off switch: -press the TP button):
– The cassette player stops during the radio traffic report.
- You hear the radio traffic report at a minimum volume.
- If the stored radio traffic announcement station can no longer be received, activate the search function for the next radio traffic report station (>SRC < is on display).
Radio at a glance
Cassette operation → radio operation
-Press the ▲▶▶ button until it engages.
Selecting a range
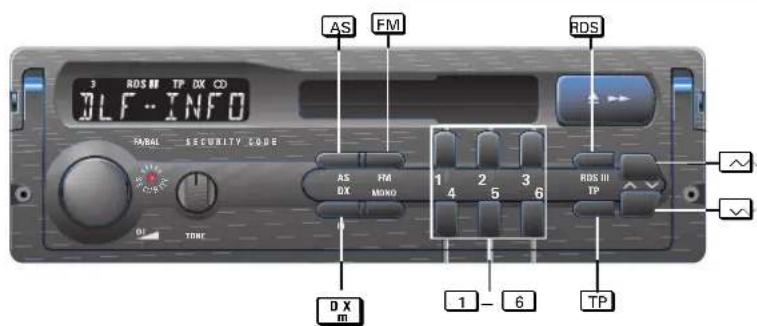
-Press the RDS (advance button) briefly:
RDS I, RDS II and RDS III ranges
FM programmes with RDS.
-Press the FM button briefly: FM range* (U)
After you have selected the range, you will hear the previous station/programme (last-station-memory) played.
* No radio report function available. No station name.
Autostore in a RDS range
In each of the 3 RDS ranges, RDS I, RDS II und RDS III, you can automatically renew the memory of all 6 memory buttons; for example, upon using the device for the first time.
Only store stations with the radio traffic announcement function, when >TP< is in the display.
(Briefly press the TP button).
Press the AS button until it is mute.
RDS programmes are now being stored*into the memory of the 1 to 6 memory buttons. A maximum of 2 automatic channel searches across the entire frequency range occur with increasing channel search sensitivity. The memory process is finished when the radio plays.
*During the automatic channel search, the >AST < and the reception frequency is in the display.
GB 5
Tuning to a station/programme - search
function Select the range:
RDS I, RDS II, RDS III or FM.
Only search for stations with the radio traffic announcement function when >TP< is in the display. (Briefly press the TP button).
Briefly press the 📋 button: frequency + Briefly press the 🌐 button: frequency -
The automatic channel search sensitivity increases after the second and third search operation across the entire frequency range.
After the third search cycle >DX< is in the display.
Immediate extreme reception sensitivity:
Briefly press the ☐D X button, >DX< is in the display.
GOTO search: Press the button and release shortly before the desired frequency.
Tuning the station manually
Select the range: FM
Press the 0x button until >MAN< is in the display, then
press the □ button: frequency +
press the √ button: frequency -
Press button briefly – incremental change Press button longer – quick change
Change from manual to automatic search:
-automatic after approx. 60 seconds
-press one of the 1 to 6 memory buttons.
Radio
Storing stations/programmes
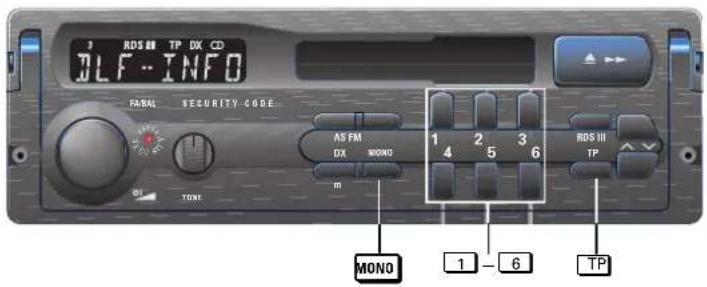
You can store the station or the programme that you are listening to into one of the 1 to 6 memory buttons with* or without the radio traffic report function.
Storing
Press the appropriate memory button (for example, 1) and hold until the tuned station becomes audible.
The stored station remains in memory even if the supply voltage is disconnected.
^* >TP<is in the display.
Selecting stored stations/programs
Select a range:
RDS I, RDS II, RDS III or FM.
Press the appropriate memory button briefly (for example, 1).
Radio traffic report function,
When >TP< is in the display.
Switching on/off: press the TP button.
- You hear the radio traffic report at a minimum volume even when the volume is at "zero".
- If you only want to hear the radio traffic reports, you can reduce the volume to "zero."
- If the stored radio traffic report station can no longer be received, activate the the search function for the next radio traffic report station (>SRC < is on display).
GB 6
Stereo broadcasts, when the stereo symbol is in the display.
Switching from stereo to mono
Manual switching from stereo to mono:
Press the MONO button briefly.
Switching back to stereo:
Press the MONO button briefly.
Display
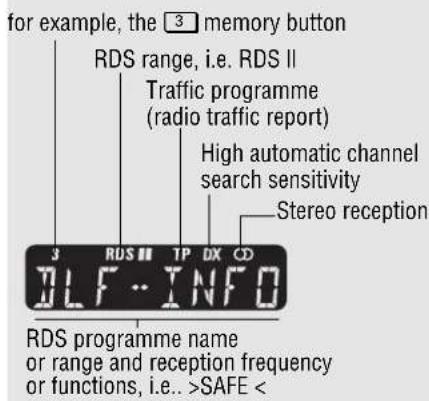
Important Information:
Reception conditions,
TP (Traffic Program) and
EON (Enhanced Other Network), page 10.
Coding
See page 3 for general information on coding.
The coding has not been activated at the factory.
If you lose your code number (identity card), the radio can only be made operational again by a dealer after you prove ownership and pay a fee.
Coding activated?
Check:
- If the car radio is switched on
Press the FM button until the following appears in the display
SAFE< (coding activated) or.
CODE< (coding is not activated).
Then switch the radio off and then on again.
- If the radio is switched off
LED display (underneath the display) flashes, SECURITY-LED display (see right).
SECURITY-LED display
The LED display flashes underneath the display if
– the car radio is switched off,
– the coding is activated (see right) and
- LED display function is switched on (see below).
Switching the LED display function on and off:
- Radio is on.
- Press the FM button until
SAFE < or >CODE < is in the display.
After approx. 3 seconds:
----<appears in the display.
- Press the 6 button until
LED ON< (function is switched on) or
LED OFF < (function is switched off) appears in the display.
Then switch the radio off and then on again.
Changing the function: repeat the procedure.
Coding activationn
-
Radio is on.
-
Press the FM button until >CODE < appears in the display.
After approx. 3 seconds:
----< is in the display.
If you want to stop the "coding activation": switch the radio off and then switch on.
- Enter the code number (from the identity card):
Press buttons 1 - 4 until the code number appears in the display.
Example: 1703 Display:
1-button press once >|---<
2-button press 7 times >|7--<
3-button press 10 times >|70-<
4-button press 3 times >1703<
- Confirm code number:
FM -Press the FM button until >SAFE < appears in the display.
After approx. 3 seconds: the radio is on.
Coding is activated!
Putting into operation again
Coding is activated.
The unit has been separated from the battery of your vehicle (permanent plus, terminal 30), for example, after taking out the radio:
- Switch the unit on:
SAFE < appears in the display.
After approx. 3 seconds:
----<appears in the display.
- Enter code number (see identity card):
Press buttons 1 - 4 until the code number appears in the display (see example in the "Activation" section).
- Confirm code number:
Press the FM button until
SAFE < appears in the display. After
approx. 3 seconds, the radio begins to play.
Coding
If you enter an incorrect code number:
SAFE < remains in the display.
Radio does not play.
Try again. Note the "waiting period" between the attempts.
Deactivating the coding
Before removing the radio:
- Radio is playing
Press the FM button until
SAFE < appears in the display.
After approx. 3 seconds:
----<appears in the display.
- Enter code number (see identity card):
Press buttons 1 - 4 until the code number appears in the display (see example in the "Activation" section).
- Confirm code number:
Press the FM button until
CODE < appears in the display.
After approx. 3 seconds, the radio begins to play.
If you enter an incorrect code number:
SAFE < remains in the display.
Radio does not play.
Try again. Note the "waiting period" between the attempts.
Waiting period
To ensure that your unit is not put into "operation" by someone testing it out, there is a waiting period between each attempt.
During this period, no entries can be made: >SAFE < is shown in the display.
The waiting period is over when the number of the attempt appears in the display, i.e. > 2 ---- <.
The table below shows the waiting period between the individual attempts.
After the 5th attempt, we recommend that
| Failed attempts (in the display) | Waiting period (approx.) |
| 21 sec. | |
| 1 | 1.5 min. |
| 2 | 5.5 min. |
| 3 | 22 min. |
| 4 | 1.5 hrs. |
| 5 | 6.0 hrs. |
| 6 | 24 hrs. |
| 7 | 24 hrs. |
your have your dealer put the unit into operation.
There is always a 24 hour wait- ing period after the 6th failed attempt!
Installation and removal
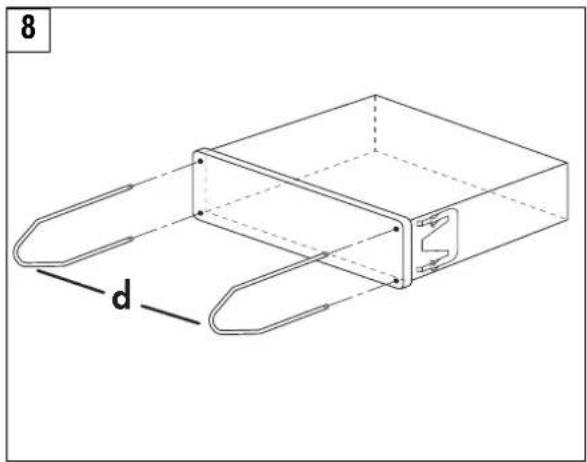
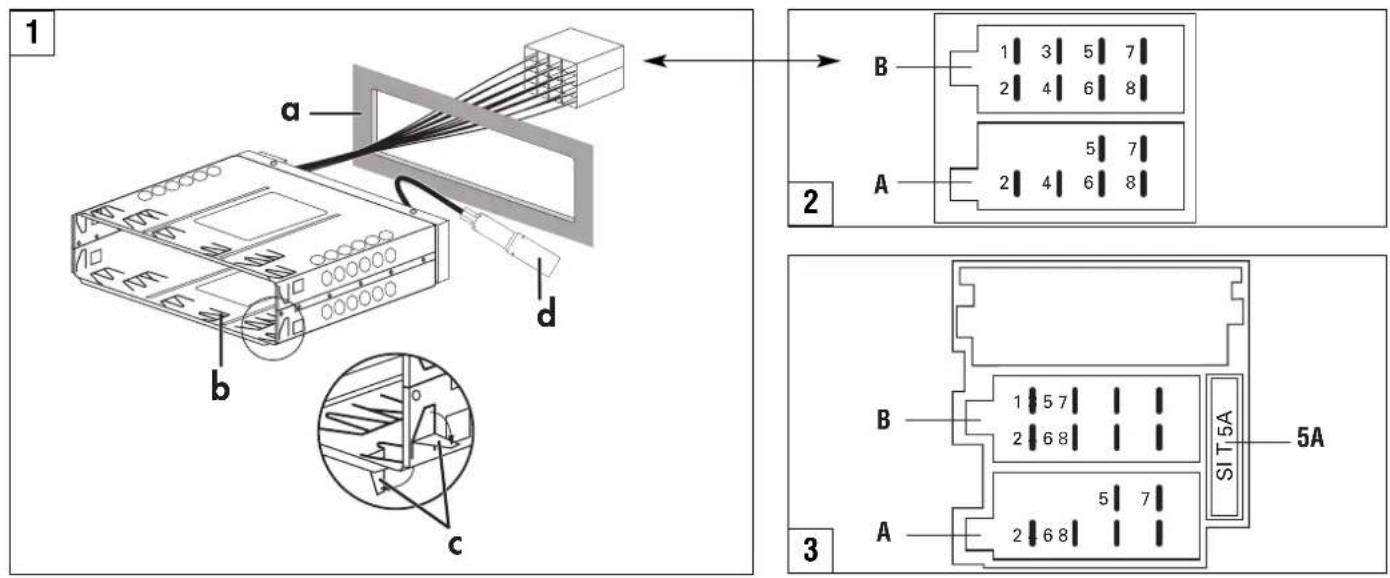
You will find illustrations 1 - 8 of the text at the beginning of this booklet.
Installation material and accessories
Your dealer can tell you wich installation materials you need and wich accessories are available.
Supply voltages
Car radio without RS*: first »Inserting the mounting frame«, page 9!
Contact blades A8 to A2: Illustration 2
A8 - operating power
Connect to terminal 31 (ground wire) of the vehicle.
A7 +12 V operating power
With vehicles from the VW/Audi company as of the 1991 model: do not, under any circumstances, connect the contact blade A7 to the S contact of the vehicle (power supply plug, PIN 4, brown/red cable).
Connect terminal 15 or terminal 30 of the vehicle:
- Terminal 15: if you want to be able to switch the radio on and off with the ignition switch, connect contact blade A4 to terminal 30!
*Release System (RS), on page 3
- Terminal 30: if you do not want the car radio to be switched on and off with the ignition switch. Do not connect contact blade A4!
A6 Illumination of the radio controls
Connect contact blade A6 to terminal 58 of the vehicle:
When the headlights are on and the radio is switched off, only the control buttons of the car radio are illuminated.
A5 +12 V control voltage (max.0.5 A)
With a switched-on car radio, contact blade A5.
For power aerials (extend and retract), Amplifiers (switching on/off), aerial amplifier (supply voltage) and so on.
A4 +12 V stand by voltage
Connect terminal 30 (permanent plus) of the vehicle if you want to be able to switch the radio on and off with the ignition switch. Also, check blade contact A7.
A2 Telephone mute
Connection for a car telephone or CB radio: The car radio is "muted" during the use of a car telephone or CB radio. Blade contact A2 is connected to the ground wire.
Connecting the aerial
Car radio with RS*: Illustration 1
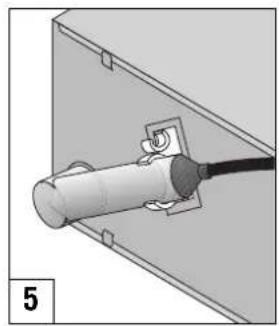
Connect the aerial cable to aerial socket d. Car radio without RS*: Illustration 5 and 6 If required, use the aerial adapter (5).
Fix the aerial adapter (5) or the aerial lead (6) in the plastic holder.
Speakers
Car radio without RS*: first »Inserting the mounting frame«!
to 4 Ωspeakers: Sine, DIN 45324 ____ 4 x 5 W Peak ____ 4 x 10 W
Front speakers
B3 right + B4 right - (ground)
B5 left + B6 left - (ground)
Rear speakers
B1 right + B2 right - (ground)
B7 left + B8 left - (ground)
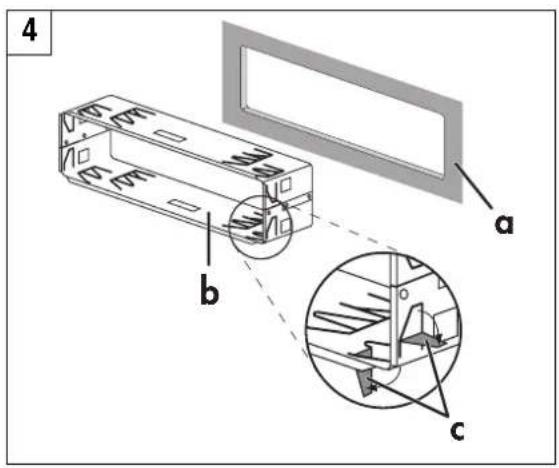
Inserting the mounting frame
Car radio with RS*: Illustration 1
Car radio without RS*: Illustration 4
Insert mounting frame b into the radio space a of the vehicle.
Bend flap c behind the radio space a (varies according to vehicle type) as needed.
Inserting the car radio
Car radio with RS*: Release System, on page3 Car radio without RS*: Illustration 4
Slide the radio all the way into the mounting frame b. The radio should lock into place.
Removing the car radio
Car radio with RS*: Release System, on page3 Car radio without RS*: Illustration 8
Insert both bows d all the way into the openings of the trim.
Press both bows outward and slowly pull the radio out.
Safety fuse
Illustration 3 (car radio without RS*: Illustration 7)
Fuse 5 A/DIN 72581 (plugged) in the device.
*Release System (RS), on page 3
Important information
Reception conditions
FM reception
Reception conditions constantly change while driving your car.
Mountains, buildings or bridges can all disturb your reception.
This is particularly true the farther removed you are from the radio station.
RDS is an information system, whose signals broadcast in addition with the FM radio station programme.
Program service
So that you see what you are listening to! With an RDS program, you can see the abbreviated name of the program in the display, for example >BAYERN 3 < which stands for "Bayerischer Rundfunk – 3. Programm."
Please note that RDS programs can have different regional radio stations and programme names.
Alternative frequencies
A RDS programme is broadcast from several stations each with different broadcast frequencies (alternate frequencies).
You choose an RDS programme and your car radio always tunes to a station which can be easily received.
Traffic program (TP)
Radio traffic report function
in the RDS I, RDS II and the RDS III ranges.
TP switching off and on
Press the TP button briefly:
When >TP< appears in the display, the traffic report function is ready.
- If no traffic report station has been set or the previously tuned station is not receiving, the automatic channel search begins to scan for the next traffic report station. The first 3 search attempts result in scanning the entire frequency range with increasing search sensitivity.
SRC < (search) appears in the display.
- You hear the radio traffic report at a given minimum volume even when the volume is set lower.
- If you only want to hear the radio traffic reports, you can reduce the volume to "zero".
Enhanced Other Network (EON)
You do not need to do without radio traffic reports anymore,
even with RDS programmes without traffic reports
in the RDS I, RDS II and RDS III ranges.
Precondition
The radio station which broadcasts the RDS programme, has an additional RDS pro-gramme that offers radio traffic reports and EON.
Switching on EON
You are listening to a station without traffic reports, for example, a classical station.
Press the TP button briefly:
Radio traffic report function (EON),
occurs when >TP< appears in the display and the preset RDS programme remains audible.
WKC 1703 RDS RS / WKC 1703 RDS
WKC 1703 RDS
WKC 1703 RDS
natural_image
Diagram of a cable inserted into a wall-mounted device, labeled with number 5 (no text or symbols on the diagram itself)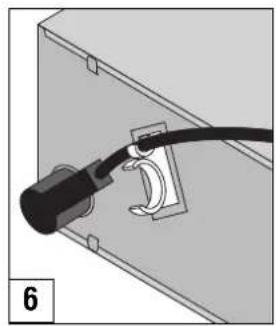
natural_image
Close-up of a black cable inserted into a wall socket, labeled with number 6 (no text or symbols on the diagram itself)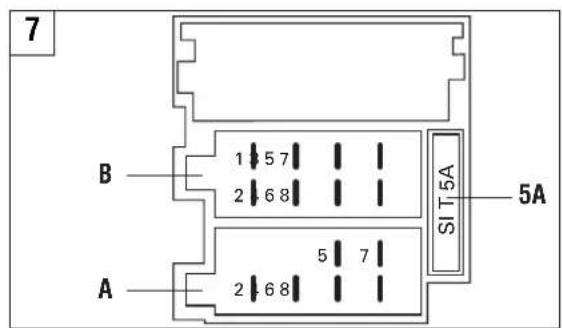
natural_image
Technical line drawing of a mechanical component with labeled dimension 'd' (no text or symbols beyond label)WKC 1703 RDS RS

natural_image
Close-up of a curled paper corner with a shadow (no text or symbols)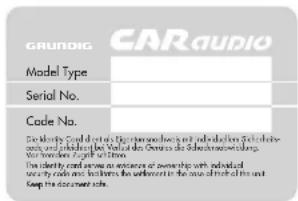
D Identity Card und Code-Aufkleber (siehe dazu Seite 2)
GB Identity Card and Code label (see page 2)
① Identity Card e Adesivi di segnalazione (vedere pagina 2)
F Identity Card et Autocollants de code (pour plus d'informations, voir page 2)
NL Identity Card en Code-sticker (zie daarvoor pagina 2)
E Identity Card y Adhesivos de código (véase la página. 2)
P Identity Card e Autocolante «Code» (ver página 2)
GB If a problem should arise
Please note however, that the undamaged guarantee seal on the unit is the precondition for your guarantee.
- Maintenance and care 1
- Please note 2
- Amplifier at a glance 4
- Cassette at a glance 4
- Radio at a glance 5
- Coding 7
- Installation and removal 8
- Important information 10
- MaintenanceandCare
- Please note
- Identity card
- Code label
- Installation of the device
- Traffic safety
- Aerial
- Switching on and off
- Ignition/starter switch
- - Car radio
- Telephone connection (mute)
- Release system (RS)
- The most effective anti-theft measure:
- The double anti-theft measure:
- Removing the unit
- Insert the unit
- Blocking the release system
- Coding
- When you have "activated" the coding of your unit:
- SECURITY LED display
- The amplifier at a glance
- The cassette at a glance
- Radio at a glance
- Cassette operation → radio operation
- Selecting a range
- Autostore in a RDS range
- Tuning to a station/programme - search
- Tuning the station manually
- Radio
- Storing stations/programmes
- Storing
- Selecting stored stations/programs
- Radio traffic report function,
- Switching from stereo to mono
- Display
- Important Information:
- Coding activated?
- Check:
- - If the car radio is switched on
- - If the radio is switched off
- SECURITY-LED display
- Switching the LED display function on and off:
- Coding activationn
- Putting into operation again
- Deactivating the coding
- Waiting period
- Installation and removal
- Installation material and accessories
- Supply voltages
- A8 - operating power
- A7 +12 V operating power
- A6 Illumination of the radio controls
- A5 +12 V control voltage (max.0.5 A)
- A4 +12 V stand by voltage
- A2 Telephone mute
- Connecting the aerial
- Speakers
- Front speakers
- Rear speakers
- Inserting the mounting frame
- Inserting the car radio
- Removing the car radio
- Safety fuse
- Important information
- Reception conditions
- FM reception
- Program service
- Alternative frequencies
- Traffic program (TP)
- Radio traffic report function
- TP switching off and on
- Enhanced Other Network (EON)
- Precondition
- Switching on EON
- WKC 1703 RDS RS / WKC 1703 RDS
- WKC 1703 RDS
- WKC 1703 RDS RS
- GB If a problem should arise
Brand : GRUNDIG
Model : WKC 1703 RDS
Category : Car radio