
VN620WS - Car radio ESX - Free user manual and instructions
Find the device manual for free VN620WS ESX in PDF.


| Product Type | Car Stereo with Navigation and Multimedia |
| Brand | ESX |
| Model | VN620WS |
| Display | 6.2 inch (15.7 cm) LCD Touchscreen, 800 x 480 pixels |
| Form Factor | Double-DIN |
| Operating System | Microsoft Windows CE 6 (i20) |
| CPU | MTK Dual Core Cortex A9+A11 800 MHz |
| RAM | 256 MB DDR3 |
| Storage | 256 MB NAND Flash + 8 GB MicroSD (Navigation) |
| Audio Output | 4 x 50 Watts Max |
| Pre-amplifier Outputs | 2 x Front, 2 x Rear, Subwoofer (RCA) |
| DSP Audio Processor | 10-Band Equalizer |
| Bluetooth | Handsfree, Phonebook Sync, A2DP Audio Streaming |
| Media Playback | MP3, WMA, MPEG4, AVI, DivX, FLAC, FullHD 1080p |
| Radio | AM/FM with RDS (Europe, North America, Asia) |
| Navigation | iGo Primo 3D with TMC, 46 Countries, TTS |
| DVD Player | DVD, DVD±R/RW, VCD, CD, CD-R/RW, MP3 |
| USB Port | Quick Charge up to 2.1 A, Copy Function |
| E-Link | Mirror Link for Android Smartphones |
| Steering Wheel Control | Analog (Teach Function) |
| Camera Inputs | Front and Rear (CVBS) |
| Power Supply | 12 V DC (Negative Ground) |
| Dimensions (Approx.) | 178 x 100 x 150 mm (Double-DIN Standard) |
| Weight (Approx.) | 2.0 kg |
| Cleaning | Soft, slightly moistened cloth; no solvents |
| Safety | Professional installation required; do not open device |
| Spare Parts | Includes cables, remote control, microphone, GPS antenna, etc. |
Frequently Asked Questions - VN620WS ESX
User questions about VN620WS ESX
0 question about this device. Answer the ones you know or ask your own.
Ask a new question about this device
Download the instructions for your Car radio in PDF format for free! Find your manual VN620WS - ESX and take your electronic device back in hand. On this page are published all the documents necessary for the use of your device. VN620WS by ESX.
USER MANUAL VN620WS ESX

natural_image
Abstract logo design featuring a stylized white 'S' inside a gray parallelogram with a yellow checkmark (no text or symbols)CAR MEDIA SYSTEMS
VN620W
15,7 CM (6.2") DOPPEL-DIN TOUCHSCREEN NAVICEIVER
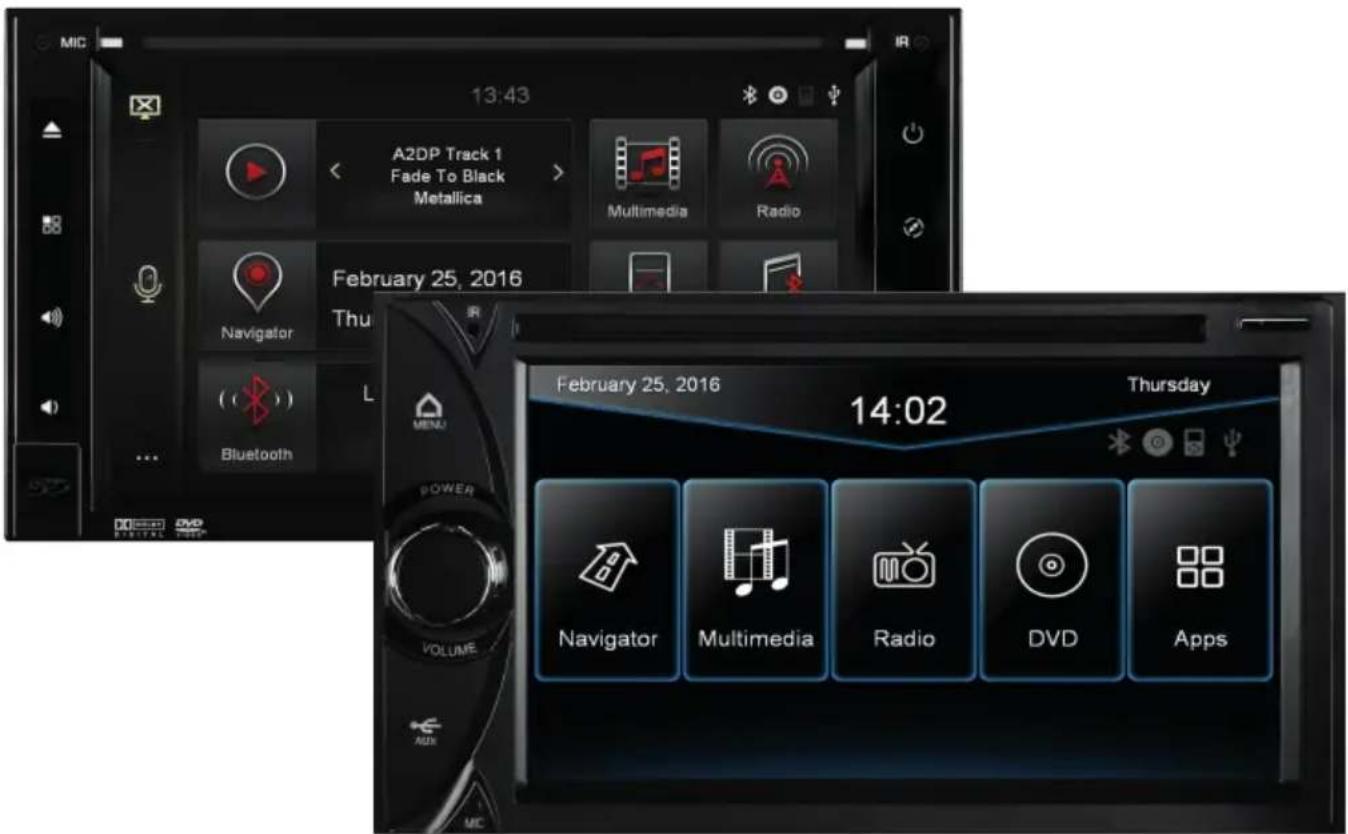
VN620D
15,7 CM (6.2") DOPPEL-DIN TOUCHSCREEN NAVICEIVER
Always follow the instructions in this manual before using the device. Please keep this manual easily accessible in the vehicle for future reference.
Features
- iGo Primo, 3D Navisoftware with TMC on 8GB SD card, 46 countries including Turkey with Points of Interests display and search function, 3D building views, TTS voice output, warnings, over 25 system and prompt languages. Latest Map Guarantee (30 days) after activation via www.naviextras.com.
- High-resolution 15.7 cm (6.2") LCD touchscreen display with 800 x 480 pixels
• Advanced i20 operating system based on Microsoft Windows CE 6
• MTK Dual Core Cortex A9+A11 800 MHz CPU, 256MB DDR3 RAM, 256MB NAND Flash RAM
• Audio amplifier with 4 x 50 Watts max.
• Pre-amplifier outputs 2 x Front/2 x Rear/Subwoofer
• DSP-Audioprocessor with 10-Band-Equalizer - Bluetooth™ handsfree, phone book synchronization and A2DP audio streaming
- Media playback (MP3/WMA/MPEG4/MPEG1/2/WMV/AVI/DivX/FLAC etc.), supports FullHD 1080p (1920 x 1080) playback
• Quick-Boot (approx. 10 seconds)
• Support ACC Logic: the device can be operated up to 30 minutes without ignition
• DVD-Player (DVD, DVD-R/RW, DVD+R/RW, VCD, CD, CD-Text, CD-R/RW, MP3)
• Radio AM/FM with RDS function (supports Europe, Northamerica, Asia)
• Virtual Disk to convert audio CDs into MP3 format
• E-LINK mirror function with compatible Android smartphones
• Quick Charge USB function with up to 2.1A charge current
• Voice control (except navigation) - Custom design function (wallpaper, startup logo, menu)
• Several design themes (skins) for customizing the user interface - Individually adjustable pre-channel volume for each application
- File manager with an open file structure, photo slideshow
• MicroSD card slot and USB port with copy function
• Integration of external applications (Compatible with Windows CE 6)
• Date/time function, 12/24 hrs. display
• 3 x Audio/Video output
• 2 x Audio/Video input
• Front and rear camera inputs
• Supports original factory AUX-In and USB-Port
• Supports analog steering wheel controls
• Supports 2D-/3D navigation maps with TMCpro function
• Supports external TV or radio receivers (DVB-T, DAB, etc.) - Supports iPod / iPhone™ with ID3 tag display via USB (compatible with iPhone 5/6), with media library, cover display and ID3 Tag display
Windows is a registered trademark of Microsoft Corporation in the United States and other countries. iPod and iPhone are trademarks of Apple Inc.. The Bluetooth word mark is registered trademark owned by Bluetooth SIG, Inc. Other trademarks, trade names or brands are the property of their respective owners.
Scope of delivery 4
Safety Information......6
Basic functions....8
Operating elements....8
Main menu 10
Navigation....11
Multimedia player 12
Radio 14
DVD (DVD/CD player)....17
Applications....18
- Bluetooth™ 19
- LinkPod 21
- AV/TV....23
-A2DP 24
– Audio 25
- Files....28
– Virtual Disk....29
– E-Link....31
– Quick Charge....32
- Option....33
Custom settings....39
Menu assignments....39
Wallpaper 40
Bootlogo 41
Additional functions 42
Infrared remote control 42
Multifunction steering wheel 43
Limited media playback 43
Optional rearview camera 43
Troubleshooting....44
Installation....48
Installation notes....48
Interconnection 50
Installation hints....54
General notes....56
| No.ItemFigureQuantity | |||
| 1 | Main device |  | 1 |
| 2 | Stylus | 1 | |
| 3 | MicroSD 8GB incl. Navigations Software |  | 1 |
| 4 | Remote Control |  | 1 |
| 5 | G71-POW0422 System Connector on ISO | 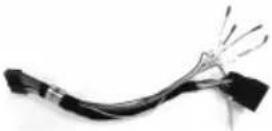 | 1 |
| 6 | M6241 System Connector on open cables | 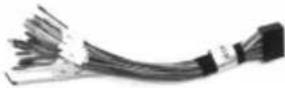 | 1 |
| 7 | G71-AUD0119 Audio / Video / AV Inputs | 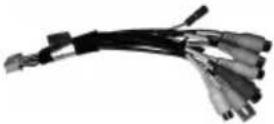 | 1 |
| 8 | G71-MNV0010 Audio Output with Remote Turn-On | 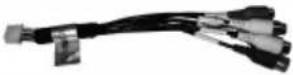 | 1 |
| 9 | G71-MIC0008 External BT-Microphone | 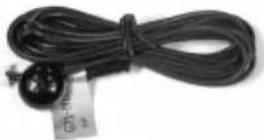 | 1 |
| 10 | G71-CCD0037 Camera Connections | 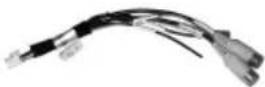 | 1 |
| 11 | G71-MNV0009Audio / Video Outputs | 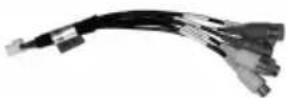 | 1 |
| 12 | G71-USB0055USB Port |  | VN620-D:1VN620-W:2 |
| 13 | G71-WHE0063Var. System Connections | 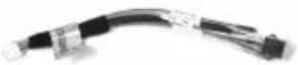 | 1 |
| 14 | GPS Antenna | 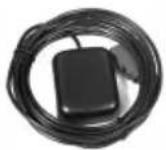 | 1 |
| 15 | TMC Wire Antenna | 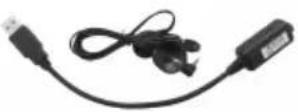 | 1 |
| 16 | Double DINMounting Frame | 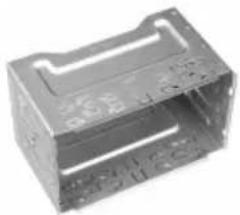 | 1 |
| 17 | Double DIN RadioDecoration Panel | 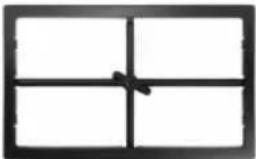 | 1 |
| 18 | Unlock Device Clamps | 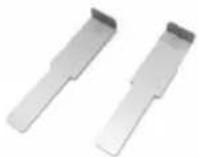 | 2 |
SAFETY INFORMATION
- In general, the assembly and installation of the device must be performed by a trained and technically skilled specialists, as the installation and connection of the device requires complex knowledge.
- This device is only suitable for the operation in a vehicle with an on-board voltage of 12 volts, negative ground.
- Improper installation or use may void the warranty.
• Note any time the traffic regulations of the country in which the device is operated. - Please ensure, that with the engine turned off the vehicle's battery does not discharge fully. The device is another electrical consumer which must be operated with the engine running, other-wise the vehicle's battery will be discharged and the vehicle can not be started.
- Set the volume of the device only as loud, that you are still be able to hear warning signals (e.g. police sirens) and traffic noise inside the vehicle.
- Operate the device as driver only if it's absolutely necessary and in the driving safety is not compromised. The same stands for looking at the screen. If necessary, better park your vehicle at a safe and appropriate location.
- The traffic rules of the EU prohibit to view moving pictures or movies while driving, if the screen of the device is installed within sight of the driver, as he may be distracted. View the screen as driver only for the navigation function, and then only briefly that you will not be distracted. Note at any time the local traffic regulations. In an accident, regress claims could be made by the car insurance company.
- This device is not a substitute for your personal judgment or perception. All suggested routes from the navigation system should never be taken as a reason to disregard the local traffic rules. Your personal assessment of traffic or your knowledge of safe driving practices is paramount. Always match your driving with the current traffic situation.
- Do not follow the suggested routes, if the navigation system instructs you to take an unsafe or illegal way, puts you in an unsafe situation, or directs you into an area which you consider unsafe.
-
If problems occur while driving, park the vehicle in a safe and appropriate place to continue before you operate.
-
The device supports only DVD/CD standard disk size of diameter with 12 cm. Do not attempt to insert disks with a different size or any other object into the disk slot. Be sure to load only one disk at the same time.
- Please use only the included original accessories. Ensure a sufficient mounting of the device by using the included installation accessories, as in the event of an accident enormous accelerations may occur. Poorly installed devices and equipment in accidents could represent a severe risk to the driver and the other passengers of the vehicle.
- Note under all circumstances the regulations and advice of the vehicle manufacturer and do not make any modifications to the vehicle, which could interfere with safe driving. Please treat all parts of the device and the components of your vehicle always with caution.
- Please avoid short circuits and make sure that no metal objects can get inside the device. Also make sure that all connections are properly connected and avoid the interchanging of the polarity of all connections. Complete the installation only while the ignition is turned off.
- In the event of a defect or malfunction, do not attempt to repair it by yourself or open the device, this is dangerous and could cause injury or damage to the equipment or vehicle. A repair should be done by trained and authorized personnel only. The device uses a Class 1 laser to read the disk. Eye contact with a laser is very dangerous to the human eye.
- If you connect an external device, you should first read the instruction manual of the external device and make sure that it is compatible. Avoid connecting an incompatible external device.
- If you install external applications onto the operating system of the device or operate files, make sure that they are „virus free“ and compatible with Windows CE 6. Otherwise there is a risk that the operating system no longer works properly and must be reinstalled.
- Do not damage or scratch the screen with sharp objects. Do not operate the screen with hard objects
- Please refer the notes in chapter GENERAL NOTES on page 56

This symbol indicates important information and instructions in this manual, which serve to improve traffic safety and operability of the device.

OPERATING ELEMENTS VN620-W
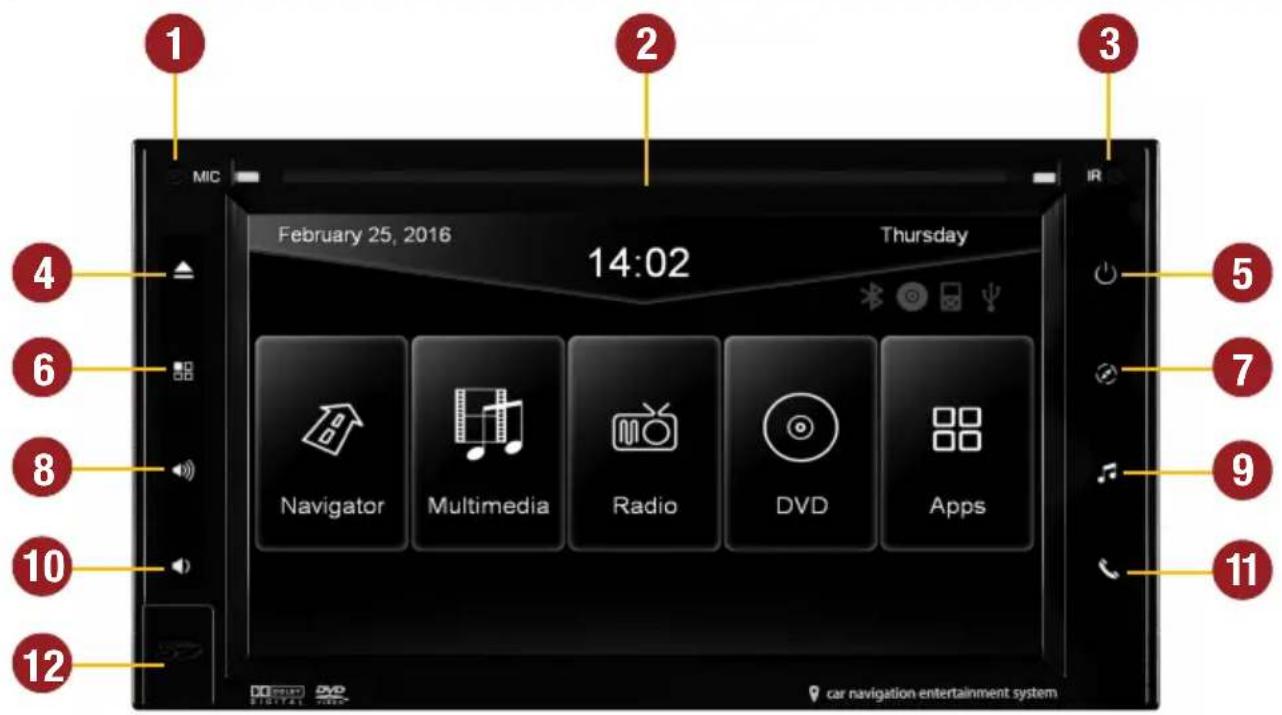
- Internal Bluetooth ^TM microphone
- Slot for CD/DVD disks (∅ 12 cm).
- Infrared sensor for the remote control
- Eject the inserted CD/DVD.
-
Press briefly: Mute
Press and hold: the device switches to stand-by (push and hold - no audio, display darkens, running navigation stops, Bluetooth connection interrupts) -
Opens main menu.
- Opens navigation system.
- Turns volume up
- Starts media playback from USB
- Turns volume down
- Press briefly: Opens voice control Press and hold: Opens Bluetooth™ mode
- MicroSD card slot and reset button

OPERATING ELEMENTS VN620-D
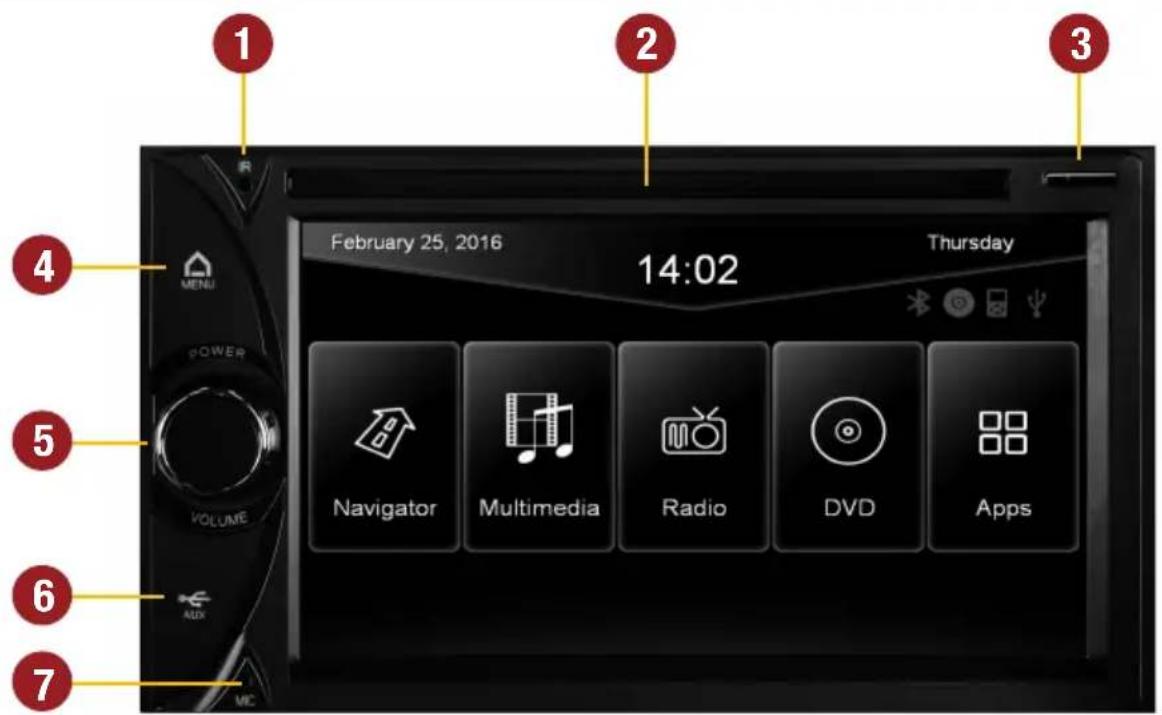
- Infrared sensor for the remote control
- Slot for CD/DVD disks (∅ 12 cm).
- MicroSD card slot
- Tap briefly: Opens voice control Tap and hold: Opens main menu
- Rotate: turn down or turn up the volume Press briefly: Mute
Press and hold: the device switches to stand-by (push and hold - no audio, display darkens, running navigation stops, Bluetooth connection interrupts)
- Behind the cover (open to the left), the reset button, the 3,5 mm AUX- and front USB input are located
- Internal Bluetooth ^TM microphone

MAIN MENU
After power on, the device starts with the main menu. By pressing the „button (VN620-W) or „Menu (VN620-D) on the device, you can always get to the main menu too.
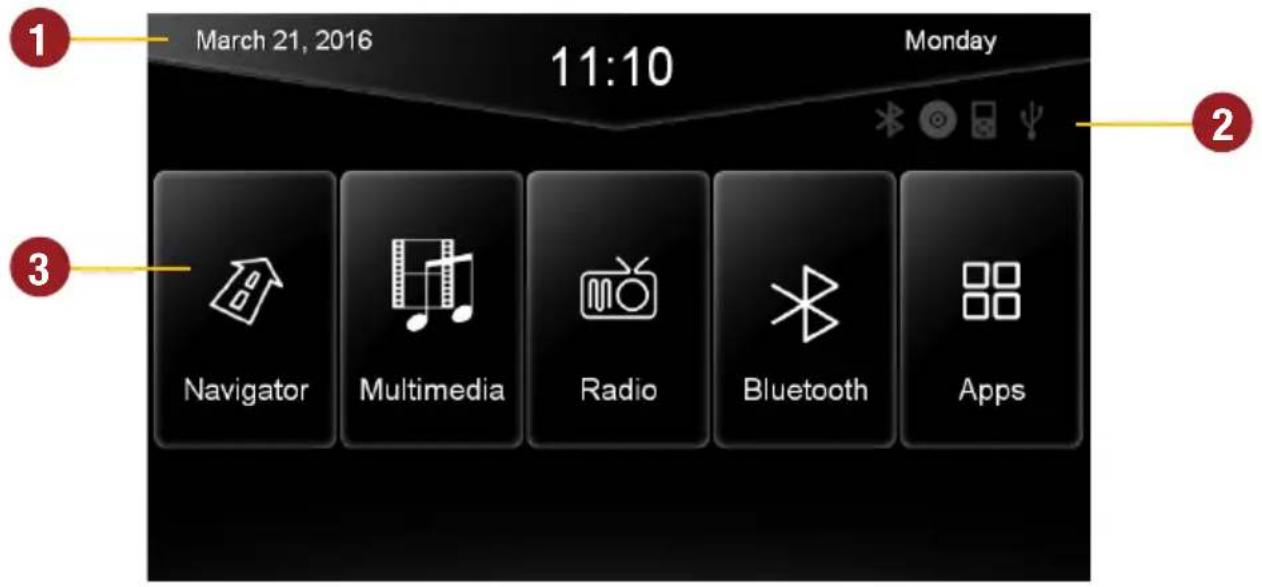
- Depending on the selected design theme (Skin), the current date and time will be displayed here.
- The four function icons are (depending on the skin) is highlighted in white and thus activated when the corresponding function is in use, such as „Bluetooth connection“, „CD / DVD in the drive“, „iPod connection“ or „USB connection“.
- The main menu displays five to eight key panels, which start the selected application or lead to the regarding submenue.
In chapter „CUSTOM SETTINGS“, section „Menu assignments“ (Pg. 39) shows how to customize and arrange the key panels.

Basically, the device can operate several applications simultaneously. But if too many extensive applications running at the same time, it can slow the operation (not responding to your input) or even crash the system.
NAVIGATION
Open the navigation application by tapping „Navigator“ in the main menu or by pressing the „(only VN620-W) button on the device.
Please refer to the separate manual for the navigation software.
The device provides the ability to use any navigation software (Windows CE 6.0 compatible). Patch the navigation software (on MicroSD card) with the device as follows:
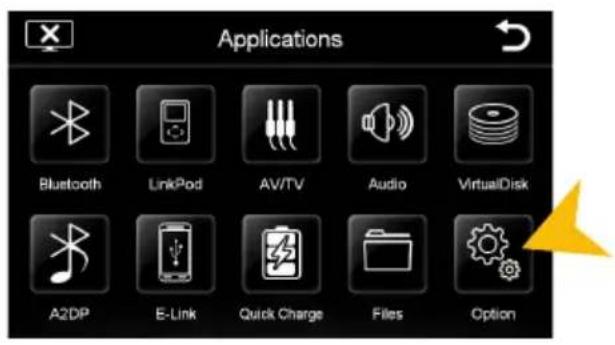
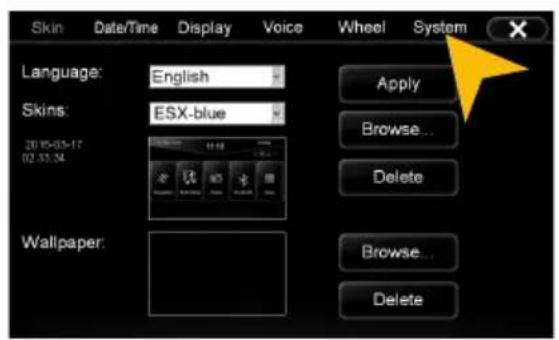
Tap on „System“. Tap on „Option“.
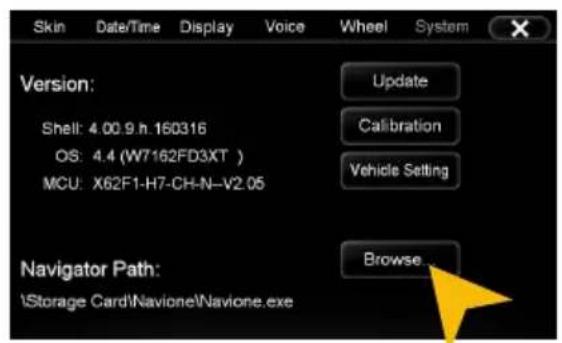
Tap on „Browse“.
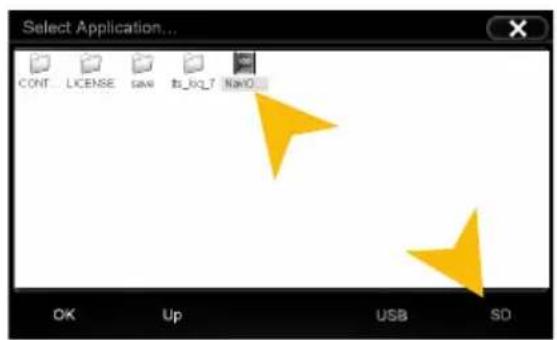
Tap on „SD“ and then select the software on the MicroSD card with a double click. This navigation software is starting as soon as you tap on „Navigation“ in the main or push the „NAVI“ buttons on the device.
Note: If you have accidentally changed the path and want to use the original ESX iGO software, the path must be always „Storage Card\NaviOne\Navione.exe“.

The unit receives GPS satellite signals automatically. In poor weather conditions or for example while passing a tunnel, these signals may be disturbed. This could lead to a malfunction of the GPS positioning.

MULTIMEDIA PLAYERR
By tapping „Multimedia“ in the main menu or by pressing the „button on the device (only VN620-W), the source selection USB or SD for audio and video playback opens. Refer to page 17 for CD Audio playback.
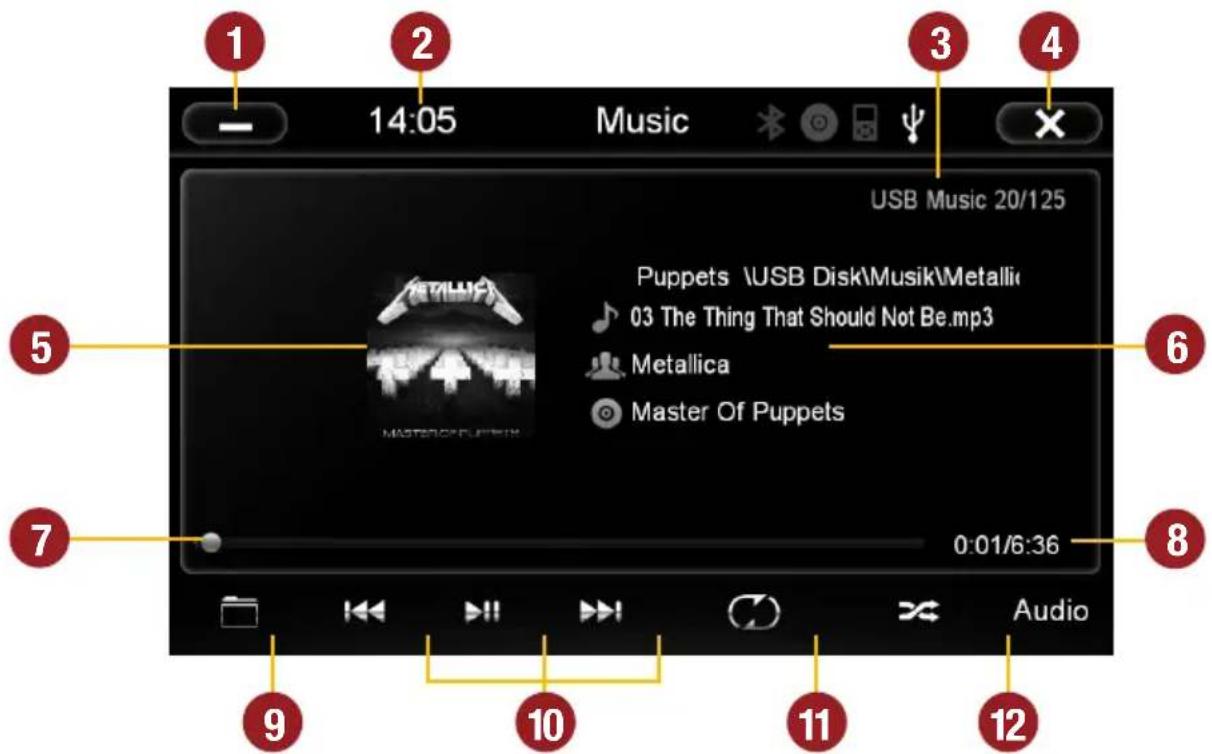
- Tap here to enter the main menu without interrupting the playback of the current title.
- Current time.
- Source information and track number.
- Tap here to exit the application, the playback will be interrupted.
- ID3-Tag album cover of the current audio file.
- Title/artist/album information.
- Progress bar of the currently playing audio file. With the displacement of the knob you can jump to another point in the track.
- Elapsed time and the total time of the track.
-
Tap here to open folder list or to change the play mode (music or video).
-
Playback controls for audio player
-
Play previous track
- Start or pause playback
-
Play next track
-
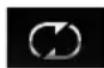
Repeat function
-
Repeat all titles
- Repeat only the current folder
-
Repeat single track
-
Tap here to start random playback

FOLDER PLAYBACK
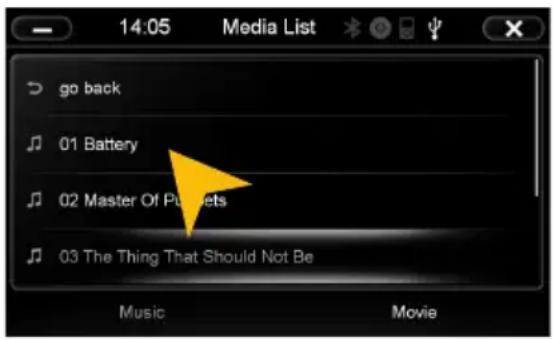
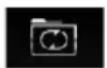
Tap on the folder icon in the multimedia menu on the bottom left (see page 9, #9) and the currently playing folder appears. Now you can scroll through the list and select another song by taping directly or with „go back“ to a higher directory level to open another another folder. Tap on the desired file and its playback starts immediately. Close this menu on the top left with „X“ to go back to the multimedia player menu.
REPEAT FUNCTION
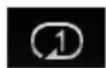
Symbol 1: When the last song has been played within a folder, the playback will continue to the next folder. After the last song, playback starts again from the beginning.
Symbol 2: The current folder is repeated
Symbol 3: A single track is repeated
RANDOM PLAY
To shuffle all tracks or all tracks within a folder (if a folder was previously selected).

MOVIE PLAYBACK
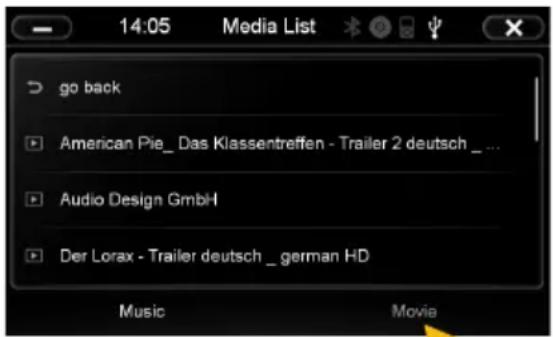
Select the folder icon and then „Movie“ on the bottom right. Now all movie files of the connected media are displayed. Are these located in several folders, you can switch to a different directory with „go back“ like in the music player. The „Repeat Function“ and „Random Play“ have the same function as in the music player. Tap during the fullscreen playback shortly at any point on the screen to open playback options.
Note: The playback of a movie file is only possible if the hand brake is closed.

If the playback does not start (a USB stick can not be detected or the source selection is not working as expected) close the multimedia player with „X“ top right (page 12, # 4) and restart it.

RADIO
Open the radio application by tapping „Radio“ in the main menu.
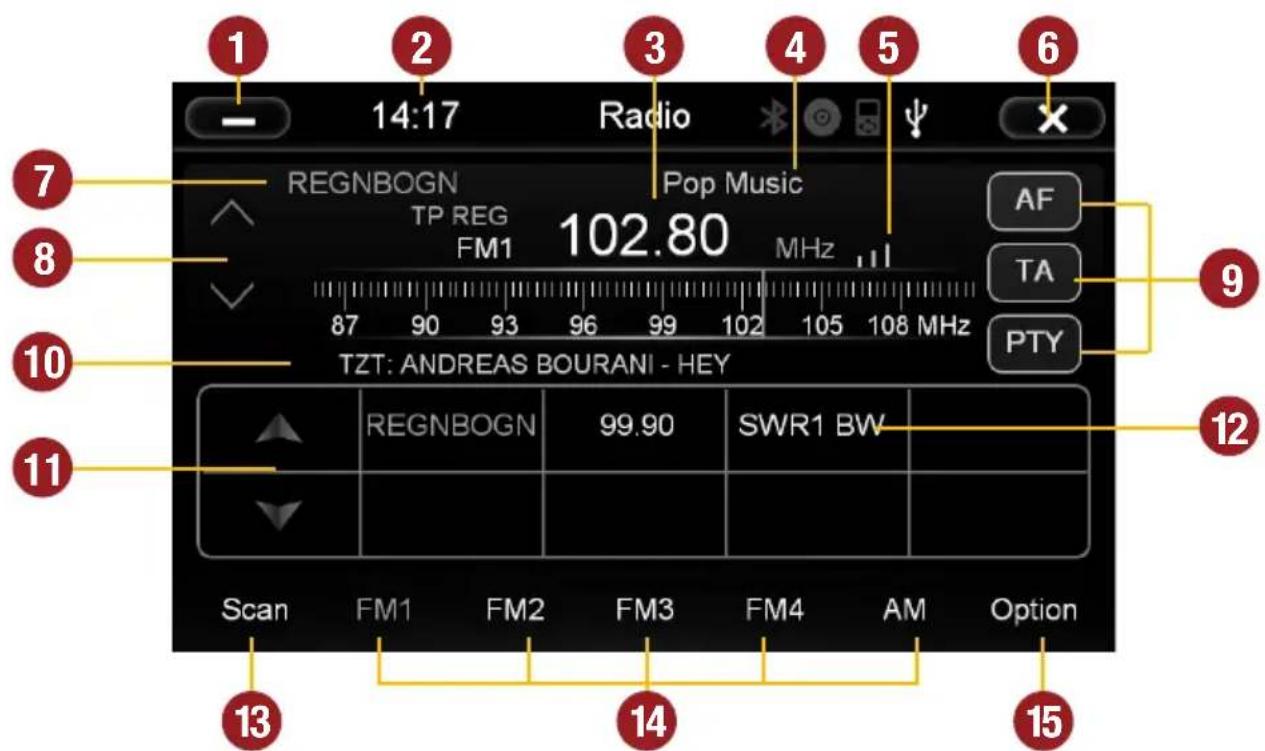
- Tap here to enter the main menu without interrupting the radio playback.
- Current time.
- Displays the current frequency band and the current station frequency, tap here for directly quick tuning.
- PTY category of the current station.
- Signal strength of the current station.
- Tap here to exit the application, the playback will be interrupted.
- RDS name of the current station.
- Fine adjustment of the frequency, Arrow left for downward, arrow right upwards.
- RDS (AF, TA, PTY) features.
-
RDS information of the current station.
-
With the arrows you can quick-start the search for a station from the current frequency up or down.
- Station presets.
- Press „Scan“ about 2 seconds to start the automatic radio station search. Then up to 32 currently available stations will be stored in all four the station presets.
Note: All previously stored stations will be erased and overwrote.
A quick tap on the icon enables a jump to the next available station.
- Tap here to the open the different preset pages, with 8 station presets each.
- Tap here to open the settings.
Settings and station presets
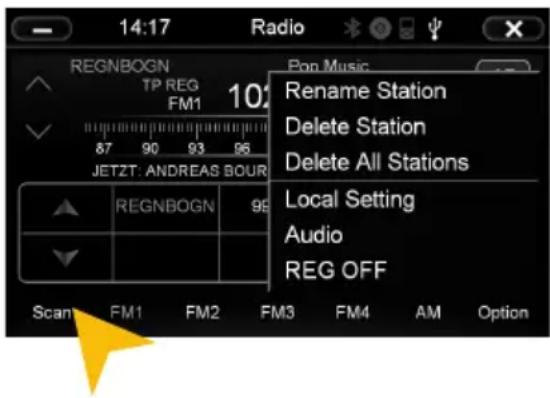
Tap on the „gear“ icon to open the settings and then:
„Rename Station“ to rename the current radio station.
„Delete Station“ to delete the current radio station from the presets.
„Delete All Stations“ to delete all radio stations from the pre-sets.
„Local Setting“ to open the settings for the local radio frequency standards.
Tap on „Audio“ to open the audio settings. Refer to the instructions in section „Audio“ in the „APPS“ menu.
REG OFF and REG ON switches the RDS function „REGIONAL“ on or off. If the menu shows „REG OFF“, the regional function is activated.
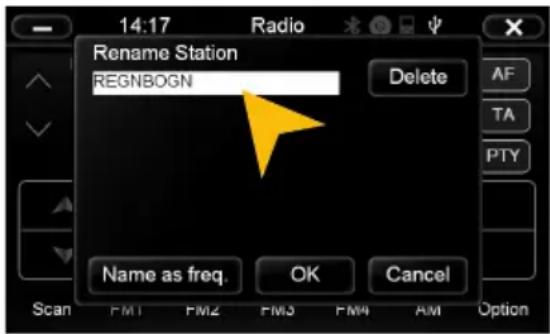
Rename Station:
Tap on the white input box to change the radio station name by using the screen keyboard.
Tap on „Name as freq.“ to set the frequency as radio station name.
Confirm your entry with „OK“ or tap „Cancel“ to exit the menu without changes.
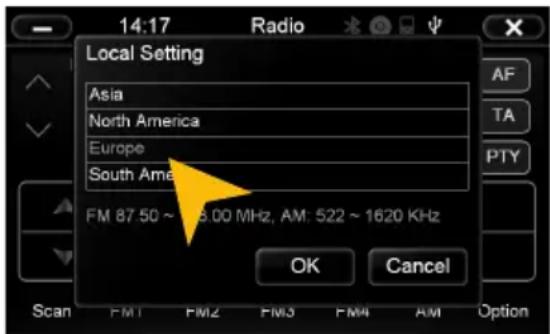
Local Setting:
Choose e.g. EUROPE from the list of local radio frequency standards.
Confirm your entry with „OK“ or tap „Cancel“ to exit the menu without changes.
After you change the settings, restart the radio application.

Basically, the device can operate several applications simultaneously. But if too many extensive applications running at the same time, it can slow the operation (not responding to your input) or even crash the system.
RDS functions
This device supports RDS (Radio Data System) in the frequency range 87.5 - 107.9 MHz FM. The following RDS functions are only available if they are supported by the selected radio station.
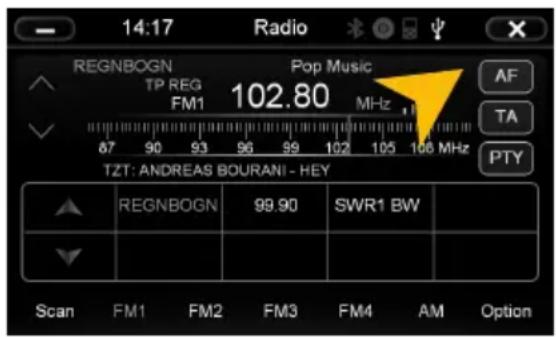
AF (Alternative Frequency)
The AF function enables the automatic switching of the receiving frequency when leaving the reception range of a transmitter. The device then checks the reception quality and automatically switches to a different frequency, when the same program in another reception area is also available. This is done automatically, without the user is notice anything.
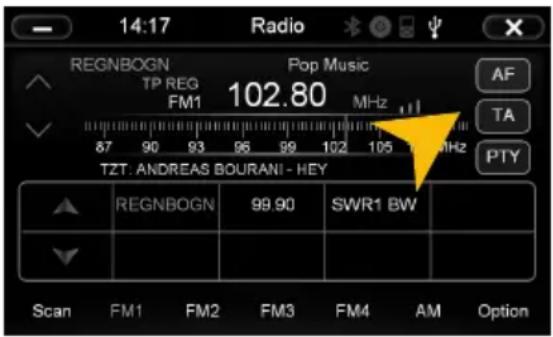
TA (Traffic Announcement)
The TA function enables the interruption of the media playback (audio player, CD, DVD, etc.) for traffic announcements. After the announcement, the previous media playback starts again.
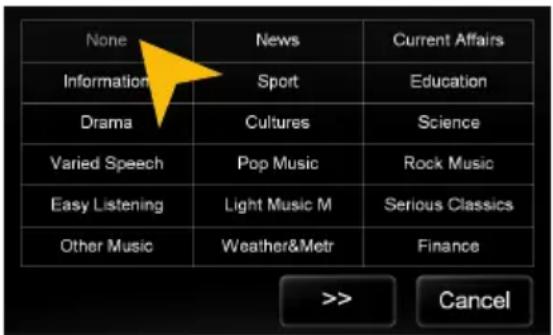
PTY (Program Type)
The PTY function is a classification of radio stations in different categories. Each program of a RDS radio station is classified categorically.
After you have selected a category, the unit automatically searches for the next matching radio station in this category. During the „Automatic scan“ only programs will be found, that match to the chosen category. If you no longer want this function, select the category „None“.

DVD (DVD/CD-Player)
The DVD player supports the following formats: DVD, DVD-R/RW, DVD+R/RW, VCD, CD, CD-R/RW, MP3. Open the DVD application by tapping „DVD“ in the main menu.
Tap during DVD playback on any spot on the display to open the DVD menu. When you playback a CD or MP3-CD, the user interface is different.
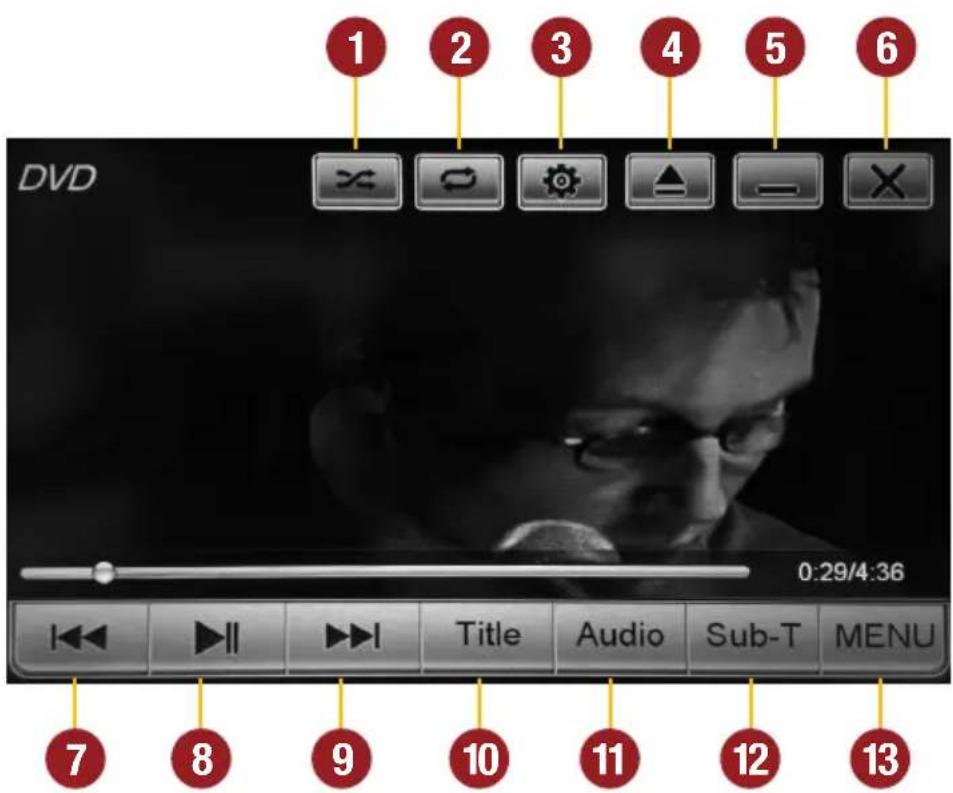
- Shuffle
- Repeat (chapter, track, all tracks, Off)
- video settings
- Eject inserted disk
- Minimize, playback resumes
- End DVD Playback
-
Previous chapter
-
Play / Pause
- Next chapter
- Title menu of the DVD
- Change language (if available)
- Change subtitles (if available)
- DVD menu of the DVD

APPS
Open the application menu by tapping on „Apps“ in the main menu.
The device offers a variety of applications that can be used as described below. Some of these functions require the appropriate accessories.
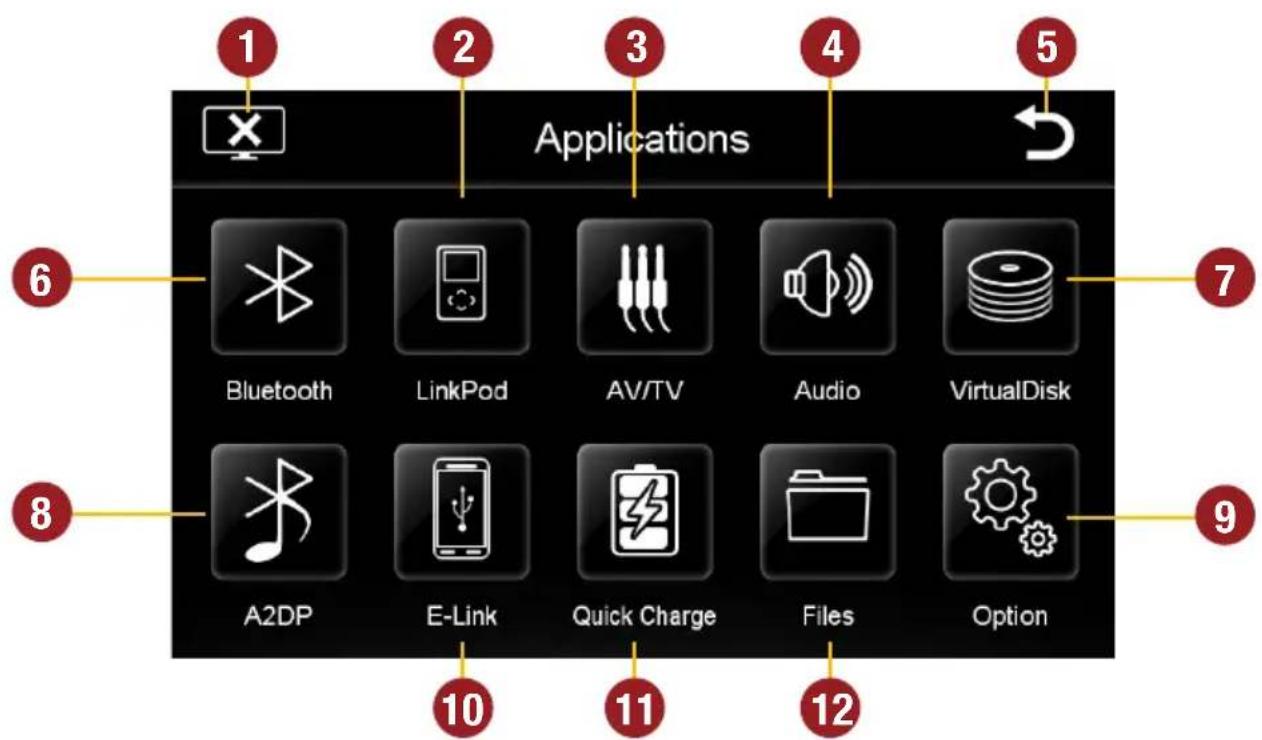
- Tap here to switch off the display. To switch on the display again, tap onto the screen.
- Tap here to open the LinkPod menu, if an iPod/iPhone is connected with the device.
- Tap here to open the AV/TV menu.
- Tap here to open the audio settings.
- Tap here to go back to the main menu.
-
Tap here to the Bluetooth™ menu.
-
Tap here to open the VirtualDisk menu.
- Tap here to start the A2DP audio streaming.
- Tap here to open the option menu.
- Tap here to open the E-Link menu.
- Tap here to open the Quick Charge menu.
- Tap here to open the file manager.
In Chapter „CUSTOM SETTINGS“, section „Menu assignments“ (Pg. 39) shows how to customize and arrange the key panels.
BLUETOOTH™
Open the Bluetooth™ application by tapping „Bluetooth“ in the main menu or by pressing the „(only VN620-W) button on the device.
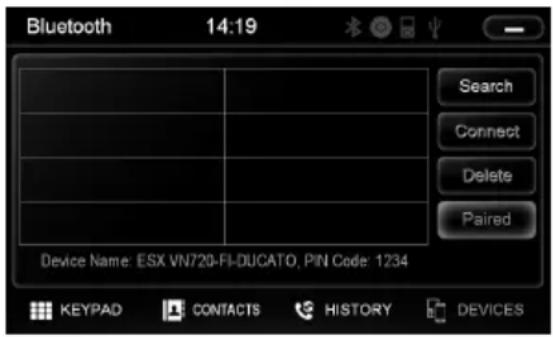
PAIRING
At first pair the devices, if necessary refer to the manual of your mobile phone. Open the „Settings“ menu on your mobile phone and open the Bluetooth settings.
Turn on Bluetooth and then search for compatible devices. The Bluetooth name of the device will be displayed.
Select your device from the device list in the phone and enter the PIN code 1234. Alternatively, you can also search your mobile phone under „Devices“ and connect to the device. Once you have connected your phone to the device, the pairing starts automatically as soon as the two devices are within range. Leave Bluetooth activated on the mobile phone. If a mobile phone has already been added to the list of Bluetooth devices, you can also manually pair the devices. The range for a satisfactory connection is about 10 m.
DISCONNECT
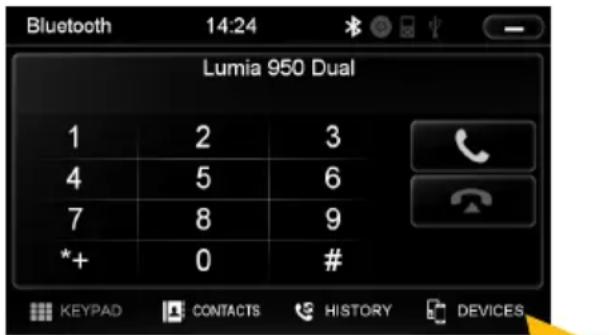
To disconnect the two Bluetooth devices, tap on „Devices“.
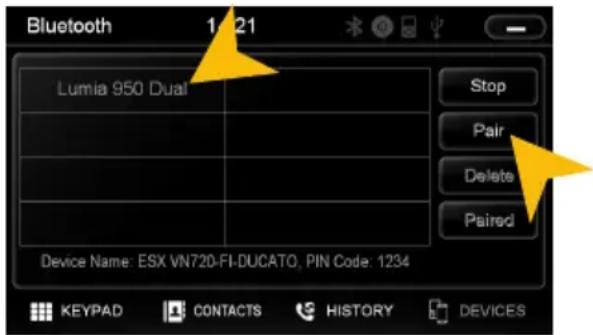
Choose the mobile phone from the list and tap „Disconnect“ or quit the Bluetooth connection on your phone.
Alternatively, the phone can also be deleted from the list, but after that, the automatic pairing is disabled and the mobile phone must be re-paired with the device. To delete the mobile phone from the list, select the name and press „Delete“. This is only possible if the devices are not currently paired.

The paired mobile phone has always priority and a phone call mutes always the currently playback of media (navigation, radio, audio, DVD, etc.). This applies both for incoming calls as well as outgoing calls.
BASIC FUNCTIONS
CONTACTS AND CALL HISTORY
Once your mobile phone has been connected via Bluetooth to the device, the synchronization of your contacts and call history starts automatically.
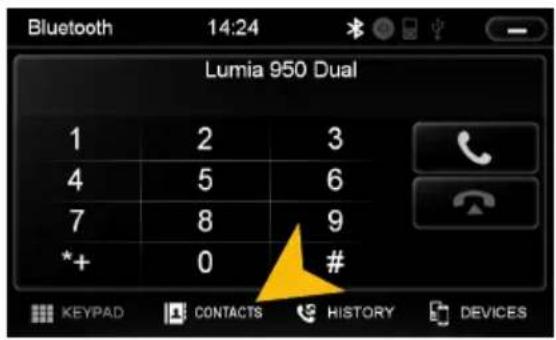
Tap on „Contacts“.
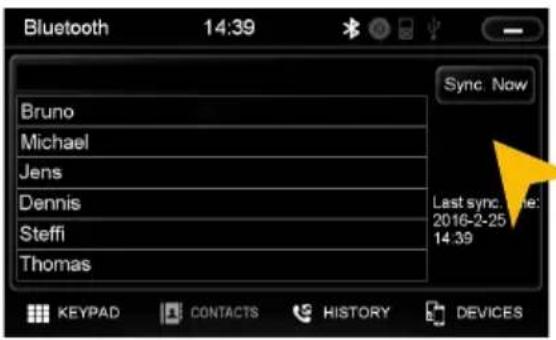
Tap on a name to start a phone call.
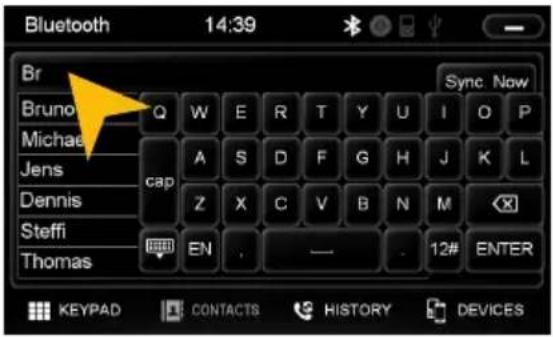
Tap on the white search field to search for a contact, by typing its name on the screen keyboard.
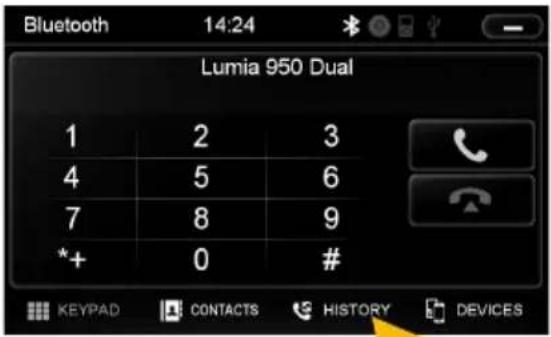
Tap on „History“.
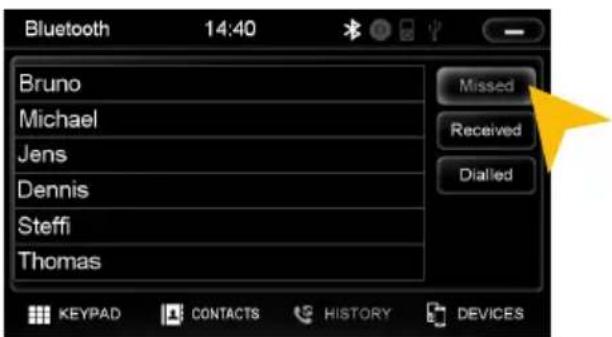
Tap on „Missed“ to display the missed phone calls.
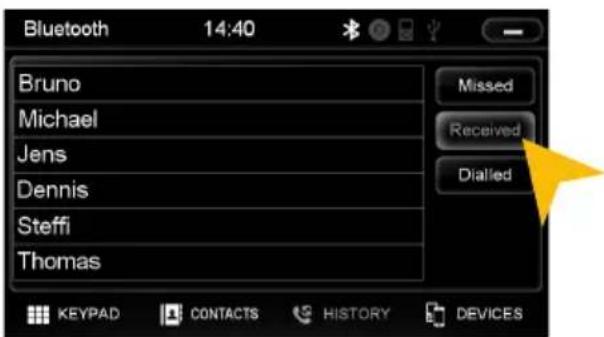
Tap on „Received“ to display the already received phone calls.
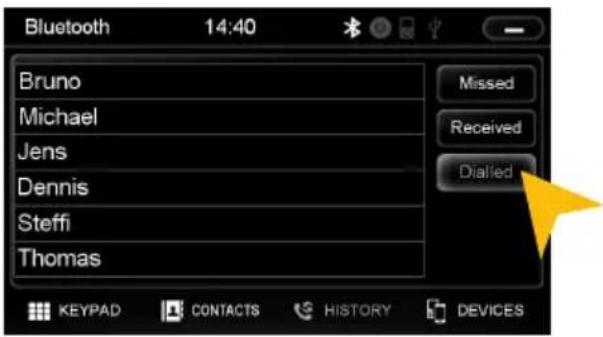
Tap on „Dialled“ to display the already transacted phone calls.
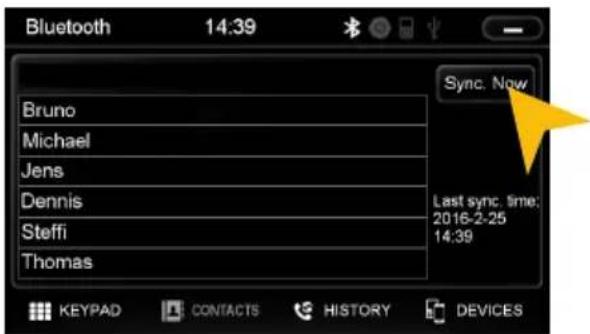
To synchronize your contacts and call history tap on „Sync. Now“.
KEYPAD
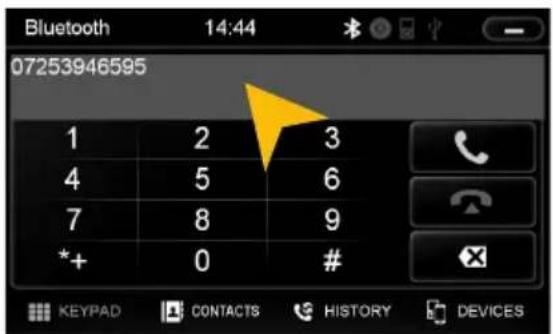
Tap on „Keypad“ to enter phone numbers manually. Then enter the desired number and then tap the green phone icon to start dialing. Tap the red phone icon to end the phone call.
You can dial with the paired mobile phone, but this is not recommended while driving and may be illegal in your country.

LinkPod (optional)
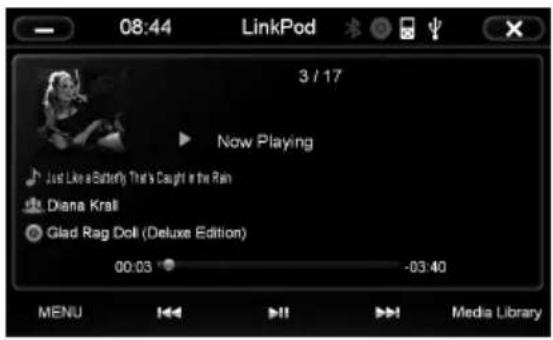
Connect your iPod™ or iPhone™ via USB with the ESX device. When the iPod™ icon is highlighted in white (top next to the time display), the connection is active.
The battery charging function is carried out when the unit is turned on. For older iPod ^TM models, it may happen that these are not recognized after the power is turned off. Pinch in this case, the iPod ^TM off and back on.
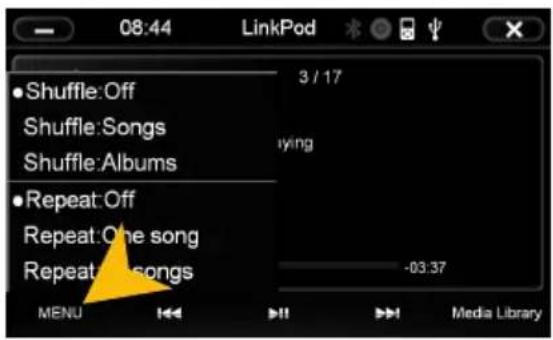
The user interface is modeled like the user interface of the iPod™. You get access to the iPod™ its contents and playlists through the lower control panels. By tapping „MENU“ you can make the desired playback settings such as „Shuffle“ or „Repeat“.
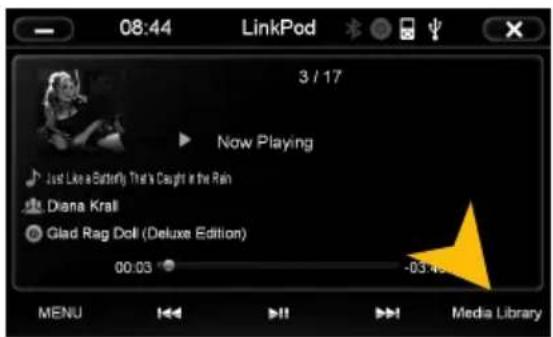
By tapping on „Media Library“, the library opens. There you can select the desired criteria (artist, playlist, album, genre, etc.) for the playback.
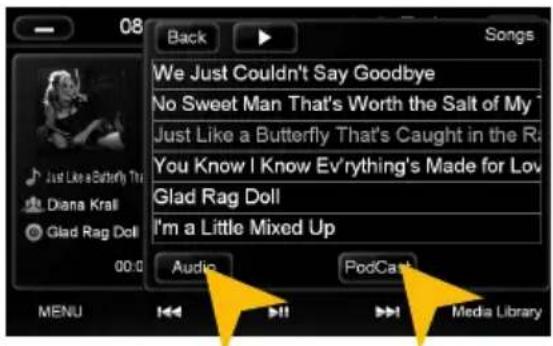
With „Audio“ and „Podcast“, you can access the desired media type of the iPod™.

Please avoid disconnecting the iPod/iPhone™ during operation. This could cause a system crash.
AV/TV (optional)
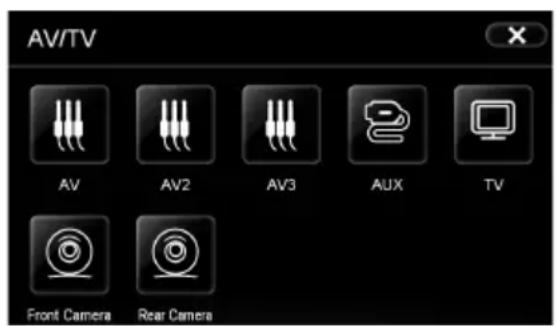
The AV/TV menu offers the possibility to playback a audio or source.
Please refer for operation, installation and functionality to the instruction manual of the connected device.
Note: AV is not available when the external DAB receiver „VNA-TM-DAB“ from ESX is used.
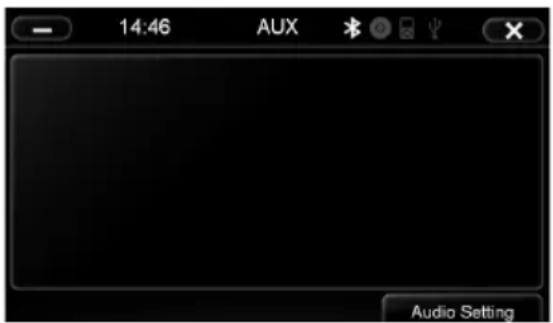
The connections are as follows:
AV = Cable AV 1 (3 x RCA)
AV2 = Cable AV2/TV (3 x RCA)
AV3 = Cable AV3/AUX (3 x RCA)
AUX = Factory AUX connection
Front Cam = Cable „FRONT-CCD-IN“
Rear Cam = Cable „CCD-CVBS-IN“

The touchscreen allows the operation by finger tip or the included stylus marker. Due to complex menu navigation within each application, the stylus is much better suited for a accurate operation.
A2DP (optional)
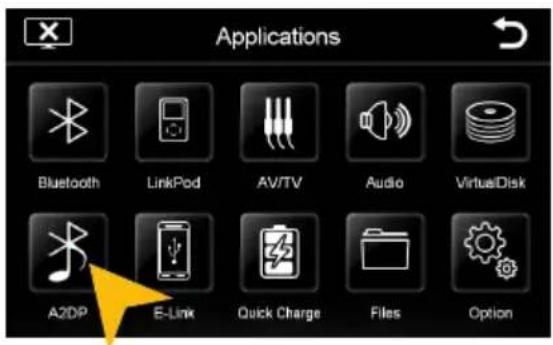
Once a Bluetooth device is (mobile phone, computer, tablet) coupled via Bluetooth, which works with the streaming A2DP standard, there is the possibility, to playback audio stream over the ESX device. Connect this device as described on page 15 and select a music source A2DP under Apps.
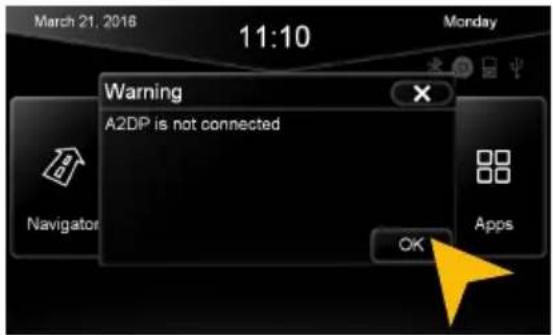
If the message „A2DP is not connected“ appears, your BT device it is not connected or the audio playback is not (yet) enabled. Check the Bluetooth device and if the appropriate settings for the audio streaming are correct. Then, disconnect the device and connect it again. If the message „A2DP is not connected“ appears again, the Bluetooth device does not support the A2DP standard.
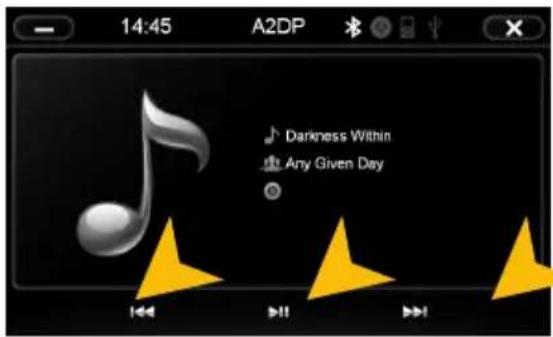
Start playback of the desired music on the Bluetooth device or with the keypad „>|” on the touch screen. If you play a playlist, you can use also the keypad „|<<“ and „>>|“ on the touch screen, respectively the „SEEK + / SEEK“ buttons or the rotary control on the ESX device to select the desired title.

Audio
You can open the audio settings in the main menu by tapping on „Apps“ and „Audio“ or by pressing the right rotary control (except while DVD/TV playback) on the device.
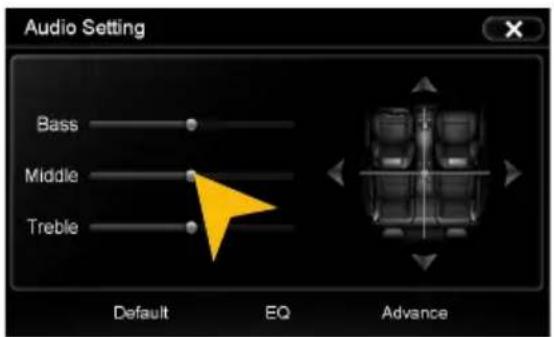
Tap on one of the control bars to change the sound adjustment.
Note: The change of settings directly influences the „Equalizer“ settings.
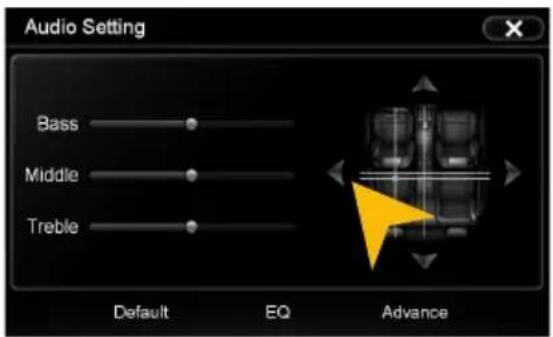
Tap on one of the seating positions or on the arrows to align the front and rear speakers.
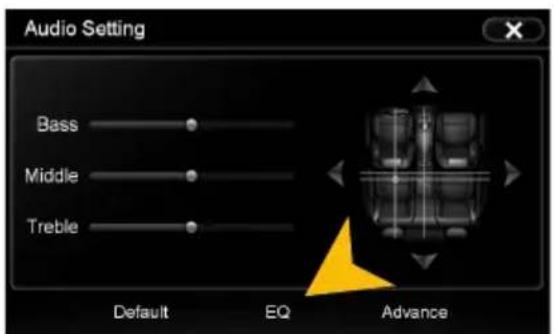
Tap on „EQ“.
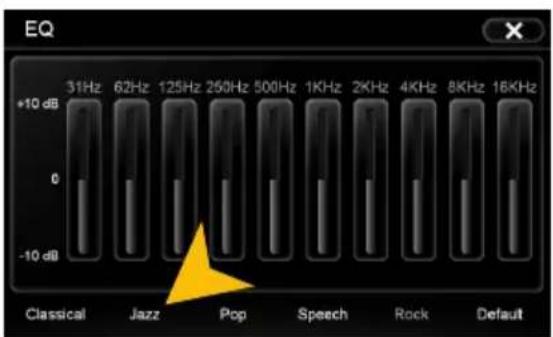
Tap on one of the preset equalizer presets.
BASIC FUNCTIONS
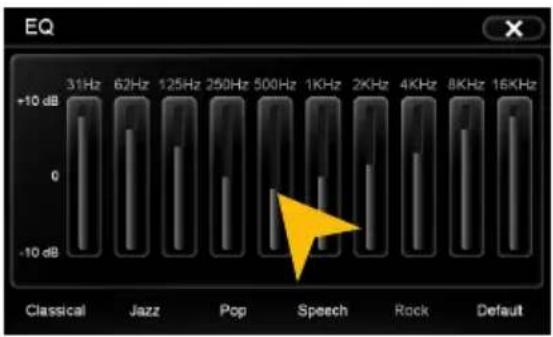
Tap on one of the control bars to change the equalizer preset.
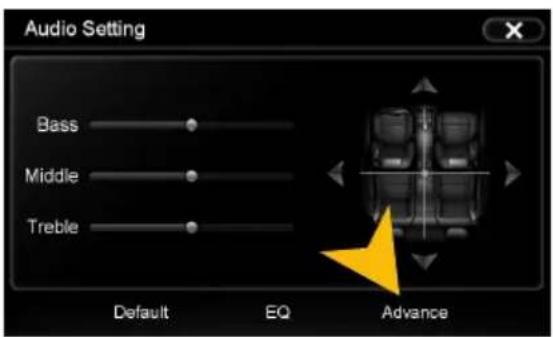
Tap on „Advance“ to open the advanced audio settings.
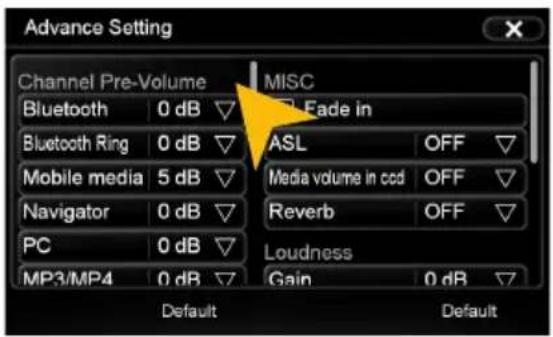
On the left under „Channel Pre-Volume“ you can set the individual volume for each application. Just tap on the arrow icons to change the value upward or downward.
Scroll down the left field to display all applications.
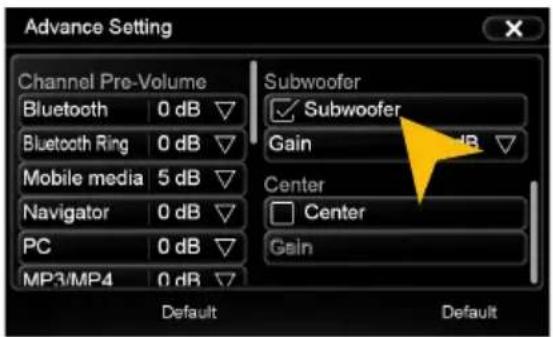
Under „MISC“ you can enable the:
„Fade in“ for very beginning audio track.
„ASL/GALA“ speed-dependent volume adjustment in three stages.
„Media Volume in CCD“ level attenuator, when reverse gear is engaged (low, medium, high). This function is only effective when „Pause Audio playback during reverse travel“ under display (see pg. 31) is set to OFF.
„Reverb“ with 6 DSP presets to change the sound characteristics of the device.
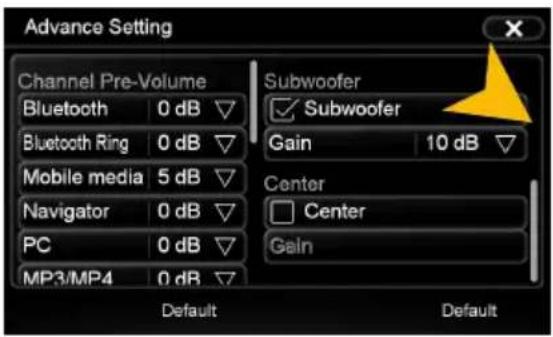
Scroll the right field down to see all settings under „MISC“. Under the section „Loudness“ you can set the bass/treble boost from 0 - 20dB regardless of the equalizer settings.
Note: This can lead to high distortion for the speakers.
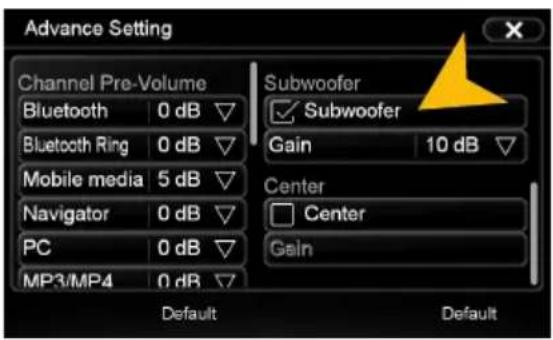
Under „Subwoofer“ you can turn on or off the sound output of the RCA output SUBWOOFER and you are able to set its level from -12dB to +10db.

With „Default“ you can restore the respective factory settings.

Files
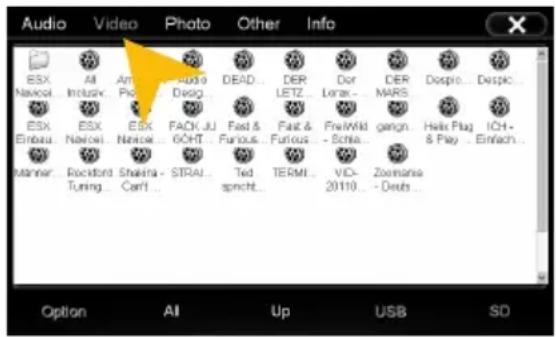
With the file manager, it is possible to manage and open computer specific file formats. The system supports the following file formats:
Photo: BMP, JPEG, GIF, PNG
Video: MPEG (*.mpg, *.mpeg), AVI, RM (*.rm. *.rmvb), WMV, MP4 (*.mp4, *.mov), MKV (*.mkv)
Audio: MP3, WMA, WAV, FLAC, AAC, Monkey Audio (*.ape)
Tap once to highlight a particular file. Tap twice (double-click) to open the desired file.
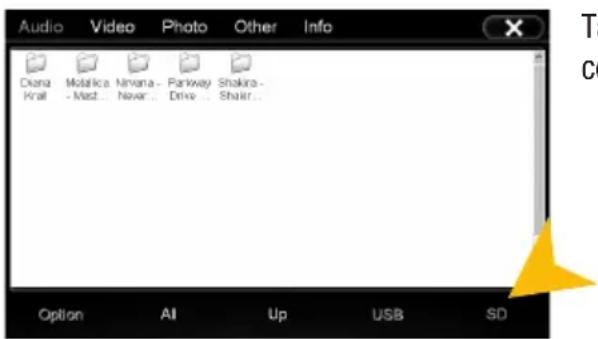
Tap on the desired storage location to display the available and compatible files.
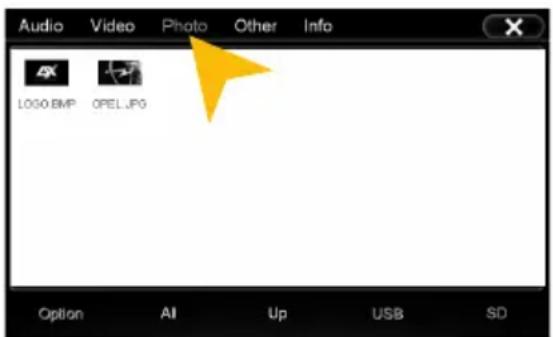
Tap on the upper bar to display the desired file category. Then the filebrowser shows only the chosen files. Chose for example „Photo“, then only all available photos including a preview will be displayed.
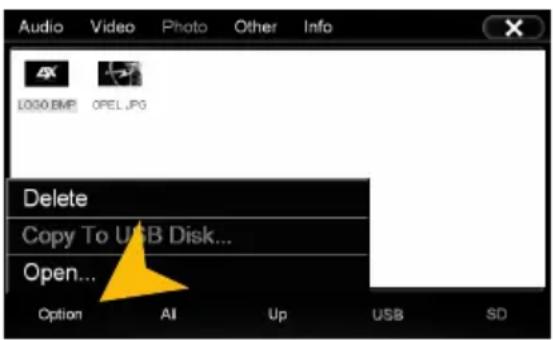
Tap on „Option“ to perform file operations, such as deleting or copying files.
With the copy function, it is possible to copy files to another location or to another disk.
natural_image
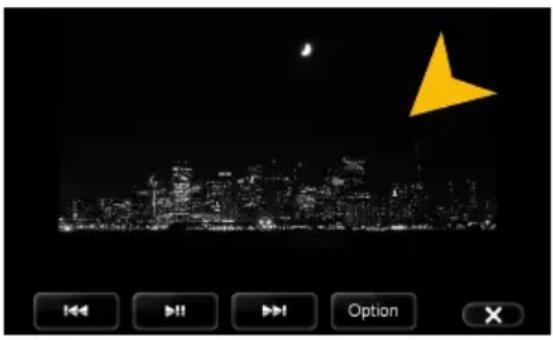
Night cityscape with a yellow triangular shape and playback controls (no readable text or symbols)Once you have open an image file, you can start a slideshow of all the pictures stored in the directory. Tap on the image and the playback options are displayed.
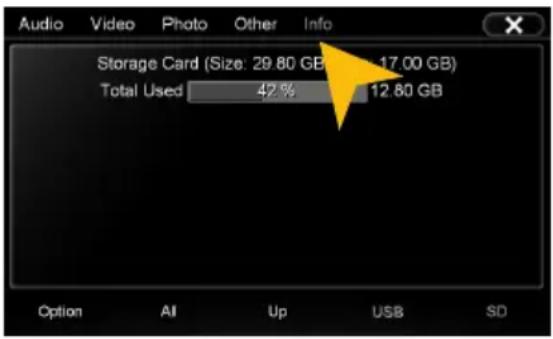
Tap on „Info“ to view the memory information of each storage locations.
Here you can view the file categories and the used disk space on the selected storage location.
The usage is displayed in percent and in kilobytes/megabytes/gigabytes.

VIRTUAL DISK (optional)
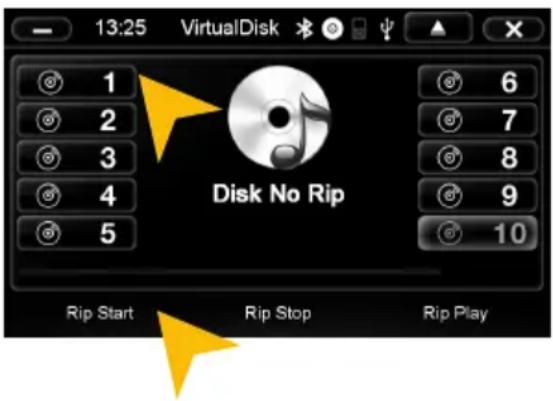
HOW TO CONVERT
The Virtual Disk feature allows you to convert audio CDs into MP3 format. For this purpose it is always necessary that a USB stick is connected.
How to read a CD:
- Open Virtual Disk under APPS.
- Connect a USB stick and insert a CD
- The playback of the inserted CD will start automatically
- Select a disc number on which position the the CD should be ripped and stored.
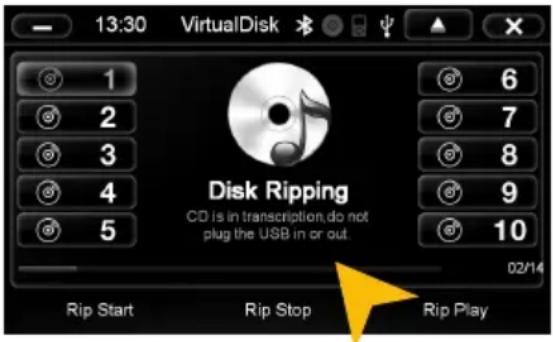
Note: If „Disk Ripped“ is displayed in the center of the screen the CD songs are already available - they will be overwritten as soon as you select „Start Rip“. If „Disk No Rip“ appears under a selected disc number, no ripped CD is available.
Select „Rip Start“. The progress bar shows the current progress of currently ripping title and all the total title numbers (e.g. 2 of 11).
Select „Rip Stop“ to cancel the process. All previously ripped songs remain on the drive.
BASIC FUNCTIONS
Note: When using multiple USB sticks, the stick with the desired RIPs must have been always connected first! If you can not access the RIPs, remove all USB sticks and connect the appropriate stick via USB. If you connect a USB Stick with contained CD RIPs while is Virtual Disk opened, they will not appear immediately. After recognizing the sticks (audible beep) tap on the disc number 1 - 10 again.
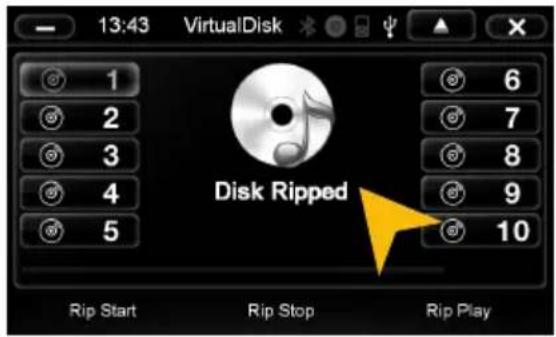
If the message „Rip Fail“ appears possibly the CD has not been recognized/not yet ripped read or it is faulty/illegible/scratched.
After a successful completion, „Disk Ripped“ appears.
From now on this album is stored under the selected button e.g. „Disk 1“ and will be always playable, as long as the USB stick is connected. You can store a total of 10 CDs in this way.
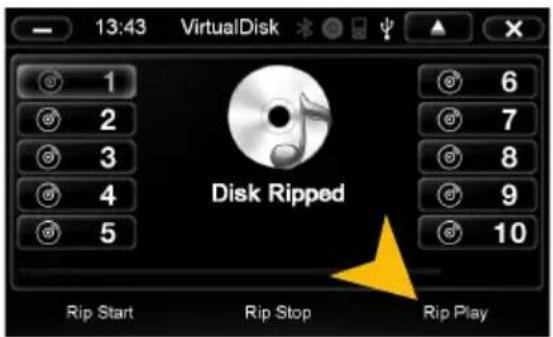
PLAYBACK
Select to „Rip Play“ to start in the play mode of the archive.
The playback of disc 1 automatically begins.
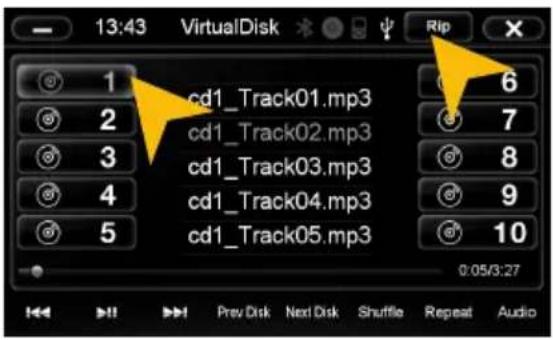
Select the desired disc 1-10. If there are no songs stored, the playlist is empty.
You can switch through the titles with |<<, >>|, or with the right rotary control of the device, Seek +, SEEK or the steering wheel remote control by switch.
The tracks can also be selected directly in the black title list by tapping on the titles, wehre you can also scroll through the tile list.
If you want to rip more CDs, select „Rip“ on the top right corner.
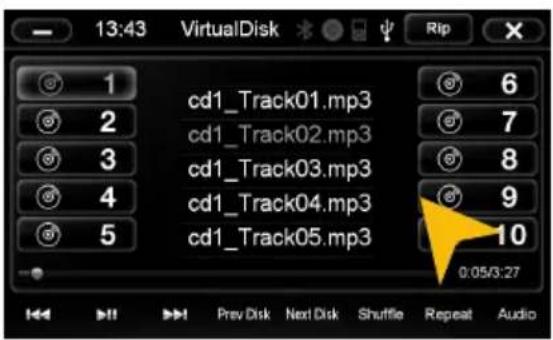
The ripped and stored titles on the USB stick songs are also available in the regular audio player. They are titled there including the CD-number, e.g. „Cd1_Track08“. Physically the data is stored in a folder named „RIP“ on the USB stick.
To delete a ripped CD on the USB drive, use the file manager (under APPS> files).
E-Link (optional, only for Android devices)
Note: Please ensure that for this function a permanent Bluetooth™ connection for the E-Link mode audio signal is required. Please refer to the section Bluetooth™ on page 15th
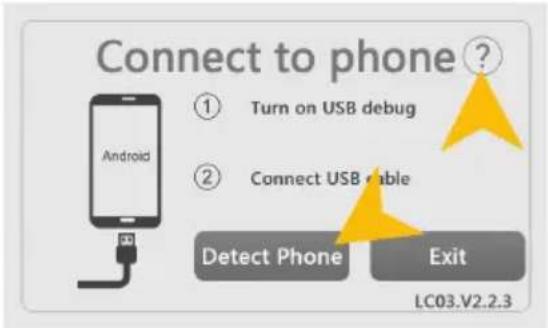
Start „E-Link“ under „Apps“ and follow the onscreen instructions.
By tapping on „?“ you get information on how to activate the so-called USB debug mode. Please note that the procedure for any Android device may vary.
Connect your Android device via USB to the ESX Naviceiver and tap on „Detect Phone“.
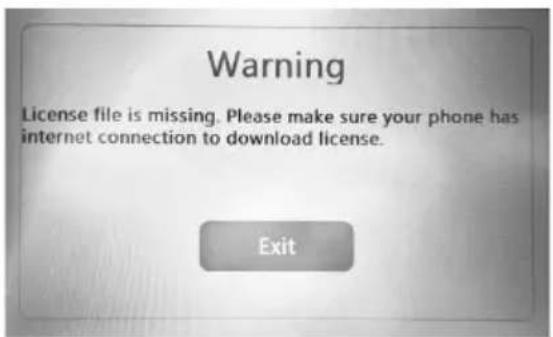
The first time you connect to an Android device, the device will automatically install the „Drive Mode“ app and a license file on your smartphone via the Internet (3G or WiFi)
Activate therefore your internet data connection. This is only necessary on the first interconnection.
„Exit“ closes the application.
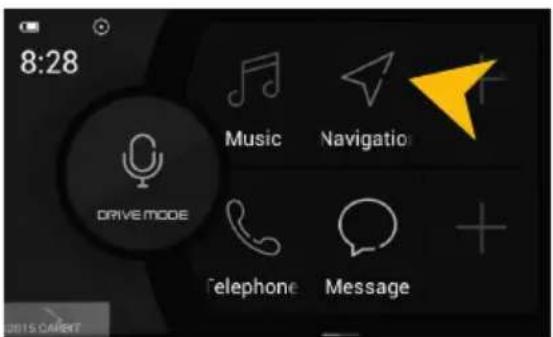
After the successful coupling the „Drive Mode“ app starts automatically.
The App menu contains initially the basic applications on your Android device which can be accessed via the „Drive Mode“ app, such as Drivermode (voice control), Music (audio player), Navigation, Telephone and Message (SMS application).
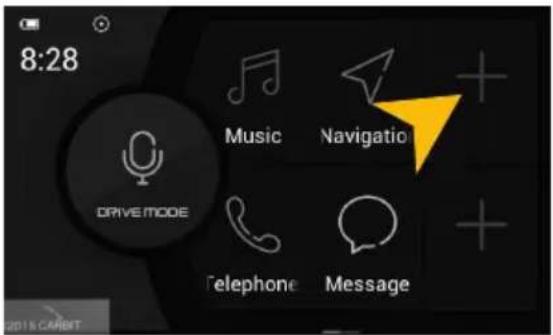
It's possible to modify the app menu according to your requirements, e.g. to embed extra applications. Click on a free App field (marked with a +).
If you wipe the app menu to the left, another app menu appears.
BASIC FUNCTIONS
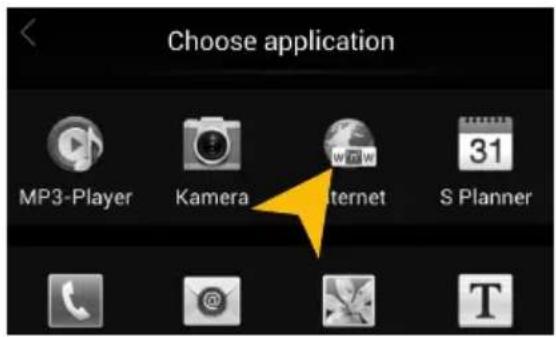
Under „Choose Application“ you can select the desired application.
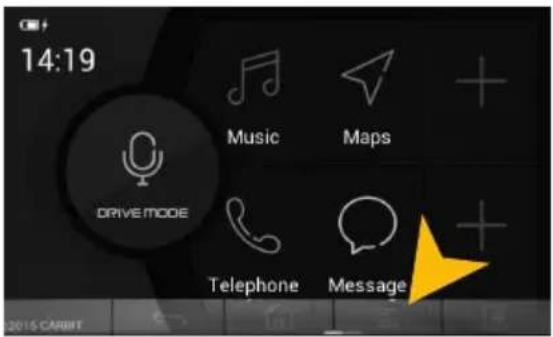
By tapping on the transparent „>“ arrow on the bottom left, a further window opens in the lower third of the screen.
There you find more options such as „Back“, „Home“, „Settings“ or „Forward“.
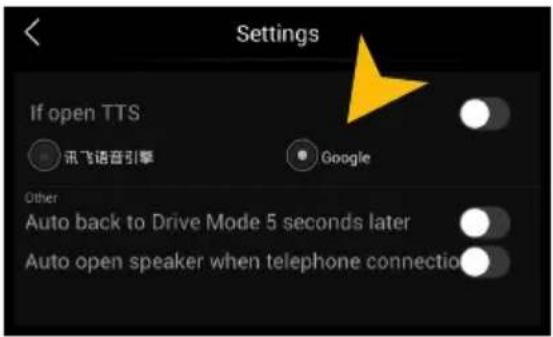
Under „Settings“ you can select:
„If open TTS“: Selection of the internet search engine for Voice Control
„Audio back ...“: After 5 seconds of inactivity jumps the application will automatically return to the „Drive Mode“ -Appmenü.
„Audio open ...“: Automatic answer for incoming calls.
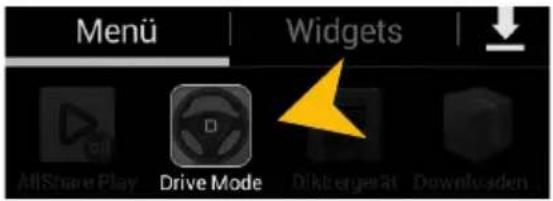
Note: In order to increase road safety, every time you start the „E-Link“ feature, the „Drive Mode“ app will be installed/ or started on your smartphone.
QUICK CHARGE (optional)
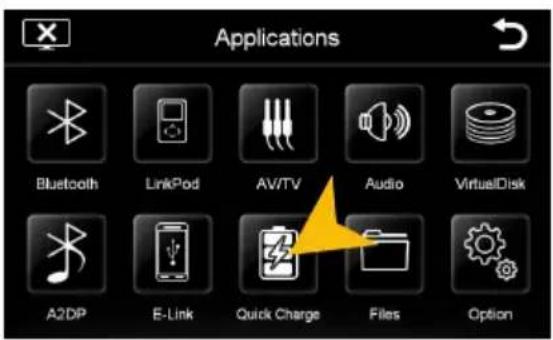
With „Quick Charge“ you can quick charge your mobile device via USB.
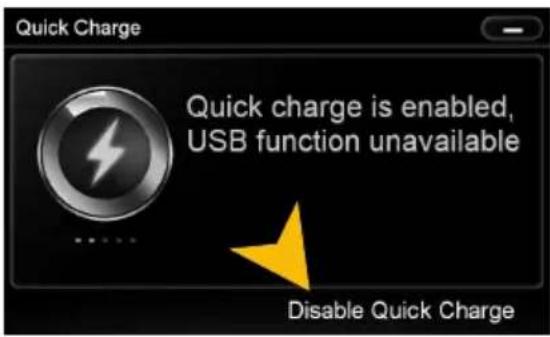
Tap on „Enable Quick Charge“ to activate the quick charge function. To disable the feature again, tap on „Disable Quick Charge“ at the same place position.
Please note that the USB data function is deactivated when the USB connection is used for the quick charging.
The ESX device provides in „Quick Charge“ function a charging current of 1A - 2.1A (depending on the connected equipment).
Note: Please note that the „Quick Charge“ function only works with USB port 1.

Option
You can open the option menu by tapping on „Options“ in the „Apps“ menu.
Language settings
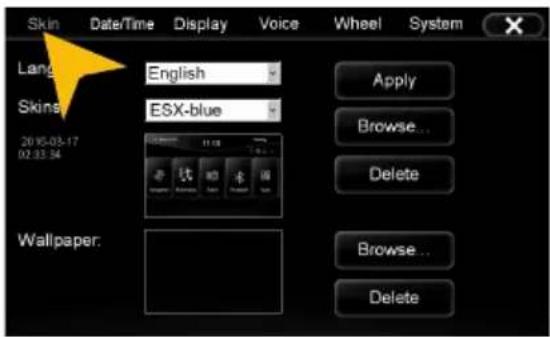
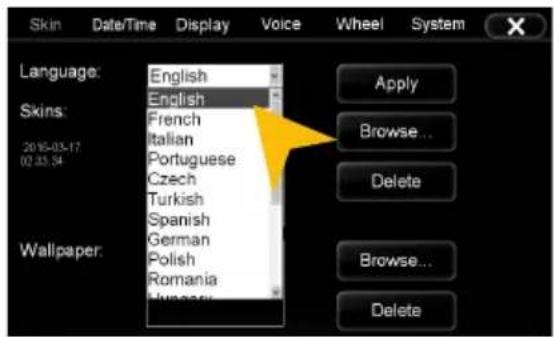
Tap on „Skin“. Select the desired language. Tap on „Apply“.
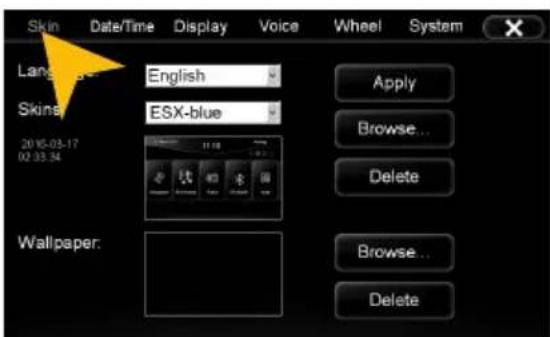
Tap on „Skin“.
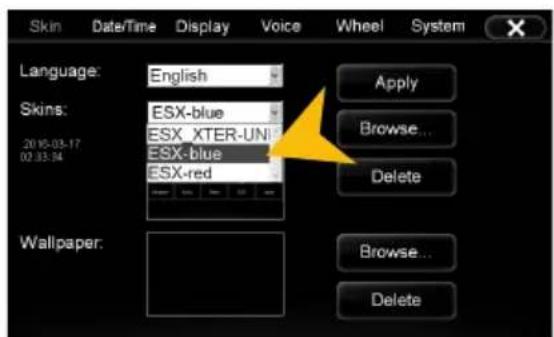
Tap on the menu „Skins“ and select the desired design theme (skin). Tap on „Apply“.
Date/Time
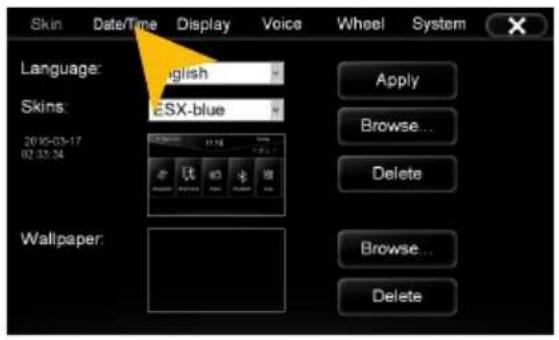
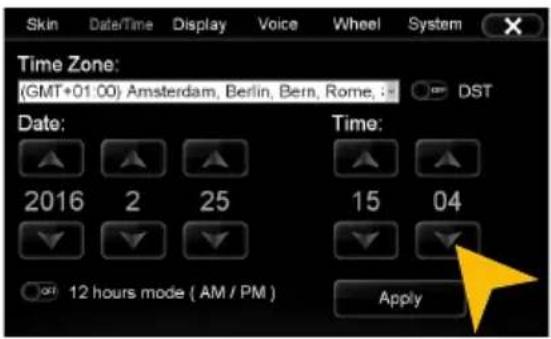
Tap on „Date/Time“.
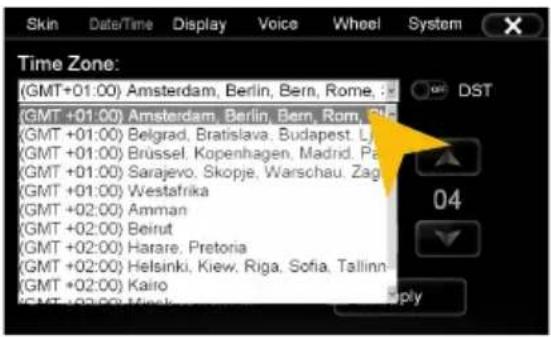
Select the desired time zone.
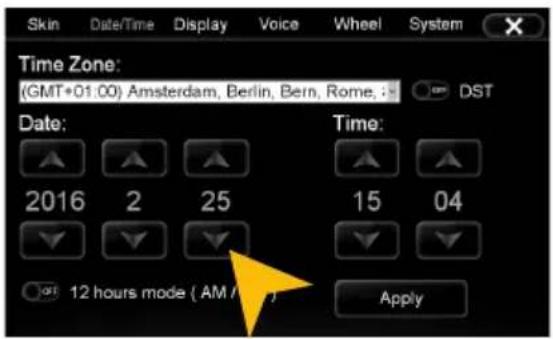
Set the current date. Set the current time.
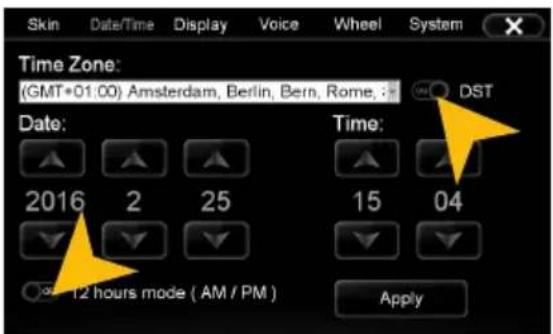
Tap on the checkbox right to set on daylight saving time.
Tap on the checkbox left to set the time format to 12-hours (AM / PM).
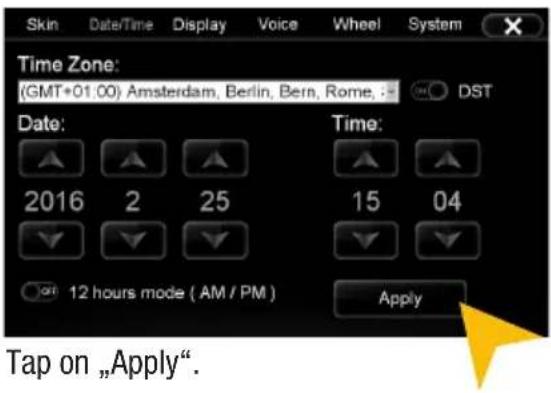

Please operate complex settings as a driver generally only if you have parked the car, otherwise the traffic safety is endangered. Otherwise you can not react in time, to avoid occurring danger situations.
Display
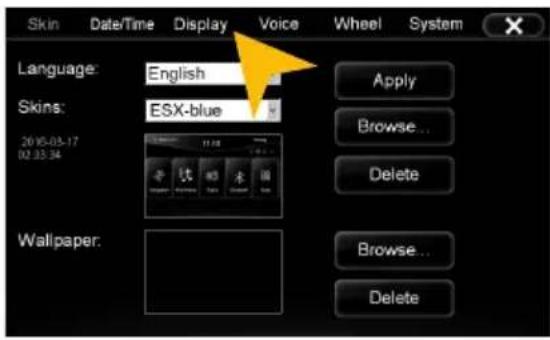
Tap on „Display“.
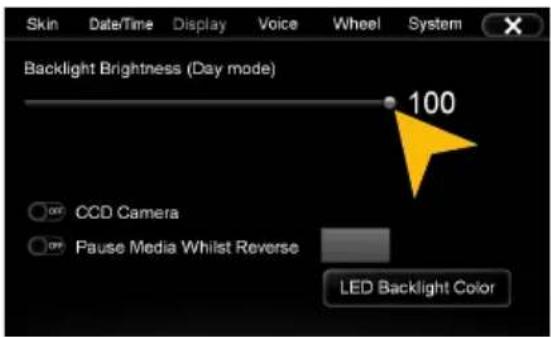
Set the desired brightness level for the display (only with vehicle headlights on).
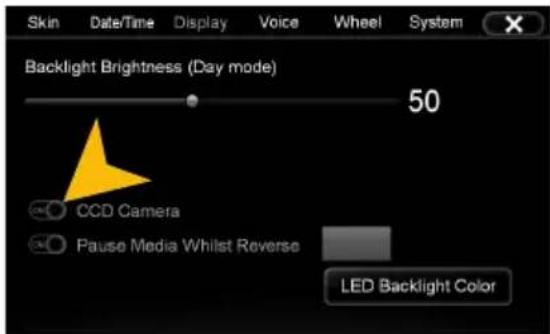
The checkbox „CCD Camera“, enables the optional rear view camera function. As soon as reverse gear is engaged, the transmission of the video camera is automatically displayed on the screen.
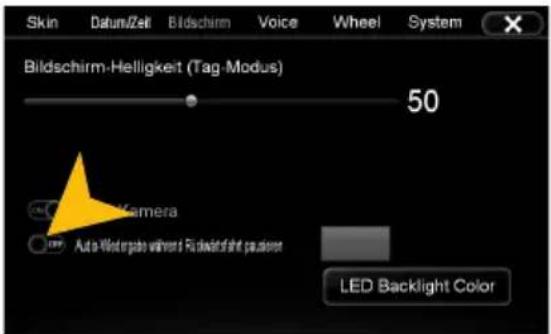
With the checkbox „Pause Media Whilst Reverse“, the media playback will be paused when the reverse gear is engaged.
Please note that the volume reduction in reverse gear „Media Volume in CCD“ only works, if the feature has been turned off here („OFF“). See also page 24.
Key illumination of the device (only in night driving mode)
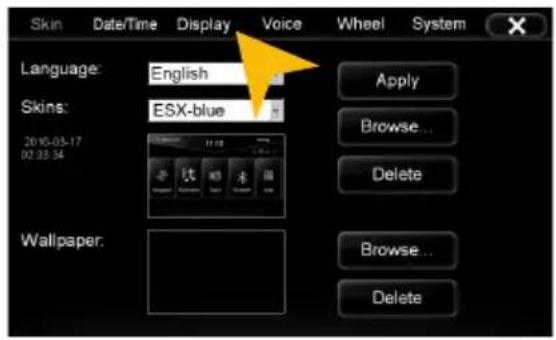
Tap on „Display“.
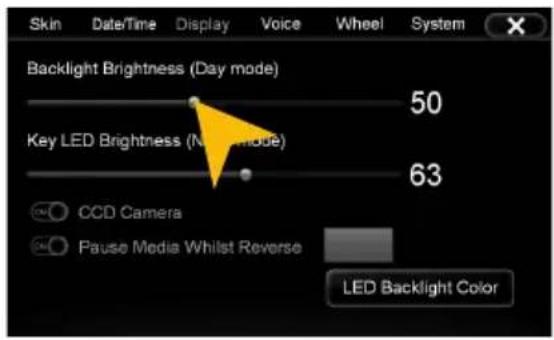
Set the key Illumination brightness by moving the status bar to a desired position.
Note: This is only possible when the light of the vehicle is switched on.
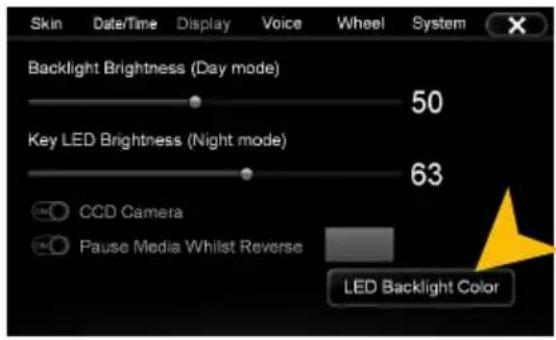
Under „LED Backlight Color“ you can adjust the color of the Key illumination.
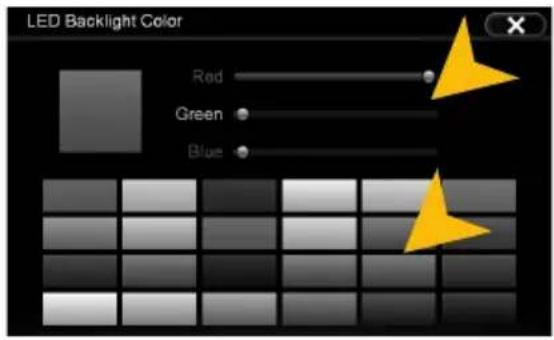
You can select a preset color or create a own color set via the RGB controller bars.
Voice (voice control)
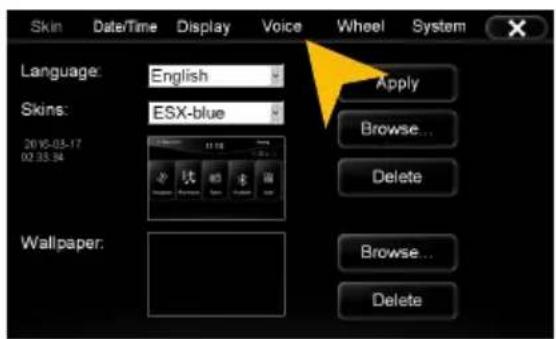
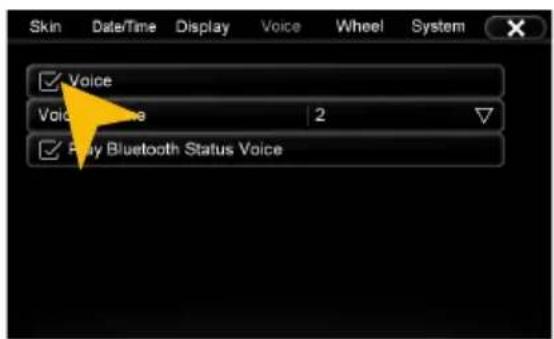
Tap on „Voice“. Tap on „Voice“ to activate the voice control.
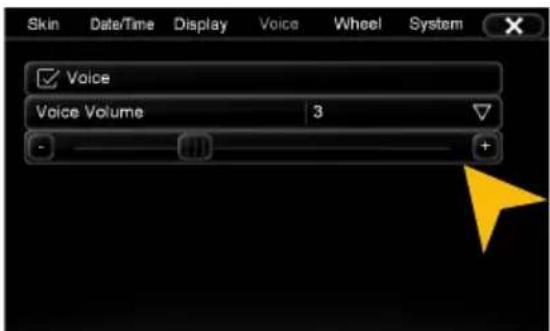
Under „Voice Volume“ you can adjust the volume of the speech output (0-10).
The unit will inform you after the activation of the voice control about the connected devices such as USB sticks or inserted SD cards.
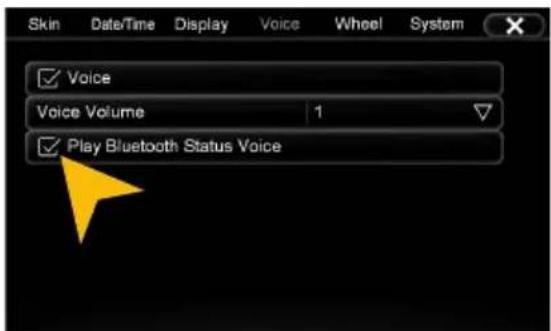
If „Play Bluetooth Status Voice“ is activated, an audible confirmation of the Bluetooth™ connection is issued whenever you connect or disconnect a paired Bluetooth™ device.
![March 21, 2016 11:10 Monday Say... Music iPod Phone media Telephone Call [name][at office/mobile/home] Navigator Help Off Lcd Volume/week/week/DVD TV Pod](/content/2026/05/846277/images/16087ed628abb7c1610c3cfdda7ea61e0673f2cee19151613569458a5dbbc275.jpg)
Press the button „“ on the device (only VN620-W) once briefly to start the voice control.
Press the button "△" on the device (only VN620-D) once briefly to start the voice control.
On the screen, possible command examples are shown. Besides the source selection you can also target the title name of e.g. a song on your USB stick.
When you speak no command, the voice control function will be disabled after about 10 seconds (timeout).
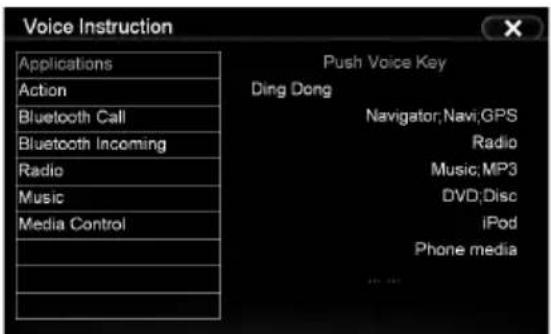
Say „Help“ to view a list of possible voice commands.
Operating System
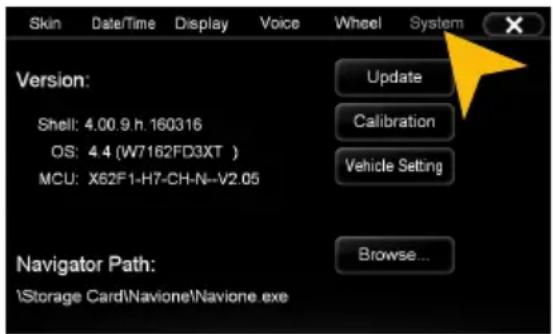
Under „System“ you find information about the system.
Shell: Version number of the user interface
OS: Version number of the operating system
Check under www.esxaudio.de/navi if an operating system update is available or ask your retail dealer. Then follow the installation instructions that come with the update.

Do not turn off the car's ignition while updating process of the operating system. Don't run the update while driving.
Calibration of the touchscreen operation
If the touchscreen function is inaccurate you can recalibrate the display. Proceed as follows:
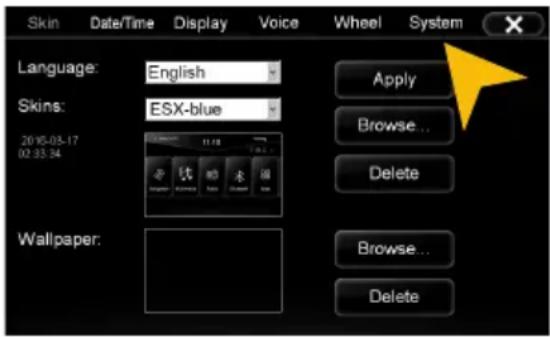
Tap on „System“.
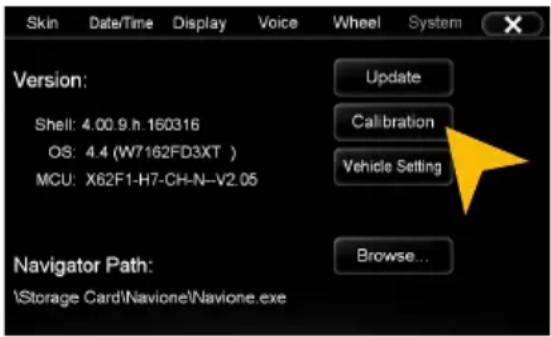
Tap on „Calibration“.
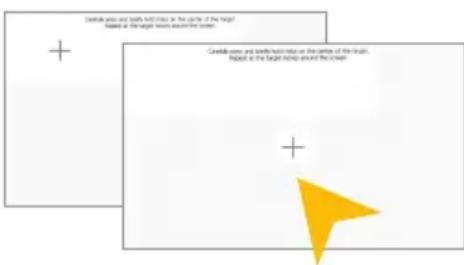
Tap with the included stylus marker on the „+“. Then the „+“ will be moved to another location, then tap again on the „+“ and repeat this process until the calibration is complete. Then confirm the calibration process.
Menu assignment
You have the possibility to arrange the main menu or apps menu to your liking.
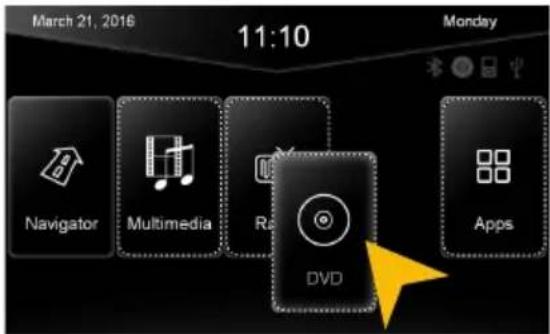
To change the position of a control panel, press and hold for 5 seconds the regarding panel in the main or apps menu until the dashed lines are visible.
Then hold and slide the control panel to the desired position within the menu.
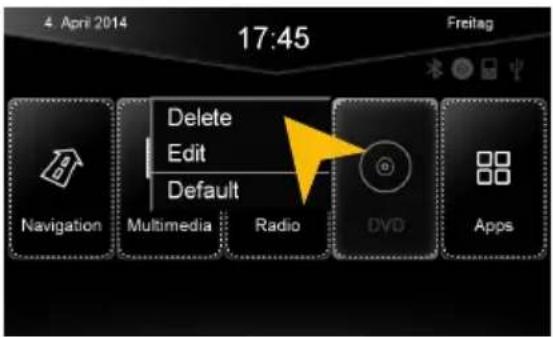
To occupy a control panel with a new function, touch the control panel for 1-2 sec. to open the edit menu. Tap on „Delete“ to remove the panel.
Tap on „Edit“ to select a new function or application or tap on „Default“ to restore the original factory settings.
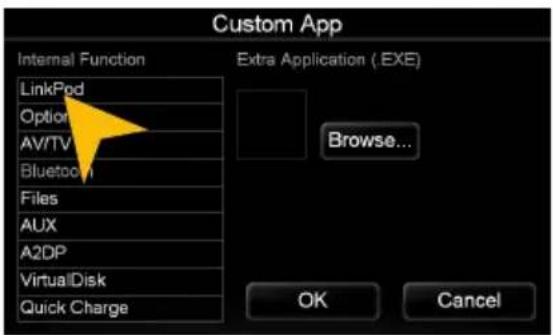
Under „Edit“ you can select an application from the list to occupy the current control panel.
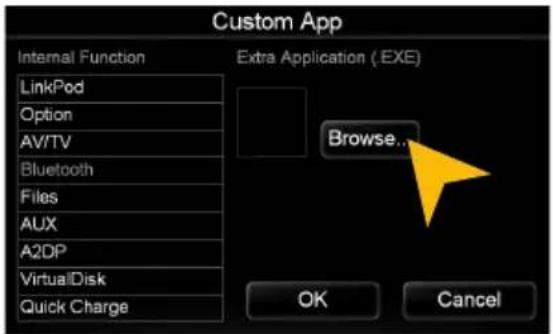
You have also the possibility to link a control panel with any compatible software application (. EXE), which must be stored on the available storage locations. Tap on „Browse“ to select the desired application.
Note: To exit the edit menu either press „OK“ or „Cancel.“ To exit the edit mode, tap on the screen (outside of the dashed lines) and the process is complete.

Wallpaper
You have the possibility to customize the background image to your liking. First, copy the desired wallpaper file to the microSD card or on a USB stick.
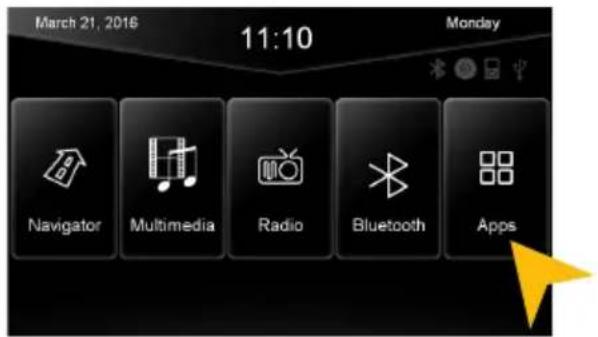
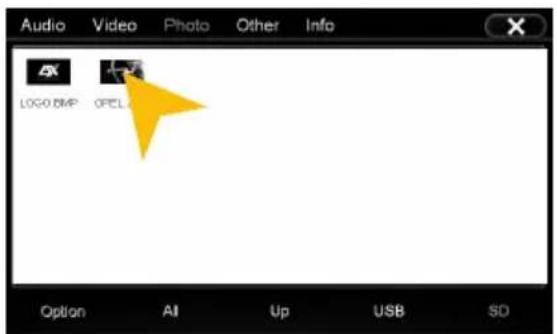
Select a file by double click.Tap at „Wallpaper“ on „Browse“
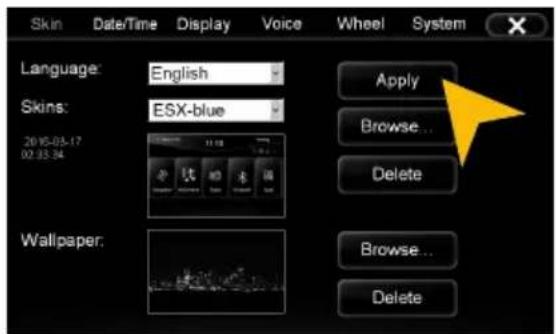
Tap on „Apply“ to confirm your selection or „Delete“ below to remove the current file.
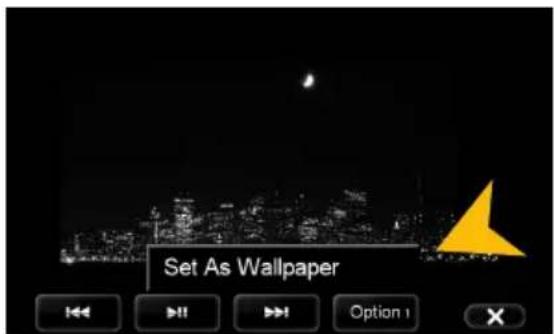
Alternatively you can set an already opened image as your wallpaper. Tap on „Options“ and select „Set as Wallpaper“.

Under certain circumstances the opening and loading of large images or movie files may take some time to proceed.
Bootlogo
You have the possibility to customize the bootlogo (startup logo) to your liking. Please refer to the following instructions.
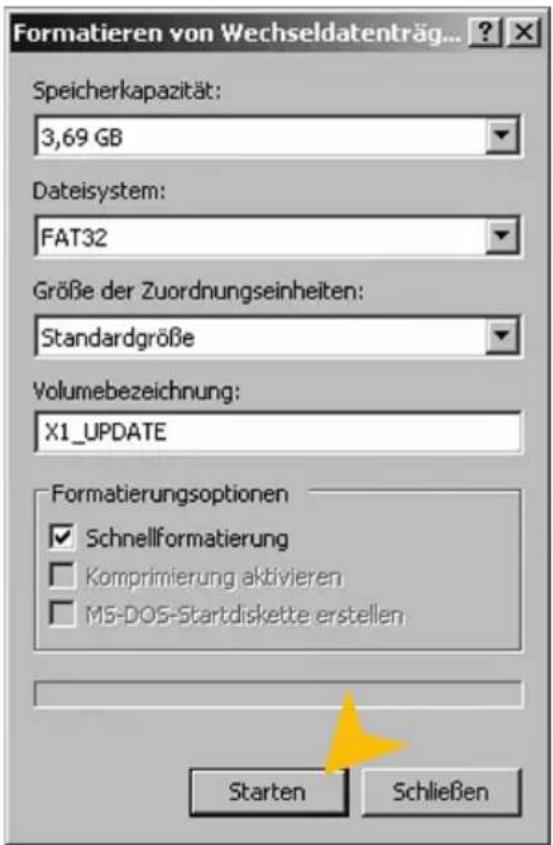
- Create an image file which has 800 x 480 pixels in size is and has a minimum resolution of 72 dpi.
- Save this as „LOGO.BMP“ (Windows bitmap 16-bit).
- Format an MicroSD card (max. 32GB) with the FAT32 file system. Rename the card as „X1_UPDATE“.
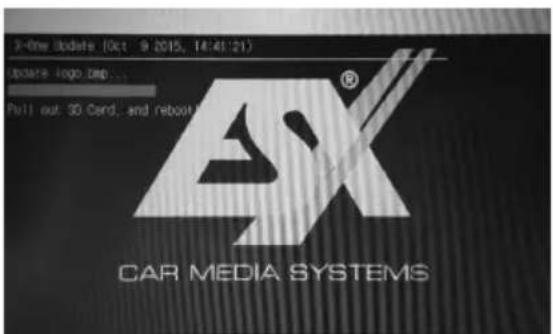
- Copy the image file from your PC to the SD card. It must be located in no folder.
- Insert the SD card into the ESX device and restart the device by pressing the reset button. The device now automatically installs the desired boot logo.
- Remove the SD card and restart the unit by pressing again the reset button.

INFRARED REMOTE
The included remote control allows you to control some basic functions on the device. Point directly with the front of the remote control to the screen of the device. The distance should not be more than 3 meters. If you use the remote control for the first time, you have to remove the safety foil in the battery compartment on the back.
Here is an overview of the basic functions of the remote control, which can be different depending on the currently running application.
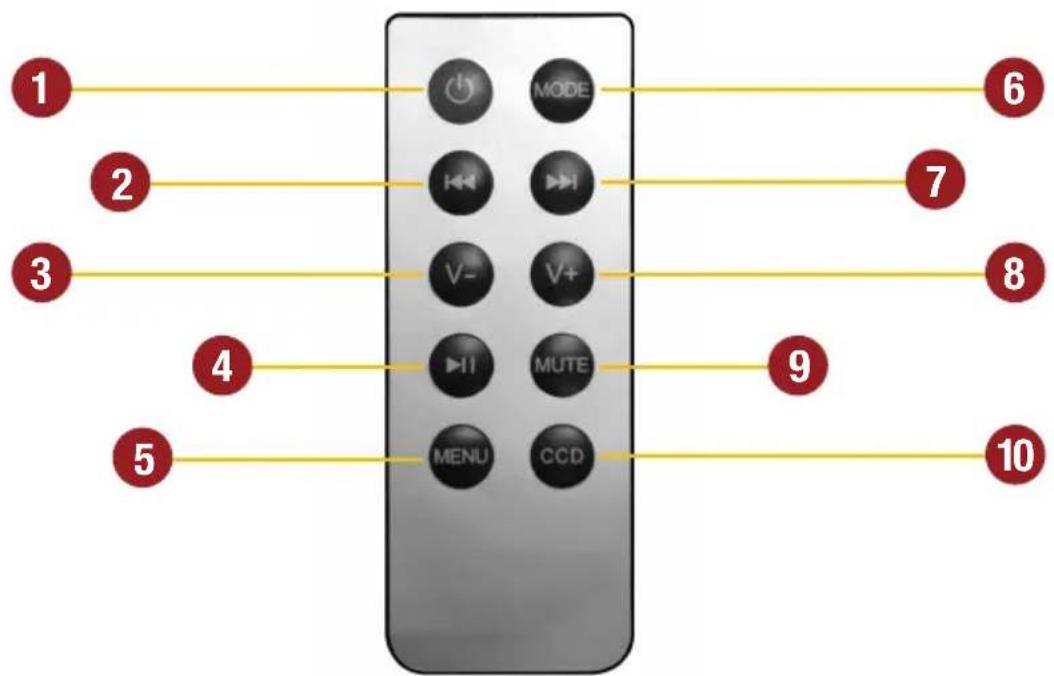
- Standby. The playback stops and the screen gets dark
- Skip to previous title
- Volume down
- Play / Pause
- Open the main menu
-
Switch manually between the sources: AV / DAB+ / Radio / Audio Player / TV
-
Skip to next title
- Volume up
- Mute On/Off
- Switch manually to the rear view camera. Press CCD to go back to the previous screen again
Note: If the battery (button cell) is discharged, replace it only with a new one of the same type (CR2025). Please do not throw used batteries into household waste, bring them to a dealer that offers a proper disposal, when you purchase a new one.
MULTI-FUNCTION STEERING WHEEL
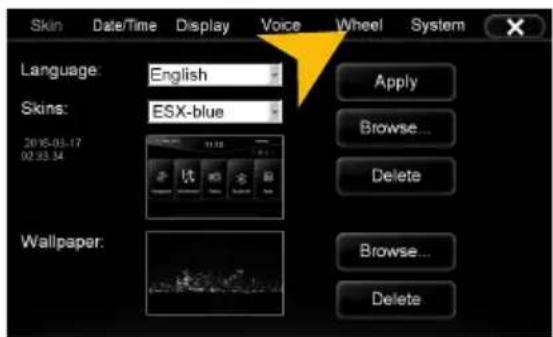
TEACHING FUNCTION
With the „wheel“ function, you can teach an analog steering wheel remote control. Please note that CANBUS controlled steering wheel remote controls are not compatible.
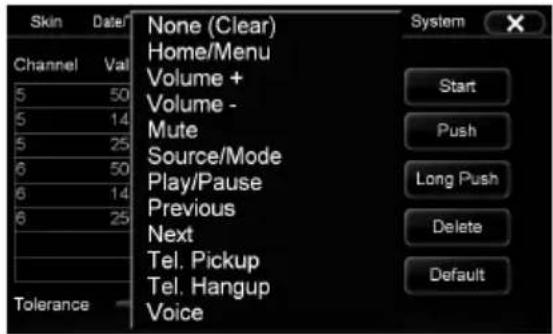
Tap on „wheel“ (Main Menu -> Option) to open the menu of teaching function.
First press „Start“ and delete all entries. Then press any button on the steering wheel until a value is displayed in the table and then arrange by „press“ the appropriate function.
OPTIONAL REAR VIEW CAMERA
natural_image
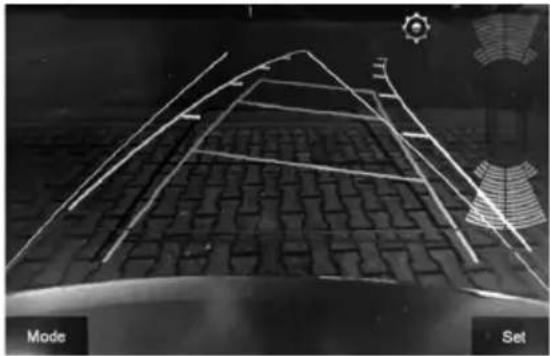
3D architectural model of a building with grid patterns and curved structural lines, displayed within a game controller interface (no text or symbols on the model itself)If you have installed an optional rear view camera, the camera image on the screen is automatically shown, when the reverse gear will be engaged (See p.35). This also occurs even when the power is off. After the reverse gear will be disengaged, the device restarts the previously used application or function.
LIMITED MEDIA PLAYBACK
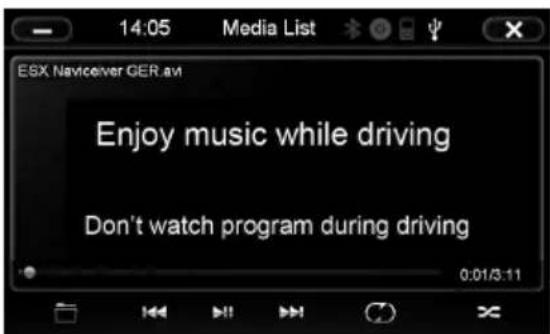
For your own and your passengers safety the picture display in DVD/Video/TV/AV applications is limited and the unit will only playback the sound track of the medium while driving.
If you have installed additional screens in the rear, it is possible to keep the video signal visible also during driving.
Note for other Audio/Video outputs:
By using the cable G71-MNV0009 (see page 5) it is possible to playback audio and video signals on other devices. The media source is always the same, which is played on ESX device.
TROUBLESHOOTING
If the following troubleshooting tips do not solve the problem and the malfunction persists, please contact an authorized repair or installation service. Do not open the device or attempt to repair it by yourself. This may cause serious damages to the electronic components of the device and in your vehicle or may void the warranty of the device.
| Problems Causes | Remedy | |
| Starting processThe device cannot be turned on. | Operator error with the ignition off. To turn on | the device with the ignition off, press and hold the power button of the unit for about 2 seconds. The device automatically switches off after 30 minutes. |
| The fuse or a fuse in the vehicle electronics is defective. | Replace the blown fuse with a new fuse of the same type with the same value. | |
| DisplayInaccurate or delayed input of touchscreen function. | The touch-screen is not properly calibrated. | Calibrate the touch screen under Apps - Options - System. |
| The device opens an application or is currently processing. | Wait until the process is completed. | |
| Screen is black. The display is disabled. Tap on the screen. | ||
| The device is in standby mode Press the left knob on the device. | ||
| SoundThere is no sound via the sound system of the vehicle hearable. | The connection or installation was not done correctly or one of the cables is defective. | Check all connections and replace a possibly damaged cable with a new one. |
| One of the audio settings is incorrect or there is an incompatibility with the vehicle sound system. | Check the audio settings under Apps - Audio - Advanced.Go through all settings step by step and test the functions. | |
| The audio system is not activated properly. | Disconnect the vehicle's battery for at least 30 minutes. | |
| The sound is distorted, overdriven or with strong noises. | The equalizer settings or the volume settings of each application are set unfavorable. | Check the audio settings under Apps - Audio or Advanced. Correct the settings down and test if the sound gets better. |
| CD/DVD playbackThe DVD menu can not be opened. | The disc does not support menus or is plagiarism. | Insert another disc. |
| The picture quality during playback is insufficient. | Brightness, contrast and color saturation are set too low. | Check the DVD player settings and correct them. |
| Erroneous or disrupted playback. | The disc is not loaded correctly. | Insert the disc again with the print side up. |
| The disc is scratched, broken or deformed. | Insert another disc. | |
| The disc is not compatible with the device. | Insert another disc. | |
| Optional connected devices (iPodTM/TV-Tuner etc.)The connected device is not working. | The device is not properly connected or the connection cable is defective. | Check all connections and replace a possibly damaged cable with a new one. |
| The devices is not compatible. If necessary, | make a software update or try another device. | |
| USB drive or microSD card is not recognized. | Incorrect storage or data format. Format the | storage with the MS-DOS file system (FAT32). |
| NavigationThe navigation application will not start. | The software is not compatible with the device. | Check the compatibility of software with Windows CE 6, or get yourself a compatible version. |
| The software was not installed on the device properly. | Check the settings under Apps - Options - System and if necessary, correct the navigation software path. | |
| The license of the installed software or the useful life has expired. | Contact the software supplier. | |
| The device isn't able to find your current location or the route guidance is disturbed. | The included GPS antenna is not or not correctly connected. | Check the GPS antenna connection or get a new one in case of defect. |
| You are in an area with weak or no GPS signal, such as in a tunnel or on a remote road. | Continue driving until the GPS signal is available again. | |
| The route guidance does not match with the current road or the map is is wrong. | The navigation software is not up to date. Update the software or contact the software supplier. | |
| The navigation system does not show the shortest way. | The navigation software considers many factors in determining a route, such as the condition of the roads, traffic rules, one-way streets, major roads, etc. | Usually the navigation software selects a route which is a good compromise and most immediate to the goal. |
| On the displayed map is nothing to see. | The display scale of the map is set too large or too small. | Change the ratio of the display scale, until the map is properly displayed. |
| A brief loss of the GPS signal. Continue driving until the GPS signal is available again. | ||
| RadioNo radiostation was found with the automatic station search. | Under PTY a program type is selected, which is not available in the current area. | Select „None“ under PTY. Then, the search for a certain program type is disabled. |
| AF or TA is activated. Disable the AF and TA function and start the search again. | ||
| Antenna system works improperly Check the plug connection of the original antenna to the radio or check the car antenna system | ||
| E-LinkNo connection. | Follow the notes on page 31. Generally Android should work from version 4.0.3. upwards. | |
| The Android device is not compatible. Use another Android device. | ||
| No sound. No Bluetooth connection. Activate Bluetooth and coupling the device. | Note that in an E-LINK coupling, the Bluetooth audio output connection must be enabled. | |
| Bluetooth/PhoneNo connection or pairing of the devices. | Bluetooth function of the phone is not enabled. | Enable Bluetooth function in the phone settings. |
| Bluetooth enabled but the phone is not visible. | Enable „visible“ in the phone settings. | |
| The Bluetooth standard of the phone is not compatible. | Use a compatible phone. | |
| Too many Bluetooth devices are registered in the device. | Delete unused Bluetooth devices from the storage of the device. | |
| Bluetooth connection is too quiet | The preset volume is set too low. | Set the preset volume under Apps - Audio - Advanced - Bluetooth on a higher value. |
| No Bluetooth audio function. The Bluetooth audio function is not enabled. | Enable the function in the phone settings. | |
| The Bluetooth standard of the phone is not compatible. | Use a compatible phone. | |
| The phonebook is not adapted. | The phone does not support the standard. | No remedy, your phone is outdated. |
| The phone allows no access to the phonebook not via Bluetooth. | Change the settings on the phone (See manual of the device). | |
| Front-/rear cameraNo transmission on the screen. | The camera is not properly connected to the device. | Check the connections for any mistakes. |
| The camera was installed improperly. Check the installation for any mistakes. | ||
| Wrong camera video format or incompatible model. | Replace the camera with a compatible model or refer to the owner's manual of the camera. | |
| The device is turned off, but in reverse gear the camera transmission is shown and the device can not be operated. | The rear camera has priority for safety reasons and also starts the transmission when the device is turned off. | Only after the reverse drive has finished, the device is operatable again and can be started. |
| Driver information display or parking sensorsNo or faulty display. | Your vehicle is not suitably prepared or a CAN bus error exists. | Consult a specialized dealer. |
| Multifunction steering wheelNo or faulty operation of the device. | Your vehicle is not suitably prepared or a CAN bus error exists. | Consult a specialized dealer. |
Important Notes
For safety reasons, leave the installation to skilled professionals. Consult your car audio dealer. This guide is an installation aid for a proper installation of the device. Please read the following instructions prior installation:
- This device can only be used with a 12 V/DC power supply with negative ground.
- Follow under all circumstance the regulations of the vehicle manufacturer and do not make any modifications on the vehicle, which could interfere the driving safety.
- Remove the key from the ignition. disconnect due to safety reasons the ground connection of the vehicle's battery before installation. To prevent a short circuit, do not connect the battery wire (yellow) and ignition wire (red) to the car chassis or with ground wire (black). Please insulate all unconnected wires with tape.
- Please ensure the correct polarity of all connections.
- Please do not modify or cut cables or jacks of the vehicle or the device, otherwise the warranty may be voided.
- Ensure after installation to ground this device to the car's chassis ground.
- Please treat all parts of the sound system and the components of your vehicle with caution.
- Make sure that no cables are squeezed or cause a short circuit.
- Lead no cable in front of the airbags (e.g. dashboard) or in a manner that they will be impaired in their function.
- While installing this device in the dashboard console of your vehicle, do not touch the metal parts of this device during and shortly after its use. Metal parts such as the heat sink and housing may become hot.
- Keep all cables away from heat dissipate metal parts.
- Do not connect the speaker cables to the car chassis or ground wire (black) or connect them in parallel.
- If your vehicle wiring harness is not equipped with an ignition terminal, connect the ignition wire (red) to the terminal on the vehicle's fuse box which provides 12 V/DC power supply and is turned on and off by the ignition key.
- After this device is installed, check whether the brake lamps, blinkers, wipers, etc. on the car are working properly. Re-connect the ground connection of the battery.
- If the fuse is defective, make sure that all the cables are not touching the car's chassis, then replace the defective fuse (10 A) with one that has the same rating.
Dashboard installation
Dashboard
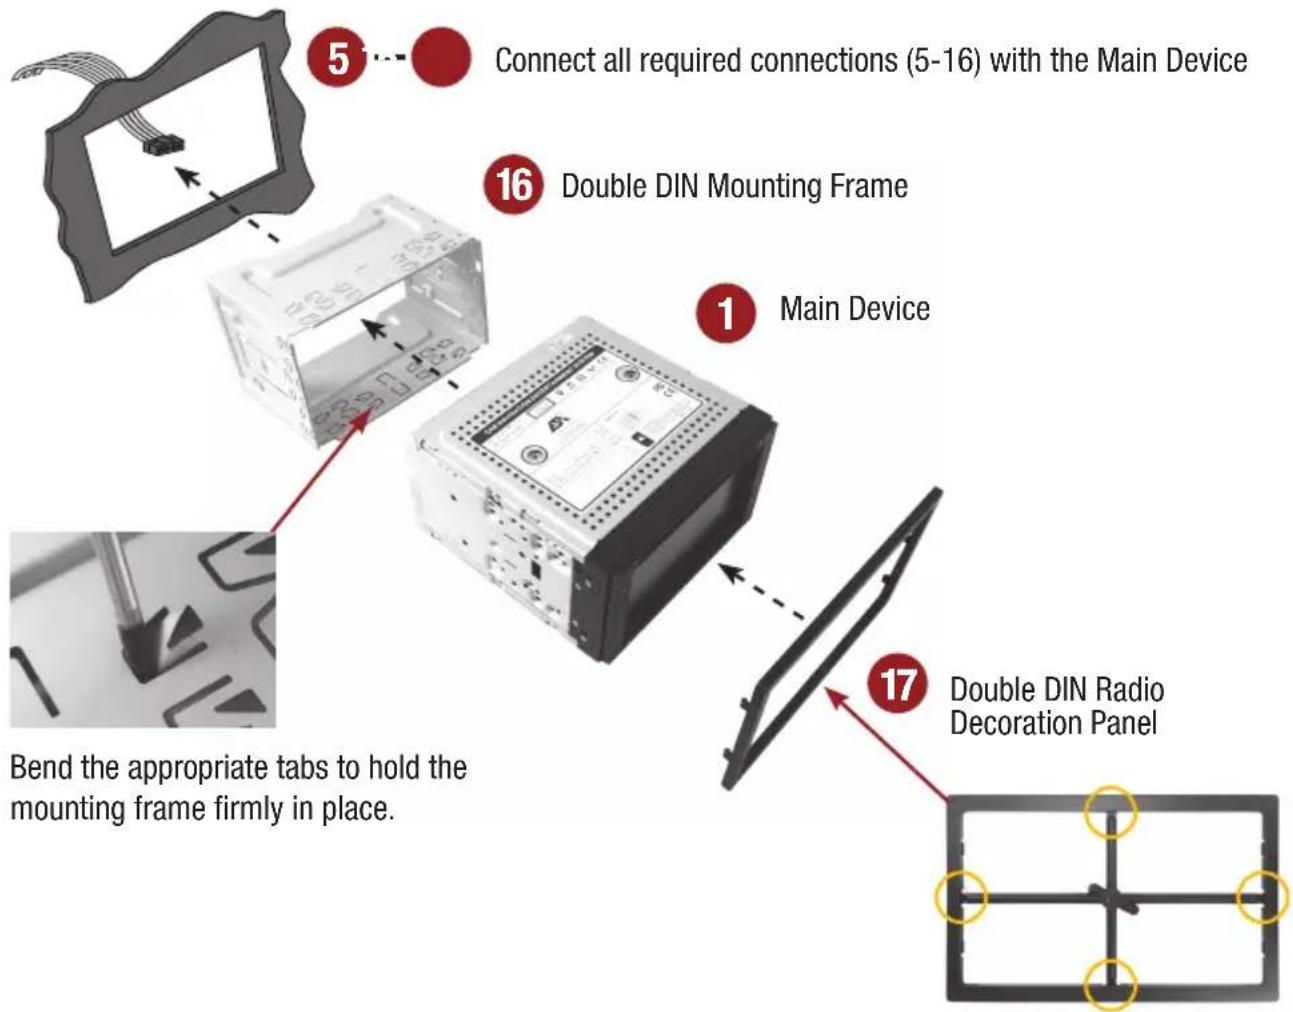
Please cut off the sprue of the radio decoration panel (18) on the four marked spots.
Recommended accessories:
natural_image
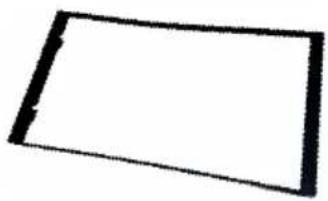
Simple black rectangular outline on white background, no text or symbols presentVNA-620-F
In some cases a smaller and more shallower mounting frame is required.
Outer dimensions: 102 mm height, 189 mm width
Important note: Usually this devices requires a double-DIN installation slot and standard ISO power/speaker terminals. Check before connecting the correct assignment of constant plus (ISO chamber A4), ignition plus (ISO chamber A7) and ground (ISO chamber A8), even with on existing ISO connections! Use appropriate vehicle-specific adapters from the accessories trade if necessary.
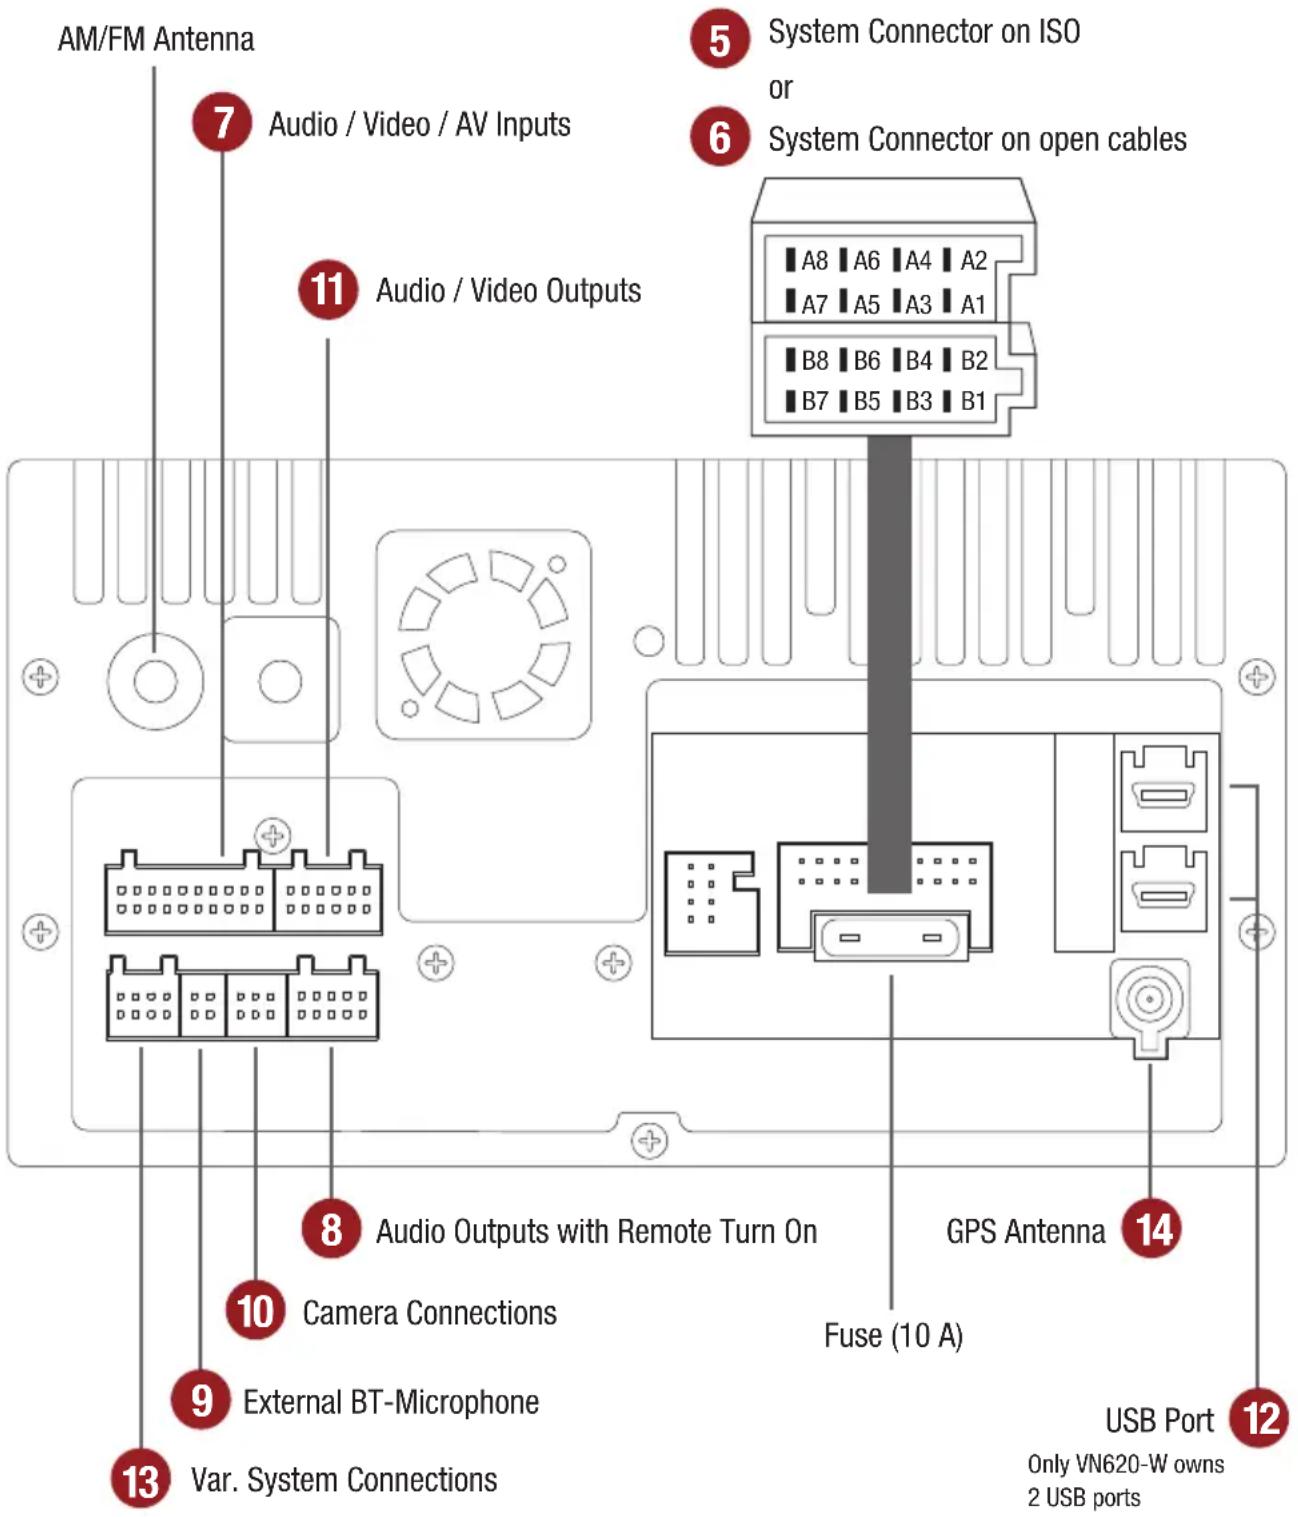
5 Assignment of the System Connector on ISO
ISO CONNECTOR OPEN CABLES
| PIN COLOR FUNCTION | ||
| A4 yellow battery +12V | ||
| A5 blue ant.cont. 12V output (max. 100ma) | ||
| A6 orange illumination | ||
| A7 red ignition (acc) | ||
| A8 black ground | ||
| B1 purple speaker rear right + | ||
| B2 purple/black speaker rear right - | ||
| B3 gray speaker front right + | ||
| B4 gray/black speaker front right - | ||
| B5 white speaker front left + | ||
| B6 white/black speaker front left - | ||
| B7 blue/black speaker rear left + | ||
| B8 green/black speaker rear left - | ||
| COLOR | FUNCTION |
| Gelb | can-high (needs additional accessory) |
| Gelb/Schwarz | can-low (needs additional accessory) |
| Grün | input for reverse signal |
| Pink input for handbrake signal | |
| Rot/Weiß | analog steering wheel control input ad0 |
| Grün/Weiß analog | steering wheel control input ad1 |
| Blau | remote output (max. 500ma) |
6 Assignment of the System Connector on open cables
| DESCRIPT. COLOR | FUNCTION | |
| BATT | yellow | battery +12V |
| ANT CONT | white | ant. cont. 12V output (max. 100ma) |
| ILL | orange | illumination |
| ACC | red | ignition (acc) |
| GND | black | ground |
| RR+ | brown | speaker rear right + |
| RR- | brown/black | speaker rear right - |
| FR+ | gray | speaker front right + |
| FR- gray/black | speaker | front right - |
| FL+ | white | speaker front left + |
| FL- | white/black | speaker front left - |
| RL+ | purple | speaker rear left + |
| RL- purple/black | speaker | rear left - |
| CAN-RX | violet/white | can-high (needs additional accessory) |
| CAN-TX | brown/white | can-low (needs additional accessory) |
| REVERSE | blue | input for reverse signal |
| BRAKE | pink | input for handbrake signal |
| AD0 | red/white | analog steering wheel control input |
| AD1 | green/white | analog steering wheel control input |
| AMP-CONT | green | remote output (max. 500ma) |
Assignment of the Accessory Connectors

Audio / Video / AV Inputs G71-AUD0119
Name Connector/Color Function
AV1-L-IN RCA white AV Audio left in AV/TV menu
AV1-R-IN RCA red AV Audio right in AV/TV menu
AV1-V-IN RCA yellow AV Video in AV/TV menu
AV2/TV-L-IN RCA white AV2 Audio left in AV/TV menu
AV2/TV-R-IN RCA red AV2 Audio right in AV/TV menu
AV2/TV-V-IN RCA yellow AV2 Video in AV/TV menu
AV3/AUX1-L-IN RCA white AV3 Audio left in AV/TV menu
AV3/AUX1-R-IN RCA red AV3 Audio right in AV/TV menu
AV3-V-IN/VIDEO RCA yellow AV3 Video in AV/TV menu
Power supply for external devices such as DVB-T tuners.
Maximum current consumption 500 mA.
GND black Ground wire to +12V OUT
TV-CONT-OUT brown Control cable for special ESX devices, please do not use.
BRAKE IN pink Connect to the parking brake signal to the device. The cable
provides ground when the parking brake is operated.

Audio Outputs with Remote Turn On G71-MNV0010
Name Connector/Color Function
FL-OUT RCA white Pre-amplifier output front left
FR-OUT RCA red Pre-amplifier output front right
RL-OUT RCA white Pre-amplifier output rear left
RR-OUT RCA red Pre-amplifier output rear right
SUBWOOFER-OUT RCA brown Pre-amplifier output Subwoofer (Mono)
CENTER-OUT RCA yellow Without function
AMP-CONT-OUT green Remote Turn On output
12V output to turn on an external amplifier.
Maximum current consumption 500 mA.

Various System Connections G71-WHE0063
Name Connector/Color Function
Uart/+5V OUT black Reserved, please do not use!
SWC1IN red-white For an analog steering wheel signal.
SWC2IN green-white For an analog steering wheel signal.
ILL IN orange Illumination signal „ILL“ input.
ANT-POWER OUT yellow 12V output for FM antenna amplifiers. Attention! The power
supply is only active while the FM function of the device is
activated. Max. Current consumption 100 mA.
10 Camera Connections G71-CCD0037
Name Connector/Color Function
CCD-CVBS-IN RCA yellow Video signal input from the rear camera FRONT-CCD-IN RCA yellow Video signal input from the front camera REVERSE IN blue The ESX device switches to the „CCD CVBS IN“ input as soon as „REVERSE IN“ is supplied with 12V and „CCD-Camera“ c checkbox in the option menu under „DISPLAY“ is activated. CCD-POWER OUT yellow 12V power supply output for an aftermarket rear view camera with max. 100mA. 12V will be supplied, as soon as „REVERSE-IN“ is supplied with 12V. FRONT CCD-POWER OUT red 12V power supply output for an aftermarket rear view camera with max. 500mA. 12V will be supplied, as soon as the ESX device is turned on. Make sure that your camera is suitable for continuous operation. GND black Ground terminal of the power supply of an optional camera (front and rear).
Important Note: Connect the reverse signal (12V when reverse gear is engaged, for example, also by reversing light) of the vehicle to „REVERSE“ (blue cable). The „GND“ and „CCD POWER OUT“ cables must not be connected obligatorily, but can be used as a power supply for the camera. also by reversing light.
Now activate the „CCD-Camera“ checkbox under APPS -> OPTIONS -> DISPLAY at the ESX device.
Operation note: When the reverse gear is engaged, the device does not allow any other operation, all the buttons and controller except volume control are blocked for security reasons. If the device is switched off and the reverse gear is engaged, the device does not even turn on.
Front View Camera
Connect the camera via RCA to the yellow RCA connector „FRONT CCD IN“. Switch to „Camera“ or „Front Camera“ in the menu „AV/TV“ to display your camera view.
11 Audio/Video Outputs G71-MNV0009
Name Connector/Color
| AUDIO L OUT/ZONE-1 | RCA white |
| AUDIO R OUT/ZONE-1 | RCA red |
| V-OUT1/ZONE-1 | RCA yellow |
| AUDIO L OUT/ZONE-2 | RCA white |
| AUDIO R OUT/ZONE-2 | RCA red |
| V-OUT2/ZONE-2 | RCA yellow |
Important Note: Connection for e.g. headrest monitors in the rear. The audio/video outputs is always the same signal to which will be played just on the ESX device. An independent input source selection is not possible.
INSTALLATION HINTS
natural_image
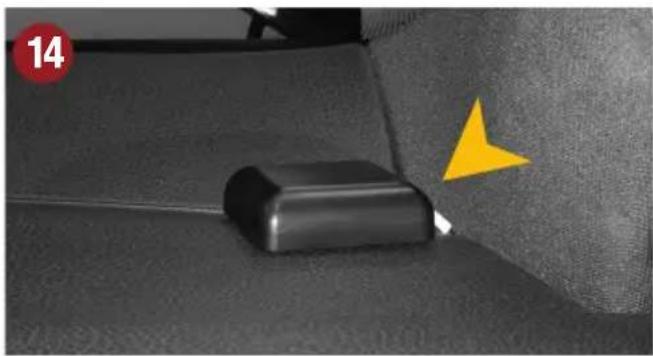
Close-up of a black rectangular object on a textured gray surface with a yellow arrow pointing to it, no visible text or symbols.GPS Antenna:
The GPS (14) antenna must be mounted horizontally in front on the dashboard (ensure a clear view to the sky). A metalized windscreen allows no reception. If a factory GPS antenna with the same connector type (Fakra) is already available, it can be used. Then the installation of the included GPS antenna is not necessary.
natural_image
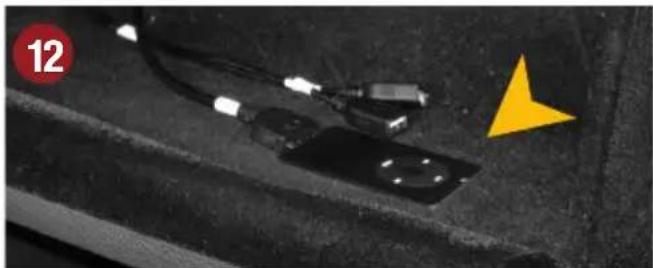
Close-up of a black electronic device with wires and connectors, marked by a yellow triangle and red circle (no readable text or symbols)USB Connectors:
Route the cables (12) to a desired location, such as the glove box. If necessary, you must drill openings.
Note: One of the USB ports is needed for the TMC antenna (15).
natural_image
Close-up of a car's dashboard and steering wheel, showing a black knob and a yellow arrow pointing to the wheel (no text or symbols visible)BT-Microphone:
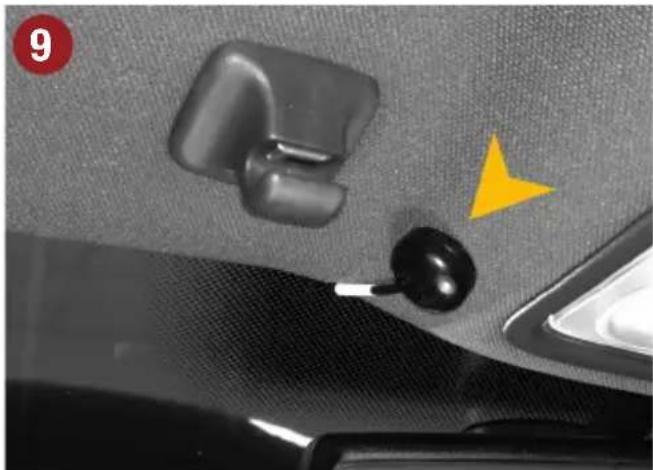
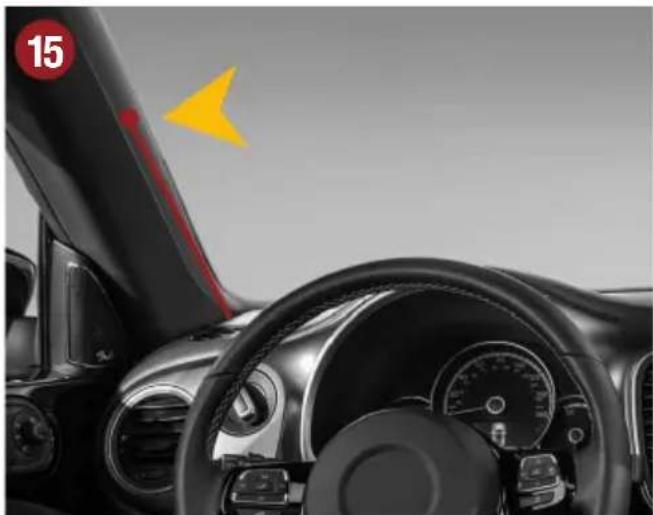
The device has an internal microphone. For an even better transmission quality you can mount the supplied microphone (9) at a suitable point such as at the A-pillar (driver's side) or on the roof lining at the interior lamp. Avoid laying the cable over the steering column. In general, the cable should be long enough to reach a desired mounting point at the A-pillar (driver's side) while laying the cable over the passenger's side. A possibly existing factory microphone is not compatible with the ESX device.
natural_image
Close-up of car seatbelt and belt switch components (no text or symbols visible)Handbrake connection:
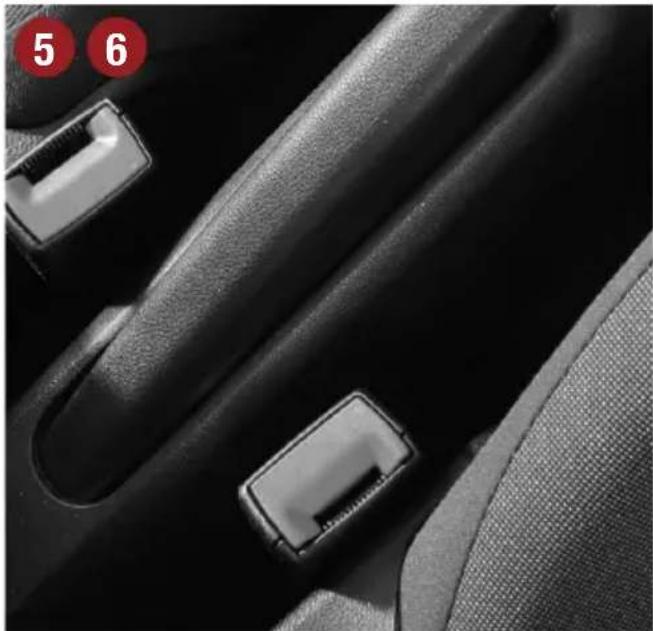
The handbrake signal needs to be connected with the included cable (5 or 6, BRAKE IN). The signal must be connected to ground with the handbrake closed. Please contact for a correct and safe installation your automotive service center! Accordance to legal regulations the device must only playback a DVD or video may on the main screen only with the handbrake closed.
Therefore the cable must be not permanently connected to ground. To avoid accidents through carelessness, the display is turned of while driving. The video outputs (11) are not affected.
natural_image
Interior view of a car dashboard and steering wheel, showing steering wheel, dashboard, and steering wheel (no visible text or symbols)TMC Cable Antenna:
Connect the enclosed TMC antenna (15) with the USB port and then lay the antenna to a suitable location on the windscreen. For optimal reception it should be fastened to the windscreen by using the suction cups.
A hidden installation e.g. under the A-pillar or the dashboard is also possible.
Care and Maintenance
This device is equipped with high precision and sensitive technique and should always be treated with caution. Please note the following tips to avoid endangering the warranty and extend the life of the appliance.
- Children under 12 should not operate the device. Keep the device and all accessories away from small children.
- Keep the device and its components dry. The effects of water, liquid or moisture can cause damage to the vehicle, the device itself or injury.
- Keep the device and its components away from excessive heat. High temperatures may shorten the life of appliance of the electrical components.
- Keep the device and its components away from excessive cold. Extreme temperature changes and moisture inside the device may cause the breaking of certain components. Do not to drop the device and avoid violent shocks or excessive shaking.
- Do not use strong chemical cleaners, solvents or water to clean the device. Use a slightly moistened cotton cloth with soft surface.
- Replace a blown fuse only with a new one with the same values. However, before you replace a defective fuse, check at first what is the cause of the short circuit. Start with the power supply cable. If the fuse blows again, a malfunction consists inside the device. In this case you should contact your authorized dealer.
Warranty information
The warranty complies with the legal rules in your country.
To maintain your warranty coverage upright, keep your original purchase receipt to prove the date of purchase. Any damage of the product, based on incorrect or improper use, accident, incorrect and improper installation, modification of the barcode, natural disaster or any non-appropriate interventions, repairing or alteration outside our factory or authorized service centers, and caused by other acts, which are unauthorized, because have been made in an incompetent manner, is excluded from the warranty. This warranty is limited only to defective parts and especially excludes all incidental or consequential damages and those who are associated with. Damage to the operating system or loss of data, which were caused by operator error or by third party software or computer viruses, are also excluded from the guarantee.
Please return the defective product along with a copy of your purchase receipt and a detailed malfunction.
Important note:
In case of loss or damage to the micro SD memory card that contains the navigation software, expires the associated navigation license. In this case, a new software license must be purchased along with a new micro SD memory card.
Legal Notice
- ESX or Audio Design GmbH are in no way affiliated with the Volkswagen AG or any of its subsidiaries or affiliated companies connected to, or is acting on its behalf or with its authorization.
- All registered product names, trade marks and brands are the property of their respective owners.
- This owner's manual was made with the utmost care.
- If you need to dispose the device, be aware that no electronic devices should be deposed in the household waste. Dispose the device in an appropriate recycling facility according to the local waste regulations. Consult if necessary your local authority or dealer.
• Technical changes and errors reserved.
Due to the ongoing development of this device, it is possible that the information in this manual is incomplete or is not matching to the delivery status.
Please visit periodically www.esxaudio.de/navi on the internet, to check if additional information and software updates are available.
Customer service
In general, the assembly and installation of the device should be made by a trained and technically skilled specialists.
If you have any problems with operating the device, contact your specialist dealer or the Audio Design Service Department under Tel. +49 7253 - 94 65 95 or by E-Mail to navi@esxaudio.de.

Declaration of Conformity
Distributor:
Hereby, Audio Design GmbH declares that the ESX VN620-D/VN620-W device is in compliance with the essential, fundamental requirements and other relevant provisions of the following directive:
R&TTE Directive 1999/5/EG
The complete Declaration of Conformity can be found at www.esxaudio.de/ce
NOTES
NOTES

natural_image
Abstract logo design featuring a stylized 'S' with a yellow checkmark and registered trademark symbol (no text or numbers present)CAR MEDIA SYSTEMS

- VN620W
- VN620D
- Always follow the instructions in this manual before using the device. Please keep this manual easily accessible in the vehicle for future reference.
- Features
- Scope of delivery 4
- Safety Information......6
- Basic functions....8
- Custom settings....39
- Additional functions 42
- Troubleshooting....44
- Installation....48
- General notes....56
- SAFETY INFORMATION
- MAIN MENU
- NAVIGATION
- MULTIMEDIA PLAYERR
- FOLDER PLAYBACK
- REPEAT FUNCTION
- RANDOM PLAY
- MOVIE PLAYBACK
- RADIO
- Settings and station presets
- Rename Station:
- Local Setting:
- RDS functions
- AF (Alternative Frequency)
- TA (Traffic Announcement)
- PTY (Program Type)
- DVD (DVD/CD-Player)
- APPS
- BLUETOOTH™
- PAIRING
- BASIC FUNCTIONS
- CONTACTS AND CALL HISTORY
- LinkPod (optional)
- AV/TV (optional)
- A2DP (optional)
- Audio
- Files
- VIRTUAL DISK (optional)
- HOW TO CONVERT
- How to read a CD:
- PLAYBACK
- E-Link (optional, only for Android devices)
- QUICK CHARGE (optional)
- Option
- Calibration of the touchscreen operation
- Menu assignment
- Wallpaper
- Bootlogo
- INFRARED REMOTE
- MULTI-FUNCTION STEERING WHEEL
- TEACHING FUNCTION
- OPTIONAL REAR VIEW CAMERA
- LIMITED MEDIA PLAYBACK
- Note for other Audio/Video outputs:
- TROUBLESHOOTING
- Important Notes
- Dashboard installation
- Recommended accessories:
- VNA-620-F
- Assignment of the System Connector on ISO
- Assignment of the System Connector on open cables
- Assignment of the Accessory Connectors
- Audio / Video / AV Inputs G71-AUD0119
- Name Connector/Color Function
- Audio Outputs with Remote Turn On G71-MNV0010
- Various System Connections G71-WHE0063
- Camera Connections G71-CCD0037
- Front View Camera
- Audio/Video Outputs G71-MNV0009
- Name Connector/Color
- INSTALLATION HINTS
- GPS Antenna:
- USB Connectors:
- BT-Microphone:
- Handbrake connection:
- TMC Cable Antenna:
- Care and Maintenance
- Warranty information
- Important note:
- Legal Notice
- Customer service
- Declaration of Conformity
- Distributor:
- R&TTE Directive 1999/5/EG
Brand : ESX
Model : VN620WS
Category : Car radio