
ZXP S3 - Plastic Card Printer ZEBRA - Free user manual and instructions
Find the device manual for free ZXP S3 ZEBRA in PDF.


| Product Type | Plastic Card Printer |
| Brand | Zebra |
| Model | ZXP Series 3 |
| Print Resolution | 300 dpi (11.8 dots/mm) |
| Print Method | Dye Sublimation / Monochrome Thermal Transfer |
| Print Speed (Full Color YMCKO) | 180 cards/hour (single-sided); 140 cards/hour (dual-sided) |
| Card Compatibility | PVC and PVC composite, CR-80 (2.125 x 3.375 in), thickness 0.015-0.040 in |
| Card Feeder Capacity | 100 cards (30 mil) |
| Card Output Hopper Capacity | 50 cards (30 mil) |
| Ribbon Types | iSeries YMCKO (200 cards), YMCKOK (165), Monochrome (1000), others |
| Interface | USB 2.0 (standard); optional 10/100 Ethernet |
| Display | 16-character LCD with multi-function control button |
| Dimensions (Printer Only) | 9.3 x 7.9 x 14.5 in (235.5 x 200.7 x 367.6 mm) |
| Weight | 12.2 lbs (5.53 kg) |
| Power Supply | Input 100-240 VAC, 50-60 Hz; Output 24V/4A |
| Operating Temperature | 60-86°F (15-30°C) |
| Operating Humidity | 20-65% non-condensing |
| Encoding Options | Magnetic encoder (HiCo/LoCo, 3-track ISO 7811); Smart Card contact/contactless |
| Cleaning Method | Pre-saturated cleaning cards and manual printhead cleaning with foam swabs |
| Security | Kensington slot; optional lockable covers for feeder and print engine |
| Supported Operating Systems | Windows XP, Server 2003/2008, Vista, 7 (32/64-bit) |
Frequently Asked Questions - ZXP S3 ZEBRA
User questions about ZXP S3 ZEBRA
0 question about this device. Answer the ones you know or ask your own.
Ask a new question about this device
Download the instructions for your Plastic Card Printer in PDF format for free! Find your manual ZXP S3 - ZEBRA and take your electronic device back in hand. On this page are published all the documents necessary for the use of your device. ZXP S3 by ZEBRA.
USER MANUAL ZXP S3 ZEBRA
natural_image
Abstract black and white geometric pattern with curved white lines on a black background (no text or symbols)P1032297-001 Rev. A
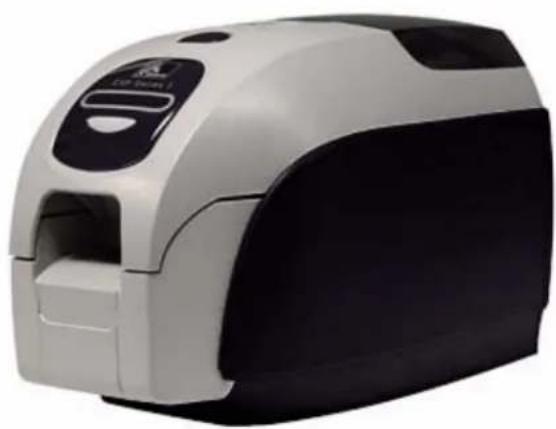
natural_image
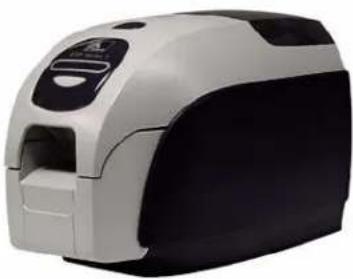
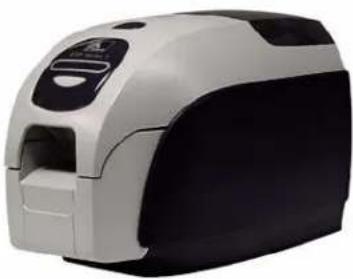
Exterior view of a modern digital scanner device (no visible text or symbols)Zebra® ZXP Series 3™ Card Printer
User's Manual
Copyright Notice
© 2010 ZIH Corp.
This document contains information proprietary to Zebra Technologies Corporation. This document and the information contained within is Copyrighted by Zebra Technologies Corporation and may not be duplicated in full or in part by any person without written approval from Zebra.
While every effort has been made to keep the information contained within current and accurate as of the date of publication, no guarantee is given that the document is error-free or that it is accurate with regard to any specification. Zebra Technologies Corporation reserves the right to make changes, for the purpose of product improvement, at any time.
Trademarks
ZXP Series 3 is a trademark and Zebra is a registered trademark of Zebra Technologies Corporation. Windows is a registered trademark of Microsoft Corporation in the United States and other countries. All other trademarks or registered trademarks are marks of their respective holders.
Product Disposal

Product Disposal Information • Do not dispose of this product in unsorted municipal waste. This product is recyclable, and should be recycled according to your local standards. For more information, please see our web site at: http://www.zebra.com/environment
Contents

natural_image
Abstract black and white pattern with curved white lines on black background (no text or symbols)1 • Getting Started .... 1
ZXP Series 3 Part Numbers. 2
Features, Controls, and Indicators. 3
Rear Panel Connectors 4
Multi-Function LCD Panel 5
2 • Printer Installation....9
Unpacking Your Card Printer 9
Installing the Printer 10
Setting up the Printer 10
Connecting Power....11
Connecting the Printer to your Computer.... 12
Viewing Printer Information 13
Installing the Windows Printer Driver 14
Initial Steps. 14
Installing the USB Printer Driver 15
Installing the Ethernet Printer Driver 20
Contents
3 • Printer Setup .... 27
Printer Features 27
Loading Ribbon Cartridge. 28
Loading Cards 30
Printing a Test Card 33
Typical Printer Operation 34
Creating a Sample Card....34
Printing the Sample Card 34
4 • Printer Settings and Adjustments ..... 35
Introduction....35
Card Printer Properties. 36
General Tab 37
Sharing Tab 38
Ports Tab 39
Advanced Tab. 40
Color Management Tab 41
Security Tab 42
Device Settings Tab 43
Card Printer Printing Preferences....50
5 • Cleaning .... 57
Cleaning the System. 57
When to Clean 57
How to Clean 58
Cleaning the Printhead. 59
6 · Troubleshooting .... 61
Introduction....61
Troubleshooting Procedures. 62
LCD Panel Warnings and Error Messages....62
Print Quality Issues....64
7 • Technical Specifications....71
Printer Specifications 71
ISO Standard Card Dimensions 74
Appendix A • Network Operations....77
Appendix B • Magnetic Encoder Option....89
Appendix C · Smart Card Options....95
Appendix D · CardSense ^TM Single Card Feed Mode ..... 101
Appendix E • Enclosure Lock Option ..... 107
Appendix F • Worldwide Support ..... 109
Getting Started

natural_image
Abstract black and white pattern with curved white lines on a black background (no text or symbols)This manual contains installation and operation information for the Zebra ZXP Series 3 Card Printer, manufactured by Zebra Technologies Corporation.
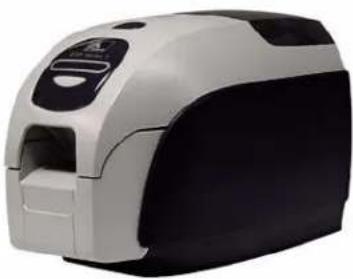
The printer provides full color dye sublimation or monochrome thermal transfer printing on standard 2.125 inch by 3.375 inch (54 mm by 86 mm) PVC or PVC Composite plastic cards. The integrated card feeder and flipper minimizes printer size while maximizing performance. Load-N-Go™ ribbon cartridges are used with an integrated card cleaning roller for easy ribbon changing or replacement.
A variety of options (some of which can be factory-installed or field-installed as upgrades) are available, making the printers configurable for varied application environments:
- Magnetic Encoder
• USB only or USB and 10/100 Ethernet - Contact + Contactless MIFARE Smart Card
- Contact Station
• C a r ^TM Single Card Feed Option
• Security (Enclosure Lock) Option
Its auto-switching 100 \~ 240 Volts AC, 50 \~ 60 Hz external power supply uses interchangeable power cords for maximum flexibility.
This manual describes single- and dual-sided ZXP Series 3 Card Printers. References to “the printer” in this document apply to either the single-sided or the dual-sided printers.
ZXP Series 3 Part Numbers
The Part Number of a particular Zebra ZXP Series 3 Card Printer is shown on a label affixed to the bottom of the printer; that Part Number identifies the specific configuration for that printer. This chart shows the configurations that are available:
| PART NUMBER DESCRIPTION | |
| Z 3 _ - _ _ _ _ _ _ _ _ _ _ _ _ _ _ _ _ _ _ _ _ _ _ _ _ _ _ _ _ _ _ _ _ _ _ _ _ _ _ _ _ _ _ _ _ _ _ _ _ _ _ _ _ _ _ _ _ _ _ _ _ _ _ _ _ _ _ _ _ _ _ _ _ _ _ _ _ _ _ _ _ _ _ _ _ _ _ _ _ _ _ _ _ _ _ _ _ _ _ _ _ | |
| _ _ 1 _ - _ _ _ _ _ _ _ _ _ _ _ _ _ _ _ _ _ _ _ _ _ _ _ _ _ _ _ _ _ _ _ _ _ _ _ _ _ _ _ _ _ _ _ _ _ _ _ _ _ _ _ _ _ _ _ _ _ _ _ _ _ _ _ _ _ _ _ _ _ _ _ _ _ _ _ _ _ _ _ _ _ _ _ _ _ _ _ _ _ _ _ _ _ _ _ _ _ | |
NOTE: Field-Upgradeable Option
Features, Controls, and Indicators
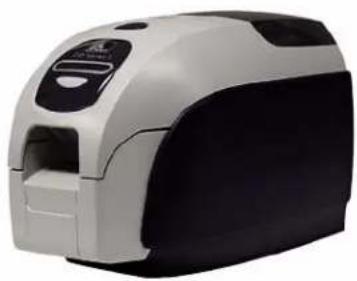
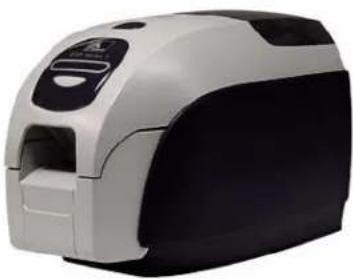
The picture below points out some of the printer's external features; see Section 3 for an interior view.
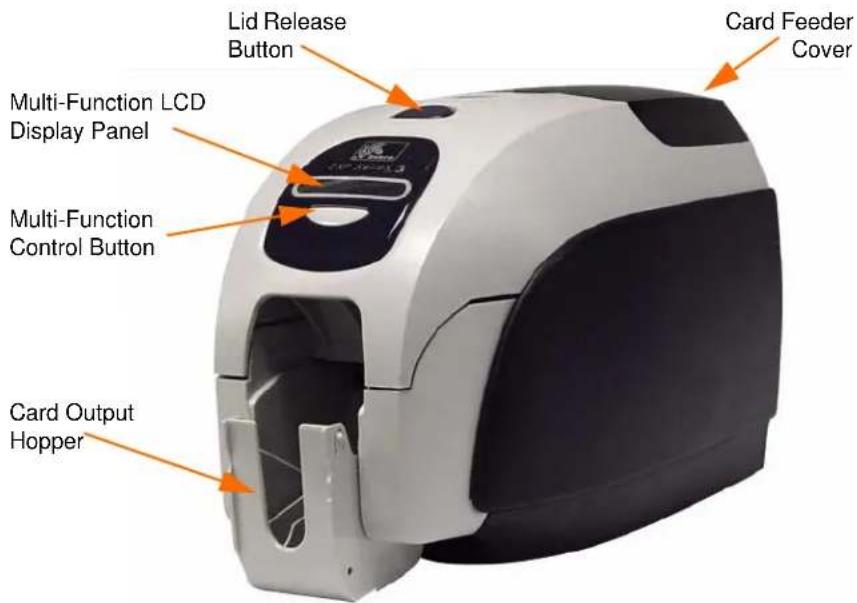
- Card Feeder Cover - Opening the Card Feeder Cover gives access to the automatic card feeder. The translucent cover allows you to see when the card supply is running low. The feeder has a 100-card capacity.
- Lid Release Button - Pressing the Lid Release Button allows the printer's lid to swing open. This gives internal access for changing the Ribbon Cartridge, changing Cleaning Rollers, and cleaning the printer.
- Multi-Function LCD Display Panel - The Multi-Function LCD Display Panel displays printer status information. Messages also alert the user of the need for action and indicate certain fault conditions.
- Multi-Function Control Button - The Multi-Function Control Button initiates several functions; these are described in the appropriate sections of this document.
- Card Output Hopper - Front-side Card Output Hopper has a 100-card capacity. Note that ZXP Series 3 Card Printers with a Smart Card Option have a different Card Output Hopper; see Appendix C.
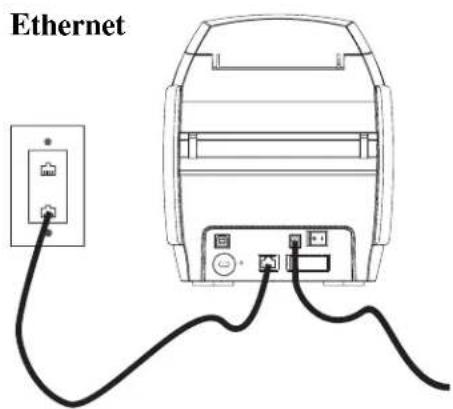
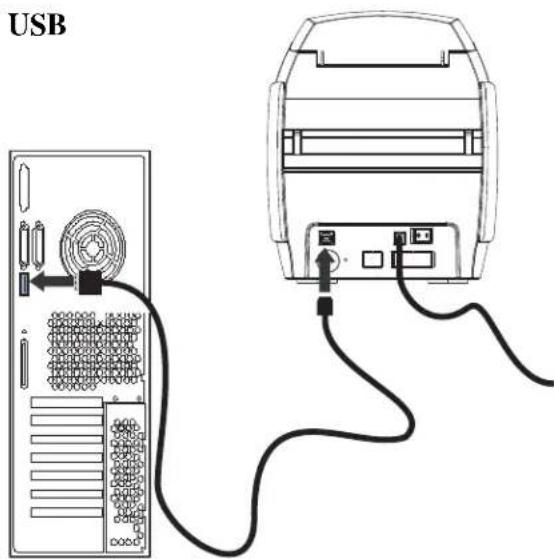
Rear Panel Connectors
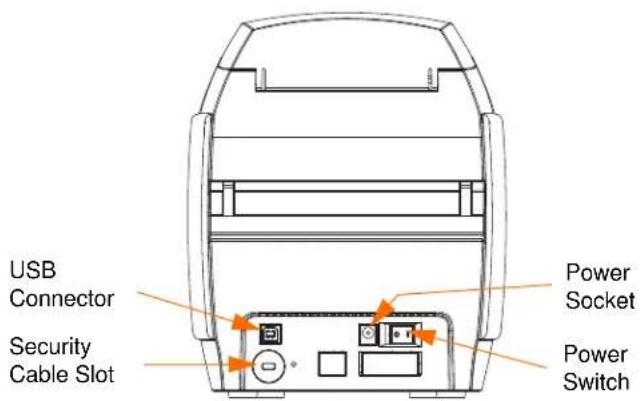
Standard USB Connection
The figure below shows the rear of the Printer with the USB interface.
Ethernet Connection
The figure below shows the rear of the printer with the standard USB interface with the Ethernet and DB-9 Smart Card Contact Station Options.
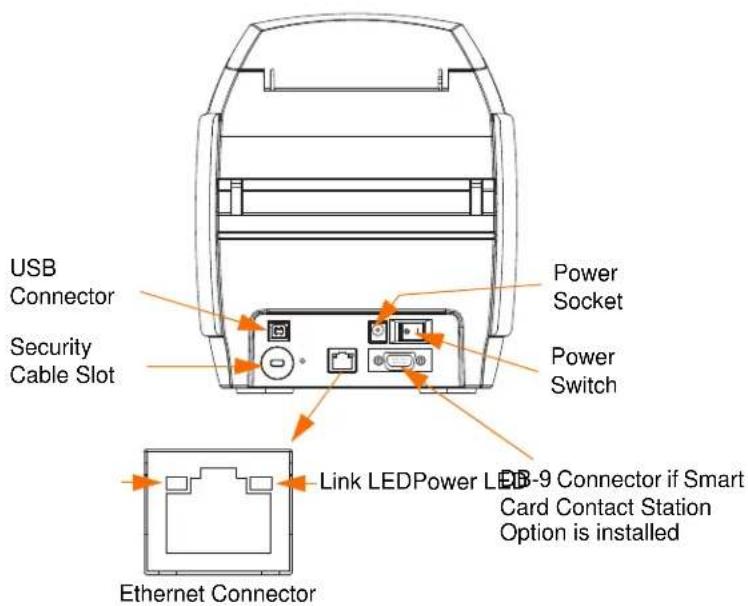
The Ethernet Connector has two LED status indicators:
• Power LED (amber): When illuminated, indicates power is on.
- Link LED (green): When illuminated, indicates valid Printer-Ethernet connectivity.
Multi-Function LCD Panel
Your printer is equipped with a Multi-Function LCD Panel to provide printer status information. The readout is controlled by the Multi-Function Control Button directly below the viewing window.
Multi-Function LCD Panel messages fall into three categories: Operational, Warning, and Error.
Operational Messages
Operational Messages are displayed during the Printer's normal operation.
| OPERATIONAL |
| CARD READY |
| CLEANING PRINTER |
| CLOSE FEEDER DOOR |
| CONTACT ENCODING |
| CONTACTLESS ENCODING |
| DOWNLOADING DATA |
| DOWNLOADING FIRMWARE |
| EMPTY FEEDER THEN CLOSE COVER |
| FEED LONG CLEANING CARD IN EXIT |
| INITIALIZING |
| INSERT CARD |
| INSERT FEEDER CLEANING CARD |
| MAG ENCODING |
| PRINTING BLACK |
| PRINTING CYAN |
| PRINTING MAGENTA |
| PRINTING MONO |
| PRINTING OVERLAY |
| PRINTING YELLOW |
| PUSH BUTTON TO CONTINUE |
| READY |
| REMOVE FEEDER CLEANING CARD |
| REMOVE LONG CLEANING CARD |
| REMOVE RIBBON THEN CLOSE LID |
| SINGLE CARD READY-PRINT OR EJECT |
Warning Messages
Warning messages alert the operator to action that should be taken; the printer will generally continue operation.
| WARNINGS (Printer will still operate) |
| CHECKING RIBBON |
| CLEAN PRINTER |
| CLOSE LID |
| ENCODING ERROR |
| FLASH ERROR |
| INVALID MAGNETIC DATA |
| READING ERROR |
Error Messages
Error messages are displayed when a situation causes the printer to stop operating. Depending on the cause of the error message, restarting the printer or curing the displayed Error may return the printer to operational status, or the printer may require troubleshooting and repair.
| ERRORS (Printer will not operate) |
| CHECK RIBBON |
| COMMAND ERROR |
| COVER OPEN |
| LID OPEN |
| MECHANICAL ERROR |
| OUT OF CARDS |
| OUT OF RIBBON |
| PARAMETERS ERROR |
Icons
Throughout this manual, different icons highlight important information, as follows:

Note • Indicates information that emphasizes or supplements important points of the main text.

Important • Advises you of information that is essential to complete a task, or points out the importance of specific information in the text.

Provides an example or scenario to demonstrate or clarify a section of text.

Electrostatic Discharge Caution • Warns you of the potential for electrostatic discharge.

Electric Shock Caution • Warns you of a potential electric shock situation.

Hot Surface • Warns you of a situation where excessive heat could cause a burn.

Caution • Advises you that failure to take or avoid a specific action could result in physical harm to you, or could result in physical damage to the hardware.
Product Disposal

Product Disposal Information • Do not dispose of this product in unsorted municipal waste. This product is recyclable, and should be recycled according to your local standards. For more information, please see our web site at: http://www.zebra.com/environment
natural_image
Close-up of a white and black handheld device with a black handle and control panel (no visible text or symbols)Printer Installation

natural_image
Abstract black and white pattern with curved white lines on a black background (no text or symbols)Unpacking Your Card Printer
Your ZXP Series 3 Card Printer ships in a cardboard carton, protected by styrofoam inserts and a protective anti-static bag. Keep all packaging material in case you need to move or re-ship the printer.
Step 1. Before opening and unpacking the printer, inspect the carton to ensure that no damage occurred during shipment.
Step 2. Ensure that you have a clean and nearly dust free environment for proper operation and storage of the printer.
Step 3. Unlatch and remove the handle, open the carton, and remove the box containing the printer accessories from the shipping carton.
Step 4. Remove the styrofoam packing material from the top of the printer.
Step 5. Lift the printer out of the carton by holding it on both sides of the bottom and lifting the printer gently from the carton.
Step 6. Make sure the following accessories are included with your printer:
a. Software CD-ROM
b. Quick Start Guide
c. Cleaning Kit
d. Power Cords (one or two depending on the configuration)
e. Power Supply
f. USB Printer Cable
If any items are missing, please contact your dealer. To reorder; refer to Appendix F of this manual.
Installing the Printer
Setting up the Printer
Step 1. Place the printer in a location that allows easy access to all sides. The printer should never be operated while resting on its side or upside down.
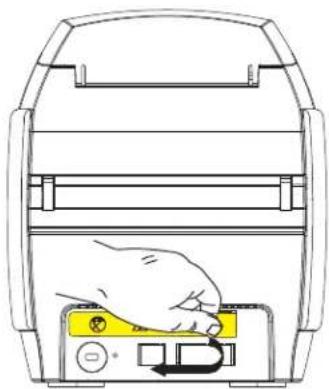
Step 2. Remove the yellow CAUTION label from the back of the printer.
natural_image
Diagram of a hand pressing down on a device component (no text or symbols visible)Step 3. Ensure that the printer's power switch is in the OFF (O) position.
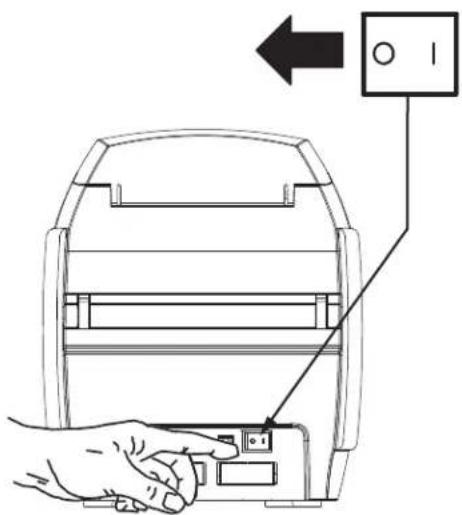
Connecting Power

Caution • Limit electrical power supplied to the printer to 24 VDC. Limit excess current draw to 16 amps or less, using an associated circuit breaker or other such device. Never operate the printer in a location where operator, computer, or printer can get wet. Personal injury could result. The printer must be connected to an earthed electrical power supply and properly protected against electrical surges and grounding faults. The power supply pack can only be replaced by the same product from the manufacturer.

Caution • Do not power the printer with USB attached to your computer at this time. THE DRIVER WILL PROMPT YOU WHEN IT IS TIME TO PLUG IN AND POWER UP YOUR PRINTER.
Step 1. Insert the power supply plug into the power socket, attach the power cord (120VAC or 230VAC) to the power supply, then plug the power cord in to a grounded electrical socket of the proper voltage and type.
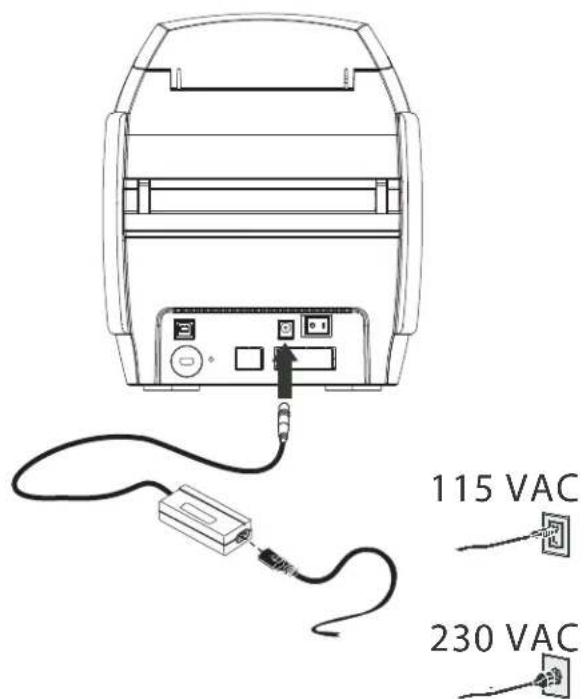
Step 2. Ensure that the printer's power switch is in the OFF (O) position.
Connecting the Printer to your Computer
Step 1. If your printer has only the USB interface, attach the included USB cable to your computer and the printer.
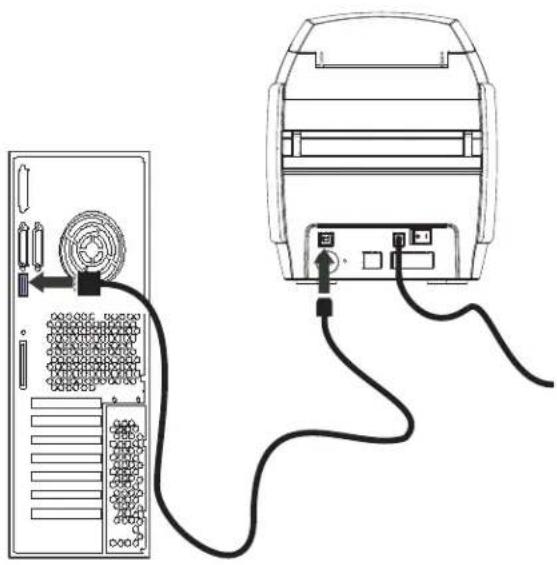
natural_image
Diagram showing two connected devices: a tower case with cable and a front-mounted device with cables (no text or symbols)Step 2. If your printer has the optional Ethernet interface (as well as the USB interface), connect either the USB cable to printer and computer or the Ethernet cable to the printer and the Ethernet network.

Important • Do not connect both the USB and the Ethernet interfaces at the same time!
Viewing Printer Information
To check the configuration parameters of the printer without being connected to a computer:
Step 1. Ensure that the printer power switch is in the OFF (O) position.
Step 2. While holding down the Control Button, place the printer power switch in the ON ( | ) position. The LCD Display Panel will glow blue.
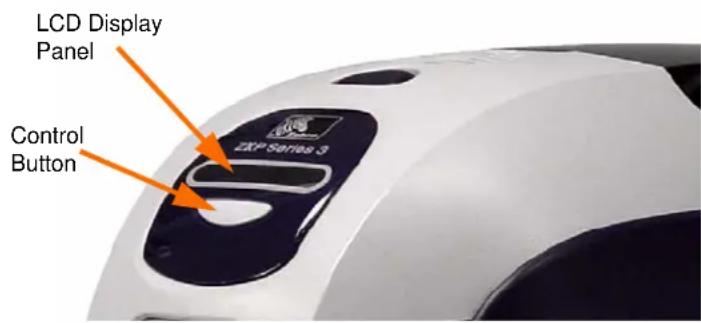
Step 3. Keep pressing the Control Button and observe the LCD Display Panel show Initializing, CHECKING RIBBON, and FEEDING CARD.
Step 4. When the PRINTER INFO message appears in the display panel, momentarily release and press the Control Button to display the first parameter: Model Name.
Step 5. Continue to tap the Control Button to advance through the parameters and cycle back to the beginning:
a. Model Name (Including the printer configuration)
b. Serial Number
c. Firmware Version
d. Head Resistance
e. X & Y Offset (front)
f. X & Y Offset (back)
g. EC Offset (front and back)
h. Ribbon Type
i. Smart Offset
j. IP Address
k. Mask
1. Gateway
m. DHCP (enabled or disabled)
Step 6. A long press of the Control Button (about 1 second) will escape the sequence. Idle time of 15 seconds will also escape the sequence.
Installing the Windows Printer Driver Initial Steps
Each computer that will use the printer must have the Printer Driver installed.
If not already done, connect power to the printer; and connect the printer to the computer.
- For USB Driver installation, turn the printer OFF (O).
- For Ethernet Driver installation, turn the printer ON ( | ).
To install the Printer Driver, insert the User Documentation and Drivers CD, included with your printer, into the host computer and the InstallShield Wizard will walk you through the required installation steps. The InstallShield Wizard will:
- Automatically install the User Interface when the driver CD is inserted. (Autorun must be enabled for your CD).
If Autorun is disabled:
a. Insert the Driver CD into the CD-ROM drive.
b. At the root (top) level of the CD, double-click on the RunCD.exe file.
- Start the installation process when the Install Printer Driver menu item is selected from the Main Menu.
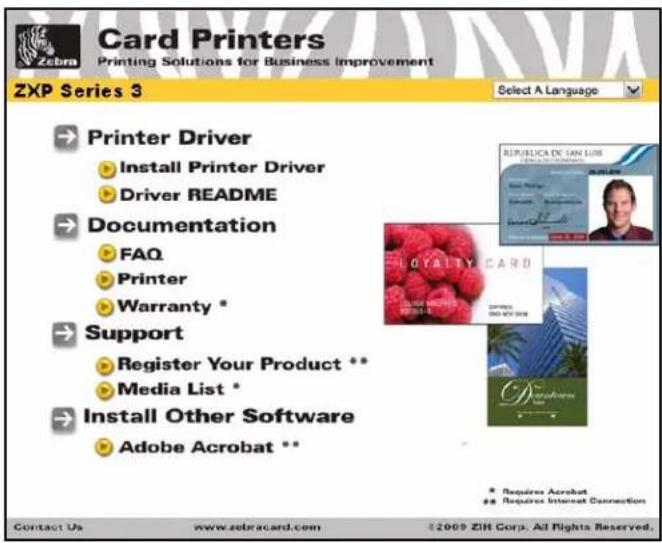
• Install the new driver files, USB (on page 15) and/or Ethernet (on page 20).
Installing the USB Printer Driver

Note • To install the Ethernet driver, see page 20.
Step 1. If not already done, connect power to the printer. Do not turn power ON.
Step 2. Connect the USB port on the rear of the printer to the computer's USB port.
Step 3. Ensure that the Printer's power switch is in the OFF (O) position.
Step 4. Insert the User Documentation and Drivers CD into the CD drive of the host computer. The Main Menu will open.
Step 5. From the drop-down menu in the upper-right corner of the Main Menu, choose the appropriate language for your system.
Step 6. From the Main Menu, click Install Printer Driver.
Step 7. If an older Printer and Driver is installed on your computer, the Select Features window will be displayed; otherwise go to Step 9.
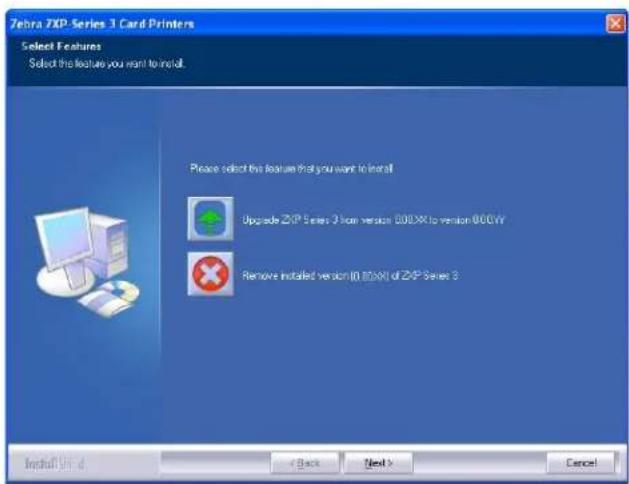
Step 8. In the Select Features window, choose the maintenance operation to be performed:
a. Select Modify to upgrade the older printer driver, click the Next button, and follow the screen prompts. At the end of the process, you will be asked to reboot your computer. Re-boot your computer. The upgrade is complete.
b. Select Remove to remove the older printer driver, click the Next button, and follow the screen prompts. At the end of the uninstall process, you will be asked to re-boot your computer. Re-boot your computer, and start over with Step 1.

Printer Installation
Installing the Windows Printer Driver
Step 9. The InstallShield Wizard window will open. To proceed with the installation, click the Next button.
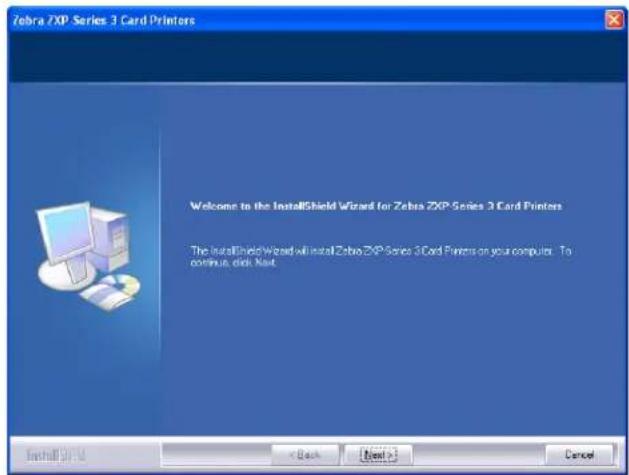
Step 10. Select Install USB printer drivers, and click the Next button.
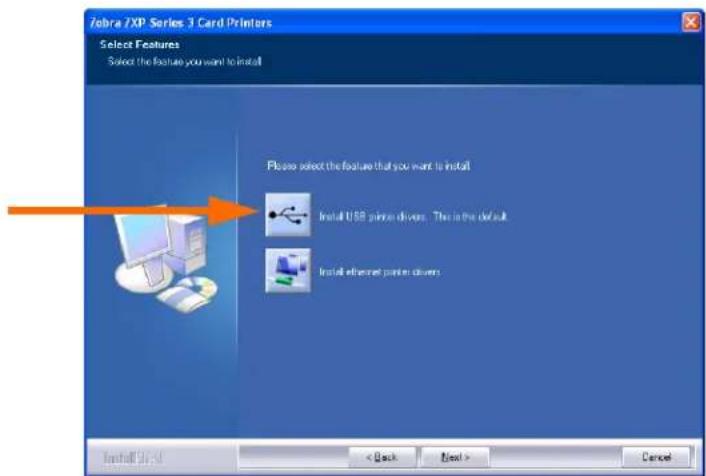
Step 11. Ensure that the Printer's power switch in the OFF (O) position; and then click the OK button.

Step 12. This will bring up the License Agreement window. To proceed with the installation, click the Yesbutton.
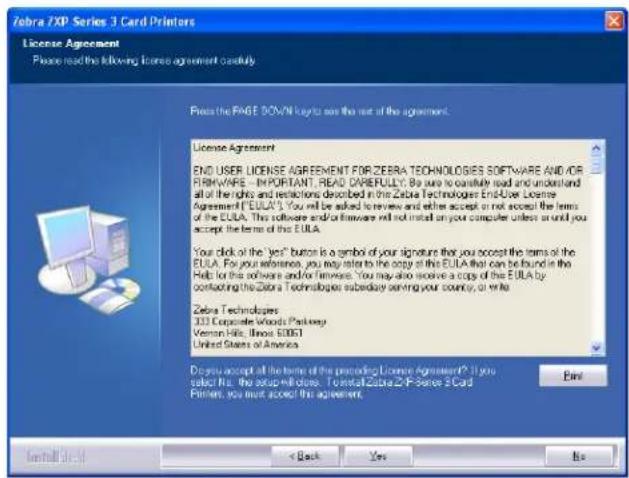
Step 13. This will bring up the Setup Type window.
- Select Complete to install all program features, and click the Next button.
- or -
- Select Custom to choose which program features you want installed, and click the Next button.
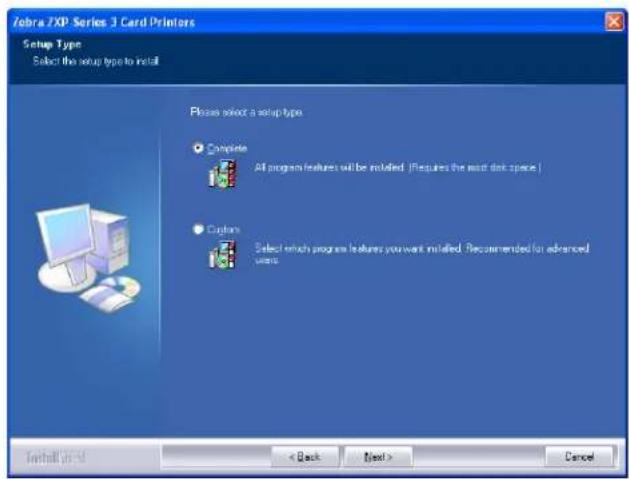
Step 14. This will bring up the Select Program Folder window. Type in a new folder name or select one from the existing folders list, and click the Next button.
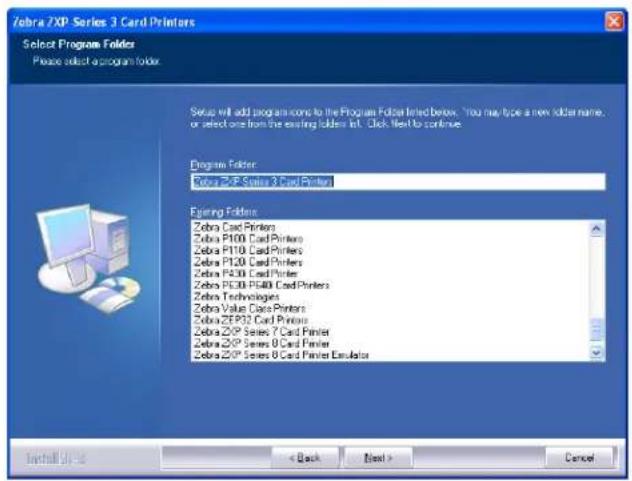
Step 15. Observe the Setup Status window.
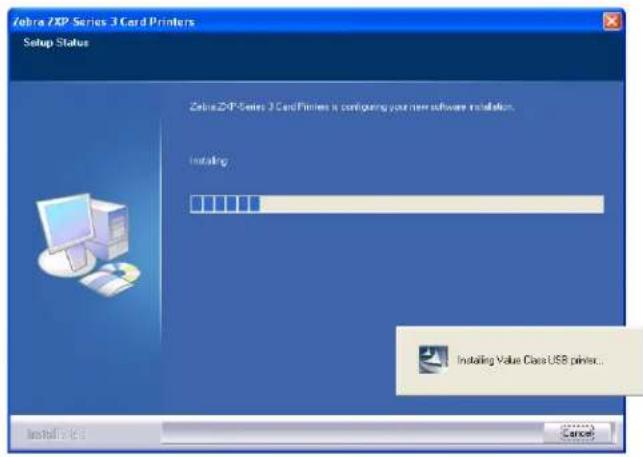
Step 16. The Congratulations window will appear.
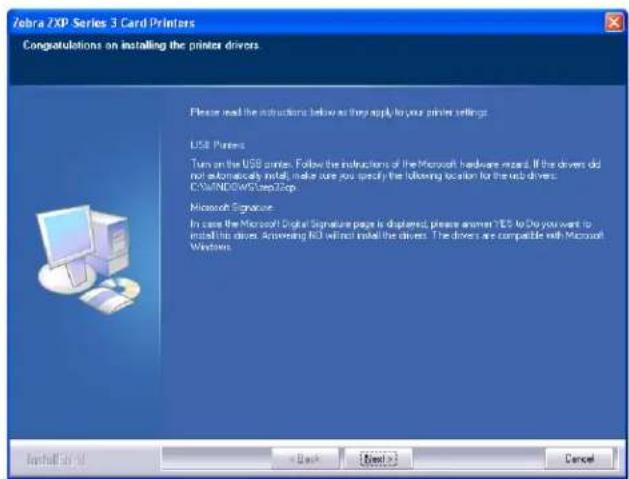
Step 17. At this point, turn on your printer; and then click the Next button. The Windows New Hardware Found wizard will find the printer.
Step 18. When the InstallShield Wizard Complete window appears, click the Finish button.
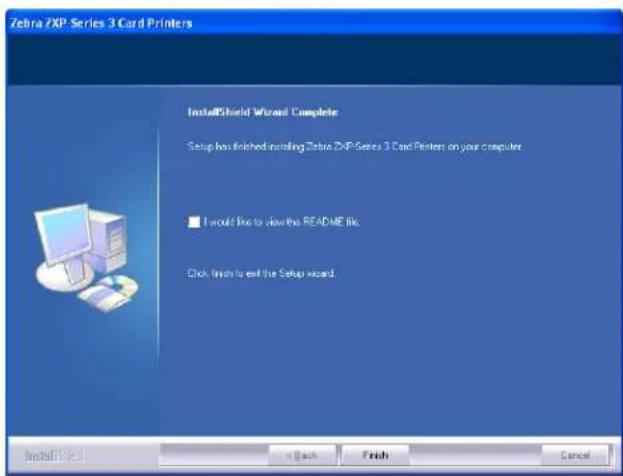
Step 19. This completes USB driver installation.
Step 20. To use the Printer, you would select it like you would any other printer connected to a Windows system.

Note • You may need to change the card setup (card orientation, ribbon type, etc.), encoding, overlay, and/or black panel settings via the Printer Driver; see Card Printer Printing Preferences on page 50.
Installing the Ethernet Printer Driver

Note • To install the USB driver, see page 15.

Important • The Ethernet Network must be configured correctly, with the Printer and the host computer on the same subnet mask. If you are not sure how to verify this or change the configuration, consult someone knowledgeable on Ethernet Networks.
Step 1. If not already done, connect power to the printer. Turn power ON.
Step 2. Connect the Ethernet port on the rear of the printer to the Ethernet network connection or directly to the computer's Ethernet port.
Step 3. Ensure that the Printer's power switch in the ON ( | ) position.
Step 4. Insert the User Documentation and Drivers CD into the CD drive of the host computer. The Main Menu will open.
Step 5. From the drop-down menu in the upper-right corner of the Main Menu, choose the appropriate language for your system.
Step 6. From the Main Menu, click Install Printer Driver.
Step 7. If an older Printer and Driver is installed on your computer, the Welcome window will be displayed; otherwise go to Step 9.
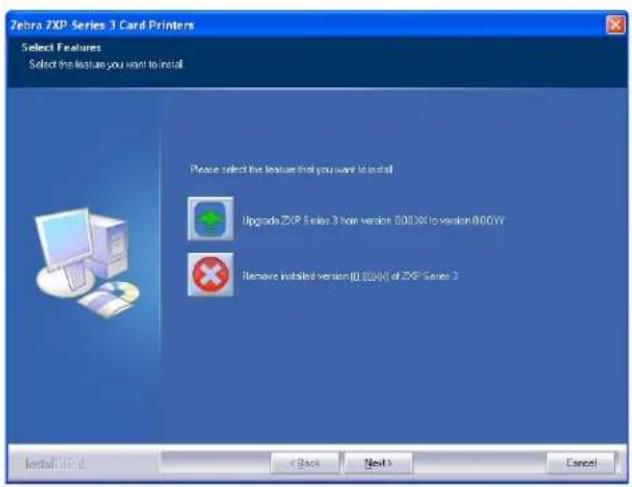
Step 8. In the Welcome window, choose the maintenance operation to be performed:
a. Select Modify to update the older printer driver, click the Next button, and follow the screen prompts. At the end of the upgrade process, you will be asked to re-boot your computer. Re-boot your computer. The upgrade is complete.
b. Select Remove to remove the older printer driver, click the Next button, and follow the screen prompts. At the end of the uninstall process, you will be asked to re-boot your computer. Re-boot your computer, and start over with Step 1.
Step 9. The InstallShield Wizard window will open. To proceed with the installation, click the Next button.
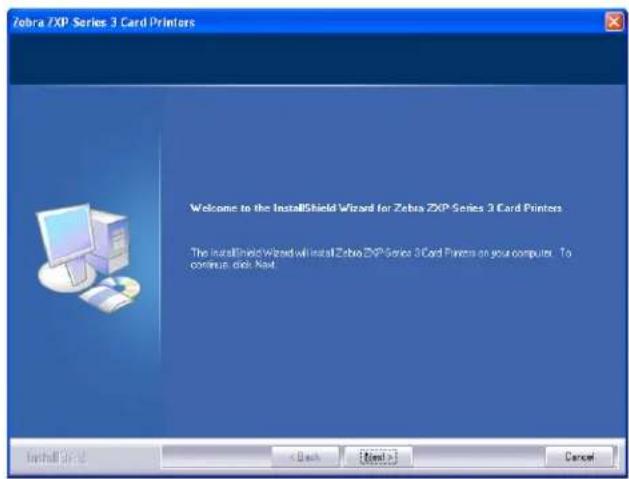
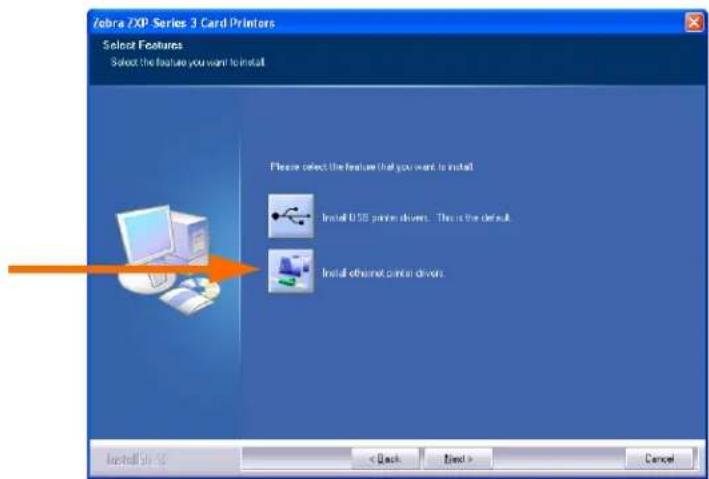
Step 10. Select Install Ethernet printer drivers, and click the Next button.
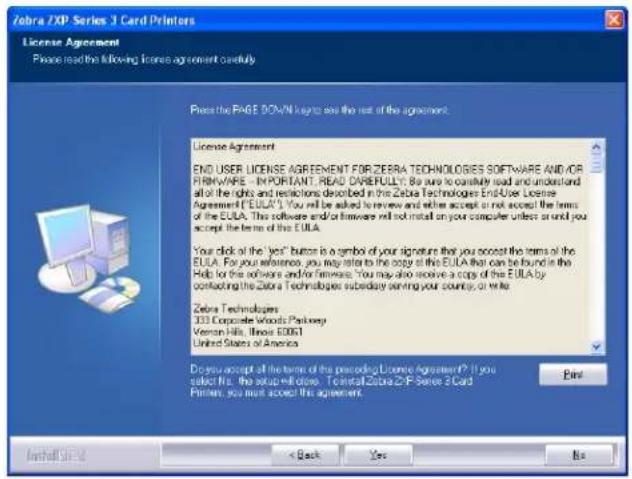
Step 11. This will bring up the License Agreement window. To proceed with the installation, select the I accept the terms of the license agreement option, and then click the Next button.
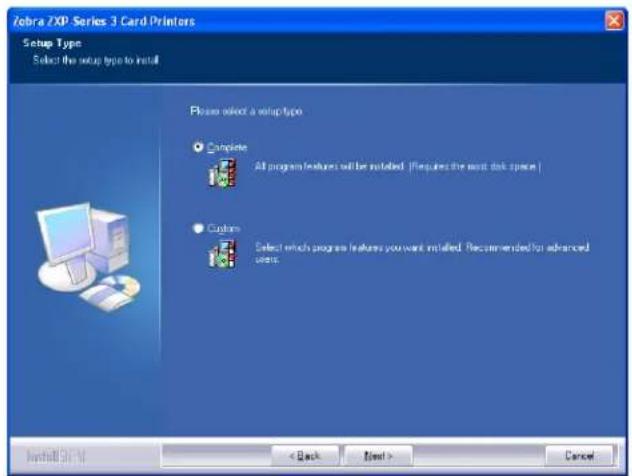
Step 12. This will bring up the Setup Type window.
- Select Complete to install all program features, and click the Next button.
- or -
- Select Custom to choose which program features you want installed, and click the Next button.
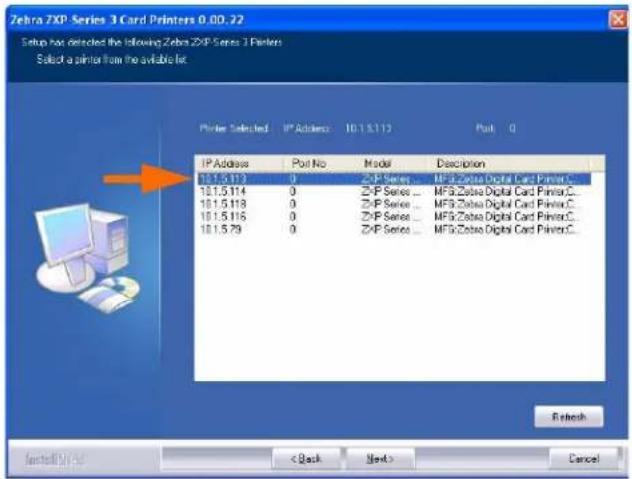
Step 13. Setup will find and list all Zebra ZXP Series 3 Printers on the network. Select a printer from the list (example, arrow below); and click the Next button.
Step 14. This will bring up the Select Program Folder window. Type in a new folder name or select one from the existing folders list, and click the Next button.
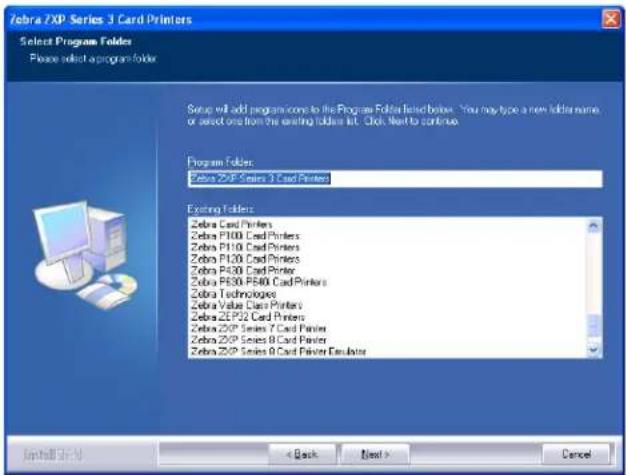

Printer Installation
Installing the Windows Printer Driver
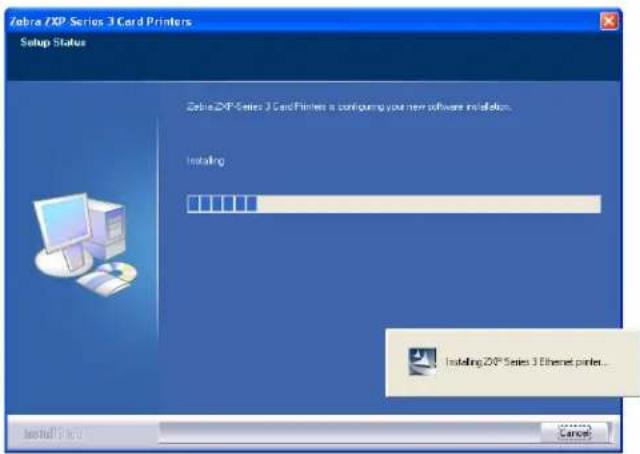
Step 15. Observe the Setup Status window.
Step 16. The Congratulations window will appear.
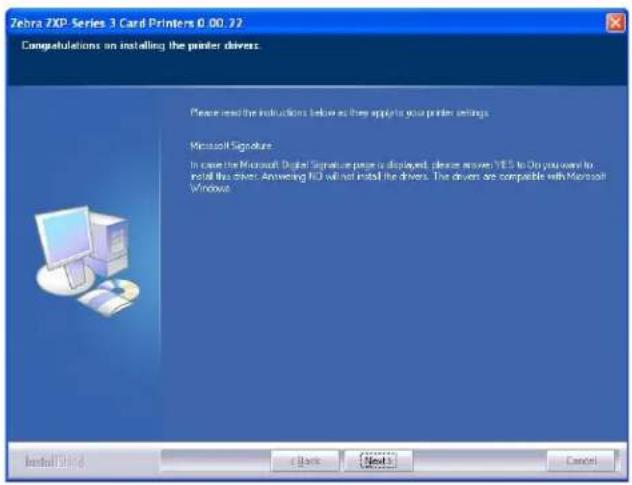
Step 17. At this point, click the Next button.
Step 18. When the InstallShield Wizard Complete window appears, click the Finish button.
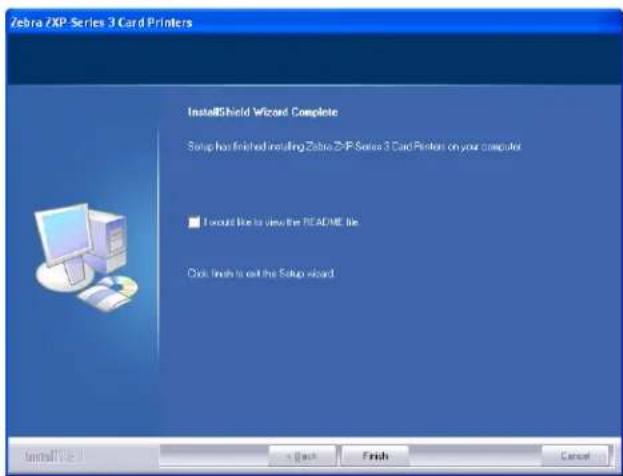
Step 19. This completes Ethernet driver installation.
Step 20. To use the Printer, you would select it just like you would any other printer connected to the Ethernet.

Note • You may need to change the card setup (card orientation, ribbon type, etc.), encoding, overlay, and/or black panel settings via the Printer Driver; see Card Printer Printing Preferences on page 50.
natural_image
Close-up of a handheld electronic device with black and white casing (no visible text or symbols)Printer Setup

natural_image
Abstract black and white pattern with curved white lines on a black background (no text or symbols)Printer Features
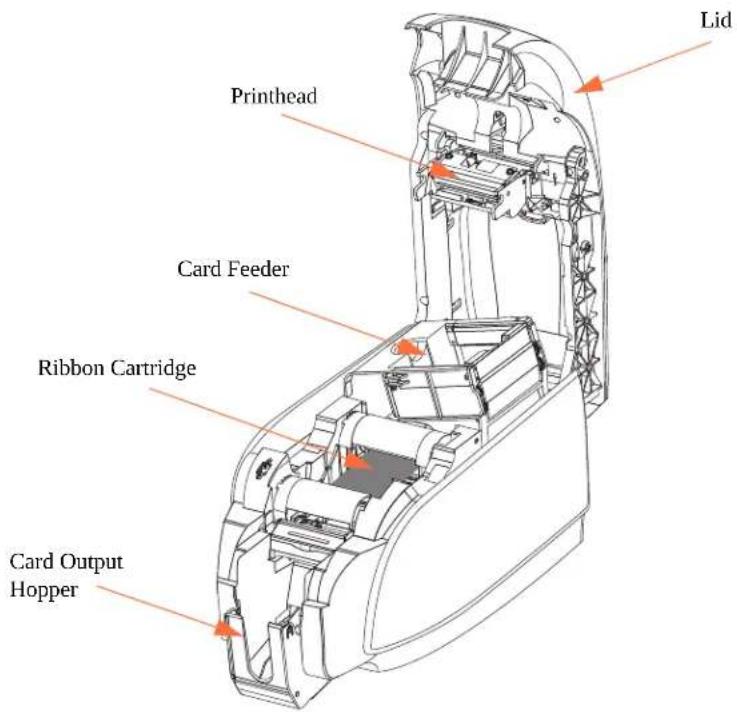
The following shows an interior view of the ZXP Series 3 Card Printer.
Loading Ribbon Cartridge
The Printer requires approved ribbon cartridges. The Resin Thermal Transfer and Dye Sublimation ribbons are specifically designed for your Printer.
- Only use Zebra i Series ribbons designed to work with ZXP Series 3 Card Printers.
- Each ribbon cartridge includes an integrated adhesive cleaning roller assembly that is used to clean the cards entering the printer. Improper cleaning will reduce printer life and degrade print quality
- When the ribbon is completely used, change the whole cartridge assembly.

Electrostatic Discharge Caution • DO NOT TOUCH the printhead or the electronic components on the printhead. Discharge of electrostatic charge from the human body or other surfaces can damage the printhead or other electronic components
- Open printer lid by pressing the Cover Release button on the top of your printer.
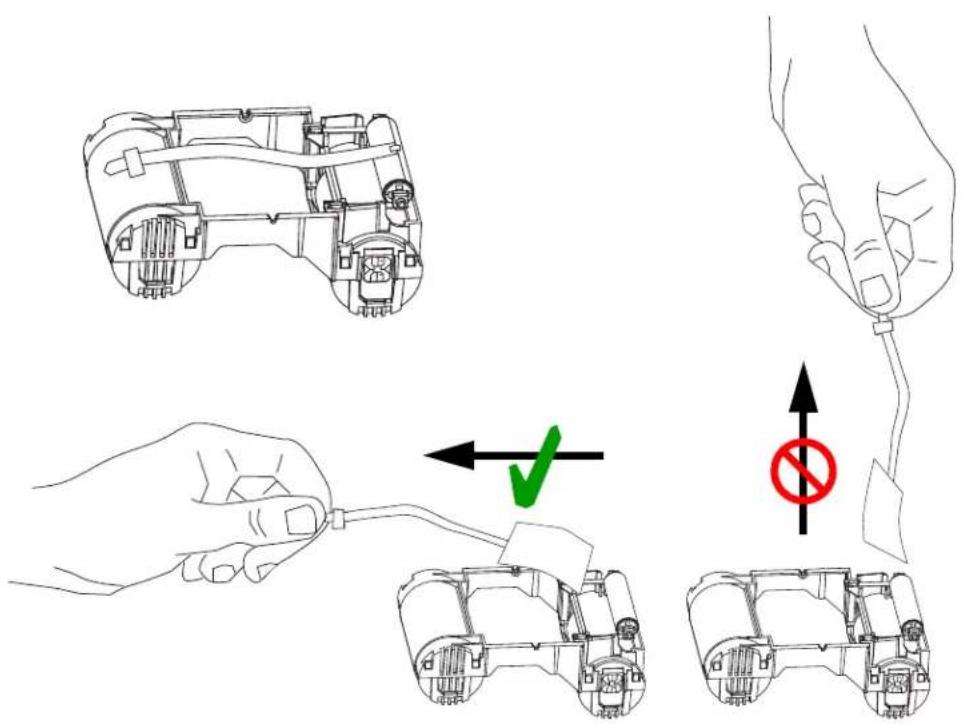
- Peel protective wrapper from the adhesive cleaning roller by gently pulling on the tape. Discard the protective wrapper.
- Insert the ribbon cartridge with the cleaning roller facing down, so the gears on the ends of the rollers fit into the appropriate slots.
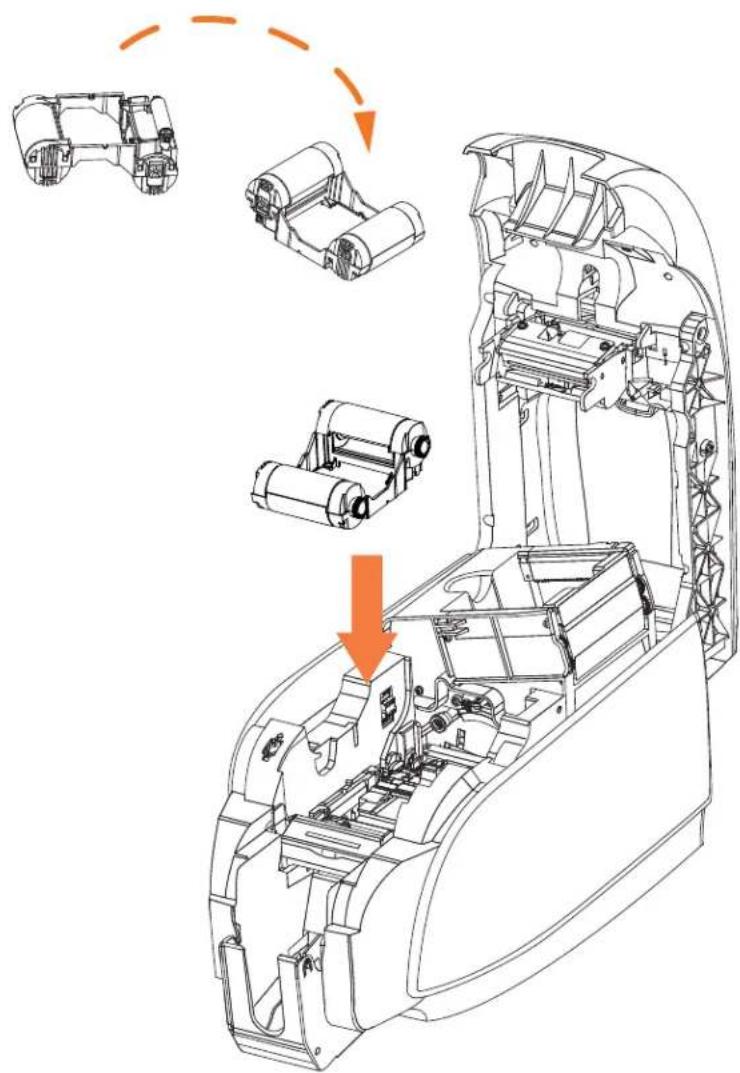
- Close the printer lid and push down until you hear an audible click.

Note • After the lid is closed, the ribbon automatically synchronizes when the printer power is on.
Loading Cards
To help you load, print, and collect cards, the printer has a card feeder and card output hopper.
Card Feeder
The card feeder is used for loading cards, it can hold up to 100 cards of 30 mils thickness. The card feeder is located under the card feeder cover of the Printer

Caution • DO NOT bend cards or touch print surfaces as this can reduce print quality.

Note • The surface of the cards must remain clean and dust free. Always store cards in an enclosed container. Ideally, use cards as soon as possible. If cards stick together, carefully fan or shuffle them.

Note • For Cards with magnetic stripe, refer to Appendix B for loading instructions.
Load cards into the card feeder as follows:
- Open the card feeder cover.
- Slide the card guide all the way to the right until it locks in place with an audible click.
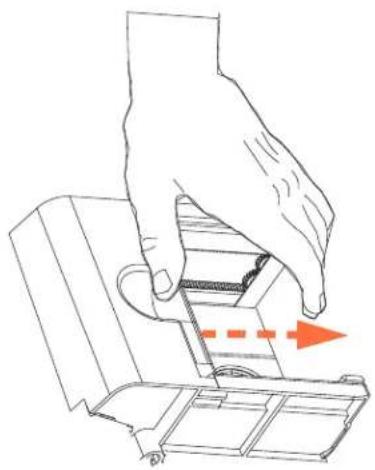
natural_image
Illustration of a hand pressing down on a mechanical component with an orange arrow indicating motion (no text or symbols)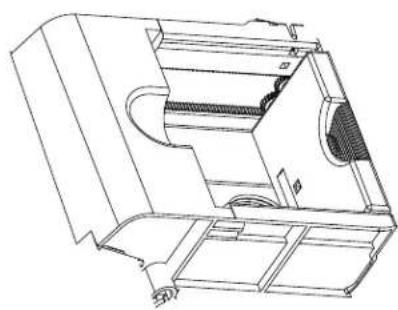
natural_image
Technical line drawing of a mechanical device with internal components (no text or symbols)
- Remove the cellophane wrapper from the card stack.
Note • Static charges and edge burrs from the card die-cutting process can render individual cards stuck together with significant adhesion force. These cards must be physically separated from each other before inserting into the feeder; if not separated, feeding or printing problems may occur.
- Holding the card deck by the sides, hold it vertically against a flat surface such as a desktop; then push the stack back and forth to an angle of about 45^ from vertical, so as to separate all of the cards.
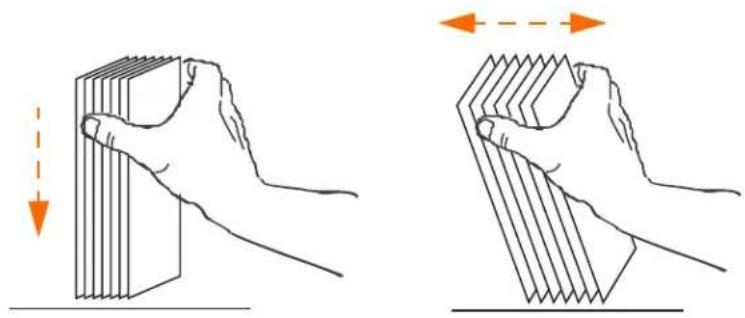
natural_image
Two hand-drawn diagrams showing a wooden plank being held, with arrows indicating force direction (no text or symbols)-
Restore the card stack to its original squared-off condition.
-
Place stack of up to 100 cards into the card feeder.
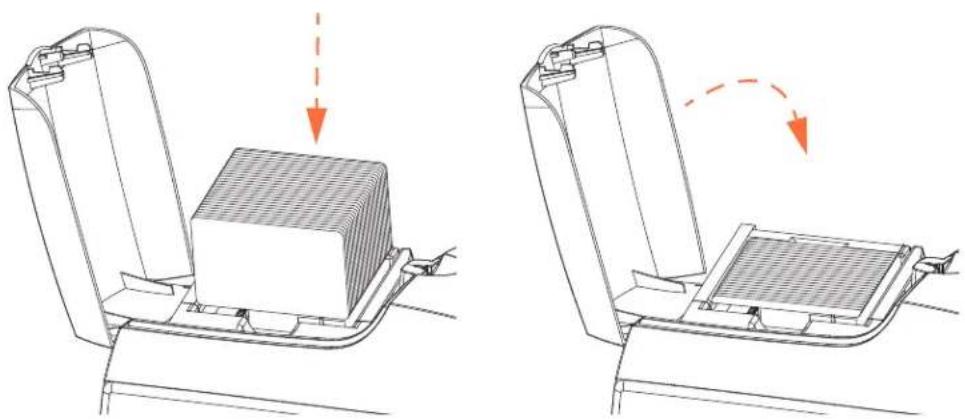
natural_image
Two technical diagrams showing a device inside a container with arrows indicating motion or transformation (no text or symbols present)- Close the card feeder cover. When card feeder cover is closed, the card guide locking mechanism will automatically be released.
Card Output Hopper
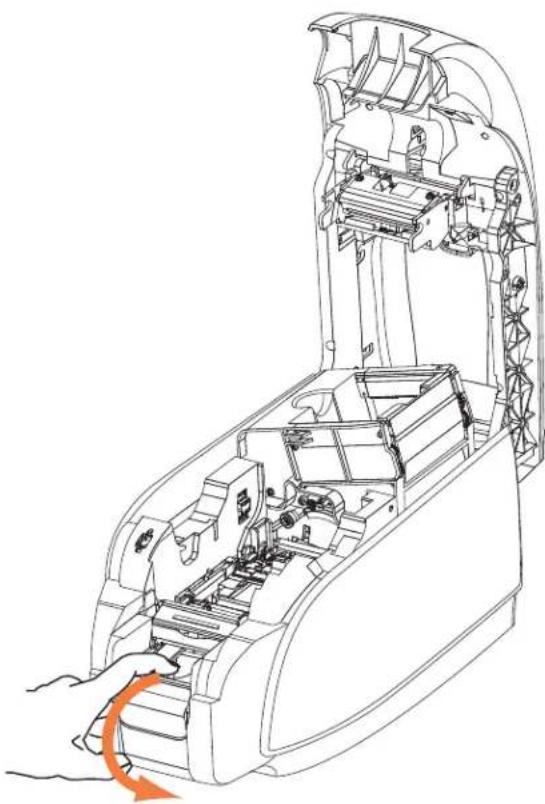
- Raise the printer lid, and pull the output hopper down to place it in its functional position.
natural_image
Technical line drawing of a device interior with a hand inserting a component (no text or symbols)- When not using the printer, place the card output hopper back in its closed position to protect the printer from dust.
Printing a Test Card
With ribbon cartridge and cards loaded, your printer is ready to print. To check the operation of the printer, you should print a test card.
- Go to the Driver Tools tab (Select Start > Settings > Printers and Faxes. Right click on the Zebra ZXP Card Printer listing. Select Properties > Device Settings > Tools).
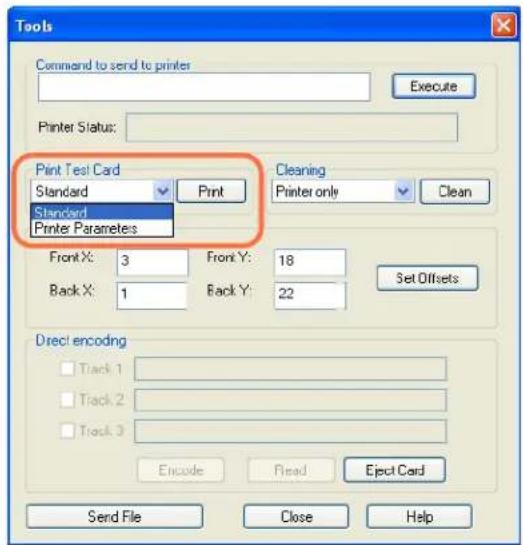
- From the Print Test Card dropdown menu, select the desired test card (circled above).
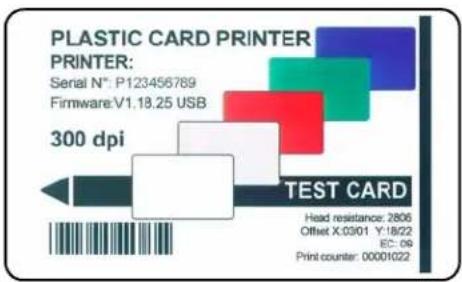
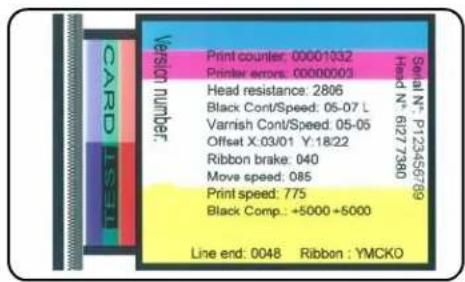
- Click on the Print button; see sample test cards below.
Standard:
Printer Parameters
Typical Printer Operation
The ZXP Series 3 Card Printer can be used with your software application program, using the Drivers on the CD provided with your Printer; refer to Installing the Windows Printer Driver on page 14.
Creating a Sample Card
Before you begin a new printing session, print a sample card to ensure that the cards will be printed correctly. Follow the steps below to print your first card using the True Colours™ Card Printer Ribbon Cartridge.
- Open a new Microsoft Word document.
- If the Zebra Printer was not set as the default printer, select the ZXP Series 3 Card Printer as the default.
- From the Microsoft Word document., set the Page Layout:
a. Size: 3.14 in x 2.13 in (86 mm x 54 mm) Card
b. Orientation: Portrait or Landscape
c. Margins: Top, Bottom, Left, and Right = 0 (zero).
- The card appears as a Microsoft Word document.
- Design a card with both black and colored text and with colored images similar to the sample card shown below.
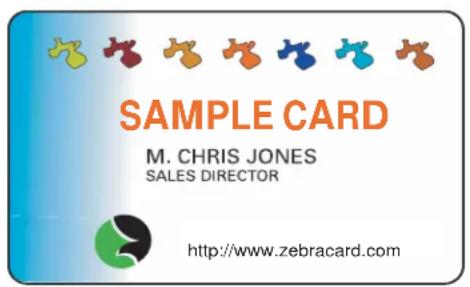
Printing the Sample Card
Once you complete creating your sample card, you are ready to print. Ensure your printer has a True Colours ^TM Card Printer Ribbon Cartridge installed and there is card stock in the card feeder. See Section 3 for instructions on installing the ribbon and loading the cards.
- Print your sample card.
- Once the printing is completed, remove the sample card from the card output hopper and check for any discrepancies. For quality issues, see Troubleshooting on page 61.
- If the sample card is correct, your printer is ready to produce more cards.
Printer Settings and Adjustments

natural_image
Abstract black and white pattern with curved white lines on black background (no text or symbols)Introduction
This section describes the settings and adjustments that can be made to your Windows ZXP Series 3 Printer Driver. This consists of two major topics:
Card Printer Properties 36
General Tab 37
Sharing Tab. 38
Ports Tab. 39
Advanced Tab. 40
Color Management Tab 41
Security Tab 42
Device Settings Tab 43
Card Printer Printing Preferences 50
Card Printer Properties

Note • The screen shots shown in this section are for the printer using the USB interface. If you are using the Ethernet interface, the screens will refer to the “Network Printer.”
To access the Card Printer Properties, select Start > Settings > Printers and Faxes. Right click on the Zebra ZXP Card Printer listing, then select Properties.
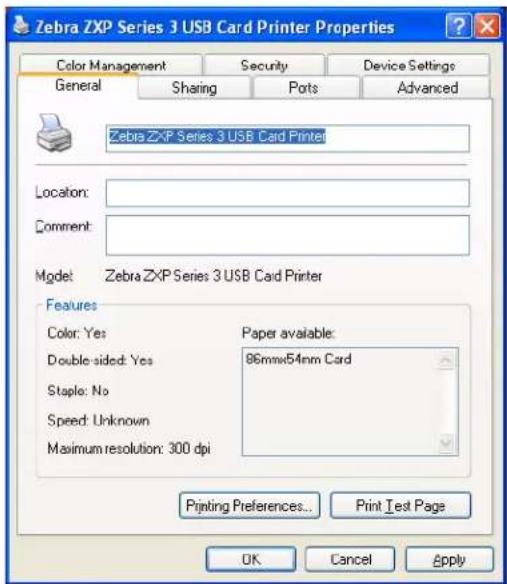
- General Tab - Displays printer information of a general nature, includes selection for Printing Preferences and Print Test Page (i.e., the standard Windows test page).
- Sharing Tab - Operating System (OS) feature where the printer can be shared with other clients on a network.
- Ports Tab - OS feature displays available communication ports.
- Advanced Tab - OS feature to select printer availability and spooling options.
• Color Management Tab - Allows user to define color profile(s) with color printers.
• Security Tab - OS feature where permissions to printers can be defined. - Device Settings Tab - Allows user to make basic printer adjustments and access advanced printer controls.
General Tab
The General tab shows the selected printer and lists the features of the printer.
To access the General tab, select Start > Settings > Printers and Faxes. Right click on the Zebra ZXP Card Printer listing. Select Properties > General.
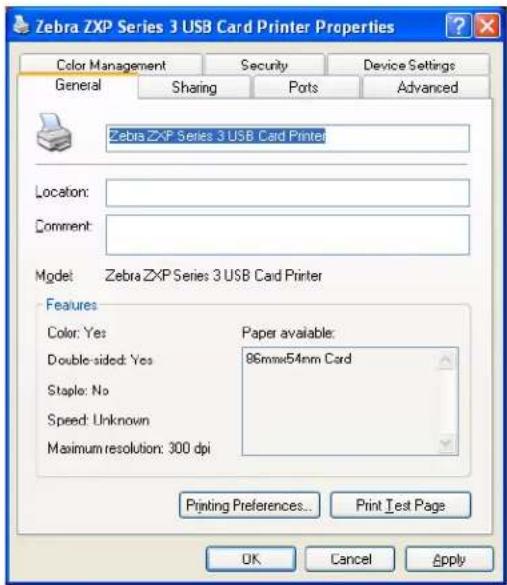
- Location - Lets you specify where the printer is located.
- Comment - Lets you specify general information about the printer, such as the type of print device and who is responsible for it. Once set, these fields can be displayed by applications.
• Model - Specifies the name of the printer driver installed. - Features - Specifies whether various options are available on the printer.
The Printing Preferences button takes you to Printing Preferences used to set selected configuration parameters; see Card Printer Printing Preferences on page 50.
The Print Test Page button sends the standard Windows test page to the printer.
Sharing Tab
On the Sharing tab, you can choose to share the printer over the network and install additional drivers to accommodate different operating systems.
To access the Sharing tab, select Start > Settings > Printers and Faxes. Right click on the Zebra ZXP Card Printer listing. Select Properties > Sharing.
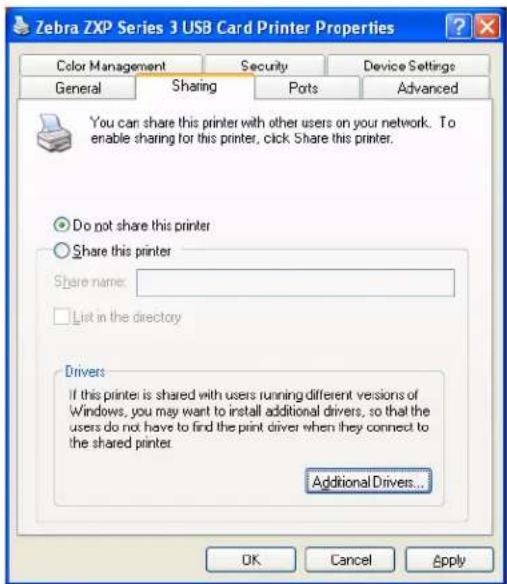
Printer sharing tasks that you can perform include:
- To share a printer, select the Share this printer radio button; and specify a name for the shared resource. Click OK when you're finished.
- To change the shared name, simply enter a new name in the Share name field; and click OK.
- To quit sharing a printer, select the Do not share this printer radio button. Click OK when you're finished.
Drivers: If this printer is shared with users running different versions of Windows, you may want to install additional drivers, so that the users do not have to find the print driver when they connect to the shared printer. Click on the Additional Drivers button.
Ports Tab
Use the Ports tab to specify the computer port to which the printer is connected. This will have been established at the initial installation of the printer, and will not normally require attention.
To access the Ports tab, select Start > Settings > Printers and Faxes. Right click on the Zebra ZXP Card Printer listing. Select Properties > Ports.
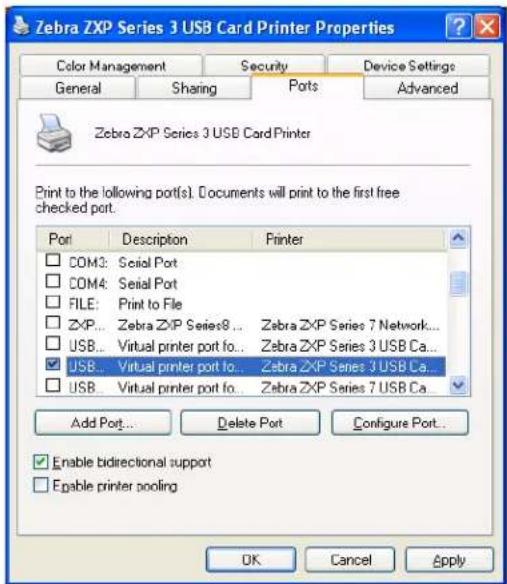
An exception to this is if you wish to use printer pooling, the ability to distribute print jobs to multiple printers; see Printer Pooling on page 87 for details.
To enable printer pooling, select the Enable printer pooling checkbox, then check the additional ports boxes. Each port should have a single Zebra printer installed on it. All the pooled printers must be identical models with the same configuration (e.g., all with YMC front, K back); and each must have its own printer driver installed.
Now, when you print to the “main printer” (that is, whichever printer you right-clicked in Printers and Faxes to get to this screen), this printer will get print jobs until it has buffered as many jobs as it can take. The remaining jobs will then “spill over” to other printers until all printers in the pool are busy.
Advanced Tab
The Advanced tab determines the spooling (queuing) of print jobs and determines how spooled jobs are handled relative to the most recent job.
To access the Advanced tab, select Start > Settings > Printers and Faxes. Right click on the Zebra ZXP Card Printer listing. Select Properties > Advanced.
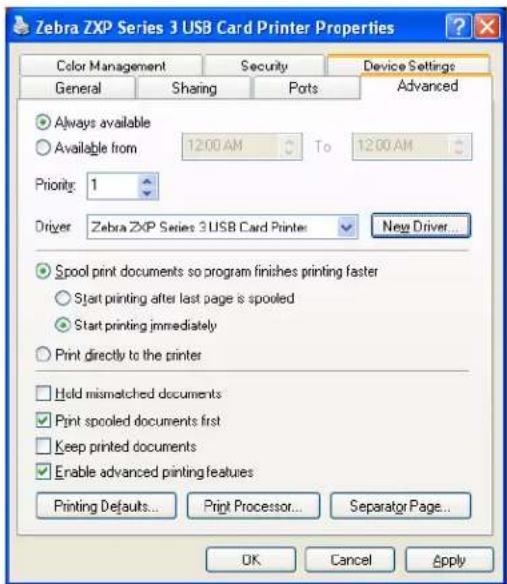
To enable spooling: Select the radio button labeled Spool print documents so program finishes printing faster.
- Select Start printing after last page is spooled if you want the entire document to be spooled before printing begins. This option ensures that the entire document is sent to the print queue before printing. If for some reason printing is canceled or not completed, the job will not be printed.
- Select Start printing immediately if you want printing to begin immediately when the print device is not already in use. This option is preferable when you want print jobs to be completed faster or when you want to ensure that the application returns control to users as soon as possible.
To disable spooling: Select the radio button labeled Print directly to the printer radio button.
Color Management Tab
Color Management settings allow you to associate color profiles on the printer based on the type of media being used and printer configuration. The Add button allows the operator to add additional profiles to the color profile list.
To access the Color Management tab, select Start > Settings > Printers and Faxes. Right click on the Zebra ZXP Card Printer listing. Select Properties > Color Management.
![Zebra ZXP Series 3 USB Card Printer Properties General Sharing Ports Advanced Color Management Security Device Settings These settings let you associate color profile(s) with your color printer. Color profiles control the color on your printer based on the type of media being used and the printer configuration. Automatic: Windows will automatically select the best color profile from the list of associated color profiles [Recommended] Manual: Manually select the default color profile for all output from this device from the list of associated color profiles Default color profile: Color Profiles currently associated with this printer: Add... Remove Set As Default OK Cancel Apply](/content/2026/05/844939/images/d6a8ddbd4b4899384307bbae85b08fae0047037e535796427edfe641581735af.jpg)
The following settings let you associate color profiles with your printer:
- The Automatic radio button lets Windows select the best color profile from the list of associated profiles (default).
- The Manual radio button lets you select the appropriate profile from the list shown in the Color Profile window.
You can manage Color Profiles currently associated with your printer as follows:
- The Add button allows you to add additional profiles to the color profile list.
- The Remove button allows you to remove profiles from the color profile list.
The Set As Default button allows you to set the selected profile as the default profile.
Security Tab
This is the standard Windows security screen, showing user access to various printer control options. Both Print and Manage Printers must be checked for full functionality of the printer.
To access the Security tab, select Start > Settings > Printers and Faxes. Right click on the Zebra ZXP Card Printer listing. Select Properties > Security.
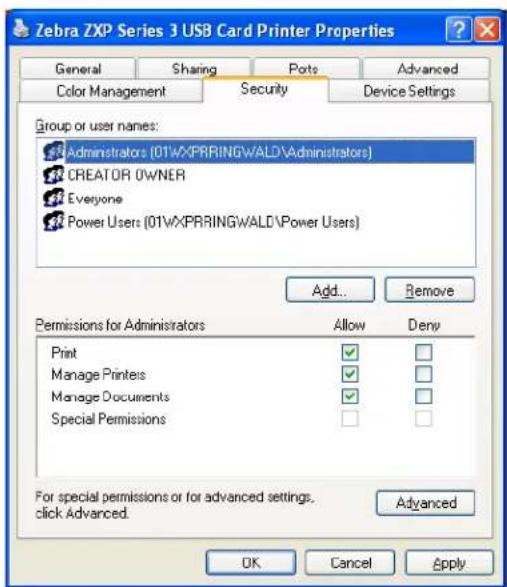
The Security tab allows you to assign the actual permissions that apply to the print queue. You can apply permissions to both users and to groups. It is usually considered a better practice to only apply security to groups.
The Advanced Security Settings properties sheet allows you to assign a more comprehensive set of permissions than the basic Security tab found on the printer's properties sheet does.
Device Settings Tab
The Device Settings tab provides device information, security status, and printer usage.
To access the Device Settings tab, select Start > Settings > Printers and Faxes. Right click on the Zebra ZXP Card Printer listing. Select Properties > Device Settings.
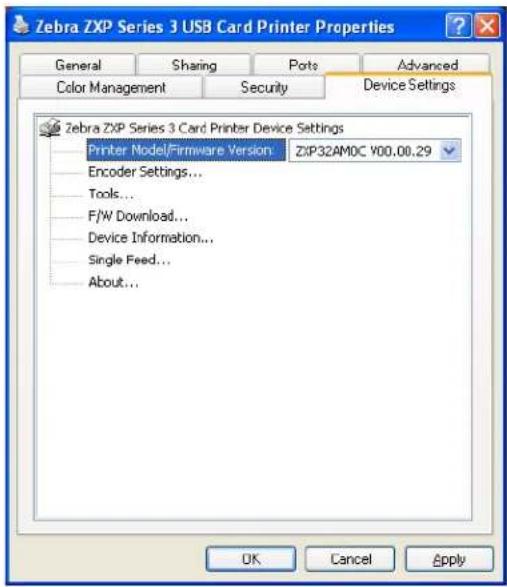
Printer Model/Firmware Version
Gives the printer model and firmware version.
Encoder Settings
Dialog box for setting Magnetic Encoder parameters. This feature is not enabled if the printer does not have the magnetic encoder option.
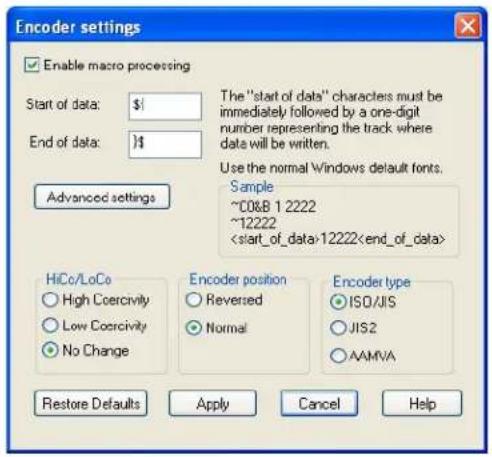
- Enable macro processing - This option will allow the user to choose the encoding preamble.
- Start of Data - Beginning of the data string for the encoder. Note that Start of Data characters must be immediately followed by a one-digit number representing desired track where the data will be written. Use the normal Windows default fonts.
• End of Data - Ending of the data string for the encoder.
- Advanced Settings - Click here for more information. (see ADVANCED SETTINGS DIALOGUE BOX on page 45).
- Restore Defaults - Click here to reset the encoder settings to the default values.
- HiCo/LoCo - Select the type of coercivity of magnetic stripe cards to be used. Coercivity is a measurement of a material's resistance to being magnetized. Low coercivity material magnetizes easier than high coercivity material.
- Encoder Position - Select the printer encoder position between Reversed and Normal. Reversed is not supported by this printer.
- Encoder Type - Select the type of encoder. JIS2 and AAMVA are not supported by this printer.
ADVANCED SETTINGS DIALOGUE BOX
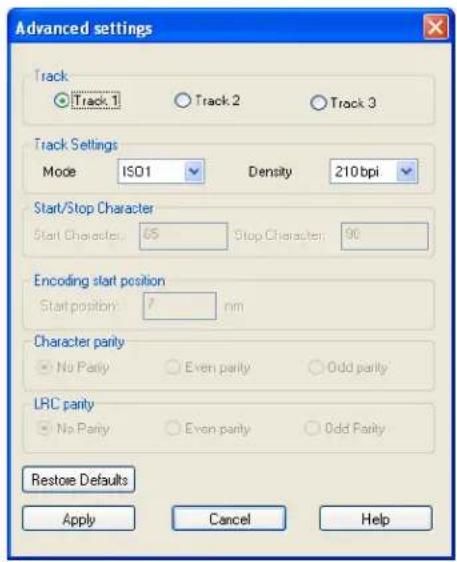
- Track: Select the track you want to configure.
- Track Settings: Select the Mode (ISO1, ISO2, ISO3, 3 bit, 4 bit, 5 bit, 6 bit, or 7 bit) and Density (75bpi or 210 bpi) for the tracks.
- Start/Stop Character (For Non-ISO encoding only): Enter an ASCII value for the Start and Stop characters.
- Encoding Start Position (For Non-ISO encoding only): Enter the encoding start position in millimeters (mm).
- Character Parity (For Non-ISO encoding only): Choose the Character Parity you want to work with -- No parity, Even parity, or Odd parity.
- LRC Parity (For Non-ISO encoding only): Choose the LRC Parity you want to work with -- No parity, Even parity, or Odd parity.
Click the Restore Defaults button to reset the settings to the original values.
Tools
Dialog box for testing and communicating with the printer.
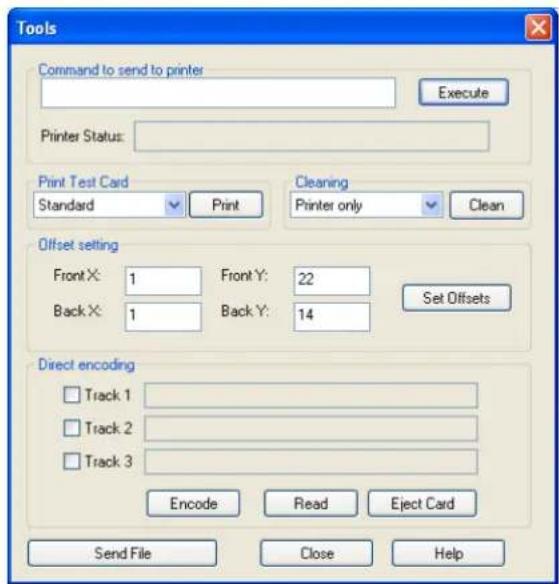
- Command to send to printer - Enter a printer command (without leading escape character) in the top edit box, and click on the Execute button to send to the printer directly. The Printer Status will show the status of the printer. Contact Zebra Technical Support for a complete list of the printer commands.
- Print Test Card - Three test card types are available: Standard, Printer Parameters, and Encoder Parameters. Click on the Print button to print the test card.
- Clean - Printer only is the only cleaning option. Click on the Clean button to clean the printer. Remove all consumables before executing a cleaning cycle.
- Offset Setting - Enter the Front and Back X and Y direction offsets, and click on the Set Offsets button to set the offsets for printing the card.
- Direct Encoding - To encode magnetic data on a track, select the track (Track 1, Track 2, or Track 3); enter the data to encode; and click on the Encode button. To read magnetic data, select the track(s) to be read; and click on the Read button. To eject the card from the printer, click on the Eject Card button.
- Send File - This command will allow a .prn or .txt file to print.
- The .prn file must be created with a Zebra printer driver using the same ribbon as present in the printer.
- The .txt file must contain firmware commands only with only one command per line. The first line must only contain MASTER; the last line must only contain SLAVE.
F/W Download
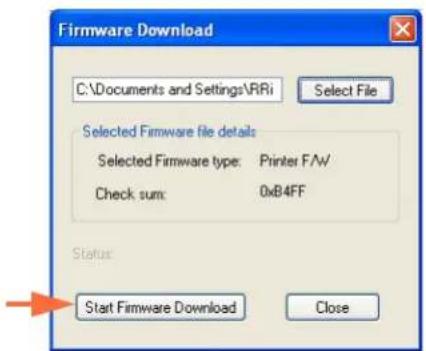
This Dialog box is used to install the firmware downloaded from the Zebra web site at http://zebracard.com under Drivers & Downloads.

Important • Do not turn off the power to the printer until the process is done and the LCD displays READY. If the download process is interrupted, the printer will not operate.
Step 1. Click on the Select File button (arrow below).
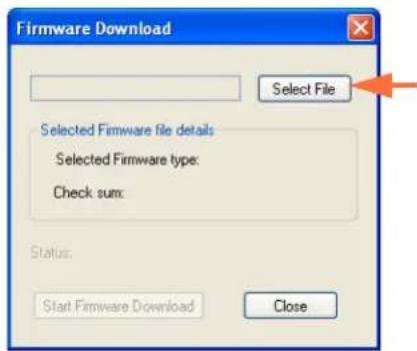
Step 2. From the Browse window, "find" the downloaded firmware (BIN file type), and click on the Open button.
Step 3. Click on the Start Firmware Download button (arrow below) to install the firmware; otherwise, click on the Close button to abandon the firmware installation.
Device Information
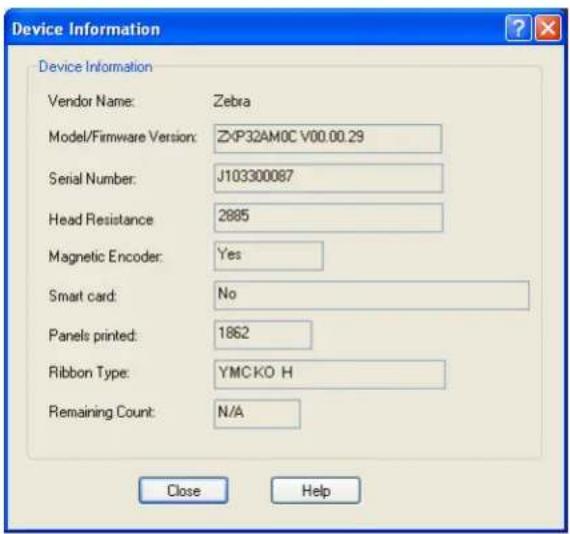
Printer configuration status window.
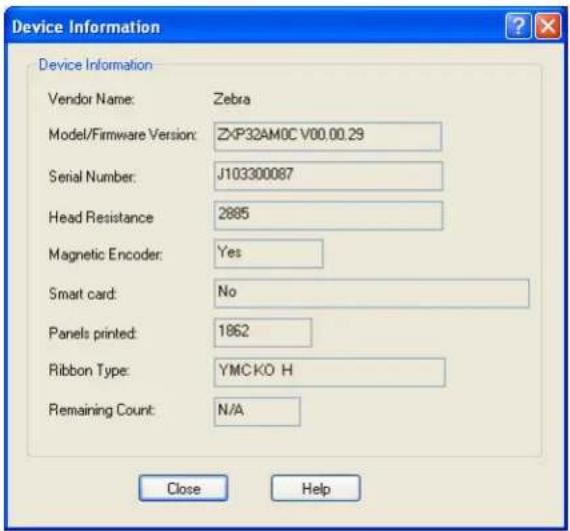
- Model/Firmware Version - Specifies the printer model number and installed firmware version.
- Serial Number - Specifies the printer serial number.
• Head Resistance - Specifies the printhead resistance value. - Magnetic Encoder - Specifies if this option is present.
• Smart Card - Specifies if a smart card encoder is present and type of encoder. - Ribbon Type - Specifies the ribbon installed in the printer.
- Remaining Count - Shows the remaining card count for the ribbon installed. For monochrome ribbons, this will display Unknown.
- Panels Printed - Shows the total number of panels printed for the lifetime of the printer.
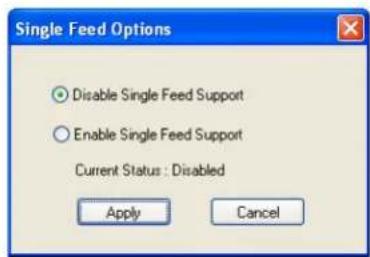
Single Feed Options

Note • For operating the ZXP Series 3 Card Printer in single card feed mode, the printer requires that the operator install an optional CardSense Single Card Feed Kit; refer to Appendix D for details.
Click on the appropriate radio button to Enable / Disable Single Feed operation.
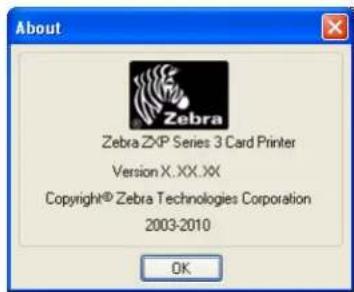
About
Dialog Box for specifying the Printer Model, the Driver Version, and the Copyright.
Once the printer driver options have been configured to your satisfaction, click the OK button to save your new configuration and close the Properties window.
Card Printer Printing Preferences

Note • The screen shots shown in this section are for the printer using the USB interface. If you are using the Ethernet interface, the screens will refer to the “Network Printer.”
To access the Card Printer Properties, select Start > Settings > Printers and Faxes. Right click on the Zebra ZXP Card Printer listing, then select Properties.
![Zebra ZXP Series 3 USB Card Printer Printing Pref... Options Zebra ZXP Series 3 Card Printer Settings Paper / Output Orientation: Landscape 180° Rotation: [None] Color Adjustment... Ribbon Type: K. Resin Print on both sides: Yes Front and Back: Front and Back.K Monochrome Conversion: Diffusion Black Panel: Use Always Black Bitmap: On Front Overlay Varnish... Back Overlay Varnish... Head Settings... Printing Mode: Print Copies: 1 OK Cancel Apply](/content/2026/05/844939/images/af09501862b4e1b9f61987d262c9e639abd9decfc56d8a2862979d6e0a21db94.jpg)
• Paper / Output - Sets the layout of card.
- Orientation - Landscape or Portrait printing layout.
- Rotation - Rotate the image 180°. Options are None, Front, Back, and Front Back.
• Color Adjustment - Adjusts color output (Intensity and Contrast).

Note • Printed colors can appear different than displayed colors; the following controls allow you to optimize the printed results.
Allows you to adjust the image colors; these adjustments apply to the entire card, not just photographic image.
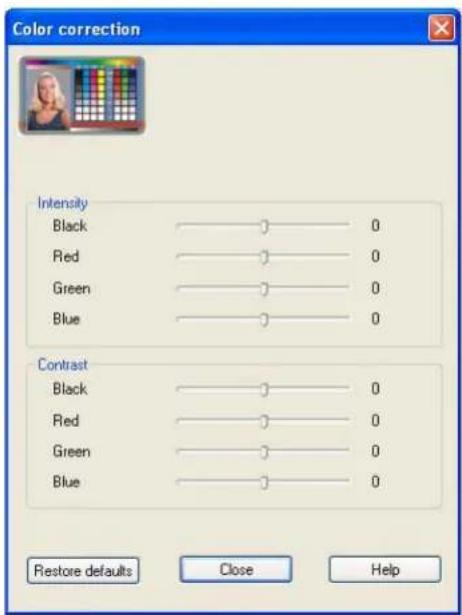
- Intensity - increase or decrease the image intensity by moving the Black, Red, Green, and Blue slider bars left or right. This will change the overall lightness or darkness of the image. Move the slider to the right (0 to 100) to increase the intensity and to the left (0 to -100) to decrease the intensity. Note that color ribbon wrinkling can be eliminated by reducing the intensity.
- Contrast - increase or decrease the image contrast by moving the Black, Red, Green, and Blue slider bars left or right. This magnifies or minimizes the difference between the light and dark parts of the image. Move the sliders to the right (0 to 100) to increase the contrast and to the left (0 to -100) to decrease the contrast.
Use the Restore Defaults button to reset the settings to the driver defaults.
Ribbon Type - Displays type of ribbon installed in printer.
Click on the Printer/Ribbon Details button to see the Device Information window:
• Print on both sides - Selection for single-sided or dual-sided printing.
- Front and Back - Feature selection for dual sided printing.
Choices are based on ribbon type; for example:
YMCKOK
• YMCKO on Front, K on Back
• YMCKO on Front, YMCKO on Back
YMCKO
• YMCKO on Front, YMCKO on Back
• YMCO on Front, K on Back
- Monochrome Conversion - Specifies the method of monochrome conversion used in printing. Different selections have different effects on the way the image is printed.
The options are:
• Diffusion
- Halftone Regular
- Barcode
- Black Panel - Defines how black panel is applied in a card design.
4 selections:
- Do Not Use - K panel not used
- Use Always - all black pixels will go to K panel
- Text Only - only black text goes to K panel
- Except in Color Picture - all black pixels except bitmap goes to K panel
- Black Bitmap - Applies black bitmap option, On or Off.
- Front Overlay Varnish - Feature selection for applying overlay varnish ribbon to front of card. Default setting is full edge-to-edge varnish.
There are various varnish options. A preview pane is shown for each selection.
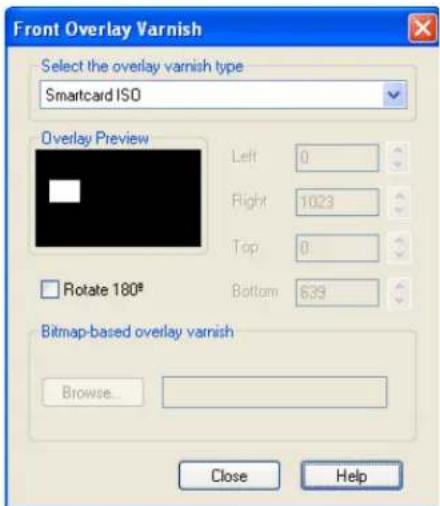
- Full overlay varnish - Applies an edge-to-edge overlay.
- No overlay - Does not apply any overlay.
- Selected area overlay varnish - Applies an overlay only in the area selected by user.
- Selected area blank - Applies an overlay only outside the area selected by user.
- Bitmap-based overlay varnish - Applies a user-defined bitmap in the overlay panel.
- Smartcard ISO - Does not apply an overlay in the area of the ISO standard smart card contacts; see figure above.
- Smartcard AFNOR - Does not apply an overlay in the area of the AFNOR standard smart card contacts.
- Magnetic Stripe - Does not apply an overlay in the area of the ISO standard magnetic stripe.
- Back Overlay Varnish - Feature selection for applying an overlay varnish ribbon to the back of a card. Default setting is full edge-to-edge varnish.
There are various varnish options. A preview pane is shown for each selection.
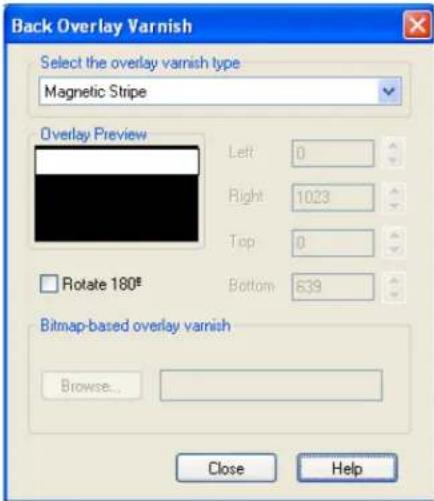
- Full overlay varnish - Applies an edge-to-edge overlay.
- No overlay - Does not apply any overlay.
- Selected area overlay varnish - Applies an overlay only in the area selected by user.
- Selected area blank - Applies an overlay only outside the area selected by user.
- Bitmap-based overlay varnish - Applies a user-defined bitmap in the overlay panel.
- Smartcard ISO - Docs not apply an overlay in the area of the ISO standard smart card contacts.
- Smartcard AFNOR - Does not apply an overlay in the area of the AFNOR standard smart card contacts.
- Magnetic Stripe - Does not apply an overlay in the area of the ISO standard magnetic stripe.
- Head Settings - Setting for heat adjustments on the print head. Adjustments can be made to the Contrast and Intensity.
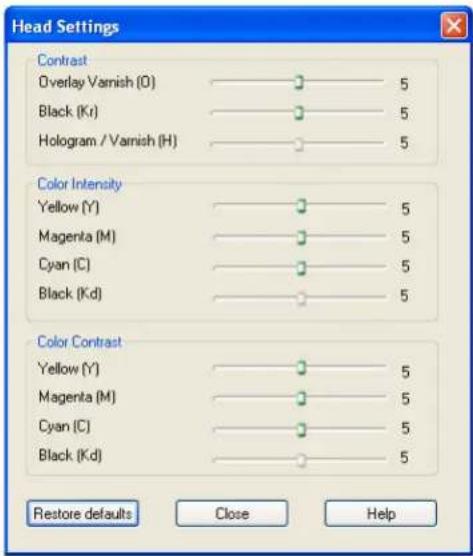
Head settings can be changed to adjust the monochrome contrast, color intensity, and color contrast. Changes made to head settings will change color quality of printed images. These adjustments directly affect the heating levels used by the printer, for each of the individual panels on a print ribbon.
- Contrast - adjusts the black and overlay contrast from 0 to 10.
- Color Intensity - adjusts the intensity of each color from 0 to 10.
- Color Contrast - adjusts the contrast of each color from 0 to 10.
Click on the Restore defaults button to reset the settings to the factory default values.
- Printing Mode - Feature selection for type of printing required:
- Encode Only (use this when magnetic encoding is the only function desired, printing will not occur).
- Print and Encode on same side
- Copies - Sets the number of copies of cards printed.
natural_image
Close-up of a handheld electronic device with black and white casing (no visible text or symbols)Cleaning the System

Caution • PROTECT YOUR FACTORY WARRANTY!
The recommended maintenance procedures must be performed to maintain your factory warranty. Other than the recommended cleaning procedures described in this manual, allow only Zebra authorized technicians to service the ZXP Series 3 Card Printer.
NEVER loosen, tighten, adjust, or bend, etc., a part or cable inside the printer.
NEVER use a high-pressure air compressor to remove particles in the printer.
Your Printer includes a simple cleaning system using Pre-Saturated Cleaning Cards provided. The regular use of these cards will clean and maintain important parts of your printer that cannot be reached: including Printhead, the Transport Rollers, and the Magnetic Encoder Station (optional feature).
When to Clean
Clean the Printer when:
- Print quality has been degraded.
• The LCD panel displays the message CLEAN PRINTER.
How to Clean
Step 1. Place the printer power switch in the ON ( | ) position, and then press and hold the Multi-Function Control Button for 5 seconds.
Step 2. When the cleaning cycle is initiated, the LCD message REMOVE RIBBON THEN CLOSE LID will display.
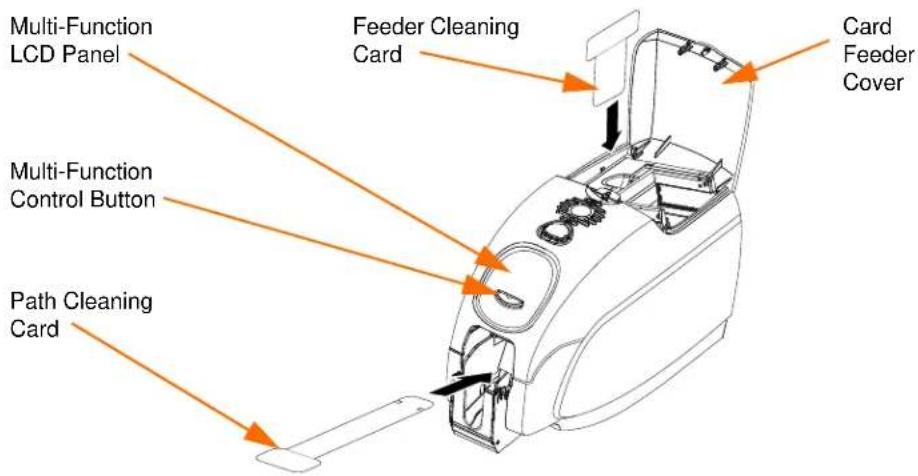
Step 3. After the ribbon is removed and the lid is closed, the message EMPTY FEEDER THEN CLOSE COVER will display.
Step 4. If the lid is opened and closed without removing the ribbon, the REMOVE RIBBON THEN CLOSE LID message will remain.
Step 5. Once the ribbon is removed and the cover is closed, the firmware will eject any card inside the printer. The message EJECTING CARD will display.
Step 6. The LCD will display FEED LONG CLEANING CARD. When the presence of the cleaning card is sensed, the rollers will take the card into the printer.
Step 7. When the cleaning process is done, the printer will eject the cleaning card. If the card sensor still senses the cleaning card, the message REMOVE LONG CLEANING CARD will display.
Step 8. Once the long cleaning card is no longer sensed by the card exit sensor, the message INSERT FEEDER CLEANING CARD will display. Open the feeder cover, and insert the feeder cleaning card.
Step 9. When the feeder cleaning card has been sensed by the feeder card sensor, the message CLOSE FEEDER COVER will display.
Step 10. When feeder cleaning is complete, the message REMOVE FEEDER CLEANING CARD will display.
Step 11. After the card is removed, the LCD will display READY. You may now reload the ribbon and cards and continue printing.
Cleaning the Printhead
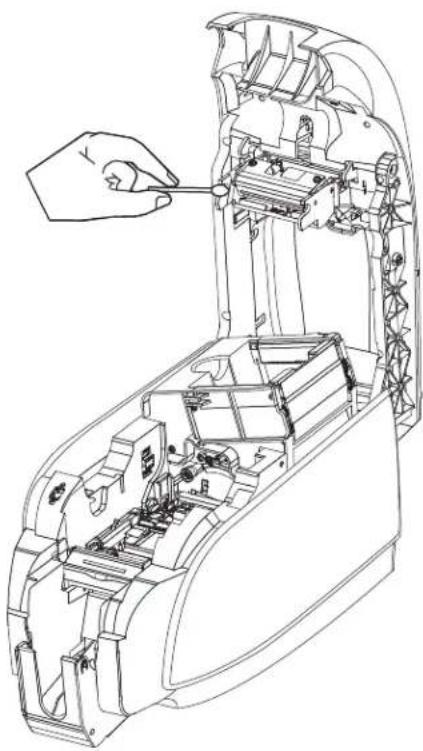
Use of the cleaning cards will normally do an adequate job of cleaning the printer. However, a separate Printhead cleaning, using swabs, can remove more stubborn deposits when print anomalies persist. To avoid deposits, only use foam-tipped swabs.

Caution • Never use a sharp object to scrape deposits from the printhead. Permanent damage to the printhead will result
Step 1. Place the printer power switch in the OFF (O) position.
Step 2. Open the printer lid by pressing the cover release button, and open the cover fully to reveal the Printhead mounted on the inside of the cover.
natural_image
Technical line drawing of a mechanical device interior with a hand adjusting the component (no text or symbols present)Step 3. Clean the Printhead by moving an alcohol-moistened swab tip side-to-side across the Printhead elements. Only use moderate force.
Step 4. Allow two to three minutes for the printhead to dry before placing the printer power switch in the ON ( | ) position.
Step 5. To reorder swabs, refer to the Media List on the Windows Drivers and User Documentation CD supplied with this printer.
natural_image
Close-up of a handheld electronic device with black and white casing (no visible text or symbols)Troubleshooting

natural_image
Abstract black and white pattern with curved white lines on a black background (no text or symbols)Introduction
The objective of troubleshooting is to relate a problem to an associated assembly or system function, in order to most efficiently isolate and repair the problem. Typically, this involves determining the failure symptom and then checking one or more possible causes of the failure.
In general, for a given failure symptom one or more possible causes are listed, with suggested corrective action to take. These causes should be checked and corrective actions taken in the order given; they are listed in order of likelihood and complexity.
Troubleshooting Procedures
LCD Panel Warnings and Error Messages
The following tables show causes and solutions to symptoms related to improper operation. Check the table when experiencing any loss of operation or print quality.
PANEL WARNINGS (printer will still operate)
| Problem / Symptom Description or Cause Possible Solution | Note | |
| CHECKING RIBBON Printer is determining type of ribbon installed. | No action required -- status message only. | |
| CLEAN PRINTER | Printer cleaning required. | Refer toCleaning the Systemon page 57. |
| CLOSE LID The lid is open. Make sure that the lid is completely | and securely closed. | |
| ENCODING ERROR May be incorrect card type. Check that you are using the correct magnetic card type (for low or high coercivity encoding). | ||
| FLASH ERROR | A flash error occurred. | Reset the Printer, and try printing the card again. |
| INVALID MAGNETIC DATA | The magnetic data may be invalid. | Check data format. |
| READING ERROR | A reading error occurred. | Reset the Printer, and try printing the card again. |
Note: If the problem persists, contact Technical Support; see Worldwide Support on page 109.
ERROR MESSAGES (printer will not operate)
| Problem / Symptom Description or Cause Possible Solution | Note | |
| CHECK RIBBON Wrong type of ribbon | on may be installed. Ribbon for P1XX will not work.Ribbon may be improperly installed. | Install proper ribbon.Reload ribbon cartridge. Refer to Loading Ribbon Cartridge on page 28. |
| COMMAND ERROR | A command error occurred. | Reset the Printer, and try printing the card again. |
| COVER OPEN The cover is open. Make sure | sure that the cover is | completely and securely closed. |
| LID OPEN The lid is open. Make sure | that the lid is completely | and securely closed. |
| MECHANICAL ERROR | Check that you are using the correct card type.Check for card jam.Check that ribbon is loaded correctly. | See Technical Specifications on page 71.Open cover and remove Card Cleaning Cartridge, empty the Card Feeder, and remove the jammed cards.Refer to Loading Ribbon Cartridge on page 28 for details. |
| OUT OF CARDS | Check for cards in the card feeder. | If no cards present, load cards; then press the Panel Button for 1 second. The printing job will restart. |
| OUT OF RIBBON | Check ribbon. May be defective or entirely used. | Load a new ribbon cartridge. Refer to Loading Ribbon Cartridge on page 28 for details. |
| PARAMETERS ERROR | A parameter error occurred. | Reset the Printer, and try printing the card again. |
Note: If the problem persists, contact Technical Support; see Worldwide Support on page 109.
Troubleshooting
Troubleshooting Procedures
Print Quality Issues
This section will help you resolve print quality problems.
The print quality is dependent on several factors. The two most important factors that will increase your print quality are cleanliness and card stock.
To diagnose and fix print quality problems, follow the troubleshooting procedures below:
Small spots 65
Non-printing horizontal lines (white) - - - - - - - - - - - - 66
Pale or inconsistent results - - - - - - - - - - - - - - - - 67
Blurry printed image - - - - - - - - - - - - - - - - - - - 68
No printing 69
Example • Small spots
Small spots appear on the printed card with a non-printed area or a different color.
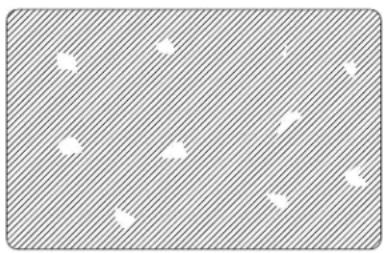
natural_image
Abstract pattern with diagonal striped background and scattered white dots (no text or symbols)Possible Cause:
- Contamination on the card surface.
Solutions:
- Check that cards are stored in a dust free environment.
- Use a different supply of cards.
Possible Cause:
- Dust inside the printer and/or dirty Cleaning Roller.
Solutions:
- Clean the printer. Refer to Cleaning the System on page 57.
- Check that the protective cover was removed from the ribbon cartridge cleaning roller. Refer to Loading Ribbon Cartridge on page 28.
Example • Non-printing horizontal lines (white)
There are non-printing horizontal lines (white) on the card surfaces.
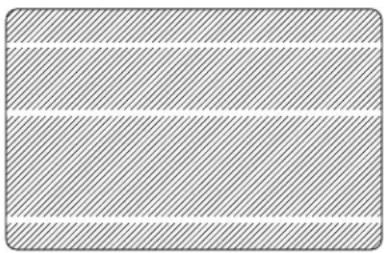
natural_image
Pure geometric pattern with diagonal hatching and horizontal lines, no text or symbols presentPossible Cause:
- Ribbon cartridge is not correctly positioned.
Solutions:
- Ensure that the ribbon is properly rolled onto the ribbon cores of the cartridge and that there are no wrinkles in the ribbon.
- Replace ribbon cartridge. Refer to Loading Ribbon Cartridge on page 28.
Possible Cause:
- Printhead is dirty.
Solutions:
- Clean the Printhead. Refer to Cleaning the Printhead on page 59.
Possible Cause:
- Printhead elements are damaged (e.g., scratched or burnt).
Solutions:
- Call Zebra Customer Service for Printhead replacement information; see Worldwide Support on page 109.
Example • Pale or inconsistent results
Printing shows very pale or inconsistent results.
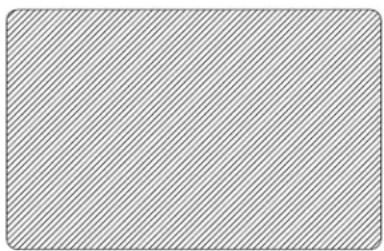
natural_image
Plain rectangular background with diagonal striped pattern (no text or symbols)Possible Cause:
- Ribbon cartridge have been stored improperly or is damaged.
Solution:
- Change ribbon cartridge, and print again. Refer to Loading Ribbon Cartridge on page 28.
Possible Cause:
- Cards may not meet specifications. Refer to Technical Specifications on page 71.
Solution:
- Use a different supply of cards.
Possible Cause:
- Dust or embedded contamination on elements of the Printhead.
Solution:
- Clean the Printhead. Refer to Cleaning the Printhead on page 59.
Possible Cause:
- Printing on wrong side of writable back cards.
Solution:
- Reverse direction of cards in feeder.
Example • Blurry printed image
Printing shows blurry printed image.
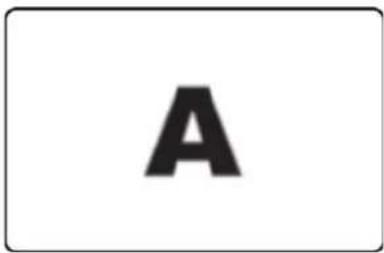
Possible Cause:
- Ribbon cartridge may not be correctly positioned.
Solution:
- Check that the ribbon is properly rolled onto the ribbon cores of the cartridge, with no wrinkles.
- Replace ribbon cartridge, making sure it locks in place, and print again. Refer to Loading Ribbon Cartridge on page 28.
Possible Cause:
- Ribbon may not be synchronized on the correct color panel position.
Solution:
- Open lid, then close lid to synchronize ribbon.
Possible Cause:
• Cards may not meet specifications. Refer to Technical Specifications on page 71.
Solution:
- Use a different supply of cards.
Possible Cause:
- Dust or embedded contamination inside the printer.
Solution:
- Clean the Rollers and the Printhead. Refer to Cleaning the System on page 57 and Cleaning the Printhead on page 59 respectively.
Example • No printing
No printing on the card.
natural_image
Empty white rectangle with black border (no text or symbols)Possible Cause:
- Ribbon cartridge may not be installed in the printer.
Solution:
- Check for ribbon cartridge in the printer. Refer to Loading Ribbon Cartridge on page 28.
Possible Cause:
- Cards may not meet specifications. Refer to Technical Specifications on page 71.
Solution:
- Use a different supply of cards.
Possible Cause:
- Cable on Printhead may be disconnected.
- Printhead elements may be scratched or burnt.
Solution:
- Call Service for Printhead repair or replacement information; see Worldwide Support on page 109.
natural_image
Close-up of a handheld electronic device with black and white casing (no visible text or symbols)Technical Specifications

natural_image
Abstract black and white pattern with curved white lines on a black background (no text or symbols)Printer Specifications
General
• Single-sided and dual-sided printing
- Single card feed capable
- Load-N-Go drop-in ribbon cartridge
• 16-character LCD display
- Wi n ^ Drivers: XP, Server 2003 and 2008, Vista, and Windows 7 (32/64 bits)
• 100-card covered feeder (30 mil card)
• 50-card output hopper (30 mil card)
• 32 MB memory standard
Communications Interfaces
• Standard: USB 2.0 (cable included)
- Optional: Built-in 10/100 Mbps Ethernet
Printing Specifications
• Color dye sublimation or monochrome thermal transfer printing
• 300 dpi (11.8 dots/mm) print resolution
- Single-Sided (Front only)
• 750 card per hour monochrome
• 180 cards per hour card full-color (YMCKO)
• Dual- Sided (Front and Back)
• 140 cards per hour (YMCKO Front, K back)
Ribbon Specifications
- i Series™ intelligent media technology
• YMCKO: 200 cards/roll
• YMCKOK: 165 cards/roll - Monochrome: 1000 cards/roll - black, blue, green, gold, red, or silver
850 cards/roll - white
• 12 Panel YMC Full KO: 250 cards/roll - KdO: 500 cards/roll
- KrO: 500 cards/roll
Cards Compatibility
- Types: PVC, PVC Composite
- Card width/length: ISO CR-80-ISO 7810: 2.125" by 3.375" (54 mm by 86 mm)
- Card thickness: .015" to .040"; for optimum performance, use standard .030" cards
• Magnetic Stripe - ISO 7811
• Smart Card Contact - ISO 7816-1,2,3,4
• Smart Card Contactless MIFARE - ISO 14443A/B
Encoding Options
- Magnetic encoder (30 mil cards only), 3 track HiCo/LoCo: ISO 7811
• Combined PC/SC MIFARE - ISO 14443 (13.56 MHz) and ISO 7816 contact encoder
• Smart Card Contact Station ISO 7816
Optional Features
- CardSense™ single-card feed mode
- Extended product warranty programs
Bar Code
• Code 39, Code 128 B & C with and without check digit
• 2 of 5 and 2 of 5 Interleaved
• UPC-A, EAN 8, and EAN 13
- PDF-417 2D bar code and other symbologies can be printed via Windows drivers
Security
• Kensington security slot
- Optional: Lockable covers on feeder, and print engine compartment
Electrical
- Power Supply
Input: 100 \~ 240 Volts AC, 50 \~ 60 Hz (auto switching)
Output: 24V/4A
- FCC Class A
Dimensions (printer only)
• Height: 9.3 in (235.5 mm)
• Width: 7.9 in (200.7 mm)
• Depth: 14.5 in (367.6 mm)
• Weight: 12.2 lbs (5.53 kg)
Environmental
- Operating Temperature: 60^ to 86^ (15°C to 30°C)
- Operating Relative Humidity: 20% to 65% non-condensing
- Storage Temperature: 23^ to 158^ (-5°C to 70°C)
• Storage Relative Humidity: 20% to 70% non-condensing
Agency Approvals
Zebra ZXP Series 3 Card Printer complies with following applicable directives and standards for the ITE: Residential, Commercial & Light Industry environments
• For US/Canada/Mexico/Australia&NZ
- FCC Class A, cfr47, Part 15 Subpart J
- FCC 15.257 2008, Part 15 Subpart C
- Canadian STD RSS-210
- NOM-ETL (Mexico)
- EN60950: 2000 Safety Standard (TUV & RTL)
- C-Tick (Australia) Electromagnetic Radiation Standard
• For Europe :
- Applicable Directives and Supporting Standards: 2004/108/EC EMC Directive, EN55022:2006 + AD:2007 Class A, EN55024:1998 + AD1:2001 + AD2:2003, EN61000-3-2:2006, EN61000-3-3:2008, 2006/95/EC LVD Directive, EN60950-1:2006 + A11, CB Scheme
- RFID Enabled Applicable Directives and Supporting Standards: 99/5/EC R&TTE Directive, EN 301 489-3 V1.4.1, EN 300 330 V1.5.1
ISO Standard Card Dimensions
Dimensions for Plain Card ISO Standard 7810
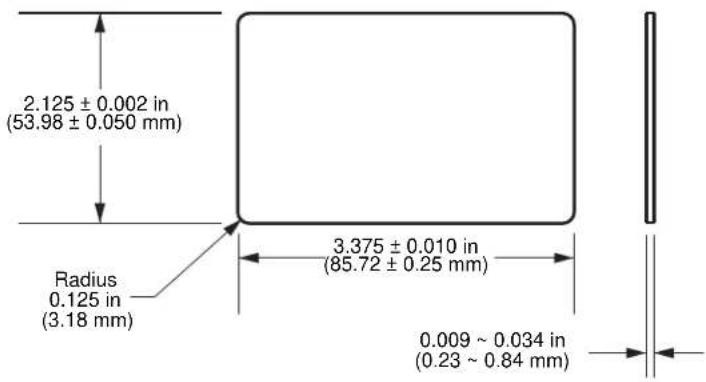
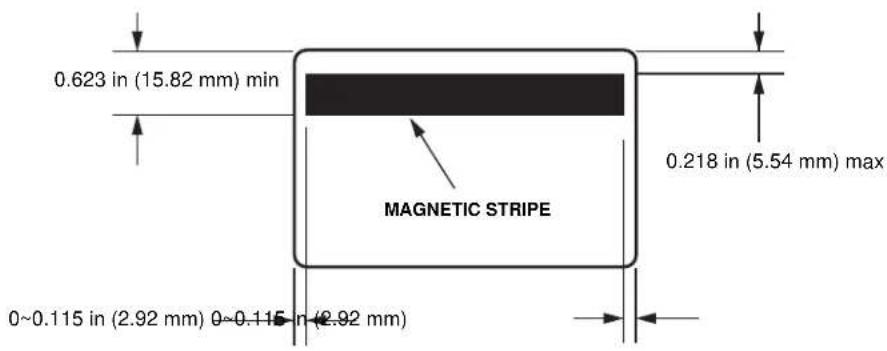
Dimensions for Magnetic Stripe Card ISO Standard 7811
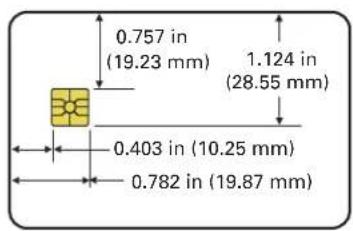
Contact Location for Smart Card ISO Standard 7816
other
| Dimension | Value (in mm) | | :--- | :--- | | Total Length | 0.757 | | Height | 19.23 | | Top Diameter | 0.403 | | Top Segment Width | 10.25 | | Top Segment Thickness | 0.782 | | Top Segment Total Length | 1.124 | | Total Total Length | 28.55 | | Total Total Thickness | 19.87 |Declarations of Conformity
CE
| 89/336/EECmodified by92/31/EEC and93/68/EEC | EMC Directive EN | 55022 (1998) RF Emissions control | |
| EMC Directive EN | 301489-3 V1.4.1 | RF Emissions and Immunity for radio equipment | |
| EMC Directive EN | 55024 (2001) | Immunity to Electro-Magnetic Disturbances | |
| 73/23/EEC modifiedby 93/68/EEC | Low voltageDirective | EN 60950-1 (2001) Product safety | |
| 1999/5/CE R&TTE Directive EN300330-2 V1.1.1 Radio Frequency Interferences | |||
For a formal certificate, please contact the Compliance Office at Zebra's Camarillo facility.
EUROPE: Norway Only: This product is also designed for IT power system with phase-to-phase voltage 230V. Earth grounding is via the polarized, 3-wire power cord.
The ZXP Series 3 has been tested and found to comply with the limits for a Class A digital device, pursuant to Part 15 of the FCC Rules. These limits are designed to provide reasonable protection against harmful interference when the equipment is operated in a commercial environment. This equipment generates, uses, and can radiate radio frequency energy and, if not installed and operated in accordance with the User's Manual, may cause harmful interference to radio communications. Operation of this equipment in a residential area is likely to cause harmful interference in which case the user will be required to correct the interference at his own expense.
Pursuant to Part 15.21 of the FCC Rules, any changes or modifications to this equipment not expressly approved by Zebra may cause harmful interference and void the FCC authorization to operate this equipment.
FCC Radiation Exposure Statement (applicable to 15.247 device only)
This equipment complices with FCC radiation exposure limits set forth for an uncontrolled environment. This equipment should be installed and operated with minimum 20 cm between the radiator and your body. This transmitter must not be collocated or operating in conjunction with any other antenna or transmitter unless authorized to do so by the FCC.
Industry Canada Notice
This device complies with Industry Canada ICES-003 class A requirements.
Japanese Notification
natural_image
Abstract black and white pattern with curved white lines on a black background (no text or symbols)Introduction
This section covers:
Network Configurations 78
Setting Up a Network Printer 80
Printer Pooling 87
Network Configurations
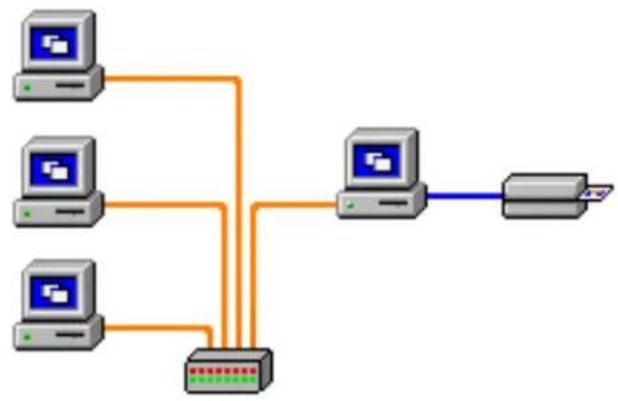
Printer Sharing
In printer sharing, the printer is connected locally to the host computer and configured to be shared to other client computers.
Client computers connect to the printer over the network through the host computer.
flowchart
graph TD
    A["Computer 1"] --> D["Router"]
    B["Computer 2"] --> D["Router"]
    C["Computer 3"] --> D["Router"]
    D["Router"] --> E["Printer"]
    style A fill:#f9f,stroke:#333
    style B fill:#f9f,stroke:#333
    style C fill:#f9f,stroke:#333
    style E fill:#ccf,stroke:#333
External Print Server
An external print server is a stand-alone device that acts as a server on the network specifically for receiving print jobs and passing them to the printer.
Client computers connect to the print server over a network.
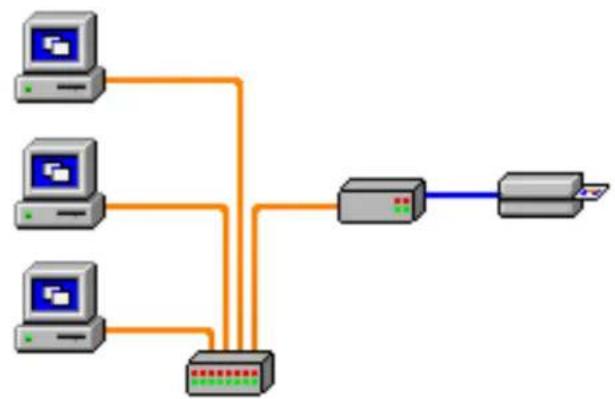
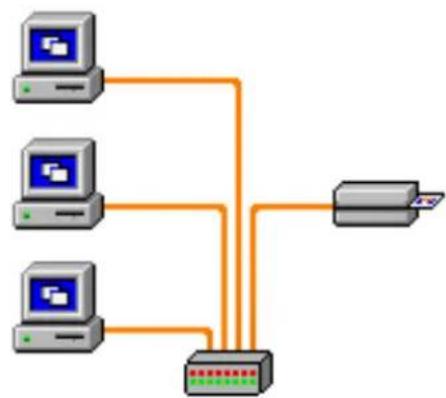
An internal print server is similar to an external print server, except the print server is integrated into the printer. This removes the need for a separate power supply and separate device drivers.
This is the simplest way to network a printer.
Use this procedure if you have already installed an ethernet printer on your system (refer to Section 2), and you want to install a second ethernet printer on the network via the Microsoft Add Printer Wizard.
Step 1. Click on the Start button, then select Settings > Printers and Faxes.
Step 2. Click on the Add a printer option in the Printer Tasks sidebar.
Step 3. Observe the Add Printer Wizard window.
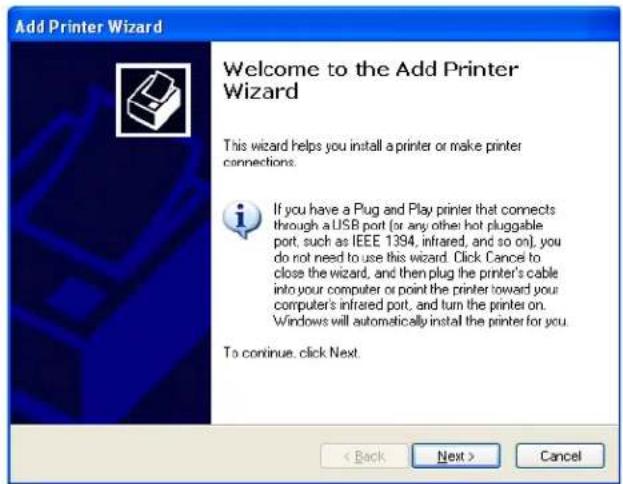
Step 4. Click on the Next button, and observe the Local or Network Printer window.
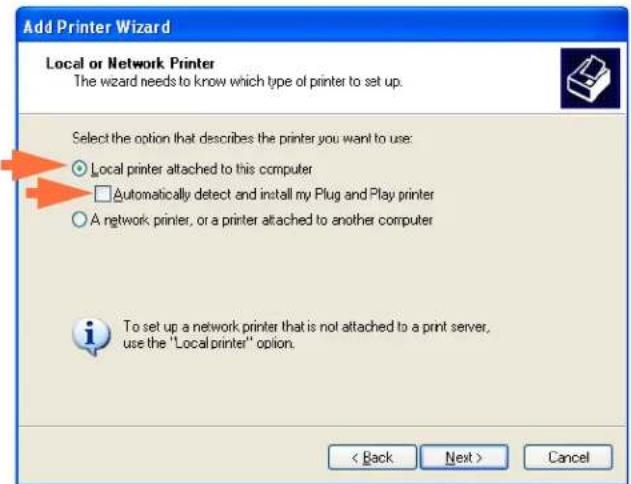
Step 5. Select Local printer attached to this computer. Ensure Automatically detect and install my Plug and Play printer is NOT checked.
Step 6. Click on the Next button
Step 7. Observe the Select a Printer Port window.
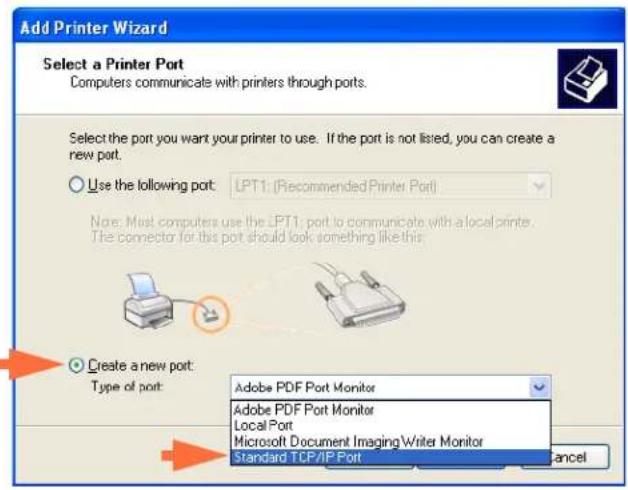
Step 8. Click on the Create a new port radio button.
Step 9. From the dropdown menu, select Standard TCP/IP Port.
Step 10. Click on the Next button, and observe the Add Standard TCP/IP Port Wizard window.
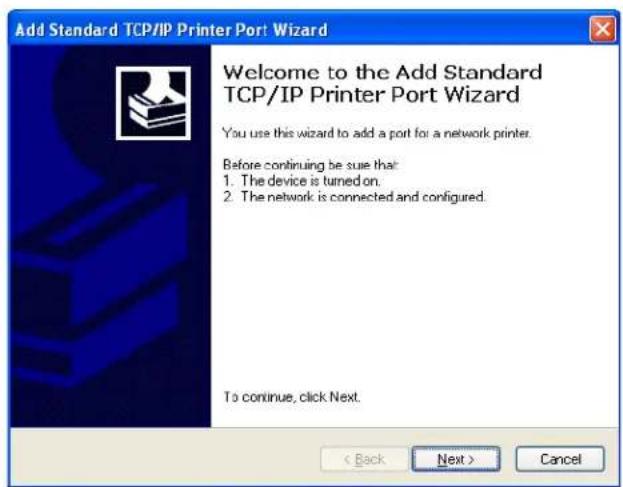
Step 11. Be sure that your printer is turned on, and the network is connected and configured.
Step 12. Click on the Next button.
Step 13. Observe a second Add Standard TCP/IP Port Wizard window.
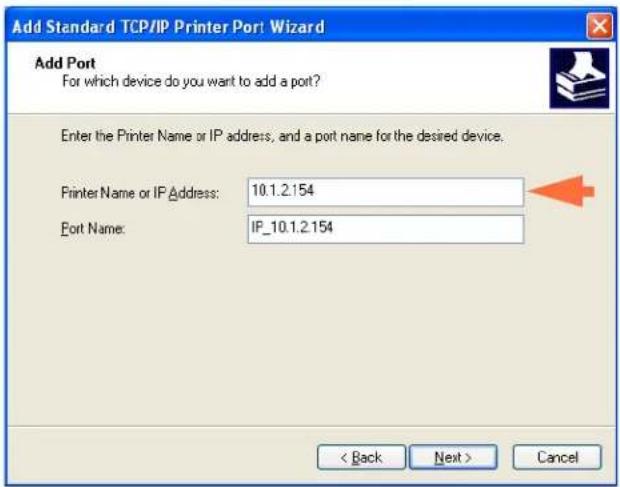
Step 14. Enter the IP Address of your printer. Note that the Port Name will automatically be filled in when you enter the IP Address. Do not change the Port Name.
Step 15. Click on the Next button, and observe the Additional Port Information Required window.
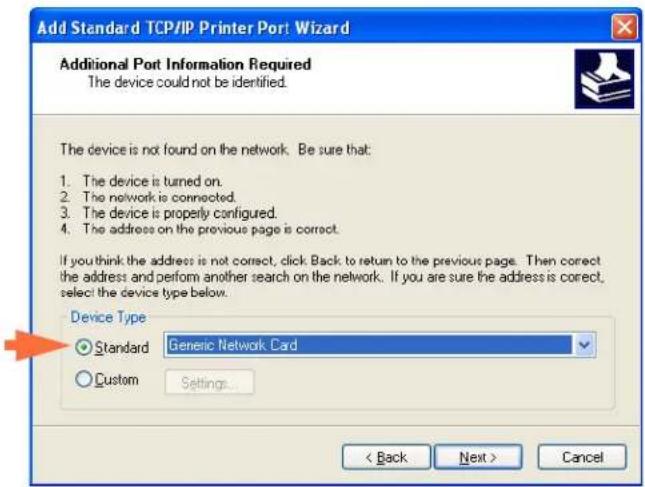
Step 16. Click on the Standard radio button; and from the dropdown menu, select Generic Network Card.
Step 17. Click on the Next button.
Step 18. Observe the Completing the Add Standard TCP/IP Printer Port Wizard window.
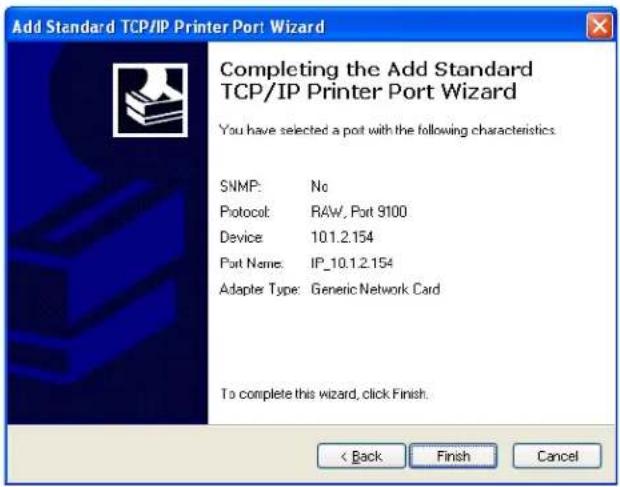
Step 19. Click on the Finish button, and observe the Install Printer Software window.
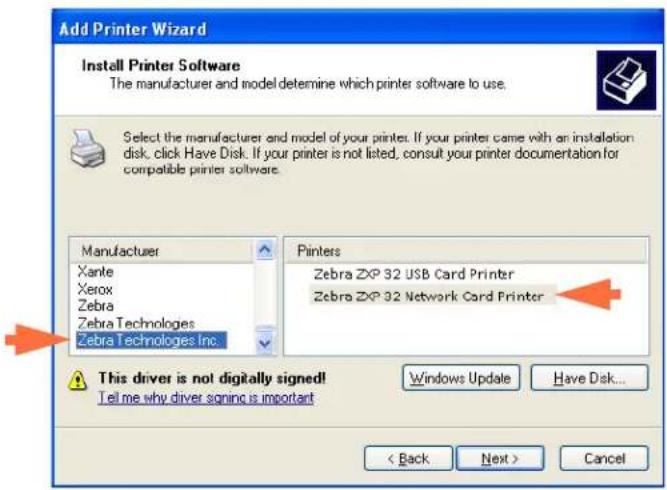
Step 20. Select the Manufacturer and the Printer.
Step 21. Click on the Next button.
Step 22. Observe the Use Existing Driver window.
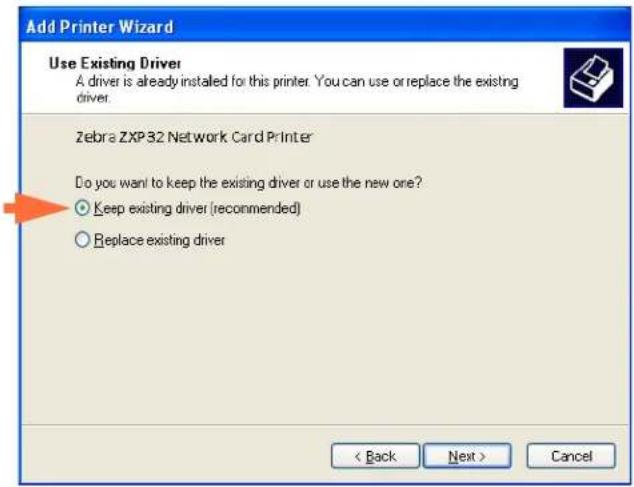
Step 23. Select the Keep existing driver radio button.
Step 24. Click the Next button, and observe the Name Your Printer window.
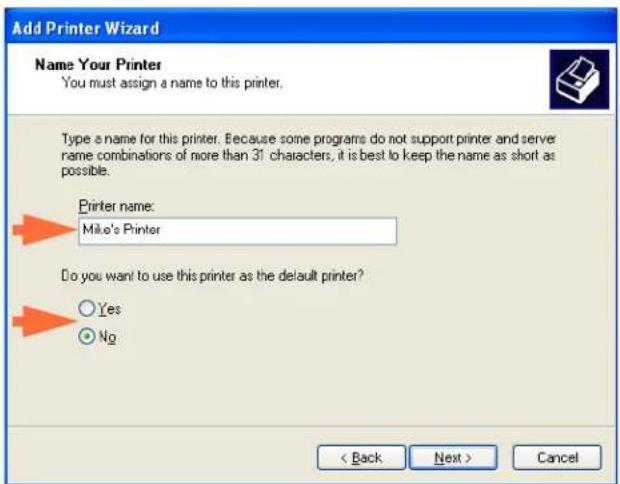
Step 25. Enter the printer name, use the default name, or add more information to indicate the printer location; e.g., Mike's Office, Hallway, Room 33, etc.
Step 26. Select the appropriate radio button in answer to the question Do you want to use this printer as the default printer?
Step 27. Click the Next button.
Step 28. Observe the Printer Sharing window.
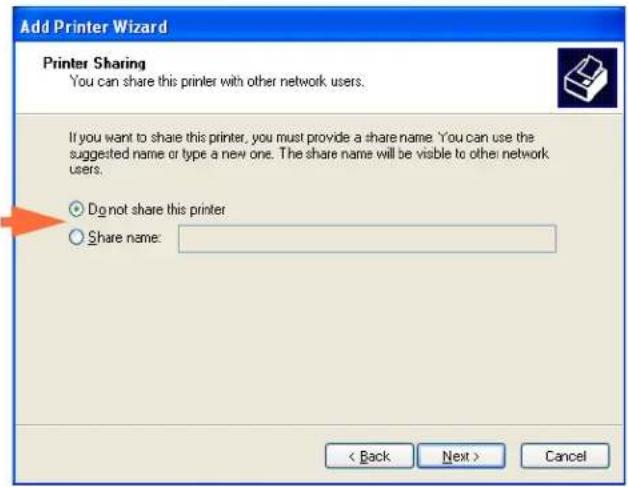
Step 29. Select the appropriate radio button in answer to the question Do you want to share this printer...? Enter the Share name if applicable.
Step 30. Click the Next button, and observe the Print Test Page window.
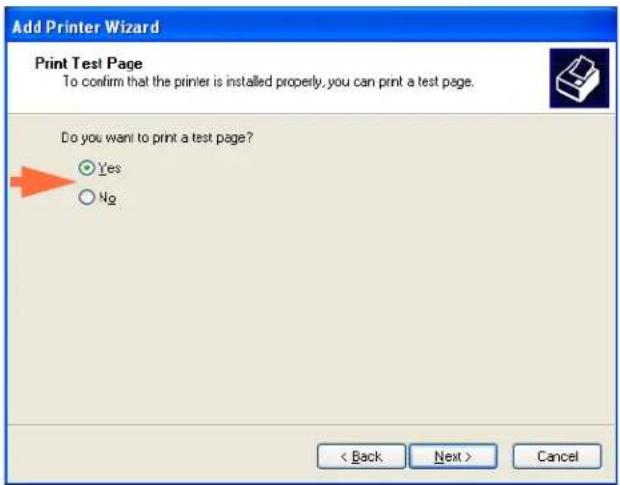
Step 31. Select the appropriate radio button in answer to the question Do you want to print a test page?
Step 32. Click the Next button.
Step 33. Observe the Completing the Add Printer Wizard window.
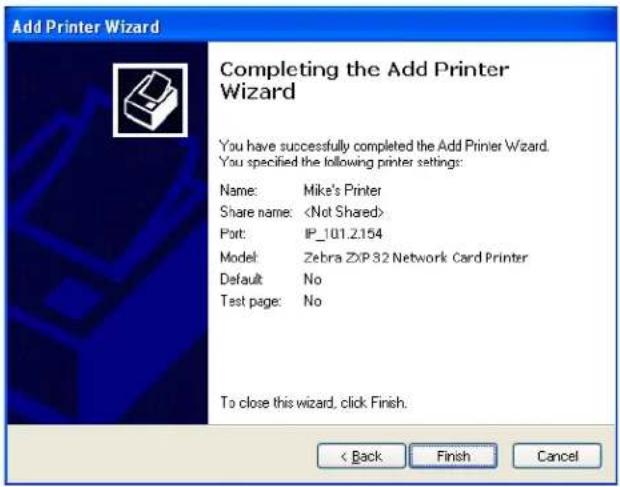
Step 34. Click on the Finish button to complete the Add Printer Wizard.
You have successfully installed the network printer.
Printer Pooling
Setting Up Printer Pooling
Printer Pooling is a standard feature of Windows, which lets you spread the printed output across a pool of several printers. In this example, we will install and setup the three network printers to be used for pooling.
Step 1. Before proceeding to pool the printers, test them individually, and be sure they are configured similarly. Specifically, check the following:
- Ribbon panel configuration (ribbon type, and what prints on which side of the card).
- Mag encoding configuration.
- Black extraction configuration (if applicable).
Step 2. Access the Ports Tab.
To access the Ports tab, select Start > Settings > Printers and Faxes. Right click on the Zebra ZXP Series 3 USB Card Printer listing. Select Properties > Ports.
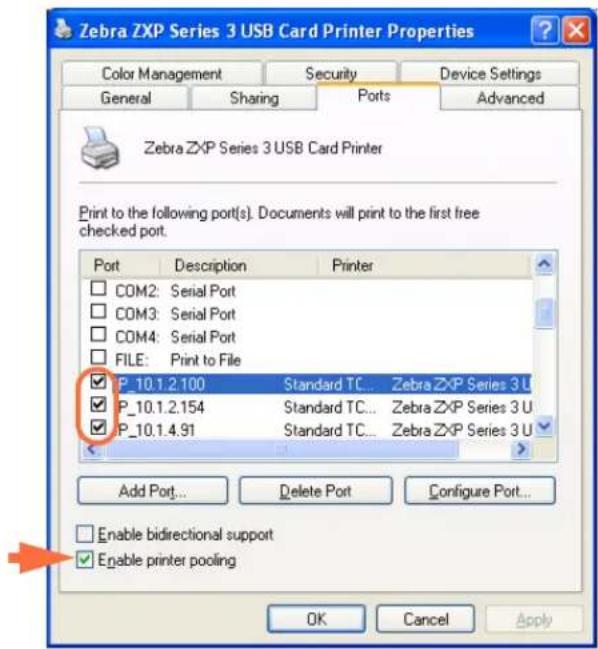
Step 3. Select the Enable printer pooling checkbox (arrow above).
Step 4. Select the three printers by selecting the associated checkbox (circle above).
Using the Printer Pool

Important • Send print jobs to the printer pool, not to an individual printer.
When the first printer has taken as many jobs as it can handle (that being two jobs - one to be printed immediately, the other waiting), the following jobs “spill over” to the second printer, and then to the third printer.
Note that if you are only printing two jobs, they would both go to the first printer. Pooling is a spill-over methodology. It does not balance printer usage.
Once the pool has been set up, maintenance and configuration changes should be done through the menus for each individual printer, not through the pool (which can produce undesirable results).

Important • The effect of any maintenance and/or changes can (and should) be tested by sending print jobs separately to each printer, not to the pool.
Appendix B
Magnetic Encoder Option

natural_image
Abstract black and white pattern with curved white and black shapes (no text or symbols)Introduction
This section contains information on the additional operations of the ZXP Series 3 Card Printer with an optional Magnetic Encoder.
This section covers:
Driver Settings 90
Media Loading Orientation....92
Magnetic Encoder Cleaning 92
Magnetic Encoding Type 93
Driver Settings
Encoder Settings
The Encoder Settings dialog box is used for setting various Magnetic Encoder parameters. This feature is not enabled if the printer does not have the magnetic encoder option.
To access the Encoder Settings dialog box, select Start > Settings > Printers and Faxes. Right click on the Zebra ZXP Card Printer listing; then select Properties > Device Settings > Encoder Settings.
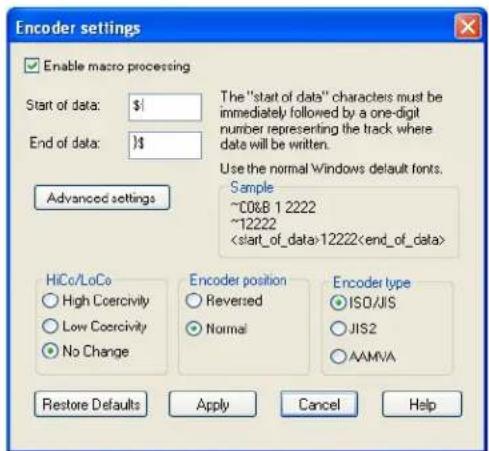
- Enable macro processing - This option will allow you to choose the encoding preamble.
- Start of data - Beginning of the data string for the encoder. Note that Start of Data characters must be immediately followed by a one-digit number representing desired track where the data will be written. Use the normal Windows default fonts.
• End of data - Ending of the data string for the encoder.
- HiCo/LoCo - Select the type of coercivity of magnetic stripe cards to be used. Coercivity is a measurement of a material's resistance to being magnetized. Low coercivity material magnetizes easier than high coercivity material.
- Encoder position - Select the printer encoder position between Reversed and Normal. Reversed is not supported by this printer.
- Encoder type - Select the type of encoder. JIS2 and AAMVA are not supported by this printer.
Click on the Advanced Settings button for additional encoding options; see Advanced Settings on page 91.
Advanced Settings
The Advanced Settings dialog box is used for primarily for Non-ISO encoding. You can make Track and Track Settings, but the other settings (Start/Stop Character, Encoding Start Position, Character Parity, and LRC Parity) are enabled only when a 3 bit, 4 bit, 5 bit, 6 bit, or 7 bit Track Setting is selected.
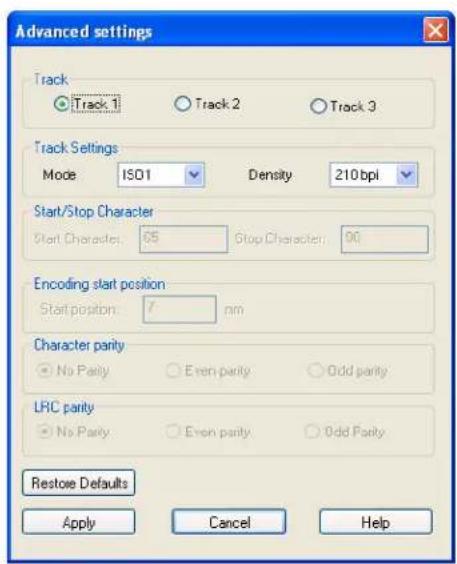
- Track: Select the track you want to configure.
- Track Settings: Select the Mode (ISO1, ISO2, ISO3, 3 bit, 4 bit, 5 bit, 6 bit, or 7 bit) and Density (75 bpi or 210 bpi) for the tracks.
- Start/Stop Character (For Non-ISO encoding only): Enter an ASCII value for the Start and Stop characters.
- Encoding Start Position (For Non-ISO encoding only): Enter the encoding start position in millimeters (mm).
- Character Parity (For Non-ISO encoding only): Choose the Character Parity you want to work with -- No parity, Even parity, or Odd parity.
- LRC Parity (For Non-ISO encoding only): Choose the LRC Parity you want to work with -- No parity, Even parity, or Odd parity.
Click the Restore Defaults button to reset the settings to the original values.
Media Loading Orientation

Caution • ONLY USE cards that comply with ISO 7810 & 7811 standards for magnetic stripe cards. The magnetic stripe must be flush to the surface of the card to work properly. Never use cards which have taped-on magnetic stripes.

Note • Zebra-approved HiCo & LoCo PVC cards are available. (Reference ZXP Series 3 Card Printer Media List.)
When loading cards with magnetic stripes into the card feeder, please ensure that the magnetic stripe is facing the left side of the printer, and closest to the bottom edge of the card feeder.
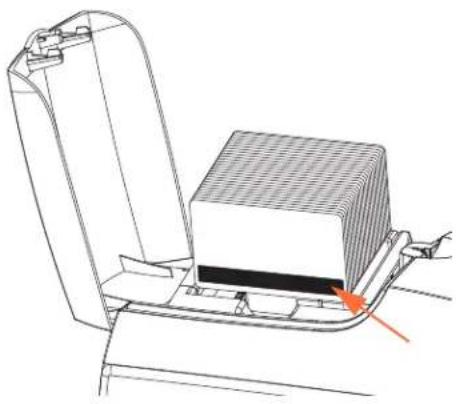
natural_image
Technical line drawing of a mechanical component with an orange arrow pointing to a textured area (no text or symbols)Magnetic Encoder Cleaning
Use the standard cleaning card process as described in Section 5, Cleaning. This cleans the most important parts of the printer; including the Printhead, Transport Roller, and Magnetic Stripe Encoder.
Magnetic Encoding Type
ISO (Default)
The encoder reads and writes standard ISO track data formats in standard ISO track locations. The following shows the three standard ISO tracks.
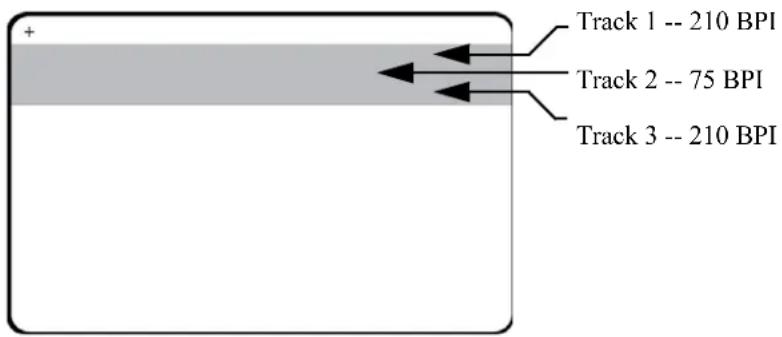
Each track can be encoded and decoded with ASCII characters in the standard default ISO data formats:
| Track Density (BPI) | Bits per character | Character parity | Length (characters) | LRC parity | Start sentinel | End sentinel | Start sentinel offset |
| 1 210 7 Odd 76 Even % ? 0.293" (7.4 mm) | |||||||
| 2 | 75 | 5 | Odd | 37 | Even | ; | ? 0.293" (7.4 mm) |
| 3 | 210 | 5 | Odd | 104 | Even | ; | ? 0.293" (7.4 mm) |
The magnetic encoder can read or encode up to 3 tracks of digital information onto CR-80 cards incorporating a HiCo or LoCo magnetic stripe in the ISO 7811 format.
Encoding for the three tracks uses the ISO 7811 format.
- Track 1 uses 210 BPI (bits per inch) encoding in the International Air Transport Association (IATA) format of 79 alphanumeric characters, at 7 bits per character.
- Track 2 uses 75 BPI encoding to store 40 numeric characters at 5 bits per character in American Banking Association (ABA) format.
- Track 3 uses 210 BPI encoding of 107 numeric characters at 5 bits per character in THRIFT format.
The ISO data formats include a preamble (all zeros), a start character, data (7-bit or 5-bit as specified by ISO), a stop character, and a longitudinal redundancy check (LRC) character. The 7-bit data format has 6 bits of encoded data and a parity bit. The 5-bit data format has 4 bits of encoded data and a parity bit.
The ISO data formats include a data field separator (or delimiter) that allows parsing of the encoded track data. An example of separate data fields would be the ABA data format (Track 2) that includes a Primary Account Number (PAN) field and an account information field (for expiration date, country code, etc.).
AAMVA
The data stored on magnetic stripes on American driver's licenses is specified by the American Association of Motor Vehicle Administrators (AAMVA).
Alpha-numeric characters on Tracks 1 and 3, numerals only on Track 2.
| Track Density(bits per inch) | Bits per character | Character parity | Length (characters) | LRC parity | Start sentinel | End sentinel | Start sentinel offset inches (mm) |
| 1 210 7 Odd 79 Even % ? 0.293" (7.4) | |||||||
| 2 | 75 | 5 | Odd | 37 | Even | ; | ? 0.293" (7.4) |
| 3 210 7 Odd 79 Even % ? 0.293" (7.4) | |||||||
CUSTOM
If a custom format is desired, the ISO standard format may be used as a starting point. The standard format can then be modified by assigning different values to any or all of the density, character, and sentinel attributes. (If any of these attributes is missing, its corresponding value in the standard ISO format will be substituted.)
BINARY
The binary option allows the user to specify directly the value for each bit on the mag stripe:.
In this “direct binary” mode, it is the host’s responsibility to fully populate the magnetic stripe; i.e., the hex data provided by the host must include the leading zeroes, start sentinel, data, end sentinel, LRC, and trailing zeroes. Note that the magnetic stripe is encoded from the right-hand end as viewed from the “stripe” side, with the stripe uppermost. The least significant bit of the data is encoded first.
A sufficient number of leading zeroes should be prepended to offset the start sentinel by approximately 0.3" (7.5 mm) from the right-hand end, as in the ISO format. Care should be taken to ensure that the payload data does not exceed the capacity of the tracks at their specified recording densities. (In the binary mode, out-of-range data is not recorded, and no error condition will result.)
A CR-80 size card has a nominal capacity of 252 bits per track at 75 BPI, and 708 bits at 210 BPI. These capacities equate approximately to 31 hex bytes (248 binary bits) and 88 hex bytes respectively.
APPENDIX C
Smart Card Options

natural_image
Abstract black and white pattern with curved white lines on a black background (no text or symbols)Introduction
This Appendix contains information on the additional operations of a Printer equipped with one or more of the available Smart Card options
Smart Cards can have a built-in microcomputer and/or memory to store fingerprints, voice recognition patterns, medical records, and other such data. All other printer operations remain the same as the standard models.
This section covers:
Output Hopper....96
Contact Smart Cards 97
Contactless Smart Cards 98
Contact Station 99
Output Hopper
The Output Hopper is positioned on the front of the Printer and receives the printed cards.
Step 1. Install the Output Hopper by inserting the four tabs on the hopper into the four slots on the front of the Printer.
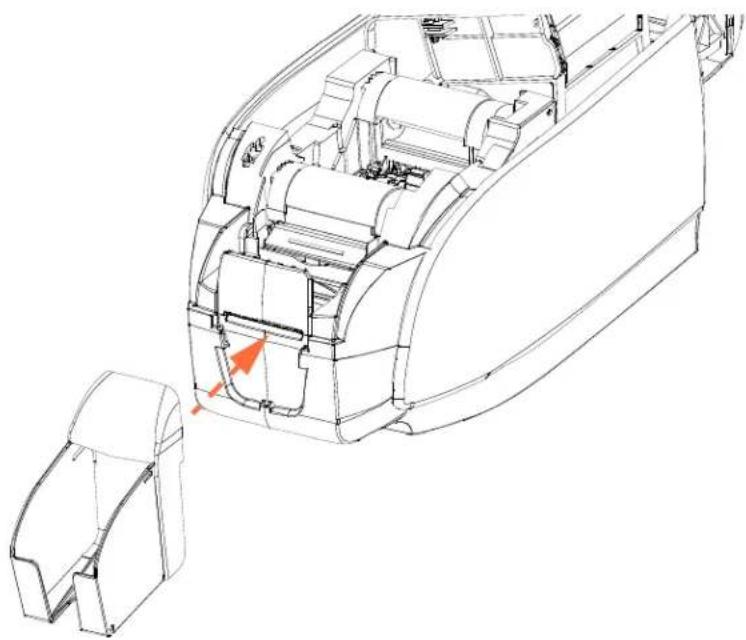
natural_image
Technical line drawing of a mechanical assembly with internal components and a separate housing (no text or symbols)Step 2. Ensure that the Output Hopper locks securely in place.
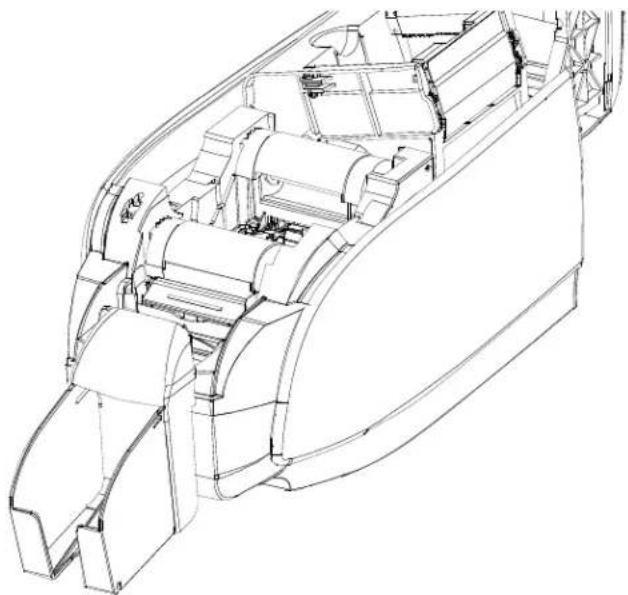
natural_image
Technical line drawing of a mechanical device interior (no text or symbols)Contact Smart Cards
Contact Smart Cards have a pad of contacts on the surface of the card that connects to the circuitry embedded into the card.
Encoding data onto Smart Cards and reading the data previously encoded on them is totally under control of the application software; no operator action is required. If you experience any problems with encoding or reading data, refer to the users manual or other documentation for the application software.
All other printer operations remain the same as the standard models.
Media Loading Orientation for Contact Smart Cards
Place the cards in the Input Hopper in the correct orientation with the gold-plated Smart Card contacts at the top surface of the cards as shown. Ensure that the cards are seated properly in the hopper.
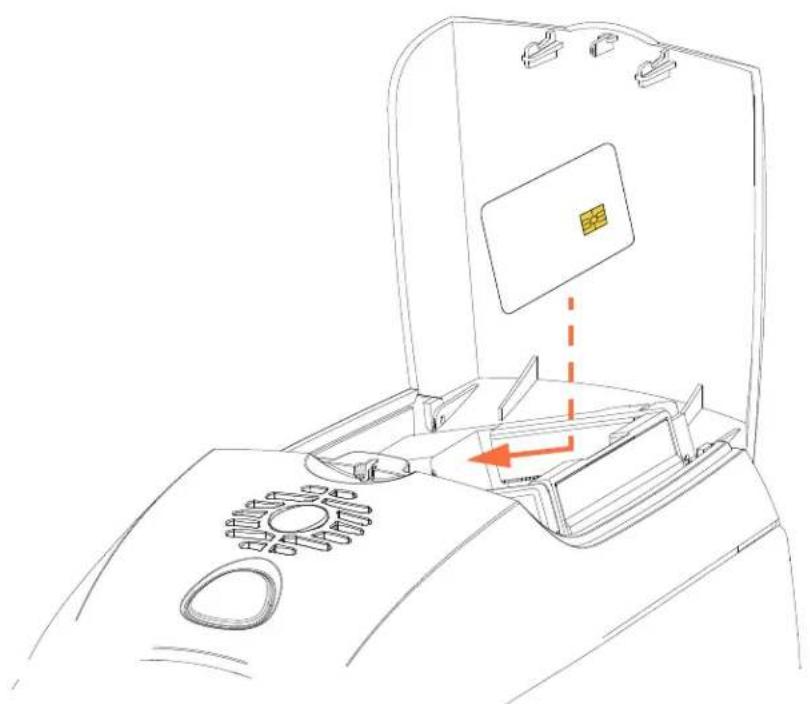
natural_image
Line drawing of a device interior with labeled components and an orange arrow indicating direction (no text or symbols present)Printing on Contact Smart Cards
When designing material to be printed on Contact Smart Cards, be sure the printing will not be on the contact area.
Contactless Smart Cards
Rather than using a contact pad, Contactless Smart Cards use various short-range radio technologies to “connect” to the printer. The printer moves the card to an antenna location on the card path, and the encoding or decoding occurs.
All other printer operations remain the same.
Media Loading Orientation for Contactless Smart Cards
For Contactless Smart Cards, orientation is not a consideration.
Printing on Contactless Smart Cards
When designing material to be printed on Contactless Smart Cards, be sure the printing will not be on the smart chip area; i.e., the printing on either side of the card must not be on top of or underneath the smart chip area.
By looking at an un-printed card very carefully, it is possible to see the chip location (as in the figure on the left below). If you print in that area, results will be unsatisfactory (in the figure on the right, the “star” should have been a single solid color).
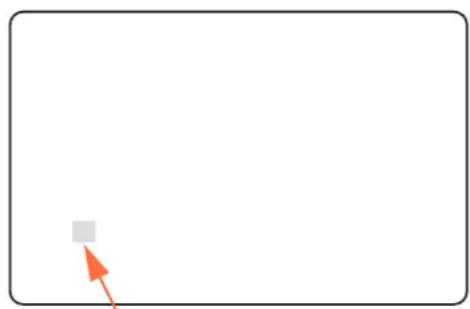
natural_image
Simple diagram with a gray square and an orange arrow pointing to it, on a white background (no text or symbols)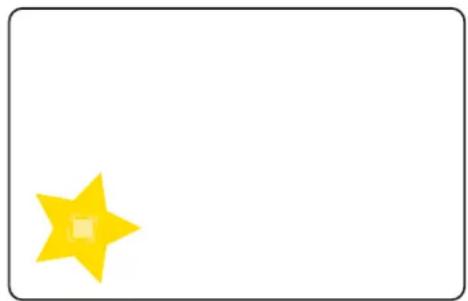
natural_image
Yellow star icon on white background, no text or symbols presentSmart Chip Location
Contact Station
Smart Card Interface
When a command to the printer interface sends a card to the Smart Card Contact Station, the printer connects the Smart Card Contact Station to the female DB-9 connector on the rear of the printer.
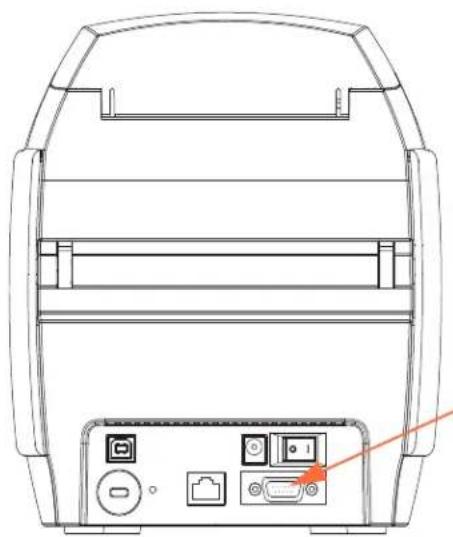
natural_image
Technical line drawing of a device rear panel with labeled ports and an orange arrow pointing to a component (no text or symbols present)DB-9 Connector location for Smart Card Contact Station
DB-9 Connector (detail)
An attached external Smart Card Programmer can be used to program Smart Card chips. The following table shows the Smart Card Contact Points.
| Pin | Smart Card Contact Points | DB-9 | Smart Card Contact Points |
| 1 C1 (VCC) 6 C6 (Vpp) | |||
| 2 C2 (Reset) 7 C7 (I/O) | |||
| 3 C3 (Clock) 8 C8 (RFU) | |||
| 4 | C 4 | 9 | ( (GND when chip is at station) |
| 5 C5 (GND) |
F
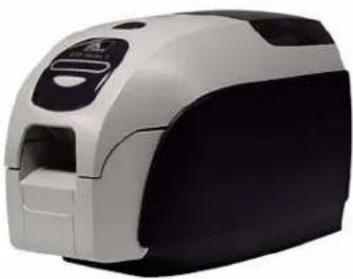
natural_image
Close-up of a handheld electronic device with black and white casing (no visible text or symbols)Appendix D
CardSense™ Single Card Feed Mode

natural_image
Abstract black and white pattern with curved white lines on a black background (no text or symbols)Introduction
For operating the ZXP Series 3 Card Printer in single card feed mode, the printer requires that the operator install an optional CardSense Single Card Feed Kit.
In Single Card Feed Mode, the printer will only accept cards through the front slot, not from the card feeder.
Installing the CardSense Single Card Feed Kit
Step 1. Turn printer power OFF.
Step 2. Open the lid, and remove the ribbon cartridge.

Important • Make sure the output hopper remains closed.
Step 3. Install the black roller. Place it between the blue clips just behind the card entry slot, and press the roller straight down so it is fully seated.
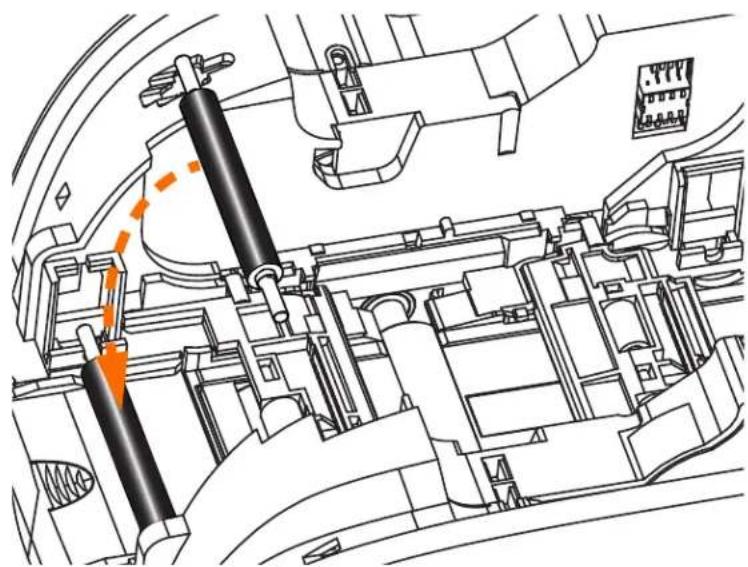
natural_image
Technical diagram of a mechanical assembly with no visible text or symbolsStep 4. While holding the roller down, turn power ON. You will hear a loud click as the clips secure the roller.
Step 5. At this point, let go of the roller, and then turn printer power OFF.
Step 6. Open the Cleaning Cartridge. The new Cleaning Cartridge will contain a Cleaning Roller with its protective wrapping.
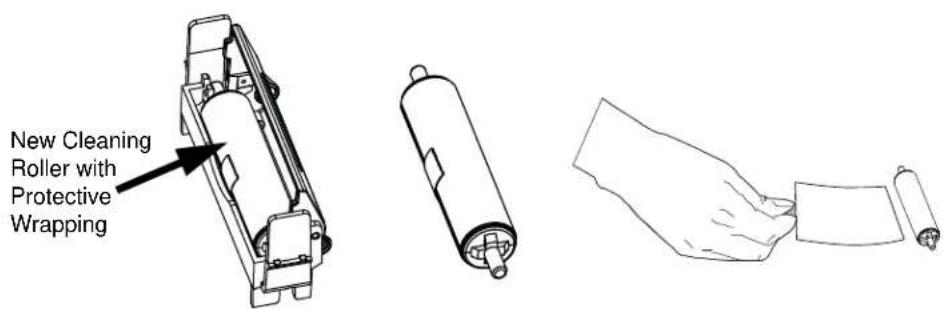
Step 7. Remove the Cleaning Roller from the Cleaning Cartridge, and then remove the protective wrapper from the Cleaning Roller,
Step 8. Place the Cleaning Roller in the Cartridge, and close the lid.
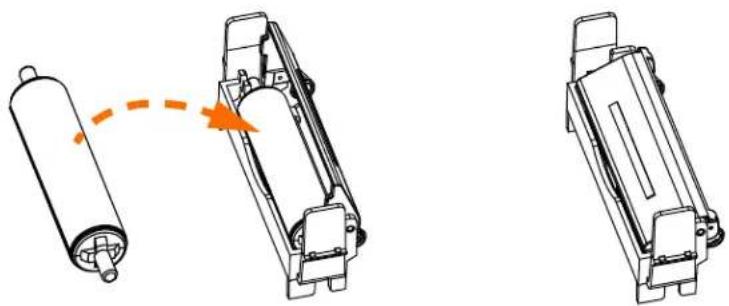
natural_image
Technical line drawing of a mechanical assembly with two views showing internal components and an orange arrow indicating motion (no text or symbols)Step 9. The Cleaning Cartridge is held in place by two clips. While gently squeezing the clips inward, press the cartridge into place. It will seat with a click.
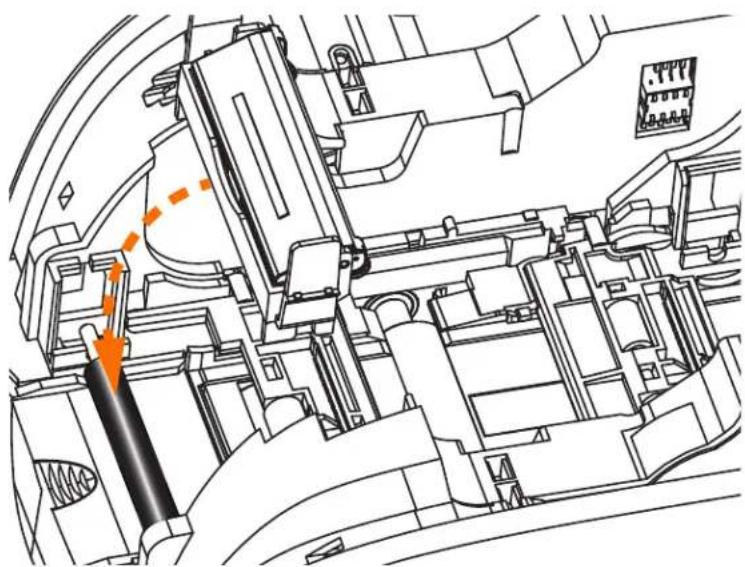
natural_image
Technical line drawing of a mechanical assembly with no visible text or symbolsStep 10. Insert the Ribbon Cartridge with the cleaning roller facing down, so the gears on the ends of the rollers fit into the appropriate slots.
Step 11. Close the printer lid, and push down until you hear an audible click. If you can not close the lid, the cleaning cartridge or the ribbon cartridge may be installed wrong.
Step 12. Place the printer power switch in the ON ( | ) position.
Setting Up the Printer Driver
Step 1. Open Printers and Faxes (click Start > Settings > Printers and Faxes).
Step 2. Right-click the printer for which you want to change settings, then click Properties.
Step 3. Select the Device Settings tab.
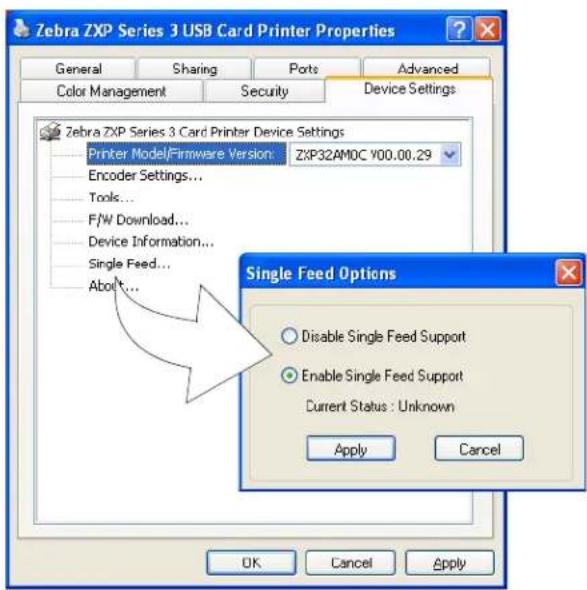
Step 4. Select Single Feed ...
Step 5. From the Single Feed Options window, select Enable Single Feed Support.
Step 6. Click the Apply button.

Important • You can disable Single Feed Support and return to printing cards from the hopper. You do not have to remove the components of the Single Card Feed Kit in order to operate in normal mode.
Printing a Single Card
Step 1. Cards are inserted one at a time into the slot on the front of the printer. Do not feed more than one card at a time. Note that the card must be fully inserted before printer turns on and accepts the card.
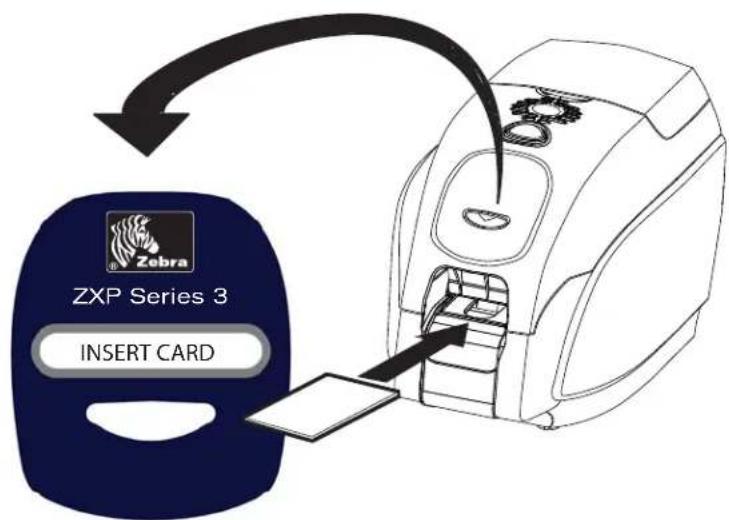
Step 2. The card is printed.
Step 3. The printed card is ejected out through the same (input) slot.

Note • If single-card feeding will be the normal mode of operation, you may select that mode through the driver software. In single card feed mode, the card will not be printed until the print job has been sent to the printer and the card to be printed has been inserted into the single card feed slot
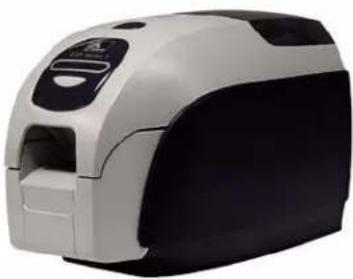
natural_image
Close-up of a handheld electronic device with black and white casing (no visible text or symbols)Appendix E
Enclosure Lock Option

natural_image
Abstract black and white pattern with curved white lines on a black background (no text or symbols)Introduction
The Enclosure Lock Option can either be factory-installed or added as an upgrade.
This option ensures that only authorized personnel have physical access to the print media (ribbon and cards). When locked, neither the Lid nor the Card Feeder Cover can be opened.
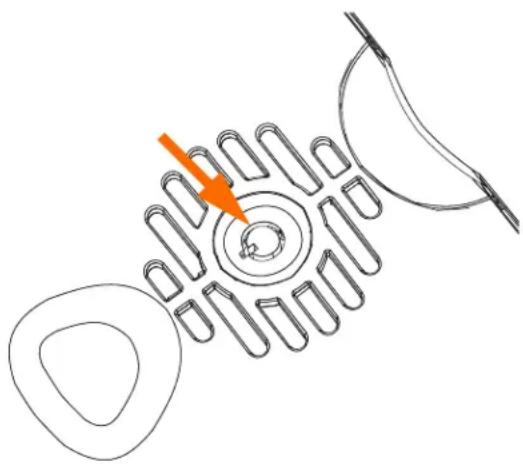
natural_image
Diagram showing a mechanical component with multiple curved slots and a highlighted circular feature, no text or symbols present.- Turn the key clockwise to unlock the printer. Note that when unlocked, the key cannot be removed from the lock.
- Turn the key counter-clockwise to lock the printer, then remove the key.
natural_image
Close-up of a handheld electronic device with black and white casing (no visible text or symbols)Appendix F
Worldwide Support

natural_image
Abstract black and white pattern with curved white lines on a black background (no text or symbols)For Technical Support or Repair Services, contact the appropriate facility listed below.
North America and Latin America - Technical Support
T: +1 877 ASK ZEBRA (877 275 9327)
+1 847 913 2259
E: ts1@zebra.c om
North America and Latin America - Repair Services
Before returning any equipment to Zebra Technologies Corporation for in-warranty or out-of-warranty repair, contact Repair Services for a Repair Order (RO) number. Mark the RO number clearly on the outside of the box. Ship the equipment, freight prepaid, to the address listed below:
Zebra Technologies Repair Services
333 Corporate Woods Parkway
Vernon Hills, IL 60061
webform: www.zebra.com/repair
T: 1 -877-275-9327
E: repair@zebra.com
Europe, Middle East, and Africa - Technical Support
| Language Phone Email | ||
| German +49 (0) 2159 676 870 zebratechDE@zebra.com | ||
| French +33 (0) 1 53 48 12 74 zebratechFR@zebra.com | ||
| English +44 (0) 1628 556 225 zebratechUK@zebra.com |
For further assistance, contact:
Zebra Technologies Card Printer Solutions
Dukes Meadow
Millboard Road, Bourne End
Buckinghamshire SL8 5XF, UK
T: +44 (0) 1628 556 025
F: +44 (0) 1628 556 001
E: cardts@zebra.com
Europe, Middle East, and Africa - Repair Services
Before returning any equipment to Zebra Technologies Corporation for in-warranty or out-of-warranty repair, contact your supplier for a Return Materials Authorization (RMA) number, or contact one of the following repair centers for support and instructions:
| Type of repair and location | Phone Email | |
| Depot Repair in Germany, Austria, Switzerland | +49 (0) 2159 676 870 zebracareDE@zebra.com | |
| Depot Repair in France | +33 (0) 1 53 48 12 74 | zebracareFR@zebra.com |
| Depot and On-Site Repair in UK and Ireland | +44 (0) 1628 556 225 zebracareUK@zebra.com | |
| Depot Repair in South Africa | +27 (0) 11 201 7777 | - |
| Depot Repair in the Middle East | +971 (0) 46058220 | support_dxb@emitac.ae |
For further assistance, contact:
For assistance anywhere in the EMEA, contact After Sales Customer Services at:
T: +44 (0) 177 2 69 3069
E: ukrma@ze bra.com
Asia Pacific - Technical Support
Zebra Technologies Asia Pacific Pte. Ltd.
120 Robinson Road
06-01 Parakou Building
Singapore 068913
T: +6 5 6858 0722
F: +6 5 6885 0838
E: tsasiapacific@zebra.com
Asia Pacific - Repair Services
Before returning any equipment to Zebra Technologies Corporation for in-warranty or out-of warranty repair, contact Repair Services for a Return Materials Authorization (RMA) number. Repack the equipment in the original packing material, and mark the RMA number clearly on the outside. Ship the equipment, freight prepaid, to either address listed below:
Zebra Technologies Asia Pacific Pte. Ltd.
No.5 Changi North Way Level 3
Singapore 498771
Agility Building
T: +65 6546 2670 ext 3203 and 3204
F: +6 5 6546 5328
E: AP ACRepair@zebra.com
Zebra Website
http://www.zebra.com
natural_image
Close-up of a handheld electronic device with black and white casing (no visible text or symbols)

- Zebra® ZXP Series 3™ Card Printer
- Copyright Notice
- Trademarks
- Product Disposal
- Contents
- • Getting Started .... 1
- • Printer Installation....9
- • Printer Setup .... 27
- • Printer Settings and Adjustments ..... 35
- • Cleaning .... 57
- · Troubleshooting .... 61
- • Technical Specifications....71
- Appendix A • Network Operations....77
- Appendix B • Magnetic Encoder Option....89
- Appendix C · Smart Card Options....95
- Appendix D · CardSense TM Single Card Feed Mode ..... 101
- Appendix E • Enclosure Lock Option ..... 107
- Appendix F • Worldwide Support ..... 109
- Getting Started
- ZXP Series 3 Part Numbers
- Features, Controls, and Indicators
- Rear Panel Connectors
- Standard USB Connection
- Ethernet Connection
- Multi-Function LCD Panel
- Operational Messages
- Warning Messages
- Error Messages
- Icons
- Printer Installation
- Unpacking Your Card Printer
- Installing the Printer
- Setting up the Printer
- Connecting Power
- Connecting the Printer to your Computer
- Viewing Printer Information
- Installing the Windows Printer Driver Initial Steps
- Installing the USB Printer Driver
- Installing the Ethernet Printer Driver
- Printer Setup
- Printer Features
- Loading Ribbon Cartridge
- Loading Cards
- Card Feeder
- Card Output Hopper
- Printing a Test Card
- Typical Printer Operation
- Creating a Sample Card
- Printing the Sample Card
- Printer Settings and Adjustments
- Introduction
- Card Printer Properties
- General Tab
- Sharing Tab
- Ports Tab
- Advanced Tab
- Color Management Tab
- Security Tab
- Device Settings Tab
- Printer Model/Firmware Version
- Encoder Settings
- ADVANCED SETTINGS DIALOGUE BOX
- Tools
- F/W Download
- Device Information
- Single Feed Options
- About
- Card Printer Printing Preferences
- YMCKOK
- YMCKO
- Cleaning the System
- Caution • PROTECT YOUR FACTORY WARRANTY!
- When to Clean
- How to Clean
- Cleaning the Printhead
- Troubleshooting
- Troubleshooting Procedures
- LCD Panel Warnings and Error Messages
- Print Quality Issues
- Example • Small spots
- Possible Cause:
- Example • No printing
- Technical Specifications
- Printer Specifications
- General
- Communications Interfaces
- Printing Specifications
- Ribbon Specifications
- Cards Compatibility
- Encoding Options
- Optional Features
- Bar Code
- Security
- Electrical
- Dimensions (printer only)
- Environmental
- Agency Approvals
- ISO Standard Card Dimensions
- Declarations of Conformity
- CE
- FCC Radiation Exposure Statement (applicable to 15.247 device only)
- Industry Canada Notice
- Japanese Notification
- Network Configurations
- Printer Sharing
- External Print Server
- Printer Pooling
- Setting Up Printer Pooling
- Using the Printer Pool
- Appendix B
- Magnetic Encoder Option
- Driver Settings
- Advanced Settings
- Media Loading Orientation
- Magnetic Encoder Cleaning
- Magnetic Encoding Type
- ISO (Default)
- AAMVA
- CUSTOM
- BINARY
- APPENDIX C
- Smart Card Options
- Output Hopper
- Contact Smart Cards
- Media Loading Orientation for Contact Smart Cards
- Printing on Contact Smart Cards
- Contactless Smart Cards
- Media Loading Orientation for Contactless Smart Cards
- Printing on Contactless Smart Cards
- Contact Station
- Smart Card Interface
- DB-9 Connector (detail)
- Appendix D
- CardSense™ Single Card Feed Mode
- Installing the CardSense Single Card Feed Kit
- Setting Up the Printer Driver
- Printing a Single Card
- Appendix E
- Enclosure Lock Option
- Appendix F
- Worldwide Support
- North America and Latin America - Technical Support
- North America and Latin America - Repair Services
- Europe, Middle East, and Africa - Technical Support
- For further assistance, contact:
- Europe, Middle East, and Africa - Repair Services
- Asia Pacific - Technical Support
- 06-01 Parakou Building
- Asia Pacific - Repair Services
- Zebra Website
Brand : ZEBRA
Model : ZXP S3
Category : Plastic Card Printer