
EasyPen M406 - Graphic tablet GENIUS - Free user manual and instructions
Find the device manual for free EasyPen M406 GENIUS in PDF.


| Product Type | Graphic Tablet |
| Brand | Genius |
| Model | EasyPen M406 |
| Interface | USB |
| System Requirements | Windows 7/Vista/XP, USB Port, DVD-ROM Drive |
| Working Area | Full area or programmable via driver |
| Pressure Sensitivity | 1024 levels |
| Pen Buttons | 2 programmable barrel buttons plus pen tip |
| Express Keys | 8 programmable express keys on tablet |
| Rolling Pad | LED indicator, programmable functions (scroll, zoom, etc.) |
| Pen Modes | Pen Mode (absolute) and Mouse Mode (relative) |
| Pen Tip | Replaceable, includes pen clip for removal |
| Driver Software | ioTablet driver, downloadable from Genius website |
| Power Supply | USB bus-powered |
| Compatibility | Works with most creative software (Adobe Photoshop, Corel Painter, etc.) |
| Maintenance | Store pen with tip upward; replace pen tip when worn |
Frequently Asked Questions - EasyPen M406 GENIUS
User questions about EasyPen M406 GENIUS
0 question about this device. Answer the ones you know or ask your own.
Ask a new question about this device
Download the instructions for your Graphic tablet in PDF format for free! Find your manual EasyPen M406 - GENIUS and take your electronic device back in hand. On this page are published all the documents necessary for the use of your device. EasyPen M406 by GENIUS.
USER MANUAL EasyPen M406 GENIUS
natural_image
Black digital tablet with control panel and pen, no visible text or symbols on device bodyioTablet Driver
I. General Information 2
- Overview 2
- Pen Tablet Function 2
- System Requirements 2
- Driver Installation 3
- Hardware Installation 3
- Verifying Hardware and Driver Functions 3
- Usage Tips 4
II. Pen Tablet Configuration 4
- The info Tab 5
- Cordless Pen 5
2.1: Button Name 5
2.2: Mode Setting 6
2.3: Pen Sensitivity adjustment 6
2.4: Default 6
- Tablet 7
3.1: Re-define express keys 7
3.2: For rolling pad definition 7
3.3: For Tablet express keys definition 7
3.4: Default 7
3.5: Tablet working area setting 8
3.6: Change screen ratio 8
III. Storing the digital pen and changing the pen tip 9
- Storing the digital pen properly 9
- Changing the wireless stylus pen tip 9
IV. Question & Answer 10
10
*The driver may already be updated to a newer version before/after packaging. If your installation screen does not match the contents of this manual, you may need to download the driver, just refer to your software screen after installation.
* To ensure your tablet operates with maximum and smooth performance, plug the USB connector to your PC/Notebook USB port instead of a USB Hub or other exterior USB port device.
I. General Information
1. Overview
Welcome to the world of tablet and digital pen! You are able to discover how easy to control your personal computer by using a wireless digital pen to instead of a mouse.
The function of the digital pen is able to draw a line very thin, thick, light or dark (called pressure sensitivity). You also can write, sign, annotate documents, and draw, sketch or paint as easily as you would on normal paper and simulate the functions like a pencil, marker, brush, or watercolor pen by using commercial software packages such as Adobe® PhotoShop™, Corel® Painter™ and Paint Shop™. If MSN Messenger 8.5 or newer is installed, you can create and send digital handwritings and hand drawn pictures, making communication much more fun and entertaining.
Note: If you cannot enable the handwriting mode in MSN Messenger, download the relevant handwriting component from Microsoft's website.
2. Pen Tablet Functions
After installing the device driver, your pen tablet features has the following functions:
-
Direct pointing – You can move the cursor to any location on the screen by hovering the digital pen tip over the tablet's surface.
-
Three-button mouse commands - Your pen tablet provides all the functions of a three-button mouse by using its pen tip and two buttons.
-
Pen scrolling – You can scroll documents and Web pages by pressing the middle button of the digital pen over the tablet's working area.
-
Pressure sensitivity – This feature allows you to emulate various brushes and pencils and you can press down on the pen tip harder, lighter, stronger or thicker, and you will get different types of pencil lines.
3. System Requirements
- Windows 7/Vista/XP
- USB Port
- DVD-ROM Drive
4. Driver Installation
For Microsoft Windows 7, Vista, and XP:
- Insert the CD into the CD-ROM drive, and wait for the main installation screen to appear.
- The main installation screen should appear automatically, or you can manually start the installation by opening 【 My Compute】 ▶【 CD/DVD Ron】 ▶ then click on the 【Setup】 program.
When installing the driver, follow the installation instructions on screen and press the "Enter" key. After the installation has been completed, reboot the computer.
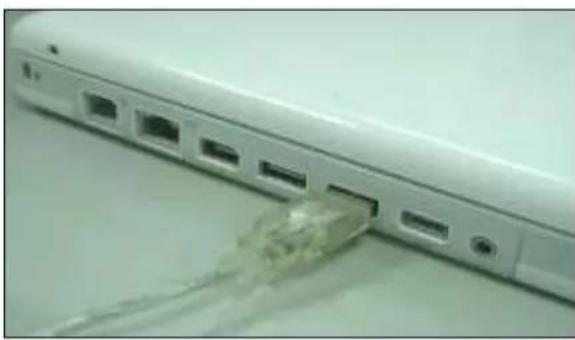
5. Hardware Installation
natural_image
Close-up of a white USB device with multiple ports and a cable wrapped around it (no visible text or symbols)Connect the tablet to the USB interface of the PC after the driver installation is finished and you have restarted Windows:
After you connect a pen tablet into the PC, you will see a small tablet icon ( ) appear in the system t ray, which is normally at the lower right corner of the screen.
★ Install the driver first before you plug the tablet into your PC.
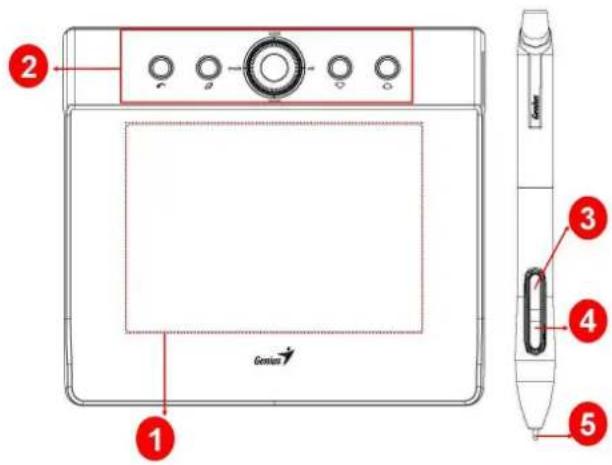
- Working area
- Express Keys
- Button 2
- Button 1
- Pen tip
6. Verifying Hardware and Driver Functions
Follow these steps to verify the tablet is installed properly:
- After you reboot your computer, move the cordless pen to make sure the cursor shown on the screen is moving.
- The LED indicator shown on the rolling pad indicates the function (mode). You may edit and setup according to your design needs.
Note: After the tablet's device driver has been properly installed, a small tablet icon ( ) will appear in the system tray, which is normally at the lower right corner of the screen.
7. Usage Tips
7.1 Double tapping
When you double tap the digital pen (equivalent to a double click with a mouse), try to keep the pen tip away from the tablet's surface, or at least try to lift the pen tip as fast as possible before the second tap.
7.2 Storing the digital pen
To store the pen, make sure the pen tip does not touch anything, and especially do not let the pen stand in a cup or penholder with the tip down. Place the pen in a penholder, or turn the pen tip pointing upward or horizontally with the pen tip free of any pressure by other objects.
7.3 Scrolling function of digital pen
The digital pen has the same function as a normal mouse when scrolling pages. Press the first button of the digital pen (same function as the mouse middle button) over the tablet's working area.
7.4 Using a pen without a mouse
You may install the digital pen, digital mouse, and a regular mouse in your computer at the same time and you can also remove them to a different computer as well. However, only one device is able to work at a time.
Do not use more than two devices at the same time in case the screen cursor is jittering or not moving.
II. Pen tablet configuration
You may configure the pen tablet by modifying the functions of the pen tip and the two barrel buttons. Tap [Start] > [Settings] > [Control Panel], and double-tap the [io Tablet ↗] icon, or tap on the tablet icon ( ) in the system tray, usually located at the lower right corner of the screen. You may also adjust the pressure sensitivity of the pen by determining the scope of the tablet's working area, or (re-) program the hot-cells of your pen tablet by modifying device driver.
- The Info Tab: The Info tab displays the devices you can choose to operate your tablet, including the pen, the tablet itself and any interface language.
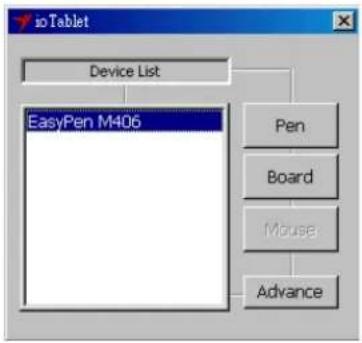
- After the tablet driver is installed in Windows, the Tablet PC function setting will support pressure in MS Journal, OneNote (2003 - 007), etc.
2. Cordless Pen
2.1 Button Name:
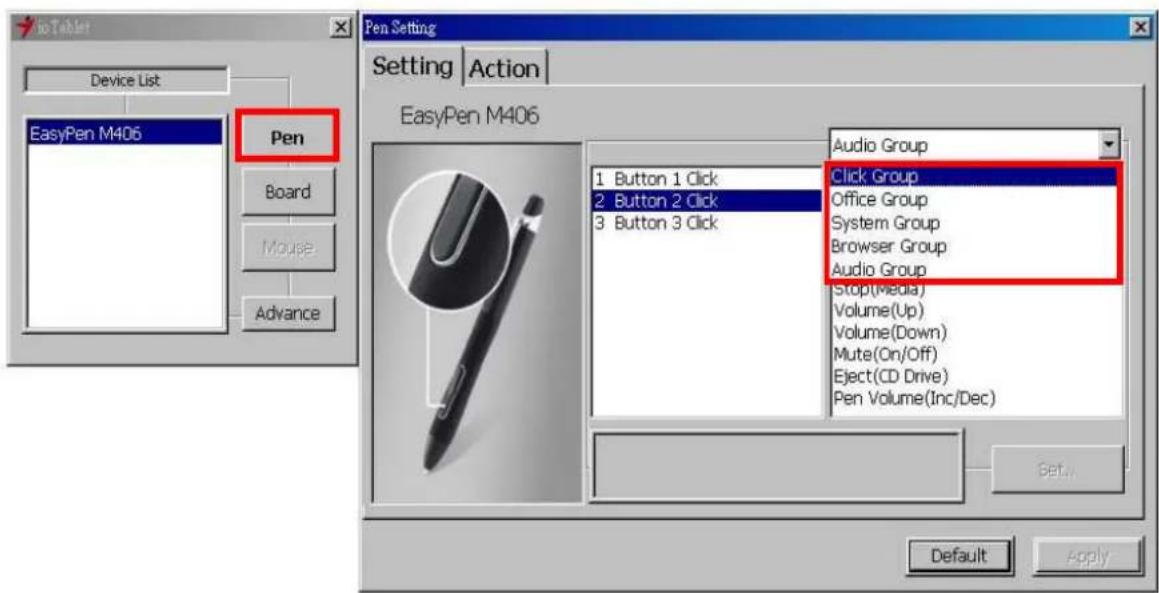
You may re-program the functions of the pen tip and the two-barrel buttons by selecting the button name from the drop down menu and assign a command of a traditional three-button mouse to it. The programmable group includes:
Click Group: Click, Scroll, Lock, etc.
Office Group: Copy, Save, Undo, etc.
System Group: My Computer, My pictures, Media Player, etc.
Browser Group: Back, Forward, Refresh, etc.
Audio Group: Play, Stop, Mute, etc.
Simply chose the function you require and press "Apply" to activate it.
2.2 Mode Setting:
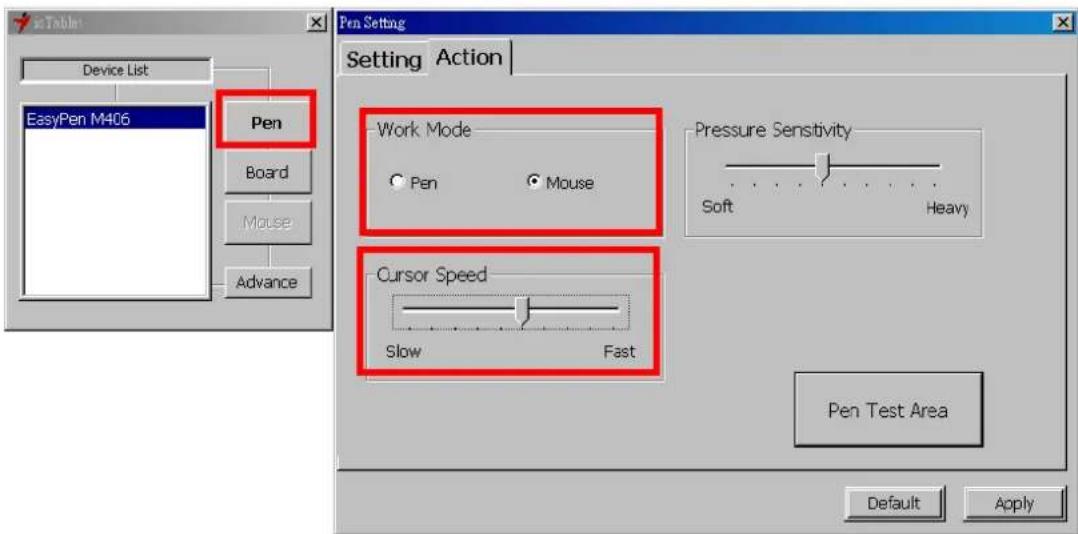
The tablet offers Pen and Mouse mode according your design demands.
- Pen Mode (Absolute mode): Use the pen to draw, point, click and sign as you wish.
- Mouse Mode (Relative mode): Use the pen as a traditional mouse.
*In Mouse mode, you may move the cursor speed between slow and fast to adjust the speed.
2.3 Pen Sensitivity Adjustment:
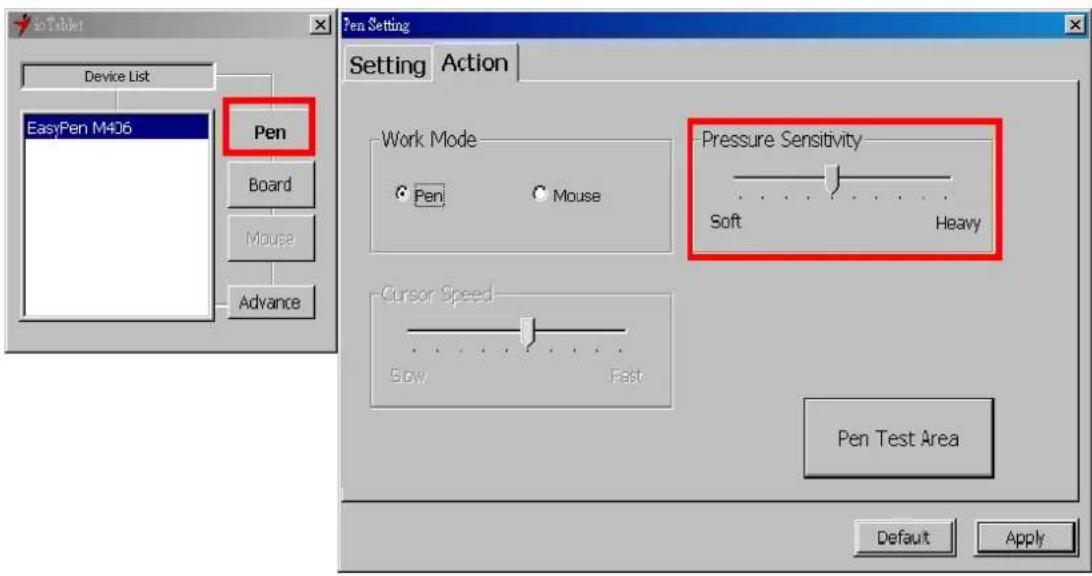
This tablet pen offers 1024 pressure levels sensitivity for all kinds of shapes and thickness. Move the slider in the sensitivity bar to adjust the levels. There is a test area to draw a line by pressing the pen tip on the tablet pad.
2.4 Default:
Tap on the Default button to return to the manufacturer settings.
3. Tablet
3.1 Re-define Express keys:
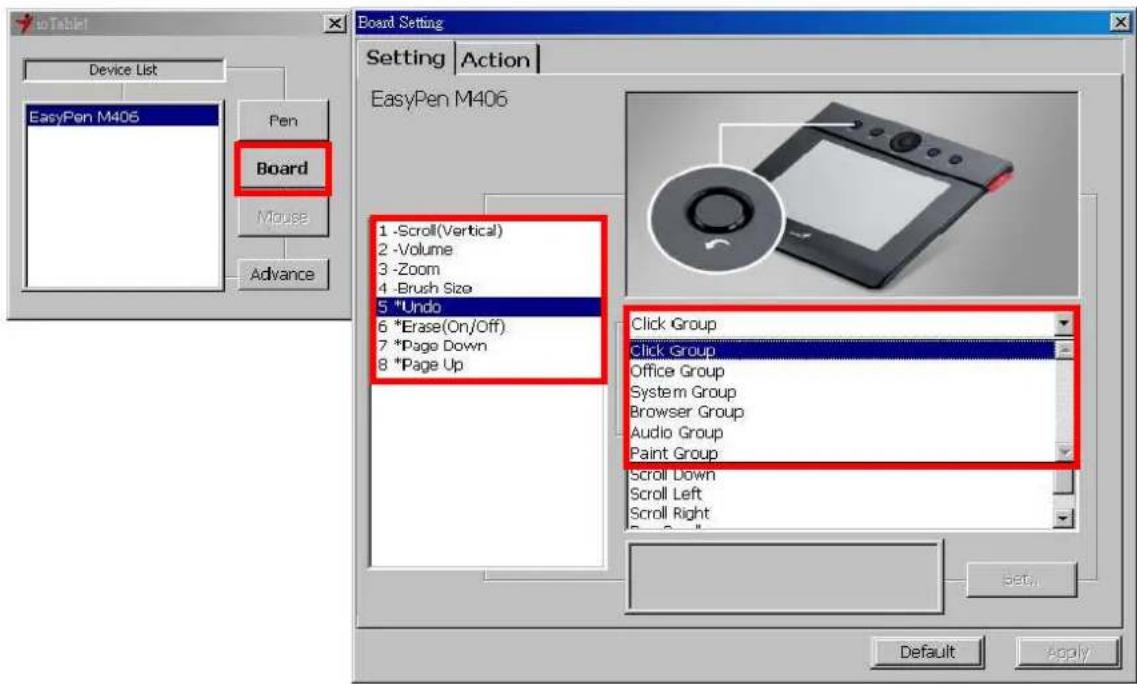
All the available express keys are shown on the left side of the menu. Click on any of them to find out the icon and location. You may re-program any express key from the drop down menu below the tablet picture.
3.2 For Rolling Pad Definition:
The LED indicator shows the current function on the rolling pad. You may choose a different function group for the rolling pad. The available groups are:
Scroll Group: Zoom, Brush size, layer switch, etc.
3.3 For Tablet express keys definition:
You may choose any:
Click Group: Click, Scroll, Lock, etc.
Office Group: Copy, Save, Undo, etc.
System Group: My Computer, My pictures, Media Player, etc.
Browser Group: Back, Forward, Refresh, etc.
Audio Group: Play, Stop, Mute, etc.
Simply chose the function you require and press "Apply" to activate it.
3.4 Default
Return the Express Keys to the default settings.
3.5 Tablet working area:
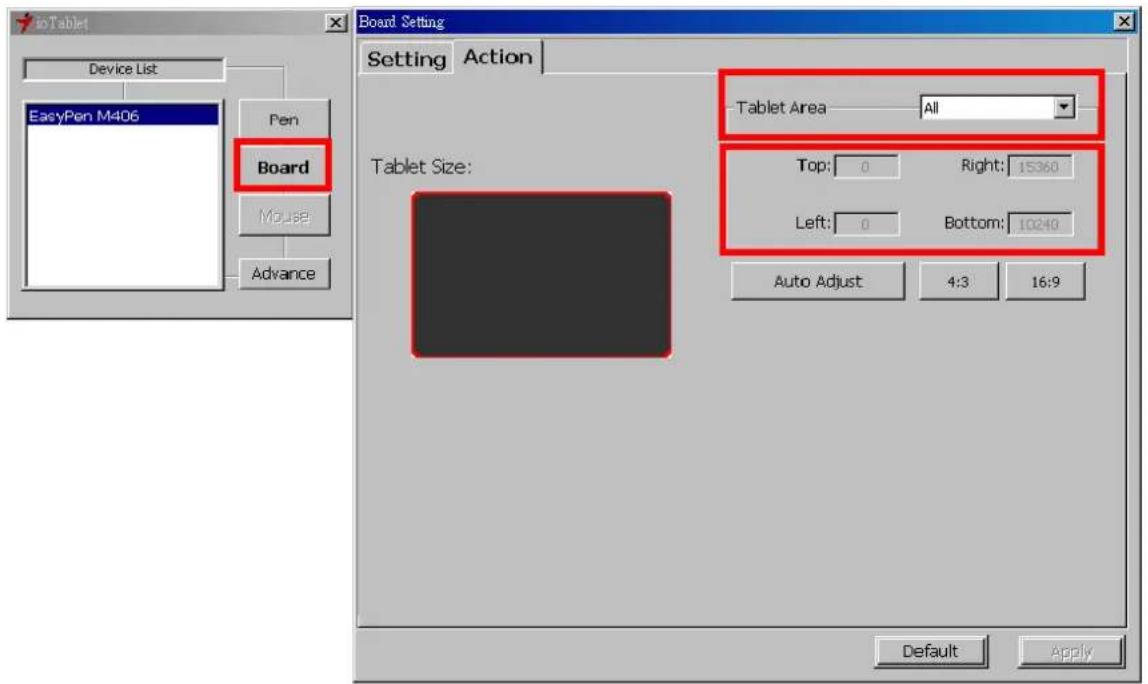
There are two modes available to define the working area, click "Apply" to activate it.
- All (Full Area): Select the largest possible working area depends on the tablet size.
- Part (Programmable Area): Allows you to define the dimensions for top, bottom, left and right. Define the size by inputting any numbers in the blank bars.
3.6 Change Screen Ratio:
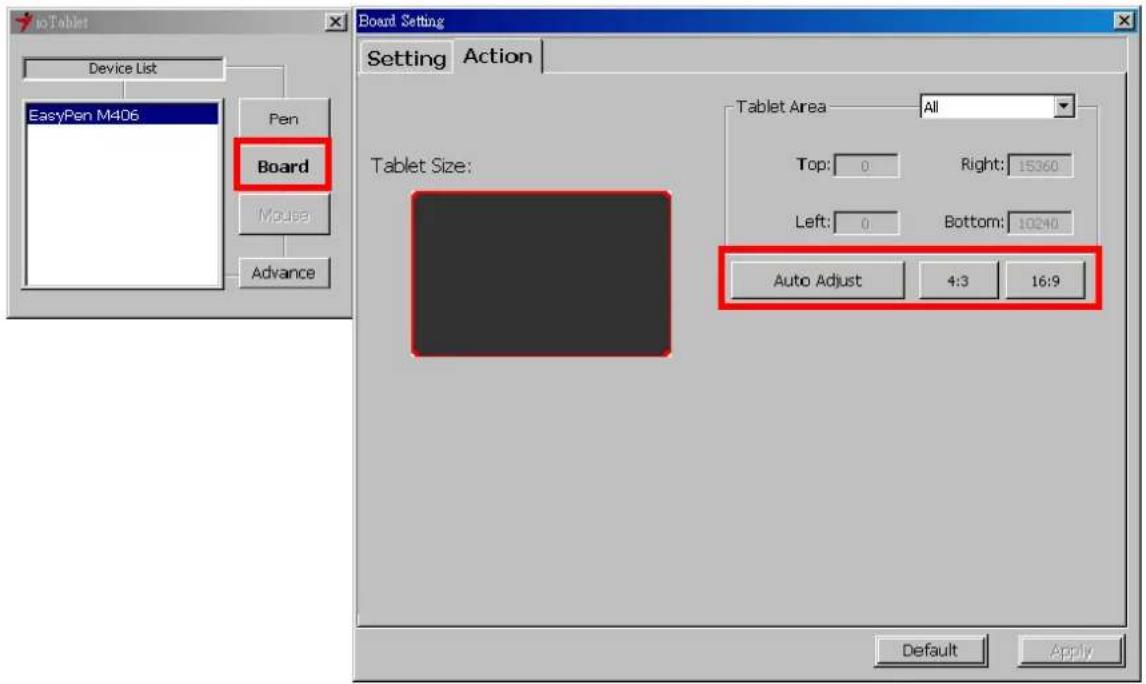
This tablet can be adjusted according to your LCD display.
A. Set the tablet working area the same as the screen size by clicking "Auto Adjust".
B. Switch the screen ratio by selecting 4:3 (Standard) or 16:9 (Wide).
III. Storing the Digital pen and changing the Pen Battery & Tip
1. Storing the digital pen properly:
To store the digital pen, make sure that the tip does not touch anything, especially, do not let the pen stand in a cup or penholder with the tip down. It is recommended to place the pen in a pen holder or store it with the pen tip pointing upward, or place it horizontally with the pen tip free of any other objects.
2. Changing the wireless stylus pen tip
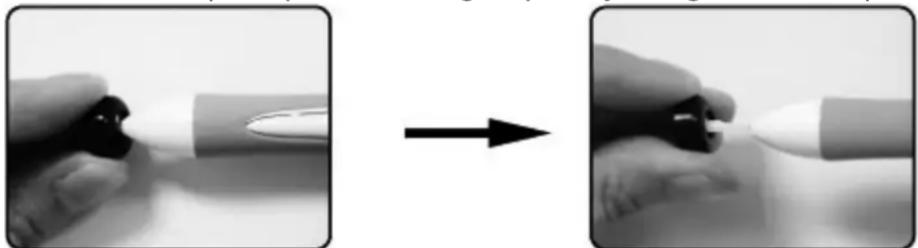
A: Pull out the pen tip from the digital pen by using the Pen Clip.
natural_image
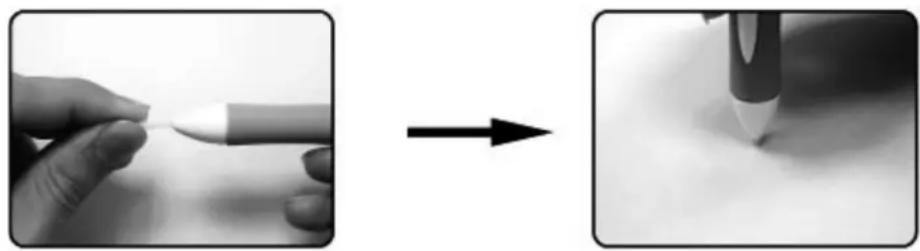
Two-step black-and-white photo showing a hand holding a small object, before and after transformation (no text or symbols visible)B: Push the pen tip into the digital pen.
natural_image
Two-step illustration showing a hand holding a pen tip before and after application of a pencil (no text or symbols present)IV. Question & Answer
Question 1: How can I get the latest update or uninstall the software?
Answer: You can download the new driver from our website.
- Uninstall your old driver: Click [Start] ▶ [All Programs] ▶ [TABLET] ▶ [Uninstall].
- Download the latest version of the driver from the download section and save it to your hard disk.
- Unzip the file in a folder on your hard disk (with Windows built-in unzip utility or a program like Winzip).
- Double-click the Setup.exe in the folder where you unzipped the file.
Question 2: The tablet cannot work. What can I do?
Check if the following is okay.
- Remove the tablet's USB plug from the computer.
- Uninstall the tablet driver from the system.
-
Re-connect the tablet's USB to the computer.
3.1 Check whether the tablet's LED is on or not? If the LED is unlit, that means your tablet is at fault.
3.2 Test your pen in the tablet working area, if it can work as a mouse, it means the hardware is OK. -
You can download the latest version of driver directly from our website www.geniusnet.com.
-
Setup the new version of the driver; and remember to restart your computer.
- After you restart your computer, on the bottom right of the screen, you will find the tablet icon ( ).
6.1 If you can't find the tablet icon ( ) on the bottom right of the screen, it means the driver failed to install, and there could be a compatibility issue.
6.2 Check [My Computer] ▶ [Properties] ▶ [Hardware] ▶ [Device Manager], if you see an exclamation mark, it means the installed driver of the tablet is incompatible with the Windows system.

- ioTablet Driver
- General Information 2
- Pen Tablet Configuration 4
- Storing the digital pen and changing the pen tip 9
- Question & Answer 10
- General Information
- Overview
- Pen Tablet Functions
- System Requirements
- Driver Installation
- Hardware Installation
- Verifying Hardware and Driver Functions
- Usage Tips
- Double tapping
- Storing the digital pen
- Scrolling function of digital pen
- Using a pen without a mouse
- Pen tablet configuration
- Cordless Pen
- Button Name:
- Mode Setting:
- Pen Sensitivity Adjustment:
- Default:
- Tablet
- Re-define Express keys:
- For Rolling Pad Definition:
- For Tablet express keys definition:
- Default
- Tablet working area:
- Change Screen Ratio:
- Storing the Digital pen and changing the Pen Battery & Tip
- Storing the digital pen properly:
- Changing the wireless stylus pen tip
- Question & Answer
- Question 1: How can I get the latest update or uninstall the software?
- Question 2: The tablet cannot work. What can I do?
Brand : GENIUS
Model : EasyPen M406
Category : Graphic tablet