
SHW 3001 - High Pressure Dishwasher SENCOR - Free user manual and instructions
Find the device manual for free SHW 3001 SENCOR in PDF.


| Product Type | High Pressure Cleaner |
| Brand | Sencor |
| Model | SHW 3001 |
| Power Supply | 220-240 V AC, 50 Hz |
| Rated Power Input | 1100 W |
| Maximum Power Input | 1300 W |
| Maximum Pressure | 110 bar / 11 MPa |
| Flow Rate | 320 l/h |
| Maximum Water Temperature | 40 °C |
| Hose Length | 3.5 m |
| Power Cord Length | 5 m |
| Operational Range | 9.5 m + water jet length |
| Dimensions (W x D x H) | 216 x 195 x 432 mm |
| Weight (without accessories) | 4.8 kg |
| Weight (with accessories) | 5.7 kg |
| Noise Level | <85 dB |
| Protection Class | IPX5 |
| Safety Features | Thermal fuse, auto shut-off on overheating |
| Included Accessories | High pressure hose, pistol, working attachment, parking position holder, inlet valve adapter, cleaning needle |
| Pistol Features | START/STOP trigger, arrest lock for continuous operation |
| Maintenance | Clean nozzle with included cleaning needle; clean exterior with soft damp cloth |
| Intended Use | Cleaning cars, motorcycles, boats, terraces, garden furniture, façades, etc. |
Frequently Asked Questions - SHW 3001 SENCOR
User questions about SHW 3001 SENCOR
0 question about this device. Answer the ones you know or ask your own.
Ask a new question about this device
Download the instructions for your High Pressure Dishwasher in PDF format for free! Find your manual SHW 3001 - SENCOR and take your electronic device back in hand. On this page are published all the documents necessary for the use of your device. SHW 3001 by SENCOR.
USER MANUAL SHW 3001 SENCOR
High Pressure Cleaner
User's manual
Z
natural_image
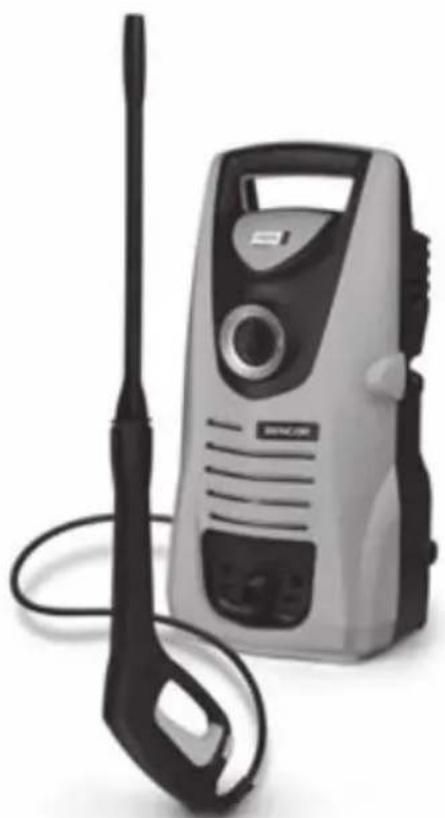
Exterior view of a gray water level control device with a black tool and hose (no visible text or symbols)SENCOR®
SHW 3001
Before first use, please read all instructions contained in this user's manual carefully, even if you are already familiar with using similar products. Only use this product in accordance with the instructions described in the user's manual. Keep the user's manual in a safe place where it can be easily retrieved for future use.
Save the original packaging, including the internal packing material, warranty card and proof of purchase receipt, at least for the duration of the warranty. If you need to ship this product, pack it in the original cardboard box to ensure maximum protection during shipping or transport (e.g. when moving or when you need to send this product for repair).
EN-1
CONTENTS
IMPORTANT SAFETY NOTICE....3
INTRODUCTION 4
PRODUCT DESCRIPTION 5
ASSEMBLING THE PRODUCT....6
INSTRUCTIONS FOR USE 8
CLEANING AND MAINTENANCE....9
TROUBLESHOOTING....10
INCLUDED CONTENTS....10
TECHNICAL DETAILS 11
DISPOSAL OF USED ELECTRICAL AND ELECTRONIC EQUIPMENT 12
INSTRUCTIONS AND INFORMATION REGARDING THE DISPOSAL OF USED PACKAGING MATERIALS .... 12
IMPORTANT SAFETY NOTICE
1) Carefully unpack the product and take care not to throw away any part of the packaging before you find all the parts of the product.
2) This product must not be used by persons (including children) with physical or mental impairments or by inexperienced persons, unless properly trained or schooled in the safe use of the product, or unless they have been properly supervised by a qualified person who will be responsible for their safety.
3) Never use accessories that have not been delivered with this product or are not intended for it.
4) Under no circumstances should you try to repair or amend the product on your own - danger of electric shock! Entrust all repairs and adjustments to a specialised company/service. Tampering with the product during the warranty period may void the warranty.
5) Never use the product if you have wet hands or feet.
6) Only store and use the product away from flammable or volatile materials and solutions.
7) Keep the product away from extreme temperatures, direct sunlight and excessive humidity. Do not use in a dusty environment.
8) Do not place the product near heaters, open fires or other appliances or equipment that are sources of heat.
9) Do not use the product for purposes other than those intended.
10) Before connecting the product to the power outlet ensure that the voltage on the label is the same as that in the power outlet.
11) Do not place the power cord near hot places or sharp objects. Do not place heavy objects on the power cable. Position the cord so that it will not be stepped on or tripped over. Make sure the power cord is not touching a hot surface.
12) If the power cord of the product is damaged have it repaired by an authorised service technician to prevent causing a dangerous situation. It is forbidden to use a product with a damaged power cord or plug.
13} Do not disconnect the power cord from the wall outlet by pulling the cord.
14) Do not spray the product with water or any other liquid. Do not pour water or any other liquids into the product. Do not submerge the product in water or any other liquid.
15) Never use the product near a bathtub, wash basin or any other container filled with water.
16) If you are not using the product, or if you know that you will not be using it soon, turn it off and disconnect the power cord from the wall socket. Prior to cleaning, proceed in the same manner.
17) Never leave the product switched on without supervision.
18) Before storing always allow the product to fully cool down.
19) Use extra care if the product is used near children. Always keep the product out of the reach of children. Children must be supervised to ensure that they do not play with the product.
20) For increased safety we recommend you install a protective device against residual voltage with a sensitivity up to 30 mA (talk to your electrician about installation options).
21) Pulling the power cord from the wall power outlet by force may cause damage.
22) In order to avoid damage to the hose, do not step on it or forcefully bend it. Do not use the product if the hose is bent or damaged in any way.
23) Do not move over the power cord with the product.
24) This product is equipped with a thermal fuse - if the motor or the pump overheat then the thermal fuse will turn the product off. As soon as the motor or pump cool down, it will be possible to turn the product on again.
25) High pressure current can be dangerous if used incorrectly. It is forbidden to direct the current at other people, one's self, animals, electric devices or the high pressure cleaner itself.
26) Neither the pistol nor the attachment may be placed near ears or eyes.
27) If it is necessary to use an extension cord to the power mains, the extension cord must be waterproof.
28) The manufacturer takes no responsibility for damages caused by the incorrect use of this product and its accessories (injuries, burns, scalding, fire, food spoilage, etc.).
INTRODUCTION
What is a high pressure cleaner?
A high pressure cleaner is in effect a powerful electric motor driving a set of pistons, which force water to spray through a small nozzle. This creates pressurised water current.
The pressure cleaner can be used for many kinds of work around the house and in the garden. It is an effective work saving cleaning method for various types of surfaces. This high pressure cleaner is designed so that the supplied cold water is sufficient for it.
Possible applications
The main applications of this product are for cleaning work in the house, e.g.:
1) Washing cars, motorcycles, boats and bicycles.
2) Cleaning of terraces, fences, garden walls, footpaths, driveways and house façades.
3) Removal of algae and moss from roofs, brickwork and gutters.
4) Cleaning of garden machines and equipment, garden furniture and meat grills.
5) Hygienic cleaning of animal enclosures and surrounding areas.
PRODUCT DESCRIPTION
A
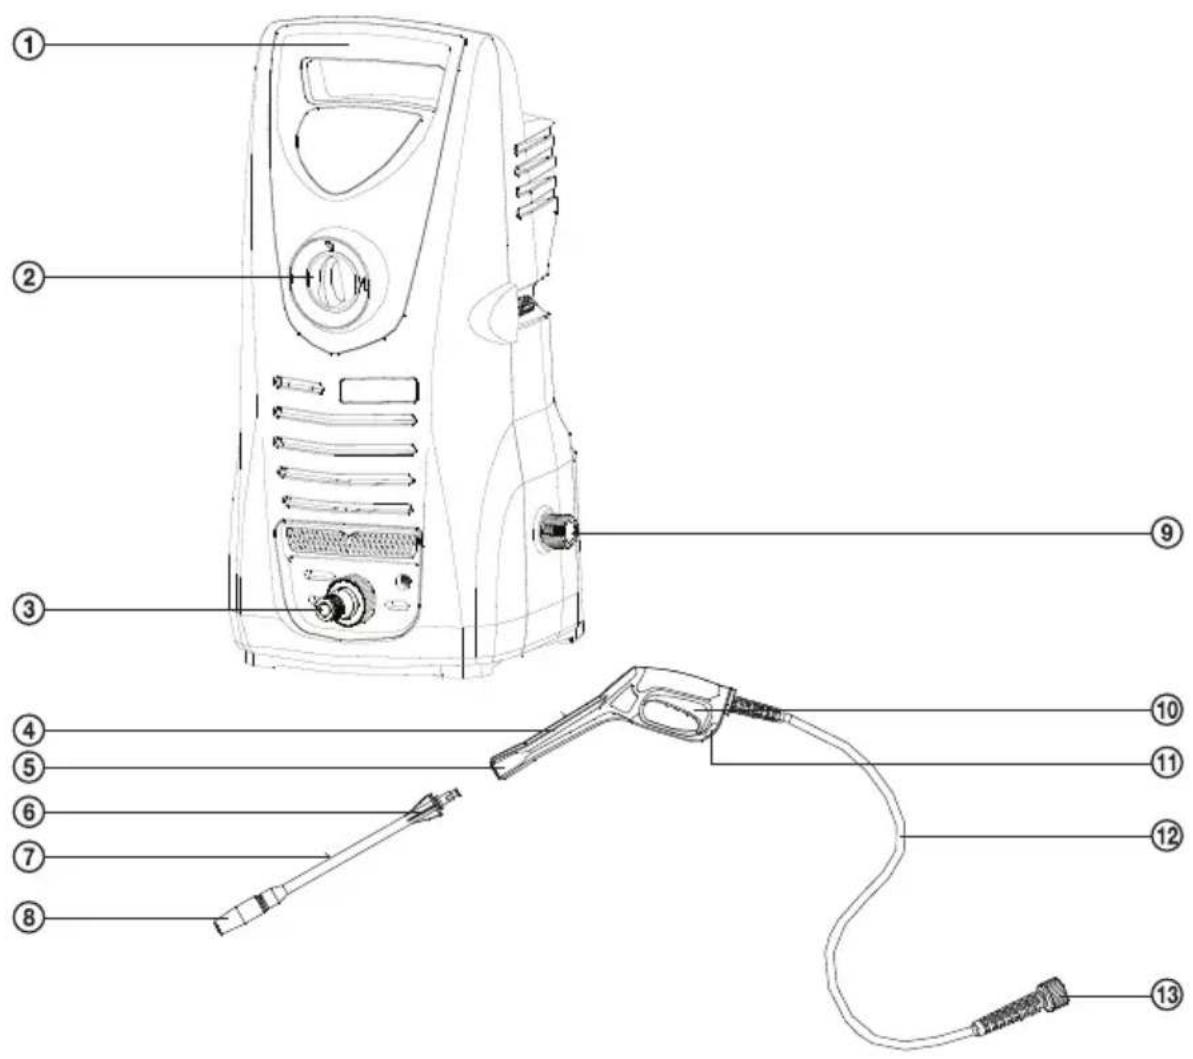
① Handle
② Main power switch
③ Inlet valve with hosed adapter
④ Pistol
⑤ Pistol opening for attachment
⑥ Bayonet of the working attachment
⑦ Working attachment
⑧ Spray diffuser
⑨ Outlet valve
⑩ START/STOP trigger
⑪ Pistol arrest
⑫ High pressure hose
⑬ High pressure hose end

Warning
- Never use this high pressure cleaner without first turning on the water supply - the product can be damaged!
- When the high pressure cleaner is turned on the high pressure water jet coming out of the attachment can cause recoil. Before turning on the high pressure cleaner hold the pistol firmly in your hand!
- Keep the high pressure hose attached to the high pressure cleaner for the entire time of operation because it is under pressure. Disconnecting the high pressure hose while it is under pressure is dangerous.
• Never use the pistol without the attachment being attached. - Always store the high pressure cleaner in a place where it will not freeze. Frost may cause irreversible damage to the cleaner. It is recommended to remove all water from the cleaner and all accessories including the inlet hoses before storage. The warranty does not cover frost damage!
ASSEMBLING THE PRODUCT
Method for connecting the high pressure hose to the pistol:
1) Open the lock in the back part of the pistol by moving it in the downward direction.
2) Insert the end of the high pressure hose into the pistol opening. Make sure that it is fully inserted (otherwise it is not possible to lock it in place).

Note
- Due to the pressure created in the hose during operation and the perfect seal, it is necessary to exert a greater force when inserting the hose ends into the pistol and if necessary fully insert the end using a rocking motion.
3) Lock the end into position by moving the lock downwards.
4) Move the high pressure hose guard all the way up to the pistol opening and turn clockwise so that it is arrested.
B
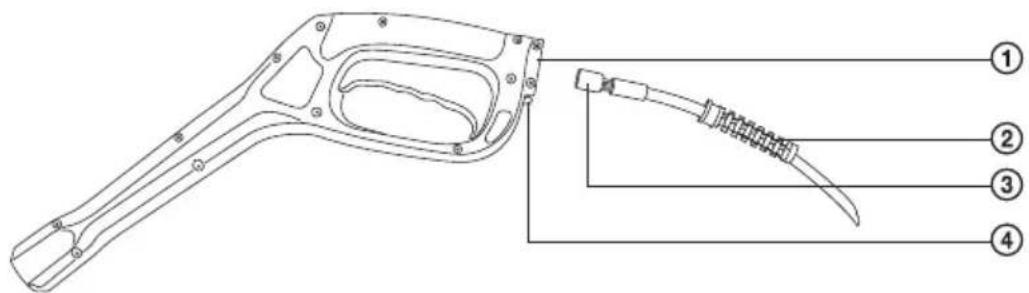
① Opening for the end
② High pressure hose guard
③ High pressure hose end
④ Lock
Method for connecting the attachment to the pistol:
1) Insert the working attachment into the pistol so that the lugs fit inside the openings inside the pistol.
2) Now gently press the working attachment into the pistol and turn it 90°.
3) The working attachment will be arrested in the pistol.

Warning
• Before operation ensure that the attachment is safely arrested in the pistol.
C
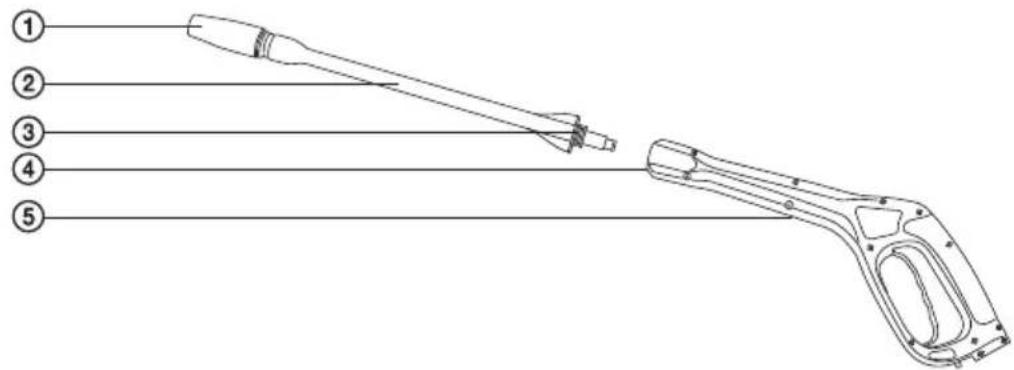
① Spray diffuser
② Working attachment
③ Bayonet
④ Opening in the pistol for the attachment of the working attachment
⑤ Pistol
Connecting the hoses:
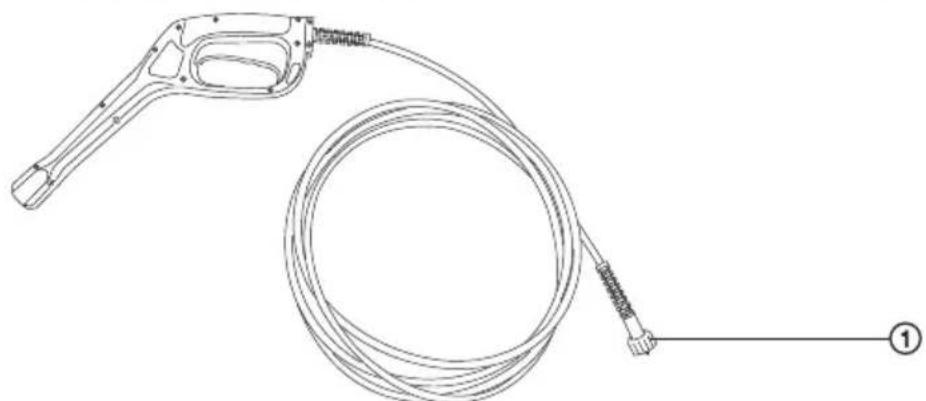
1) Screw the end of the high pressure hose (pic. D ①) on to the inlet valve of the high pressure cleaner (pic. A ⑤).
2) Now connect the inlet valve of the garden hose to the appropriate screw end or quick-release coupling. In the case of the quick-release coupling you can use a screw adapter, which is included with this product.

Warning
- Before connecting check that the inlet hose is not under pressure and that the water tap is turned off.
D
natural_image
Technical line drawing of a mechanical device with a coiled cable and attached rod (no text or symbols)① High pressure hose end
EN-7
INSTRUCTIONS FOR USE
1) Ensure that the main switch is in position "0".
2) Connect to power cord to the power socket.
3) Hold the pistol with the attached working attachment in your hand.
4) Fully open the water tap on the water supply.

Warning
• Do not yet turn on the main switch on the high pressure cleaner!
5) Now press the pistol trigger.
6) After pushing all air out of the hoses water will start to flow from the nozzle.
7) Only now move the main switch to position "1".
8) Hold the pistol together with the working attachment in your hand, point at the desired location, press the trigger and you can start working. The recommended distance between the nozzle and the surface being cleaned is at least 30 cm.

Tip:
If you need to arrest the operation of the cleaner, full press the pistol trigger and at the same time press the arrest lock (pic. A 22).
Using the parking positions
This cleaner lets you store (park) your accessories.
1) To store the work attachment you can use one of the two grooves of the parking positions (pic. E 3).
2) To store the pistol itself without the attached working attachment you can use the parking position holder.
E
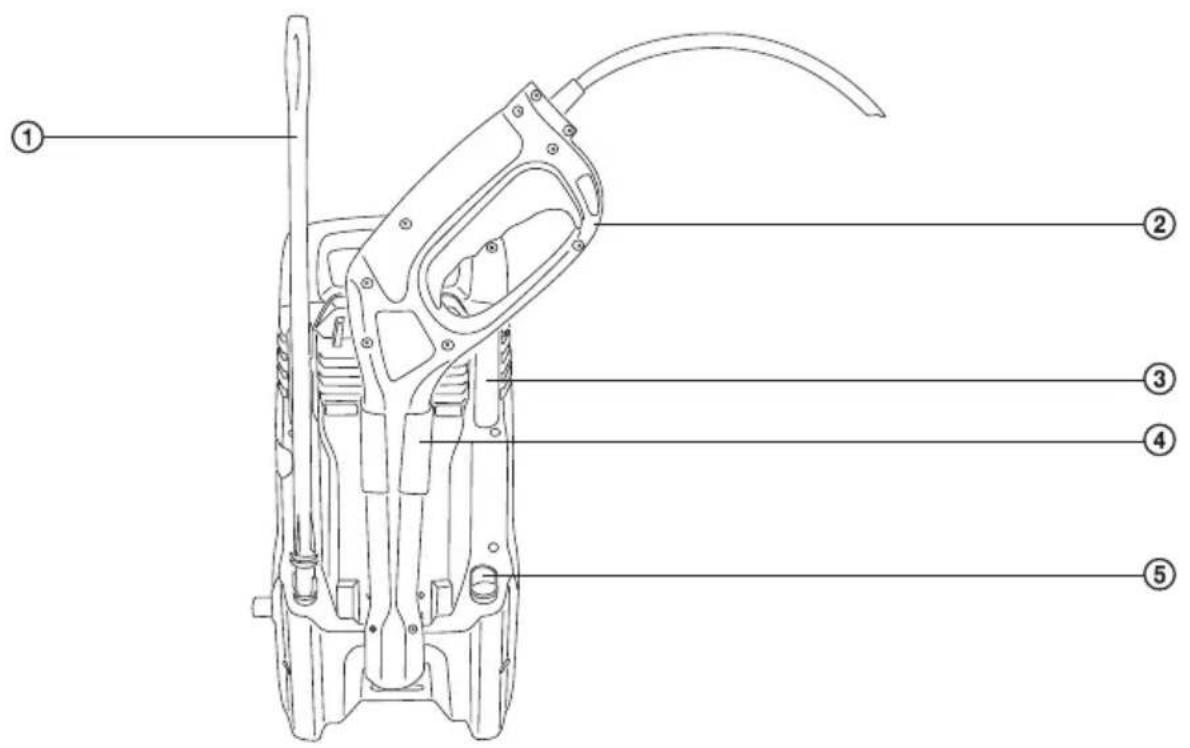
① Working attachment
② Pistol
③ Parking position groove
④ Parking position holder
⑤ Parking position pocket
CLEANING AND MAINTENANCE

Warning
• Before cleaning disconnect this product from the power source.
To clean the outer parts of the product, use a soft cloth dipped in lukewarm water. Do not use aggressive cleaning products and solvents as this could damage the surface of the product.
We recommend you regularly clean especially the nozzle of the working attachment. To clean the nozzle use the included cleaning pin. Nozzles with regulation it is necessary to first turn the nozzle until it is fully open.
TROUBLESHOOTING
| PROBLEM | POSSIBLE CAUSE | SOLUTION |
| The product cannot be turned on | The power plug is not inserted | Insert the power plug into the power socket |
| Faulty power socket | Try using a different power socket | |
| Faulty extension cord | Try using a different extension cord | |
| Incorrect input voltage | Check that the mains voltage corresponds to the product's specifications | |
| Power for the product is not turned on | Turn on the product | |
| A grounding protection device is turned off (if used) | Reset the grounding protection device | |
| The pump keeps stopping | The product is overheating due to insufficient water supply | Check the amount of water supplied - the hose should fill a 10 litre bucket in 1 minute |
| Significant pressure fluctuations | The nozzle is partially clogged | Clean out the nozzle using a pin and flush it out from the front |
| The product does not reach operating pressure | Blocked/worn out nozzle | Clean/replace the nozzle |
| Inappropriate water supply | Check the amount of water supplied | |
| Inlet hose is pressed down | Straighten the hose | |
| Blocked water filter | Clean the filter | |
| Inlet hose is blocked | Check whether the hose is leaking or blocked | |
| The pistol trigger does not work | The arrest is activated | Deactivate the arrest |
INCLUDED CONTENTS
1) High pressure cleaner
2) High pressure hose
3 Pistol
4 Working attachment
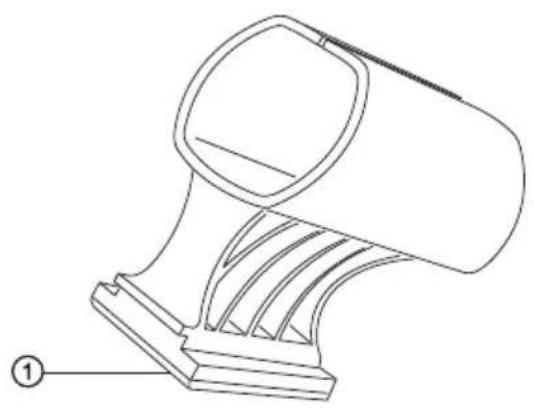
5 Parking position holder
6) Inlet valve adapter
7) Cleaning needle
F
natural_image
Technical line drawing of a mechanical component with no visible text or symbols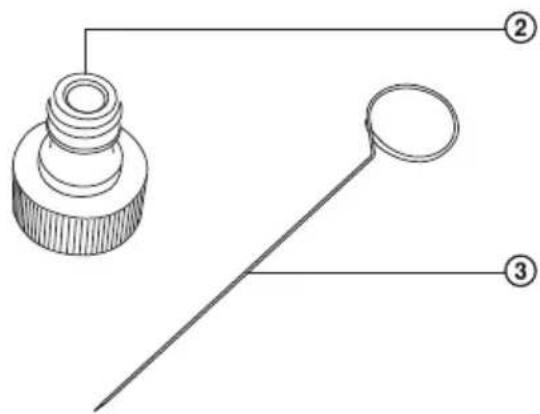
natural_image
Technical line drawing of a mechanical component with three labeled parts (no text or symbols present)① Parking position groove
② Inlet valve adapter
③ Cleaning needle
TECHNICAL SPECIFICATIONS
Nominal voltage....220 - 240 V AC (alternate current)
Nominal frequency....50 Hz
Rated power input....1100 W
Maximum power input 1300 W
Maximum pressure 110 bar / 11 MPa
Flow rate 320 l/hour
Maximum temperature of supplied water 40°C
Length of hose 3.5m
Operational range 9,5m + length of water current
Noise level....<85dB
Protection class IPX5
Length of power cord ....5 m
Dimensions(width x depth x height) 216 x 195 x 432 mm
Weight without attached accessories 4,8kg
Weight with the accessories attached 5,7kg
Amendments to text and technical parameters are reserved.
DISPOSAL OF USED ELECTRICAL & ELECTRONIC EQUIPMENT
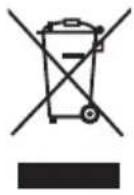
The meaning of the symbol on the product, its accessory or packaging indicates that this product shall not be treated as household waste. Please, dispose of this equipment at your applicable collection point for the recycling of electrical & electronic equipments waste. In the European Union and Other European countries which there are separate collection systems for used electrical and electronic product. By ensuring the correct disposal of this product, you will help prevent potentially hazardous to the environment and to human health, which could otherwise be caused by unsuitable waste handling of this product. The recycling of materials will help conserve natural resources. Please do not therefore dispose of your old electrical and electronic equipment with your household waste. For more detailed information about recycling of this product, please contact your local city office, your household waste disposal service or the shop where you purchased the product.
INSTRUCTIONS AND INFORMATION REGARDING THE DISPOSAL OF USED PACKAGING MATERIALS
Dispose of used packaging material in a location determined by the municipality for the disposal of wastes.

This product meets all the basic EU regulation requirements that relate to it.
- High Pressure Cleaner
- User's manual
- SENCOR®
- EN-1
- CONTENTS
- IMPORTANT SAFETY NOTICE
- INTRODUCTION
- What is a high pressure cleaner?
- Possible applications
- PRODUCT DESCRIPTION
- Warning
- ASSEMBLING THE PRODUCT
- Note
- Method for connecting the attachment to the pistol:
- Connecting the hoses:
- EN-7
- INSTRUCTIONS FOR USE
- Tip:
- Using the parking positions
- CLEANING AND MAINTENANCE
- INCLUDED CONTENTS
- TECHNICAL SPECIFICATIONS
- DISPOSAL OF USED ELECTRICAL & ELECTRONIC EQUIPMENT
- INSTRUCTIONS AND INFORMATION REGARDING THE DISPOSAL OF USED PACKAGING MATERIALS
Brand : SENCOR
Model : SHW 3001
Category : High Pressure Dishwasher