RasterLink Pro 5 TA - Logiciel photo/vidéo Mimaki - Free user manual and instructions
Find the device manual for free RasterLink Pro 5 TA Mimaki in PDF.


| Product Type | RIP software (Raster Image Processor) for Mimaki inkjet printers |
| Version | RasterLink Pro 5 TA |
| Supported Operating Systems | Windows XP Professional/Home SP3 (32-bit), Windows Vista SP2 (32/64-bit), Windows 7 (32/64-bit), Windows 8 (32/64-bit), Windows 8 Pro/Enterprise |
| CPU Requirements | Intel Core Duo 1.8 GHz or higher; Intel chipset recommended |
| Memory (RAM) Requirements | 2 GB or more |
| Hard Disk Space | 60 GB recommended (NTFS format) |
| Supported Interfaces | IEEE1394, Ethernet, USB 1.1/2.0 (for dongle/printer connection) |
| Maximum Number of Printers | Up to 4 printers simultaneously |
| Input Data Formats | PostScript Level 3 (PS), EPS, MRL, TIFF, JPEG, BMP, PDF (PDF 1.5 or later not supported) |
| Maximum Spool Image Size | Width: 10871 mm, Length: 10871 mm |
| Maximum RIP Image Size | Width: 50 m, Length: 50 m |
| Color Profile | Installed ICC profiles for various media; tone curve, contrast, density adjustment |
| License Activation | Online activation via Internet or substitute activation via file; 60-day trial period |
| Supported Applications | Adobe Illustrator 8-CS6, Adobe Photoshop 5-CS6 |
| PostScript Fonts | Standard 60 European fonts; adding fonts not allowed |
| Update Methods | Program Update and Profile Update via Internet after license activation |
Frequently Asked Questions - RasterLink Pro 5 TA Mimaki
User questions about RasterLink Pro 5 TA Mimaki
0 question about this device. Answer the ones you know or ask your own.
Ask a new question about this device
Download the instructions for your Logiciel photo/vidéo in PDF format for free! Find your manual RasterLink Pro 5 TA - Mimaki and take your electronic device back in hand. On this page are published all the documents necessary for the use of your device. RasterLink Pro 5 TA by Mimaki.
USER MANUAL RasterLink Pro 5 TA Mimaki
The kinds of manuals and how to use them
This product comes with following manuals.
Installation Guide
This manual explains how to install and set up RasterLinkPro5 SG/RasterLink Pro5 IP/RasterLinkPro5 TA.
you are now reading this manual.
Network Connection Guide
This manual explains how to set computer to connect to RasterLinkPro5 via network. (This is provided in PDF file in the manual CD.)
Reference Guide
There are two kinds of reference guides.
One is for common settings to each printer and the other is for special settings to each printer.
They explain necessary setting items of the functions and operation in order to use RasterLinkPro5 SG/RasterLinkPro5 IP/RasterLinkPro5 TA.
Read the proper reference guide for your printer.
(This is provided in PDF file in the manual CD.)
Firmware Update Operation Manual
This manual explains how to use the update software for MIMAKI printer.
(This is provided in PDF file in the manual CD.)
Adobe, the Adobe logo, Photoshop, Illustrator and PostScript are trademarks of Adobe System Incorporated.
Apple, Macintosh, Power Macintosh, Mac OS and Mac OSX are registered trademarks of Apple Inc.
Microsoft, Windows, Windows 2000, Windows XP, Windows Vista, Windows 7 or Windows 8 are trademarks of Microsoft Corporation and other countries.
PC MACLAN is registered trademarks of Miramar Systems, Inc.
All trademarks of Corel used in this document are trademarks or registered trademarks of the Corel Corporation and its related companies in Canada, the United States and/or other countries.
All brand names and product names are trademarks or registered trademarks of their respective companies.
Notice
- It is strictly prohibited to write or copy a part or whole of this document without our approval.
- The contents of this document may be subject to change without notice.
- Due to improvement or change of this software, the description of this document could be partially different in specification, for which your understanding is requested.
- It is strictly prohibited to copy this software to other disk (excluding the case for making backup) or to load on the memory for the purpose other than executing it.
- With the exception of what is provided for in the warranty provisions of MIMAKI ENGINEERING CO., LTD., we do not assume any liability against the damages (including but not limited to the loss of profit, indirect damage, special damage or other monetary damages) arisen out of the use or failure to use of this product. The same shall also apply to the case even if MIMAKI ENGINEERING CO., LTD. had been notified of the possibility of arising damages in advance. As an example, we shall not be liable for any loss of the media (works) made using this product or indirect damages caused by the product made using this media.
About this manual
This manual explains how to set PC for installing RasterLinkPro5.
This document explains the installation procedure using Windows Vista as an example.
Unless otherwise specified, use the same procedure for Windows XP and Windows 7.
Notations
Menu items are enclosed in quotation marks like "Full Color".
Buttons in dialog box are framed like . Close
This manual is based on RasterLinkPro5 SG. Please replace software and printer names used in this manual with those of the software and printer you are using.
Symbol
NOTE!
Indicates a caution you must observe when operating the product.

Describes a useful procedure.

Shows the number of the page that has related contents.
Table of Contents
The kinds of manuals and how to use them....2
Notice 3
About this manual ....3
About RasterLinkPro5....6
System requirements ......9
Installing PC for RasterLinkPro5....9
Client PC....10
Set PC with RasterLinkPro5 installed.... 11
RasterLinkPro5 Installation 12
Operations before installing RasterLinkPro5 12
Set the RasterLinkPro5 CD 13
Install the RasterLinkPro5....14
License Activation ....16
Activating the License....16
Printer Registration to be used....23
Starting printer management 23
Adding a printer 25
Starting RasterLinkPro5 28
For Windows XP/ Vista / 7....28
For Windows 8....29
Updating the Program....31
For Windows XP/ Vista / 7....31
For Windows 8....32
Updating the Profile....33
For Windows XP/ Vista / 7 ....33
For Windows 8....34
Setting Internet Connection Options ....36
Upgrade RasterLinkPro5 37
Updating version of RasterLinkPro5 38
Upgrading RasterLinkIII / RasterLinkPro4 series to RasterLinkPro5 ..40
Uninstall RasterLinkPro5.... 43
Deactivating the License....44
Checking the contents deletion in shared folder 49
Check that the folder contents are deleted .... 50
Uninstall RasterLinkPro5....52
If an error occurs in license authentication....55
How to release license authentication when PC has broken down....56
About RasterLinkPro5
RasterLinkPro5, which is application software, receives data in PostScript3 format and supplies printing data to an ink jet printer made by MIMAKI ENGINEERING.
Example of system configuration of RasterLinkPro5
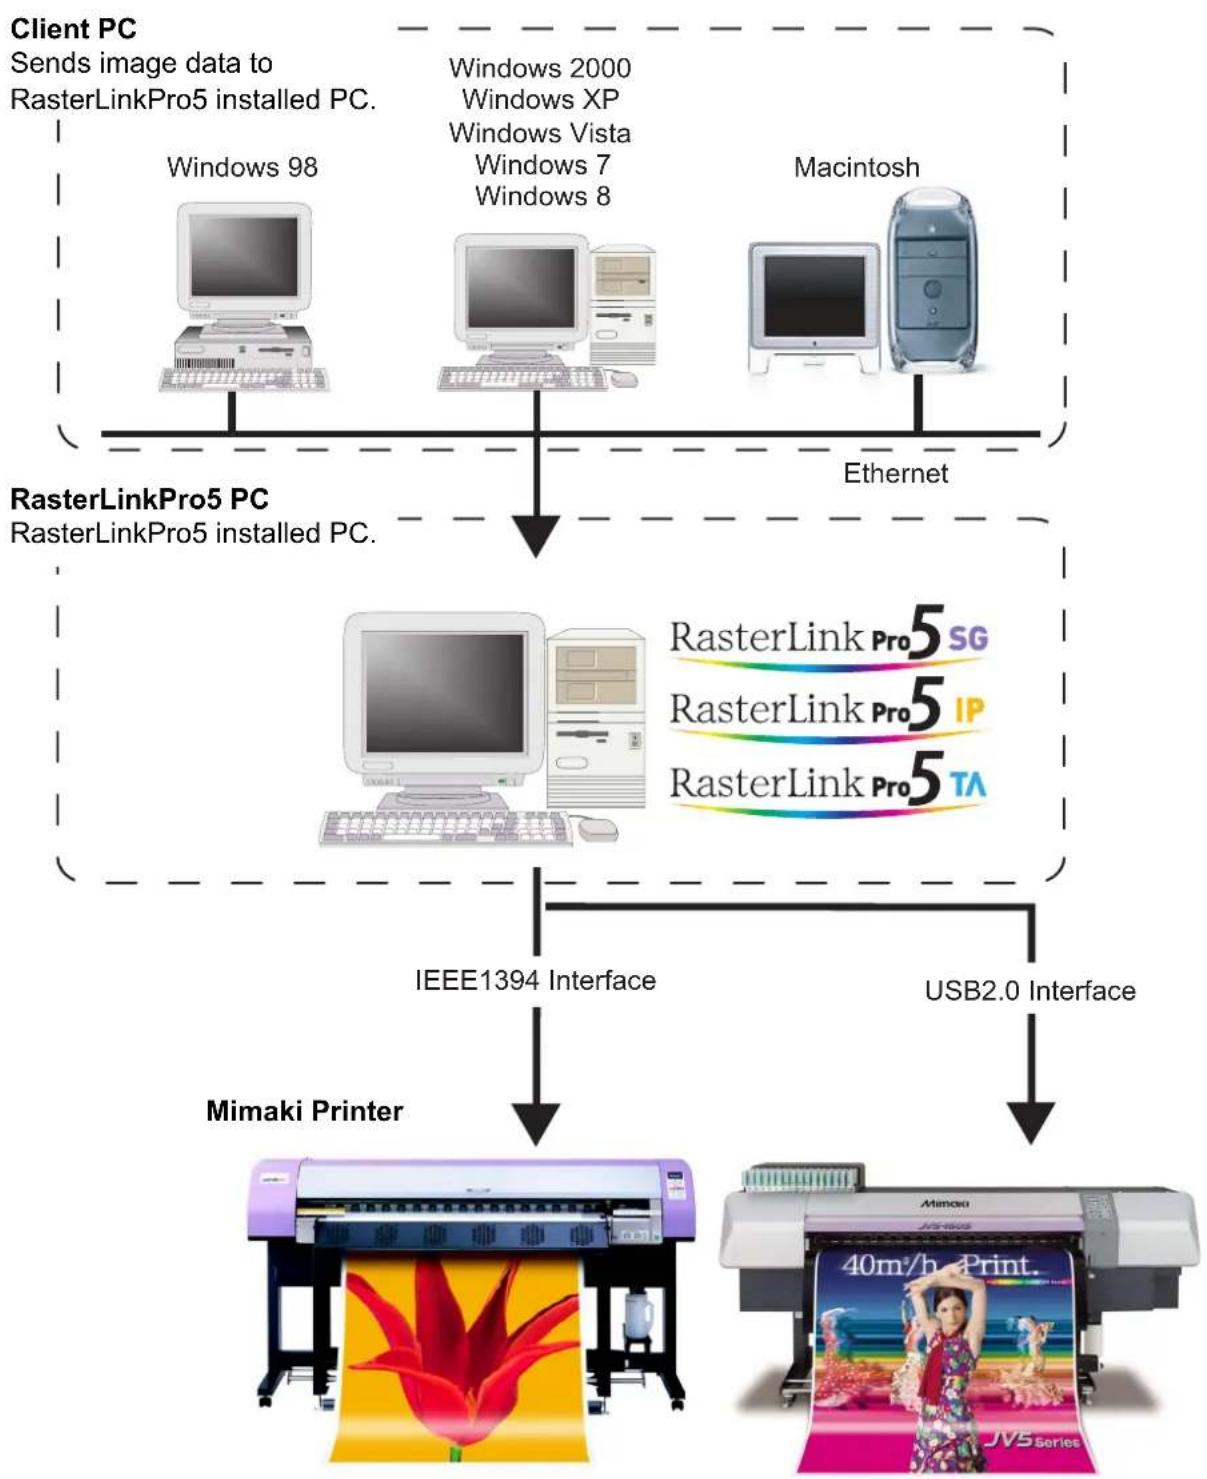
flowchart
graph TD
    A["Client PC"] --> B["RasterLinkPro5 PC"]
    B --> C["Macintosh"]
    A --> D["Mimaki Printer"]
    D --> E["IEEE1394 Interface"]
    D --> F["USB2.0 Interface"]
    B --> G["RasterLinkPro5 installed PC"]
    G --> H["Ethernet"]
    H --> I["Windows 98, Windows XP, Windows Vista, Windows 7, Windows 8"]
    B --> J["RasterLinkPro5 SG, RasterLink Pro5 IP, RasterLink Pro5 TA"]
Color Profile makes color matching easier
Installed Color Profile meets to various kinds of media and realizes the best print without complicated settings.
Color adjustment function which enables delicate representation
RasterLinkPro5 has a function of adjustment to color (the tone-curve, contrast of each color, and density of CMY ink).
It copes with various media flexibly.
Supported printers
RasterLinkPro5 is intended for use with MIMAKI ENGINEERING ink jet printers.
Up to 4 printers can be connected at the same time. ^*1
RasterLinkPro5 provides a number of different functions according to the features of the printer. Functions and operational settings such as print condition and job editing differ according to the printer. Therefore, there is a different Reference Guide for each printer type. The Reference Guide is provided in PDF file in the manual CD.
Input/Output data
Input data
PostScript Level 3(PS file), EPS, MRL, TIFF, JPEG, BMP, PDF (PDF 1.5 or later is not allowed ^*2 )
Data formats other than MRL are automatically recognized.
AI files are not supported.
Alpha channel can not be used with TIFF data.
PostScript Font
Standard 60 European fonts
Adding fonts are not allowed.
Application
Adobe Illustrator 8, 9, 10, CS, CS2, CS3, CS4, CS5, CS6
Adobe Photoshop 5, 6, 7, CS, CS2, CS3, CS4, CS5, CS6
Maximum spool processible image size
Width : 10871 mm (428 inch)
Length : 10871 mm (428 inch)
Maximum RIP processible image size
Width : 50 meters
Length : 50 meters
NOTE!
Some output data even within above sizes may not be ripped, depending on the kind of data.
In this case, change the data or divide the data by application software for printing.
The largest image size which can be tiled ^*3
•Width: 50 meters, Length: 50 meters
- When the data width size exceeds the printable range of a printer, it is necessary to use the tiling function.
- Image sizes for tiling differ according to output resolutions.
- The maximum size of tiling-supported images depends on the input data. If the input data is too complex, the maximum image size may not be printed.
NOTE!
- If the print resolution of the image is 1,440 x 1,440 dpi, the maximum printable image size is as follows.
| Width Length | |
| 4-color model 2m 50m | |
| 6-color model 1m 50m |
- Even within the processable image size, the maximum size for width may be restricted depending on the printer specifications. Also even when using specialty ink (white ink and the like), the maximum size for width may be restricted depending on the resolution. Please check the "Max. printing width" in the manual of your printer.
*1: If multiple printers are connected with an IEEE1394 interface, the same number of IEEE1394 interface cards are required.
*2:The PDF version and Acrobat version are as follows.
PDF 1.3 ---- Acrobat 4
PDF 1.4 ---- Acrobat 5
PDF 1.5 ---- Acrobat 6
PDF files saved with Illustrator are not supported.
*3: Some printers do not support the tiling function.
System requirements
Installing PC for RasterLinkPro5
The following conditions are required to install RasterLinkPro5.
| OS: Microsoft | ^® Windows ^® XP Professional Edition SP3 or later (32-bit) ^*1 : Microsoft ^® Windows ^® XP Home Edition SP3 or later (32-bit) ^*1 : Microsoft ^® Windows Vista ^® Home Premium SP2 or later (32-bit/64-bit): Microsoft ^® Windows Vista ^® Business SP2 or later (32-bit/64-bit): Microsoft ^® Windows Vista ^® Vista Ultimate SP2 or later (32-bit/64-bit): Microsoft ^® Windows Vista ^® Vista Enterprise SP2 or later (32-bit/64-bit): Microsoft ^® Windows 7 ^® Home Premium (32-bit/64-bit): Microsoft ^® Windows 7 ^® Professional (32-bit/64-bit) ^*2 : Microsoft ^® Windows 7 ^® Ultimate (32-bit/64-bit) ^*2 : Microsoft ^® Windows 7 ^® Enterprise (32-bit/64-bit) ^*2 : Microsoft ^® Windows 8 ^® (32-bit/64-bit): Microsoft ^® Windows 8 ^® Pro (32-bit/64-bit): Microsoft ^® Windows 8 ^® Enterprise (32-bit/64-bit)CPU: ^® CoreTM Duo 1.8GHz or more ^*3 Chip set : Intel ^® chip set ^*3 Memory : 2 GB or moreHDD : 60 GB capacity recommended (NTFS format ^*4 )Interface : IEEE1394 ^*5 , Ethernet Port ^*6 , USB1.1/2.0 ^*7 |
*1 : Windows XP 64-bit is not supported.
*2 : It cannot be operated on the Windows XP mode of Windows 7.
*3 : For CPU or chip set, use the products made by Intel. If not using it, an error may occur during printing and the printer may stop printing.
*4 : With the FAT32 format, problems occur when using hot folders from a Macintosh client.
*5 : It is required for connecting to the printer with IEEE1349 Interface.
Do not connect to printer using repeater hub. An error may occur during printing and the printer may stop printing.
*6 : It is required for license activation. (Even if you do not connect with the Internet, or, you use a PPP connection network device etc., it is required.)
For direct license activation from RasterLinkPro5, connect to the Internet.
When Macintosh is connected with PC MACLAN, Network card that supports AppleTalk is needed.
*7 : USB 2.0 port is required for connecting to the printer with USB 2.0 interface.
Do not connect to the printer via a USB hub or an extension cable. An error may occur during printing and the printer may stop printing.
USB 1.1 port or USB 2.0 port is needed to use the dongle. Do not connect the dongle via a USB hub
Client PC
The client PC to be connected is limited depending on the OS of RasterLinkPro5 PC. For the connection method, see “Network Connection Guide” in the manual CD.
Set PC with RasterLinkPro5 installed
RasterLinkPro5 PC is a PC on which RasterLinkPro5 is to be installed or already installed. This is the explanation about necessary settings and the procedure of installation for operating RasterLinkPro5 properly.

In this Installation Guide, the RasterLinkPro5 PC host name is described as "RasterLink". Where the explanation mentions "RasterLink", substitute the host name of your RasterLinkPro5 PC.
RasterLinkPro5 installation (P.12)
Install the RasterLinkPro5.
License activation (P.16)
Activate the RasterLinkPro5 license.
Printer Registration (P.23)
Register printer on RasterLinkPro5.
Starting RasterLinkPro5 (P.28)
Start the RasterLinkPro5
RasterLinkPro5 Installation
Operations before installing RasterLinkPro5
Perform the following operations before installing RasterLinkPro5.
1 Check whether the MIMAKI's other software RIP is installed or not on the PC for installation.
- If RasterLinkProII v2.0 or later / RasterLinkIII series / RasterLinkPro4 series is installed, see the following page. ?Upgrading RasterLinkIII / RasterLinkPro4 series to RasterLinkPro5? (P.40)
- If RasterLinkPro UJ / RasterLinkPro GP / RasterLinkProll v1.2 or before is installed, uninstall it.
- If RasterLinkPro is installed, you can install RasterLinkPro5 without any change. However, you cannot use RasterLinkPro when RasterLinkPro5 is running.
2 Check the Automatic Updates setting of Windows Update.
If you select “Automatic” on the [Automatic updates] of Windows Update, automatically update program may be installed at the set times and the PC may be restarted. Once the PC is restarted when RasterLinkPro5 is running, you can never start RasterLinkPro5. To prevent automatic restart of the PC, select “Download updates for me, but let me choose when to install them.” on the [Automatic Updates] of the [Control Panel].
3 Set data receiving from the client PC.
Setting is required for receiving data from the client PC. See “Set PC with RasterLinkPro5 installed” for details.
4 Install MIMAKI IEEE1394 driver / MIMAKI USB 2.0 driver.
Check the interface used on the printer, and install the driver. Drivers are offered at the followings.
- Driver CD provided with the printer
• MIMAKI ENGINEERING website
NOTE!
- If using Windows 7/8, use the MIMAKI device driver Ver3.00 or later.
- Use the MIMAKI IEEE1394 driver Ver.2.20 or later, or MIMAKI USB2.0 driver Ver.1.10 or later.
Set the RasterLinkPro5 CD
NOTE!
Installing RasterLinkPro5 requires Administrator authority.
Insert the installation CD-ROM of RasterLinkPro5 into the CD drive, and the RasterLinkPro5 installation menu starts automatically.
In case the RasterLinkPro5 installation menu does not start automatically, double-click "CDMenu.exe" in the CD-ROM.
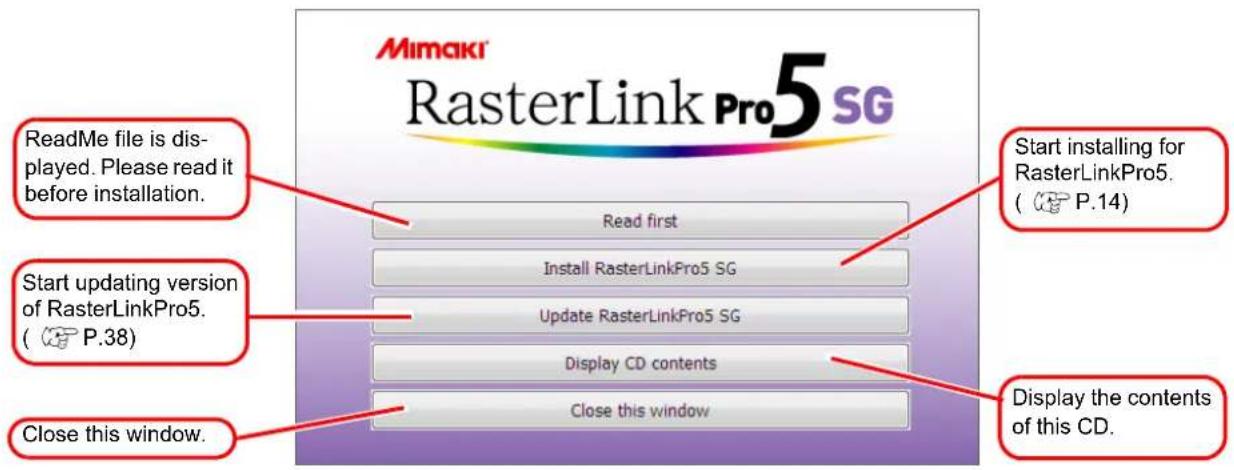

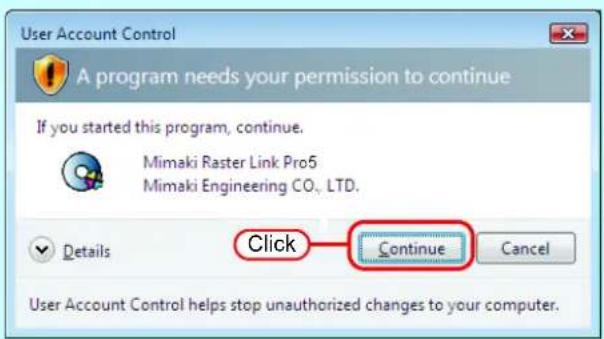
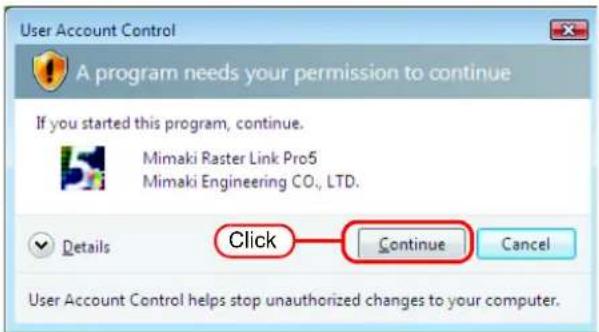
When the User Account Control screen appears before starting the Installation menu, click Continue
Install the RasterLinkPro5
1 Click Install RasterLinkPro5 the RasterLinkPro5 installation menu.
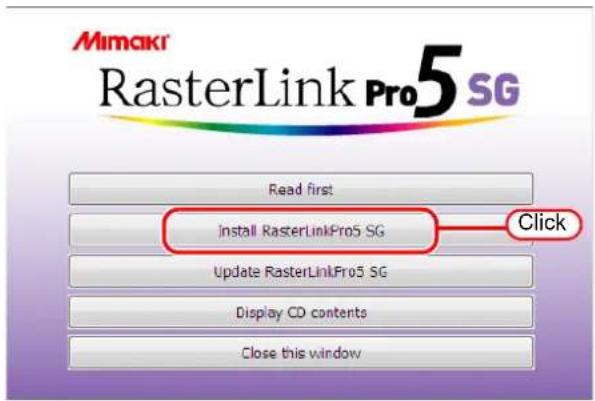
in
2 The confirmation screen for installing the USB dongle driver appears. Click . OK Installation of the USB dongle driver starts.
3 If Microsoft .NET Framework is not installed on your PC, the installer starts. Installation of the .Net Framework starts.
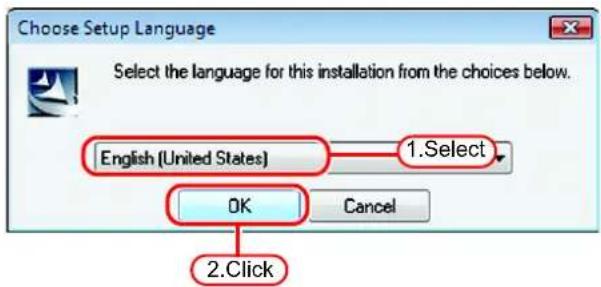
4 The "Choose Setup Language" dialog box appears.
Select a setup language, and click OK.
5 Click Next.
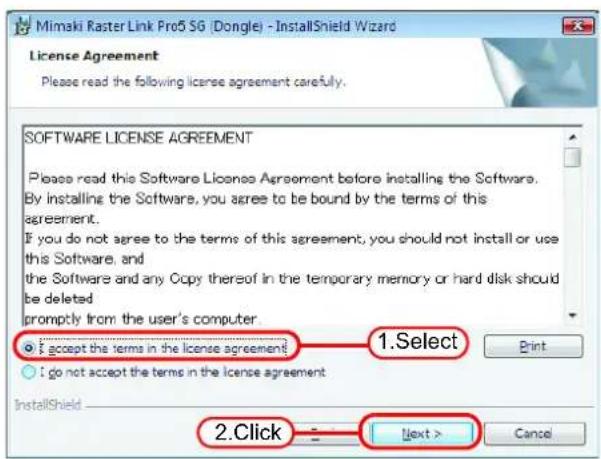
6 Select "I accept the terms in the license agreement."
Click Next.
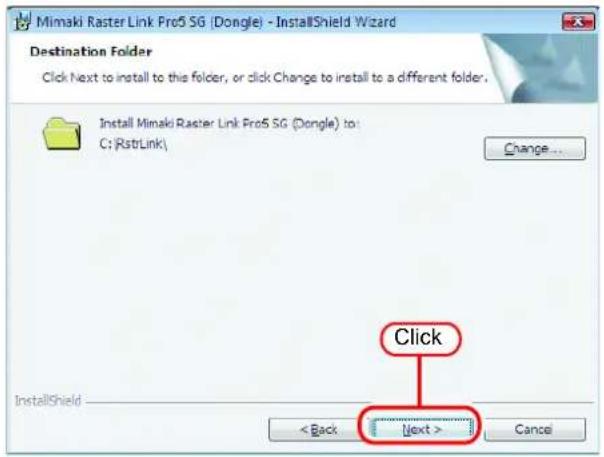
7 Specify a destination for the installation.
Specify a drive with sufficient spare capacity.
Click . Next
8 Click Install.
The RasterLinkPro5 files are copied to the installation destination.
9 RasterLinkPro5 installation finishes.
Click Finish.
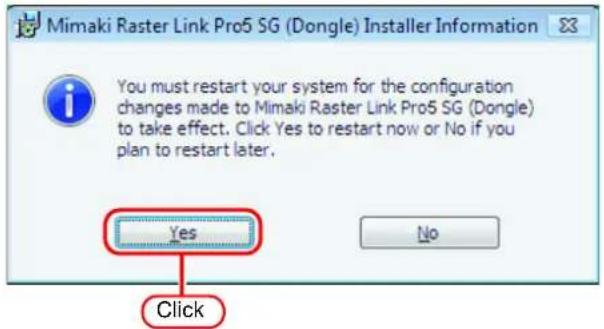
10 Restart the PC.
Click to Yestart.
NOTE!
After installing RasterLinkPro5, never do the following.
- Changing or deleting all the names of folder or file in the RasterLinkPro5-installed folder.
License Activation
You can download the update program from our Web server and use the Program Update (P.31) or the Profile Update (P.33) service to update RasterLinkPro5 to the latest version if you activate the license of RasterLinkPro5.
PC running RasterLinkPro5 needs to connect to the Internet to activate the license. If connecting to the Internet is not possible, you can use another PC that is connected to the Internet to activate the license.

- When you activate the license, the serial key and information for identifying the PC running RasterLinkPro5 (information generated automatically from the PC hardware configuration) are sent to Mimaki Engineering. No information to identify an individual is sent.
- You can use RasterLinkPro5 without activating the license for a trial period of 60 days from the time RasterLinkPro5 is first started. If the license is not activated during the trial period, RasterLinkPro5 will no longer be able to be used after the trial period ends.
- The program update (P.31) or profile update (P.33) cannot be used if you have not activated the license.
Activating the License
This section explains how to activate the license.

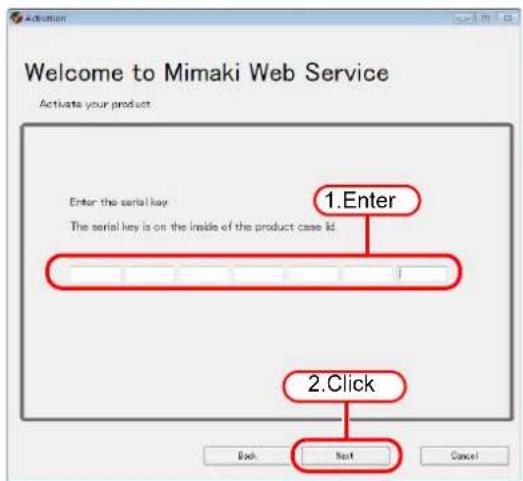
When you activate the license, the serial key attached to RasterLInkPro5 is required. Have the serial key at hand when you activate the license.
Start License Activation
If the license has not been activated, the license activation screen appears when you start RasterLinkPro5.
Or, start it as follows from the Windows [Start].
- Windows XP/Vista/7
[Start]-[All Programs]-[Mimaki RasterLinkPro5]-{License}-[License] - Windows 8
On [Start] screen, right-click to display the [All apps] icon.
Click the [All apps] icon to display the [Apps] screen.
In the [Mimaki RasterLinkPro5] category,m click the [License] icon.
Activate the License
There are two procedures for activating the license.
- Connect the PC running RasterLinkPro5 to the Internet and directly activate the license.
- If the PC running RasterLinkPro5 is not connected to the Internet, use another PC connected to the Internet or make a request for activating the license to the place of purchase or our customer service, and perform a substitute activation procedure ("Substitute License Activation Procedures" (P.18).
When the PC running RasterLinkPro5 is connected to the Internet:

Confirm that the PC running RasterLinkPro5 is connected to the Internet before activating the license.
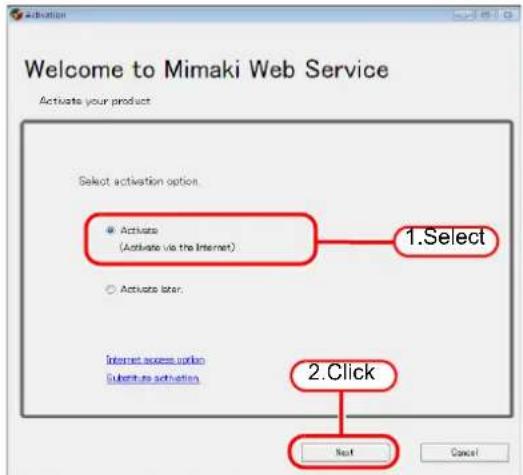
1 Display the license activation screen.

If you are using a proxy server, click [Internet access option]. For the setting procedure, see P36.
Select [Activate], and then click Next.
2 Enter the serial key. Click Next.
3 The server is accessed to activate the license.

If a personal firewall is set, a connection confirmation screen may appear. If a screen appears, allow the connection.
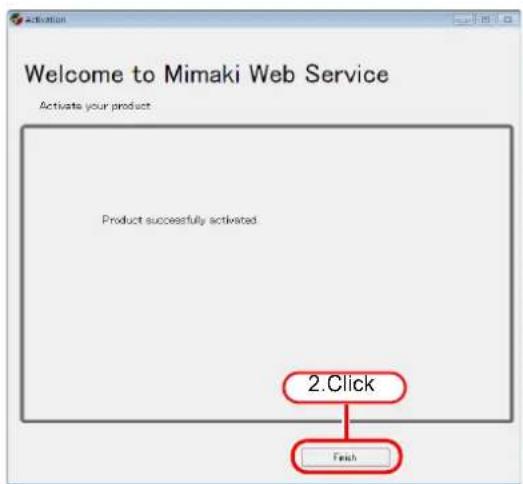
4 The activation finishes.
Substitute License Activation Procedures
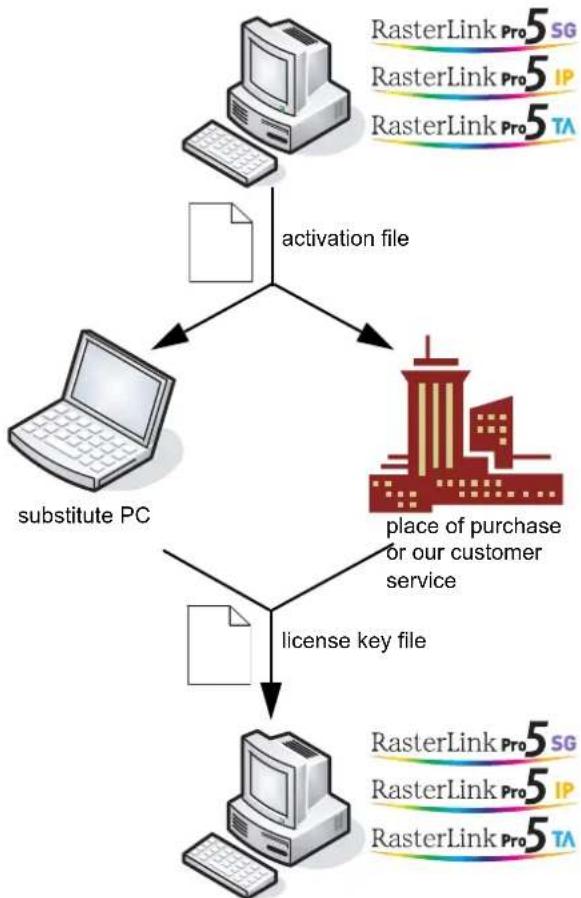
If the PC running RasterLinkPro5 is not connected to the Internet, you can use the following indirect license activation procedures.
- Use another PC connected to the Internet (hereafter referred to as "substitute PC") to activate the license.
• Make a request for activating the license to the place of purchase or our customer service.
Follow the instructions below for these procedures.
1 Create an activation file in Raster-LinkPro5.
P.19
2 If you have a PC connected to the Internet, copy the activation file to that PC and then activate the license.
P.20
If you do not have a setup in which connecting to the Internet is possible, the license can be activated if you send the activation file to the place of purchase or our customer service.
When you activate the license, a license key file is created and sent. Copy the file to the PC with RasterLinkPro5 installed.
flowchart
graph TD
    A["Computer"] -->|activation file| B["Laptop"]
    B --> C{Substitute PC}
    C -->|license key file| D["Printer"]
    style A fill:#f9f,stroke:#333
    style B fill:#ccf,stroke:#333
    style C fill:#cfc,stroke:#333
    style D fill:#fcc,stroke:#333
3 Read the license key file on the PC running RasterLinkPro5, and register the license key in RasterLinkPro5.
Creating an activation file
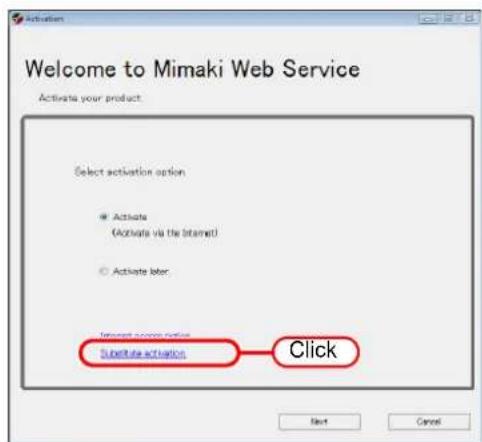
1 Display the license activation screen. Click [Substitute activation].
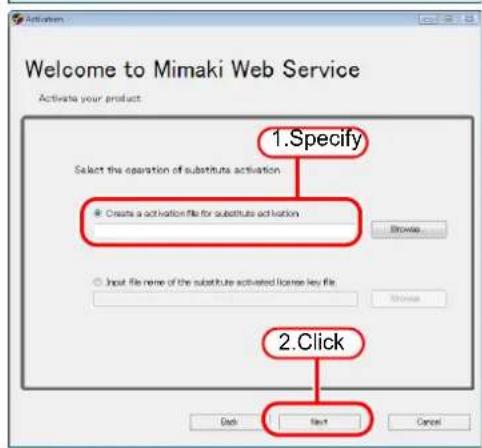
2 Select [Create an activation file for substitute activation.]. Specify the file name of the activation file. Clicking □ displays the [Save as new file] dialog box so that you can specify a file name.
Click Next.
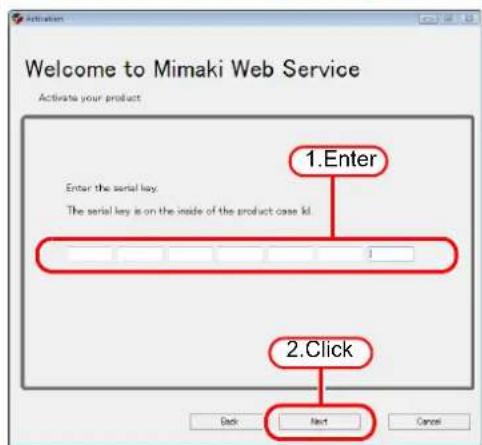
3 Enter the serial key. Click Next.
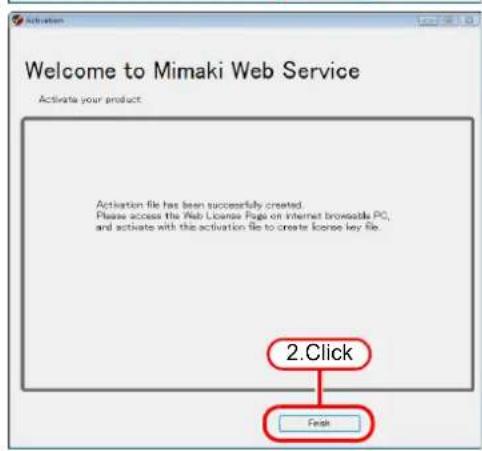
4 The work from the PC running RasterLinkPro5 is now finished. Click Finish.
To use a substitute PC for the activation, copy the activation file to the substitute PC. To make a request for activating the license, contact either the place of purchase or our customer service.
Work from substitute PC
1 Start the Web browser and enter the following address.
http://miws.mimaki.jp/license/agencytop.aspx
Click [Activation].
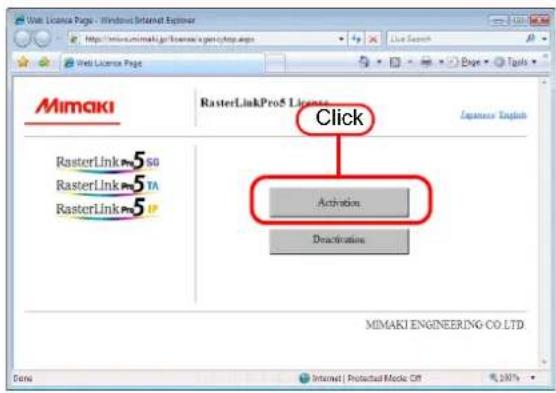
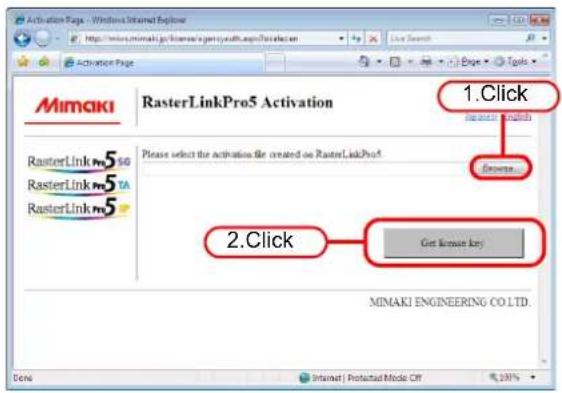
2 Click Browse .
The [File Upload] dialog box appears. Specify the activation file you saved on the PC running Raster LinkPro5.
Click [Get license key].
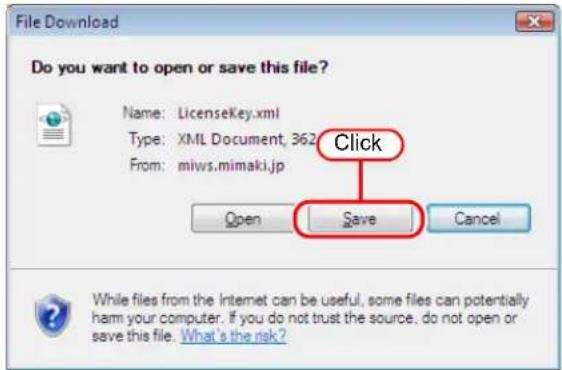
3 The [File Download] dialog box appears.
Click □ Save to open the [Save as] dialog box.
Assign the file a suitable name.
The license key is issued, and the file is saved.
Copy the saved license key file to the PC running RasterLinkPro5.
Load the license key file
1 Redisplay the license activation screen on the RasterLinkPro5 PC. Click [Substitute activation].
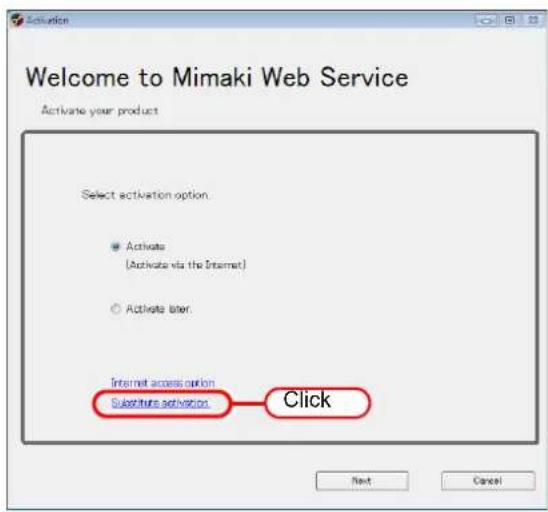
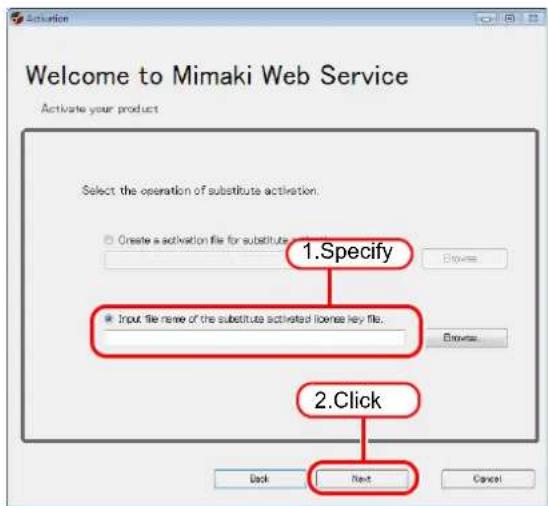
2 Select [Input file name of the substitute activated license key file.].
Specify the file name of the license key file. Clicking display the [Open the license key file] dialog box so that you can specify a file name.
Click Next.
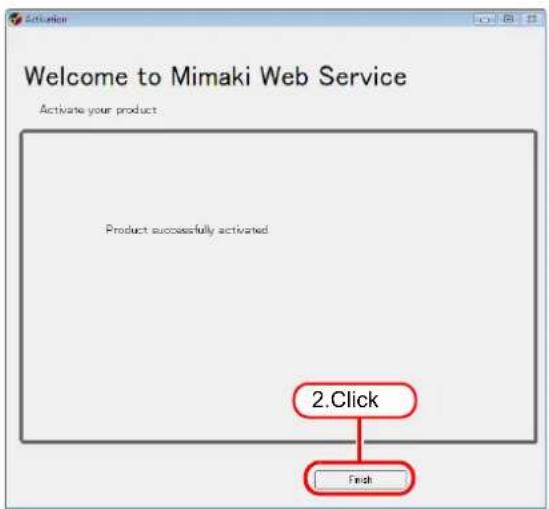
3 The activation finishes.
Activating the License Later
If you want to try out RasterLinkPro5 or activate the license later, follow the procedure below.
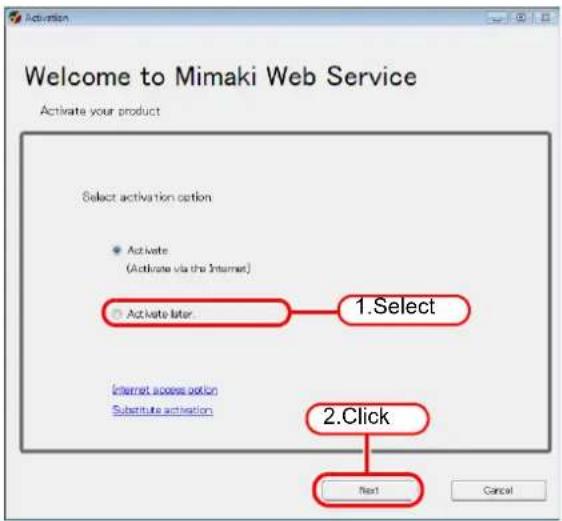
1 Start license activation.
Select [Activate later], and then click Next.
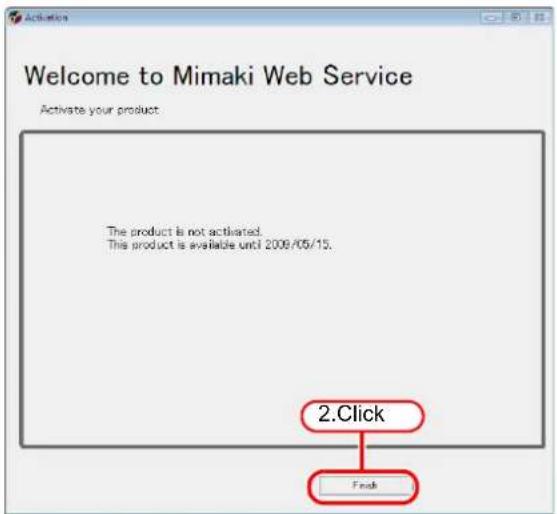
2 The trial period appears.

Activate the license within the trial period.
Click Finish.
Printer Registration to be used
One or more printer registration is required to use RasterLinkPro5. No printers are registered immediately after RasterLinkPro5 is installed.
Start [Printer Management] to register printer.

Up to four printers can be registered.
Starting printer management
For Windows XP/ Vista / 7
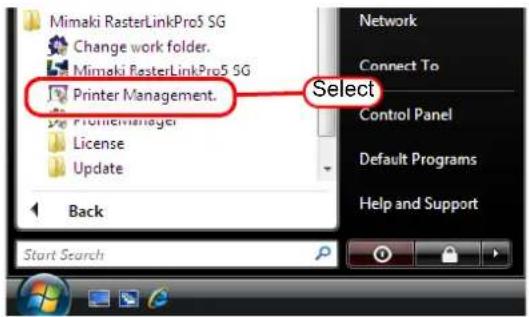
1 In Windows select [Start] - [All Programs] - [Mimaki RasterLink-Pro5] - [Printer Management].
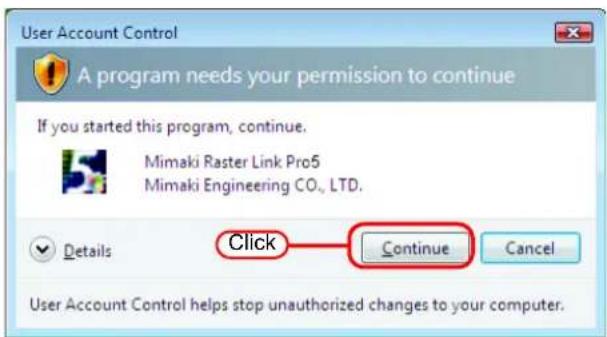
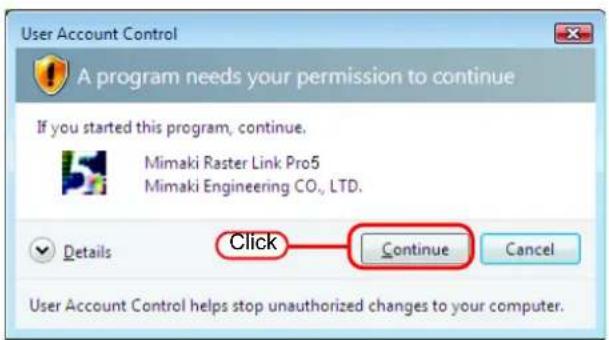
2 User Account Control screen is displayed. Click Continue.
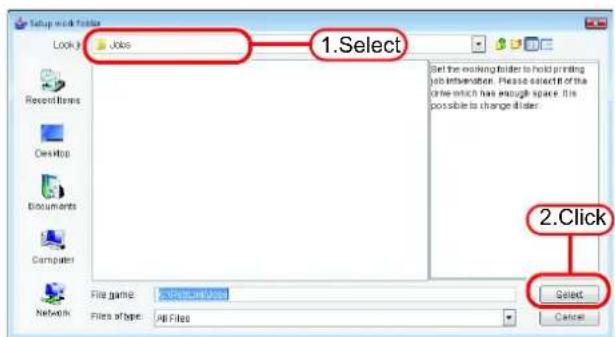
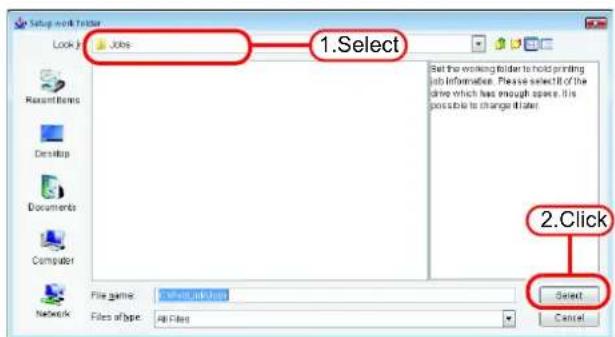
3 When first starting printer management, the setup work folder screen appears.
Select a folder on a disk with sufficient spare capacity.
A folder for saving the working files of jobs is created automatically in the selected folder.
For Windows 8
1 Right-click on the Start screen.
On the bottom-right side of the screen,
the [All apps] icon is displayed. Click it.
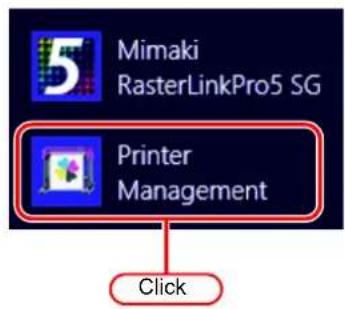
2 The screen changes to the application screen.
Click [Printer Management].
3 User Account Control screen is displayed. Click Continue.

4 When first starting printer management, the setup work folder screen appears. Select a folder on a disk with sufficient spare capacity. A folder for saving the working files of jobs is created automatically in the selected folder.
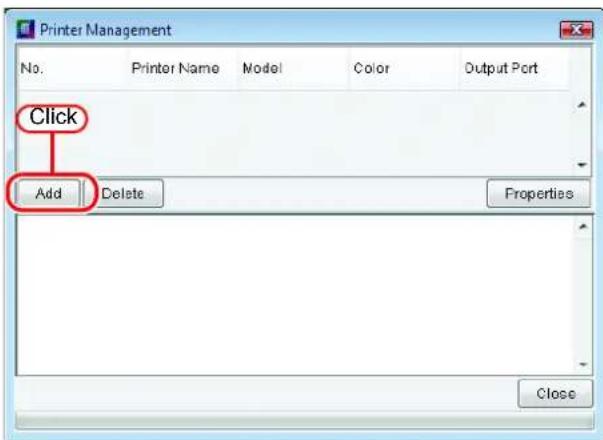
Adding a printer
1 Turn on the printer, and check that the RasterLinkPro5 PC and printer are connected with a USB 2.0 cable or IEEE1394 cable.
NOTE!
- Before connecting multiple printers to RasterLinkPro5 with a USB 2.0 interface, it is necessary to change the "MACHINE NAME" of each printer to a unique name on the Operation Panel.
- If multiple printers are connected to RasterLinkPro5 with an IEEE1394 interface, the same number of IEEE1394 interface cards are required. Multiple printers cannot be connected to one IEEE1394 interface card.
2 On the printer management screen, click the button.
3 The printer setting screen appears. If "IEEE1394" is specified for [Output Port], the printer model name and printer status (shown in brackets) of connected printers are shown in the [Available Printers] list.
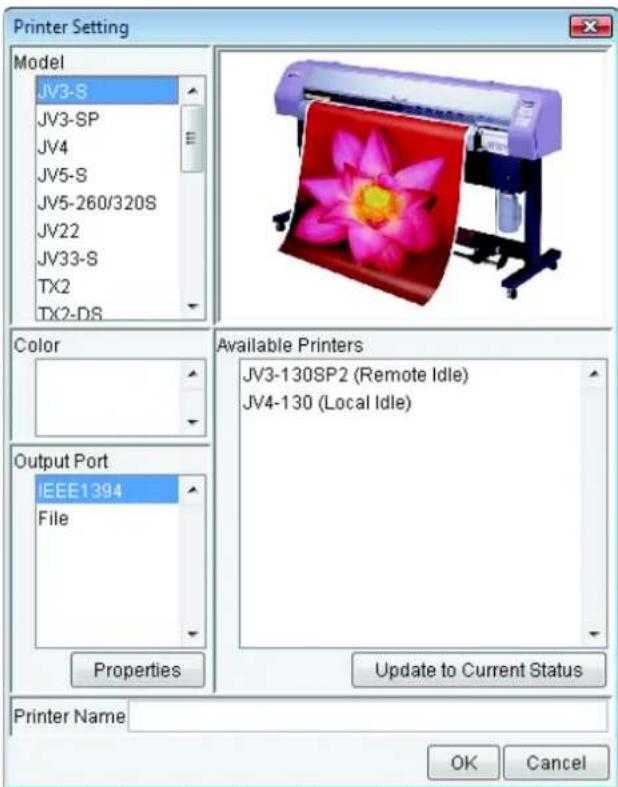

If several same model are connected, the same model names are shown in the [Available Printers] list and it may not be possible to identify the relevant printer. In this case, switch between the
If “USB 2.0” is specified for Port, the “MACHINE NAME” of the connected printers are shown in the Available Printers list.
4 Select the [Model], [Color], and [Available Printers] in accordance with the printer actually connected.
Normally, specify “USB 2.0” or “IEEE1394” for the [Output Port]. For the [Printer Name], enter a simple name to identify the printer.
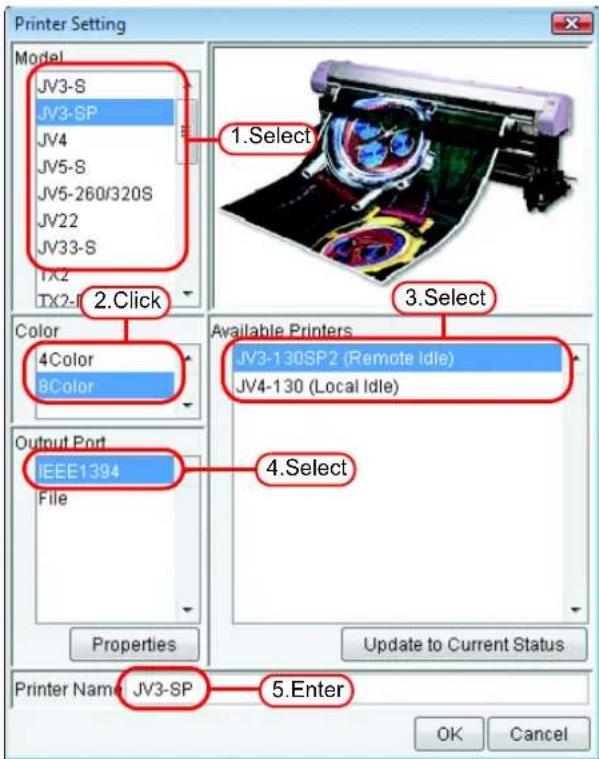
NOTE!
- When using a JV3-SL model, select JV3-SP 8 color. As for the device profile, install only the 4 color profile.
- The following single byte characters cannot be used for printer names. \ / : * ? " < > | ! ,
- The printer name entered cannot be changed later. When a printer is added, a default hot folder and printer driver are created with the printer name entered. Also, the printer name entered here appears in the title of the execution status screen shown in the main window.
- When accessing the hot folder or shared printer from a PC with an OS earlier than Windows ME, enter a printer name of single byte characters within 11 bytes.
- When registering two or more printers, duplicate printer names cannot be registered. Be sure to register different printer names.
- RasterLinkPro5 outputs plotting data to the printer selected in the available printer list and acquires its printer status (with "IEEE1394" the serial number of the printer identifies the printer, and with "USB 2.0" the "MACHINE NAME" identifies the printer). Therefore, when a different printer even of the same model is connected, it is necessary to select it from the available printer list and change its settings.
- When "IEEE1394" is selected for the output port, do not perform the following actions when RasterLinkPro5 is running. It may cause the PC to freeze.
- Turn off the printer
•Pull out the IEEE1394 cable

If "File" is selected for the output port, a file can be created that can be printed with the MIMAKI ENGINEERING printer command file output software NetLink.
5 Click OK .
Click on the confirmation screen.
The printer setting screen closes, and the process to add the printer starts. The progress is displayed in the information field of the printer management screen. When the process is complete, the message “Completed” is displayed.
- Do not force quit printer management while a printer is being added.
- If PC MACLAN is installed on the RasterLinkPro5 PC, the [PC MACLAN file server warning] screen may appear while the printer is being added.
Click the but-OK ton to stop the PC MACLAN file server. The PC is not shut down.
Click
Click
Do NOT perform the following operations with the printer driver of hot folder created by printer management.
Changing the name, deleting them, changing the share name, or canceling sharing.
(For the printer driver and the hot folder, see “Reference Guide Common features for every printer” in the manual CD.)
Starting RasterLinkPro5
Start the RasterLinkPro5 as follows.

License activation (P-16) is required to use RasterLinkPro5. Activate the license within 60 days after you first start RasterLinkPro5. Otherwise, RasterLinkPro5 will no longer be able to used after 60 days elapses. If the license is not activated, the license activation screen appears each time you start RasterLinkPro5.
For Windows XP/ Vista / 7
1 Select [Mimaki RasterLinkPro5]; [Start] - [All Programs] - [Mimaki RasterLinkPro5] menu.
Or double-click the "Mimaki Raster-LinkPro5" icon on the desktop.
The RasterLinkPro5 start screen is displayed.
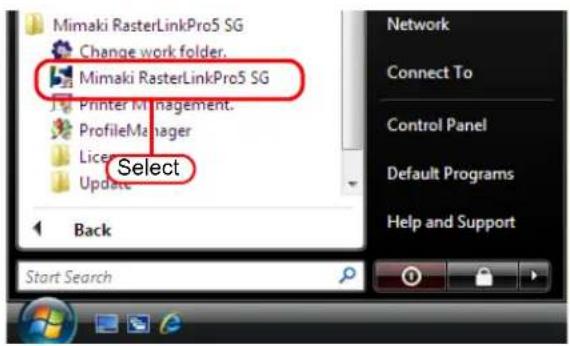
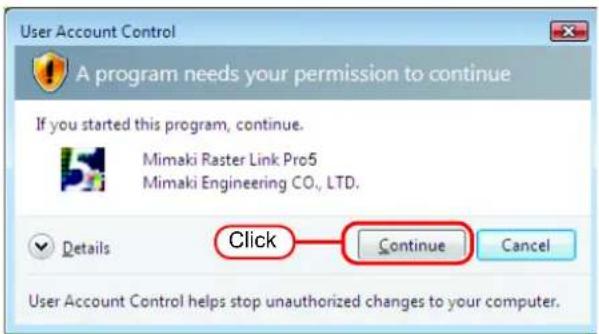
2 User Account Control screen is displayed.
Click Continue.

If the security center symbol (shield) is displayed

If the security center symbol (shield) is displayed, in order for a
file to be executed, display the User Account Control screen and make sure that file execution is permitted.
3 The main window of RasterLinkPro5 is displayed.
![Mimaki® RasterLink Pro5 SG [10:30:05] Checking the version information. [10:30:05] Checking RGB input profile information. [10:30:06] Checking CMYK input profile information. [10:30:06] Checking profile information of CJV30(4Color).](/content/2026/05/843534/images/ef058dff15da7aafb4d42dd32a0b757cf68c7940860ffcc530cd9f42ed50361c.jpg)
For Windows 8
1 Right-click on the Start screen.
On the bottom-right side of the screen,
the [All apps] icon is displayed. Click it.
2 The screen changes to the application screen.
Click [Mimaki RasterLinkPro5].
Or, double-click the [Mimaki Raster-LinkPro5] icon on the desktop.
1 Right-click on the Start screen.
On the bottom-right side of the screen,
the [All apps] icon is displayed. Click it.
2 The screen changes to the application screen.
Click [Mimaki RasterLinkPro5].
Or, double-click the [Mimaki Raster-LinkPro5] icon on the desktop.

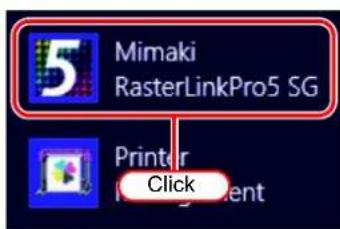
3 User Account Control screen is displayed.
Click Continue.

If the security center symbol (shield) is displayed

If the security center symbol (shield) is displayed, in order for a file to be executed, display the User Account Control screen and make sure that file execution is permitted.
4 The main window of RasterLinkPro5 is displayed.

![[10:30:05] Checking the version information. [10:30:05] Checking RGB input profile information. [10:30:06] Checking CMYK input profile information. [10:30:06] Checking profile information of CJV30(4Color).](/content/2026/05/843534/images/1e60c165df9a3fe29fc31e9a6fe414c8b1da1ca74cff9957a1fb5dc3572c4e2e.jpg)

![File Edit Winning Disk(C): 50% 8.21 GB Available CPU Usage(I) Start Physics: Mon (960.8 MB) 71% 2013 MB Available Job Queue Start Stop Cancel All Job List Auto-SP (4) Mode Full Color 0 Jobs Auto Execution Start Stop Printer Name Group File Name Format Thumbnail Status File Size Ripped Data Date/Time Print Count B9.25.54 [MRL - Starting information for the job B9.25.54 [MRL jobs exist B9.25.54 [JNQ-SPM]: Started monitoring Hot Folder B9.25.54 [JNQ-SP]: Started monitoring Hot Folder](/content/2026/05/843534/images/f25947920d72b7b9160f5b85137363df41e7106131f5558257271caea12cbe27.jpg)
Updating the Program
You can use the Internet to update RasterLinkPro5.
NOTE!
- Make sure you connect the PC running RasterLinkPro5 to the Internet.
- The program update cannot be used if you have not activated the license.
• After installation, we recommend checking whether the latest updates are available.
For Windows XP/ Vista / 7
1 Select [RasterLinkPro5] - [Update] - [Program Update] from the Start menu.
The program update starts.
Click Next.
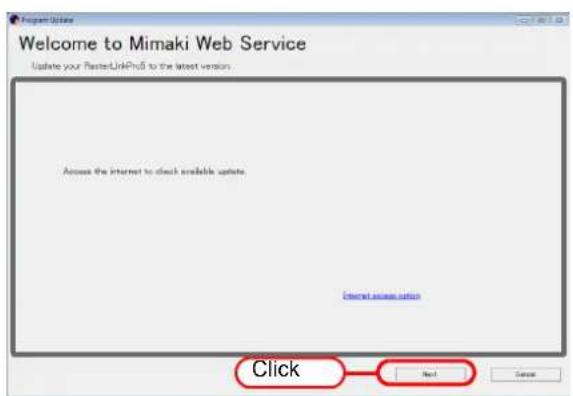
2 A connection is made to the Internet to check whether any updates are available.
NOTE!
If a personal firewall is set, a connection confirmation screen may appear. If a screen appears, allow the connection.
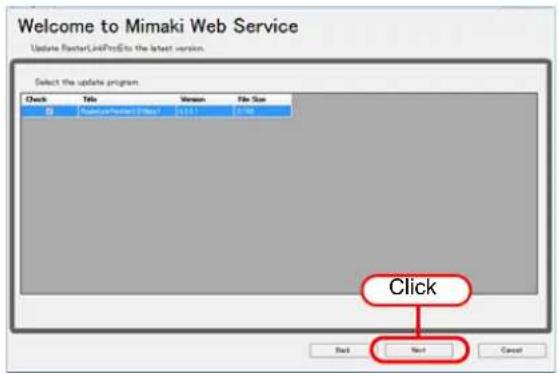
3 If updates are available, a list of the updates appears.
Select the updates you want to apply, and click Next.
![Welcome to Mimaki Web Service Update RasterLinkProE to the latest version. Select the update program Check Title Version File Size Newuser/RasterE 0.01 0.01 [119] Click Next Back Cancel](/content/2026/05/843534/images/d5f03fc09307aeb01a9e5fb75fad30952985e987f42ba08dea60e77187d89e94.jpg)
4 The updates are downloaded.
5 Downloading of the updates finishes.
Click to finish the download procedure.
The updates are applied when RasterLinkPro5 is started.
For Windows 8
1 Right-click on the Start screen. On the bottom-right side of the screen, the [All apps] icon is displayed. Click it.

2 The screen changes to the application screen. Click [Program Update].

3 A connection is made to the Internet to check whether any updates are available.
NOTE!
If a personal firewall is set, a connection confirmation screen may appear. If a screen appears, allow the connection.
4 If updates are available, a list of the updates appears.
Select the updates you want to apply, and click Next.
5 The updates are downloaded.
6 Downloading of the updates finishes. Click to finish the download procedure.
The updates are applied when RasterLinkPro5 is started.
Updating the Profile
You can download and install the profile via the Internet.
NOTE!
- Make sure you connect the PC running RasterLinkPro5 to the Internet. - The profile update cannot be used if you have not activated the license.
For Windows XP/ Vista / 7
1 Select [RasterLinkPro5] - [Update] - [Profile Update] from the Start menu.
The profile update starts.
Click Next.
2 Specify the printer and ink to install a profile.
If [Show only registered printer] is checked, only registered printer is displayed. If unchecked, all printers usable on Raster-LinkPro5 is displayed.
Click Next.
![Welcome to Mimaki Web Service Install new profiles for your own printer. Please select the ink with your wishes from the [Combination of the printer and ink] tree Click Show only registered printer OK Next Cancel](/content/2026/05/843534/images/e53dbeea385544a636879ba38bf2f57eaddbbbf2813062b644861746f24789cf.jpg)
3 Specify the option.
If [Show only newly released profiles] is checked, only the profile released after the day specified at the following options is confirmed.
Select [Last downloaded] or [Specifies date].
For [Specifies date], click [Calendar] to select the date.
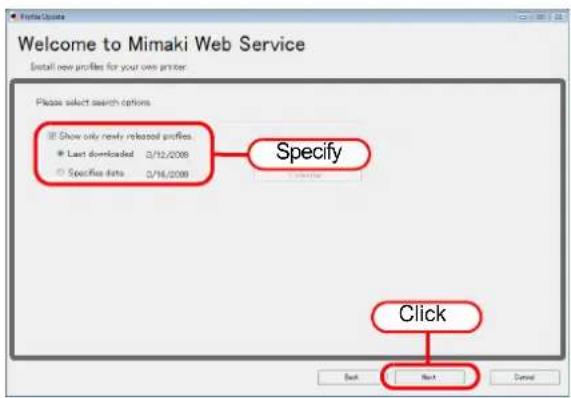
Click Next.
4 Connect the Internet and check the profile.
NOTE!
If a personal firewall is set, a connection confirmation screen may appear. If a screen appears, allow the connection.
5 If there are profiles that meet the settings, the list appears.
If [Do not show installed profile.] is checked, installed profiles are not displayed.
Select the profile to install, and click Next.
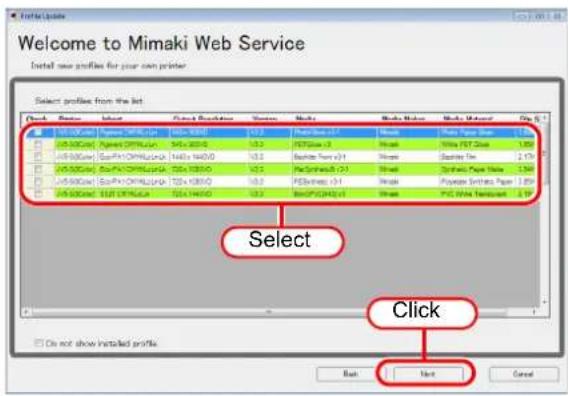
6 Download the profile.
7 Downloading of the profile finishes.
Click tFinish the download procedure.
The profile is installed when RasterLinkPro5 is started.
For Windows 8
1 Right-click on the Start screen. On the bottom-right side of the screen, the [All apps] icon is displayed. Click it.
2 The screen changes to the application screen.
Click [Profile Update].


3 Specify the printer and ink to install a profile.
If [Show only registered printer] is checked, only registered printer is displayed. If unchecked, all printers usable on Raster-LinkPro5 is displayed.
Click Next.
![Welcome to Mimaki Web Service Install new profiles for your own printer Please select the Ink with your wishes from the [Combination of the printer and Ink] tree Click Show only registered printer Back Next Cancel](/content/2026/05/843534/images/1a6ff70bc83f97ec96471a5063b483daa336af1bbd20bb0c00f614e2e955b54f.jpg)
4 Specify the option.
If [Show only newly released profiles] is checked, only the profile released after the day specified at the following options is confirmed.
Select [Last downloaded] or [Specifies date].
For [Specifies date], click [Calendar] to select the date.
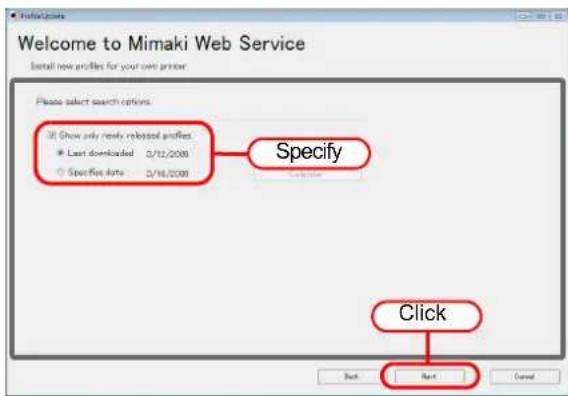
Click Next.
5 Connect the Internet and check the profile.
NOTE!
If a personal firewall is set, a connection confirmation screen may appear. If a screen appears, allow the connection.
6 If there are profiles that meet the settings, the list appears.
If [Do not show installed profile.] is checked, installed profiles are not displayed.
Select the profile to install, and click Next.
![Welcome to Mimaki Web Service Install new profiles for your own printer. Select profiles from the list. Check Name Select Direct Resolution Version Notes Media Name Media Type Page 5 [1] [2] [3] [4] [5] [6] [7] [8] [9] [10] [11] [12] [13] [14] [15] [16] [17] [18] [19] [20] [21] [22] [23] [24] [25] [26] [27] [28] [29] [30] [31] [32] [33] [34] [35] [36] [37] [38] [39] [40] [41] [42] [43] [44] [45] [46] [47] [48] [49] [50] Select Click Do not show installed profiles Next Next Cancel](/content/2026/05/843534/images/0f756aa9f77cacbb36da3ba0386ba31c93d43f62041aa83695f7f2939872c4c0.jpg)
7 Download the profile.
8 Downloading of the profile finishes.
Click to finish the download procedure.
The profile is installed when RasterLinkPro5 is started.
Setting Internet Connection Options
Set the options for connecting to the Internet to activate/release the license and update the program.
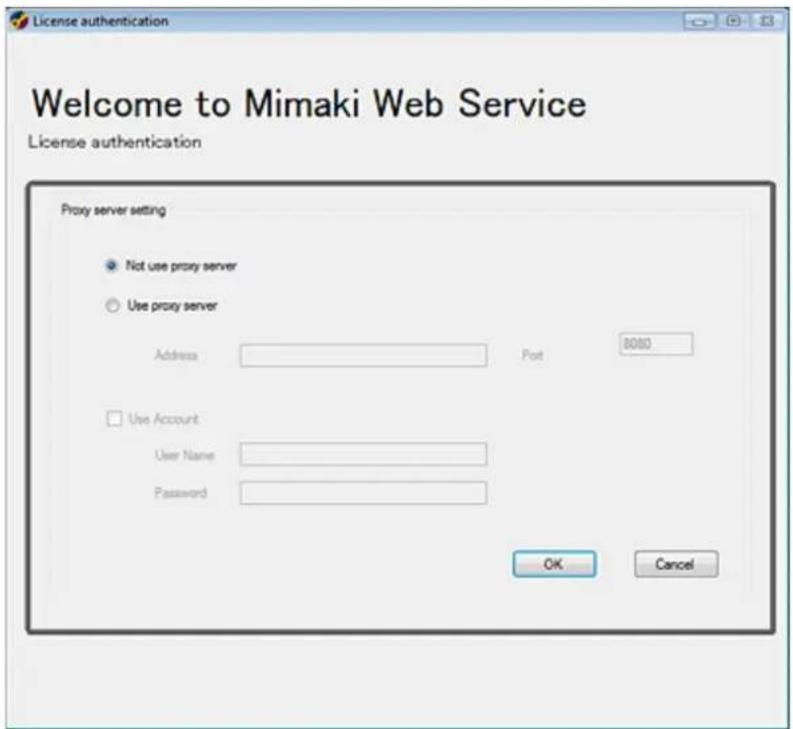
[Proxy server setting]
Specify this when using a proxy server to connect to the Internet.
Upgrade RasterLinkPro5
This section explains how to upgrade the RasterLinkPro5.
RasterLinkPro5 update (P.38)
Update the RasterLinkPro5.
RasterLinkPro5 upgrade (P.40)
Procedures how to upgrade from RasterLink III / RasterLinkPro4 series.
Updating version of RasterLinkPro5
1 Mount the installation CD for RasterLinkPro5 whose version is newer than the currently installed one onto the PC. The RasterLinkPro5 installation menu automatically starts.
NOTE!
Updating to an older version cannot be executed.
2 Click
Update RasterLinkPro5 of RasterLinkPro5 installation menu.
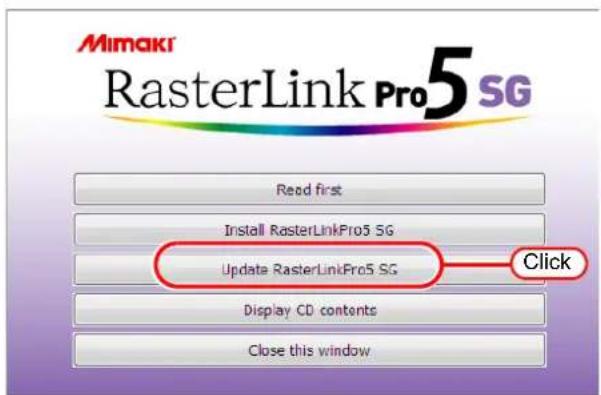
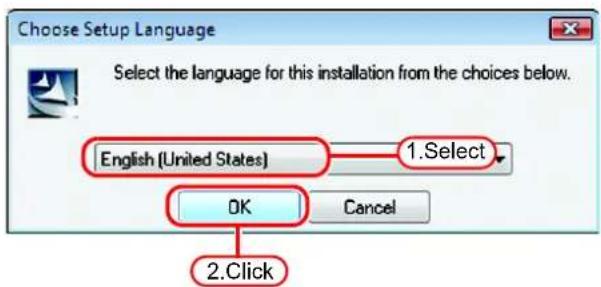
3 The "Choose Setup Language" dialog box appears.
Select a setup language, and click OK.
4 Click Next.
5 Click . Install Update starts.
6 RasterLinkPro5 update finishes. Click Finish.
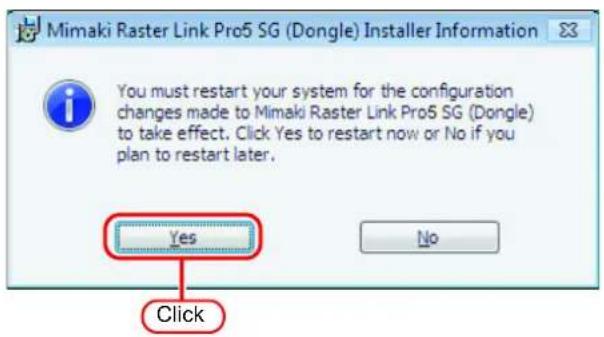
7 Restart the PC. Click to Yestart.
Upgrading RasterLinkIII / RasterLinkPro4 series to RasterLinkPro5
NOTE!
For upgrading procedure from RasterLinkProII, refer to "Manual\English\Upgrade Guide_En.pdf" in the installation CD.
1 Mount the installation CD (upgrade version) for RasterLinkPro5 onto the PC.
The RasterLinkPro5 installation menu automatically starts.
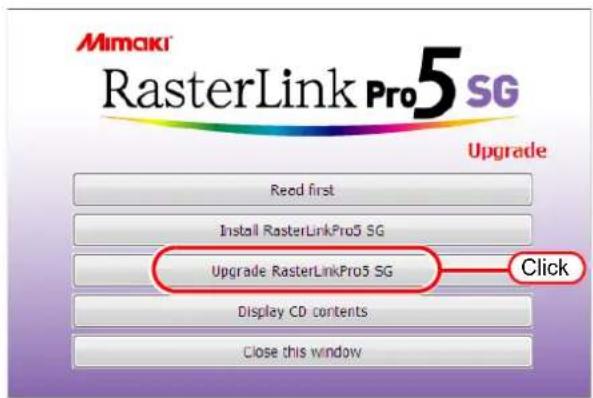
2 Click
Upgrade RasterLinkPro5 of RasterLinkPro5 installation menu.
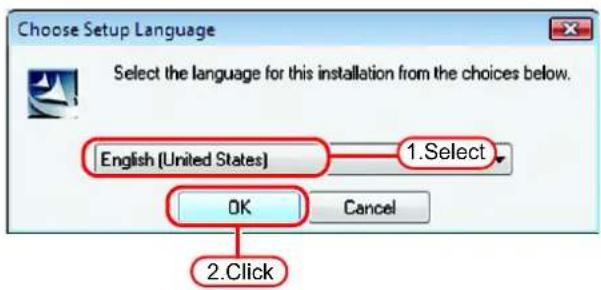
3 The "Choose Setup Language" dialog box appears.
Select a setup language, and click OK.
4 Click Next.
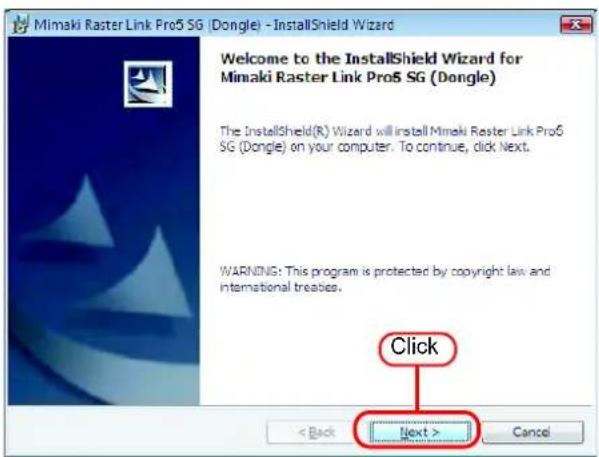
5 Click . Install Start upgrading.
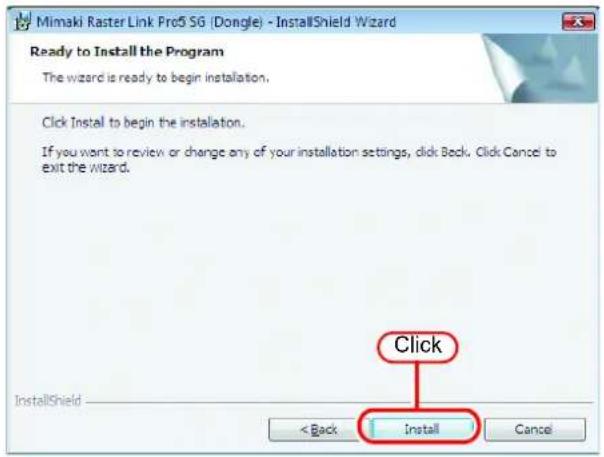
6 Upgrading to RasterLinkPro5 is complete. Click Finish.
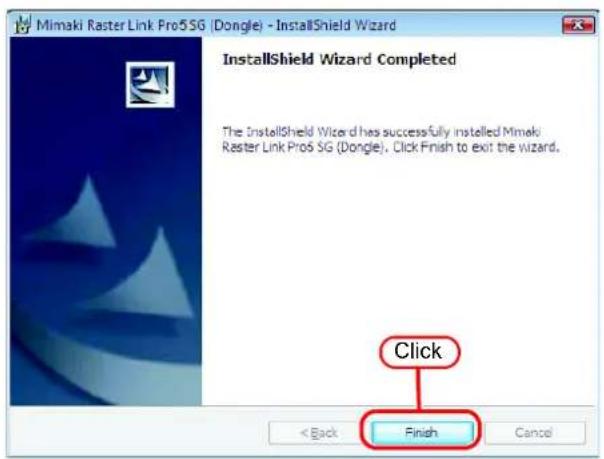
7 Restart the PC. Click to Yestart.
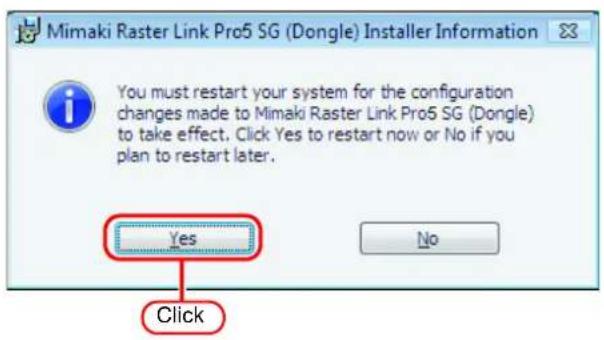
After upgrading, please follow the procedure below to update to the latest version.
1 Start up RasterLinkPro5.
2 Active the license.
For the "License Activation", see . P16.
3 RasterLinkPro5 will then startup.
4 Close RasterLinkPro5.
5 Use one of the following methods to update to the latest version.
Run Program Update.
For the "Program Update", see P31.
Download the update tool from the MIMAKI official website.
Please refer to the download page for instructions how to use the update tool.
Uninstall RasterLinkPro5
This section explains how to uninstall the RasterLinkPro5.
License Deactivation (P.44)
Deactivate the license.

Check of the contents deleted in shared folder ( P.49)
When hot folders are used from MacOS 9.x, delete the special folder in the shared folder.

RasterLinkPro5 Uninstallation (P.52)
Uninstall the RasterLinkPro5.
Deactivating the License
To install and use RasterLinkPro5 on another PC, the license needs to be deactivated on the PC on which the license is activated.
NOTE!
- If uninstalling before deactivating the license, a screen for deactivating the license appears during uninstalling.
- Before installing RasterLinkPro5 on another PC, make sure to deactivate the license on the PC on which the license is activated. Otherwise, license activation will not be possible and you will not be able to use RasterLinkPro5 on another PC even if you install it on that PC.
Start License Release
Start it as follows from the Windows [Start].
- Windows XP/Vista/7
[Start]-[All Programs]-[Mimaki RasterLinkPro5]-[License]-[License] - Windows 8
On [Start] screen, right-click to display the [All apps] icon.
Click the [All apps] icon to display the [Apps] screen.
In the [Mimaki RasterLinkPro5] category,m click the [License] icon.
Deactivate the License
As with license activation, there are two procedures for deactivating the license.
- Connect the PC running RasterLinkPro5 to the Internet and directly deactivate the license.
- If the PC running RasterLinkPro5 is not connected to the Internet, use another PC connected to the Internet or make a request for deactivating the license to the place of purchase or our customer service, and perform a substitute release procedure ("Substitute License Release Procedures" P.46).
When the PC running RasterLinkPro5 is connected to the Internet:
1 Start the license deactivating process.

If you are using a proxy server, click [Internet access option]. For the setting procedure, see P36.
Click Next.
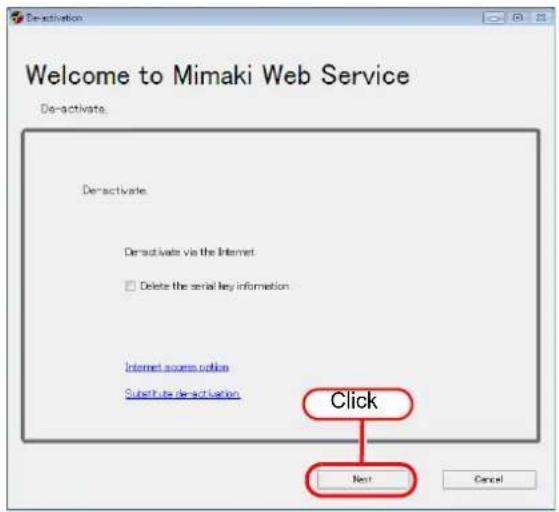
2 The server is accessed to deactivate the license.
NOTE!
If a personal firewall is set, a connection confirmation screen may appear. If a screen appears, allow the connection.
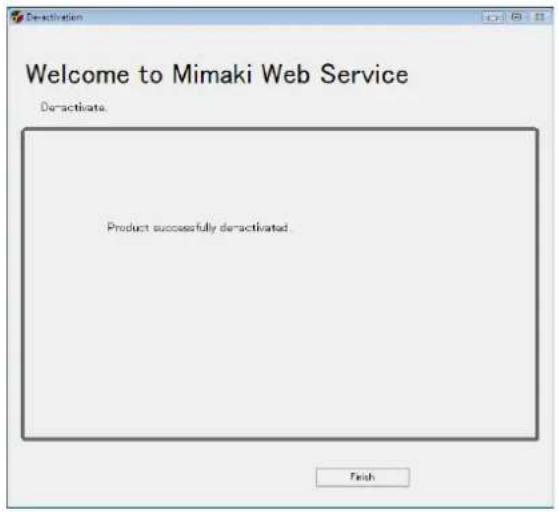
3 The license is deactivated.
Substitute License Deactivating Procedures
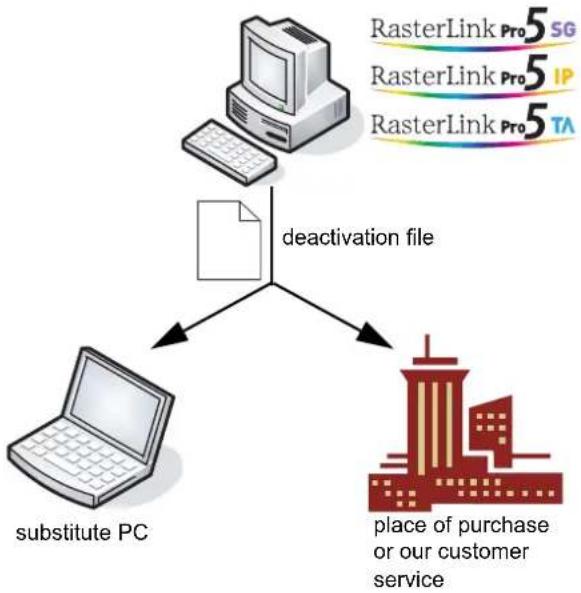
If the PC running RasterLinkPro5 is not connected to the Internet, you can use substitute license deactivating procedures that are similar to the license activation procedures.
Follow the instructions below for these procedures.
1 Create a file for deactivating the license in RasterLinkPro5. P46
2 If you have a PC connected to the Internet, copy the deactivation file to that PC and then deactivate the license. P.48
If you do not have a setup in which connecting to the Internet is possible, the license can be deactivated if you send the deactivation file to the place of purchase or our customer service.
flowchart
graph TD
    A["Start"] --> B["Document"]
    B --> C["deactivation file"]
    C --> D["Substitute PC"]
    C --> E["Place of purchase or our customer service"]
    style A fill:#f9f,stroke:#333
    style B fill:#ccf,stroke:#333
    style C fill:#cfc,stroke:#333
    style D fill:#fcc,stroke:#333
    style E fill:#cff,stroke:#333
Operation from PC Running RasterLinkPro5
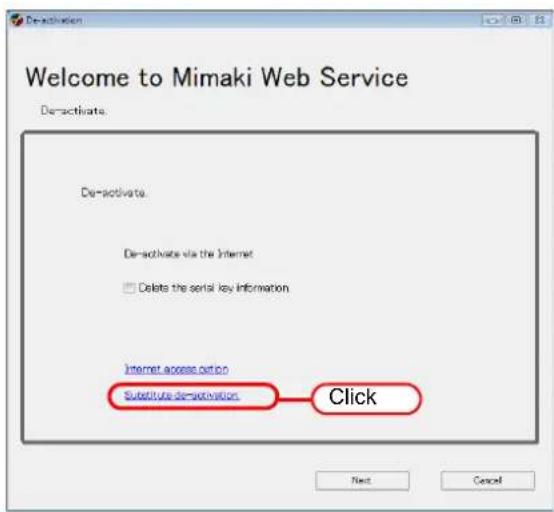
1 Display the license de-activation screen.
Click [Substitute de-activation].
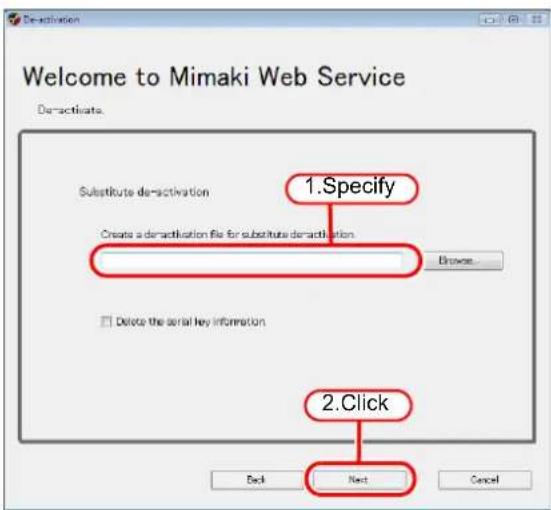
2 Specify the save location of the deactivation file.
Click to open the [Save the
license release file] dialog box.
Assign the file a suitable name and save the file.
A deactivation file is created.
Click Next.
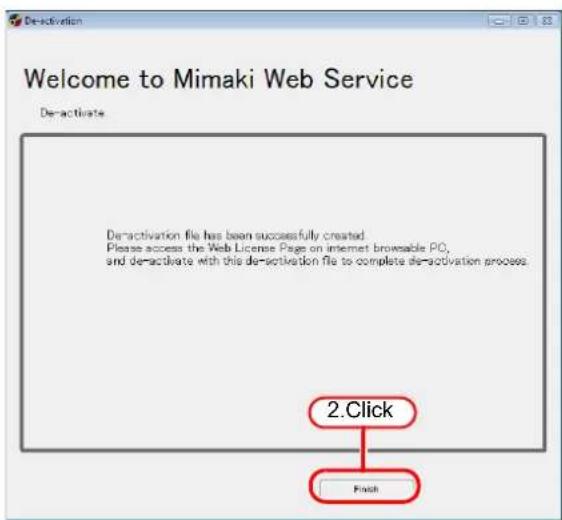
3 Click Finish.
The work from the PC running RasterLink-Pro5 is now finished.
At this point, RasterLinkPro5 can no longer be used because the license has been deactivated.
To use a substitute PC for the license deactivating, copy the deactivation file to the substitute PC.
To make a request for deactivating the license, contact either the place of purchase or our customer service.
NOTE!
Keep the deactivation file at hand until the deactivation is complete. If lost before deactivating, RasterLinkPro5 cannot be used on the other PC because of the inability to deactivate.
Operation from Substitute PC
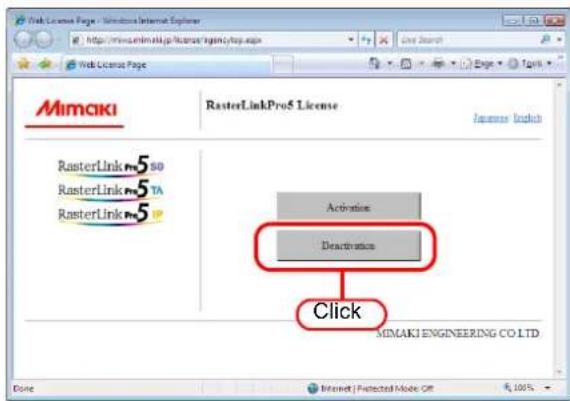
1 Start the Web browser and enter the following address.
http://miws.mimaki.jp/license/agencytop.aspx
Click [Deactivation].
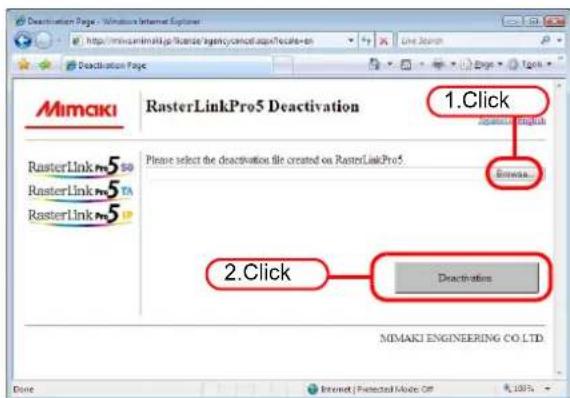
2 Click Browse .
The [Chose file] dialog box appears. Specify the deactivation file that you saved on the PC running RasterLinkPro5.
Click [Deactivation].
The procedure is now complete.
Checking the contents deletion in shared folder
When using hot folders from Mac OS 9.x, after uninstalling RasterLinkPro5, there is possibility not to delete the installation directory.
Also when Deleting the Printer with [Printer Management], or when deleting the hot folder with [Condition Management], the message “Cannot remove file in the Hot Folder” may appear, and the process cannot be completed.
This occurs because the Macintosh client creates special folders and files in the hot folder.
To avoid this, before uninstalling RasterLinkPro5, deleting the Printer or deleting the hot folder, delete the special folders in the shared folder.
The shared folders to delete are as follows.
· Before uninstallation Installation folder\Hot\all hot folders Installation folder\PPD
- Before deleting Printers with [Printer Management] Installation folder\Hot\all hot folders
- Before deleting hot folders with [Condition Management] Installation folder\Hot\condition set name hot folders
Check that the folder contents are deleted
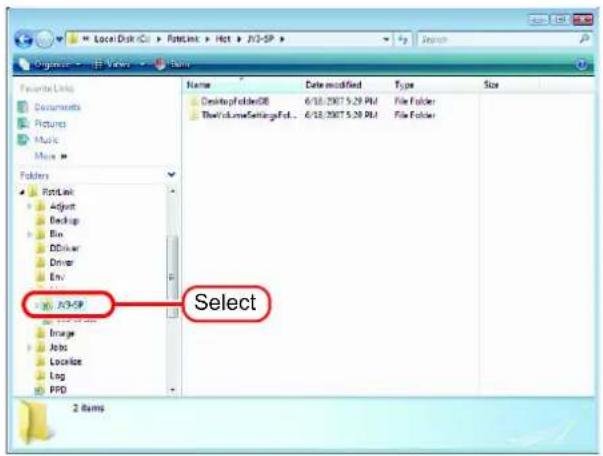
This section describes how to check the hot folder as an example. Check PPD folder with the same steps. In this example, JV3-SP is registered with [Printer Management].
1 In Explorer, select the hot folder in the installation folder\Hot folder. If there are no subfolders inside the hot folder, deleting is not necessary.
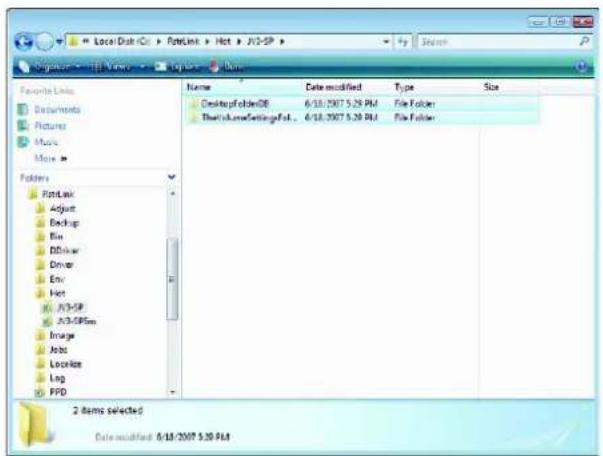
2 If there are subfolders in the hot folder, select them with the mouse and try deleting them with the Delete key.
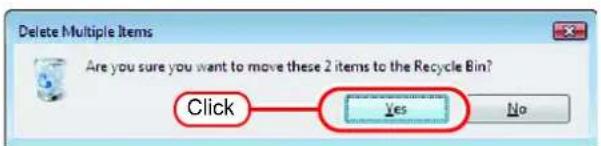
3 Click on the "Delete Multiple Items" screen.
If subfolders are deleted, unmounting is not necessary.
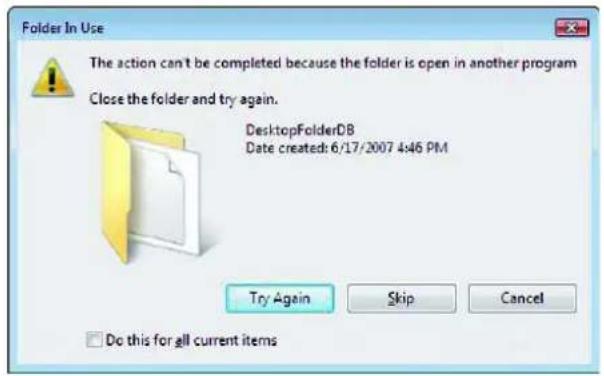
4 If an error message appears, the hot folder is not deleted.
With the Macintosh client, move the folder mounted by AppleShare to the trash can to unmount it. If it is already unmounted, mount the folder again with AppleShare, then unmount it.
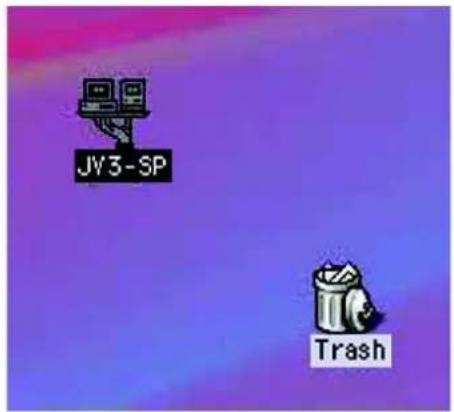
5 After unmounting the folder in step 4, perform the operation in step 2 again, and check whether the sub-folders inside the folder can be deleted.
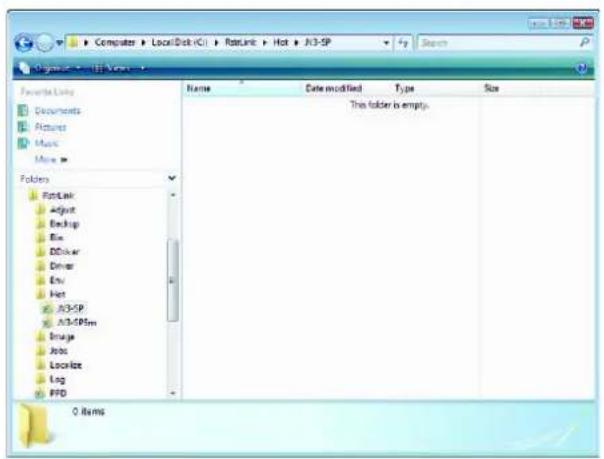
6 Perform steps 1 to 5 for all the sub-folders in the installation folder\Hot folder.
Uninstall RasterLinkPro5
NOTE!
- All RasterLinkPro5 setting is deleted when it is uninstalled.
- Before starting uninstalling, check the following items.
* RasterLinkPro5 is not running.
* The RasterLinkPro5 license is deactivated.
* The RasterLinkPro5 hot folder is not open (including via the network).
* The RasterLinkPro5 printer is not being used (including via the network).
* The RasterLinkPro5 hot folder and printer is not being mounted from Macintosh clients with a Macintosh network connection tool (such as PC MACLAN and SMB).
1 Double click "Programs and Features" in [Control Panel].
Double-click "Add and Remove Programs", depending on the OS of the RasterLinkPro5-installed PC.
The [Programs and Features] window opens.
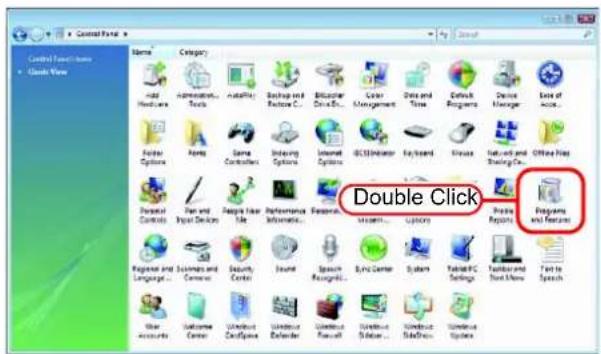
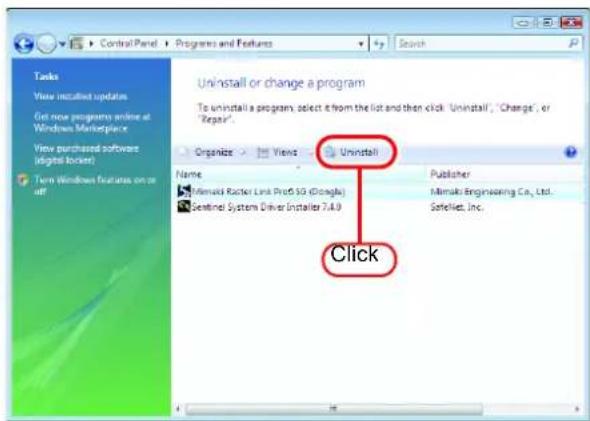
2 From the "Currently installed programs:" list, select "Mimaki Raster Link Pro5".
Click Uninstall.
Click Removing on the OS of the RasterLinkPro5-installed PC.
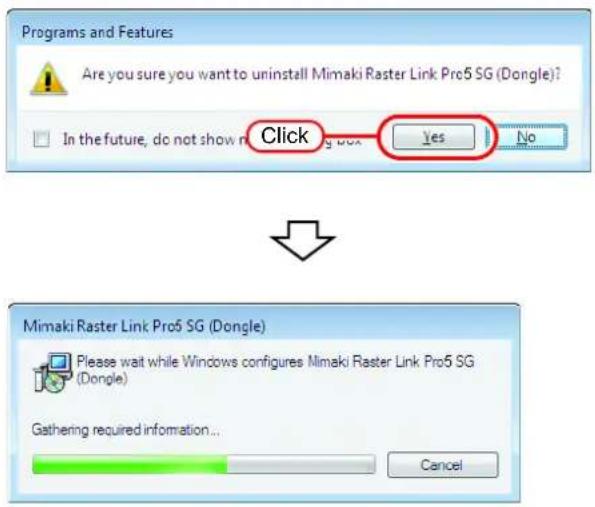
The "Programs and Features" confirmation dialog box opens.
3 Uninstallation starts. Click Yes.
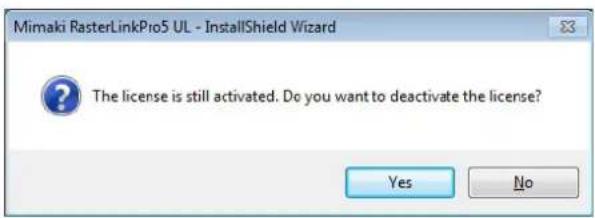
4 If the license is still active, a screen for deactivating the license appears.
NOTE!
Before installing on another PC, be sure to deactivate the license of the PC on which the license is activated. If not deactivated, you cannot activate the license with the PC and cannot use the PC, even if installing RasterLinkPro5.
NOTE!
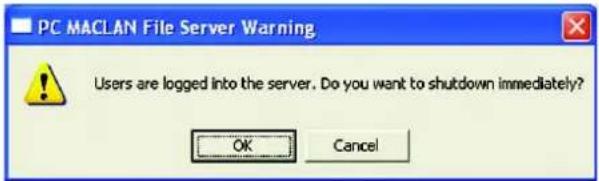
If PCMACLAN is installed on the computer for RasterLinkPro5, the right warning message may be displayed during the uninstall. Click toStop the server. The computer is not shutdown.
NOTE!
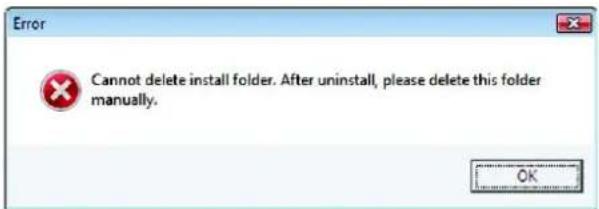
The right message may be displayed during un-installation. In this case, delete the installation folder manually after un-installation.
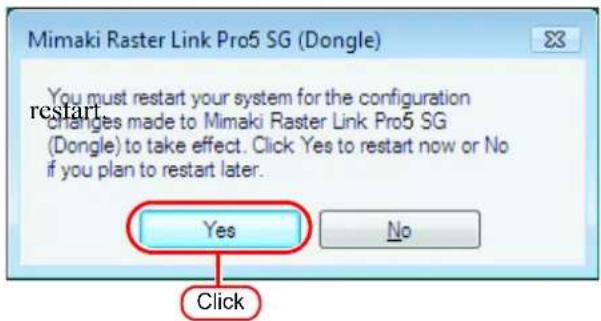
5 The right dialog is displayed after a completion of un-installation.
Click Yes and
NOTE!
- If PC MACLAN is used, it is required to execute [Remove folder information] of PC MACLAN file server after the uninstallation of the RasterLinkPro5.
For details, see the following in the PC MACLAN User's Guide:
Using the File Server......Remove folder information - When you create the "Work Folder" in any place other than the installation folder of the RasterLinkPro5, delete the work folder after the restart.
- Make sure the following folders are not remained when you wish to reinstall after un-installation of the RasterLinkPro5.
* Previous installation folder
* Previous work folder
* Previous installation folder * Previous work folder
When the above two folders are still remained, delete them before you start reinstallation.
The RasterLinkPro5 may not start normally, if you do not delete the folders.
If an error occurs in license authentication
The countermeasure when an error occurs in license authentication is explained by following the examples below:
Example 1 : RasterLinkPro5 was uninstalled without releasing license authentication. Example 2 : OS was reinstalled without releasing license authentication. Example 3 : HDD with OS was replaced without releasing license authentication.
You can conduct license authentication for the PC on which you conducted license authentication once as many times as you want until you release it and conduct license authentication with the serial key used for other PC.
When you reuse RasterLinkPro5 in that PC
(1) Reinstall RasterLinkPro5.
(2) Start license authentication and input the same serial key.
- License authentication is conducted again.
When you use RasterLinkPro5 in other PC
(1) Release license authentication (P.56) from the Web site and release license authentication.
(2) Install RasterLinkPro5 into the PC on which you use RasterLinkPro5.
(3) Start license authentication and input the serial key released in (1).
Example 4 : PC was replaced without releasing license authentication.
Release license authentication (P.56) from the Web site and release license authentication.
Example 5 : After having sent PC to repair, program update and profile update became unavailable with an error displayed.
When it was repaired, it is possible that the device that is the base of PC unique information gained at license authentication was replaced.
In such a case, it is necessary to conduct license authentication again. By following the procedures below, conduct license authentication.
(1) Release license authentication (P.56) from the Web site and release license authentication.
(2) Start RasterLinkPro5 in RasterLinkPro5 PC on which the error occurred.
(3) Conduct license authentication again.
Example 6 : The serial key was lost.
When RasterLinkPro5 was uninstalled without releasing license authentication
In such a case, serial key information remains in the PC. When you reinstall RasterLinkPro5 and start license authentication, the serial key you input the previous time is displayed on the serial key input screen.
You found that you lost the serial key after releasing license authentication.
In such a case, if you uncheck the checkbox of “Delete the serial key information.” on the first screen when releasing license authentication, serial key information remains in the PC. The checkbox is OFF by default.
Check that the serial key you input the previous time is displayed on the serial key input screen.
How to release license authentication when PC has broken down
If normal release of license authentication cannot be conducted (P.44) and RasterLinkPro5 cannot be used in other PC, you can release license authentication in the procedures below:
NOTE!
- Do not use this function when normal release of license authentication can be conducted. If you use this function, defects may occur in the following license authentication etc. and RasterLinkPro5 cannot operate normally.
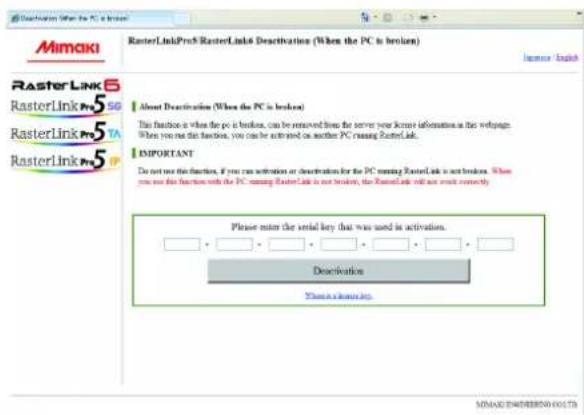
1 Start the Web browser and input the address below.
http://miws.mimaki.jp/license/agencytop.aspx
Click [RasterLink Deactivation (When the PC is broken)].
2 Input the authenticated serial key into the serial key input form.
Click [Deactivation].
Then, license authentication is released.
Mimaki
D202025-16-27062013
Printed in Japan
© 2013 MIMAKI ENGINEERING CO., LTD. All rights reserved.
- The kinds of manuals and how to use them
- Installation Guide
- Network Connection Guide
- Reference Guide
- Firmware Update Operation Manual
- Notice
- About this manual
- Notations
- Symbol
- Table of Contents
- Set PC with RasterLinkPro5 installed.... 11
- Upgrade RasterLinkPro5 37
- Uninstall RasterLinkPro5.... 43
- About RasterLinkPro5
- Color Profile makes color matching easier
- Color adjustment function which enables delicate representation
- Supported printers
- Input/Output data
- Input data
- PostScript Font
- Application
- Maximum spool processible image size
- Maximum RIP processible image size
- NOTE!
- The largest image size which can be tiled *3
- System requirements
- Installing PC for RasterLinkPro5
- Client PC
- Set PC with RasterLinkPro5 installed
- RasterLinkPro5 Installation
- Operations before installing RasterLinkPro5
- Set the RasterLinkPro5 CD
- Install the RasterLinkPro5
- License Activation
- Activating the License
- Start License Activation
- Activate the License
- When the PC running RasterLinkPro5 is connected to the Internet:
- Display the license activation screen.
- Enter the serial key. Click Next.
- The server is accessed to activate the license.
- The activation finishes.
- Substitute License Activation Procedures
- Creating an activation file
- Work from substitute PC
- Start the Web browser and enter the following address.
- Click Browse .
- The [File Download] dialog box appears.
- Load the license key file
- Activating the License Later
- Start license activation.
- The trial period appears.
- Printer Registration to be used
- Starting printer management
- For Windows XP/ Vista / 7
- For Windows 8
- Adding a printer
- Click OK .
- Starting RasterLinkPro5
- If the security center symbol (shield) is displayed
- Updating the Program
- Updating the Profile
- Setting Internet Connection Options
- Upgrade RasterLinkPro5
- Updating version of RasterLinkPro5
- Click
- The "Choose Setup Language" dialog box appears.
- Click Next.
- Upgrading RasterLinkIII / RasterLinkPro4 series to RasterLinkPro5
- Run Program Update.
- Download the update tool from the MIMAKI official website.
- Uninstall RasterLinkPro5
- Deactivating the License
- Start License Release
- Deactivate the License
- Start the license deactivating process.
- The server is accessed to deactivate the license.
- The license is deactivated.
- Substitute License Deactivating Procedures
- Operation from PC Running RasterLinkPro5
- Specify the save location of the deactivation file.
- Click Finish.
- Operation from Substitute PC
- Checking the contents deletion in shared folder
- Check that the folder contents are deleted
- The right dialog is displayed after a completion of un-installation.
- If an error occurs in license authentication
- When you reuse RasterLinkPro5 in that PC
- When you use RasterLinkPro5 in other PC
- Example 6 : The serial key was lost.
- When RasterLinkPro5 was uninstalled without releasing license authentication
- You found that you lost the serial key after releasing license authentication.
- How to release license authentication when PC has broken down
- Mimaki
Brand : Mimaki
Model : RasterLink Pro 5 TA
Category : Logiciel photo/vidéo