
SRC-181SS - Cooker Spring USA - Free user manual and instructions
Find the device manual for free SRC-181SS Spring USA in PDF.


| Type | Induction Cooker |
| Brand | Spring USA |
| Model | SRC-181SS |
| Power Rating | 1800 Watts |
| Voltage | 110-120 Volts |
| Current | 15 Amps |
| Frequency | 50-60 Hz |
| Plug Type | NEMA 5-15 |
| Power Cord Length | 6 feet (1.8 meters) |
| Operating Modes | Cook (power levels 1-20) and Temp (temperature settings) |
| Temperature Range (Temp Mode) | 110°F to 400°F (43°C to 204°C) in 19 steps |
| Cookware Compatibility | Induction-ready vessels with flat bottom, diameter > 4 inches |
| Ventilation Requirement | At least 7 inches of space underneath; cabinet temperature < 90°F (32°C) |
| Control Panel Cutout | 5-3/4" x 2-3/4" |
| Mounting | Flush mount with leveling screws; silicone sealant on seams |
| Error Codes | E0 (no pan), E1 (overheating), E2 (overheat protection), E3 (voltage overload) |
| Safety Features | Auto shut-off after 2.5 minutes without pan; overheat protection |
| Weight | Approximately 12 lbs (estimated) |
| Dimensions | Approximately 12" x 12" x 4" (estimated) |
| Warranty | Limited warranty; refer to www.springusa.com |
| Country of Origin | USA (based on brand location) |
Frequently Asked Questions - SRC-181SS Spring USA
User questions about SRC-181SS Spring USA
0 question about this device. Answer the ones you know or ask your own.
Ask a new question about this device
Download the instructions for your Cooker in PDF format for free! Find your manual SRC-181SS - Spring USA and take your electronic device back in hand. On this page are published all the documents necessary for the use of your device. SRC-181SS by Spring USA.
USER MANUAL SRC-181SS Spring USA
The Evolution of Intelligent Design®
Spring USA®
127 Ambassador Drive
Suite 147
Naperville, IL 60540-4079
Phone: (1) 630-527-8600
Fax: (1) 630-527-8677
Email: springusa@springusa.com
Web: www.springusa.com
Installation
& Operation
Manual
MAX
INDUCTION®
By Spring USA®
Model: SM-181R, SM-261R &
SM-263R & SM-263RU (International)
Before You Begin:
Read the following instructions in their entirety. Use proper serving vessels. All serving vessels must be induction-ready.
Your MAX Induction ^® Range must have proper ventilation in order to operate correctly. There must be at least 7" of space available under a mounted induction range. Cabinets housing the induction range (s) should have intake & exhaust vents. Active ventilation may be needed. For optimal performance, the inside temperature of the cabinet should not exceed 90°F / 32°C.
Ensure that you have dedicated power to the installed location. Refer to the grid on Page 6 for Electrical Specifications.
Suitable Serving Ware:
Your MAX Induction ^® Range works with induction-ready serving vessels. Visit the Spring USA Website for a full line of induction-ready, professional serve ware.
Serving pieces must have a flat bottom, in order to make full contact with the countertop.
Serving pieces that are footed, or that have a raised ridge, are not for use on this system, as they cannot make full contact with the counter surface.
Vessels must have a bottom diameter greater than 4".
Glass Cookware is not suited for use on your induction warming system.
Serving vessels must be centered on the induction warmer for optimal heating and performance.

Convertible Buffet Servers

Stainless Steel Multi-Ply Cookware

Aluminum Tray With Induction Disk
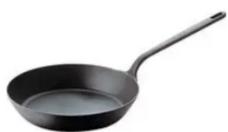
Carbon Steel

Aluminum Cookware with Induction Disc
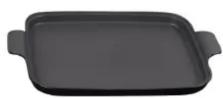
Cast Iron
www.springusa.com
Induction Range Error Codes:
| Error Cause Solution | ||
| E0 | Range does not detect a pan on the range. | Place an induction ready pan on the range. |
| E1 | Range has overheated due to blocked ventilation and has shut down the range. | Clear vents, let range cool down, then restart. If error message continues, your range needs to be serviced. |
| E2 | Overheating protection has been activated & the range has been shut down. | Remove the cookware from the range. Let the unit cool down, then restart. Make sure the cookware you are using is induction ready. |
| E3 | Range is experiencing temporary voltage overload. | Let the induction range cool down completely, before restarting. Review dedicated power requirements. |
Safety Precautions & Key Points:
Cabinet Ventilation must be provided. The inside temperature of the cabinet must not exceed 90^ F / 32^ C. Regularly inspect air intake grill on underside of ranges. Clean by vacuuming, as needed. Ventilation areas into and out of the cabinet should be provided. Active ventilation may be necessary dependent on cabinet design. Attach Control Panel to range prior to connecting to power source.
Actual range temperatures may vary due to a number of variables such as ambient temperature in the immediate surrounding area, content and volume of food being heated or cooked, and whether or not you are utilizing a cover on the vessel you are using.
Never attempt to service any part of your MAX Induction® Range on your own. Contact our Service Department by calling (1) 630-527-8600.
Attempting to service your Induction Range on your own, or through an unauthorized repair facility automatically voids your warranty. For service forms, visit the Spring USA Website. Always disconnect from power source prior to removing range from cabinet.
For Limited Warranty Information, visit www.springusa.com
Note:
This equipment uses, generates and can radiate radio frequency energy. If not installed correctly and used in accordance with the instructions, may cause harmful interference to radio communications.

Mounting Control Panel:

Mounting The Control Panel:
To mount the Control Panel (B), use the template provided. Place the template on a plane or panel, perpendicular to the MAX Induction® Range, centering it to the range whenever possible.
The Control Panel cutout should measure 5-314 "x 2-314 ". Place the Control Panel (B) into cutout hole. Using the four (C) wood screws provided, secure the Control Panel into place.
Using Your MAX Induction® Range:
Attach Control Panel to range prior to connecting to power source. Turn the induction range on (remember, the induction unit, by default, will start out in cook mode). An 'E0' message will appear in the panel. Place an induction-ready pan or server on the induction range. The display will begin to read the set temperature.
Set a stainless steel pan or server filled with water on top of the granite directly over the induction range mounted underneath. The blinking LED light should go solid. This means the induction range is reading the pan.
Electrical Specifications:
| Model # Voltage / Amps Peak Power Plug Type | ||||
| SM-181R 110- | 120 Volts / 15 Amps 1800 Watts | 50-60 Hz NEMA 5-15 6' | Cord | |
| SM-261R 208- | 220 Volts / 11.8 Amps 2600 Wa | ts 50-60 Hz NEMA 6-20 | 6' Cord | |
| SM-263R 220- | 240 Volts / Varied Amps 2600 | Watts 50-60 Hz CEE 7/7 16 | A European Plug or BS 1363 13A U.K. Plug 1.8 m Cord | |
| SM-263RU 220- | 240 Volts / Varied Amps 2600 | Watts 50-60 Hz BS 1363 | 3 A U.K. Plug 1.8 M Cord | |
Spring USA®
www.springusa.com
(1) 630-527-8600
How To Operate:
Your MAX Induction ^® Range is designed to operate in two modes:
"Cook" or "Temp".
“Cook” Mode offers you high-speed heating, used for sautéing, omelet stations, pasta bars or demonstration cooking.
“Temp” Mode offers you thermostatically controlled holding temperatures for use with soups, sauces, buffets or pastry work. The LED display allows for more accurate temperature selection.
In "Cook" Mode:
An ‘E0’ code will flash until suitable cookware is placed on the glass surface of the range.
The LED panel will display a two-digit number indicating the power level. Power levels run from 1 thru 20.
As a safety precaution, if no cookware is placed on the induction range plate after 2-1/2 minutes, the unit will shut off.
Once suitable cookware has been placed on the glass induction plate, the unit will continue to cook until the range is manually shut down, or the mode is changed over to “Temp” mode.
Note: There must be at least 7" of space available under a mounted induction range. Cabinets housing the induction ranges should have both vents & circulation fans installed. The inside temperature of the cabinet must not exceed 90°F / 32°C.
In "Temp" Mode:
An ‘E0’ code will flash until suitable cookware is placed on the glass surface of the range.
The LED panel will display a three-digit number indicating the temperature setting. To increase the temperature setting, turn the dial clockwise. To decrease the setting, turn the dial to the counter-clockwise.
The induction range will continue to warm the food until the set temperature has been reached. Once the temperature has been reached, the range will maintain that pre-selected temperature setting.
➢ Temperature settings in “Temp” mode, in fahrenheit are:
110°, 120°, 130°, 140°, 150°, 160°, 170°, 180°, 190°, 200°, 220°, 240°,
260°, 280°, 300°, 320°, 340°, 380° & 400°.
Celsius: 43°, 49°, 54°, 60°, 66°, 71°, 77°, 82°, 88°, 93°, 104°, 116°, 127°,
138°, 149°, 160°, 171°, 182°, 193° & 204°.
Spring USA®
(1) 630-527-8600
www.springusa.com
Mounting Your MAX Induction® Range:
Remove your MAX Induction® range from the packaging and inspect all parts. If the ceramic glass surface is cracked or damaged, do not install the range. Contact your supplier for a replacement range.
Counter or table thickness must not exceed 2". If installing multiple ranges, each range opening must be at least 4" apart.
Your MAX Induction® Range must have the proper ventilation in order to operate correctly. There must be at least 7" of space available under a mounted induction range. Cabinets housing the induction ranges should have both vents & circulation fans installed.
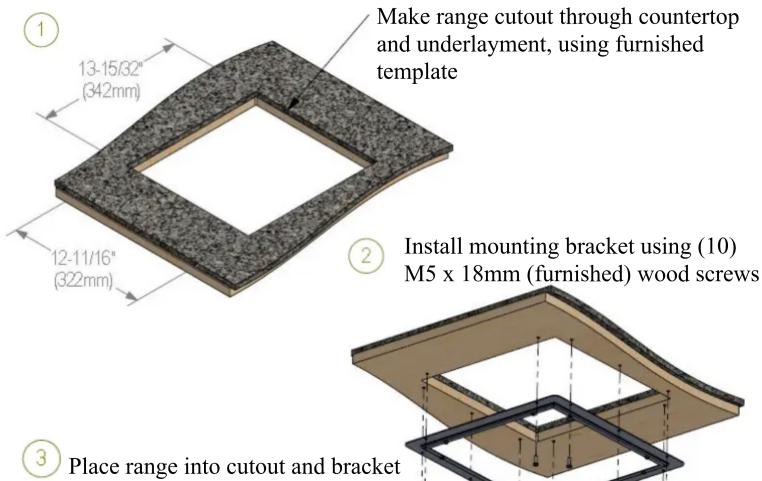

natural_image
3D architectural diagram of a roof structure with support columns and vertical supports (no text or symbols)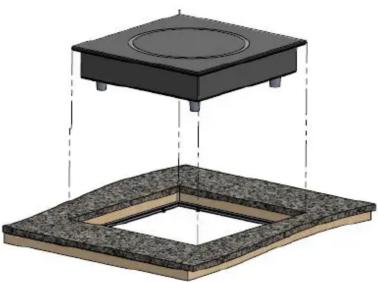
natural_image
3D diagram of a mechanical assembly with a square base and a rectangular plate, showing alignment lines (no text or symbols)Spring USA®
(1) 630-527-8600
www.springusa.com
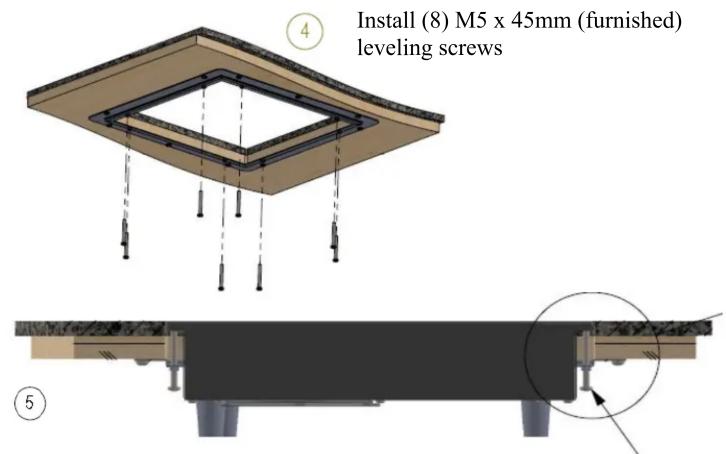
Use the leveling screws to adjust the range height so that it rests flush with countertop

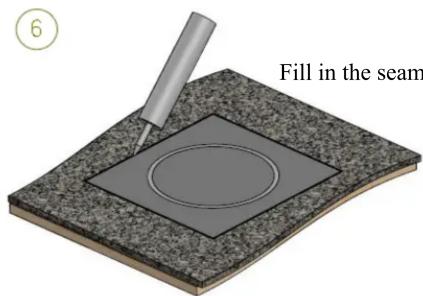
Fill in the seams using silicone sealant
Spring USA®
(1) 630-527-8600
Brand : Spring USA
Model : SRC-181SS
Category : Cooker