
XPD06 - Charger Xtorm - Free user manual and instructions
Find the device manual for free XPD06 Xtorm in PDF.


| Product Type | Portable SmartHub / Charger |
| Brand | Xtorm |
| Model | XPD06 |
| Dimensions | Approx. 100 x 70 x 20 mm |
| Weight | Approx. 150 g |
| Input | Micro USB, 5V |
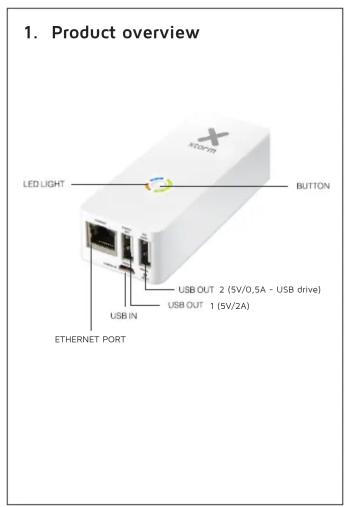
| Output Ports | USB Out 1 (5V/2A), USB Out 2 (5V/0.5A for USB drive) |
| Battery Capacity | Approx. 5000 mAh (estimated based on charging times) |
| Charging Time (Device) | 5-6 hours via USB/A/C |
| Charging Time (Mobile) | 1-4 hours |
| Supported Media | SD card, USB drive (FAT32/NTFS) |
| File Formats | Photo: JPG, JPEG, PNG, BMP; Audio: MP3, WAV; Video: MOV, MP4, M4V; Documents: DOC, XLS, PPT, PDF, TXT |
| Operating Systems | iOS, Android (others via web interface) |
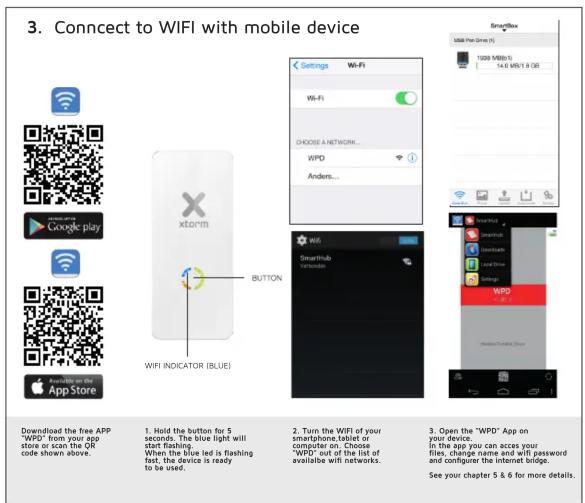
| WiFi | 802.11 b/g/n, creates access point (SSID: WPD) |
| Ethernet | RJ45 port for LAN connection |
| LED Indicators | Battery status (4 levels), WiFi usage, charging status |
| Button Functions | 1x press: battery status + USB charging; 5 sec press: activate WiFi; 3 sec press: power off |
| Software | WPD App (iOS/Android) and web interface (192.168.1.2) |
| Safety | Do not drop, disassemble, expose to water or heat. Keep away from children. |
| Maintenance | Keep dry; clean with soft cloth; avoid flammable gases. |
| Spare Parts / Repairability | Not user-serviceable; no spare parts specified. |
Frequently Asked Questions - XPD06 Xtorm
User questions about XPD06 Xtorm
0 question about this device. Answer the ones you know or ask your own.
Ask a new question about this device
Download the instructions for your Charger in PDF format for free! Find your manual XPD06 - Xtorm and take your electronic device back in hand. On this page are published all the documents necessary for the use of your device. XPD06 by Xtorm.
USER MANUAL XPD06 Xtorm
- Connecting a USB pen or SD card

- Slide the SD card into the SD slot on top/back of the
device.
The SD card will show in
the WPD app
To remove it push on the end of the end.
- Connect the USB drive to the USB port "USB drive".
the USB port USB drive at the front of the device
The USB drive will show in
the USD drive will show in the WPD app.
-
The connected storage source will appear in the age as shown.
will appear in the app as shown above.
It is possible
It is possible to connect both (a USB drive + SD card). They
will both appear in the app
as shown above.
EN:Warnings
Don't drop, dissemble or attempt to repair the device by yourself.
Avoid exposure to water or high humidity. Don't expose to any heat source.
Don't expose to any heat source. Keep out of reach of children.
Don't use in the presence of flammable gas.
NL: Waarschuwing
* THIS MANUAL IS AVAILABLE IN DIFFERENT LANGUAGES ON OUR WEBSITE
Hoofdveste 19
3992 DH Houten
The Netherlands (2) 30,635,188
1: + 31 (0) 30 635 4800 5: + 31 (0) 30 635 4801
07 50 633 4801
www.xtomf.co

xtorm

LED battery indication
Charging time: 5-6
Charging time Mobile equipment: 1-4 hr
SUPPORTED MEDIA & OS
Operating systems
(others via web-interface)
Photo: JPG, JPEG, PNG, BMP
Audio: MP3, WAV
Video: MOV, MP4, M4V
Documents: DOC, XLS, PPT, PDF, TXT


5. Using the iOS APP
Storage overview

Upload files

Download photo's

Download documents


Settings

In this overview you can browse and search trough files and folders
Tap on [Upload] on the bottom menu. Cheese which file you
want to upload and choose the destination folder.
Destination for
Tap on a file for more than 2 sec
more than 2 sec. A option menu will appear. Choose "Download file"
Download the
The picture will appear
in the photo-APP of your device
Tap on a file for more than 2 sec
more than 2 sec. A option memo will appear. Choose "Download file"
The file will appear
in the [Download] list
(see bottom menu [Downloads])
Tap on the icon "Downloads" in the bottom menu.
This is the list of downloaded documents.
documents.
These files stay available, even
Tap [Settings]. In this menu you can choose the WiFi app
you can change the Wifi home, set a Wifi password or reboot the device.
the device.
Default admin password is "0000"
Settings explanations
[Change SSID and Password] Here you can edit the displayed WiFi acces point name (SSID) and/or password
[Change authentication] This changes the Administrator Password
[Restart WPD] This restarts the app & SmartHub
[Default] Restores app & SmartHub to factory defaults
[Upgrade Firmware] This upgrades the SmartHub firmware. Make sure the SmartHub is connected to the internet (Either by WiFi or LAN).
[Wifi Bridge] This lets you connect your SmartHub to an available Wifi Network, while your
device is still connected to the SmartHub. Once enabled an connected, you can be connected to your SmartHub and another WiFi Access Point (with Internet Access), to be able to surf & store.
[Auto Wifi bridge] When you turn this option on, the SmartHub automatically connects to open or known WIFI networks.
Extra functions
Connect to the Internet using the SmartHub
You have two options for connecting the SmartHub to the Internet:
- Connect to an existing Internet-based LAN network.
- It will connect automatically. You can check the connection status by clicking the Wireless
Bridge Icon
b. Connect the SmartHub to a secondary, internet enabled, WiFi Access Point 1. Check Settings: WiFi Bridge
- Check Settings [WIFI: Bridge]
Auto Backup
- The Storage Menu automatically appears from the left when a device is connected. When it does not appear, swipe right from the app home screen.
In this menu you see three options:
[Photo] this captures all images from your android device and backs it up to storage media connected to the SmartHub.
[Contacts] this backs up all your contact data in a contacts-file on your storage media connected to the Smethylub
[ON/OFF] This turns automatic backup on or off
6. Using the web-interface
Storage overview

Upload files

Download photo's

Download documents

Settings
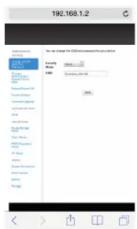
For acces via browser, connect with wifi (see chapter 3) and type
192.168.1.2 in the URL field of your
browser.
This is a APP only feature. Click on the arrow and click "Download file"
the
The picture will open in a new tab/window of view browsers.
tsu/ window of your browser. Right-click and choose "Save
picture as"
*This can be different in some browsers
Click on the arrow and click "Download file"
The 2017 World War II:
The file will
your browser
*This can be different in some browsers
Tap "Settings". In this menu
you can change the wifi name set a Wifi password or reboot
the device.
Default admin password is "0000"
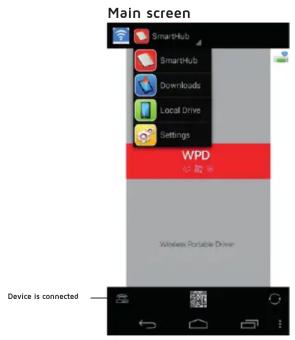
- Using the Android APP
a. Folder options:
• [Open] Opens folder
• (Mays to...) Mays folders to another
• [Move to...] Moves folder to another folder on storage media
• [Rename] Renames fold
• [Delete] Deletes folder
• [Details] Shows folder details
-
田川 4
-
File options: • [Download] Downloads file
to WPD App folder
• [Download to...] Downloads file to local
Android device's storage (See D.)
• [Move to...] Moves file to another folder on storage media
• [Rename] Renames file
• [Delete] Deletes file
[Non-Text]
Extra functions
Connect to the Internet using the SmartHub
The following table is provided in the image.
You have two options for connecting the SmartHub to the Internet. Connect to an existing, internet-enabled LAN Network
- Connect to an existing, Internet-enabled LAN Network.
-
Connect a LAN cable to your existing LAN network and the Ethernet-Port of the SmartHub
-
It will connect automatically. You can check the connection status by clicking the Wireless Bridge Icon
-
-
-
-
-
-
-
-
-
-
-
-
-
-
-
-
-
-
-
-
-
-
-
-
-
-
-
-
-
-
-
-
-
-
-
-
-
-
-
-
-
-
-
-
-
-
-
-
-
-
-
-
-
-
-
-
-
-
-
-
-
-
-
-
-
-
-
-
-
-
-
-
-
-
-
-
-
-
-
-
-
-
-
-
-
-
-
-
-
- 91.
-
-
-
-
-
-
-
-
-
-
-
-
-
-
-
-
-
-
-
-
-
-
-
-
-
-
-
-
-
-
-
-
-
-
-
-
-
-
-
-
-
-
-
-
-
-
-
-
-
-
-
-
-
-
-
-
-
-
-
-
-
-
-
-
-
-
-
-
-
-
-
-
-
-
-
-
-
-
-
-
-
-
-
-
-
-
-
-
-
Connect the SmartHub to a s 1. Check Settings [WiFi Bridon]
-
Check Settings [WIP Bridge]
Differential\* Backup
-
The frames: More automatically assess from the left when a factor is represented. When it does
-
The Storage Menu automatically appears from the top appear, swine right from the 200 home screen.
not appear, swipe right from the app
In this menu you see three options:
[Photo] this captures all images from your android device and backs it up to storage media connected to the SmartHub
[Contacts] this backs up all your contact data in a [ON/OFF]. This turns automatic backup on or off.
[ON/ON] This torna automatic backup on or on
* Differential means that only the changes
made or automatic backup is switched on.

Files on USB or SD

Files Local drive

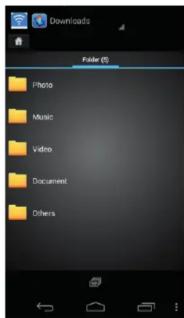
Files in Downloads
Settings

Settings explanations
-
-
-
-
-
-
-
-
-
-
-
-
-
-
-
-
-
-
-
-
-
-
-
-
-
-
-
-
-
-
-
-
-
-
-
-
-
-
-
-
-
-
-
-
-
-
-
-
-
-
-
-
-
-
-
-
-
-
-
-
-
-
-
-
-
-
-
-
-
-
-
-
-
-
-
-
-
-
-
-
- 100.
-
-
-
-
-
-
-
-
-
-
-
-
-
-
-
-
-
-
-
-
-
-
-
-
-
-
-
-
-
-
-
-
-
-
-
-
-
-
-
-
-
-
-
-
-
-
-
-
-
-
-
-
-
-
-
-
-
-
-
-
-
-
-
-
-
-
-
-
-
-
-
-
-
-
-
-
-
-
-
[Change SSID and Password] Here you can edit the displayed WiFi access point name (SSID) and/or password
displayed with a success point home (SSID) one or password
[Change authentication] This changes the Administrator
Password
[Restart WPD] This restarts the app & SmartHub
[Default] Postoses age & SmartHub to factory defaults
[Default] Restores app & SmartHoo to factory defaults
[Upgrade Firmware] This upgrades the SmartHub firmware.
Make sure the SmartHub is connected to the internet
(Either by Wi-Fi or LAN)
[Wifi Bridge] This lets you connect your SmartHub to an
available Wifi Network, while your device is still connected
to the SmartHub. Once enabled an connected, you can be supported to www.SmartHub and another WiFi Access Point
connected to your SmartHub and another WiFi Access Point (with Internet Access), to be able to surf & store.
(With Internet Access), to be able to sell a store.
[Auto Wifi bridge] When you turn this option on, the
SmartHub automatically connects to open or known WiFi networks.
Accessing storage media (SD/USB)
• • • •
-
Connect a storage device by either
-
Inserting on SD-Card
-
Connecting a USB-Drive to port indicated "USB Drive"
-
Open the WRD App and connect to Smart Hub (See A)
-
The Storage Menu automatically appears from the left.
(when it does not appear, swipe right from the app home screen)
-
Click on Mass-Storage indicator on the top-left of the screen 7. You can now analyze your storage device's folders and files
-
You can now explore your storage device's folders and files
Manage files on storage media (connected to
the Smart Hub
-
Access to website media (see first account)
-
Access your storage in
-
Long press folder/file
-
Files/Folders can now be edited
Manage Android device local files
•
-
Select [Local Drive] from the drop-down menu
-
You can how expi files and folders
-
Edit files/folders by long pressing the file folder
Manage Downloaded files
•
-
Select [Downloads] from the drop-down menu
-
You can now explore your WPD app downloaded folder on your Android device. Here you can find files downloaded
the Android device with the [Download] command under (D.)
- Edit files/folders by long pressing the file folder
Settings
•
-
Select [Settings] from the drop-down menu
-
You will be asked for an Administrator password
By Default this is 0000
- In settings you can change following options
[Change SSID and Passwor]
Change Suthe Restart WPD1
[Upgrade Firm]
[Wifi Bridge]
[Auto wifi bridge]


Brand : Xtorm
Model : XPD06
Category : Charger