
EW826ED852 - Washing machine Equator - Free user manual and instructions
Find the device manual for free EW826ED852 Equator in PDF.


| Type | Front loading washing machine |
| Model | EW826ED852 |
| Capacity | 15 lb / 6.8 kg |
| Width | 23.6 in / 600 mm |
| Height | 33.5 in / 850 mm |
| Depth | 21.85 in / 555 mm |
| Depth with door open | 38.54 in / 979 mm |
| Net weight | 152 lb / 69 kg |
| Rated voltage | 110-120V / 60Hz, 10A |
| Water pressure | 7.25 - 145 psi / 0.05 - 1.00 MPa |
| Maximum spin speed | 1400 rpm |
| Power consumption (wash) | 150 W |
| Power consumption (spin) | 500 W |
| Wash heater power | 1000 W |
| Number of programs | 12 wash cycles + 3 extra cycles |
| Features | Add-a-sock, Delay start, Child lock, Memory, Extra rinse, No spin, Max extract |
| Dispenser | 3 compartments: main wash, fabric softener, pre-wash/bleach |
| Drum material | Stainless steel |
| Self-cleaning pump | Yes |
| Coin trap maintenance | Every few months |
| Warranty | 1 year parts & labor (USA/Canada) |
Frequently Asked Questions - EW826ED852 Equator
User questions about EW826ED852 Equator
0 question about this device. Answer the ones you know or ask your own.
Ask a new question about this device
Download the instructions for your Washing machine in PDF format for free! Find your manual EW826ED852 - Equator and take your electronic device back in hand. On this page are published all the documents necessary for the use of your device. EW826ED852 by Equator.
USER MANUAL EW826ED852 Equator
natural_image
Line drawing of a washing machine with circular frame and control panel (no text or symbols)OWNER'S MANUAL
Please read the instructions carefully and keep for future reference. Information may be updated from time to time so please refer to the manual online for the latest version of the manual.
TABLE OF CONTENTS
Please read the Owner's Manual carefully before using your Fully Automatic Washer
Introduction 1
Warranty 2
Exclusions 3
Technical Data 4
Important Safety Instructions.... 5
Helpful Hints 6
Pre-installation 6
Diagram of the Washer 7
Installation Instructions.... 8
Unpacking and Leveling 9
Electrical 10
Plumbing 11
Built-In, Recessed, Closet, Alcove Installation 12
Program Selection Chart 13
Operating Instructions 14
Control Panel 15
Display Panel 16
Useful Tips & Understanding Fabric Care Label 17
Maintenance 18
Stain Removal Chart 21
Troubleshooting 23
Diagnostic Menu 24
Congratulations on your new Super Washer! In addition to its contemporary design, this is a highly sophisticated engineered product that will give you many years of satisfaction.
Here are some of the best reasons for buying your Super Washer
1. Easy Operation
This appliance is simple to use as a washer.
2. Efficient Operation
With a high spin speed of 1400 rpm, more water is extracted, allowing shorter dry times.
3. Convenience
This appliance can be permanently installed and be made portable with the installation of the portability kit (sold separately) where needed.
4. Placement Options
The Washer's sleek design makes it a perfect appliance for any kitchen or laundry room. Its compact size makes the Washer perfect for placement on each floor of your home.
5. Better Clothing Appearance
This Washer has no agitator to damage your clothes so they look better and last longer.
6. Water Savings
This appliance uses very little water for washing and far less than a standard full size top-loading washer. A new feature introduced is automatic water level which helps in saving water as it automatically decides the water intake depending on the quantity of your clothes.
7. Energy Savings
This appliance is engineered to provide valuable energy savings when compared to other washers
8. Maintenance
Since the machine has a self-cleaning pump, this appliance needs no cleaning of lint after every washing. Instead, there is a convenient coin trap which only needs to be cleaned every few months.
9. Space Savings
The washer is of optimum size thus saving previous space around your home.
10. Add a sock
In this feature, the program can be stopped at any time to add forgotten items to the wash. Press PAUSE for 5 seconds. Door will open after draining water so that it does not overflow. Load clothes. Close door. Press the START button. Washer will continue from the point it stopped.
Your appliance is protected by this warranty under normal, personal, family or household use for 1 Year Parts & Labor and limited commercial use (90 days) in USA and Canada.
WARRANTY
Consolidated Brands undertakes to the consumer/owner to repair or, at our option, to replace any part of this product which proves to be defective in workmanship or material under normal personal, family or household use in USA and Canada, for a period of one years parts & labor from the date of original purchase. For commercial use, the product is warranted for a period of 90 days.
During this period, we will provide all labor and parts necessary to correct such defect, free of charge, if the appliance has been installed and operated in accordance with the written instructions provided with the appliance. Ready access to the appliance, for service, is the responsibility of the consumer/owner. If unit installed in closet or cabinet, it should be removed for access by service technician. If this cannot be done, then there will be extra charge.
We may require return of products or parts to our warranty department for which the shipping charges are to be incurred by the consumer. If a return or replacement is required, allow 3-4 weeks to process. If unit is located more than 25 miles there will be a trip charge. If unit is in remote area more than 75 miles, customer will need to take the product to the technician's workshop.
Replacement unit will be delivered with curb side delivery only. If Unit is installed in a 5th wheel RV, in a location behind the axle it won't be covered under warranty.
All repairs or replacements are warranted only for the remainder of the original warranty period. Charges may incur if warranty coverage is not applicable. Service would be provided from Monday to Friday between normal business hours.
GENERAL
Since it is the responsibility of the consumer/owner to establish the warranty period by verifying the original purchase date, Consolidated Brands recommends that a receipt, delivery slip or some other appropriate payment record be kept for that purpose. This warranty gives you specific legal rights, and you may also have other rights which vary from State to State.
You can register your warranty by either of following methods:
- Scan the QR Code
- Online at: ApplianceDesk.com/Warranty
WARRANTY SERVICE
This warranty is given by:
Consolidated Brands
10222 Georgibelle Drive, Suite 200,
Houston, TX 77043-5249
QR Code

- Open Smart Phone
- Open Camera
- Scan QR Code
- Click the Link
QUESTIONS / SERVICE
In no event shall Consolidated Brands be liable for incidental or consequential damages or for damages resulting from external causes such as abuse, operation misuse, neglect, alterations, normal wear and tear, incorrect voltage or acts of God. This warranty does not cover service calls which involve defective workmanship, damage due to other products while combined use with this product or materials covered by this warranty. Accordingly, diagnosis and repair costs for a service call which involves defective workmanship or materials will be the responsibility of the consumer-owner.
Most work is covered. The defining factor is has the machine malfunctioned (Consolidated Brands is responsible) or has the customer omitted or done something to cause malfunction (customer is responsible).
THE FOLLOWING WORK ARE NOT COVERED UNDER WARRANTY:
Installation
- Non-removal of shipping bolts, causing vibration / internal damage.
- Non-adjustment of feet to level machine, causing vibration / internal damage.
- Non-removal of exhaust vent plate at the back while using Venting Dry mode, causing excess heat and resulting in damage to internal components.
- Using incorrect length of venting i.e. more than 10 feet unless used with a booster fan.
- Not conforming to minimum space requirements for built-in installation, causing excess heat and resulting in damage to internal components.
- Installation in a corrosive environment.
- Incorrect water pressure i.e below 7.25 psi or above 145 psi
- Incorrect water inlet hose installation (use only factory supplied hoses with metric threads on the L shaped side to fit water valve)
Maintenance
- Non-cleaning of coin trap for debris, causing the unit to not drain out water and resulting in drain pump malfunction.
- Non-cleaning of vent fan & exhaust hose for lint, causing the unit to not dry properly.
- Improper maintenance (such as, but not limited to, scale build-up, freeze damage, or vent blockage).
Damage
- Breakage of cosmetic parts e.g., door handle, knob.
Other
- Accident, abuse or misuse.
- Using solvents to clean the machine or wash clothes, causing damage.
- Misapplication of this product e.g., use in a non household/commercial environment.
- Any other cause not due to defects in materials or workmanship.
- Problems or damage due to fires, flooding, electrical surges, freezing or any acts of God.
- Any damage caused by poor water quality.
- Operating the appliance with anything other than potable water at all times.
- Force majeure.
TECHNICAL DATA
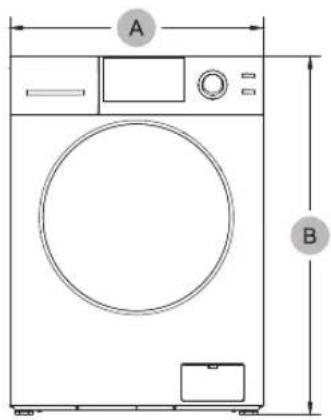
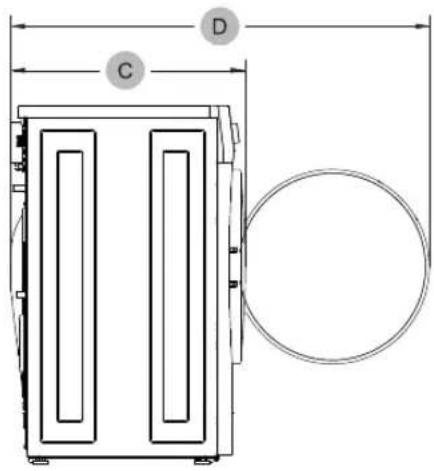
| Type | Front loading washing machine | |
| Model | 826 | |
| Dimensions (inches/mm) | A. Width | 23.6/600 |
| B. Height-overall | 33.5/850 | |
| C. Depth | 21.85/555 | |
| D. Depth with door open | 38.54/979 | |
| Rated voltage | 110-120V/60Hz 10A | |
| Water pressure (psi/Mpa) | 7.25 - 145 / 0.05- 1.00 | |
| Wash capacity (lb/kg) | 15 / 6.8 | |
| Net weight (lb/kg) | 152/69 | |
| Spin revolution (rpm) | Max. 1,400 | |
| Power consumption (W) | Washing | 150 |
| Spin | 500 | |
| Wash heater | 1,000 | |

Intertek
4007606
Electrical Testing Laboratories
US N° 4007606 CANADA
The ETL Listed Mark is the legal equivalent to the UL and CSA Listed Marks
Note: All rights reserved.
Designs, Specifications and Manual subject to change without notice
Your washing machine has been built in compliance with safety regulations, to protect you and all your family.
WARNING – To reduce the risk of fire, electric shock, or injury to persons when using your appliance, follow basic precautions, including the following:
- Read all instructions before using the appliance.
- Do not wash articles that have been previously cleaned in, washed in, or spotted with gasoline, other flammable or explosive substances, as they emit vapors that could ignite or explode.
- Do not allow children to play on or in the appliance. Close supervision of children is necessary when the appliance is used near children.
- Before the appliance is removed from service or discarded, remove the door.
- Do not reach into the appliance if the tub or drum is moving.
- Do not install or store this appliance where it will be exposed to the weather.
- Do not tamper with controls.
- Do not repair or replace any part of the appliance or attempt any servicing unless specifically recommended in the user-maintenance instructions or in published user-repair instructions that you understand and have skills to carry out.
- Do not add gasoline, dry-cleaning solvents, or other flammable or explosive substances to the wash water. These substances give off vapors that could ignite or explode.
- Under certain conditions, hydrogen gas may be produced in a hot water system that has not been used for 2 weeks or more. HYDROGEN GAS IS EXPLOSIVE. If the hot water system has not been used for such a period, before using the washer, turn on all hot water faucets and let the water flow from each for several minutes. This will release any accumulated Hydrogen.
- Do not use fabric softeners or products to reduce static unless recommended by the manufacturers of the fabric softener product
- Check the Coin Trap every few months to remove any coins, buttons or similar size objects.
SAFETY

CAUTION

RISK OF ELECTRIC SHOCK DO NOT OPEN
CAUTION: TO REDUCE THE RISK OF ELECTRIC SHOCK, DO NOT REMOVE COVER (OR BACK). NO USER SERVICEABLE PARTS INSIDE. REFER SERVICING TO QUALIFIED SERVICE PROFESSIONALS.
The model number and the serial number are on the label affixed to the back of the unit. These numbers are also available on the front of the cabinet behind the door.
You should note the model and serial numbers of this unit in the space provided. Retain this booklet as a permanent record of your purchase to aid in identification in the event of theft.
MODEL#
SERIAL#
HELPFUL HINTS
- Your Washer spins at a high 1200 rpm spin speed, which will extract more water especially from absorbent fabrics and reduce the degree of dampness. This will cut down on your drying time.
- FABRIC SOFTENER: After the wash cycle, the clothes can get stuck to the sides of the drum. USING LIQUID FABRIC SOFTENER WILL CAUSE THE CLOTHES TO UNSTICK IMMEDIATELY AND REDUCE WRINKLES.
PRE-INSTALLATION
- The unit must be installed on a strong leveled surface in a protected, dry and well-ventilated area, with a power and water supply of sufficient capacity and a sufficient outlet in close proximity.
-
Installation on Carpet or Wood increases vibrations.
-
Carpets – place on light carpet only.
-
Wood – brace floor with screws and place additional sheets of plywood before installation.
-
This unit's installation and grounding should be done in accordance with local codes by a qualified installer. "Installation Instructions" are included in this manual for the Installer's reference.
- The unit should be plugged into a properly grounded three (3) prong electrical outlet of 110V/60Hz with minimum 15 Amps, It should not be controlled by a wall switch or pull cord which might be turned off accidentally.
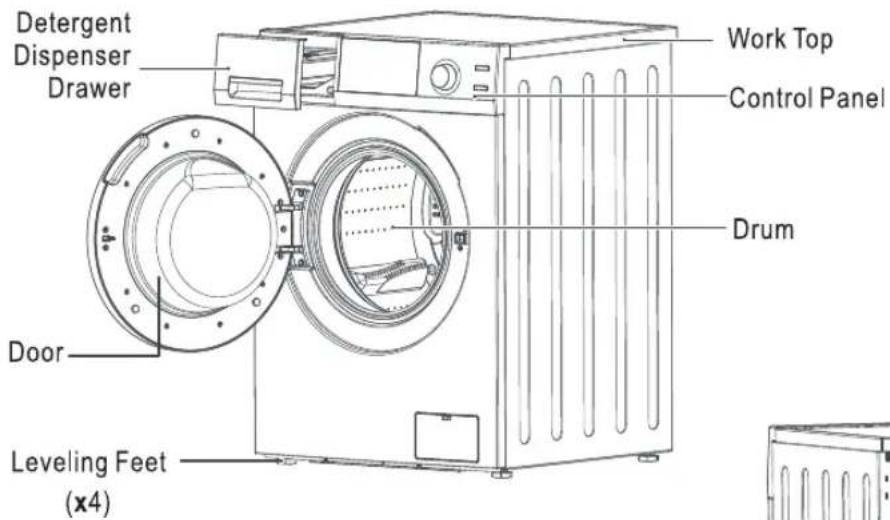
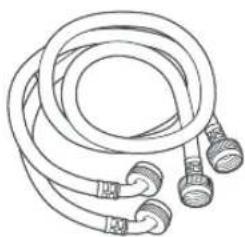
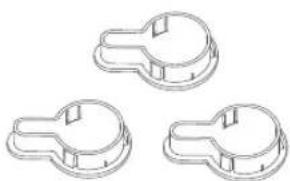
Factory supplied accessories
natural_image
Line drawing of a coiled hose with multiple connectors (no text or symbols)Cold/Hot water hoses
natural_image
Three identical outline mechanical components with no text or symbolsBlanking Caps - 3 (To cover shipping bolts hole)
NOTE
- Contact Customer Service if any accessories are missing.
- For your safety and for extended product life, use only authorized components. The manufacturer is not responsible for product malfunction or accidents caused by the use of separately purchased unauthorized components or parts.
- The images in this guide may be different from the actual components and accessories, and are subject to change by the manufacturer without prior notice for product improvement purposes.
INSTALLATION INSTRUCTIONS
Handling
Please handle the machine carefully and use appropriate means while lifting and moving the machine so that it does not get damaged. Do not drag the machine on your floor. Do not hold on to protruding parts when lifting.
Disposing of the packing
The shipping package has protected your new appliance on its way to your home. All packaging materials are non-polluting and recyclable. Please dispose of packing material according to local environmental regulations.
DANGER
Keep children away from the shipping carton and packing components. Danger of suffocation from plastic foil and folding cartons.
Disposing of your old appliance
Old Appliances are not worthless trash! Valuable raw material can be recycled from old appliances. To prevent children from locking themselves in the appliances, remove the door. Please dispose of your old appliance according to local environmental regulations.
Factory - supplied equipment
Inside the drum there is a packet of accessory parts supplied with your appliance. Check that all the accessory parts supplied for your model are there. If any parts are missing contact customer service.
Any residual moisture inside the drum is due to the final testing which every appliance undergoes before leaving the factory.
Installation area
DANGER
Appliance stability is very important otherwise washing machine could "wander" during the spin cycles.
The installation area must be solid and even. Soft floor surfaces such as carpets or surfaces with foam backing are not suitable.
DANGER
Do not install the appliance outdoor or in an area exposed to freezing condition. frozen hoses can tear / burst.
If the appliance is located in a room which will be exposed to temperatures below freezing point, or if it is located in a cabin that is being shutdown for the winter, any residual water in the pump or water inlet hoses must be drained.
Removing the shipping rods
CAUTION
The shipping rods must be removed before using the appliance for the first time and must be retained for any future transport. (e.g when moving)
UNPACKING, LEVELING & POSITIONING
Remove the packing and check that the Super Washer is undamaged. If you have any doubt, do not use the Super Washer and call Customer Service. Keep all packing parts (plastic bag, foam rubber, screws, etc.) out of the reach of children since they could be dangerous.
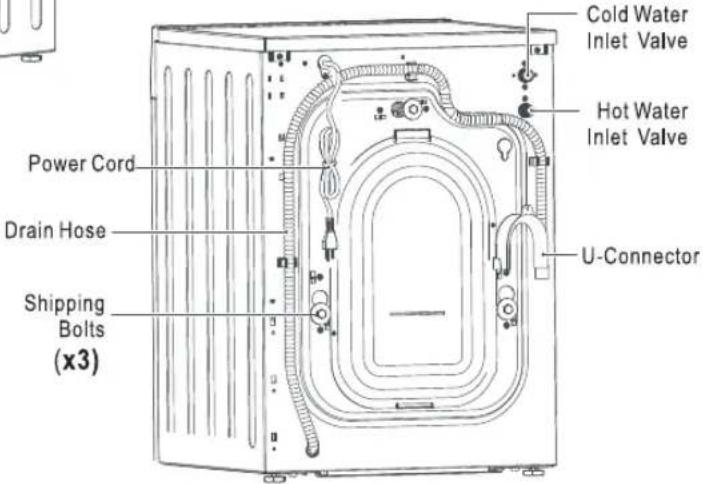
Important: The inside of the Super Washer consists of a free floating drum that is affixed with shipping bolts at the back of the cabinet during transport (Fig.1). The power cord can be accessed by removing the shipping bolts (Fig. 2 & 3). Close the holes left open by the bolts with the caps provided (Fig. 4).
It is important for the machine to be perfectly level. For this reason, the machine is fitted with adjustable feet used for leveling the machine before use (Fig. 5).
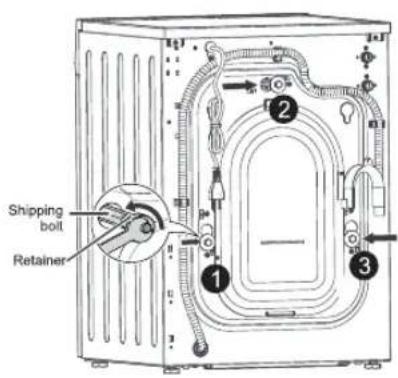
Fig. 1
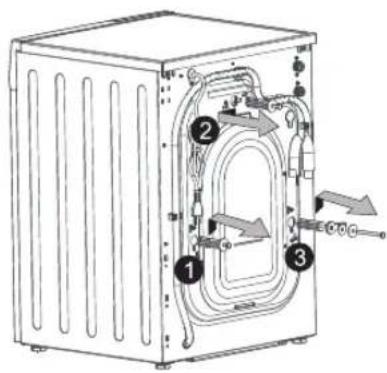
Fig. 2
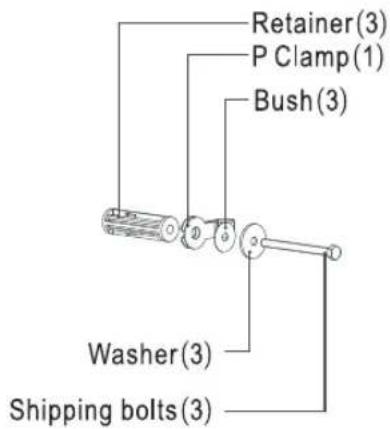
Fig. 3
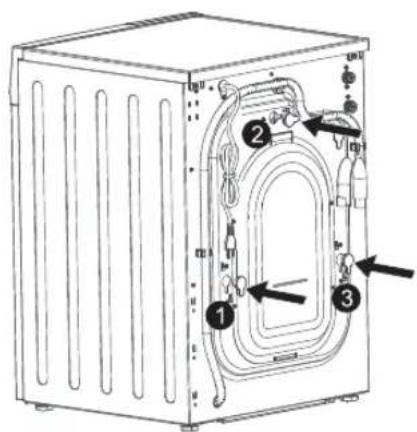
Fig. 4
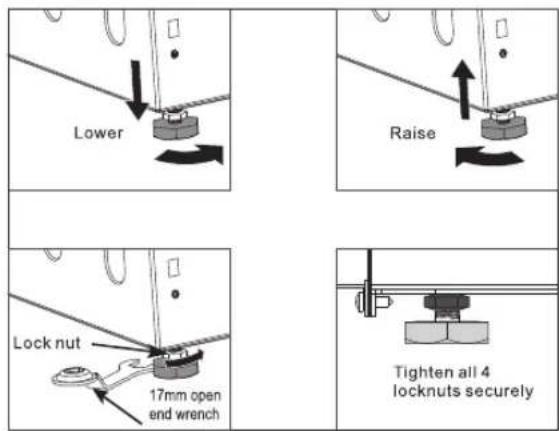
Fig. 5

NOTE
- Save the bolt assemblies for future use. To prevent damage to internal components, DO NOT transport the washer without reinstalling the shipping bolts.
- Failure to remove shipping bolts and retainers may cause severe vibration and noise, which can lead to permanent damage to the appliance.
- The cord is secured to the back of the combo by a clamp with a shipping bolt to help prevent operation with shipping bolts in place.
CONNECTION
Connect the plug to a power outlet - 110V / 60Hz with minimum 15 Amps. Make sure that the voltage and frequency available correspond with those stated on the serial number plate located on the machine. Do not use adaptors or extension cords since they could result in overheating and burn out.
POWER SUPPLY
This Super Washer must be connected to an individual circuit identical to the one specified on the rating plate of the loading port protected by fuses or circuit breaker conforming to local codes.
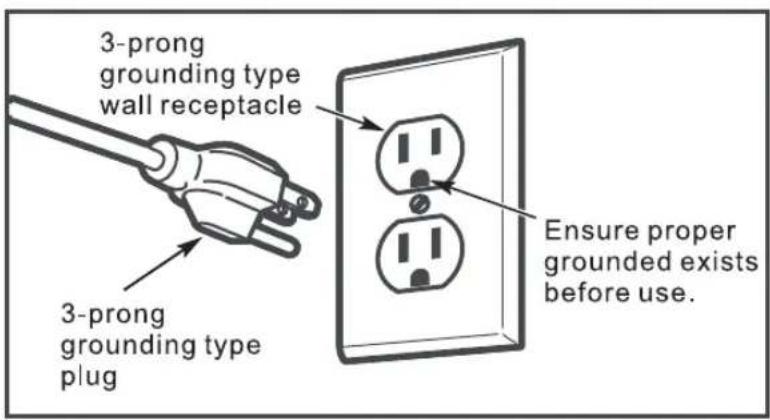
GROUNDING
This appliance must be grounded. In the event of malfunction or breakdown, grounding will reduce the risk of electric shock by providing a path of least resistance for electric current. This appliance is equipped with a power cord having an equipment-grounding conductor and a grounding plug. The plug must be plugged into an appropriate outlet that is properly installed and grounded in accordance with all local codes and ordinances.
WARNINGS
- Improper connection of the equipment-grounding conductor can result in a risk of electric shock. Check with a qualified or service representative or personnel if you are in doubt as to whether the appliance is properly grounded.
- Do not modify the plug provided with the appliance: if it will not fit the outlet, have a proper outlet installed by a qualified electrician.
Note: If the electrical power supply does not meet the specifications listed above, please call a licensed electrician.
CONNECTING TO THE WATER FAUCET
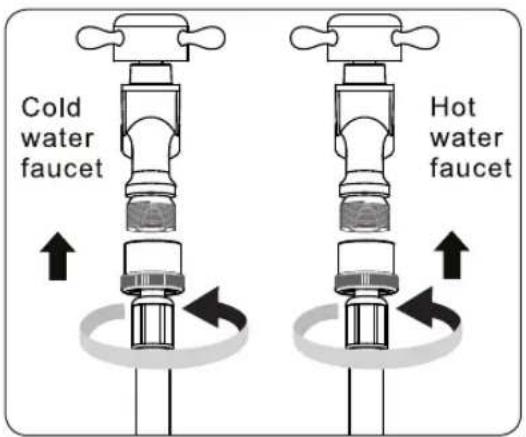
Fig.6
To connect the hoses to the water faucets:
- Connect the straight end of each hose to the cold or hot faucet.
- Turn the fittings by hand until they are tight, and then tighten them by just an additional two-thirds of a turn with a plier. Do not overtighten the fittings.
They can be damaged. - When done, pull the water hoses up and down to check if they are properly connected.
CONNECTING TO THE MACHINE
To connect the hoses to the machine:
- Connect the L-shaped end of each hose to the cold or hot water valve on the rear of machine.
- Open both the faucets, and check if there is a leak.
- Connect the L-shaped end of each hose to the cold or hot water valve on the rear of machine. - Open both the faucets, and check if there is a leak.
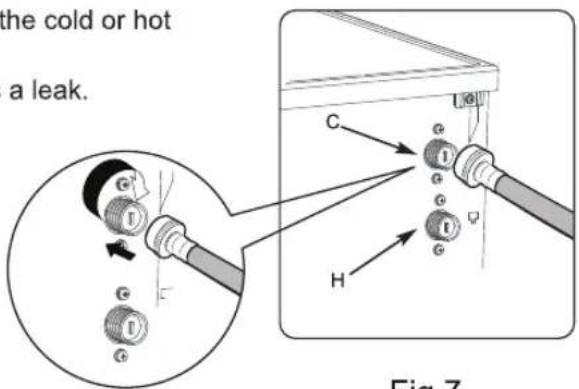
Fig.7
CONNECTING THE DRAIN HOSE
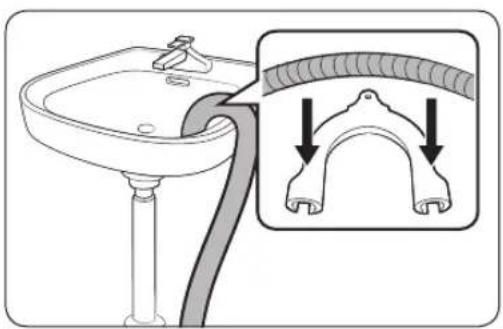
Connect the drain hose to a drain duct (with internal diameter of at least 1.6 inches) or place it for drainage in to a sink or a tub, ensuring that there are no kinks or bends. The free end must be at a height of 24"-40" from the floor. The hose can be held in place using the white plastic clamp on the upper part of the back panel.
natural_image
Illustration of a bathtub sink with a curved tube and a magnified view showing the handle (no text or symbols)Fig.8
Height difference between the installation location of the washing machine and the drainage point: Minimum 24", and Maximum 40".
- Attach water drain hose to hose guide.
- Hook the hose guide over the side or standpipe (Fig.8).
- When the water is being drained, check that the water flow out of the hose is adequate.
SPECIAL INSTALLATION REQUIREMENTS
MINIMUM CLEARANCE OTHER THAN ALCOVE OR CLOSET INSTALATION
Minimum clearances to combustible surfaces: 2" (5 cm) clearance both sides and 3" (7.5 cm) rear.
BUILT-IN, RECESSED, CLOSET AND ALCOVE INSTALLATION
The Super Washer may be installed in a built-in, recessed area, closet or alcove.
The installation spacing is in inches and is the minimum acceptable.
Other installations must use the minimum dimensions indicated.
Minimum clearance between dryer cabinet and adjacent walls are: 2" either side and 3" front and rear.
Minimum vertical space from floor to overhead cabinets, etc. is 52" (132 cm).
Closet door must be louvered or otherwise ventilated and must contain a minimum of 60 sq. in. of open area equally distributed. If this closet contains both washer and a dryer, doors must contain a minimum 120 sq. in. of open area equally distributed.
No other fuel-burning appliance shall be installed in the same closet with dryer.
★ Additional clearances for wall, door and floor molding may be required.
NOTE: If a door is installed that potentially encloses the unit while running, the door must allow for a minimum of 20 sq. in. of air free movement. There must also be a 1" additional space in front of the unit to the closed door and 1" from the back of the unit to the wall. Additional spacing should be considered for easy installation, servicing and compliance with all applicable local, state and federal codes.
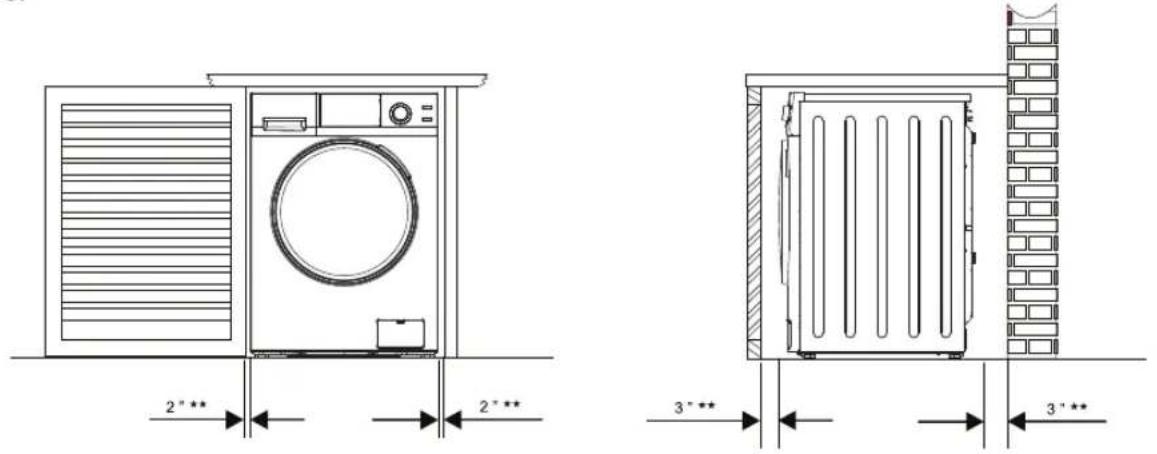
Fig.10
ADA COMPLIANCE
Fig.11
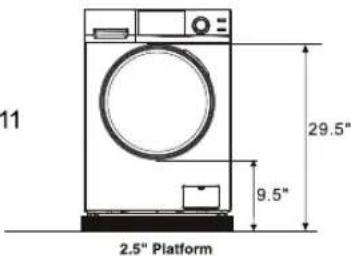
Use 2.5" height platform to make the machine ADA compliant.
WASH CYCLES
| Wash Programs | Description of Load | Wash Features Water Temp/Spin rpm | Approx Time |
| 1. NORMAL | Mixed clothes (shirts, pants, etc.) | Warm / 1200 | 51 mins |
| 2. Prewash+Heavy | Thick cottons (towels, jeans) | Cold +Hot / 1400 | 75 mins |
| 3. Heavy | Mixed cottons (t-shirts, jeans) | Hot / 1400 | 51 mins |
| 4. ECO | Cotton blends, light fabrics | Cold / 800 | 31 mins |
| 5. Quick 20 | Cotton blends, light fabrics | Cold / 1200 | 20 mins |
| 6. Baby | Light fabrics | Warm / 800 | 41 mins |
| 7. Delicate | Silk, Polyester, etc. | Cold / 800 | 36 mins |
| 8. Wool | Woolens | Cold / 500 | 36 mins |
| 9. Quiet 60 | Mixed cottons | Cold / 800 | 31 mins |
| 10. Sanitize 165 | Bedsheets, etc. | Hot / 1200 | 69 mins |
| 11. Allergen 131 | Mixed Cottons | Hot / 1200 | 59 mins |
| 12. PET Cycle | Mixed Cottons | Cold / 1200 | 36 mins |
OTHER CYCLES:
Spin only - 12 minutes Spin cycle at Max. 1,000 RPM.
Self clean - 40 minutes cycle at 90° to clean the inner drum and tub of the machine.
Winterize - 2 minutes cycle to winterize your appliance.
PET Cycle - For cleaning pet hair - Please see important instructions on page 17.
The total working time will vary with the laundry size, water pressure, water temperature and ambient temperature etc.
OPERATING INSTRUCTIONS
- Make sure the Washer is turned off. (Power Indicator light should be off).
- Separate clothes by type, color and degree of soiling.
- For small items such as socks, children's garments and small towels please use a Washing Net Bag.
- Load clothes of the selected type loosely into the drum.
- Close the Washer door. You will hear a click when it is correctly closed.
Use High Efficiency (HE) detergent about 1 tablespoon.
Add detergent to Dispenser A.
You can add fabric softener in Dispenser B, and pre-wash detergent and bleach in Dispenser C (Fig.12).
Detergent Dispenser
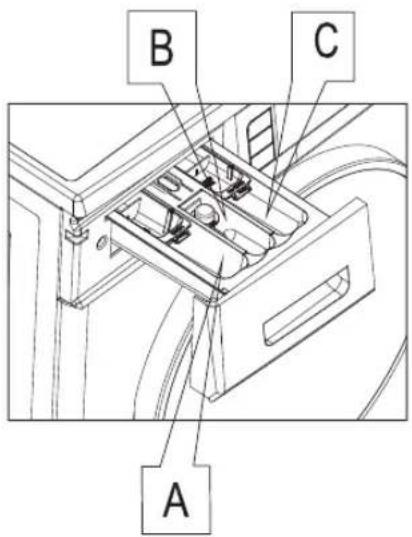
Fig. 12
Dispenser A: Detergent for main wash
Dispenser B: Fabric Softener
Dispenser C: Detergent for pre-wash and bleach
The blue cups are only for liquid detergent. Please do not add powder in these cups.
Note : concentrated fabric softener must be diluted with a little water before being poured into the dispenser (This prevents the over flow siphon from getting blocked)
Your washer is designed to use a high efficiency (HE) detergent, which reduces or eliminates suds and results in more efficient washing.

WINTERIZING
How to winterize for cold weather
1) Pour 2 cups of RV type Antifreeze in soap dispenser.
2) Select WINTERIZE cycle on knob and press START. Machine will Rinse & Spin.
3) Open coin trap once cycle is finished and drain out remaining water.
4) Shut o ffwater at both faucets and disconnect water inlet hoses from faucets and drain.
Control Panel
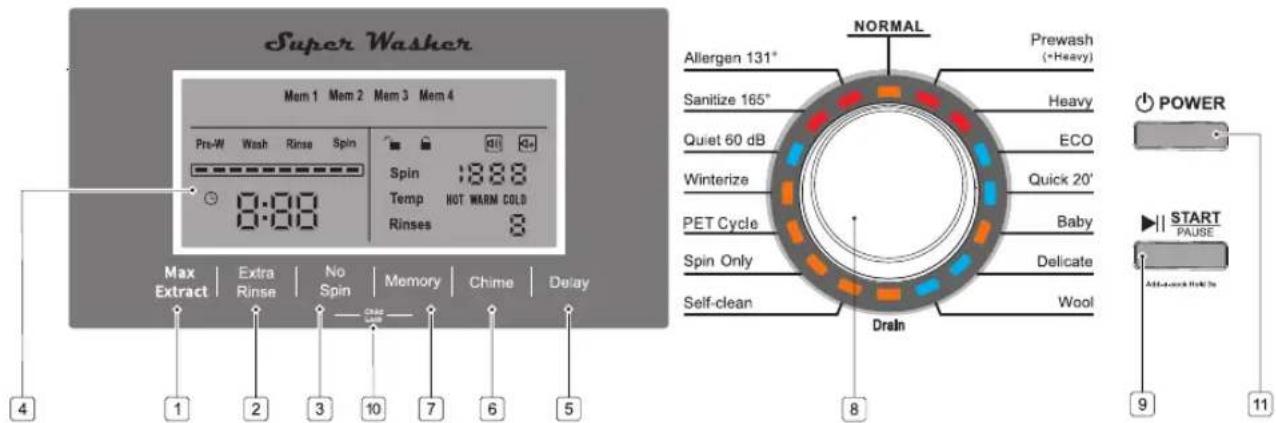
Buttons Introduction
| 1 | Max Extract | To extend the duration of final spin cycle by 30%. |
| 2 | Extra Rinse | Press this selection button to add once more rinse cycle to the selected wash program. |
| 3 | No Spin | If you want to soak your clothes before the spin cycle, press this button to eliminate the spin function. This will keep the clothes in the rinse water after the last rinse cycle is finished. After the desired soak time, press this button again and the water will drain out and proceed to the last spin cycle. |
| 4 | Color LED Display | Displays the selected program, such as the water temperature, spin speed, remaining time, rinse times, water level and error messages. |
| 5 | Delay Start button | Press this button to select the delay time from 1 to 24 hours, in one hour increments, for the wash cycle to start.If a change is to be made after the delay start time is set, turn the dial to another point, then select your desired program again. |
| 6 | Chime button | Press this button to turn on, or turn offthe chime before you start the washing cycle. |
| 7 | Memory button | Press this button to select one of the four memory settings. Then select the your favorite wash cycles. Then press START/PAUSE button to run this program, and this program will be memorized. If you want to run the memorized program later, press this button to select desired program and then press START/PAUSE button. |
| 8 | Program Dial | Turn dial to point to one of the 16 programs depending on the load to select wash program. |
| 9 | Start/Pause button | Press this button to start or interrupt the selected wash program, or to view the program during a cycle. |
| 10 | Child Lock | In order to deactivate function to the controls, to prevent altering the wash cycle, press and hold No spin and Memory buttons for 5 seconds. |
| 11 | Power | Press this button to turn the machine on. Or hold down this button to turn it off. |
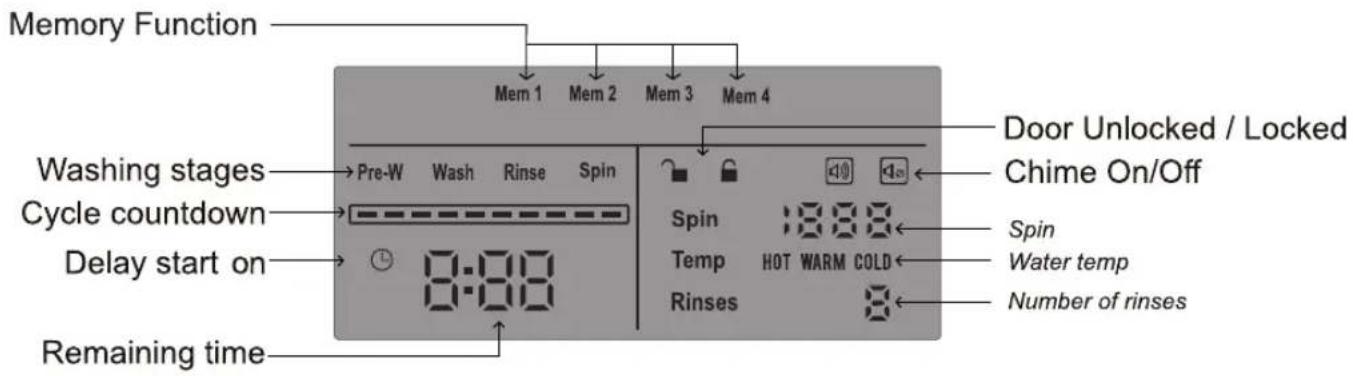
How to Run Wash cycle
- Press POWER button
- Press START
Default cycle is NORMAL - If required, you can change to desired washing cycle based on type of clothes by rotating the Program Dial knob.
How to stop the wash cycle
- The wash program can be stopped at any time.
- PRESS START/PAUSE, rotate the knob to another program to cancel the current selected program.
- PRESS POWER button for 3 seconds to turn off the machine
How to turn on the display in energy saving mode
- Machine display gets turned off automatically during operations to save energy.
- Press any button to turn on display during this energy saving mode
Add-a-sock Feature
The wash program can be stopped at any time to add forgotten items to the laundry.
- PRESS START/PAUSE for 5 seconds.
- Door will open after draining water so that it does not overflow.
- Load clothes. Close door.
- Press START. The cycle will continue from the point it stopped
Door lock function
Pressing the START button will lock the door →. The wash cycle will start and will continue until the whole program is completed. The door will be locked and cannot be opened until the wash cycle ends. In a few minutes after the cycle ends, the door lock icon will change from locked to unlocked and then you can open the door easily.
Please do not try to force the door open. Breakage of the door handle is not covered by warranty.
PET Cycle
Before loading clothes and sheets into the appliance, remove as much pet hair as possible in order to prevent buildup and clogging of the drain pump. Wipe the surface of clothes and sheets with a lint roller or a damp rubber glove to easily remove pet hair.
After the end of the wash cycle, run a quick wash cycle without clothes. After the cycle ends, wipe down the drum with a damp cloth to collect any pet hair on the drum surface.
USEFUL TIPS
Denim Alert:
Some overalls have straps with hooks that can damage the drum of your washing machine or other garments during the wash. To minimize the risk, place hooks in the pocket and fasten with safety pins.
Vacations: unplug the appliance:
It is recommended that you should unplug the machine from the socket and turn off the water supply. Leave the door ajar to allow air circulation to the draw and the door gasket area. This will prevent unpleasant odors.
UNDERSTANDING FABRIC CARE LABELS
The symbols on labels of your garments will help you in choosing the suitable wash program, the right temperature, wash cycles, and ironing methods. Please review the chart below.
 Energetic washDelicate wash Energetic washDelicate wash |  Max. wash temperature 95°C Max. wash temperature 95°C |  Max. wash temperature 60°C60 Max. wash temperature 60°C60 |  Max. wash temperature 40°C40 Max. wash temperature 40°C40 |  Max. wash temperature 30°C30 Max. wash temperature 30°C30 |  Hand wash Hand wash |  DO NOT wash at all DO NOT wash at all | ||||
 Bleaching Bleaching | C1 Bleach in cold water | DO NOT bleach | ||||||||
 Ironing Ironing |  Hot iron max. 200°C Hot iron max. 200°C |  Warm iron max. 150°C Warm iron max. 150°C |  |  Lukewarm iron max. 110°C Lukewarm iron max. 110°C |  DO NOT iron DO NOT iron | |||||
 Dry cleaning Dry cleaning |  Dry cleaning in all solvents Dry cleaning in all solvents |  Dry cleaning in perchlorethylene, petrol, pure alcohol, R 111 & R 113 Dry cleaning in perchlorethylene, petrol, pure alcohol, R 111 & R 113 | F Dry cleaning in petrol, pure alcohol and R 113 |  DO NOT dry clean DO NOT dry clean | ||||||
 Drying Drying |  Flat Flat |  On the line On the line |  On clothes hanger On clothes hanger | High temperature  Low temperature Tumble dry Low temperature Tumble dry | [K=28]DO NOT tumble dry | |||||
MAINTENANCE
Your Washer has been designed to operate with easy maintenance.
Follow these simple maintenance procedures to obtain optimum performance:
- Ensure that your machine was installed according to the correct installation procedures detailed in this Manual.
- Do not use solvents either to clean the machine or to wash clothes.
- Keep the inside of the detergent dispenser clean.
Cleaning the coin trap
- Switch off the Washer, allow the water to cool down.
- Open the service flap by using a finger. (bottom right corner) (Fig.13)
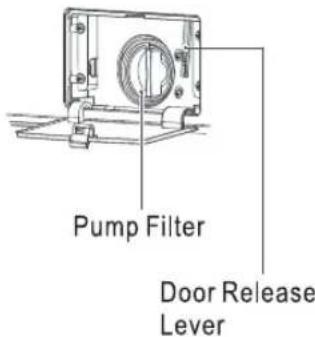
- Turn the pump filter open to the left. (Fig.14)
- Remove foreign objects/fluff from inside and clean the interior. (Fig.15)
- The pump impeller wheel located behind the water filter, must be able to rotate.
Remove detergent residue and fluff from the pump cover thread and pump housing.
- Insert the coin-trap cover and screw tight, close the service flap. (Fig.16)
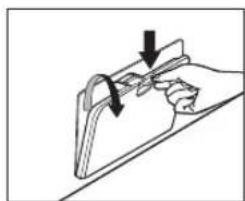
natural_image
Illustration of a hand using a tool to cut or mark a curved object, with arrows indicating motion (no text or symbols)Fig.13
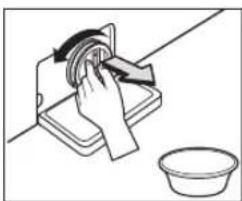
natural_image
Illustration of a hand cleaning a kitchen appliance with a bowl nearby (no text or symbols)Fig.14
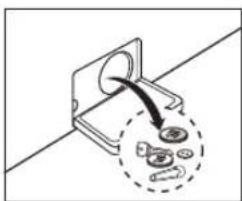
Fig.15
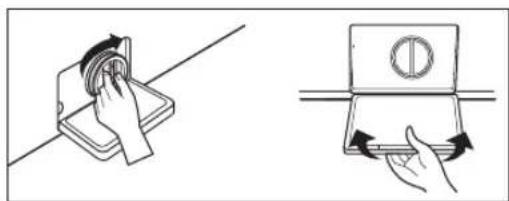
natural_image
Illustration showing two hand positions: one moving a circular object on a surface, the other holding a tray with arrows (no text or symbols)Fig.16
Cleaning the Detergent drawers and Recess
- Press release lever on the inside of the drawer and pull it out. (Fig.16)
- Remove the cap from the Fabric Softener compartment.
- Clean the drawer recess with a bristle brush. (Fig.17, Fig.18)
- Reinsert the cap (Pushing it firmly into place).
- Push the drawer back into place.
- Run a rinse program without any laundry in the drum.
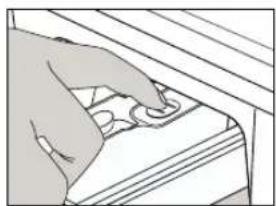
natural_image
Illustration of a hand inserting a circular component into a wooden frame (no text or symbols)Fig.16
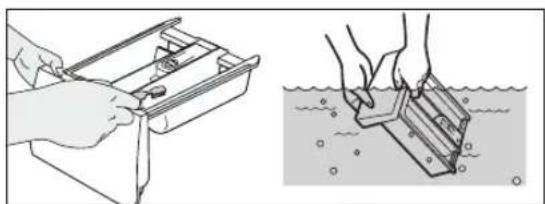
natural_image
Illustration showing hands using a tool to clean or repair a container in a water-filled container (no text or symbols present)Fig.17
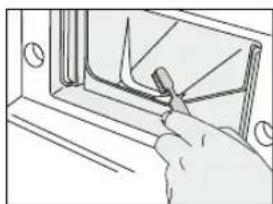
natural_image
Line drawing of a hand pressing down on a mechanical component (no text or symbols)Fig.18
Cleaning the water inlet filter
- If water is very hard or contains traces of lime deposit, the water inlet filter may become clogged. It is therefore a good idea to clean it from time to time.
- Turn off the water tap. (Fig.19)
- Unscrew the water inlet hose. (Fig. 20)
-Clean the filter using a hard bristle brush under the running water. (Fig. 21) - Insert the filter into the valve and tighten up the inlet hose. (Fig. 22)
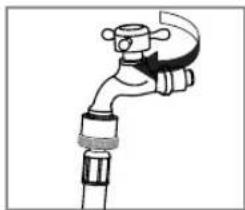
natural_image
Simple line drawing of a faucet with handle and valve (no text or symbols)Fig.19
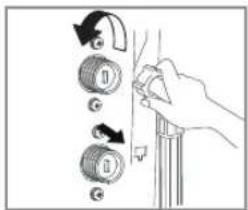
Fig. 20
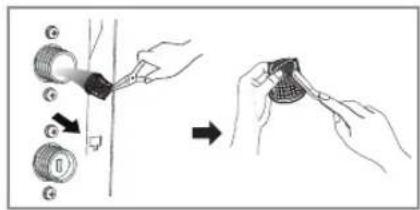
Fig. 21
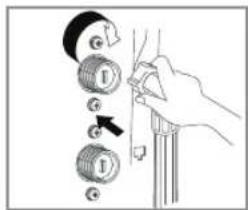
Fig. 22
Cleaning the drum
If you live in a hard water area, limescale may build up continuously in places where it cannot be seen and thus not easily. Over time the build up of scale clogs appliances, and if it is not kept in check these may have to be replaced.
Although the washing drum is made of stainless steel, specks of rust can be caused by small metal articles (paper clips, safety pins) which have been left in the drum.
- The washing drum should be cleaned from time to time.
- If you use descaling agents, dyes or bleaches, make sure they are suitable for washing machine use.
- Descaler may contain chemicals that may damage part of your washing machine.
- Remove any spots with a stainless steel cleaning agent.
- Never use steel wool.
Cleaning the machine
1. Exterior
Proper care of your washer can extend its life.
- The outside of the machine can be cleaned with warm water and a neutral non abrasive household detergent.
- Immediately wipe off any spills. Wipe with damp cloth.
- Try not to hit surface with sharp objects.
- Do not use methylated spirits, diluents or similar products.
2. Interior
- Dry around the washer door opening, flexible gasket and door glass.
- Run washer through a complete cycle using hot water.
- Repeat process if necessary.

To remove hard water deposits, use only cleaners labelled washer safe.
Clean Door gasket
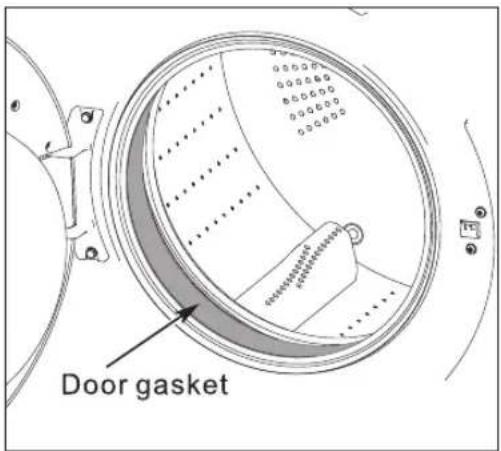
Clean the door gasket once a month to prevent buildup of dirt in the door gasket.
- Open the door, and then empty the drum.
- Combine 3/4 cups of liquid chlorine bleach and approx 6 pints of warm tap water.
- Turn over the rubber door gasket.
- Wearing rubber gloves, use a soft, clean cloth dipped in the water and bleach solution to clean the gasket.
- Let stand 5 minutes, and then wipe up and dry well.
- Put the rubber gasket back into position.
CAUTION
- Clean the door gasket with undiluted liquid chlorine bleach may cause the door gasket and machine to malfunction. Dilute the bleach by adding it to water before using it.
- Use bleach carefully and be sure to follow the bleach manufacturer's use and care instructions.
PET Cycle - Maintenance
If the PET Cycle is used, it is important to run a quick wash cycle without clothes following every load. After the cycle ends, wipe down the drum with a damp cloth to collect any pet hair on the drum surface. The lint filter should also be cleaned more frequently.
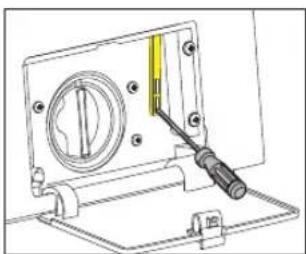
Emergency Release, e.g. the power failure occurs
The program continues running if the power is restored. If the laundry is still to be unload, the door can be opened as described below:
- Open the service flap.
- Drain the remaining water.
- Pull down the emergency release lever with a tool and release.
- Door can then be opened.
- Close the service flap.
natural_image
Technical line drawing of a mechanical device with a yellow component inserted, no visible text or symbolsThe dangers of freezing
If the machine is exposed to temperatures below 0^ C, certain precautions should be taken.
- Turn off the water tap.
- Unscrew the inlet hose.
- Unhook the drain hose from the sink.
- Pull forward the drain hose and the inlet hose in a bowl placed on the floor, and let the water drain out.
- Screw the water inlet hose back on and reposition the drain hose.
When you intend to start the machine up again, make sure that the room temperature is above 0^ C.
Blood
Rinse or soak fresh stain in cold water. Work detergent into any remaining stain. Rinse. If stain persists, put a few drops of ammonia on stain and repeat detergent treatment. Rinse. If necessary bleach.
Burn Marks
Rinse or soak in cold water. Work detergent into stain. Rinse. Bleach, if necessary. Stain may be impossible to remove.
Candle Wax
Scrape off excess. Place stain between clean white blotters or several layers of facial tissues. Press with warm iron. Sponge with cleaning fluid. If dye spot remains, bleach.
Chewing Gum
Rub with ice to harden. Scrape off excess with dull blade. Sponge with cleaning fluid.
Chocolate or Cocoa
Soak 15 minutes in cold water. Rub detergent paste into stain, then rinse thoroughly. Launder in hottest water safe for fabric. If colored stain remains, sponge with hydrogen peroxide, rinse and launder.
Coffee or Tea
Soak fresh stains immediately in cold water. Then use bleach treatment with hottest water safe for fabric. Launder.
Cosmetics (makeup, lipstick, etc.)
Apply undiluted liquid detergent to stain, or dampen stain and rub in soap or detergent paste until thick suds are formed. Work in until stain is gone, rinse well. Repeat if necessary. If color remains, bleach if safe for fabrics.
Cream, Ice Cream or Milk
Sponge stain with cool water or soak stain in cool water for 30 minutes or longer. If stain remains, work detergent on spot then rinse. Bleach if necessary.
Deodorants and Antiperspirants
Wash or sponge stain thoroughly with warm water and detergent; rinse. If stain remains, bleach with hot sudsy water. Launder. You may be able to restore fabric color by sponging with ammonia. Rinse thoroughly.
Dye
Rinse or soak in cold water. Work detergent into stain. Rinse. If necessary, bleach. Stain is not always possible to remove. A commercial color remover may also be used.
Egg or Meat Juice
Rinse in cold water. If stain remains, sprinkle with meat tenderizer, let stand 15-20 minutes. If stain still remains, sponge with cleaning fluid or diluted bleach. Launder in hot water. The use of hot water first may set stain.
Fabric Softener Stain
Rub with bar soap until stain has lightened. Rinse thoroughly. Launder. Rubbing alcohol is sometimes effective in the color of the garment can take it. Launder. If desired, dry cleaning can be used.
Felt tip pen
Spray spot with cleaners suitable to this purpose. Sponge stain thoroughly. Rinse with cold water. Reapply cleaner if necessary.
Fruit, Wine
Soak fresh stains immediately with cool water. Then use bleach treatment with hottest water safe for fabrics. Launder.
Grass
Work detergent into stain. Sponge with denatured alcohol. Bleach, if necessary.
Grease or Oil
Scrape away excess. Rub detergent paste or a general purpose liquid household cleaner into stain, rinse with hot water. If stain remains, sponge thoroughly with a grease solvent. Dry. Repeat if necessary. To remove yellow stain, use a chlorine or oxygen bleach.
Ink
Some ball-point inks are set by water. First test a scrap of cloth. Sponge stain repeatedly with acetone, amyl acetate or rubbing alcohol. Hair spray is effective. Launder. Bleach if necessary. Use amyl acetate on triacetate, arnel, dynel and verel. Use acetone on other fabrics. NOTE: Some inks cannot be removed.
Ketchup
Scrape of excess. Soak in cold water 30 minutes. Pre-treat with a detergent paste. Launder.
Mildew
Brush off surface growth to keep mold spores from spreading. Dip article into solution of 12 cup bleach per 1 gallon of cool sudsy water for 5 to 10 minutes. Rinse well. Launder.
Mud
Let stain dry; then brush well. Rinse repeatedly in cool water until mud comes out. Launder. (Hot soaps suds set a red or yellow clay stain).
Mustard
Soak in hot detergent water for several hours. If stain remains, bleach.
Nail Polish
Treat while fresh, scraping or wiping off as much as possible, before it dries. Place stain face down on white paper towels. Sponge back of stain acetone (nail polish remover) or sponge with denatured alcohol and a few drops of household ammonia. Sponge stain
frequently. Launder with water at temperature suitable for fabric. Do not use acetone on acetate, arnel, dynel or rayon.
Paint
Sponge or soak in turpentine or solvent recommended as a thinner on label. Launder.
Perfume
Rinse in cold water. Rub undiluted liquid detergent or a detergent paste into stain. Rinse. If stain remains, bleach.
Perspiration
Wash or sponge stain thoroughly with warm water and detergent paste. If perspiration has changed the color of the fabric, restore it by treating with ammonia or vinegar. Apply ammonia to fresh stains; rinse with water. Apply vinegar to old stains; rinse with water.
Rust and Iron
Apply commercial rust remover, Rinse. Or, if safe for fabric, boil stained article in solution of 4 teaspoons of cream of tartar to 1 pint water.
Shoe Polish
Scrape off as much as possible. Pre-treat with a detergent paste; rinse. If stain persists, sponge with rubbing alcohol (1 part to 2 parts water) or turpentine. Remove turpentine by sponging again with warm detergent solution or with alcohol. Bleach if necessary.
Soft Drinks
Sponge with cold water, some stains are invisible when they have dried, but turn brown when heated and may be impossible to remove.
Tar and Asphalt
Act quickly before stain is dry. Sponge with grease solvent or turpentine. Launder.
Urine
Soak in cool water. If stain is dry, work a detergent paste into the spot then rinse. If necessary, bleach.
TROUBLESHOOTING
In most cases, when your Super Washer fails to work, the problems arising can be easily solved without having to call for a technician. Before calling for assistance, always check these points.
| Problem | Solution |
| Will not start | Make sure the door is firmly closed. E-1Make sure your Washer is plugged in.Make sure the water source faucets are open.Make sure to press the Start/Pause Button to start your Washer.Make sure the Child Lock is not activated.Before your machine starts to fill, it will make a series of clicking noises to check the door lock and do a quick drain.Check the fuse or reset the circuit breaker |
| Has no water or not enough water | Turn both faucets on fully. E-3Make sure the door is tightly closed.Straighten the water inlet hoses.Disconnect hoses and clean filters. Hose filter screens may be clogged.Open and close the door, then press the Start/Pause Button. |
| Vibrates or is too noisy | Make sure your machine is set on a level surface. If the surface is not level, adjust your machine feet to level the appliance.Make sure that the shipping bolts are removed.Make sure your machine is not touching any other object.Make sure the laundry load is balanced. |
| Load is too wet at the end of the wash cycle | Use the High or Extra High spin speed.Use high efficiency detergent to reduce over-sudsing. E-4Load is too small. Very small loads (one or two items) may become unbalanced and not spin out completely. |
| Leaks water | Make sure the door is firmly closed.Make sure all hose connections are tight.Make sure the end of the drain hose is correctly inserted and secured to the drainage system.Avoid overloading.Use Front loading detergent to prevent over - sudsing. E-4 |
| Door locked or will not open | Press the Start/Pause Button to stop your machine.Your machine door will remain locked during the heating portion of the Sanitize CycleIt may take a few moments for the door lock mechanism to disengage. |
| Does not drain and/or spin | Check the fuse or reset the circuit breaker.Straighten the drain hoses. Eliminate kinked hoses. If there is a drain restriction, call for service. E-2Close the door and press the Start/Pause Button. For your safety, your Washer will not tumble or spin unless the door is closed. |
| Has excessive suds | Use Front loading detergent to prevent over-sudsing. E-4Reduce the detergent amount for soft water, small or lightly soiled loads.Non Front loading detergent is NOT recommended. |
| Continuously fills and drains water | Check if the drain hose is positioned too low.Check that the inlet hose is not connected at a height more than 3 feet (100 cm) above the floor. |
| DIAGNOSTIC MENU | ||
| Code | Description | Component |
| E1 | Door close | Door Switch |
| E2 | Drain | Drain Pump |
| E3 | Water inlet | Inlet Valves |
| E4 | Water overfill | Pressure Switch |
| E5 | Motor | Motor +Electronic Module |
| E7 | Washing heater failure | Washing heater |
| E10 | Water level failure | Water level sensor |
| E16 | Communication between display & electronic module | Communication Cable |
Information or Parts:
www.ApplianceDesk.com/Parts
Compact Short Dryer
Model - 852
natural_image
Pure geometric diagram showing concentric circles and a separate rounded rectangle, without any text, numbers, or symbols.OWNER'S MANUAL
Please read the instructions carefully and keep for future reference. Information may be updated from time to time so please refer to the website for the latest version of the manual.
Warranty
Consolidated Brands undertakes to the consumer-owner to repair or, at our option, to replace any part of this product which proves to be defective in workmanship or material under normal personal, family or household use, in USA and Canada, for a period of one year from the date of original purchase. During this period, we will provide all labor and parts necessary to correct such defect, free of charge, if the appliance has been assembled and operated in accordance with the written instructions with the appliance.
Exclusions
In no event shall Consolidated Brands be liable for incidental or consequential damages or for damages resulting from external causes such as abuse, misuse, incorrect voltage or acts of God. This warranty does not cover service calls which do not involve defective workmanship or materials covered by this warranty. Accordingly, diagnosis and repair costs for a service call which does not involve defective workmanship or materials will be the responsibility of the consumer-owner.
Specifically, the following work is not covered under warranty and does not constitute warranty work:
Installation - e.g. incorrect attachment to rack or wall Maintenance - e.g. failure to clean lint filters Mishandling - e.g. breakage of door handle
Most work is covered. The defining factor is, has the machine malfunctioned (Consolidated Brand is responsible) or has the customer omitted or done something to cause the appliance to malfunction (customer is responsible). Some States do not allow the exclusion or limitation of incidental or consequential damages, so the above limitation or exclusion may not apply to you.
This warranty is given by:
Consolidated Brands
10216 Georgibelle Drive, Suite 900D
Houston, Texas 77043-5249
For Customer Service:
Appliance Desk
Business hours: 9:00 am to 5:00 pm weekdays
You can register your Warranty by any of the following methods:
- Mail in the Warranty Registration Card
- Register online at www.ApplianceDesk.com
- Scan the QR Code

GENERAL
Since it is a responsibility of the consumer-owner to establish the warranty period by verifying the original purchase date, Consolidated Brand recommends that a receipt, delivery slip or some other appropriate payment record be kept for that purpose.
This warranty gives you specific legal rights, and you may also have other rights which vary from State to State.
All rights reserved. Manual subject to change without notice.
Important Safeguards
When using electrical appliances, in order to reduce the risk of fire, electric shock, and/or injury to persons, basic safety precautions should always be followed, including:
For Your Safety
Read all instructions carefully, even if you are quite familiar with the appliance.
- This appliance is not intended for use by persons (including children) with reduced physical, sensory or mental capabilities, or lack of experience and knowledge, unless they have been given supervision or instruction concerning use of the appliance by a person responsible for their safety.
- Do not allow children to play on or in the appliance. Close supervision of children is necessary when the appliance is used near children.
- INDOOR USE ONLY – this appliance is not intended for outdoor use.
- Do not place naked flame sources, such as candles, on the appliance.
- Do not locate the appliance or cord near heat sources such as radiators, heaters, air ducts or direct sunlight.
- Do not block any of the ventilation openings. Ensure that vents are not covered by newspapers, tablecloths, curtains, etc.
- Do not run the cord under floor coverings. Instead, arrange the cord away from traffic areas where it will not become a trip hazard.
- To disconnect the appliance, turn the appliance off, switch off the power outlet and remove the plug from the power outlet.
- Do not misuse the cord. Never carry the appliance by the cord or pull to disconnect it from the outlet. Instead, grasp the plug and pull to disconnect.
- Do not operate the appliance if it has a damaged cord or plug; after the appliance malfunctions; or has been dropped or damaged in any way. Consult the manufacturer.
- Do not attempt to repair, disassemble or modify this appliance. The warranty becomes void if not serviced or repaired by a qualified person.
-
Do not reach into the appliance if the drum is moving.
-
Do not place items that have been soiled with flammable liquids inside the dryer without washing them with detergent thoroughly before hand.
- Do not excessively bend, stretch, twist or bind the power cord or place heavy objects on it.
- This appliance is only to be serviced by a qualified person. There are no user-serviceable parts inside.
- Do not install in a tight fitting cabinet.
- Do not overload the tumble dryer.
- Do not dry articles that have been previously cleaned in, washed in, soaked in, or spotted with gasoline, dry-cleaning solvents, or other flammable or explosive substances, as they give off vapours that could ignite or explode.
- Before the appliance is removed from service or discarded, remove the door to the drying compartment.
- Do not install or store this appliance where it will be exposed to the weather.
- Do not tamper with controls.
- Do not repair or replace any part of the appliance or attempt any servicing unless specifically recommended in the user-maintenance instructions or in published user-repair instructions that you understand and have the skills to carry out.
- Do not use fabric softeners or products to eliminate static unless recommended by the manufacturer of the fabric softener or product.
- Do not use heat to dry articles containing foam rubber or similarly textured rubber-like materials.
- Keep area around the exhaust opening and adjacent surrounding areas free from the accumulation of lint, dust, and dirt.
- The interior of the appliance and exhaust duct should be cleaned periodically by qualified service personnel.
- Do not place items exposed to cooking oils in your dryer. Items contaminated with cooking oils may contribute to a chemical reaction that could cause a load to catch fire.
- Ensure foreign objects do not find their way into the tub of the tumble dryer.
- Clean lint screen before or after each load.

- Oil-affected items can ignite spontaneously, especially when exposed to heat sources such as in a tumble dryer. The items become warm, causing an oxidation reaction in the oil. Oxidation creates heat. If the heat cannot escape, the items can become hot enough to catch fire. Piling, stacking or storing oil-affected items can prevent heat from escaping and so create a fire hazard.
- If it is unavoidable that fabrics that contain vegetable or cooking oil or have been contaminated by hair care products be placed in a tumble dryer they should first be washed in hot water with extra detergent - this will reduce, but not eliminate, the hazard.
- Do not dry unwashed items in the tumble dryer.
- Items that have been soiled with substances such as cooking oil, acetone, alcohol, petrol, kerosene, spot removers, turpentine, waxes and wax removers should be washed in hot water with an extra amount of detergent before being dried in the tumble dryer.
- Fabric softeners, or similar products, should be used as specified by the fabric softener instructions.
- The final part of a tumble dryer cycle occurs without heat (cool down cycle) to ensure that the items are left at a temperature that ensures that the items will not be damaged.
- WARNING: Never stop a tumble dryer before the end of the drying cycle unless all items quickly removed and spread out so that the heat is dissipated.

This dryer can not be used upside down
Caution, danger
WARNING
-Risk of Fire
Clothes dryer installation must be performed by a qualified installer.
Install clothes dryer according to the manufacturers instructions and local codes.
Do not install a clothes dryer with flexible plastic venting materials. If flexible metal(foil type) duct is install, it must be of a specific type identified by the appliance manufacturer as suitable for use with clothes dryers. Flexible venting materials are known to collapse, be easily crushed, and trap lint. These conditions will obstruct clothes dryer airflow and increase the risk of fire.
To reduce the risk of severe injury or death, follow all Installation instructions.
Connet To Individaul Branch Circuit.
This appliance must be grounded. In the event of malfunction or breakdown, grounding will reduce the risk of electric shock by providing a path of least resistance for electric current. This appliance is equipped with a cord having an equipment-grounding conductor and grounded in accordance with all local codes and ordinances.
WARNING
- Improper connection of the equipment-grounding conductor can result in a risk of electric shock. Check with a qualified electrician or service representative or personnel if you are in doubt as to whether the appliance is properly grounded. Do not modify the plug provided with the appliance: if it will not fit the outlet, have a proper outlet installed by a qualified electrician.
It must be placed on firm horizontal ground. Do not place the dryer on carpet as this will block the intake. There should be at least 10cm between the dryer and the walls.
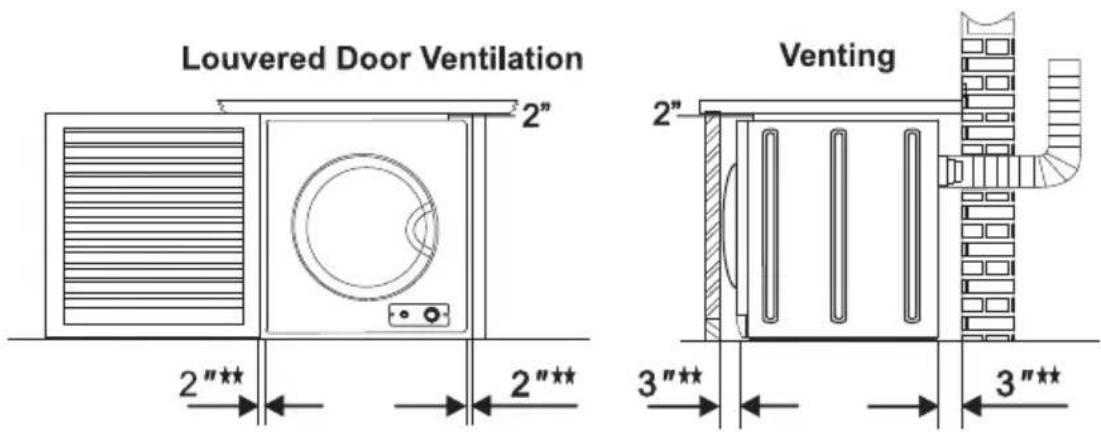
BUILT-IN, RECESSED, CLOSET AND ALCOVE INSTALLATION
• The Dryer may be installed in a built-in, recessed area, closet or alcove.
• The installation spacing is in inches and is the minimum acceptable.
- Other installation must use the minimum dimension indicated.
- Minimum clearance between dryer cabinet and adjacent walls are: 2" either side and 3" front and rear.
- Minimum vertical space from floor to overhead cabinets, etc. is 52" (132 cm).
- Closet door must be louvered or otherwise ventilated and must contain a minimum of 60 sq.in. of open area equally distributed. If closet contains both a washer and a dryer, doors must contain a minimum of 120 sq.in. of open area equally distributed.
- No other fuel-burning appliance shall be installed in the same closet with the dryer.
★ Additional clearances for wall, door and floor moulding may be required.
★★ Additional space is needed when an external exhaust elbow is used.
NOTE: If a door is installed that potentially encloses the unit while running, the door must allow for a minimum of 20 square inches of free air movement. There must also be a 1" additional space in front of the unit to the closed door and 1" from back of the unit to the wall. Additional spacing should be considered for easy installation, servicing and compliance with all applicable local, state, and federal codes.
Cutout Dimensions
| Cutout Height | 28.5 inches |
| Cutout Width | 27.5 inches |
| Cutout Depth | 27.5 inches |
Installation Instructions
This dryer cannot be used upside down
Where to place your dryer
Place the dryer in a dry well ventilated area. It should be positioned away from heat and direct sunlight.
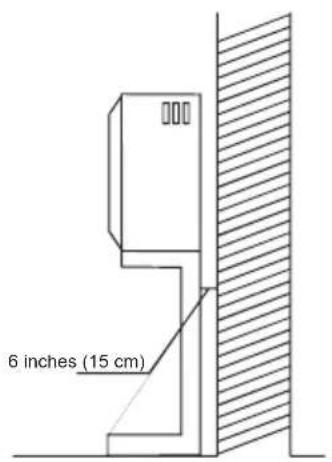
If the dryer is not wall mounted, it must be placed on firm horizontal ground. Do not place the dryer on carpet as this will block the intake. There should be at least 6 in (15 cm) between the dryer and the walls.
The dryer comes with fixed legs that need to be assembled to ensure stability.
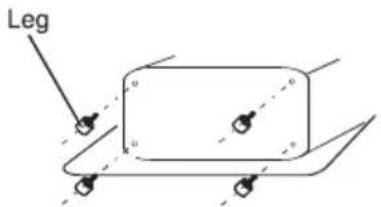
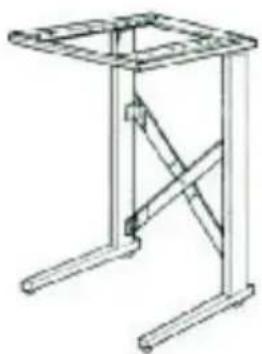
If the dryer is rack mounted. A secure bracket is required to ensure stability and prevent vibration. At least 6 in (15 cm) between the dryer and walls is required (the bracket is not included).
natural_image
Line drawing of a simple metal stand with supports and legs (no text or symbols)Wall Mounting Instructions
- Determine and mark the dryer position on the wall. This dryer is not suitable to be directly placed on top of a washing machine.
* A minimum 2 in (50 mm) is needed between the top of the dryer and the ceiling for ease of installation.
* If mounting above a washing machine, allow sufficient room to open the lid of the washer.
| Tools required | ||
| Tools & arts required for Plaster/ wooden wall | Drill & 3mm Bit | 1 |
| Philips Head Screw Driver | 1 | |
| Wood Screws, 12x 50mm wood plank Screws | 4 | |
| Helper to lift dryer onto wall | 1 | |
| Wall Mounting Kit Includes | |||
| Description | Hanging Hook (top) | 2 | |
| Spacer (bottom) | 2 | ||
| Exhaust connector | 1 | ||
| 12mm Long Screws | 4 | ||
| 25mm Long Screws | 4 | ||
- Fix the wall hanging hooks (2 supplied) to the wall securely (eg. into the stud.) Fit a wood plank between the studs to mount the brackets onto if the stud position is too wide.
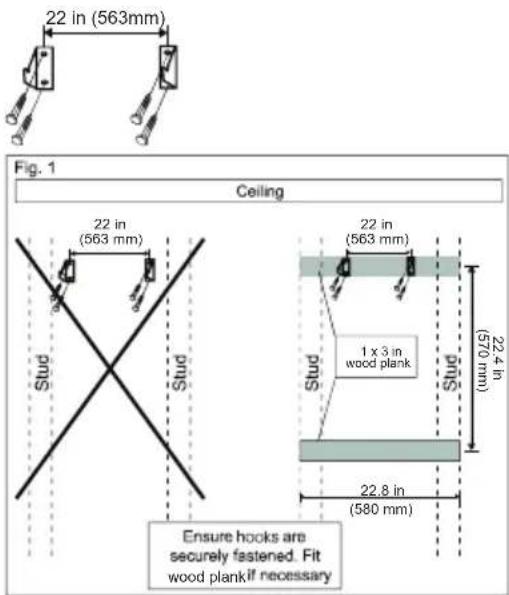
- To install the hanging hook to wood plank, start at Fig 2.
- Align hanging hooks and fasten screws tightly.
- Please adjust the exhaust connector direction, then, match the exhaust connector onto the connector. Please refer to Fig 3.
- Turn the exhaust connector clockwise, until it insert into the connector's groove.
- Using 4×12mm screws (provided) to fix the 2 spacers as per Fig 4.
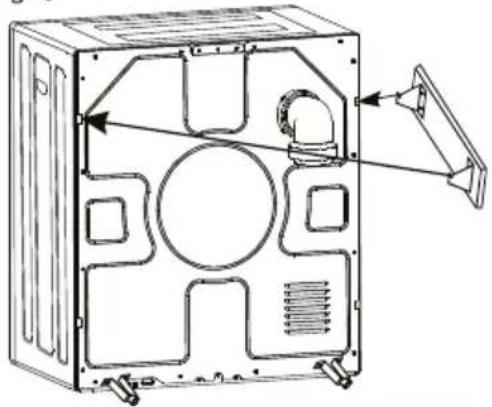
- With assistance, mount dryer on wall hooks. See Fig 5.
Fig. 2
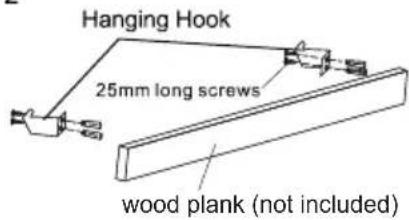
Fig. 4
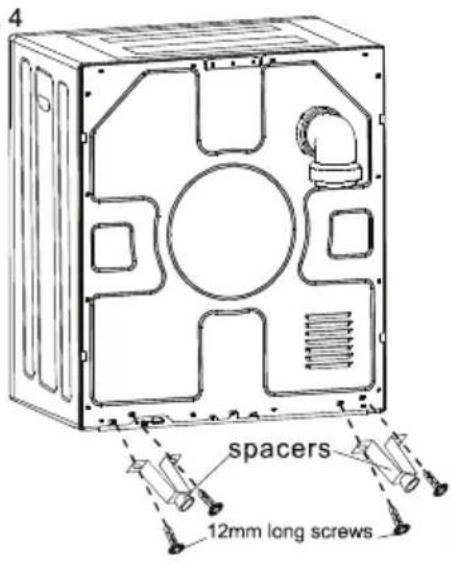
Fig. 3
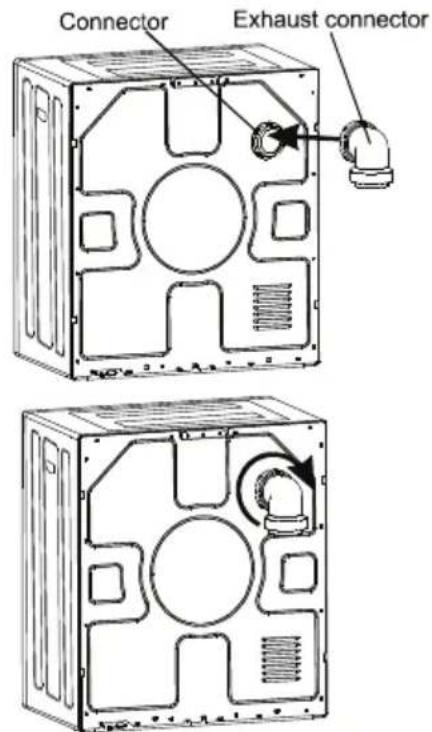
Fig. 5
natural_image
Technical line drawing of a mechanical device casing with internal components and mounting feet (no text or symbols)The appliance shall not be exhausted into a chimney, a wall, a ceiling, an attic, a crawl space, or a concealed space of a building.
Only rigid or flexible metal duct shall be used for exhausting.
In Canada, that only those foil-type flexible ducts, if any, specifically identified for use with the appliance by the manufacturer shall be used. In the United States, that only those foil-type flexible ducts, if any, specifically identified for use with the appliance by the manufacturer and that comply with the outline for Clothes Dryer Transition Duct, Subject 2158A, shall be used.
In Canada, that the exhaust duct shall be 4 in (102 mm) in diameter. In the United States, the required exhaust duct diameter.
That the total length of flexible metal duct shall not exceed 2.4 m (8 ft).
That the duct shall not assembled with screws or other fastening means that extend into the duct and catch lint.
PARTS AND FEATURES
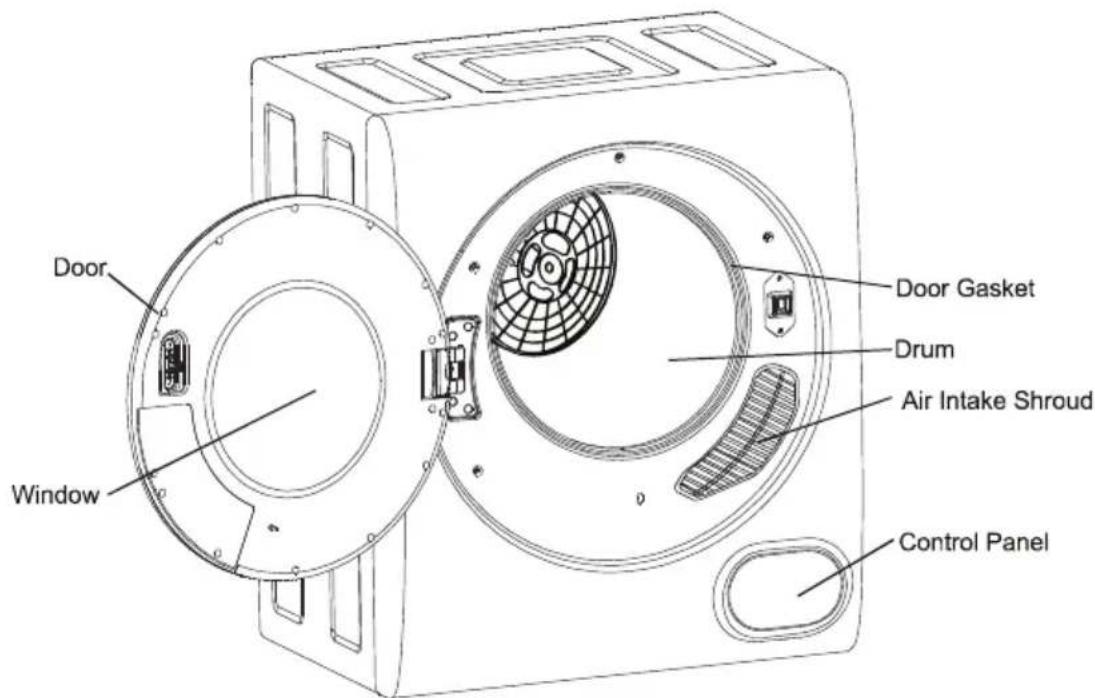
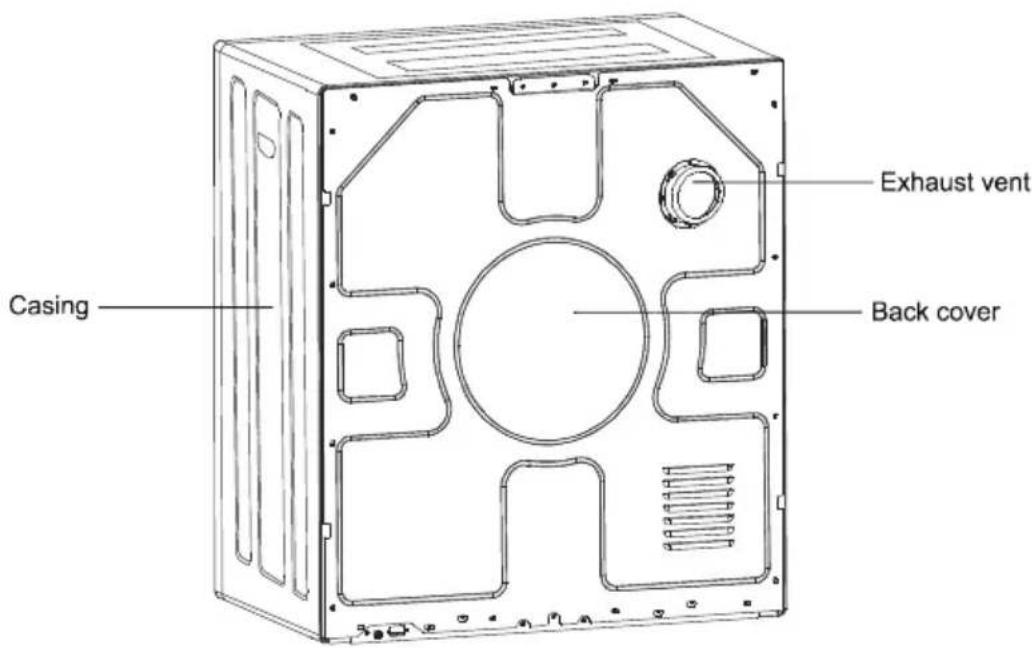
Operating your dryer
Electrical Requirements
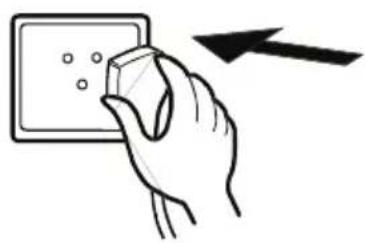
The unit is required to be plugged into a three pin socket that is reliably grounded.
Plug the power cord into the socket.
natural_image
Hand placing a small component into an electrical socket with a lightning bolt symbol (no text or labels)Loading the dryer
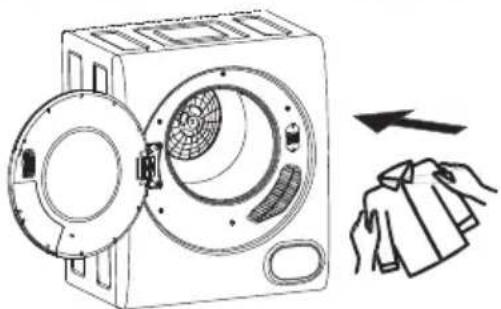
It is recommended that items are placed into the dryer one at a time. This ensures they are not tangled which results in uneven drying. When closing the dryer door prior to starting the unit ensure that items are not jammed in the door.
natural_image
Diagram of a washing machine with fan and door, showing hand cleaning process (no text or symbols)Tips before drying
Prior to loading the dryer check that the items do not have the following the symbols anywhere on them. If they do, do not tumble dry these items.

Dry flat

Dry in the shade

Do not tumble dry

Hang to dry

Drip dry
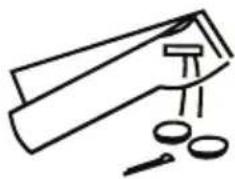
- Check the items to be dried do not have combustible materials or foreign objects within them ie: lighters, hair pins, coins.
natural_image
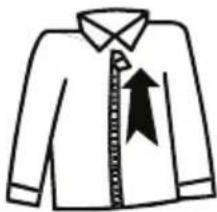
Simple line drawing of a lamp with a lamp illuminating the base (no text or symbols)- Turn items with zippers inside out and fasten buckles.
natural_image
Simple line drawing of a jacket with collar and tie (no text or symbols)- Dryer heat may permanently set stains, ensure you check prior to drying that stains are removed.
- Separate dark and light colored items as you would do when washing.
- For best results load the dryer with similar fabrics. Place small delicate items in a mesh bag and do not overload the dryer.
- The maximum mass is 13.2 lbs of dry textile material for the dryer and do not overload. The tumble dryer is intended only for drying textile material washed in water.
Control Panel Functions
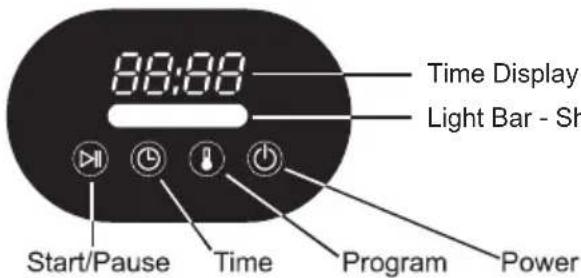
Time Display - Shows Program times and time remaining (minutes) Light Bar - Shows colors for different programs
| Color Program Display | |
| Red Time Dry: High Heat 150 | |
| Light Blue Sensor Dry: High Heat 200 | |
| Dark Blue Sensor Dry: Air + High Heat ECO | |
| Green Time Dry: Half Heat 90 |
Step 1 - Power Button
When the power cord is connected to the socket, the Power button is slightly lit, and you can see the location of the Power button. After touching the Power button, other buttons and descriptions on the control panel appear.
Step 2 - Program Button
This button is used to select a drying program. When you press the Program button, it first shows red on the light bar. Each time you press it, will show a different color for each of the 4 different programs.
Each of the drying programs is described below:
a) Red: The dry cycle runs at high heat and the default time is 150 minutes. The time can be changed by pressing the Time button. This program is best for drying a heavy load.
b) Light Blue: The dry cycle runs at high heat and the default time is 200 minutes. This program works with a sensor and will adjust the time automatically and will stop when the clothes are dry. The time cannot be changed in this program.
c) Dark Blue: The dry cycle runs at no heat, just air and the default time is 30 minutes. The time can be changed by pressing the Time button. This program is best for delicates or if you just want to refresh clothes.
d) Green: The dry cycle runs at half heat and the default time is 90 minutes. The time can be changed by pressing the Time button. This program is best for drying a light to normal load and if you want clothes to be damp dry for ironing or for hanging up to dry.
Note: This button is inactive during the operation of the dryer. To change the program, touch the "Start / Pause" button to pause the dryer before touching this button to change the drying program.
Step 3 - Time Button
This button is used to set the drying time. With each press of the button, the time increases in 20-minute increments, up to 200 minutes. To change the time once the drying program is running, press the Start/Pause button, make the time change, and then press Start/Pause again to restart.
Step 4 - Start/Pause
Press this button to start or pause the dryer operation.
When the program and time are set, touch the button to start the dryer. To change the time or program while the dryer is running, touch this button to pause. Select the desired program and then press this button again to restart.
Operation Precautions
Delicate items should be placed into a nylon net bag prior to drying. It is not recommended to dry under wire bras in this unit.
natural_image
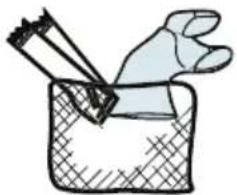
Illustration of a hand holding a pen and a bag (no text or symbols)Ensure that foreign objects do not find their way into the dryer. All pockets should be emptied, buttons, buckles and zips fastened. This will also help reduce impact noise when the items hit against the turning drum.
natural_image
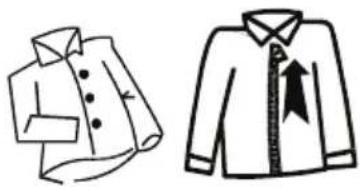
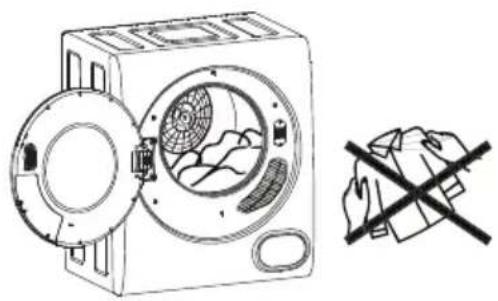
Two line drawings of men's collared shirts, one open and one closed, with no text or symbols present.Do not add items into the dryer whilst it is in operation.
natural_image
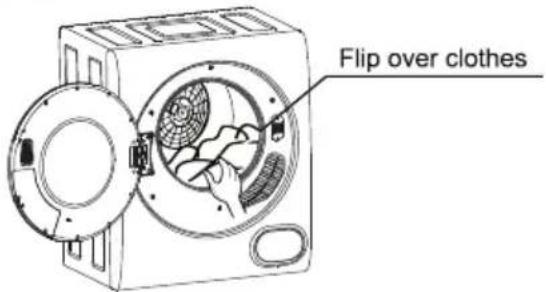
Line drawing of a washing machine with a fan and internal blades, alongside a hand holding a cross-shaped object (no text or symbols)If drying large items such as a blanket, it is recommended that from time to time you open the dryer door, shake the item, place the item hack in the dryer and close the door. This will ensure even drying.
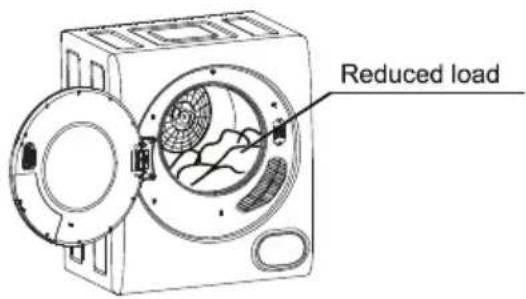
To ensure you get the most out of the Anti-wrinkle function do not overload the dryer and remove the dried items from the dryer immediately and hang on coat hangers. Iron the items if desired.
To minimize the risk of fire in a tumble dryer, the following should be observed:
- Items that have been spotted or soaked with vegetable or cooking oil constitute a fire hazard and should not be placed in a tumble dryer.
Oil-affected items can ignite spontaneously, especially when exposed to heat sources such as in a tumble dryer. The items become warm, causing an oxidation reaction in the oil. Oxidation creates heat. If the heat cannot escape, the items can become hot enough to catch fire. Piling, stacking or storing oil-affected items can prevent heat from escaping and so create a fire hazard.
If it is unavoidable that fabrics that contain vegetable or cooking oil or have been contaminated by hair care products be placed in a tumble dryer they should first be washed in hot water with extra detergent this will reduce, but not eliminate, the hazard.
The 'cool down' cycle of tumble dryers should be used to reduce the temperature of the items. They should not be removed from the tumble dryer or piled or slacked while hot.
Items that have been previously cleaned in, washed in, soaked in or spotted with petrol/gasoline, dry-cleaning solvents or other flammable or explosive substances should not be placed in a tumble dryer.
Highly flammable substances commonly used in domestic environments include acetone, denatured alcohol, petrol/gasoline, kerosene, spot removers(some brands), turpentine, waxes and wax removers.
- Items containing foam rubber (also known as latex foam) or similarly textured rubber, like materials should not be dried in a tumble dryer on a heat setting.
Foam rubber materials can, when heated, produce fire by spontaneous combustion.
● Fabric softeners or similar products should not be used in a tumble dryer to eliminate the effects of static electricity unless this practice is specifically recommended by the manufacturer of the fabric softener or product.
• Undergarments that contain metal reinforcements should not be placed in a tumble dryer.
Damage to the tumble dryer can result if metal reinforcements come loose during drying. When available a drying rack could be used for such items.
- Plastic articles such as shower caps or babies' waterproof napkin covers should not be placed in a tumble dryer.
- Rubber-backed articles, clothes fitted with foam rubber pads, pillows, galoshes and rubber-coated tennis shoes should not be placed in a tumble dryer.
Maintenance
Cleaning the Lint Filter
Please unplug the power cord prior to any cleaning. The lint filter must be in place whenever drying. It must be cleaned before each use.
1. Removing the filters
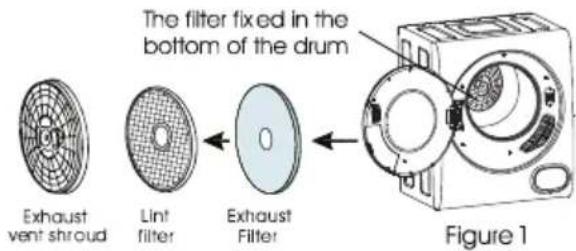
Remove by pulling outwards with fingers, inserted into the four holes around the exhaust vent shroud. The filter is in 3 parts: Exhaust vent shroud, lint filter and exhaust filter (as shown in figure1)
2. Cleaning the filter
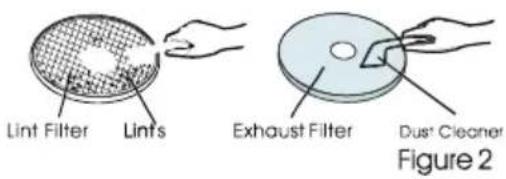
Separate "exhaust vent shroud", "lint filter" and "exhaust filter". Clean the lint on the lint filter and exhaust filter with a soft brush or vacuum cleaner. Do not damage the filters (as shown in figure 2)
3. Re-installing the filter
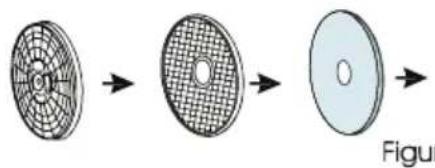
After cleaning, assemble in the sequence of "exhaust filter - lint filter- exhaust vent shroud", align the recesses in the center with the projection in the center of the drum. Make sure that it is firmly inserted (as shown in figure 3).
natural_image
Diagram showing a circular fan with internal mesh structure, progressing from top to bottom (no text or symbols)Note: The filter fixed in the bottom of the drum should also be cleaned with a soft brush.
Cleaning of the Air Intake Filter
The filter should be cleaned once a month.
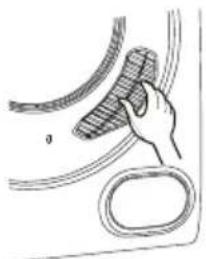
Remove by pulling outwards holding the upper and lower ends of the air intake shroud. Remove the filter inside the shroud and clean it with a soft brush. Reassemble and install as before.
natural_image
Hand cleaning a car wheel with a mesh material (no text or symbols visible)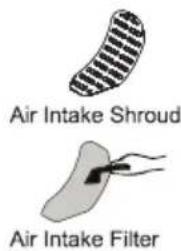
Slightly push upwards with your thumb until the latch hook disconnects, then remove.
Cleaning the interior & exterior of the Dryer
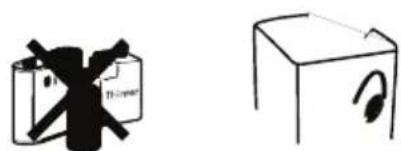
Do not wash directly with water.
Do not use thinner, gasolene or alcohol.
Do not use any type of spray cleaner when cleaning the interior. If dryer drum becomes stained, clean the drum with a damp cloth.
Remove any residue before drying the next load.
Clean cabinet with mild soap and water. Do not use harsh or abrasive cleaners, this could damage the dryer.
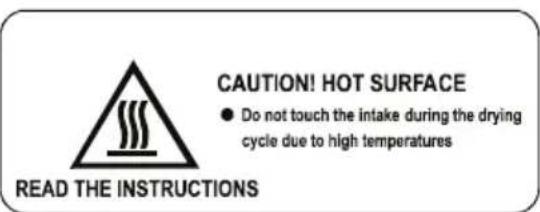
WARNING: Regularly clean the lint trap
Troubleshooting
Review the following pages before calling for service.
| Problem | Possible Cause | What to do |
| Timer knob does not turn | • Is the power cord inserted firmly? | • Insert the power cord firmly |
| Drum does not turn | • Is the door closed?• Is the power cord inserted?• Does the receptacle have power? | • Close the door.• Insert the power cord firmly.• Check the power cord receptacle. |
| Hot air is not blowing out | • Is the timer incorrectly set on cold air? | • Set the timer to hot air. |
| The laundry is not thoroughly dried | • Are the front and back filters clogged?• Is there too much laundry in the dryer?• Have items been added while the dryer is in operation?• Has the laundry become twisted while drying?• Has the dryer been placed in a small and badly ventilated area? | • Clean the filter.• Reduce the amount in the dryer.• Re-dry the items again• Untwist the items and re-dry.• Place the dryer in a well-vented area.• Use High Heat program and increase dry time |
| Dryer does not start | • Is there a power failure?• Is the power cord inserted firmly?• Is the door closed? | • Try again when there is power• Insert the power cord firmly• Close the door• Set the dry time |
ERROR CODE
E1 Temperature sensor
E2 Humidity sensor
E3 Temperature & Humidity sensor
Dryer Technical Specifications
| Model | 852 |
| Drying Capacity | 13 lbs |
| Voltage | 120V~ 60Hz |
| Rated Input | 1500 W |
| Net Weight | 55 lbs |
| Dimensions (HxWxD) | 27.5” x 23.6” x 21.5” |
NOTE: Consistent with our continuing product development policy, improvements may have been made which render the contents of this package slightly different to that shown.

- OWNER'S MANUAL
- TABLE OF CONTENTS
- Please read the Owner's Manual carefully before using your Fully Automatic Washer
- Here are some of the best reasons for buying your Super Washer
- Easy Operation
- Efficient Operation
- Convenience
- Placement Options
- Better Clothing Appearance
- Water Savings
- Energy Savings
- Maintenance
- Space Savings
- Add a sock
- Your appliance is protected by this warranty under normal, personal, family or household use for 1 Year Parts & Labor and limited commercial use (90 days) in USA and Canada.
- WARRANTY
- GENERAL
- WARRANTY SERVICE
- THE FOLLOWING WORK ARE NOT COVERED UNDER WARRANTY:
- Installation
- Maintenance
- Damage
- Other
- TECHNICAL DATA
- SAFETY
- CAUTION
- RISK OF ELECTRIC SHOCK DO NOT OPEN
- HELPFUL HINTS
- PRE-INSTALLATION
- Factory supplied accessories
- NOTE
- INSTALLATION INSTRUCTIONS
- Handling
- Disposing of the packing
- DANGER
- Disposing of your old appliance
- Factory - supplied equipment
- Installation area
- Removing the shipping rods
- UNPACKING, LEVELING & POSITIONING
- CONNECTION
- POWER SUPPLY
- GROUNDING
- WARNINGS
- CONNECTING TO THE WATER FAUCET
- CONNECTING TO THE MACHINE
- CONNECTING THE DRAIN HOSE
- SPECIAL INSTALLATION REQUIREMENTS
- MINIMUM CLEARANCE OTHER THAN ALCOVE OR CLOSET INSTALATION
- BUILT-IN, RECESSED, CLOSET AND ALCOVE INSTALLATION
- ADA COMPLIANCE
- OTHER CYCLES:
- OPERATING INSTRUCTIONS
- WINTERIZING
- How to winterize for cold weather
- Control Panel
- Buttons Introduction
- How to Run Wash cycle
- How to stop the wash cycle
- How to turn on the display in energy saving mode
- Add-a-sock Feature
- Door lock function
- PET Cycle
- USEFUL TIPS
- Denim Alert:
- Vacations: unplug the appliance:
- UNDERSTANDING FABRIC CARE LABELS
- Cleaning the coin trap
- Cleaning the Detergent drawers and Recess
- Cleaning the water inlet filter
- Cleaning the drum
- Cleaning the machine
- Exterior
- Interior
- Clean Door gasket
- PET Cycle - Maintenance
- Emergency Release, e.g. the power failure occurs
- The dangers of freezing
- Blood
- Burn Marks
- Candle Wax
- Chewing Gum
- Chocolate or Cocoa
- Coffee or Tea
- Cosmetics (makeup, lipstick, etc.)
- Cream, Ice Cream or Milk
- Deodorants and Antiperspirants
- Dye
- Egg or Meat Juice
- Fabric Softener Stain
- Felt tip pen
- Fruit, Wine
- Grass
- Grease or Oil
- Ink
- Ketchup
- Mildew
- Mud
- Mustard
- Nail Polish
- Paint
- Perfume
- Perspiration
- Rust and Iron
- Shoe Polish
- Soft Drinks
- Tar and Asphalt
- Urine
- TROUBLESHOOTING
- Information or Parts:
- www.ApplianceDesk.com/Parts
- Compact Short Dryer
- Model - 852
- Exclusions
- Consolidated Brands
- For Customer Service:
- Appliance Desk
- Important Safeguards
- For Your Safety
- This dryer can not be used upside down
- WARNING
- This dryer cannot be used upside down
- Where to place your dryer
- Wall Mounting Instructions
- PARTS AND FEATURES
- Operating your dryer
- Electrical Requirements
- Loading the dryer
- Tips before drying
- Control Panel Functions
- Step 1 - Power Button
- Step 2 - Program Button
- Step 3 - Time Button
- Step 4 - Start/Pause
- Operation Precautions
- Cleaning the Lint Filter
- Removing the filters
- Cleaning the filter
- Re-installing the filter
- Cleaning of the Air Intake Filter
- Cleaning the interior & exterior of the Dryer
- WARNING: Regularly clean the lint trap
- ERROR CODE
Brand : Equator
Model : EW826ED852
Category : Washing machine