SF-16W81 - Fan SPT - Free user manual and instructions
Find the device manual for free SF-16W81 SPT in PDF.


| Brand | SPT |
| Model | SF-16W81 |
| Product Type | Fan (Wall-Mountable) |
| Speed Settings | 3 speeds: Low, Medium, High |
| Wind Modes | Normal, Natural, Sleep |
| Timer | Up to 4 hours (30 min, 1H, 2H, 4H) |
| Oscillation | Multi-directional: Left-Right, Up-Down, Horizontal-8, Fixed |
| Remote Control | Included, operates up to 5m, 30° angle |
| Batteries for Remote | 2 x AAA (not included) |
| Mounting Method | Wall-mounted using included bracket; wall thickness >= 4 inches |
| Tilt Adjustment | Manual tilt up/down |
| Motor Overheat Protection | Automatic shut-off |
| Fuse Protection | Plug fuse, 2.5A / 125V, replaceable |
| Polarized Plug | Yes (one blade wider) |
| Power Cord | Do not run under carpet; avoid tripping hazards |
| Control Panel | On-unit buttons: ON/SPEED, MODE/OFF, OSC, TIMER |
| Power-off Memory | Retains last speed and mode setting (except timer) |
| Cleaning | Unplug; use mild soap and damp cloth; avoid motor contact |
| Indoor Use Only | Yes, not for window use |
| Warranty | 1 year limited (USA only) |
Frequently Asked Questions - SF-16W81 SPT
User questions about SF-16W81 SPT
0 question about this device. Answer the ones you know or ask your own.
Ask a new question about this device
Download the instructions for your Fan in PDF format for free! Find your manual SF-16W81 - SPT and take your electronic device back in hand. On this page are published all the documents necessary for the use of your device. SF-16W81 by SPT.
USER MANUAL SF-16W81 SPT
natural_image
Line drawing of a circular fan with radial blades and central hub (no text or symbols)OWNER'S MANUAL
SAVE THESE INSTRUCTIONS
Attention: Pictures in the IM are for reference only.
CAUTION
Read Rules for Safe Operation and Instructions Carefully.
WARNING
-
This appliance has a polarized plug (one blade is wider than the other). To reduce the risk of electric shock, this plug is intended to fit in a polarized outlet only one way. If plug does not fit fully in the outlet, reverse the plug. If it still does not fit, contact a qualified electrician. Do not attempt to defeat this safely feature.
-
To reduce the risk of fire or electric shock, DO NOT use this fan with any solid-state speed control devices.
- Never insert fingers, pencils, or any other object through the grille when fan is running.
- Disconnect fan when moving from one location to another.
- Disconnect fan when removing grilles for cleaning.
- Be sure fan is on a stable surface when operating to avoid overturning.
- Do not use fan in window. Rain may create electrical hazard.
- Ensure that the fan is switched off from the supply mains before removing the grille.
The rules about cord and plug as below:
-
This product employs overload protection (fuse). A blown fuse indicates an overload or short-circuit situation. If the fuse blows, unplug the product from the outlet. Replace the fuse as per the user servicing instructions (follow product marking for proper fuse rating) and check the products. If the replacement fuse blows, a short-circuit may be present and the product should be discarded or returned to an authorized service facility for examination and/or repair.
-
Do not operate any fan with a damaged cord or plug. Discard fan or return to an authorized service facility for examination and/or repair.
-
Do not run cord under carpeting. Do not cover cord with throw rugs, runners, or similar coverings. Do not route cord under furniture or appliances. Arrange cord away from traffic area and where it will not be tripped over.
PART FIGURE
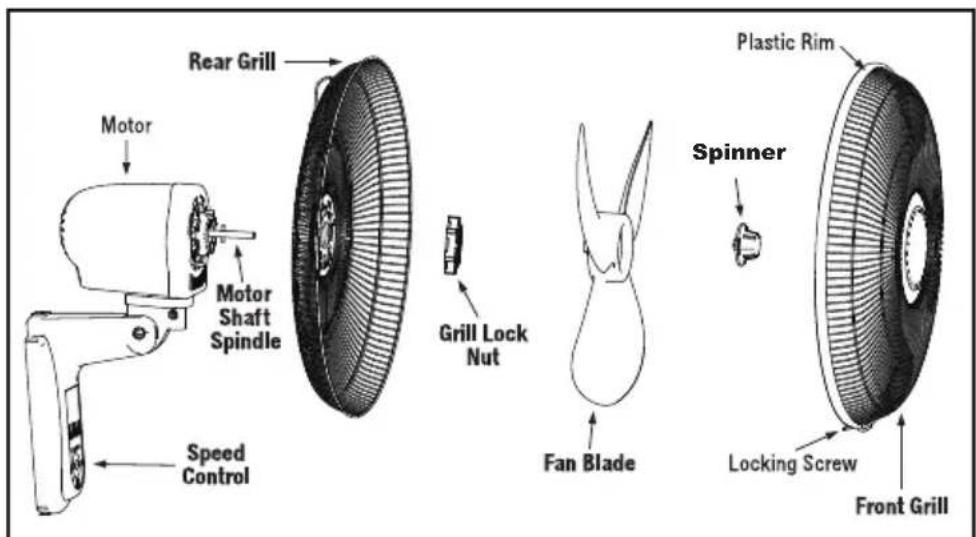
Note: All the pictures in this manual are for explanation purpose only. Any discrepancy between the real object and the illustration in the drawing shall be subject to the real subject.
GRILL & FAN BLADE ASSEMBLY
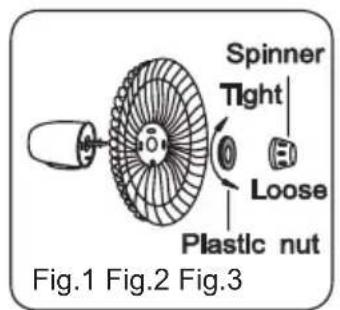
- Unscrew the spinner clockwise (this part may be packed separately in bag) and unscrew plastic nut counterclockwise to remove. Fix the rear grill onto the motor shaft, replace plastic nut and turn clockwise to tighten. (Fig.1)
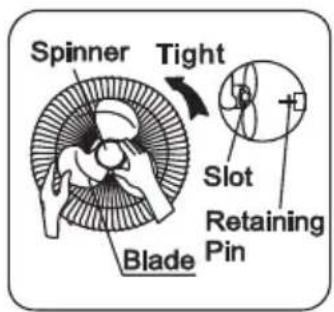
- Insert the blade onto shaft - make sure the rotor shaft pin is fitted into the groove on the blade. Turn the spinner counterclockwise to tighten the blade. (Fig.2)
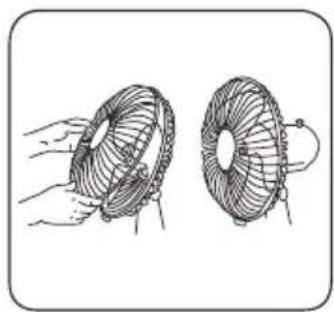
- Fix the front grill to the rear grill with then use the fasten clip with locking screw to secure the front grill. (Fig.3)
natural_image
Illustration of two hand-drawn fans with internal blades, shown from different angles (no text or symbols)MOUNTING ON THE WALL
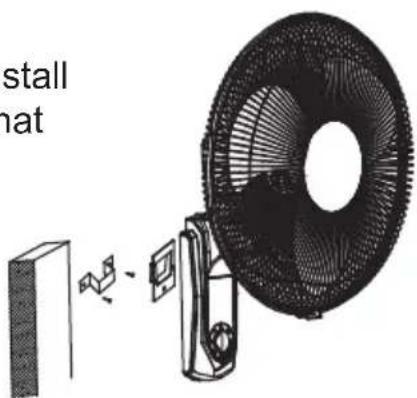
Fan should be installed on solid wood or a pillar which stands vertically to floor.
CAUTION: To prevent the fan from falling off, DO NOT install it on walls less then 4 inches thick or made of materials that are easily damaged.
- Installing the mounting bracket.
Fix the supplied mounting bracket to the wall using the two screws. Be sure bracket is firmly in place.
NOTE: The bracket should be placed at least 12 inches below the ceiling and at least 12 inches from adjoining wall.
- Installing the fan.
Mount the fan onto the bracket by inserting the bracket catch into the open slot on.
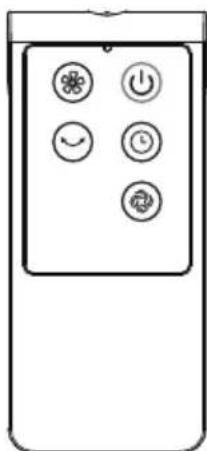
REMOTE CONTROLL (Fig.4)
“⏻” ON/OFF KEY
Press to turn on and press again to turn fan off.
“ ℟ ” TIMER KEY
Press to set timer: 30 minutes, 1H, 2H and 4H. The corresponding time indicator will illuminate.
When none of the timer indicators are lit, the unit runs continuously.
natural_image
Line drawing of a remote control with six function icons (no text or labels)Fig 4
“✿”SPEED KEY
After the fan has started, press to change fan speed in sequence of: Low - Medium - High. The corresponding indicator will illuminate.
“ ” MODE KEY
Press this key to select mode (or wind type). Press to change in the sequence: NORMAL - NATURAL - SLEEP. Corresponding indicator will illuminate.
The features of 3 wind types are as follows:
NORMAL WIND: delivers air constantly on set speed of high, medium or low.
NATURAL WIND: delivers air according to preset program, simulating natural wind:
- Natural Low: L(6s) → M(6s) → L(6s) → OFF(3s) → M(12s) → L(12s) → OFF(3s) → M(6s) → L(15s) → OFF(3s) → M(6s) → L(6s) → M(6s) → repeat
- Natural Medium: M(6s) → L(6s) → M(12s) → L(6s) → OFF(3s) → M(6s) → L(6s) → M(6s) → H(6s) → M(6s) → L(6s) → OFF(3s) → M(6s) → L(6s) → M(6s) → repeat
- Natural High: H(6s) → M(6s) → L(6s) → OFF(3s) → M(6s) → H(12s) → M(6s) → L(6s) → M(6s) → L(6s) → H(6S) → OFF(3s) → M(12s) → H(6s) → repeat
SLEEP WIND:
Basically follows the Natural Wind programs but steps down in speed:
- Sleep Low: follows the same pattern as Natural Low mode.
- Sleep Medium: follows the Natural Medium pattern for 30 minutes, then steps down to Natural Low and remains here until mode change, timer/power off.
- Sleep High: follows the Natural High pattern for 30 minutes, then steps down to Natural Medium for 30 minutes, then to Natural Low and remains here until mode change, timer or power off
“”OSC KEY
With the fan operating, press to select oscillation mode. The sequence is: Left-Right, Up-Down, Horizontal-8, and fixed.
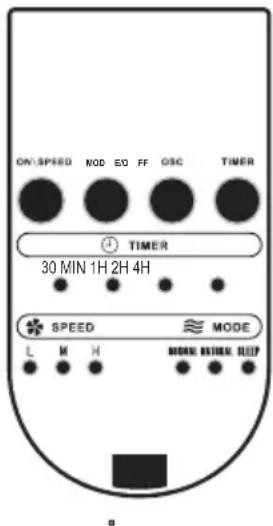
CONTROL PANEL
"ON/SPEED" button
Press this button once to switch fan on. Continue pressing to select speed in sequence: Low - Medium - High.
The corresponding speed indicator will illuminate.
"MODE/OFF" button
Press to select wind type, corresponding mode indicator will illuminate. After cycling through the modes, press again to turn off.
"OSC" button: Same function as the remote
"TIMER" button: Same function as the remote
Tilt Adjustment
To adjust the fan head upward or downward, push the head gently to desired angle.
Power off memory
Fan will turn on to operate at last setting (for the exception of timer).
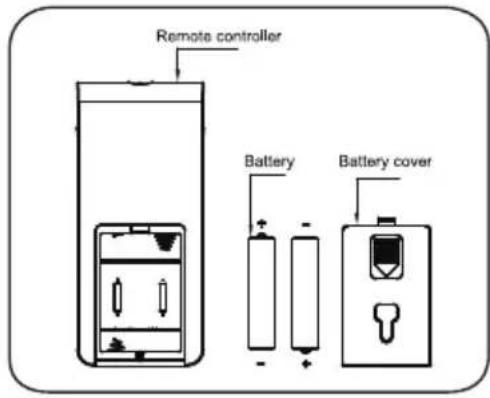
BATTERIES (not included)
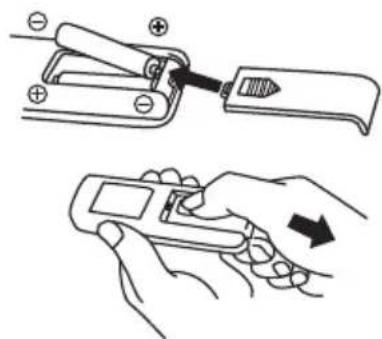
(1) Slide the battery compartment cover downwards.
(2) Insert batteries as indicated by drawing.
(3) Slide the battery cover back in place.
NOTES: Use size "AAA" manganese or alkaline batteries. Do not use rechargeable batteries.
WARNING
- Do not dispose of batteries in fire or high heat locations, batteries may explode or leak.
- Do not mix old and new batteries.
- Do not mix alkaline, standard (carbon-zinc) or rechargeable (nickel-cadmium) batteries.
natural_image
Illustration showing two hands using a power tool to adjust or install a circuit board (no text or symbols present)Point the remote controller at the receptor on body of the fan and press the desired button. The remote controller will work at distances of up to roughly five meters and the angle of 30 degree included between right and left from the receptor. The batteries must be removed from the remote controller for disposal and see that they are disposed of safely.
OVERHEAT PROTECTION OF THE MOTOR
This fan has an overheat thermal-fuse protection that automatically switches the fan off should the temperature of the motor rise abnormally.
FUSE REPLACEMENT
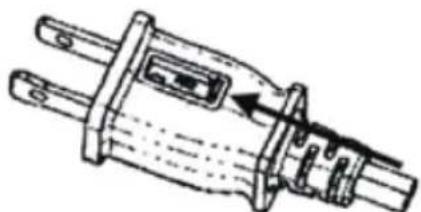
a) Grasp plug to remove from the receptacle. Do not unplug by pulling on the cord.
b) Fuse is located on the plug. Slide the fuse cover towards the blades to open.
c) Remove fuse carefully. Using a tweezer, insert the tip of your tool into the fuse slot and grasp one end. Remove the fuse gradually and slowly - do not overexert. If it feels tight, wiggle gently to remove little by little. When one side of the fuse has come loose, you can remove the fuse entirely.
d) Risk of fire. Replace fuse only with 2.5 Amp, 125 Volt fuse.
e) Slide close the fuse access cover.
f) Risk of fire. Do not replace attachment plug. Contains a safety device (fuse) that should not be removed. Discard product if the attachment plug is damaged.
natural_image
Technical line drawing of a mechanical component with no visible text or symbolsNotice:
- When replacing the fuse, do not overexert or product may be damaged.
- If it seems too hard to install, make sure you have got the right fuse type.
CLEANING
- Be sure to unplug from the electrical supply source before cleaning.
- Plastic parts can be cleaned with mild soap and a damp cloth or sponge. Follow with clean damp towel to remove soap film.
- Be sure water or other liquid does not come in contact with the motor.
Your Guarantee
If this product is found to be faulty as a result of faulty materials or workmanship within one year from date of purchase, it will be repaired free of charge.
This guarantee is subject to the following terms:
- Sunpentown must be notified of the fault.
- Proof of purchase must be presented to Sunpentown's nominated representative.
- The warranty will be void if the product if modified, misused or repaired by an unauthorized person.
- The warranty after repair will not be extended beyond the original one-year period.
- All replacement parts will be new or reconditioned.
- Parts, which are replaced, become the property of Sunpentown.
- The warranty applies for the use of the product in the USA only.
What is NOT COVERED:
- Warranty does not include freight charges.
- Damage due to installation error, product abuse and/or misuse.
- Incidental or consequential damage caused by possible defects with this product.
- Labor cost incurred for the installation and/or removal of a possible defective unit.
- Damage to product caused by improper power supply voltage, accident, fire, floods or acts of nature.
- Failure of product resulting from unauthorized modifications to the product.
- Improper installation or failure to perform the necessary maintenance.
- Normal wear and tear on parts or replacement of parts designed to be replaced.
- Damage to personal property from use of product.
- Replacement or repair of household fuses, circuit breakers, wiring or plumbing.
This GUARANTEE is in addition to your Statutory Rights
SUNPENTOWN INTERNATIONAL INC.
14625 Clark Ave. City of Industry, CA 91745
Tel: 800-330-0388
service@sunpentown.com
www.sunpentown.com
- OWNER'S MANUAL
- SAVE THESE INSTRUCTIONS
- CAUTION
- WARNING
- PART FIGURE
- GRILL & FAN BLADE ASSEMBLY
- MOUNTING ON THE WALL
- REMOTE CONTROLL (Fig.4)
- “⏻” ON/OFF KEY
- “ ℟ ” TIMER KEY
- “✿”SPEED KEY
- “ ” MODE KEY
- The features of 3 wind types are as follows:
- SLEEP WIND:
- “”OSC KEY
- CONTROL PANEL
- BATTERIES (not included)
- OVERHEAT PROTECTION OF THE MOTOR
- FUSE REPLACEMENT
- Notice:
- CLEANING
- Your Guarantee
Brand : SPT
Model : SF-16W81
Category : Fan