
APOLLO MS-WB675 - Radio Fusion - Free user manual and instructions
Find the device manual for free APOLLO MS-WB675 Fusion in PDF.


| Product Type | Marine Entertainment System / Hideaway Stereo |
| Brand | Fusion (a Garmin brand) |
| Model | APOLLO MS-WB675 |
| Dimensions (W x H x D) | 130 x 55 x 107 mm (5.10 x 2.17 x 4.21 in) |
| Weight | 475 g (16.75 oz) |
| Water Rating | IPX2 |
| Operating Temperature Range | 0 to 50°C (32 to 122°F) |
| Storage Temperature Range | -20 to 70°C (-4 to 158°F) |
| Input Voltage | 10.8 to 16 Vdc |
| Maximum Current Draw | 15 A |
| Fuse | 15 A mini blade-type |
| On-board Amplifier | Class D, 4 x 70 W max (2 ohm), 4 x 43 W RMS (2 ohm, 10% THD) |
| Total Output Peak Power | 280 W max |
| Speaker Zones | 2 powered zones (internal amp), 2 line-level output zones |
| Bluetooth Wireless Range | Up to 10 m (33 ft) |
| ANT Wireless Range | Up to 3 m (10 ft) |
| Wireless Frequencies/Protocols | Bluetooth 2.4 GHz @ 12 dBm; ANT 2.4 GHz @ 11.77 dBm |
| Compass-safe Distance | 15 cm (6 in) |
| USB Compatibility | USB mass storage, iAP2 Apple devices, Android MTP, FAT/NTFS/HFS+/EXT2/3/4 |
| Audio Formats | MP3, AAC (.m4a), FLAC |
| FM Tuner Frequency Range (Europe/USA/Japan) | 87.5-108 MHz / 87.5-107.9 MHz / 76-95 MHz |
| AM Tuner Frequency Range | 522-1620 kHz (Europe), 530-1710 kHz (USA) |
| Network | Fusion PartyBus™ (Ethernet), NMEA 2000, Wi-Fi (via router) |
| Remote Control Options | ERX400, ARX70, Garmin chartplotter, Fusion-Link app |
| Software Updates | Via USB flash drive or Fusion-Link app (Wi-Fi) |
| Included Accessories | Power/speaker harness, line-out harness, NMEA 2000 drop cable, screws, template |
Frequently Asked Questions - APOLLO MS-WB675 Fusion
User questions about APOLLO MS-WB675 Fusion
0 question about this device. Answer the ones you know or ask your own.
Ask a new question about this device
Download the instructions for your Radio in PDF format for free! Find your manual APOLLO MS-WB675 - Fusion and take your electronic device back in hand. On this page are published all the documents necessary for the use of your device. APOLLO MS-WB675 by Fusion.
USER MANUAL APOLLO MS-WB675 Fusion
APOLLO™ MS-WB675
Quick Start Manual 2
See the Important Safety and Product Information guide in the product box for product warnings and other important information.
The MS-WB675 hideaway stereo is a stereo that you control using a Fusion ® remote control, Garmin ® chartplotter, or other Fusion stereo on the same network.
To help you understand how the MS-WB675 hideaway stereo works, this manual contains instructions for using the stereo with a ERX400 remote control. If you are controlling this stereo using Garmin chartplotter or other Fusion stereo, see the chartplotter or stereo owner's manual for more information.
Getting the Owner's Manual
You can get the latest owner's manual and translations of manuals from the web.
1 Go to www.garmin.com/manuals.
2 Select a manual.
Stereo Buttons and Status LEDs
Because this device is designed to be installed in a location that may not be easily accessible, almost all playback and device interaction is done through a network-connected remote control, stereo, or chartplotter. In some instances, you may need to watch the LEDs or press the buttons on the device itself.
Stereo Buttons
| Press to turn on the stereo. Press and hold for two seconds to turn off the stereo. | |
| Press to make the stereo discoverable to BLUETOOTH® devices. | |
| Press and hold both buttons together for ten seconds to reset the stereo to factory settings. |
Status LEDs
| Icon | LED Activity | LED Status |
| Solid | The stereo is receiving power. | |
| Blinking | The stereo is turning on. | |
| Solid | The stereo is on and operating normally. | |
| Off | The stereo is off. | |
| Blinking | The stereo is communicating using Ethernet. | |
| Blinking | The stereo is discoverable to BLUETOOTH devices. | |
| Solid | The stereo is connected to a BLUETOOTH device. |
Controls
NOTE: These stereo controls are available when you use a connected remote control, such as a Fusion ERX400. If you control the stereo using a chartplotter, an MS-NRX300 remote control, or another stereo on the network, you should see the owner's manual for that device for more information.

| Dial | Turn to adjust the volume.When adjusting the volume, press to switch between zones.Turn to move through the menus or adjust a setting.When in a menu, press to select the highlighted option. |
| Press to turn on the remote control.Press to mute and un-mute the audio.Press and hold to turn off the stereo or all stereos on the network.NOTE:The stereo turns on and off when you turn the connected remote control on or off. | |
| Press to open the menu.Press to return to the previous screen from the menu.Press and hold to exit the menu. | |
| Press to select a source.TIP:You can turn the dial to browse, and press the dial to select the source.Press and hold to open the GROUPS menu when connected to a Fusion PartyBus TM network. | |
| Press to tune to the previous station.Press to skip to the beginning of the track or to the previous track. |
| Dial | Turn to adjust the volume.When adjusting the volume, press to switch between zones.Turn to move through the menus or adjust a setting.When in a menu, press to select the highlighted option. |
| Press to turn on the remote control.Press to mute and un-mute the audio.Press and hold to turn off the stereo or all stereos on the network.NOTE:The stereo turns on and off when you turn the connected remote control on or off. | |
| Press to open the menu.Press to return to the previous screen from the menu.Press and hold to exit the menu. | |
| Press to select a source.TIP:You can turn the dial to browse, and press the dial to select the source.Press and hold to open the GROUPS menu when connected to a Fusion PartyBus TM network. | |
| Press to tune to the previous station.Press to skip to the beginning of the track or to the previous track. |
| ▶II | • Press to pause or resume the current track.• Press to cycle through the tuning modes (auto, manual, and presets). |
| ▶▶I | • Press to tune to the next station.• Press to skip to the next track. |
Naming the Device
You should enter a unique name for this device so you can easily identify it when viewing devices on the Fusion PartyBus network.
NOTE: You can also name and disable unused zones and sources on the stereo. See the owner's manual for more information.
1 Select > SETTINGS.
2 Select the device to rename.
3 Select DEVICE NAME, and enter a unique name for the device.
Setting the Home Zone
The home zone is the speaker zone that you adjust by default when you turn the dial on the remote control.
1 Select > SETTINGS.
2 Select the name of the remote control you plan to use with this stereo.
3 Select ASSIGN HOME ZONE.
4 Select a zone.
Adjusting the Volume
Using this remote control, you can control the volume of any zone on any stereo connected to the Fusion PartyBus network.
1 Turn the dial to adjust the volume for the home zone on the stereo.
2 If necessary, press the dial to switch between zones.
NOTE: If a stereo is part of a group, you can adjust the volume of all stereos in the group or individual zones on each stereo (page 4).
TIP: You can press and hold the dial to adjust the subwoofer level of a zone.
Creating or Editing a Group
Before you can create a group, you must connect multiple compatible stereos to the Fusion PartyBus network. See the installation instructions provided with your stereo for installing and configuring the network.
You can combine compatible stereos on the network into groups. Grouped stereos can share available sources and control media playback and volume on all of the stereos in the group, which allows for a synchronized audio experience across the vessel. You can quickly create, edit, and break up groups as needed from any compatible stereo or remote control on the network.
NOTE: You can adjust the volume of any zone on any compatible stereo on the network, regardless of whether or not those stereos are in the group.
A zone stereo, such as the Apollo ™ SRX400, can create or join a group to control and play sources from other stereos, but it cannot share its sources with the group.
You cannot change the settings when a stereo is part of a group.
For additional considerations about groups and sharing sources, see the owner's manual.
1 Select > GROUPS.
TIP: You can hold → from any screen to open the GROUPS menu.
2 Select the name of the stereo you want to be the primary stereo in the group, or select the name of an existing group.
3 Select the stereos you want to add to or remove from the group.
4 Select DONE.
Selecting a Source
1 Select →.
2 Turn the dial to highlight a source.
NOTE: If the device is part of a group, continue turning the dial to access the sources on other devices in the group (page 4).
If a source cannot be shared with the group, it will appear gray and you cannot select it.
3 Press the dial to select the source.
Media Player Connection
CAUTION
Always disconnect your media player from the stereo when not in use and do not leave it in your vessel. This helps reduce the risk of theft and damage from extreme temperatures.
Do not remove the media player or use your stereo in a distracting manner while operating the vessel. Check and obey all marine laws in association with use.
NOTICE
It is the user's responsibility to comply with all applicable laws and ordinances associated with the use of this device. Garmin is not responsible for any fines, penalties, or damages that you may incur for failing to abide by any such laws and ordinances.
The stereo accepts a variety of media players, including smartphones and other mobile devices. You can connect a compatible media player using a Bluetooth® wireless connection or a USB connection to the USB port. The stereo can play media from Universal Plug and Play (UPnP) devices, such as a Network Attached Storage (NAS) device connected to the same network. The stereo can play media from a compatible Apple® device connected to the same network using the AirPlay® feature.
USB Device Compatibility
You can use a USB flash drive or the USB cable included with your media player to connect a media player or mobile device to the USB port.
The stereo is compatible with Android ™ devices that support MTP mode.
The stereo is compatible with media players and other USB mass storage devices, including USB flash drives. Music on USB drives must meet these conditions:
• The music files must be formatted as MP3, AAC (.m4a), or FLAC, files.
- If you connect a portable hard drive, you must connect it to an external power source. The USB port on this stereo cannot provide power for a portable hard drive.
- The USB mass storage device must be formatted using one of the following systems:
- Microsoft®: NTFS, VFAT, FAT 1 , MSDOS
Apple: HFS, HFSPLUS - Linux: EXT2, EXT3, EX4
Connecting a USB Device
You can connect a USB device to the USB port on the stereo.
You cannot connect a USB device to the remote control. You must connect a USB device to the stereo you are controlling with the remote control.
1 Locate the USB port on the back of the stereo.
2 Connect the USB device to the USB port.
Connecting a Compatible Bluetooth Device
You can play media from a compatible Bluetooth device using the Bluetooth wireless connection.
You can control the music playback with the media app on a Bluetooth device or using the Fusion-Link ™ remote control app (page 6).
1 Select the BLUETOOTH source.
2 Select > BLUETOOTH > CONNECTIONS > DISCOVERABLE to make the stereo visible to your compatible Bluetooth device.
TIP: You can also press the ✝ button on the stereo to make it discoverable.
3 Enable Bluetooth on your compatible Bluetooth device.
4 Bring the compatible Bluetooth device within 10 m (33 ft.) of the stereo.
5 On your compatible Bluetooth device, search for Bluetooth devices.
6 On your compatible Bluetooth device, select the stereo from the list of detected devices.
NOTE: The stereo appears in the Bluetooth device list as the device name (the default name is MS-WB675 unless it was changed in the settings).
7 On your compatible Bluetooth device, follow the on-screen instructions to pair and connect to the discovered stereo.
When pairing, your compatible Bluetooth device may ask you to confirm a code on the stereo. The stereo does not display a code, but it does connect correctly when you confirm the message on the Bluetooth device.
8 If your compatible Bluetooth device does not immediately connect to the stereo, repeat steps 1 through 7.
NOTE: If another Bluetooth device is already playing music on the stereo, connecting a new device will not interrupt playback. You must select the newly-added device if you want to use it instead.
The DISCOVERABLE setting is disabled automatically after two minutes.
NOTE: On some Bluetooth devices, adjusting the volume on the device affects the volume level on the stereo.
Connecting to a Garmin Watch
For more information about the watch, see the watch manual at www.garmin.com/manuals.
1 Following the instructions in the watch manual, install the Fusion-Link Lite app from the Connect IQ store onto the watch.
2 On the stereo, select the BLUETOOTH source.
3 Select > BLUETOOTH > CONNECTIONS > DISCOVERABLE.
The stereo remains discoverable for two minutes.
4 Bring the watch within 3 m (10 ft.) of the stereo.
NOTE: Stay 10 m (33 ft.) away from other ANT ® devices while pairing.
5 Open the Fusion-Link Lite app on the watch.
The first time you open the app on the watch, the watch automatically pairs with and connects to the stereo. If you need to pair to another stereo, in the Fusion-Link Lite app, select Settings > Pair new.
6 Control the audio playback using the Fusion-Link Lite app on the watch.
After the devices are paired, they connect automatically when they are turned on, within range, and the app is open on the watch.
Connecting to an ARX70 Remote Control
1 On the stereo, select the BLUETOOTH source.
2 Select > BLUETOOTH > CONNECTIONS > DISCOVERABLE.
TIP: You can also press the Ⓧ button on the stereo to make it discoverable.
3 Bring the ARX70 remote control within 10 m (33 ft.) of the stereo.
NOTE: Stay 10 m (33 ft.) away from other ANT devices while pairing.
4 On the ARX70 remote control, press and hold ➕ until the status LED starts alternating green and red.
The remote control searches for the stereo. When the remote control pairs successfully, the status LED turns on green briefly and then turns off.
If the remote control cannot find the stereo, the status LED turns on red briefly and then turns off.
Fusion-Link Wireless Remote Control App
You can use the Fusion-Link remote control app on your compatible Apple or Android device to adjust the stereo volume, change the source, control playback, select and manage radio presets, and adjust some stereo settings. You can use the app to set up and configure DSP profiles on the stereo. You can use the app to update the stereo software.
The app communicates with the stereo using a wireless connection to the mobile device. You must connect your compatible device to the stereo using Bluetooth technology to use the app.
If the stereo is connected to a network with a Wi-Fi ® access point, the app can communicate with the stereo using the network for greater range than a Bluetooth connection.
NOTE: You cannot update the stereo software using a Bluetooth connection. You must connect the app using a Wi-Fi connection to update the stereo software wirelessly.
For information about the Fusion-Link remote control app for compatible Apple or Android devices, go to the Apple App Store ™ or the Google Play ™ store.
Playing Music
Setting the Tuner Region
You must select the region you are in to receive AM and FM stations properly. If you are connected to a compatible SiriusXM ® tuner and antenna, and have a subscription (USA only), you must select the region you are in to receive SiriusXM stations properly.
NOTE: SiriusXM service is not available in all regions.
You must select the region you are in to receive DAB stations properly.
NOTE: DAB stations are not available in all regions.
1 Select > SETTINGS.
2 Select the name of the stereo.
3 Select TUNER REGION.
4 Select the region you are in.
Changing the Radio Station
1 Select an applicable source, such as FM.
2 Select ▶ repeatedly to move through the tuning modes, and select an option:
- Select AUTO to scan and stop on the next available station.
- Select MANUAL to select a station manually.
- Select PRESET to select a saved station preset.
3 Select ◀◀ or ▶▶ to tune to the station.
When in MANUAL tuning mode, you can hold ◀◀ or ▶▶ to quickly advance through the stations.
Scanning for DAB Stations
NOTE: Because DAB signals are broadcast in select countries only, you must set the tuner region to a location where DAB signals are broadcast.
1 Select the DAB source.
2 Select ▶ to scan for available DAB stations.
When scanning is complete, the first available station in the first ensemble found begins playing.
NOTE: After the first scan is complete, you can select ▶ again to re-scan for DAB stations. When the re-scan is complete, the system starts playing the first station in the ensemble you were listening to when you started the re-scan.
SiriusXM Satellite Radio
Only SiriusXM brings you more of what you love to listen to, all in one place. Get over 140 channels, including commercial-free music plus the best sports, news, talk, comedy and entertainment. Welcome to the world of satellite radio. A SiriusXM Vehicle Tuner and subscription are required. For more information, go to www.siriusxm.com.
To learn more about activation or operation of the SiriusXM tuner, see the MS-WB675 Owner's Manual.
Controlling Music Playback on a USB Source
1 Connect a compatible USB device to the stereo.
2 Select the appropriate source.
TIP: If the USB device has a screen and controls, you can launch a music application on the USB device to begin playback.
3 Select > USB
4 Select the name of the USB device.
5 Browse the music files on the device and begin playback.
You can use the remote control, chartplotter, or stereo controls to select, play, pause, and skip tracks.
Controlling Music Playback on a Connected Smartphone or Media Player
1 Connect a compatible smartphone or media player to the stereo using USB or Bluetooth (if available).
2 Select the appropriate source.
3 Launch a music application on the connected smartphone or media player, and begin playback.
You can use the remote control, chartplotter, or stereo controls to select, play, pause, and skip tracks.
DSP Settings
This stereo features digital signal processing (DSP). You can select pre-configured DSP settings for Fusion speakers and amplifiers to optimize audio reproduction in their installed locations.
All DSP settings are configured using the Fusion-Link remote control app (page 6). See the stereo owner's manual for more information.
More Information
Registering Your Fusion Device
Help us better support you by completing our online registration today.
• Go to www.fusionentertainment.com.
- Keep the original sales receipt, or a photocopy, in a safe place.
Apollo™ MS-WB675
© 2022 Garmin Ltd. or its subsidiaries
Garmin ® , ANT ® , Fusion ® , and the Fusion logo are trademarks of Garmin Ltd. or its subsidiaries, registered in the USA and other countries. Apollo ™ , Fusion-Link ™ , Fusion-Link Lite ™ , and Fusion PartyBus ™ are trademarks of Garmin Ltd. or its subsidiaries. These trademarks may not be used without the express permission of Garmin.
Apple ® and AirPlay ® are trademarks of Apple Inc., registered in the U.S. and other countries. App Store ™ is a service mark of Apple Inc. Android ™ and Google Play ™ are trademarks of Google Inc. BLUETOOTH ® word mark and logos are owned by the Bluetooth SIG, Inc. and any use of such marks by Garmin is under license. NMEA ® , NMEA 2000 ® , and the NMEA 2000 logo are registered trademarks of the National Marine Electronics Association. All rights reserved. SiriusXM ® and all related marks and logos are trademarks of Sirius XM Radio Inc. All rights reserved. Other trademarks and trade names are those of their respective owners.
M/N: A03924
IC: 1792A-03924
FUSGN®
A Garmin Brand

APOLLO™ MS-WB675
INSTALLATION INSTRUCTIONS
Important Safety Information
WARNING
Failure to follow these warnings and cautions could result in personal injury, damage to the vessel, or poor product performance.
See the Important Safety and Product Information guide in the product box for product warnings and other important information.
This device must be installed according to these instructions.
Disconnect the vessel's power supply before beginning to install this product.
Before applying power to this product, make sure it has been correctly grounded according to these instructions.
CAUTION
To avoid possible personal injury, always wear safety goggles, ear protection, and a dust mask when drilling, cutting, or sanding.
NOTICE
When drilling or cutting, always check what is on the opposite side of the surface to avoid damaging the vessel.
Do not use the stereo as a template when drilling the mounting holes because this may damage the glass display and void the warranty. You must only use the included template to correctly drill the mounting holes.
You must read all installation instructions before beginning the installation. If you experience difficulty during the installation, contact Fusion ® Product Support.
What's In the Box
• Four 8-gauge, self-tapping screws
• Power and speaker wiring harness
- Auxiliary-in, line-out, and subwoofer-out wiring harnesses
• NMEA 2000 * drop cable
Tools Needed
• Phillips screwdriver
- Electric drill
- Drill bit (size varies based on surface material and screws used)
Mounting Considerations
CAUTION
In high ambient temperatures and after extended use, the device enclosure may reach temperatures deemed dangerous to touch. As a result, the unit must be installed in a location where it cannot be touched during operation.
NOTICE
This device should be mounted in a location that is not exposed to extreme temperatures or conditions. The temperature range for this device is listed in the product specifications Specifications, page 16. Extended exposure to temperatures exceeding the specified temperature range, in storage or operating conditions, may cause device failure. Extreme-temperature-induced damage and related consequences are not covered by the warranty.
When selecting a mounting location for the device, observe these considerations.
- You must mount the device in a location where it is not submerged.
- You must mount the device in a location with adequate ventilation where it is not exposed to extreme temperatures.
- You should mount the device so the cables can be connected easily.
- To achieve IPX2 water ingress protection, you must mount the device on a vertical surface with the connectors pointing downward.
- You can mount the device on a horizontal surface, but such positioning might not achieve IPX2 water ingress protection.
- To avoid interference with a magnetic compass, you must mount the device at least 15 cm (6 in.) away from a compass.
Mounting the Device
NOTICE
If you are mounting the device in fiberglass, when drilling the pilot holes, use a countersink bit to drill a clearance counterbore through only the top gel-coat layer. This will help to avoid cracking in the gel-coat layer when the screws are tightened.
NOTE: Screws are included with the device, but they may not be suitable for the mounting surface.
Before you mount the device, you must select a mounting location, and determine what screws and other mounting hardware are needed for the surface.
1 Place the device in the mounting location, and mark the location of the pilot holes.
2 Drill a pilot hole for one corner of the device.
3 Loosely fasten the device to the mounting surface with one corner, and examine the other three pilot-hole marks.
4 Mark new pilot-hole locations if necessary, and remove the device from the mounting surface.
5 Drill the remaining pilot holes.
6 Secure the device to the mounting location.
Connection Considerations
For the stereo to function correctly, you must connect it to power, to speakers, and to input sources. You should carefully plan the layout of the stereo, speakers, input sources, optional NMEA 2000 network, and optional Fusion PartyBus ™ devices or network before making any connections.
Port Identification
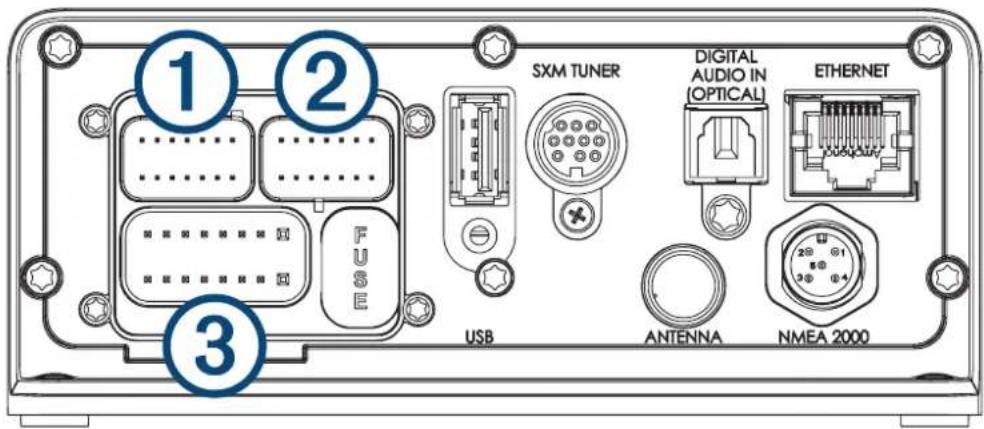
| Item Description | |
| 1 | Connects the stereo to the wiring harness for line and subwoofer outputs for zones 3 and 4. |
| 2 | Connects the stereo to the wiring harness for auxiliary input 1, and for the line and subwoofer outputs for zones 1 and 2. |
| 3 | Connects the stereo to the power and speaker wiring harness for all zones. |
| FUSE Contains the 15 A fuse for the device. | |
| USB Connects the stereo to a USB source. | |
| SXM TUNER | Connects the stereo to a SiriusXM® Connect Tuner to receive SiriusXM stations where available (not included).Connects to a Fusion DAB module to receive DAB stations where available (not included). |
| DIGITAL AUDIO IN (OPTICAL) | Connects the stereo to an optical digital audio source, such as TV or DVD player. |
| ETHERNET | Connects the stereo to another Fusion PartyBus stereo, zone stereo, or network (Fusion PartyBus Networking, page 12). |
| ANTENNA | Connects the stereo to a typical AM/FM antenna.If you are installing the stereo on a boat with a metal hull, you must use a ground-dependent antenna. If you are installing the stereo on a boat with a non-metal hull, you must use a ground-independent antenna. See the installation instructions provided with your antenna for more information. |
| NMEA 2000 | Connects the stereo to a NMEA 2000 network (NMEA 2000 System Wiring Diagram, page 11).Connects to an NRX series remote control directly. |
Wiring Harness Wire and Connector Identification

Wiring Harness ①
| RCA Connector Function | RCA Label Name | Notes |
| Zone 3 line out (left)Zone 3 line out (right)Zone 3 subwoofer out | ZONE 3 | Provides output to an external amplifier, and is associated with the volume control for zone 3.Each subwoofer cable provides a single mono output to a powered subwoofer or subwoofer amplifier. |
| Zone 4 line out (left)Zone 4 line out (right)Zone 4 subwoofer out | ZONE 4 | Provides output to an external amplifier, and is associated with the volume control for zone 4.Each subwoofer cable provides a single mono output to a powered subwoofer or subwoofer amplifier. |
Wiring Harness ②
| RCA Connector Function | RCA Label Name Notes | |
| Zone 1 line out (left)Zone 1 line out (right)Zone 1 subwoofer out | ZONE 1ZONE 1 SUB OUT | Provides output to an external amplifier, and is associated with the volume control for zone 1.Each subwoofer cable provides a single mono output to a powered subwoofer or subwoofer amplifier. |
| Zone 2 line out (left)Zone 2 line out (right)Zone 2 subwoofer out | ZONE 2ZONE 2 SUB OUT | Provides output to an external amplifier, and is associated with the volume control for zone 2.Each subwoofer cable provides a single mono output to a powered subwoofer or subwoofer amplifier. |
| Auxiliary in leftAuxiliary in right | AUX IN | Provides an RCA stereo line input for audio sources, such as a CD or MP3 player. |
Wiring Harness ③
| Wire Function Bare Wire | Color Notes | |
| Ground (-) | Black | Connects to the power source (Power Connection, page 6). |
| Power (+) | Yellow | Connects to the power source (Power Connection, page 6). |
| Ignition | Red | Connects to the power source (Power Connection, page 6). |
| Amplifier on Blue | Connects to optional external amplifiers, enabling them to turn on when the stereo turns on.A connected amplifier must use the same ground (-) as the stereo for this signal wire to function correctly. | |
| Telemute Brown | Activates when connected to ground.For example, when you connect this wire to a compatible, hands-free mobile kit, the audio mutes or the input switches to AUX when a call is received and the kit connects this wire to ground. You can enable this functionality from the settings menu. | |
| Dim Orange This wire is not used when installing this device. | ||
| Speaker zone 1 left (+) White | ||
| Speaker zone 1 left (-) White/black | ||
| Speaker zone 1 right (+) Gray | ||
| Speaker zone 1 right (-) Gray/black | ||
| Speaker zone 2 left (+) Green | ||
| Speaker zone 2 left (-) Green/black | ||
| Speaker zone 2 right (+) Purple | ||
| Speaker zone 2 right (-) Purple/black | ||
Power Connection
When connecting the stereo to power, you must connect the yellow, red, and black wires to the power source. The yellow and red wires have different functions, and the method you use to connect them to power depends on how you plan to use the stereo on your vessel.
Yellow wire
- This wire provides power to the stereo.
- This wire should be connected through a 15 A circuit breaker, if one is available on the vessel.
NOTICE
If a 15 A circuit breaker is not available on the vessel, you must connect this wire to power through a 15 A fuse (not included).
- This wire provides power to the stereo at all times, and it will drain the battery even when the stereo is not in use. You should install a manual switch on this wire if a 15 A circuit breaker is not available on the vessel, or if you cannot toggle the breaker to remove power to the stereo when storing the vessel.
- If it is necessary to extend this wire, use 14 AWG (2.08 mm 2 ) wire. For extensions longer than 1 m (3 ft.), use 12 AWG (3.31 mm 2 ) wire.
Red wire
- This wire can be connected to the same power source as the yellow wire through the ignition or through a manual switch. This enables you to turn the stereo on and off automatically when you turn the vessel on and off, or when you activate the switch.
- Using this wire to turn the stereo on and off behaves in the same way as using the power button on the stereo to turn it on and off. It is not necessary to connect this wire to a switch if you plan to toggle the power using the power button on the stereo or using a connected chartplotter or remote control. This wire must be connected to turn the stereo on.
- When you turn off the stereo using this switch or the power button, it enters a standby mode that allows the stereo to start up again faster than if you switch the power off using the yellow wire. When it is in standby mode, the stereo uses up to 200 mA, and you must turn off power to the stereo on the yellow wire through the circuit breaker or manual switch when you are not using the vessel to avoid draining the battery.
NOTICE
You must connect this wire to power through a 1 A fuse (not included), whether or not you connect it to the ignition or manual switch.
- If it is necessary to extend this wire, use 22 AWG (0.33 mm 2 ) wire.
Black wire
- This is the ground wire, and you must connect it to the negative terminal of the power source or to a common ground.
- If it is necessary to extend this wire, use 14 AWG (2.08 mm -2 ) wire. For extensions longer than 1 m (3 ft.), use 12 AWG (3.31 mm 2 ) wire.
Connecting to Power Without Using an Ignition Switch
This method of connection is used most often on larger vessels and on vessels with multiple networked stereos and other marine devices. For these installations, a faster startup time is typically less critical, and it is more effective to use the breaker or a dedicated switch on the electrical panel to turn off the stereo and ensure that no unexpected power drain occurs.
1 Consult this diagram to plan the wire connections.

| Item | Description Notes | |
| 1 | Yellow wire | You should connect this wire to the red wire before you connect both wires to the manual switch or circuit breaker. |
| 2 | Red wire | You should connect this wire to the yellow wire so that it does not act as a physical standby switch. |
| 3 | 1 A fuse (not included) | You must install this fuse on the red wire before you connect the red wire to the yellow wire. |
| 4 | Manual switch (optional) | This switch is needed only if a circuit breaker is not available or if it provides a more convenient method of cutting power to the stereo. |
| 5 | Black wire Ground (-) | |
| 6 | 15 A fuse (not included) | This fuse is required if you are not able to connect to power through a 15 A circuit breaker7 |
| 7 | 15 A circuit breaker | If a circuit breaker is not available, you must connect a 15 A fuse on the yellow wire |
2 Route all wires to the stereo wiring harness, the circuit breaker or switch, and the power source as necessary.
Do not connect the wiring harness to the stereo until after you have made all of the bare wire connections.
3 Install all of the necessary fuses on the red and yellow wires.
4 Connect the wiring harness to the stereo.
When the circuit breaker or manual switch is closed, the stereo is always on. You can use the power button on the stereo or a connected chartplotter or remote control to place the stereo in a low-power standby mode if needed.
NOTE: When you are not using the vessel, you should remove power to the stereo using the circuit breaker or manual switch to avoid draining the battery.
Connecting to Power Through an Ignition Switch
This method of connection is used most often on ski boats, wake boats, and similar sport or recreational vessels where power to the engines is toggled often. For these installations, a quick standby and faster startup time is desired so that music can be stopped and begin playing again as quickly as possible after restarting the engines. When in standby mode, the stereo uses up to 200 mA, and you should connect the power wires through a circuit breaker or manual switch to avoid draining the battery when you are not using the boat.
1 Consult this diagram to plan the wire connections.

| Item | Description Notes | |
| 1 | Yellow wire | You must connect this wire to the same power source as the ignition or ACC switch. |
| 2 | Red wire | You must connect this wire to the ignition or ACC switch before you connect it to the same power source as the yellow wire. |
| 3 | 1 A fuse (not included) | You must install this fuse on the red wire before you connect the red wire to the ignition or ACC switch. |
| 4 | Ignition or ACC switch | Connecting the red wire to this switch allows the stereo to enter a low-power standby mode when you turn off the engines, so it can start up faster when you turn on the engines again. |
| 5 | Black wire Ground (-) | |
| 6 | 15 A fuse (not included) | This fuse is required if you are not able to connect to power through a 15 A circuit breaker7 |
| 7 | 15 A circuit breaker or manual switch | If a circuit breaker is not available, you must connect a 15 A fuse on the yellow wire. You should also connect the yellow wire to power using a manual switch, so you can remove power to the stereo when you are not using the boat. |
2 Route all wires to the stereo wiring harness, the ignition or ACC switch, the circuit breaker, and the power source as necessary.
Do not connect the wiring harness to the stereo until after you have made all of the bare wire connections.
3 Install all of the necessary fuses on the red and yellow wires.
4 Connect the wiring harness to the stereo.
When you turn on the ignition switch, the stereo turns on along with other accessory electronics. When you turn off the ignition switch, the stereo enters a low-power standby mode.
NOTE: When you are not using the vessel for an extended period of time, you should remove power to the stereo using the circuit breaker or other manual switch on the yellow wire to avoid draining the battery.
Speaker Zones
You can group speakers in one area into a speaker zone. This enables you to control the audio level of the zones individually. For example, you could make the audio quieter in the cabin and louder on deck.
Up to two pairs of speakers can be connected per channel of each zone, in parallel. One zone can support no more than four speakers using the on-board amplifier (zones 1 and 2).
Zones 1 and 2 are powered by the on-board amplifier. Zones 3 and 4 are available as a line-level output only. To use the RCA line output and the RCA subwoofer output for zones 3 and 4, you must connect an external amplifier.
You can set the balance, volume limit, tone, subwoofer level, subwoofer frequency, and name for each zone, and configure other zone-specific settings.
Single-Zone System Wiring Example

①
Speakers
②
Water-tight connection
Speaker System Wiring Using a Line Out
This diagram illustrates a system installation with an external amplifier and subwoofer connected to zone 2 on the stereo using a line out. You can connect an amplifier and subwoofer to any or all of the available zones on the stereo.
NOTE: You can connect speakers to the speaker wires for the internal stereo amplifier while using the line out on zones 1 and 2, although adjusting the volume affects both the speakers connected to the internal amplifier and the line out. This may result in uneven volume levels.
![graph TD A["①"] --> B["②"] C["③"] --> D["⑤"] E["⑦"] --> F["⑥"] B --> G["④"] D --> G F --> G](/content/2026/05/838863/images/0f9291e22b708f433a59bdce3e321a4104234ecad38ead6cdd3d62fd04234b9d.jpg)
① Zone 1 speakers
② Water-tight connection
③ Zone 2 speakers
Amplifier-on signal wire You must connect this wire to each amplifier connected to a zone line out. A connected amplifier must use the same ground (-) as the stereo for this signal wire to function correctly.
⑤ Powered amplifier connected to the zone 2 line out
Zone 2 line out and subwoofer out Each subwoofer cable provides a single mono output to a powered subwoofer or subwoofer amplifier. You may need to use an RCA splitter to connect this to an amplifier.
⑦ Subwoofer
Connecting a SiriusXM Tuner Module
This device is compatible with a SiriusXM SXV300 or newer vehicle tuner module.
1 If you have already connected a USB source, disconnect it from the stereo.
2 Connect the cable from the SiriusXM tuner module to the SXM TUNER port on the back of the stereo.
3 Follow the instructions provided with the SiriusXM tuner module and antenna to complete the SiriusXM installation.
4 If necessary, reconnect the USB source.
5 Complete the stereo installation.
NMEA 2000 System Wiring Diagram


Stereo

Supported chartplotter, MFD, or compatible Fusion NMEA 2000 remote control

NMEA 2000 GPS antenna, speed sensor, or wind instrument.
When the stereo is connected to the same NMEA 2000 network as a compatible engine, a GPS antenna, a chartplotter with a built-in GPS antenna, a wind instrument, or a water speed sensor, it can be configured to automatically adjust the volume according to the engine RPM, the speed over ground, the wind speed, or the speed through water. See the stereo Owner's Manual for more information.

In-line switch

NMEA 2000 power cable

NMEA 2000 drop cable, up to 6 m (20 ft.)

9 to 16 Vdc power supply

NMEA 2000 terminator or backbone cable

NMEA 2000 T-connector

NMEA 2000 terminator or backbone cable
Fusion PartyBus Networking
The Fusion PartyBus networking feature allows you to connect multiple compatible stereos together on a network, using a combination of wired or wireless connections.
You can group a compatible stereo, such as the Apollo WB675 stereo, with other compatible stereos connected to the network. Grouped stereos can share available sources and control media playback on all of the stereos in the group, which allows for a synchronized audio experience across the vessel. You can quickly create, edit, and break up groups as needed from any compatible stereo or remote control on the network.
NOTE: A zone stereo, such as the Apollo SRX400, can create or join a group to control and play sources from other stereos, but it cannot share its sources with the group.
For additional considerations when sharing sources, see the owner's manual.
You can use compatible stereos and remote controls, whether they are grouped or not, to adjust the volume of the available speaker zones for any stereo on the network.
Wired Networking Considerations
When you are planning your network installation, observe the following considerations for all wired connections.
- You must connect devices using standard Cat5e or Cat6 network cables with RJ45 connectors.
- You can use one network cable to directly connect two compatible devices.
- You must use wired network switches and wired or wireless network routers when you connect more than two compatible devices to a network.
- If you install a router on the network, it should be configured to be a DHCP server by default. See your router instructions for more information.
- If you do not install a router, and there are no other DHCP servers on the network, you should configure one Fusion PartyBus stereo to be a DHCP server.
Wired Network Example for Direct Connections
No network setting changes are needed when connecting two devices together directly.
![graph TD A["○①"] --> B["②"] C["○③"] --> D["②"] style A fill:#fff,stroke:#000 style C fill:#fff,stroke:#000 style B fill:#fff,stroke:#000 style D fill:#fff,stroke:#000](/content/2026/05/838863/images/e12e5b8710153c8b2f9c6f4790de66652298e004ba576b7c03009a6737541aaa.jpg)
①
Fusion PartyBus zone stereo or remote control
②
Apollo MS-WB675 stereo
③
Fusion PartyBus stereo
Wired Network Example with a Switch or Router
You must use wired network switches, a wired network router, or both to connect more than two Fusion PartyBus devices.
No network setting changes are needed when connecting multiple Fusion PartyBus devices using a switch, but if you are using a router, you may need to configure it to be a DHCP server. See your router instructions for more information.

①
Fusion PartyBus zone stereo or remote control
②
Wired network switch or wired network router
③
Apollo MS-WB675 stereo
④
Fusion PartyBus stereo
Constructing a Network
You should have a basic understanding of networking when building a network for Fusion PartyBus devices. These instructions guide you through the basics of building and configuring a network, and should apply to most situations. If you need to perform advanced networking tasks, such as assigning static IP addresses to devices on the network or configuring advanced settings on a connected router, you may need to consult a networking professional.
1 Determine the installation location of the Fusion PartyBus devices you want to connect to the network.
NOTE: Wired connections are more reliable than wireless connections. When planning your network, you should run network cables instead of using wireless connections when possible.
2 Determine the installation location of any needed network routers or switches.
3 Route Cat5e or Cat6 network cable to the installation locations of the stereos, switches, and router.
4 Connect the network cables to the stereos, switches, and router.
NOTICE
Do not completely install the stereos yet. You should test the network before you install the stereos.
5 Turn on all devices connected to the network, including wireless devices.
6 If you are using a network router (wired or wireless), consult the documentation provided with your router to configure the router as the DHCP server, if necessary.
All stereos should use their default configuration (DHCP CLIENT).
7 Test the network by selecting > GROUPS to view a list of devices connected to the on the network, and select an option:
- If any devices are not available to the network, troubleshoot the network (Network Troubleshooting, page 15).
- If all devices are available to the network, complete the installation for each stereo, if necessary.
Network Configuration
Setting the Stereo as the DHCP Server
If you connected more than two network devices together directly or using a network switch or wireless access point and did not install a router, you should configure only one Fusion PartyBus stereo to be a DHCP server.
1 Select > SETTINGS.
2 Select the name of the stereo.
3 Select NETWORK > STATIC IP > SAVE.
4 Select ADVANCED > DHCP SERVER > DHCP ENABLED > SAVE.
Configuring the Stereo for use with a Garmin ® Marine Network
You can connect this stereo to a Garmin Marine Network in order to view and control the stereo using a compatible Garmin chartplotter.
NOTE: When you configure the stereo for use with a Garmin Marine Network, you are limited to using only Garmin and Fusion devices. You may not be able to use third-party routers, storage devices, or other network products with this stereo directly.
When the stereo is connected to a Garmin Marine Network, you can connect a smartphone to a wireless access point on a connected Garmin chartplotter and use the Fusion-Link™ app to control the stereo.
1 Select > SETTINGS.
2 Select the name of the stereo.
3 Select NETWORK > GARMIN MARINE NETWORK.
Resetting Network Settings
You can reset all network settings for this stereo to the factory default values.
1 Select SETTINGS.
2 Select the name of the stereo.
3 Select NETWORK > ADVANCED > RESET > YES.
Advanced Network Configuration
You can perform advanced networking tasks on a Fusion PartyBus device, such as defining DHCP ranges and setting static IP addresses. See the owner's manual for more information.
Network Troubleshooting
If you cannot see or connect to Fusion PartyBus devices on the network, perform these steps.
- Verify that all Fusion PartyBus devices, network switches, routers, and wireless access points are connected to the network and turned on.
- Verify that wireless Fusion PartyBus devices are connected to a wireless router or wireless access point on the network.
NOTE: Wired connections are more reliable than wireless connections. If possible, you should connect devices to the network using an Ethernet cable.
- Verify that only one device, either a stereo or a router, is configured as a DHCP server.
- Change the channel on your router or wireless access point to test for and correct interference.
You may experience wireless interference if there are many nearby wireless access points.
- Disconnect Bluetooth 9 devices to test for and correct interference.
Connecting a Bluetooth device to a stereo configured as a wireless access point or client may reduce wireless performance.
- If you are experiencing trouble connecting, make sure your router supports 2.4 GHz band connections.
When connecting to a wireless router, this device is compatible with only 2.4 GHz band connections, and cannot connect to a 5 GHz band.
- If you configured static IP addresses, verify that every device has a unique IP address, that the first three sets of numbers in the IP addresses match, and that the subnet masks on every device are identical.
- If you have made configuration changes that might be causing networking issues, reset all network settings to the factory default values.
Stereo Information
Specifications
| Weight 475 g (16.75 oz.) | |
| Water rating IEC 60529 IPX2 | 1 |
| Operating temperature range From 0 to 50°C (from 32 to 122°F) | |
| Storage temperature range From -20 to 70°C (from -4 to 158°F) | |
| Input voltage From 10.8 to 16 Vdc | |
| Current (max.) 15 A | |
| Current (muted) Less than 700 mA | |
| Current (off) Less than 200 mA | |
| Fuse 15 A mini blade-type | |
| NMEA 2000 LEN @ 9 Vdc 1 (50 mA) | |
| Bluetooth wireless range Up to 10 m (30 ft.) | |
| ANT* wireless range Up to 3 m (10 ft.) | |
| Wireless frequencies/protocols | Bluetooth 2.4 GHz @ 12 dBm nominalANT 2.4 GHz @ 11.77 dBm nominal |
| Compass-safe distance 15 cm (6 in.) | |
On-board, Class D amplifier
| Output music power per channel 4 x 70 W max. 2 ohm | |
| Total output peak power 280 W max. | |
| Output power per channel | 4 x 43 W RMS at 14.4 Vdc input, 2 ohm, 10% THD 2 4 x 26 W RMS at 14.4 Vdc input, 4 ohm, 10% THD 2 |
| Line output level (max.) 5.5 V (peak to peak) | |
| Aux input level (typical) | 1 V RMS |
Stereo Dimension Drawings
Side Dimensions
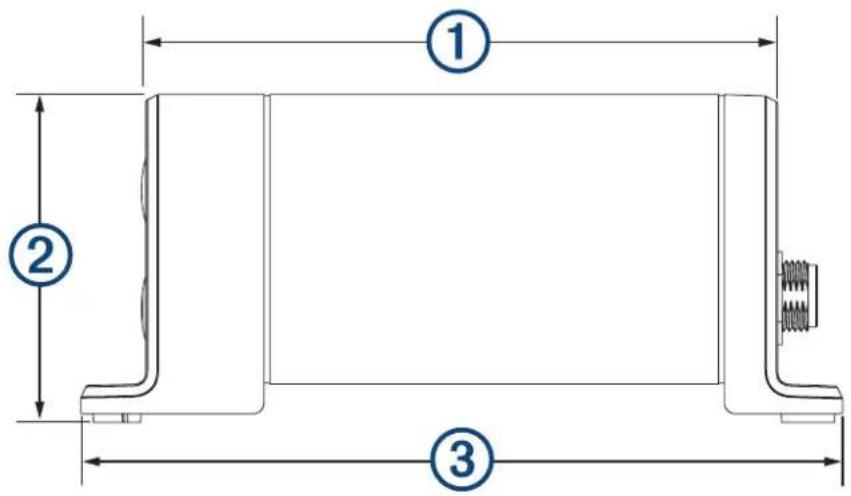
| 1 | 107 mm (4.21 in.) |
| 2 | 55 mm (2.17 in.) |
| 3 | 130 mm (5.10 in.) |
Top Dimensions

| 1 | 130 mm (5.10 in.) |
| 2 | 130 mm (5.10 in.) |
Software Updates
Go to support.garmin.com to find software updates and information for your device.
連絡地址
製造銷售:台灣國際航電股份有限公司
© 2022 Garmin Ltd. or its subsidiaries
Garmin 1 , ANT 1 , Fusion 8 , and the Fusion logo are trademarks of Garmin Ltd. or its subsidiaries, registered in the USA and other countries. Apollo ™ , Fusion-Link ™ , and Fusion PartyBus ™ are trademarks of Garmin Ltd. or its subsidiaries. These trademarks may not be used without the express permission of Garmin.
Apple ® is a trademark of Apple Inc., registered in the USA and other countries. App Store ™ is a service mark of Apple Inc., registered in the USA and other countries. Android ™ and Google Play ™ are a trademarks of Google Inc. BLUETOOTH ® word mark and logos are owned by the Bluetooth SIG, Inc. and any use of such marks by Garmin is under license. NMEA 2000 ® and the NMEA 2000 logo are registered trademarks of the National Marine Electronics Association. SiriusXM † and all related marks and logos are trademarks of Sirius XM Radio Inc. All rights reserved.
M/N: A03924
IC: 1792A-03924

APOLLO™ MS-WB675
Marine Entertainment System
© 2022 Garmin Ltd. or its subsidiaries
All rights reserved. Under the copyright laws, this manual may not be copied, in whole or in part, without the written consent of Garmin. Garmin reserves the right to change or improve its products and to make changes in the content of this manual without obligation to notify any person or organization of such changes or improvements. Go to www.garmin.com for current updates and supplemental information concerning the use of this product.
Garmin ® , ANT ® , Fusion ® , and the Fusion logo are trademarks of Garmin Ltd. or its subsidiaries, registered in the USA and other countries. Apollo ™ , Fusion-Link ™ , Fusion-Link Lite ™ , and Fusion PartyBus ™ are trademarks of Garmin Ltd. or its subsidiaries. These trademarks may not be used without the express permission of Garmin.
Apple 2 and AirPlay 3 are trademarks of Apple Inc., registered in the U.S. and other countries. App Store 4 is a service mark of Apple Inc. Android 5 and Google Play 6 are trademarks of Google Inc. BLUETOOTH 7 word mark and logos are owned by the Bluetooth SIG, Inc. and any use of such marks by Garmin is under license. NMEA 7 , NMEA 2000 7 , and the NMEA 2000 logo are registered trademarks of the National Marine Electronics Association. All rights reserved. SiriusXM 8 , SportsFlash 9 , TuneMix 10 , TuneStart 11 , and all related marks and logos are trademarks of Sirius XM Radio Inc. All rights reserved. Other trademarks and trade names are those of their respective owners.
M/N: A03924
IC: 1792A-03924
Table of Contents
Getting Started.... 1
Stereo Buttons and Status LEDs...... 1
Controls.... 2
Entering Text....4
Using the Dial to Select Items......4
Stereo Screen 4
Naming the Device.... 5
Setting the Home Zone.... 5
Selecting a Source.... 5
Audio Control...... 6
Adjusting the Volume......6
Muting all Connected Stereos.... 6
Adjusting the Subwoofer Level......6
Adjusting the Tone.... 6
Disabling the Loud Setting for a
Zone 6
Adjusting the Gain for an Auxiliary
Device....7
Speaker Zones....7
DSP Settings....7
Configuring the DSP Settings...... 7
Automatic Volume Adjustment Based on
Speed....8
Media Player Connection...... 8
Bluetooth Device Playback...... 8
Connecting a Compatible Bluetooth
Device....9
Bluetooth Range Information...... 9
Selecting a Different Bluetooth
Device....9
Bluetooth Source Menu and Settings.. 10
Disabling Bluetooth Auto
Connection....10
USB Device Playback......11
USB Device Compatibility.... 11
Connecting a USB Device.... 11
Controlling Music Playback on a USB
Flash Drive or Media Player.... 12
Controlling Music Playback on a
Connected Android Device.... 12
Controlling Music Playback on a
Connected Apple Device....12
USB Source Settings...... 12
Radio....13
Setting the Tuner Region.... 13
Changing the Radio Station.... 13
Apple AirPlay....14
Connecting an Apple Device Using
AirPlay.... 14
Setting an AirPlay Password.... 14
UPnP Playback.... 14
Connecting a UPnP Device.... 14
Connecting an Auxiliary Device.....15
Optical Audio Connection...... 15
SiriusXM Satellite Radio...... 15
Setting the Tuner Region for the
SiriusXM Source 15
Locating the SiriusXM Radio ID......15
Activating a SiriusXM Subscription..... 15
Selecting a Category.... 16
Using Replay Mode.... 16
Alerts.... 16
Adding an Artist or Song Alert...... 16
Adding Teams for Game Alerts...... 16
Adding Teams from a Live Game.... 16
Viewing Active Alerts...... 17
Managing Alerts.... 17
TuneMix™ Feature.... 17
Starting and Stopping a TuneMix Collection.... 17
Creating and Customizing a TuneMix Collection.... 17
SportsFlash Feature....18
Adding Teams to Receive SportsFlash Alerts.... 18
Changing SportsFlash Team Priority.... 18
Enabling the TuneStart™ Feature...... 18
Parental Controls.... 18
Unlocking the Parental Controls.....19
Locking Channels.... 19
Clearing All Locked Channels...... 19
Changing the Parental Control Passcode.... 19
SiriusXM Troubleshooting...... 20
Clearing SiriusXM Data...... 20
DAB Playback...... 21
Setting the Tuner Region...... 21
Scanning for DAB Stations...... 21
Changing DAB Stations......21
Selecting a DAB Station from a List....21
Selecting a DAB Station from a Category....21
Presets....22
Saving a Station or Channel as a Preset.... 22
Selecting a Preset from a List...... 22
Removing Presets.... 22
Fusion PartyBus Networking......22
Creating a Group.... 23
Editing a Group.... 23
Leaving a Group.... 23
Grouped Stereo Functions....23
Grouped Stereo Source Considerations.... 24
Group Synchronization.... 24
Enabling Group Synchronization..... 25
General Settings...... 25
Speaker Zone Settings......25
Disabling the Internal Amplifier...... 25
Setting the Home Zone 26
Synchronizing the Source and Zone
Volume Levels...... 26
Adjusting the Power-On Volume Limit.... 26
Maintaining Individual Zone Volume Levels.... 26
Enabling Automatic Volume
Adjustment Based on Speed...... 26
Automatic Volume Control Settings.... 27
Disabling a Zone....27
Setting a Zone Name...... 28
Linking Zones.... 28
Enabling Volume Control of Zone 3 or 4 from a Connected Amplifier..... 28
Adjusting the Subwoofer Filter...... 28
Adjusting Additional Audio Settings for a Zone....29
Source Settings.... 29
Network Settings....29
Setting the Stereo as the DHCP Server.... 30
Setting a Static IP Address.... 30
DHCP Settings.... 30
Configuring the Stereo for use with a Garmin Marine Network.... 30
Resetting Network Settings...... 31
Update Options.... 31
Additional Stereo Control Options...31
Connecting to a Garmin Watch.... 31
Connecting to an ARX70 Remote Control.... 32
Fusion-Link Wireless Remote Control App.... 32
FUSION-Link™ Network Technology.... 32
NMEA 2000 Information.... 32
Appendix.... 33
Registering Your Fusion Device...... 33
Cleaning the Device.... 33
Software Updates.... 33
Updating the Software Using a USB Flash Drive.... 33
Updating the Software Using the Fusion Link App.... 34
Troubleshooting.... 34
The stereo does not respond to key presses....34
My Bluetooth audio is interrupted by short breaks.... 34
The stereo does not display all song information from my Bluetooth source.... 34
Network Troubleshooting...... 35
Network Status Icons...... 35
The stereo keeps locking up when connected to an Apple device...... 35
The stereo is not finding my
connected Apple device......35
My Apple AirPlay audio is interrupted
by short breaks...... 36
The stereo does not receive DAB
stations.... 36
Specifications....37
Stereo Dimension Drawings...... 38
Side Dimensions....38
Top Dimensions.... 38
Getting Started
WARNING
See the Important Safety and Product Information guide in the product box for product warnings and other important information.
Stereo Buttons and Status LEDs
Because this device is designed to be installed in a location that may not be easily accessible, almost all playback and device interaction is done through a network-connected remote control, stereo, or chartplotter. In some instances, you may need to watch the LEDs or press the buttons on the device itself.
Stereo Buttons
 | Press to turn on the stereo. Press and hold for two seconds to turn off the stereo. Press and hold for ten seconds to reset the stereo. |
| ### | Press to make the stereo discoverable to BLUETOOTH ® devices. |
| [40W2] and | Press and hold both buttons together for ten seconds to revert the stereo to factory settings. |
Status LEDs
| Icon LED Activity LED Status | ||
 | Solid The stereo is receiving power. | |
 | Blinking The stereo is turning on. | |
 | Solid The stereo is on and operating normally. | |
 | Off The stereo is off. | |
 | Blinking The stereo is communicating using Ethernet. | |
| ### | Blinking The stereo is discoverable to BLUETOOTH devices. | |
| ### | Solid The stereo is connected to a BLUETOOTH device. | |
Controls
NOTE: These stereo controls are available when you use a connected remote control, such as a Fusion® ERX400. If you control the stereo using a chartplotter, an NRX remote control, or another stereo on the network, you should see the owner's manual for that device for more information.

| Dial | ·Turn to adjust the volume.·When adjusting the volume, press to switch between zones.·Turn to move through the menus or adjust a setting.·When in a menu, press to select the highlighted option.·Press and hold to activate certain functions such as opening the radio presets or muting all connected stereos from the mute screen (Muting all Connected Stereos, page 6). |
| ·Press to turn on the remote control.·Press to mute and un-mute the audio.·Press and hold to turn off the stereo or all stereos on the network.·Press and hold for longer than 10 seconds to reset the remote control.NOTE: The stereo turns on and off when you turn the connected remote control on or off. | |
 | ·Press to open the menu.·Press to return to the previous screen from the menu.·Press and hold to exit the menu. |
 | Press to select a source.TIP: You can turn the dial to browse, and press the dial to select the source.Press and hold to open the GROUPS menu when connected to a Fusion PartyBusTM network (Fusion PartyBus Networking, page 22). |
 | ·Press to skip to the previous track, when using an applicable source.·Press and hold to rewind the track when using an applicable source.·AM/FM: ·Press to tune to the previous station or preset. ·Press and hold for faster tuning (manual mode only).·AUX: Press to decrease the gain.·SiriusXM source: ·In Live Mode, press to tune to the previous station or preset. ·In Live Mode, press and hold for faster tuning, in Manual mode only. ·In Replay Mode, press to skip to the previous track. ·In Replay Mode, press and hold to rewind the current track.·DAB source: ·Press to return to the previous DAB station in the ensemble. When you reach the beginning of the current ensemble, the stereo automatically changes to the last available station in the previous ensemble. ·Press and hold to return to the previous DAB ensemble. |
 | ·BLUETOOTH or USB: Press to pause or resume the current track.·AM/FM: ·Press to cycle through the tuning modes (auto, manual, and presets). ·Press and hold to save the current station as a preset.·SiriusXM source: ·Press and hold to switch between Replay Mode and Live Mode. ·In Live Mode, press to cycle through the tuning modes (Manual, Category, and Preset). ·In Replay Mode, press to pause and play.·DAB: ·Press to scan for DAB stations. ·Press and hold to save the current station as a preset. |
 | ·Press to skip to the next track, when using an applicable source.·Press and hold to fast-forward the track when using an applicable source.·AM/FM: |
- Press to tune to the next station or preset.
- Press and hold for faster tuning (manual mode only).
• AUX: Press to increase the gain.
- SiriusXM source:
• In Live Mode, press to tune to the next station or preset.
• In Live Mode, press and hold for faster tuning, in Manual mode only.
- In Replay Mode, press to skip to the next track, if applicable.
In Replay Mode, press and hold to fast-forward the current track, if applicable.
• DAB source:
- Press to advance to the next DAB station in the ensemble. When you reach the end of the current ensemble, the stereo automatically changes to the first available station in the next ensemble.
- Press and hold to advance to the next DAB ensemble.
Entering Text
1 In a field that allows you to enter text, select Xerase the existing characters.
2 If necessary, select to use numerals, symbols, or lower-case letters when available.
3 Turn the dial to choose a character, and press the dial to select it.
4 Select to save the new text.
Using the Dial to Select Items
You can use the dial to highlight and select items on the screen.
- Turn the dial to highlight an item on the screen.
- Press the dial to select the highlighted option.
Stereo Screen
The information displayed on the screen varies depending on the source selected. This example shows a track playing on a device connected using Bluetooth ® wireless technology.
NOTE: The screen shown is from a connected remote control, such as an Apollo ERX400. If you are using your chartplotter to control the stereo, see your chartplotter's owner's manual for more information.


Source name

Active zone and status icons (Network Status Icons, page 35)

Track details (if available)

Album art (if available from a compatible source)

Elapsed time, track duration, and the current track number out of the total number of tracks in the playlist (if available)
Naming the Device
You should provide a unique name for this device so you can easily identify it when viewing devices on the Fusion PartyBus network.
NOTE: You should provide unique names for all of the devices and zones on the network to avoid confusion when grouping, controlling, and setting up stereos and zones. You should also turn off zones that are not in use (Speaker Zone Settings, page 25).
For further customization, you can provide unique names for the sources on each stereo and turn off unused sources (General Settings, page 25).
1 Select

2 Select the device to rename.
3 Select DEVICE NAME, and select an option:
- Select a pre-defined name from the list.
- Select CUSTOM NAME, and enter a unique name for the device.
Setting the Home Zone
The home zone is the speaker zone that you adjust by default when you turn the dial on the remote control.
1 Select

2 Select the name of the remote control you plan to use with this stereo.
3 Select ASSIGN HOME ZONE.
4 Select a zone.
Selecting a Source
1 Select

2 Turn the dial to highlight a source.
NOTE: If the device is part of a group, continue turning the dial to access the sources on other devices in the group (Fusion PartyBus Networking, page 22).
If a source cannot be shared with the group, it will appear gray and you cannot select it.
3 Press the dial to select the source.
Audio Control
Adjusting the Volume
Using this remote control, you can control the volume of any zone on any stereo connected to the Fusion PartyBus network.
1 Turn the dial to adjust the volume for the home zone on the stereo.
2 If necessary, press the dial to switch between zones.
NOTE: If this stereo is part of a group, you can adjust the volume of all stereos in the group or individual zones on each stereo (Fusion PartyBus Networking, page 22).
Muting all Connected Stereos
You can quickly mute the audio from this stereo or from all stereos connected to the Fusion PartyBus network (Fusion PartyBus Networking, page 22).
1 From any source, press .
The mute symbol appears and audio from this stereo is silenced.
NOTE: If the stereo is part of a group, the audio from all grouped stereos is silenced.
2 Press and hold the dial to select MUTE SYSTEM.
Audio from all connected stereos is silenced.
3 Press and hold the dial to select UNMUTE SYSTEM.
Audio is restored to all connected stereos.
Adjusting the Subwoofer Level
You can adjust the subwoofer level for each zone.
1 Press the dial, and select a zone with a connected subwoofer.
2 Press and hold the dial.
The SUB LEVEL adjustment for the zone appears.
3 Adjust the subwoofer level and press the dial to set it.
Adjusting the Tone
1 Select >AUDIO.
2 Select the zone to adjust.
3 Press the dial to select a tone.
4 Adjust the tone level and press the dial to set it.
Disabling the Loud Setting for a Zone
The LOUD setting maintains frequency response at low volumes and increases perceived loudness at high volumes. This setting is enabled by default in all zones.
1 Select >AUDIO.
2 Select a zone to adjust.
3 Select LOUD to clear the check box.
Adjusting the Gain for an Auxiliary Device
You can adjust the gain for a connected auxiliary device to achieve a volume level similar to that of other media sources. You can adjust the gain in 1 dB increments. You can also adjust the gain for digital sources using an optical audio connection.
1 Select an auxiliary source.
2 Select an option:
• To increase the gain, select .▶▶
• To decrease the gain, select .
NOTE: To achieve the best audio quality when using a portable media player with headphone output, it may be necessary to adjust the volume control on the media player, instead of adjusting the gain.
Speaker Zones
You can group speakers in one area into a speaker zone. This enables you to control the audio level of the zones individually. For example, you could make the audio quieter in the cabin and louder on deck.
You can set the balance, volume limit, tone, subwoofer frequency, and name for each zone, and configure other zone-specific settings (Speaker Zone Settings, page 25).
DSP Settings
This stereo features digital signal processing (DSP). You can select pre-configured DSP settings for Fusion speakers and amplifiers to optimize audio reproduction in their installed locations.
All DSP settings are configured using the Fusion-Link ™ remote control app (Fusion-Link Wireless Remote Control App, page 32).
Configuring the DSP Settings
You must download and install the Fusion-Link remote control app on your compatible Apple ® or Android ™ device before you can configure the DSP settings (Fusion-Link Wireless Remote Control App, page 32).
You can configure the DSP settings to optimize the sound on each zone with the installed speakers, amplifiers, and environment.
1 From the settings menu on your Apple or Android device, connect to the stereo using Bluetooth technology, or connect to the same wireless network as the stereo.
2 Open the Fusion-Link remote control app on your compatible Apple or Android device.
3 If necessary, select the stereo you want to configure.
4 Select .
5 If necessary, select the MUSIC tab.
6 Select a zone.
7 Select DSP SETTINGS.
8 Configure the DSP settings as needed, depending on the models of Fusion speakers and amplifiers connected to the zone.
9 Repeat these steps for each zone.
10 After you have finished configuring the DSP settings for all zones, select an option:
- On an Apple device, select SEND DSP SETTINGS
- On an Android device, select ☐one > SEND DSP SETTINGS.
Automatic Volume Adjustment Based on Speed
If your stereo is connected to a NMEA 2000 ® network with a device that provides speed information such as an engine, chartplotter, GPS antenna, water speed sensor, or wind speed sensor, you can set the stereo to adjust the volume automatically based on the selected speed source (Enabling Automatic Volume Adjustment Based on Speed, page 26).
For example, if a chartplotter with an internal GPS antenna or a stand-alone GPS antenna is on the same NMEA 2000 network as the stereo and you set the SPEED SOURCE to SPEED OVER GROUND, the volume increases as your speed increases.
NOTE: When the volume increases to adjust for speed, the actual volume output changes, but the volume-level indicator bar and number stays the same.
For more information about connecting the stereo to a NMEA 2000 network, see the installation instructions for your stereo.
Media Player Connection
CAUTION
Always disconnect your media player from the stereo when not in use and do not leave it in your vessel. This helps reduce the risk of theft and damage from extreme temperatures.
Do not remove the media player or use your stereo in a distracting manner while operating the vessel. Check and obey all marine laws in association with use.
NOTICE
It is the user's responsibility to comply with all applicable laws and ordinances associated with the use of this device. Garmin is not responsible for any fines, penalties, or damages that you may incur for failing to abide by any such laws and ordinances.
The stereo accepts a variety of media players, including smartphones and other mobile devices. You can connect a compatible media player using a Bluetooth wireless connection or a USB connection to the USB port. The stereo can play media from Universal Plug and Play (UPnP) devices, such as a Network Attached Storage (NAS) device connected to the same network. The stereo can play media from a compatible Apple device connected to the same network using the AirPlay ® feature.
Bluetooth Device Playback
You can pair the stereo to up to eight Bluetooth media devices.
You can control the playback using the controls on a connected remote control, chartplotter, or stereo on all Bluetooth devices, and on some devices you can browse the music collection from the menu on the remote control, chartplotter, or stereo.
On Bluetooth devices that do not support media browsing, you should select the song or playlist on the media device.
The availability of song information such as song title, artist name, track duration, and album art depends on the capability of the media player and music application.
Connecting a Compatible Bluetooth Device
You can play media from a compatible Bluetooth device using the Bluetooth wireless connection.
You can control the music playback with the media app on a Bluetooth device or using the Fusion-Link remote control app (Fusion-Link Wireless Remote Control App, page 32).
1 Select the BLUETOOTH source.
2 Select > BLUETOOTH > CONNECTIONS > DISCOVERABLE to make the stereo visible to your compatible Bluetooth device.
TIP: You can also press the ✕button on the stereo to make it discoverable.
3 Enable Bluetooth on your compatible Bluetooth device.
4 Bring the compatible Bluetooth device within 10 m (33 ft.) of the stereo.
5 On your compatible Bluetooth device, search for Bluetooth devices.
6 On your compatible Bluetooth device, select the stereo from the list of detected devices.
NOTE: The stereo appears in the Bluetooth device list as the device name (the default name is MS-WB675 unless it was changed in the settings).
7 On your compatible Bluetooth device, follow the on-screen instructions to pair and connect to the discovered stereo.
When pairing, your compatible Bluetooth device may ask you to confirm a code on the stereo. The stereo does not display a code, but it does connect correctly when you confirm the message on the Bluetooth device.
8 If your compatible Bluetooth device does not immediately connect to the stereo, repeat steps 1 through 7.
NOTE: If another Bluetooth device is already playing music on the stereo, connecting a new device will not interrupt playback. You must select the newly-added device if you want to use it instead (Selecting a Different Bluetooth Device, page 9).
The DISCOVERABLE setting is disabled automatically after two minutes.
NOTE: On some Bluetooth devices, adjusting the volume on the device affects the volume level on the stereo.
Bluetooth Range Information
The stereo and Bluetooth wireless devices have a range of 10 m (33 ft.). For optimal performance, the Bluetooth wireless device should also have a clear line of sight to the stereo.
Selecting a Different Bluetooth Device
When you have more than one Bluetooth device paired to the stereo, you can select a different device when needed. You can pair the stereo with up to eight Bluetooth devices.
1 With the BLUETOOTH source selected, select ≡ > BLUETOOTH > CONNECTIONS > PAIRED DEVICES.
2 Select a Bluetooth device.
Bluetooth Source Menu and Settings
With the BLUETOOTH source selected, select ✉ BLUETOOTH.
NOTE: The options in this menu vary based on the connected device.
CONNECTIONS > DISCOVERABLE: Allows the stereo to be visible to Bluetooth devices. You can turn off this setting to prevent possible interruption to audio after pairing a Bluetooth device to the stereo.
CONNECTIONS > PAIRED DEVICES: Shows a list of Bluetooth devices paired with the stereo. You can select a device in the list to connect it to the stereo if it is in range.
CONNECTIONS > REMOVE DEVICE: Removes the Bluetooth device from the stereo. To listen to audio from this Bluetooth device again, you must pair the device again.
NOTE: You should also remove the stereo from the list of paired devices on your Bluetooth device to avoid connection issues when pairing the device again.
REPEAT: Sets the repeat mode for the current selection (Apple devices only). You can repeat the current selection by selecting the REPEAT ONE option. You can repeat all items in the selection by selecting the REPEAT ALL option.
SHUFFLE: Shuffles the tracks in the folder, album, or playlist (Apple devices only).
PLAYLIST: Displays the playlists on the device (Apple devices only).
ARTISTS: Displays the artists on the device (Apple devices only).
ALBUMS: Displays the albums on the device (Apple devices only).
GENRES: Displays the genres of music on the device (Apple devices only).
SONGS: Displays the songs on the device (Apple devices only).
Disabling Bluetooth Auto Connection
By default, the stereo automatically reconnects to the last connected Bluetooth device when you turn it on. You can disable this setting.
1 Select > SETTINGS.
2 Select the name of the stereo.
3 Select SOURCE > BLUETOOTH > AUTO CONNECT.
When the AUTO CONNECT checkbox is clear, the stereo will not attempt to automatically reconnect to a Bluetooth device. When this feature is disabled, you must select a Bluetooth device manually to connect it (Selecting a Different Bluetooth Device, page 9).
USB Device Playback
You can connect various USB media players, USB flash drives, and smartphones to the stereo. How you access the USB source depends on the type of connected media player or smartphone.
| Media Player Source Selections | |
| Android device MTP | |
| Apple device iPod | |
| USB flash drive USB | |
| MP3 media player (as a mass-storage device) | USBNOTE: If your MP3 media player does not support mass-storage when connected using USB, you must connect it to the stereo as an auxiliary device(Connecting an Auxiliary Device, page 15). |
You can control the playback using the stereo controls on all USB devices, and on some devices you can browse the music collection from the menu on the stereo. On USB devices that do not support media browsing, you should select the song or playlist on the media device.
The availability of song information such as song title, artist name, and track duration depends on the capability of the media player and music application.
USB Device Compatibility
You can use a USB flash drive or the USB cable included with your media player to connect a media player or mobile device to the USB port.
The stereo is compatible with iAP2 Apple devices such as the iPhone ® Xs Max, iPhone Xs, iPhone XR, iPhone X, iPhone 8 Plus, iPhone 8, iPhone 7 Plus, iPhone 7, iPhone SE, iPhone 6s Plus, iPhone 6s, iPhone 6 Plus, iPhone 6, iPhone 5s, and iPod touch ® (6th generation).
The stereo is compatible with Android devices that support MTP mode.
The stereo is compatible with media players and other USB mass storage devices, including USB flash drives. Music on USB drives must meet these conditions:
- The music files must be formatted as MP3, AAC (.m4a), or FLAC, files.
- If you connect a portable hard drive, you must connect it to an external power source. The USB port on this stereo cannot provide power for a portable hard drive.
- The USB mass storage device must be formatted using one of the following systems:
• Microsoft NTFS, VFAT, FAT 1 , MSDOS
• Apple: HFS, HFSPLUS
Linux: EXT2, EXT3, EX4
Connecting a USB Device
You can connect a USB device to the USB port on the stereo.
1 Locate the USB port on the back of the stereo.
2 Connect the USB device to the USB port.
Controlling Music Playback on a USB Flash Drive or Media Player
1 Connect a compatible USB flash drive or media player to the stereo.
2 Select the USB source.
3 Select USB.
4 Select the name of the USB device.
5 Browse the music files on the device and begin playback.
You can use the remote control, chartplotter, or stereo controls to select, play, pause, and skip tracks.
TIP: If the USB media player has a screen and controls, you can use the controls on the USB media player to control playback.
Controlling Music Playback on a Connected Android Device
You can connect an Android device to the stereo using a USB cable to play media files stored on the Android device. To play media from an app on the Android device, you should connect the device using Bluetooth technology instead (Bluetooth Device Playback, page 8).
1 Connect a compatible Android device to the stereo using an appropriate USB cable.
2 If necessary, enable USB file transfer or MTP on your Android device.
See the documentation available for your Android device for more information.
3 Select the MTP source on the stereo.
4 Select MTP.
5 Browse the music files on the Android device and begin playback.
You can use the stereo controls to select, play, pause, and skip tracks.
Controlling Music Playback on a Connected Apple Device
1 Connect a compatible iAP2 Apple device to the stereo using USB.
2 Select the iPod source on the stereo.
3 Launch a music application on the connected Apple device, and begin playback.
You can use the music application on the Apple device or you can use the stereo controls to browse the music library and to select, play, pause, and skip tracks.
USB Source Settings
With a USB device connected and a USB source selected, select ■ then select USB, iPod, or MTP.
NOTE: You can browse the files on the device using this menu. The options in this menu vary based on the connected device.
REPEAT: For a USB or MTP source, select to start playing the tracks in the list from the beginning after the last track has played.
For an iPod source, select REPEAT ONE to repeat the current track, or select REPEAT ALL to start playing the tracks in the folder, album, or playlist from the beginning after the last track has played.
SHUFFLE: For a USB or MTP source, select to randomly play the tracks in the list.
For an iPod source, select to randomly play the tracks in the folder, album, or playlist.
Radio
To listen to AM or FM radio, you must have a suitable marine AM/FM antenna properly connected to the stereo and be within range of a broadcasting station. For instructions on connecting an AM/FM antenna, see the stereo installation instructions.
To listen to SiriusXM ® radio, you must have the appropriate equipment and subscriptions (SiriusXM Satellite Radio, page 15). For instructions on connecting a SiriusXM Connect Vehicle Tuner, see the stereo installation instructions.
To listen to DAB stations, you must have the appropriate equipment (DAB Playback, page 21). For instructions on connecting a DAB adapter and antenna, see the installation instructions provided with your adapter and antenna.
Setting the Tuner Region
You must select the region you are in to receive AM and FM stations properly.
If you are connected to a compatible SiriusXM tuner and antenna, and have a subscription (USA only), you must select the region you are in to receive SiriusXM stations properly.
NOTE: SiriusXM service is not available in all regions.
You must select the region you are in to receive DAB stations properly.
NOTE: You must connect a compatible DAB module and antenna (not included), to receive DAB stations.
DAB stations are not available in all regions.
1 Select > SETTINGS.
2 Select the name of the stereo.
3 Select TUNER REGION.
4 Select the region you are in.
Changing the Radio Station
1 Select an applicable source, such as FM.
2 Select Repeatedly to move through the tuning modes, and select an option:
- Select AUTO to scan and stop on the next available station.
- Select MANUAL to select a station manually.
- Select PRESET to select a saved station preset.
3 Select to tune to the station.
When in MANUAL tuning mode, you can hold to quickly advance through the stations.
Apple AirPlay
Connecting an Apple Device Using AirPlay
1 From the settings menu on your Apple device, connect to the same wireless network as your compatible Fusion stereo. NOTE: You can connect some Apple devices to the network using a wired Ethernet connection, if applicable. Go to the Apple website for more information.
2 On your Apple device, open the music app you want to stream to the stereo. 3 From the music app or program, select ☐, and select the name of the stereo.
4 If necessary, start playing music on the app. The stereo changes to the AirPlay source automatically and plays audio from your Apple device.
NOTE: If your Apple device is using AirPlay 2 software, you can connect to multiple stereos on the same network.
NOTE: You cannot stream the AirPlay source to other stereos on the network using the Fusion PartyBus network (Fusion PartyBus Networking, page 22). Using AirPlay 2 software, you can play content on multiple stereos on the network, but the stereos must not be grouped.
NOTE: On some AirPlay devices, adjusting the volume on the device affects the volume level on the stereo.
Setting an AirPlay Password
You can set a password that a user must enter when connecting to the stereo using the AirPlay feature.
1 Select > SETTINGS.
2 Select the name of the stereo.
3 Select SOURCE > AirPlay > AirPlay PASSWORD.
4 Enter a password.
NOTE: The AirPlay password is case-sensitive.
When connecting to this stereo using the AirPlay feature, the user must enter the password on their Apple device.
UPnP Playback
This stereo can play content from Universal Plug and Play (UPnP) devices connected to the network, such as computers and media servers. You must connect your UPnP device to the same network as the stereo using a wired or wireless connection, and you must configure the device to share media over the network. See the owner's manual from your UPnP device for more information.
After you have connected your UPnP device to the network and configured it to share media, the UPnP source appears on the source selection screen of each stereo on the network (Selecting a Source, page 5).
Connecting a UPnP Device
You must connect your stereo to a network to play media from a UPnP device, such as a NAS device.
1 Connect your UPnP device to the same network as the stereo, referring to the instructions provided with your UPnP device and router if necessary.
2 Select the UPnP source on the stereo (Selecting a Source, page 5).
You can browse and play media from the UPnP device.
Connecting an Auxiliary Device
You can connect various auxiliary devices to the stereo. These devices have either RCA connectors, a line output, or a headphone output jack.
1 Locate the auxiliary connectors on the wiring harness.
2 If necessary, connect an RCA-to-3.5 mm adapter cable to the auxiliary device.
3 Connect the auxiliary device to the AUX IN RCA connectors on the wiring harness.
4 Select the Aux source.
Optical Audio Connection
You can connect devices with an optical audio output to the stereo using an optical audio cable. Televisions, DVD players, CD players, and other devices may supply digital optical audio output.
This stereo supports PCM audio only. You may have to change the settings on your device to output PCM audio.
NOTE: Because streaming audio over the Fusion PartyBus network introduces a slight delay, streaming content from a television or DVD player may not be ideal. You can disable Optical as a streaming source in the settings, if needed (Source Settings, page 29).
SiriusXM Satellite Radio
Only SiriusXM brings you more of what you love to listen to, all in one place. Get over 140 channels, including commercial-free music plus the best sports, news, talk, comedy and entertainment. Welcome to the world of satellite radio. A SiriusXM Vehicle Tuner and subscription are required. For more information, go to www.siriusxm.com.
Setting the Tuner Region for the SiriusXM Source
You must set the stereo to use the USA tuner region before you can listen to SiriusXM Satellite Radio.
1 Select > SETTINGS.
2 Select the name of the stereo.
3 Select TUNER REGION > USA.
Locating the SiriusXM Radio ID
You must have the radio ID of your SiriusXM Connect Tuner before you can activate your SiriusXM subscription. You can locate the SiriusXM Radio ID on the back of the SiriusXM Connect Tuner or its packaging, or by tuning your stereo to channel 0.
With the SiriusXM source selected, select >SiriusXM >CHANNELS >ALL CHANNELS >000 RADIO ID. The SiriusXM Radio ID does not include the letters I, O, S, or F.
Activating a SiriusXM Subscription
1 With the SiriusXM source selected, tune to channel 1.
You should be able to hear the preview channel. If not, check the SiriusXM Connect Tuner and antenna installation and connections, and try again.
2 Tune to channel 0 to locate the Radio ID.
3 Contact SiriusXM listener care by phone at (866) 635-2349 or go to www.siriusxm.com/activatenow to subscribe in the United States. Contact SiriusXM by phone at (877) 438-9677 or go to www.siriusxm.ca/activatexm to subscribe in Canada.
4 Provide the Radio ID.
The activation process usually takes 10 to 15 minutes, but can take up to an hour. For the SiriusXM Connect Tuner to receive the activation message, it must be turned on and receiving the SiriusXM signal.
5 If the service is not activated within the hour, go to http://care.siriusxm.com/refresh or contact SiriusXM Listener Care by phone at 1-866-635-2349.
Selecting a Category
You can control which categories of channels are available when using the CATEGORY tuning method.
1 With the SiriusXM source selected, select > SiriusXM > CATEGORY.
2 Select a category.
Using Replay Mode
You can use Replay Mode to control playback of a SiriusXM broadcast.
NOTE: The device enables Replay Mode automatically when playing saved preset channels.
1 If necessary, hold to enable Replay Mode.
A progress bar appears at the bottom of the screen.
2 Select an option:
- Press to pause and resume playback.
- Press to skip backward or forward in increments.
NOTE: If you fast-forward or skip forward to the end of the progress bar, the stereo exits Replay Mode automatically.
- Hold to rewind or fast-forward the track.
- Hold to exit Replay Mode.
Alerts
WARNING
Use caution when using the stereo or media player while operating the vessel, because doing so can cause distraction which could lead to an accident causing serious personal injury or death.
NOTE: The Artist, Song, and Game Alerts feature is compatible with the SXV300 tuner (sold separately). Other tuners are compatible, but may limit the features. Review the user manual supplied with your SiriusXM tuner to learn about features available with your tuner module.
Adding an Artist or Song Alert
You can set alerts for artists and songs so that when a particular song or a song from a particular artist begins to play on any music channel, you can quickly tune to that channel.
1 While a particular song or a song from a particular artist is playing, select > SiriusXM > ADD ALERT > SAVE ARTIST/SONG.
2 Select the song or the artist.
Adding Teams for Game Alerts
You can set alerts for sports teams so that when a game featuring a saved team begins to play on any sports channel, you can quickly tune to that channel.
NOTE: A Game Alert is different than a SportsFlash ™ alert. A Game Alert lets you know when a game begins, while a SportsFlash alert lets you know when an exciting play occurs during a game.
1 Select >SiriusXM >ADD ALERT >GAME ALERT TEAMS.
2 Select a sports league.
3 Select a team to fill the check box and add a Game Alert.
4 Repeat steps 2 and 3 for each team you want to add to the list of Game Alerts.
Adding Teams from a Live Game
While listening to a game, you can quickly add a team playing to your list of Game Alert teams.
1 While listening to a game on a channel, select >SiriusXM >ADD ALERT >SAVE TEAM.
A list of teams playing in the current game appears.
2 Select the team or teams to add to your list of Game Alert teams.
Viewing Active Alerts
You can review active Artist, Song, and Game Alerts.
1 Select >SiriusXM >ACTIVE ALERTS.
2 Select a category.
Managing Alerts
You can manage your saved alerts to select which ones you want to receive. You can delete saved alerts you do not want.
1 Select > SiriusXM > SXM SETTINGS > ALERT MANAGEMENT.
2 Select an option:
- To enable saved alerts for songs only, artists only, or games only, select ENABLE BY TYPES, and select a type.
• To enable saved alerts for specific artists only, select ENABLE ARTISTS, and select the artists.
• To enable saved alerts for specific songs only, select ENABLE SONGS, and select the songs.
• To enable saved game alerts for specific teams, select ENABLE TEAMS, and select the teams.
• To delete all saved alerts for songs, artists, or teams, select DELETE BY TYPES, and select a type.
• To delete saved alerts for specific artists, select DELETE ARTISTS, and select the artists. - To delete saved alerts for specific songs, select DELETE SONGS, and select the songs.
- To delete saved alerts for specific teams, select DELETE TEAMS, and select the teams.
TuneMix™ Feature
NOTE: The TuneMix feature is compatible with the SXV300 tuner (sold separately). Other tuners are compatible, but may limit the features. Review the user manual supplied with your SiriusXM tuner to learn about features available with your tuner module.
Starting and Stopping a TuneMix Collection
Before you can start playing a TuneMix collection, you must create one (Creating and Customizing a TuneMix Collection, page 17).
The TuneMix feature enables you to mix your favorite music channels to create a custom listening experience.
1 Select > SiriusXM > TUNEMIX.
2 Select a TuneMix collection.
The stereo begins playing the TuneMix collection.
3 To stop playing a TuneMix collection, select > CHANNELS, and select a channel.
The stereo stops playing the TuneMix collection and begins playing the selected channel.
Creating and Customizing a TuneMix Collection
You can create up to 10 unique TuneMix collections on the stereo.
NOTE: A TuneMix collection must include at least two of your favorite SiriusXM music channels.
1 Select > SiriusXM > SXM SETTINGS > TUNEMIX SETUP.
2 Select a TuneMix collection.
3 Select a channel to fill the check box and add it to the TuneMix collection.
4 After you are finished customizing the TuneMix collection, select
5 Repeat steps 2 through 4 for each TuneMix collection you want to customize.
SportsFlash Feature
WARNING
Use caution when using the stereo or media player while operating the vessel, because doing so can cause distraction which could lead to an accident causing serious personal injury or death.
The SportsFlash feature alerts you to key plays from your favorite teams during a live game. When an exciting play happens, a SportsFlash alert appears, and you can tune to the broadcast and hear the play. When the SportsFlash alert ends, you can choose to return to the previous channel, or remain tuned to the game.
NOTE: To receive SportsFlash alerts, your subscription package must include play-by-play sports channels for the sports leagues you want to include in the alerts.
You can enable, disable, or delete SportsFlash alerts that you have added (Managing Alerts, page 17).
NOTE: A SportsFlash is different than a Game Alert. A SportsFlash alert lets you know when an exciting play occurs during a game, while a Game Alert lets you know when a game begins.
NOTE: The SportsFlash feature is compatible with the SXV300 tuner (sold separately). Other tuners are compatible but may limit the features. Review the user manual supplied with your SiriusXM tuner to learn about features available with your tuner module.
Adding Teams to Receive SportsFlash Alerts
1 Select >SiriusXM >SPORTSFLASH >TEAM SELECT.
2 Select a sports league.
3 Select a team to fill the check box and add a SportsFlash alert.
4 Repeat steps 2 and 3 for each team you want to add to the list of SportsFlash alerts.
Changing SportsFlash Team Priority
If more than one team for which you have set up SportsFlash alerts are playing at the same time, you can adjust the team priority to hear SportsFlash alerts from your preferred team first.
1 Select >SiriusXM >SPORTSFLASH >TEAM PRIORITIES.
A list of your selected SportsFlash teams appears, in order of priority.
2 Select a team to move it up one priority level in the list.
3 Repeat the previous step with each team you want to reorder until the priority list is ordered the way you prefer.
Enabling the TuneStart™ Feature
When you enable the TuneStart feature and tune to a preset channel, the stereo starts the current song from the beginning of the song instead of starting it from the point it is at in the live broadcast.
NOTE: The TuneStart feature is available when tuning to preset channels only. The TuneStart feature is compatible with the SXV300 tuner (sold separately). Other tuners are compatible but may limit the features. Review the user manual supplied with your SiriusXM tuner to learn about features available with your tuner module.
If necessary, select >SiriusXM >SXM SETTINGS >TUNESTART.
When the TuneStart feature starts a song from the beginning, a progress bar appears and you can control the track using the same controls as Replay Mode (Using Replay Mode, page 16).
Parental Controls
The parental control feature allows you to limit access to any SiriusXM channels, including those with mature content. When the parental control feature is enabled, you must enter a passcode to tune to the locked channels. You can also change the 4-digit passcode.
Unlocking the Parental Controls
You can unlock the parental controls to access locked channels.
1 With the SiriusXM source selected, select > SiriusXM > PARENTAL.
2 Select UNLOCK.
3 Enter the passcode.
TIP: The default passcode is 0000.
The parental controls remain unlocked until you turn off the vehicle or until you lock them again.
Locking Channels
1 With the SiriusXM source selected, select > SiriusXM > PARENTAL.
2 Select the UNLOCK check box.
3 Enter the passcode.
TIP: The default passcode is 0000.
4 Select LOCK/UNLOCK.
A list of available channels appears.
5 Select one or more channels to lock, and select .
6 Clear the UNLOCK check box to lock the parental controls.
You cannot access the locked channels while the parental controls are locked. You must unlock the parental controls to tune the locked channels.
Clearing All Locked Channels
1 With the SiriusXM source selected, select >SiriusXM >PARENTAL >UNLOCK.
2 Enter the passcode.
3 Select > SiriusXM > PARENTAL > CLEAR ALL LOCKED.
Changing the Parental Control Passcode
1 With the SiriusXM source selected, select >SiriusXM >PARENTAL >UNLOCK.
2 Enter the passcode.
3 Select > SiriusXM > PARENTAL > CHANGE PIN.
4 Follow the on-screen instructions.
SiriusXM Troubleshooting
| Advisory Description Resolutions | ||
| Check Antenna | The radio has detected a fault with the SiriusXM antenna. The antenna cable may be disconnected or damaged. | ·Verify the antenna cable is connected to the SiriusXM Connect Vehicle Tuner.·Inspect the antenna cable for damage and kinks. Replace the antenna if the cable is damaged. SiriusXM products are available at your local car audio retailer, or at www.shop.siriusxm.com. |
| Check Tuner | The stereo is having difficulty communicating with the SiriusXM Connect Vehicle Tuner. The tuner may be disconnected or damaged. | Verify the SiriusXM Connect Vehicle Tuner cable is connected securely to the stereo. |
| No Signal | The SiriusXM Connect Vehicle Tuner is having difficulty receiving the SiriusXM satellite signal. | ·Verify the SiriusXM antenna is outdoors with a clear view of the sky.·Verify the SiriusXM antenna is mounted securely.·Remove obstructions above or next to the SiriusXM antenna.·Inspect the cable antenna for damage and kinks. Replace the antenna if the cable is damaged. SiriusXM products are available at your local car audio retailer or at www.shop.siriusxm.com.·Consult the SiriusXM Connect Vehicle Tuner installation instructions for more information on antenna installation. |
| Subscription Updated | The radio has detected a change in your SiriusXM subscription status. | ·Select any button to clear the message.·Go to www.siriusxm.com or call 866-635-2349 with questions about your subscription. |
| Channel Not Available | The channel you requested is not a valid SiriusXM channel, or the channel that you were listening to is no longer available. You may see this message briefly the first time you connect a new SiriusXM Connect Vehicle Tuner. | Go to www.siriusxm.com for more information about the SiriusXM channel lineup. |
| Channel Not Subscribed | The channel you requested is not included in your SiriusXM subscription package, or the channel you were listening to is no longer included in your SiriusXM subscription package. | Go to www.siriusxm.com or call 866-635-2349 for more information about your subscription package or to subscribe to the channel. |
| Channel Locked | The channel you requested is locked by the parental control feature. | Refer to the parental control section in the owner's manual to unlock channels. |
Clearing SiriusXM Data
You can clear all entered SiriusXM user information, such as favorite teams and alerts.
Use the FACTORY RESET option in the settings menu to reset the stereo (Update Options, page 31).
NOTE: The factory reset setting resets all data in the stereo, including AM and FM presets, zone settings, etc. in addition to clearing all SiriusXM user information.
DAB Playback
When you connect the MS-DAB100A module and antenna to the Apollo WB675 stereo, you can tune in to and play DAB stations. For instructions on connecting the DAB adapter and antenna, see the installation instructions provided with your adapter and antenna.
DAB broadcasts are not available in all regions. When the stereo is not set to a compatible region, the DAB source is not available.
See the troubleshooting section if you cannot access the DAB source or if DAB stations are not playing properly. (The stereo does not receive DAB stations, page 36)
Setting the Tuner Region
You must select the region you are in to receive DAB stations properly.
1 Select Z SETTINGS.
2 Select the name of the stereo.
3 Select TUNER REGION.
4 Select the region you are in.
Scanning for DAB Stations
Before you can scan for DAB stations, you must connect a compatible DAB module and antenna (not included) to the stereo.
NOTE: Because DAB signals are broadcast in select countries only, you must set the tuner region to a location where DAB signals are broadcast.
1 Select the DAB source.
2 Select tollscan for available DAB stations.
When scanning is complete, the first available station in the first ensemble found begins playing.
NOTE: After the first scan is complete, you can select ▶II again to re-scan for DAB stations. When the re-scan is complete, the system starts playing the first station in the ensemble you were listening to when you started the re-scan.
Changing DAB Stations
1 Select the DAB source.
2 If necessary, select tollscan for local DAB stations.
3 Select to change the station.
When you reach the end of the current ensemble, the stereo automatically changes to the first available station in the next ensemble.
TIP: You can hold to change the ensemble.
Selecting a DAB Station from a List
1 Select the DAB source.
2 If necessary, select tollscan for local DAB stations.
3 Select > DAB > BROWSE > STATIONS.
4 Select a station from the list.
Selecting a DAB Station from a Category
1 Select the DAB source.
2 If necessary, select tollscan for local DAB stations.
3 Select > DAB > BROWSE > CATEGORIES.
4 Select a category from the list.
5 Select a station from the list.
Presets
You can save your favorite AM stations and FM stations as presets for easy access.
You can save your favorite SiriusXM channels if the stereo is connected to an optional SiriusXM tuner and antenna.
You can save your favorite DAB stations if the stereo is connected to the proper DAB equipment and set to the correct tuner region. (DAB Playback, page 21)
Saving a Station or Channel as a Preset
1 With an applicable source selected, tune the stereo to a station or a channel.
2 Press and hold .▶II
TIP: You can also select ≡, the name of the source, and PRESETS > SAVE CURRENT to save the current station or channel as a preset.
Selecting a Preset from a List
1 With an applicable source selected, press and hold the dial.
TIP: You can also select ≡, the name of the source, and PRESETS > VIEW PRESETS to view the list of presets.
2 Select a preset.
Removing Presets
1 With an applicable source selected, press and hold the dial.
2 Select .
3 Select each preset station or channel you want to remove.
4 When you are finished removing presets, select .
TIP: You can also select ☐, the name of the source, and PRESETS > REMOVE PRESETS or REMOVE ALL PRESETS to remove preset stations or channels.
Fusion PartyBus Networking
The Fusion PartyBus networking feature allows you to connect multiple compatible stereos together on a network, using a combination of wired or wireless connections.
You can group a compatible stereo, such as the Apollo RA770 stereo, with other compatible stereos connected to the network. Grouped stereos can share available sources and control media playback on all of the stereos in the group, which allows for a synchronized audio experience across the vessel. You can quickly create, edit, and break up groups as needed from any compatible stereo or remote control on the network.
You can use compatible stereos and remote controls, whether they are grouped or not, to adjust the volume of the available speaker zones for any stereo on the network.
You should refer to the installation instructions provided with your stereo when constructing the Fusion PartyBus network.
Creating a Group
Before you can create a group, you must connect multiple compatible stereos to the Fusion PartyBus network. See the installation instructions provided with your stereo for information about installing and configuring the network.
NOTE: There are some limitations and other considerations when using stereos in groups. See Grouped Stereo Source Considerations, page 24 for more information.
1 Select > GROUPS.
TIP: You can hold from any screen to open the GROUPS menu.
2 Select the name of the stereo you want to be the primary stereo in the group.
3 Select the stereos you want to add to the group.
4 Select DONE.
From the source screen, you can select a source from any stereo in the group except a zone stereo, such as the Apollo SRX400 stereo or any sources that are disabled for use on the Fusion PartyBus network (General Settings, page 25).
Editing a Group
1 Select > GROUPS.
2 Select the name of an existing group.
3 Select the stereos you want to add to or remove from the group.
4 Select DONE.
Leaving a Group
You can leave the Fusion PartyBus group to play local sources on the stereo.
1 Select > GROUPS.
2 Select the name of the existing group you want to leave.
3 Select the stereos you want to remove from the group.
4 Select DONE.
Grouped Stereo Functions
After you create a group of stereos, additional functions and options are available to all stereos in the group.
• After you create a group, all of the stereos in the group share the same synchronized display.
- You can select a source from any stereo in the group, with a few limitations (Grouped Stereo Source Considerations, page 24), and the source will play simultaneously on all stereos in the group (Selecting a Source, page 5).
- You can control playback (such as pausing and skipping tracks) on any stereo in the group, and it will affect all stereos in the group.
- You can adjust the volume for any zone on any stereo in the group.
TIP: When adjusting the volume, you can select ALL to adjust the volume of all the stereos in the group at the same time.
Grouped Stereo Source Considerations
When selecting sources to play over the network, you should observe these considerations.
- A zone stereo, such as the Apollo SRX400, can create or join a group to control and play sources from other stereos, but it cannot share its sources with the group.
- You cannot share an AirPlay source with grouped stereos. Using AirPlay 2 software, you can play content on multiple stereos on the network, but the stereos must not be grouped (Connecting an Apple Device Using AirPlay, page 14).
- You can disable sharing on most sources by changing the GROUP ENABLED setting for the source. When disabled, the source cannot be selected from a grouped stereo (General Settings, page 25).
-
When audio sources are streamed over a data network, there is a slight delay in the synchronized audio that may be noticeable if you are also using an external audio source.
-
If you have a television with an Optical Out connection to a stereo and you continue to use the television speakers, there will be a delay between the audio from the television speakers and the optical audio streamed on the grouped stereos.
- If you synchronize a radio station and tune that same radio station on a non-networked stereo, there will be a delay between the audio from the non-networked stereo and the audio from the radio station streamed on the grouped stereos.
- You can remove this delay by changing the GROUP ENABLED setting for the source, but the source cannot be shared with grouped stereos (General Settings, page 25).
NOTE: You cannot change the settings when a stereo is part of a group. You must remove the stereo from the group before you can change any settings.
Group Synchronization
By default, groups you create are not maintained when you turn off stereos in the group. If you turn off a single stereo added to the group, it leaves the group. If you turn off the primary stereo in the group, the group is dissolved. You can enable group synchronization to preserve group membership for a stereo after turning it off. Group synchronization behaves differently based on how you turn the stereos off and on.
- If you turn a synchronized stereo off and on by using either the power button on the stereo or a physical switch on the ignition wire (the red wire), all of the synchronized stereos in the group turn off and on together. This applies to all of the synchronized stereos in the group, whether or not a stereo is the primary stereo in the group.
NOTE: Selecting ALL OFF from the power menu on a stereo turns off all stereos on the network, even if they are not in a group or have group synchronization enabled.
- If you turn a synchronized stereo off and on using a physical switch on the power wire (the yellow wire), the other synchronized stereos in the group behave differently:
- If the synchronized stereo is the primary stereo in the group and you turn it off using a physical switch on the power wire, the other synchronized stereos in the group remain on, but leave the group. When you turn the primary stereo back on again, the other synchronized stereos rejoin the group.
- If the synchronized stereo is not the primary stereo in the group and you turn it off and on using a physical switch on the power wire, all of the other synchronized stereos in the group remain on and grouped, and the stereo rejoins the group when you turn it on again.
Enabling Group Synchronization
You must remove the stereo from an existing group before you can enable the GROUP SYNC setting. You cannot update settings when a stereo is part of a group.
You must enable this setting on each stereo that you want to retain group settings after a power cycle.
1 Select > SETTINGS.
2 Select the name of the stereo.
3 Select POWER OPTIONS > GROUP SYNC.
The stereo retains group settings after a power cycle.
4 Repeat for additional stereos as needed.
NOTE: You must enable GROUP SYNC on all networked stereos for synchronization to work properly.
General Settings
NOTE: When the stereo is in a group, you cannot change the settings on that stereo.
Select Z SETTINGS, and select the name of the stereo.
NOTE: When a check box is filled, the option is on. When the check box is clear, the option is off.
DEVICE NAME: Sets a name for this device.
TUNER REGION: Sets the region used by the FM and AM sources.
This setting is also needed to configure DAB and SiriusXM sources.
TELEMUTE: Sets the behavior of the stereo when it detects a signal on the TELEMUTE wire in the wiring harness. This is commonly used to change to the Aux source when you hold the button on a Fusion handheld microphone. You can also choose to either mute the audio or change to the Aux source when connected to a hands-free mobile phone kit. See yourFusion handheld microphone or hands-free mobile phone kit instructions for more information.
NOTE: This setting does not affect a phone connected to the stereo using Bluetooth technology.
POWER OPTIONS: Adjusts the power settings, such as the power-save mode.
SEARCHING: Enables Fusion Alpha Search Technology (FAST), which allows you to quickly search for tracks by letter or number. You can select a number to enable the FAST menu if your music device contains more than the selected number of items.
ZONE: Enables you to configure the speaker zones (Speaker Zone Settings, page 25).
SOURCE: Allows you to enable, disable, and name the sources on the stereo (Source Settings, page 29).
NETWORK: Enables you to configure the Fusion PartyBus network settings (Network Settings, page 29).
UPDATE: Updates the stereo or connected devices using the appropriate update file on a connected USB flash drive (Update Options, page 31).
NOTE: It is not necessary to use this menu if you are updating the software using the Fusion-Link app on a mobile device instead of using an update file loaded onto a USB flash drive (Updating the Software Using the Fusion Link App, page 34).
UPDATE > FACTORY RESET: Restores all settings to the factory default values.
ABOUT: Shows the software version information for the stereo.
Speaker Zone Settings
Disabling the Internal Amplifier
If you do not connect speakers directly to zones 1 and 2, you can disable the internal amplifier to reduce power consumption.
1 Select SETTINGS.
2 Select the name of the stereo.
3 Select ZONE.
4 Select INTERNAL AMP ON to clear the check box.
Setting the Home Zone
The home zone is the speaker zone that you adjust by default when you turn the dial on the remote control.
1 Select SETTINGS.
2 Select the name of the remote control you plan to use with this stereo.
3 Select ASSIGN HOME ZONE.
4 Select a zone.
Synchronizing the Source and Zone Volume Levels
You can synchronize the volume levels on one or all zones with some source devices, such as a Bluetooth, AirPlay, or UPnP source.
1 Select SETTINGS.
2 Select the name of the stereo.
3 Select ZONE > PHONE VOLUME SYNC.
4 Select a zone or ALL.
When you adjust the volume on the connected source, the volume on the selected zone is also adjusted.
Adjusting the Power-On Volume Limit
By default, when you turn on the stereo, the system automatically reduces the volume to level 12 if it was louder than that when you turned it off. You can adjust this limit if you want to retain a louder volume or limit to a lower volume when you turn on the stereo.
NOTE: This setting affects all zones on the stereo.
1 Select SETTINGS.
2 Select the name of the stereo.
3 Select ZONE > POWER ON VOLUME LIMIT.
4 Adjust the volume limit.
Maintaining Individual Zone Volume Levels
If you adjust the volume levels of individual zones so that some zones are louder than others, the individual zone volume settings are all affected when you adjust the volume for ALL zones. By default, if you adjust the volume for ALL to 00, this sets of the volume levels for all zones to 00 and resets all individual zone volume adjustments. You can enable the KEEP VOLUME RATIOS option to retain individual zone volume adjustments when you adjust the volume for ALL to 00.
NOTE: This setting applies to volume adjustments on the stereo or a connected Apollo ERX400 remote control only. If you adjust the volume on the stereo using a connected chartplotter or NRX remote control, the volume levels will still be reset.
TIP: For the best results when enabling this setting, you should set the power-on volume limit to 24 (Adjusting the Power-On Volume Limit, page 26).
1 Select > SETTINGS.
2 Select the name of the remote control.
3 Select KEEP VOLUME RATIOS.
Enabling Automatic Volume Adjustment Based on Speed
1 Select > SETTINGS.
2 Select the name of the stereo.
3 Select ZONE > SPEED VS VOLUME > ENABLED
4 If needed, update the settings to select the speed source (Automatic Volume Control Settings, page 27).
Automatic Volume Control Settings
Select > SETTINGS, select the name of the stereo, then select ZONE > SPEED VS VOLUME.
ENABLED: Enables the automatic volume control feature.
SPEED SOURCE: Sets the source that the stereo uses to determine the speed (Speed Source Information, page 27).
MAX/MIN SPEED: Sets the expected maximum and minimum speed range for the selected SPEED SOURCE. The MIN setting indicates the speed at which the volume plays at the level you set by turning the dial. The MAX setting indicates the speed at which the volume plays at the highest level set in the VOLUME INCREASE setting.
TIP: You should start by setting these values at the speeds you typically expect from your engine or sensor and adjust them as needed.
VOLUME INCREASE: Sets the total volume increase for each zone when the selected SPEED SOURCE reaches the set maximum speed set in the MAX/MIN SPEED setting. The higher you set this level, the louder the volume will be as you approach the set maximum speed.
NOTE: When the volume increases to adjust for speed, the actual volume output changes but the volume-level indicator bar and number stays the same.
CUSTOM UNITS: Changes the measurement unit used to indicate the vessel or wind speed.
Speed Source Information
Select > SETTINGS, select the name of the stereo, then select ZONE > SPEED VS VOLUME > SPEED SOURCE.
ENGINE SPEED: Uses the RPM reading provided by a supported NMEA 2000 engine. The volume increases as the engine RPM increases from the set MIN speed to the set MAX speed. If multiple supported engines are connected, the stereo uses the average RPM reading from all engines.
SPEED OVER GROUND: Uses the speed over ground (SOG) reading provided by a supported NMEA 2000 GPS antenna or chartplotter with an internal GPS antenna. The volume increases as the SOG increases from the set MIN speed to the set MAX speed.
SPEED THROUGH WATER: Uses the speed through water (STW) reading provided by a supported NMEA 2000 water-speed sensor. The volume increases as the STW increases from the set MIN speed to the set MAX speed.
WIND SPEED: Uses the wind speed reading provided by a supported NMEA 2000 wind-speed sensor. The volume increases as the wind speed increases from the set MIN speed to the set MAX speed.
Disabling a Zone
You can disable an unused zone and remove it from the audio level pages. When a zone is disabled, you cannot change any of the settings for that zone. You cannot disable zone 1.
1 Select > SETTINGS.
2 Select the name of the stereo.
3 Select ZONE.
4 Select a zone.
5 Select ZONE ENABLED to clear the check box.
Setting a Zone Name
You can set a name for a speaker zone to make it easier to identify.
1 Select > SETTINGS.
2 Select the name of the stereo.
3 Select ZONE.
4 Select a zone.
5 SelectZONE NAME, and select an option:
- Select a pre-defined name from the list.
- Select CUSTOM NAME, and enter a unique name for the zone.
Linking Zones
You can link zones 1 and 2 to keep the volume levels synchronized. Adjusting the volume of either of the linked zones affects both zones.
1 Select > SETTINGS.
2 Select the name of the stereo.
3 Select ZONE > ZONE 2 > LINK TO ZONE 1.
NOTE: After zones 1 and 2 are linked, you cannot adjust the volume of each zone individually.
Enabling Volume Control of Zone 3 or 4 from a Connected Amplifier
By default the volume of zones 3 and 4 are controlled by the stereo. You can control the volume of these zones using the connected amplifier instead.
1 Select > SETTINGS.
2 Select the name of the stereo.
3 Select ZONE.
4 Select zone 3 or zone 4.
5 Select VOLUME CONTROL to clear the check box.
The audio signal from the zone is provided to the amplifier as a fixed-line-level output at maximum volume.
Adjusting the Subwoofer Filter
You can use the subwoofer filter setting to control the subwoofer cutoff frequency for each zone, which can enhance the blend of the sound produced by the speakers and the subwoofer. Audio signals above the selected frequency are not passed to the subwoofer.
NOTE: If a DSP setting has been applied to the zone using the Fusion-Link app, this setting cannot be changed on the stereo.
1 Select > SETTINGS.
2 Select the name of the stereo.
3 Select ZONE.
4 Select a zone.
5 Select SUB. FREQ..
6 Select a frequency.
Adjusting Additional Audio Settings for a Zone
1 Select > SETTINGS.
2 Select the name of the stereo.
3 Select ZONE.
4 Select a zone.
5 Select one or more options:
- To limit the maximum volume output of this zone, select VOLUME LIMIT, and adjust the level.
• To adjust the right and left speaker balance of this zone, select BALANCE, and adjust the balance.
- To reduce the power output to the external amplifier associated with this zone, select EXT. AMP GAIN, and adjust the gain level.
- To reduce the power output to the internal amplifier associated with this zone, select INT. AMP GAIN, and adjust the gain level.
NOTE: This setting is available only for zones associated with an internal amplifier, typically zones 1 and 2.
- To change the output of this zone from stereo to mono, select MONO.
NOTE: The mono setting is useful if a listening position is closer to one speaker than the other and predominantly hear only that channel. The mono setting combines both channels in each speaker in the zone.
Source Settings
Select ≡ > SETTINGS, select the name of the stereo, select SOURCE, and select the name of the source you want to configure.
NOTE: This menu contains system-wide source settings. Most sources also have source-specific settings. See the sections of this manual for each source for more information about source-specific settings.
Not all options are available for every source on the stereo.
SOURCE ENABLED: Enables and disables the source on this stereo. You may want to disable sources that will never be used on the stereo so they no longer appear on the source-selection screen.
GROUP ENABLED: Enables and disables the sharing of the source when connected to other stereos in a group (Fusion PartyBus Networking, page 22). You may want to disable sharing for some sources, such as AM, because streaming over the Fusion PartyBus network introduces a small audio lag that is not desirable in some situations.
SOURCE NAME: Changes the name of the source as it appears on this stereo. This also affects how the source appears to other stereos in a group.
Network Settings
Select SETTINGS, select the name of the stereo, then select NETWORK.
DHCP CLIENT: Sets the device as a DHCP client. This is the default setting for all devices that are not configured to be a DHCP server.
STATIC IP: Allows you to set a static IP address for the device (Setting a Static IP Address, page 30).
GARMIN MARINE NETWORK: Allows the device to be used on a Garmin Marine Network so it can be viewed and controlled by connected Garmin chartplotters (Configuring the Stereo for use with a Garmin Marine Network, page 30).
DETAILS: Shows information about the network configuration.
ADVANCED: Allows you to configure the DHCP server and reset all network settings for this stereo to the factory default values.
SAVE: Allows you to save changes to the network settings.
Setting the Stereo as the DHCP Server
If you connected more than two network devices together directly or using a network switch or wireless access point and did not install a router, you should configure only one Fusion PartyBus stereo to be a DHCP server.
NOTE: Although the Fusion PartyBus devices can communicate with each other without a DHCP server on the network, the devices take longer to connect to each other when you first turn them on. It is highly recommended to have a properly-configured DHCP server on the network for the best results.
1 Select SETTINGS.
2 Select the name of the stereo.
3 Select NETWORK > STATIC IP > SAVE.
You must set the stereo to use a static IP address before you can set it as a wired DHCP server.
4 Select ADVANCED > DHCP SERVER > DHCP ENABLED > SAVE.
You can configure the IP address range of the DHCP server (DHCP Settings, page 30).
Setting a Static IP Address
If the stereo is configured as a static IP, it is automatically assigned the IP address of 192.168.0.1. You can change this IP address.
If the stereo is a DHCP client on the network and you do not want the DHCP server to automatically assign an IP address to the stereo, you can set a static IP address.
NOTE: Every device on the network must have a unique IP address. If you select a static IP address that is the same as the IP address on the network, the devices will not work properly.
1 Select SETTINGS.
2 Select the name of the stereo.
3 Select NETWORK > STATIC IP.
4 Select an option:
- To set the IP address, select IP, and enter the IP address.
- To set the subnet mask, select MASK, and enter the subnet mask.
NOTE: The subnet mask must match all other devices on the network to work properly. A typical subnet mask is 255.255.255.0.
- To set the default gateway IP address, select GATEWAY, and enter the gateway IP address.
NOTE: The default gateway is typically set as the IP address of the DHCP server on the network.
5 Select SAVE.
DHCP Settings
Select > SETTINGS, then select NETWORK > ADVANCED > DHCP SERVER.
DHCP ENABLED: Sets the device as the DHCP server on the network.
START IP: Sets the first IP address in the IP-address range of the DHCP server.
END IP: Sets the final IP address in the IP-address range of the DHCP server.
Configuring the Stereo for use with a Garmin Marine Network
You can connect this stereo to a Garmin Marine Network in order to view and control the stereo using a compatible Garmin chartplotter.
NOTE: When you configure the stereo for use with a Garmin Marine Network, you are limited to using only Garmin and Fusion devices. You may not be able to use third-party routers, storage devices, or other network products with this stereo directly.
When the stereo is connected to a Garmin Marine Network, you can connect a smartphone to a wireless access point on a connected Garmin chartplotter and use the Fusion-Link app to control the stereo.
1 Select > SETTINGS.
2 Select the name of the stereo.
3 Select NETWORK > GARMIN MARINE NETWORK.
Resetting Network Settings
You can reset all network settings for this stereo to the factory default values.
1 Select SETTINGS.
2 Select the name of the stereo.
3 Select NETWORK > ADVANCED > RESET > YES.
Update Options
NOTICE
Do not turn off the device or disconnect the power during a software update. Turning off the power during a software update may cause the device to become unresponsive.
NOTE:
- You can update the device software using an update file loaded onto USB flash drive (Updating the Software Using a USB Flash Drive, page 33).
- If the stereo is connected to a wireless network, you can update the software using the Fusion-Link app on a mobile device instead of using an update file loaded onto a USB flash drive (Updating the Software Using the Fusion Link App, page 34).
- The device may restart a few times when updating. This is normal.
- You can program only newer versions of software on the device.
Select ☐, select the name of the device, and select SETTINGS > UPDATE.
STEREO: Updates the stereo using a valid software update file on a connected USB flash drive (Updating the Software Using a USB Flash Drive, page 33).
NRX REMOTE: Updates an optional NRX remote connected to the NMEA 2000 port or NMEA 2000 network.
ERX REMOTE: Updates an optional Apollo ERX400 remote connected to the ETHERNET port or the Fusion PartyBus network using a valid software update file on a connected USB flash drive (Updating the Software Using a USB Flash Drive, page 33).
DAB MODULE: Updates an optional DAB module connected to the SIRIUS XM port.
Additional Stereo Control Options
Connecting to a Garmin Watch
For more information about the watch, see the watch manual at garmin.com/manuals.
1 Following the instructions in the watch manual, install the Fusion-Link Lite™ app from the Connect IQ™ store onto the watch.
2 On the stereo, select the BLUETOOTH source.
3 Select > BLUETOOTH > CONNECTIONS > DISCOVERABLE.
The stereo remains discoverable for two minutes.
4 Bring the watch within 3 m (10 ft.) of the stereo.
NOTE: Stay 10 m (33 ft.) away from other ANT ® devices while pairing.
5 Open the Fusion-Link Lite app on the watch.
The first time you open the app on the watch, the watch automatically pairs with and connects to the stereo. If you need to pair to another stereo, in the Fusion-Link Lite app, select Settings > Pair new.
6 Control the audio playback using the Fusion-Link Lite app on the watch.
After the devices are paired, they connect automatically when they are turned on, within range, and the app is open on the watch.
Connecting to an ARX70 Remote Control
1 On the stereo, select the BLUETOOTH source.
2 Select > BLUETOOTH > CONNECTIONS > DISCOVERABLE.
TIP: You can also press the ✕ button on the stereo to make it discoverable.
3 Bring the ARX70 remote control within 10 m (33 ft.) of the stereo.
NOTE: Stay 10 m (33 ft.) away from other ANT devices while pairing.
4 On the ARX70 remote control, press and hold ➕ until the status LED starts alternating green and red.
The remote control searches for the stereo. When the remote control pairs successfully, the status LED turns on green briefly and then turns off.
If the remote control cannot find the stereo, the status LED turns on red briefly and then turns off.
Fusion-Link Wireless Remote Control App
You can use the Fusion-Link remote control app on your compatible Apple or Android device to adjust the stereo volume, change the source, control playback, select and manage radio presets, and adjust some stereo settings. You can use the app to set up and configure DSP profiles on the stereo. You can use the app to update the stereo software.
The app communicates with the stereo using a wireless connection to the mobile device. You must connect your compatible device to the stereo using Bluetooth technology to use the app.
If the stereo is connected to a network with a Wi-Fi ® access point, the app can communicate with the stereo using the network for greater range than a Bluetooth connection.
NOTE: You cannot update the stereo software using a Bluetooth connection. You must connect the app using a Wi-Fi connection to update the stereo software wirelessly.
You can connect an Apple device to the stereo using a USB cable to update the stereo software.
For information about the Fusion-Link remote control app for compatible Apple or Android devices, go to the Apple App Store SM or the Google Play TM store.
FUSION-Link™ Network Technology
FUSION-Link network technology allows you to fully control compatible Fusion entertainment systems on compatible multi-function displays installed at the helm, flybridge, or navigation station of the vessel. This provides integrated entertainment control and a less cluttered console.
The partnered multi-function display becomes the portal on which you can control all audio on the vessel, no matter where on the vessel the connected stereo is installed. The FUSION-Link equipped stereo can be installed out of sight if space is an issue and users need to access the stereo only to replace removable media.
FUSION-Link technology on this device can communicate using existing industry-standard network connections including Ethernet and Wi-Fi wireless technology.
FUSION-Link technology offered on this device can communicate using existing industry-standard NMEA 2000 networks.
NMEA 2000 Information
NMEA 2000 is the most popular marine standard for data communication within vessels. It has become the standard for sending navigation and engine management data within vessels. Fusion introduces an industry-first product by incorporating NMEA 2000 functionality in its audio remote control devices. This enables the user to monitor a series of NMEA ® sentences available over the NMEA 2000 network on a connected remote control.
Appendix
Registering Your Fusion Device
Help us better support you by completing our online registration today.
- Go to garmin.com/account/register/.
- Keep the original sales receipt, or a photocopy, in a safe place.
Cleaning the Device
1 Dampen a soft, clean, lint-free cloth with fresh water.
2 Gently wipe the device.
Software Updates
For best results, you should update the software in all Fusion devices regularly.
If the device is connected to a Fusion PartyBus network with a Wi-Fi router, you can also update the software using the Fusion-Link remote control app on your compatible Apple or Android device.
Updating the Software Using a USB Flash Drive
You can update the device software using a USB flash drive.
NOTICE
Do not turn off the device or disconnect the power during a software update. Turning off the power during a software update may cause the device to become unresponsive.
NOTE:
- You cannot update the software using a USB flash drive formatted using the NTFS file system. If you encounter problems updating the device, format the USB flash drive using FAT32 and try the update process again.
- The device may restart a few times while updating the software. This is expected behavior.
- You can program only newer versions of software on the device.
1 Go to the page for your device on support.garmin.com, and download the update file.
2 Extract the contents of the .zip file to the root of your USB storage device.
The contents of the software update are contained in a folder named Garmin.
3 Insert the USB storage device into the USB port of the stereo.
4 Select > SETTINGS.
5 Select the name of the stereo.
6 Select UPDATE > STEREO > YES.
The LED flashes four times and repeats while the software update is in progress.
Updating the Software Using the Fusion Link App
You must connect the Fusion-Link app to the network using a wireless router or wireless access point to update the software. You cannot update the software using a Bluetooth connection.
NOTE: If the stereo you want to update is in a group, you must remove it from the group (Leaving a Group, page 23).
If the Fusion PartyBus network has a wireless router or wireless access point, you can update the stereo software using the Fusion-Link app, available for compatible Apple or Android on the Apple App Store or the Google Play store.
NOTICE
Do not turn off the device or disconnect the power during a software update. Turning off the power during a software update may cause the device to become unresponsive.
NOTE:
- The device may restart a few times while updating the software. This is expected behavior.
- You can program only newer versions of software on the device.
1 Connect your mobile device to a wireless router or wireless access point on the Fusion PartyBus network.
2 Open the Fusion-Link app, and verify that you can see the stereo in the app.
3 If the Fusion PartyBus network is not connected to the internet, disconnect the mobile device from the wireless router or access point.
4 In the Fusion-Link app, select CHECK FOR UPDATES.
5 Select the stereo.
6 Select Download.
The app downloads the software update file.
7 If the Fusion PartyBus network is not connected to the internet, after the app finishes downloading the update file, reconnect the mobile device to the wireless router or access point on the Fusion PartyBus network.
8 In the Fusion-Link app, reconnect to the stereo.
9 Select ⚙ > GENERAL > Software Updates > Online Software Update.
The app transfers the software update to the stereo over the Wi-Fi network, the stereo updates the software, and then it restarts.
The  ED flashes four times and repeats while the software update is in progress.
Troubleshooting
The stereo does not respond to key presses
- Hold until the stereo turns off, and turn it on again to reset the stereo.
- Disconnect power to the stereo for two minutes to reset the stereo.
My Bluetooth audio is interrupted by short breaks
- Ensure the media player is not covered or obstructed.
Bluetooth technology performs best with line-of-sight operation.
- Bring the media player within 10 m (33 ft.) of the stereo.
- Turn off the DISCOVERABLE setting after pairing a Bluetooth device to the stereo.
The stereo does not display all song information from my Bluetooth source
The availability of song information such as song title, artist name, track duration, and album cover artwork depends on the capability of the media player and music application.
Network Troubleshooting
If you cannot see or connect to Fusion PartyBus devices on the network, perform these steps.
- Verify that all Fusion PartyBus devices, network switches, routers, and wireless access points are connected to the network and turned on.
- Verify that wireless Fusion PartyBus devices are connected to a wireless router or wireless access point on the network.
NOTE: Wired connections are more reliable than wireless connections. If possible, you should connect devices to the network using an Ethernet cable.
- Verify that only one device, either a stereo or a router, is configured as a DHCP server.
- Change the channel on your router or wireless access point to test for and correct interference.
You may experience wireless interference if there are many nearby wireless access points.
- Disconnect Bluetooth devices to test for and correct interference.
Connecting a Bluetooth device to a stereo configured as a wireless access point or client may reduce wireless performance.
- If you are experiencing trouble connecting, make sure your router supports 2.4 GHz band connections.
When connecting to a wireless router, this device is compatible with only 2.4 GHz band connections, and cannot connect to a 5 GHz band.
- If you configured static IP addresses, verify that every device has a unique IP address, that the first three sets of numbers in the IP addresses match, and that the subnet masks on every device are identical.
- If you have made configuration changes that might be causing networking issues, reset all network settings to the factory default values.
Network Status Icons
A network-status icon is shown on some screens of the device. You can refer to this table to understand the appearance of the icon and help diagnose issues with the Fusion PartyBus network.
You can also observe the network status LED on the stereo for further information when troubleshooting (Stereo Buttons and Status LEDs, page 1).

The device is connected correctly to a network.

The device cannot detect the network. An Ethernet cable may not be connected or there may be other problems with the network.
The stereo keeps locking up when connected to an Apple device
- Press and hold the power button to reset the stereo.
- Reset the Apple device. Go to www.apple.com for more information.
- Make sure you have the latest version of iTunes ® and the latest operating software on your Apple device.
The stereo is not finding my connected Apple device
- Make sure your Apple device supports Interface Accessory Protocol 2 (iAP2). This stereo is not compatible with iAP1 devices.
- Make sure you have the latest version of iTunes and the latest operating software on your Apple device.
- Make sure you have the latest version of the Fusion-Link application on your Apple device.
- Reset the Apple device.
Go to www.apple.com for more information.
- Contact your Fusion dealer or go to support.garmin.com.
My Apple AirPlay audio is interrupted by short breaks
- Make sure the Apple device is not covered or obstructed.
- Make sure the Apple device has a good connection to the same Wi-Fi network as the stereo.
- Make sure the Apple device is not connected to the stereo using Bluetooth technology and Wi-Fi.
Using both a Bluetooth and a Wi-Fi connection may cause playback interruptions.
The stereo does not receive DAB stations
NOTE: The Apollo WB675 stereo does not include a built-in DAB module and requires a compatible DAB module and antenna.
- Make sure the stereo is set to a tuner region where DAB stations are broadcast (Setting the Tuner Region, page 21).
- Make sure that you have connected a compatible DAB module and antenna, and that the connections are secure.
- Make sure you are physically located in a region where DAB stations are broadcast.
- For additional information, go to support.garmin.com and contact Product Support.
Specifications
| Weight 475 g (16.75 oz.) | |
| Water rating IEC 60529 IPX2 | 2 |
| Operating temperature range From 0 to 50°C (from 32 to 122°F) | |
| Storage temperature range From -20 to 70°C (from -4 to 158°F) | |
| Input voltage From 10.8 to 16 Vdc | |
| Current (max.) 15 A | |
| Current (muted) Less than 700 mA | |
| Current (off) Less than 200 mA | |
| Fuse 15 A mini blade-type | |
| NMEA 2000 LEN @ 9 Vdc 1 (50 mA) | |
| Bluetooth wireless range Up to 10 m (30 ft.) | |
| ANT wireless range Up to 3 m (10 ft.) | |
| Wireless frequencies/protocols | Bluetooth 2.4 GHz @ 12 dBm nominalANT 2.4 GHz @ 11.77 dBm nominal |
| Compass-safe distance 15 cm (6 in.) | |
On-board, Class D amplifier
| Output music power per channel 4 x 70 W max. 2 ohm | |
| Total output peak power 280 W max. | |
| Output power per channel | 4 x 43 W RMS at 14.4 Vdc input, 2 ohm, 10% THD 3 4 x 26 W RMS at 14.4 Vdc input, 4 ohm, 10% THD 3 |
| Line output level (max.) 5.5 V (peak to peak) | |
| Aux input level (typical) | 1 V RMS |
Tuner frequencies
| Tuner | Europe and Australasia | USA | Japan |
| FM radio frequency range | 87.5 to 108 MHz | 87.5 to 107.9 MHz | 76 to 95 MHz |
| FM frequency step | 50 kHz | 200 kHz | 50 kHz |
| AM radio frequency range | 522 to 1620 kHz | 530 to 1710 kHz | 522 to 1620 kHz |
| AM frequency step | 9 kHz | 10 kHz | 9 kHz |
Stereo Dimension Drawings
Side Dimensions

| 1 | 107 mm (4.21 in.) |
| 2 | 55 mm (2.17 in.) |
| 3 | 130 mm (5.10 in.) |
Top Dimensions

| 1 | 130 mm (5.10 in.) |
| 2 | 130 mm (5.10 in.) |
support.garmin.com
FUSGN®
A Garmin Brand

IMPORTANT SAFETY AND PRODUCT INFORMATION
WARNING
Failure to heed the following warnings could result in an accident or collision resulting in death or serious injury.
Marine Operation Warnings
- You are responsible for the safe and prudent operation of your vessel. This device is a tool that will enhance your capability to operate your vessel. This device does not relieve you from the responsibility of safely operating your vessel. Avoid navigational hazards and never leave the helm unattended.
- Use this device only as a navigational aid. Do not attempt to use the device for any purpose requiring precise measurement of direction, distance, location, or topography.
• Always be prepared to promptly regain control of the vessel. Use caution near hazards in the water, such as docks, pilings and other vessels. - If the device has navigating capabilities, when navigating, carefully compare information displayed on the device to all available navigation sources, including information from visual sightings, local waterway rules and restrictions, and maps. For safety, always resolve any discrepancies or questions before continuing navigation.
Hearing Damage Warning
You can permanently damage your ears and lose hearing if you listen to the stereo at high volume. If you experience ringing in your ears or muffled speech, stop listening and have your hearing checked.
Product Environmental Programs
Information about the Garmin ® product recycling program and WEEE, RoHS, REACH, and other compliance programs can be found at garmin.com/aboutGarmin/environment.
Declaration of Conformity
Hereby, Garmin declares that this product is in compliance with the Directive 2014/53/EU. The full text of the EU declaration of conformity is available at the following internet address: garmin.com/compliance.
UK Declaration of Conformity
Hereby, Garmin declares that this product is in compliance with the relevant statutory requirements. The full text of the declaration of conformity is available at the following internet address: garmin.com/compliance.
FCC Compliance
This device complies with part 15 of the FCC Rules. Operation is subject to the following two conditions: (1) this device may not cause harmful interference, and (2) this device must accept any interference received, including interference that may cause undesired operation.
This equipment has been tested and found to comply with the limits for a Class B digital device, pursuant to part 15 of the FCC rules. These limits are designed to provide reasonable protection against harmful interference in a residential installation. This equipment generates, uses, and can radiate radio frequency energy and may cause harmful interference to radio communications if not installed and used in accordance with the instructions. However, there is no guarantee that interference will not occur in a particular installation. If this equipment does cause harmful interference to radio or television reception, which can be determined by turning the equipment off and on, the user is encouraged to try to correct the interference by one of the following measures:
- Reorient or relocate the receiving antenna.
- Increase the separation between the equipment and the receiver.
- Connect the equipment into an outlet on a circuit different from that to which the receiver is connected.
- Consult the dealer or an experienced radio/TV technician for help.
This product does not contain any user-serviceable parts. Repairs should only be made by an authorized Garmin service center. Unauthorized repairs or modifications could result in permanent damage to the equipment, and void your warranty and your authority to operate this device under Part 15 regulations.
Innovation, Science and Economic Development Canada Compliance
This device contains licence-exempt transmitter(s)/receiver(s) that comply with Innovation, Science and Economic Development Canada's licence-exempt RSS(s). Operation is subject to the following two conditions: (1) this device may not cause interference, and (2) this device must accept any interference, including interference that may cause undesired operation of the device.
Radio Frequency Radiation Exposure
This device is a mobile transmitter and receiver that uses an internal antenna to send and receive low levels of radio frequency (RF) energy for data communications. The device emits RF energy below the published limits when operating in its maximum output power mode and when used with Garmin authorized accessories. To comply with RF exposure compliance requirements, the device should be installed and operated with a minimum of 20 cm (7.87 in.) between the device and your body. The device should not be used in other configurations. This device must not be co-located or operated in conjunction with any other transmitter or antenna.
Software License Agreement
BY USING THE DEVICE, YOU AGREE TO BE BOUND BY THE TERMS AND CONDITIONS OF THE FOLLOWING SOFTWARE LICENSE AGREEMENT. PLEASE READ THIS AGREEMENT CAREFULLY.
Garmin Ltd. and its subsidiaries ("Garmin") grant you a limited license to use the software embedded in this device (the "Software") in binary executable form in the normal operation of the product. Title, ownership rights, and intellectual property rights in and to the Software remain in Garmin and/or its third-party providers.
You acknowledge that the Software is the property of Garmin and/or its third-party providers and is protected under the United States of America copyright laws and international copyright treaties. You further acknowledge that the structure, organization, and code of the Software, for which source code is not provided, are valuable trade secrets of Garmin and/or its third-party providers and that the Software in source code form remains a valuable trade secret of Garmin and/or its third-party providers. You agree not to decompile, disassemble, modify, reverse assemble, reverse engineer, or reduce to human readable form the Software or any part thereof or create any derivative works based on the Software. You agree not to export or re-export the Software to any country in violation of the export control laws of the United States of America or the export control laws of any other applicable country.
Limited 3-Year Marine Consumer Warranty
Garmin New Zealand Limited, trading as Fusion® Entertainment ('Fusion'), warrants that this Fusion Marine product is free from defects in material and workmanship, according to the following terms and conditions:
- The limited warranty for the Fusion product purchased extends to 36 months beginning on the date of purchase of the product.
- The limited warranty extends only to consumers who purchase the product in one of the countries (or areas) set forth on garmin.com/compliance. The limited warranty is only valid in Fusion's intended country (or area) of sale of the product.
- During the limited warranty period, Fusion or its authorised service network will repair or replace (at Fusion's discretion), any defective product or parts thereof with new and return the product to the consumer in working condition. No charge will be made to the consumer for either parts or labour in repairing or replacing the product. All replaced parts and cosmetic parts should be free of defects at the time of shipment and, therefore shall not be covered under these limited warranty terms.
- Repaired product will be warranted for the balance of the original warranty period or for ninety (90) days from the date of repair, whichever is longer.
- All warranty claims must be accompanied with a copy of this warranty card, and a copy of proof of purchase.
The consumer shall have no coverage or benefits under this limited warranty if any of the following conditions are applicable:
- The product has been subject to: abnormal use, abnormal conditions, improper storage, unauthorised modifications, unauthorised connections, unauthorised repair including but not limited to use of unauthorised spare parts in repairs, misuse, neglect, abuse, accident, alteration, improper installation, acts of God, spill of foods or liquids, maladjustment of customer controls or other acts which are beyond the reasonable control of Fusion, including deficiencies in consumable parts such as fuses, and breakage or damage to antennae unless caused directly by defects in materials or workmanship, and normal wear and tear of the product.
- Fusion was not notified by the consumer of the alleged defect or malfunction of the product during the applicable limited warranty period.
- The product serial number or the accessory date code has been removed, defaced or altered.
- The product was used with or connected to an accessory not supplied by Fusion or fit for use with Fusion product, or used in a manner other than its intended use.
If a problem develops during the limited warranty period, the consumer should take the following step-by-step procedure:
1 The consumer shall return the product to any authorised Fusion dealer in authorised sales countries for repair or replacement processing. Fusion assumes no freight or shipping responsibility for returning goods to an authorised Fusion dealer, or return freight from an authorised dealer to the consumer submitting the warranty claim.
2The consumer shall be charged for any parts or labour charges not covered by this limited warranty. The consumer shall be responsible for expenses related to removal and reinstallation of the product.
3If the product is returned to Fusion after the expiration of the warranty period, Fusion's normal service policies shall apply and the consumer will be charged accordingly.
The benefits conferred by this warranty apply to the extent that they are not superseded by any other rights and remedies available under any applicable legislation that cannot be excluded. In jurisdictions where implied or legal warranties may be excluded, any implied or legal warranty is hereby excluded and the foregoing warranty is the purchaser's sole and exclusive remedy and is in lieu of all other warranties, express or implied.
- Some states in America do not allow the exclusion or limitation of consequential damages, so the above limitation and exclusion may not apply to you. This warranty gives you specific legal rights which may vary from state to state.
- Fusion neither assumes nor authorises any authorised service centre or any person or entity to assume for it any other obligation or liability beyond that which is expressly provided for in this warranty.
- All warranty information, product features and specifications are subject to change without notice.
Limited 3-Year Marine Consumer Warranty for Australian Consumers
Garmin Australasia, 30 Clay Place, Eastern Creek, NSW 2766, Australia.
EMAIL: australia@fusionentertainment.com PHONE: 1800 235 822
THE FUSION PROMISE OF QUALITY LIMITED 3-YEAR CONSUMER WARRANTY
This warranty is given in addition to other rights and remedies available to the consumer under Australian Consumer Law. In addition to the Fusion Warranty, our goods come with guarantees that cannot be excluded under the Australian Consumer Law. You are entitled to a replacement or refund for a major failure and for compensation for any others reasonably foreseeable loss or damage. You are also entitled to have the goods repaired or replaced if the goods fail to be of acceptable quality and the failure does not amount to a major failure.
Garmin New Zealand Limited, trading as Fusion Entertainment ('Fusion'), warrants this Fusion Product including, Speaker, Subwoofer, Amplifier, Head Unit, or genuine Fusion Accessory 'product' is free from defects in materials and workmanship, in accordance with the following terms and conditions:
- The limited warranty for the Fusion product purchased is only available for (36) months after the date of purchase.
- The limited warranty extends only to the original consumer of the product and may not be assigned or transferred to any other person or consumer without Fusion's prior written consent being provided.
- During the limited warranty period, Fusion or its authorised service network will repair or replace any defective or faulty product or parts at its own cost.
- Repaired or replaced product will be warranted for the balance of the original warranty period or for ninety (90) days after the date of repair, whichever is longer.
- All warranty claims must be notified to Fusion or its authorised Dealer in writing during the warranty period accompanied with a copy of this warranty card, proof of purchase date and the product with an intact and unaltered serial number or accessory date code.
This warranty will not apply if:
The consumer causes the Product to be of unacceptable quality or fails to take steps to prevent the product from becoming of unacceptable quality and/or it is damaged by abnormal use. Examples of goods becoming of unacceptable quality or of abnormal use by the consumer include:
- Storage of product under improper conditions.
- Exposure to excessive moisture or dampness.
- Exposure to excessive temperature extremes or other adverse environmental conditions.
- Unauthorised modifications of product, connections or otherwise unauthorised repairs including, but not limited, to the use of unauthorised parts in the repair of products.
- Improper use of or installation of, or interference with, product adjustments or controls and or including antenna breakage or damage due to misuse.
- Damage caused by consumables or by electricity supply.
- Acts of god (force majeure), exposure of product to food spills, or any other type of fluid ingress.
- Using the product in a way for which was not intended to be used or connecting it to an accessory not supplied by, specified by, or authorised by Fusion.
- Any other abnormal use of or conduct causing product to become of unacceptable quality.
Other exclusions:
- This warranty extends to the repair or replacement of Fusion product only and the consumer is responsible for any expenses relating to the removal or installation of the product or related services including the cost of delivering the product to Fusion or its authorised dealer.
- Repair work conducted by Fusion after this warranty has expired or if this warranty for any other reason this Fusion warranty does not apply is subject to Fusion's normal service policies and Fusion charges for labour and material may apply.
- This is a manufacturers warranty provided to consumers of Fusion products. Variations to this warranty may only be made by Fusion and will be notified to the customer in writing or issued on the Fusion website. Fusion Dealers, agents and authorised dealers are not authorised to make changes or vary this Fusion warranty.
- All warranty information, product features and specifications are subject to change without notice.
- Fusion is not responsible for replacing or the cost of replacing any consumer data lost occurring either due to equipment failure or during the repair and replacement process.


- APOLLO™ MS-WB675
- GETTING THE OWNER'S MANUAL
- STEREO BUTTONS AND STATUS LEDS
- CONTROLS
- NAMING THE DEVICE
- SETTING THE HOME ZONE
- ADJUSTING THE VOLUME
- CREATING OR EDITING A GROUP
- SELECTING A SOURCE
- MEDIA PLAYER CONNECTION
- CAUTION
- NOTICE
- USB DEVICE COMPATIBILITY
- CONNECTING A USB DEVICE
- CONNECTING A COMPATIBLE BLUETOOTH DEVICE
- CONNECTING TO A GARMIN WATCH
- CONNECTING TO AN ARX70 REMOTE CONTROL
- FUSION-LINK WIRELESS REMOTE CONTROL APP
- PLAYING MUSIC
- SETTING THE TUNER REGION
- CHANGING THE RADIO STATION
- SCANNING FOR DAB STATIONS
- SIRIUSXM SATELLITE RADIO
- CONTROLLING MUSIC PLAYBACK ON A USB SOURCE
- CONTROLLING MUSIC PLAYBACK ON A CONNECTED SMARTPHONE OR MEDIA PLAYER
- DSP SETTINGS
- MORE INFORMATION
- REGISTERING YOUR FUSION DEVICE
- FUSGN®
- INSTALLATION INSTRUCTIONS
- IMPORTANT SAFETY INFORMATION
- WARNING
- WHAT'S IN THE BOX
- TOOLS NEEDED
- MOUNTING CONSIDERATIONS
- MOUNTING THE DEVICE
- CONNECTION CONSIDERATIONS
- WIRING HARNESS WIRE AND CONNECTOR IDENTIFICATION
- POWER CONNECTION
- YELLOW WIRE
- RED WIRE
- BLACK WIRE
- CONNECTING TO POWER WITHOUT USING AN IGNITION SWITCH
- CONNECTING TO POWER THROUGH AN IGNITION SWITCH
- SPEAKER ZONES
- SPEAKER SYSTEM WIRING USING A LINE OUT
- CONNECTING A SIRIUSXM TUNER MODULE
- FUSION PARTYBUS NETWORKING
- WIRED NETWORKING CONSIDERATIONS
- WIRED NETWORK EXAMPLE FOR DIRECT CONNECTIONS
- WIRED NETWORK EXAMPLE WITH A SWITCH OR ROUTER
- CONSTRUCTING A NETWORK
- NETWORK CONFIGURATION
- SETTING THE STEREO AS THE DHCP SERVER
- CONFIGURING THE STEREO FOR USE WITH A GARMIN ® MARINE NETWORK
- RESETTING NETWORK SETTINGS
- ADVANCED NETWORK CONFIGURATION
- NETWORK TROUBLESHOOTING
- STEREO INFORMATION
- STEREO DIMENSION DRAWINGS
- SIDE DIMENSIONS
- TOP DIMENSIONS
- SOFTWARE UPDATES
- 連絡地址
- MARINE ENTERTAINMENT SYSTEM
- TABLE OF CONTENTS
- GETTING STARTED.... 1
- AUDIO CONTROL...... 6
- MEDIA PLAYER CONNECTION...... 8
- BLUETOOTH DEVICE PLAYBACK...... 8
- USB DEVICE PLAYBACK......11
- RADIO....13
- APPLE AIRPLAY....14
- UPNP PLAYBACK.... 14
- CONNECTING AN AUXILIARY DEVICE.....15
- OPTICAL AUDIO CONNECTION...... 15
- SIRIUSXM SATELLITE RADIO...... 15
- DAB PLAYBACK...... 21
- PRESETS....22
- FUSION PARTYBUS NETWORKING......22
- GENERAL SETTINGS...... 25
- ADDITIONAL STEREO CONTROL OPTIONS...31
- APPENDIX.... 33
- GETTING STARTED
- ENTERING TEXT
- USING THE DIAL TO SELECT ITEMS
- STEREO SCREEN
- AUDIO CONTROL
- MUTING ALL CONNECTED STEREOS
- ADJUSTING THE SUBWOOFER LEVEL
- ADJUSTING THE TONE
- DISABLING THE LOUD SETTING FOR A ZONE
- ADJUSTING THE GAIN FOR AN AUXILIARY DEVICE
- CONFIGURING THE DSP SETTINGS
- AUTOMATIC VOLUME ADJUSTMENT BASED ON SPEED
- BLUETOOTH DEVICE PLAYBACK
- BLUETOOTH RANGE INFORMATION
- SELECTING A DIFFERENT BLUETOOTH DEVICE
- BLUETOOTH SOURCE MENU AND SETTINGS
- DISABLING BLUETOOTH AUTO CONNECTION
- USB DEVICE PLAYBACK
- CONTROLLING MUSIC PLAYBACK ON A USB FLASH DRIVE OR MEDIA PLAYER
- CONTROLLING MUSIC PLAYBACK ON A CONNECTED ANDROID DEVICE
- CONTROLLING MUSIC PLAYBACK ON A CONNECTED APPLE DEVICE
- USB SOURCE SETTINGS
- RADIO
- APPLE AIRPLAY
- CONNECTING AN APPLE DEVICE USING AIRPLAY
- SETTING AN AIRPLAY PASSWORD
- UPNP PLAYBACK
- CONNECTING A UPNP DEVICE
- CONNECTING AN AUXILIARY DEVICE
- OPTICAL AUDIO CONNECTION
- SETTING THE TUNER REGION FOR THE SIRIUSXM SOURCE
- LOCATING THE SIRIUSXM RADIO ID
- ACTIVATING A SIRIUSXM SUBSCRIPTION
- SELECTING A CATEGORY
- USING REPLAY MODE
- ALERTS
- ADDING AN ARTIST OR SONG ALERT
- ADDING TEAMS FOR GAME ALERTS
- ADDING TEAMS FROM A LIVE GAME
- VIEWING ACTIVE ALERTS
- MANAGING ALERTS
- TUNEMIX™ FEATURE
- STARTING AND STOPPING A TUNEMIX COLLECTION
- CREATING AND CUSTOMIZING A TUNEMIX COLLECTION
- SPORTSFLASH FEATURE
- ADDING TEAMS TO RECEIVE SPORTSFLASH ALERTS
- CHANGING SPORTSFLASH TEAM PRIORITY
- ENABLING THE TUNESTART™ FEATURE
- PARENTAL CONTROLS
- UNLOCKING THE PARENTAL CONTROLS
- LOCKING CHANNELS
- CLEARING ALL LOCKED CHANNELS
- CHANGING THE PARENTAL CONTROL PASSCODE
- CLEARING SIRIUSXM DATA
- DAB PLAYBACK
- CHANGING DAB STATIONS
- SELECTING A DAB STATION FROM A LIST
- SELECTING A DAB STATION FROM A CATEGORY
- PRESETS
- SAVING A STATION OR CHANNEL AS A PRESET
- SELECTING A PRESET FROM A LIST
- REMOVING PRESETS
- CREATING A GROUP
- EDITING A GROUP
- LEAVING A GROUP
- GROUPED STEREO FUNCTIONS
- GROUPED STEREO SOURCE CONSIDERATIONS
- GROUP SYNCHRONIZATION
- ENABLING GROUP SYNCHRONIZATION
- GENERAL SETTINGS
- SPEAKER ZONE SETTINGS
- DISABLING THE INTERNAL AMPLIFIER
- SYNCHRONIZING THE SOURCE AND ZONE VOLUME LEVELS
- ADJUSTING THE POWER-ON VOLUME LIMIT
- MAINTAINING INDIVIDUAL ZONE VOLUME LEVELS
- ENABLING AUTOMATIC VOLUME ADJUSTMENT BASED ON SPEED
- AUTOMATIC VOLUME CONTROL SETTINGS
- SPEED SOURCE INFORMATION
- DISABLING A ZONE
- SETTING A ZONE NAME
- LINKING ZONES
- ENABLING VOLUME CONTROL OF ZONE 3 OR 4 FROM A CONNECTED AMPLIFIER
- ADJUSTING THE SUBWOOFER FILTER
- ADJUSTING ADDITIONAL AUDIO SETTINGS FOR A ZONE
- SOURCE SETTINGS
- NETWORK SETTINGS
- SETTING A STATIC IP ADDRESS
- DHCP SETTINGS
- CONFIGURING THE STEREO FOR USE WITH A GARMIN MARINE NETWORK
- UPDATE OPTIONS
- NOTE
- ADDITIONAL STEREO CONTROL OPTIONS
- FUSION-LINK™ NETWORK TECHNOLOGY
- NMEA 2000 INFORMATION
- APPENDIX
- CLEANING THE DEVICE
- UPDATING THE SOFTWARE USING A USB FLASH DRIVE
- UPDATING THE SOFTWARE USING THE FUSION LINK APP
- TROUBLESHOOTING
- THE STEREO DOES NOT RESPOND TO KEY PRESSES
- MY BLUETOOTH AUDIO IS INTERRUPTED BY SHORT BREAKS
- THE STEREO DOES NOT DISPLAY ALL SONG INFORMATION FROM MY BLUETOOTH SOURCE
- NETWORK STATUS ICONS
- THE STEREO KEEPS LOCKING UP WHEN CONNECTED TO AN APPLE DEVICE
- THE STEREO IS NOT FINDING MY CONNECTED APPLE DEVICE
- MY APPLE AIRPLAY AUDIO IS INTERRUPTED BY SHORT BREAKS
- THE STEREO DOES NOT RECEIVE DAB STATIONS
- MARINE OPERATION WARNINGS
- HEARING DAMAGE WARNING
- PRODUCT ENVIRONMENTAL PROGRAMS
- DECLARATION OF CONFORMITY
- UK DECLARATION OF CONFORMITY
- FCC COMPLIANCE
- INNOVATION, SCIENCE AND ECONOMIC DEVELOPMENT CANADA COMPLIANCE
- RADIO FREQUENCY RADIATION EXPOSURE
- SOFTWARE LICENSE AGREEMENT
- LIMITED 3-YEAR MARINE CONSUMER WARRANTY
- LIMITED 3-YEAR MARINE CONSUMER WARRANTY FOR AUSTRALIAN CONSUMERS
- THE FUSION PROMISE OF QUALITY LIMITED 3-YEAR CONSUMER WARRANTY
- THIS WARRANTY WILL NOT APPLY IF
- OTHER EXCLUSIONS
Brand : Fusion
Model : APOLLO MS-WB675
Category : Radio