
Jem ZR12 AL - Light effect machine MARTIN - Free user manual and instructions
Find the device manual for free Jem ZR12 AL MARTIN in PDF.


| Product Type | Fog Machine |
| Brand | Martin |
| Model | Jem ZR12 AL |
| Dimensions (L x W x H) | 520 x 280 x 280 mm |
| Weight | 12.5 kg |
| Power Supply | AC 230V / 50-60 Hz |
| Power Consumption | 1500 W |
| Output | 28,000 cu.ft/min (approx.) |
| Warm-up Time | 3-4 minutes |
| Fluid Capacity | 5 liters |
| Fluid Consumption | 0.5 L/min at maximum output |
| Remote Control | Wired remote with on/off and timer |
| DMX Control | Optional (via external DMX interface) |
| Operating Modes | Continuous, timer, remote |
| Fluid Type | Water-based fog fluid (Martin recommended) |
| Cleaning | Flush with distilled water after use; clean filter regularly |
| Safety Features | Thermal cut-out, low fluid shut-off, fuse protection |
| Spare Parts Available | Heater, pump, fuse, remote controller |
| Repairability | Modular design; user-replaceable parts |
| Operating Temperature | 5°C to 40°C |
| Housing Material | High-impact plastic and steel |
| Certifications | CE, RoHS |
Frequently Asked Questions - Jem ZR12 AL MARTIN
User questions about Jem ZR12 AL MARTIN
0 question about this device. Answer the ones you know or ask your own.
Ask a new question about this device
Download the instructions for your Light effect machine in PDF format for free! Find your manual Jem ZR12 AL - MARTIN and take your electronic device back in hand. On this page are published all the documents necessary for the use of your device. Jem ZR12 AL by MARTIN.
USER MANUAL Jem ZR12 AL MARTIN
MANUFACTURED BY MARTIN MANUFACTURING (UK) PLC DELVOID WAY
FAIRFIELD INDUSTRIAL ESTATE, LOUTH, LINCOLNSHIRE, LN11 0LQ
TEL:+44(0)1507 604399 FAX:+44(0)1507 601956
USER GUIDE
VERSION 1.5

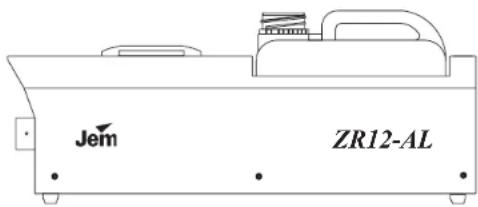
ZR12-AL
MARTIN MANUFACTURING (UK) PLC
ZR12-AL USER GUIDE
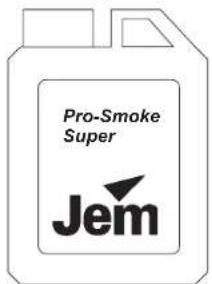
Fluids Suitable For This Machine:



ZR12-AL USER GUIDE
How To Contact Us
Address: Martin Manufacturing (uk) Plc Belvoir Way, Fairfield Industrial Estate, Louth, Lincolnshire, LN11 0LQ UK
Telephone: +44 (0) 1507 604399
Fax: +44 (0) 1507 601956
Note: The JEM warranty will be void if any fluid other then JEM approved fluid is used. If other fluids are used there could be serious damage to the machine and the fluid may not of been tested for use in public areas.
ZR12-AL USER GUIDE
Notes
ZR12-AL USER GUIDE
User Guide Index
Introduction
Safety
Machine Layout
Getting Started
Using The Remote Control
Using The Analogue Link
The ZR12-AL Ducting Kit
Trouble Shooting
How To Contact Us
Note:
Martin Manufacturing (UK) reserves the right to modify or change the
specification of this product without prior notice.
No part of this publication shall be copied without permission
© Martin Manufacturing (UK). 1999
ZR12-AL USER GUIDE
ZR12-AL USER GUIDE
Introduction
The ZR12 is the first small JEM machine to feature the new "AL" Analogue Link technology. This allows units to be linked together and controlled from one JEM Multi Function Controller. The ZR12 is also fitted with a 1 kW heat exchanger which guarantees the maximum output from this size of vaporizing system.
The ZR12 uses the 'DTP' overheat protection device for the best possible overheat protection. This was first used on the JEM TECHNO-FOG with great success. A 2.5 Litre fluid container is supplied to minimize the need for refilling. A multi-function controller enables the user to operate the machine manually using the 'FOG' button or set the timer for auotmatic operation. The timer has a new feature called x8 mode, this allows the timer values to be adjusted from x1 to x8 giving the user more variation in the timer settings. There is also a ducting kit for applications where the effect is needed in an area away from the ZR12.
Notes
Features:
Analogue Link facility
High Power Piston Pump
Multifunction Remote Controller
"DTP" Safety System
Pump Ramping For Continuous Output
2.5 Litre Fluid Capacity
SMD Electronics
Low Noise Soft Start Pumping
Heavy Duty Construction
ZR12-AI. USER GUIDE
Trouble Shooting
| SYMPTOM | CAUSE | CURE |
| The mains switch does not light when I switch on. | No power connected. | Check power is connected. |
| The power LED does not light on the remote control. | Fuse on main PCB blown. Remote control not connected. | Check fuse on Main PCB. Check connection of remote control. |
| The ready LED does not light, even after 15 minutes. | Stand-by button is not on. Sensor fault | Check stand-by button Contact JEM or your Distributor: |
| No smoke output when fog button is pressed (ready LED is lit). | The output knob is not set correctly No fluid in fluid container. | Turn output knob fully clockwise. Replace fluid container. |
| The effect is not lasting long enough. | Fluid is the wrong grade. | Choose a longer lasting fluid (SP) |
ZR12-AL USER GUIDE
Safety
Always use a JEM approved fluid, other fluids could be dangerous and could cause damage to the machine.
Always check the voltage is correct for use with the machine, the voltage setting is printed on the serial label.
Always read the user guide before operating the machine, smoke machines need to be operated carefully to avoid risk.
Never touch the nozzle at the front of the machine, the nozzle can stay hot for up to 10 hours.
Do not remove the cover or attempt to repair a faulty machine, an authorized JEM dealer should be contacted in the event of a faulty machine.
Always use smoke machines in well ventilated areas, over use could affect sufferers of asthma or other chest conditions.
Do not use the machine if there is a faulty mains lead or plug, this could be dangerous.
Never point the output directly at peoples heads, this is a high power smoke machine.
Always use approved accessories with this machine.
Do not spill fluid over the machine, if fluid is spilt clean with clean water and contact an approved JEM dealer for advice.
Mains Lead Wiring Instructions
Brown = Live
Blue = Neutral
Green/Yellow = Earth
Note! This Appliance must be earthed

ZR12-AL USER GUIDE
Machine Layout
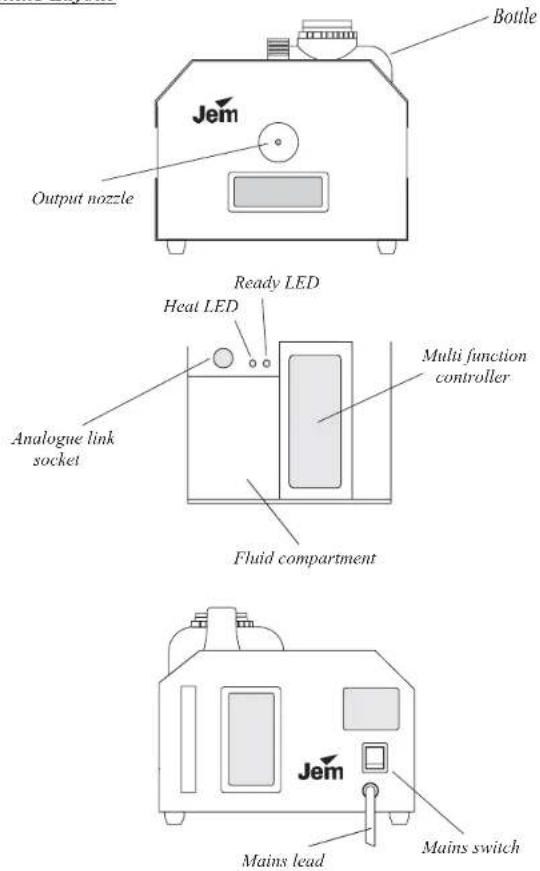
ZR12-AL USER GUIDE
ZR12-AL Ducting Kit

The JEM ZR12-AL ducting kit enables the user to duct the smoke from the machine to an area where the effect is required. This is done by using the JEM ducting adaptor and a length of 100 mm (4") ducting pipe. The length can be anything from a couple of metres up to 20 metres or further. There are one or two things to beware of when using smoke machines with ducting. Firstly if there are bends to redirect the smoke they could cause condensation to form. Also an air space must be provided between the output of the machine and the ducting adaptor.
NOTE! Always use the recommended ducting adaptor and ducting pipe, others may cause damage to the machine.
ZR12-AI. USER GUIDE
Using The Analogue Link
The ZR12-AL has the ability to connect machines together using a Din lead and then operating all of the machines with one controller. This is ideal when there is a need for lots of smoke and there is no DMX to operate the machines. Simply remove the controllers from all but one of the machines and then connect a Din lead (5 pin) from the slave socket of the first machine (the one with the controller) to the next machine's remote socket, and then from that machine's slave to the next machine's remote socket. This can be done from two up to ten machines maximum. All of the machines will operate with the same output and timer settings as the first machine.
Wiring of Din
Pin 1 - NA
Pin 2 - Gnd
Pin 3 - NA
Pin 4 - NA
Pin 5 - 0 - 10v

ZR12-AL USER GUIDE
Getting Started
Once you have selected the best position for the ZR12-AL you can begin to use the machine. First check the power supply you have is correct for the machine, if it is you can connect to the power supply and switch the mains switch on at the rear of the machine. This will light when switched on, now de-press the grey "stand-by" button, the machine will now heat up which takes around 7 - 8 minutes. While it heats up you should check the level in the fluid container, the container can hold up to 2.5 litres of fluid.
NOTE! Do not allow the ZR12-AL to run out of fluid. Serious damage may occur if the machine is operated when no fluid is connected.
When the machine has reached working temperature the green "ready" LED will light on the top of the machine and the machine can now be operated. Check the "output" knob is turned fully clockwise (maximum) and press and hold the red "fog" button. The fluid pump will start operating and if the machine has a new container of fluid the fluid will take a few seconds to reach the pump. When the pump has primed smoke will be visible. The output can now be set to the desired level by turning the "output" knob. The timer may be activated or you can simply use the "FOG" button when smoke is required.
Once you have finished using the machine you should de-press the "stand-by" button and then turn the mains switch off. If any problems occur when operating the ZR12-AL please refer to the trouble shooting guide..
ZR12-AL USER GUIDE
Using The Remote Control
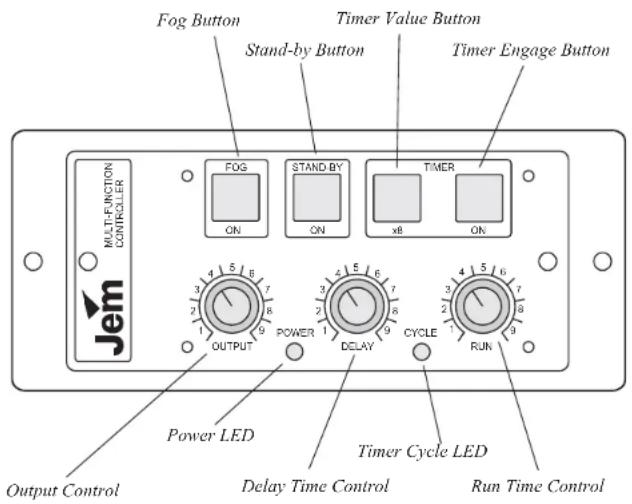
The ZR12-AL comes with a comprehensive controller that allows the user to manually fire the machine or set a well featured timer to operate the machine. When the "ready" LED is lit on the top of the machine, the remote becomes functional and the "Fog" button will operate the machine when pressed. Sometimes a pre-determined amount of smoke is needed and the ZR12-AL remote has a timer that will operate over a wide range of time periods. The x8 timer value gives even greater flexibility when a longer delay and run time are needed.
ZR12-AL USER GUIDE
Functions
FOG BUTTON: Will when the machine has reached operating temperature fire the machine when pressed and held.
STAND-BY BUTTON: This turns the machines electronics on and off. TIMER VALUE BUTTON: When the timer is being used, the timer values can be adjusted by a factor of 8, i.e. a 5 second minimum run time becomes 40 seconds & a 10 second delay time becomes 1 minute 20 seconds.
TIMER ENGAGE: This will engage the timer to fire the machine according to the present settings.
OUTPUT CONTROL: Turning this knob clockwise will increase the output of the machine, if turned fully anti-clockwise there will be no output.
DELAY TIME CONTROL: This will adjust the amount of time the machine waits between operating when the timer is engaged.
RUN TIME CONTROL: This will adjust the time the machine will operate for when the timer is engaged.
POWER LED: This LED will light when the machine is switched on CYCLE LED: This LED will light when the timer is engaged and the machine is operating.
Timer Values
Run Time: X1 mode
Run Time: X8 mode
Minimum = 2 seconds Maximum = 18 seconds
Minimum = 16 seconds Maximum = 2 minutes 24 seconds
Delay Time: X1 mode
Delay Time: X8 mode
Minimum = 2 seconds Maximum = 18 seconds
Minimum = 16 seconds Maximum = 2 minutes 24 seconds
An extension lead is available from JEM for using the controller out of the machine.



Brand : MARTIN
Model : Jem ZR12 AL
Category : Light effect machine