
GoPal E4230 M20 (MD 97190) - Gps MEDION - Free user manual and instructions
Find the device manual for free GoPal E4230 M20 (MD 97190) MEDION in PDF.


| Product Type | Portable GPS Navigation System |
| Brand and Model | Medion GoPal E4230 M20 (MD 97190) |
| Dimensions | 129 mm x 19 mm x 78 mm |
| Weight (incl. battery) | 175 g |
| Display | Touch screen (exact size not specified in manual) |
| Battery | Li-Ion, 3.7 V, rechargeable |
| Power Supply | Car adapter: 12-24V DC input, 5V / 1A output; also via USB |
| Memory Card Support | MMC and SD cards |
| USB Interface | USB 1.1 (Mini-USB connector) |
| Audio | Built-in loudspeaker, 3.5 mm stereo headphone jack |
| Navigation Software | Pre-installed on internal memory; installation from DVD or memory card optional |
| Map Material | Digital maps on DVD; additional maps can be transferred to memory card |
| GPS Receiver | Built-in with antenna; requires clear view of sky |
| TMC (Traffic Message Channel) | Integrated TMC receiver; requires supplied dipole antenna |
| Additional Applications | Picture Viewer, Travel Guide, Alarm Clock, Sudoku |
| Security Function | Password protection, SuperPIN and UUID for recovery |
| Operating Temperature | +5°C to +35°C (operating); 0°C to +60°C (storage) |
| Humidity | 10% – 90% (non-condensing) |
| Supplied Accessories | Car power adapter, USB cable, TMC dipole antenna, car holder, mounting kit, DVD with software and maps, user manual, warranty card |
Frequently Asked Questions - GoPal E4230 M20 (MD 97190) MEDION
User questions about GoPal E4230 M20 (MD 97190) MEDION
0 question about this device. Answer the ones you know or ask your own.
Ask a new question about this device
Download the instructions for your Gps in PDF format for free! Find your manual GoPal E4230 M20 (MD 97190) - MEDION and take your electronic device back in hand. On this page are published all the documents necessary for the use of your device. GoPal E4230 M20 (MD 97190) by MEDION.
USER MANUAL GoPal E4230 M20 (MD 97190) MEDION
Notes on these Operating Instructions
The operating instructions and installation guidelines have been organized so that subject-related information can be easily found using the contents list.
Note
Comprehensive Operating Instructions for navigation can be found on the DVD supplied, as well as online at www.medion.co.uk.
The section "Frequently Asked Questions" contains answers to questions that are frequently addressed to our customer service department.
Document Your Navigation Unit
It is important to record the details of your Navigation Unit and the purchase thereof. In the event you require warranty support you may be asked for this information. The serial number can be found on the back of the device:
Serial Number
Password
Information note ....
SuperPIN
UUID
Date of Purchase ....
Place of Purchase ....
Please record the serial number into any appropriate guarantee documents.
You will enter your own password and information note using the Security Function.
The SuperPIN and the UUID will be provided following the activation of the Security Function. See Page 17.
Quality
The components used have been selected to provide a product that has a high level of functionality and is user friendly, safe and reliable. A well-balanced hardware and software design allows us to offer you a technologically advanced navigation system, which is both practical and enjoyable to use.
Service
Our customer care is there to provide support and assistance whenever you have questions or are experiencing problems.
This manual contains a section specific to Customer Service starting on page 41.
Copyright © 2009, version 20/02/2009. All rights reserved. Microsoft , MS-DOS ircledR , and Windows are registered trademarks of Microsoft Corporation in the U.S. and other countries. Pentium is a registered trademark of Intel Corporation. The names of actual companies and products mentioned herein may be the trademarks of their respective owners. Information in this document is subject to change without notice.
Contents
Safety and Maintenance ....1
Safety Instructions....1
Data Security....1
Operating Environment....2
Repair....2
Ambient temperature....2
Electromagnetic Compatibility 3
Connection 3
Power supply through Car Adapter.... 3
Cabling 3
Information about the Regulatory Compliance according to R&TTE 3
Battery Operation.... 4
Maintenance 4
Care of the Display 4
Recycling and Disposal.... 5
Transport 5
Supplied Items 6
Views....7
Front Components 7
Back Components 8
Bottom Components....8
Top Components 9
Left Components.... 10
Initial Set up....11
I. Charging the Battery 11
II. Power Supply 12
Car Adapter.... 12
Alternative possibility of charging the battery....12
III. Switching on the Device 13
IV. Installing the Navigation Software.... 14
General Operating Instructions....15
Switching on/off the device.... 15
Security 17
Storing the password and the information note 17
Making settings.... 18
SuperPIN and UUID 19
Making subsequent settings....20
Password Request 21
Resetting the Navigation System 22
Reset 22
Switching the Device off Completely / Hard Reset 22
Navigation....23
Safety Instructions for Navigation.... 23
General Instructions.... 23
Notes for Use in a Vehicle 24
Additional Notes for Use on a Bicycle or a Motorcycle 24
Aerial Orientation 25
I. Mounting the Car Holder 25
II. Attaching the Navigation System 26
III. Connecting the Car Adapter 27
IV. Starting the Navigation Software 28
Picture Viewer....29
Operating the Picture Viewer.... 29
Main Screen 29
Full Image View.... 30
Travel Guide 32
Alarm Clock (waking function) 33
Overview of the main screen 33
Description of the Interfaces.... 34
Setting the System Time.... 35
Selecting an Alarm Signal.... 36
Setting the Volume 36
Snooze Function 37
Ending the AlarmClock Application 37
Sudoku 38
Main Screen 38
Description of the switch fields.... 38
FAQ....40
Customer Service 41
Faults and Possible Causes 41
Additional Support.... 41
Appendix 42
Special CleanUp Function.... 42
Synchronisation with the PC.... 45
I. Installing Microsoft ActiveSync 45
II. Connecting with the PC 46
Alternative possibility of charging the battery.... 46
III. Working with Microsoft ActiveSync 46
GPS (Global Positioning System) 47
TMC (Traffic Message Channel) 48
Connecting the TMC Dipole Aerial (optional) 49
Working with Memory Cards.... 50
Inserting Memory Cards.... 50
Removing Memory Cards.... 50
Accessing Memory Cards 50
Data Exchange via Card Reader 51
Additional Card Material.... 51
Transfer of card material to a memory card 51
Alternate method of installing Navigation Software (using a Memory Card) ...... 52
Transferring Installation Files and Map Material to the Internal Memory .... 52
Specifications 53
Index 54
Safety and Maintenance
Safety Instructions
Please read this section carefully and follow all the instructions provided. This will help ensure reliable operation and prolong the life of your appliance.
Keep the packaging and the user instructions for future reference or enquiries at a later date. If you pass the article on to another person, you should pass on these instructions.
- Never allow children to play with electrical equipment unsupervised.
- Keep the packaging materials, such as plastic bags away from children as there is a danger of suffocation.
- Never open up the housing of the appliance or the power adapter. These contain no user-serviceable parts. If the housing is opened there is a danger of electric shock.
- Do not place any objects on the appliance and do not exert any pressure on the display. Otherwise there is a danger that the screen will break.
- To avoid damage, do not touch the screen with sharp objects. We recommend using only the stylus provided or finger when using the touch-screen functionality of the product.
- There is a risk of injury if the display breaks. If this should occur, use protective gloves to pack the broken parts and contact customer support to arrange for disposal. Then wash your hands with soap, since there is a possibility that chemicals may have escaped.
Remove the power adapter from the outlet, switch the appliance off immediately, or do not switch it on, and contact Customer Service.
- If the housing of the appliance or the power pack becomes damaged or liquid may have leaked into it the components must be checked by Customer Service in order to avoid damage!
Data Security
- Every time your data is updated or modified backup copies should be made on an external storage medium. The supplier assumes NO liability for data loss or damage to data storage units, and no claims can be accepted for damages resulting from the loss of data or for consequential damages.
Operating Environment
Failure to follow these instructions may lead to your appliance being damaged. In cases where products are damaged as a result of misuse or neglect the associated guarantee will be considered void.
- Keep your navigation System and all connected devices away from moisture and avoid exposure to dust, heat and direct sunlight, especially in the car.
- Make sure you prevent your appliance from getting wet, e.g. from rain and hail, at all times. Please note that moisture can even build up inside a protective pouch as a result of condensation.
- Avoid heavy vibrations and shaking.
- Please note the device should be installed vertically, this will ensure that the device remains secure within its holder.
Repair
- Please contact our Service Centre if you encounter technical problems with your appliance.
- In the event a repair becomes necessary, please use Medion authorised Service Partners. The address can be found on the back of your guarantee card or online at www.medion.co.uk
Ambient temperature
- The appliance will operate effectively at an ambient temperature of between +32°F and +95°F (0°C and 35°C) and at a relative humidity of between 10% and 90% (non-condensing).
- In the powered down state the appliance can be stored at between -4ircF and +140ircF ( -20ircC + to 60ircC ).
- Store the appliance in a safe location, away from high temperatures (e.g. when parking or from direct sunlight).
Electromagnetic Compatibility
- When connecting additional or other components the “Electromagnetic Compatibility Directive” (EMC) must be adhered to. Please note that only screened cable (maximum 10ft) should be used with this appliance.
- For optimal performance, maintain a distance of at least 10 ft. from sources of high-frequency and magnetic interference (televisions, loudspeaker systems, mobile telephones etc.). This will help to avoid malfunctions and loss of data.
• Electronic devices emit electromagnetic waves during operation.
These emissions are harmless, but can interfere with other devices operated in close proximity.
While our devices are tested and optimised for electromagnetic compliance in our laboratories, interference during operation may still occur in the device itself and with other devices in its proximity.
Should such interference occur, try to eliminate it by adjusting the positions of and the distances between the devices.
Before driving, please ensure that the electronic systems of the car are working properly.
Connection
When connecting your appliance it is important to observe the following instructions:
Power supply through Car Adapter
- The car adapter should only be connected to the lighter socket of a car (car battery = DC 12V, truck battery = DC 24V). If you are in any doubt about the power source in your car, please contact your car manufacturer.
Cabling
- Arrange cables so that they do not cause unnecessary obstruction or risk of entanglement or snaring. E.g. ensure that the cables cannot be tread on, or tripped over.
- Do not place any items on the cable.
Information about the Regulatory Compliance according to R&TTE
The company declares that this device is in compliance with the essential requirements and other relevant provisions of Directive 1999/5/EC. Complete declarations of conformity are available under www.medion.com/conformity.

Battery Operation
Your appliance is powered by an integrated battery, Li-Ion. In order to prolong the life and efficiency of your battery and ensure safe operation, follow the instructions below:
- Batteries cannot withstand excessive heat. Take care to avoid overheating of appliance and the integrated battery. Failure to comply with this instruction may lead to damage to or, even explosion of the battery.
- Only use an original power pack (optional) to charge the battery or the car adapter from the optional navigation kit.
- The batteries are special category waste. When disposing of the appliance ensure that this is done correctly. Contact Customer Service for more details.
Maintenance
Warning
There are no user-serviceable parts which require cleaning inside the housing of the appliance.
You can prolong the life of the appliance by taking the following simple steps:
• Always remove the power plug and all connecting cables before cleaning.
- Clean the appliance only with a damp, lint-free cloth.
- Do not use solvents, caustic or gaseous cleaners.
Care of the Display
- Avoid scratching the display surface as this may be easily damaged. We recommend using a display protection film (mylar) to prevent scratching of the screen. Please contact your nearest dealer for this accessory.
The plastic on the display at delivery is purely for protection during transportation! - Ensure that no traces of water remain on the screen. Water can cause irreversible discoloration.
- Use only a soft, lint-free cloth to clean the screen.
- Do not expose the screen to strong sunlight or ultraviolet radiation.
Recycling and Disposal
The device and its packaging are recyclable.

Device
At the end of its life, the appliance must not be disposed of in household rubbish. Consult your local waste disposal company to enquire about environmentally-friendly options for disposal.
Packaging

To avoid damage during transport, the appliance was supplied in protective packaging. The majority of packaging is manufactured from materials which can be disposed of in an environmentally friendly manner and be recycled professionally.
Transport
When transporting the appliance please follow the instructions below:
- After transporting the appliance wait until the unit has acclimatised and adjust to surrounding conditions (e.g. room temperature and humidity) prior to use. In the event of large fluctuations in temperature or humidity, condensation or moisture may form inside the appliance. This can cause an electrical short-circuit.
- In order to protect the appliance from dirt, knocks and scratching, please use an appropriate protective case.
- Before travelling ensure that you are aware of the power and communications provisions at your destination. Before travelling obtain any power or communications adapters that may be required for the operation of your device.
- When shipping your appliance we recommend using the original packaging. If the original packaging isn't available please contact customer service for advice.
- When passing through baggage control at airports, it is recommended that you pass the appliance and all magnetic storage media (external hard drives) through the X-ray system (the machine on which your bags are placed). Avoid the magnetic detector (the structure through which you yourself pass) or the magnetic wand (the hand device that the security staff use), since this may corrupt your data.
Supplied Items
Please check the condition of items supplied and check for missing items using the list below. If you find your package to be incomplete, please forward to us all claims for missing items within 14 days from the date of purchase.
The package should include the following:
- Navigation system
• Power cable for cigarette lighter - USB cable
• TMC dipole antenna - Car holder
• Instruction manual and warranty card
- DVD with navigation software, digital maps, ActiveSync ® , data for rapidly resetting the contents of the memory card/internal memory
Views
Front Components

| Ref | Component | Description |
| 1 | Touch Screen | Displays the output of your appliance. Tap on the screen with the stylus (found in the holder, see page 26) to select menu commands or enter data. |
| 2 | Microphone | |
| 3 | Battery charge indicator | The loading display will flash orange during the charging process. It will shine green when the accumulator is completely charged. |
Back Components

Ref Component Description
① Loudspeaker Provides audible language statements and warnings.
Bottom Components

natural_image
Back view of a black electronic device with an attached port and indicator light (no text or symbols visible)| Ref | Component | Description |
| 1 | Mini-USB-Connector | Connection for connecting to a PC by means of a USB cable (for data transfer) as well as connection to external power supply. |
Top Components
natural_image
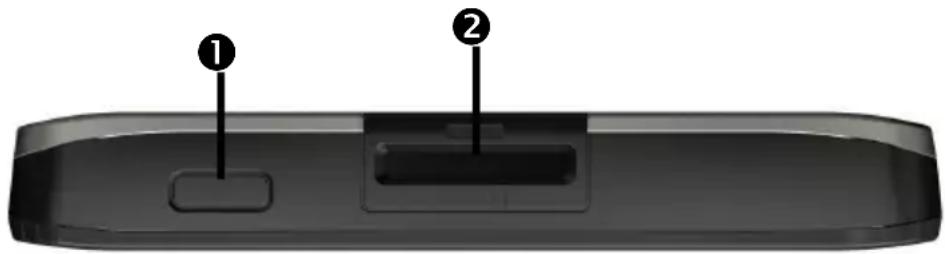
Back panel with two labeled buttons (① and ②) pointing to a button on the left side (no text or symbols beyond labels)| Ref | Component | Description |
| 1 | On/Off switch | Switch the device on or off by pressing and holding the On/Off key. You will switch to the stand-by mode or reactive the device by quickly pressing the button. |
| 2 | SD/MMC Slot | Accepts an optional SD (Secure Digital) or MMC (MultiMediaCard) card for removable storage. |
Left Components
closed

natural_image
Exterior view of a black rectangular electronic device casing (no visible text or symbols)open

natural_image
Close-up of a black rectangular device with a metallic clip and a circular button, labeled with number 1 (no text or symbols on the device itself)| Ref | Component | Description | |
| 1 | Headphone connection | Connection for a pair of stereo headphones (3.5 mm). | |
 | Using this appliance at full or high volumes for extended periods of time may cause damage to the hearing of the listener. | ||
| The TMC dipole antenna can also be connected using this connection. | |||
Initial Set up
The following is a step by step guide to assist in the initial Set-up of the navigation system.
Start by removing the protective plastic from the display.
I. Charging the Battery
The battery of your navigation system can be charged in the following ways:
• Using the supplied car adapter,
• using a suitable USB cable or
- by using a mains adapter (purchased as an optional extra)
Attention!
It may be necessary to initially charge the battery for a considerable period of time prior to commencing and running through the initial installation, this is dependent on the level of charge held at the time by the internal battery.
Please observe the following notes relating to the battery:
- The charging status display LED will flash orange until the navigation system is charged. If possible, do not interrupt the charging process until the battery is fully charged. This may take a few hours. The charging status LED will shine constant green if the battery has a high level of charge. Leave the device charging for 20 further minutes, to ensure the battery is fully charged.
- The navigation system can be used during the charging process, but the power supply must not be interrupted during initial set-up.
- Leave the external power supply connected to the navigation system for around 24 hours, so that the backup battery also charges-up fully.
- The external power supply can remain connected; this is recommended for continuous operation. However, the mains adapter (optional) must remain switched on whenever it is connected to the navigation system.
- Even after a power source has been connected to the device it may take several minutes until the device is once again ready to operate again, this occurs if the charging state of the battery is exceptionally low. The battery will continue to be charged if the power supply is connected and the device is switched off.
II. Power Supply
Car Adapter

natural_image
Illustration of a device with a cable and a handheld device connected to a screen (no text or symbols)(similar picture)
- Plug the jack (①) of the connection cable into the corresponding receptor at the bottom of your navigation system.
- Insert the power adapter (②) into the cigar lighter socket ensuring, that it will not lose contact while driving. This could cause a malfunction.
Alternative possibility of charging the battery
The battery will charge as soon as you connect your navigation device to a switched-on PC or notebook by means of a USB cable (optional). No additional software or updates is required for your PC to perform this function. Do not interrupt the charging process if possible during the initial charge.
Note
The brightness will be adjusted downwards, if necessary, if a USB connection is being set up when the device is switched on.
It is recommended to set the device to the stand-by mode, in order to shorten the charging time by USB.
III. Switching on the Device
You will switch your navigation device on or off again completely by pressing the On/Off key for a long time (> 3 sec.).
The Navigation System will start the initial installation automatically. The brand logo will appear and your device will display the application screen after a few seconds.
| Button | Description | Main | |
 | Navigation, page 23 | ||
 | Travel Guide, page 32 | ||
 | Alarm Clock, page 33 | ||
 | Picture Viewer, page 29 | ||
 | Sudoku, page 38 | ||
| Settings | |||
Note
Brief pressure on the on/off button will be enough to switch the device on or off, provided that your navigation system is connected to an external source of electricity or is running in battery operation (standby mode).
You can adjust the period of operation to suit your needs using the
Settings button on the main screen of your device. Your device is delivered in a status in which it will not switch off independently.
Press and hold the On/Off key (> 3 sec.), to completely switch off the device.
No data will be lost as data is stored in the internal memory. The starting process will only last slightly longer.
Your navigation system will use a low amount of electricity and the batteries will be discharged, even when in standby mode.
IV. Installing the Navigation Software
The final installation of the navigation software will take place automatically from the internal memory, during the initial set up, if your device has already been equipped with the basic data of the navigation software at the factory. Follow the instructions on the screen.
An optional memory card must always be inserted in the device while the navigation system is being used.
It will be necessary to carry out a Reset to restart the navigation system if the memory card has been removed (see page 22).
Please also read the chapter Navigation starting on page 23.
General Operating Instructions
Switching on/off the device
Your device will be in its normal operating state after the initial set up. You can activate and deactivate your device with the On-/Off switch.
- To start your navigation system press briefly the On-/Off switch ⏻.
Note
Your device is delivered in a status in which it will not switch off independently. You can adjust the period of operation to suit your needs using the
Settings button on the main screen of your device.
Your navigation system will use a low amount of electricity and the batteries will be discharged, even when it is in the standby mode.
- To switch off your navigation system briefly press the On-/Off switch ⏻. The following screen will appear:

You have three possible choices:
Button Description

Cancel/Back
Return to previous view with this key, if you have accidentally called up this screen.

Standby Mode
The device will go into Standby Mode if this key is clicked.

Reset
You can carry out a reset by clicking this key.
The device will go into the Standby mode automatically after a few seconds if you do not want to select any of these three possibilities.
For further settings within the Standby mode also see the chapter on “Special CleanUp Function”, page 42, point 8.
This display will also appear after the delay period of a few seconds has expired, if you have activated the DC AutoSuspend Comfort Function.
Security
You have the possibility of protecting your device against external access by means of this function. Some one-off settings will have to be made before you will be able to use this function. Proceed as follows to do this:
Storing the password and the information note

-
Go to the settings by means of the main display.
-
Click on Security, in order to start the respective function. The following display will appear:
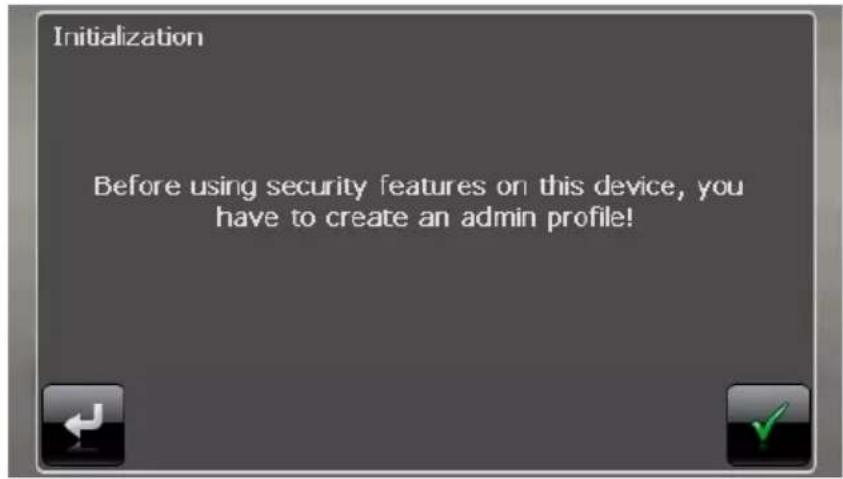

-
Click on , in order to enter a password.
-
A keyboard will appear. Enter a password with it.
Note
The password must consist of at least 4 symbols. Use a combination of letters (A - Z) and numbers (0 - 9). Keep the password in a safe place.

-
Confirm the password with the symbol after you have entered it.
-
Enter the password in the second field to reconfirm it and in order to avoid potential careless mistakes.
Note
The password will be displayed in the form of small stars (****).
- An additional text field will appear after you have entered the password. Enter an information note here that will serve as a support for remembering your password. You will be able to call up this information if you have forgotten or mislaid the password.
Making settings
The following selection window, through which you will make the settings for the Security Function, will appear after you have entered the password and the information note successfully.
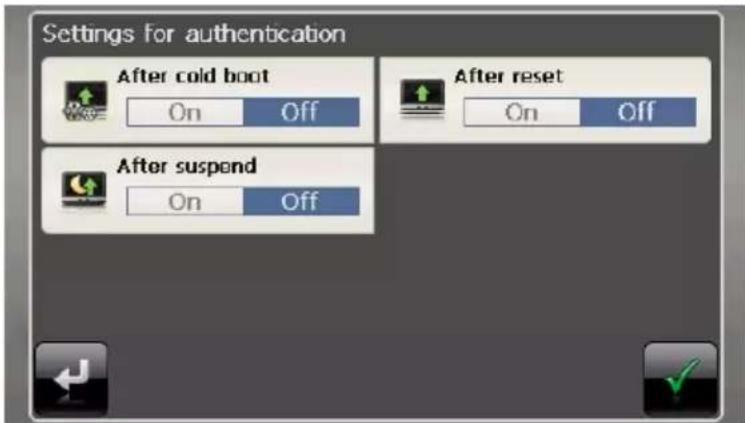
Button Description

Set here whether the device should request the password after a hard reset.

Set here whether the device should request the password after a restart.

Set here whether the device should request the password after the device has been switched on from the Standby mode.
Confirm your settings with

during the set-up. The following screen will appear:

SuperPIN and UUID
The SuperPIN and the UUID (Universally Unique IDentifier = definite device identification) will appear on the display after you have confirmed the settings.
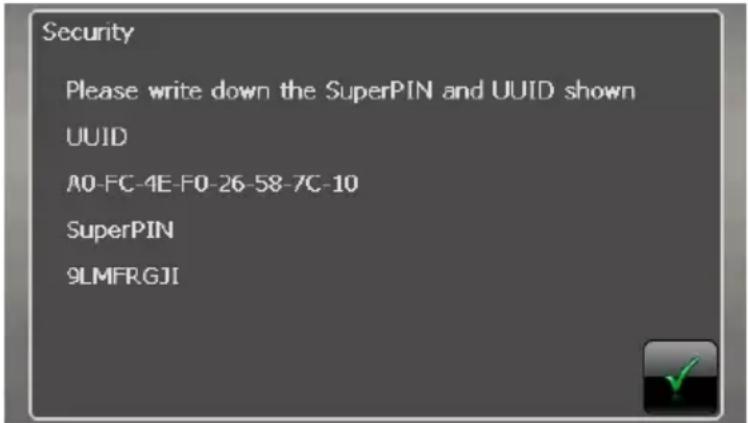
Note
Record this data in your Operating Instructions (see Page 1) and keep them in a safe place.
You will need this information if you have entered the password incorrectly 3 times. The navigation device can then only be released with this information.
Making subsequent settings
Start the Security Function if you have already entered a password and would like to make a subsequent setting or to change the password. The following display will appear:

| Button | Description | |
 | Active profile settings | Change the password or the information text. |
 | Authentication settings | Authentication settings(see Page 18, Making settings) |
 | Show SuperPIN | Display SuperPIN and UUID (see Page 19) |
 | Restore to standard | Reverses the complete security function. All security settings and passwords will have been deleted after this function has been carried out. You will have to enter and confirm your password again to be able to carry out the security function. |
Password Request
A password request will appear at the restarting of the device, according to the setting, if you have established a password by means of the Security Function.

- Enter the password stored by you by means of the keyboard.
Note
The password will be displayed in the form of small stars (****).
-
Click on the question symbol to have the information note displayed, if you have forgotten the password and need the Help setting.
-
Click on 📋 to confirm the entry.
Note
You will have to enter the SuperPIN if you have entered the password incorrectly 3 times. Contact your Service Center, giving the UUID, if you have also mislaid it. The UUID will be faded out in the lower display.
Resetting the Navigation System
You can reset your navigation system if it is no longer reacting or working properly.
This option restarts the navigation system, without reinstallation being necessary. A reset is often used in order to reorganise the memory. In doing so all programs that are running are interrupted and the working memory is reinitialised.
You can carry out two different Reset procedures with your device.
Reset
The following screen will appear if you press the On/Off switch for a short time:


If you want to carry out a Reset, tap on
You will find further information in the chapter “Switching on/off the device”, page 15.
Switching the Device off Completely / Hard Reset
Attention!
A hard reset will delete all data in the temporary memory.
Your navigation system will normally be in the Standby Mode, if you have switched it off by pressing the on/off button briefly. In addition, the system can be switched off completely; the consumption of energy can be kept as low as possible through this. All the data in the temporary memory will be lost if the device is switched off completely (hard reset).
To switch your navigation system off completely:
- Press and hold the On/Off key (> 3 sec.), to switch off the device.
- Press and hold the On/Off key (> 3 sec.), to switch the device on again.
A reinstallation will not be necessary after a hard reset if your device has already been equipped with the basic data of the navigation software in the permanent memory.
Navigation
Safety Instructions for Navigation
The bundled product DVD contains a comprehensive instruction manual.
General Instructions
- Do not adjust or configure the navigation system whilst driving, this is to protect yourself and others from accidents!
- In the event that you do not understand the voice instruction or if you are in any doubt about what to do at the next intersection, then the map or arrow displayed on the screen will provide you with a quick orientation. Only look at the display when it is safe to do so and driving conditions allow!
Attention!
The road layout and driving rules take precedence over the instructions of the navigation system. Only follow the instructions when circumstances and driving rules permit it! The navigation system will guide you to your destination even when you have to deviate from your planned route.
- The direction statements of the navigation system given do not release the driver of the vehicle from his or her duty of care or personal responsibility.
- Plan routes before you leave. If you want to plan a new route whilst on the road pull over and stop driving.
- In order to receive the GPS signal correctly, keep away from metal objects as they may hinder reception. Attach the navigation system onto the inside of the windscreen or near the windscreen with the suction cup. Try out different positions in your vehicle in order to find the best reception.
Notes for Use in a Vehicle
- Take care that the holder does not present any risk to safety, even in the case of an accident, when installing it.
• Take care that the cable does not impede any safety components. - The display of your navigation system may show “light reflections”. Please take care of not being “blinded” during operation.
- Do not mount the components within the operating range of any airbags.
- Check the secure adherence of the suction cup at regular intervals.
- The power plug will consume power, even if no device is connected. Remove it when not in use to avoid draining the car battery.
- Check all safety equipment in your car after installation.
Note
Do not leave your navigation software in the vehicle when you leave it unattended. You should also uninstall the holder for security reasons.
Additional Notes for Use on a Bicycle or a Motorcycle
• Pay attention during installation that the ability to steer is not impaired.
- Do not cover any instruments during installation.
Aerial Orientation
The aerial must have unrestricted access to the sky to receive GPS satellite signals. Place the aerial as horizontally as possible for this reason. Try out aerial and installation possibilities in the vehicle if the reception is inadequate.
I. Mounting the Car Holder
Attention!
Only fix the holder for the navigation system to the windscreen, if it does not impede the view.

(similar picture)
Note
Your navigation device can also be equipped with a different but similar vehicle attachment as an alternative, according to the version.
Note
Clean the windscreen thoroughly with a glass cleaner. Warm the disk and the nipple slightly at temperatures below 15irc C.
Place the holder with the suction head directly onto the wind screen and press the lever on the suction head downwards. The sucker will attach itself to the background firmly.
II. Attaching the Navigation System
- Connect the car adapter (see page 12) and, if necessary, the TMC aerial to your navigation system and insert the memory card.
- Place the device below in the centre of the holder.
- Press it gently backwards (1) until it engages audibly (2).


natural_image
Black plastic device with handle and internal components, labeled '2' (no text or symbols on the device itself)(similar picture)
- Place the holder on the fixing catches of the car holder.
- Now, push the unit downwards until it engages audibly.
- Now you will be able to place the complete unit on the cleaned windscreen or the suction plate.
III. Connecting the Car Adapter

natural_image
Illustration of a medical device with labeled parts (① and ②) showing connections to a screen and a catheter (no text or symbols beyond labels)(similar picture)
-
Plug the jack (①) of the connection cable into the corresponding receptor at the bottom of your navigation system (p. 8).
-
Insert the power adapter (②) into the cigarette lighter socket and ensure, that it will not lose contact while driving. This could cause a malfunction.
Note
Remove the power adapter from the cigarette lighter socket when ending a trip or when parking the car for a extended period of time. Otherwise the car battery could be drained. In this case use the power switch to turn off the navigation system.
IV. Starting the Navigation Software
Note
Your memory card will always have to be inserted into the device during the use of the navigation system, if the card contains (additional) mapping material.
It will be necessary to carry out a reset to restart the navigation system if the memory card has been removed while the system was being used (see page 22). According to the navigation system the reset is carried out automatically.
- Switch on your navigation system.
- The Navigation software will start automatically or after tapping on the navigation control button on the main screen, according to the version.
- Tap on Navigation on the screen for entering the destination. Enter the destination address. Confirm your entry by clicking the √ symbol to start the navigation. After a short time, if the satellite reception is adequate you will receive augmented language statements.
Further information regarding the navigation software can be found in the comprehensive manual on your navigation DVD. This is a pdf-file you can read and print with Acrobat Reader.
Note
The GPS-receiver will require some minutes for initialization when deployed for the first time. Even when GPS signal reception is indicated the navigation could be imprecise. In all future instances it will take about 30-60 seconds until a correct GPS-signal is available, sufficient “sight” of the satellite is a prerequisite.
Picture Viewer
Your navigation system is equipped with a Picture Viewer.
You can view the jpg format images on your memory card on your navigation system, with the Picture Viewer. All the images on the memory card will be available immediately.
Operating the Picture Viewer
Start the Picture Viewer from the main screen by tapping on the 'Picture Viewer' switch area. Alternatively, the Picture Viewer can also be started from the navigation software itself.
Main Screen

Fig.: Miniature view
Move the miniature view to the left or to the right with the arrow keys. Tap on a specific image to display it in the Full Image Mode.
Return to the start in miniature view by tapping on 📄 You can end the application by tapping on the 🔊 symbol. Start the slide show by tapping the ▶ symbol.
Full Image View

natural_image
Two vintage-style paintings of women in flowing dresses, displayed against a plain wall (no text or symbols visible)Fig.: Full image view without service strip
Tap in the lower area of the screen in the full image view, in order to activate the service strip:

natural_image
Two identical paintings of a woman in red dresses, viewed from behind, with no visible text or symbols.Fig.: Full image view with service strip
| Button Description | |
 | Previous picture |
 | Turn it clockwise by 90° in stages |
 | Fade in grid |
 | Start the slide showPause the slide show |
 | Turn it counter-clockwise by 90° in stages |
 | Next picture |
You can return to the miniature view by tapping in the centre of the image.
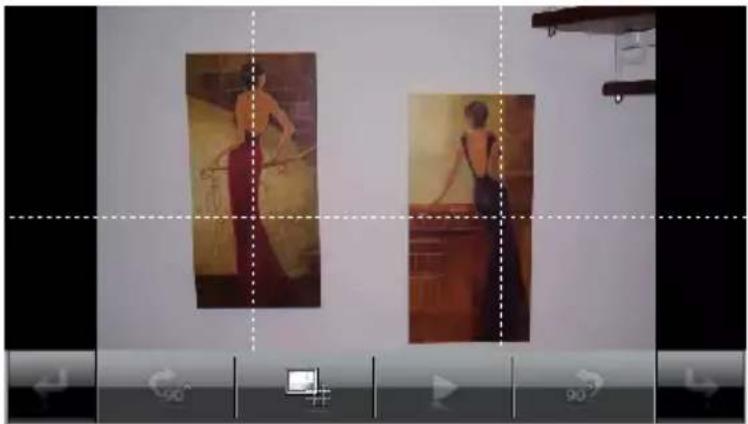
The image displayed will be subdivided into 6 fields by tapping on the (fade in grid).
symbol
natural_image
Two women in vintage dresses standing side by side, viewed through a camera lens (no visible text or symbols)Fig.: Full image mode with grid
Tap on a square in the grid to zoom in on that area of the picture:

natural_image
Two identical paintings of a woman in red dress, viewed from behind, against a plain wall (no text or symbols visible)Fig.: Zoom-in Mode
Tap on the centre of the image to go back to viewing the full picture.
Travel Guide
Your navigation system is equipped with a Travel Guide.
The Travel Guide will supply general information about the different areas of individual towns and cities or regions in Europe, such as sights, restaurants, culture and travel information.
Start the Travel Guide from the main screen by tapping the 'Travel Guide' switch areas. Alternatively, the Travel Guide can also be started from the navigation software itself.
Select the country initially, then the town or city (or the region). Then, select the category.

Fig. 1

Fig. 2

Fig. 3

Fig. 4
Confirm with √, if you want to navigate to the destination displayed. The address will then be available to the navigation software as the destination.
Alarm Clock (waking function)
Your navigation system is equipped with an Alarm Clock/waking function.
Start this function from the main screen by tapping on the 'Alarm Clock' button.
The waking function can work when the device is switched off (Standby Mode / Power Saving Mode) as well as a reminder during the current navigation.
Overview of the main screen
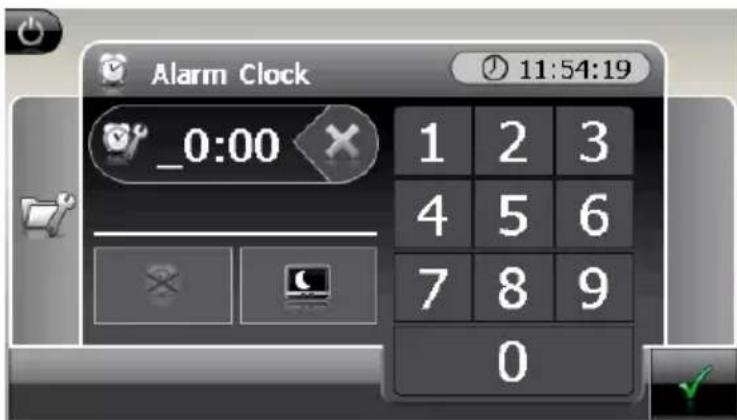
This view will appear if you have not yet set up a waking time. Enter an alarm time in the
24-hour format and confirm your entry with

Description of the Interfaces
| Button | Description | |
 | Current system time | |
 | Setting-up mode (Setting volumes, system time and alarm) | |
 | Night mode (Standby mode) | |
 | Reset/deactivate the waking function | |
 | Setting the alarm time | |
 | Delete the entry | |
 | Confirmation interface | |
 | Reduce the volume | |
 | Increase the volume | |
 | Back to the previous menu | |
 | Close the application | |
Setting the System Time
The display of the current time will be located in the upper right corner of the screen. You can adjust it as follows:
- Tap on in the main screen. The following screen will appear:

- Tap on to change the time setting.
Note
The system time is updated by GPS reception. Pay attention to the time zone settings.
Selecting an Alarm Signal
- To select an alarm signal touch the

symbol.
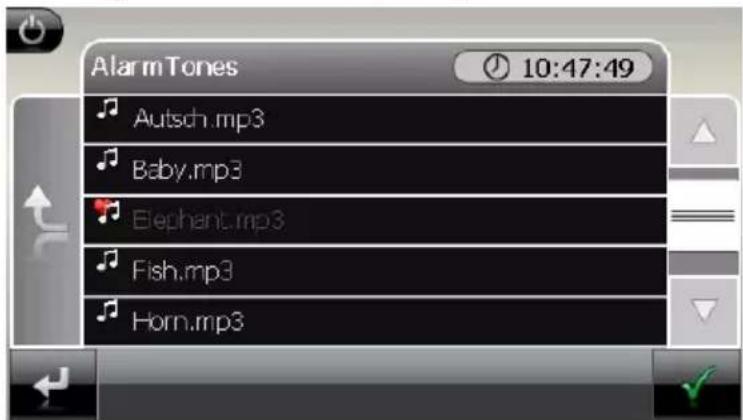

-
Select the desired alarm sound and confirm the selection with
-
The selected alarm signal is marked by a

- Close the application with

Setting the Volume
You can adjust the volume of the alarm signal by tapping on the interface.
Note
The volume configured here only relates to the alarm signal and will not change the volume of the language output of the navigation system or other functions of the system.

Snooze Function
You will have the possibility of making the waking signal repeat at regular intervals by means of the Snooze function, once it has sounded at the alarm time set.

to activate the Snooze function.

-
To be wakened again at the same time on the following day tap on the button.
-
Tap on = to return to the screen before the alarm signal started.
Ending the Alarm Clock Application

-
Tap on to deactivate the alarm time set.
-
You will find yourself in the Setting-up mode.
-
Tap on in order to leave the application. An alarm time is not set.
Sudoku
Your navigation system is supplied with Sudoku.
Start the game from the main screen by tapping on the Sudoku switch field.
Sudoku is a number puzzle. The puzzle area is square and subdivided into nine sections. Each section consists of 9 smaller squares.
When playing Sudoku, the aim is to fill all the 81 number fields using the numbers 1-9. Each number must only appear once in each section at the same time. Each number must only appear once in each row and column.
Some number fields will already have been populated prior to the start of the game.
Main Screen

Description of the switch fields
| Button | Description | ||
 | Strip of numbers to be enteredStrip for the selection of the numbers to be entered in the number fields. The selected number will stand out and it will now be possible to enter it into a number field. | ||
 | Entry modeFirst, tap on the number in the strip of numbers to be entered that should appear in particular number field and then on the corresponding number field. | ||
| or | Deletion mode | ||
 | Tap on the number to be deleted. | ||
 | You will receive the information about the deletion by tapping on this switch field. | ||
 | Conceal the information about the deletion. | ||
 | A new Sudoku game will open by a tap on this switch field. | ||
 | SettingsYou will have the following possibilities in the Settings Menu: | ||
 | You can select the storage location of your game (internal memory or memory card) here. | ||
 | The current game will be stored by a tap on this switch field. | ||
 | You will load a game that has been started on the screen by a tap on this switch field. | ||
 | Deletion of a stored game status. | ||
 | You can set the level of difficulty (1-4) here. | ||
 | You will be able to see during a game whether the number that you have entered is correct or incorrect here. | ||
 | Update the view | ||
 | Back to the current game. | ||
 | Leave the application by means of this field. | ||
FAQ

Where can I find more information on the navigation system?

Detailed operating instructions for navigation can be found on the corresponding DVD, which accompany your navigation system.
Also use the additional Help functions that are available with a single touch of a button (usually F1 on the PC), or by selecting the Help option, as additional assistance. These aids will be provided to you while you are using the computer or the device.

What do I need the accompanied DVD for?

The DVD contains:
- the ActiveSync ® program for balancing data between the navigation system and the PC.
• Additional programs (optional). - This User manual in digital form.
- digital maps
• PC-application for rapidly resetting the data material - Manual of the navigation software

The navigation system is no longer responding. What should I do?

Carry out a reset (see page 22).

How can I adjust the lighting?

Under Settings.
Customer Service
Faults and Possible Causes
The navigation system no longer reacts or is behaving atypically.
- Carry out a reset (see page 22).
The navigation system is recognised only as a guest by ActiveSync ® .
• See information on page 46.
The GPS receiver cannot be initialized or found.
If a GPS signal continues not to be reported on the screen, in spite of the correct installation of the system, this can be caused by the following factors:
• Sufficient satellite reception is not possible.
Solution:
Change the position of your navigation system and ensure that unrestricted "sight" of the aerial is not impaired.
No language statements can be heard.
- Check the volume setting.
Additional Support
If the suggestions in the above section have not solved your problem, please contact our customer service hotline. However, before you contact your customer service hotline, please have the following information available:
- How is your navigation unit configured?
• What additional peripherals do you use?
• What messages, if any, appear on your screen?
- What software were you using when the error occurred?
• What steps have you already undertaken to solve the problem?
- If you have been given a customer number previously, please give this number to the technician.
Appendix
Special CleanUp Function
The CleanUp function serves the targeted deletion of data, without using a PC.
Note
Please use this function very carefully, because it is possible for data to be deleted that can only be entered again manually afterwards.
The CleanUp function is activated when the ‘o’ is pressed in the Gopal lettering of the Main Menu, immediately after the start tone following a reset.
The CleanUp function offers 8 options:

1. Remove Installation Only
Removes the software installed from the 'My Flash Disk'
memory [= part of the permanent memory in which the executable parts of the navigation software will be located following the initial alignment (\My Flash Disk\Navigation)].
2. Remove MAP Only
Removes the digital maps from the 'My Flash Disk' memory (\My Flash Disk\MapRegions).
3. Remove Preload Only
Removes the data needed for the installation of the navigation software from the permanent memory (\My Flash Disk\Install).
4. Remove All
Deletes the whole contents of the 'My Flash Disk' memory. It will not be necessary to recalibrate the screen after this function has been carried out.
5. Factoryreset
Sets the device back to the delivery status in the case of an intact main installation.
6. Format Flash
Formats the internal 'My Flash Disk' memory. This formatting can be necessary in the case of a prolonged removal of errors. It will be necessary to recalibrate the screen after the formatting function has been carried out. All data will be deleted from the internal 'My Flash Disk' memory irrevocably.
7. GPS Factory Reset
Performs a factory reset of the GPS receiver. When using the GPS function after having performed a factory reset, the GPS receiver must orientate itself again. This process may take a while.
8. DC AutoSuspend
You can select here when your navigation system should go into Standby mode automatically after the withdrawal of the external power supply. For example, this function is useful in the case of vehicles where the cigarette lighter also switches off when the ignition is switched off.
The AutoSuspend function will be activated several seconds after the discontinuation of the external power supply and the Standby display will appear for the time set (see Page 15).
The DC AutoSuspend function will be deactivated again if the power has been reconnected within the total period (in the case that the engine has been switched off for a short time, for example). Otherwise, the navigation system will go into the Standby mode after the expiry of the time set.
Set the required time by clicking on it and confirm your selection with OK.

Note
This function is deactivated and can be set individually in the status at delivery and after a hard reset (see Page 22)
Exit
Leaving the CleanUp function and restarting the device (like reset).
Note
The deletion of the data must be confirmed before the action actually takes place. To do this, press on YES. There will be a corresponding report if the data to be deleted is no longer available.
Please read the "Transferring Installation Files and Map Material to the Internal Memory" chapter on Page 52, in order to recreate the files (installation files and map material) in the internal memory.
Synchronisation with the PC
I. Installing Microsoft® ActiveSync®
In order to transfer data between your PC and your navigation system you need the Microsoft® ActiveSync® program.
The cost of the navigation system includes a license for this program which can be found on the DVD.
Hinweis
You will not need the ActiveSync ® communications software, if you are a user of the Windows Vista ® operating system. The system files necessary for the simple data transfer are already integrated into your Vista ® operating system.
Procedure for Vista users:
Please connect your device to your PC with the help of the USB synchronization cable. The necessary drivers will be installed automatically, after the new device has been found. Your new device will be listed under the 'Portable Devices' point in the Windows Explorer overview, following a successful installation.
Attention!
Important files can be overwritten or changed during the installation of software. You should create a hard disk backup, in order to be able to have access to the original files in the case of possible problems following the installation.
You must have administrator rights to install the software under Windows 4 2000 or XP.
Important
You should not connect the navigation system to your computer yet.
- Insert the DVD and wait until the program starts automatically.
Note
If it does not function, the Auto Run function is probably deactivated. The Setup program on the DVD must be started, to start installation manually.
- Choose the language, click then Install ActiveSync ® and follow the instructions on the screen.
Note
When installing the GoPal Assistant, ActiveSync ® will be installed automatically.
II. Connecting with the PC
- Press the On/Off button to start your navigation system.
- Connect the USB cable to your navigation system.
- Push the USB connector into a free USB port on your computer.
- The hardware installation assistant will recognise a new appliance and install a suitable driver which can take some minutes. Repeat the connection search if it fails the first time.
- Follow the instructions on the screen. The program will now set up a partnership between your PC and the device.
Alternative possibility of charging the battery
The battery will charge as soon as you connect your navigation device to a switched-on PC or notebook by means of a USB cable (optional). No type of software or driver installation will be necessary for this. Do not interrupt the charging process if possible during the initial charge.
III. Working with Microsoft® ActiveSync®
ActiveSync ® will be started automatically if you connect your navigation system to the PC. The program will check whether the device is one with which a partnership has been entered. If this is the case, the changes that have taken place on the PC and on the navigation system since the last synchronisation will be compared and adjusted to each other. You will be able to define exactly which data will have priority during the synchronisation in the settings of the ActiveSync ® Program. Call up the Help of the Program (with the F1 Button), in order to become familiar with the effects of the respective settings. A restricted Guest Access, with which you will be able to exchange data, for example, will become active automatically if the navigation system has not been recognised as a partner. If this is the case, although the process concerns the registered partner device, separate your navigation system from the PC and switch it off and on again. Now connect your navigation system to the PC, to restart the recognition process. Repeat the process and, restart your PC in addition, if your device continues to be recognised as a guest.
Note
Make sure that you always connect your navigation system to your PC with the same USB connection, otherwise your PC will allocate an additional ID and reinstall the device.
GPS (Global Positioning System)
GPS is a satellite-backed system for determining your position. With the help of 24 satellites revolving around the earth, it is possible to determine your position on earth with the accuracy of a few meters. The satellite signals are received by the antenna of the built-in GPS receiver, which must have a "line of sight" to at least 4 of these.
Note
When the line of sight is interrupted (e.g. in tunnels, between houses, in woods or also in vehicles with metal-coated windows) it is not possible to determine the position. The satellite reception however automatically picks up again as soon as the obstacle has been passed and the line of sight is re-established. Moving slowly (e.g. slow walking) also limits the accuracy of the navigation.
The GPS receiver consumes additional power. This is especially of concern when running on batteries. To conserve power do not turn on the GPS receiver unnecessarily. Also terminate the navigation software if it is not needed or satellite reception is not possible for a longer period. You can also switch the device off by means of the On/Off switch if you experience a short interruption in your journey, pressing the same switch again will reactivate a restart. The GPS receiver will also be reactivated at the same time, if the navigation software is still active. There may be a delay for the position to be updated again, this is dependant on the reception situation.
Note
Please note that your appliance is preset to not shut down automatically after a few minutes without activity. You can change this preset in the Settings mode. If the GPS receiver has not been active for some hours, it must orientate itself again. This process may take a while.
TMC (Traffic Message Channel)
The Traffic Message Channel (TMC) is a digital radio data service that functions in a similar way to RDS and is used to transmit disruptions to traffic to a suitable reception device.
The traffic information is continuously transmitted across FM.
The user is less dependent on the half-hourly broadcast traffic information, because the signal is continuously transmitted. Apart from this, important information, as in the case of an accident in the road ahead, can be passed on immediately.
The transmission is planned for the whole of Europe and is already offered by radio transmitters in many countries. The precision of the TMC messages can deviate greatly according to the country. At time of printing a TMC service is not available in Ireland.
The evaluation of TMC messages is not supported by every type of navigation software. Enquire whether your system supports TMC before the possible purchase of a TMC receiver.
Connecting the TMC Dipole Aerial (optional)
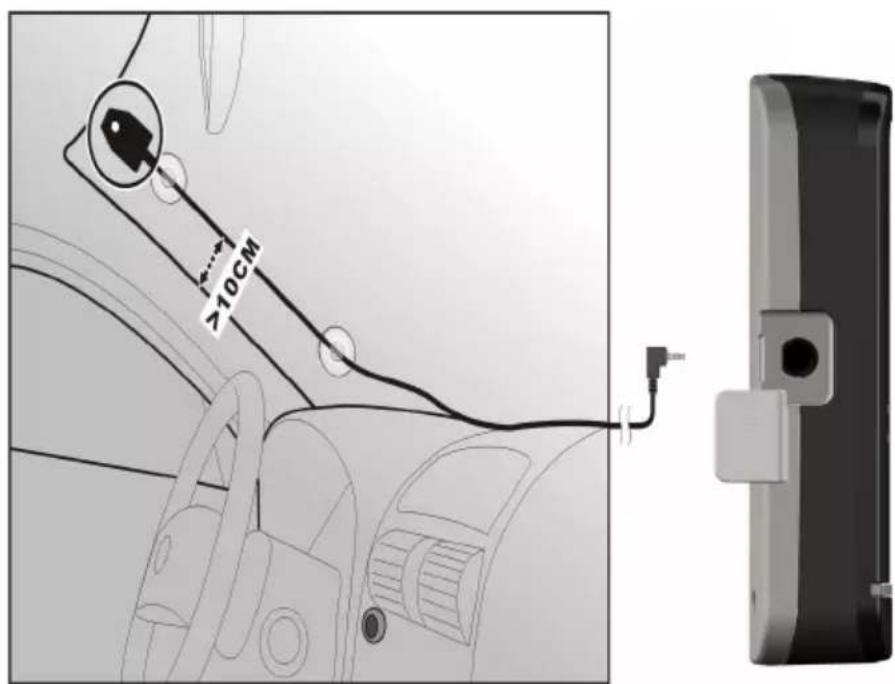
A TMC receiver is integrated into your navigation system, to receive traffic information. However, reception will only be guaranteed if the TMC angled aerial supplied with the device has been connected.
Plug the jack plug of the TMC angled aerial into the earphone connection of your navigation system.
Attach the aerial, on the edge of your windscreen, for example, with the help of the sucker.
Place the aerial so that a distance of approx. 10 cm from the metal frame of the screen is maintained.
TMC reception can be improved by different aerial positioning, according to the vehicle.
(similar pictures)
Your navigation system will now be able to receive traffic information through the TMC receiver and thus direct you away from disruptions to traffic.
Working with Memory Cards
Your navigation system supports MMC and SD memory cards.
Inserting Memory Cards
- Carefully take the optional memory card out of its packing (if included). Take care not to touch or dirty the contacts.
- Insert the memory card carefully into the card bay with contacts pointing forward. The card must lock easily.
Removing Memory Cards
Note
Only remove the memory card if the navigation software has been closed and the device has been switched off by means of the On/Off button beforehand. Otherwise you will risk a loss of data.
- To remove the card press lightly onto the upper edge until it ejects.
- Pull the card out without touching the contacts.
- Store the memory card in the packaging or in another safe location.
Note
Memory cards are very fragile. Take care not to dirty the contacts and not to force the card.
Accessing Memory Cards
- The appliance only supports memory cards in the FAT16/32 file format. If you insert a card prepared with a different format (e.g. in cameras, MP3 players), your navigation system may not recognise it and will ask you to format it again.
Attention!
Formatting the memory card irretrievably wipes out all data.
Data Exchange via Card Reader
If you wish to copy large quantities of data (MP3 files, navigation maps) to the memory card, these can also be stored directly to the memory card.
Many computers already have memory card devices. Insert the card into your computer and copy the data directly to the card.
Because of the direct access you can achieve a much higher transfer rate compared to using ActiveSync ® .
Additional Card Material
Your navigation system is already equipped with digitalised map material in the internal memory and/or memory card at the factory. Depending on the configuration, additional maps may be included on your navigation DVD. You will be able to transfer these cards to a memory card immediately. It is recommended that you use an external card reader (see also page 51). The GoPal Assistant supplied with the device enables a simple and individual compilation of the map material to be transferred.
Depending on the amount of map data on the navigation DVD, memory cards with capacities of 256 MB, 512 MB, 1.024 MB or more may be required.
You can obtain additional memory cards (MMC or SD cards) in specialist stores.
Transfer of card material to a memory card
The transfer of additional card material to a memory card can take place through Explorer on your PC via the following steps:
- Insert the DVD with the card material required.
- Start your workstation and select your DVD Drive.
- Copy the file with the .psf ending out of the Directory of the region that you require to the MapRegions Directory on your memory card, from the DVD.
You can transfer several files with map material to your memory card, depending on the capacity of the memory card.
If you have copied digitized maps of several countries or country groups onto your memory card, you will be required to select the desired map in the navigation application of your device.
Alternate method of installing Navigation Software (using a Memory Card)
The software for your navigation system can be installed directly from a memory card.
The pre-installed software may have to be uninstalled beforehand (see special Clean Up function, Page 42).
You will be requested to install the navigation software during the initial adjustment.
Please proceed as follows:
- Remove the memory card from the packaging carefully. Ensure the contacts are not touched or soiled.
- Push the memory card into the SD-/MMC slot until it engages.
- Click on OK, in order to install the application.
The main screen, through which you will now be able to carry out the navigation settings, will appear after all data has been copied to your navigation system.
Transferring Installation Files and Map Material to the Internal Memory
Note
The navigation system must be connected to a computer by means of ActiveSync ® for the transfer of the data.
Your device has an internal, permanent memory, which is located in the \My Flash Disk directory.
You will be able to make this directory, and others, visible with ActiveSync ® , by means of the Search option. Directories and files can be manipulated as in Windows Explorer.
The required directory must have been stored, in order to make the installation files and the map material for the device available.
Deposit the INSTALL directory for the installation files at (\My Flash Disk\INSTALL). Deposit the map material in the MapRegions directory (\My Flash Disk\MapRegions). Please pay attention to the modes of lettering given above when naming the directories.
Pay attention to the fact that sufficient drive capacity must be available, if you have stored additional data on your navigation device. Remove files not needed if sufficient drive capacity is not available.
Specifications
| Parameter | Information | |
| Power supplyPower supply cable for a cigarette lighterInputOutput | CA-051-00U-00 / CA-0511MH-2F (Mitac)12-24V DC, 800mA / fuse 2A (T2AL/250V)5V / 1A (max.) | |
| Power supply (alternative)Power supply cable for a cigarette lighterInputOutput | G12PCL-535-L031 (UDID/L&K)12-24V DC, 800mA / fuse 2A (T2AL/250V)5V / 1A (max.) | |
| Battery Li-Ion, 3.7 V | ||
| Earphones Stereo earphones (3.5 mm) | ||
| Memory card type MMC and SD | ||
| USB interface USB 1.1 | ||
| Dimensions approx. 129 mm x 19 mm x | 78 mm | |
| Weight incl. battery approx. 175 g (without packaging) | ||
| Temperatures | Operating +5°C - +35°C | |
| Storage 0°C - +60°C | ||
| Humidity (without condensation) 10 – 90 % | ||
Index
A
Accessing Memory cards ....50
Additional card material....51
Aerial Orientation 25
Alarm Clock (Wake up function) Ending the application....37 Selecting an alarm signal ....36 Setting the system time ....35 Setting the volume ....36 Snooze function....37 Interfaces ....34 Main screen ....33
Alternative installation of the navigation software from a memory card ....52
Ambient temperature ....2
Auto run 45
Auto start....45
B
Battery charge indicator......7
Battery Operation ....4
C
Cabling....3
Card reader....51
Care of the Display ....4
CleanUp 16,42
Contents...... iii
Copyright ...... ii
Customer Service....41
D
Data exchange....51
Data Security ......1
DC AutoSuspend ....43
E
Earphone connector ....10
Electromagnetic Compatibility......3
EMC 3
F
FAQ....40
G
GPS.... 47
H
Hard Reset.... 22
Hotline.... 41
|
Initial set up Charging the battery .... 11 Installing the navigation software .. 14 Power supply .... 12 Switching on the device .... 13
L
Loudspeaker 8
M
Memory cards.... 50
Microsoft ActiveSync * 45
Mini-USB-Connector 8
Mounting the car holder 25
N
Navigation Attaching the navigation system .... 26 Mounting the car holder .... 25 Safety instructions.... 23 Starting the navigation software.... 28
Note...... i
0
On/Off switch 9
Operating Switching on/off the device...... 15
Operating Environment 2
P
Passwort ......i, 17
Picture Viewer
Main screen 29
Operation 29
Q
Quality ...... ii
R
R&TTE 3
Recycling and Disposal ....5
Repair 2
Reset....22
Resetting the navigation system
Hard Reset 22
Soft Reset....22
S
Safety and Maintenance ....1
Safety instructions
Navigation 23
Connection....3
Ambient temperature ......2
Data security......1
Operating environment ......2
Repair 2
Cabling....3
Battery operation ....4
Maintenance ....4
Care of the display 4
Transport....5
SD/MMC Slot 9
Security 17
Serial Number......i
Service.... ii
Faults and possible causes...... 41
Hotline 41
Specifications 53
Standards
R&TTE.... 3
Starting the navigation software ..... 28
Sudoku
Description of the switch fields..... 38
Main screen 38
SuperPIN......i, 19, 20
Supplied Items.... 6
Synchronisation with the PC 45
T
TMC....48
Connecting a TMC dipole aerial ..... 49
Touch Screen 7
Transfer of card material to a memory card 51
Transferring Installation Files and
Map Material to the Internal Memory 52
Transport 5
Travel Guide 32
U
UUID......i, 19, 20
V
Views
Back components...... 8
Bottom components 8
Front components 7
Top components...... 9


- Notes on these Operating Instructions
- Note
- Document Your Navigation Unit
- Quality
- Service
- Contents
- Safety and Maintenance ....1
- Views....7
- Initial Set up....11
- General Operating Instructions....15
- Security 17
- Navigation....23
- Picture Viewer....29
- Travel Guide 32
- Alarm Clock (waking function) 33
- Sudoku 38
- FAQ....40
- Customer Service 41
- Appendix 42
- Specifications 53
- Index 54
- Safety and Maintenance
- Safety Instructions
- Data Security
- Operating Environment
- Repair
- Ambient temperature
- Electromagnetic Compatibility
- Connection
- Power supply through Car Adapter
- Cabling
- Information about the Regulatory Compliance according to R&TTE
- Battery Operation
- Maintenance
- Warning
- Care of the Display
- Recycling and Disposal
- Device
- Packaging
- Transport
- Supplied Items
- Views
- Back Components
- Ref Component Description
- Bottom Components
- Top Components
- Left Components
- Initial Set up
- Charging the Battery
- Attention!
- Power Supply
- Car Adapter
- Alternative possibility of charging the battery
- Switching on the Device
- Installing the Navigation Software
- General Operating Instructions
- Switching on/off the device
- Button Description
- Cancel/Back
- Standby Mode
- Reset
- Security
- Storing the password and the information note
- Making settings
- SuperPIN and UUID
- Making subsequent settings
- Password Request
- Resetting the Navigation System
- Switching the Device off Completely / Hard Reset
- Navigation
- Safety Instructions for Navigation
- General Instructions
- Notes for Use in a Vehicle
- Additional Notes for Use on a Bicycle or a Motorcycle
- Aerial Orientation
- Mounting the Car Holder
- Attaching the Navigation System
- Connecting the Car Adapter
- Starting the Navigation Software
- Picture Viewer
- Operating the Picture Viewer
- Main Screen
- Full Image View
- Travel Guide
- Alarm Clock (waking function)
- Overview of the main screen
- Description of the Interfaces
- Setting the System Time
- Selecting an Alarm Signal
- Setting the Volume
- Snooze Function
- Ending the Alarm Clock Application
- Sudoku
- Description of the switch fields
- FAQ
- Customer Service
- Faults and Possible Causes
- Solution:
- Additional Support
- Appendix
- Special CleanUp Function
- The CleanUp function offers 8 options:
- Remove Installation Only
- Remove MAP Only
- Remove Preload Only
- Remove All
- Factoryreset
- Format Flash
- GPS Factory Reset
- DC AutoSuspend
- Exit
- Synchronisation with the PC
- Installing Microsoft® ActiveSync®
- Hinweis
- Procedure for Vista users:
- Important
- Connecting with the PC
- Working with Microsoft® ActiveSync®
- GPS (Global Positioning System)
- TMC (Traffic Message Channel)
- Connecting the TMC Dipole Aerial (optional)
- Working with Memory Cards
- Inserting Memory Cards
- Removing Memory Cards
- Accessing Memory Cards
- Data Exchange via Card Reader
- Additional Card Material
- Transfer of card material to a memory card
- Alternate method of installing Navigation Software (using a Memory Card)
- Transferring Installation Files and Map Material to the Internal Memory
- Index
- A
- B
- C
- D
- E
- F
- G
- H
- |
- L
- M
- N
- 0
- P
- Q
- R
- S
- T
- U
- V
Brand : MEDION
Model : GoPal E4230 M20 (MD 97190)
Category : Gps