
KDS-10 - Cutting machine Pro-Cut - Free user manual and instructions
Find the device manual for free KDS-10 Pro-Cut in PDF.


| Product Type | Meat Slicer / Cutting Machine |
| Brand | Pro-Cut |
| Model | KDS-10 |
| Blade Diameter | 250 mm (10 in) or 300 mm (12 in) (model dependent) |
| Dimensions (H x W x D) | 43.2 x 40.6 x 54.6 cm (17 x 16 x 21.5 in) for 250 mm model |
| Weight | Not specified in manual |
| Power Supply | 115 V / 220 V, 60 Hz / 50-60 Hz (see ID plate) |
| Motor Power | 1/3 HP |
| Speed | 400-420 RPM |
| Knife Material | Stainless steel (assumed) |
| Housing Material | Anodized aluminum |
| Adjustable Thickness | Yes, via thickness gauge plate and slice adjusting knob |
| Carriage Type | Sliding carriage with adjustable grip |
| Sharpener | Integrated sharpener box with grinding and truing stones |
| Safety Features | Knife guard, On/Off switch with pilot light, grounding requirement |
| Cleaning Instructions | Disassemble and wash with mild detergent; do not submerge; clean every 4 hours |
| Lubrication | Lubricate slide rods every 100 hours or 3 days with light oil |
| Sharpening Frequency | As needed, using built-in sharpener |
| Manual Languages | English (PDF available) |
| Included Accessories | Knife guard, thickness gauge plate, carriage, sharpener box, grip |
Frequently Asked Questions - KDS-10 Pro-Cut
User questions about KDS-10 Pro-Cut
0 question about this device. Answer the ones you know or ask your own.
Ask a new question about this device
Download the instructions for your Cutting machine in PDF format for free! Find your manual KDS-10 - Pro-Cut and take your electronic device back in hand. On this page are published all the documents necessary for the use of your device. KDS-10 by Pro-Cut.
USER MANUAL KDS-10 Pro-Cut
natural_image
Exterior view of a modern commercial kitchen with a large side panel and control buttons (no text or symbols on the device itself)READ THIS MANUAL BEFORE USING THE EQUIPMENT FOR THE FIRST TIME.
507134-A
INSTRUCTIONS FOR OPERATION, SERVICE AND MAINTENANCE OF THIS EQUIPMENT
CONTENTS: PAGE
I. INTRODUCTION 1
II. UNPACKING 2
III. INSTALLATION 3
IV. OPERATION 3
V. KEY ELEMENTS IN GRINDING QUALITY PRODUCT 4
VI. CLEANING 4
VII. MAINTENANCE 7
VIII. EQUIPMENT SPECIFICATIONS 8
I.- INTRODUCTION:
Congratulations!, you have acquired a Deli slicer, which is made of high quality long lasting materials that should give you years of trouble free operation and durable service. This slicer is made of parts of anodized aluminum, a material with a type of superficial coat that maximizes the appearance, reduce the oxidation and it is also the best for the contact with food products.
IMPORTANT!: it is of vital importance that you and any person that will operate this unit thoroughly read this manual.

WARNING!:
This machine is designed to slice food products and is by nature dangerous, if not used and maintained properly for optimum safety.
This equipment must be connected to a thermal connection. Do not use the equipment if it is not properly grounded.

The appliance is not be used by persons (including children) with reduced physical, sensory or mental capabilities, or lack of experience and knowledge, unless they have given supervision or instruction. Children being supervised not play with the appliance.

Never perform service, cleaning or maintenance on this unit while connected to a power source.

Never use hands or fingers to feed products to cut; or introduce hands into the blade track area, within 4" (four inches) close to the blade, while in operation.

Do not leave the machine unattended while in operation & turn it off when it is not being used.
II.- UNPACKING
While unpacking the machine take special care in removing these components to be assembled later. Make sure that all are accounted for *.
The grinding unit includes:
| 1 Knife (5) 1 | Carriage support (2) 1 |
| 1 Motor (21) 1 | Carriage (3) |
| 1 Thickness gauge plate (6) 1 | Carriage Handle (18) |
| 1 Knife Guard (4) 1 | Grip (9) |
Also:
Sharpener Bpx Assembly:
Sharpener box (8)
*Note: for reference numbers see "Deli slicer diagram for components" (central pages).
A.- Remove the carton card board protectors and the plastic bag.
B.- Define the place to set the machine.
C.- Take out the carriage assembly. Do the same with the Base unit Assy by lifting from the base (1), (exercise proper lifting method, preferably do this procedure with two persons).
D.- Once the unit is firmly on the intended place of operation, take out the knife sharpener box Assembly and remove the bag and foam protector.
E.- Remove the knife edge protector by following the next instructions (See Fig. 1):
- Rotate the slice adjusting knob (7) counter clockwise until it stops.
- Remove the knife guard plate (4) by loosing the knife guard knob (13).
- Exercise extreme caution to remove the knife edge protector by finding the protector joint and removing the protector by lifting it from the knife. (Always wear hand and finger protection for this operation).
- Once the knife edge protector is removed, Assemble again the knife guard plate (4) and assure it with the knife guard knob(13). Close the thickness gauge plate(6) by rotating the slice adjusting knob (7) clockwise fully.

FIG 1. HOW TO REMOVE THE KNIFE'S EDGE PROTECTOR

WARNING!:
Take special care when you take apart the knife protector. The knife is already sharp from the factory and without protection serious injury may happen.
III.- INSTALLATION:
Before connecting to the power source follow this easy assembly and preparation steps (Fig. 2).
1.- Assemble the carriage assembly on the slicer base (1):
A.- Remove carriage knob (19) and washer.
B.- Place carriage assembly onto the support of the carriage bearing(20).
C.- Place washer and tighten carriage knob (19) firmly.
2.- Then install the Knife Sharpener Box Assembly (8) according to Fig. 3. Screw clockwise the lock knob (17) to fix the complete assembly.
3.- Set the slicer on a clean and leveled floor.
4.- Rotate the slice adjusting knob (7) to be sure that it works freely all the way through, and check that the thickness gauge plate (6) opens and closes simultaneously.
5.- Connect the slicer to the power source. The power source should be close enough to the machine to provide ease of disconnection for cleaning and service.
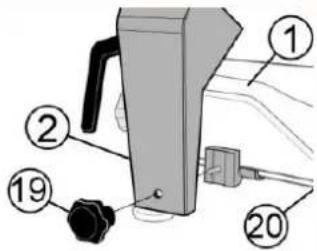
FIG 2. FIXING THE CARRIAGE ASSY
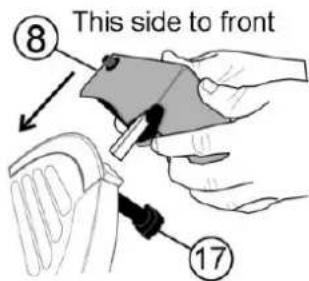
FIG 3. INSTALLING THE SHARPENER BOX
IV.- OPERATION:

WARNING!:
For the first time usage, you must clean the machine and also cut a couple of slices of scrap product (you can use carrots, potatoes etc.) to be sure that the knife is clean before cutting edible product.
Normal operation of the slicer:
1.- Place the product to be cut on the carriage tray (3).
2.- Unlock the grip (9) from under the carriage tray (3), move it to the top of the slide rod, do not force this operation, then rotate the grip (9) counter clockwise to its position over the product (See Fig. 4).
3.- Push the grip (9) by the grip knob (10) all the way down on the product. To slide the carriage back and forth use the carriage handle (18) (See Fig. 5).
4.- Move the carriage assembly all the way back and select the thickness using the slice adjusting knob (7).

FIG 4. UNLOCKING THE GRIP
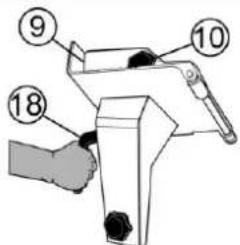
FIG 5. USING THE CARRIAGE
5.- Turn on the machine using the On/Off switch (14), the pilot safety light switch gives warning that the slicer is running.
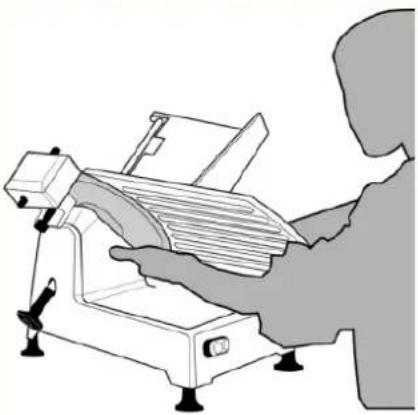
6.- Locate in the correct working position (See Fig. 6), and now you can start to slice the product; this machine has been designed with a 45^ angle so that minimum effort is required to push the product through the cut. For best results, keep knife (5) sharp.
7.- When finished, always turn the machine off by using the switch (14) and turn the slice adjusting knob (7) clockwise as far as it will go (be sure that the thickness gauge plate (6) covers the edge of the knife (5) to prevent any possible accident).
8.- Replace the grip (9) to its stowed position under the carriage (3).
V.- KEY ELEMENTS IN SLICING QUALITY PRODUCT:
1.- Do not force the cut against the knife (5).
2.- Keep knife (5) edge sharp to assure ease of cutting and enhance product appearance.
natural_image
Illustration of a person using a lathe machine to cut a sheet of paper (no text or symbols visible)FIG 6. WORKING POSITION
Note: the re-sharpening procedure steps are shown in section VII MAINTENANCE.
3.- Keep the thickness gauge plate (6), the carriage tray (3), the knife (5), and the receiving tray free of scraps and debris.
VI.- CLEANING, SANITIZING & INSPECTING INSTRUCTIONS:

WARNING!:
CLEAN and SANITIZE this equipment at least once every four hours of operation in order to prevent the growth of disease-causing bacteria. This procedure must comply with additional laws from your state and local health departments.
Follow the next procedure to disassemble and clean the equipment. Remember to turn off and disconnect the slicer before this.
A. CARRIAGE TRAY (See Fig. 7).
1.- Turn the carriage support knob (19) counter clockwise and then remove the carriage assembly.
2.- Inspect the contact area between the carriage support (2) and the carriage (3) plate, and the grip (9) with the serrated sheets. Mating surfaces of joined components shall be with no hollow spaces between the joined surfaces. Also gasket shall not be broken, missing or unattached.
3.- Clean completely and remove all food debris specially from the carriage sliding bar and grip (9). Apply FDA approved mineral oil in all surface of sliding bar after clean (ask to your authorized dealer).
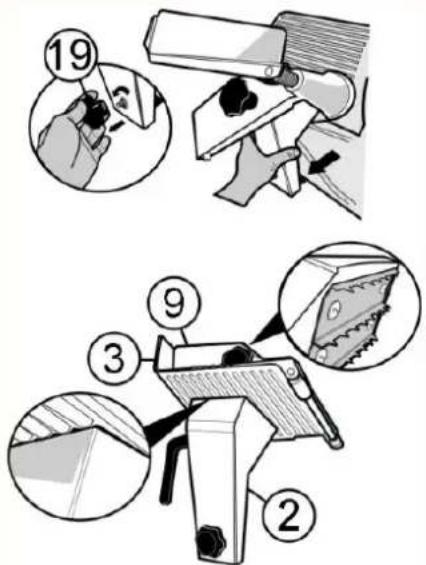
FIG 7. CARRIAGE TRAY

natural_image
Mechanical component diagram showing a lever mechanism with arrows indicating motion (no text or symbols)FIG 8. SLICE DEFLECTOR
B. SLICE DEFLECTOR (See Fig. 8).
1.- Turn off and unplug the slicer.
2.- Remove the slice deflector by loosening the screw knobs (Counter clockwise).
3.- Sink the part with warm water and a mild detergent solution. Clean and dry completely.
Note: When assemble again, keep enough space between deflector and knife (1/32" min).

IMPORTANT!:
It is recommended to clean the machine daily, with a soft damp cloth, and a soft brush with approved mild detergent and water. Do not clean the machine with a water hose. DO NOT SUBMERGE THE UNIT IN WATER OR OTHER LIQUIDS.
C. KNIFE (See Fig. 9).
1.- Loose the knife guard knob (13) by turning it counter clockwise. Knob's at the backside of slicer.
2.- Remove the knife guard (4) (lifting up using both hands).
3.- With extreme caution, wipe all the knife (5) towards outside (from center). Spray, clean and dry as necessary.
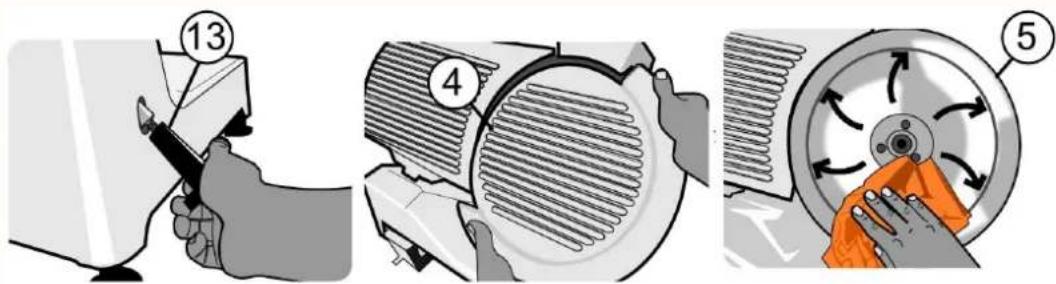
FIG 9. STEPS FOR KNIFE CLEANING

CAUTION!
Since the knife edge is partially or totally exposed, it is extremely dangerous. It's recommended to wear hand and finger protection for the cleaning steps.
D. SHARPENER BOX (See Fig. 10).
1.- Remove the sharpener box (8) by loosening the sharpener lock knob (17) and pull the assembly up.
2.- For cleaning the inside of the sharpener use a small soft brush, and a soft damp cloth, do not use water hose. Remove all food debris contained in pores of stones.
3.- Dry completely or let air dry.
Note: Never use sharpener box with wet stones. Rods must be lubricated all the time. After knife sharpening, all components: knife (5) and stones (11 & 12), should be cleaned and sanitized again.
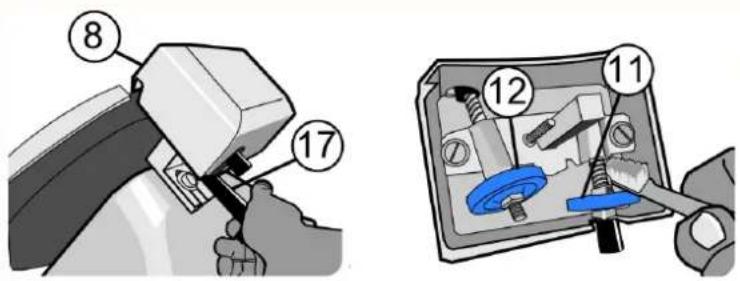
FIG 10. SHARPENER BOX
After sanitizing, be sure all components are totally dried and clean, reattach again following the previous steps in reverse order.
Note: Before using the slicer, be sure the knife sharpener is in place and secure.

CAUTION!
Simply wiping down to remove visible debris is not a substitute for thoroughly cleaning and sanitizing the equipment.
E. INSPECTION
Routinely examine the conditions of seams, seals and gaskets to confirm integrity while the slicer is assembled and before breaking down for cleaning and sanitizing. Also, look in hard-to-reach areas for food and liquid accumulations. Remember, proper inspection may require that components be removed and reattached. See next diagram for inspection points (Fig. 11).

FIG 11. POINTS TO BE INSPECTED

IMPORTANT!:
The recommended interval between gasket inspections shall not exceed 4 months and must be performed by authorized service agent. If any gasket or seal is damaged or missing, the equipment must be removed from service until be repaired. Please contact to your authorized dealer.
VII.- MAINTENANCE:
1.- Slide rods: you must lubricate the slicer with light oil at least every 100 hours or 3 days of service. The points to lubricate are upper and bottom sides of round (20) and square sliding rods.
2.- Knife: after certain period of use or if you notice the quality of the sliced meat is not as fine as the first time, you will need to re-sharpen the knife (5):
A.- Be sure the machine is off.
B.- Loosen the sharpener lock knob (17) under the sharpening assembly, until it springs up (See Fig. 12).
C.- Lift the sharpener assembly and rotate it 180°, reassemble and secure it. Verify that the stones are on each side of the knife (approx. 1/4" under the edge), then tighten the knob (17) again.
D.- Turn on the machine and, push the rod "a", let the stone (11) grind the under side of the knife for a few seconds. This will sharpen the edge and create a slight burr on the top side of the edge. When you release the rod "a" it will return automatically.
E.- Then with the upper stone (12) remove the burr from the top side of the knife by pushing down rod "b". Only a very slight pressure is needed to home the edge. Too much pressure and time can create a reverse angle and destroy knife edge. Rod "b" will return automatically when released.
F. - Clean and sanitize the equipment (See CLEANING, SANITIZING AND INSPECTING section).
G.- Reassemble in the previous position the sharpener assembly by following the reverse order.

IMPORTANT!:
The time spent in grinding and truing the knife edge will add to longevity of the knife and provide optimum efficiency of your meat slicer. Repeat steps "D" and "E" if it is necessary.

FIG 12. HOW TO RE-SHARP THE KNIFE
PARTS TO CARE FOR WEARING OUT:
| REVIEW OF PARTS (SUPPLIES) | FREQUENCY VERIFICATION | COMMENTS |
| Band Once a month | If you see any product to your slicing blade stops. Tension to give the band for a better grip rotation between pulleys. | |
| Bearing Daily | Do daily clean bearing area to prevent buildup of fluids and wastes.Also oil (food grade grease) this area for the purpose of extending the life of bearing. | |
| Membrane (on-off) Daily | Required immediately change switch membrane break if failure to prevent post on or off the introduction of moisture or other waste. | |
| Moving truck (bars media) | Once a week | Keep free of waste (powder, food, etc.) Bars also keep moving thin oil lubricated, do not use oil or fat thick as it affects the movement. |
| Knife Once a week | Sharpening blade heavy cut if you notice, or if you notice when excess scrap slicing. (Cut must be gentle and easy to clean). | |
| Sharpening stones and Seated | Daily | It is recommended that the stones are kept covered or protected from wasteto extend the life of these. Make sure before the blade sharpening is free to prevent wasteClogged pores of stones. |
VIII.- EQUIPMENT SPECIFICATION
A) GENERAL DIMENSIONS

B

natural_image
Technical line drawing of a mechanical device with no visible text or symbolsC
FIG 13. EQUIPMENT GENERAL DIMENSIONS
DIMENSIONS 250 (MM-Diameter) MODEL 300 (MM-Diameter) MODEL
| A | 40.6 CMS 45.7 CMS | |
| 16 IN 18 IN | ||
| B | 54.6 CMS 54.6 CMS | |
| 21.5 IN 21.5 IN | ||
| C | 43.2 CMS 53.3 CMS | |
| 17 IN 21 IN |
B) ELECTRICAL SPECIFICATIONS (Depends on your model. See ID plate)
| MEAT SLICER 250 (MM) MODEL 300 (MM) MODEL | ||||
| Capacity 1/3 HP 1/3 HP | ||||
| Frecuency 60 Hz 50 or 60 Hz 60 Hz 50 or 60 Hz | ||||
| Voltage 115 V 220 V 115 V 220 V | ||||
| RPM 400-420 | ||||
| Phases 1 1 | ||||
ELECTRICAL DIAGRAM
The electrical diagram for this unit is located under the base frame.

WARNING!:
The maintenance or service for this equipment must be performed by qualified personnel only. For any problem or doubt related to electrical specifications and connections, please call to your authorized dealer.
MEAT SLICER DIAGRAM FOR COMPONENTS (SEE CENTRAL PAGES)
| ITEM DESCRIPTION QTY | ||
| 1 | SLICER BASE FRAME 1 | |
| 2 | CARRIAGE SUPPORT 1 | |
| 3 | CARRIAGE | 1 |
| 4 | KNIFE GUARD PLATE 1 | |
| 5 | SLICER KNIFE 1 | |
| 6 | THICKNESS GAUGE PLATE 1 | |
| 7 | SLICER ADJUSTING KNOB 1 | |
| 8 | SHARPENER BOX 1 | |
| 9 | GRIP | 1 |
| 10 | GRIP KNOB 1 | |
| 11 | GRINDING STONE | 1 |
| 12 | TRUING STONE | 1 |
| 13 | KNIFE GUARD KNOB | 1 |
| 14 | SWITCH WITH PILOT LIGHT | 1 |
| 15 | CARRIAGE BEARING | 1 |
| 16 | RUBBER FOOT | 4 |
| 17 | SHARPENER LOCK KNOB 1 | |
| 18 | CARRIAGE HANDLE | 1 |
| 19 | CARRIAGE SUPPORT KNOB | 1 |
| 20 | ROUND SLIDING ROD | 1 |
| 21 | MOTOR 1/3 SINGLE PHASE (NOT SHOWN) | 1 |
| 22 | MEAT HOOKS | (2) |

THANKS FOR READING THIS MANUAL. IF YOU HAVE ANY DOUBT REGARDING THE OPERATION OF THIS MEAT SAW, PLEASE CONTACT TO YOUR PRO CUT AUTHORIZED DEALER.
- INSTRUCTIONS FOR OPERATION, SERVICE AND MAINTENANCE OF THIS EQUIPMENT
- CONTENTS: PAGE
- I.- INTRODUCTION:
- WARNING!:
- II.- UNPACKING
- III.- INSTALLATION:
- IV.- OPERATION:
- V.- KEY ELEMENTS IN SLICING QUALITY PRODUCT:
- VI.- CLEANING, SANITIZING & INSPECTING INSTRUCTIONS:
- CARRIAGE TRAY (See Fig. 7).
- SLICE DEFLECTOR (See Fig. 8).
- IMPORTANT!:
- KNIFE (See Fig. 9).
- CAUTION!
- SHARPENER BOX (See Fig. 10).
- INSPECTION
- VII.- MAINTENANCE:
- VIII.- EQUIPMENT SPECIFICATION
- ELECTRICAL DIAGRAM
Brand : Pro-Cut
Model : KDS-10
Category : Cutting machine