
PHTCM48 - Camera Pyle - Free user manual and instructions
Find the device manual for free PHTCM48 Pyle in PDF.


| Product Type | Trail Camera |
| Brand | Pyle |
| Model | PHTCM48 |
| Image Sensor | 16 Megapixel CMOS |
| Video Resolution | 1080p Full HD |
| Night Vision | Infrared LEDs up to 50ft |
| Trigger Speed | 0.5 seconds |
| Detection Range | Up to 60ft |
| Power Source | 8x AA batteries (not included) or 6V DC adapter |
| Standby Current | Low power consumption; up to 12 months battery life |
| Memory Card | Supports microSD up to 32GB |
| Dimensions | 5.5 x 3.5 x 2.5 inches |
| Weight | 0.5 lbs (without batteries) |
| Mounting | Adjustable strap mount included |
| Interface | 2.4-inch color LCD screen |
| Protection Rating | IP54 weatherproof |
| Maintenance | Clean lens with soft cloth; store in dry place |
| Safety | Keep away from children; do not expose to extreme heat |
| Spare Parts | Batteries, memory card, strap, USB cable |
| Repairability | Limited user serviceable parts; contact support for repairs |
Frequently Asked Questions - PHTCM48 Pyle
User questions about PHTCM48 Pyle
0 question about this device. Answer the ones you know or ask your own.
Ask a new question about this device
Download the instructions for your Camera in PDF format for free! Find your manual PHTCM48 - Pyle and take your electronic device back in hand. On this page are published all the documents necessary for the use of your device. PHTCM48 by Pyle.
USER MANUAL PHTCM48 Pyle
natural_image
Black PYLE surveillance camera with 16-lens illuminated modules and a red LED indicator (no text or symbols on device body)PHTCM48
Night Vision Trail Camera System
Index
- Introduction...... 2
- Digital Scout Camera Specifications .... 4
- Parts Identification .... 5
- Packing Contents 6
- Battery and SD Card Installation 6
- Setup your Camera 7
6.1 Enter Camera Setting Mode....7
6.2 Setup the Camera....8
6.2.1 Set PIR Sensitivity 8
6.2.2 Set Date 8
6.2.2 Set Time 9
6.2.3 Set Delay....9
6.2.4 Format the SD Card....10
6.2.5 Set MODE (Photo Resolution and Video Length).... 10
6.2.6 Set Status (PIR, Time-Lapse) 11
6.2.7 Set Camera Duty Time.... 11
6.3 GSM Setting (after transmitting adaptor is connected).... 12
7 Using the Camera 12
7.1 Mounting the Camera 12
7.2 Turn on the Camera 13
7.3 Testing the Camera Coverage Area.... 13
7.4 Secure Your Camera.... 14
7.5 Battery Status Reading.... 14
8 Viewing the Images and Movies on a Computer.... 15
9. Glossary 15
10. Troubleshooting/FAQ.... 16
1. Introduction
Congratulations on your purchase of the Night vision camera digital scout camera. This scout camera is designed to record the activity of wildlife game in the outdoors and enhance personal security with its still image and movie modes, weatherproof and rugged construction.
New Features:
- 5 to 30 seconds video with audio
- New Text LCD
- PIR Sensitivity Adjustor
- MMS/GPRS Compatible
- GPS Location
- Time lapse function
- Manually Set Camera Working Time Period (For example, you can let the camera work from 7:35 PM to 5:25 AM the next Day) for surveillance purposes.
Main Features:
◆ 5.0MP Effective Pixel
◆ 21 IR LEDs,
◆ 1/2.5 Inch CMOS
◆ New Text LCD
◆ 5 to 30 seconds video with audio
◆ MMS/GPRS Compatible
◆ Time lapse function
◆ PIR Sensitivity Adjustor
◆ Longitude & Latitude, Temperature, Date Time, Moon Phase Imprint
◆ Power Supply: 6V, 2*4 (8) AA Cell batteries
◆ Ultra Portable Size (100mm * 122mm * 66 mm)
◆ Standard Socket for Camera Tripod
◆ Water Resistant
2. Digital Scout Camera Specifications
| Product Name | Digital Scout Camera |
| Model Number | ST042 |
| Image Sensor Type | 1/2.5 Inch CMOS |
| Effective Pixels | 5.0 Megapixels |
| Lens Aperture | F2.0 for night time / F3.0 for day time |
| Camera Lens Sight Angle | 55 Degrees |
| Trigger Speed | <1.0Second |
| Number of IR LEDs | 21 LEDs |
| IR Filter | Fully Automatic IR Filter |
| Display | Text LCD |
| PIR Distance Adjustor | Yes |
| Max Night Vision Lighting Distance | 12 meters |
| Time Delay | 5 seconds - 10minutes |
| Time Lapse Mode | Yes (1m~24h) |
| Duty Time | 00H00M~23H59M |
| Multi-shot | 3pcs |
| Selectable Image Resolution | 10MP, 5.0MP |
| Audio | Yes |
| Video Resolution | Movie size: VGA,Movie length: by setting (5~30s) |
| MMS/GPRS Compatible | Yes |
| Photo Stamp | Longitude & Latitude, Moon phase, Date, Time, Temperature |
| Menu Languages | English |
| Extra power | DC-In 6Volts 1000mA (1A) minimum current |
| Power Supply | 6V, 2*4 (8) AA Cell batteries. |
| Dimension | 122mm X 100mm X66mm |
| Camera Tripod Socket | Yes |
| Water Resistant | Yes |
3. Parts Identification
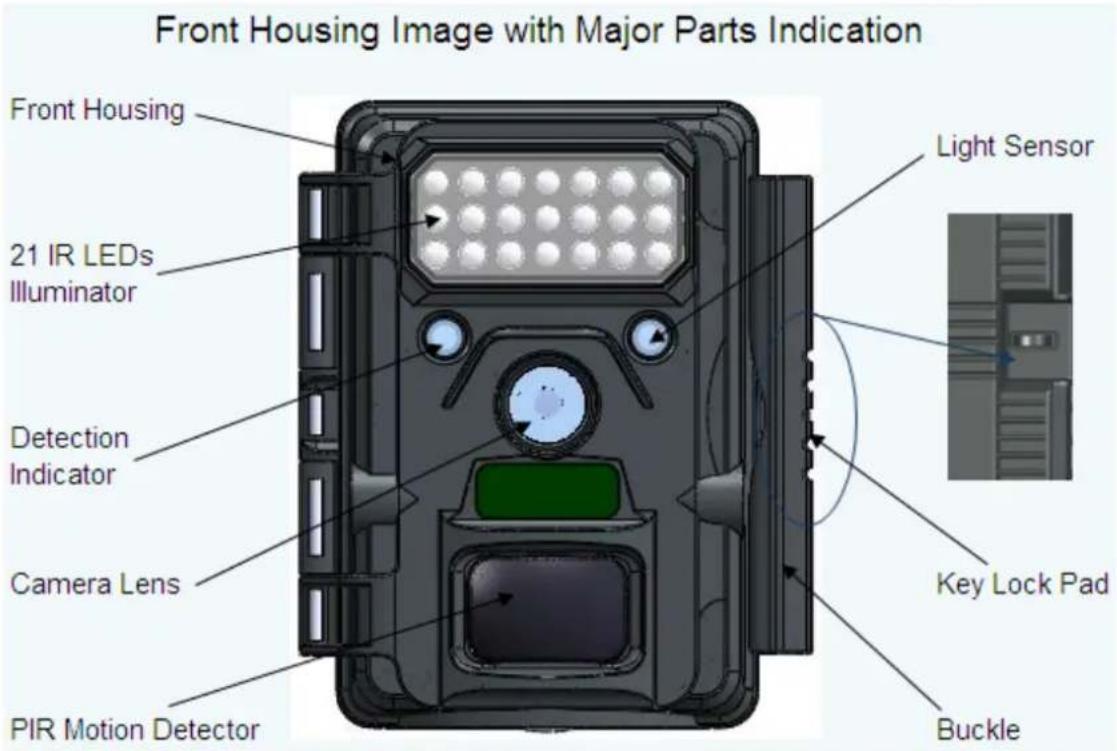

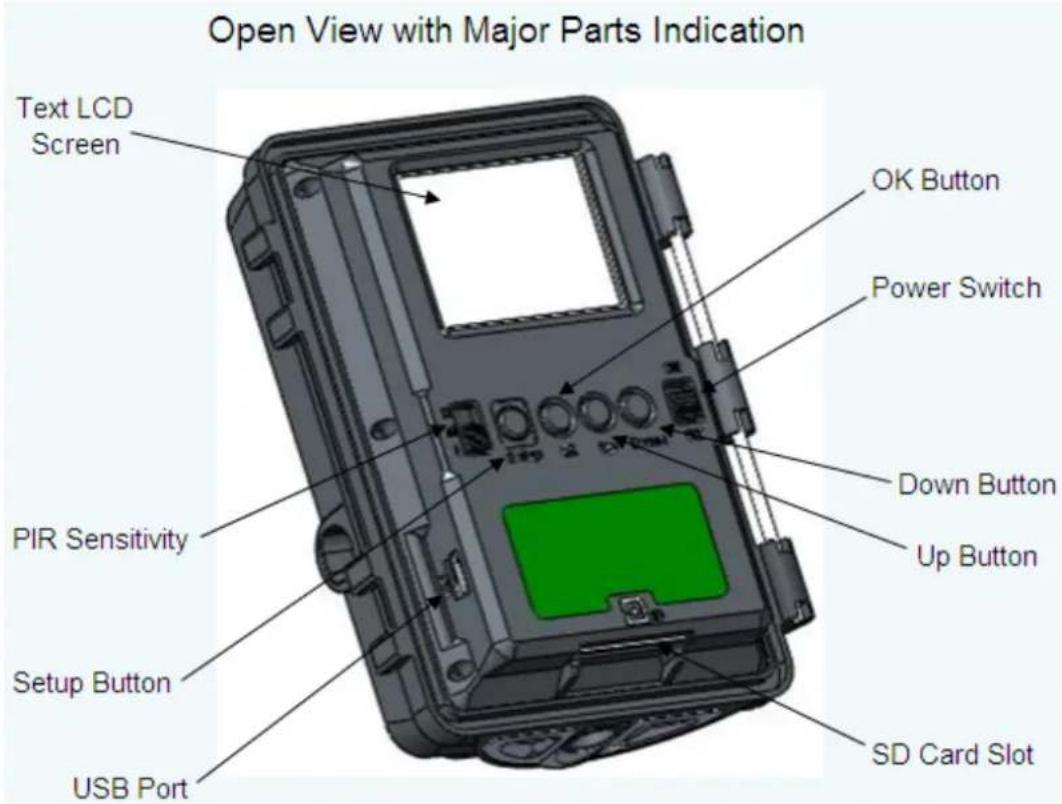
4. Packing Contents
Model Night vision camera Digital Scouting Camera
- User Manual
- USB cable
- Mounting Kit
5. Battery and SD Card Installation
Night vision camera Digital Scouting Camera is designed to operate using 2 x 4*AA Cell Batteries. We recommend using Alkaline batteries.
NOTE: Always have camera in OFF position when installing or removing batteries.
Do not mix old and new batteries together.
Do not mix battery types—use all Alkaline or all Lithium.
▲ Please make sure the voltage and polarity (+/-) are correct before connection. Incorrect voltage or polarity (+/-) will damage the camera.

Memory
Your Night vision camera Digital Scouting Camera has a memory card slot and can accept SD cards with a max capacity of 32GB (SD card sold separately).
Inserting SD card
Make sure camera is in the OFF position whenever adding or removing memory.
- Insert SD memory card in to the SD Card Slot completely and in the correct direction as shown by the sticker located at the side of the housing.
• To remove the SD memory card, depress the SD card and pull out the card gently.
▲ SD cards must be clean (no images from other sources), if you are using the SD card from other cameras, please make sure to format the SD card prior to using in the camera. New cards can be used straight from the package.
6. Setup Your Camera
6.1 Enter Camera Setting Mode
The setting of this camera is very easy. The word "WAIT" will show on the display for 2-3 seconds, then the camera will enter setup mode. Menu list as following:

Menu Items
| Basic Setting Items Options | ||
| 1 | DATE | YYYY MM/DD |
| 2 TIME HH:MM | ||
| 3 | DELAY | MM:SS |
| 4 | FORMAT | FORMAT SD CARD |
| 5 MODE | 1P, 3P and Movie5M(HI), 3M(LO) for Photo5 ~ 30s for Video | |
| Advance Setting | Items | Options |
| 6 STATUS | PIR, TL or PIR+TLTL: 1m~24H (Time Interval) | |
| 7 DUTY | HH:MM (Start Time) ~HH:MM (End Time) | |
6.2 Setup the camera
In this chapter, it will tell you how to set up the camera.
6.2.1 Set PIR Sensitivity

This camera has 3 sensitivity levels. Choose "H" ("H" means high sensitivity) when the weather is hot. Choose "M" ("M" means middle sensitivity) when the weather is normal, and choose "L" ("L" means low sensitivity) when the weather is cold. If you want the camera to detect long distance coverage, or to sense very small animals, please always put the Switch at "H".
6.2.2 Set Date
Setting the date before use, so that the user can have the month, day and year printed on the picture.

a) Turn on the camera
b) Press "UP" and "DOWN" to Select "DATE" menu
c) Press "OK" to confirm
d) Press "UP" and "DOWN" to select year number
e) Press "OK" to confirm and then it will come to set Month "MM", Press "UP" and "DOWN" to select.
f) Press "OK" to confirm and then it will come to set Date "DD", Press "UP" and "DOWN" to select.
g) Press "OK" to confirm
h) Press "Setup" to QUIT or continue to the next menu item.
6.2.2 Set Time
Setting time before use, so that the user can have time information printed on the picture.
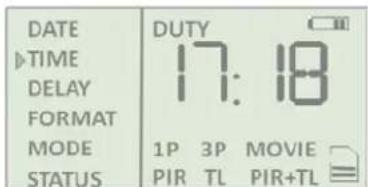
a) Turn on the camera
b) Press "UP" and "DOWN" to Select "TIME" menu
c) Press "OK" to confirm
d) Press "UP" and "DOWN" to select hour "HH".
e) Press "OK" to confirm and then it will come to set minute, Press "UP" and "DOWN" to select the minute "MM".
f) Press "OK" to confirm
g) Press "Setup" to QUIT or continue to the next menu item.
6.2.3 Set Delay
Camera Delay is used to set the amount of preset time in minutes and seconds the camera will sleep between PIR triggering. This setting ranges from 5 second \~ 10mins. Default delay is 1 minute.

a) Turn on the camera
b) Press "UP" and "DOWN" to Select "DELAY" menu
c) Press "OK" to confirm
d) Press "UP" and "DOWN" to select minute "MM".
e) Press "OK" to confirm and then it will come to set seconds "SS", Press "UP" and "DOWN" to select.
f) Press "OK" to confirm
g) Press "Setup" to QUIT or continue to the next menu item.
6.2.4 Format the SD Card
You are able to format the SD card and clear all the pictures on the card. When you select this menu, you will see a 4 digits number. For example "6586", this means you have total 6586 pictures and movies on the SD card.

a) Turn on the camera
b) Press "UP" and "DOWN" to Select "FORMAT" menu
c) Press "OK" to confirm
d) Press "UP" and "DOWN" to select YES or NO
e) Press "OK" to confirm
f) Press "Setup" to QUIT or continue to the next menu item.
6.2.5 Set MODE (1P, 3P, Movie, Photo Resolution and Video Length)
The MODE setting is used to tell the camera how it will take photos or videos. This setting is related to the toggle on "Photo or Video". If the toggle stays at photo, you will set the picture resolution. If it stays at Video, you will set the video length.
a) Turn on the camera
b) Press "UP" and "DOWN" to Select "MODE" menu
c) Press "OK" to confirm
d) Press "UP" and "DOWN" to select from 1P, 3P or Movie
e) Press "OK" to confirm

f) Then it will show corresponding options for 1P 3P or Movie
g) If you select 1P or 3P, the camera will ask you to set the photo resolution HI (5M) or LO(3M)
h) If you select Movie, the camera will ask you to set the video length from 5s \~ 30s.
i) Press OK to confirm
j) Press "Setup" to QUIT or continue to the next menu item.
6.2.6 Set Status (PIR, Time-lapse)
In the menu, you are able to set the camera working status such as PIR activated or time-lapse mode. We have three statuses.
- PIR: This means the camera works on PIR activation only.
-
TL: This means the camera works on time-lapse mode only. Time-lapse means the camera takes the picture on a certain interval of time. The interval range is from 1 minute to 24 hours. Example: The time interval 20:15 means camera will capture a image every 20 hours and 15 minutes. 00:59 means camera will capture a photo every 59 minutes.
-
PIR+TL: This means the camera works on both PIR trigger and the time-lapse hybrid mode.

a) Turn on the camera
b) Press "UP" and "DOWN" to Select "STATUS" menu
c) Press "OK" to confirm
d) Press "UP" and "DOWN" to select "PIR", "TL" or "PIR+TL"
e) Press "OK" to confirm
f) If you select "TL" or "PIR+TL", you are asked to set the interval from 1 minute to 24 hours. For example, 1 minute means the camera will take the picture every 1 minute.
g) Press "OK" to confirm
h) Press "Setup" to QUIT or continue to the next menu item.
6.2.7 Set Camera Duty Time
User can make the camera work in a specific time period of the day. if you only need camera work at night, you can set camera work start from 19:00PM and end at morning 06:00AM. This will affect all three status of PIR, TL or PIR+TL mode. We call this “duty time” mode. By system default, the camera works 24 hours a day.

a) Turn on the camera
b) Press "UP" and "DOWN" to Select "DUTY" menu
c) Press "OK" to confirm
d) Next you will set the starting point in HH:MM.
e) Press "UP" and "DOWN" to select and press "OK" to confirm
f) First you will set the ending point in HH:MM.
g) Press "UP" and "DOWN" to select and press "OK" to confirm
h) Press "Setup" to QUIT or continue to the next menu item.
For Example:
07:30 -- 18:30 would define camera to work from 7:30AM to 6:30PM
20:15 --- 04:20 would define camera to work from 8:15PM to 4:20AM the next day.
6.3 GSM Setting (After transmitting adaptor is connected)
For how to connect and set the transmitting adaptor, please read the S2G00 User Manual. MMS/GPRS functions are compatible on this camera. If the user selects these functions, the camera display will show the following:
Transmitting Adaptor's LED indicator will be illuminated if it connects to camera successfully.
After user completes set up of the camera, press "setup", the camera will start to take images, while the display will show the signal intensity "*H/M/L".
When the adaptor is transmitting images, the display will show "GSM" and countdown 15s.
Note:
The camera display will show "2GNO" if connection is not made very well.
The camera display will show "NOSI" if the SIM card is not inserted in the adaptor, or if the SIM card is in poor condition and not making good contact.
7 Using the Camera
7.1 Mounting the Camera
It is recommended that you mount the camera 1.2\~1.5 meters off the ground with the camera pointed at a slight downward angle. Be sure to avoid mounting the camera facing east or west as the rising and setting of the sun could produce false triggers and overexposed images. Clear branches and other debris away from the front of the camera so as not to block the camera lens or PIR sensor.

a) Insert the strap through the strap slots on the rear housing.
b) Wrap the strap around the mounting surface. Secure the strap and tighten the buckle in order to secure the camera.
In order to obtain proper weather resistance, please make sure that both door latches are securely locked in place.
7.2 Turn on the Camera
Just move the "POWER" switch to "ON", and the camera will be turned on. If there is no operation in 1 minute, the camera will go into the sleeping mode. When the PIR sensor is triggered, it will start to take photos/video right after the delay time is passed.
7.3 Testing the Camera Coverage Area
One of Night vision camera Scouting Camera's features is the ability to test the coverage area.
- After mounting the camera, open the front housing and slide the "Power" switch to the "ON" position and put the camera into the "SETUP" mode (Refer to section 6.1).
• A red indicator light on the front will blink when you have intruded the coverage area. - Adjust the camera position as needed and repeat testing until the desired coverage area is achieved.

▲ Make sure to switch the "Power" to "On" and press the "SETUP" button again after setting is over. Otherwise the camera will not take any pictures or movies.
7.4 Secure Your Camera
Night vision camera Scouting Camera has a locking hole to have a lock on it.

natural_image
3D rendering of a black electronic device casing with ventilation slots and a red circular logo (no text or symbols visible)You can also use the cable lock with our camera to secure the camera on a tree or a pole. It also has a hole for a security chain.

natural_image
Two black plastic electronic devices with ventilation grilles and red arrows indicating airflow direction (no text or symbols visible)7.5 Battery Status Reading
a) If system voltage is greater than 4.1v, the camera will operate normally both day and night
b) If system voltage is greater than 3.9v but less than 4.1v, the battery indicator will flash 2 times in the night and go into sleep mode. The camera will operate in the day but will sleep in the night, because the power cannot support IR flash.
c) If the system voltage is less then 3.9v, the battery indicator will flash 10 times and then turn off the camera. You need to replace a set of new batteries.

natural_image
Top-down view of a black camera module with illuminated screen, buttons, and display (no text or symbols)8 Viewing the Images and Movies on a Computer
Connect the Camera directly to the PC
- Slide the "Power" toggle switch to the "on" position
- Select "Setup" Mode (Refer to Section 6.1)
- Connect your camera to the PC via the USB cable. The PC will recognize the new device as a "mass storage" camera drive.
- Then the user can copy, move or delete the photos and videos that are on the SD card.
Read Images by Card Reader
- Depress the SD card and pull out the card gently.
- Put the SD card into the card reader (SD card readers are available in the market)..
- Read images and movies from the card reader.
9. Glossary
■ PIR: Passive Infrared Sensor. Senses motion like typical security motion detector. Requires infrared energy (heat) in addition to motion to trip sensor to assure detection of live animals.
■ Time-Lapse: Time lapse the camera to take pictures during a certain time interval by manually pre-setting. This helps the hunter or wildlife freely observer monitor the field.
■ Camera Delay: Time elapsed between photos while events are sensed and recorded. This is user-set based on wildlife activity in the area.
■ Resolution: The resolution selection that you have selected. MP = Mega Pixels = 1 million pixels HI (2560 x 1920): 5.0M pixels image. (High image quality, big file size)
LO (2048 x 1536): 3.1M pixels image. (Medium image quality, medium file size)
Video resolution (640 x 480@30fps): This is the resolution during video capturing.
■ FPS: Frame per second. This is the measurement of the frequency (rate) at which an imaging
device produces unique consecutive images. 30 fps means that the camera produces video at 30 frames per second. Higher fps values provide higher quality video.
■ Moon Phase Imprint: The activity of animals is believed by many to be related to the moon phase. Our unit features an imprint of the moon phase stamp on each photo, as to provide more information to the hunter or wildlife enthusiast.
■ IR Flash: Also called IR LED Array or Infrared LED Night Vision feature. It can emit a burst of infrared light which is invisible to the human eye. This is especially useful for night photos when a visible flash is undesirable.
■ SD Card: Memory card used to store images and video. The camera is compatible with up to 32GB capacity SD cards
■ Battery Life: Time that camera will function in the field. It is dependent on temperature, number of images and number of flashes during that time. Based on our new advanced power system, this camera can support 30 pictures/day for one year surveillance.
■ Multiple: Refers to set the number of pictures the camera will take per PIR triggering
1P: Single image capturing per PIR triggering
3P: Three continuous images captured per PIR triggering
10. Troubleshooting/FAQ
■ Battery life is shorter than expected
Battery life will vary with operating temperature and the number of images taken over time. Typically, the camera will be able to capture several thousand images before the batteries die.
Check to make sure you have used new alkaline or lithium batteries.
Make sure that the power switch was turned to the "ON" position and that the camera was not left in "Setup" mode while in the field.
Make sure that you are using a good quality name brand SD card in your camera.
■ Camera stops taking images or won't take images
Please make sure that the SD card is not full. If the card is full, the camera will stop taking images.
Check the batteries to make sure that they are new alkaline or lithium AA batteries. See note above about short battery life.
Make sure that the camera power switch is in the "ON" position and not in the "OFF" position or in "Setup" mode.
Make sure that you are using a good quality SD card in your camera.
If the SD card has its write protect switch in the lock position, the camera will not take images.
If you have used an SD card in another device before inserting it in your camera, you might want to try formatting the card using the "Format" parameter in Setup mode. Make sure you have backed up any important files first, as formatting will erase all previous files. In some cases, other devices may change the formatting of the SD card so that it will not work properly with the camera.
■ Camera won't power up
Make sure that you have installed all 2x4 batteries in the battery compartment.
Make sure that the batteries are installed correctly, observing proper polarity. Always place the negative (flat) end of each battery in contact with the spring tab side of its slot inside the camera.
■ Still Photo and/or Video Quality Problems
Night photos or videos appear too dark
a. Try using a set of new batteries. The flash will stop operating near the end of the battery life.
b. You will get the best results when the subject is within the ideal flash range, and no farther than 10 meters from the camera. Subjects may appear too dark at greater distances.
c. Please note that when the still photo mode is set to "3P", or with very short Delay time settings, some images may appear darker than others. This is due to the quick response and rapid retriggering of the camera, allowing less time for the flash to fully recharge before firing again.
Daytime photos or videos appear too dark
a. Make sure that the camera is not aimed at the sun or other light sources during the day, as this may cause the auto exposure to produce darker results.
Night photos or videos appear too bright
a. You will get the best results when the subject is within the ideal flash range, no closer than 10' (3m) from the camera. Subjects may appear too light at closer distances.
✨ Photos with streaked subject
a. In some cases with low lighting conditions and fast moving subjects, the 5M (Megapixel) resolution setting may not perform as well as the 3M settings.
b. If you have multiple images where fast moving subjects produce streaks on the photo, try the low resolution setting instead.
◆ Red, green or blue color cast
a. Under certain lighting conditions, the sensor can become confused resulting in poor color images.
b. If this is seen on a consistent basis, then the sensor may need servicing. Please contact customer service.
Short video clips—not recording to the length set
a. Check to make sure that the SD card is not full.
b. Make sure that the camera has good batteries in it. Near the end of the battery life, the camera may choose to record shorter video clips to conserve power.
■ Photos Do Not Capture Subject of Interest
Try to set your camera up in an area where there is not a heat source in the camera's line of sight.
In some cases, setting the camera near water will make the camera take images with no subject in them. Try aiming the camera over ground.
✿ Try to avoid setting the camera up on small trees that are prone to being moved by strong winds.
✧ Remove any limbs which are right in front of the camera lens.
■ PIR Sensor LED Flashes/Doesn't Flash
When the camera is in the "Setup" mode, the PIR Indicator LED on the front of the camera will flash when it senses motion. This is for setup purposes only and will help the user aim the camera.
During use, the LED will not flash when the camera takes an image. This is to help keep the camera hidden from game.
■ Camera won't retain settings
Make sure that you have been saving the changes to any parameter settings that you made while in "Setup" mode, by pressing "OK" after changing the setting. If you don't save your new setting after changing it, the camera will continue to use the original default setting for that parameter.
■ Longitude & latitude imprint not be showed on images
Make sure this trail camera is connecting or working together with the transmitting adaptor. Longitude & Latitude will only be printed if the camera is connected to the transmitting adaptor.
- PHTCM48
- Index
- Introduction
- New Features:
- Main Features:
- Digital Scout Camera Specifications
- Parts Identification
- Packing Contents
- Battery and SD Card Installation
- Memory
- Inserting SD card
- Setup Your Camera
- Enter Camera Setting Mode
- Setup the camera
- Set PIR Sensitivity
- Set Date
- Set Time
- Set Delay
- Format the SD Card
- Set MODE (1P, 3P, Movie, Photo Resolution and Video Length)
- Set Status (PIR, Time-lapse)
- Set Camera Duty Time
- GSM Setting (After transmitting adaptor is connected)
- Note:
- Using the Camera
- Mounting the Camera
- Turn on the Camera
- Testing the Camera Coverage Area
- Secure Your Camera
- Battery Status Reading
- Viewing the Images and Movies on a Computer
- Connect the Camera directly to the PC
- Read Images by Card Reader
- Glossary
- Troubleshooting/FAQ
- ■ Battery life is shorter than expected
- ■ Camera stops taking images or won't take images
- ■ Camera won't power up
- ■ Still Photo and/or Video Quality Problems
- ■ Photos Do Not Capture Subject of Interest
- ■ PIR Sensor LED Flashes/Doesn't Flash
- ■ Camera won't retain settings
- ■ Longitude & latitude imprint not be showed on images
Brand : Pyle
Model : PHTCM48
Category : Camera