
R5i - Exercise bike LifeSpan - Free user manual and instructions
Find the device manual for free R5i LifeSpan in PDF.


| Product Type | Exercise Bike |
| Brand | LifeSpan |
| Model | R5i |
| Resistance System | Magnetic |
| Resistance Levels | 16 |
| Display Type | LCD |
| Display Metrics | Time, Distance, Speed, Calories, Heart Rate |
| Programs | 12 Preset Programs |
| Heart Rate Monitoring | Hand Pulse Sensors |
| Seat Adjustment | Vertical and Horizontal |
| Pedals | Adjustable Straps |
| Dimensions (L x W x H) | 100 cm x 50 cm x 120 cm |
| Net Weight | 40 kg |
| Max User Weight | 150 kg |
| Power Supply | 2 AA Batteries (not included) |
| Assembly Required | Yes |
| Warranty | 2 Years |
| Maintenance | Wipe with a dry cloth after use |
| Safety Features | Stable frame, non-slip pedals |
Frequently Asked Questions - R5i LifeSpan
User questions about R5i LifeSpan
0 question about this device. Answer the ones you know or ask your own.
Ask a new question about this device
Download the instructions for your Exercise bike in PDF format for free! Find your manual R5i - LifeSpan and take your electronic device back in hand. On this page are published all the documents necessary for the use of your device. R5i by LifeSpan.
USER MANUAL R5i LifeSpan
Congratulations on Purchasing Your LifeSpan R5i Recumbent Bike!
At LifeSpan we take pride in the quality, safety, and reliability of our products as well as the professionalism of our sales support and customer service teams. Making it our number one priority that you have an exceptional experience using our products.
In support of this quality focus we pre-assemble parts on the manufacturing line whenever possible to reduce the number of steps and complexity of customer assembly, independently certify our products to comply with UL and EN957 Safety Standards, and use state of the art production processes and quality components.
Then we back LifeSpan products with excellent warranties and a responsive customer service department making it simple and easy to get assistance should the need arise.
This attention to quality, our high standard for customer service and focus on innovation has earned LifeSpan numerous awards and consistent praise from independent review groups, industry authorities and you the consumer.
Thanks for choosing LifeSpan.
Please thoroughly read this manual before you assemble or operate your recumbent bike. Neither LifeSpan nor its representatives can accept responsibility for any damages or injury incurred as a result of information presented in this manual except under the terms of the product warranty.
Contents
Welcome
Safety First 4
Safety First
About Your R5i Recumbent Bike 7
Specifications
Unique Features
Console Overview
Starting an Exercise Program
Heart Rate Monitoring
Programs
Warranty
Assembling Your R5i Recumbent Bike 18
Exploded View & Hardware
Assembly Instructions
Console Basics 32
Console Buttons / Date & Time
Display Console Window
Quickstart
Using Programs 36
Manual Mode
Custom User
My Zone Heart Rate Control Programs
Maintenance and Tips 41
Engineering Mode
Troubleshooting
General Maintenance
Moving
Safety First
When using exercise equipment, basic precautions should always be followed, including:
- Never drop or insert any object into any opening. If an object falls into an opening, unplug the power cord from the outlet. Remove the object or call customer service at 877.654.3837 option 4.
- Never operate this recumbent bike if it has been damaged or partially submersed in water.
- To reduce the risk of electric shock, unplug the recumbent bike from the wall outlet when not in use, before performing any maintenance, or before moving the recumbent bike.
- Do not use outdoors or in areas of high humidity or extreme temperature changes.
- Do not operate where aerosol spray products are being used or where oxygen is being administered.
- Never place the power cord under carpeting or place any object on top of the cord, this may pinch or damage the cord causing fire damage or personal injury.
- Use this exercise product for its intended use as described in this Owner's Manual. Do not use attachments that are not recommended by LifeSpan.
- Keep hands away from all moving parts
- Keep your recumbent bike on a solid, level surface. Do not operate recumbent bike on deeply padded, plush or shag carpeting. Damage to carpeting may occur.
Children and Pets
- When in use children and pets should be kept at least 10 feet (3m) away.
- This recumbent bike can be used by children ages 12 years and above and persons with reduced physical, sensory or lack of experience and knowledge if they have been given supervision or instruction concerning use of the appliance in a safe way and understand the hazards involved.
- Cleaning and user maintenance shall not be made by children without supervision.
- Keep children away from the recumbent bike. There are areas that can cause harm and injury.
Safety Tips While in Use
• Always consult a physician before beginning an exercise program.
- If you experience chest pains, nausea, dizziness or shortness of breath, stop exercising immediately and consult your physician before continuing. Do not wear clothing or jewelry that might catch on any part of the recumbent bike.
- Wear shoes with high traction rubber soles. Do not wear shoes with heals, leather soles, cleats or spikes.
- Heart Rate monitoring systems may be inaccurate. Various factors, including the user's movement may affect the accuracy of the heart rate readings. The pulse sensors are intended only as exercise aids in determining heart rate trend.
• Over exercising may result in serious injury or death. If you feel faint stop exercising immediately.
Specifications
Mechanical and Performance
| Seat Molded with chair | style armrest |
| Seat Adjustment 14 inf | inite positions |
| Seat Back Breathable | |
| Seat Back Adjustment | Adjustable Angle |
| Resistance System Magnetic - Eddy Current | |
| Pedals Self balancing | |
| Flywheel Weight 18 lbs (8.1 kg) | |
| Max. User Weight 400 lbs (181.4 kg) | |
| Dimensions 73" x 28" x | 46" (185.4 cm x 71.1cm x 116.8 cm) |
| Transport Wheels Front | Mounted |
| Self-Generating No Power Required | |
Console Features
| Readouts Program Name | Date and Time, Workout Time, Calories, RPM, Distance, Heart Rate, Speed, Resistance Level (Load), Watts |
| Programs Manual, Preset | (17), User Set-up (2), Heart Rate Control (2) |
| Display Multi-Color LCD | |
| Heart Rate | Grip Pulse and Receiver (chest strap is not included) |
| Program Matrix | 16 Row by 20 Columns |
| Program Buttons | 5 Program Group Buttons for Heart Rate Control, Healthy Living, Sports Training, Weight Loss and User Set-up Programs |
| Levels of Resistance | 16 Levels |
About Your R5i Recumbent Bike
Console Overview


About Your R5i Recumbent Bike
Starting an Exercise Program
Starting an exercise program can sound like a daunting task, but just remember that your main goal is to boost your health by meeting the basic physical activity recommendations.
Before you begin an exercise program, or substantially increase your level of activity, be sure to consult your primary care physician. In preparation for a visit you may also want to take the PAR-Q Assessment. The Physical Activity Readiness Questionnaire (PAR-Q) will help you determine your suitability for beginning an exercise program and prepare you for discussing your physical activity program with your physician.
- Has your doctor ever said that you have a heart condition or that you should participate in physical activity only as recommended by a doctor?
- Do you feel pain in your chest during physical activity?
- In the past month, have you had chest pain when you were not doing physical activity?
- Do you lose you balance because of dizziness?
- Do you ever lose consciousness?
- Do you have a bone or joint problem that could be made worse by a change in your physical activity?
- Is your doctor currently prescribing drugs for your blood pressure or a heart condition?
- Do you know of any reason you should not participate in physical activity?
If you answered yes to one or more of the questions, if you are over 40 years of age and have been inactive or if you are concerned about your health, consult a physician before beginning an exercise program or substantially increasing your physical activity. If you answered no to each question then it's likely you can begin an exercise program.
Heart Rate Monitoring

bar_stacked
| AGE | 20 | 25 | 30 | 35 | 40 | 45 | 50 | 55 | 60 | 65 | |---|---|---|---|---|---|---|---|---|---|---| | Total | 116 | 114 | 112 | 110 | 108 | 106 | 104 | 102 | 100 | 98 | | Within Group 1 | 135 | 133 | 131 | 128 | 126 | 124 | 121 | 119 | 117 | 114 | | Within Group 2 | 155 | 152 | 149 | 147 | 144 | 141 | 139 | 136 | 133 | 131 | | Within Group 3 | 174 | 171 | 167 | 165 | 162 | 159 | 156 | 153 | 150 | 147 | | Within Group 4 | 194 | 190 | 187 | 183 | 180 | 177 | 173 | 170 | 167 | 163 | The top segment (dark gray) represents the total sum of all segments for each age group. The middle segment (medium gray) and bottom segment (light gray) represent individual components within each age group. The top segment also contains a numerical value in parentheses below each bar.Seeing your heart rate while exercising will help you understand the intensity of your exercise and corresponding heart rate training zone, and predict health benefits found through repeated bouts of exercise. Refer to the information below to understand your heart rate training zones:
Zone 5 — Performance Redline Zone: 90% - 100% of your Max HR
The performance zone involves extreme effort, requiring the heart to beat at or near maximum capacity. Training bouts include intense incline or sprinting, benefiting speed, power, and anaerobic performance competency.
Zone 4 — Threshold Zone: 80% - 90% of your Max HR
The threshold zone involves intense jogging or sub-maximal sprinting, typically unsustainable for long periods of time. Benefits include highly-elevated calorie burn, speed and power performance enhancement, improved lactate removal capabilities, and enriched heart health.
Zone 3 — Aerobic Zone: 70% - 80% of your Max HR
The aerobic zone is ideal for cardiovascular training. Workouts in this zone are more intense, involving moderate jogging. Long-term benefits are improved heart health and cardiovascular performance, reductions in blood pressure and cholesterol, and increased calorie burn.
Zone 2 — Temperate Zone: 60% - 70% of your Max HR
The temperate zone consists of moderate-intensity exercise, typically as fast walking to slow jogging. Speaking is more difficult and breathing is elevated. Benefits are similar to those of the healthy heart rate zone, though caloric expenditure is higher.
Zone 1 — Healthy Heart Zone: 50% - 60% of your Max HR
The healthy heart zone involves safe, low-intensity activity, like medium-to-brisk walking. Full conversations can be held, despite a gentle increase in respiration. Benefits include reduced risk of heart and vascular disease, moderated blood pressure and cholesterol, and improved insulin sensitivity.
About Your R5i Recumbent Bike

Reading Your Heart Rate
Contact Heart Rate Sensors are built into the hand grips of the R5i to monitor your heart rate during exercise. To use, grasp the sensors with a comfortable grip with the palms of your hands placed over the sensors. If the sensors are having difficulty picking up your heart rate you may consider using aloe or a moisturizer on your hands, or you can warm up as you exercise to increase the moisture in your hands. Dry hands do not transfer your pulse as effectively as moist hands.
Do not squeeze tightly as this can cause your blood pressure to rise. It will take a few seconds for the console to calculate your heart rate accurately.
Chest Strap
The R5i Recumbent Bike has an integrated heart rate receiver built into the console. The chest strap should be worn as shown.
When using a chest strap you may need to warm up first to increase the moisture in your skin. If this doesn't work use aloe or another moisturizer where the sensors on the chest strap are making contact with your skin.

natural_image
Illustration of a muscular human torso wearing a belt (no text or symbols)
natural_image
Illustration of a life span device with a circular logo and handle (no text or symbols on the device itself)NOTE: The heart rate monitoring system will vary due to your age, method of use, physiology and other factors. LifeSpan cannot guarantee the accuracy of the heart rate readings.
Preset Programs
Preset programs automatically change the resistance level during a workout according to a preset pattern called a profile. This provides a better workout, since it uses a wider range of muscles and different intensities, a well-known benefit in the cross-training and interval-training world.
Each preset program can be set to change the resistance level. Each has a suggested duration which can be adjusted to anywhere from 10 to 99 minutes. Two overall levels may be selected, which raises or lowers the program profile.
Changing the resistance level changes which muscles are used. Adjust the resistance level to your personal preferences, or to target different muscles.
Long Slow Distance
(40 minutes default)

bar
| Category | Value | |---|---| | 1 | 3 | | 2 | 3 | | 3 | 4 | | 4 | 5 | | 5 | 6 | | 6 | 7 | | 7 | 8 | | 8 | 9 | | 9 | 10 | | 10 | 11 | | 11 | 12 | | 12 | 13 | | 13 | 14 | | 14 | 15 | | 15 | 16 | | 16 | 17 | | 17 | 18 | | 18 | 19 | | 19 | 20 | | 20 | 21 | | 21 | 22 | | 22 | 23 | | 23 | 24 | | 24 | 25 | | 25 | 26 | | 26 | 27 | | 27 | 28 | | 28 | 29 | | 29 | 30 | | 30 | 31 | | 31 | 32 | | 32 | 33 | | 33 | 34 | | 34 | 35 | | 35 | 36 | | 36 | 37 | | 37 | 38 | | 38 | 39 | | 39 | 40 | | 40 | 41 | | 41 | 42 | | 42 | 43 | | 43 | 44 | | 44 | 45 | | 45 | 46 | | 46 | 47 | | 47 | 48 | | 48 | 49 | | 49 | 50 | | 50 | 51 | | 51 | 52 | | 52 | 53 | | 53 | 54 | | 54 | 55 | | 55 | 56 | | 56 | 57 | | 57 | 58 | | 58 | 59 | | 59 | 60 | | 60 | 61 | | 61 | 62 | | 62 | 63 | | 63 | 64 | | 64 | 65 | | 65 | 66 | | 66 | 67 | | 67 | 68 | | 68 | 69 | | 69 | 70 | | 70 | 71 | | 71 | 72 | | 72 | 73 | | 73 | 74 | | 74 | 75 | | 75 | 76 | | 76 | 77 | | 77 | 78 | | 78 | 79 | | 79 | 80 | | 80 | 81 | | 81 | 82 | | 82 | 83 | | 83 | 84 | | 84 | 85 | | 85 | 86 | | 86 | 87 | | 87 | 88 | | 88 | 89 | | 89 | 90 | | 90 | 91 | | 91 | 92 | | 92 | 93 | | 93 | 94 | | 94 | 95 | | 95 | 96 | | 96 | 97 | | 97 | 98 | | 98 | 99 | | Note: The actual values in the 'Value' column are not provided in the code. The 'Number' is estimated based on the 'Number' value in the 'Year' column. There is only one data series in this case. The values for the last three categories (after the first) are estimated based on the 'Year' column.This profile has small changes,
allowing for a more consistent style of effort, maximizing the duration of your workout.
Short Interval
(20 minute default)

bar
| Category | Value | |---|---| | 1 | 3 | | 2 | 4 | | 3 | 5 | | 4 | 6 | | 5 | 7 | | 6 | 8 | | 7 | 9 | | 8 | 10 | | 9 | 11 | | 10 | 12 | | 11 | 13 | | 12 | 14 | | 13 | 15 | | 14 | 16 | | 15 | 17 | | 16 | 18 | | 17 | 19 | | 18 | 20 | | 19 | 21 | | 20 | 22 | | 21 | 23 | | 22 | 24 | | 23 | 25 | | 24 | 26 | | 25 | 27 | | 26 | 28 | | 27 | 29 | | 28 | 30 | | 29 | 31 | | 30 | 32 | | 31 | 33 | | 32 | 34 | | 33 | 35 | | 34 | 36 | | 35 | 37 | | 36 | 38 | | 37 | 39 | | 38 | 40 | | 39 | 41 | | 40 | 42 | | 41 | 43 | | 42 | 44 | | 43 | 45 | | 44 | 46 | | 45 | 47 | | 46 | 48 | | 47 | 49 | | 48 | 50 | | 49 | 51 | | 50 | 52 | | 51 | 53 | | 52 | 54 | | 53 | 55 | | 54 | 56 | | 55 | 57 | | 56 | 58 | | 57 | 59 | | 58 | 60 | | 59 | 61 | | 60 | 62 | | 61 | 63 | | 62 | 64 | | 63 | 65 | | 64 | 66 | | 65 | 67 | | 66 | 68 | | 67 | 69 | | 68 | 70 | | 69 | 71 | | 70 | 72 | | 71 | 73 | | 72 | 74 | | 73 | 75 | | 74 | 76 | | 75 | 77 | | 76 | 78 | | 77 | 79 | | 78 | 80 | | 79 | 81 | | 80 | 82 | | 81 | 83 | | 82 | 84 | | 83 | 85 | | 84 | 86 | | 85 | 87 | | 86 | 88 | | 87 | 89 | | 88 | 90 | | 89 | 91 | | 90 | 92 | | 91 | 93 | | 92 | 94 | | 93 | 95 | | 94 | 96 | | 95 | 97 | | 96 | 98 | | 97 | 99 | | Note: The actual values in the 'Value' column are not explicitly provided in the code. The 'Number' is calculated based on the 'Value' column. It's based on the 'Value' column as it's the sum of the 'Value' columns. There is only one data point for 'Value' in the 'Number' column.This has the widest variation of
resistance level, and has the shortest default duration.
Moderate Interval
(30 minute default)

bar
| Category | Value | |---|---| | 1 | 10 | | 2 | 15 | | 3 | 20 | | 4 | 25 | | 5 | 30 | | 6 | 35 | | 7 | 40 | | 8 | 45 | | 9 | 50 | | 10 | 55 | | 11 | 60 | | 12 | 65 | | 13 | 70 | | 14 | 75 | | 15 | 80 | | 16 | 85 | | 17 | 90 | | 18 | 95 | | 19 | 100 |Smaller resistance changes than
Short Interval, but greater overall duration, resulting in a longer workout.
Long Interval
(40 minute default)

bar
| Category | Value | |---|---| | 1 | 3 | | 2 | 4 | | 3 | 5 | | 4 | 6 | | 5 | 7 | | 6 | 8 | | 7 | 9 | | 8 | 10 | | 9 | 11 | | 10 | 12 | | 11 | 13 | | 12 | 14 | | 13 | 15 | | 14 | 16 | | 15 | 17 | | 16 | 18 | | 17 | 19 | | 18 | 20 | | 19 | 21 | | 20 | 22 | | 21 | 23 | | 22 | 24 | | 23 | 25 | | 24 | 26 | | 25 | 27 | | 26 | 28 | | 27 | 29 | | 28 | 30 | | 29 | 31 | | 30 | 32 | | 31 | 33 | | 32 | 34 | | 33 | 35 | | 34 | 36 | | 35 | 37 | | 36 | 38 | | 37 | 39 | | 38 | 40 | | 39 | 41 | | 40 | 42 | | 41 | 43 | | 42 | 44 | | 43 | 45 | | 44 | 46 | | 45 | 47 | | 46 | 48 | | 47 | 49 | | 48 | 50 | | 49 | 51 | | 50 | 52 | | 51 | 53 | | 52 | 54 | | 53 | 55 | | 54 | 56 | | 55 | 57 | | 56 | 58 | | 57 | 59 | | 58 | 60 | | 59 | 61 | | 60 | 62 | | 61 | 63 | | 62 | 64 | | 63 | 65 | | 64 | 66 | | 65 | 67 | | 66 | 68 | | 67 | 69 | | 68 | 70 | | 69 | 71 | | 70 | 72 | | 71 | 73 | | 72 | 74 | | 73 | 75 | | 74 | 76 | | 75 | 77 | | 76 | 78 | | 77 | 79 | | 78 | 80 | | 79 | 81 | | 80 | 82 | | 81 | 83 | | 82 | 84 | | 83 | 85 | | 84 | 86 | | 85 | 87 | | 86 | 88 | | 87 | 89 | | 88 | 90 | | 89 | 91 | | 90 | 92 | | 91 | 93 | | 92 | 94 | | 93 | 95 | | 94 | 96 | | 95 | 97 | | 96 | 98 | | 97 | 99 | | Note: The actual values in the 'Value' column are not explicitly labeled in the code. The 'Index' column is not used in the chart. It's based on the label 'Value' to determine the 'Index' value for each bar. There is only one data point for 'Value'.The smallest resistance alterations
of any of the interval workouts, allowing a longer overall duration.
About Your R5i Recumbent Bike
Negative Interval 1
(30 minute default)

bar
| Category | Value | |---|---| | 1 | 3 | | 2 | 3 | | 3 | 4 | | 4 | 5 | | 5 | 6 | | 6 | 7 | | 7 | 8 | | 8 | 9 | | 9 | 10 | | 10 | 11 | | 11 | 12 | | 12 | 13 | | 13 | 14 | | 14 | 15 | | 15 | 16 | | 16 | 17 | | 17 | 18 | | 18 | 19 | | 19 | 20 | | 20 | 21 |A good choice for someone new to interval training. Resistance levels decrease in the second half of the workout.
Negative Interval 2
(30 minute default)
A slightly higher-intensity version of Negative Interval 1.

bar
| Category | Value | |---|---| | 1 | 10 | | 2 | 10 | | 3 | 10 | | 4 | 15 | | 5 | 15 | | 6 | 15 | | 7 | 20 | | 8 | 20 | | 9 | 18 | | 10 | 18 | | 11 | 15 | | 12 | 15 | | 13 | 15 | | 14 | 15 | | 15 | 12 | | 16 | 12 | | 17 | 12 | | 18 | 12 | | 19 | 10 | | 20 | 10 |Fartlek
(30 minute default)
A Fartlek is a Swedish workout that inspires improved levels of fitness through unpredictable changes in programming. This profile purposefully has no predictable pattern to its profile.

bar
| Category | Value | |---|---| | 1 | 3 | | 2 | 5 | | 3 | 4 | | 4 | 7 | | 5 | 6 | | 6 | 8 | | 7 | 5 | | 8 | 9 | | 9 | 4 | | 10 | 7 | | 11 | 10 | | 12 | 4 | | 13 | 6 | | 14 | 5 | | 15 | 7 | | 16 | 5 | | 17 | 8 | | 18 | 5 | | 19 | 6 | | 20 | 4 |Uphill Climb
(30 minute default)
A gradual increase, then corresponding decrease of resistance.
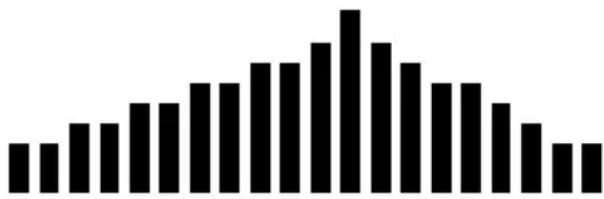
bar
| Category | Value | |---|---| | 1 | 3 | | 2 | 3 | | 3 | 4 | | 4 | 5 | | 5 | 6 | | 6 | 7 | | 7 | 8 | | 8 | 9 | | 9 | 10 | | 10 | 11 | | 11 | 12 | | 12 | 13 | | 13 | 14 | | 14 | 15 | | 15 | 16 | | 16 | 17 | | 17 | 18 | | 18 | 19 | | 19 | 20 | | 20 | 21 | | 21 | 22 | | 22 | 23 | | 23 | 24 | | 24 | 25 | | 25 | 26 | | 26 | 27 | | 27 | 28 | | 28 | 29 | | 29 | 30 | | 30 | 31 | | 31 | 32 | | 32 | 33 | | 33 | 34 | | 34 | 35 | | 35 | 36 | | 36 | 37 | | 37 | 38 | | 38 | 39 | | 39 | 40 | | 40 | 41 | | 41 | 42 | | 42 | 43 | | 43 | 44 | | 44 | 45 | | 45 | 46 | | 46 | 47 | | 47 | 48 | | 48 | 49 | | 49 | 50 | | 50 | 51 | | 51 | 52 | | 52 | 53 | | 53 | 54 | | 54 | 55 | | 55 | 56 | | 56 | 57 | | 57 | 58 | | 58 | 59 | | 59 | 60 | | 60 | 61 | | 61 | 62 | | 62 | 63 | | 63 | 64 | | 64 | 65 | | 65 | 66 | | 66 | 67 | | 67 | 68 | | 68 | 69 | | 69 | 70 | | 70 | 71 | | 71 | 72 | | 72 | 73 | | 73 | 74 | | 74 | 75 | | 75 | 76 | | 76 | 77 | | 77 | 78 | | 78 | 79 | | 79 | 80 | | 80 | 81 | | 81 | 82 | | 82 | 83 | | 83 | 84 | | 84 | 85 | | 85 | 86 | | 86 | 87 | | 87 | 88 | | 88 | 89 | | 89 | 90 | | 90 | 91 | | 91 | 92 | | 92 | 93 | | 93 | 94 | | 94 | 95 | | 95 | 96 | | 96 | 97 | | 97 | 98 | | 98 | 99 | | Note: The actual values may vary due to the random nature of the data generation. The provided values are just an example based on the visual encoding system. The actual values may be the result of the random number generation. This is not a statistical formula for the bars. It's not a type of representation in the code. Therefore, the correct output is an empty string.Pyramid Climb
(30 minute default)
Similar to Uphill Climb but with less frequent changes.
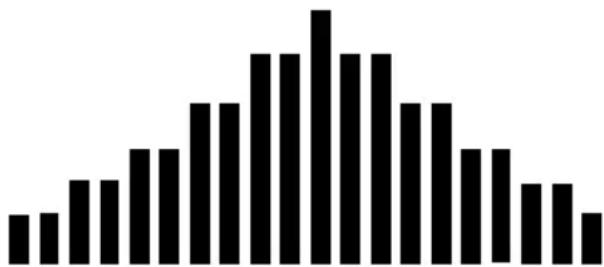
bar
| Category | Value | |---|---| | 1 | 2 | | 2 | 3 | | 3 | 4 | | 4 | 5 | | 5 | 6 | | 6 | 7 | | 7 | 8 | | 8 | 9 | | 9 | 10 | | 10 | 11 | | 11 | 12 | | 12 | 13 | | 13 | 14 | | 14 | 15 | | 15 | 16 | | 16 | 17 | | 17 | 18 | | 18 | 19 | | 19 | 20 | | 20 | 21 | | 21 | 22 | | 22 | 23 | | 23 | 24 | | 24 | 25 | | 25 | 26 | | 26 | 27 | | 27 | 28 | | 28 | 29 | | 29 | 30 | | 30 | 31 | | 31 | 32 | | 32 | 33 | | 33 | 34 | | 34 | 35 | | 35 | 36 | | 36 | 37 | | 37 | 38 | | 38 | 39 | | 39 | 40 | | 40 | 41 | | 41 | 42 | | 42 | 43 | | 43 | 44 | | 44 | 45 | | 45 | 46 | | 46 | 47 | | 47 | 48 | | 48 | 49 | | 49 | 50 | | 50 | 51 | | 51 | 52 | | 52 | 53 | | 53 | 54 | | 54 | 55 | | 55 | 56 | | 56 | 57 | | 57 | 58 | | 58 | 59 | | 59 | 60 | | 60 | 61 | | 61 | 62 | | 62 | 63 | | 63 | 64 | | 64 | 65 | | 65 | 66 | | 66 | 67 | | 67 | 68 | | 68 | 69 | | 69 | 70 | | 70 | 71 | | 71 | 72 | | 72 | 73 | | 73 | 74 | | 74 | 75 | | 75 | 76 | | 76 | 77 | | 77 | 78 | | 78 | 79 | | 79 | 80 | | 80 | 81 | | 81 | 82 | | 82 | 83 | | 83 | 84 | | 84 | 85 | | 85 | 86 | | 86 | 87 | | 87 | 88 | | 88 | 89 | | 89 | 90 | | 90 | 91 | | 91 | 92 | | 92 | 93 | | 93 | 94 | | 94 | 95 | | 95 | 96 | | 96 | 97 | | 97 | 98 | | 98 | 99 | | Note: The actual values may vary due to the random nature of the data generation. The provided values are just an example based on the visual representation of the bars. The actual values may be the same if they are not explicitly labeled in the code. There is only one data series being plotted. The values for the last three categories (after the first bar) are estimated based on the given output.Plateau Climb
(40 minute default)
A higher-intensity version of Long Slow Distance, with a steady level
of effort comprising the majority of the profile.

bar
| Category | Value | |---|---| | 1 | 3 | | 2 | 3 | | 3 | 4 | | 4 | 5 | | 5 | 6 | | 6 | 7 | | 7 | 8 | | 8 | 9 | | 9 | 9 | | 10 | 9 | | 11 | 9 | | 12 | 9 | | 13 | 9 | | 14 | 9 | | 15 | 9 | | 16 | 8 | | 17 | 7 | | 18 | 6 | | 19 | 5 | | 20 | 4 |Ladder
(30 minute default)
A form of interval training with longer, increasingly-intense

bar
| Category | Value | |---|---| | 1 | 3 | | 2 | 4 | | 3 | 5 | | 4 | 6 | | 5 | 7 | | 6 | 8 | | 7 | 9 | | 8 | 10 | | 9 | 11 | | 10 | 12 | | 11 | 13 | | 12 | 14 | | 13 | 15 | | 14 | 16 | | 15 | 17 | | 16 | 18 | | 17 | 19 | | 18 | 20 | | 19 | 21 | | 20 | 22 | | 21 | 23 | | 22 | 24 | | 23 | 25 | | 24 | 26 | | 25 | 27 | | 26 | 28 | | 27 | 29 | | 28 | 30 | | 29 | 31 | | 30 | 32 | | 31 | 33 | | 32 | 34 | | 33 | 35 | | 34 | 36 | | 35 | 37 | | 36 | 38 | | 37 | 39 | | 38 | 40 | | 39 | 41 | | 40 | 42 | | 41 | 43 | | 42 | 44 | | 43 | 45 | | 44 | 46 | | 45 | 47 | | 46 | 48 | | 47 | 49 | | 48 | 50 | | 49 | 51 | | 50 | 52 | | 51 | 53 | | 52 | 54 | | 53 | 55 | | 54 | 56 | | 55 | 57 | | 56 | 58 | | 57 | 59 | | 58 | 60 | | 59 | 61 | | 60 | 62 | | 61 | 63 | | 62 | 64 | | 63 | 65 | | 64 | 66 | | 65 | 67 | | 66 | 68 | | 67 | 69 | | 68 | 70 | | 69 | 71 | | 70 | 72 | | 71 | 73 | | 72 | 74 | | 73 | 75 | | 74 | 76 | | 75 | 77 | | 76 | 78 | | 77 | 79 | | 78 | 80 | | 79 | 81 | | 80 | 82 | | 81 | 83 | | 82 | 84 | | 83 | 85 | | 84 | 86 | | 85 | 87 | | 86 | 88 | | 87 | 89 | | 88 | 90 | | 89 | 91 | | 90 | 92 | | 91 | 93 | | 92 | 94 | | 93 | 95 | | 94 | 96 | | 95 | 97 | | 96 | 98 | | 97 | 99 | | 98 | -0.1 | | -0.1 to +0.1: -0.2 to +0.2 -0.2 to +0.2: -0.3 to +0.3 -0.3 to +0.3: -0.4 to +0.4 -0.4 to +0.4: -0.5 to +0.5 -0.5 to +0.5: -0.6 to +0.6 -0.6 to +0.6: -0.7 to +0.7 -0.7 to +0.7: -0.8 to +0.8 -0.8 to +0.8: -0.9 to +0.9 -0.9 to +0.9: -1.0 to +1.0 -1.0 to +1.0: -1.1 to +1.1 -1.1 to +1.1: -1.2 to +1.2 -1.2 to +1.2: -1.3 to +1.3 -1.3 to +1.3: -1.4 to +1.4 -1.4 to +1.4: -1.5 to +1.5 -1.5 to +1.5: -1.6 to +1.6 -1.6 to +1.6: -1.7 to +1.7 -1.7 to +1.7: -1.8 to +1.8 -1.8 to +1.8: -1.9 to +1.9 -1.9 to +1.9: -2.0 to +2.0 -2.0 to +2.0: -2.1 to +2.1 -2.1 to +2.1: -2.2 to +2.2 -2.2 to +2.2: -2.3 to +2.3 -2.3 to +2.3: -2.4 to +2.4 -2.4 to +2.4: -2.5 to +2.5 -2.5 to +2.5: -2.6 to +2.6 -2.6 to +2.6: -2.7 to +2.7 -2.7 to +2.7: -2.8 to +2.8 -2.8 to +2.8: -2.9 to +2.9 -2.9 to +2.9: -3.0 to +3.0 -3.0 to +3.0: -3.1 to +3.1 -3.1 to +3.1: -3.2 to +3.2 -3.2 to +3.2: -3.3 to +3.3 -3.3 to +3.3: -3.4 to +3.4 -3.4 to +3.4: -3.5 to +3.5 -3.5 to +3.5: -3.6 to +3.6 -3.6 to +3.6: -3.7 to +3.7 -3.7 to +3.7: -3.8 to +3.8 -3.8 to +3.8: -3.9 to +3.9 -3.9 to +3.9: -4.0 to +4.0 -4.0 to +4.0: -4.1 to +4.1 -4.1 to +4.1: -4.2 to +4.2 -4.2 to +4.2: -4.3 to +4.3 -4.3 to +4.3: -4.4 to +4.4 -4.4 to +4.4: -4.5 to +4.5 -4.5 to +4.5: -4.6 to +4.6 -4.6 to +4.6: -4.7 to +4.7 -4.7 to +4.7: -4.8 to +4.8 -4.8 to +4.8: -4.9 to +4.9 -4.9 to +4.9: -5.0 to +5.0 -5.0 to +5.0: -5.1 to +5.1 -5.1 to +5.1: -5.2 to +5.2 -5.2 to +5.2: -5.3 to +5.3 -5.3 to +5.3: -5.4 to +5.4 -5.4 to +5.4: -5.5 to +5.5 -5.5 to +5.5: -5.6 to +5.6 -5.6 to +5.6: -5.7 to +5.7 -5.7 to +5.7: -5.8 to +5.8 -5.8 to +5.8: -5.9 to +5.9 -5.9 to +5.9: -6.0 to +6.0 -6.0 to +6.0: -6.1 to +6.1 -6.1 to +6.1: -6.2 to +6.2 -6.2 to +6.2: -6.3 to +6.3 -6.3 to +6.3: -6.4 to +6.4 -6.4 to +6.4: -6.5 to +6.5 -6.5 to +6.5: -6.6 to +6.6 -6.6 to +6.6: -6.7 to +6.7 -6.7 to +6.7: -6intervals. Each unique, altering level is designed to mimic a higher rung on a ladder. This is the most difficult of the preset programs.
Uphill Interval
(20 minute default)
Similar to Short Interval, but with more pronounced changes in intensity.

bar
| Category | Value | |---|---| | 1 | 1 | | 2 | 1 | | 3 | 2 | | 4 | 1 | | 5 | 3 | | 6 | 1 | | 7 | 4 | | 8 | 1 | | 9 | 5 | | 10 | 1 | | 11 | 6 | | 12 | 1 | | 13 | 7 | | 14 | 1 | | 15 | 8 | | 16 | 1 | | 17 | 1 | | 18 | 2 | | 19 | 2 | | 20 | 1 |Steady Pace
(40 minute default)

natural_image
Abstract pattern of black vertical bars on white background (no text or symbols)Similar to Long Slow Distance, but with a lower intensity, steady profile. This is the easiest of the preset programs.
Long Slow Distance 2
(40 minute default)

Similar to Long Slow Distance, but reaches maximum intensity more rapidly.
Cardio Ride
(20 minute default)

natural_image
Abstract pattern of black vertical bars on white background (no text or symbols)A short, continuous workout with consistently high intensity.
Short Interval 2
(20 minute default)

bar
| Category | Value | |---|---| | 1 | 2 | | 2 | 4 | | 3 | 6 | | 4 | 8 | | 5 | 6 | | 6 | 7 | | 7 | 6 | | 8 | 8 | | 9 | 6 | | 10 | 7 | | 11 | 6 | | 12 | 8 | | 13 | 6 | | 14 | 7 | | 15 | 6 | | 16 | 8 | | 17 | 6 | | 18 | 7 | | 19 | 6 | | 20 | 8 |Similar to Short Interval, but with a more rapid buildup to the initial interval.
About Your R5i Recumbent Bike
Uphill Climb
(30 minute default)
Gradually increases intensity throughout the entire workout.

Warranty
Your LifeSpan treadmill/bike desk comes with the following limited warranty valid in North America. If you are outside of this area contact your local authorized LifeSpan dealer.
| Frame | Lifetime |
| Parts | 5 Years |
| Labor | 2 Years |
LifeSpan warrants that the equipment it manufactures is free from defects in materials and workmanship under normal use and services. The periods above are based on the date of purchase. During these periods, LifeSpan will repair or replace any defective part. Free labor is included on all parts that are not normally assembled or replaced by the customer within the labor period.
If within the time frames specified above, any part fails to operate properly, login to our website at www.LifeSpanFitness.com, click on "Customer Service" and complete the form to request assistance or call 877.654.3837 option 4 for a Customer Service Agent (please note that certain kinds of service should only be performed by a qualified service technician).
LifeSpan reserves the right to make changes and improvements to our products without incurring any obligations to similarly alter any product purchased. In order to insure our product warranty and to ensure the safe and efficient operation of your LifeSpan product, only authorized parts can be used. The warranty is void if any parts other than those provided by LifeSpan are used.
Exclusions and Limitations:
- This warranty does not apply to any defects caused by negligence, misuse, improper assembly, or maintenance, accident, or "act of God."
- This warranty does not apply to discoloration of paints or plastics.
- LifeSpan shall not be responsible for incidental or consequential damages.
- This warranty is non-transferable form the original owner.
Assembling Your R5i Recumbent Bike
Exploded View
Prior to starting the assembly process take all of the parts out of the box. Remove plastic bags and lay them out on the floor to become familiar with the components.
Since your recumbent bike is a heavy piece of equipment it is recommended you use two people during assembly and follow these assembly instructions to reduce any problems that could occur.
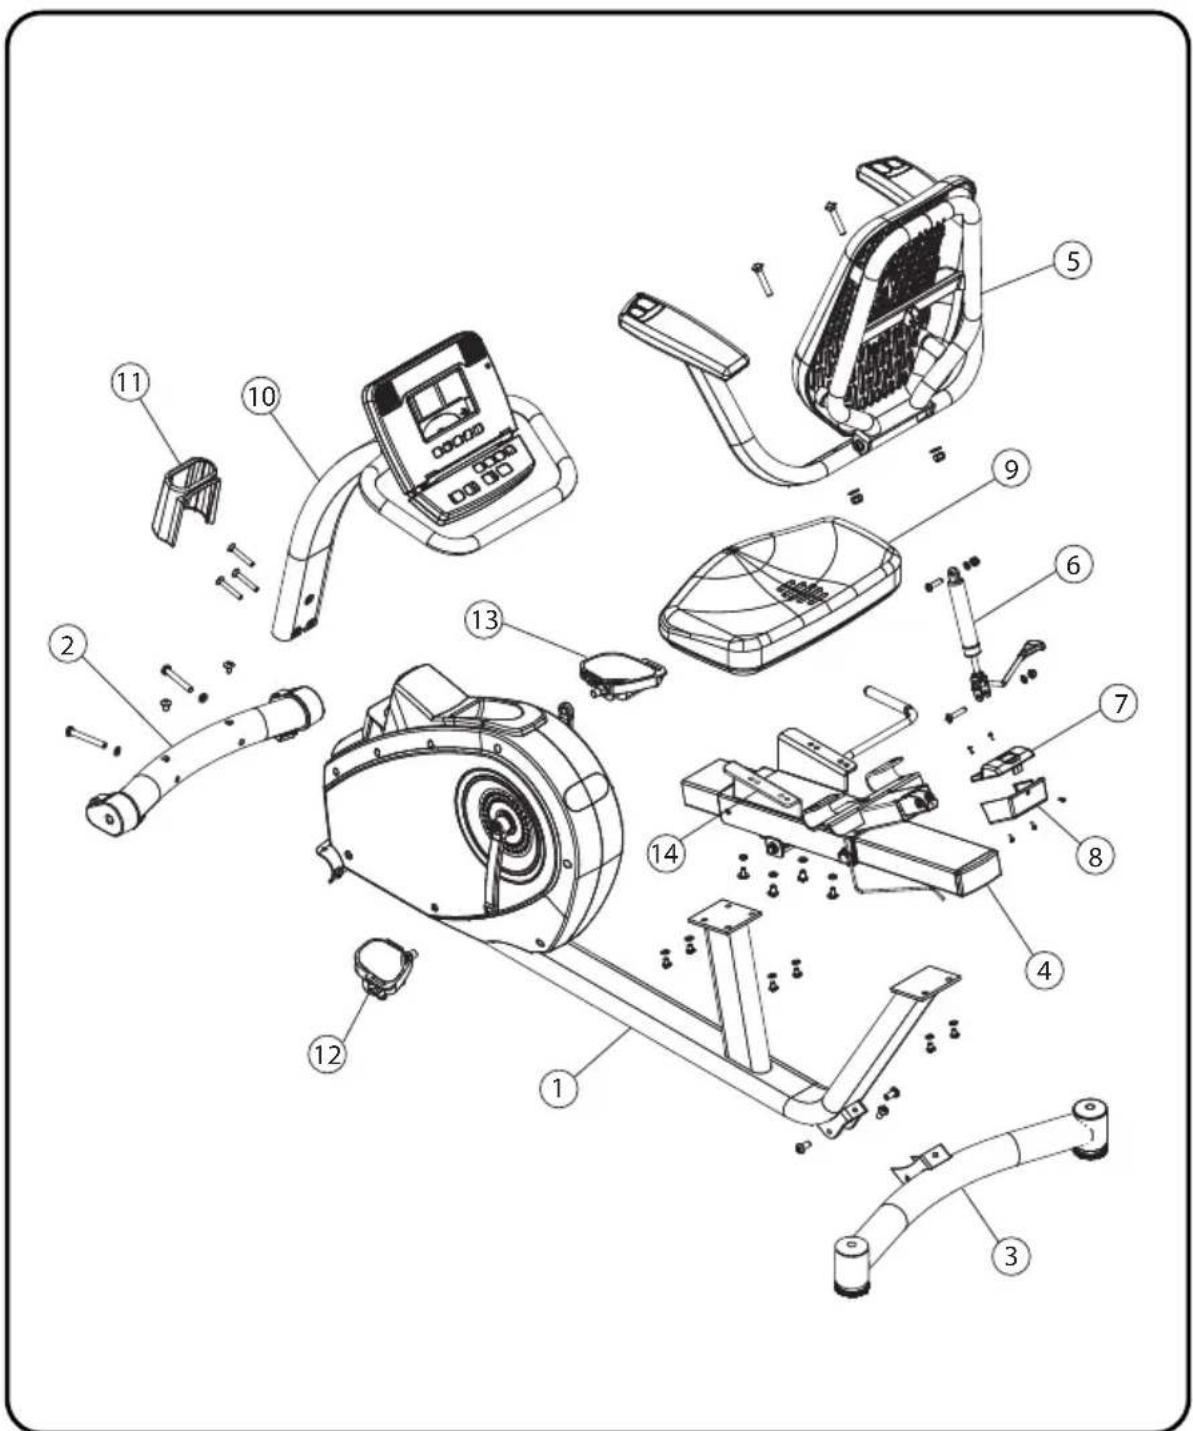
Assembling Your R5i Recumbent Bike
Hardware Included
| Item# Part Description Item# Part Description | |
| 1 Main Frame 8 Bottom Shock Cover | |
| 2 Front Support 9 Seat Bottom | |
| 3 Real Support 10 | |
| 4 Seat Rail Assembly 11 Upright Cover | |
| 5 Seat back/Armrest | |
| 6 Seat back Shock 13 | |
| 7 Top Shock Cover 14 Seat Mount |
| Console Upright | |
| 12 | Left Pedal |
| Right Pedal | |
Hardware Bag Contents
| Item # Qty. Hardware Description | ||
| 15 | 2 M8 x 75L Bolt | |
| 16 | 2 M8 Curved Washer | |
| 27 | 3 M8 x 50L Countersink Bolt | |
| 31 | 1 | Multi-Wrench: 10, 13, 14, 15, 17, 22mm |
| 29 | 1 Allen Wrench-5mm | |
| 30 | 1 Allen Wrench-4mm | |

Pre-installed Hardware
Hardware will need to be removed and re-installed during the installation process
| 28 | 2 | M6 Washer |
| 17 | 10 | M8 x 15L Bolt |
| 18 | 6 | M8 Washer |
| 19 | 5 | M8 x 16L Bolt |
| 20 | 2 | M10x55LCarriage Bolt |
| 21 | 2 | M10 Washers |
| 22 | 2 | M10 Nut |
| 23 | 1 | M8 x 30L Bolt |
| 24 | 1 | M8 x 20L Bolt |
| 25 | 2 | M6 Nut |
| 26 | 5 | M3 x 10L Screw |

Assembling Your R5i Recumbent Bike
Step 1: Remove Components from Box
A. Remove plastic bags and lay all parts out on the floor.
B. Locate the hardware bag.
Step 2: Rear Support Assembly
A. Align the Rear Support Assembly (3) with Rear Bracket (B).
B. Set the rear of the main frame assembly on the Seat (9) with the seat's bolt holes facing upward as shown below, this will raise the frame making it easier to install the Rear Support Assembly.
C. Install three M8x16L Bolts (19) through the Rear Support Assembly (3) and into the Rear Bracket (B). Do not fully tighten the bolts until all three bolts are installed.
D. Securely tighten the top bolt first, and then the two side bolts.

Assembling Your R5i Recumbent Bike
Step 3: Front Support Assembly
A. Move the Seat (9) forward so it is located in the position as shown below.
B. Align the Front Support Assembly (2) with the Front Bracket (A).
C. Install two M8x75L Bolts (15) and Curve Washers (16) through the Front Support Assembly (2) and into the Front Bracket (A). Tighten these bolts prior to starting step D.
D. Insert two M8x16L Bolts (19) through the top of the Front Bracket (A) and into the Front Support Assembly (2).

Assembling Your R5i Recumbent Bike
Step 4: Front Support Assembly
A. Check that the Seat Mount (14) is centered along the Seat Rail Assembly (4), and tighten the Seat Mount Stop Lever (B) to lock the Seat Mount on the rail.
B. Align the Seat Rail Assembly (4) with its front (C) and rear (D) brackets on the Main Frame Assembly (1).
C. Install six M8x15L Bolts (17) and Washers (18) through the brackets (C and D) into the threaded holes on the Seat Rail Assembly (4). Do not
tighten any bolts until all are installed.

D. Once all six bolts (4 in front and 2 in rear) are installed, fully tighten.
NOTE:
Remove wire tie from the Connectors (E) and (F).
E. Plug Connector(s) (E) into Connector(s) (F).
NOTE:
It does not matter which connector(s) plug into each other as long as both connector(s) are plugged in.
F. Push the excess wire into the hole in the Main Frame Assembly (1) until the Plastic Grommet (G) is fully seated in the frame.

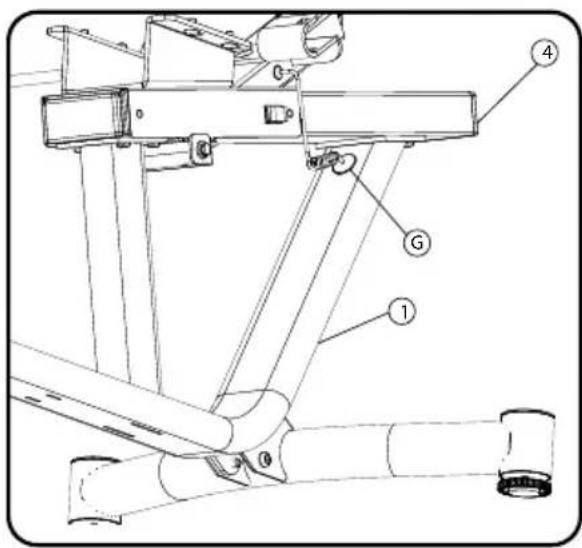
Step 5: Seatback / Armrest Assembly
NOTE:
Make sure seat is locked and remove wire ties from Connectors (H) and (I).
A. Plug Connectors (H) from the top of Seat Mount (14) to Connectors (I) from the base of the Seatback/Arm-rest Assembly (5).
NOTE:
It does not matter which connectors plug into each other as long as both connectors are plugged in.
B. Push excess wiring into the Seatback/Armrest Assembly (5) wire hole.
NOTE:
Be careful not to pinch the wiring when securing the Seatback Assembly (5) to the Seat Mount (14).
C. Align the Armrest Tube (J) with the corresponding Bracket (K) and insert into the bracket.
D. Install the two M10x55L Carriage Bolts (20) through the Bracket (K) and the Armrest Tube (J).
E. Install the two M10 Washers (21) and M10 Nuts (22) onto M10x55L Carriage Bolts (20) and securely tighten.


Assembling Your R5i Recumbent Bike
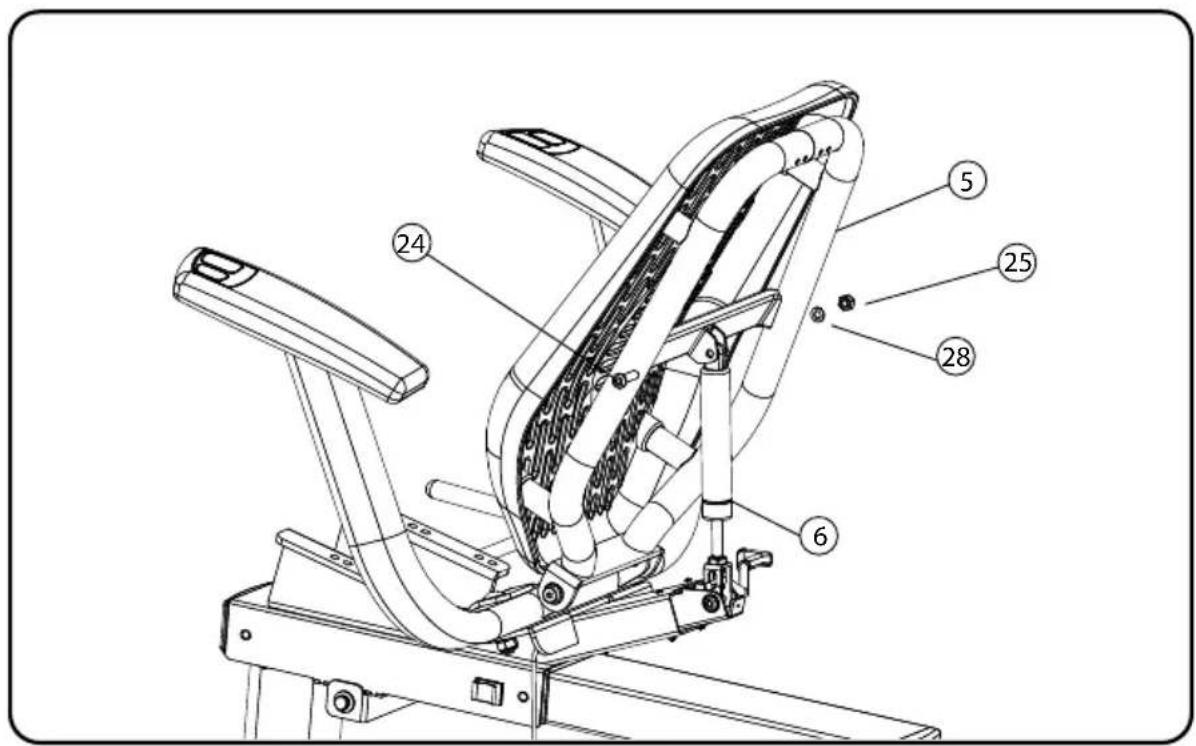
Step 6: Seatback Shock Assembly
A. Align the Shock Assembly (6) to the Lower Shock Bracket (L), handle should be on the lower right side.
B. Install one M8x30L Bolt (23) through the Lower Shock Bracket (L) and Shock Assembly (6).
C. Install the M6 Washer (28) and Nut (25) onto the M8x30L Bolt (23) and tighten securely.

Step 6: Seatback Shock Assembly (Continued)

E. Align the top of the Shock Assembly (6) with the Upper Shock Bracket (M) on the Seatback/Armrest Assembly (5).
F. Install the M8x20L Bolt (24) through the Upper Shock Bracket (M) and the top of the Shock Assembly (6).
G. Install the M6 Washer (28) and Nut (25) onto the M8x20L bolt and tighten.
Assembling Your R5i Recumbent Bike
Step 7: Shock Assembly Covers
A. Align the Bottom Shock Cover (8) with the bottom of the Lower Shock Bracket (L).
B. Install the three M3x10L Screws (26) through the Bottom Shock Cover (8) into the bottom of the Lower Shock Bracket (L) and tighten securely.
C. Align Top Shock Cover (7) with the top screw holes in the Lower Shock Bracket (L).
D. Install two M3x10L Screws (26) through the Top Shock Cover (7) into the Lower Shock Bracket (L).

Assembling Your R5i Recumbent Bike
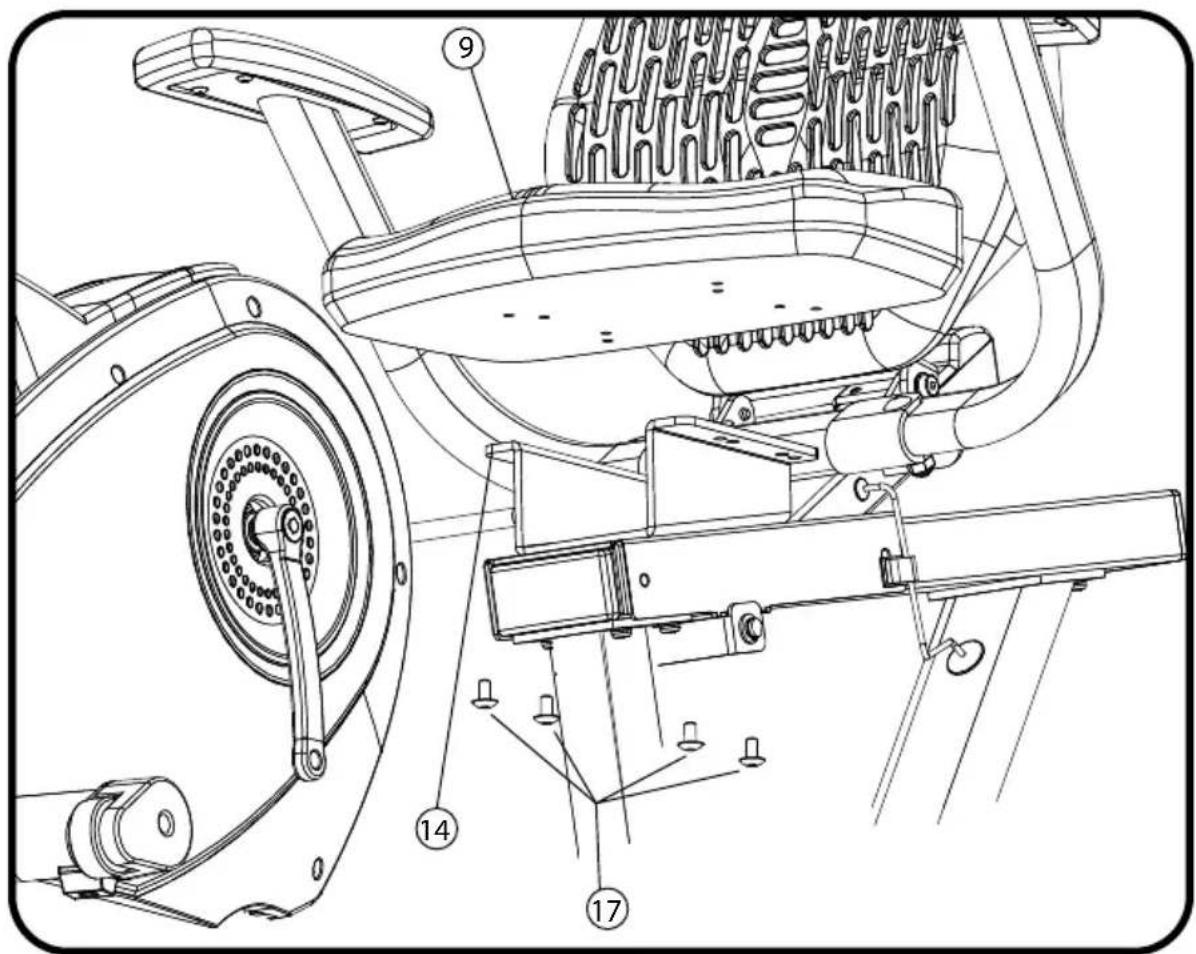
Step 8: Seat Bottom Assembly
A. Place Seat Bottom (9) on the Seat Mount (14).
B. Align the four inner holes on the Seat Bottom (9) with four holes on the Seat Mount (14). For a larger person use the four front holes and for a smaller person use the rear holes in the Seat Mount (14).


C. Install four M8x15L Bolts (17) through the Seat Mount (14) into the Seat Bottom (9). Be sure to install all four bolts before tightening.
Assembling Your R5i Recumbent Bike
Step 9: Console Upright Assembly
A. Slide the Upright Cover (11) a third of the way up the Console Upright Assembly (10) as shown below.
NOTE: Remove wire ties from connectors (N) and (O).
B. Align the Console Upright Assembly (10) with the Console Upright Bracket (P) on the Main Frame Assembly (1). Plug the two Connectors (N) from the Console Upright Assembly (10) into the two Connectors (O) coming from the Main Frame Assembly (1).
C. Tuck excess wiring into the bottom tube of the Console Upright Assembly (10).
D. Install three M8x50L Countersink Bolts (27) through the Console Upright Assembly (10) and into the Console Upright Bracket (P) Do not tighten until all three bolts are installed.
NOTE: Be Careful not to pinch the wiring when securing the upright assembly (10) to the console upright bracket (P).
E. Slide the Upright Cover (11) down the Console Upright Assembly (10) to cover the mounting bolts and bracket. Press down firmly to snap into place.


Step 10: Pedal Assembly
A. Identify which pedal goes on the right side and which goes on the left side by locating the "R" on the top of the Right Pedal (13) and the "L" on the top of the Left Pedal (12)
B. Hand tighten the Right Pedal (13) into the Right Crank Arm (R) by turning clockwise
C. Tighten both pedals with the provided 15mm Wrench (31).


Step 11: Setting Date and Time
To set the date and time in your console follow these steps:
-
Press any of the quick resistance buttons to initiate the date and time set up mode. The console will read Update Calendar.
-
Press and hold any of the quick resistance buttons for 5 seconds.
-
Press the ▲ /▼ buttons to set the correct YEAR. Press ENTER.
-
Press the ▲ /▼ buttons to select the correct MONTH. Press ENTER.
-
Press the ▲ /▼ buttons to set the correct DAY. Press ENTER.
-
Press the ▲ /▼ buttons to set the correct HOUR. Press ENTER.
-
Press the ▲ /▼ buttons to set the correct MINUTES. Press ENTER.
Assembling Your R5i Recumbent Bike
Leveling
Your R5i bike comes with Two Leveling Feet (S) in the back and Two Stationary feet (T) in the front. Gently rock the bike back and forth to see if any of the feet are not sitting on the floor Adjust the Rear Feet (S) until all 4 feet are sitting on the floor.
HINT:
If the right front foot is not solid on the floor, turn the left rear foot counterclockwise to tilt the right front foot down to the floor.

natural_image
Line drawing of a stationary exercise machine with labeled components (T and S), no text or symbols present.Seat Adjustments
Seat Fore/Aft Adjustment
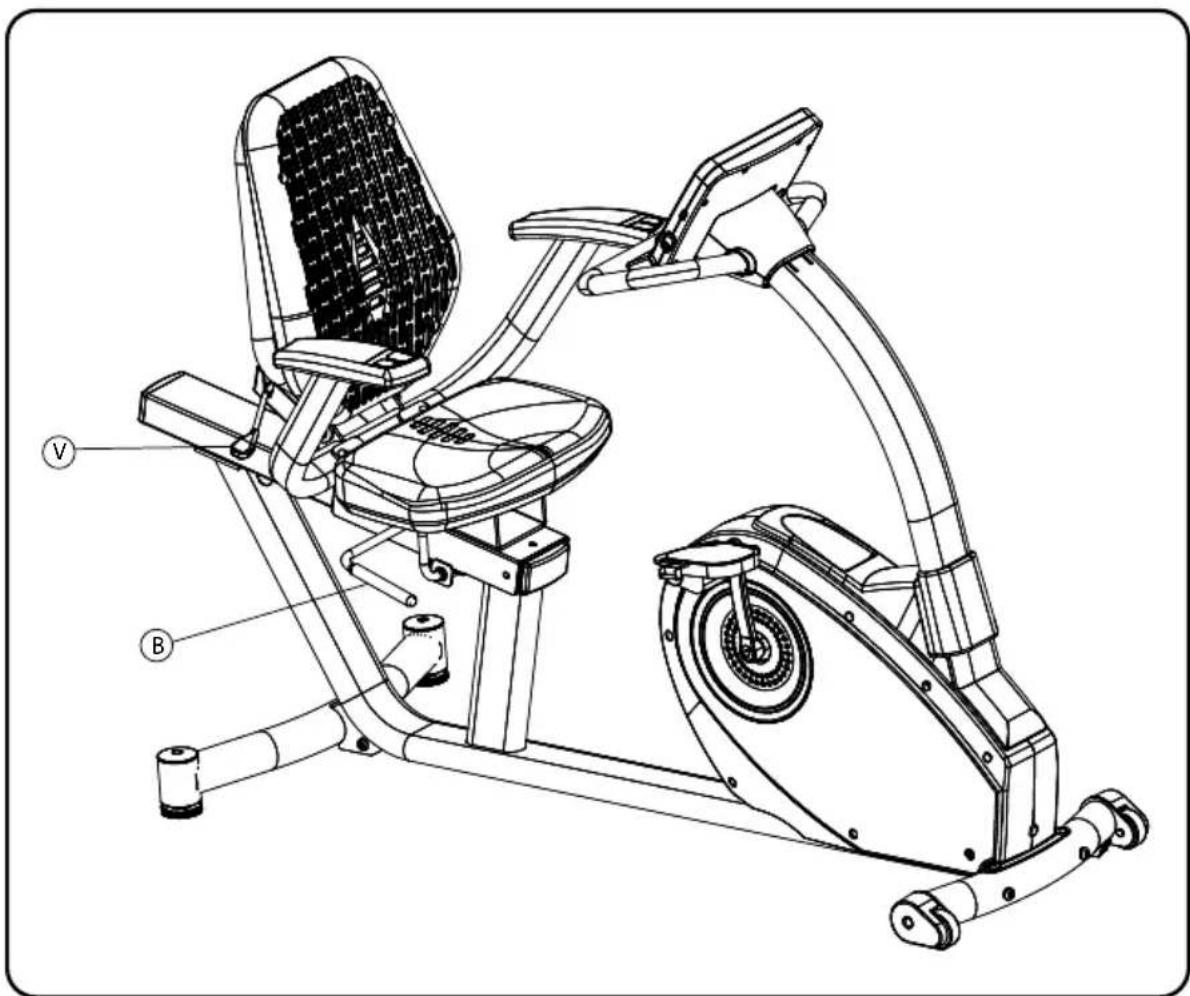
Your R5i bike comes with 14" of seat travel. The seat can be moved by pulling up on the Seat Lock Handle (B) and sliding the seat forward or back to the desired location. To lock the seat, simply push down on the seat lock handle.
Seat Back Tilt Adjustment
Your R5i bike comes with the ability to adjust the tilt of the seat back. To tilt the seat back, pull up on the Seat Back Adjustment Lever (V) and push back on the seat back. When the desired position is reached, release the Seat Back Adjustment Lever. To adjust the seat back forward, pull up on the Seat Back Adjustment Lever (V) and allow the seat back to tilt forward. When the desired position is reached, release the seat back adjustment lever.
Display Console Overview
Console Buttons
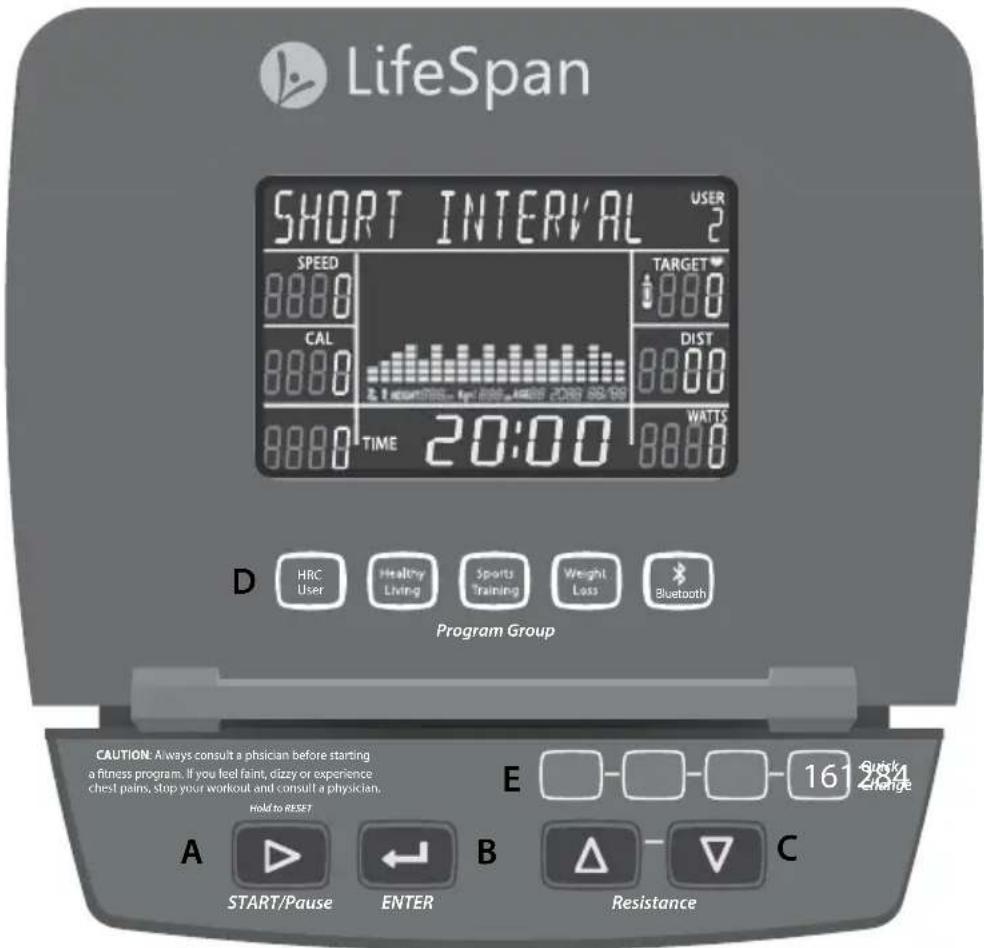
The R5i comes with our innovative Intelli-Key feature that will prompt you through console operations by using intelligent lights on the buttons that automatically flash when they need to be pressed to continue operations.
A. Quickstart: - Press the START button to begin a Manual workout without having to set any individual information. When the program begins your workout time will start counting up from 00:00 and you can manually adjust the resistance using the ▲/▼ arrows.
A. Pause: -If you need to temporarily stop your workout, press the START button to PAUSE. To RESTART the workout, press the START button. After 10 minutes of no activity the console will reset.
A. Reset: - To RESET the console, press and hold the START button for 3 seconds.
B. Enter: - The ENTER button is used to select each piece of information needed during program setup, including Program, Workout Level and Workout Time.
C. Arrows: - These buttons are used to modify the value of each selection entered during the setup process and to change the workout resistance during use.
D. Program Buttons: - The R5i has Program Group buttons. These are designed to help you add variety to your exercise program while staying consistent with your exercise goals. To quickly select a specific program that matches your workout objective use one of the program buttons. These 4 buttons group the programs into HRC User, Healthy Living, Sports Training and Weight Loss Programs. Depending on which button you select, there are multiple programs in each. To look at the next program within each group just press the Program Group button again to scroll to the next option.
E. Quick Resistance Buttons: - The R5i comes with 4 quick change resistance buttons allowing you to select resistance level 4, 8, 12, or 16 without scrolling. If you are using a preset program you can also use these buttons to adjust the entire profile of the program, making the program easier or more difficult to complete.
Setting the Date and Time
Before getting started using Your R5i Recumbent Bike make sure the date and time are properly set on the console to ensure that your exercise data is properly recorded.
To set the date and time in your console follow these steps:
- Press any of the quick resistance buttons to initiate the date and time set up mode. The console will read Update Calendar.
- Press and hold any of the quick resistance buttons for 5 seconds.
- Press the ▲ /▼ buttons to set the correct YEAR. Press ENTER.
- Press the ▲ /▼ buttons to select the correct MONTH. Press ENTER.
- Press the ▲ /▼ buttons to set the correct DAY. Press ENTER.
- Press the ▲ /▼ buttons to set the correct HOUR. Press ENTER.
- Press the ▲ /▼ buttons to set the correct MINUTES. Press ENTER.
Display Console Overview
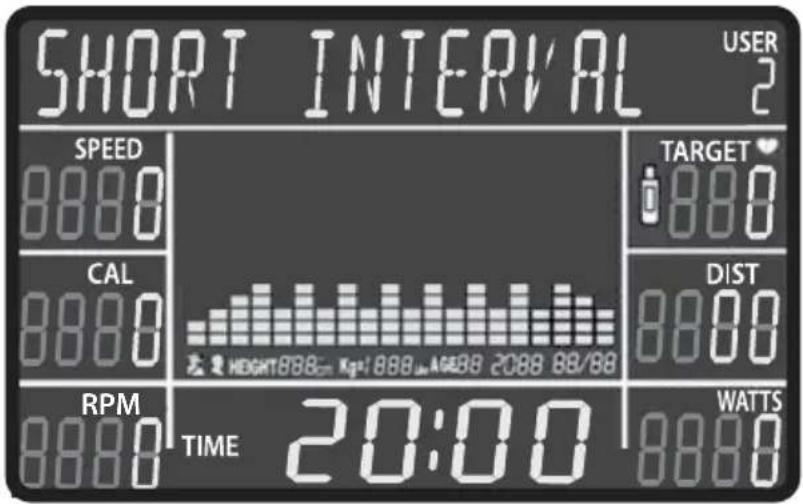
Alpha Numeric Window - The R5i comes with a 16 character alpha window that is used to show the program name and set user functions like date and time.
Workout Feedback: The R5i display window will simultaneously display the following workout information:
Speed - The speed you are traveling in Miles Per Hour (this reading can be changed to Kilometer by using the Engineering Mode.)
Calories - Estimated calories burned since the beginning of the workout.
RPM - Number of Pedal Revolutions per minute.
Pulse- Your measured heart rate using the hand pulse sensors located on the handlebars.
Distance - Total distance traveled in miles or kilometers since the beginning of the workout
Watts - An estimate of the power you are putting into the bike.
Time - The workout time elapsed or the workout time remaining.
Date - The date is presented as the year / month / day below the program matrix.
Time - The time of day is shown in the bottom center window when the console is not in use.
QuickSTART
The quickest way to get started with a workout is to press the START button. This will start the recumbent bike in manual mode with the time counting up from 00:00. You can also set a desired workout Time and update your Weight in the console for more accurate calorie calculation by following these steps:
A. Press ENTER to select manual mode.
B. Select the amount of time (in minutes) you want to use the manual program by pressing the resistance ▲ /▼ buttons. Press ENTER.
C. Use the resistance ▲ /▼ buttons to set your weight. Your weight is used to more accurately calculate calories burned. Press ENTER.
D. Press START and the recumbent bike will start with the time counting down from the preset time.
E. To increase resistance press the ▲ button.
Using Programs
Starting in Manual Mode
The quickest way to get started is to press the START button. Pressing the START button will select the Manual program and the TIME will start counting up from 00:00. You can also press ENTER to select the Manual program. Using the ENTER button will allow you to set a specific workout TIME.
Starting a Preset Program
- Select Program - Use the Program buttons to select your desired Exercise Program. Each program button has multiple programs that you can scroll through. Each time you press the program button you will move to the next program option. Once you find the desired program press ENTER.
You can also select programs by pressing the ▲ /▼ arrows. Press ENTER when you find the program you want to use.
-
Set Program Level - There are 2 levels of intensity with each preset program (1 being the easiest and 2 being the most difficult).
-
Set Time – Set the program TIME of your workout using the ▲ /▼ arrow keys. Press ENTER.
- Press the START button to begin your workout.
Custom User Set-Up Programs
There are 2 user programs that provide you with the ability to establish customized program profiles specific to your workout requirements. Once these programs are completed they are saved by the console and can be selected like any other preset program. Complete the following steps to set up a user program:
-
Select USER1 or USER2 Programs - Use the ▲ /▼ arrow keys to select the USER1 OR USER2 programs. Press ENTER.
-
Set Time - Set the program TIME of your workout using the ▲ /▼ arrow keys. Press ENTER.
-
Set Level – Select the level for each segment in the exercise program. Press ENTER and repeat until all 20 segments are complete.
-
START - Press the START button.
Once the program has been set up, simply scroll to the USER1 or USER2 program and press START.
My Zone Heart Rate Control Programs
The R5i has 2 MyZone Heart Rate control programs: Constant and Interval. In each of these programs you will set your target heart rate and the console will automatically adjust the resistance to maintain your heart rate at either a CONSTANT level or at an alternating LOW and HIGH level. You will need to use the hand pulse sensor to receive your heart rate throughout the course of the workout. You can also purchase a chest strap for a wireless heart rate readout. Please review the Heart Rate Monitoring section of this Owner's Manual for more information.


natural_image
Black and white photo of a life span device with a circular logo on the head (no text or symbols on the device itself)Using Programs
HRC1 – Constant Heart Rate Control
The Constant Heart Rate is a steady state program that lets you select a single heart rate to maintain throughout your workout. After 3 minutes of warm up, the pedaling resistance will automatically be adjusted every 10 seconds to get your heart rate up to the preset level that you selected and then maintain your heart rate during the workout. Refer to the Heart Rate Training section of this manual to determine your optimal training zones based on your age and exercise objectives.
To use this program:
- Select HRC1 - Use the ▲ /▼ arrow keys to select the HRC1 program. Press the ENTER button to select.
- Set Time - Set the program TIME using the ▲ /▼ arrow keys.
Press ENTER. Remember that the program will include 3 minutes of warm up and 3 minutes of cool down not included in the time you set. - Set Age – Enter your age using the ▲ /▼ arrow keys. Press ENTER.
- Set Target Heart Rate – Set your target heart rate using the ▲/▼ arrow keys. Press ENTER.
- Press the START button to begin your workout.
OPERATIONS
While exercising you can change the Resistance level by pressing the ▲/▼ buttons. To pause your exercise program press the START button and to reset your program, press the START button for 3 seconds.
HRC2 – Interval Heart Rate Control
The Interval program is designed to help you increase your aerobic endurance and improve heart rate recovery. This program lets you select a LOW (or recover target heart rate) and a HIGH target. After a 3-minute warm-up the console will adjust the Level every 10 seconds to maintain your Low target for 2 minutes. Then the console will adjust the Level to raise your heart rate to the High target that you selected and once again keep it at this level for 2 minutes and then repeat the process until the end of the workout. It is recommended that you set the workout time to 20 minutes or higher to use this program effectively.
To use this program:
-
Select HRC2 - Use the ▲ /▼ arrow keys to select the HRC2 program. Press the ENTER button to select.
-
Set Time - Set the program TIME using the ▲ /▼ arrow keys. Press ENTER. Remember that the program will include 3 minutes of warm up and 3 minutes of cool down not included in the time you set.
-
Set Age – Enter your age using the ▲ /▼ arrow keys. Press ENTER.
-
Set HIGH Target Heart Rate – Set your HIGH internal training heart rate using the ▲ /▼ arrow keys. Press ENTER.
-
Set LOW Target Heart Rate – Set your LOW internal training heart rate using the ▲ /▼ arrow keys. Press ENTER.
-
Press the START button to begin your workout.

WARNING: Heart rate monitoring may be inaccurate. Over exercising may result in serious injury or death. If you feel faint stop exercising immediately.
Engineering Mode
To Enter Engineering Mode, Press and hold the Enter Button and the Up button for 3 seconds. The console will beep and display Engineering Mode.
| Function Display | |
| Press Enter. The display will show Roller. This is something that does not need adjustment. | Roller183 |
| Press Enter. The display will show Select the units. Press the ▲ or ▼ buttons to change between Si (metric) or EN English modes. | Select the unitsSI or EN |
| Press Enter. The display will show Set calendar On or Off. Use the ▲ or ▼ buttons to change between On or Off | Set Calendar On/Off |
| Press Enter. The display will show Total Distance. It will show 1 digit on the left and 3 digits on the right for a total of 4 digits. This is the total number or miles or Kilometers accumulated. | Total Distance0 000 |
| Press Enter. The display will show Total Hours. It will show 1 digit on the left and 3 digits on the right for a total of 4 digits. This is the total number of hours the bike has been used. | Total Hours0 000 |
| Press Enter Console goes back to normal | operating mode |
Troubleshooting
If you have a question that isn't answered in this Owner's Manual, visit our website at www.LifeSpanFitness.com or call us at 877.654.3837 option 4.
Problem: Unit is unstable or rocks while in use.
Solution: Make sure unit is on a solid, level surface. Adjust the rear adjustment feet until all 4 feet are sitting solid on the floor.
Problem: Rough feeling in pedals when in use.
Solution: If everything is tight, contact LifeSpan Customer Service for replacement pedals.
Problem: Excess play in the handlebars or frame components.
Solution: Using the provided assembly tools, go over the R5i to make sure all assembly hardware is tight.
Maintenance and Tips
General Maintenance
- Keep the unit clean and dry. It is a good idea to wipe the recumbent bike down after each workout.
- If the unit is not going to be used for any extended period of time it is a good idea to unplug the unit and store in a clean environment.
- Clean only with mild soap and a slightly damp cloth. Never use solvents when cleaning.
Moving the R5i Recumbent Bike
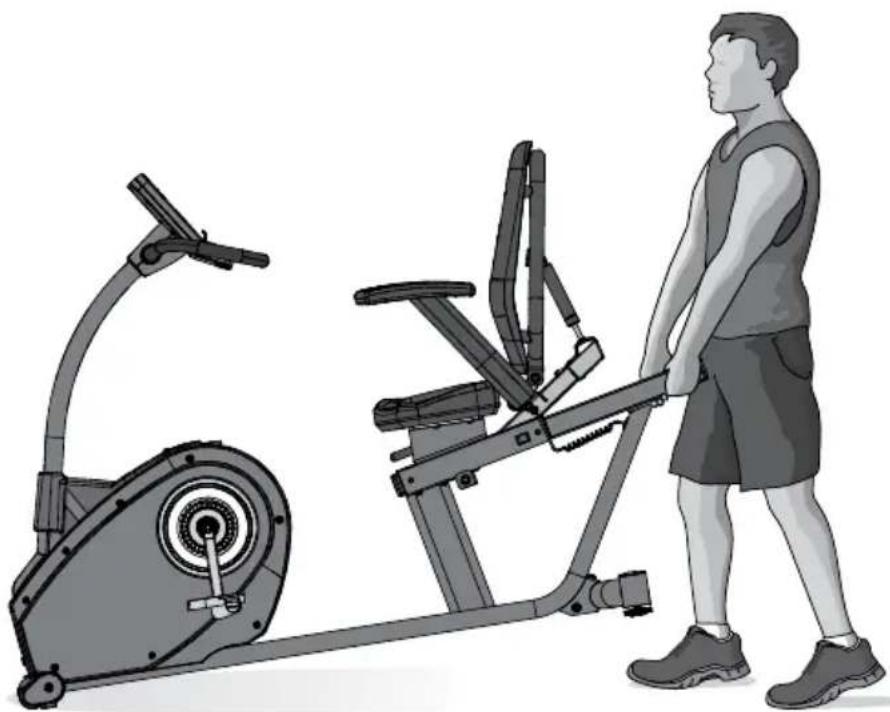
Your R5i bike is equipped with two transport wheels (U) located on the front support. Carefully lift the back of the bike up until the transport wheels make contact with the floor and roll the bike to the desired location. Be sure to bend your knees and use proper lifting techniques while moving this product. It may be difficult to roll the bike on plush carpeting.
natural_image
Illustration of a person standing beside an stationary exercise bike (no text or symbols visible)
CAUTION: When lifting, use proper safety precautions and lifting techniques. Bend your knees and elbows, keep your back straight and pull up evenly with both arms.
- Congratulations on Purchasing Your LifeSpan R5i Recumbent Bike!
- Contents
- Welcome
- Safety First 4
- About Your R5i Recumbent Bike 7
- Assembling Your R5i Recumbent Bike 18
- Console Basics 32
- Using Programs 36
- Maintenance and Tips 41
- Safety First
- Children and Pets
- Safety Tips While in Use
- Specifications
- About Your R5i Recumbent Bike
- Console Overview
- Starting an Exercise Program
- Zone 5 — Performance Redline Zone: 90% - 100% of your Max HR
- Zone 4 — Threshold Zone: 80% - 90% of your Max HR
- Zone 3 — Aerobic Zone: 70% - 80% of your Max HR
- Zone 2 — Temperate Zone: 60% - 70% of your Max HR
- Zone 1 — Healthy Heart Zone: 50% - 60% of your Max HR
- Reading Your Heart Rate
- Chest Strap
- Preset Programs
- Long Slow Distance
- Short Interval
- Moderate Interval
- Long Interval
- Negative Interval 1
- Negative Interval 2
- Fartlek
- Uphill Climb
- Pyramid Climb
- Plateau Climb
- Ladder
- Uphill Interval
- Steady Pace
- Long Slow Distance 2
- Cardio Ride
- Short Interval 2
- Warranty
- Exclusions and Limitations:
- Assembling Your R5i Recumbent Bike
- Exploded View
- Pre-installed Hardware
- Step 1: Remove Components from Box
- Step 2: Rear Support Assembly
- Step 3: Front Support Assembly
- Step 4: Front Support Assembly
- NOTE:
- Step 5: Seatback / Armrest Assembly
- Step 6: Seatback Shock Assembly
- Step 7: Shock Assembly Covers
- Step 8: Seat Bottom Assembly
- Step 9: Console Upright Assembly
- Step 10: Pedal Assembly
- Step 11: Setting Date and Time
- Leveling
- HINT:
- Seat Adjustments
- Seat Fore/Aft Adjustment
- Seat Back Tilt Adjustment
- Display Console Overview
- Console Buttons
- Setting the Date and Time
- QuickSTART
- Using Programs
- Starting in Manual Mode
- Starting a Preset Program
- Custom User Set-Up Programs
- My Zone Heart Rate Control Programs
- HRC1 – Constant Heart Rate Control
- To use this program:
- OPERATIONS
- HRC2 – Interval Heart Rate Control
- Engineering Mode
- Troubleshooting
- Maintenance and Tips
- General Maintenance
- Moving the R5i Recumbent Bike
Brand : LifeSpan
Model : R5i
Category : Exercise bike