
AC-DAC-CO2 - Uncategorized AVPro Edge - Free user manual and instructions
Find the device manual for free AC-DAC-CO2 AVPro Edge in PDF.


| Product Type | Digital to Analog Audio Converter |
| Brand | AVPro Edge |
| Model | AC-DAC-CO2 |
| Input Ports | 1 x TOSLINK (S/PDIF Optical), 1 x RCA (S/PDIF Coaxial) |
| Output Ports | 2 x RCA (Stereo Analog Audio) |
| Audio Input Format | LPCM 2.0 (uncompressed stereo) |
| Audio Output Format | Analog Stereo 2.0 |
| Input Sampling Rates | 32kHz, 44.1kHz, 48kHz, 88.2kHz, 96kHz, 176.4kHz, 192kHz |
| Output Level | 2 Vrms |
| Output Impedance | 600 Ω |
| Power Supply | 5V DC, 1.2A (included adaptor, US/EU standards, CE/FCC/UL certified) |
| Power Consumption | 0.74W |
| ESD Protection | Human Body Model: ±12kV (Air Discharge), ±8kV (Contact Discharge) |
| Dimensions (W x H x D) | Case only: 46mm x 22.5mm x 45.5mm; Inclusive: 56mm x 22.5mm x 46mm |
| Weight | 30g |
| Chassis Material | Plastic |
| Silkscreen Color | White |
| Operating Temperature | 0°C to 40°C (32°F to 104°F) |
| Storage Temperature | -20°C to 60°C (-4°F to 140°F) |
| Relative Humidity | 20% to 90% RH (non-condensing) |
| Package Contents | 1 x Converter, 1 x 5V/1.2A DC Power Adaptor, 1 x Operation Manual |
| Certifications | CE, FCC, UL (power supply) |
| Input Selection | Coaxial/Optical switch on left panel |
| LED Indicators | Optical and Coax LEDs on top panel |
| Cleaning Instructions | Wipe with a dry, soft cloth; do not use liquids or sprays |
| Safety Precautions | Read all instructions; avoid moisture; use only supplied PSU; do not block vents |
| Spare Parts / Repairability | Contact AVPro Edge support for service; no user-serviceable parts inside |
Frequently Asked Questions - AC-DAC-CO2 AVPro Edge
User questions about AC-DAC-CO2 AVPro Edge
0 question about this device. Answer the ones you know or ask your own.
Ask a new question about this device
Download the instructions for your Uncategorized in PDF format for free! Find your manual AC-DAC-CO2 - AVPro Edge and take your electronic device back in hand. On this page are published all the documents necessary for the use of your device. AC-DAC-CO2 by AVPro Edge.
USER MANUAL AC-DAC-CO2 AVPro Edge
DISCLAIMERS
AVPro Global assumes no responsibility for any inaccuracies that may be contained in this document. AVPro Global also makes no commitment to update or to keep current the information contained in this document.
AVPro Global reserves the right to make improvements to this document and/or product at any time and without notice.
COPYRIGHT NOTICE
No part of this document may be reproduced, transmitted, transcribed, stored in a retrieval system, or any of its part translated into any language or computer file, in any form or by any means— electronic, mechanical, magnetic, optical, chemical, manual, or otherwise—without express written permission and consent from AVPro Globl Hldgs.
© Copyright 2017 by AVPro Global Hldgs.
All Rights Reserved.
TRADEMARK ACKNOWLEDGMENTS
All products or service names mentioned in this document may be trademarks of the companies with which they are associated.
SAFETY PRECAUTIONS
Please read all instructions before attempting to unpack, installor operate this equipment and before connecting the powersupply.
Please keep the following in mind as you unpack and install this equipment:
• Always follow basic safety precautions to reduce the risk of fire, electrical shock and injury to persons.
• To prevent fire or shock hazard, do not expose the unit to rain, moisture or install this product near water.
• Never spill liquid of any kind on or into this product.
- Never push an object of any kind into this product through any openings or empty slots in the unit, as you may damage parts inside the unit.
• Do not attach the power supply cabling to building surfaces.
- Use only the supplied power supply unit (PSU). Do not use the PSU if it is damaged.
- Do not allow anything to rest on the power cabling or allow any weight to be placed upon it or any person walk on it.
• To protect the unit from overheating, do not block any vents or openings in the unit housing that provide ventilation and allow for sufficient space for air to circulate around the unit.
REVISION HISTORY
| VERSION NO. | DATE (DD/MM/YY) | SUMMARY OF CHANGE |
| VS1 | 03/14/18 | First release |
CONTENTS
- Introduction......1
- Applications....1
- Package Contents....1
- System Requirements....1
- Features....1
- Operation Controls and Functions......2
6.1 Top Panel....2
6.2 Front Panel....2
6.3 Rear Panel 3
6.4 Left Panel....3
- Connection Diagram ....4
- Specifications....5
- Acronyms......6
1. INTRODUCTION
The Digital to Analog Audio Converter is an easy to use product that converts Coaxial or Optical audio signals into analog Stereo (L/R) audio. It can be easily switched between either Coaxial or Optical inputs. With its compact, elegant design and simple LED input status make it easier for users to connect up and use instantly.
2. APPLICATIONS
• HDTV digital output conversion
• 24-bit DAC conversion
3. PACKAGE CONTENTS
• 1×Digital to Analog Audio Converter
• 1×5V/1.2A DC Power Adaptor
• 1×Operation Manual
4. SYSTEM REQUIREMENTS
Source equipment such as a DVD/Blu-ray player or an HDTV and output to active speakers or amplifier with connection cables.
5. FEATURES
• Supports digital audio input (Coaxial/Optical) and stereo analog audio output (L/R)
- Integrated digital interpolator filter and Digital to Analog Converter (DAC)
• Supports uncompressed digital stereo audio input
• Supports S/PDIF audio at 192kHz/24-bit data for conversion to left and right analog channels
- Compact size and easy to install
6. OPERATION CONTROLS AND FUNCTIONS
6.1 Top Panel
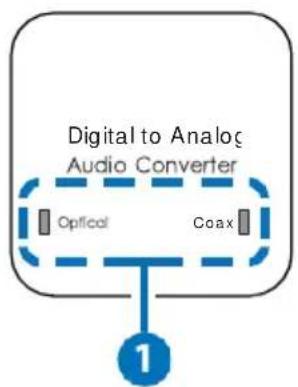
1 Optical & Coax LEDs: These LED lights will illuminate according to which input is currently selected.
6.2 Front Panel
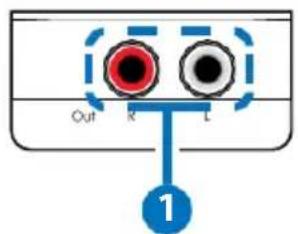
1 L/R Out: Analog stereo output. Connect to the input of your audio device or display.
6.3 Rear Panel
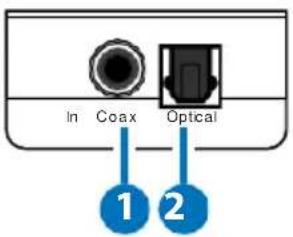
1 Coax In: Connect to the Coaxial digital audio source, such as a DVD player or CD player.
2 Optical In: Connect to the Optical audio source, such as a Blu-ray player or games console.
6.4 Left Panel
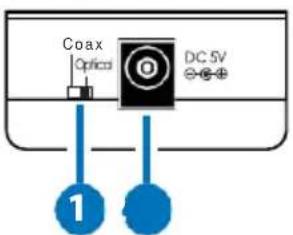
1 Coax/ Optical Switch: Select which digital audio input is active and will be converted to analog stereo (L/R) audio.
2 DC 5V: Connect the 5V DC power supply to the unit and plug the adaptor into an AC wall outlet.
7. CONNECTION DIAGRAM
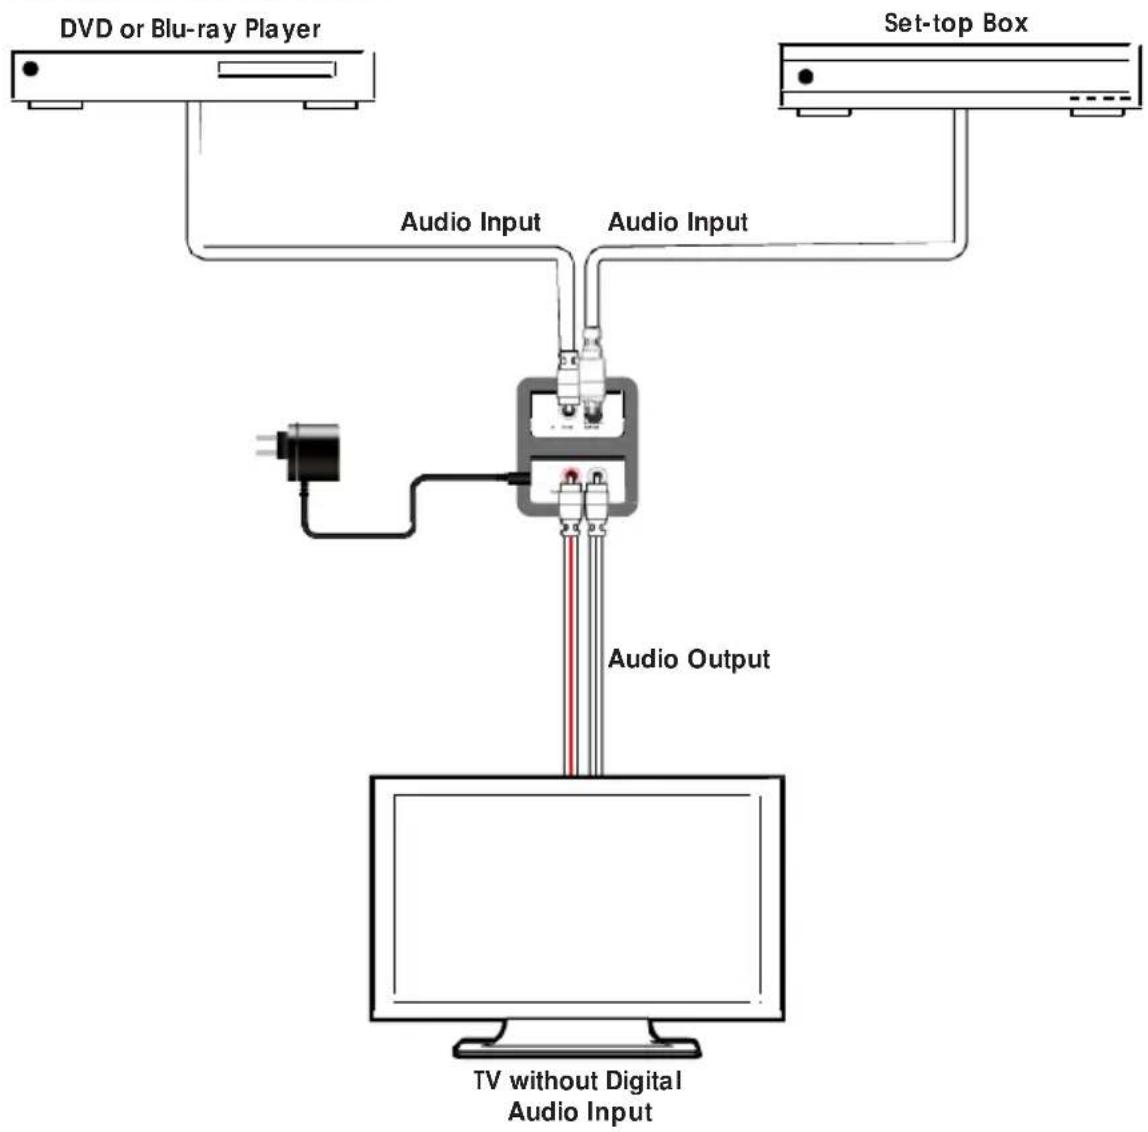
flowchart
graph TD
    A["TV without Digital Audio Input"] --> B["Set-top Box"]
    B --> C["Audio Input"]
    C --> D["Video or Blu-ray Player"]
    D --> E["Audio Output"]
    style A fill:#f9f,stroke:#333
    style B fill:#ccf,stroke:#333
    style C fill:#cfc,stroke:#333
    style D fill:#fcc,stroke:#333
    style E fill:#ffc,stroke:#333
- SPECIFICATIONS
| Input Ports | 1×TOSLINK (S/PDIF Audio) |
| 1×RCA (S/PDIF Audio) | |
| Output Ports | 2×RCA (Stereo Audio) |
| Input Audio Fromat | LPCM 2.0 |
| Output Audio Fromat | Analog 2.0 |
| Input Sampling Rates | 32kHz, 44.1kHz, 48kHz, 88.2kHz, 96kHz, 176.4kHz & 192kHz |
| Output Level | 2Vrms |
| Output Impedance | 600Ω |
| Power Supply | 5V/1.2A DC (US/EU standards, CE/FCC/UL certified) |
| ESD Protection | Human Body Model: ±12kV (Air Discharge) ±8kV (Contact Discharge) |
| Dimensions | 46mm×22.5mm×45.5mm (W×H×D) [Case Only] 56mm×22.5mm×46mm (W×H×D) [All Inclusive] |
| Weight | 30g |
| Chassis Material | Plastic |
| Silkscreen Color | White |
| Operating Temperature | 0°C - 40°C/32°F - 104°F |
| Storage Temperature | -20°C - 60°C/-4°F - 140°F |
| Relative Humidity | 20 - 90% RH (Non-condensing) |
| Power Consumption | 0.74W |
9. ACRONYMS
| ACRONYM | COMPLETE TERM |
| DAC | Digital to Analog Conversion |
| LPCM | Linear Pulse-Code Modulation |
| S/ PDIF | Sony/ Philips Digital Interface Format |
Thanks you and make sure to check out www.AVProEdge.com to find all our new products and latest specials
From all your friends here at AVPro:
Happy Installing

natural_image
Black-and-white illustration of a hand giving a thumbs-up gesture (no text or symbols)Brand : AVPro Edge
Model : AC-DAC-CO2
Category : Uncategorized