
HDR-10 - Audio recorder DataVideo - Free user manual and instructions
Find the device manual for free HDR-10 DataVideo in PDF.


| Product Type | 3G/HD/SD-SDI Highlight Replay Recorder |
| Video Input | 1 x 3G/HD-SDI (Level A only) |
| Video Output | 2 x 3G/HD-SDI (AUX & PGM, one configurable as loop-through) |
| Audio Support | Embedded audio, mono/stereo/quad |
| Recording Format | Uncompressed 4:2:2 MOV (10-bit or 8-bit) |
| Internal Buffer | 4 GB (stores up to 30 seconds of video) |
| Storage Media | Removable 2.5" SSD (no size limit) |
| Video Formats | 720p@50/59.94/60, 1080i@50/59.94/60, 1080p@50/59.94/60 (3G Level A) |
| Control Interface | USB 2.0 (Contour Shuttle Express included), GPI, LISN |
| Navigation Modes | Capture, Review, Replay, Home/Menu |
| Playback Speed | Slow motion, normal, fast (1x, 2x, 4x) |
| Power Supply | DC 12V (adapter included) |
| Power Consumption | Approx. 15W (estimated based on typical devices) |
| Dimensions | Not specified, standalone unit |
| Weight | Not specified |
| Maintenance | Clean with dry cloth; do not use liquid cleaners |
| Safety Precautions | Do not block vents; avoid moisture; use only specified power |
| Warranty | 1 year standard, 3 years with registration (parts may vary) |
| Firmware Upgrade | Via SSD or USB flash drive |
| Optional Accessory | RMC-400 Replay Control Center (sold separately) |
Frequently Asked Questions - HDR-10 DataVideo
User questions about HDR-10 DataVideo
0 question about this device. Answer the ones you know or ask your own.
Ask a new question about this device
Download the instructions for your Audio recorder in PDF format for free! Find your manual HDR-10 - DataVideo and take your electronic device back in hand. On this page are published all the documents necessary for the use of your device. HDR-10 by DataVideo.
USER MANUAL HDR-10 DataVideo
WARNINGS AND PRECAUTIONS 4
WARRANTY 5
STANDARD WARRANTY 5
THREE YEAR WARRANTY....6
DISPOSAL 6
-
INTRODUCTION 7
-
FEATURES....7
-
FUNCTIONS....7
FRONT PANEL 7
REAR PANEL 8
4.2 REVIEW MODE....11
Saving an edited clip or highlight to MOV file 12
4.3 REPLAY MODE 12
Capture and Replay....13
Recalling a previously saved Clip....13
4.4 HOME MODE 13
5. RMC-400 REPLAY CONTROL CENTER 16
5.1 REAR PANEL....16
5.2 CONTROL PANEL 17
5.3 HOW TO PURCHASE 19
6. FIRMWARE UPGRADE......20
-
FORMATTING STORAGE MEDIA 21
-
SPECIFICATIONS 22
-
SERVICE AND SUPPORT....24
Disclaimer of Product & Services
The information offered in this instruction manual is intended as a guide only. At all times, Datavideo Technologies will try to give correct, complete and suitable information. However, Datavideo Technologies cannot exclude that some information in this manual, from time to time, may not be correct or may be incomplete. This manual may contain typing errors, omissions or
incorrect information. Datavideo Technologies always recommend that you double check the information in this document for accuracy before making any purchase decision or using the product. Datavideo Technologies is not responsible for any omissions or errors, or for any subsequent loss or damage caused by using the information contained within this manual. Further advice on the content of this manual or on the product can be obtained by contacting your local Datavideo Office or dealer.
FCC Compliance Statement
This device complies with part 15 of the FCC rules. Operation is subject to the following two conditions:
(1) This device may not cause harmful interference, and
(2) This device must accept any interference received, including interference that may cause undesired operation.
Warnings and Precautions

- Read all of these warnings and save them for later reference.
- Follow all warnings and instructions marked on this unit.
- Unplug this unit from the wall outlet before cleaning. Do not use liquid or aerosol cleaners. Use a damp cloth for cleaning.
- Do not use this unit in or near water.
- Do not place this unit on an unstable cart, stand, or table. The unit may fall, causing serious damage.
- Slots and openings on the cabinet top, back, and bottom are provided for ventilation. To ensure safe and reliable operation of this unit, and to protect it from overheating, do not block or cover these openings. Do not place this unit on a bed, sofa, rug, or similar surface, as the ventilation openings on the bottom of the cabinet will be blocked. This unit should never be placed near or over a heat register or radiator. This unit should not be placed in a built-in installation unless proper ventilation is provided.
- This product should only be operated from the type of power source indicated on the marking label of the AC adapter. If you are not sure of the type of power available, consult your Datavideo dealer or your local power company.
- Do not allow anything to rest on the power cord. Do not locate this unit where the power cord will be walked on, rolled over, or otherwise stressed.
- If an extension cord must be used with this unit, make sure that the total of the ampere ratings on the products plugged into the extension cord do not exceed the extension cord's rating.
- Make sure that the total amperes of all the units that are plugged into a single wall outlet do not exceed 15 amperes.
- Never push objects of any kind into this unit through the cabinet ventilation slots, as they may touch dangerous voltage points or short out parts that could result in risk of fire or electric shock. Never spill liquid of any kind onto or into this unit.
- Except as specifically explained elsewhere in this manual, do not attempt to service this product yourself. Opening or removing covers that are marked "Do Not Remove" may expose you to dangerous voltage points or
other risks, and will void your warranty. Refer all service issues to qualified service personnel.
- Unplug this product from the wall outlet and refer to qualified service personnel under the following conditions:
a. When the power cord is damaged or frayed;
b. When liquid has spilled into the unit;
c. When the product has been exposed to rain or water;
d. When the product does not operate normally under normal operating conditions. Adjust only those controls that are covered by the operating instructions in this manual; improper adjustment of other controls may result in damage to the unit and may often require extensive work by a qualified technician to restore the unit to normal operation;
e. When the product has been dropped or the cabinet has been damaged;
f. When the product exhibits a distinct change in performance, indicating a need for service.
Warranty
Standard Warranty
- Datavideo equipment are guaranteed against any manufacturing defects for one year from the date of purchase.
- The original purchase invoice or other documentary evidence should be supplied at the time of any request for repair under warranty.
- The product warranty period begins on the purchase date. If the purchase date is unknown, the product warranty period begins on the thirtieth day after shipment from a Datavideo office.
- All non-Datavideo manufactured products (product without Datavideo logo) have only one year warranty from the date of purchase.
- Damage caused by accident, misuse, unauthorized repairs, sand, grit or water is not covered under warranty.
- Viruses and malware infections on the computer systems are not covered under warranty.
- Any errors that are caused by unauthorized third-party software installations, which are not required by our computer systems, are not covered under warranty.
- All mail or transportation costs including insurance are at the expense of the owner.
• All other claims of any nature are not covered.
- All accessories including headphones, cables, and batteries are not covered under warranty.
• Warranty only valid in the country or region of purchase.
- Your statutory rights are not affected.
Three Year Warranty
- All Datavideo products purchased after July 1st, 2017 are qualified for a free two years extension to the standard warranty, providing the product is registered with Datavideo within 30 days of purchase.

- Certain parts with limited lifetime expectancy such as LCD panels, DVD drives, Hard Drive, Solid State Drive, SD Card, USB Thumb Drive, Lighting, Camera module, PCIe Card are covered for 1 year.
- The three-year warranty must be registered on Datavideo's official website or with your local Datavideo office or one of its authorized distributors within 30 days of purchase.
Disposal

natural_image
Symbol of a trash bin with crossed lines indicating no waste or discharge (no text or labels)For EU Customers only - WEEE Marking
This symbol on the product or on its packaging indicates that this product must not be disposed of with your other household waste. Instead, it is your responsibility to dispose of your waste equipment by handing it over to a designated collection point for the recycling of waste electrical and electronic equipment. The separate collection and recycling of your waste equipment at the time of disposal will help to conserve natural resources and ensure that it is recycled in a manner that protects human health and the environment. For more information about where you can drop off your waste equipment for recycling, please contact your local city office, your household waste disposal service or the shop where you purchased the product.

CE Marking is the symbol as shown on the left of this page. The letters "CE" are the abbreviation of French phrase "Conformité Européenne" which literally means "European Conformity". The term initially used was "EC Mark" and it was officially replaced by "CE Marking" in the
Directive 93/68/EEC in 1993. "CE Marking" is now used in all EU official documents.
1. Introduction
The HDR-10 is a Highlight Replay Recorder (3G/HD/SD SDI) capable of capturing specific, desired or special scenes during any sports game. The captured scene is then output to the switcher as a replay. The HDR-10 also allows the user to store the chosen Highlights into removable compatible media (2.5" SSD recommended). The User controls the unit with a simple USB 2.0 compatible Jog/Shuttle wheel which has five function buttons. An SDI AUX video output from the HDR-10 unit provides an On Screen Display (OSD) menu and the PGM SDI output provides clean video output.
Note: The HDR-10 3G input accepts video signals from Level A camera only.
2. Features
- Single channel highlight replay recorder
• Internal 4GB Buffer to capture and review the event
• 3G/HD/SD SDI input, output and loop through with embedded audio
• A third party Jog/Shuttle control device is provided with the unit - GPI interface allows other devices such as switcher to trigger the playback.
• Recording file formats: Uncompressed 4:2:2 MOV - LISN (Local Interconnect Synchronous Network) connection between main unit, remote controller and other devices.
3. Functions
Front Panel
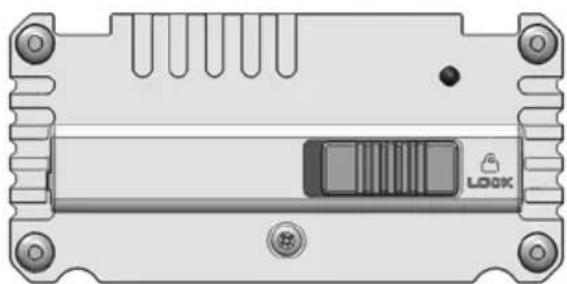
natural_image
Front view of an electronic device casing with ports and a central indicator block labeled 'LOOK' (no text or symbols beyond branding)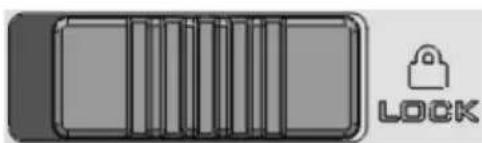
natural_image
Diagram of a vehicle lock mechanism with no text or symbolsMedia Locking Switch
Rear Panel
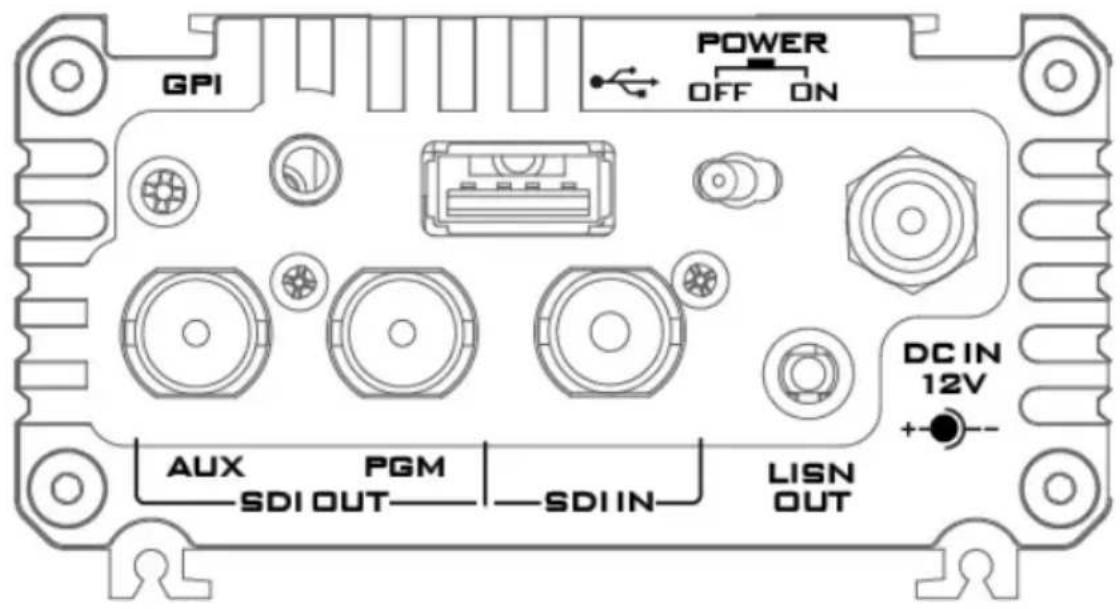

DC In Socket (12V)
ON/OFF Switch
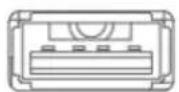
USB 2.0 port for Control or Updates

External GPI Trigger
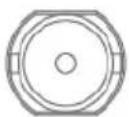
AUX OUT
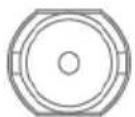
PGM OUT
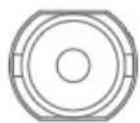
SDI IN
4. Quick Operation Instruction
To operate the HDR-10, the user needs to be familiar with the supplied Contour Shuttle Express USB 2.0 controller. When viewing the HDR-10 AUX SDI output, relevant controller buttons or wheels are annotated as an OSD menu in the lower left hand corner of the video with a number or icon assigned to each. This OSD menu is not shown on the separate PGM SDI output.
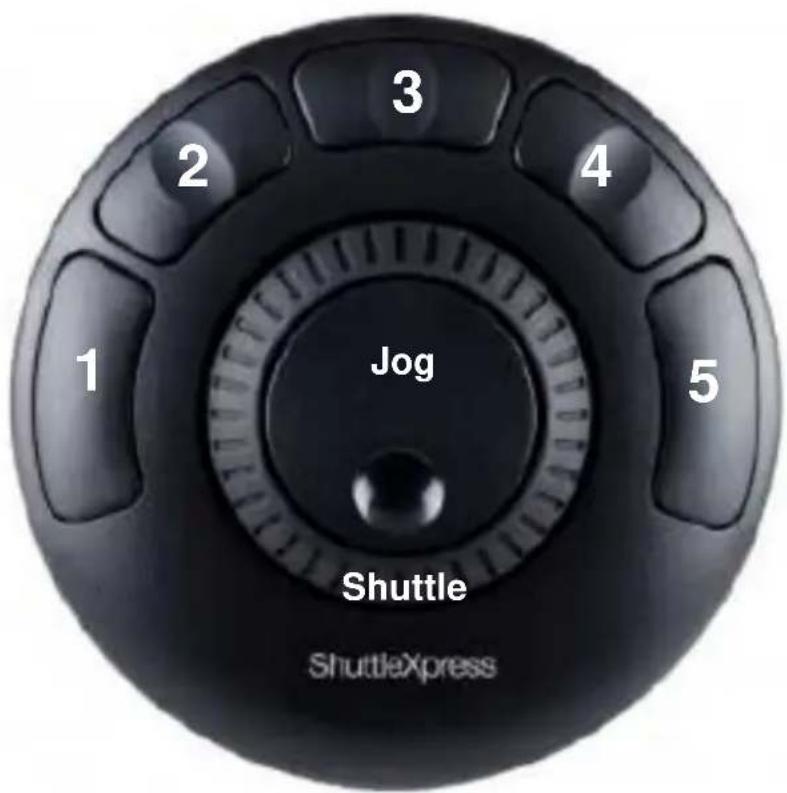
There are four modes of operation within the HDR-10, three main modes and a menu driven maintenance mode. The three main modes follow the normal operation sequence of the HDR-10.
These are, in order:
- Capture Mode Where live action is monitored and a potential highlight is flagged.
- Review Mode Where a highlight is precisely edited and can be also saved.
3. Replay Mode
Where the selected highlight is replayed on the PGM OUT port.
In these three modes, dedicated keys are provided for quick access and control. As a reminder, the function of each button or wheel is then annotated in the lower left hand corner of the AUX screen.
Maintenance mode
Accessed from the HOME menu option and is menu driven.
4.1 Capture Mode
The HDR-10 automatically enters this mode when it is first powered on and this mode can also be selected from the OSD Home menu by the user.
In capture mode video is buffered or saved to working memory only. This memory is depicted by a growing red buffer line at the bottom of the AUX OSD display.
This memory buffer will only store up to the latest 30 seconds of video.
Once the buffer memory is full the line stops growing and the HDR-10 starts recycling memory or buffer space. During this recycle process the oldest video frames captured are lost in order to save the latest video data being supplied to the HDR-10.
 | 2 | Drop start cue sets the start point of a particular replay clip |
| EXIT | 5 | Exit highlight Capture mode and enter Review mode |
When the user presses button 2 on the Jog/Shuttle controller, a start flag or box is shown progressing along the red buffer line. This marks the beginning of a possible video highlight to be replayed. When the user decides enough video has been captured for the highlight clip button 5 is pressed to end capture mode and the unit automatically enters Review Mode.
4.2 Review Mode
The HDR-10 automatically enters this mode when capture mode is exited. This mode can also be selected from the OSD Home menu by the user. In review mode the buffer line has changed colour to a green buffer line to quickly confirm the mode has changed.
The clip marked between the start and exit buttons being pressed in capture mode can now be reviewed, edited further or saved to the removable SSD media as an uncompressed .MOV file.
 | 1 | Save the currently marked clip, between the Start and End points, as an uncompressed MOV file to the removable SSD media. |
 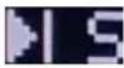 | 2 | Drop Start Cue marker at current positionGo to Start Cue marker |
 | 3 | Toggles the unit between Drop Marker or Go To marker mode |
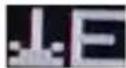  | 4 | Drop End Cue marker at current positionGo to End Cue marker |
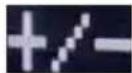 |  | Jog (inside wheel) : Frame-By-Frame fine tune |
 |  | Shuttle (outside wheel): Fast forward or rewind at 1x, 2x or 4x speed |
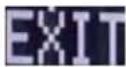 | 5 | Exit the Review mode and move to Replay mode |
Saving an edited clip or highlight to MOV file
The HDR-10 only saves the marked clip/highlight on the buffer line to the removable SSD as an uncompressed MOV file. The file size will be large, up to 4GB, depending on the clip length in seconds. The saved clip can be replayed from the unit at a later stage or added (appended) to other clips on the same SSD. The SSD removed from the HDR-10 can also be used to transfer saved clips to a non-linear editing computer.
- Power on the HDR-10 and by default, the HDR-10 will be in the capture mode.
- Press the No. 2 control button to place the start cue
- To stop capturing, press the No. 5 control button (EXIT) and enter the Review Mode
- In Review Mode, use jog and shuttle wheels to adjust the cursor position and once the cursor is at desired position, replace the start cue and/or the end cue.
- Press the No. 1 control button (☐) to save after the start and end points are determined.
4.3 Replay Mode
The HDR-10 automatically enters this mode when review mode is exited. This mode can also be selected from the OSD Home menu by the user.
In replay mode the buffer line has also changed colour to blue to quickly confirm the mode has changed.
| 1 Play the replay clip | ||
| Repeat 2 | Repeat the replay clip for unlimited counts until the button is pressed again | |
| Ext/Int T | 3 | Switches between GPI trigger or Contour Shuttle Express controller trigger |
| Speed | ↓↑ | Change play speed |
| Exit | 5 | Exit the Replay mode and move to the Home menu |
Capture and Replay
- Power on the HDR-10 and by default, the HDR-10 will be in the capture mode.
- The HDR-10 will start capturing once it is in the capture mode.
- Press the No. 2 controller button to place the start cue.
- To stop capturing, press the No. 5 controller button (EXIT) to enter the Review Mode.
- In the Review Mode, use jog and shuttle wheels to adjust the cursor position and once the cursor is at desired position, place the start cue or the end cue.
- Press the No. 2 controller button to place the start cue and press the No. 4 controller button to place the end cue.
- Press the No. 5 controller button to exit the Review Mode after the start and end points are determined.
- Go to the Replay Mode.
- To start the replay, simply press the No. 1 controller button (▶)
Recalling a previously saved Clip
- On the home mode menu, select Media.
- To select the desired bin number, select "SELECT BIN" on the Media Sub-Menu.
- After the bin number is selected, select the "Recall Clip" option to load the desired clip.
- Select "SELECT CLIP" to start clip selection, which can be done by using the jog wheel to cycle through the available clip numbers.
- After the desired clip is selected, the user can either clear the memory buffer content and load the selected clip (Clear and Recall) or append the selected clip to the existing buffer content (Recall Append).
- After the clip is loaded, exit the Media Sub-Menu back to the Home Mode and then select the Replay Mode.
- To start the clip replay, simply press the No. 1 controller button (▶)
4.4 Home Mode
After entering the Home menu, the menu options can be seen at the top center of the AUX output OSD. The relevant controls are annotated in the lower left hand corner of the AUX screen. The small inside wheel on
the jog/shuttle controller allows the user to scroll up/down the Home menu. To make the selection, simply press the No. 1 control button on the controller.
| Capture | Capture Mode | Refer to Capture Mode section | |
| Review | Review Mode | Refer to Review Mode section | |
| Replay | Replay Mode | Refer to Replay Mode section | |
| Media | Storage Media | Space Avail: Space available on HDR-10 Audio and Video formats (e.g. STEREO 1080i59.9) | |
| Recall Clip | SELECT CLIP | ||
| CLEAR AND RECALL | |||
| RECALL APPEND | |||
| Select Bin | |||
| Mark Clip Bad | Yes/No | ||
| Empty Recent Bin | Yes/No | ||
| Format Media | Yes/No | ||
| Save Clip | |||
| Tools | System Tools | Video Format | 720p50720p59.9720p601080i501080i59.91080i601080p501080p59.91080p60 |
| Revision | CONTROL/HDR VersionsCONTROL 08.010DHDR 08.0002SUB 08.0807010303 | ||
| Date & Time (YYYY-MM-DD HH:MM) | SET GMT | ||
| SET RTC | |||
| Time Code | SET SOURCE | ||
| SET TIMECODE | |||
| Audio Setup | MONO | ||
| STEREO | |||
| QUAD | |||
| Firmware Upgrade | |||
Currently selected option is indicated by an asterisk mark (*).
5. RMC-400 Replay Control Center
In addition to the standard Contour Shuttle Express USB 2.0 controller, the RMC-400 Replay Control Center is available separately for the user. The RMC-400 offers the user a powerful and effective way to control multiple HDR-10 highlight replay recorders.
The RMC-400 allows the user to control up to four HDR-10 units simultaneously. Moreover, the user can use the RMC-400 to capture their desired scenes during any live events such as sports game or live concert. After the desired scenes are captured, the user will be able to edit and replay the captured scenes directly on the RMC-400.
5.1 Rear Panel
The rear panel of the RMC-400 is illustrated in the diagram below.
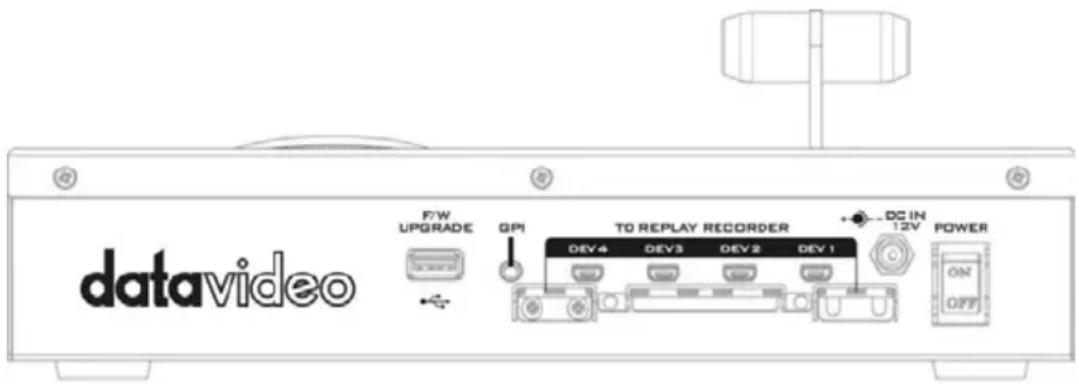
- Power Switch: The power switch allows you to turn ON/OFF the device.
- DC IN 12V: A 12V DC power adapter unit must be connected to the DC IN 12V socket.
- Mini-USB interface: Up to four HDR-10 Highlight Replay Recorders can be connected.
- GPI interface: The GPI interface can be used to connect other external devices.
- Firmware Upgrade: USB type A interface for firmware upgrade.
5.2 Control Panel
The control panel of the RMC-400 is illustrated in the diagram below.
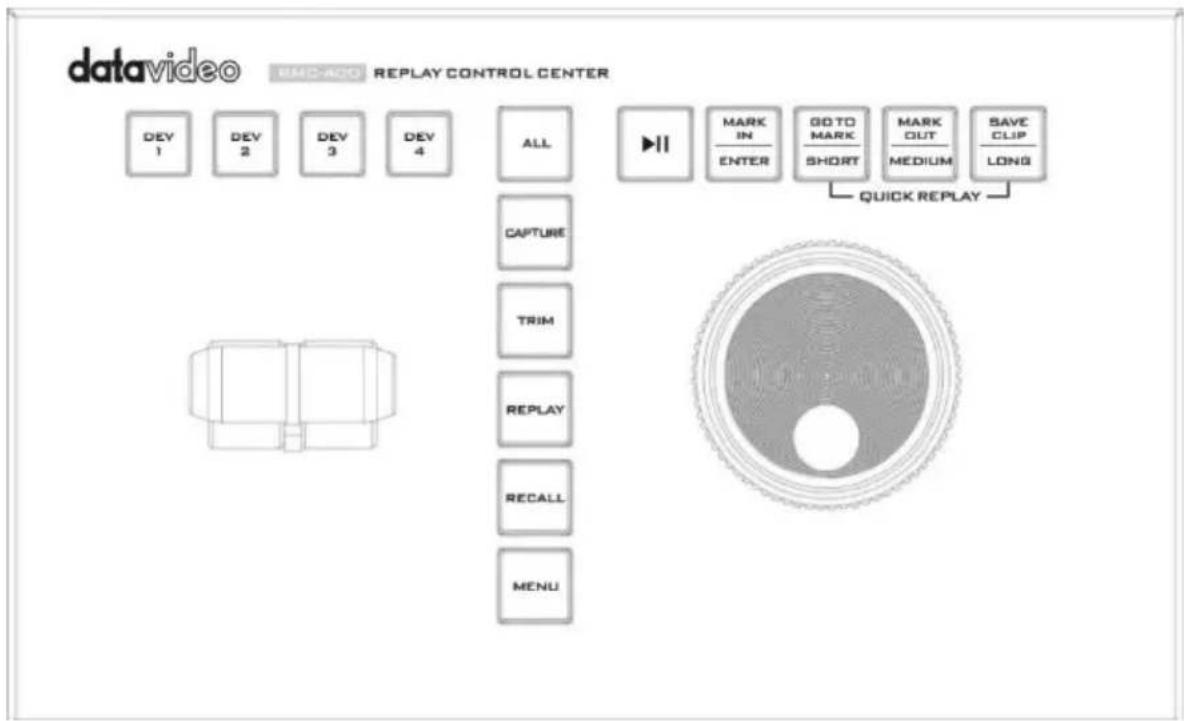
- DEV1 to DEV4 Buttons: "Dev" Buttons allow the user to activate the respective HDR-10 devices.
- ALL Button: Press the "ALL" button to activate all HDR-10 devices simultaneously.
- CAPTURE Button: Press the "CAPTURE" button to enter the Capture mode.
- TRIM Button: After desired scenes are captured, press the "TRIM" button to enter the TRIM mode for further editing.
- REPLAY Button: Press the "REPLAY" button to enter the Replay mode.
-
RECALL Button: Press the “RECALL” button to enter the RECALL mode, which allows the user to retrieve a previous-saved clip for replay.
-
MENU Button: Press the "MENU" button to open the on-screen menu.
- Play/Pause Button: In Replay and TRIM mode, press this button to start and pause the clip playback.
- MARK IN/ENTER Button: In Capture and TRIM modes, this button determines the start point of the clip. In Replay mode, this button is disabled. In Recall and Menu modes, this is an “ENTER” button that confirms a selection when pressed.
- GO TO MARK/SHORT Button: In TRIM mode, the “GO TO MARK” button toggles between Go To Marker and Drop marker mode. In Replay mode, this button is disabled. In Capture mode, the button (SHORT) acts as the hotkey for capturing short-length clip. For example, if the “SHORT” button is set to 3 seconds, then the latest 3 second video will be captured after the “SHORT” button is pressed.
- MARK OUT/MEDIUM Button: In TRIM mode, the “MARK OUT” button determines the end point of the clip. In Replay mode, this button is disabled. In Capture mode, the button (MEDIUM) acts as the hotkey for capturing a medium-length clip. For example, if the “MEDIUM” button is set to 5 seconds, then the latest 5 second video will be captured after the “MEDIUM” button is pressed.
- SAVE CLIP/LONG Button: In TRIM mode, the current captured clip will be saved after the “SAVE CLIP” button is pressed. In Replay mode, this button is disabled. In Capture mode, the button (LONG) acts as the hotkey for capturing a short-length clip. For example, if the “LONG” button is set to 14 seconds, then the latest 14 second video will be captured after the “LONG” button is pressed.
- T-Bar: T-Bar sets the playback speed of the Replay ranging from 0% to 400%. Push the T-Bar to determine the desired speed. When the replay is at its full speed, the T-Bar is at its resting position leaning away from the user. However, if the speed is at 0%, the T-Bar leans toward the user at its resting position.
- Jog/Shuttle Knob: When the video is paused in TRIM and Replay modes, use jog and shuttle wheels to adjust the cursor position. The shuttle wheel fast forwards or rewinds the cursor at 1x, 2x or 4x speed. The jog wheel fine tunes the cursor position. In Recall and Menu modes, the jog wheel can be used to browse the on-screen menu.
5.3 How to Purchase
The RMC-400 Replay Control Center is available for separate purchase. If the RMC-400 is of interest to you, please contact the local Datavideo sales representatives for more details.
6. Firmware Upgrade
Upgrading the Firmware involves upgrading the HDR-10 (Recorder) portion of the unit first and then the Controller portion of the unit.
Recorder portion:
- Format the SSD drive within the HDR-10 and then connect the SSD to your computer.
- Copy the supplied flash.bin file to the root directory of the SSD.
- Safely eject the media from the computer and return the SSD to the HDR-10.
- Go to the UPGRADE FIRMWARE option in the Home menu and follow OSD directions.
This process can take several minutes to complete, please be patient.
Controller portion:
- Copy the supplied update.bin file to a USB Flash drive at the root directory.
- Turn power to the HDR-10 unit OFF.
- Disconnect the USB Jog/Shuttle Controller and connect the Flash Drive in its place.
- Turn power to the HDR-10 unit ON and the unit will upgrade itself.
- When finished, turn power OFF and return the Jog/Shuttle controller to the HDR-10.
This process can take several minutes to complete, please be patient.
7. Formatting Storage Media
Follow the procedure below to format SSD media in your HDR-10:
WARNING: Formatting the SSD will destroy any existing files already on the SSD. Back up any important files before formatting a previously used SSD in the HDR-10.
- Go to Home menu.
- Select Media → Format media.
- A Format prompt screen will appear to ask for confirmation; select "Yes"
- Formatting will progress until finished
- System returns to media menu after formatting is completed.
8. Specifications
| Descriptions | 3G/HD Recorder, Player, Highlight Replay Recorder | ||
| Housing Size | Standalone Type | ||
| HDD Size | No size limitation | ||
| Removable SSD / HDD V | |||
| File Format MOV | |||
| Connector | 3G/HD-SDI Input | 1 | Level A |
| 3G/HD-SDI Output | 2 | One is programmable as loop-through or independent output | |
| LISN 1 | Connection interface between main unit, remote controller and other devices | ||
| USB | 1 | Connection with remote controller (Contour Shuttle Express controller) | |
| GPI | 1 | ||
| DC IN | 1 | ||
| Video Format | HD | 720P@50/59.94/60 | |
| 1080i@50/59.94/60 | |||
| 3G (Level A Signal Only) | 1080p@50/59.94/60 | In Highlight Replay Recorder Mode only | |
| Codec | Color Format | 4:2:2 | |
| Uncompressed | 10-bit or 8-bit | ||
| Internal Buffer | Size (GB) | 4 | Standard memory module |
| Channels | 1 in and up to 2 out | ||
| Navigation | Slow Motion/ Normal Speed/ Fast Speed | ||
| Cues | 2 | Cue In and Cue Out, controlled by Controller | |
| Highlight | Records the clip marked by Cue In and Cue Out | ||
Note
Service & Support
It is our goal to make owning and using Datavideo products a satisfying experience. Our support staff is available to assist you to set up and operate your system. Contact your local office for specific support requests. Plus, please visit www.datavideo.com to access our FAQ section.

Please visit our website for latest manual update. www.datavideo.com/product/HDR-10
datavideo
www.datavideo.com
All the trademarks are the properties of their respective owners. Datavideo Technologies Co., Ltd. All rights reserved 2018
Jan-30.2018
Version : E3
- WARNINGS AND PRECAUTIONS 4
- WARRANTY 5
- DISPOSAL 6
- RMC-400 REPLAY CONTROL CENTER 16
- FIRMWARE UPGRADE......20
- Disclaimer of Product & Services
- FCC Compliance Statement
- Warnings and Precautions
- Warranty
- Standard Warranty
- Three Year Warranty
- Disposal
- For EU Customers only - WEEE Marking
- Introduction
- Features
- Functions
- Front Panel
- Quick Operation Instruction
- Replay Mode
- Maintenance mode
- Capture Mode
- This memory buffer will only store up to the latest 30 seconds of video.
- Review Mode
- Saving an edited clip or highlight to MOV file
- Replay Mode
- Capture and Replay
- Recalling a previously saved Clip
- Home Mode
- RMC-400 Replay Control Center
- Rear Panel
- Control Panel
- How to Purchase
- Firmware Upgrade
- Recorder portion:
- Controller portion:
- Formatting Storage Media
- Specifications
- Note
- Service & Support
Brand : DataVideo
Model : HDR-10
Category : Audio recorder