
Koffee King 8572 - Coffee maker Bloomfield - Free user manual and instructions
Find the device manual for free Koffee King 8572 Bloomfield in PDF.


| Product Type | Coffee Maker |
| Brand | Bloomfield |
| Model | Koffee King 8572 |
| Color | Stainless Steel |
| Dimensions (H x W x D) | 28.5 x 14.5 x 18 inches |
| Weight | 35 lbs |
| Power Supply | 120V, 60Hz, 1500W |
| Brewing Capacity | Up to 100 cups per hour |
| Water Reservoir | Removable, 3.5 gallons |
| Brewing Method | Pour-over, automatic drip |
| Control Type | Electronic push-button with LED display |
| Keep Warm Function | Yes, adjustable up to 2 hours |
| Timer | Programmable auto-start |
| Auto Shut-off | Yes, after brew cycle complete |
| Water Filtration | Built-in charcoal filter |
| Indicator Lights | Power, brewing, keep warm |
| Material | Stainless steel body, glass decanter |
| Cord Length | 6 feet |
| Included Accessories | Glass decanter, brew basket, charcoal filter |
| Cleaning Instructions | Daily rinse, weekly vinegar descale |
| Safety Certifications | UL, NSF listed |
| Warranty | 1 year limited |
| Repairability | Modular design, spare parts available |
Frequently Asked Questions - Koffee King 8572 Bloomfield
User questions about Koffee King 8572 Bloomfield
0 question about this device. Answer the ones you know or ask your own.
Ask a new question about this device
Download the instructions for your Coffee maker in PDF format for free! Find your manual Koffee King 8572 - Bloomfield and take your electronic device back in hand. On this page are published all the documents necessary for the use of your device. Koffee King 8572 by Bloomfield.
USER MANUAL Koffee King 8572 Bloomfield
Servicing Instructions

Model 8574 Brewer
with optional
8900-Series Glass Decanters
WARRANTY STATEMENT
All electrical equipment manufactured by WELLS BLOOMFIELD, LLC is warranted against defects in materials and workmanship for a period of one year from the date of original installation or eighteen (18) months from the date of shipment from our factory, whichever comes first, and is for the benefit of the original purchaser, except that: a. airpots carry a 30 day parts warranty only. b. dispensers; i.e., tea and coffee carry a 90 days parts warranty only, excludes decanters.
THE FOREGOING OBLIGATION IS EXPRESSLY GIVEN IN LIEU OF ANY OTHER WARRANTIES, EXPRESSED OR IMPLIED, INCLUDING ANY IMPLIED WARRANTY OF MERCHANTABILITY OR FITNESS FOR A PARTICULAR PURPOSE, WHICH ARE HEREBY EXCLUDED.
WELLS BLOOMFIELD, LLC SHALL NOT BE LIABLE FOR INDIRECT, INCIDENTAL OR CONSEQUENTIAL DAMAGES OR LOSSES FROM ANY CAUSE WHATSOEVER.
This warranty is void if it is determined that upon inspection by an Authorized Service Agency that the equipment has been modified, misused, misapplied, improperly installed, or damaged in transit or by fire, flood or act of God.
It also does not apply if the serial nameplate has been removed or unauthorized service personnel perform service. The prices charged by Bloomfield Industries for its products are based upon the limitations in this warranty. Seller's obligation under this warranty is limited to the repair of defects without charge by a Bloomfield Authorized Service Agency or one of its sub-agencies. This service will be provided on customer's premises for non-portable models. Portable models (a device with a cord and plug) must be taken or shipped to the closest Authorized Service Agency, transportation charges prepaid, for services.
In addition to restrictions contained in this warranty, specific limitations are shown below (Additional Warranty Exclusions). Bloomfield Industries Authorized Service Agencies are located in principal cities.
This warranty is valid in the United States and void elsewhere. Please consult your classified telephone directory or your food service equipment dealer; or, for information and other details concerning warranty, write to:
Service Parts Department
Wells Bloomfield, LLC
10 Sunnen Drive, St. Louis, MO 63143
Phone: (314) 678-6336... Fax: (314) 781-2714
SERVICE POLICY AND PROCEDURE GUIDE ADDITIONAL WARRANTY EXCLUSIONS
- Resetting of safety thermostats, circuit breakers, overload protectors, or fuse replacements unless warranted conditions are the cause.
- All problems due to operation at voltages other than specified on equipment nameplates; conversion to correct voltage must be the customer's responsibility.
- All problems due to electrical connections not made in accordance with electrical code requirements and wiring diagrams supplied with the equipment.
- Replacement of items subject to normal wear, to include such items as knobs and light bulbs. Normal maintenance functions including adjustment of thermostats, microswitches, and replacement of fuses and indicating lights are not covered under warranty.
- All problems due to inadequate water supply, such as fluctuating, or high or low water pressure.
-
All problems due to mineral/calcium deposits, or contamination from chlorides/chlorines. De-liming is considered a preventative maintenance function and is not covered by warranty.
-
Full use, care and maintenance instructions are supplied with each machine. Those miscellaneous adjustments noted are customer responsibility. Proper attention will prolong the life of the machine.
-
Travel mileage is limited to sixty (60) miles from an authorized Service Agency or one of its sub-agencies.
-
All labor shall be performed during normal working hours. Overtime premium shall be charged to the customer.
-
All genuine Bloomfield replacement parts are warranted for ninety (90) days from date of purchase on non-warranted equipment. Any use of non-genuine Bloomfield parts completely voids any warranty.
-
Installation, labor and job check-out are not considered warranty.
-
Charges incurred by delays, waiting time or operating restrictions that hinder the service technicians ability to perform services are not covered by warranty. This includes institutional and correctional facilities.
SHIPPING DAMAGE CLAIMS PROCEDURE
NOTE: For your protection, please note that equipment in this shipment was carefully inspected and packaged by skilled personnel before leaving the factory. Upon acceptance of this shipment, the transportation company assumes full responsibility for its safe delivery.
IF SHIPMENT ARRIVES DAMAGED:
-
VISIBLE LOSS OR DAMAGE: Be certain that any visible loss or damage is noted on the freight bill or express receipt, and that the note of loss or damage is signed by the delivery person.
-
FILE CLAIM FOR DAMAGE IMMEDIATELY: Regardless of the extent of the damage.
-
CONCEALED LOSS OR DAMAGE: if damage is unnoticed until the merchandise is unpacked, notify the transportation company or carrier immediately, and file "CONCEALED DAMAGE" claim with them. This must be done within fifteen (15) days from the date the delivery was made to you. Be sure to retain the container for inspection.
Wells Bloomfield cannot assume liability for damage or loss incurred in transit. We will, however, at your request, supply you with the necessary documents to support your claim.
TABLE OF CONTENTS
| WARRANTY STATEMENT xi | |
| SPECIFICATIONS 1 | |
| FEATURES & OPERATING CONTROLS 2 | |
| PRECAUTIONS & GENERAL INFORMATION 3 | |
| AGENCY APPROVAL INFORMATION 3 | |
| INSTALLATION INSTRUCTIONS 4 | |
| OPERATION 6 | |
| BREWING COFFEE 8 | |
| CLEANING INSTRUCTIONS 9 | |
| TROUBLESHOOTING SUGGESTIONS 10 | |
| SERVICING INSTRUCTIONS 11 | |
| Deliming Instructions 16 | |
| EXPLODED VIEWS & PARTS LISTS 18 | |
| WIRING DIAGRAMS 22 |
Thank You for purchasing this Wells Bloomfield appliance.
Proper installation, professional operation and consistent maintenance of this appliance will ensure that it gives you the very best performance and a long, economical service life.
This manual contains the information needed to properly install this appliance, and to use, care for and maintain or repair the appliance in a manner which will ensure its optimum performance.
SPECIFICATIONS
| MODEL | TYPE | WARMERS | FAUCET | VOLTS 1ø | AMPS | WATTS | POWER CORD |
| 8540 | In-Line, Automatic, Plumbed-In | 2 | YES | 120VAC | 14.1 | 1700 | NEMA 5-15P |
| 120C | 11.7 | 1400k | |||||
| 220/240V | 2000 | CEE 7/VII | |||||
| 8541 | In-Line, Automatic, Plumbed-In | 2 | NO | 120VAC | 14.1 | 1700 | NEMA 5-15P |
| 120C | 11.7 | 1400k | |||||
| 8542 | In-Line, Pour-Over | 1 | NO | 120VAC | 13.3 | 1600 | NEMA 5-15P |
| 120C | 1300k | ||||||
| 220/240V | 1900 | CEE 7/VII | |||||
| 8543 | In-Line, Pour-Over | 2 | NO | 120VAC | 14.1 | 1700 | NEMA 5-15P |
| 120C | 11.7 | 1400k | |||||
| 8571 | 3-Station, Pour-Over | 3 | NO | 120VAC | 15.0 | 1800 | NEMA 5-15P |
| 120C | 1500k | ||||||
| 220/240V | 2100 | CEE 7/VII | |||||
| 8572 | 3-Station, Automatic, Plumbed-In | 3 | YES | 120VAC | 15.0 | 1800 | NEMA 5-15P |
| 120C | 12.5 | 1500k | |||||
| 220/240V | 2100 | CEE 7/VII | |||||
| 8573 | 3-Station, Automatic, Plumbed-In | 3 | NO | 120VAC | 15.0 | 1800 | NEMA 5-15P |
| 120C | 12.5 | 1500k | |||||
| 220/240V | CEE 7/VII | ||||||
| 8574 | 3-Station, Automatic, Plumbed-In | 3 | YES | 115/230VAC | 17.0 | 3800 | not provided |
k Canadian brewers are 1500W maximum.
FEATURES AND OPERATING CONTROLS
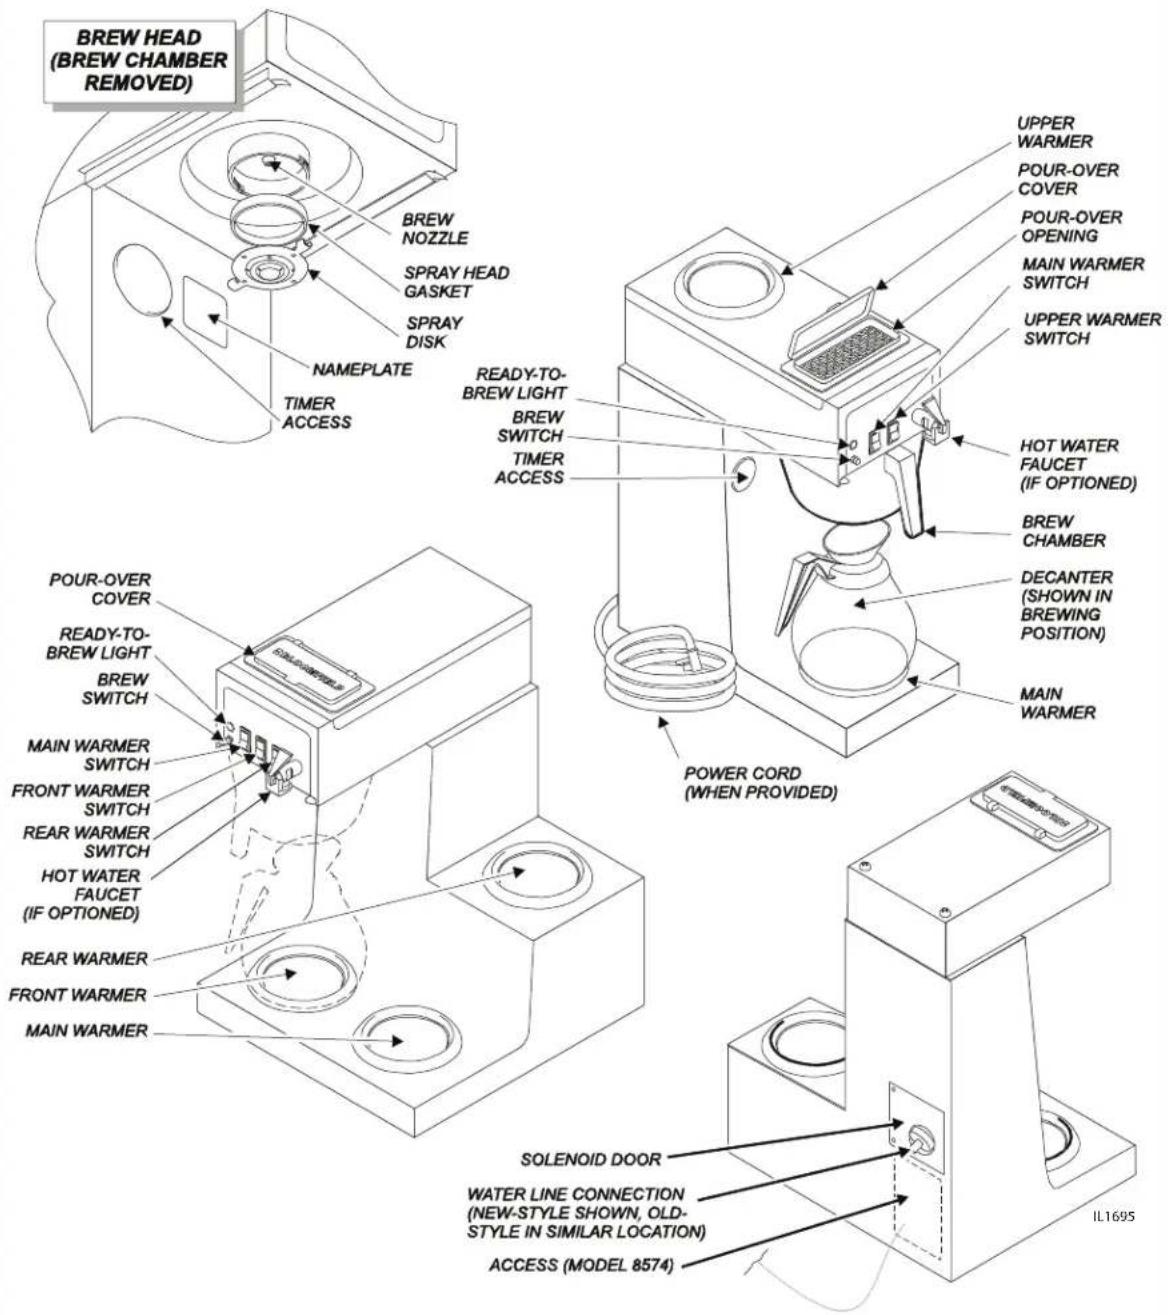
Fig. 1 Features & Operating Controls
PRECAUTIONS AND GENERAL INFORMATION

WARNING: ELECTRIC SHOCK HAZARD
All servicing requiring access to non-insulated components must be performed by qualified service personnel. Do not open any access panels which require the use of tools. Failure to heed this warning can result in electrical shock.

WARNING: INJURY HAZARD
All installation procedures must be performed by qualified personnel with full knowledge of all applicable electrical and plumbing codes. Failure could result in property damage and personal injury.

WARNING: ELECTRIC SHOCK HAZARD
Brewer must be properly grounded to prevent possible shock hazard. DO NOT assume a plumbing line will provide such a ground. Electrical shock will cause death or serious Injury.

WARNING: BURN HAZARD
This appliance dispenses very hot liquid. Serious bodily injury from scalding can occur from contact with dispensed liquids.
This appliance is intended for commercial use only.
This appliance is intended for use to brew beverage products for human consumption. No other use is recommended or authorized by the manufacturer or its agents.
This appliance is intended for use in commercial establishments, where all operators are familiar with the appliance use, limitations and associated hazards. Operating instructions and warnings must be read and understood by all operators and users.
Except as noted, this piece of equipment is made in the USA and has American sizes on hardware. All metric conversions are approximate and can vary in size.
The following trouble shooting, component views and parts lists are included for general reference, and are intended for use by qualified service personnel.
This manual should be considered a permanent part of this appliance. The manual must remain with the appliance if it is sold or moved to another location.

CAUTION: EQUIPMENT DAMAGE
DO NOT plug in or energize this appliance until all Installation Instructions are read and followed. Damage to the Brewer will occur if these instructions are not followed.

CAUTION: BURN HAZARD
Exposed surfaces of the appliance, brew chamber and decanter may be HOT to the touch, and can cause serious burns.
AGENCY APPROVAL INFORMATION
These brewer are

listed under UL file E9253, and

listed under LR21315.

This brewer meets Standard 4 only when installed, operated and maintained in accordance with the enclosed instructions.

E9253

LR21315

STD 4
INSTALLATION INSTRUCTIONS
READ THIS CAREFULLY BEFORE STARTING THE INSTALLATION
IMPORTANT:
To enable the installer to make a quality installation and to minimize installation time, the following suggestions and tests should be done before the actual unit installation is started:
REFER TO EXPLODED VIEWS PAGES 18 thru 22 FOR COMPONENT NAMES/NUMBERS
Unpack the unit. Inspect all components for completeness and condition. Ensure that all packing materials have been removed from the unit.
Verify that the Spray Head Gasket (#33) and Spray Disk (#34) are properly installed.

CAUTION: EQUIPMENT DAMAGE
DO NOT plug in or energize this appliance until all Installation Instructions are read and followed. Damage to the Brewer will occur if these instructions are not followed.
LEVELING THE UNIT
Verify that an adjustable leg is installed at each corner of the brewer.
Set Brewer in its operating location. Level the Brewer. A spirit level should be placed on the top of the unit, at the edge, as a guide when making level adjustments.
Level the unit from left to right and front to back by turning the adjustable feet. Be sure all four feet touch the counter to prevent tipping.

CAUTION: UNSTABLE EQUIPMENT HAZARD
It is very important for safety and for proper operation that the brewer is level and stable when standing in its final operating position. Provided adjustable, non-skid legs must be installed at each corner of the unit. Failure to do so will result in movement of the brewer which can cause personal Injury and/or damage to brewer.
PLUMBER'S INSTALLATION INSTRUCTIONS
Brewer should be connected to a POTABLE WATER, COLD WATER line. Flush water line before connecting to Brewer.
DO NOT use a saddle valve with a self-piercing tap for the water line connection. Such a tap can become restricted by waterline debris. For systems that must use a saddle tap, shut off the main water supply and drill a 3/16" (minimum) tap for the saddle connection, in order to insure an ample water supply. Remember to flush the line prior to installing the saddle.
The brewer must be installed on a water line with average pressure between 20 PSI and 90 PSI. If your water pressure exceeds 90 PSI at anytime, a pressure regulator must be installed in the water supply line to limit the pressure to not more than 90 PSI in order to avoid damage to lines and solenoid.
A water shut-off valve should be installed on the incoming water line in a convenient location (Use a low restriction type valve, such as a 1/4-turn ball valve, to avoid loss of water flow thru the valve.
The provided water line strainer must be installed in the supply line, between the shutoff valve and inlet fitting. Note FLOW arrow marking on strainer body.
NOTE: Water supply inlet line must meet certain minimum criteria to insure successful operation of the brewer. Bloomfield recommends 1/4" copper tubing for installation of less than 25 feet and 3/8" for more than 25 feet from a 1/2" water supply line.
INSTALLATION INSTRUCTIONS (continued)
NSF requires that the brewer be able to be moved for cleaning underneath. A flex line or loops of copper tubing will satisfy this requirement. See Figure 2 below.

Fig. 2 Water Supply Installation IL1652 New-style shown
In some areas, local codes require a backflow preventer (check valve) to be installed on the inlet water line. If a backflow preventer is used, you must install a water hammer arrester in the incoming line, between the backflow preventer and the brewer inlet, as far away from the brewer as space will allow. This will relieve the excessive back pressures that can cause faucet leaks and solenoid malfunctions.
ELECTRICIAN'S INSTALLATION INSTRUCTIONS
REFER TO ELECTRICAL SPECIFICATIONS - Page 1 Check the nameplate to determine correct electrical service required for the Brewer to be installed.
IMPORTANT: Before connecting to electricity, make sure automatic brewers are connected to the water supply.
All models (except 8574) are equipped with a cord and plug. They require a 115 - 125 volt 20 amp circuit (50/60 Hz, 2 wire plus ground, with NEMA 5-15R or 5-20R Receptacle).
IMPORTANT: The ground prong of the plug is part of a system designed to protect you from electrical shock in the event of internal damage. Never cut off the ground prong nor twist a blade to fit an existing receptacle. Contact a licensed electrician to install the proper circuit and receptacle.
Model 8574 must be wired by an electrician, and requires a 115/230V 20A circuit (50/60 Hz, 2 hot legs / 1 neutral leg, plus ground). Remove front panel to gain access to terminal block. Green terminal must be connected to a suitable building ground. Circuit must be capable of 3800 Watts. See figure 3 at right.
IMPORTANT: Wiring must be installed in approved solid or flexible conduit, and must be secured to the brewer with a strain relief (to be provided by the installer).
NOTE: This equipment must be installed to comply with applicable federal, state and local plumbing codes and ordinances.

WARNING: SHOCK HAZARD
Brewer must be properly grounded to prevent possible shock hazard. DO NOT assume a plumbing line will provide such a ground. Electrical shock will cause death or serious injury.
IMPORTANT: Do not connect brewer to electrical power until the tank is filled with water. Pour water into the pour-over opening until water flows from the brew head.
IMPORTANT:
Supply power must match nameplate for voltage and phase. Connecting to the wrong voltage will damage the brewer or result in decreased performance. Such damage is not covered by warranty.

Fig. 3 115/240 Volt Terminal Block
OPERATION
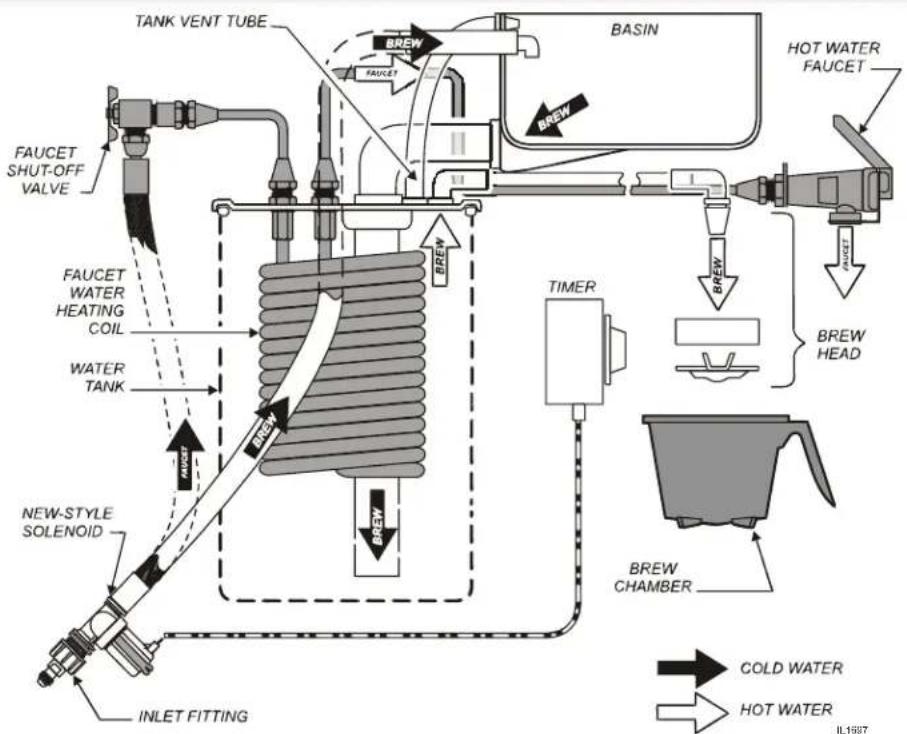
Fig. 4 Brewer Operation Diagram
Tank must be full of water before connecting brewer to electrical power. Heating elements will be damaged if allowed to operate without being fully submerged in water. Damage caused by operating the brewer without water in the tank is NOT COVERED BY WARRANTY.

natural_image
Line drawing of a laboratory filtration setup with a beaker, funnel, and spray bottle (no text or symbols)A. IMPIORITAINF:
For initial start-up, or if the brewer has not been used for an extended period of time:
- Be sure spray disk and brew gasket are properly installed in the brew head.
- Be sure the water supply is properly connected and the water supply valve is turned ON.
- Be sure the WATER TANK IS FILLED
BEFORE plugging the brewer into a receptacle, or otherwise connecting brewer to electrical power THE WATER TANK MUST BE FILLED. Place an empty decanter under the brew head. Lift the pour-over cover then pour warm tap water into the pour-over opening until water flows from the brew head. When water stops dripping from the brew head, empty the container.
Once the tank is full of water, connect the brewer to electrical power. The heating elements will begin heating the water in the tank. When the water has reached the proper temperature, the "READY To BREW" light will glow.
OPERATION (continued)
WATER HEATER
Water temperature is sensed by a thermobulb inserted into the water tank. This temperature signal is fed to the thermostat, which controls line power to the heating element.
The setpoint temperature is adjustable at the thermostat.
The element is protected from over-temperature by a hi-limit thermostat.
WATER FLOW
POUR-OVER FEATURE
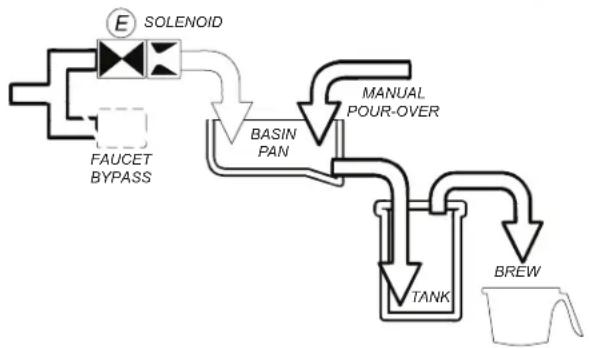
Pouring any amount of cold water into the pour-over opening and into the basin pan forces an identical amount of hot water out of the tank and through the spray head into the brew chamber.
AUTOMATIC OPERATION
Pressing BREW button energizes the solenoid valve, allowing water from an external water supply to flow into the basin pan and then into the hot water tank. This forces an identical amount of hot water out of the tank and through the spray head into the brew chamber
The solenoid uses a flow control device so that flow is consistent between 20 p.s.i. and 90 p.s.i.
Length of time the solenoid is open is controlled by the timer.
HOT WATER FAUCET
The faucet water coil is submerged in the hot water tank and draws heat from the brew water. Water going to the water coil is not controlled by the solenoid valve.
The faucet is at supply water pressure any time the faucet shut-off valve is OPEN.

Fig. 5 Heat Control Diagram

flowchart
graph TD
    A["BASIN PAN"] --> B["TANK"]
    B --> C["BREW"]
    C --> D["MANUAL POUR-OVER"]
flowchart
graph TD
    A["FAUCET BYPASS"] --> B["SOLENOID"]
    B --> C["BASIN PAN"]
    C --> D["TANK"]
    D --> E["BREW"]
    C --> F["MANUAL POUR-OVER"]

flowchart
graph TD
    A["SOLENOID"] --> B["FAUCET BYPASS"]
    B --> C["FAUCET SHUT-OFF VALVE"]
    C --> D["WATER COIL TANK"]
    D --> E["HAUF CET"]
    E --> F["HOT WATER IL1654"]
Fig. 6 Water Flow Diagram
BREWING COFFEE

CAUTION: BURN HAZARD
Exposed surfaces of the brewer, brew chamber and decanter may be HOT to the touch, and can cause serious burns.

CAUTION: BURN HAZARD
To avoid splashing or overflowing hot liquids, ALWAYS place an empty decanter under the brew chamber before starting the brew cycle. Failure to comply can cause serious burns.

CAUTION: BURN HAZARD
After a brew cycle, brew chamber contents are HOT. Remove the brew chamber and dispose of used grounds with care. Failure to comply can cause serious burns.
NOTE: Water for the hot water faucet is heated in a coil inside of the water tank. Use of the faucet will not affect the volume of water delivered for a brew. However, overuse of the faucet during a brew may lower the temperature of the brew water.
A. PREPARATION
Place one (1) genuine Bloomfield paper filter in the brew chamber. Add a pre-measured amount of fresh coffee grounds.
Gently shake the brew chamber to level the bed of grounds. Slide the brew chamber into place under the brew head.

Fig. 7 Brew Chamber
NOTE: Any Integrity™ brewer can be used in the pour-over mode.
BE sure "READY TO BREW" light is lit.
Place the appropriate EMPTY decanter in place under the brew chamber.
Fill a decanter with tap water. Lift the pour-over cover and pour the entire contents of the decanter into the pour-over opening, which will fill the basin.
Water from the basin will displace a like amount of heated water from the tank. The hot water will be forced into the brew head where it will spray over the bed of grounds. Freshly brewed coffee will begin to fill the container under the brew chamber. When the flow and all dripping stops, the coffee is ready to serve.
Discard the contents of the brew chamber. Rinse the brew chamber in a sink. When the "READY TO BREW" light glows, the brewer is ready for another brew cycle.
BE sure "READY TO BREW" light is lit.
Place an EMPTY decanter in place under the brew chamber.
Press the “BREW” switch. The solenoid will open for an amount of time determined by the timer setting, admitting a measured quantity of water into the basin.
Water from the basin will displace a like amount of heated water from the tank. The hot water will be forced into the brew head where it will spray over the bed of grounds. Freshly brewed coffee will begin to fill the decanter under the brew chamber. When the coffee flow and all dripping stops, the coffee is ready to serve.
Discard the contents of the brew chamber and rinse it in a sink. When the "READY TO BREW" light glows, the brewer is ready for another brew cycle.
CLEANING INSTRUCTIONS
PROCEDURE: Clean Coffee Brewer
PRECAUTIONS: Disconnect brewer from electric power. Allow brewer to cool.
FREQUENCY: Daily
TOOLS: Mild Detergent, Clean Soft Cloth or Sponge Bristle Brush.
- Disconnect brewer from electric power. Allow brewer to cool before cleaning.
- Remove and empty decanters.
- Remove and empty brew chamber.
- Remove the spray disk from the brew head (See figure 8):
Press up on the spray disk ears, and then turn the disk to the left to unlatch. Remove the gasket from inside the brew head. - Wipe inside of brew head and area around the brew head with a soft clean cloth or sponge moistened with clean water.
- Wash the spray disk in a sink using warm water and a mild detergent. A bristle brush may be used to clear clogged spray holes. Rinse the spray disk with clean water and allow to air dry.
- Wash the brew chamber in a sink using warm water and a mild detergent. A bristle brush may be used to clean the inside. Rinse with clean water and allow to air dry. For stainless steel brew chambers, be sure the wire rack is properly reinstalled.
- Wipe the exterior of the brewer with a soft clean cloth or sponge moistened with clean water.
- Reinstall the gasket INSIDE the brew head, and then reinstall the spray disk.
- Reinstall the brew chamber.
- Decanters may be washed in a dishwasher or sink.
Procedure is complete

CAUTION: BURN HAZARD
Brewing and serving temperatures of coffee are extremely hot. Hot coffee will cause serious skin burns.

CAUTION: SHOCK HAZARD
Do not submerge or immerse brewer in water.
IMPORTANT:
DO NOT use steel wool, sharp objects, or caustic, abrasive or chlorinated cleansers to clean the brewer.
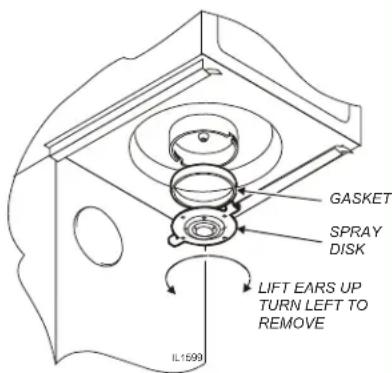
Fig. 8 Cleaning
TROUBLESHOOTING SUGGESTIONS
| SYMPTOM POSSIBLE CAUSE SUGGESTED REMEDY | ||
| Water won't heat | Brewer unplugged or circuit breaker tripped | Check power supply cord |
| Check / reset circuit breaker | ||
| Thermostat set too low Set for desired temperature | ||
| Hi-Limit thermostat tripped | Allow to cool | |
| Reset hi-limit (8786, 8788) | ||
| Damaged internal component or wiring | Examine wiring & connectors, thermostat and heating element, Repair/replace as needed | |
| Pourover - no water or too little water added at startup | Be sure to add sufficient water | |
| Coffee level low (pour-over) | Not enough water poured in Increase water amount | |
| Too much coffee grounds Adjust amount of grounds | ||
| Coffee level too high or low (automatic) | Timer out of adjustment Adjust timer | |
| Brew chamber overflows | Too many filter papers or wrong filter paper | Use one (1) genuine Bloomfield filter per brew |
| Brew chamber dispense hole plugged Thoroughly clean brew chamber | ||
| Too much coffee or too fine a grind Adjust coffee amount and grind | ||
| Sprays water from brew head | Spray gasket improperly installed | Check/reinstall gasket on INSIDE of brew head |
| Spray disk plugged Clean spray disk | ||
| No brew (automatic) | Water supply OFF Turn water supply ON | |
| Water line strainer plugged Clean strainer (see pg. 14) | ||
| Water filter (if used) plugged Replace filter element | ||
| Bad BREW switch Replace switch | ||
| Damaged internal component or wiring | Examine wiring & connectors, brew switch and solenoid, Repair/replace as needed | |
| No flow from hot water faucet | Faucet valve turned OFF Turn faucet valve ON | |
| Faucet plugged | Disassemble faucet, clean | |
| Poor coffee quality | Water not hot enough | Adjust water temp 195-205°F |
| Keep brewer, and decanters clean. Install a taste and odor filter in water supply, and replace cartridges regularly. Use a quality coffee with a consistent roast. Use proper grind and amount of coffee per brew. | ||
SERVICING INSTRUCTIONS
ACCESS PANELS
Each warmer plate has a center stud which screws into a bracket. Warmer plates on Canadian brewers are secured with a nut. Remove button plug on bottom of brewer to access nut on warmer plate. Remove warmer plates by turning counterclockwise.
Solenoid door is held by two screws and a retaining lip.
Front Panel (In-Line Models) and Top / Rear Panel (3-Station Models):
a. Remove warmer plate by turning counter-clockwise until it unscrews.
b. Remove screws from two retaining clips under warmer plate.
c. Lift off panel.
Front Panel (3-Station Models):
a. Remove warmer plates by turning counter-clockwise until they unscrew.
b. Remove screws from two retaining clips under each warmer plate.
c. Remove three screws from bottom-side of front lip.
d. Pull bottom of panel forward until it clears
Top Panel (All Models):
a. Remove two screws from rear of top panel.
b. Lift rear of panel, remove to rear.

CAUTION: SHOCK HAZARD
Opening access panels or removing warmer plates on this brew may expose uninsulated electrical components. Disconnect brewer from electrical power before removing any panel or warmer plate.
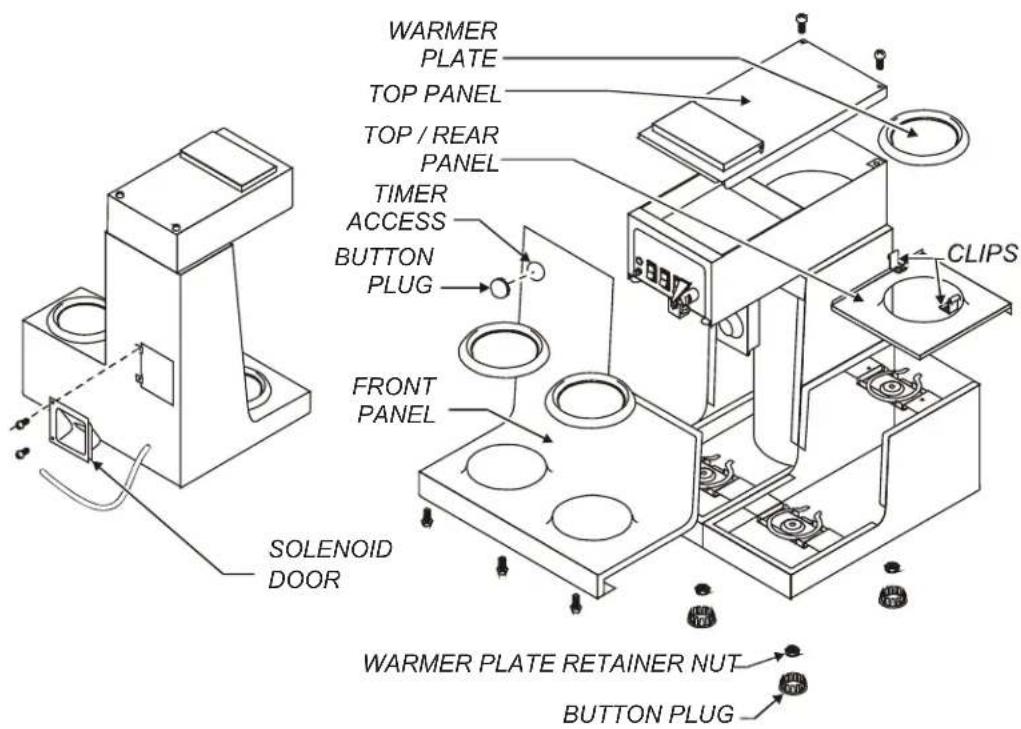
Fig. 9 Access Panels
SERVICING INSTRUCTIONS (continued)

CAUTION: SHOCK HAZARD
These procedures involve exposed electrical circuits. These procedures are to be performed by qualified technical personnel only.
NOTE:
Optimum brewing temperature range is 195°F to 205°F (90°C to 96°C).
IMPORTANT:
A mechanical thermostat will maintain temperature within ±5irc F. To prevent boiling water in the brewer, thermostat should be adjusted to a maximum temperature equal to the local boiling temperature minus 5irc F.
NOTE: 1/8 turn = approximately 10irc F (5.6°C).

Fig. 11 Adjust Thermostat
TEMPERATURE ADJUSTMENT
Unplug power cord or turn circuit breaker OFF. Remove top panel.
Pull vent tube out of tank lid and insert a thermometer of known accuracy in vent hole. Reconnect brewer to electrical power.
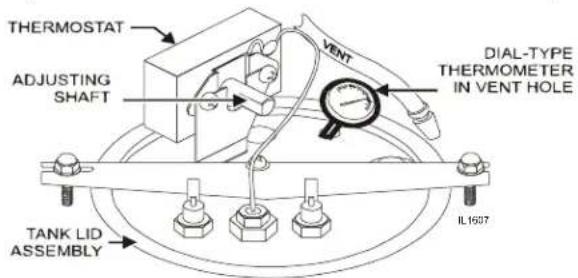
Fig. 10 Checking and Adjusting Brew Temperature
Place an empty decanter under brew chamber. Energize brewer and pour one decanter (64 oz.) of cold water into pour-over opening. When READY TO BREW light comes on, read temperature displayed on thermometer.
Adjust thermostat by turning shaft; clockwise increases temperature. 1/8 turn = approximately 10irc F.
Refer to Table 1 below for proper brewing temperature based on altitude.
Upon completion, remove thermometer and reinstall vent tube.

line
| Temperature (°C) | Value | | ---------------- | ----- | | BOILING POINT OF WATER | 100 | | IDEAL BREWING TEMPERATURE | 94 | | MAXIMUM TEMPERATURE SETTING | 91 |ELEVATION (meters above sea level)

line
| Temperature Setting | Value | | ------------------- | ----- | | BOILING POINT OF WATER | 210 | | IDEAL BREWING TEMPERATURE | 205 | | MAXIMUM TEMPERATURE SETTING | 195 |ELEVATION (feet above sea level)
IL1601
Table 1 Boiling Temperature by Altitude
SERVICING INSTRUCTIONS (continued)
TIMER ADJUSTMENT
The amount of water dispensed automatically during a brew cycle is controlled by the timer.
Place empty decanter under brew chamber. Press BREW button. Brewer should dispense one decanter of water. To adjust amount:
Remove brew chamber and button plug. Adjust knob on timer; clockwise increases time. Run several cycles to check amount of water delivered. Replace button plug.
REMOVE TANK LID ASSEMBLY
Unplug brewer or turn circuit breaker OFF. Turn OFF water supply. Remove top panel. Pull vent tube and inlet elbow out of basin pan.
Pull water inlet tube out of basin pan. Remove basin pan.
On models with faucet, disconnect inlet pipe at faucet shut-off valve and outlet pipe at faucet.
Disconnect all wiring from thermostat, hi-limit, and heating element.
Loosen center screw on tank hold-down bracket. Remove hold-down bracket by sliding short slotted end off of locking stud and lifting it off. Remove cover assembly by lifting it straight up.
Reassemble in reverse order.
REPLACE THERMOSTAT
Unplug brewer or turn circuit breaker OFF. Turn OFF water supply. Remove top panel.
Disconnect all wiring from thermostat only. Loosen and free jam nut from pass-thru fitting securing temperature sensing bulb. Remove two screws holding thermostat to bracket.
Lift out thermostat, sensing bulb and thermostat gasket.
Push sensing bulb into tank lid thermowell until fitting seats. Tighten capillary lock nut only enough to ensure no water leakage. Excessive tightening is not necessary.
Reassemble in reverse order.
IMPORTANT: Water pressure must be between 20 p.s.i and 90 p.s.i. flowing pressure. If water pressure exceeds this value, or if water pressure varies greatly, a pressure regulator must be installed in the water supply line.
IMPORTANT: Before setting assembly into tank, make sure tank lid gasket is properly seated on flange of lid. DO NOT OVER-TIGHTEN.
IMPORTANT:
If mounting thermostat p/n 8512-51, be sure to place a new seal washer below the fitting on the capillary line.
If replacing gray-bodied thermo with p/n 8512-51, be sure to remove tube from thermowell.
SERVICING INSTRUCTIONS (continued)
IMPORTANT: When replacing heating element, also replace seal gaskets.
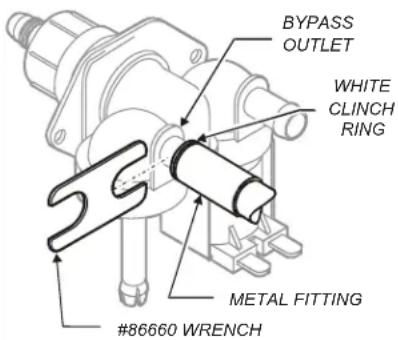
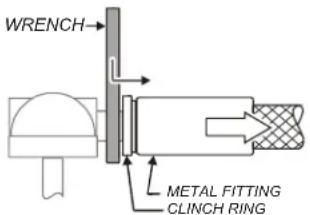
SLIDE WRENCH BETWEEN VALVE AND HOSE FITTING PRESS CLINCH RING TOWARD METAL FITTING TO RELEASE IL1699
Fig. 11 Remove Faucet Supply from Solenoid

Fig. 12 Clean Strainer Screen
REPLACE HEATING ELEMENT
Remove tank lid assembly as described on page 13.
Remove two hex nuts holding element to cover. Pull element from mounting holes.
Reassemble in reverse order.
REPLACE SOLENOID
Symptom: Automatic brewer will not flow water; or, automatic brewer drips continuously from brew head.
NOTE: Wrench p/n 86660 is designed to allow easy removal of the hoses from the plastic solenoid valve.
IMPORTANT: Shut-off water and electric supply to brewer before removing hoses or wiring.
Remove water supply flare fitting:
a. Slide the 5/8" end of the wrench over the flats on the inlet fitting of the valve.
b. Hold the wrench to prevent the inlet fitting from turning while installing or removing the inlet water supply flare nut.
Remove braided hose:
a. Slide the 7/16" end of the wrench between the valve body and the white ring on the extreme end of the metal hose fitting.
b. Pressure on the white ring toward the metal ferrule releases the clinch ring, allowing the hose to be easily slid off of the solenoid bypass outlet.
c. Install hose on new valve by pressing end of hose onto bypass outlet until it is fully seated.
Disconnect wiring.
Remove two screws holding solenoid to access door.
Reassemble in reverse order.
CLEAN SOLENOID SCREEN
Symptom: Automatic brewer will not flow water.
Unplug power cord or turn circuit breaker OFF. Turn OFF and disconnect water supply from brewer inlet fitting.
Unscrew water inlet fitting from solenoid.
Using needle-nose pliers, withdraw strainer screen from solenoid. Clean screen under faucet. A stiff bristle brush may be used if necessary.
Reinsert screen in solenoid. Be careful to maintain correct orientation. (The OPEN END of the screen goes in FIRST.)
Reassemble in reverse order.
SERVICING INSTRUCTIONS (continued)
REPLACE TIMER ASSEMBLY
Unplug power cord or turn circuit breaker OFF.
Remove front panel. Remove knob and three screws holding timer to bracket. Disconnect wiring to timer.
Reassemble in reverse order.
Adjust timer as described on page 13
IMPORTANT: When replacing water faucet coil, also replace seal gaskets.
REPLACE HOT WATER FAUCET COIL
Symptom: Brewer drips continuously from brew head, except when faucet valve is turned OFF.
Remove tank lid assembly per above.
Remove two hex nuts hot water coil to cover. Pull coil from mounting holes.
Reassemble in reverse order.
NOTE: Any abrasion or roughness on the flat end of the seat cup will require replacing the seat cup:
REPAIR HOT WATER FAUCET
Remove top panel and turn faucet valve OFF.
Unscrew aerator cap from faucet and remove handle retaining clip. Do not let faucet body turn.
Pull bonnet assembly from faucet body.
Examine the interior of the faucet body and the surface of the seat cup. Clean out any debris in the faucet body, using a stiff bristle brush if necessary.
Examine the aerator. Clean any debris from the screen or flow straightener, using a stiff bristle brush if necessary.
Reassemble in reverse order.
Work the seat cup out of the bonnet and off of the end of the stem.
Install a new seat cup, making sure the knob on the stem is fully inserted into the pocket of the seat cup, and the skirt of the seat cup is fully inserted into the bonnet.
REPLACE BREW READY LIGHT or BREW BUTTON
Unplug power cord or turn circuit breaker OFF.
Using Switch Removal Tool (p/n 83209) or a thin screwdriver, pry light or switch from mounting hole. Disconnect leads.
Reassemble in reverse order.
SERVICING INSTRUCTIONS (continued)

CAUTION: CHEMICAL BURN HAZARD
Deliming chemicals are caustic. Wear appropriate protective gloves and goggles during this procedure.
Never siphon deliming chemicals or solutions by mouth.
This operation should only be performed by qualified and experienced service personnel.
IMPORTANT: DO NOT spill, splash or pour water or deliming solution into or over any internal component other than the inside of the water tank.
IMPORTANT: DO NOT allow any internal components to come into contact with the deliming solution. Take care to keep all internal components dry.
NOTE: Repeat steps 4 thru 5 as required to remove all scale and lime build-up.
NOTE: Normally, silicone hoses do not need to be delimed. Should deliming hoses become necessary, Bloomfield recommends replacing the hoses.
PROCEDURE: Delime the Water Tank
PRECAUTIONS: Disconnect brewer from electric power. Allow brewer to cool.
FREQUENCY: As required (Brewer slow to heat)
TOOLS: Deliming Solution Protective Gloves, Goggles & Apron Mild Detergent, Clean Soft Cloth or Sponge Bristle Brush, Bottle Brush Large Sink (or other appropriate work area)
- Disconnect brewer from the electrical supply. Turn off the water shut-off valve and disconnect the water supply line from the brewer inlet fitting.
- Remove the tank lid assembly as described on page 13.
- Remove the water tank from the brewer body by lifting straight up. Empty all water from the tank. Set the tank back into the brewer.
- Mix 2 quarts of deliming solution according to the manufacturer's directions. Carefully pour the deliming solution into the water tank. Lower the lid assembly back onto the tank. Allow to sit for 30 minutes, or as directed by the manufacturer.
- At end of soaking period, remove lid assembly from tank. Thoroughly rinse internal components of lid assembly with clear water. Using a stiff bristle brush, scrub the heating element (and faucet water coil on automatic brewers) to remove lime and calcium build-up. Rinse with clean water. Store lid assembly in a safe location.
- Remove the tank from the brewer and empty. Using a stiff bristle brush, scrub the interior of the water tank to remove lime and calcium build-up. Rinse with clean water.
- Set the tank back into the brewer. Reassemble the tank lid to the water tank. Make sure the gasket is properly in place, and then reinstall the hold-down strap.
- Reinstall wiring to heating element and thermostat. Reinstall the hi-limit thermostat (if removed). For brewers with hot water faucet, reassemble faucet piping. Verify that all internal components are dry, then reinstall the top panel.
- Reconnect brewer to electrical supply and, for automatic brewers, reconnect water supply.
- Install the brew chamber without filter paper or grounds. Run at least three full brew cycles and discard all water generated.
- Brewer is ready to use.
2M-75804-611 Koffee-King 8900 Series Brewer

Koffee-King™ EXPLODED VIEW & PARTS LIST (continued)
| ITEM | PART NO. | DESCRIPTION USED ON | |
| 1 | 2D-70090 CO | VER PLATE, WARMER, BLACK, 1/4-28 STUD ALL, MADE IN USA | |
| 2D-Z15630 P | LATE COVER WARMER, 1/4-20 STUD ALL, MADE IN CHINA | ||
| 4 2C-700 | 98 CLIP, PANEL RETAINING ALL | ||
| 20 2C-70 | 132 NUT, #8S | SMS, TINNERMAN (not shown) ALL | |
| 23 2K-70 | 229 BUSHING, HEYCO ALL | ||
| 33 2I-70 | 139 GASKET, $PRAY HEAD | ALL | |
| 34 A6-72 | 2727 SPRAY D | SK, EMBOSSED ALL | |
| 34a | A6-70163 | RETAINER, SPRAY HEAD (REQUIRES DRILL/RIVETS TO INSTALL) | ALL |
| 35 2Q-7 | 5089 DOOR, SOLENOID ACCESS, PLASTIC 8540, -41, -72, -73, -74 | ||
| 38 D7-70 | 735 DOOR, ELECTRIC ACCESS | 8574 | |
| 40 | 2P-70953 | BUTTON PLUG, 1-1/8" DIA, METAL (WARMER PLATE RETAINER) | ALL (Canadian) |
| 41 | 18-50 | NUT, WARMER PLATE RETAINING, 1/4-28 | ALL (Canadian) |
| 47 | 2P-70272 | BUTTON PLUG, 1/2" DIA, PLASTIC (NON FAUCET MODELS) | 8541, -42, -43, -71, -73 |
| 47a | 2P-70275 | BUTTON PLUG, 3/8" DIA, METAL (HI-LIMIT RESET) | 8574 |
| 48 2A-7 | 732 ASSEMBLY, ADJUSTABLE LEG | ALL | |
| 70 | 2P-70053 | BUTTON PLUG, 2" DIA, METAL (TIMER) | 8540, -41, -71, -72, -73 |
| 101 | A6-70231 ASSEMBLY, BASIN TOP | ALL | |
| 102 | WS-8512-56 | BASIN COVER W/WARMER MOUNT | 8540, 8541, 8543 |
| WS-8542-6 | BASIN COVER, W/O WARMER MOUNT 8542, -71, -72, -73, -74 | ||
| 103 | 2F-76666 | ASSEMBLY, POUR-OVER PLASTIC | ALL |
| 108 | 2D-70095 BASIN PAN (AUTOMATIC) | 8540, -41, -72, -73, -74 | |
| 2D-70226 BASIN PAN (POUR-OVER) | 8542, 8543, 8571 | ||
| 110 | 2M-71135 | LABEL, CONTROL PANEL DECAL (IN-LINE POUR-OVER 1W) | 8542 |
| 2M-70252 | LABEL, CONTROL PANEL DECAL (IN-LINE POUR-OVER 2W) | 8543 | |
| 2M-70289 | LABEL, CONTROL PANEL DECAL (IN-LINE AUTOMATIC 2W) | 8540, 8541 | |
| 2M-70279 | LABEL, CONTROL PANEL DECAL (STEP-UP AUTOMATIC 3W) | 8572, 8573, 8574 | |
| 2M-70264 | LABEL, CONTROL PANEL DECAL (STEP-UP POUR-OVER 3W) 8571 | ||
| 111 | B7-70249 ASSEMBLY, BREWER BASE (IN-LINE POUR-OVER) | 8542, 8543 | |
| DD-8540-25 | ASSEMBLY, BREWER BASE (IN-LINE AUTOMATIC) | 8540, 8541 | |
| 67-70263 | ASSEMBLY, BREWER BASE (STEP-UP POUR-OVER) | 8571 | |
| DD-8572-33 | ASSEMBLY, BREWER BASE (STEP-UP AUTOMATIC) | 8572, 8573 | |
| NONE | ASSEMBLY, BREWER BASE (STEP-UP AUTOMATIC) | 8574 | |
| 112 | A6-70288 PANEL, FRONT (IN-LINE AUTOMATIC) | 8540, 8541 | |
| A6-70227 PANEL, FRONT (IN-LINE POUR-OVER) | 8542, 8543 | ||
| B7-70265 PANEL, FRONT (STEP-UP POUR-OVER) | 8571 | ||
| A6-8572-10 | PANEL, FRONT (STEP-UP AUTOMATIC) | 8572, 8573, 8574 | |
| 114 | A6-70256 PLATE BOT 1-2 WRMR S/SAAY | 8430, 8540, 8718, 8730, 8738, 8783 | |
| A6-71550 PLATE BOT SUB ASSY AIRPOT | 8773, 8774 | ||
| 115 A6-70267 PANEL, COVER W/WARMER MOUNT | 8571, 8572, 8573, 8574 | ||
| 200 | 2D-70234 BREW CHAMBER, BLACK PLASTIC | ALL | |
| WS-8942-6 | BREW CHAMBER, BROWN PLASTIC (OPTIONAL limited to stock on hand) | ||
| 2D-70114 BREW CHAMBER, STAINLESS W/ WIRE BASKET (OPTIONAL) | |||
| 201 | WS-POF | FILTER PAPER, COFFEE (CASE OF 1000) | ALL |
Koffee-King™ EXPLODED VIEW & PARTS LIST (continued)
HOT WATER TANK ASSEMBLY
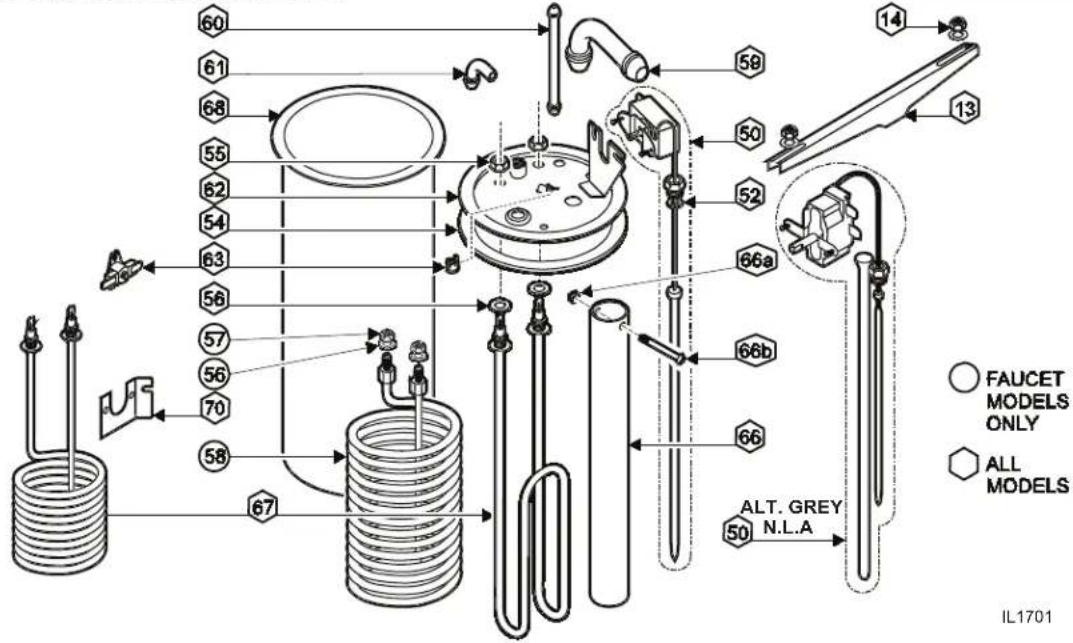
| ITEM PART NO. DESCRIPTION USED ON | |||
| 13 2C-70134 HOLD-DOWN STRAP ALL | |||
| 14 2C-73457 NUT, HEX 8-32 KEPS ALL | |||
| 50 | WS-8512-51 THERMOSTAT (BLACK BODY - INCL. SEAL & MOUNTING SCREWS) | ALL | |
| N.L.A THERMO (ALT) (GRAY BODY - INCL. TUBE & MOUNTING SCREWS) | |||
| 52 2C-70174 SEAL WASHER, THERMO CAP TUBE (ONLY) ALL | |||
| 54 2I-70147 TANK COVER GASKET ALL | |||
| 55 2C-70175 NUT HEX 1/2-20 BRASS ALL | |||
| 56 2I-70152 SEAL GASKET, ELEMENT OR WATER COIL ALL | |||
| 57 2C-70151 NUT HEX 7/16-20 BRASS 8540, 8572, 8574 | |||
| 58 2N-70149 HOT WATER COIL 8540, 8572, 8574 | |||
| 59 | 2K-70101 | TUBE, BASIN OUTLET/TANK INLET, SILICONE | ALL |
| 60 | 2V-70102 | TUBE, VENT, SILICONE | ALL |
| 61 | 2K-70103 | ELBOW, TANK OUTLET, SILICONE | ALL |
| 62 | A6-70221 TAN COVER, PLATE ONLY, 6 HOLES 8541, 8542, 8543, 8571, 8573 | ||
| A6-70142 TAN COVER, PLATE ONLY, 8 HOLES 8540, 8572, 8574 | |||
| 63 | 2T-47499 | THERMOSTAT, HI-LIMIT | ALL, except 8574 |
| 2T-70716 | THERMOSTAT, HI-LIMIT RESET | 8574 | |
| 66 | 2V-70144 | WATER INLET TUBE | ALL |
| 66a | 2C-70146 NUT, HEX 4-40 SS ALL | ||
| 66b | 2C-70145 SCREW 4-40 x 1 PAN HEAD ALL | ||
| 67 | 2N-70167UL | HEATING ELEMENT (120V, 1200W) | ALL Canadian |
| 2N-70143UL | HEATING ELEMENT (120V, 1500W) | ALL, exc. Canadian & 8574 | |
| 2N-70715UL | HEATING ELEMENT (240V, 3500W) | 8574 | |
| 2N-70173UL | HEATING ELEMENT (240V, 1800W) | UK & EU, 230V UNITS | |
| 68 2D-70110 TANK BODY ALL | |||
| 70 | A6-70625 | BRACKET, HI LIMIT THERMOSTAT | 8574 |
| TANK COVER ASSEMBLY | |
| WS-8541WF-300 | INCLUDES: MOUNTED THERMO, HI-LIMIT, 120V 1500W HEATING ELEMENT & HOT WATER COIL) |
| WS-8543-300 | INCLUDES: MOUNTED THERMO, HI-LIMIT, 120V 1500W HEATING ELEMENT. NO HOT WATER COIL) |
Koffee-King™ EXPLODED VIEW & PARTS LIST (continued)
INTERNAL PLUMBING COMPONENTS

| ITEM | PART NO. | DESCRIPTION USED ON | |
| 8 2V | -70104 FORMED TUBE, FAUCET OUTLET ASSEMBLY 10-7/8" LONG 8540, 8572, 8574 | ||
| 9 2V | -70111 FORMED TUBE, FAUCET COIL INLET ASSEMBLY 8540, 8572, 8574 | ||
| 10 2E | -70451 ADAPTER, 1/4" MALE FLARE x 1/8" FPT BRASS 8540, 8572, 8574 | ||
| 11 2V | -70352 VALVE, FAUCET SHUT OFF, NEEDLE SEAT 8540, 8572, 8574 | ||
| 12 2J | -75681 BRAIDED TUBE, FAUCET INLET 6MM x 299MM (11-3/4") LONG 8540, 8572, 8574 | ||
| 18 2K | -70096 ELBOW, BASIN INLET DIVERTER POLYPROPYLENE 8540, -41, -72, -73, -74 | ||
| 24 2V | -70131 TUBE, BREW OUTLET, METAL 4-3/4" LONG ALL | ||
| 25 2K | -70130 ELBOW, SPRAYER, SILICONE ALL | ||
| 26 | 2C-72680 | LOCK NUT, HEX 7-16-20 | 8540, 8572, 8574 |
| 27 | 2C-72680 | LOCK WASHER 7/16" EXT SEMS (FAUCET) | 8540, 8572, 8574 |
| 28 | 2C-72681 | WASHER, FLAT 15/32" x 1-1/8" x 1/16" SS | 8540, 8572, 8574 |
| 29 | WS-82556 | FAUCET ASSEMBLY, PRESSURE | 8540, 8572, 8574 |
| 33 | 2I-70139 GASKET, SPRAY HEAD ALL | ||
| 34 A6 | -72727 SPRAY DISK, EMBOSSED ALL | ||
| 34a | A6-70163 | RETAINER, SPRAY HEAD (REQUIRES DRILL/RIVETS TO INSTALL) | ALL |
| 43 | A6-70276 | TUBE, BASIN INLET, SILICONE 13" | 8540, -41, -72, -73, -74 |
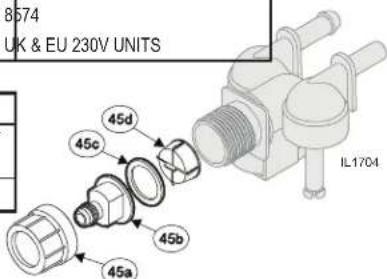
| 45 | 2E-73612 SOLENOID, SINGLE, 120V, .75 GPM | 8541, 8573 | |
| 2E-75685 SOLENOID W/BYPASS, 120V, .75 GPM | 8540, 8572, 8574 | ||
| 2E-75760 SOLENOID SINGLE 220/240V | UK & EU 230V UNITS | ||
| 2V-70124 VALVE SOLENOID 120V | 8576 | ||
| 59 2K | -70101 TUBE, BASIN OUTLET/TANK INLET, SILICONE ALL | ||
| 60 2V | -70102 TUBE, VENT, SILICONE ALL | ||
| 61 2K | -70103 ELBOW, TANK OUTLET, SILICONE ALL | ||
| 108 | 2D-70095 | BASIN PAN (AUTOMATIC) | 8540, -41, -72, -73, -74 |
| 2D-70226 | BASIN PAN (POUR-OVER) | 8542, 8543, 8571 | |
| FAUCET REPAIR KITS | |
| WS-82573 | HANDLE, FAUCET RED (29a) |
| WS-82575 | SEAT CUP (29c) |
| WS-82576 | FAUCET REPAIR KIT, INCL: HANDLE (29a), SEAT CUP (29c), SPRING (29d), STEM (29h), PIN (29j) & BONNET (29k) |
| WS-82682 | RETAINER CLIP (29b) |
| WS-84804 | AERATOR REPLACEMENT, INCL: O-RING (29e), DISK (29f) & CAP (29g) |
| WS-84870 | AERATOR REPAIR KIT, INCL: O-RING (29e) & DISK (29f) |
Koffee-King™ EXPLODED VIEW & PARTS LIST (continued)
ELECTRICAL COMPONENTS

| ITEM | PART NO. | DESCRIPTION USED ON | |
| 2 | 2N-70091UL HEATING ELEMENT, WARMER 120V 100W ALL | ||
| 2N-70635UL ELEM WMR, 100W @240/85W @220 UK & EU 230V UNITS | |||
| 30 | 2E-72946 SWITCH, WARMER ON/OFF 120V ALL | ||
| 2E-70247 SWITCH ON OFF LTD BLACK UK & EU 230V UNITS | |||
| 31 | 2E-70137 SWITCH, MOMENTARY PUSH-BUTTON, BREW 8572, 8573, 85742E-70733 SWITCH, MOMENTARY ROCKER, BREW 8540, 8541 | ||
| 32 | 2J-72671 INDICATOR, 120V, READY-TO-BREW ALL | ||
| 2J-70644 LIGHT PILOT GREEN 250V UK & EU 230V UNITS | |||
| 35 | 2P-70128 TIMER, 2-MINUTE (WITH DIAL & KNOB) 120V 8540, -41, -72, -73, 74 | ||
| 2P-70054RO | TIMER W/KNOB 2-MIN 240V | UK & EU 230V UNITS | |
| 36 | 2E-70353 POWER CORD ASSEMBLY, 120V NEMA 5-15P ALL (exc. 8574) | ||
| A6-WL0139 | CORD & UK PLUG ASSY. TERM | UK 230V UNITS | |
| A6-71156 CORD CAP ASSY EURO | EU 230V UNITS | ||
| 37 | 2K-70215 STRAIN RELIEF ALL (exc. 8574) | ||
| 2kK-70648 | STRAIN RELIEF SMALL | UK & EU 230V UNITS | |
| 43 | 2E-70709 TERMINAL BLOCK, 4P 8574 | ||
| 45 | 2E-73612 SOLENOID, SINGLE, 120V, .75 GPM 8541, 85732E-75760 SOLENOID SINGLE, 220/240V UK & EU 230V UNITS2E-75685 SOLENOID WBYPASS, 120V, .75 GPM 8540, 8572, 85742E-74570 SOLENOID WBYPASS, 240V, 75GPM UK & EU 230V UNITS | ||
| 50 | WS-8512-51 | THERMOSTAT (BLACK BODY - INCL. SEAL & MOUNTING SCREWS) | ALL |
| 63 | 2T-47499 THERMO, HI-LIMIT ALL (exc. 8574)2T-70716 THERMO, HI-LIMIT, RESET 8574 | ||
| 67 | 2N-70167UL HEATING ELEMENT (120V, 1200W) ALL Canadian2N-70143UL HEATING ELEMENT (120V, 1500W) ALL, exc. Canadian & 85742N-70715UL HEATING ELEMENT (240V, 3500W) 85742N-70173UL HEATING ELEMENT (240V, 1800W) UK & EU 230V UNITS | ||
| SOLENOID REPAIR KITS | ||
| WS-85218 | INLET FITTING KIT INCLUDES: CAP (45a), FITTING (45b), GASKET(45c) & STRAINER (45d) | |
| WS-85219 | INLET STRAINER ( 45d ONLY) | |
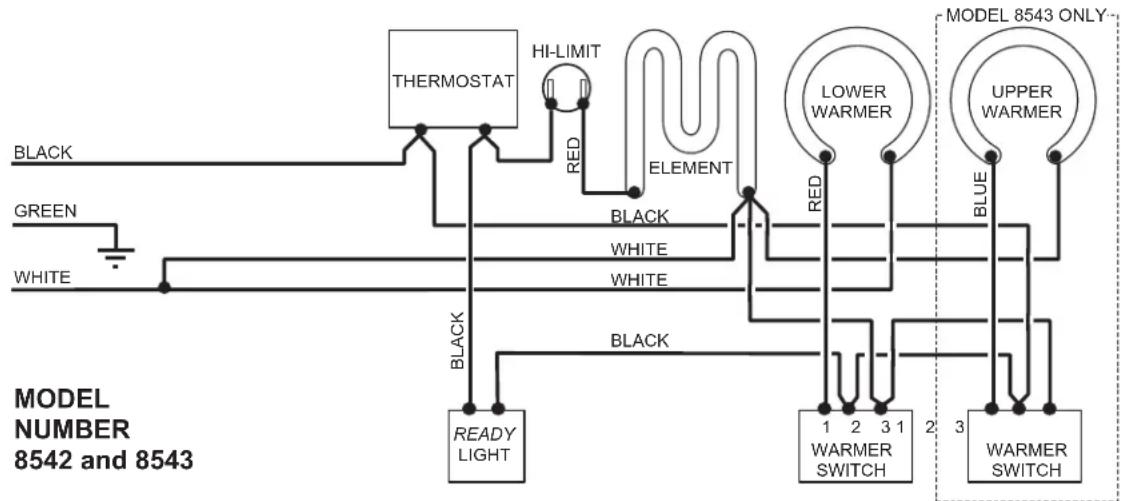
Koffee-King™ WIRING DIAGRAMS

flowchart
graph TD
    A["SOLENOID"] -->|WHITE| B["BROWN"]
    A -->|WHITE| C["BROWN"]
    A -->|WHITE| D["BROWN"]
    B --> E["THERMOSTAT"]
    C --> E
    D --> E
    E --> F["HI-LIMIT"]
    E --> G["ELEMENT"]
    F --> H["LOWER WARMER"]
    G --> I["UPPER WARMER"]
    H --> J["1 2 3 1 2 3 WARMER SWITCH"]
    I --> K["BLUE"]
    J --> L["WARMER SWITCH"]
    K --> M["WRAMER SWITCH"]
    L --> N["WRAMER SWITCH"]
    O["BLACK"] --> P["WHITE"]
    Q["GREEN"] --> R["White"]
    S["TIMER"] --> T["WHITE"]
    U["BLEW SWITCH"] --> V["BREW SWITCH"]
    W["READY LIGHT"] --> X["BLEW SWITCH"]
    Y["BLACK BLACK"] --> Z["BREW SWITCH"]
    AA["Black"] --> AB["BREW SWITCH"]
    AC["RED"] --> AD["BREW SWITCH"]

flowchart
graph TD
    A["THERMOSTAT"] -->|RED| B["ELEMENT"]
    C["GREEN"] -->|BLACK| D["WHITE"]
    E["WHITE"] -->|BLACK| F["READY LIGHT"]
    G["LEFT WARMER"] -->|ORANGE| H["WARMER SWITCH"]
    I["RIGHT WARMER"] -->|RED| J["WARMER SWITCH"]
    K["REAR WARMER"] -->|BLUE| L["WARMER SWITCH"]
    style A fill:#f9f,stroke:#333
    style C fill:#f9f,stroke:#333
    style E fill:#f9f,stroke:#333
    style G fill:#f9f,stroke:#333
    style I fill:#f9f,stroke:#333
    style K fill:#f9f,stroke:#333
2M-75804-611 Koffee-King 8900 Series Brewer
2M-75804-611 Koffee-King 8900 Series Brewer
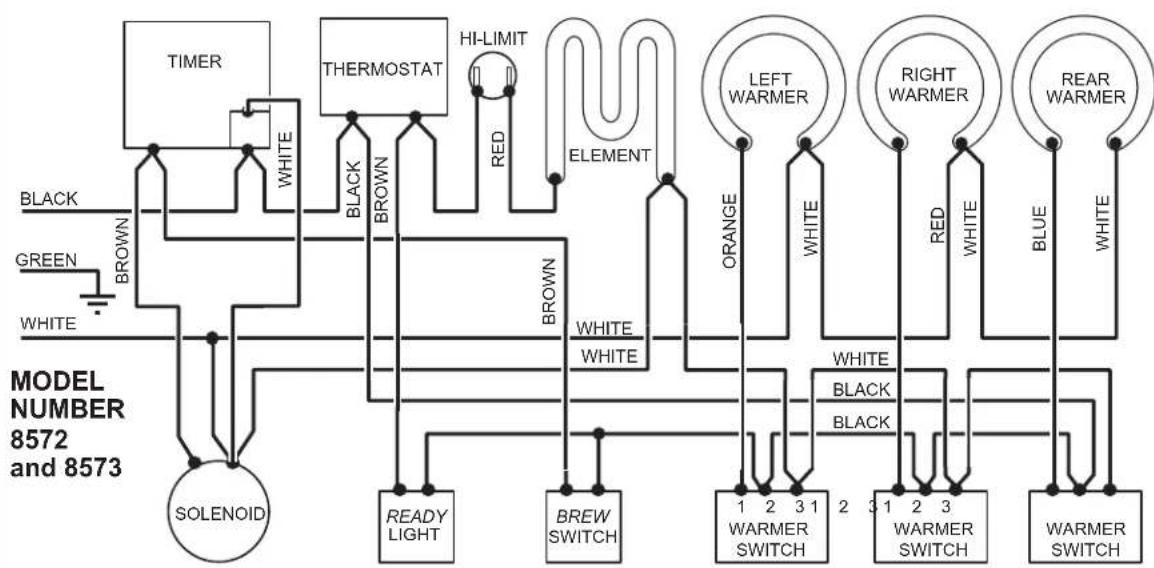
Koffee-King™ WIRING DIAGRAMS (continued)
flowchart
graph TD
    A["SOLENOID"] --> B["BROWN"]
    B --> C["THERMOSTAT"]
    C --> D["RED"]
    D --> E["ELEMENT"]
    E --> F["ORANGE"]
    F --> G["LEFT WARMER"]
    G --> H["RIGHT WARMER"]
    H --> I["REAR WARMER"]
    I --> J["BLUE"]
    J --> K["WHITE"]
    L["TIMER"] --> M["BROWN"]
    N["GREEN"] --> O["BROWN"]
    P["BLACK"] --> Q["BROWN"]
    R["WHITE"] --> S["BROWN"]
    T["READY LIGHT"] --> U["BREW SWITCH"]
    V["WHITE"] --> W["BROWN"]
    X["WHITE"] --> Y["BROWN"]
    Z["WHITE"] --> AA["BROWN"]
    AB["1 2 3 1 2 3 1 2 3 WARMER SWITCH"] --> AC["ORANGE"]
    AD["2 3 1 2 3 WARMER SWITCH"] --> AE["ORANGE"]
    AF["3 1 2 3 WARMER SWITCH"] --> AG["ORANGE"]
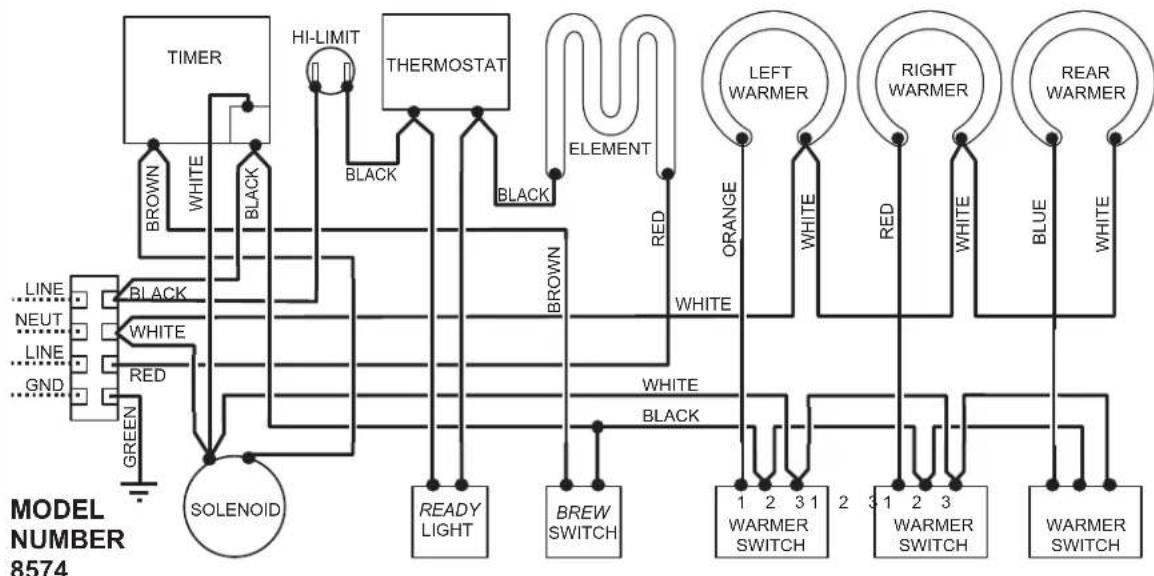
flowchart
graph TD
    A["LINE"] --> B["SOLENOID"]
    C["NEUT"] --> B
    D["LINE"] --> B
    E["GND"] --> B
    F["BROWN"] --> G["HI-LIMIT"]
    H["WHITE"] --> I["THERMOSTAT"]
    J["BLENT"] --> K["ELEMENT"]
    L["BLENT"] --> M["RIGHT WARMER"]
    N["BLENT"] --> O["REAR WARMER"]
    P["BLENT"] --> Q["WARMER SWITCH"]
    R["BLENT"] --> S["WARMER SWITCH"]
    T["BLENT"] --> U["WARMER SWITCH"]
    V["BLENT"] --> W["WARMER SWITCH"]
    X["BLENT"] --> Y["WARMER SWITCH"]
    Z["BLENT"] --> AA["WARMER SWITCH"]
    AB["GREEN"] --> AC["SOLENOID"]
    AD["WHITE"] --> AE["HEMICAL LINE"]
    AF["RED"] --> AG["HEMICAL LINE"]
    AH["WHITE"] --> AI["HEMICAL LINE"]
    AJ["RED"] --> AK["HEMICAL LINE"]
    AL["WHITE"] --> AM["HEMICAL LINE"]
    AN["WHITE"] --> AO["HEMICAL LINE"]
    AP["BLENT"] --> AQ["HEMICAL LINE"]
    AR["BLENT"] --> AS["HEMICAL LINE"]
    AT["BLENT"] --> AU["HEMICAL LINE"]
    AV["BLENT"] --> AW["HEMICAL LINE"]
    AX["BLENT"] --> AY["HEMICAL LINE"]
NOTES:
2M-75804-611 Koffee-King 8900 Series Brewer
NOTES:

Commercial Food Equipment Service Association
Wells Bloomfield proudly supports CFESA
Commercial Food Equipment Service Association
SERVICE TRAINING - QUALITY SERVICE

CUSTOMER SATISFACTION

WELLS BLOOMFIELD, LLC
10 Sunnen Drive, St. Louis, MO 63143
telephone: 314-678-6336 fax: 314-781-2714
www.wellsbloomfield.com
- WARRANTY STATEMENT
- SERVICE POLICY AND PROCEDURE GUIDE ADDITIONAL WARRANTY EXCLUSIONS
- SHIPPING DAMAGE CLAIMS PROCEDURE
- IF SHIPMENT ARRIVES DAMAGED:
- FEATURES AND OPERATING CONTROLS
- PRECAUTIONS AND GENERAL INFORMATION
- WARNING: ELECTRIC SHOCK HAZARD
- WARNING: INJURY HAZARD
- WARNING: BURN HAZARD
- CAUTION: EQUIPMENT DAMAGE
- CAUTION: BURN HAZARD
- AGENCY APPROVAL INFORMATION
- INSTALLATION INSTRUCTIONS
- READ THIS CAREFULLY BEFORE STARTING THE INSTALLATION
- IMPORTANT:
- LEVELING THE UNIT
- CAUTION: UNSTABLE EQUIPMENT HAZARD
- PLUMBER'S INSTALLATION INSTRUCTIONS
- INSTALLATION INSTRUCTIONS (continued)
- ELECTRICIAN'S INSTALLATION INSTRUCTIONS
- WARNING: SHOCK HAZARD
- OPERATION
- IMPIORITAINF:
- OPERATION (continued)
- WATER HEATER
- WATER FLOW
- POUR-OVER FEATURE
- AUTOMATIC OPERATION
- HOT WATER FAUCET
- BREWING COFFEE
- PREPARATION
- CLEANING INSTRUCTIONS
- PROCEDURE: Clean Coffee Brewer
- CAUTION: SHOCK HAZARD
- TROUBLESHOOTING SUGGESTIONS
- SERVICING INSTRUCTIONS
- ACCESS PANELS
- SERVICING INSTRUCTIONS (continued)
- NOTE:
- TEMPERATURE ADJUSTMENT
- TIMER ADJUSTMENT
- REMOVE TANK LID ASSEMBLY
- REPLACE THERMOSTAT
- REPLACE HEATING ELEMENT
- REPLACE SOLENOID
- CLEAN SOLENOID SCREEN
- REPLACE TIMER ASSEMBLY
- REPLACE HOT WATER FAUCET COIL
- REPAIR HOT WATER FAUCET
- REPLACE BREW READY LIGHT or BREW BUTTON
- CAUTION: CHEMICAL BURN HAZARD
- PROCEDURE: Delime the Water Tank
- Koffee-King™ EXPLODED VIEW & PARTS LIST (continued)
Brand : Bloomfield
Model : Koffee King 8572
Category : Coffee maker