
Converge Matrix - Uncategorized ClearOne - Free user manual and instructions
Find the device manual for free Converge Matrix ClearOne in PDF.


| Product Type | Audio Conferencing Digital Signal Processor |
| Model | Converge Matrix (various input/output configurations) |
| Dimensions | 19" (48.3 cm) rackmount, 1U height, 8.5" (21.6 cm) depth |
| Weight | Approximately 5.5 lbs (2.5 kg) |
| Power Supply | 100-240 V AC, 50/60 Hz, 30 W max |
| Audio Inputs | Up to 24 balanced mic/line inputs (RJ-45 or terminal block) |
| Audio Outputs | Up to 24 balanced line outputs (RJ-45 or terminal block) |
| Digital Audio | Dante / AES67 (optional) with up to 64x64 channels |
| Control | Ethernet (TCP/IP), RS-232, GPIO |
| Acoustic Echo Cancellation | Full-duplex, up to 256 ms tail length |
| Noise Reduction | Adaptive noise cancellation and gating |
| Automatic Gain Control | Per-input AGC and auto-mixing |
| Signal Processing | Filtering, EQ, compression, routing, mixing |
| Compliance | FCC Part 15, CE, RoHS |
| Operating Temperature | 0°C to 40°C (32°F to 104°F) |
| Mounting | 19-inch rackmount, 1U |
| Included Accessories | Power cord, rack ears, Quick Start Guide |
| Warranty | 2 years (depending on region) |
Frequently Asked Questions - Converge Matrix ClearOne
User questions about Converge Matrix ClearOne
0 question about this device. Answer the ones you know or ask your own.
Ask a new question about this device
Download the instructions for your Uncategorized in PDF format for free! Find your manual Converge Matrix - ClearOne and take your electronic device back in hand. On this page are published all the documents necessary for the use of your device. Converge Matrix by ClearOne.
USER MANUAL Converge Matrix ClearOne
natural_image
Front view of a silver networking device with ventilation slots and ports (no visible text or labels)Table of Contents
CLEARONE CONVERGE MATRIX
What you Receive .... 1
CONVERGE Matrix System Diagram....1
Connections....2
Expansion Cards 2
Expansion Card Installation 3
USB Connection 4
Status LED's 4
Terminal Control 4
CONVERGE MATRIX CONSOLE
Installing the Software....5
Creating a Solution File....6
Setting Up Resources....8
Naming Tool 8
Channel Groups 9
Macro Commands....10
GPIO Control and Status 10
Timers....11
Configuration 11
Properties Tab 11
Matrix Tab 13
Filter View....14
Event Action Tab 15
CONVERGE Matrix Events Tab....15
Creating Presets 16
Saving the Solution....16
CONNECTING TO CONVERGE MATRIX AND PUSHING A SOLUTION
Device Discovery ....17
Pushing a Solution....18
Editing a Live Configuration....19
Configuration 19
Safety Mute 19
Macros and Presets....19
Synchronizing the CONVERGE Matrix....20
Redundancy Operation 20
COMPLIANCE
European Compliance....21
FCC Part 15/ICES-003 Compliance 22
ClearOne CONVERGE Matrix
The ClearOne CONVERGE ^® Matrix is an audio mixer and router that provides 64x64, 128x128, 256x256 or 512x512 networked audio channels through Dante ^™ digital audio-over-IP networking technologies. It works with ClearOne CONVERGE products through CONNECT Dante interface products and other 3rd party Dante enabled products.
WHAT YOU RECEIVE
When you receive your CONVERGE Matrix, please check to be sure all components are in good order. If you have concerns contact your ClearOne representative.
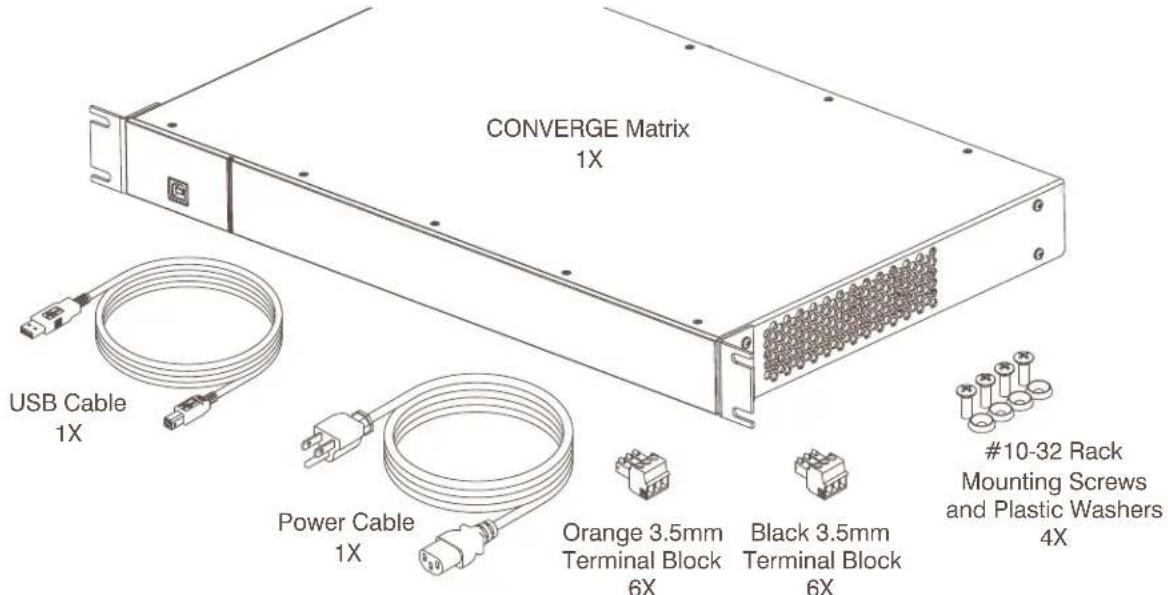
Cables required for connecting to the networks are not provided.
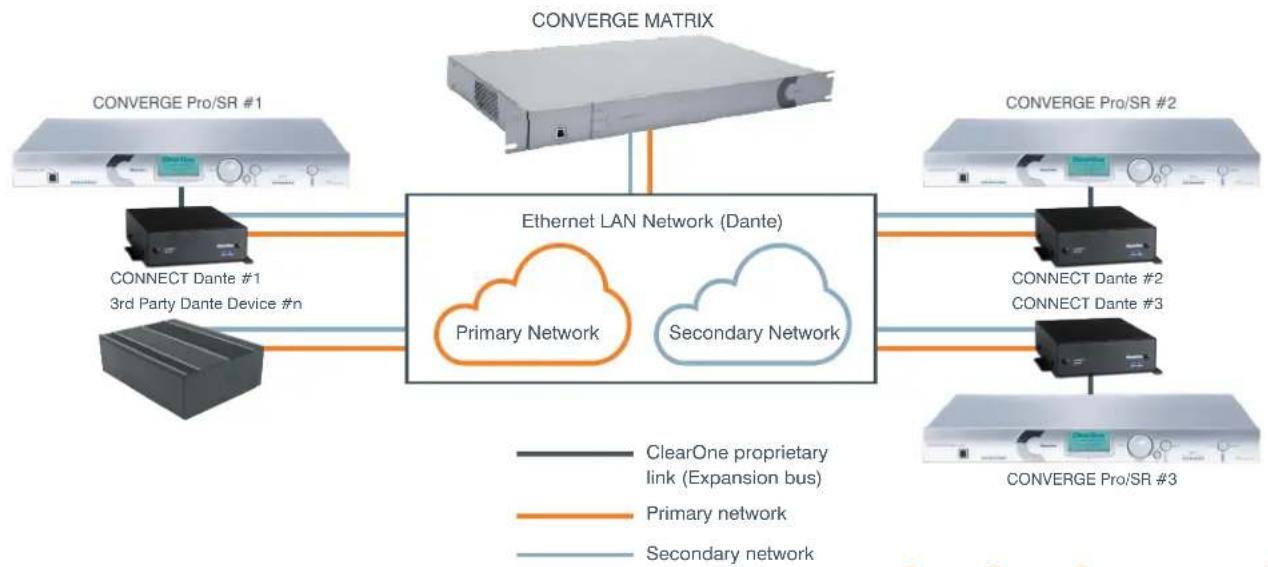
CONVERGE MATRIX SYSTEM DIAGRAM
The following illustration shows an installation where a CONVERGE Matrix is operating within a Dante network that interfaces to CONVERGE Pro units using the CONNECT Dante network interfaces.
flowchart
graph TD
    A["CONVERGE Pro/SR #1"] --> B["Ethernet LAN Network (Dante)"]
    C["CONVERGE PRO/SR #2"] --> B
    D["CONVERGE PRO/SR #3"] --> B
    B --> E["Primary Network"]
    B --> F["Secondary Network"]
    B --> G["CONNECT Dante #1\n3rd Party Dante Device #n"]
    B --> H["ClearOne proprietary link (Expansion bus)"]
    B --> I["Primary network"]
    B --> J["Secondary network"]
QUICK START GUIDE
CONNECTIONS
- Six analog audio input and six audio output channels using terminal block connections. - Dante Audio channels: Bidirectional @ 48kHz per pair of Dante Primary and Secondary ports @ 48kHz/96kHz sample rate with Ethernet RJ45 connector.
The Dante Primary connects to the Dante audio network and the Secondary connects to a separate, redundant Dante audio network. If a redundant audio network is not deployed the Secondary connection is not used.
- Optional Primary & Secondary network Expansion card: Additional 256 x 256 bidirectional channels @ 48kHz over Dante Primary and Secondary ports.
- An additional Ethernet connection provides CONVERGE Matrix Console connectivity and control via LAN. The Ethernet port supports DHCP or a static IP Address.
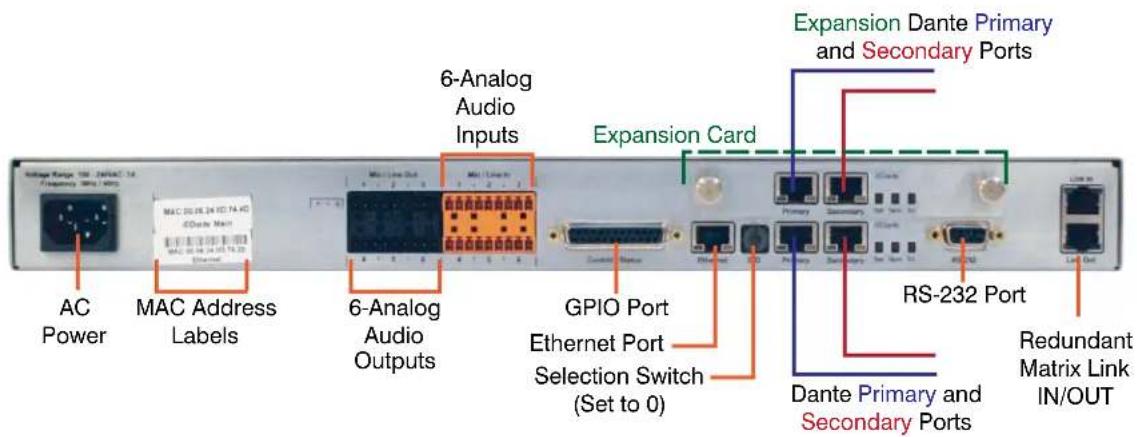
» Note: the Redundant Matrix Link IN and Link OUT are only for connection to redundant matrix units. These are not compatible with CONVERGE Pro Expansion buses.
EXPANSION CARDS
The CONVERGE Matrix main unit can be expanded to double its Dante channels by adding a corresponding Expansion card. A main unit can only receive an expansion of identical size.
For example: a CONVERGE Matrix 64x64 unit can have an 64x64 expansion card added to make the unit a 128x128 channel unit. A 128x128 Main unit can have add an expansion card of the same channel size (128x 128) to make it a 256x256 channel unit. Similarly, a 256x256 channel Main unit can be upgraded to a 512x512 channel unit.
In case of Redundancy units, then both Main unit and the Redundant unit must have identical channel count size. That is, a 64x64 Main unit can have only a 64x64 channel Redundant unit.
The network ports for both the Main and Expansion card must be connected to the corresponding network.
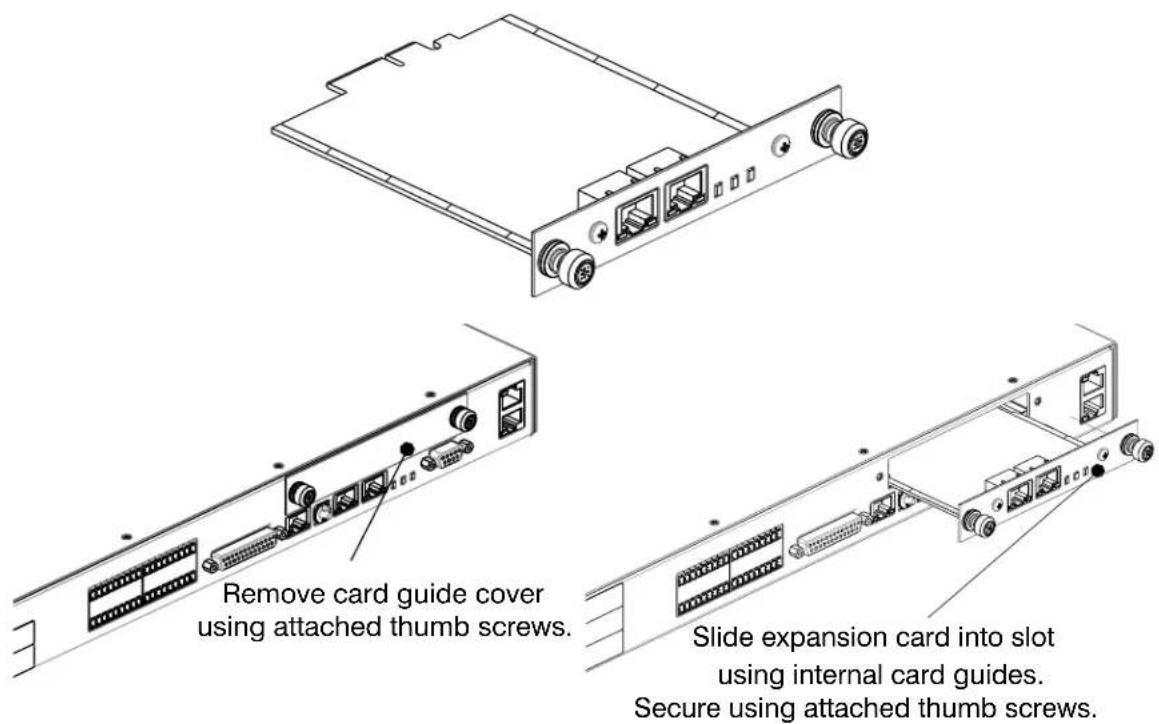
EXPANSION CARD INSTALLATION
There is no need to send a CONVERGE Matrix back to ClearOne to add the expansion card, this can be done on-site by the system integrator.
- Power off the main unit.
- On the back of the unit, loosen the thumb screws and remove the card guide cover.
- Insert the Expansion card and tighten the thumb screws.
- Add expansion card sticker to back of the unit.
- Power On the unit.
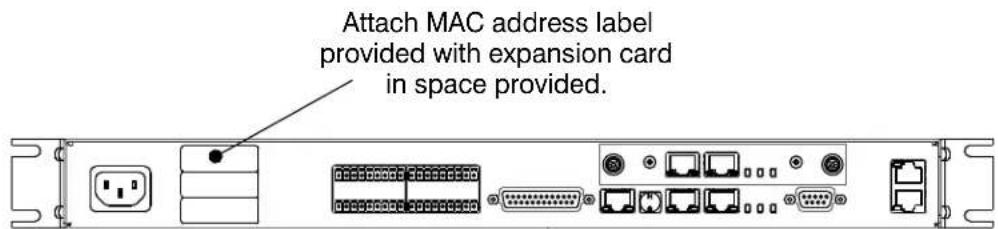
USB CONNECTION
If the Ethernet port is not used to connect the PC running CONVERGE Matrix Console to the unit, a USB port is provided at the front of the unit for this connection.
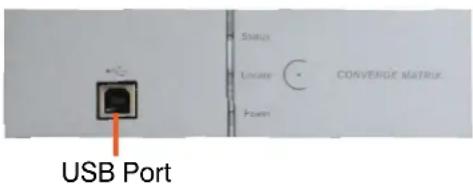
» Note: the Locate button (appearing as a "C" with a dot in the middle, is for future use.
STATUS LED'S
The CONVERGE Matrix Status LED's on the front of the unit give indications of the processes and status of the unit in both standalone and redundant operation:
| All LED's Purple System is booting. | |
| Top LED blinking blue, bottom two are solid blue | System is idle/working normally. Or, if redundancy is active, this system is the main unit and is passing audio |
| All LED's solid blue System is in redundancy mode and standing by.This device is Not passing audio. | |
| Top LED is blinking RED bottom two are solid blue | Failover has happened and this device is now passing audio. |
TERMINAL CONTROL
The CONVERGE Matrix RS-232 functionality provides an interface for direct control of the hardware using a terminal program such as PuTTY or Tera Term, or for a third party controller to integrate with the system. The default serial port settings are:
| Port: | COM1 Stop: 1 Bit | ||
| Baud Rate: | 57600 Flow Control: None | ||
| Data: | 8 Bit Transmit Delay: 0 | ||
| Parity: | None Local Echo: Enabled |
CONVERGE Matrix Console
A software solution file defining all the connections must be pushed down to the CONVERGE Matrix to enable the system to control all connections. These solutions are created using the CONVERGE Matrix Console. Changes or additions to the solution are also performed in the console, then pushed to the CONVERGE Matrix
INSTALLING THE SOFTWARE
When you receive your CONVERGE Matrix, you can then download the application from the ClearOne website at:
http://www.clearone.com/resources#professional_audio.
After downloading, run the Setup_ClearOne_Converge_Matrix_Console application.
If you are installing CONVERGE Matrix Console on a Windows® computer that also has CONVERGE Console, the installation program will replace the drivers with updated versions that support the CONVERGE Matrix.
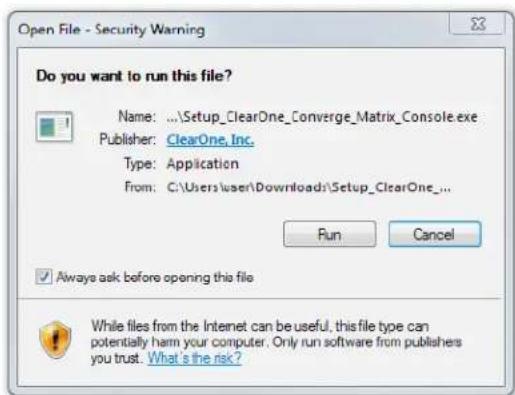
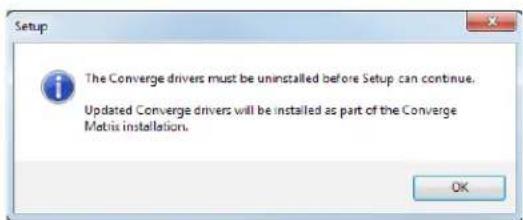
You are given installation options for directory placement of the program and start icons that support the CONVERGE Matrix, then the installation wizard can be started by clicking on Next.
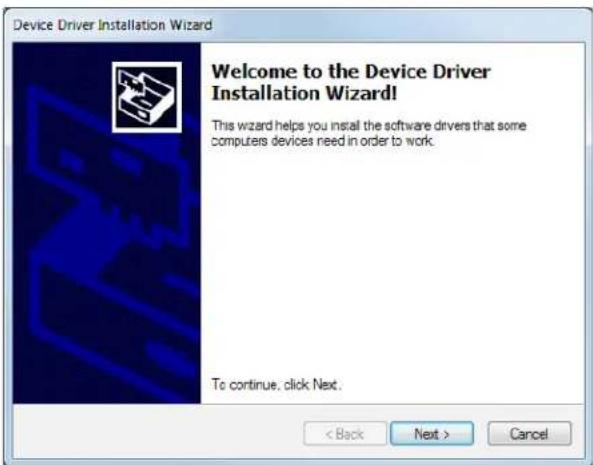
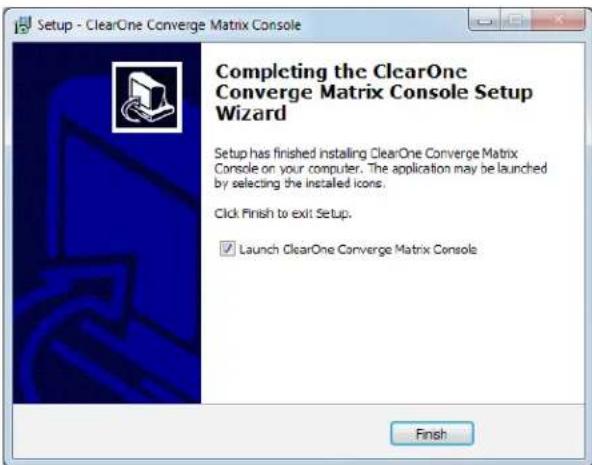
Once installed you can start the CONVERGE Matrix Console application.
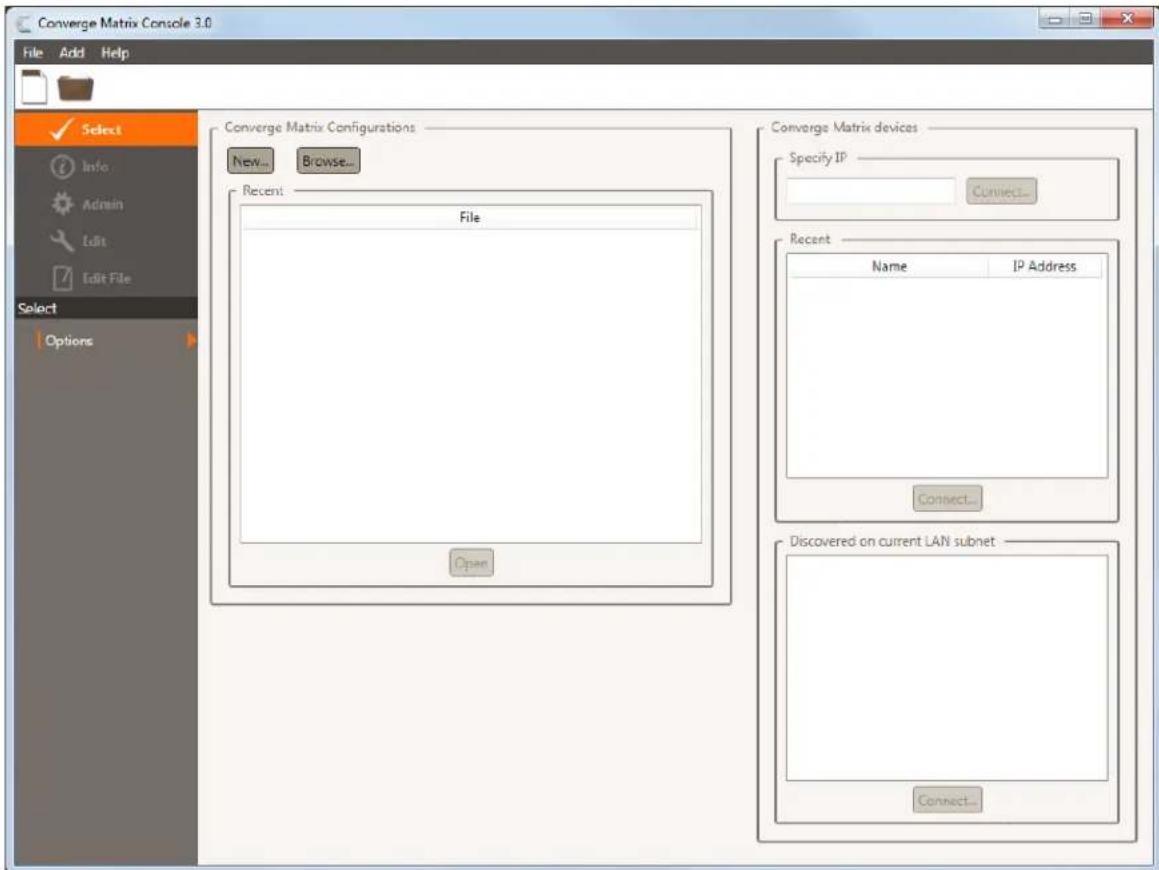
The CONVERGE Matrix Console Home Screen is displayed.
»Note: Non-English interfaces are selectable using the Help menu.
The Home screen has display areas for:
- CONVERGE Matrix Configurations - Solution files recently accessed by CONVERGE Matrix Console.
- CONVERGE Matrix devices - Entry and connect area for specific IP address of CONVERGE Matrix unit.
• Recent - History of connections to CONVERGE Matrix units. - Discovered on current LAN subnet - CONVERGE Matrix Console examines the subnet it is attached to and lists the powered-on CONVERGE Matrix units it finds. Any units attached to the Console computer's USB connections are also found.
These are empty at present since this is a new installation.
CREATING A SOLUTION FILE
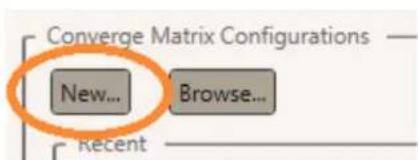
From the CONVERGE Matrix Home Screen, click on the New button displayed in the "CONVERGE Matrix Configurations" area.
6 TECHNICAL SUPPORT: 800.283.5936
You will be asked to fill in a Solution Name, Author, Version (Major/Minor often used to identify version of solutions), Description, and then select the Device Type of the Matrix device to receive the solution. These can be customized or left at default.
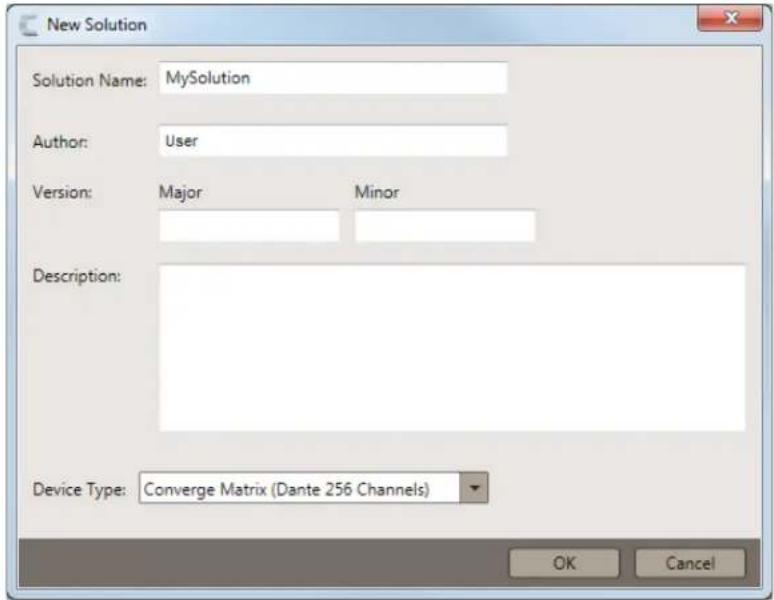
After Clicking OK a solution file is created in CONVERGE Matrix Console. You are taken to the System>Home page underneath Edit File with information about the solution file you are creating.
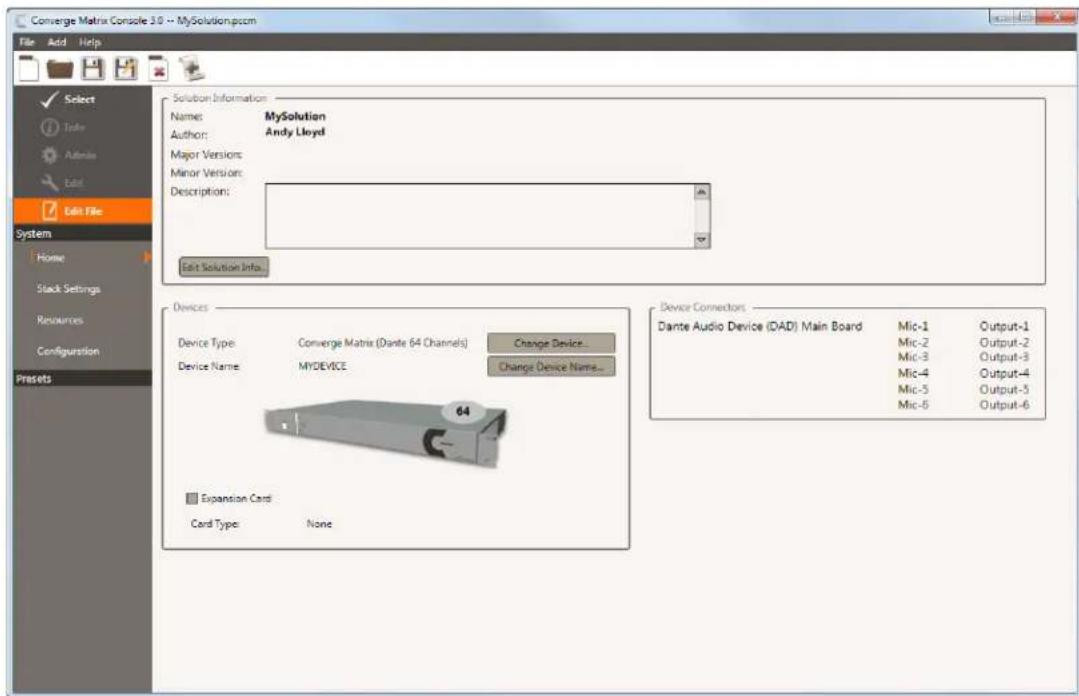
Check that the Device Type matches your device and the Expansion Card checkbox is selected if you have expanded your Matrix over 64 channels. Otherwise a solution file cannot be pushed to the device.
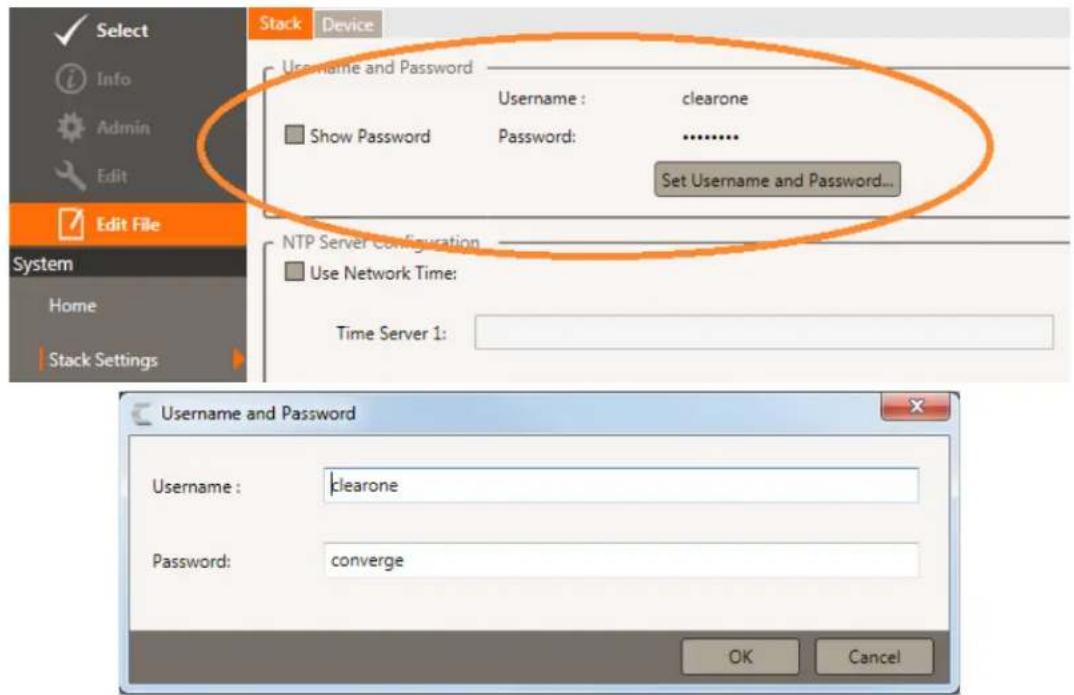
Navigating to the System>Stack Settings page provides an area where you can supply a custom Username and Password. The defaults are 'clearone' and 'converge' respectively.
SETTING UP RESOURCES
The Resources area under Edit File allows you to create channel groups, macros, timers, GPIO labels, and channel labels. This includes the microphone inputs and outputs. Dante-based inputs and outputs are not created in the CONVERGE Matrix, but are used by the CONVERGE Matrix for grouping, switching, macros, and other operations.
The Dante Controller software, provided by Audinate™, is used to discover, control, and configure all devices and services on the Dante network. This software and its documentation can be obtained from the ClearOne website:
http://www.clearone.com/resources#professional_audio
CONVERGE Matrix Console utilizes name dependent Endpoint Architecture when combining resources. Once a name is selected, it is best practice not to change it or it could create invalid commands.
NAMING TOOL
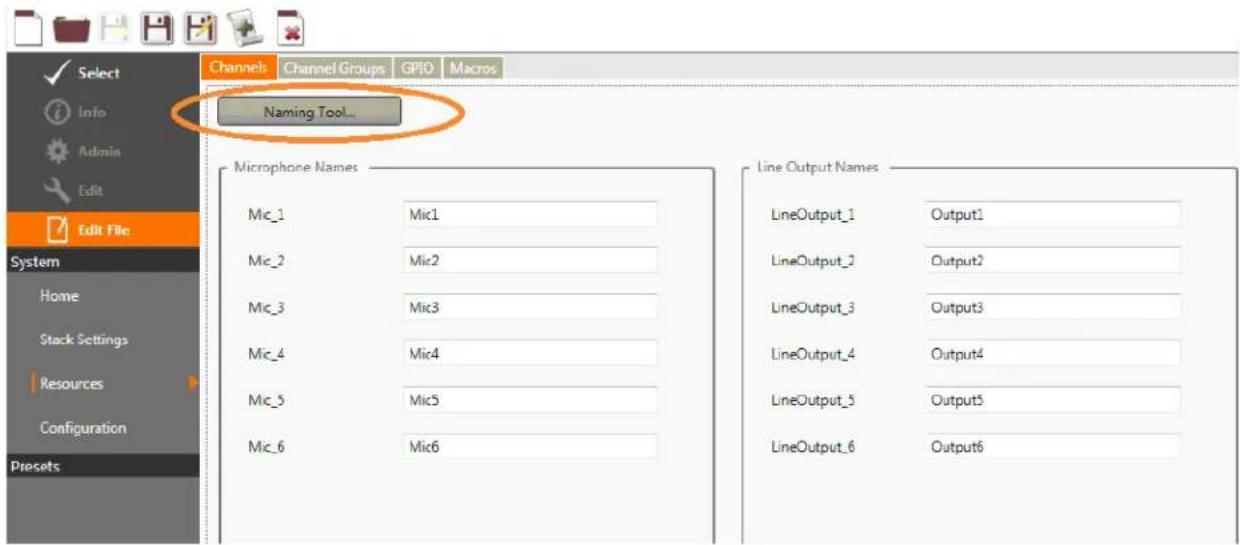
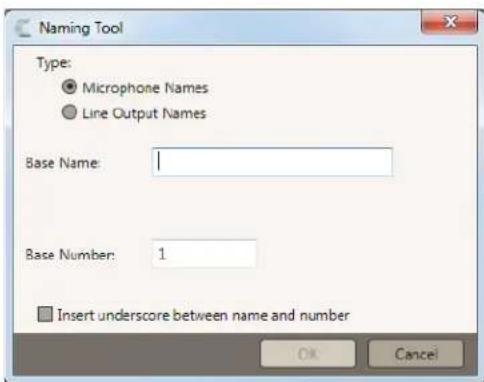
A naming tool is provided to aid with multiple names with a similar base.
Setting a Base Name will allow the renaming of all microphone and/or line outputs with the base and then an increasing number.
CHANNEL GROUPS
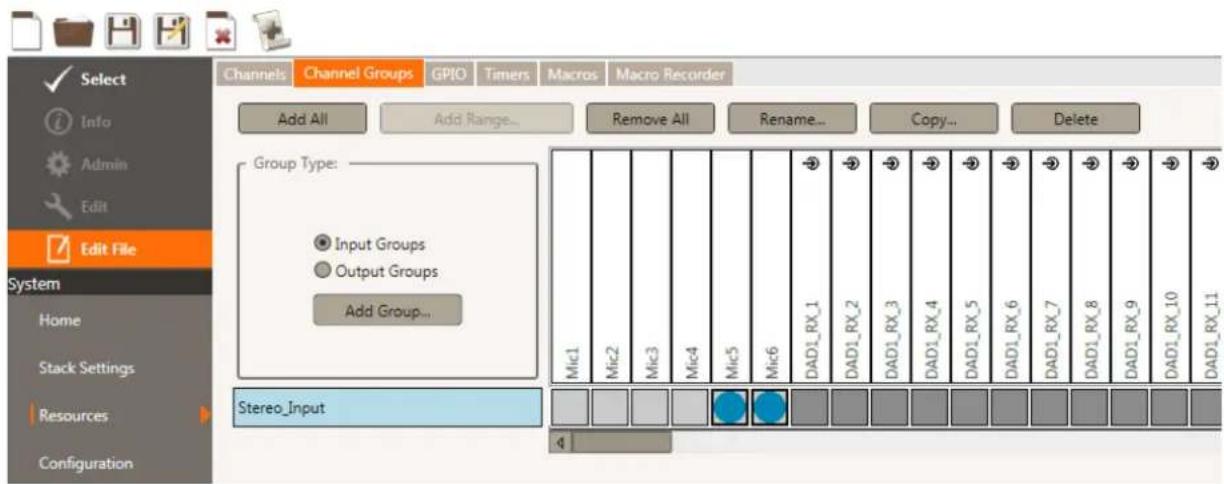
Channel Groups provide a way to group analog inputs/outputs and Dante Channels into logically named groups for easier control and routing. Select to create an input or output group, enter a group name, and then select the mics or outputs for the group by clicking on the square below the mic/output. The example below shows an input group called "stereo_input" comprised of Mic5 and Mic6.
MACRO COMMANDS
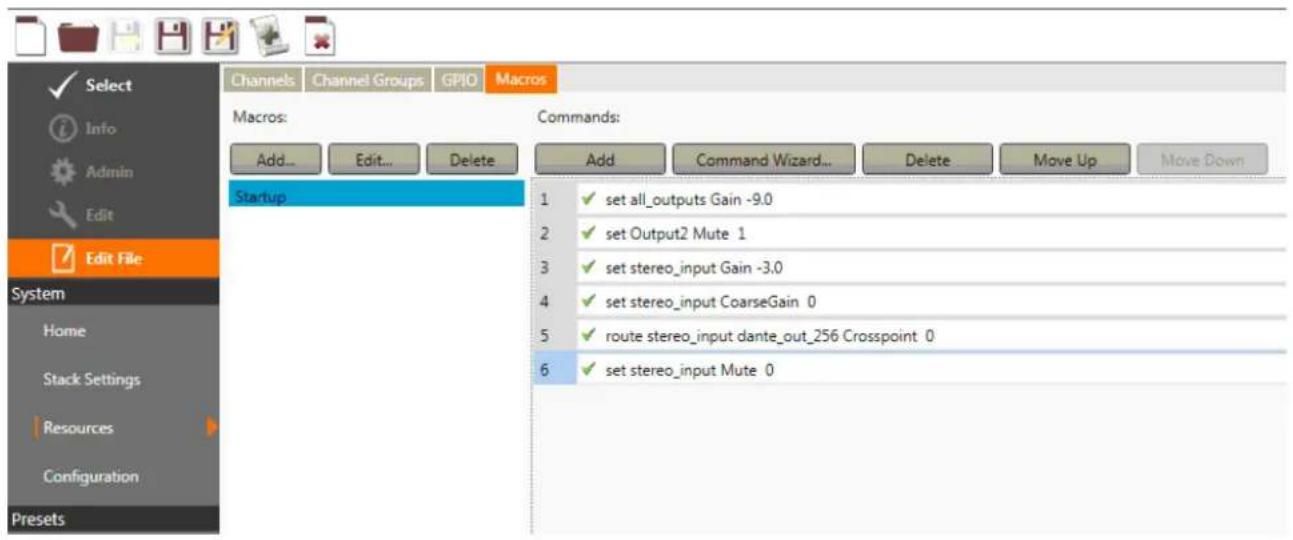
The Macros tab provides a way to build macro commands to control the device for different configurations. A Command Wizard allows a way to build commands one at a time. Once a command has been configured it can be manually edited to change its values. If a command is not valid the green check mark will change to a red x until the command has been corrected.
Macros can be ran from the software once the file has been pushed to a device.
GPIO CONTROL AND STATUS
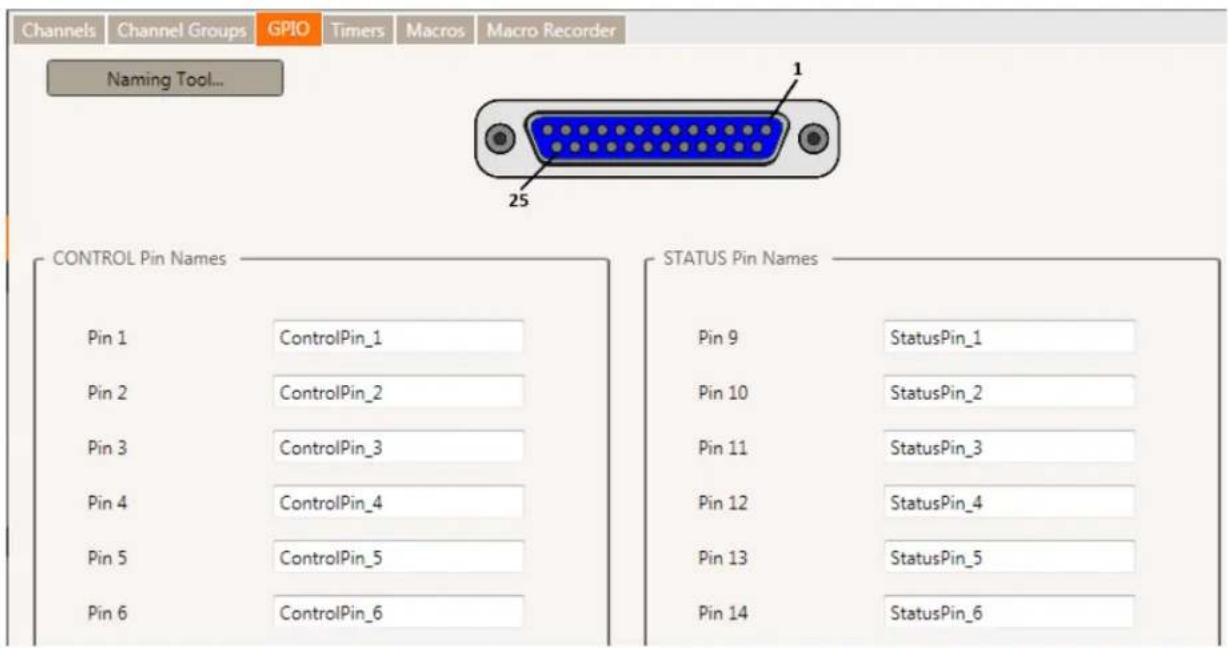
The GPIO port allows the CONVERGE Matrix to label signals on port control pins and the status pins. This allows Event Actions along with Serial Commands to be used to manage the unit. Serial Commands are detailed in a separate CONVERGE Matrix Serial Command Guide. The GPIO screen shows the pin assignments and names, along with a naming tool.
TIMERS
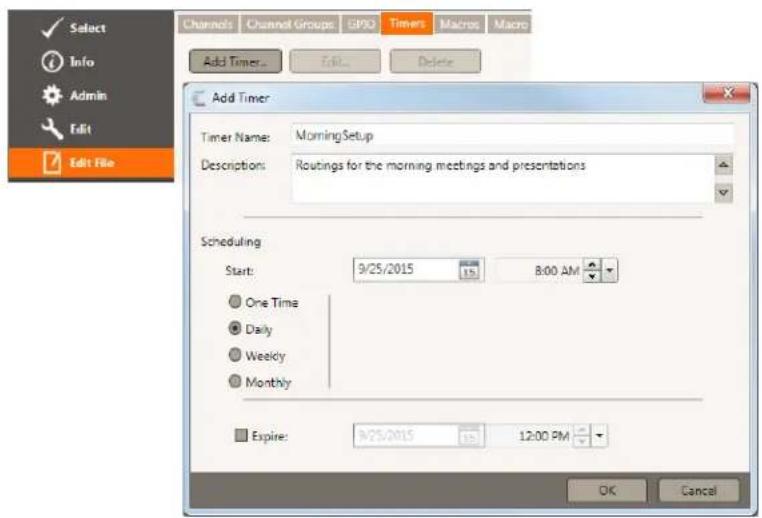
The Timers tab allows you to create various timers for the CONVERGE Matrix that can be one time or repeating at specified dates and intervals. Timers are used to or run presets or macros at given times in the future. For example if you wanted the system to have a morning 'startup' configuration. And a evening 'configuration'. Then you could set up two timers to execute a preset or macro at those given times
CONFIGURATION
The Configuration screen under Edit File>System>Configuration is where endpoints are configured and routed. There are three tabs where these tasks are performed: Properties, Matrix, and Event Actions.
PROPERTIES TAB
The Properties tab allows setting the analog input and output ports of the CONVERGE Matrix.
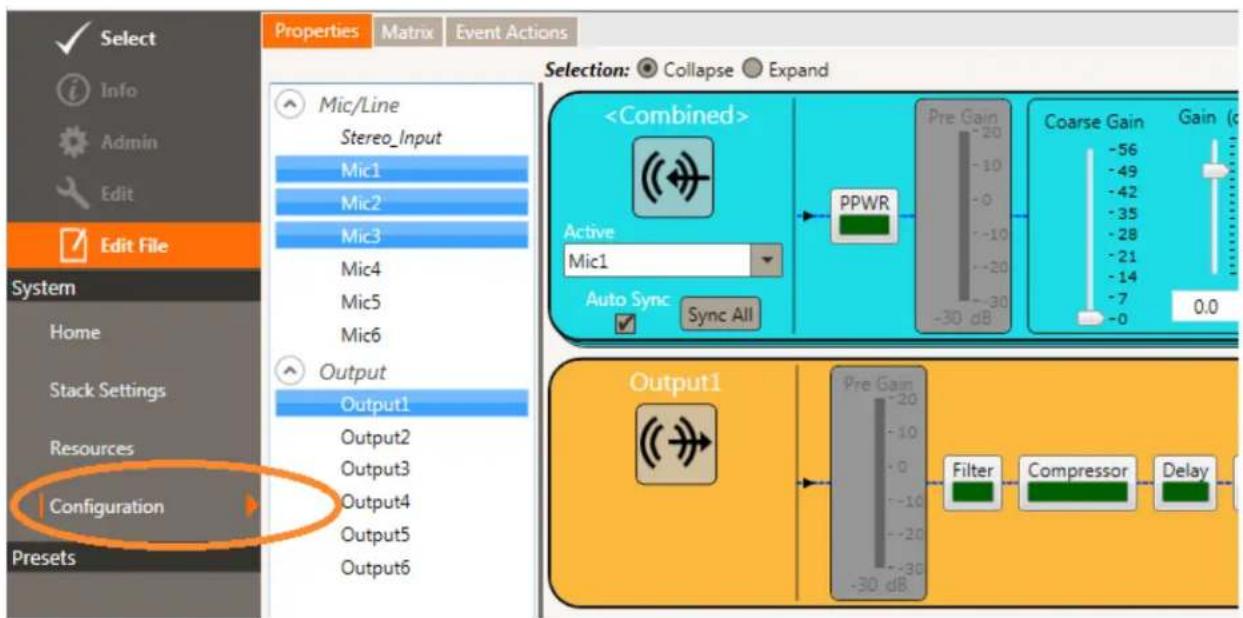
The inputs and outputs can be adjusted individually or combined as ad-hock groups to allow you to quickly change the settings on multiple channels. To create an ad-hock group click on at least one channel and then use the Control key on your keyboard and the mouse to select individual channels or use the Shift key to select all channels between.
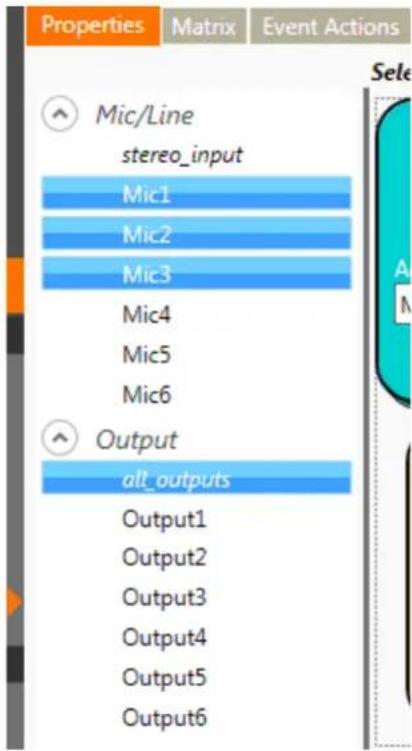
There are bullets to collapse or expand the selected channels as a group, allowing you to view multiple channels all at the same time.
Selection: ● Collapse ○ Expand
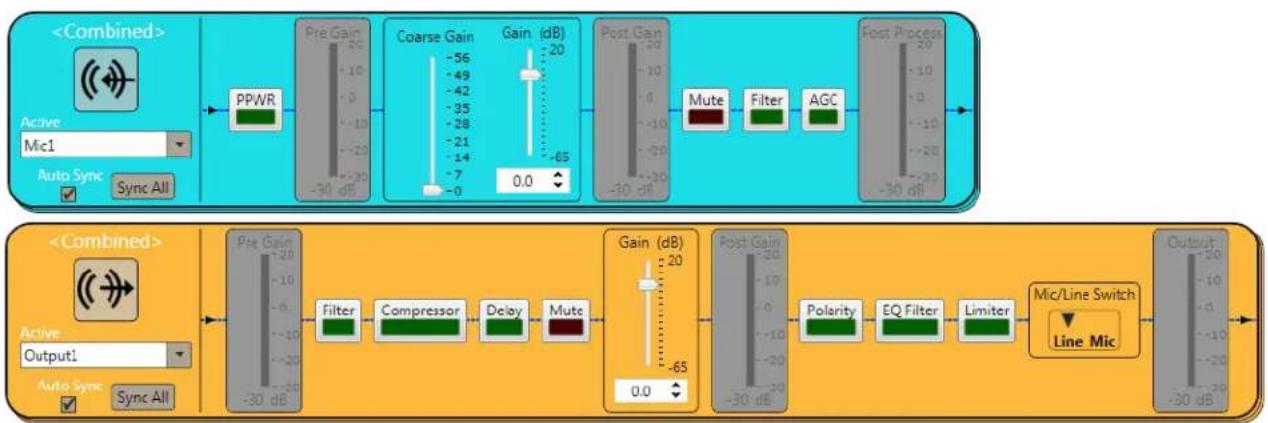
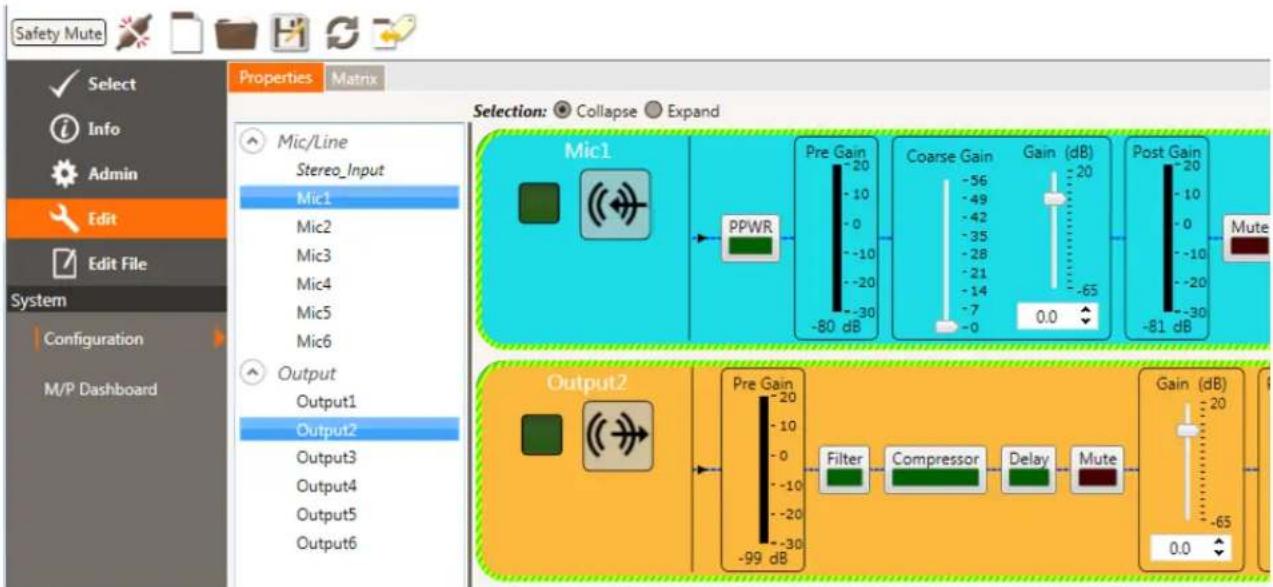
The inputs and outputs have gain controls and buttons for muting, filtering and AGC etc. When several inputs or outputs are grouped, the controls can be synced to operate over all inputs or outputs within the group.
flowchart
graph TD
    A["<Combined>"] --> B["Active: Mic1"]
    B --> C["Auto Sync Sync All"]
    C --> D["PPWR"]
    D --> E["Pre Gain 55 dB"]
    E --> F["Coarse Gain -56 dB"]
    F --> G["Gain (dB) 20"]
    G --> H["Post Gain 20 dB"]
    H --> I["Mute Filter AGC"]
    I --> J["Post Process 20 dB"]

    K["<Combined>"] --> L["Active: Output1"]
    L --> M["Auto Sync Sync All"]
    M --> N["Pre Gain -30 dB"]
    N --> O["Filter Compressor Delay Mute"]
    O --> P["Gain (dB) 20"]
    P --> Q["Post Gain -30 dB"]
    Q --> R["Polarity EQ Filter Limiter"]
    R --> S["Line Mic"]
    S --> T["Output -30 dB"]
MATRIX TAB
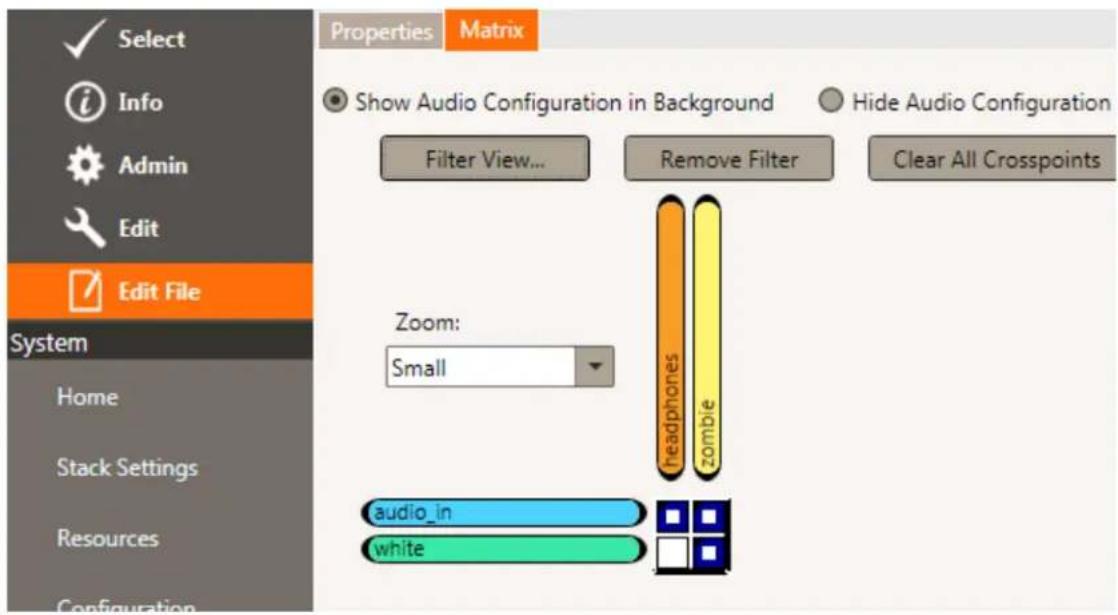
The Configuration Matrix screen is where all routing takes place. Groups of channels and individual channels can be routed and saved with a configuration. Outputs appear along the top of the matrix while inputs appear along the left side.
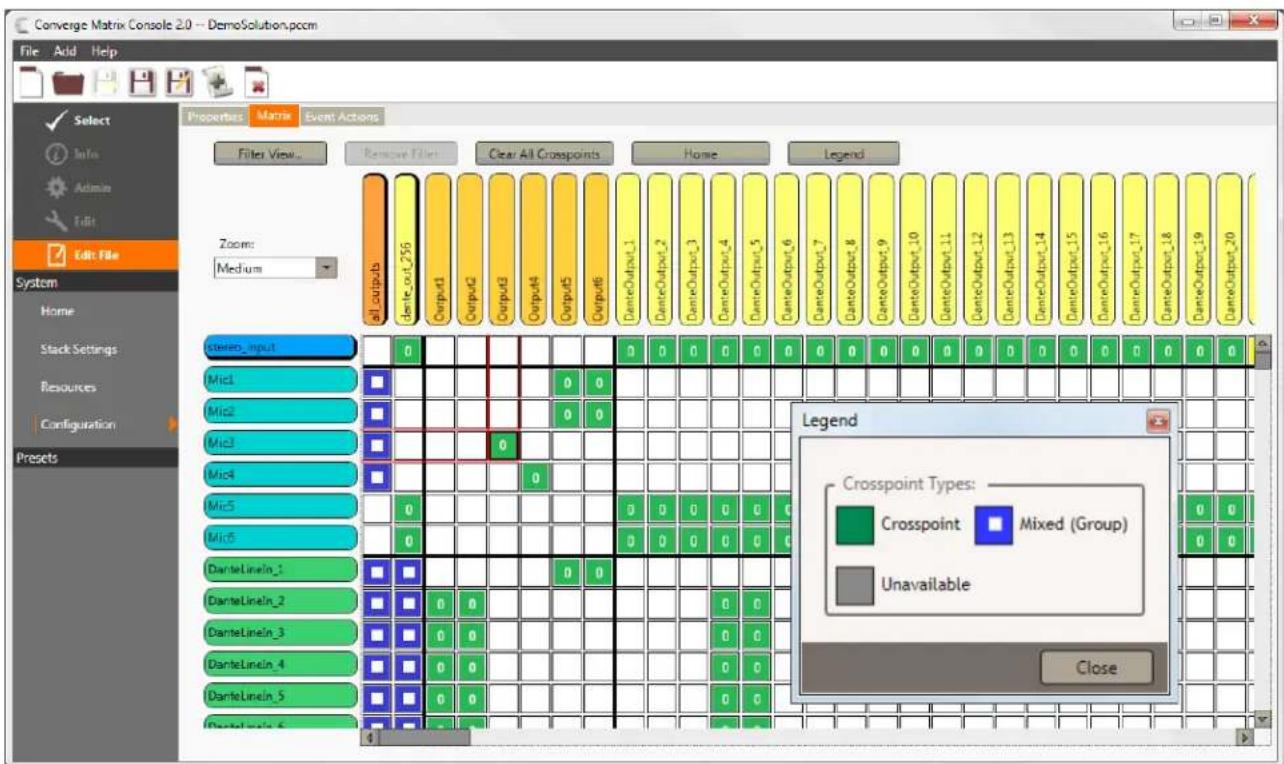
Clicking on the intersection of an input and output sets a crosspoint connection. A legend is provided to explain the different types of cross-points seen on the matrix. Mixed, or group, crosspoints involve more than one input and/or more than one output.
An output can receive routings from multiple inputs, and a single input can be routed to multiple outputs.
Channel Groups, as explained earlier, allows for efficient routing by reducing the number of individual cross-points you must create. Clicking on a crosspoint that involves an input or output that belongs to a channel group will also select all other group inputs/outputs. Notice the groups are listed first on the matrix, followed by analog inputs/outputs and Dante channels.
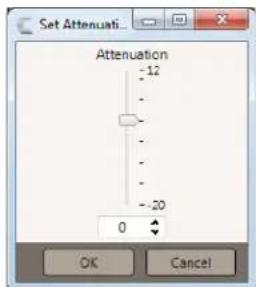
The number appearing in a cross-point is the attenuation setting of that point. This can be individually set on a point by right-clicking over the crosspoint to display the attenuation control.
FILTER VIEW
Filter view is helpful when configuring the channel matrix by eliminating/hiding/removing/extraneous crosspoints and only showing relevant crosspoints thereby simplifying the channel matrix.
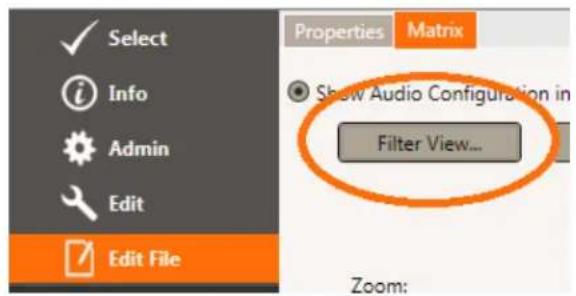
From the Matrix screen, select the Filter View button. You are given the Filter dialog box to define your filtered view.
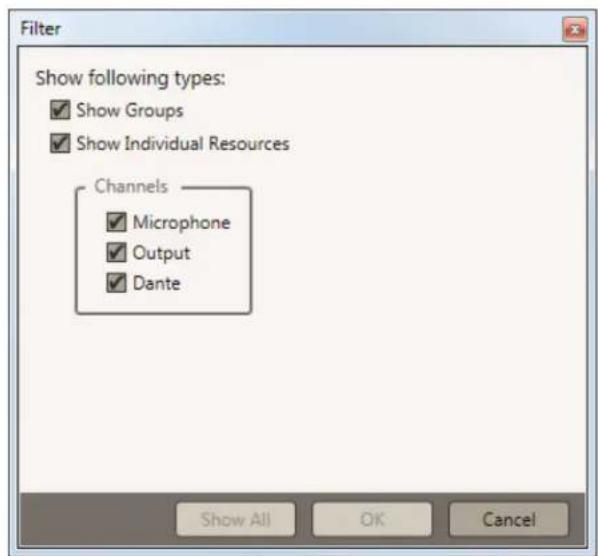
You are then presented a filtered view of the channel matrix.
EVENT ACTION TAB
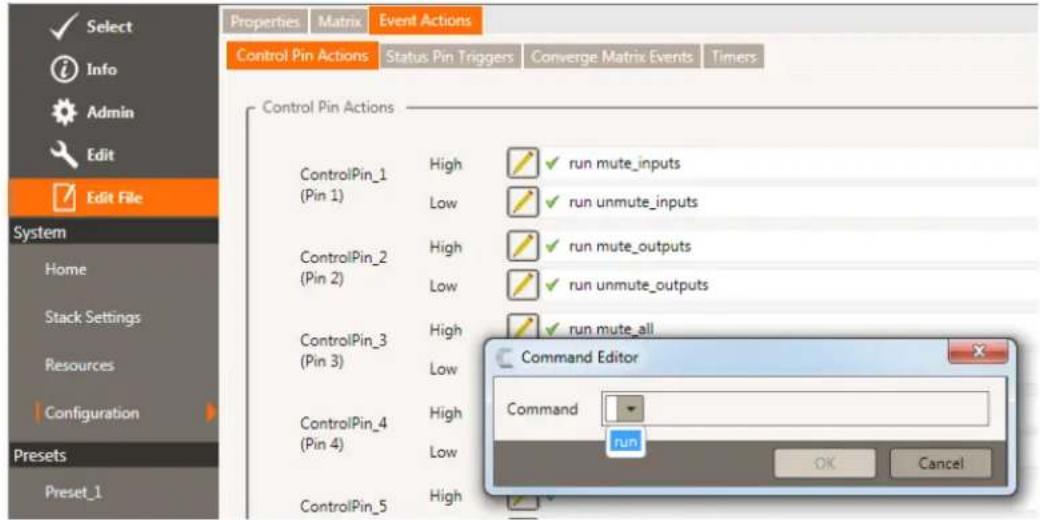
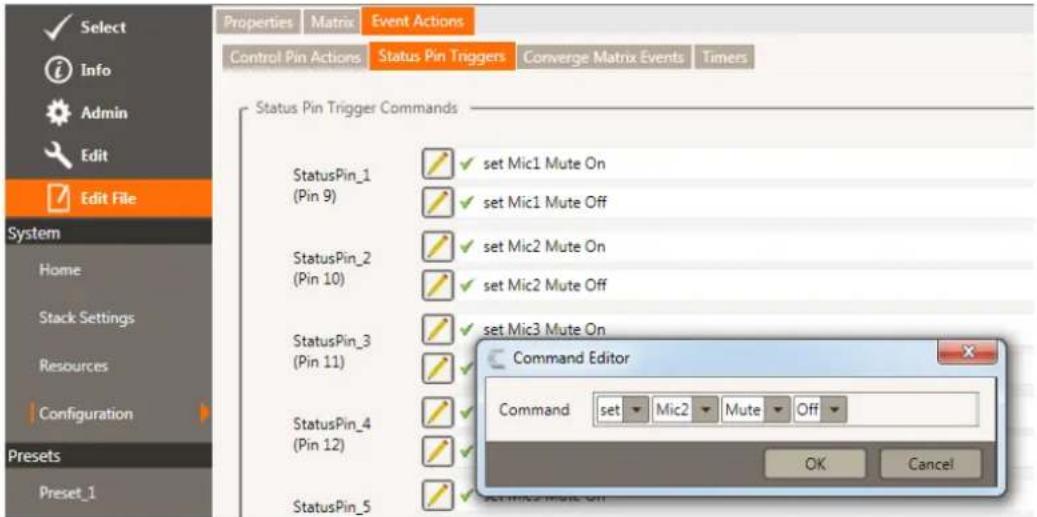
The Event Action screen is where commands can be created that run automatically when a control pin or status pin change as defined on the GPIO port or a CONVERGE Matrix event occurs.
Clicking on the Pencil icon by a designated control pin or status pin opens a command editor to create the action that is to follow as that control pin activates High or Low.
CONVERGE MATRIX EVENTS TAB
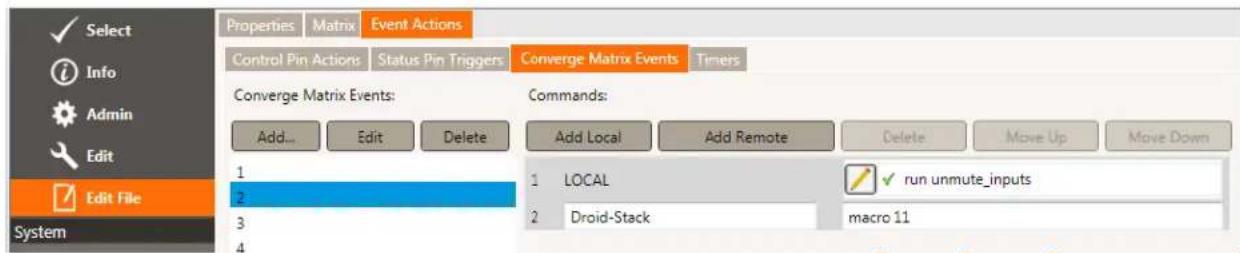
The CONVERGE Matrix Events in the Actions tab area is where Matrix events can be defined that then run other commands or macros.
CREATING PRESETS
Presets are input/output configurations that are stored in a solution and pushed to a CONVERGE Matrix for immediate use as needed, in macros, or in response to events. Preset configurations can include everything under the Edit section except for Event Timers. They allow you to make changes to the input and output channels as well as the entire matrix.
From the Edit screen, select the Add Preset icon.
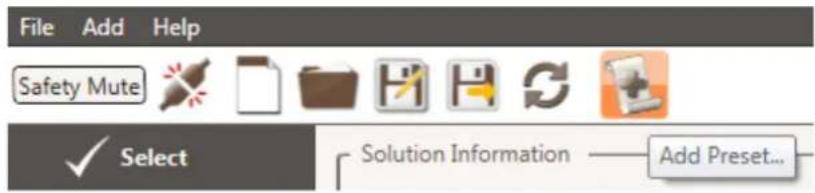
You are presented a dialog box to name the preset configuration.
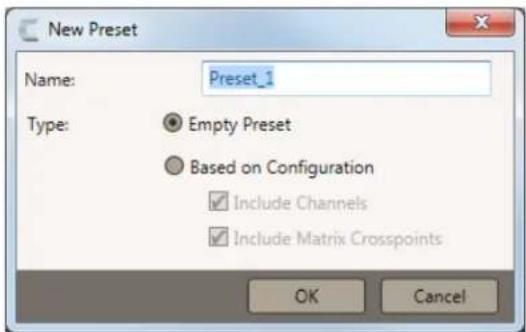
While in preset mode and in the Edit File screen, you can choose which inputs/outputs to adjust and which ones not to change, as well as the entire matrix. They can be created by by using your current template or as a 'empty configuration'. Once a preset is created it can be renamed, deleted, and copied.
Once pushed with the solution file to the Matrix unit, the presets are then available to be executed by using the Macro/Preset dashboard.
» Note: There is no numerical limit to the number of Presets that can be created, but a limit is imposed by the complexity of the preset actions and the size of the unit main memory.
SAVING THE SOLUTION
The solution created in the Console program at this point exists only in the program memory and must be saved for subsequent use, editing, and for pushing to a CONVERGE Matrix switch.
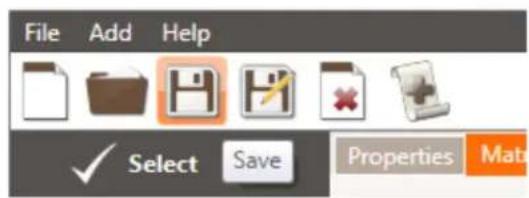
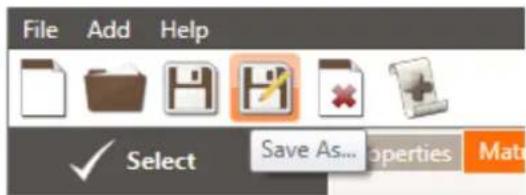
Using the Save button at the top of the Console screen saves the solution under it's current name. Using the Save As button allows saving the solution under a new name and not writing over the existing solution file.
16 TECHNICAL SUPPORT: 800.283.5936
Connecting to CONVERGE Matrix and Pushing a Solution
Once a configuration solution file is created and saved, you can connect to a device via Ethernet or USB to push the file into the device.
DEVICE DISCOVERY
Available devices are detected by the Console program and will show up on the "Discovered on current LAN" List. This discovery process may take a few minutes.
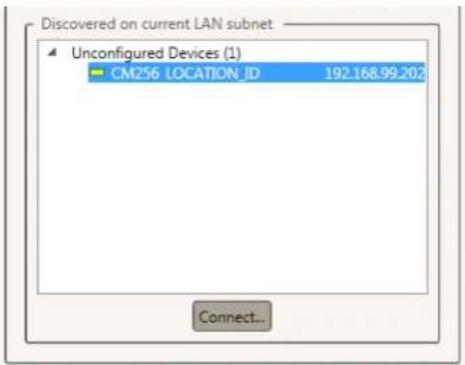
Select a unit from the list and click Connect. You will be asked to provide a user name and password to access the unit. The defaults are 'clearone' 'converge'. When connected, an information screen about the unit appears. The Admin control is also active.
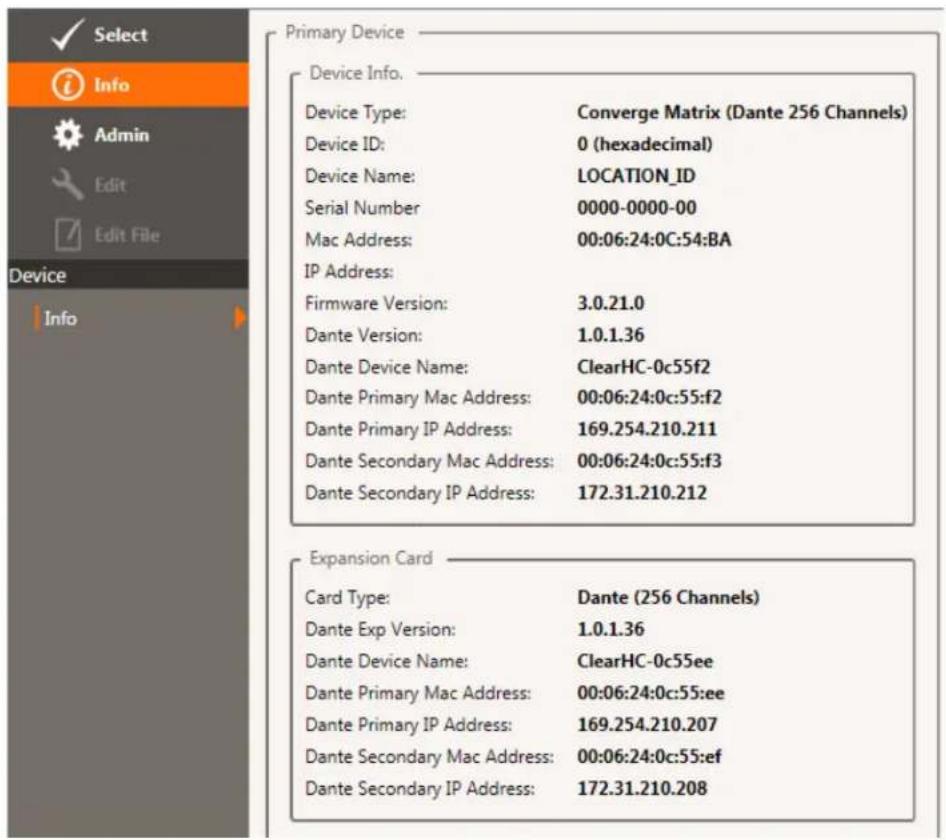
PUSHING A SOLUTION
Once connected to a default device, you must push a valid solution file to the unit.
Click on the Admin control at the side of the display.
» Note: Edit and Edit File will be grayed out until the device has a valid file.
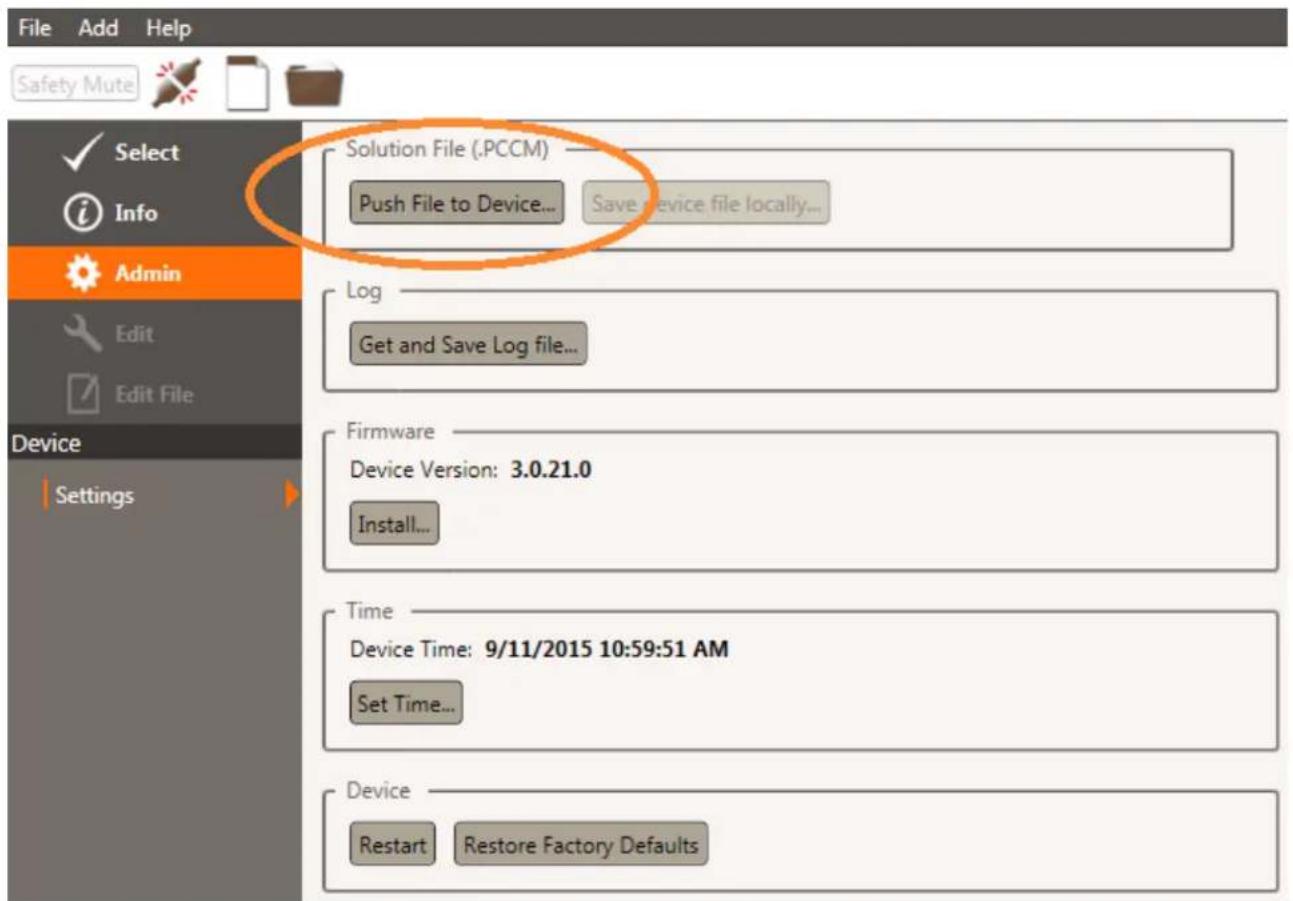
You will be allowed to select the Solution file to push, then you will observe an indication of the file being sent. You are notified after completion.
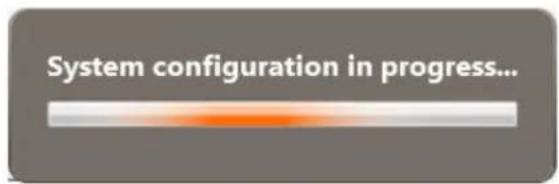
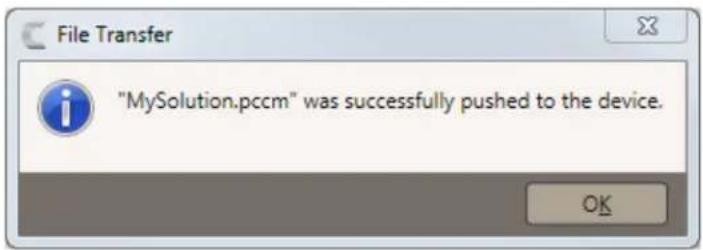
» Note: Once the solution system configuration has been pushed to the CONVERGE Matrix, it is immediately active.
EDITING A LIVE CONFIGURATION
With a valid solution pushed to the unit, you can now continue to edit the live configuration using the Edit control to make adjustments. The distinction between editing the current solution on the device and editing the file saved to the computer is shown by a border around the "live" controls. As you make changes, they are saved separately to ensure the original configuration is not lost.
» Note: Edit and Edit File are active when the device has a valid file.
CONFIGURATION
Click on the Edit control at the side of the display, then the Configuration screen. The controls on the Properties and Matrix tabs become active.
SAFETY MUTE
The Safety Mute button toggles on and off and is used to quickly mute all channels.
MACROS AND PRESETS
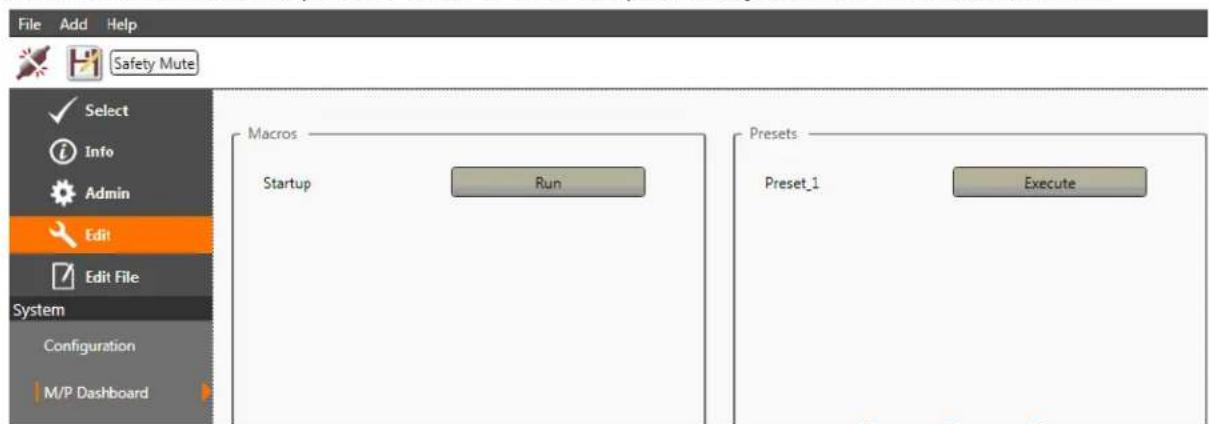
Click on the Edit control at the side of the display, then the M/P Dashboard screen. The controls for Macros and Presets become active. These macros or presets can be executed on the "Live" system. The macros and presets must have been previously created in the solution file.
QUICK START GUIDE
SYNCHRONIZING THE CONVERGE MATRIX
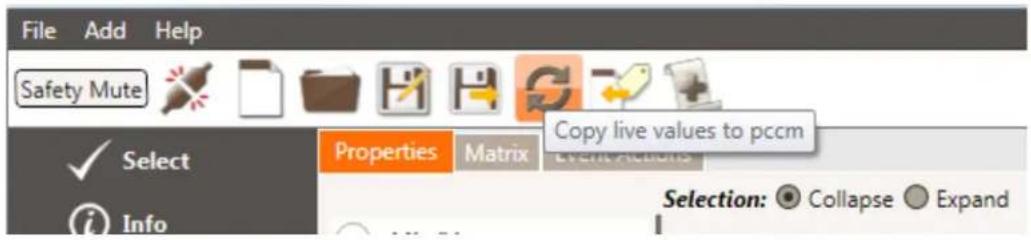
While connected to the CONVERGE Matrix, changes made on the "Live" CONVERGE Matrix unit can be synchronized back into the configuration file created in Console so they are not lost.
Click on the Copy Live Values icon to initiate copying the changed live values back into the solution file configurations.
Redundancy allows two identical CONVERGE Matrix boxes to be connected to the networks and configured so that in the event of failure of the Main unit, the Redundant unit seamlessly assumes all functions and so passing of audio over the network is not interrupted.
This connection of the Main and Redundant units are as shown in the following illustration:
» Note: Network, power and other connections are not shown for simplicity.
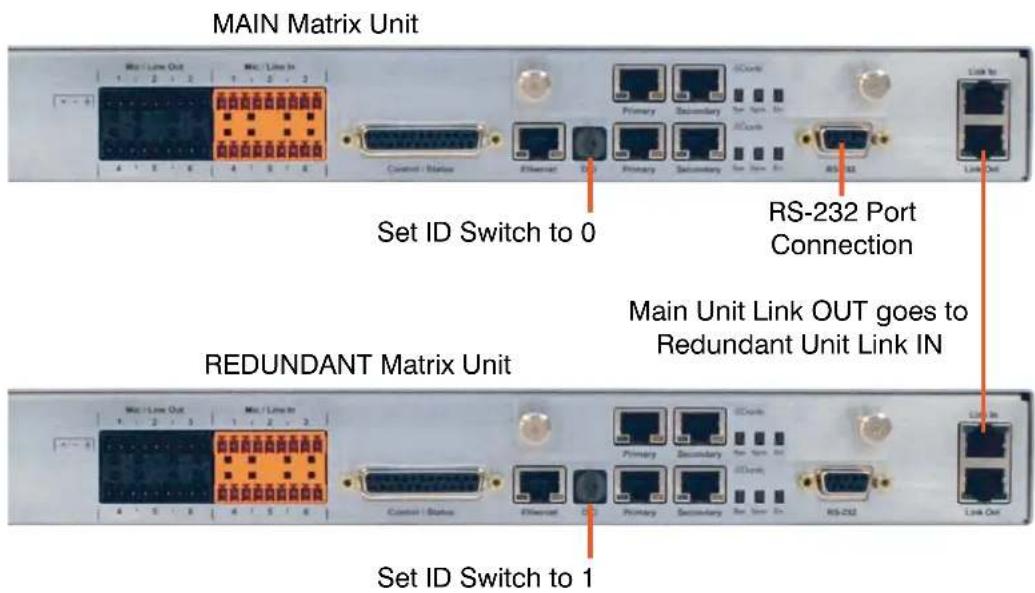
The redundant unit configuration will be added in the future release of the CONVERGE Matrix Console Software. Currently it can be performed by Serial commands. Details of this operation are included in the CONVERGE Matrix Serial Command Guide.
Compliance
The CONVERGE Matrix has European and FCC compliance certifications.
EUROPEAN COMPLIANCE
Conformity of the equipment with the guidelines below is attested by the CE mark.

Declaration of Conformity
Manufacturer's Name: Clear One Inc.
Manufacturer's Address: Edgewater Corporate Park South Tower
5225 Wiley Post Way, Suite 500
Salt Lake City, Utah 84116 U.S.A.
Models: CONVERGE Matrix YYY EX
(where Y is a numeric value or blank and EX is optional)
Declares that the product(s) listed above conform(s) to the following Council Directive(s):
2006/95/EC "Low Voltage Directive,"
2004/108/EC "EMC Directive,"
2011/65/EU "RoHS Directive,"
2012/19/EU "WEEE Directive"
Product Standard(s) to which Conformity of the Council Directive is declared:
EN 60950-1:2005 + Am1:2009
EN 55022:2010
EN 61000-3-2:2014
EN 61000-3-3:2013
EN 61000-4-7:2002
EN 55024:2010
EN 61000-4-2:2008
EN 61000-4-3:2006 + A1:2007 + A2:2010
EN 61000-4-4:2012
EN 61000-4-5:2014
EN 61000-4-6:2013
EN 61000-4-8:2009
EN 61000-4-11:2004
FCC PART 15/ICES-003 COMPLIANCE
This equipment has been tested and found to comply with the limits for a Class A digital device, pursuant to Part 15 of the FCC rules and Industry Canada ICES-003. These limits are designed to provide reasonable protection against harmful interference when the equipment is operated in a commercial environment. This equipment generates, uses, and can radiate radio frequency energy and, if not installed and used in accordance with the instruction manual, may cause harmful interference to radio communications. Operation of this equipment in a residential area is likely to cause harmful interference, in which case the user will be required to correct the interference at his/her own expense.
This device complies with Part 15 of the FCC Rules. Operation is subject to the following two conditions: (1) this device may not cause harmful interference, and (2) this device must accept any interference received including interference that may cause undesired operation.
Changes or modifications not expressly approved by ClearOne Inc. could void the user's authority to operate the equipment.
> CLEARONE LOCATIONS
HEADQUARTERS:
Salt Lake City, UT USA
5225 Wiley Post Way
Suite 500
Salt Lake City, UT 84116
Tel: +801.975.7200
Toll Free: +800.945.7730
Sales: +800.707.6994
Fax: +801.303.5711
e-mail: sales@clearone.com
Europe & Oceana
Tel: +44.1454.616.977
e-mail: global@clearone.com
Asia Pacific
Tel: +852.3590.4526
e-mail: global@clearone.com
Latin America
Tel: +801.974.3621
e-mail: global@clearone.com
Middle East
Tel: +852.3590.4526
e-mail: global@clearone.com
Technical Support
Tel: +800.283.5936
e-mail: tech.support@clearone.com
© 2015 ClearOne Inc. All rights reserved. No part of this document may be reproduced in any form or by any means without written permission from ClearOne. ClearOne reserves specific privileges. Other product names may be trademarks of their respective owners. Information in this document is subject to change without notice. CONVERGE Matrix Quick Start Guide QSG-0260-001 (Rev. 1.0) - October 2015
22 TECHNICAL SUPPORT: 800.283.5936
- Table of Contents
- CLEARONE CONVERGE MATRIX
- CONVERGE MATRIX CONSOLE
- CONNECTING TO CONVERGE MATRIX AND PUSHING A SOLUTION
- COMPLIANCE
- WHAT YOU RECEIVE
- CONVERGE MATRIX SYSTEM DIAGRAM
- CONNECTIONS
- EXPANSION CARDS
- EXPANSION CARD INSTALLATION
- USB CONNECTION
- STATUS LED'S
- TERMINAL CONTROL
- INSTALLING THE SOFTWARE
- CREATING A SOLUTION FILE
- SETTING UP RESOURCES
- NAMING TOOL
- CHANNEL GROUPS
- MACRO COMMANDS
- GPIO CONTROL AND STATUS
- TIMERS
- CONFIGURATION
- PROPERTIES TAB
- Selection: ● Collapse ○ Expand
- MATRIX TAB
- FILTER VIEW
- EVENT ACTION TAB
- CONVERGE MATRIX EVENTS TAB
- CREATING PRESETS
- SAVING THE SOLUTION
- DEVICE DISCOVERY
- PUSHING A SOLUTION
- EDITING A LIVE CONFIGURATION
- SAFETY MUTE
- MACROS AND PRESETS
- SYNCHRONIZING THE CONVERGE MATRIX
- EUROPEAN COMPLIANCE
- Declaration of Conformity
- Declares that the product(s) listed above conform(s) to the following Council Directive(s):
- Product Standard(s) to which Conformity of the Council Directive is declared:
- FCC PART 15/ICES-003 COMPLIANCE
- > CLEARONE LOCATIONS
- HEADQUARTERS:
- TECHNICAL SUPPORT: 800.283.5936
Brand : ClearOne
Model : Converge Matrix
Category : Uncategorized