
RAVEN-Xr15 - Coffee maker PRIMO - Free user manual and instructions
Find the device manual for free RAVEN-Xr15 PRIMO in PDF.


| Product Type | Commercial Coffee Roaster |
| Brand | Primo |
| Model | RAVEN-Xr15 |
| Green Coffee Capacity | 15 – 33 lb (6.80 – 15 kg) |
| Dimensions (L × W × H) | 90" × 80" × 78" (2286 × 2032 × 1981 mm) |
| Shipping Weight | Approx. 1,650 lb (748.4 kg) |
| Roaster Weight | 1,200 lb (544.3 kg) |
| Cyclone Weight | 300 lb (136.1 kg) |
| Full Batch Roast Time | Approximately 15 minutes |
| Hourly Output | 95.46 lb/hr (43.3 kg/hr) |
| Roast Air Flow (Max) | 360 scfm |
| Cooling Bin Air Flow (Max) | 1,125 scfm |
| Cyclone Exhaust Diameter | 6 in (152.4 mm) |
| Roaster Exhaust Diameter | 6 in (152.4 mm) |
| Temperature High Limit | 500°F (260°C) |
| Gas Types | Liquid Propane (LP) or Natural Gas (NG) |
| Maximum Gas Consumption | 300,000 BTU/hr (88 kW) |
| Typical Consumption per Roast | 53,000 BTU (15.5 kWh) |
| Inlet Pressure (LP) | 11 in WC (27.4 mbar) |
| Inlet Pressure (NG) | 7 in WC (17.4 mbar) |
| Gas Supply Connection | 3/4" male NPT |
| Electrical Requirements | 220V AC, 14.5 A, 60 Hz |
| Safety Clearance | Minimum 18" (457 mm) around the roaster |
| Maintenance Interval (Bearings) | Grease every 500 lb of coffee |
Frequently Asked Questions - RAVEN-Xr15 PRIMO
User questions about RAVEN-Xr15 PRIMO
0 question about this device. Answer the ones you know or ask your own.
Ask a new question about this device
Download the instructions for your Coffee maker in PDF format for free! Find your manual RAVEN-Xr15 - PRIMO and take your electronic device back in hand. On this page are published all the documents necessary for the use of your device. RAVEN-Xr15 by PRIMO.
USER MANUAL RAVEN-Xr15 PRIMO
PRIMO ROASTING EQUIPMENT
THE MOST RELIABLE AND CUSTOMIZABLE MACHINES ON THE MARKET.
TABLE OF CONTENTS
TABLE OF CONTENTS 2 ......
RAVEN-XR15 TECHNICAL DATA 3 ....
RAVEN-XR15 ROASTER DRAWINGS 4 ....
FRONT VIEW 5 ....
LEFT SIDE VIEW 6 ....
REAR VIEW 7 ....
RIGHT SIDE VIEW....8
TOP VIEW 9
FRONT VIEW WITH CYCLONE....10
SAFETY INFORMATION ....11
THINGS TO CONSIDER....12
PRE-INSTALLATION....13
INSTALLATION....14
EXHAUST DUCTING & GENERAL INFORMATION ....16
EXHAUST DUCTING, HOT AIR - ROASTERS & AFTERBURNERS ....17
EXHAUST DUCTING, AMBIENT AIR -LOADERS & DESTONERS....18
OPERATING MACHINE ....19
MAINTENANCE & CLEANING ....21
ADDITIONAL DOCUMENTS & INFORMATION ......23
RAVEN-XR15 TECHNICAL DATA
1. Raven-Xr15 Roaster Technical Data
This section contains a table, on the next pages, with technical data information applicable to both the Standard Raven-Xr15 and a Custom Raven-Xr15 roaster. Information in this table is subject to change.
| RAVEN-Xr15 Information | Technical Data |
| Green coffee capacity, min-max | 15 - 33 lb.; 6.80 - 15 kg |
| Dimensions, maximum L x W x H | 90" x 80" x 78" |
| Shipping Weight (Approximate) | 1,650 lb; 748.42 kg |
| Roaster | 1200 lb; 544.3 kg |
| Cyclone | 300 lb; 136.1 kg |
| Full Batch Roast Time | Approximately 15 minutes |
| Hourly Output | 95.46 lb/hr.; 43.3 kg/hr. |
| Roast Air, Maximum | 360 scfm |
| Cooling Bin Air, Maximum | 1125 scfm |
| Cyclone Exhaust Diameter | 6 in; 152.4 mm |
| Roaster Exhaust Diameter | 6 in; 152.4 mm |
| Temperature High Limit | 500F/ 260C |
| Gas Information | |
| Gas Types | Liquid Propane (LP) or Natural Gas (NG) |
| Maximum Consumption | 300,000 BTU/hr.; 88 kW |
| Typical Consumption per roast | 53,000 BTU; 15.5 kWh |
| Inlet Pressure LP | 11 in WC; 27.4 mbar |
| Inlet Pressure NG | 7 in WC; 17.4 mbar |
| Inlet Gas Supply Connection | 3/4" in male NPT on the roaster |
| Electrical Information | |
| Volts AC | 220V 14.5 amps |
| Frequencies | 60Hz |
RAVEN-XR15 ROASTER DRAWINGS
2. Raven-Xr15 Roaster Drawings
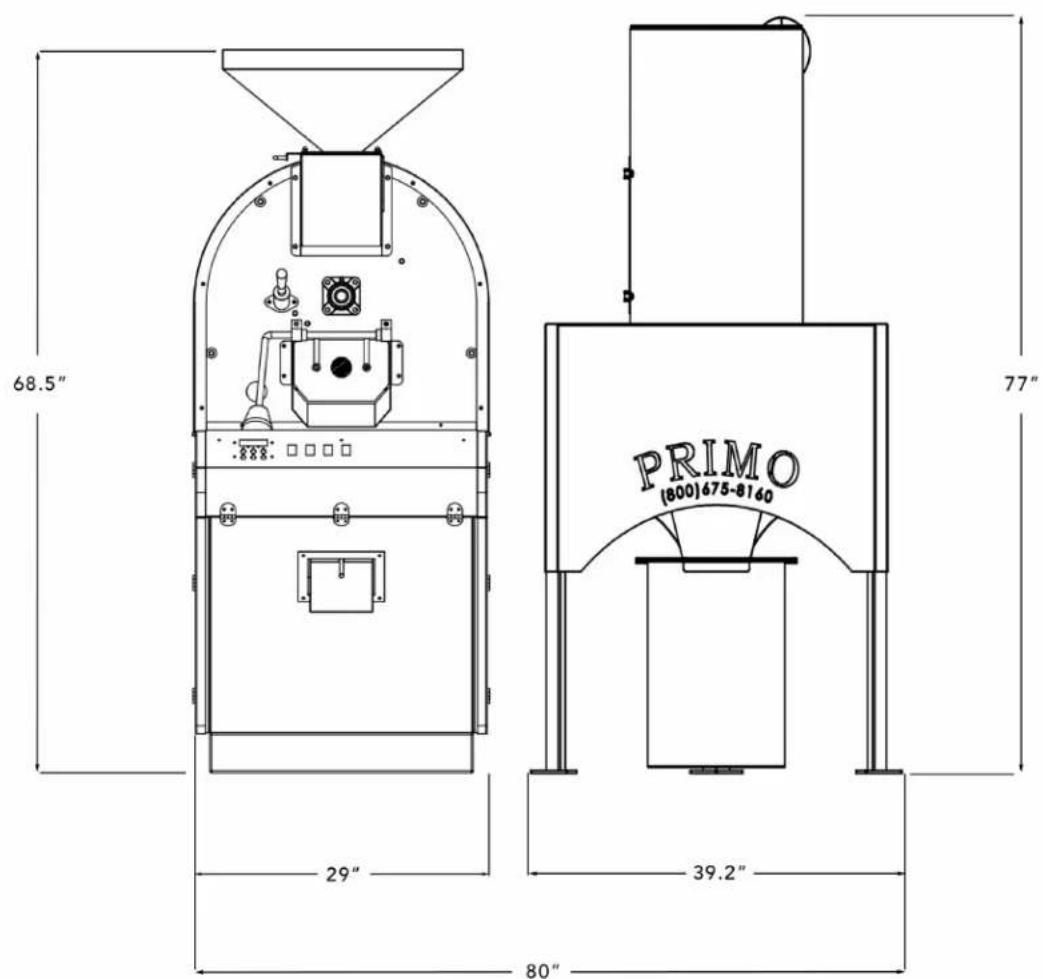
This section contains drawing views with dimensions and component descriptions. These drawings are valuable for familiarization with the Raven-Xr15 roaster and for space and utility connection planning.
Dimensions and some details are subject to change.
These drawings each take a full page so the remainder of this page is intentionally blank.
FRONT VIEW
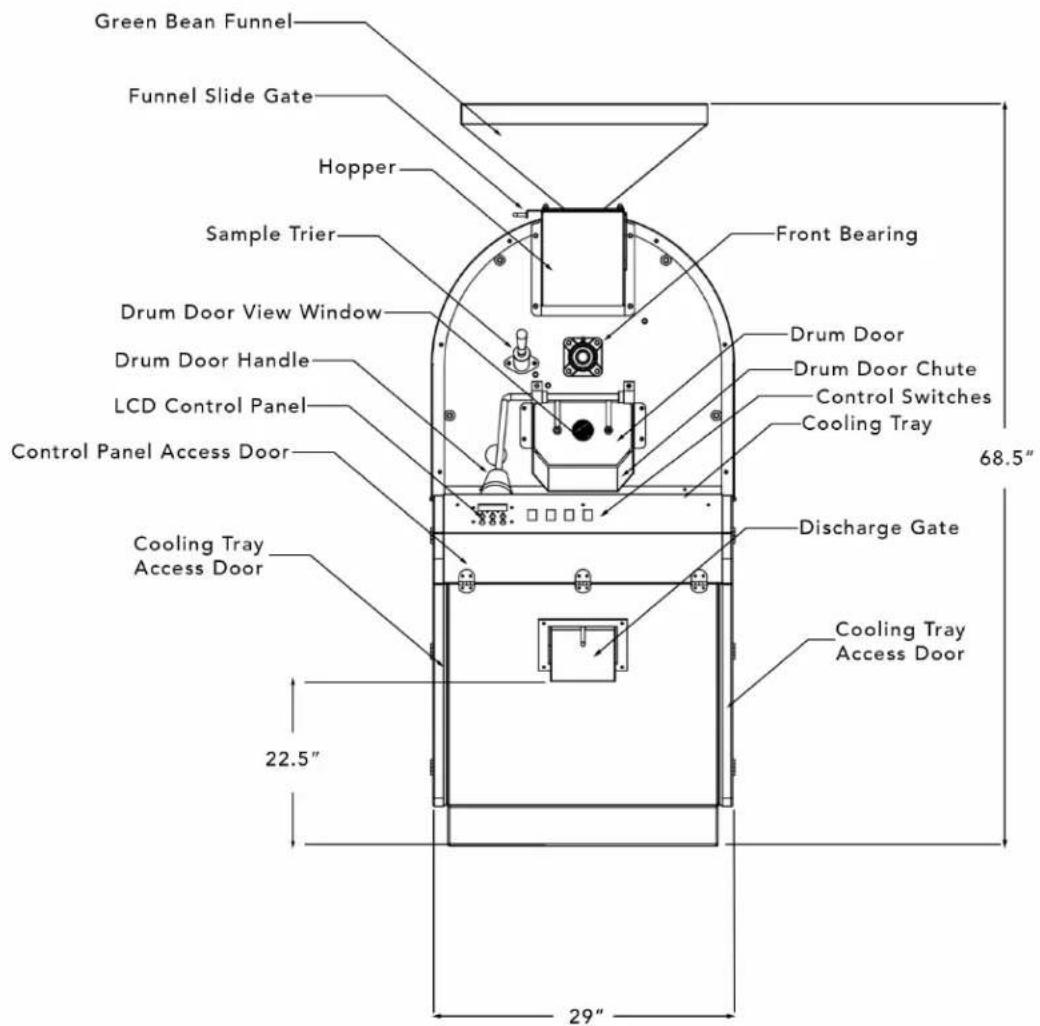
Scale 1:32
LEFT SIDE VIEW

Scale 1:32
REAR VIEW
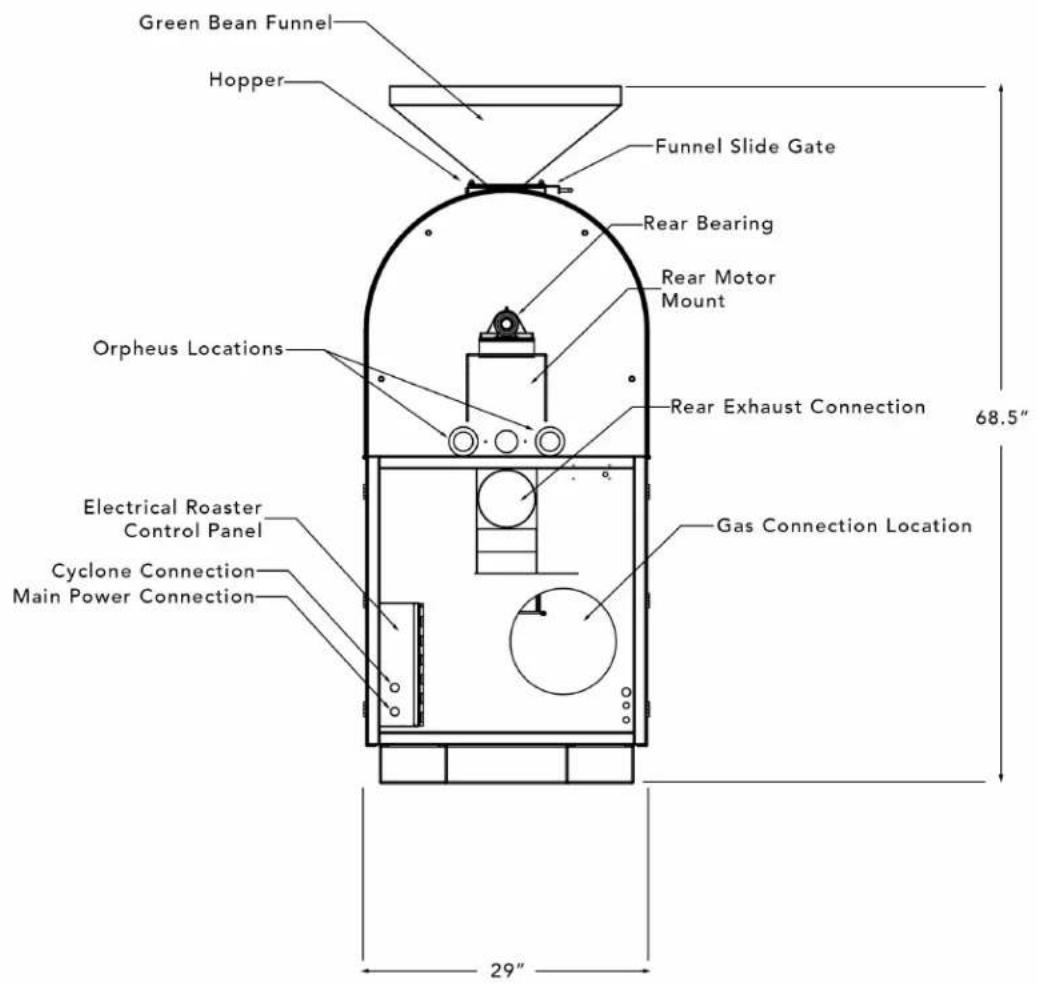
Scale 1:32
RIGHT SIDE VIEW

TOP VIEW
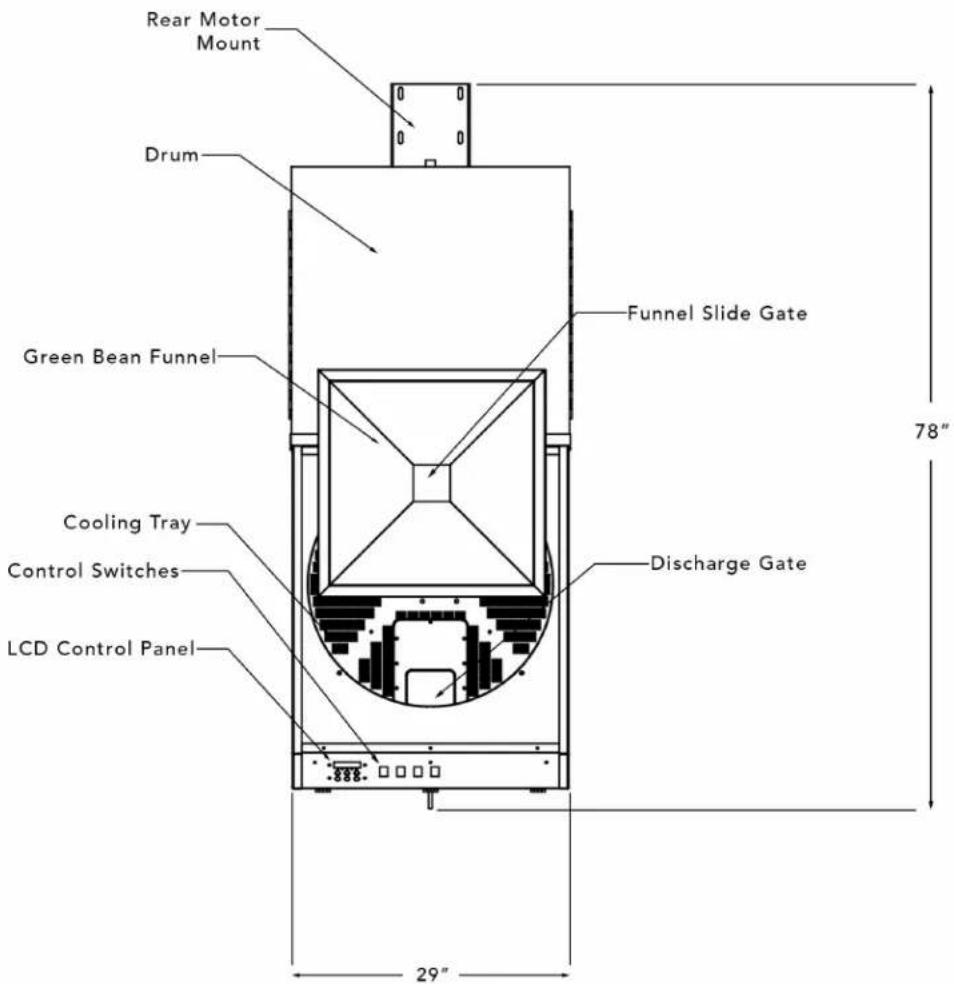
FRONT VIEW WITH CYCLONE
SAFETY INFORMATION
Prior to installing and operating your roaster, please read the entire manual. If you see this symbol in the manual, make sure to read what follows because it is a caution for actions that can cause harm or damage to your machine and/or the operator.
Death, injury, or property damage can be caused by improper installation, adjustment, alteration, service, or maintenance. The entire installation guide must be read prior to installing, cleaning, operating, or servicing this roaster.

It is the owner's responsibility to ensure the installation, cleaning, and operation of the roaster are done safely and properly. Only a qualified professional should operate this roaster.
Keep any flammable items, including but not limited to gases, vapors, liquids, and solids, far away from the roaster at all times. The roaster needs to have a fire extinguisher nearby and easily accessible in case of fire. Your local fire department will have information on which fire extinguishers should be used. Fires may be caused by not cleaning the roaster or exhaust system correctly and/or often enough.
The roaster needs 18 inches of space around it at all times. Do not touch hot surfaces.
Once the installation of the roaster is completed, you will need to have it inspected to ensure it complies with local building codes. A local fire inspector must also inspect the machine. These steps must be completed before operating. The Primo Roasting Equipment warranty may be null and void if the inspections are not done. This would relieve Primo Roasting Equipment from any liability related to the use of the machine and how the installation was done.
Instructions for what to do when the roaster operator finds a gas leak and/or smells gas need to be posted in a location that is easily accessible and readable. Your local gas company or the company that supplies gas will have the instructions for you to obtain from them.
THINGS TO CONSIDER
i. Ease of movement
ATTENTION: Prior to moving the machine and/or cyclone, make sure the roaster is turned off, unplugged, and the gas is disconnected or turned off.
To move the roaster and/or cyclone, the machine must be taken apart.
- Remove the exhaust arm by pulling it off via compression fittings and set it aside.
- Unbolt the cyclone from the ground if applicable. (1) Use a forklift to pick up the machine from the back. *Make sure to tilt the forklift back once the roaster is lifted to avoid it sliding off or tipping the forklift.*
- Place the roaster in the desired location using the installation guide and spacing requirements.
Make sure to leave ample room behind the machine to allow the forklift access for movement purposes.
*Every time the machine is moved, disassembled, and put back together, the operator must inspect the machine prior to resuming operations.*
PRE-INSTALLATION
i. Receiving/Un-Crating
ATTENTION: Hire a professional to install your roaster.
Roaster:
The roaster comes in a crate.
Cut plastic walls off to expose roaster.
*Be careful not to drop/slide the tool you are using to cut into the crate, on the roaster*
Once all walls are taken off, cut the steel cord strapped over the cooling tray to the pallet.
After the roaster is free standing on the pallet use forklift to move off of the pallet.
Pick up roaster from the back of the machine to get off of the pallet
*Make sure to tilt the forklift arms up once roaster is in the air*
*We recommend keeping the roaster as close to the ground as possible when moving*
Set roaster in desired area *Spacing requirements further down*
Cyclone:
The cyclone comes bolted down on a pallet, wrapped in plastic.
Remove plastic wrap from cyclone & pallet Move pallet as close to desired position for the cyclone to make moving it easier.
*Use spacing requirements further down*
Remove bolts from cyclone legs.
Pick up cyclone using forklift in-between the cyclone legs.
*Wrap and protect the forklift arms/cyclone arms to prevent abrasion on the cyclone when moving*
Place cyclone on correct side of roaster using spacing requirements below.
Spacing Requirements:
Be sure you have ample access to the green bean funnel, control panel, access doors, chaff bin, hopper, etc.
Space your roaster about 18" from back wall to ensure you have ample access for venting the machine.
The footprint of the roaster and cyclone is 90" x 80" x 78". The cyclone needs to be placed 12" to the right of the roaster. The cyclone vent should be flush with the roaster vent to make adding the exhaust arm simple & easy. There must be easy access to the following areas: cyclone chaff bin, left and right side access doors, control panel, hopper, and gas line connection located on the back of the machine. Having easy access to these places will make cleaning and maintenance much easier.
INSTALLATION
ATTENTION: Hire a professional to install your roaster. This manual must be read completely through prior to any installation. Check with local building authorities for their local codes & installation requirements prior to installation.
i. Electrical
ATTENTION: Use a licensed electrical company when installing the electrical on your Primo roaster.
Consult your licensed electrician to ensure proper installation of either the 110 V or 220 V, based off requested voltage. If using 220v a 3 prong 220v will not be included and must be wired to the 3 wires from the machine.
ii. Gas
ATTENTION: Use a licensed gas company when installing the gas line on your Primo roaster.
Local codes, regulations, and/or laws must be followed when doing the gas installation for the machine.
*Propane roasters must use propane only and are required to use a gas regulator. *Have a certified gas worker inspect and double check any gas connection work you do.*
iii. Roaster Funnel & Cyclone Exhaust Fitting
- Remove a total of four nut caps (7/16") from the hopper.
- Place funnel slide gate in designated position on top of the hopper.
- Place green bean funnel on top of the funnel slide gate.
- Before tightening the green bean funnel to the hopper ensure that your funnel slide gate is operating smoothly. (Slide gate should move with ease.)
- After the slide gate and green bean funnel are in position you may begin tightening the four nut caps using a (7/16") wrench.
- Finally, slide the exhaust on, connecting the roaster and cyclone via compression fit.
iv. Cyclone
ATTENTION: When installing the cyclone to your roaster use a licensed contractor.
The cyclone uses 6" ducting to vent.
Consult your licensed contractor to ensure proper installation of duct work.
EXHAUST DUCTING & GENERAL INFORMATION
- Throughout the remainder of this document, the term exhaust ducting refers to the ducting that the customer, or their contractor/representative, select, acquire, and install. The exhaust ducting will connect to the applicable Primo Roasting provided equipment.
- One of the most important aspects of the equipment installation is the use of an approved exhaust ducting system. Its design can greatly affect the equipment performance and the product quality. The cost and time to order and install the exhaust ducting are also important customer considerations.
- Designing the exhaust ducting system requires a qualified professional to calculate the efficiency of the system and the proper size of ducting. The ducting must be of sufficient diameter to accommodate the air flow (SCFM - standard cubic feet per minute or SCMH - standard cubic meters per hour), and meet applicable regulations. A licensed engineer or Heating, Ventilation, Air Conditioning (HVAC) professional can assist. Information the qualified professional will need, such as the diameter of the exhaust ducting and the maximum exhaust air flow, is located on page 3 Technical Data table. Customers should contact their sales or project manager representative with any questions.
- A properly designed and installed chimney and rain cap is essential to the equipment performance and longevity. Water leaking in may cause an electrical short or damage the equipment. Your contractor will be able to coordinate with local jurisdictions for the correct cap. The cap should not have a screen since it will clog with residue of chaff over time.
- The Primo Roasting Equipment (roaster, cyclone, Afterburner, loader, or destoner, as applicable) MUST NOT support the weight of the exhaust system.
- The exhaust air from Primo products fits into one of the two general categories. Either hot exhaust air, such as from the roaster or an afterburner; or ambient/room temperature exhaust air, from products such as loaders and destoners. The sections that follow will discuss ducting considerations specific to these general categories.
EXHAUST DUCTING, HOT AIR - ROASTERS & AFTERBURNERS
- The exhaust air from the roasting process is hot and contains oils and residues which are flammable. In the event of a ducting/flue fire, the internal duct temperatures can exceed 1000°F (538°C), which could cause nearby combustible materials to ignite. Thus, Diedrich recommends, at a minimum, stainless steel, double wall, positive pressure grease ducting that meets the applicable region/local standards, such as UL for USA, ULC for Canada, and CE for the European Union.
- An important consideration when designing an exhaust ducting system is the static pressure. The static pressure is the back-pressure or suction within the system. The exhaust ducting that connects to the roaster, cyclone, or afterburner, must be designed to operate with a static flue pressure between negative 0.15"WC (suction) and positive 0.25"WC (back-pressure) at the exhaust of the roaster (cyclone or Afterburner, as applicable) while in operation.
- For Roasters (with or without cooling bin cyclone, and without an Afterburner).
Ducting must be suitable for 500°F (260°C) continuous, 2,000°F (1,093°C) for 30 minutes, and comply with UL-1978/ULC-SC662 Standard for Grease Ducts in the USA/Canada, and/or equivalent standards for other countries (such as CE standards for the European Union).
Installation must be done in accordance with appropriate NFPA standards in the USA or equivalent standards in other countries. The installation must also comply with the manufacturer's installation specifications and allowable distance to combustible/noncombustible materials.
- For Roasters with an Afterburner.
Ducting from the Afterburner must be suitable for 1,000°F (538°C) continuous, 1,400°F (927°C) intermittent, and comply with UL103/ULC_ORD-C959 in the USA/Canada, and/or equivalent standards for other countries (such as CE standards for the European Union).
Installation must be done in accordance with appropriate NFPA standards in the USA or equivalent standards in other countries. The installation must also comply with the manufacturer's installation specifications and allowable distance to combustible/noncombustible materials.
EXHAUST DUCTING, AMBIENT AIR -LOADERS & DESTONERS
DANGER DO NOT USE CLASS B OR SPIRAL-WRAP DUCTING FOR ROASTER OR AFTERBURNER DUCTING UNDER ANY CIRCUMSTANCES.
DANGER Fires are caused by failure to maintain a clean roaster and its exhaust ducting system. Regular cleaning of the roaster and exhaust ducting will prevent the buildup of residues that could cause fire.
- The exhaust air from loaders and destoners is about the same temperature as the ambient air in the room or operating area. The regulatory requirements for the exhaust ducting for these components are much less stringent than the requirements for the hot air roaster, cyclone and afterburner exhaust.
- The exhaust air from the green bean loader and the destoner will likely contain some dust and/or other particulate matter. A dust collection system should be considered.
OPERATING MACHINE
Primo Roasters have 3 or 4 switches depending on model. The switches in order from left to right: Ignition (IGN), Drum (DRUM), Cooler (COOLER), & Agitator (AGT). Every Primo Roaster is outfitted with a LCD screen. This LCD screen shows your current drum temperature, Temp 1 & Temp 2 set points, and your Burners switch (ON/OFF).
i. Starting Roaster
- Make sure roaster is properly connected to correct gas source.
- Make sure roaster is properly plugged in to correct outlet.
- Make sure the chaff bin is empty and that the under cooler & side panels are clean of debris.
How to turn roaster on:
ii. Roasting
- Preheat roaster before first roast for 15-20 minutes or at 400 F.
- Turn Drum on by pushing in the drum switch on the control panel of the roaster.
- Next push in the ignition switch next to the drum switch to activate the LCD screen.
- Press the ON button located on the LCD screen to ignite the burners.
- Push temp 1 button on the LCD, use keypad to set desired temperature.
- Push temp 2 button on the LCD, use keypad to set desired temperature.
- Let roaster preheat to desired temperature and stay constant for 3 minutes.
- Fill hopper with raw material.
- Once filling stops pull funnel slide gate open to allow material to fall into the drum.
- Close funnel slide gate.
- Once the material reaches desired temperature turn on the agitator switch and the cooler switch.
- When material is finished open drum door to allow all material to fall into the cooling tray.
- Allow machine to reheat prior to next material.
- Open discharge gate to allow first roast to be transported before the new roast reaches desired degrees.
- Close discharge gate when all roasted material is out of cooling tray to prepare it for the batch currently roasting.
- Repeat steps for multiple batches.
iii. Cooling
Cooler/Agitator
Primo Roasters are equipped with an agitator/cooler to cool down the roasted material.
Before dropping roasted material into the cooler tray turn on the agitator and cooler switches (The Genesis-Xr3 & Ranger-Xr5 models do NOT have both switches).
Once your material has cooled to the desired temp you can open the discharge gate to drop material into storage bin. Be sure to close the discharge gate correctly before dropping the next batch of material into the cooler tray.
iv. Misc
Shut-off
- Open the funnel slide gate and the drum door when shutting off to speed up the cooling process.
- Press the stop button on the LCD screen until the burners turn off.
- Leave the drum switch on until the temperature drops to 200 degrees Fahrenheit.
- Turn all switches to the off position once the roaster has cooled down.
- Close the funnel slide gate and drum door.
- Turn off the gas valves and unplug the roaster.
MAINTENANCE & CLEANING
i. Maintenance Schedule
Changing Drum Depth
- Make sure the machine is shut off.
- Loosen the two set screws on the front bearing with a 3/32" hex key.
- Use a rubber mallet to push the drum axle back to the desired distance. *Use a rubber mallet to avoid damaging the machine. Do not hit any part other than the front flat section of the drum axle.*
Grease Bearings
- Add grease to the front and rear bearings every 500 pounds of coffee.
- Use the greasing tool to add Teflon grease to the pin on the side of the front bearing.
- Wipe excess grease off with a rag.
ii Cleaning Schedule
ATTENTION: Unplug machine prior to cleaning. Turn gas valve off prior to cleaning machine. Let machine cool down if hot prior to cleaning to avoid injury.
Daily Cleaning
- Empty chaff bin beneath cyclone, remove the bin by sliding it away from the front of the cyclone.*Be sure the chaff bin is below cyclone prior to operating machine.*
- Open cooler tray access doors to vacuum out chaff that has fallen below the cooling tray. *Be sure to close both doors and lock latches before operating machine.*
- If the cooling tray screen has any blockages in it be sure to clean them out via a brush or tool to ensure maximum cooling is taking place.
- Open side access doors on roaster by turning each of the knobs and lowering the panel. Remove the heat shield. Vacuum out the burner area to clear all chaff. *Be sure side panels are closed properly before your next roast.*
Every 10th Day Cleaning
- Clean exterior of machine/cyclone using either compressed air or microfiber cloth.
- Inspect front/rear drum bearings and lubricate as necessary.
- Inspect venting system from roaster to cyclone, cyclone to vent, and roaster to vent for blockage. Clean as necessary.
- Inspect all ducting on roaster/cyclone for accumulation. If necessary clean and remove the accumulation prior to cleaning.
- Check blower motor fan and if necessary, clean.
Annual Cleaning
- Check all visible bolts/screws and tighten/replace if necessary.
- Have a professional chimney cleaner sweep clean the exhaust ducting.
ADDITIONAL DOCUMENTS & INFORMATION
The information in this document is intended to assist customers with purchasing and facility preparation decisions. Upon purchase of a Primo Roaster, additional documentation will be provided. It is important for customers to read these documents to ensure that the installation and operation phases are smooth and safe. Please feel welcome to reach out to us with questions or information requests.
Phone: (1)-800-675-0160
Email: support@PrimoRoasting.com
Website: PrimoRoasting.com
Released November 2021



- PRIMO ROASTING EQUIPMENT
- TABLE OF CONTENTS
- RAVEN-XR15 TECHNICAL DATA
- RAVEN-XR15 ROASTER TECHNICAL DATA
- RAVEN-XR15 ROASTER DRAWINGS
- FRONT VIEW
- LEFT SIDE VIEW
- REAR VIEW
- RIGHT SIDE VIEW
- TOP VIEW
- FRONT VIEW WITH CYCLONE
- SAFETY INFORMATION
- THINGS TO CONSIDER
- EASE OF MOVEMENT
- ATTENTION: PRIOR TO MOVING THE MACHINE AND/OR CYCLONE, MAKE SURE THE ROASTER IS TURNED OFF, UNPLUGGED, AND THE GAS IS DISCONNECTED OR TURNED OFF
- PRE-INSTALLATION
- RECEIVING/UN-CRATING
- ROASTER
- CYCLONE
- SPACING REQUIREMENTS
- INSTALLATION
- ELECTRICAL
- II. GAS
- III. ROASTER FUNNEL & CYCLONE EXHAUST FITTING
- IV. CYCLONE
- ATTENTION: WHEN INSTALLING THE CYCLONE TO YOUR ROASTER USE A LICENSED CONTRACTOR
- EXHAUST DUCTING & GENERAL INFORMATION
- EXHAUST DUCTING, HOT AIR - ROASTERS & AFTERBURNERS
- EXHAUST DUCTING, AMBIENT AIR -LOADERS & DESTONERS
- DANGER DO NOT USE CLASS B OR SPIRAL-WRAP DUCTING FOR ROASTER OR AFTERBURNER DUCTING UNDER ANY CIRCUMSTANCES
- OPERATING MACHINE
- STARTING ROASTER
- II. ROASTING
- III. COOLING
- IV. MISC
- MAINTENANCE & CLEANING
- MAINTENANCE SCHEDULE
- II CLEANING SCHEDULE
- ANNUAL CLEANING
- ADDITIONAL DOCUMENTS & INFORMATION
Brand : PRIMO
Model : RAVEN-Xr15
Category : Coffee maker