RR-1070 - Uncategorized ROTEL - Free user manual and instructions
Find the device manual for free RR-1070 ROTEL in PDF.


| Product Type | Universal Touch Screen Remote Control |
| Brand | Rotel |
| Model | RR-1070 |
| Dimensions (W x H x D) | 220 x 51 x 25 mm |
| Weight (without batteries) | 165 g |
| Weight (with batteries) | 215 g |
| Power Supply | 4 x AAA NiMH rechargeable batteries |
| Charging Time | Approximately 17 hours |
| Display | Monochrome 320 x 80 pixel touch screen LCD |
| Backlight | Blue-Green EL backlighting with light sensor |
| Operating Distance | Up to 8 meters (25 feet) |
| Memory Capacity | 240 learned commands |
| Number of Devices Controlled | Up to 10 |
| Preprogrammed Device Types | TV, VCR, SAT/DSS/Cable, CD, DVD, LD, Rotel Amp/Tuner, and custom |
| Smart Keys | 10 programmable keys, each with up to 32 steps |
| Learning Function | Yes, with dual signal learning support |
| Cloning | Yes, remote-to-remote copy of settings |
| PC Link (Optional) | Via docking station and USB cable (sold separately) |
| Password Protection | Yes, 5-character password |
| Real-Time Clock | Yes, with day of week display |
| Hard Keys | 5: Power, CH+/-, VOL+/- |
| Shortcut Keys | 3: HOME, MENU, MUTE |
| Auto Power Off | Yes, after 60 seconds of inactivity |
| Battery Level Indicator | Yes, on screen |
| Included Accessories | Power cord, AC/DC adapter, charging connector, 4x AAA NiMH batteries |
Frequently Asked Questions - RR-1070 ROTEL
User questions about RR-1070 ROTEL
0 question about this device. Answer the ones you know or ask your own.
Ask a new question about this device
Download the instructions for your Uncategorized in PDF format for free! Find your manual RR-1070 - ROTEL and take your electronic device back in hand. On this page are published all the documents necessary for the use of your device. RR-1070 by ROTEL.
USER MANUAL RR-1070 ROTEL
natural_image
Close-up of a printed circuit board with various electronic components and traces (no readable text or symbols)
Owner's Manual
The Rotel Co. Ltd.
10-10 Shinsen-Cho
Shibuya-Ku
Tokyo 150-0045
Japan
Phone: +81 3-5458-5325
Fax: +81 3-5458-5310
Rotel of America
54 Concord Street
North Reading, MA 01864-2699
USA
Phone: +1 978-664-3820
Fax: +1 978-664-4109
Rotel Europe
Dale Road
Worthing, West Sussex BN11 2BH
England
Phone: +44 (0)1903 221 600
Fax: +44 (0)1903 221 525
Rotel Deutschland
Kleine Heide 12
Getting to Know the RR-1070 4
Battery Installation and Charging 5
Getting Started 6
From the HOME page 6
Touch Screen Calibration 6
Hot Keys 7
Hard Keys 7
Key Tone 7
Back Light 7
IR Codes Library 7
Configuration and Set Up 8
Brand Name 8
Enter Code 9
Auto Search 10
Learning New Commands 10
To Program New Commands 10
Dual Signal Learning 11
Advanced Set Up 12
Editing Key Labels 12
To Change a Control Key or Device Key Name 12
Moving a Key 13
Rearranging Home Screen Device List 14
Deleting a Key 14
Preference Settings 15
Volume/Mute Control Punch Through 15
Custom Page Set Up 15
Remote Setting 16
Clock Setting 16
Beep Sound 16
LCD Display and Backlighting Controls 16
Password 17
To Enable the Password System 17
To Disable the Password System 17
Restore Factory Settings 17
Clear Learning 18
Key Rename 18
Device Rename 19
Move Key 19
Move Device 20
Deleted Key 20
All to Default 21
Status 21
Smart Key Programming 21
Program a New Smart Key Command 22
Editing a Smart Key Command 22
Deleting a Smart Key 23
Renaming a Smart Key 23
Cloning the RR-1070 Commands 23
Copy One Device 24
Copy All Devices 24
PC Link 24
Interactive Help Screens 24
Troubleshooting and Common Questions 25
Specifications 27
Control Codes 28
Control Codes
Rotel (Amp/Tuner)
| RA-02 | 0005 |
| RA-1060 | 0005 |
| RA-1062 | 0005 |
| RA-1070 | 0015 |
| RA-972 | 0005 |
| RC-1070 | 0005 |
| RC-1090 | 0015 |
| RSDX-02 (EUR) | 0025 |
| RSDX-02 (US) | 0035 |
| RSP-1066 | 0065 |
| RSP-1098 | 0065 |
| RSX-1055 | 0045 |
| RSX-1065 | 0045 |
| RX-1050 | 0055 |
Control Codes
LD
| Aiwa 0177 | |
| Denon 0167 | |
| Disco Vision 0037 | |
| Funai 0177 | |
| Hitachi 0037 | |
| Kenwood 0107, 0127 | |
| Magnavox 0047 | |
| Marantz 0047 | |
| Mitsubishi | 0157 |
| NAD | 0157 |
| Panasonic | 0097, 0197 |
| Philips 0047 | |
| Pioneer | 0037, 0057, 0157 |
| RCA | 0187 |
| Realistic | 0177 |
| Rotel | 0007, 0017 |
| Sharp | 0147 |
| Sony 0067, 0077, 0137 | |
| Victor | 0117 |
| Yamaha | 0027, 0087 |
DVD
| Akai | 0068 |
| Denon 0208 | |
| Finlux | 0278 |
| Goldstar 0278 | |
| Grundig | 0288 |
| Hanseatic | 0278 |
| Harman/Kardon | 0318 |
| Hitachi 0308, 0338, 0378 | |
| JVC | 0288, 0098, 0188 |
| Kenwood 0158 | |
| LG | 0278 |
| Linn | 0358 |
| Loewe | 0288, 0368 |
| Marantz 0218, 0288 | |
| Magnavox 0138 | |
| Micromedia 0288 | |
| Micromega | 0288 |
| Mitsubishi | 0148 |
| NAD | 0328 |
| Onkyo | 0078, 0138 |
| Optimus 0228 | |
| Panasonic | 0038 |
| Philips 0108, 0138, 0218, | |
| 0288, 0368 | |
| Pioneer | 0118, 0128, 0198, |
| 0228 | |
| Proscan | 0168 |
| RCA | 0168 |
| Rotel | 0008 |
| Rotel RDR-1080 | 0408 |
| Rotel RDV-1060 | 0418 |
| Rotel RDV-1080 | 0428 |
| Salora | 0278 |
| Samsung | 0088, 0338 |
| Sharp | 0048 |
| Sherwood | 0238 |
| Shinco 0258 | |
| Sony 0028, 0268, 0348 | |
| 0388 | |
| Sony PS2 | 0298 |
| Teac | 0278 |
| Technics | 0038 |
| Theta Digital | 0228 |
| Thomson | 0178 |
| Toshiba | 0058, 0138 |
| Universum | 0278 |
| Xbox | 0398 |
| Yamaha | 0018, 0138, 0148, |
| 0158, 0168, 0178, | |
| 0288 | |
| Zenith | 0138, 0248, 0278 |
| 3Dlab | 0288 |
Introduction
Congratulations and thank you for selecting the RR-1070 Touch Screen Universal Remote. The RR-1070 is a state-of-the-art electronic device that will replace up to ten remote controls. It is pre-programmed to control a wide range of audio/video devices. It can also learn the command signals of any other remote control. These capabilities, together with the ability to customize the keys on the touch screen, make it easy to control a complex audio/video system. You can almost think of it as a Personal Digital Assistant (PDA) for your Home Theatre system.
Key Features
- Replaces up to ten remote controls
- Pre-programmed for a wide range of audio/video devices
• Control code learning capability - Learn up to 240 commands
• Maximum 70 keys per device mode - EL back lit touch screen panel with intelligent light sensor for extended battery life
• 5 hard keys for direct access to power, channel and volume controls
• 3 touch screen shortcuts for 🎨MENU, 🎨HOME and 🎨MUTE - Set up by code entering, device brand name search and library code search
- 10 Programmable "Smart" keys, each with up to 32 steps
• Device and function key name editing - Custom page for personal set up and frequently used commands
- Remote-to-remote copy function
• V olume punch through control for TV and ROTEL AMP - Interactive help page
• Security password lock
• Real time clock - Battery level indicator
- Auto power off
- AC/DC power charger
- Rechargeable batteries
Optional Features
- Docking charger for quick battery charging
- PC Link which enables you to upload and download remote setting data to and from your Personal Computer. You can also perform remote customization such as different key shape or layout editing with the PC software.
Getting to Know the RR-1070
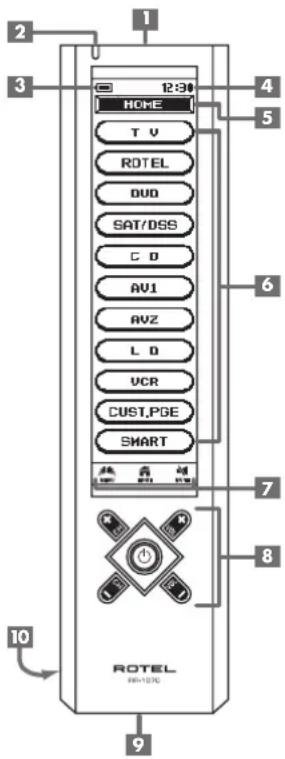
The RR-1070 has three types of control keys – soft keys, short cut keys and hard keys. Since most of the keys discussed in this manual are soft keys these will simply be called "keys". When short cut keys or hard keys are discussed they will always be specified.
Soft Keys - The largest part of the touch screen is used to display "soft" keys. The soft keys displayed change with the device you've selected to control. Soft keys can also be customized.
Short Cut Keys - These three keys allow quick access to the MENU page, HOME page and MUTE control. The MUTE key can be reprogrammed with new control commands. The MENU and HOME keys cannot.
Hard Keys - Are dedicated to controlling the power, channel selection and volume of the selected device. All hard keys can be reprogrammed with new control commands
1 Infrared lens. Point this at the equipment you want to operate.
2 G reen LED indicator. This flashes when the RR-1070 is active
3 Battery level meter shows the charge level of the batteries.
4 Current time display.
5 Current mode display shows the device the RR-1070 is controlling
6 Soft key display area
7 Short cut keys
8 Hard keys
9 Connection jack
10 Battery compartment (back of case)
NOTE: The RR-1070 is not fragile. However it should be handled like any piece of electronics. Do not drop the RR-1070. Take care to not damage the LCD touch screen.
Note: This equipment has been tested and found to comply with limits for a Class B digital device, pursuant to Part 15 of the FCC Rules. These limits are designed to provide reasonable protection against harmful interference in a residential installation. This equipment generates, uses and can radiate radio frequency energy and, if not installed and used in accordance with the instruction, may cause harmful interference to radio communications. However, this is no guarantee that interference will not occur in a particular installation. If this equipment does cause harmful interference to radio or television, which can be determined by turning — continued
Control Codes
Tangberg 1246
Teac 0286, 0386, 0436,
0576, 0846, 0886,
1406
Technics 0106, 0656, 1146
Techwood 1376
Telefunken 0556
Thomson 0556
Toshiba 0086, 0736
Vector Research 0116, 1186
Victor 0366
Wards 0226
Yamaha
0056, 0066, 0136,
0466, 0596, 0626,
1116
Control Codes
CD
| Acoustic Research 1346 | |
| Adc 0076 ,0116 | |
| Adcom 0256 ,0306 ,1066 | |
| Ads 0316 | |
| Aiwa 0346 ,0996 ,1086, 1106 | |
| Akai 0226 ,0536 ,0586 | |
| Alpine 1266 ,1356 | |
| Audio-Technica 0596 | |
| Bsr 0296 ,0706 ,0826 | |
| California Audio Lab 0106 | |
| Cambridge Audio 1416 | |
| Capetronic | 1256 |
| Carrera | 0296 |
| Carver 0336 ,1186 | |
| Casio | 0396 |
| Crown 0236 | |
| Curtis Mathes | 0396 |
| Denon | 0326, 0926, 0936 |
| Dual | 0556 |
| Dynamic Bass (h) 0606 | |
| Emerson | 0256, 0376, 1156 |
| Eroica | 1326 |
| Fisher | 0146, 0606, 0976, 1056 |
| Garrard | 0416 |
| Genexxa | 0356, 0376, 1156 |
| Goldstar | 1186, 1276, 1316, 1386 |
| H/K | 0156, 0226, 0516, 1046 |
| Hitachi | 0246, 0256, 0556, 0866 |
| Inkel | 0166, 0446 |
| JVC 0366 | |
| Kenwood | 0096, 0146, 0456, 0636, 0776, 0786, 0796, 0806, 0946 |
| Kyocera | 0076 |
| Luxman | 0126, 0476, 0726, 0756, 0766, 1036 |
| Magnavox | 0216, 0266, 0696, 1006 |
| Marantz | 0266, 0286, 0426, 0836, 1396 |
| Mcintosh | 0406, 1136 |
| Mcs | 0956, 1366 |
| Memorex | 0256, 0276, 0286, 0356, 0376, 1156 |
| MGA 0186 | |
| Mission | 0266 |
| Mitsubishi | 0186, 0496 |
| MTC | 1306 |
| NAD 0086, 0666, 0736, 0746 | |
| Nakamichi | 0176, 0486, 0566 |
| NEC | 0306, 0956, 1016 |
| Nikko | 0596, 1056 |
| Onkyo | 0206, 0506, 0546, 0856, 1206 |
| Optimus | 0276, 0296, 0606, 0646, 0896, 0906, 0916, 0946, 0986 |
| Panasonic | 0106, 0876, 1146, 1176 |
| Penny 0956 | |
| Philips | 0216, 0266 |
| Pioneer | 0356, 0986, 1096 |
| Proton 0266, 1236 | |
| Quasar | 0106 |
| RCA | 0256, 0966, 1166 |
| Realistic | 0256, 0276, 0286, 0376, 0606, 0896 |
| Revox 1226 | |
| Rotel | 0006, 0016, 0026, 0036, 0046, 0266 |
| Rotel RCD-02 | 1426 |
| Rotel RCC-1055 | 1436 |
| Rotel RCD-1070 | 1426 |
| Rotel RCD-1072 | 1426 |
| Rotel RCC-945 | 1436 |
| Rotel RCC-955 | 1436 |
| Rotel RCD-930 | 1426 |
| Rotel RCD-950 | 1426 |
| Rotel RCD-951 | 1426 |
| Rotel RCD-961 | 1426 |
| Rotel RCD-971 | 1426 |
| Rotel RCD-991 | 1426 |
| Saba Telecommander (e) | |
| 0556 | |
| SAE | 0266 |
| Samsung | 1336 |
| Sansui | 0266, 0676, 1026, 1076, 1156 |
| Sanyo 0196, 0606, 0686, 0816 | |
| Scott 0376, 1156 | |
| Sears | 0396 |
| Sharp | 0286, 0716, 0946, 1116, 1126 |
| Sherwood | 0166, 0286, 0446, 0526 |
| Siemens Garrard 1296 | |
| Signature | 0226 |
| Sontec | 1216 |
| Sony 0116, 0616, 0916 | |
| 1196 | |
| Staron | 1286 |
| STS | 0076 |
| Sylvania | 0266 |
| Symphonic | 0386 |
| Tandy | 0356 |
Battery Installation and Charging
Supplied with the RR-1070 are four AAA NiMH rechargeable batteries, a special charging connector and a power adapter. Before using the remote the batteries should be charged for at least 10 hours.
There is a battery charge symbol in the upper left corner of the touch screen. The □ indicates the batteries have a full charge. As the batteries discharge the less of the battery charge is filled. When the □ symbol appears the batteries should be recharged.
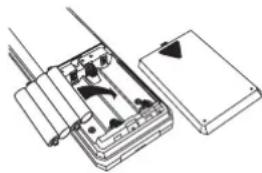
To install the batteries, open the battery cover, and insert the batteries with the terminals as shown in the bottom of the battery compartment. Then replace the cover.
natural_image
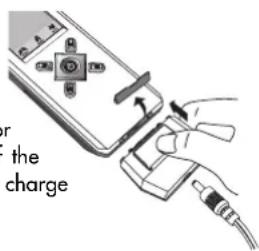
Technical line drawing of a mechanical assembly with no visible text or symbolsTo charge the batteries, plug the socket of the power cord into an AC wall outlet and plug the other end of the power cord to the switching adaptor. Then attach the DC jack of the switching adaptor to the connector and insert the connector to the bottom of the RR-1070. It can take up to 17 hours to fully charge the batteries.
Notes:
- Battery icon is not shown when the Menu page is displayed.
- The unit is designed for optimum operation with the original supplied batteries.
- DO NOT connect power charging adapter and power supply to the RR-1070 when batteries other than those originally supplied are installed.
- To avoid data lost, remote setup is prohibited when batteries are weak.
the equipment off and on, the user is encouraged to try to correct the interference by one or more of the following measures:
– Reorient or relocate the receiving antenna.
- Increase the separation between the equipment and receiver.
- Connect the equipment into an outlet on a circuit different from that to which the receiver is connected.
- Consult the dealer or an experienced radio/TV technician for help.
"Modifications not authorized by the manufacturer may void users authority to operate this device."
Getting Started
The RR-1070 has three type of keys - Hard Keys, Hot Keys and Soft Keys. Each type is described in a following section. Since most keys being referred to in the manual are soft keys, they will simply be referred to as "keys". Whenever a key is referred to its name or label is shown in small capital letters like MENU. Whenever a hot key or hard key is referred to it is noted. Screen names are shown in bold letters like Home.
After the batteries are installed the Home page is displayed. This page is used to select the audio/video component, or "device" the RR-1070 controls. Once a device is selected, it remains selected until another is selected on the Home page. You can return to the Home page at any time by touching the HOME key at the bottom of the touch screen.
From the HOME page
- Touch one of the keys on the Home page to select the device you want to control. The first control page for that device is displayed.
- Touch any control key on the touch screen that is labeled to send the corresponding infra-red command. Keys that are not labeled have not been programmed with IR commands.
• Each device mode has from three to six control key pages. Touch ▲PAGE▼ at bottom of screen to change command pages. - Or press the VOLUME +/-, CHANNEL +/- and POWER hard keys.
If the RR-1070 is inactive for about 60 seconds, it goes to power saving (sleep) mode and turns off the touch screen display. Touching the screen panel "wakes up" the remote and activates the display, returning to the last page selected.
Note: When in power saving (sleep) mode, the hard keys are still active.
Touch Screen Calibration
Follow these steps to calibrate the touch screen panel. If the touch screen panel does not respond correctly it may be necessary to recalibrate the screen.
- Touch the MENU key to go to the Main Menu page.
- Touch the REMOTE SETTING key
• Touch the CALIBRATION key - Follow the steps shown on the screen display
- Touch BACK to go back to the HOME page
Control Codes
RCA Digital Satellite System
0393, 0403
Realistic 0133
Regency/Eastern 0683
RFT 0923
Runco 0383
Saba 1033, 1113
Sabre 0963
Sagem 0963, 1183
Salora 1053
Samsung 0273
Schneider 0983, 1113
Scientific atlanta 0363, 0563, 0573 0583
Sedea 0863, 0873, 0883
Signal 0273
Sky 0893
Sl Marx 0273
Sony 0843, 1143
Spectavision 0233
Standard Components 0183
Starcom V 0253
Stargate 0273
Strong 1173
Sylvania/Texscan 0373, 0493
Tantec 0963, 1113
Teknika 0173
Teleservice 0053
Teleview 0273
Texscan 0183, 0373
TFC 0023
Thomson 0943, 0963
Tocom 0223, 0353, 0503,
0513, 0523
Toshiba 0383,0853
Tps 0873,1183
Tudi 0043
Universum 1023
Uniden 0763
Unika 0133
Universal 0133, 0153, 0203
0283
Ventana 0923
Videoway 0093
Viewstar 0213
Wisi 0963
Xsat 0883
Zenith 0243, 0383, 0483
Control Codes
SAT/DSS/CBL
| Abc 0253, 0373 | |
| Akiba 0963 | |
| Alba 0963 | |
| Allsat 0923 | |
| Alpha star 0773 | |
| Amstrad 1143 | |
| Ansonic 0953 | |
| Antronix | 0133 |
| Archer | 0133, 0283 |
| Astra | 1053 |
| Autovox 1113 | |
| Bbt | 0073 |
| Beko | 0963 |
| British Sky Broadcasting (BskyB) | |
| 1143 | |
| BT | 1033 |
| Cabletime | 0163 |
| Canal Digital | 0943 |
| Canal Satellite | 0943, 0953 |
| Canal + | 0863 |
| Canalt 0943 | |
| Carena | 0963 |
| Clyde Cablevision | 0193 |
| Colour voice | 0303, 0343 |
| Comtronics | 0213, 0273 |
| Conrad | 1063 |
| Cyrus 0923 | |
| DNT | 0923 |
| Dual | 1113 |
| D-box | 1073 |
| Eagle Comtronics | 0273 |
| Eastern | 0063 |
| Echostar 0783, 0943 | |
| Electricord | 0203 |
| Electus | 0263 |
| Ferguson | 1113 |
| Finlandia | 0963, 1053 |
| Finlux 0963 | |
| Flint | 0963 |
| GE | 0113, 0123 |
| Gec Cable System | 0193 |
| General Instrument | 0793, 0803 |
| Gold Box | 0943, 0953 |
| Gooding 1023 | |
| Goodmans | 0963 |
| Granada | 1053 |
| Grundig | 0973, 0983, 1023, 1143 |
| Hamlin | 0633, 0643, 0653, 0663, 0673 |
| Hirschmann | 1063 |
| Hisawa | 0963 |
| Hitachi | 0753, 0963 |
| Hts | 0783 |
| Hughes Network Systems | |
| 0813 | |
| ITT | 1053 |
| ITT/Nokia 1163 | |
| Jerrold | 0253, 0433, 0593, 0603, 0613, 0803 |
| 0823 | |
| JOK 1033 | |
| JVC 1023 | |
| Kathrein | 0923 |
| Luxor 1053, 1063, 1073 | |
| Magnavox | 0003, 0413, 0423, 0763 |
| Mamm | 0293 |
| Manhattan | 0963 |
| Marantz 0923 | |
| Maspro | 0973, 1113 |
| Matsui | 1023 |
| MediaSat | 0943 |
| Memorex | 0003, 0383, 0763 |
| Minerva | 1023 |
| Mitsubishi | 1053 |
| Mivar 0953 | |
| Movie time | 0143, 0203 |
| Myryad | 0923 |
| Nokia 0963, 1053, 1063, | |
| 1073, 1083 | |
| Northcoast | 0013 |
| NSC | 0143 |
| OAK | 0103 |
| OAK sigma | 0533, 0543 |
| Ondigital | 0933, 1013, 1093 |
| Pace | 0903, 0963, 1093, 1103, 1113, 1123, 1133, 1143, 1153 |
| Palladium | 1023 |
| Panasat | 1173 |
| Panasonic | 0443, 0453, 0463 |
| 0473 1143 | |
| Panda 0963 | |
| Paragon 0383 | |
| Philips | 0003, 0033, 0213, 0303, 0313, 0323, 0333, 0343, 0413, 0423, 0763, 0913, 0923, 0933, 0943, 0953, 0963, 0973, 0983, 0993, 1003, 1013, 1023, 1033, 1043 |
| Pioneer | 0003, 0083, 0553, 0693, 0943 |
| Premiere | 0943, 0953, 1073 |
| Primestar | 0803, 0823 |
| Pulsar 0383 | |
| Promax | 0963 |
| Radiola 0923 | |
| RCA 0833 | |
Hot Keys
There are 3 "hot" keys below the LCD display.
- Home the Main page where you select the device you want to control, e.g. TV, VCR, DVD, etc.
- MENU – Accesses the main Setup menu for configuration and set up.
- MUTE - A mute control that is preprogrammed for most components. This key can also be reprogrammed by learning a new control code from another remote.
Hard Keys
There are 5 hard keys on the RR-1070 for the most commonly accessed functions.
• Power ON/OFF
• CH+ Program up or channel up
- CH- Program down or channel down
• VOL+ Volume up
- VOL- Volume down
These controls have IR control codes preprogrammed for most components. These keys can also be reprogrammed by learning new control codes from another remote.
Key Tone
When you touch any key, there is a short beep sound. User can control this function from main menu setting. (For details, please refer to Remote Setting section in this manual.)
Back Light
The RR-1070 has separate EL back lights for the LCD screen and Hard Keys. The back lights will turn on separately as needed. The factory default setting for the back light to remain on is 5 seconds. This can be increased to 10 or 15 seconds. See the Remote Setting section.
IR Codes Library
To setup a code, touch "MENU" once then select a device to setup, choose a setup method. User can setup by learning key command from an original remote control, entering a code number, browsing through brand name list, or searching through the whole library. Refer to the Code List at the end of this manual for the IR code numbers for various devices.
Configuration and Set Up
For most users programming the RR-1070 involves starting with one of the many preprogramming IR code sets that are available for each component. Then you can add to the preprogramming codes and fine tune the configuration as needed.
There are three ways to select one of the preprogramming control code sets. In order of preference they are:
- Brand Name Search – search for your particular component in the brand name database.
- IR Code Selection – enter an IR control code from the supplied list of components.
- Auto Search – where you are guided through a series of "trial and error" steps to find the correct control codes for your device.
NOTES:
When a new control code set is selected for any device, any learned commands and customized key names are lost and replaced with the preprogramming commands and labels. The "ROTEL" device has preprogrammed IR code sets for Rotel Tuner/Amplifier models. The IR code set for the Rotel Integrated Amplifier RA-1060 is the default. The "DVD" device has preprogrammed IR code sets for Rotel DVD Player models. The IR code set for the Rotel DVD Player RDV-1060 is the default. The "CD" device has preprogrammed IR code sets for Rotel CD Player models. The IR code set for the Rotel CD Player RCD-1072 is the default.
Brand Name
Select one of the preprogramming control code sets by selecting a brand name.
- T urn on the device you want the RR-1070 to control before you start this setup procedure.
- Touch the Monday to go to the Main Menu page.
- Touch SETUP to go to the Setup page.
- Touch BRAND NAME key to go to the Brand Name device selection page.
- Touch one of the device keys, e.g. TV, to select the device you want the RR-1070 to control.
- A brand name list in alphabetical order is displayed. Touch the ▲ or ▼ keys to browse the list, or touch one of the character keys on the lower part of the page to access a list of brand names that start with that letter. Touch the ◀ or keys to see more character keys if necessary.
- Touch a brand name from the list, it will be highlighted briefly. The next page shows the brand name selected and the number of a control code set. Touch TEST KEY to go to the opening page for the device selected.
Control Codes
VCR
| Akai 0262 | |
| Audio Dynamics 0202 | |
| Blaupunkt 0412 | |
| Candle 0342 | |
| Citizen 0342 | |
| Curtis Mathes | 0342 |
| DBX | 0202 |
| Dynatech | 0342, 0472 |
| Emerson | 0072, 0122, 0132,0142, 0152, 0162,0172, 0182, 0192,0212, 0342 |
| Goldstar | 0082 |
| Goodmans | 0402 |
| Hitachi | 0102, 0562, 0572,0582, 0592, 0602, |
| JVC | 0002, 0202, 0472,0522, 0532, 0542,0552 |
| Kenwood | 0202, 0542 |
| LXI | 0022, 0342 |
| Magnavox | 0342, 0482, 04920502, 0512 |
| Marantz | 0202, 0402 |
| Matsushita | 0342 |
| MEI | 0222 |
| Memorex | 0232, 0242, 0472,0512 |
| Minolta | 0592, 0602 |
| Mitsubishi | 0452, 0462, 0542 |
| Montgomery | 0472 |
| Motorola | 0472 |
| NAD 0442 | |
| NEC | 0202, 0292, 0422,0432, 0542 |
| Olympus | 0412 |
| Optimus | 0442, 0472 |
| Optionica | 0402, 0472 |
| Orion | 0212 |
| Panasonic | 0012, 0052, 0092,0222, 0342, 0372,0382, 0392, 0412, |
| Penny | 0202, 0432, 0602, |
| Pentax | 0592, 0602 |
| Philips | 0282, 0342, 0402,0492 |
| Pioneer | 0442, 0542 |
| Pulsar | 0512 |
| Quartz | 0272 |
| Quasar 0382, 0392 | |
| Radio Shack | 0472 |
| RCA | 0112, 0382, 0392,0482, 0592, 0602 |
| Realistic | 0402, 0472 |
| Ricoh | 0352, 0362 |
| Saisho | 0212, 0582 |
| Samsung | 0212, 0312 |
| Sanky | 0472, 0512 |
| Sansui | 0292, 0542 |
| Sanyo | 0242 |
| SBR | 0282 |
| Scott | 0342 |
| Sears | 0302, 0342, 05920602 |
| Sharp | 0402, 0472 |
| Sony | 0032, 0332, 0352,0362 |
| STS | 0602 |
| Sunpak | 0352 |
| Sylvania | 0492, 0502 |
| Teknika | 0322 |
| Telefunken | 0252 |
| Tmk | 0212 |
| Toshiba | 0062, 0302, 0342 |
| Vector Research | 0202, 0432 |
| Victor | 0542, 0552 |
| Video Concepts | 0202, 0432 |
| Wards | 0322, 0402, 0472,0482, 0602 |
| Yamaha | 0202 |
| Zenith | 0042, 0362, 0512 |
Control Codes
TV
| Akai 0331 | |
| Alba 0431 | |
| Amstrad 0481 | |
| Anam 0251 | |
| AOC 0361 | |
| Bauer 0441 | |
| Candle 0351, 0361 | |
| Centurion 0411 | |
| Citizen 0351, 0361 | |
| Colortyme | 0361 |
| Concerto | 0351 |
| Craig | 0251 |
| Curtis Mathes | 0161, 0361 |
| Daewoo | 0291, 0301, 0331 |
| Decca 0271 | |
| Dixi | 0331 |
| Elta | 0331 |
| Emerson | 0021, 0061, 0071, 0081, 0091, 0101, 0111 |
| Envision | 0361 |
| Etron | 0331 |
| Fisher 0171 | |
| Formenti | 0441 |
| GE | 0131, 0161, 0201 |
| Gec | 0271 |
| Gemini 0391 | |
| Genexxa | 0431 |
| Goldstar 0031, 0121, 0351, 0411 | |
| Goodmans/Tashiko 0011, 0271 | |
| Hitachi | 0181, 0351 |
| Jensen | 0311 |
| JVC | 0001, 0261, 0281 |
| Kenwood | 0361 |
| Logik | 0381 |
| Luxman | 0351 |
| Magnasonic | 0031 |
| Magnavox | 0341, 0391, 0401, 0411, 0421, 0581, 0591, 0601 |
| Marantz 0221, 0351, 0361 | |
| Matsui | 0271, 0331 |
| Memorex 0331, 0351, 0381, 0571 | |
| MGA | 0361, 0561, 0571 |
| Mitsubishi | 0221, 0321, 0561, 0571 |
| Montgomery | 0351 |
| MTC 0351, 0361 | |
| NAD 0551 | |
| NEC | 0241, 0351, 0361 |
| Nikkai | 0271, 0431 |
| Nikko 0031 | |
| Optimus 0551 | |
| Optonica | 0541 |
| Osaki | 0271 |
| Panasonic | 0191, 0251 |
| Penny | 0161, 0351, 0361, 0521, 0531 |
| Philco 0361, 0581, 0591, 0601 | |
| Philips | 0401 |
| Pioneer | 0511, 0551 |
| Proton | 0351, 0501 |
| Pulser | 0351 |
| Quasar 0251 | |
| Radio Shack | 0541 |
| RCA | 0051, 0141, 0151, 0181, 0411, 0491, 0531 |
| Realistic | 0541 |
| Saisho | 0331 |
| Sampo | 0361 |
| Samsung | 0331, 0341, 0351, 0361 |
| Sanyo | 0171, 0231, 0271 |
| Sears | 0161, 0171, 0351, 0481, 0521 |
| Sharp 0461, 0471, 0541, 0611, 0621 | |
| Signature 0351, 0381 | |
| Simpson 0581 | |
| Sony | 0371, 0451, 0631 |
| Squareview | 0481 |
| Surpa 0351 | |
| Sylvania | 0361, 0441, 0581, 0591, 0601 |
| Symphonic | 0481 |
| Tandy 0271, 0431 | |
| Tatung 0271 | |
| Techwood 0351 | |
| Teknika | 0351, 0381, 0571 |
| Teletech | 0331 |
| Tera | 0501 |
| Tmk | 0351 |
| Toshiba | 0351, 0521 |
| Vector Research | 0361 |
| Vidikron 0211 | |
| Wards | 0361, 0381, 0451, 0541, 0581, 0591, 0601 |
| Yamaha | 0361 |
| Zenith | 0011, 0041, 0381 |
- Test this control code set by touching one of the active keys on the LCD screen or press one of the Hard Keys.
- After testing one key the previous page is displayed. If the test key you pressed worked as it should press OK to select that code set. A "New code setup is completed." message is briefly displayed.
- If the test key did not work as intended touch ⊕ on the Brand Name page to select the next control code set to test. (Touch ⏻ key to select a previous code set.) Repeat the test key procedure. Repeat this step if necessary until you find a control code set that works. Then press OK to select that code set. A "New code setup is completed." message is briefly displayed.
- Touch BACK at any time to stop the process and return to the previous page.
Note: If you have tried all the available codes for the brand name you will see the following messages: "No more code for this brand! End of code of selected brand! Search through all code library?" Touch YES to start the Auto Search process. Refer to Auto Search Setup section in this manual. Touch NO to return to the previous page.
Enter Code
Select a preprogramming control code set by entering the control code set number. Refer to the enclosed code list to see if the device you wanted to control is listed.
- T urn on the device you want the RR-1070 to control before you start this setup procedure.
- Touch the Monday to go to the Main Menu page.
- Touch SETUP to go to the Setup page.
- Touch ENTER CODE to go to the Enter Code device selection page.
- Touch one of the device keys, e.g. TV, to select the kind of device you want the RR-1070 to control.
- Touch the numeric keys to enter a 4 digit code number in the blank box at the top of the page. If you enter an incorrect number touch DELETE to delete the previous digit.
- Touch OK to confirm the input. The Enter Code test key page is displayed.
- Touch TEST KEY on the LCD screen or any of the hard keys to test the corresponding function.
- Test this control code set by touching one of the active keys on the LCD screen or press one of the hard keys.
- After testing one key the previous page is displayed. If the test key you pressed worked as it should press the OK key to select that code set. A "New code setup is completed." message is briefly displayed.
- If the test key did not work as intended repeat the preceding steps with a new code number. Repeat the test key procedure. Repeat this step if necessary until you find a control code set that works. Then press OK to select that code set. A "New code setup is completed." message is briefly displayed.
- Touch BACK at any time to stop the process and return to the previous page.
Auto Search
Select a preprogramming code by searching through the library.
- T urn on the device you want the RR-1070 to control before starting this setup procedure.
- Touch the Home to go to the Main Menu page.
- Touch SETUP to go to the Setup page.
- Touch AUTO SEARCH to go to the Auto Search device selection page.
- Touch one of the device keys, (e.g. TV), to select the kind of device you want the RR-1070 to control. The Auto Search page is shown with the first control code set for that device selected.
- Point the RR-1070 at the device and touch ⭕ once. If the device is turned off touch OK to select that control code set. A "New code setup is completed." message is briefly displayed.
- If the device is not turned off keep touching ⭕ slowly, patiently and repeatedly, until your device is switched off. Then, touch OK to lock the code. A "New code setup is completed." message is displayed.
- You can also touch TEST KEY on the Auto Search page to test the other active preprogramming keys for that device.
- Touch to go back and test a previous control code set.
- Touch BACK at any time to stop the process and return to the previous page.
NOTE: Some of control code sets do not have Power command. Try touching TEST KEY on the Auto Search page to test another active key. Or one of the VOLUME +/- or CHANNEL +/- hard keys can be used to test a control code set.
Learning New Commands
Even if you start with a preprogramming control code set you will probably want to use the learning capabilities of the RR-1070 add control codes or modify existing ones.
NOTE: When a key is programmed with a new control code the previous code is overwritten. The original preprogramming code can be restored. See the Clear Learning section of this manual. The original code can also be restored by selecting the original preprogramming control code set. However this will also erase all other learned commands and customized labels.
To Program New Commands
- Touch the menu to go to the Main Menu page.
- Touch SETUP to go to the Setup page
- Touch LEARNING to go to the Learning Device selection page.
- Touch one of the device keys, (e.g. TV), to select the kind of device you want to program. The first Learning page for that device is shown. Any programmed keys are shown. Unprogrammed keys are blank.
- Each device will have from three to six pages. Touch ▲ or ▼ to access other pages.
- Touch the key on the RR-1070 you want to reprogram. The Learning page appears.
Specifications
Operation System:
Integrated preprogrammed & learning infrared remote control system
Compatibility:
Preprogrammed with code library of Televisions (TVs), Video Cassette Recorders (VCRs), Satellite/Digital Satellite Receivers (SAT/DSS), Cable Converters (CTVs), Laser Disc Players (LDs), Compact Disc Players (CDs), Digital Video Disc Players (DVDs) and Rotel Tuner/Amplifier (ROTEL)
Memory Capacity:
240 learned commands
Memory Retention After Battery Removal:
Non-volatile and permanent memory
Display Panel:
Monochrome 320 x 80 pixel touch screen LCD
EL Backlighting:
Blue-Green EL backlighting with light sensor
Operating Distance:
8 Metres (25 feet)
Power Requirement:
4 x AAA size NiMH rechargeable batteries
Charging Time:
About 17 hours
Dimensions:
220 × 51 × 25 mm
Weight :
165g (without batteries installed), 215g (with batteries installed)
Included Accessories:
1 Power Cord
1 AC/DC switching adaptor
(Input: 100-240V \~50/60Hz. Output: 9V, 0.667A)
1 Connector (for charging purpose)
4 AAA NiMH size rechargeable batteries
Optional Accessories:
Docking Charger — Quick charger
PC Link software for MS Windows 98, 2000
USB Cable
For improvement purposes, specifications and functions are subjected to change without priority notice.
Q: What is Cloning?
A: The Cloning feature enables you to transfer data from one RR-1070 to another. This can only be done between two RR-1070 units. See the Cloning the RR-1070 Commands section.
Q: What is PC Link?
A: The PC Link feature enables you to upload and download remote setting data to and from your Personal Computer. You can also perform remote customization such as different key shape or layout editing with the PC software. Using the PC Link feature requires the RR-1070 Docking Station and the corresponding computer software installed in your PC. For details, please refer to the owner's manual of the RR-1070 Docking Station.
- Point the original remote at the front of the RR-1070. Press and hold the key on the original remote until the key naming page shows on the RR-1070. This normally takes several seconds.
- Edit the key name or just touch OK to accept the existing name. See the Changing Key Names section.
- Touch another key to continue learning for the rest of the commands you want to program.
- If the RR-1070 does not receive a signal from the original remote within 30 seconds the "Learning is failed! Try agian." message appears and you are returned to the Device Learning page.
- Touch the ⚠️MENU or ⏻ HOME hot keys to cancel the key reprogramming and return to the corresponding page.
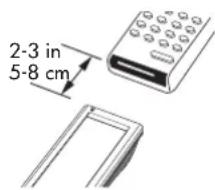
Note: The optimum receiving distance for remote learning is 2-3 inches (5-8cm). If you have problems during the learning process try adjusting the distance between the two remotes and try again.
Dual Signal Learning
Some remote controls send one signal for one phase of a process and a different signal for the other phase. The control codes or power on/off and muting on/off are sometimes set up this way. If you program a control code that works intermittently your original remote may have dual signals. The following steps show how to set up the RR-1070 for dual signals.
- Touch the Hotkey to go to the Main Menu page.
- Touch SETUP to go to the Setup page.
- Touch LEARNING to go to the Learning Device selection page.
- Touch one of the device keys,. (e.g. TV), to select the kind of device you want to program.
- Touch or press the key on the RR-1070 you want to reprogram. The Learning page appears.
- Point the original remote at the front of the RR-1070. Press and hold the key on the original remote until the key naming page shows on the RR-1070. This normally takes several seconds.
- Edit the key name or just touch OK to accept the existing name.
- Touch or press the same key on the RR-1070. The Learning page appears.
- Again point the original remote at the front of the RR-1070. Press and hold the same key on the original remote until the key naming page shows on the RR-1070.
- Edit the key name or just touch OK to accept the existing name. You are returned to the Device Learning page.
- Touch the ⚠️MENU or ⚠️HOME hot keys to cancel the key reprogramming and return to the corresponding page.
NOTE: You can check the amount of memory remaining for learning additional commands from the STATUS menu. See the Remote Setting section in this manual.
Advanced Set Up
Editing Key Labels
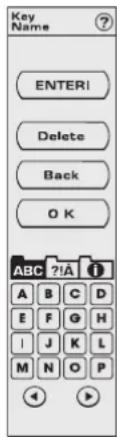
The letter and symbols shown on most of the soft keys can be changed. During the editing process you will go to the Device Name or Key Name editing pages.
In this page the top window is the editing box.
- Touch DELETE to remove the previous character(s).
- Touch BACK to cancel the process and return to the previous page.
- Touch OK to accept the label shown in the editing box.
At the bottom of the page is the character selection area. There are three character sets as indicated by the ABC ?!A 1. Touch the folder symbol to change to another character set.
All three character sets have multiple pages. Touch or to go to other pages.
ABC has all the normal letter and number characters and the SPACE character.
?!À has punctuation, symbols and special characters.
has symbols related to a full range of A/V system control functions.
Touch MENU or HOME hot key to cancel the process and return to the corresponding pages.
NOTE: The key must have been programmed with a control code before the label can be edited. Preprogrammed control codes are all labeled. As part of the control code learning process you can enter a label or leave the key blank and then add a label later.
To Change a Control Key or Device Key Name
- Touch the 🎯MENU hot key to go to the Main Menu.
- Touch EDIT to go to the Edit Menu.
- Touch KEY NAME or DEVICE NAME to select the type of key you want to change.
- If you selected DEVICE NAME you go to the Device Name page.
Touch the device key you want to change. You will go to the Device Name editing page. - Use the keys as previously described to edit the label. Touch OK to accept the label and return to the Device Name page.
- Touch another Device Name label to edit it or touch MENU HOME to stop the editing process and return to the corresponding page.
Troubleshooting and Common Questions
Q: My RR-1070 is not working!
A: Be sure the supplied batteries are installed with the correct polarity and that they are fully charged. See the Battery Installation and Charging section of this manual.
A: If your RR-1070 should "lock up" or "freeze" it may be necessary to reset it. You can reset the RR-1070 by pressing the RESET key inside the battery compartment. See the illustration.
Q: I have installed a code for my device from the provided code list but the remote is not working or not working properly with my device.
A: The selected code is not matched with your device. Try another code if it is available on the code list. Or use the Auto Search feature to locate another code. Or you can use the original remote to reprogram the RR-1070 using the Learning Function. See the Configuration and Set Up and Learning New Commands sections.
Q: I have used my original remote to reprogram the RR-1070, but some commands work inconsistently.
A : Your original remote may have dual signal commands. Try re-programming the RR-1070 for dual signal commands as described in the Dual Signal Learning section.
Q: I cannot move a key to another location.
A: The two keys you want to exchange positions must be the same type. You cannot exchange the position of one key with a key of a different type. See the Moving a Key section.
Q: The back lighting is not working.
A: You must select either By Sensor or Always On in the Remote Setting menu. See the LCD Display and Backlighting Controls section.
Q: How can I prevent someone from changing the settings of my RR-1070?
A: Activate the "Password" function to lock your remote. See the Password section.
Q: I forgot my password.
A: Use the factory preloaded universal password, "AAAAA".
Q: How can I restore the factory preloaded setting of the RR-1070?
A: Carefully follow the instructions in the Restore Factory Settings section.
Q: What is Smart Key?
A: The Smart Key feature of the RR-1070 enables you to program a series of commands, with or without necessary time delays. When you touch a programmed Smart Key the RR-1070 sends a chain of IR signals automatically. See the Smart Key programing section.
Copy One Device
To copy all the user settings for a single device:
- On the sender and receiver units touch MENU. The Main Menu page appears.
- Touch CLONE to go to the Clone page.
- On the receiver unit touch RECEIVE. A Data Loss confirmation page appears. Touch YES to continue. Touch NO to cancel the process and return to the previous page.
- On the sender unit touch COPY ONE DEVICE. The Device Selection page appears.
- Touch a device to select it. A Sending Data message appears.
Copy All Devices
To copy all the user settings for all devices:
- On the sender and receiver units touch MENU. The Main Menu page appears.
- Touch CLONE to go to the Clone page.
- On the receiver unit touch RECEIVE. A Data Loss confirmation page appears. Touch YES to continue. Touch NO to cancel the process and return to the previous page.
- On the sender unit touch COPY ALL DEVICES. A Sending Data message appears.
- All user settings except Clock and Password will be sent out via IR linking.
PC Link
The PC link enables you to connect the RR-1070 to a PC via a USB port to upload and download commands. The PC-to-remote data upload/download function requires the RR-1070 docking package which is available from the Rotel distributor for an additional cost. Software and instructions are provided with the docking station. The PC Link function cannot be done without the docking station.
Interactive Help Screens
On most of the pages you access from the Main Menu page, there is a help icon ☐ on the top right corner of the page. Touch it at any time for helpful information.
- If you selected KEY NAME you go to the Key Name device selection page. Touch one of the devices. You will go to the first page for that device.
- If necessary use 🔒 to go to other pages for that device. Touch the key you want to change. You will go to the Key Name editing page.
- Use the keys as previously described to edit the label. Touch OK to accept the label and return to the previous Key Name page.
- Touch another key label to edit it or press HOME or MENU to stop the editing process and return to the corresponding page.
Notes About Label Editing
The number of characters that can be in a label depends on the size of the key. The Device Name and other large keys can have up to seven characters. Smaller keys may allow as few as two characters.
The -s at soft key, once it is programmed, will always show - and at the ends. The bar in the middle can contain a label of four characters
The keys that make up the five key array can all be programmed with new codes. Once the four outside keys are programmed they will always show ◀, ▶, ▲ and ▼ These labels cannot be changed. Once the center key is programmed it can be labeled with up to two characters or symbols.
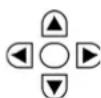
Spaces count as characters.
Moving a Key
You can move a key to a different position or even a different page for the device. For example there may be a preprogramming command on the third page of a device set that you may want on the first. In many cases you can exchange keys positions. There are a few exceptions:
- The keys must be the same type. Keys of the same size are usually compatible.
- The keys in a or in a typically cannot be moved.
- The keys can only be moved with the same device.
To exchange the position of two keys:
- Touch the MENU hot key to go to the Main Menu.
- Touch EDIT key to go to the Edit Menu.
- Touch MOVE KEY to go to the first Move Key device selection page.
- Touch a Device Key. You will go to the first page for that device.
- If necessary use and to go to other pages for that device.
- Touch the key you want to move. The first Move Key confirmation page appears with the name of the key to be moved. Touch OK to accept this key.
— continued
14
RR-1070
- Touch the key you want the first key to exchange positions with. If necessary use and to go to other pages for that device. Remember the keys must be the same type and size.
- The second Move Key confirmation page appears showing the two keys chosen to exchange positions.
- Touch OK to accept the move. A confirmation page appears if the move is completed.
- If the move is not completed an error message explains why. You are returned to the previous Move Key selection page.
- Touch CANCEL at any time to stop the process and return to the previous page.
- Touch the ⚠️MENU or ⏻ HOME hot keys at any time to stop the process and return to the corresponding page.
Rearranging Home Screen Device List
You can change the order of the device keys on the Home page by exchanging their positions.
- Touch the ⚠️MENU hot key to go to the Main Menu.
- Touch EDIT to go to the Edit Menu.
- Touch MOVE DEVICE to go to the first Move Device selection page.
- Touch the device key you want to move. The first Move Device confirmation page appears with the name of the key to be moved. Touch OK to accept this key.
- Touch the device key you want the first key to exchange positions with. The second Move Key confirmation page appears showing the two keys chosen to exchange positions.
- Touch OK to accept the move. A confirmation page appears.
- Touch CANCEL at any time to stop the process and return to the previous page.
- Touch the ⚠️MENU or ⚡️HOME hot keys at any time to stop the process and return to the corresponding page.
Deleting a Key
You can delete the label and command codes for any key.
- Touch the 📁MENU hot key to go to the Main Menu.
- Touch EDIT to go to the Edit Menu.
- Touch DELETE KEY. The Delete Key device selection page appears. Touch one of the devices. The first page for that device appears.
- If necessary use and to go to other pages for that device.
- Touch the key you want to delete. The Delete Key confirmation page appears showing the selected key.
- Touch YES to delete the key. A confirmation message appears. Touch NO to cancel the process and return to the previous page.
- Touch the ⚡️MENU or ⚡️HOME hot keys at any time to stop the process and return to the corresponding page.
English
23
NOTE: New key and delay commands can only be added at the end of the command sequence. Add the new command at the end of the sequence then select it and touch MOVE UP as needed to move it up in the sequence.
- Touch TEST to see if the command sequence works properly.
- When the test produces the results you want touch OK. The Smart Key label editing page appears. The current name for the Smart Key in the editing box.
- Touch OK to accept the existing name. Or use the keys as described in the Advanced Set Up section to edit the Smart Key label. Touch OK.
Deleting a Smart Key
- From the Smart Key page touch DELETE SMART. The Delete Smart page is displayed.
- Touch the Smart Key you want to delete. A Confirm Deletion page is displayed.
- Touch YES to delete the Smart Key. Or touch NO to cancel the process and return to the previous page.
Renaming a Smart Key
- From the Smart Key page touch RENAME SMART. The Rename Smart page is displayed.
- Touch the Smart Key you want to rename. The Rename Smart page is displayed.
- Use the keys as described in the Advanced Set Up section to edit the Smart Key label. Touch OK.
- Touch BACK at any time to cancel the process and return to the previous page.
Cloning the RR-1070 Commands
Once you have an RR-1070 programmed as you want, you can copy all of the commands for a single device or for all the devices to another RR-1070.
NOTE: The process can only be done with two RR-1070 remotes. Other remotes are not compatibly programmed. You have to identify which unit is the sender and which one is the receiver. The sender is the unit which contains data that will be transferred to the other RR-1070. The receiver is the unit which will copy the signals from the sender.
When you copy the commands for a single device or for all devices from one RR-1070 to another, any special set up or learned commands in the receiver unit are overwritten.
Keep both sender and receiver units on a flat surface, face to face at a distance of 2-3 inches (5-8cm) during the cloning process. Do not move the units while commands are being copied. The flashing light on the upper left corner of the case indicates data transfer activity.

— continued
Before you program a Smart Key be sure that all of the control commands you want to use are preprogramming or have been learned by the RR-1070. The Smart Key feature simply allows you to record a sequence of individual RR-1070 commands and play them back when you touch the Smart Key.
Touch the 🖱️ MENU hot key to display the Main Menu. Touch SMART. The Smart Key editing page is displayed. From this page you can add, delete, edit or rename a Smart Key.
Program a New Smart Key Command
- From the Smart Key page touch ADD NEW SMART. The Add New Smart page is displayed.
- T ouch an empty Smart Key.
- Touch ADD KEY. The Device Selection page is displayed.
- Touch a device to select it. The first control key page for that device is displayed.
- Touch the control key you want to add to the Smart Key. If necessary touch ▲ or ▼ to go to other control key pages for that device. The Smart Key editing page is again displayed. The device and label for the key are added to the command list.
- To add a time delay after the most recently entered command touch ADD DELAY one or more times. The maximum delay is 20 seconds.
- Continue adding commands and delays to the command list. When all the commands and delays are entered touch TEST to see if the command sequence works properly.
- Edit the command list if necessary then touch TEST again. When the test produces the results you want touch OK. The Smart Key label editing page appears.
- Use the keys as described in the Advanced Set Up section to edit the Smart Key label. Touch OK.
Editing a Smart Key Command
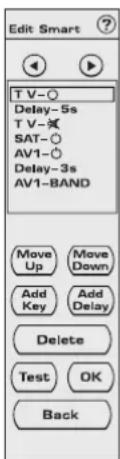
You can edit a Smart Key command sequence either as you create it or later. The Add New Smart and Edit Smart pages are essentially the same. The top box shows the command keys, if any, entered in the Smart Key sequence. If there are more than eight steps in the sequence touch or to see them.
- From the Smart Key page touch EDIT SMART. The Edit Smart page is displayed.
- Touch the Smart Key you want to edit. The Edit Smart page is displayed.
- Touch any command key in the top editing box to select it. The selected command is highlighted with a box around it.
- Touch MOVE UP or MOVE DOWN to reposition the command in the sequence.
- Touch DELETE to remove the command from the list.
- Touch ADD KEY or ADD DELAY to add new commands to the sequence.
Preference Settings
Volume/Mute Control Punch Through
The Punch Through feature lets you control the volume and muting of the TV or ROTEL AMP devices even when the RR-1070 is in another device mode. For example, you can make the RR-1070 volume and mute controls affect the TV when the DVD device mode is selected.
- Touch the ⚠️MENU hot key to go to the Main Menu.
- Touch PREFERENCES to go to the Preferences Menu.
- Touch PUNCH THROUGH. The first Punch Through page appears. Touch TV or ROTEL to select the source device. The second Punch Through page appears.
- Touch a device key to select the target device. A confirmation message appears.
- Touch BACK to stop the process and return to the previous page.
- Touch the ⚠️MENU or ⏱HOME hot keys at any time to stop the process and return to the corresponding page.
Custom Page Set Up
You can copy command keys from any device and put together Custom Pages of keys. To access the Custom Page touch CUST.PGE on the Home page.
- Touch the ⚠️MENU hot key to go to the Main Menu.
- Touch PREFERENCES to go to the Preferences Menu.
- Touch CUSTOM PAGE. The first Custom Page page appears. Touch the key you want copy a command key to. If necessary touch ▲ or ▼ to go to other Custom Page pages. The Custom Page device selection page appears.
- Touch a Device key. You will go to the first page for that device.
- If necessary use to go to other pages for that device.
- Touch the key you want to copy to the Custom Page. A confirmation page appears. Touch YES to copy the key to the location you selected on the Custom Page. Touch NO to stop the process and return to the previous page.
- Touch another Custom Page key to copy a key to.
- Or touch the ⚡MENU or ⚡HOME hot key to stop the process and return to the corresponding page.
Note:
To view the device that a key on the Custom Page comes from, touch the header bar on the Custom Page page once to change between displaying the key name and the device name.
The labels for keys on the Custom Page cannot be edited. However if the original key label is deleted or renamed, it is also changed on the
Custom Page.
Remote Setting
Clock Setting
To reset the time displayed in the upper right corner of the touch screen:
- Touch the ⚠️MENU hot key to go to the Main Menu.
- Touch REMOTE SETTING to go to the Remote Setting page.
- Touch CLOCK. The time/day setting page appears.
- To change the time setting touch SET below the Current Time box. The Set Clock page appears.
- Touch the numeric keys to enter a new time. The 24 hour format is used. You must touch four numeric keys to complete the time resetting. For example, to enter 7:15 AM you would touch the 0, 7, 1 and 5 keys. To enter 4:45 PM you would touch 1, 6, 4 and 5.
- Touch OK to accept the time displayed. Or touch BACK to cancel the process and return to the previous page.
- To change the day setting touch SET below the Day of Week box. The Set Clock page appears.
- T ouch or to select day of week.
- Touch OK to accept the day displayed. Or touch BACK to cancel the process and return to the previous page.
Beep Sound
The RR-1070 can emit a short beep tone when a key is touched or pressed. This feature can be turned on or off.
- Touch the 📁MENU hot key to go to the Main Menu.
- Touch REMOTE SETTING to go to the Remote Setting menu.
- Touch BEEP SOUND to go to the Beep Sound menu.
- T ouch ENABLE to turn on beep sound.
- Touch DISABLE to turn off beep sound.
• After making a selection you return to the Remote Setting menu.
LCD Display and Backlighting Controls
You can control when the back lighting is turned on and how long it remains lit. The LCD touch screen and the five hard keys have separate back light systems that operate independently. The control settings for both are the same.
- Touch the ⚠️MENU hot key to go to the Main Menu.
- Touch REMOTE SETTING to go to the Remote Setting menu.
- Touch LCD to go to the LCD menu.
- Light Auto Off – Touch 5 Sec, 10 Sec or 15 Sec to select the amount of time the back light remains on. A confirmation message is displayed. Longer time settings can reduce the amount of time the batteries remain charged.
- Backlit Control – Sets when the back light is turned on. If you touch BY SENSOR the back light comes on only in low light conditions. Touch ALWAYS ON and the back lighting turns on whenever a key is used. Touch ALWAYS OFF to turn off the back lighting. A confirmation message is displayed.
-
Touch BACK to return to the Remote Setting page.
-
If you touch ALL DEVICE a "Restore all Deleted keys?" message is displayed.
- Touch YES to confirm. A "Restore is completed!" message is displayed. Touch NO to stop the process and return to the previous page.
- Or touch the ⚠️MENU or ⚡HOME hot key to stop the process and return to the corresponding page.
All to Default
Touch this key to restore all the original preprogramming settings. If you use this process all user modified settings are erased! All relabeled, moved or reprogrammed keys are restored to their original settings. All learned IR control codes are erased. Only the clock and password settings remain.
- From the Reset Default menu touch ALL TO DEFAULT. A "Restore to Factory Default" message is displayed.
- Touch YES to confirm. A "Restore is completed!" message is displayed. Touch NO to stop the process and return to the previous page.
- Or touch the ⚠️MENU or ⚡HOME hot key to stop the process and return to the corresponding page.
Status
Touch this key to show information about the settings of the RR-1070.
- Touch the ⚠️MENU hot key to go to the Main Menu.
- Touch REMOTE SETTING to go the Remote Setting menu.
- Touch STATUS and the first Status Screen is displayed. It shows the IR control code numbers selected for each device.
- Touch ⬇ to display the second Status Screen. It shows the settings for back lighting, beep sound, password as well as the memory available for learning commands and the firmware revision number.
- Touch BACK to return to the Remote Settings page. Or touch the MENU or HOME to stop the process and return to the corresponding page.
Smart Key Programming
The Smart Key feature of the RR-1070 allows to send a series of commands to one or more devices. For example you might want to create a Smart Key that turns on the TV set, selects channel 5, turns on the surround processor, and selects the TV input. Once you program a Smart Key you access it by touching SMART on the Home Screen. There are ten Smart Keys. Each can contain up to 32 steps (including added time delays).
NOTE: Once a Smart Key command sequence is started, you can stop it by pressing one of the 5 Hard Keys. A "Command is Stopped" message appears then the Smart Key page is displayed.
— continued
20
RR-1070
- If you touch ONE DEVICE a device selection page is shown. Touch to select a device. A "Clear all Moved keys in this device?" message is displayed.
- Touch YES to confirm. A "Restore is completed!" message is displayed. Touch NO to stop the process and return to the previous page.
- Or touch the HOME or MENU hot key to stop the process and return to the corresponding page.
- If you touch ALL DEVICES a "Clear all Moved keys?" message is displayed.
- Touch YES to confirm. A "Restore is completed!" message is displayed. Touch NO to stop the process and return to the previous page.
- Or touch the ⚠️MENU or ⚡HOME hot key to stop the process and return to the corresponding page.
Move Device
Touch this key to restore the device keys on the Home Page to their original positions.
- From the Reset Default menu touch MOVE DEVICE. A "Clear all Moved devices?" message is displayed.
- Touch YES to confirm. A "Restore is completed!" message is displayed. Touch NO to stop the process and return to the previous page.
- Or touch the ⚠️MENU or ⚡HOME hot key to stop the process and return to the corresponding page.
Deleted Key
Touch this key to restore keys that have been deleted. This process also restores the original IR command codes.
- From the Reset Default menu touch DELETED KEY. The Deleted Key page is displayed.
- Touch ONE KEY, ONE DEVICE or ALL DEVICES.
- If you touch ONE KEY a device selection page is shown. Touch to select a device. The first control page for that device is displayed.
- If necessary touch ▲ or ▼ to go to other control pages. Touch the key you want to restore. A "Restore this Deleted key?" message is displayed.
- Touch YES to confirm. A "Restore is completed!" message is displayed. Touch NO to stop the process and return to the previous page.
- Or touch the ⚠️MENU or ⚡HOME hot key to stop the process and return to the corresponding page.
- If you touch ONE DEVICE a device selection page is shown. Touch to select a device. A "Restore all Deleted keys in this device?" message is displayed.
- Touch YES to confirm. A "Restore is completed!" message is displayed. Touch NO to stop the process and return to the previous page.
- Or touch the ⚠️MENU or ⚠️HOME hot key to stop the process and return to the corresponding page.
English
17
Password
If you want to prevent others from changing the settings of the RR-1070 you can enable the Password System. Once the Password System is enabled the password must be entered before you can access any of the submenus on the Main Menu page.
To Enable the Password System
- Touch the ⚠️MENU hot key to go to the Main Menu.
- Touch REMOTE SETTING to go to the Remote Setting menu.
- Touch PASSWORD to go to the Enter Password menu.
- Enter your password, 5 characters maximum. Touch 🔔 or ▶ if necessary to see other letters. Touch DELETE to remove the previous character(s). Touch BACK to cancel the process and return to the previous page.
- Touch OK to accept the label shown in the editing box. A "Please enter the password again" message is displayed.
- Re-enter the password and touch OK again. A "Password lock is enabled" message appears. You return to the Remote Settings menu.
To Disable the Password System
- Touch the ⚠️MENU hot key to go to the Main Menu. You will go to the Enter Password page.
- Enter your password and touch OK.
- Touch REMOTE SETTING to go to the Remote Setting menu.
- Touch PASSWORD to go to the Enter Password menu.
- On the Enter Password page leave the password box empty and touch OK. A "Please enter the password again" message is displayed.
- Again leave the password box empty and touch OK. A "Password lock is disabled" message appears. You return to the Remote Settings menu.
Note: Universal password is "AAAAA".
You can restore any device or control key name, IR code programming or any other customization you may have to the factory "default" or original settings.
Warning: Please make sure it is really necessary to perform this function. Your RR-1070 will be reset to factory pre-loaded settings and all the learned signals/custom settings will be erased.
The first three steps of the Restore Factory Setting process is always the same:
- Touch the ⚠️MENU hot key to go to the Main Menu.
- Touch REMOTE SETTING to go to the Remote Setting menu.
- Touch RESET DEFAULT to go to the Reset Default menu. From here you can select a wide range of options.
Clear Learning
Touch this key to delete learned IR commands and restore the factory original commands. If there was no command in the original configuration this step leaves the key with no IR command programmed.
- From the Reset Default menu touch CLEAR LEARNING. The Clear Learning page is displayed.
- Touch ONE KEY, ONE DEVICE or ALL DEVICES.
- If you touch ONE KEY a device selection page is shown. Touch to select a device. The first control page for that device is displayed.
- If necessary touch ▲ or ▼ to go to other control pages. Touch the key you want to restore. A "Clear this Learned key?" message is displayed.
- Touch YES to confirm. A "Restore is completed!" message is displayed. Touch NO to stop the process and return to the previous page.
- Or touch the ⚠️MENU or ⏻HOME hot key to stop the process and return to the corresponding page.
- If you touch ONE DEVICE a device selection page is shown. Touch to select a device. A "Clear all Learned keys in this device?" message is displayed.
- Touch YES to confirm. A "Restore is completed!" message is displayed. Touch NO to stop the process and return to the previous page.
- Or touch the ⚠️MENU or ⚠️HOME hot key to stop the process and return to the corresponding page.
- If you touch ALL DEVICE a "Clear all Learned keys?" message is displayed.
- Touch YES to confirm. A "Restore is completed!" message is displayed. Touch NO to stop the process and return to the previous page.
- Or touch the ⚠️MENU or ⚡HOME hot key to stop the process and return to the corresponding page.
Key Rename
Touch this key to restore the factory original key labels. If there was no label in the original configuration this step leaves the key unlabeled. This process does not remove learned IR commands.
- From the Reset Default menu touch KEY RENAME. The Key Rename page is displayed.
- Touch ONE KEY, ONE DEVICE or ALL DEVICES.
- If you touch ONE KEY a device selection page is shown. Touch to select a device. The first control page for that device is displayed.
- If necessary touch ▲ or ▼ to go to other control pages. Touch the key you want to restore. A "Clear this Renamed key?" message is displayed.
-
Touch YES to confirm. A "Restore is completed!" message is displayed. Touch NO to stop the process and return to the previous page.
-
Or touch the ⚡MENU or ⚡HOME hot key to stop the process and return to the corresponding page.
- If you touch ONE DEVICE a device selection page is shown. Touch to select a device. A "Clear all Renamed keys in this device?" message is displayed.
- Touch YES to confirm. A "Restore is completed!" message is displayed. Touch NO to stop the process and return to the previous page.
- Or touch the ⚡MENU or ⚡HOME hot key to stop the process and return to the corresponding page.
- If you touch ALL DEVICES a "Clear all Renamed keys?" message is displayed.
- Touch YES to confirm. A "Restore is completed!" message is displayed. Touch NO to stop the process and return to the previous page.
- Or touch the ⚠️MENU or ⚡HOME hot key to stop the process and return to the corresponding page.
Device Rename
Touch this key to restore the factory original device names on the Home page.
- From the Reset Default menu touch DEVICE RENAME. The Device Rename page is displayed.
- Touch ONE DEVICE or ALL DEVICES.
- If you touch ONE DEVICE a device selection page is shown. Touch to select a device. A "Clear this Renamed device?" message is displayed.
- Touch YES to confirm. A "Restore is completed!" message is displayed. Touch NO to stop the process and return to the previous page.
- Or touch the HOME or MENU hot key to stop the process and return to the corresponding page.
- If you touch ALL DEVICES a "Clear all Renamed devices?" message is displayed.
- Touch YES to confirm. A "Restore is completed!" message is displayed. Touch NO to stop the process and return to the previous page.
- Or touch the HOME or MENU hot key to stop the process and return to the corresponding page.
Move Key
Touch this key to restore the control keys, for one or all devices, to their factory original positions.
- From the Reset Default menu touch MOVE KEY. The Move Key page is displayed.
- Touch ONE DEVICE or ALL DEVICES.
— continued
- Control Codes
- Introduction
- Key Features
- Optional Features
- Getting to Know the RR-1070
- Battery Installation and Charging
- Notes:
- Getting Started
- From the HOME page
- Touch Screen Calibration
- Hot Keys
- Hard Keys
- Key Tone
- Back Light
- IR Codes Library
- Configuration and Set Up
- Brand Name
- Enter Code
- Auto Search
- Learning New Commands
- To Program New Commands
- Specifications
- Operation System:
- Compatibility:
- Memory Capacity:
- Memory Retention After Battery Removal:
- Display Panel:
- EL Backlighting:
- Operating Distance:
- Power Requirement:
- Charging Time:
- Dimensions:
- Weight :
- Included Accessories:
- Optional Accessories:
- Dual Signal Learning
- Advanced Set Up
- Troubleshooting and Common Questions
- Copy One Device
- Copy All Devices
- PC Link
- Interactive Help Screens
- Notes About Label Editing
- Moving a Key
- To exchange the position of two keys:
- RR-1070
- Rearranging Home Screen Device List
- Deleting a Key
- English
- Deleting a Smart Key
- Renaming a Smart Key
- Cloning the RR-1070 Commands
- Program a New Smart Key Command
- Editing a Smart Key Command
- Preference Settings
- Custom Page Set Up
- Note:
- Custom Page.
- Remote Setting
- Beep Sound
- LCD Display and Backlighting Controls
- All to Default
- Status
- Smart Key Programming
- Move Device
- Deleted Key
- Password
- To Enable the Password System
- To Disable the Password System
- Clear Learning
- Key Rename
- Device Rename
- Move Key
Brand : ROTEL
Model : RR-1070
Category : Uncategorized