
Skycommand Center - Drone Autel - Free user manual and instructions
Find the device manual for free Skycommand Center Autel in PDF.


| Product Type | Drone Flight Control Platform (Software) |
| Supported Devices | EVO II series, Dragonfish series, EVO Nest |
| Supported Browsers | Chrome 55 or above |
| Network Connection | Recommended built-in 4G card or stable Wi-Fi |
| Platform Access | PC or Mac via web browser |
| Account Types | Organization, Team, Operator accounts with different permissions |
| Main Functions | Live video monitoring, mission planning & scheduling, fleet & team management, remote control, flight log review |
| Mission Types | Waypoint missions, manual missions, immediate/planned execution |
| Maps | Standard, satellite, hybrid; supports AMap and Google Map |
| Live Video Channels | Up to 32 channels, displayable in 1, 4, 9, 16 grids |
| Remote Control | Request control from pilot; keyboard shortcuts (WASD+Mouse) |
| Language Support | Simplified Chinese, English |
| Data Storage | Flight data accessible later; mission logs stored |
| Security | Password-protected accounts; role-based permissions; password reset via admin |
| Maintenance | Manual updates at www.autelrobotics.com; no physical maintenance |
| Repairability | Software-based; contact local dealer for account issues |
| General Information | Brand: Autel; Model: SkyCommand Center; Category: Drone accessories (software) |
Frequently Asked Questions - Skycommand Center Autel
User questions about Skycommand Center Autel
0 question about this device. Answer the ones you know or ask your own.
Ask a new question about this device
Download the instructions for your Drone in PDF format for free! Find your manual Skycommand Center - Autel and take your electronic device back in hand. On this page are published all the documents necessary for the use of your device. Skycommand Center by Autel.
USER MANUAL Skycommand Center Autel
Autel Skycommand Center
User Manual

natural_image
Line drawing of a computer monitor with an open button symbol on the screen (no text or labels)Disclaimer And Warning
Thank you for your interest in products provided by Autel Robotics Co., Ltd (hereinafter referred to as "Autel Robotics"). Please read the following terms carefully and acknowledge that you have understood and agreed the following terms, conditions and safe operation guide. This Manual will update without a fixed schedule. In order to ensure your use of the latest version, please visit: www.autelrobotics.com
If user fails to abide by the safe operating instructions, Autel Robotics will assume no responsibility for any product damage or loss--direct or indirect, legal, special or economic loss (including but not limited to profit loss) during use, and will not provide warranty service.
This Manual will show you the safe operating procedures. Please ensure that your operation will not endanger your and other personal and property safety.
The trademarks Autel Robotics® is the registered trademark of Autel Robotics in China and other countries/regions. All other products and company names mentioned in this Manual are the registered trademark of their respective owners. Reproduction in any form is not permitted without permission.
Product Introduction
The Autel SkyCommand Center is a flight control platform that enables users to manage tasks, equipment, and mission roles for their drones through a computer or mobile device. Using the platform, remote operators can monitor live video in real time or schedule missions in clusters and access the recorded flight data at their convenience.
Preparation
Computer: PC or Mac.
Browser: Chrome 55 or above version.
Network connection: It is recommended to use a tablet device or a mobile phone with a built-in 4G card.
Support device: EVO II series, Dragonfish series, EVO Nest.
Require Account
Contact the local dealer to purchase an account; the account is associated with the login name, login password, number of bound aircraft and other information.
Log in
Enter your account and password to log in to Autel Command Center.

Interface Description
Display the location of pilot, device and mission status.
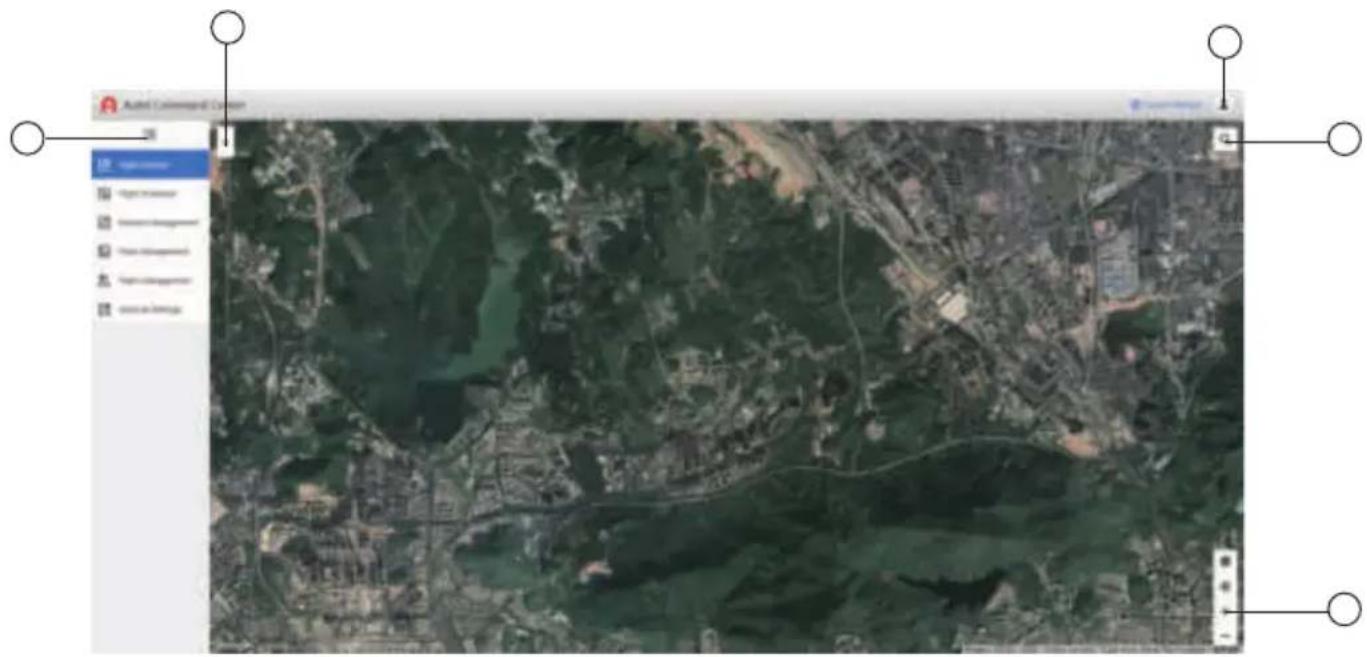
1. Navigation bar
Show/Hide Menu: flight mission, flight schedule, mission management, fleet management, team management, general settings.
2. Device list
Display real-time status of in-process missions, online aircrafts, online pilots, online nests, and focus on selected objects.
Note:
If there's a device which is performing the system mission, then it will display the route of the mission; if no device performing the mission, then it will display the trailing track.
3. Account management
Modify User name, avatar, reset password or log out.
Note:
The passwords of users with all levels of authority can be modified, but not retrieved. Users can apply for reset to the team administrator first. If the administrator with the highest authority forgets the password, please contact the local dealer.
4. Search
After entering the place name, the matching detailed place will be displayed below the input box. Selecting the place on the interface will focus on the location on the map.
5. Map
Types: Switch between standard, satellite, or hybrid map.
Focus: When a device is selected in the device list or there is only one device on the map, click Focus to focus on the device.
Zoom in: Zoom in on the map.
Zoom out: Zoom out the map.
Note:
Or zoom with the mouse wheel.
2. Flight Schedule
Displays the scheduled missions that have been issued; the mission display method (calendar/list) can be switched by clicking the upper right corner icon.

1. Calendar style
Displays by month or week. Click on a mission in the calendar to view the mission details.
2. List style
Contains information like mission name, mission ID, creation date, execution team, execution pilot, start time, total mileage, total duration, and operations.
Note:
Immediate execution-type missions will not be displayed in the "Flight Plan."
If the mission is created but not issued, it will not be displayed in the "Flight Plan."
3. Mission Management
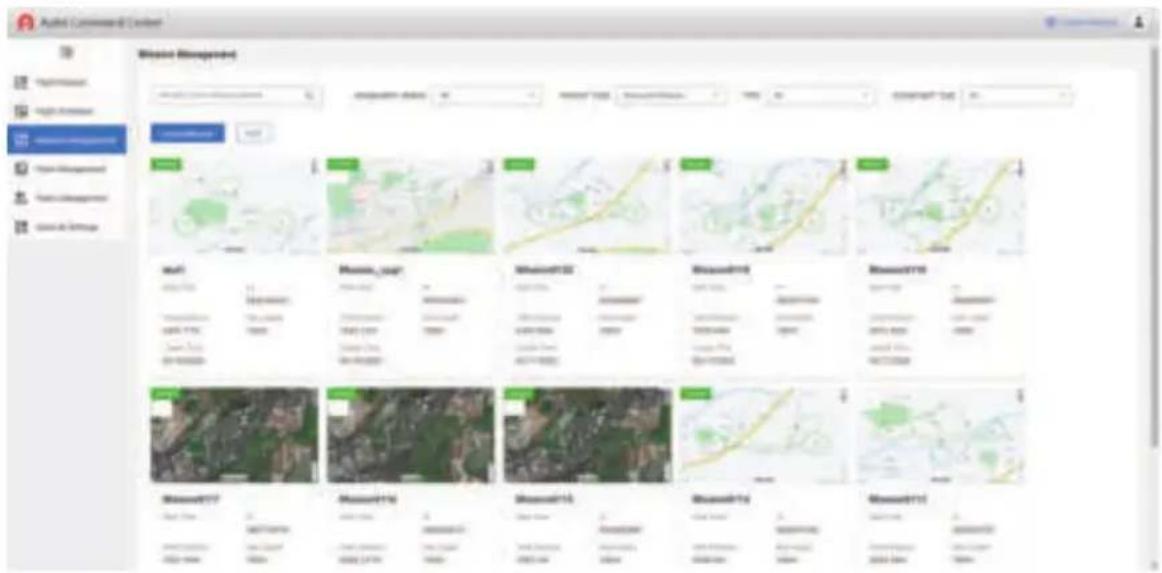
1. Search box
Enter the mission name to search for the corresponding mission.
2. Assignation status
Filter the issued/un-issued missions.
3. Mission Type
Filter waypoint missions/manual missions.
4. Pilots
Filter pilot's missions.
5. New mission
Create a flight mission: including name, device, mission type, route parameters, and other information.
6. Edit
Created missions can be deleted. If the mission is being executed, it cannot be deleted.
7. Mission Cards
Click a single mission card to see the mission details, and you can edit or view the mission route.
4. Fleet Management
Add or edit devices (including aircrafts and Nests), reset Nest passwords, and view the device's flight times, last flight date, flight duration, and other information.
Note:
Log in with an organization account to view all devices under the organization; log in with a team account, view all devices under the team.

1. Search box
Enter the device name or serial number to search for the corresponding device.
2. Model
Filter devices by product model, for example: Select Dragonfish to view all Dragonfish devices.
3. Team
Filter devices owned by the team. Only organization accounts have the filter permission.
4. Add device
The organization account and team account can log in to add devices, but the operator account does not have this permission.
5. Edit
The organization account and team account can log in to edit the device, but the operator account does not have this permission.
5. Team Management

Accounts are divided into organization accounts, team accounts, and operator accounts according to their permission levels. The construction is as below.

flowchart
graph TD
    A["Organization account"] --> B["Team account Team account"]
    A --> C["Pilot 1 Pilot 1 OperatorOperator Pilot 1 Pilot 1"]
1. Organization account permissions:
- create, edit, view and delete team accounts
· add, edit, view, and delete member accounts - reset operator and pilot password
· edit team leader and operator permissions
| Organization account | ||
| Permissions | Team leader | Operator |
| Add device | √ | ✕ |
| Edit device | √ | ✕ |
| View device | √ | √ |
| Add new member | √ | ✕ |
| Edit member | √ | ✕ |
| View member | √ | √ |
| Flight control authority settings | ✕ | √ |
| Live authority | ✕ | √ |
| Create mission | ✕ | √ |
| View mission | ✕ | √ |
| Edit mission | ✕ | √ |
| View flight log | ✕ | √ |
| Edit light log | ✕ | √ |
2. Team account permissions
- Support adding, editing, viewing and deleting member accounts
- Support reset operator and pilot password
3. Operator account permissions
- Support to create and issue missions, no team management authority
Note:
Pilots do not have permission to log in to Autel SkyCommand Center.
6. General Settings

1. Gear Setting
The default value is 1, and the range is 1-10. The larger the value, the greater the range of the stick during remote control.
2. Language switch
Select the system language as Simplified Chinese or English.
3. Map switch
Select the system map as AMap or Google Map.
Note:
It is necessary to ensure the smooth operation of the operator's network throughout the process. In following operation instructions, we use the organization account as an example.
1. Add team and members
- Log in to the organization account, enter the team page under the team management menu, click Add Team, and edit the team name.
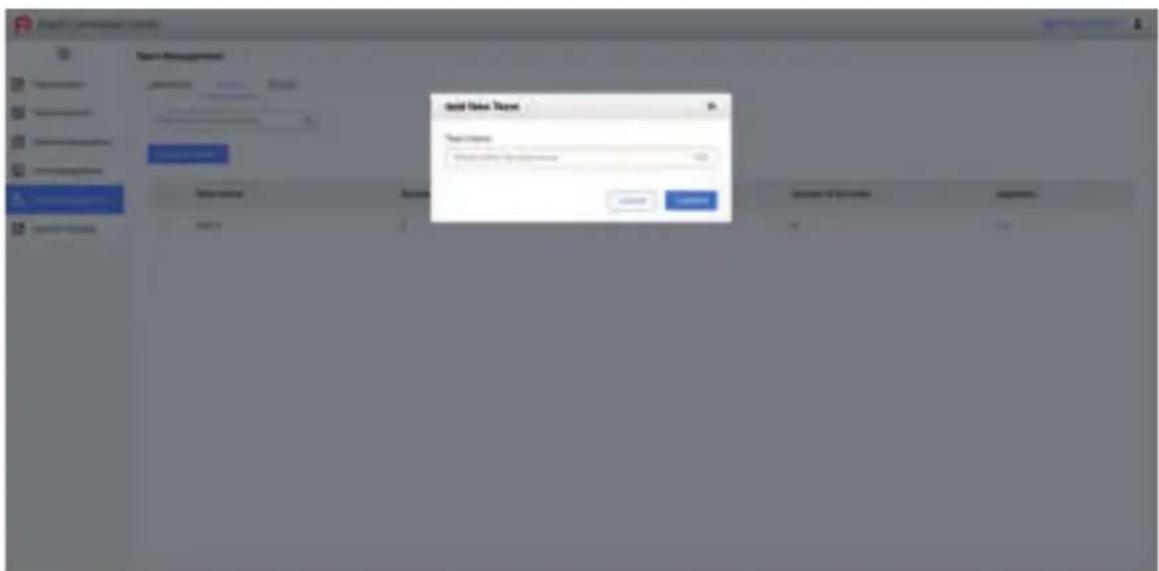
- Switch to the member page, click Add member, and edit the member's name, team, role (team leader, operator, pilot), login account and password in the pop-up window.

- Switch to the role page and assign permissions according to different member roles.

2. Add equipment
- Log in to the organization account, enter the fleet management page, you can choose to add a drone or a Nest, and enter the device name, serial number, and team in the pop-up window. After entering the serial number, the device model will be displayed according to the result of automatic matching.

Note:
When adding a Nest for the first time, enter the Nest name and serial number. After the Nest model is automatically recognized, a password input field will appear. Enter a 6-digit password for Nest authentication, and the password can be modified.
When the Nest App is used for the first time, the Nest verification pop-up window will pop up, and you need to enter the server address and the corresponding 6-digit password; when the Nest has been added in the fleet management and powered on, the Nest will appear on the map.
3. Create a mission
- Log in to the organization account, enter the mission management interface, click "New mission", edit the mission name, equipment type (multi-rotor/fixed-wing), and mission type. After editing, click Configure Mission to enter the configuration interface.
Note:
There are 3 entries for creating a mission:, the quick add entry on the right side of the top navigation bar, the add entry for when the online mission list under the mission flight tab is empty, and the "new mission" entry under the mission management tab.
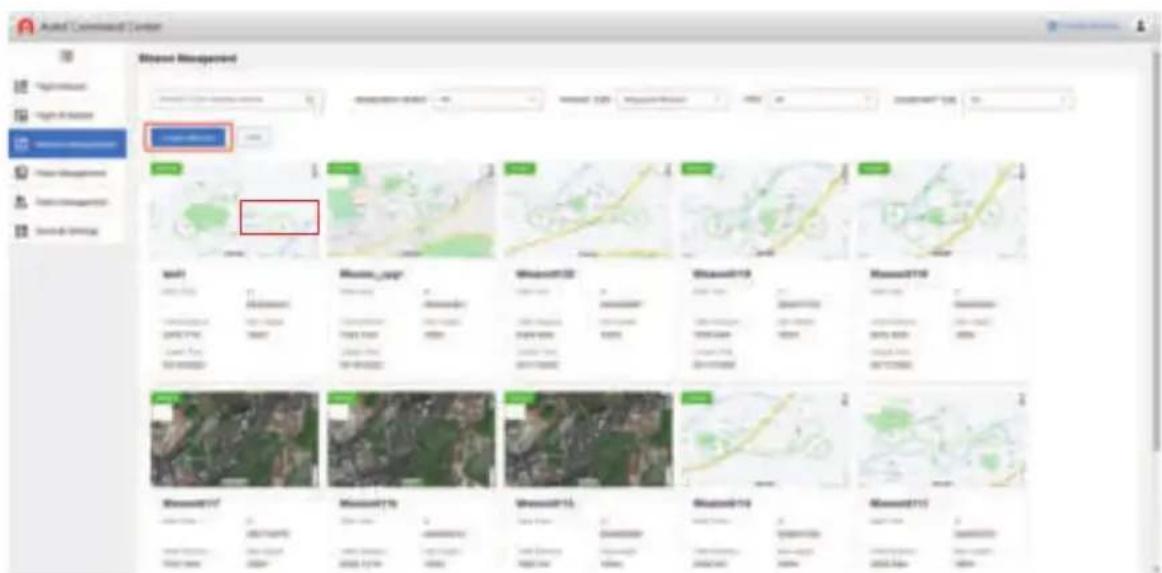

2. Mission configuration
- Configure route parameters
You can configure route parameters first and then add waypoints. You can also click to add waypoints directly on the map; if you configure route parameters first and then add waypoints, the flight altitude of the generated waypoints defaults to the flight altitude in the route configuration. It is the reference base; when no waypoints are added, only waypoints can be added first.

- Add waypoint
After adding a waypoint, click the waypoint again to edit the waypoint parameters or delete the waypoint. The last waypoint added by the multi-rotor device is the end point by default. While the fixed-wing device generates the waypoint, it also generates the route, return point, ascending circle point and descending circle point.

- Add observation points
Click the observation point icon ( ) at the bottom of the configuration interface to configure the observation point parameters.
When the fixed-wing aircraft flies within the flight segment associated with the observation point or within the action radius of the observation point, the gimbal will face the observation point; when the multi-rotor aircraft reaches the waypoint associated with the observation point, the gimbal will face the observation point.

| vertical take-off height | × | 45~1000 m |
| height type | Relative heightAbsolute height | × |
| flight altitude | 10~800 m | 50~1000 m |
| flight speed | 4~36 km/h | 17~25 m/s |
| Gimbal pitch angle | 0°~90° | -120°~0° |
| Pan tilt angle | × | -180°~180° |
| mission action | × | Timing photo (photograph interval)Fixed distance photography (photography spacing) start recording |
| Disconnected action | ReturnContinue the mission | × |
| yaw angle | Along the routeManualCustomize | × |
| camera action | No actionTiming photo (photograph interval)Fixed distance photography (photography spacing)Start recordingStop recordingPhotograph | × |
| complete the action | ReturnHover | × |
| flight altitude | 10~800 m | 50~1000 m |
| flight speed | 4~36 km/h | × |
| Waypoint Action - Flyby | Camera action (no action, start video recording, stop video recording, take photo, timed photo, fixed distance photo)Heading when flying (along route, manual, custom)Gimbal pitch angle (0~90°) | Can be set, but does not support adding camera actions |
| Waypoint Action - Hover | Camera action (no action, video recording, photo taking, timed photo taking)Heading when flying (along route, manual, custom)Gimbal pitch angle (0~90°) | × |
| Waypoint Action - Circling | × | Radius (10~500 m)Number of laps (1~99) |
| Associated observation points | support | support |
| waypoint coordinates | latitude and longitude | latitude and longitude |
| Gimbal pitch angle | × | |
| Pan tilt angle | × | |
| vertical landing height | × | 50~1000 m |
| The drone position is the home point | × | When turned on, the drone will return to the take-off position; when turned off, the home point is the home point |
| waypoint coordinates | × | latitude and longitude |
| flight altitude | × | 50~1000 m |
| Hover radius | × | 100~500 m |
| waypoint coordinates | × | latitude and longitude |
| flight altitude | × | 50~1000 m |
| Hover radius | × | 100~500 m |
| waypoint coordinates | × | latitude and longitude |
| association | Associate Waypoint | Associated segment |
| Action radius | × | 100~500 m |
| waypoint coordinates | latitude and longitude | latitude and longitude |
| Elevation correction | × | DEM correctionManual correction |
Note:
When creating a fixed-wing mission, one observation point can be associated with up to 5 flight segments, and the associated flight segments of two observation points cannot be repeated.
When creating a multi-rotor mission, you can only add 1 camera action when you select the waypoint action and select "fly over". Multiple camera actions can be added when "Hover" is selected.
- After the parameter configuration is completed, click Save to return to the mission management interface.
4. Issue missions
- "Undelivered" missions can be filtered in the delivery status.

- Click the mission to enter the details page of the un-issued mission. At this time, click "Edit" to continue editing the route.

- Click "Issue Mission", select the execution object (Nest/Pilot), execution type (immediate execution/planned execution), period, start time and validity period in the delivery pop-up window, and finally click OK to send the mission to App side.
Note:
If the system recognizes that there is a Nest under the account, it will select the Nest to execute by default.
5. Perform missions
-
Pilots can log in with the username and password created by the command center on the app side, and can view the system missions issued by the command center.
-
Click the mission card to enter the mission details page, and click the take-off button to start the mission.
Note:
The pilot can download the missions issued by the command center to the local.
If there is a newly assigned mission, the App will receive a notification and prompt again 10 minutes before the mission starts.
If you want to perform the hands-on flying mission of the Nest, you can first find the available Nest on the map through the Nest list, and then click the one-key take-off icon (✗) of the Nest drone on the map, and the drone can be remotely controlled in the background.
6. Live video
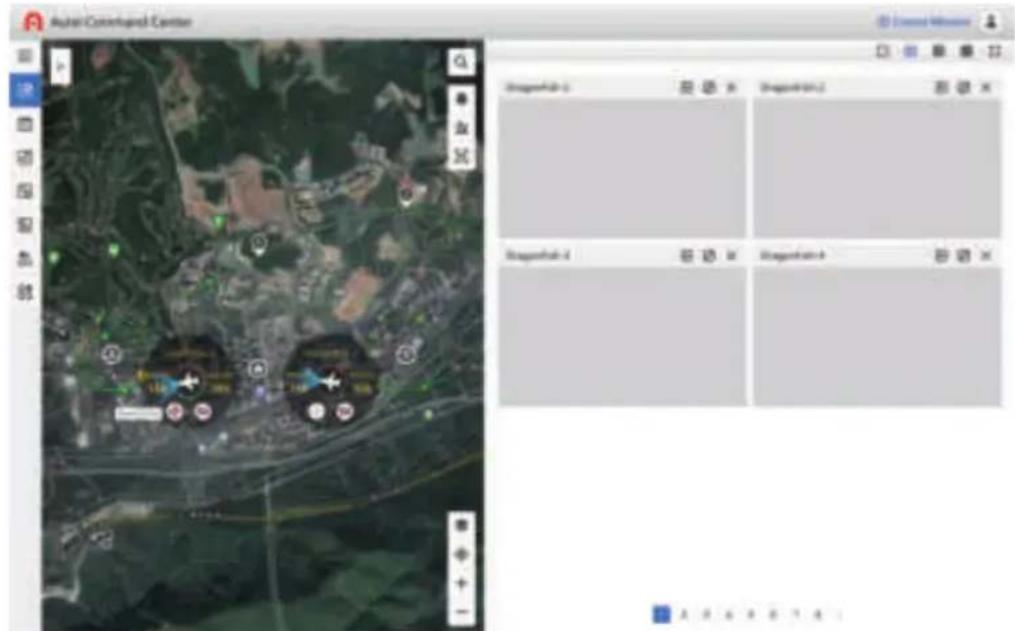
- All aircraft connected to the command center will start live broadcast by default after they are powered on, and the live broadcast window will appear in the upper right corner. During the execution of the mission, the mission route, waypoint, and the current position of the aircraft are displayed on the map.

Note:
The display area of the live broadcast window in the upper right corner is displayed according to the actual number of live broadcasts. It supports up to 32 channels of live video broadcasts. Users can choose 1, 4, 9, or 16 grids to watch.
7. Remote control
- The PC terminal of the command center can apply to the pilot for the control right of the device, and click the remote control icon ( ✉ ) in the background to issue a control right request.
- When the pilot receives the application notification on the App, the pilot can choose to accept or reject the application.
- The command center can only remotely control one aircraft at the same time. When one account is performing remote control, other accounts can no longer apply for the control right.
Note:
If the object applying for control in the background is the Autel Dragonfish fixed-wing UAV, the pilot must first set the ground station gear to A before transferring the control right.
- During the background remote control process, the App only has a display function and cannot perform any operations. If the pilot wants to regain control, he can click the exit icon in the upper right corner of the interface, exit the background remote control, and return to the previous non-remote control interface. If the aircraft has not completed the mission, the mission will continue from the stop point.
| Shortcuts for remote control Definition | |
| W | Ascend |
| S | Descend |
| A | Turn Left |
| D | Turn Right |
| Move Forward | |
| Move Backward | |
| Move Left | |
| Move Right | |
| Hold down the left mouse button and drag the mouse | Adjust the pitch angle of gimbal |
| MouseWheel | Zoom in/out |
Note:
After the multi-rotor aircraft is remotely controlled during the execution of an automatic mission, it does not support manual directional control, but only supports returning home.
The multi-rotor gimbal only supports the control of the pitch angle, not the heading angle.
8. Quick missions
When the background of the command center is under remote control, a quick mission can be created and executed.

- Click on the map to generate a quick mission point. The quick mission point can be dragged and dropped with the mouse, and the mission parameters can be edited in the pop-up parameter configuration bar.
- After editing, click "Go", the system will prompt whether to suspend the current mission, click "OK", the device will fly to the quick mission point.
Note:
To return to the previous route mission, click the ( ≡ ) icon.
Icon instruction
| Edit account information | |
| Obstacle avoidance off | |
| Obstacle avoidance on | |
| Finished charging | |
| Not charged | |
| Charging | |
| Low battery | |
| The battery is fully charged | |
| Pilot position | |
| Multi-rotor drone | |
| Fixed-wing UAV | |
| Nest & Drone | |
| Nest drone takes off with one click | |
| Nest | |
| Target focus | |
| Find drones (available only with fixed-wing units) | |
| Find drones - drone locations | |
| Vertical speed | |
| Horizontal speed | |
| Aircraft altitude | |
| Aircraft distance | |
| One-click height change (only available for fixed-wing equipment) | |
| Back to home |
| → | Live screen to the right | |
| ← | Live screen to the left | |
| ■ | Click to start live | |
| ↖ | Click to close live | |
| ↙ | Full screen | |
| ↙ | Exit Full Screen | |
| ▲ | Alarm prompt | |
| □ | 1 Square | |
| ⊕ | 4 Square grid | |
| ■ | 9 Square grid | |
| ■ | 16 Square grid | |
| ◆ | Apply for remote control | |
| ♠ | Back to home | |
| ◎ | Take a photo | |
| ◀ | Record | |
| ■ | Pause recording | |
| ◎ | Reference point | |
| ○ | Center route | |
| ■ | Remote control shortcut description | |
| ◇ | New quick mission | |
| ✕ | View elevation data | |
| ✕ | Back to waypoint mission | |
| ○○ | Display in card | |
| ≡ | Display in list | |
| ∠ | Mission renaming | |
| ▼ | Orientation in flight | |
| ■ | Click to add observation point |
AUTEL
ROBOTICS



- Autel Skycommand Center
- Disclaimer And Warning
- Product Introduction
- Preparation
- Require Account
- Log in
- P########## #######
- ### ###
- Interface Description
- Navigation bar
- Device list
- Account management
- Search
- Map
- Flight Schedule
- Calendar style
- List style
- Mission Management
- Search box
- Assignation status
- Mission Type
- Pilots
- New mission
- Edit
- Mission Cards
- Fleet Management
- Model
- Team
- Add device
- Edit
- Team Management
- Organization account permissions:
- Team account permissions
- Operator account permissions
- General Settings
- Gear Setting
- Language switch
- Map switch
- Note:
- Add team and members
- Add equipment
- Create a mission
- Mission configuration
- Issue missions
- Perform missions
- Live video
- Remote control
- Quick missions
- Icon instruction
- AUTEL
- ROBOTICS
Brand : Autel
Model : Skycommand Center
Category : Drone