
MiniStack - External hard drive OWC - Free user manual and instructions
Find the device manual for free MiniStack OWC in PDF.


| Product Type | External Hard Drive Enclosure |
| Compatible Drives | 1x 3.5" or 2.5" SATA hard drive |
| Interface | USB 3.1 Gen 1 (USB-A to USB-B) |
| Power Supply | External AC adapter (12V DC, 2A) |
| Dimensions (approx.) | 5.0 x 5.0 x 1.5 inches (127 x 127 x 38 mm) |
| Weight (approx.) | 0.5 kg (1.1 lbs) |
| Material | Aluminum and plastic |
| Front Panel | Power/activity LED (white solid or blinking) |
| Rear Panel | DC IN, USB 3.1 port, Kensington security slot, ON/OFF switch |
| Operating Temperature | 41°F to 107°F (5°C to 42°C) |
| Storage Temperature | -40°F to 149°F (-40°C to 65°C) |
| System Requirements (Mac) | OS X 10.6 or later, USB port |
| System Requirements (PC) | Windows 7 or later, USB port |
| Included Accessories | Power supply, USB 3.1 cable, screw packet |
| Formatting | OWC Drive Guide utility or manual formatting |
| Data Backup Recommendation | Keep two copies of data; OWC not liable for data loss |
| Safety Features | Ventilation openings, anti-static precautions, Kensington lock |
| Warranty | 3 years (with drive), 1 year (enclosure only) |
| Certifications | FCC Class B |
| Repairability | User-replaceable drive after warranty; no other user-serviceable parts |
Frequently Asked Questions - MiniStack OWC
User questions about MiniStack OWC
0 question about this device. Answer the ones you know or ask your own.
Ask a new question about this device
Download the instructions for your External hard drive in PDF format for free! Find your manual MiniStack - OWC and take your electronic device back in hand. On this page are published all the documents necessary for the use of your device. MiniStack by OWC.
USER MANUAL MiniStack OWC
natural_image
Logo featuring a blue ring with the letters 'OWC' and a white arc above it, set against a blue background (no additional text or symbols)MINISTACK
Assembly Manual & User Guide
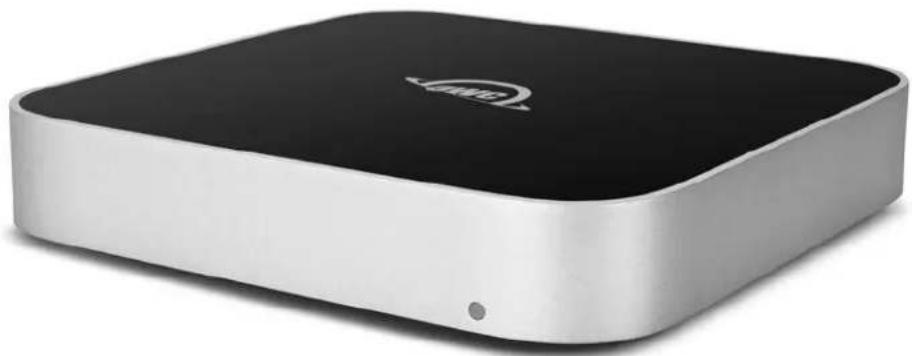
natural_image
Exterior view of a modern black and silver electronic device (no visible text or symbols)INTRODUCTION
1.1 Minimum System Requirements....1
1.1.1 Apple Mac Requirements
1.1.2 PC Requirements
1.1.3 Supported Drives
1.2 Package Contents ....1
1.3 About This Manual....1
1.4 Front View....3
1.5 Rear View....3
1.6 Usage Notes......4
DEVICE SETUP
2.1 Quick Start....5
2.2 Assembly ....5
SUPPORT RESOURCES
3.1 Formatting 8
3.2 Troubleshooting 8
3.3 About Data Backup ....8
3.4 Online Resources....8
3.5 Contacting Technical Support 8
1.1 Minimum System Requirements
1.1.1 Apple Mac Requirements
- OS X 10.6 or later
1.1.2 PC Requirements
- Windows 7 or later
1.1.3 Supported Drives
• (1) 3.5" SATA drive
or
• (1) 2.5" SATA drive
1.2 Package Contents
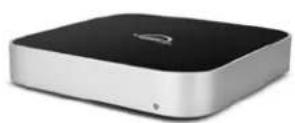
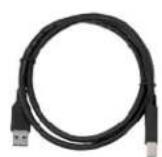
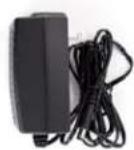
OWC miniStack Power SupplyUSB 3.1 Gen 1 (Standard-A to Standard-B) cable
Not pictured: screw packet
1.3 About This Manual
The images and descriptions may vary slightly between this manual and the unit shipped. Functions and features may change depending on the firmware version or driver version, if applicable. Please visit the product web page for the most recent product requirements, specifications, and warranty information.

General Use Precautions
To avoid damage, do not expose the device to temperatures outside: 41^ - 107^ F (operating) or -40^ - 149^ F (non-operating).
Always unplug the device from the electrical outlet if there is a risk of lightning or if it will be unused for an extended period of time. Otherwise, there is an increased risk of electrical shock, short-circuiting or fire.
Do not use the device near other electrical appliances such as televisions, radios or speakers. Doing so may cause interference which will adversely affect the operation of the appliances.
Do not place the device near sources of magnetic interference, such as computer displays, televisions or speakers. Magnetic interference can affect the operation and stability of hard drives.
Do not place heavy objects on top of the device.
Protect your device from excessive exposure to dust during use or storage. Dust can build up inside the device, increasing the risk of damage or malfunction.
Do not block any ventilation openings on the device. These help to keep the device cool during operation. Blocking the ventilation openings may cause damage to the device and cause an increased risk of short-circuiting or fire.

Safety Precautions
Use proper anti-static precautions while installing your hard drives into this device. Failure to do so can cause damage to your drive mechanisms and/or the enclosure.
Read this user guide carefully and follow the recommended steps for assembly.
Do not attempt to disassemble or modify the device. To avoid any risk of electrical shock, fire, short-circuiting or dangerous emissions, never insert any metallic object into the device. If it appears to be malfunctioning, please contact technical support.
Never expose your device to rain, or use it near water or in damp or wet conditions. Never place objects containing liquids on the drive, as they may spill into its openings. Doing so increases the risk of electrical shock, short-circuiting, fire or personal injury.
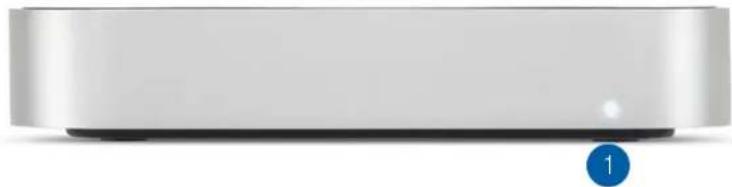
1.4 Front View
natural_image
Exterior view of a modern office building (no signage)- Power LED — emits a solid white light when the OWC miniStack is powered on, and blinks during drive activity.
1.5 Rear View
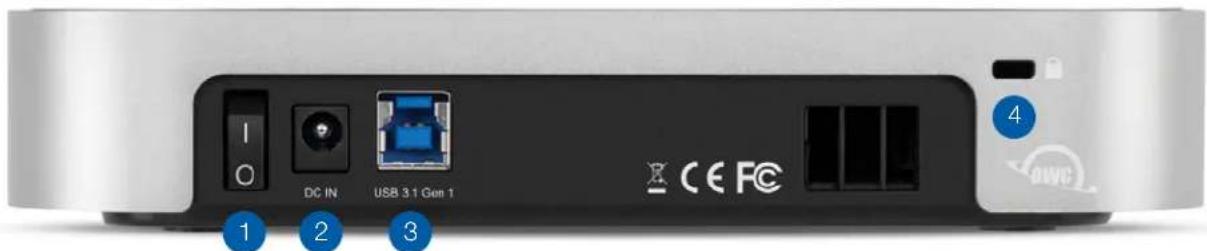
- ON/OFF Switch — power the miniStack on and off using this switch.
- DC IN — connect the included power supply here.
- USB 3.1 Gen 1 port — attach the included USB 3.1 Gen 1 (Standard-A to Standard-B) cable to this port.
- Kensington® Security Slot — affix a security tether here.
1.6 Usage Notes
- If the computer enters sleep or hibernation mode, the LED will remain on but will not blink or pulse.
- For the safe removal of your drive and to ensure that no data is lost, always eject or unmount the corresponding disk(s) from your operating system before powering off. You can use the methods described below to safely unmount your disk(s).
OS X :
- Drag the icon for the disk you wish to unmount to the trash can; OR
- Right-click the disk icon on the desktop, then click "Eject"; OR
- Highlight the disk on your Desktop and press Command-E.
Windows:
- Go to the System Tray (located in the lower right corner of your screen). Click on the "Eject" icon (a small green arrow over a hardware image).
- A message will appear, detailing the devices that the "Eject" icon controls, i.e., "Safely remove..." Click on this prompt.
- You will then see a message that says, "Safe to Remove Hardware." It is now safe to disconnect the miniStack from the computer.
2.1 Quick Start
Follow the steps below to use the OWC Drive Guide utility to format your OWC miniStack for Mac OS X or Windows. If you installed your own drives, please use the formatting method you are most familiar with or check Section 3.1 for a link to our online formatting tips.
- Power on the miniStack and plug it into to your computer using the proper data cable. If you prefer to use a different formatting utility, do so at this time and skip the rest of these steps.
- The disk will mount and your operating system will display it as "OWC SETUP". Open the disk icon to view its contents.
- Double-click the OWC Drive Guide application.
- Follow the simple on-screen instructions to complete the formatting process. Once the formatting is finished the drive is ready to use.
2.2 Assembly
NOTE: these assembly instructions are written for users who purchased the miniStack as an empty enclosure. The instructions show how to open the enclosure in order to install drives. If you purchased the miniStack with drives already installed, opening the enclosure before the expiration of the original warranty will VOID the warranty. If you wish to remove or replace the drives after the expiration of the original warranty, you may do so at that time. You should start with Step 8 in that case and work backwards.
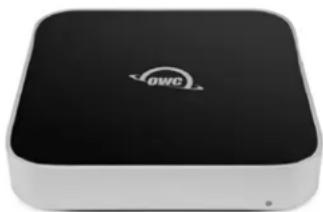
- The miniStack ships with a protective plastic film on the top cover. Please remove it before proceeding.
natural_image
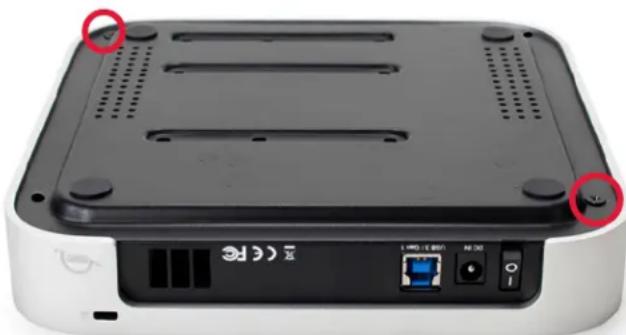
Exterior view of a black square electronic device labeled 'OWC' (no additional text or symbols visible)- Turn the miniStack over, placing it on a soft work surface. Remove the two Phillips screws affixed at the corners of the miniStack (circled at right) and set them aside. The two remaining screws are included in the screw packet.
natural_image
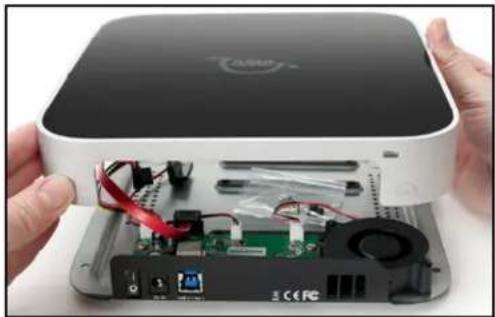
Front view of a network device with ports and indicator lights (no readable text or symbols)- Holding the base and top cover together, flip the miniStack again, then carefully lift the cover off as shown at right.
natural_image
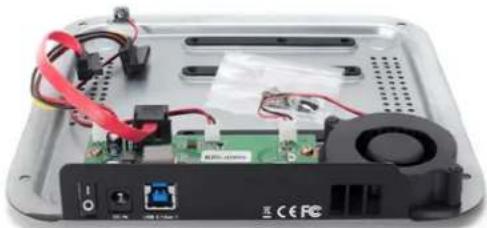
Close-up of hands installing or maintaining an open-out device into a circuit board (no visible text or symbols)- Remove the screw packet found on the base of the miniStack. Set the screws aside for use in later steps.
natural_image
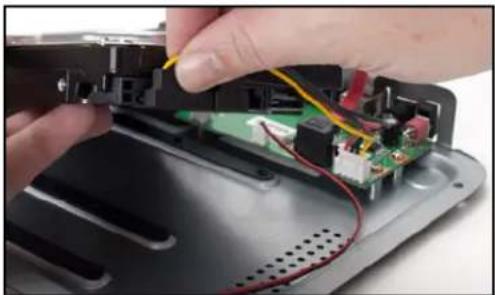
Interior view of a laptop chassis showing circuit board, RAM slots, and connected components (no readable text or symbols)5a. 3.5 inch SATA drives: Rotate the base as shown then connect the SATA power and data cables to the corresponding ports on the back of the drive. Set the drive onto the black support strips; make sure the screw holes are aligned.
natural_image
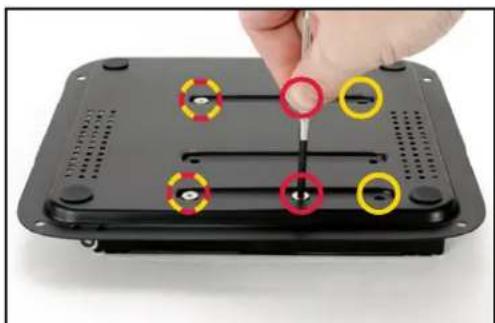
Close-up of hands installing or repairing electronic components on a device chassis (no visible text or symbols)6a. Hold the drive in place then flip the base over. Where the screw holes on the drive and base overlap, affix four of the coarse thread screws from the packet. NOTE: most drives will use the pattern shown at right in red, while some drives will use the pattern shown in yellow.
natural_image
Close-up of a hand using a screwdriver to adjust or install a black electronic device with four circular holes (no text or symbols visible)5b. 2.5 inch SATA drive: Rotate the base as shown then connect the SATA power and data cables to the corresponding ports on the back of the drive. Set the drive onto the black support strips, lining up the screw holes.
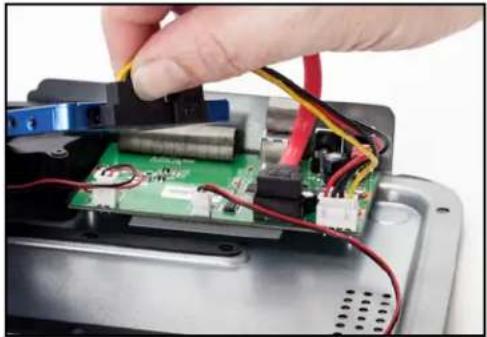
natural_image
Close-up of hands installing or adjusting a green circuit board with red and yellow wires, inside an open device (no visible text or symbols)6b. Hold the drive in place then flip the base over. Where the screw holes on the drive overlap the screw holes on the base, affix four the fine thread screws from the packet.
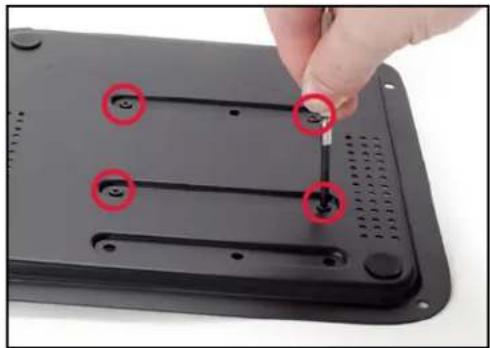
natural_image
Close-up of a hand using a screwdriver to adjust or install a black electronic device with four mounting holes (no text or symbols visible)- Flip the base over then carefully align and re-seat the top cover as shown at right.
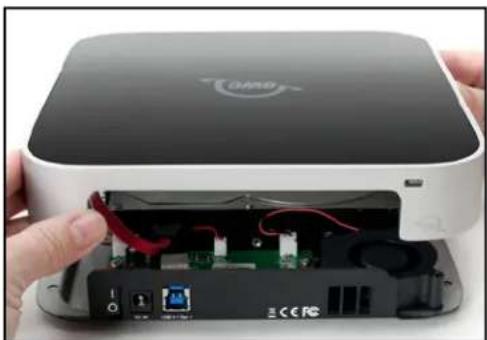
natural_image
Close-up of a white OMO device showing internal components and wiring, with no visible text or symbols on the device itself.- Holding the top cover and base together, again flip the miniStack over. Re-affix the four large corner screws in the locations shown. Once complete, flip the miniStack over.
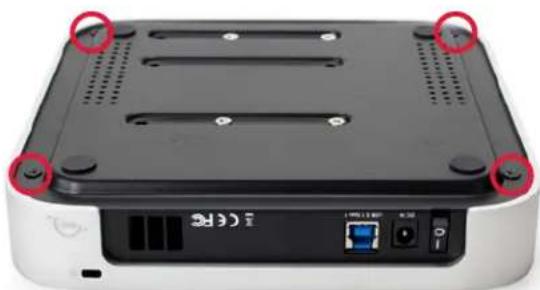
natural_image
Front view of a black I-CE router with ports and buttons, no visible text or symbols on the device body.This completes the assembly process.
3.1 Format ting
For additional formatting information, including instructions on how to format your OWC miniStack for Mac or Windows, go to: www.owcdigital.com/format
3.2 Troubleshooting
Begin by verifying that the power cable is connected to the miniStack and to a power source. If the power cable is connected to a power strip, make sure that the power strip switch is in the ON position. Next, verify that both ends of the included USB cable are properly plugged into the computer and the miniStack, respectively.
If that does not resolve the issue, try using a different USB 3.1 Gen 1 (Standard-A to Standard-B) cable. You may want to try connecting the miniStack to a different computer. If the problem persists, and you purchased the miniStack as an empty enclosure, or the enclosure shipped with drives installed but is past the three year warranty period, unmount the disk from the OS, power off, then check the SATA cable connections inside the enclosure. Please see Section 2.2 for steps on how to disassemble the miniStack, working backward from Step 8.
If problems persist please see Section 3.5 for information on how to contact OWC technical support.
3.3 About Data Backup
To ensure that your files are protected and to prevent data loss, we strongly suggest that you keep two copies of your data: one copy on your miniStack and a second copy on either your internal drive or another storage medium, such as an optical backup, or on another external storage unit. Any data loss or corruption while using the miniStack is the sole responsibility of the user, and under no circumstances may OWC, its parent, affiliates, officers, employees, or agents be held liable for loss of the use of data including compensation of any kind or recovery of the data.
3.4 Online Resources
To access our online knowledge base, which includes topics like migrating your data from an old drive to a new one, please visit: www.owcdigital.com/faq
3.5 Contacting Technical Support

Phone: M-F, 8am-5pm CST
(866) 692-7100 (N. America) | +1 (815) 383-4751 (Int'l)

Chat: M-F, 8am-8pm CST
www.owcdigital.com/support

Email: Answered within 48 hours
www.owcdigital.com/support
Changes:
The material in this document is for information purposes only and subject to change without notice. While reasonable efforts have been made in the preparation of this document to assure its accuracy, OWC, its parent, affiliates, officers, employees, and agents assume no liability resulting from errors or omissions in this document, or from the use of the information contained herein. OWC reserves the right to make changes or revisions in the product design or the product manual without reservation and without obligation to notify any person of such revisions and changes.
FCC Statement:
Warning! Modifications not authorized by the manufacturer may void the user's authority to operate this device. NOTE: This equipment has been tested and found to comply with the limits for a Class B digital device, pursuant to Part 15 of the FCC Rules. These limits are designed to provide reasonable protection against harmful interference in a residential installation. This equipment generates, uses and can radiate radio frequency energy and, if not installed and used in accordance with the instructions, may cause harmful interference to radio communications. However, there is no guarantee that interference will not occur in a particular installation. If this equipment does cause harmful interference with radio or television reception, which can be determined by turning the equipment off and on, the user is encouraged to try to correct the interference by one or more of the following measures:
- Reorient or relocate the receiving antenna.
- Increase the separation between the equipment and receiver.
- Connect the equipment to an outlet on a circuit different from that to which the receiver is connected.
Warranty:
The OWC miniStack has a 3 Year OWC Limited Warranty if it was bundled with a drive. OWC miniStack enclosures that do not ship with a drive have a 1 Year OWC Limited Warranty.
Copyrights and Trademarks:
No part of this publication may be reproduced, stored in a retrieval system, or transmitted in any form or by any means, electronic, mechanical, photocopying, recording or otherwise, without the prior written consent of OWC.
© 2017 OWC. All rights reserved.
OWC and miniStack are trademarks of New Concepts Development Corporation, registered in the U.S. Patent and Trademark Office and/or in Canada. The OWC logo is a trademark of New Concepts Development Corporation. Apple, Mac, and OS X are trademarks of Apple Inc., registered in the United States and/or other countries. Windows and Windows Vista are either registered trademarks or trademarks of Microsoft Corporation in the United States and/or other countries. Kensington is a registered trademark of ACCO Brands Corporation. Other marks may be the trademark or registered trademark property of their owners. Other marks may be the trademark or registered trademark property of their owners.

- MINISTACK
- INTRODUCTION
- DEVICE SETUP
- SUPPORT RESOURCES
- Minimum System Requirements
- Apple Mac Requirements
- PC Requirements
- Supported Drives
- Package Contents
- About This Manual
- General Use Precautions
- Safety Precautions
- Front View
- Rear View
- Usage Notes
- OS X :
- Windows:
- Quick Start
- Assembly
- Format ting
- Troubleshooting
- About Data Backup
- Online Resources
- Contacting Technical Support
- Changes:
- FCC Statement:
- Warranty:
- Copyrights and Trademarks:
Brand : OWC
Model : MiniStack
Category : External hard drive