
828mkII FW - DJ Equipment MOTU - Free user manual and instructions
Find the device manual for free 828mkII FW MOTU in PDF.


| Product Type | Audio Interface (FireWire) |
| Brand | MOTU |
| Model | 828mkII FW |
| Connectivity | FireWire 400 (IEEE 1394) |
| Analog Inputs | 8 x TRS balanced/unbalanced (line), 2 x combo XLR/TRS with preamps |
| Analog Outputs | 10 x TRS balanced/unbalanced (including main out and headphone) |
| Digital I/O | ADAT optical (8ch at 44.1/48kHz; 4ch at 96kHz), S/PDIF coaxial and optical |
| MIDI | 1x IN, 1x OUT |
| Synchronization | Internal, Word Clock, ADAT Sync, S/PDIF, SMPTE |
| Sample Rates | 44.1, 48, 88.2, 96 kHz |
| Bit Depth | 24-bit |
| CueMix DSP | On-board no-latency mixing with 4 independent mix busses |
| Phantom Power | 48V, switchable for each mic input |
| Headphone Output | 1/4" stereo jack, independent or mirror |
| Foot Switch Jack | For hands-free punch-in/out |
| Dimensions (approx) | 19" (482.6mm) width x 1.75" (44.45mm) height x 7" (177.8mm) depth |
| Weight (approx) | 5 lbs (2.27 kg) |
| Power Consumption | 7W maximum |
| Power Supply | AC 100-120V or 220-250V, 47-63Hz |
| Operating Temperature | 10°C to 40°C (50°F to 104°F) |
| Safety Certifications | FCC Class B, CE, UL/CSA |
| Cleaning | Unplug, use damp cloth; no liquid or aerosol cleaners |
| Service | No user-serviceable parts; refer to qualified personnel |
| System Requirements | Mac with FireWire, G3 300MHz+, 64MB RAM, OS 9 or X 10.2+ |
Frequently Asked Questions - 828mkII FW MOTU
User questions about 828mkII FW MOTU
0 question about this device. Answer the ones you know or ask your own.
Ask a new question about this device
Download the instructions for your DJ Equipment in PDF format for free! Find your manual 828mkII FW - MOTU and take your electronic device back in hand. On this page are published all the documents necessary for the use of your device. 828mkII FW by MOTU.
USER MANUAL 828mkII FW MOTU
User's Guide for Macintosh
MOTU
1280 Massachusetts Avenue
Cambridge, MA 02138
Business voice: (617) 576-2760
Business fax: (617) 576-3609
Technical support: (617) 576-3066
Tech support fax: (617) 354-3068
Techsupport email: techsupport@motu.com
Web site: www.motu.com
SAFETY PRECAUTIONS AND ELECTRICAL REQUIREMENTS
WARNING: TO REDUCE THE RISK OF FIRE OR ELECTRICAL SHOCK, DO NOT EXPOSE THIS APPLIANCE TO RAIN OR OTHER MOISTURE.
CAUTION: TO REDUCE THE RISK OF ELECTRICAL SHOCK, DO NOT REMOVE COVER. NO USER-SERVICEABLE PARTS INSIDE. REFER SERVICING TO QUALIFIED SERVICE PERSONNEL.
WARNING: DO NOT PERMIT FINGERS TO TOUCH THE TERMINALS OF PLUGS WHEN INSTALLING OR REMOVING THE PLUG TO OR FROM THE OUTLET.
WARNING: IF NOT PROPERLY GROUNDED THE MOTU 828mkII COULD CAUSE AN ELECTRICAL SHOCK.
The MOTU 828mkII is equipped with a three-conductor cord and grounding type plug which has a grounding prong, approved by Underwriters' Laboratories and the Canadian Standards Association. This plug requires a mating three-conductor grounded type outlet as shown in Figure A below.
If the outlet you are planning to use for the MOTU 828mkll is of the two prong type, DO NOT REMOVE OR ALTER THE GROUNDING PRONG IN ANY MANNER. Use an adapter as shown below and always connect the grounding lug to a known ground. It is recommended that you have a qualified electrician replace the TWO prong outlet with a properly grounded THREE prong outlet. An adapter as illustrated below in Figure B is available for connecting plugs to two-prong receptacles.
Figure A Figure B

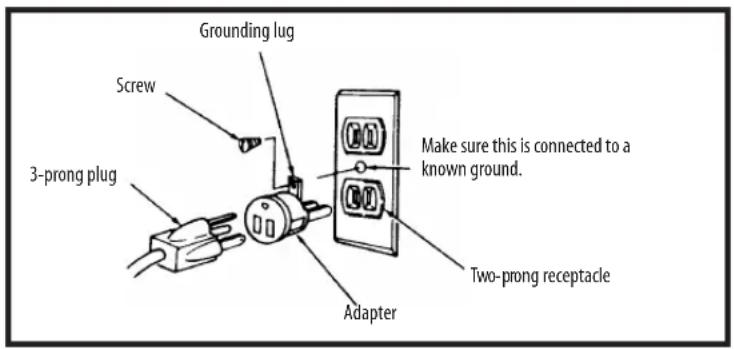
WARNING: THE GREEN GROUNDING LUG EXTENDING FROM THE ADAPTER MUST BE CONNECTED TO A PERMANENT GROUND SUCH ASTO A PROPERLY GROUNDED OUTLET BOX. NOT ALL OUTLET BOXES ARE PROPERLY GROUNDED.
If you are not sure that your outlet box is properly grounded, have it checked by a qualified electrician. NOTE: The adapter illustrated is for use only if you already have a properly grounded two-prong receptacle. Adapter is not allowed in Canada by the Canadian Electrical Code. Use only three wire extension cords which have three-prong grounding type plugs and three-prong receptacles which will accept the MOTU 828mkll plug.
IMPORTANT SAFEGUARDS
- Read instructions - All the safety and operating instructions should be read before operating the MOTU 828mkll.
- Retain instructions - The safety instructions and owner's manual should be retained for future reference.
- Heed Warnings - All warnings on the MOTU 828mkll and in the owner's manual should be adhered to.
- Follow Instructions - All operating and use instructions should be followed.
- Cleaning - Unplug the MOTU 828mkll from the computer before cleaning and use a damp cloth. Do not use liquid or aerosol cleaners.
- Overloading - Do not overload wall outlets and extension cords as this can result in a risk of fire or electrical shock.
- Power Sources - This MOTU 828mkll should be operated only from the type of power source indicated on the marking label. If you are not sure of the type of power supply to your location, consult your local power company.
- Power-Cord Protection - Power-supply cords should be routed so that they are not likely to be walked on or pinched by items placed upon or against them. Pay particular attention to cords and plugs, convenience receptacles, and the point where they exit from the MOTU 828mkl.
- Lightning - For added protection for the MOTU 828mkll during a lightning storm, unplug it from the wall outlet. This will prevent damage to the MOTU 828mkll due to lightning and power line surges.
- Servicing - Do not attempt to service this MOTU 828mkill yourself as opening or removing covers will expose you to dangerous voltage and other hazards. Refer all servicing to qualified service personnel.
- Damage Requiring Service - Unplug the MOTU 828mkll from the computer and refer servicing to qualified service personnel under the following conditions.
a. When the power supply cord or plug is damaged.
b. If liquid has been spilled or objects have fallen into the MOTU 828mkII.
c. If the MOTU 828mkll has been exposed to rain or water.
d. If the MOTU 828mkll does not operate normally by following the operating instructions in the owner's manual.
e. If the MOTU 828mkll has been dropped or the cabinet has been damaged.
f. When the MOTU 828mkll exhibits a distinct change in performance, this indicates a need for service.
-
Replacement Parts - When replacement parts are required, be sure the service technician has used replacement parts specified by the manufacturer or have the same characteristics as the original part. Unauthorized substitutions may result in fire, electric shock or other hazards.
-
Safety Check - Upon completion of any service or repairs to this MOTU 828mkII, ask the service technician to perform safety checks to determine that the product is in safe operating conditions.
ENVIRONMENT
Operating Temperature: 10°C to 40°C (50°F to 104°)
AVOID THE HAZARDS OF ELECTRICAL SHOCK AND FIRE
Do not handle the power cord with wet hands. Do not pull on the power cord when disconnecting it from an AC wall outlet. Grasp it by the plug.
INPUT
Line Voltage: 100 - 120 volts AC, RMS (US and Japan) or 220 - 250 volts AC, RMS (Europe). Frequency: 47 - 63 Hz single phase. Power: 7 watts maximum.
CAUTION: DANGER OF EXPLOSION IF BATTERY IS REPLACED. REPLACE ONLY WITH THE SAME OR EQUIVALENT TYPE RECOMMENDED BY MANUFACTURER. DISPOSE OF USED BATTERY ACCORDING TO MANUFACTURER'S INSTRUCTIONS.
Contents
5 Quick Reference: 828mkll Front Panel
6 Quick Reference: 828mkII Rear Panel
7 Quick Reference: MOTU FireWire Audio Console
9 About the 828mkll
15 Packing List and Macintosh System Requirements
17 Installing the 828mkII Hardware
35 Installing the 828mkII Macintosh Software
41 MOTU FireWire Audio Console (Mac OS X)
47 MOTU FireWire Control Panel (Mac OS 9)
53 828mkII Front Panel Operation
59 Digital Performer
65 AudioDesk
73 Other Mac OS X Audio Software
79 Cubase, Nuendo and OS 9 ASIO Software
89 Reducing Monitoring Latency
97 CueMix Console
103 MOTU SMPTE Console
107 Troubleshooting
109 Index
About the Mark of the Unicorn License Agreement and Limited Warranty on Software
TO PERSONS WHO PURCHASE OR USE THIS PRODUCT: carefully read all the terms and conditions of the "click-wrap" license agreement presented to you when you install the software. Using the software or this documentation indicates your acceptance of the terms and conditions of that license agreement.
Mark of the Unicorn, Inc. ("MOTU") owns both this program and its documentation. Both the program and the documentation are protected under applicable copyright, trademark, and trade-secret laws. Your right to use the program and the documentation are limited to the terms and conditions described in the license agreement.
Reminder of the terms of your license
This summary is not your license agreement, just a reminder of its terms. The actual license can be read and printed by running the installation program for the software. That license agreement is a contract, and clicking "Accept" binds you and MOTU to all its terms and conditions. In the event anything contained in this summary is incomplete or in conflict with the actual click-wrap license agreement, the terms of the click-wrap agreement prevail.
YOU MAY: (a) use the enclosed program on a single computer; (b) physically transfer the program from one computer to another provided that the program is used on only one computer at a time and that you remove any copies of the program from the computer from which the program is being transferred; (c) make copies of the program solely for backup purposes. You must reproduce and include the copyright notice on a label on any backup copy.
YOU MAY NOT: (a) distribute copies of the program or the documentation to others; (b) rent, lease or grant sublicenses or other rights to the program; (c) provide use of the program in a computer service business, network, time-sharing, multiple CPU or multiple user arrangement without the prior written consent of MOTU; (d) translate, adapt, reverse engineer, decompile, disassemble, or otherwise alter the program or related documentation without the prior written consent of MOTU.
MOTU warrants to the original licensee that the disk(s) on which the program is recorded be free from defects in materials and workmanship under normal use for a period of ninety (90) days from the date of purchase as evidenced by a copy of your receipt. If failure of the disk has resulted from accident, abuse or misapplication of the product, then MOTU shall have no responsibility to replace the disk(s) under this Limited Warranty.
THIS LIMITED WARRANTY AND RIGHT OF REPLACEMENT IS IN LIEU OF, AND YOU HEREBY WAIVE, ANY AND ALL OTHER WARRANTIES, BOTH EXPRESS AND IMPLIED, INCLUDING BUT NOT LIMITED TO WARRANTIES OF MERCHANTABILITY AND FITNESS FOR A PARTICULAR PURPOSE. THE LIABILITY OF MOTU PURSUANT TO THIS LIMITED WARRANTY SHALL BE LIMITED TO THE REPLACEMENT OF THE DEFECTIVE DISK(S), AND IN NO EVENT SHALL MOTU OR ITS SUPPLIERS, LICENSORS, OR AFFILIATES BE LIABLE FOR INCIDENTAL OR CONSEQUENTIAL DAMAGES, INCLUDING BUT NOT LIMITED TO LOSS OF USE, LOSS OF PROFITS, LOSS OF DATA OR DATA BEING RENDERED INACCURATE, OR LOSSES SUSTAINED BY THIRD PARTIES EVEN IF MOTU HAS BEEN ADVISED OF THE POSSIBILITY OF SUCH DAMAGES. THIS WARRANTY GIVES YOU SPECIFIC LEGAL RIGHTS WHICH MAY VARY FROM STATE TO STATE. SOME STATES DO NOT ALLOW THE LIMITATION OR EXCLUSION OF LIABILITY FOR CONSEQUENTIAL DAMAGES, SO THE ABOVE LIMITATION MAY NOT APPLY TO YOU.
Update Policy
In order to be eligible to obtain updates of the program, you must complete and return the attached Mark of the Unicom Purchaser Registration Card to MOTU.
Copyright Notice
Copyright © 2003 by Mark of the Unicorn, Inc. All rights reserved. No part of this publication may be reproduced, transmitted, transcribed, stored in a retrieval system, or translated into any human or computer language, in any form or by any means whatsoever, without express written permission of Mark of the Unicorn, Inc., 1280 Massachusetts Avenue, Cambridge, MA, 02138, U.S.A.
Limited Warranty on Hardware
Mark of the Unicorn, Inc. and S&S Research ("MOTU/S&S") warrant this equipment against defects in materials and workmanship for a period of NINETY (90) DAYS from the date of original retail purchase. This warranty applies only to hardware products; MOTU software is licensed and warranted pursuant to separate written statements.
If you discover a defect, first write or call Mark of the Unicorn at (617) 576-2760 to obtain a Return Merchandise Authorization Number. No service will be performed on any product returned without prior authorization. MOTU will, at its option, repair or replace the product at no charge to you, provided you return it during the warranty period, with transportation charges prepaid, to Mark of the Unicorn, Inc., 1280 Massachusetts Avenue, MA 02138. You must use the product's original packing material for in shipment, and insure the shipment for the value of the product. Please include your name, address, telephone number, a description of the problem, and the original, dated bill of sale with the returned unit and print the Return Merchandise Authorization Number on the outside of the box below the shipping address.
This warranty does not apply if the equipment has been damaged by accident, abuse, misuse, or misapplication; has been modified without the written permission of MOTU, or if the product serial number has been removed or defaced.
ALL IMPLIED WARRANTIES, INCLUDING IMPLIED WARRANTIES OF MERCHANTABILITY AND FITNESS FOR A PARTICULAR PURPOSE, ARE LIMITED IN DURATION TO NINETY (90) DAYS FROM THE DATE OF THE ORIGINAL RETAIL PURCHASE OF THIS PRODUCT.
THE WARRANTY AND REMEDIES SET FORTH ABOVE ARE EXCLUSIVE AND IN LIEU OF ALL OTHERS, ORAL OR WRITTEN, EXPRESS OR IMPLIED. No MOTU/S&S dealer, agent, or employee is authorized to make any modification, extension, or addition to this warranty.
MOTU/S&S ARE NOT RESPONSIBLE FOR SPECIAL, INCIDENTAL, OR CONSEQUENTIAL DAMAGES RESULTING FROM ANY BREACH OF WARRANTY, OR UNDER ANY LEGAL THEORY, INCLUDING LOST PROFITS, DOWNTIME, GOODWILL, DAMAGE OR REPLACEMENT OF EQUIPMENT AND PROPERTY AND COST OF RECOVERING REPROGRAMMING, OR REPRODUCING ANY PROGRAM OR DATA STORED IN OR USED WITH MOTU/S&S PRODUCTS.
Some states do not allow the exclusion or limitation of implied warranties or liability for incidental or consequential damages, so the above limitation or exclusion may not apply to you. This warranty gives you specific legal rights, and you may have other rights which vary from state to state.
MOTU, AudioDesk, MOTU, Mark of the Unicorn and the unicorn silhouette logo are trademarks of Mark of the Unicorn, Inc.
This equipment has been type tested and found to comply with the limits for a class B digital device, pursuant to Part 15 of the FCC Rules. These limits are designed to provide reasonable protection against harmful interference in a residential installation. This equipment generates, uses, and can radiate radio frequency energy and, if not installed and used in accordance with the instruction manual, may cause harmful interference to radio communications. However, there is no guarantee that interference will not occur in a particular installation. If this equipment does cause interference to radio or television equipment reception, which can be determined by turning the equipment off and on, the user is encouraged to try to correct the interference by any combination of the following measures:
- Relocate or reorient the receiving antenna
- Increase the separation between the equipment and the receiver
• Plug the equipment into an outlet on a circuit different from that to which the receiver is connected
If necessary, you can consult a dealer or experienced radio/television technician for additional assistance.
PLEASE NOTE: only equipment certified to comply with Class B (computer input/output devices, terminals, printers, etc.) should be attached to this equipment, and it must have shielded interface cables in order to comply with the Class B FCC limits on RF emissions.
WARNING: changes or modifications to this unit not expressly approved by the party responsible for compliance could void the user's authority to operate the equipment.
CE
Quick Reference: 828mkII Front Panel

Quick Reference: 828mkII Rear Panel
If you are using the 828mkII with an ADAT, use this standard ADAT SYNC INPUT to connect the 828mkII to the end of your ADAT sync chain. For example, if you have three ADATs, chain the ADATs in the usual fashion (SYNC OUT to SYNC IN, etc.), and then connect the last ADAT's SYNC OUT to this SYNC IN. This connection allows you to make sample-accurate audio transfers between AudioDesk (or other sample-accurate software) and the ADATs. If you have a MOTU MIDI Timepiece AV or Digital Timepiece, make it the master of the ADAT SYNC chain so that you can control everything from AudioDesk (or your other MIDI Machine Control compatible software).

Quick Reference: MOTU FireWire Audio Console
![Internal S/PDIF Word Clock In ADAT 9-pin ADAT Optical SMPTE If you are running under Mac OS 9, and any of these settings are grayed out (not available), see "If 828mkII settings are grayed out" on page 51. MOTU FireWire Audio General 828mk2 Sample Rate 96000 Clock Source Internal Optical Input ADAT Optical Output None Phones Phones Word Out System Clock ÷ 2 Click the tabs to access general MOTU FireWire interface settings or settings specific to the 828mkII (or other connected interface.) Choose the global sample rate for the system here. Choose the desired optical format you'd like to use for the optical input and output. Note that they don't have to be the same. If you are running an 828mkII interface at a high sample rate (96 or 88.2), this option appears in the interface tab. It lets you choose a word clock output rate that either matches the global sample rate (e.g. 96kHz) or halves the global rate (e.g. 48kHz instead of 96kHz). If you are using the 828mkII with Mac OS 9, see chapter 6, "MOTU FireWire Control Panel (Mac OS 9)" (page 47). Click the General tab to access these settings. Enable Pedal Pedal Down Set [3] Pedal Up Set none Check this option if you would like the MOTU FireWire Audio Console icon to appear in the application dock as soon as a MOTU FireWire interface is detected (switched on, plugged in, etc.) Launch console when hardware becomes available If you have a foot switch connected to the 828mkII, these settings let you map the foot switch to any computer keyboard key for both the up and down position. For details about how to set this up, see "Enable Pedal" on page 45. In the standard Mac OS X fashion, the console appears in the dock when you launch it. If the Launch console automatically option is checked (as shown above), the icon appears as soon as you switch on your 828mkII interface. If you click and hold on the dock icon (instead of clicking it) or control-click, a menu of hardware settings appears as shown to the right. You can view and configure any hardware settings from this menu, without opening the console window. 828mk2 Sample Rate ▶ Clock Source ▶ Optical Input ▶ Optical Output ▶ Phones ▶ Keep In Dock Show In Finder Quit](/content/2026/05/834830/images/086994e92d726d0d5efa7aa87f0d8b409cfce0a1b306d9dcadbb9765e0056de8.jpg)
CHAPTER 1 About the 828mkll
OVERVIEW
The 828mkII is a computer-based hard disk recording system for Mac OS and Windows that offers 20 inputs and 22 outputs at any standard sample rate up to 96kHz. All inputs and outputs can be accessed simultaneously. The 828mkII consists of a standard 19-inch, single-space, rack-mountable I/O unit that connects directly to a computer via a standard IEEE 1394 FireWire™ cable. The 828mkII offers the following:
■ Eight 24-bit analog TRS inputs
■ Ten 24-bit analog TRS outputs
■ Two combo XLR/TRS mic/guitar inputs with preamps, rear-panel quarter-inch sends and 48V phantom power
■ Eight-channel ADAT optical digital I/O
■ S/PDIF (optical and RCA)
■ ADAT sync in
■ Word clock I/O
■ MIDI I/O
■ On-board SMPTE synchronization with dedicated SMPTE I/O jacks
■ Foot switch for hands-free punch-in/out
■ Headphone jack
■ Main volume knob (for headphone + main outs)
■ CueMix™ DSP no-latency mixing & monitoring
■ Front-panel programming
■ Stand-alone mixing
With a variety of I/O formats, mic preamps, no-latency monitoring of live input and synchronization capabilities, the 828mkII is a complete,
portable “studio in a box” when used with a Macintosh or Windows computer. The 828mkII system includes AudioDesk ^™ , full-featured audio workstation software for Mac OS that supports both 16-bit and 24-bit recording. Also included is an ASIO driver for multi-channel operation with any Macintosh audio software that supports ASIO drivers.
THE 828MKII I/O REAR PANEL
The 828mkII rear panel has the following connectors:
■ Ten gold-plated, balanced +4dB quarter-inch (TRS) analog outputs (with 24-bit 96kHz converters)
■ Two gold-plated, balanced +4dB quarter-inch (TRS) analog sends (for the front-panel mic/guitar inputs)
■ Eight gold-plated, balanced +4 dB quarter-inch (TRS) analog inputs (with 24-bit 96kHz converters)
■ One set of ADAT optical 'light pipe' connectors (8 channels of ADAT optical I/O at 44.1/48kHz or 4 channels at 88.2/96kHz), individually switchable to optical S/PDIF ('TOSLink')
■ RCA S/PDIF in/out
■ MIDI IN and MIDI OUT
■ Gold-plated balanced TRS quarter-inch analog in/out dedicated for SMPTE time code
■ One 9-pin ADAT SYNC IN connector
■ Word clock in/out
■ Foot pedal jack
■ Two 1394 FireWire jacks
20 inputs and 22 outputs
All 828mkII inputs and outputs can be used simultaneously, for a total of 20 inputs and 22 outputs:
Connection Input Output
| Analog 24-bit 96kHz on +4/-10 bal/unbal TRS 8 8 |
| Mic preamps 24-bit 96kHz on XLR/TRS combo 2 - |
| Main outputs 24-bit 96kHz on bal/unbal TRS - stereo |
| Headphone output - stereo |
| ADAT optical digital (at 44.1 or 48kHz) 8 8 |
| SPDIF 24-bit 96kHz digital stereo stereo |
| Total | 20 | 22 |
All inputs and outputs are discrete. In other words, using a mic input does not “steal” an input from the TRS analog I/O bank. The same is true for the headphone outs and the main outs.
The ADAT optical ports provide 4 channels of I/O at 88.2 or 96kHz. They can also be independently configured as stereo TOSLink SPDIF at any supported sample rate.
The headphone outputs can operate as an independent output pair, or they can mirror any other 828mkII output pair, such as the main outs.
Analog
All 10 analog inputs are equipped with 24-bit 96kHz, 64x oversampling A/D converters. All 10 analog outputs have 24-bit 128x oversampling D/A converters. All audio is carried to the computer in a 24-bit data stream. All 10 analog outputs and the 8 rear-panel quarter-inch inputs are on balanced TRS +4dB quarter-inch jacks. All of these jacks can also accept unbalanced plugs.
All quarter-inch analog inputs can be individually switched between a +4 and -10dB reference level. An additional 6dB of software boost can be applied via the CueMix Console software application or via the front panel LCD display.
Mic sends
Before A/D conversion, the pre-amplified signal from each front-panel mic/guitar input is routed to one of the two rear-panel quarter-inch analog sends, so that you can insert a favorite outboard EQ, compressor, amp or effects processor to the mic/guitar input signal before it is converted to digital form. The resulting output from the outboard gear can be fed back into the 828mkII via one of the eight TRS analog inputs on the rear panel, for routing to the computer and/or inclusion in the 828mkII's built-in monitor mixes.
Main Outs
The main outs are equipped with 24-bit 128x oversampling D/A converters and serve as independent outputs for the computer or for the 828mkII's on-board CueMix DSP mixes.
Optical
The 828mkII optical jacks support two digital audio formats: ADAT and S/PDIF. The ADAT optical format provides eight channels of 24-bit digital audio at either 44.1 or 48 kHz, and four channels at 88.2 or 96 kHz. The optical S/PDIF format (often referred to as TOSLink), supplies stereo S/PDIF input or output.
S/PDIF
The 828mkII rear panel provides S/PDIF input and output in two different formats: RCA “coax” and optical “TOSLink”. The RCA jacks are dedicated to the S/PDIF format. The TOSLink jacks can be used either for either TOSLink or ADAT optical. The optical input /output jacks can operate independently. For example, the optical input can be set to TOSLink while the optical output is set to ADAT.
MIDI I/O
The 828mkII's standard MIDI IN and MIDI OUT jacks supply 16 channels of MIDI I/O to and from the computer via the 828mkII's FireWire connection. Timing accuracy can be sample-accurate with host software that supports it.
On-board SMPTE synchronization
The 828mkII can resolve directly to SMPTE time code via the quarter-inch SMPTE input, without a separate synchronizer. A SMPTE out jack is also provided for time code generation. The 828mkII provides a DSP-driven phase-lock engine with sophisticated filtering that provides fast lockup times and sub-frame accuracy.
The included MOTU SMPTE Console ^™ software provides a complete set of tools to generate SMPTE for striping, regenerating or slaving other devices to the computer. Like CueMix DSP, the synchronization features are cross-platform and compatible with all audio sequencer software that supports the ASIO2 sample-accurate sync protocol.
ADAT sync: sample-accurate synchronization
The 828mkII's standard 9-pin ADAT SYNC IN connector provides sample-accurate synchronization with all Alesis ADAT tape decks connected to the system—or any device that supports the ADAT sync format. For example, if you digitally transfer a single track of material from an ADAT via light pipe into audio workstation software on the computer, and then transfer the track back to the ADAT, it will be recorded exactly at its original location, down to the sample.
Word clock
The 828mkII provides standard word clock that can slave to any supported sample rate. In addition, word clock can resolve to and generate “high” and “low” sample rates. For example, if the 828mkII global sample rate is set to 96 kHz, the word clock input can resolve to a “low” rate of 48 kHz. Similarly, when the 828mkII is operating at 96 kHz, the MOTU FireWire Audio Console lets you choose a word clock output rate of 48 kHz (“System clock ÷ 2”).
Punch in/out
The quarter-inch Punch in/out jack accepts a standard foot switch. When you push the foot switch, the 828mkII triggers a programmable keystroke on the computer keyboard. For example, with MOTU's Digital Performer audio sequencer software, the foot switch triggers the 3 key on the numeric keypad, which toggles recording in Digital Performer. Therefore, pressing the foot switch is the same as pressing the 3 key. The 828mkII Control Panel software lets you program any keystroke you wish.
1394 FireWire
The two 1394 FireWire jacks accept a standard IEEE 1394 FireWire cable to connect the 828mkII to a FireWire-equipped Macintosh or Windows computer. The second jack can be used to daisy chain multiple interfaces — up to four MOTU FireWire interfaces — on a single FireWire bus. It can also be used to connect other FireWire devices without the need for a FireWire hub.
THE 828MKII FRONT PANEL
Mic inputs with 48V phantom power
Two front-panel Neutrik™ combo (XLR/TRS) jacks with preamps and phantom power let you to connect a microphone, guitar or any quarter-inch input with front-panel convenience. The XLR jack serves as a low-impedance mic input, and the TRS jack serves as a high-impedance guitar/instrument input. Dedicated front-panel trim knobs allow you to adjust each input independently. Defeatable 48V phantom power is supplied by a front panel switch.
As explained in “Mic sends” on page 10, the pre amplified signal can be routed to external outboard gear before being routed back into the 828mkII.
Headphone output and main volume control
The 828mkII front panel includes a quarter-inch stereo headphone output jack and volume knob. The volume knob also controls the rear-panel main outs. Push the knob to toggle between them. The LCD display provides feedback.
CueMix™ DSP no-latency on-board mixing
The CueMix DSP section of the front-panel provides access to the 828mkII's on-board mixing features, as well as global system settings, Together, these features provide complete stand-alone operation, without a computer. The 828mkII can mix all inputs to any output pair, and up to four such mixes can be independently programmed and simultaneously operated.
Backlit LCD display
Any 828mkII setting can be accessed directly from the front panel using the six rotary encoders and the 2x16 backlit LCD display. CueMix DSP settings such as input gain, panning, +4/-10 input level, 6dB boost, stereo pair grouping, mix output assignment and others are quickly accessed, clearly marked and easy to adjust. Sixteen presets can be created, saved, recalled and duplicated.
Metering section
The front panel of the 828mkII displays several banks of input and output metering. The round analog output, SPDIF output and ADAT optical LEDs display the presence of an output signal. The threshold for these lights is approximately -42 dB. The four- and five-segment input meters provide dedicated multi-segment metering for their respective inputs, as do the five-segment main out meters.
The Clock lights indicate the global sample rate (as chosen in the MOTU FireWire Audio Console software). The LOCK and TACH LEDs provide feedback for the 828mkII's on-board SMPTE synchronization features.
16-BIT AND 24-BIT RECORDING
The 828mkII system handles all data with a 24-bit signal path, regardless of the I/O format. You can record and play back 16-bit or 24-bit audio files at any supported sample rate via any of the 828mkII's analog or digital inputs and outputs. 24-bit audio files can be recorded with any compatible host application that supports 24-bit recording.
AUDIODESK
AudioDesk is a full-featured, 24-bit audio workstation software package included with the 828mkII system (for Macintosh only). AudioDesk provides multi-channel waveform editing, automated virtual mixing, graphic editing of ramp automation, real-time effects plug-ins with 32-bit floating point processing, crossfades, support for many third-party audio plug-ins, background processing of file-based operations, sample-accurate editing and placement of audio, and more.
DIGITAL PERFORMER
The 828mkII system is fully integrated with MOTU's award-winning Digital Performer audio sequencer software package.
OTHER HOST AUDIO SOFTWARE
The 828mkII system includes a standard Mac OS X CoreAudio driver for multichannel I/O with any audio application that supports CoreAudio.
The 828mkII also includes a Mac OS 9 Macintosh ASIO driver for multi-channel compatibility with any Mac OS 9 audio application that supports ASIO drivers.
A COMPUTER-BASED SYSTEM
Regardless of what software you use with the 828mkII, the host computer determines the number of tracks the software can record and play simultaneously, as well as the amount of real-time effects processing you can apply to your mix. A faster computer with more RAM and faster hard drives will allow more simultaneous tracks and
real-time effects than a slower computer with less RAM and slower hard drives. Today's fastest computers can typically play as many as 72 tracks or more. Standard third-party SCSI acceleration products can also help you achieve higher track counts.
CHAPTER 2 Packing List and Macintosh System Requirements
PACKING LIST
The 828mkII ships with the items listed below. If any of these items are not present in your 828mkII box when you first open it, please immediately contact your dealer or MOTU.
■ One 828mkII I/O rack unit
■ One 1394 "FireWire" cable
Power cord
■ One 828mkII Mac/Windows manual
■ One AudioDesk Manual
■ One cross-platform CD-ROM
■ Product registration card
MACINTOSH SYSTEM REQUIREMENTS
The 828mkII system requires the following Macintosh system:
■ A G3/300Mhz Power Macintosh or faster equipped with at least one FireWire port
■ Atleast 64 Mb (megabytes) of RAM (128 Mb or more is recommended)
■ Mac OS 9 or Mac OS X (version 10.2 or later)
■ For Mac OS 9 users only: FireWire Enabler and FireWire Support system extensions 2.4 or later
■ A large hard drive (preferably at least 20 Gb)
PLEASE REGISTER TODAY!
Please send in the registration card included with your 828mkII system. As a registered user, you will be eligible to receive on-line technical support email and announcements about product enhancements as soon as they become available. Only registered users receive these special update notices, so please, complete and mail this registration card!
There is also an AudioDesk software registration card found at the beginning of your AudioDesk manual. Please be sure to fill out and return this card as well, so that you will be eligible to receive on-line technical support email and announcements about AudioDesk software enhancements as soon as they become available.
Thank you for taking the time to register your new MOTU products!
CHAPTER 3 Installing the 828mkII Hardware
OVERVIEW
Here's an overview for installing the 828mkII:
Connect the 828mkll interface.... 17
Connect the 828mkII to the computer.
Connect audio inputs and outputs 18
Make optical and analog connections as desired.
Connect MIDI gear 19
Connect a controller, synth or control surface.
Connect a foot switch.... 19
Connect a footswitch to trigger any keystroke.
A typical 828mkll setup (no mixer).... 20
An example setup for computer-based mixing/FX.
Using the 828mkII with a mixer 21
An example setup for a mixer-based studio.
Making sync connections.... 22
If you need to resolve the 828mkII with other devices, make the necessary sync connections.
Do you need a synchronizer? 23
Sample-accurate sync 24
Sample-accurate ADAT sync.... 25
Sample-accurate ADAT sync with no synchronizer .. 26
Syncing to SMPTE time code.... 27
Syncing to video and/or SMPTE time code using a synchronizer.... 28
Syncing optical devices 29
Syncing S/PDIF devices 30
Syncing word clock devices.... 31
Syncing large systems 31
Connecting multiple MOTU FireWire interfaces ..... 32
CONNECT THE 828MKII INTERFACE
1 Plug one end of the 828mkII FireWire cable (included) into the FireWire socket on the computer as shown below in Figure 3-1.
2 Plug the other end of the FireWire cable into the 828mkII I/O as shown below in Figure 3-1.

natural_image
Close-up of a network device showing an open port with Ethernet ports and a USB cable inserted (no visible text or symbols)
Figure 3-1: Connecting the 828mkll to the computer.
CONNECT AUDIO INPUTS AND OUTPUTS
The 828mkII audio interface has the following audio input and output connectors:
■ 8 balanced, +4 dB quarter-inch analog outputs
■ 8 balanced +4 dB quarter-inch analog inputs
■ 2 Neutrik™ XLR/quarter-inch analog inputs
■ 2 quarter-inch analog sends for the front-panel mic/guitar inputs
■ 2 balanced, +4 dB quarter-inch TRS main outs
■ 1 pair of RCA S/PDIF in and out
■ 1 pair of optical in/out switchable between ADAT (“Lightpipe”) or optical S/PDIF (TOSLink)
Here are a few things you should keep in mind as you are making these connections to other devices.
Quarter-inch analog
The quarter-inch analog inputs and outputs (1-8), as well as the main outs, are balanced TRS connectors that can also accept an unbalanced plug. The outputs are all referenced to +4dBu. The inputs can be manually set to either +4 or -10dBu. Use the front panel controls to adjust the reference level (+4/-10) as needed for each input (or input pair) as follows:
1 Turn the PARAM knob until you see the "4/10" setting displayed in the LCD, as shown below.
If turning the PARAM knob doesn't do anything, press the SETUP knob once, and then turn it.
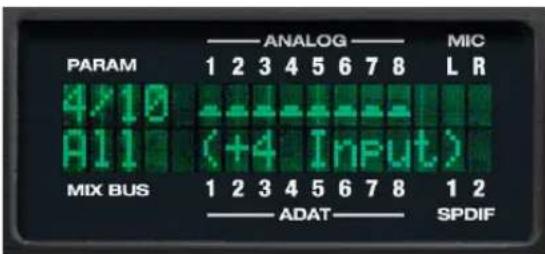
Figure 3-2: Setting the reference level for the eight TRS analog inputs.
2 Turn the CURSOR knob until the desired input flashes.
3 Turn (or press) the VALUE knob to toggle the input between a +4 or -10dB reference level setting.

Front-panel mic/guitar/instrument inputs
Connect a microphone, guitar or other similar instrument to the front-panel inputs. If your microphone requires phantom power, move the 48V phantom power switch on the front panel to the right (enabled). Use the trim knobs on the front panel to adjust the input level as needed for each input. Use the two input level meters on the front panel (labeled MIC) to calibrate the level. These meters register for both the XLR and TRS input.
Do not connect a +4 (line level) XLR cable to the front-panel inputs (because of the preamps). Use a rear-panel quarter-inch input instead.
Mic/guitar/instrument sends
Each front-panel XLR/TRS input has a corresponding send on the rear panel. The send provides the pre amplified and calibrated input signal, which you can then route to any other device, such as compressor, guitar amp, outboard EQ, reverb unit, etc. Use any 828mkII input (analog or digital) as a return back into the 828mkII. From there, you will be able to route the signal anywhere in the system, such as to the computer and/or to any CueMix DSP mix bus.
Optical
Reminder: optical goes OUT to IN and IN to OUT, like MIDI.
The optical jacks can be connected to either an ADAT “lightpipe” device or an optical S/PDIF “TOSLink” device. Just make the connections as needed and then you’ll set the format later in the MOTU FireWire Audio Console. Input and output are independent. For example, you could connect ADAT optical input from your digital mixer and connect TOSLink optical output to your DAT deck.
Main outs
The main outputs serve as independent outputs. The main out volume is controlled by the volume knob on the front panel. Push the knob to toggle between phone and main out volume control. In a standard studio configuration, the main outs are intended for a pair of studio monitors, but they can also be used as additional outputs for any purpose.
CONNECT MIDI GEAR
828mkII MIDI input and output is supported under Mac OS X only. Connect your MIDI device's MIDI IN jack to the 828mkII's MIDI OUT jack (Connection A below). Conversely, connect the MIDI device's MIDI OUT jack to the 8238mkII's MIDI IN jack (Connection B).

flowchart
graph TD
    A["828mkII rear panel"] -->|MIDI OUT| B["MIDI Device"]
    A -->|MIDI IN| C["MIDI Cable"]
    C -->|MIDI OUT| D["MIDI Device"]
    C -->|MIDI IN| E["MIDI Cable"]
    E -->|MIDI IN| F["MIDI Device"]
    style A fill:#f9f,stroke:#333
    style B fill:#ccf,stroke:#333
    style C fill:#cfc,stroke:#333
    style D fill:#fcc,stroke:#333
    style E fill:#cff,stroke:#333
Figure 3-3: Connecting a MIDI device to the 828mkll.
One-way MIDI connections
MIDI devices that do not receive MIDI data, such as a dedicated keyboard controller, guitar controller, or drum pad, only need Connection B shown in Figure 3-3. Similarly, devices that never send data, such as a sound module, only need Connection A. Make both connections for any device that needs to both send and receive MIDI data.
Connecting additional gear with MIDI THRUs
If you need to connect several pieces of MIDI gear, run a MIDI cable from the MIDI THRU of a device already connected to the 828mkII to the MIDI IN on the additional device as shown below in Figure 3-4. The two devices then share the 828mkII's MIDI OUT port. This means that they share the same set of 16 MIDI channels, too, so try to do this with devices that receive on only one MIDI channel (such as effects modules) so their receive channels don't conflict with one another.

flowchart
graph TD
    A["828mkII rear panel"] -->|MIDI OUT| B["MIDI IN"]
    B --> C["MIDI Device"]
    C --> D["MIDI THRU"]
    D --> E["MIDI cable"]
    E --> F["MIDI IN"]
    F --> G["Additional device"]
Figure 3-4: Connecting additional devices with MIDI THRU ports.
CONNECT A FOOT SWITCH
If you would like to use a foot switch with your 828mkII, connect it to the PUNCH IN/OUT jack. See “Quick Reference: MOTU FireWire Audio Console” on page 7 for information about how to program the foot switch to trigger any computer keystroke you wish.
A TYPICAL 828MKII SETUP (NO MIXER)
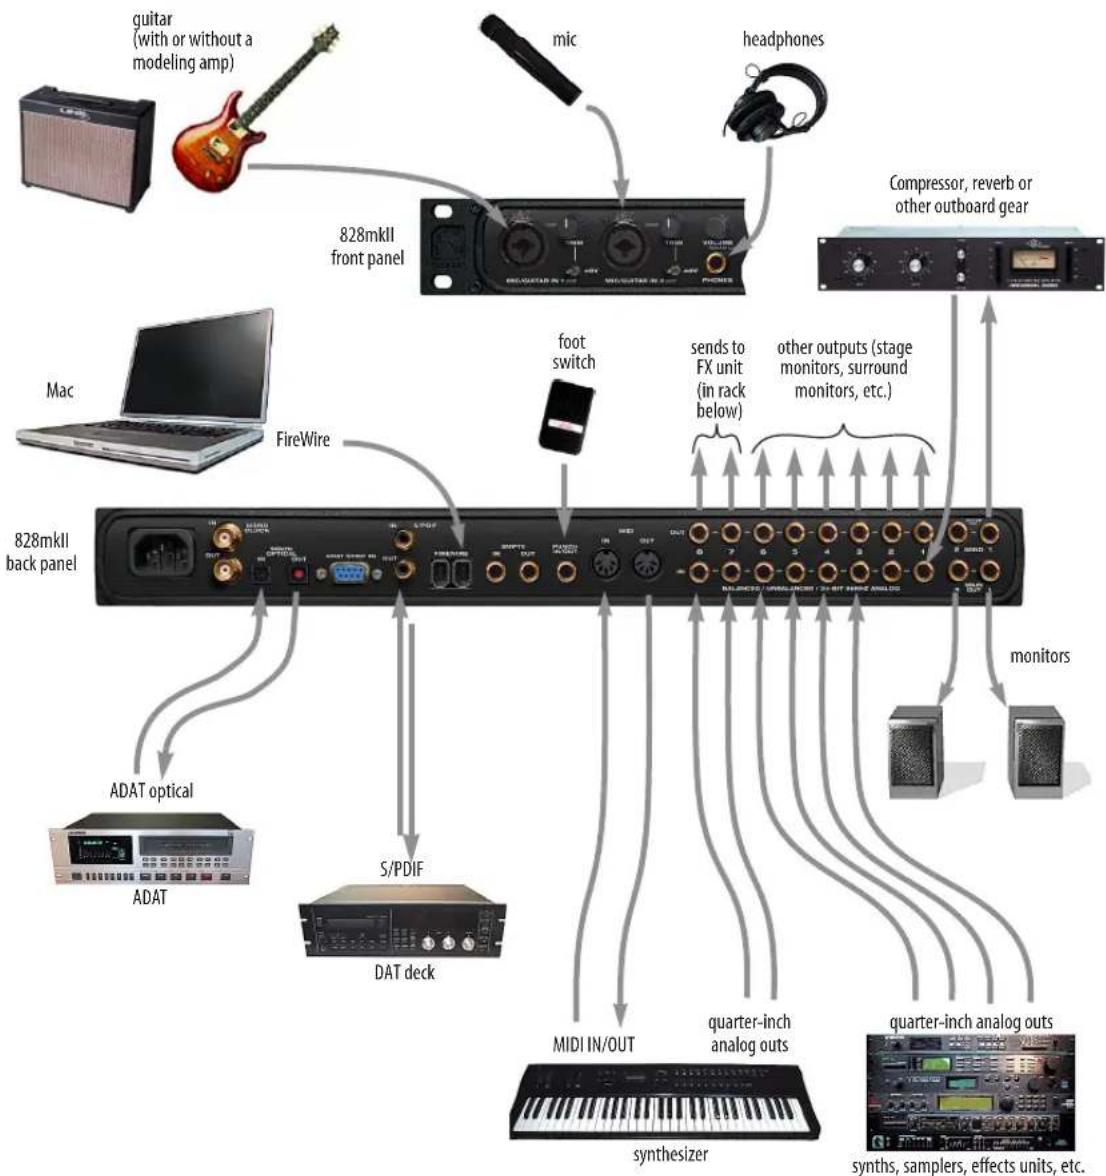
Here is a typical 828mkII studio setup. This rig can be operated without an external mixer. All mixing and processing can be done in the computer with audio software. During recording, you can use the 828mkII's CueMix™ DSP no-latency monitoring to listen to what you are recording via the main
outs, headphone outs, or any other output pair. You can control monitoring either from the front panel or from the included CueMix Console software. The two front-panel guitar/mic inputs can be routed to outboard effects processor, such as a compressor, EQ or reverb, via the rear panel sends.
flowchart
graph TD
    A["828mkII back panel"] --> B["828mkII front panel"]
    B --> C["mic"]
    B --> D["headphones"]
    B --> E["Compressor, reverb or other outboard gear"]
    B --> F["Mac"]
    B --> G["FireWire"]
    G --> H["foot switch"]
    H --> I["828mkII back panel"]
    I --> J["ADAT optical"]
    I --> K["ADAT"]
    I --> L["S/PDIF"]
    I --> M["DAT deck"]
    I --> N["MIDI IN/OUT"]
    I --> O["synthesizer"]
    I --> P["monitors"]
    I --> Q["microphone"]
    I --> R["quarter-inch analog outs"]
    I --> S["synthes, samplers, effects units, etc."]
Figure 3-5: A typical 828mkll studio setup.
USING THE 828MKII WITH A MIXER
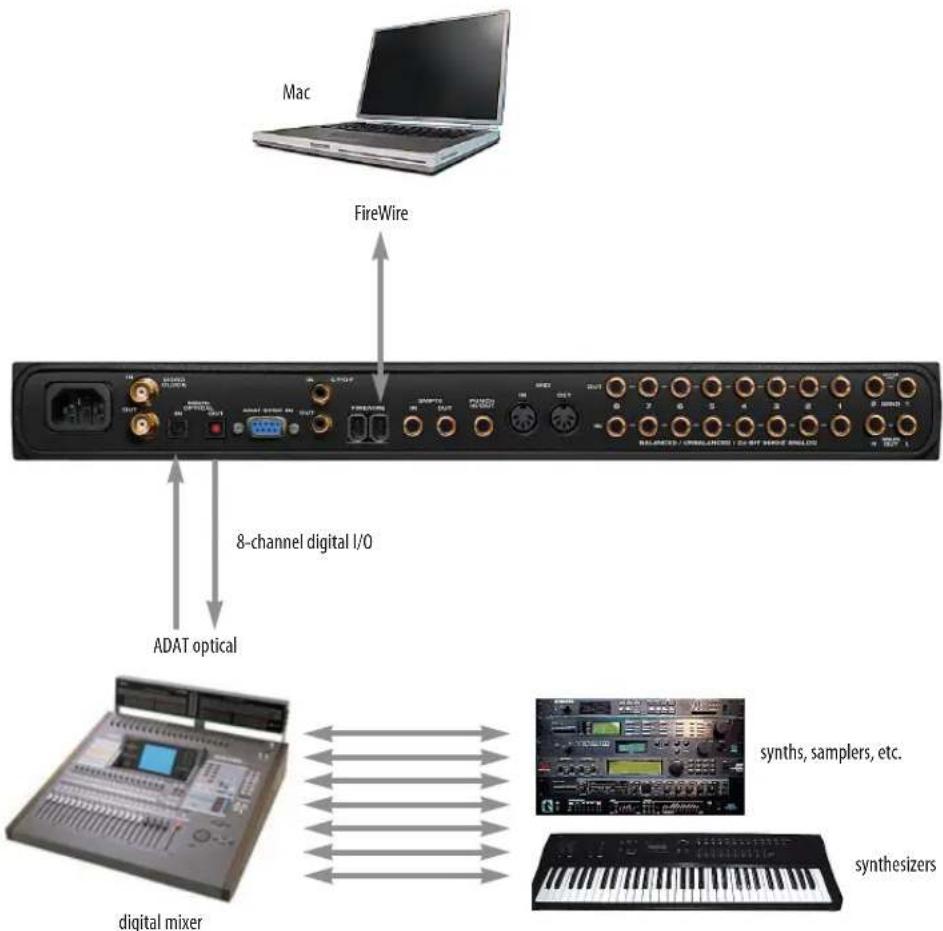
While there are many ways to use the 828mkII with an external mixer, typically the 828mkII serves as a multi-channel "pipeline" between the mixer and the computer. If your mixer is analog, connect the analog section of the 828mkII to your mixer. If your mixer is digital, and it has ADAT optical I/O, you can connect them optically as shown below in Figure 3-6. The 828mkII's available analog and
SPDIF inputs and outputs can serve as an extension to the mixer I/O, but then you will probably find yourself mixing in two places: the mixer and the computer. A word of advice: if you would like to use the 828mkII with an external mixer, use the mixer for mixing. Trying to mix large multitrack projects in two places can become very cumbersome very quickly.
flowchart
graph TD
    A["Mac"] --> B["FireWire"]
    B --> C["ADAT optical"]
    C --> D["digital mixer"]
    D <--> E["synthes, samplers, etc."]
    D <--> F["synthesizers"]
Figure 3-6: Using the 828mkll with a digital mixer.
MAKING SYNC CONNECTIONS
If you connect devices digitally to the 828mkII, or if you need to synchronize the 828mkII with an outside time reference such as SMPTE time code, you must pay careful attention to the synchronization connections and clock source issues discussed in the next few sections.
Do you need to synchronize the 828mkII?
If you will be using only the 828mkII's analog inputs and outputs (and none of its digital I/O), and you have no plans to synchronize your 828mkII system to SMPTE time code, you don't need to make any sync connections. You can skip this section and proceed to chapter 4, "Installing the 828mkII Macintosh Software" (page 35). After you install the 828mkII software, you'll open the MOTU FireWire Audio Console and set the Clock Source setting to Internal as shown below. For details, see chapter 5, "MOTU FireWire Audio Console (Mac OS X)" (page 41) or chapter 6, "MOTU FireWire Control Panel (Mac OS 9)" (page 47).

Figure 3-7: You can run the 828mkll under its own internal clock when it has no digital audio connections and you are not synchronizing the 828mkll system to an external time reference such as SMPTE.
Situations that require synchronization
There are three general cases in which you will need to resolve the 828mkII with other devices:
■ Synchronizing the 828mkII with other digital audio devices so that their digital audio clocks are phase-locked (as shown in Figure 3-8)
■ Slaving the 828mkII system to SMPTE time code from a video deck, analog multi-track, etc.
■ Both of the above
Synchronization is critical for clean digital I/O
Synchronization is critical in any audio system, but it is especially important when you are transferring audio between digital audio devices. Your success in using the 828mkII's digital I/O features depends almost entirely on proper synchronization. The following sections guide you through several recommended scenarios.
Be sure to choose a digital audio clock master
When you transfer digital audio between two devices, their audio clocks must be in phase with one another — or phase-locked. Otherwise, you'll hear clicks, pops, and distortion in the audio — or perhaps no audio at all.
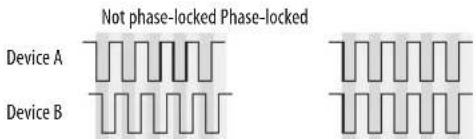
Figure 3-8: When transferring audio, two devices must have phase-locked audio clocks to prevent clicks, pops or other artifacts.
There are two ways to achieve phase lock: slave one device to the other, or slave both devices to a third master clock. If you have three or more digital audio devices, you need to slave them all to a single master audio clock.

flowchart
graph TD
    A["Master"] --> B["Slave"]
    C["Master"] --> D["Slave Slave"]
    E["Master"] --> F["Slave Slave"]
Figure 3-9: To keep the 828mkll phased-locked with other digital audio devices connected to it, choose a clock master.
Also remember that audio phase lock can be achieved independently of time code (location). For example, one device can be the time code master while another is the audio clock master. But only one device can be the audio clock master. If you set things up with this rule in mind, you'll have trouble-free audio transfers with the 828mkII.
DO YOU NEED A SYNCHRONIZER?
Whether or not you'll need a synchronizer depends on your gear and what you will be doing with your 828mkII system. The following pages give you specific information about common sync scenarios. At least one of them will likely apply to you. Here are some general considerations to help you figure out if you need (or want) a synchronizer for you 828mkII system.
You don't need a synchronizer if...
As explained earlier, the 828mkII's digital audio clock must be phase-locked (synchronized) with other connected digital audio devices to achieve clean digital transfers between them. Can this be accomplished without an additional digital audio synchronizer? It depends on the nature of the other devices, and what you want to do with them. You don't need a synchronizer if the device has a way of locking itself directly to the 828mkII's clock (via ADAT lightpipe, S/PDIF or word clock), AND if the device carries no sense of location in time. A digital mixer is a good example: it can slave to its ADAT lightpipe connection from the 828mkII, and it has no sense of time; it just passes audio through for mixing.
A stand-alone digital recorder, on the other hand, does have a sense of location in time, either via SMPTE time code or via its own sample address. For example, if you want to fly tracks back and forth between your computer and an Alesis hard disk recorder while maintaining the audio's position in time, the ADAT Sync port on the 828mkII lets you do so without a separate synchronizer — and with sample-accurate precision, as long as you're using AudioDesk, Digital Performer, or other sample-accurate software. Just connect the 828mkII directly to the Alesis recorder (or other ADAT Sync-compatible device) as discussed in "Sample-accurate ADAT sync with no synchronizer" on page 26. But if you also want transport control over the entire rig (including the hard disk recorder) from your audio software, you'll need a MIDI Machine Control-compatible synchronizer such as MOTU's MIDI Timepiece AV, as discussed in "Sample-accurate sync" on page 24. If you are simply using a standalone recorder as a way to capture live tracks that you then transfer in one pass into the computer, no synchronizer is required because the tracks will remain in perfect phase lock with each other as you transfer them together. You can simply slave the stand-alone recorder to the optical output from the 828mkII as explained in "Syncing optical devices" on page 29.
Transport control from your computer
If you have stand-alone digital recorders connected to the 828mkII, and they support ADAT Sync, your audio software — if it supports MIDI Machine Control (MMC) — allows you to control the transports of everything from your computer. Most advanced audio programs support MMC. To do this, you'll also need an MMC-compatible ADAT synchronizer such as a MOTU MIDI Timepiece AV or Digital Timepiece. Synchronizers like these allow you to play, stop, rewind and locate all of your tape decks using the transport controls in the audio software. If your audio software supports sample-accurate sync (like Digital Performer and AudioDesk), you can do so with sample-accurate precision. The following pages show you how to achieve MMC control, where possible.
Continuous sync to SMPTE / MTC
The 828mkII can synchronize directly to SMPTE time code. If your audio software supports sample-accurate sync (like Digital Performer and AudioDesk), it can also resolve to time code via the 828mkII. If your software does not support sample-accurate sync, you need a dedicated synchronizer, as illustrated on the following pages.
Your 828mkII system provides you with the most advanced, accurate synchronization possible with Alesis modular digital tape decks and hard disk recorders — or any device that supports sample-accurate ADAT sync. Figure 3-10 below shows a few best-case scenarios. Below is a brief explanation of the benefits you achieve with these setups.
Sample accurate locating
With sample accurate locating, when you transfer audio between AudioDesk (or any other sample-accurate host software) and a sample-accurate recorder, the audio will not drift in time — even by as little as one sample. This is the tightest possible synchronization between digital audio devices. The timing in your audio will not be affected in any way by the process of transferring it between the 828mkII and the recorder.
Is your audio software sample-accurate?
Sample-accurate locating is only possible with software that supports this feature, such as AudioDesk or Digital Performer. For third-party software, sample-accurate performance (if it's supported) is achieved through the 828mkII's ASIO Version 2 driver (Mac OS 9 only).
Transport control from your computer
If you have a MIDI Timepiece AV, Digital Timepiece or any ADAT synchronizer that also supports MIDI Machine Control (MMC), you can play, stop, rewind and locate all of your ADATs using the transport controls in the audio software running on your computer. This includes cueing features like markers, position bars, playback wipers, time rulers, etc.

Figure 3-11: AudioDesk and Digital Performer support sample-accurate transfers with ADAT Sync compatible digital tape decks and modular hard disk recorders.
| Sync format Software Synchronizer | Sample accurate locating | Transport control from computer | Continuous sync to SMPTE / MTC | |
| ADAT AudioDesk, Cubase or Digital Performer | MIDI Timepiece AV or Digital Timepiece | Yes Yes Yes | ||
| ADAT AudioDesk, Cubase or Digital Performer | BRC (or any MMC capable ADAT synchronizer) | Yes Yes Yes | ||
| ADAT AudioDesk, Cubase or Digital Performer | None Yes No No | |||
Figure 3-10: These recommended combinations of hardware and software offer the tightest sync possible between the 828mKII and digital audio recorders in the form of sample-accurate locating between the software and the tape decks. Sample accurate locating is possible even without a MIDI Timepiece AV or Digital Timepiece, although you give up transport control from the computer.
SAMPLE-ACCURATE ADAT SYNC
The 828mkII can achieve sample-accurate sync with ADATs, Alesis hard disk recorders or any ADAT Sync-compatible devices. Sample-accurate software is required, such as AudioDesk, Digital Performer, or Mac OS 9 ASIO 2.0-compatible software that also supports sample-accurate sync. Connect the 828mkII to the end of the ADAT Sync chain and make the software settings shown below in Figure 3-12. If you will be using the stand-alone recorder for its analog inputs and outputs only (you won't be doing any recording with it), treat it as an 'optical' device. See "Syncing optical devices" on page 29.
Use this setup if you have:
√ ADATs, Alesis hard disk recorders or any ADAT SYNC compatible device(s).
√ A MOTU Digital Timepiece, MIDI Timepiece AV or other ADAT synchronizer.
√ Host software that supports sample-accurate sync.
This setup provides:
√ Sample-accurate locating between all ADAT SYNC-compatible devices, the 828mkII and your software (AudioDesk, Digital Performer or other sample-accurate software).
√ With a Digital Timepiece, this setup provides sample-accurate locating across all devices: ADAT, Tascam and the 828mkII.
√ Transport control of everything from the computer, OR continuous sync to SMPTE time code and other sync sources (the other source is the transport master in this case).

flowchart
graph TD
    A["Macintosh computer running AudioDesk, Digital Performer or other sample-accurate software."] --> B["FireWire"]
    B --> C["ADATs"]
    C --> D["FireWire"]
    D --> E["ADAT Sync Out"]
    E --> F["Sync In Sync cables"]
    F --> G["Sync In Sync Out"]
    G --> H["Sync In Sync Out"]
    H --> I["Sync In Sync Out"]
    I --> J["Adat Sync Out"]
    J --> K["AdAT Sync Out"]
    K --> L["Adat Sync Out"]
    L --> M["Adat Sync Out"]
    M --> N["Adat Sync Out"]
    N --> O["Adat Sync Out"]
    O --> P["Adat Sync Out"]
    P --> Q["Adat Sync Out"]
    Q --> R["Adat Sync Out"]
    R --> S["Adat Sync Out"]
    S --> T["Adat Sync Out"]
    T --> U["Adat Sync Out"]
    U --> V["Adat Sync Out"]
    V --> W["Adat Sync Out"]
    W --> X["Adat Sync Out"]
    X --> Y["Adat Sync Out"]
    Y --> Z["Adat Sync Out"]
    Z --> AA["Adat Sync Out"]
    AA --> AB["Adat Sync Out"]
    AB --> AC["Adat Sync Out"]
    AC --> AD["Adat Sync Out"]
    AD --> AE["Adat Sync Out"]
    AE --> AF["Adat Sync Out"]
    AF --> AG["Adat Sync Out"]
    AG --> AH["Adat Sync Out"]
    AH --> AI["Adat Sync Out"]
    AI --> AJ["Adat Sync Out"]
    AJ --> AK["Adat Sync Out"]
    AK --> AL["Adat Sync Out"]
    AL --> AM["Adat Sync Out"]
    AM --> AN["Adat Sync Out"]
    AN --> AO["Adat Sync Out"]
    AO --> AP["Adat Sync Out"]
    AP --> AQ["Adat Sync Out"]
    AQ --> AR["Adat Sync Out"]
    AR --> AS["Adat Sync Out"]
    AS --> AT["Adat Sync Out"]
    AT --> AU["Adat Sync Out"]
    AU --> AV["Adat Sync Out"]
    AV --> AW["Adat Sync Out"]
    AW --> AX["Adat Sync Out"]
    AX --> AY["Adat Sync Out"]
    AY --> AZ["Adat Sync Out"]
    AZ --> BA["Adat Sync Out"]
    BA --> BB["Adat Sync Out"]
    BB --> BC["Adat Sync Out"]
    BC --> BD["Adat Sync Out"]
    BD --> BE["Adat Sync Out"]
    BE --> BF["Adat Sync Out"]
    BF --> BG["Adat Sync Out"]
    BG --> BH["Adat Sync Out"]
    BH --> BI["Adat Sync Out"]
    BI --> BJ["Adat Sync Out"]
    BJ --> BK["Adat Sync Out"]
    BK --> BL["Adat Sync Out"]
    BL --> BM["Adat Sync Out"]
    BM --> BN["Adat Sync Out"]
    BN --> BO["MIDI Timepiece AV"]
Figure 3-12: Connections for sample-accurate ADAT sync.
SAMPLE-ACCURATE ADAT SYNC WITH NO SYNCHRONIZER
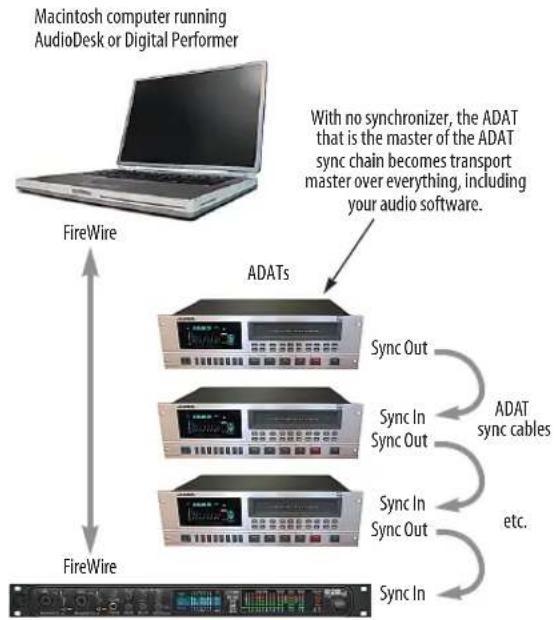
Even if you don't have an ADAT synchronizer, you can achieve sample-accurate sync between ADAT-sync compatible devices, an 828mkII, and any sample-accurate software (such as AudioDesk or Digital Performer). Just connect the 828mkII to the end of the ADAT sync chain as shown below. You don't get transport control from your computer, nor can you slave the system to SMPTE time code. Instead, you have to play, stop, rewind and cue the system from the transports on your recorder. If you're using the recorder as an additional source of analog inputs and outputs only (not for recording), see "Syncing optical devices" on page 29.
Use this setup if you have:
√ ADATs, Alesis hard disk recorders or any ADAT SYNC compatible device(s).
✗ No ADAT synchronizer.
√ Host software that supports sample-accurate sync.
This setup provides:
√ Sample-accurate locating between all ADAT SYNC-compatible devices, the 828mkII and your software (AudioDesk, Digital Performer or other sample-accurate software).
✗ No transport control of everything from the computer.
✗ No sync to SMPTE time code or other sync sources.
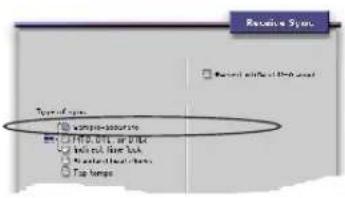
In AudioDesk or Digital Performer:
-
Choose Receive Sync the Setup menu (Basics menu under OS 9).
-
Choose the Sample-accurate option shown to the left.
-
Make sure that Slave to External Sync is checked in the Studio menu (Basics menu under OS 9).

flowchart
graph TD
    A["Macintosh computer running AudioDesk or Digital Performer"] --> B["FireWire"]
    B --> C["ADATs"]
    C --> D["Sync Out"]
    C --> E["Sync In Sync Out"]
    C --> F["Sync In Sync Out"]
    C --> G["Sync In"]
    D --> H["ADAT sync cables"]
    E --> H
    F --> I["etc."]
    G --> J["Sync In"]
    style A fill:#f9f,stroke:#333
    style B fill:#ccf,stroke:#333
    style C fill:#cfc,stroke:#333
    style D fill:#fcc,stroke:#333
    style E fill:#fcc,stroke:#333
    style F fill:#fcc,stroke:#333
    style G fill:#fcc,stroke:#333
To set the 828mkII hardware clock source for sample-accurate sync:
-
In AudioDesk or Digital Performer, choose MOTU Audio System>Configure Hardware Driver from the Setup menu (or the Basics menu under OS 9), or run the MOTU FireWire Audio Console.
-
Choose ADAT 9-pin from the Clock Source menu as shown to above.
-
Make sure the Sample Rate setting matches the recorder and synchronizer.
In AudioDesk or Digital Performer:
- Make sure that Slave to External Sync is checked in the Studio menu (Basics menu under OS 9).
- Click the play or record button. The software will then wait for you to start your recorder.

- Press the Play button on the front panel of your recorder to initiate playback or recording.
For sample-accurate sync settings in Cubase VST, see "Sample-accurate sync to ADAT" on page 5.
Figure 3-13: Sample-accurate sync between AudioDesk or Digital Performer and one or more ADAT-sync compatible devices — without an ADAT synchronizer.
SYNCING TO SMPTE TIME CODE
The 828mkII system can resolve directly to SMPTE time code. It can also generate time code and word clock, under its own clock or while slaving to time code. Therefore, the 828mkII can act both as an audio interface and digital audio synchronizer, to which you can slave other digital audio devices. You can use the 828mkII to slave your audio software to SMPTE as well, as long as your software supports sample-accurate sync, which is the means by which the software follows the 828mkII. The accuracy may not be sample-accurate, but in most cases it will be very close.
Use this setup if you have:
√ A SMPTE time code source, such as a multitrack tape deck.
√ An 828mkII by itself, OR with another slaved device (such as a digital mixer).
√ Host software that supports sample-accurate sync.
This setup provides:
✗ No sample-accurate locating.
√ Continuous sync to SMPTE time code.
√ Sub-frame timing accuracy.
√ Transport control from the SMPTE time code source.
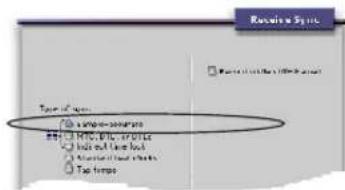
In AudioDesk or Digital Performer:
- Choose Receive Sync the Setup menu (Basics menu under OS 9).
- Choose the Sample-accurate option shown to the left.
- Make sure that Slave to External Sync is checked in the Studio menu (Basics menu under OS 9).
For sample-accurate sync settings in Cubase, see "Sample-accurate sync with Cubase or Nuendo" on page 96.

flowchart
graph TD
    A["SMPTE time code source"] --> B["audio cable bearing LTC (Longitudinal Time Code)"]
    B --> C["SMPTE IN quarter-inch jack"]
    C --> D["828mkII interface"]
    D --> E["FireWire cable"]
    E --> F["Other digital audio device slaved to the 828mkII"]
    D --> G["Macintosh computer running AudioDesk, Digital Performer or other sample-accurate software."]
    style A fill:#f9f,stroke:#333
    style B fill:#ccf,stroke:#333
    style C fill:#cfc,stroke:#333
    style D fill:#fcc,stroke:#333
    style E fill:#cff,stroke:#333
    style F fill:#ffc,stroke:#333
    style G fill:#ffc,stroke:#333

Choose SMPTE as the clock source in AudioDesk, Digital Performer, or the MOTU FireWire Audio Console. This setting can also be made in the MOTU SMPTE Console (shown below).
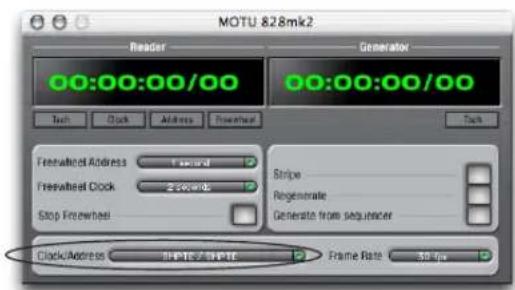
Launch the MOTU SMPTE Console to specify the time code frame rate and amount of freewheel. Also, confirm that the Clock Source/Address is SMPTE/SMPTE. For details about the other settings, see chapter 13, "MOTU SMPTE Console" (page 103).
Figure 3-14: Connections for synchronizing the 828mkll directly to SMPTE time code.
SYNCING TO VIDEO AND/OR SMPTE TIME CODE USING A SYNCHRONIZER
If your host audio software does not support the 828mkII's on-board SMPTE sync features (because your software does not support sample-accurate sync), you need a universal synchronizer, such as a MOTU MIDI Timepiece AV or Digital Timepiece. These dedicated sync boxes can read video and SMPTE time code and then convert it into word clock and MIDI Time Code (MTC). The word clock goes to the 828mkII to resolve the audio hardware, and MIDI Time Code is fed to your host audio software, which locks to it, as shown below in Figure 3-15.
Use this setup if you have:
√ Video and/or a SMPTE time code source.
√ A Digital Timepiece, MIDI Timepiece AV or other universal synchronizer.
√ Host software that does not support sample-accurate sync (although you can use this setup even if it does).
This setup provides:
✗ No sample-accurate locating.
√ Continuous sync to SMPTE time code.
√ Sub-frame timing accuracy.
√ Transport control from the SMPTE time code source.

flowchart
graph TD
    A["Video deck or other source for video and/or SMPTE time code"] --> B["Audio cable bearing LTC (Longitudinal Time Code)"]
    B --> C["MOTU MIDI Timepiece AV or Digital Timepiece slaving to video and/or SMPTE time code"]
    C --> D["word clock MIDI Time Code (Via MIDI interface)"]
    D --> E["Macintosh computer running any audio software"]
    E --> F["828mkII"]
Figure 3-15: If your host audio software does not support sample-accurate sync and the 828mkll's built-in SMPTE sync features, use a universal synchronizer such as the MOTU MIDI Timepiece AV or Digital Timepiece.
SYNCING OPTICAL DEVICES
The word optical is our short-hand way of referring to any device that connects to the 828mkII via an optical cable. But we make a further distinction: an optical device is also one that doesn't care about sample location. An example is a digital mixer. Since a digital mixer is not a recording device, it has no sense of sample location like an ADAT does. An ADAT can cue to a specific sample number (e.g. sample number 43,478, 103) — as can any device that supports ADAT sync, but most digital mixers simply mix and process audio digitally, with no sense of a specific sample location. There are many other devices that fall into this category, including digital effects processors, synthesizers, A/D converters, and many more.
For ADATs or other devices that support ADAT sync, synchronize them with the 828mkII as described in the previous sections of this chapter.
For optical devices, such as digital mixers, all you have to do is make sure that their digital audio clock is phase-locked (in sync with) the 828mkII. There are three ways to do this:
■ Slave the optical device to the 828mkII
■ Slave the 828mkII to the optical device
■ Slave both the optical device and the 828mkII to a third master clock (such as a Digital Timepiece or MIDI Timepiece AV synchronizer)

flowchart
graph TD
    A["828mkII"] --> B["ADAT Optical OUT"]
    B --> C["ADAT Optical IN"]
    C --> D["Digital mixer or other optical device"]
    D --> E["828mkII Clock Source setting = Internal, or any dock source setting except Optical. The optical device slaves to the 828mkII (via its optical cable connection)."]

    F["828mkII"] --> G["ADAT Optical OUT"]
    G --> H["ADAT Optical IN"]
    H --> I["828mkII 828mkII Clock Source setting = optical"]

    J["MIDI Timepiece AV set to Internal"] --> K["Word Clock Out"]
    J --> L["Word Clock IN"]
    M["Mac"] --> N["828mkII Clock Source setting = ADAT 9-pin"]
    N --> O["ADAT Sync out"]
    P["Computer with 828mkII"] --> Q["ADAT sync in"]
    Q --> R["bi-directional optical"]
    S["Digital mixer or other optical device"] --> T["Word Clock IN"]
    T --> U["Word Clock IN"]
Figure 3-16: Three setups for synchronizing an optical device with the 828mkll. You can slave the optical device to the 828mkll or vice versa with their optical connections. For more elaborate setups, you can slave both to a digital audio synchronizer like the Digital Timepiece. Don't use any of these setups for an ADAT or other optical device that records. Instead, see "Sample-accurate ADAT sync" on page 25.
SYNCING S/PDIF DEVICES
DAT decks and other S/PDIF devices will sync to the 828mkII in one of two ways:
■ Via the S/PDIF connection itself
■ Via word clock
S/PDIF devices with no word clock
If your DAT deck or other S/PDIF device has no word clock sync connectors, just connect it to the 828mkII via the S/PDIF connectors. When the device records S/PDIF audio (from the 828mkII), it will simply synchronize to the clock provided by the audio input.
On the other hand, when you transfer audio from the S/PDIF device into the 828mkII, you'll have to slave the 828mkII to its S/PDIF input. If you have other digital audio devices connected to the 828mkII, and they are not slaved directly to the 828mkII itself, you may hear clicks and pops resulting from their unsynchronized audio clock. If so, just turn them off during the transfer.
S/PDIF devices with word clock
If your S/PDIF device has a Word Clock input, slave the S/PDIF device to the 828mkII via their word clock connection. You can then freely transfer audio between the 828mkII and the S/PDIF device.

flowchart
graph TD
    A["828mkII"] -->|S/PDIF| B["DAT deck or other S/PDIF device"]
    C["828mkII"] -->|Clock Source setting = Internal (when transferring from the 828mkII to the S/PDIF device)| D["DAT deck or other SPDIF device"]
    E["828mkII"] -->|Clock Source setting = S/PDIF (when transferring from the S/PDIF device to the 828mkII)| F["DAT deck or other SPDIF device"]
    G["828mkII"] --> H["Word Clock Out"]
    G --> I["Word Clock In"]
    G --> J["SPDIF"]
    K["828mkII"] --> L["Word Clock Out"]
    K --> M["Word Clock In"]
    K --> N["SPDIF"]
    O["With this setup, in the MOTU FireWire Audio Console window, choose Internal, or any other clock source setting except SPDIF. The DAT deck (or other SPDIF device) slaves to the 828mkII via word clock for SPDIF transfers in both directions."] --> P["Data card or other SPDIF device"]
Figure 3-17: Two setups for synchronizing an S/PDIF device with the 828mkll. In the top diagram, sync is achieved via the S/PDIF connection itself. In this case, you have to choose S/PDIF as the 828mkll's clock source when recording from the S/PDIF device. If you don't want to have to worry about switching the Clock Source setting depending on the direction of the S/PDIF transfer, you can slave the S/PDIF device to word clock from the 828mkll or vice versa (not shown). The Word Clock connection maintains sync, regardless of the direction of the transfer.
SYNCING WORD CLOCK DEVICES
The 828mkII word clock connectors allow you to synchronize it with a wide variety of other word clock-equipped devices.
For standard word clock sync, you need to choose an audio clock master (as explained in “Be sure to choose a digital audio clock master” on page 22). In the simplest case, you have two devices and one is the word clock master and the other is the slave as shown below in Figure 3-18 and Figure 3-19.

flowchart
graph TD
    A["Master 828mkII"] -->|Word clock OUT| B["Slave"]
    B -->|Word clock IN| C["Slave"]
    C --> D["Other device"]
Figure 3-18: Slaving another digital audio device to the 828mkll via word clock. For the 828mkll clock source, choose any source besides word clock, as it is not advisable to chain word clock.

flowchart
graph TD
    A["Audio clock Master"] --> B["Word clock OUT"]
    B --> C["Word clock IN"]
    C --> D["Slave"]
Figure 3-19: Slaving the 828mkll to word clock. For the 828mkll clock source, choose 'Word Clock In'.
Don't chain word clock
If you have three or more digital audio devices that you need to synchronize, avoid chaining their word clock connections (OUT to IN, OUT to IN, etc.), as this causes problems. Instead, use a dedicated synchronizer like the Digital Timepiece or a word clock distribution device of some kind.
Slaving to 2x and 1/2x word clock
All MOTU FireWire audio interfaces that support 96 kHz operation (including the 828mkII and 896) have the ability to slave to a word clock signal running at either twice or half their current clock rate. For example, the 828mkII could be running at 96 kHz while slaving to a 48 kHz word clock signal from a MOTU Digital Timepiece. Similarly, the 828mkII could run at 88.2 kHz and slave to 44.1 kHz word clock. Conversely, the 828mkII could run at 48 kHz and slave to a 96 kHz word clock signal. In all of these cases, the front panel clock LEDs flash both sample rates to indicate that the 828mkII is slaving to word clock at either twice or half its own clock rate. But if the 828mkII is running at 96 kHz, it cannot slave to word clock running at 44.1 kHz.
Remember, the word clock signal must be one of the following:
■ the same as the 828mkII clock
■ twice the 828mkII clock
■ half of the 828mkII clock
SYNCING LARGE SYSTEMS
If you are connecting the 828mkII to a lot of other digital audio gear, get a Digital Timepiece. It can synchronize a wide variety of devices, and it offers sample accurate synchronization for devices that support it, such as ADATs. You will also be able to control everything from the transport controls of your audio software. If you have even more devices than a single Digital Timepiece can support, consider a word clock distribution device, such as the Aardvark Aard Sync™ video-to-word clock converter. Products like this offer multiple word clock outputs and an extremely low-jitter clock.
CONNECTING MULTIPLE MOTU FIREWIRE INTERFACES
You can daisy-chain up to four MOTU FireWire interfaces on a single FireWire bus, with the restrictions described in the following sections. Most computers have only one built-in FireWire bus (even if it supplies multiple FireWire sockets). Connect them as follows:
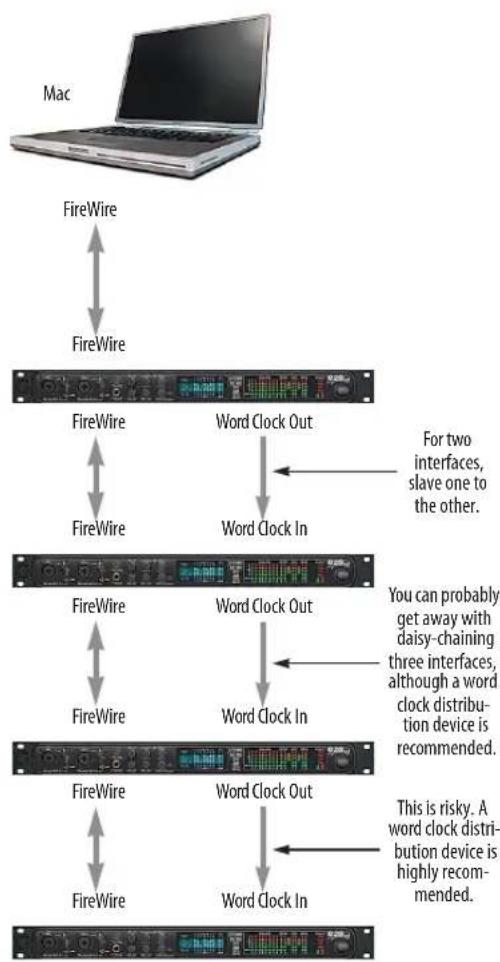
flowchart
graph TD
    A["Mac"] --> B["FireWire"]
    B --> C["FireWire"]
    C --> D["FireWire"]
    D --> E["Word Clock Out"]
    E --> F["Word Clock In"]
    F --> G["For two interfaces, slave one to the other."]
    G --> H["FireWire"]
    H --> I["FireWire"]
    I --> J["Word Clock Out"]
    J --> K["Word Clock In"]
    K --> L["You can probably get away with daisy-chaining three interfaces, although a word clock distribution device is recommended."]
    L --> M["FireWire"]
    M --> N["FireWire"]
    N --> O["Word Clock Out"]
    O --> P["Word Clock In"]
    P --> Q["This is risky. A word clock distribution device is highly recommended."]
Figure 3-20: Connecting multiple 828mkll's (or other MOTU FireWire audio interfaces) to a computer. NOTE: the word clock connections shown above are only necessary under Mac OS X. They are not required under Mac OS 9.
Multiple interfaces in the MOTU FireWire Audio Console
The MOTU FireWire Audio Console displays the settings for one interface at a time. To view the settings for an interface, click its tab as shown below in Figure 3-21.

![Mac OS 9 MOTU FireWire Audio Sample Rate: 96000 Clock Source: 828mkII #1 Internal Samples Per Buffer: 512 Enable Pedal Down Set [3] Up Set none Interface: 828mkII #1 Disable Pedal (if any) is normally open. Optical Input: Off Optical Output: Off Phones: Main out Word Out: System Clock Cancel OK](/content/2026/05/834830/images/d0a1671bcb6fc53d5533d8841826802cb85d05216d735057490197188a70ecf5.jpg)
Figure 3-21: To view the settings for an interface, click its tab. Under Mac OS 9, choose it from the Interface menu as shown.
Using multiple interfaces under Mac OS 9
All connected MOTU FireWire interfaces get their clock from whatever you choose from the Clock Source menu in the MOTU FireWire Audio Console. When you connect multiple MOTU FireWire interfaces, all of their respective sync sources are displayed in the menu as shown below in Figure 3-22.
![MOTU FireWire Audio Sample Rate: 48000 Clock Source: Samples Per Buffer: Enable Sound Manager Drive Input: Output: Enable Pedal Down Set [3] ● 828mk2 #1: Internal 828mk2 #1: SPDIF 828mk2 #1: Word Clock In 828mk2 #1: ADAT 9-pin 828mk2 #1: ADAT optical [828mk2 #2: Internal] [828mk2 #2: SPDIF] [828mk2 #2: Word Clock In] [828mk2 #2: ADAT 9-pin] [828mk2 #2: ADAT optical]](/content/2026/05/834830/images/64f8782b8cb90a0720c5bf20619103c1f2abbaccc4b7be31949d39bb9a775e2b.jpg)
Figure 3-22: In Mac OS 9, all MOTU FireWire audio interfaces get their clock from a single master sync source on any connected 828mkll (or other MOTU FireWire interface). After you choose a source from this menu, the entire system, including all connected 828mklls, synchronizes to it.
Under Mac OS 9, Each FireWire interface in the system gets its clock from the Audio Wire cable connection (unless it is the master clock itself). There is no need to make word clock connections between multiple FireWire interfaces.
Using multiple interfaces under Mac OS X
Mac OS X provides a more advanced, flexible driver model that allows multiple CoreAudio drivers to be active at one time, accessed by multiple applications simultaneously. For example, under Mac OS X, you can run both FireWire and PCI audio interfaces at the same time, accessing all of their inputs and outputs from your host audio application — or even multiple applications — simultaneously.
A by-product of this more flexible model is that multiple devices must be externally synchronized to one another in order to remain resolved to each another. Without external synchronization, the audio streams going to each interface might drift with respect to one another. For example, the audio tracks playing back through the 828mkII might drift out of sync with the audio tracks playing back through your 2408mk3 PCI interface.
Synchronizing them to each other externally ensures that they remain as tightly and continuously phase-locked as if they were operating as one unified interface.
To resolve two 828mkII FireWire interfaces with each other, choose one as the word clock master and then slave the second interface to the first, as shown in Figure 3-20 on page 32. For three interfaces, you can probably get away with daisy-chaining them via their word clock connectors, but this may not always produce the most reliable results. For three or more devices, a word clock distribution device is highly recommended. In this case, the distribution box is the master, and all FireWire interfaces slave directly to it (instead of to each other).
Connecting an 828
You can add an original MOTU 828 to the end of a FireWire daisy chain (because the 828 has only one FireWire port), or you can mix and match multiple 828's with other MOTU FireWire interfaces using a standard FireWire hub. Up to four interfaces can be combined on one FireWire bus.
Operating multiple FireWire interfaces at high sample rates
Four MOTU FireWire interfaces can operate at 44.1 or 48kHz on a single FireWire bus. At the high samples rates (88.2 or 96kHz), you can operate no more than two FireWire interfaces on a single FireWire bus.
Adding additional interfaces with a second FireWire bus
Third-party FireWire bus expansion products in the form of a cardbus ("PC card") adaptor or PCI card allow you to add a second FireWire bus to your computer. In may be possible to add
additional MOTU FireWire interfaces connected to such a third-party product, depending on the performance of the product and the performance of your host computer.
Managing the IDs of multiple interfaces (Mac OS 9 only)
Multiple 828mkII interfaces are identified by number (#1, #2, #3, etc.) Interfaces are ID'd (given a number) by the order in which they are first powered up after being connected. This information is stored in the MOTU FireWire Audio preferences file. Once ID'd, they retain the same number regardless of the order in which they are powered up. You can disable an interface at any time with the Disable interface option shown in Figure 3-21 on page 32. Doing so frees up the FireWire bandwidth required by the interface without turning it off. Switching off an interface accomplishes the same thing. To get the MOTU FireWire Audio Control Panel Console to forget about an interface entirely, you'll see a Forget button in the MOTU FireWire Audio Console. Just click the Forget button and the MOTU FireWire Audio Console will no longer consider the interface to be present but off line (turned off).
CHAPTER 4 Installing the 828mkII Macintosh Software
OVERVIEW
Software installation for Mac OS X 35
Software installation for Mac OS 9....37
CueMix Console 39
MOTU SMPTE Console 39
AudioDesk workstation software 39
SOFTWARE INSTALLATION FOR MAC OS X
Install the 828mkII software as follows:
1 Insert the MOTU FireWire Installer disc and launch the installer.
2 Follow the directions that the installer gives you.
What does the OS X installer do?
The installer checks the computer to make sure it satisfies the minimum system requirements for your MOTU interface. If so, the installer proceeds with the OS X installation. Drivers are installed, along with the MOTU FireWire Audio Console, FireWire CueMix Console, and several other applications, summarized in the following table:
The 828mkll CoreAudio driver
CoreAudio is a term that refers to the software technology built into Mac OS X that provides all of its standardized audio features. More specifically, we use CoreAudio to refer to Mac OS X's standard audio driver model. A CoreAudio driver allows the 828mkII to establish audio input and output with any Mac OS X CoreAudio-compatible software.
Once the 828mkII's CoreAudio driver has been successfully installed (by the installer), and you have chosen it for use in your host audio software, the 828mkII will appear as a choice for audio inputs and outputs in your software.
All MOTU audio hardware, including our PCI systems and other FireWire interfaces, ship with CoreAudio drivers that allow them to operate successfully with virtually all Mac OS X audio software.
Software component Location Purpose For more information
| MOTU FireWire CoreAudio driver | /System/Library/ Extensions | Provides 828mkII multi-channel audio input and output with all Mac OS X audio software | “The 828mkII CoreAudio driver” on page 35 |
| MOTU FireWire CoreMIDI driver /Library/Audio/ MIDI Drivers | Provides 828mkII MIDI input and output for all Mac OS X MIDI software | “CoreMIDI and Audio MIDI Setup” on page 36 | |
| MOTU FireWire Audio Console Applications folder Provides access to all of the settings in the828mkII and other MOTU FireWire interfaces. Required for 828mkII operation. | chapter 5, “MOTU FireWire Audio Console (Mac OS X)” (page 41) | ||
| MOTU SMPTE Console Applications folder Provides access to the 828mkII system’s SMPTE time code sync features. | chapter 14, “MOTU SMPTE Console” (page 103) | ||
| AudioDesk Workstation Software Applications folder Provides complete multi-track recording, mixing and processing. Optional. | AudioDesk User Guide | ||
| AudioDesk Demo Project Anywhere you want Provides a multi-track mix that you can open, play, and mix in AudioDesk. Optional. | AudioDesk User Guide | ||
| FireWire CueMix Console | Applications folder Gives you complete control over the 828mkII’s CueMix DSP feature, which provides no-latency monitoring and mixing of live inputs through your 828mkII system. | chapter 13, “CueMix Console” (page 97) | |
CoreMIDI and Audio MIDI Setup
CoreMIDI is the “under-the-hood” portion of Mac OS X that handles MIDI services for MIDI hardware and software. CoreMIDI provides many universal MIDI system management features, including MIDI communication between your 828mkII FireWire interface and all CoreMIDI compatible software.
Audio MIDI Setup is a utility included with Mac OS X that allows you to configure your 828mkII interface for use with all CoreMIDI compatible applications. Audio MIDI Setup provides:
■ A “virtual” studio on your Mac that graphically represents your MIDI hardware setup and that is shared by all CoreMIDI-compatible programs
■ A simple, intuitive list of your MIDI devices whenever you need it in any CoreMIDI-compatible program
Launching Audio MIDI Setup
1 Make sure your 828mkII interface is connected and turned on.
2 Launch the Audio MIDI Setup utility.
This can usually be found in /Applications/ Utilities. If it has been moved, just search for Audio MIDI Setup.
3 Confirm that the MIDI interface is present in the MIDI Devices tab of Audio MIDI Setup.
If the interfaces does not appear, or if it is grayed out, check your cable connections and click Rescan MIDI.

Figure 4-1: The 828mkII interface as it appears in the MIDI tab of Audio MIDI Setup.
Connecting MIDI devices to the 828mkII
Once your 828mkII interface appears in Audio MIDI Setup, you are ready to add devices, indicate how they are connected, and identify properties they may have for particular purposes. This information is shared with all CoreMIDI compatible applications.
To add a device in Audio MIDI Setup:
1 Click Add Device.

Figure 4-2: Adding a MIDI device.
2 Drag on its input and output arrows to draw connections to the 828mkII that match its physical connection.

flowchart
graph TD
    A["MOTU B28mk2"] --> B["Sound module"]
    A --> C["new external device"]
Figure 4-3: Connecting devices to the 828mkII. In this example, a controller keyboard is connected to the 828mkII's MIDI IN, and a sound module is connected to the 828mkII MIDI OUT.
3 Double-click the device to make settings, such as input and output channels, that further describe the device.

Figure 4-4: Device settings.
4 Repeat the above steps for each MIDI device connected to the interface.
5 When you are finished, quit Audio MIDI Setup.
Your configuration is automatically saved as the default configuration, and it is shared with all CoreMIDI-compatible software.
SOFTWARE INSTALLATION FOR MAC OS 9
Install the 828mkII software as follows:
1 Insert the MOTU FireWire Installer disc and launch the installer.
2 Follow the directions that the installer gives you.
What does the OS 9 installer do?
The 828mkII ships with the following Mac OS 9 software components:
Software
component Location Purpose
| MOTU FireWire Audio Driver | Extensions Folder | Allow the 828mkII to establish communication with the computer. |
| MOTU FireWire Enabler | ||
| MOTU Folder | Extensions Folder | Contains the MOTU hard disk recording engine. Required for 828mkII operation with AudioDesk and Digital Performer. |
| MOTU FireWire Audio Control Panel | Apple menu (Control Panels Folder) | Provides access to all of the settings in the 828mkII hardware. |
| MOTU FireWire Control Strip | Control Strip (Control Strip Modules Folder) | Provides access to all of the settings in the 828mkII hardware. |
| AudioDesk Workstation Software | Top level of the startup disk | Provides complete multi-track recording, mixing and processing. Optional. |
| ASIO MOTU FireWire Audio Driver | In the ASIO Drivers folder of your audio software—other than AudioDesk or Digital Performer | Allows ASIO-compliant audio software to do multi-channel input and output with the 828mkII. Only required if you are using Cubase or another ASIO-compatible program. |
| AudioDesk Demo Project | Anywhere you want | Provides a multi-track mix that you can open, play, and mix in AudioDesk. Optional. |
828mkII MIDI input and output is supported under Mac OS X only.
MOTU FireWire Audio Control Panel
The MOTU FireWire Audio Console is placed by the installer in your Mac's Apple menu (under Control Panels). It gives you access to all of the settings in the 828mkII hardware, such as the sample rate. For complete details, see chapter 6, "MOTU FireWire Control Panel (Mac OS 9)" (page 47).
![MOTU FireWire Audio Sample Rate: 48000 Clock Source: Internal Samples Per Buffer: 512 Enable Sound Manager Driver Input: CueMix 1-2 Output: Phones 1-2 Enable Pedal Down Set [3] Up Set none Interface: 828mk2 Pedal (if any) is normally open. Optical Input: Off Optical Output: Off Phones: Phones Cancel OK](/content/2026/05/834830/images/c40460dce589ce43071b64a086ed0af81991498e5e74530d97bd5145e8ed6f96.jpg)
Figure 4-5: The MOTU FireWire Audio Console gives you access to all of the settings in the 828mkll hardware.
MOTU FireWire Control strip module
The MOTU FireWire Control Strip module is placed by the installer in your Mac's Control Strip. Just like the MOTU FireWire Audio Console, it gives you access to all of the settings in the 828mkII hardware. For complete details, see chapter 6, "MOTU FireWire Control Panel (Mac OS 9)" (page 47).

Figure 4-6: The MOTU FireWire Control Strip module gives you access to all of the settings in the MOTU FireWire hardware, just like the MOTU FireWire Audio Console.
ASIO MOTU FireWire Audio driver
ASIO stands for Audio Streaming Input and Output. The ASIO MOTU FireWire Audio driver allows 828mkII to provide multi-channel input and output for Steinberg's Cubase VST software, or any other audio application that supports ASIO drivers.
The ASIO MOTU FireWire Audio driver is only required if you are using Cubase VST (or another audio program that relies on the ASIO driver to support multi-channel I/O with the 828mkII).
Digital Performer and AudioDesk support ASIO, but they also access the 828mkII directly through the MOTU Audio System, so it is not necessary to use the ASIO driver with these MOTU applications.
The ASIO MOTU FireWire Audio driver should be placed in the ASIO folder of Cubase VST or other ASIO-compliant software that you are running as the software "front end" for the 828mkII.
For details about using Cubase VST with the 828mkII, see chapter 8, "The MOTU 828 and Other Audio SoftwareASIO-compatible Audio Software" (page 1).

Figure 4-7: The ASIO MOTU FireWire Audio driver.
CUEMIX CONSOLE
This program provides a mixing console that gives you control over the 828mkII's no-latency CueMix DSP features. For details, see chapter 13, "CueMix Console" (page 97).
MOTU SMPTE CONSOLE
The MOTU SMPTE Console software provides a complete set of tools to resolve the 828mkII to SMPTE time code, and to generate SMPTE for striping, regenerating or slaving other devices to the computer. For details, see chapter 14, “MOTU SMPTE Console” (page 103).
AUDIODESK WORKSTATION SOFTWARE
The MOTU FireWire installer places AudioDesk on the top level of your Macintosh's startup volume.
AudioDesk is an advanced workstation software package for the 828mkII that lets you record, edit, mix, process, bounce and master multi-track digital audio recording projects. Advanced features include real-time 32-bit effects processing, sample-accurate synchronization with ADATs, 24-bit recording, and much more.
See the AudioDesk manual included with your 828mkII system for details.
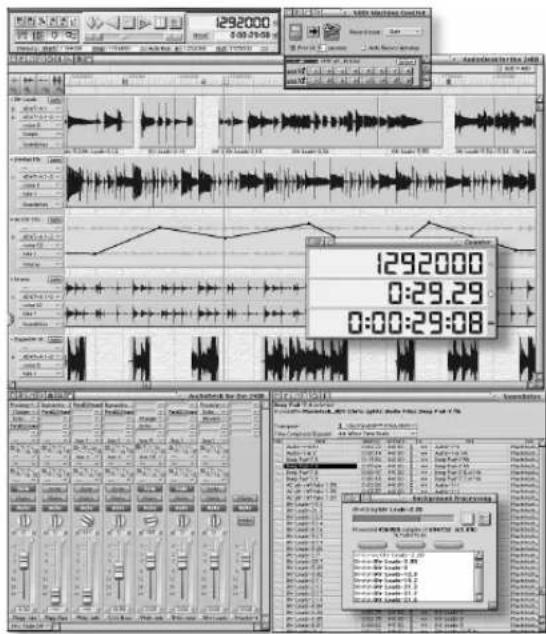
Figure 4-8: AudioDesk for Mac OS 9.

Figure 4-9: AudioDesk for Mac OS X.
CHAPTER 5 MOTU FireWire Audio Console (Mac OS X)
OVERVIEW
Accessing the 828mkll settings .... 41
828mkll Settings.... 42
Sample Rate 42
Clock Source 42
Optical input/output.... 44
Phones....44
Enable Pedal.... 45
Launch console when hardware becomes available. 45
ACCESSING THE 828MKII SETTINGS
There are several ways to access the MOTU FireWire Audio Console settings:
■ From the dock, press on the MOTU FireWire Audio Console icon, or control-click it to open the menu immediately
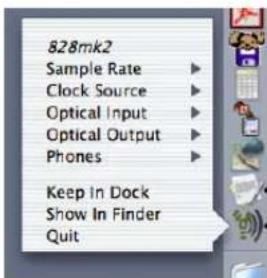
■From within AudioDesk™ or Digital Performer™, choose Setup menu>MOTU Audio System options>Configure Hardware Driver
■ From within Cubase VST, go to the Audio menu, choose System and then click the ASIO Control Panel button. In Cubase SX, open the Devices Setup window, click the VST Multitrack device and click the Control Panel button.
■ From within other ASIO-compatible programs, refer to their documentation.
■ From the front panel LCD (see chapter 7, "828mkII Front Panel Operation" (page 53)).
828MKII SETTINGS
Sample Rate
Choose the desired Sample Rate for recording and playback. The 828mkII can operate at 44.1 (the standard rate for compact disc audio), 48, 88.2 or 96KHz. Make absolutely sure that all of the devices connected digitally to the 828mkII match the 828mkII's sample rate. Also make sure that your Digital Timepiece, MIDI Timepiece AV or other digital audio synchronizer matches it as well.
Mismatched sample rates cause distortion and crackling. If you hear this sort of thing, check the sample rate settings in your hardware and here in the MOTU FireWire Audio Console.
Clock Source
The Clock Source determines the digital audio clock that the 828mkII will use as its time base. For a complete explanation of synchronization issues, see “Making sync connections” on page 22. The following sections briefly discuss each clock source setting.
Internal
Use the Internal setting when you want the 828mkII to operate under its own digital audio clock. For example, you may be in a situation where all you are doing is playing tracks off hard disk in your digital audio software on the computer. In a situation like this, you most often don't need to reference an external clock of any kind.
Another example is transferring a mix to DAT. You can operate the 828mkII system on its internal clock, and then slave the DAT deck to the 828mkII via the S/PDIF connection (usually DAT decks slave to their S/DIF input when you choose the S/PDIF input as their record source) or via the 828mkII's word clock output (if your DAT deck has a word clock input).
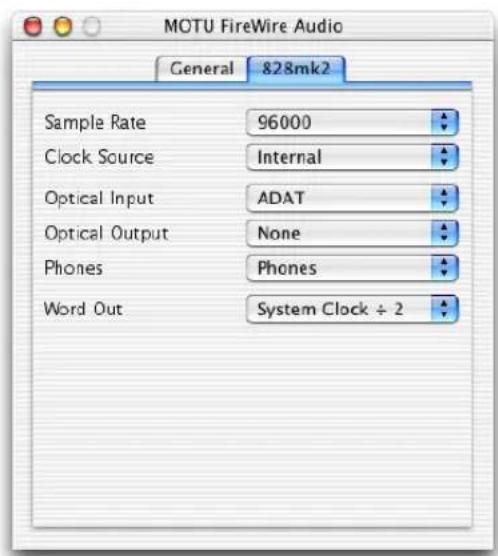
![MOTU FireWire Audio General 828mk2 Enable Pedal Pedal Down Set [3] Pedal Up Set none Launch console when hardware becomes available](/content/2026/05/834830/images/fe7a61ffdd1a499b3711ceb02a59606bef466edc7bf54e5b660a96b1562015c1.jpg)
Figure 5-1: The MOTU FireWire Audio Console gives you access to all of the settings in the 828mkll hardware.
If you would like help determining if this is the proper clock setting for your situation, see “Do you need a synchronizer?” on page 23.
With ADAT devices, however, you usually want an external digital audio synchronizer, such as the MIDI Timepiece AV or Digital Timepiece, to be the digital clock master. In this case, you would set the 828mkII clock source setting to ADAT 9-pin, as described below.
S/PDIF
The S/PDIF clock source setting refers to the S/PDIF RCA input jack on the 828mkII. This setting allows the 828mkII to slave to another S/PDIF device.
Use this setting whenever you are recording input from a DAT deck or other S/PDIF device into the 828mkII. It is not necessary in the opposite direction (when you are transferring from the 828mkII to the DAT machine).
For further details about this setting, see “Syncing S/PDIF devices” on page 30.
Word Clock In
The Word Clock In setting refers to the Word Clock In BNC connector on the 828mkII rear panel. Choosing this setting allows the 828mkII to slave to an external word clock source, such as the word clock output from a digital mixer or another 828mkII.
ADAT 9-pin
The ADAT 9-pin clock source setting refers to the ADAT digital audio synchronization format. It allows the 828mkII to slave to an ADAT — or ADAT sync chain — via its ADAT sync 9-pin connector. ADAT sync also carries precise, sample location information, which allows AudioDesk and Digital Performer to transfer audio to and from ADAT-sync compatible recorders without drifting by as much as one sample.
Use this setting when you are using the 828mkII with one or more ADAT-sync compatible recorders. Make sure the 828mkII is connected to the end of the ADAT sync chain.
You should also use this setting if you have a MIDI Timepiece AV, which allows you to drive your entire system from the transport controls of AudioDesk, Digital Performer or other computer software.
You could also use ADAT sync to continuously resolve the 828mkII to SMPTE time code, video, and word clock via a synchronizer like the MOTU MIDI Timepiece AV. Word clock can accomplish the same thing.
For further details, see “Sample-accurate ADAT sync” on page 25, “Sample-accurate ADAT sync with no synchronizer” on page 26 and “Syncing to video and/or SMPTE time code using a synchronizer” on page 28.
ADAT optical
The ADAT optical clock source setting refers to the clock provided by the 828mkII's optical input, when it is connected to an ADAT optical device. This setting can be used to slave the 828mkII directly to the optical input connection. Most of the time, you can set up a better operating scenario that uses one of the other synchronization options. However, there may be occasions when you have an ADAT optical compatible device that has no way of synchronizing digitally to the 828mkII or an external synchronizer such as the Digital Timepiece. In this case, the ADAT Optical clock source setting lets you slave the 828mkII to the device itself via its digital input to the 828mkII.
If the ADAT Optical setting does not appear in the menu, it means that the 828mkII's optical input is currently either turned off or set to the TOSLink
format. In either case, choose the ADAT optical format from the Optical input menu (Figure 5-1 on page 42).
This setting is also useful if you just need to make a simple, click-free digital transfer between the 828mkII and another device — where a time code reference and shared transport control are not needed — without having to set up an elaborate synchronization scenario.
For further details about this setting, see “Syncing optical devices” on page 29.
TOSLink
The TOSLink clock source setting refers to the clock provided an optical S/PDIF device connected to the 828mkII's optical input. This setting can be used to slave the 828mkII directly to the optical input connection. Most of the time, you can set up a better operating scenario that uses one of the other synchronization options. However, there may be occasions when you have an TOSLink-compatible device that has no way of synchronizing digitally to the 828mkII or an external synchronizer such as the Digital Timepiece. In this case, the TOSLink clock source setting lets you slave the 828mkII to the other device via the 828mkII's optical input.
If the TOSLink setting does not appear in the menu, it means that the 828mkII's optical input is currently either turned off or set to the ADAT optical format. In either case, choose the TOSLink format from the Optical input menu (Figure 5-1 on page 42).
This setting is also useful if you just need to make a simple, click-free digital transfer between the 828mkII and another device — where a time code reference and shared transport control are not needed — without having to set up an elaborate synchronization scenario.
For further details about this setting, see “Syncing optical devices” on page 29.
SMPTE
Choose this setting to resolve the 828mkII directly to SMPTE time code (LTC) being received via the 828mkII's quarter-inch SMPTE input jack. For details, see "Syncing to SMPTE time code" on page 27 and chapter 14, "MOTU SMPTE Console" (page 103).
Optical input/output
The Optical input and Optical output settings let you choose between ADAT optical ('lightpipe') and S/PDIF optical ('TOSLink') as the format for the 828mkII's optical input and output. Choose the format that matches the device connected. If you are not using the optical connections, it is recommended that you turn them off (as provided in the menus) to reduce bandwidth and processing overhead. Note that you can operate the input and output independently. For example, you could use the ADAT optical format on the input (with a digital mixer, for example) and optical S/PDIF on the output (with a DAT deck, for example).
When the optical output is set to TOSLink, the signal is split to both the RCA and optical output jacks. However, when the optical input is set to TOSLink, the RCA SDIF jack is disabled.
Phones
The Phones setting lets you choose what you will hear from the headphone jack. Choose Main Outs if you'd like the headphone output to match the main outs. Choose Phones if you would like the headphones to serve as their own independent output, which you can access as an independent output destination in your host audio software and as an output destination for the four on-board CueMix DSP mix busses.
Word Out
The Word Out menu appears when the 828mkII is operating at a high sample rate (88.2 or 96kHz). This menu lets you set the word clock output either to match the current sample rate (System Clock) or to halve the current sample rate (System Clock ÷ 2). In the latter case, the word clock output would be reduced to either 44.1 or 48 kHz.
Enable Pedal
Check the Enable Pedal option if a foot switch is connected to the 828mkII and you would like to trigger recording punch in/out (or other software functions) with it. Use the Set buttons to determine what keystroke is triggered by the pedal-up and pedal-down positions. You can assign the pedal to any two keystrokes you wish. (You are not restricted to punch in/out.)
Launch console when hardware becomes available
Check this option if you would like the MOTU FireWire Audio Console icon to appear in the application dock as soon as a MOTU FireWire interface is detected (switched on, plugged in, etc.)
CHAPTER 6 MOTU FireWire Control Panel (Mac OS 9)
OVERVIEW
The MOTU FireWire Control Panel provides access to all 828mkII settings. These settings can also be accessed from the MOTU FireWire Control Strip module or from the Configure Hardware Driver command in AudioDesk or Digital Performer (Basics menu).
Accessing the 828mkll settings 47
828mkll Settings.... 48
Sample Rate 48
Clock Source 48
Samples Per Buffer.... 50
Optical input/output.... 51
Phones....51
Enable Sound Manager driver 51
Enable Pedal....51
If 828mkll settings are grayed out .... 51
ACCESSING THE 828MKII SETTINGS
There are several ways to access the MOTU FireWire Control Panel settings:
■ From the Apple menu, choose the MOTU FireWire Control Panel
■ From the MacOS control strip, click on the MOTU FireWire Control Strip Module
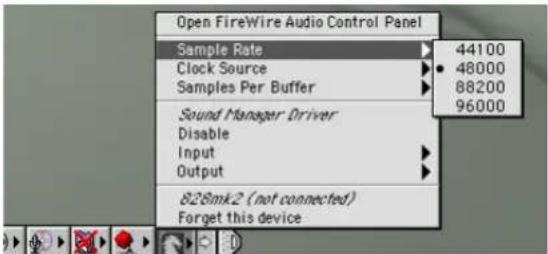
■ From within AudioDesk™ or Digital Performer™, choose Basics menu>MOTU Audio System options>Configure Hardware Driver

■ From within Cubase (Version 5 or higher), click the ASIO Control Panel button in the System Setup dialog as shown in Figure 8-3 on page 3.
■ From within other ASIO-compatible programs, refer to their documentation.
It doesn't matter which way you access the 828mkII settings. They are the same in all three places.
828MKII SETTINGS
![MOTU FireWire Audio Sample Rate: 48000 Clock Source: Internal Samples Per Buffer: 512 Enable Sound Manager Driver Input: CoeMix 1-2 Output: Phones 1-2 Enable Pedal Down Set [3] Up Set none Interface: 828mk2 Pedal (if any) is normally open. Optical Input: Off Optical Output: Off Phones: Phones Cancel OK](/content/2026/05/834830/images/0a21fa92894d80a47fab32af53fdbd1134233c21237222d5d1249047c9b719d4.jpg)
Figure 6-1: The MOTU FireWire Control Panel gives you access to all of the settings in the 828mkll hardware.
Sample Rate
Choose the desired Sample Rate for recording and playback. The 828mkII can operate at 44.1 (the standard rate for compact disc audio), 48, 88.2 or 96KHz. Make absolutely sure that all of the devices connected digitally to the 828mkII match the 828mkII's sample rate. Also make sure that your Digital Timepiece, MIDI Timepiece AV or other digital audio synchronizer matches it as well.
Mismatched sample rates cause distortion and crackling. If you hear this sort of thing, check the sample rate settings in your hardware and here in the MOTU FireWire Audio Console.
Clock Source
The Clock Source determines the digital audio clock that the 828mkII will use as its time base. For a complete explanation of synchronization issues, see “Making sync connections” on page 22. The following sections briefly discuss each clock source setting.
Internal
Use the Internal setting when you want the 828mkII to operate under its own digital audio clock. For example, you may be in a situation where all you are doing is playing tracks off hard disk in your digital audio software on the computer. In a situation like this, you most often don't need to reference an external clock of any kind.
Another example is transferring a mix to DAT. You can operate the 828mkII system on its internal clock, and then slave the DAT deck to the 828mkII via the S/PDIF connection (usually DAT decks slave to their S/DIF input when you choose the S/PDIF input as their record source).
If you would like help determining if this is the proper clock setting for your situation, see "Do you need a synchronizer?" on page 23.
With ADAT devices, however, you usually want an external digital audio synchronizer, such as the MIDI Timepiece AV or Digital Timepiece, to be the digital clock master. In this case, you would set the 828mkII clock source setting to ADAT 9-pin, as described below.
S/PDIF
The S/PDIF clock source setting refers to the S/PDIF RCA input jack on the 828mkII. This setting allows the 828mkII to slave to another S/PDIF device.
Use this setting whenever you are recording input from a DAT deck or other S/PDIF device into the 828mkII. It is not necessary in the opposite direction (when you are transferring from the 828mkII to the DAT machine).
For further details about this setting, see “Syncing S/PDIF devices” on page 30.
Word Clock In
The Word Clock In setting refers to the Word Clock In BNC connector on the 828mkII rear panel. Choosing this setting allows the 828mkII to slave to an external word clock source, such as the word clock output from a digital mixer.
ADAT 9-pin
The ADAT 9-pin clock source setting refers to the ADAT digital audio synchronization format. It allows the 828mkII to slave to an ADAT — or ADAT sync chain — via its ADAT sync 9-pin connector. ADAT sync also carries precise, sample location information, which allows AudioDesk and Digital Performer to transfer audio to and from ADATs without drifting by as much as one sample.
Use this setting when you are using the 828mkII with one or more ADATs. Make sure the 828mkII is connected to the end of the ADAT sync chain.
You should also use this setting if you have a MIDI Timepiece AV, which allows you to drive your entire system from the transport controls of AudioDesk, Digital Performer or other software.
You could also use ADAT sync to continuously resolve the 828mkII to SMPTE time code, video, and word clock via a synchronizer like the MOTU MIDI Timepiece AV. Word clock can accomplish the same thing.
For further details, see “Sample-accurate ADAT sync” on page 25, “Sample-accurate ADAT sync with no synchronizer” on page 26 and “Syncing to video and/or SMPTE time code using a synchronizer” on page 28.
ADAT optical
The ADAT optical clock source setting refers to the clock provided by the 828mkII's optical input, when it is connected to an ADAT optical device. This setting can be used to slave the 828mkII directly to the optical input connection. Most of the time, you can set up a better operating scenario that uses one of the other synchronization options. However, there may be occasions when you have an ADAT optical compatible device that has no way of synchronizing digitally to the 828mkII or an external synchronizer such as the Digital Timepiece. In this case, the ADAT Optical clock source setting lets you slave the 828mkII to the device itself via its digital input to the 828mkII.
If the ADAT Optical setting does not appear in the menu, it means that the 828mkII's optical input is currently either turned off or set to the TOSLink format. In either case, choose the ADAT optical format from the Optical input menu (Figure 6-1 on page 48).
This setting is also useful if you just need to make a simple, click-free digital transfer between the 828mkII and another device — where a time code reference and shared transport control are not needed — without having to set up an elaborate synchronization scenario.
For further details about this setting, see “Syncing optical devices” on page 29.
TOSLink
The TOSLink clock source setting refers to the clock provided an optical S/PDIF device connected to the 828mkII's optical input. This setting can be used to slave the 828mkII directly to the optical input connection. Most of the time, you can set up a better operating scenario that uses one of the other synchronization options. However, there may be occasions when you have an TOSLink-compatible device that has no way of synchronizing digitally to the 828mkII or an external synchronizer such as the Digital Timepiece. In this case, the TOSLink clock source setting lets you slave the 828mkII to the other device via the 828mkII's optical input.
If the TOSLink setting does not appear in the menu, it means that the 828mkII's optical input is currently either turned off or set to the ADAT optical format. In either case, choose the TOSLink format from the Optical input menu (Figure 6-1 on page 48).
This setting is also useful if you just need to make a simple, click-free digital transfer between the 828mkII and another device — where a time code reference and shared transport control are not needed — without having to set up an elaborate synchronization scenario.
For further details about this setting, see “Syncing optical devices” on page 29.
SMPTE
Choose this setting to resolve the 828mkII directly to SMPTE time code (LTC) being received via the 828mkII's quarter-inch SMPTE input jack. For details, see "Syncing to SMPTE time code" on page 27 and chapter 14, "MOTU SMPTE Console" (page 103).
Samples Per Buffer
The Samples Per Buffer setting lets you reduce the delay you hear when patching live audio through your audio software. For example, you might have a live microphone input that you would like to run through a reverb plug-in that you are running in your host audio software. When doing so, you may hear or feel some “sponginess” (delay) between the source and the processed signal. If so, don’t worry. This effect only affects what you hear: it is not present in what is actually recorded.
You can use Samples Per Buffer setting to reduce this monitoring delay—and even make it completely inaudible.
If you don't need to process an incoming live signal with software plug-ins, you can monitor the signal with no delay at all using CueMix Console, which routes the signal directly to your speakers via hardware. For details, see chapter 12, “CueMix Console” (page 97).
Adjusting the Samples Per Buffer setting impacts the following things:
■The strain on your computer's CPU
■ The delay you hear when routing a live signal through your host audio software plug-ins
■ How responsive the transport controls are in your software
This setting presents you with a trade-off between the processing power of your computer and the delay of live audio as it is being processed by plug-ins. If you reduce the Samples Per Buffer, you reduce patch thru latency, but significantly increase the overall processing load on your computer, leaving less CPU bandwidth for things like real-time effects processing. On the other hand, if you increase the Samples Per Buffer, you reduce the load on your computer, freeing up bandwidth for effects, mixing and other real-time operations. But don't set the Samples Per Buffer too low, or it may cause distortion in your audio.
If you don't process live inputs with software plug-ins, leave this setting at its default value of 1024 samples. If you do, try settings of 256 samples or less, if your computer seems to be able to handle them. If your host audio software has a processor meter, check it. If it starts getting maxed out, or if the computer seems sluggish, raise the Samples Per Buffer until performance returns to normal.
If you are at a point in your recording project where you are not currently working with live, patched-thru material (e.g. you're not recording vocals), or if you have a way of externally monitoring input, choose a higher Samples Per Buffer setting. Depending on your computer's CPU speed, you might find that settings in the middle work best.
The Samples Per Buffer setting also impacts how quickly your audio software will respond when you begin playback, although not by amounts that are very noticeable. Lowering the Samples Per Buffer will make your software respond faster; raising the Samples Per Buffer will make it a little bit slower, but barely enough to notice.
Monitoring live inputs without plug-in effects As mentioned earlier, CueMix Console allows you to monitor dry, unprocessed live inputs with no delay at all. For complete details, see chapter 11, "Reducing Monitoring Latency" (page 91).
Optical input/output
The Optical input and Optical output settings let you choose between ADAT optical ('lightpipe') and S/PDIF optical ('TOSLink') as the format for the 828mkII's optical input and output. Choose the format that matches the device connected. If you are not using the optical connections, it is recommended that you turn them off (as provided in the menus) to reduce bandwidth and processing overhead. Note that you can operate the input and output independently. For example, you could use the ADAT optical format on the input (with a digital mixer, for example) and optical S/PDIF on the output (with a DAT deck, for example).
When the optical output is set to TOSLink, the signal is split to both the RCA and optical output jacks. However, when the optical input is set to TOSLink, the RCA SDIF jack is disabled.
Phones
The Phones setting lets you choose what you will hear from the headphone jack. Choose Main Outs if you'd like the headphone output to match the main outs. Choose Phones if you would like the headphones to serve as their own independent output, which you can access as an independent output destination in your host audio software and as an output destination for the four on-board CueMix DSP mix busses.
Word Out
The Word Out menu appears when the 828mkII is operating at a high sample rate (88.2 or 96kHz). This menu lets you set the word clock output either to match the current sample rate (System Clock) or to halve the current sample rate (System Clock ÷ 2). In the latter case, the word clock output would be reduced to either 44.1 or 48 kHz.
Enable Sound Manager driver
Check the Enable Sound Manager option if you would like to route Sound Manager audio to and from the 828mkII. For example, you could listen to an audio CD playing in the CD drive of your Macintosh through headphones connected to the 828mkII. As another example, you could route audio from a pair of 828mkII inputs into a third-party Sound Manager-compatible audio application. Use the menus provided to choose the desired 828mkII inputs and outputs you would like to route to/from Sound Manager. For further details, see chapter 9, “Sound Manager” (page 1).
This option is disabled when the 828mkII is set to a high sample rate (88.2 or 96kHz).
Enable Pedal
Check the Enable Pedal option if a foot switch is connected to the 828mkII and you would like to trigger recording punch in/out (or other software functions) with it. Use the Set buttons to determine what keystroke is trigger by the pedal-up and pedal-down positions. You can assign the pedal to any two keystrokes you wish. (You are not restricted to punch in/out.)
IF 828MKII SETTINGS ARE GRAYED OUT
If the MOTU FireWire driver is currently in use by an audio program (or Sound Manager), some of its settings cannot be changed and are therefore grayed out in the MOTU FireWire Control Panel menus. (Settings that cannot be changed are ones on which audio applications continuously depend for smooth, error free operation.) If you find that a
MOTU FireWire Control Panel setting that you wish to change is grayed out, simply quit all 828mkII-compatible audio programs (which may include Sound Manager-compatible programs, too, if you are using the 828mkII with Sound Manager). Once you have quite all applications, all MOTU FireWire Control Panel settings will be available (not grayed out).
CHAPTER 7 828mkII Front Panel Operation
OVERVIEW
The 828mkII is the first FireWire audio interface to offer complete front-panel programming via six rotary encoders and a 2x16 backlit LCD display. All 828mkII settings can be accessed via these front-panel controls.
Push-button rotary encoders 53
Multi-function LCD display 53
VOLUME 54
SETUP / SELECT 54
MIX BUS 56
PARAM....56
CURSOR/VALUE 57
Stand-alone operation....57
PUSH-BUTTON ROTARY ENCODERS
All of the knobs shown in Figure 7-1 are push-button digital rotary encoders. In many cases, you can either push the knob or turn it to make a setting or toggle the LCD display (depending on the encoder and setting).
MULTI-FUNCTION LCD DISPLAY
The LCD provides access to the many 828mkII settings, as well as visual feedback of the current parameter being modified.
The LCD operates in two different modes: setup mode and mixer mode. Push the SETUP knob to toggle between the two modes.
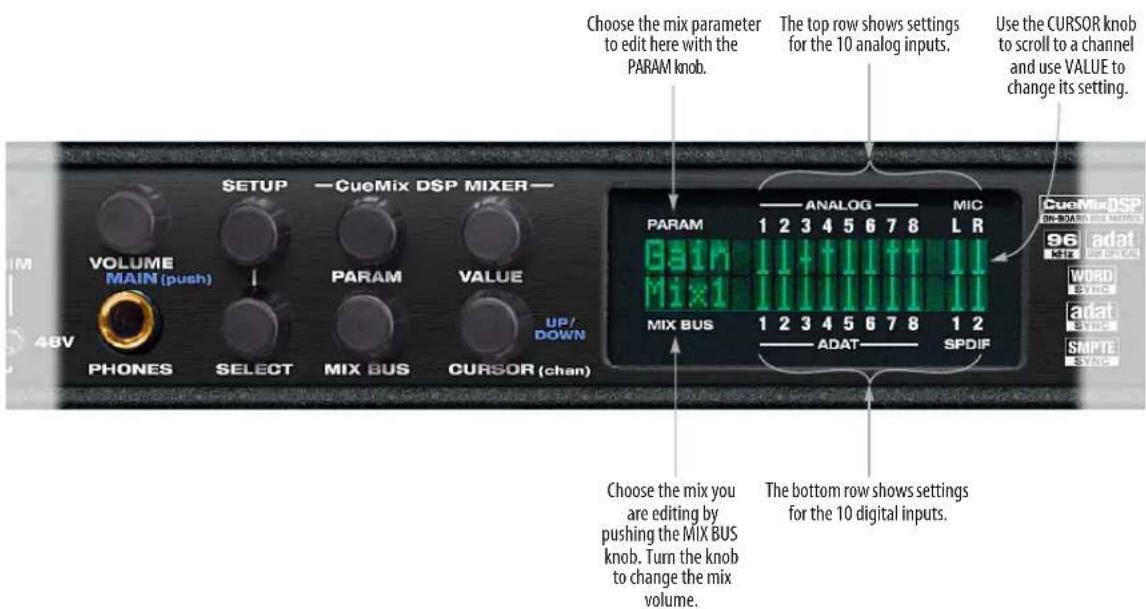
Figure 7-1: The 828mkll front panel controls.
Setup mode
In setup mode, the LCD displays basic settings, such as clock source, optical I/O format (ADAT versus TOSLink), and so on. These settings are covered in detail later in “SETUP / SELECT” on page 54.

Figure 7-2: In setup mode, the LCD displays a setup parameter in the top row of the LCD and the current setting in the bottom row.
Mixer mode
In mixer mode, the LCD displays the settings for the current 828mkII mix being shown in the display, as demonstrated in Figure 7-1 on page 53.
Parameter "zooming"
For many settings, the LCD temporarily “zooms in” to display a long-throw meter and alpha-numeric display to give you precise, real-time feedback as you adjust the setting. For example, if you change the headphone volume, the LCD will display a level meter and gain reduction reading that updates as you turn the volume knob. After a brief time-out, the display returns to its previous state before you turned the volume knob. The time-out period can be adjusted, as explained later in “Fader View Time”.
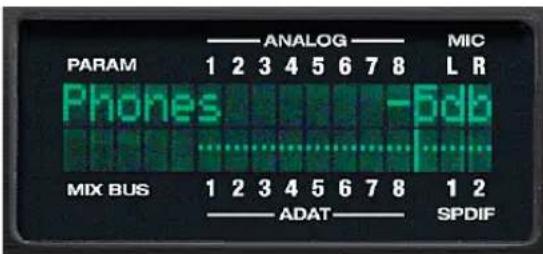
Figure 7-3: For many settings, the LCD "zooms in" on the setting as you adjust it.
VOLUME
The VOLUME knob lets you control the volume of both the headphone jack and the rear-panel main outs. Press the knob to toggle between the headphones and the main outs. As explained in the previous section, the LCD provides detailed feedback as you turn the knob. To view the current setting without changing it, just push the knob (without turning it).
SETUP / SELECT
Press the SELECT knob to toggle between mixer mode and setup mode. In mixer mode, the SETUP and SELECT knob do nothing. In setup mode, turn SETUP to choose a setting and SELECT to change it. In some cases, SELECT chooses one of the 828mkII's four mixes, and the VALUE knob changes the setting. The setup settings are briefly explained below.
Clock source
This sets the global clock source for the 828mkII and is the same as the Clock Source setting in the MOTU FireWire Audio Console as explained in "Clock Source" on page 42. If the 828mkII is currently connected to a computer, this setting cannot be changed from the front-panel LCD. It must be changed in the MOTU FireWire Audio Console instead. Or, you can disconnect the 828mkII from the computer to change the Clock Source from the front panel.
Fader View Time
The Fader View Time option lets you control the length of time that an adjusted parameter remains displayed in the LCD before the LCD returns to its previous state. For example, when you turn the MIX BUS knob to adjust the volume of the current mix, you'll see a long-throw horizontal fader in the LCD, along with a numeric display of the current gain reduction. After you stop turning the knob, this fader remains displayed in the LCD for a moment before the LCD returns to its previous
state. The Fader View Time option lets you control how long the adjusted parameter remains on the LCD after the knob stops turning.
Optical In / Optical Out
These two settings determine the format for the 828mkII's optical input and output. They are the same as the optical setting in the MOTU FireWire Audio Console as explained in "Optical input/output" on page 44. If the 828mkII is currently connected to a computer, these settings cannot be changed from the front-panel LCD. They must be changed in the MOTU FireWire Audio Console instead. Or, you can disconnect the 828mkII from the computer to change them from the front panel.
Bus output
The Bus Output setting lets you choose the 828mkII output pair for each of the four CueMix DSP mix busses. Turn the SELECT knob to choose a bus. Turn the VALUE knob to choose an output. Push the VALUE knob to select the output. The output stops flashing to confirm that it has been selected.
Bus mute
The Bus Mute setting mutes and unmutes the bus output. Turn the SELECT knob to choose a bus. Push the SELECT knob to mute or unmute the bus.
Phones Assign
The Phones Assign setting lets you choose what you hear on the headphone output. This is the same as the Phones setting in the MOTU FireWire Audio Console as explained in “Phones” on page 44.
Init Current Mix
The Init Current Mix setting lets you reset the current mix (or all four mixes). All inputs get reset to unity gain (0 dB), pan c enter, etc.
Copy Bus Mix
Copy Bus Mix lets you copy all of the settings for the currently displayed mix. Turn the SELECT knob to choose a mix. Push the SELECT knob to copy it.
You can then paste the settings to another mix as explained below. The word Done appears briefly to confirm that the mix settings have been successfully copied.
Paste Bus Mix
After you copy mix settings (explained above), Paste Bus Mix lets you paste the copied mix settings to another mix. Turn the SELECT knob to choose a mix. Push SELECT to paste. The word Done appears briefly to confirm the paste. The following mix parameter are included in the paste operation: Gain, Pan, Solo, Mute, +4/-10, +6dB boost, and stereo pairing. The following mix parameters are not pasted: Bus output, Bus mute and Bus gain.
Save/Name Preset
The Save/Name Preset setting lets you name and save up to sixteen separate 828mkII presets. A preset holds all of the current CueMix DSP mix settings for all four mix busses. Setup parameters are not included. The name can have up to 12 characters. Here is a summary of how to name and save a preset:
To do this: Do this:
| To change the currently flashing character | Turn the VALUE knob |
| To jump to capital letters, lower case letters, numbers or symbols | Push the VALUE knob repeatedly |
| To scroll to a different character | Turn the CURSOR knob. |
| To save the preset Push SELECT. If you are askedto replace existing preset, push SELECT again to replace it, orturn it to select a different preset. | |
Load preset
After you've saved one or more presets, Load Preset lets you recall them. Turn the SELECT knob to choose a preset. Push SELECT to load it. The word Loaded appears briefly to confirm the operation.
All Notes Off
The All Notes Off setting sends a MIDI All Notes Off message, as well as a MIDI note-off message for every note on every MIDI channel. This stops any stuck notes that are currently playing. Push SELECT to initiate the All Notes Off operation. The MIDI OUT LED will glow to confirm that the note-off data is being sent.
Factory Defaults
The Factory Defaults setting restores the 828mkII factory settings. Before you can attempt this operation, the 828mkII must first be disconnected from the computer. If the interface is still connected, the LCD will alert you with the message "Must detach FW". Once you have done so, push SELECT to initiate the operation, and then when the LCD asks "Are you sure?", push VALUE to execute it.
MIX BUS
The 828mkII on-board CueMix DSP mixer provides four stereo mix busses, named MIX1, MIX2, MIX3 and MIX4, respectively. Each mix bus (also referred to as a “mix”) independently mixes all inputs (or any subset of your choosing) down to one 828mkII output pair of your choosing. For example, you could assign MIX1 to the main outs, MIX2 to analog outputs 1-2 and MIX3 to the headphone outs. You can then independently assign any input to any mix. An input can even be included in two or more mixes simultaneously at different input levels.

Figure 7-4: In mixer mode, the LCD displays the mix settings for the mix bus currently being displayed in the LCD.
When the LCD display is in mixer mode, push the MIX BUS knob repeatedly to cycle through the four mixes. The current mix is indicated in the LCD above the MIX BUS label (as shown in Figure 7-1 on page 53). Turn the MIX BUS knob to change the output level for the mix.
PARAM
When the LCD display is in mixer mode, the PAR AM knob cycle through the mix parameters listed below. Use the CURSOR knob to scroll to a particular channel (until it flashes) and use the VALUE knob to change its setting:
Mix
parameter Range Comments
| Gain OFF, -84 to 0 dB | Each channel displays a small fader. Push the VALUE knob to toggle between OFF and unity gain (0dB). | |
| Pan -64 to +64 | Push the VALUE knob to jump to pan center. Stereo pairs (explained below) are panned hard left/right by default. | |
| Zero = pan center | ||
| Solo “s” or blank | Push the VALUE knob to toggle between soloed (S) and not soloed (blank), or turn the knob to toggle. | |
| Mute “m” or blank | Push the VALUE knob to toggle between muted (m) and unmuted (blank), or turn the knob to toggle. | |
| 4/10 down (+4) or up (-10) | This setting applies universally across ALL mix busses for analog inputs 1-8. Push the VALUE knob to toggle between a +4dB reference level (down) and a -10dB reference level (up). Or turn the knob to toggle. | |
| +6db “+” or blank | This setting applies universally across ALL mix busses for analog inputs 1-8. Push the VALUE knob to toggle between a +6dB software boost (+) and no boost (blank). Or turn the knob to toggle. | |
| Pair | “[ ]” or blank | This setting applies universally across ALL mixes. Push the VALUE knob to toggle a stereo input pair between separate mono inputs (blank) or a stereo pair (“[ ]”). Or turn the knob to toggle. When a pair of inputs are linked, all of their mix settings become linked (gain, solo, etc.) except for pan. When the pair is first created, pan is set to hard left and hard right, but the channels can then be further modified independently. When a pair is unlinked, the channels are set to pan-center. |
Mix parameters that apply across all mixes
The last three mix settings (input reference level, +6dB software boost, and stereo pairing) apply across all mixes because they have to do with the nature of the input itself. For example, if you have an input that requires a -10dB reference level, then you'll want the reference level to apply to all mixes.
Working with stereo pairs
When you group a pair of inputs as a stereo pair, all of their mix settings become linked, and whenever you scroll to either channel, both channels will flash to indicate that they will operate as a linked stereo pair. Note that when a pair is first created, pan is set to hard left and hard right, but the channels can then be further modified independently. When a pair is unlinked, the channels are set to pan-center.
CURSOR / VALUE
When the LCD display is in mixer mode, the CURSOR knob scrolls left and right over the 20 inputs displayed in the LCD. The current input flashes. As a shortcut, you can push the CURSOR knob to toggle between the top row (analog inputs) and bottom row (digital inputs). The VALUE knob changes the current mix parameter for the currently flashing input. In some cases, such as Gain and Pan, the LCD will “zoom” to the enlarged horizontal fader while you adjust it with the VALUE knob. After you stop adjusting, the LCD will return to the mixer display.
All settings, including all mix settings and global settings, are saved in the 828mkII's memory, and they remain in effect even when the 828mkII is not connected to a computer. This allows you to use the 828mkII as a stand-alone 8-bus mixer. You can make adjustments to any setting at any time from the front panel.
CHAPTER 8 Digital Performer
OVERVIEW
This chapter provides a brief overview of Digital Performer's basic I/O and synchronization operation with the 828mkII hardware. This chapter covers both DP3 with Mac OS 9 and DP4 with Mac OS X.
Setting up your system 59
The 828mkll settings....59
Be sure you have enough voices.... 61
24-bit operation....62
Fine-tuning I/O timing 62
Synchronization 62
MIDI Machine Control (MMC) 63
MIDI I/O via the 828mkII MIDI ports....64
Processing live inputs with plug-ins 64
Using a foot switch 64
Exchanging projects with AudioDesk....64
Sound Manager and Digital Performer (OS 9 only) .. 64
SETTING UP YOUR SYSTEM
As described in chapter 4, “Installing the 828mkII Macintosh Software” (page 35), the Digital Performer and MOTU 828mkII software installers will properly install and update everything for you.
If you are using a MIDI Timepiece AV or Digital Timepiece for synchronization, be sure they are present in Audio MIDI setup (or FreeMIDI Setup under Mac OS 9).
THE 828MKII SETTINGS
828mkll settings in Mac OS 9
In Mac OS 9, the 828mkII settings can be accessed by choosing MOTU Audio System options>Configure Hardware Driver from the Basics menu. This is where you choose the 828mkII as your audio input output device. Once you've done so, you should see the 828mkII settings as shown below in Figure 8-1.
![Configure Hardware Driver MOTU FireWire Audio Sample Rate: 44100 Clock Source: Internal Samples Per Buffer: 512 Auto Monitor (in Hardware Play through mode) Enable Pedal Down Set [3] Up Set none Interface: 828mkII Pedal (if any) is normally open Optical Input: AD:AT Optical Output: AD:AT Phones: Phones OK Cancel](/content/2026/05/834830/images/2f3067550815e27032518955488454a5bfad7df5bf6e87185fe4e3ceaddbafdd.jpg)
Figure 8-1: The 828mkll settings.
828mkII settings in Mac OS X
In Mac OS X, choose the 828mkII as your audio input output device by choosing MOTU Audio System options>Configure Hardware Driver from the Setup menu. This window shows some of the 828mkII settings, such as sample rate and clock source, but to access all of the 828mkII settings, open the MOTU FireWire Audio Console, as shown in Figure 5-1 on page 42.
![Configure Hardware Driver Core Audio MOTU 828mk2 PCI-424 Master Device: MOTU 828mk2 Sample Rate: 44100 Clock Modes: MOTU 828mk2 Internal Buffer Size: 512 Host Buffer Multiplier: 1 OK Cancel MOTU FireWire Audio General 828mk2 Sample Rate 96000 Clock Source Internal Optical Input ADAT Optical Output None Phones Phones Word Out System Clock + 2 MOTU FireWire Audio General 828mk2 Enable Pedal Pedal Down Set [3] Pedal Up Set none Launch console when hardware becomes available](/content/2026/05/834830/images/24583a1393350a28c6eb106099bb9c2d550229250c2e31d0db9fe60eab57399a.jpg)
Figure 8-2: Under Mac OS X, choose Setup menu> Configure Audio System> Configure Hardware Driver to open the dialog shown above and access the 828mkll CoreAudio driver. To access the rest of the 828mkll settings, open the MOTU FireWire Audio Console.
For complete details about the 828mkII settings, see chapter 5, “MOTU FireWire Audio Console (Mac OS X)” (page 41) or chapter 6, “MOTU FireWire Control Panel (Mac OS 9)” (page 47). The following sections provide a brief explanation of each 828mkII setting for use with Digital Performer.
Sample rate
Choose the desired overall sample rate for the 828mkII system and Digital Performer. Newly recorded audio in Digital Performer will have this sample rate. Imported audio or soundbites in existing files that do not match this sample rate will be displayed in the Soundbites window with a red 'X' on its move handle to indicate that it cannot be played.
Clock Source
This setting is very important because it determines which audio clock the 828mkII will follow.
If you do not have any digital audio connections to your 828mkII (you are using the analog inputs and outputs only), and you will not be slaving Digital Performer to external SMPTE time code, choose Internal.
If you are slaving the 828mkII to the ADAT sync Input connector, choose ADAT 9-pin.
If you are slaving the 828mkII and Digital Performer to SMPTE time code via the 828mkII itself, choose SMPTE and follow the directions in "Syncing to SMPTE time code" on page 27.
If you have digital audio devices connected to the 828mkII, or if you are not sure about the clock source of your setup, be sure to read “Making sync connections” on page 22 and “Clock Source” on page 42.
Buffer Size (OS X) / Samples Per Buffer (OS 9)
The Buffer Size setting (Samples Per Buffer under Mac OS 9) can be used to reduce the delay — or monitoring latency — that you hear when live audio is patched through your 828mkII hardware and Digital Performer. For example, you might have MIDI instruments, samplers, microphones, and so on connected to the analog inputs of the 828mkII. If so, you will often be mixing their live input with audio material recorded in Digital Performer. See chapter 12, “Reducing Monitoring Latency” (page 89) for complete details.
Optical input and output
To make a 828mkII optical input or output available in Digital Performer, choose the appropriate format (ADAT optical or TOSLink) from the optical input and/or output menu. If you won't be using the optical connectors, turn them off.
Phones
This 828mkII setting lets you choose what you'll hear from the headphone jack. For example, if you choose Main Outs, the headphones will duplicate the main outs. Or you can choose any other output pair. If you choose Phones, this setting makes the headphone jack serve as its own independent output pair. As a result, you'll see Phones 1-2 as an additional audio destination in Digital Performer's audio output menus.
BE SURE YOU HAVE ENOUGH VOICES
Go to the Setup menu (Basics menu under Mac OS 9) and choose MOTU Audio System
Options>Configure Studio Size. Then check to make sure you have enough mono and stereo audio voices to cover the 20 channels of input and 22 channels of output provided by your 828mkII — although the number of channels may depend on how your 828mkII is configured:
■ 12 channels for analog I/O (including the headphone out)
■2 channels for RCA S/PDIF
■ Zero, 2 or 8 channels for optical, depending on whether you have optical turned off, or set to S/PDIF or ADAT optical
For example, if you are using analog only, you only need 12 channels. If you are using analog and RCA S/PDIF, you need 14 channels.
As another example, if you are using analog, RCA S/PDIF and ADAT optical, you need 22 channels (the maximum number of simultaneous output channels provided by the 828mkII).
WORKING WITH 828MKII INPUTS AND OUTPUTS
Once you've enabled the MOTU FireWire Audio driver as explained earlier in “The 828mkII settings” on page 59, 828mkII audio inputs and outputs will appear in Digital Performer's audio input and output menus. If you don't see the optical inputs and/or outputs, check the MOTU FireWire Audio Console to make sure they are turned on and set to the format you require. If you don't plan to use the optical input or output, turn it off to conserve computer bandwidth.
Phones 1-2
If you've chosen to treat the 828mkII headphones as an independent output, you'll see Phones 1-2 in Digital Performer's output menus. Audio tracks assigned to this output pair will be heard on the headphone jack only. For further explanation, see "Phones" on page 44.
Mix1 1-2
In Digital Performer's audio input menus, you'll see an 828mkII input called Mix1 1-2. This input source delivers the output of CueMix DSP "MIX1" (the first mix bus of the four on-board no-latency monitor mixes in the 828mkII) back to your computer. This input serves, for example, as a convenient way for you to record the 828mkII's MIX1 monitor mix back into Digital Performer
(for reference and archiving purposes). Further, if you are sending audio from Digital Performer to the same output pair as MIX1, you can choose to either include or exclude the audio from the computer in the stream being sent back to Digital Performer. For details on how to do this, see “Mix1 Return Includes Computer” on page 100.
Warning: the Mix1 1-2 input can cause feedback loops! DO NOT assign this input to a track that shares the same 828mkII output pair as MIX1.
24-BIT OPERATION
Your 828mkII hardware fully supports Digital Performer's 24-bit recording capabilities, including both analog and digital 24-bit recording. If you would like to record and play back 24-bit audio files, go to the Setup menu (Basics menu under OS 9), choose MOTU Audio System options>Configure Sample Format, and choose 24-bit recording as the sample format. This setting is saved with the Digital Performer project.
FINE-TUNING I/O TIMING
The 828mkII has the ability to be sample accurate. This means that when you transfer audio between Digital Performer and an ADAT (or other ADAT-sync compatible recorder), for example, you can record the audio back and forth as many times as you want between them and it will remain exactly at its original sample location (unless you move it in Digital Performer, of course).
Occasionally, you may encounter a situation in which you observe a slight offset of one sample — or maybe a few — caused by inherent latencies in the devices you are using with the 828mkII. Usually, these offsets will be consistent, and you can compensate for them in Digital Performer. To do so, choose MOTU Audio System Options>Fine-tune Audio I/O Timing from the Setup menu (Basics menu under Mac OS 9) as shown in Figure 8-3.

Figure 8-3: Fine-tuning the timing of audio playback and recording.
SYNCHRONIZATION
Digital Performer can run under its own transport control or slave to an external sync source, such as SMPTE time code or ADAT sync (sample address).
Running DP under its own transport control
If you do not need to synchronize Digital Performer with time code or another recording device, such as a tape deck, just leave the Slave to External Sync command in the Studio menu (Basics menu under OS 9) unchecked.
However, even though Digital Performer is not slaving to external sync, you still need to be concerned with the synchronization of the 828mkII's digital audio clock with other devices connected to it digitally (if any). For example, if you have a digital mixer connected to the 828mkII via an ADAT optical lightpipe cable, you need to make sure that their audio clocks are phase-locked. For details, see "Syncing optical devices" on page 29 and "Making sync connections" on page 22. If you don't have any digital audio devices connected to the 828mkII, digital audio phase-lock does not apply to you.
Resolving DP and the 828mkII to SMPTE time code
If you need to slave Digital Performer and the 828mkII to SMPTE time code, you can do so with or without a dedicated synchronizer.
Resolving directly to time code (with no synchronizer)
To resolve your Digital Performer/828mkII system directly to SMPTE time code with no additional synchronization devices, use the setup shown in "Syncing to SMPTE time code" on page 54.
Choose Receive Sync from the Setup menu (Basics menu under Mac OS 9) and choose the Sample accurate option. Then make sure that the Slave to External Sync command in the Studio menu (Basics menu under Mac OS 9) is checked. Make sure the Clock Source setting in the MOTU FireWire Audio Console window is set to SMPTE. Also, make sure that you've connected an LTC input signal the 828mkII SMPTE input.
Resolving to video and/or time code with a dedicated synchronizer
To resolve your Digital Performer/828mkII system to video and/or SMPTE time code using an additional synchronization device, use the setup shown in “Syncing to video and/or SMPTE time code using a synchronizer” on page 60.
Choose Receive Sync from the Setup menu (Basics menu under Mac OS 9) and choose the MTC (MIDI Time Code) option. Then make sure that the Slave to External Sync command in the Studio menu (Basics menu under Mac OS 9) is checked. To ensure that your audio tracks don't drift out of sync with your MIDI tracks — or time code, use a hardware synchronizer like the MIDI Timepiece AV or Digital Timepiece to resolve the 828mkII hardware as well, as shown in Figure 5-30 on page 62. A digital audio synchronizer is required for drift-free SMPTE/MIDI time code sync. Make sure the Clock Source setting in the MOTU FireWire Audio Console window has the appropriate setting for locking the 828mkII to the synchronizer. For example, in Figure 5-30 on page 62, word clock is being used to resolve the 828mkII, so the Clock Source setting is WordClock In.
If you have an ADAT sync compatible device, don't use SMPTE time code. Instead, use sample-accurate sync as described in the next section.
Sample-accurate sync to ADAT and Tascam
Together, Digital Performer and the 828mkII provide you with sample-accurate transfers with ADATs, Alesis recorders and any other devices that support standard ADAT sample address (ADAT Sync).
Similarly, with the help of a MOTU Digital Timepiece, Digital Performer and a 828mkII can perform sample-accurate transfers with Tascam digital recorders.
A sample-accurate transfer is one in which the original location of the audio is preserved in the transfer, down to the sample.
For details on how to set up sample-accurate sync, see “Sample-accurate sync” on page 24. Be sure to choose the Sample Accurate Sync option in Digital Performer’s Receive Sync dialog, and make sure that the Slave to External Sync command is checked, too.
To control the transports of everything together from Digital Performer, see the next section.
MIDI MACHINE CONTROL (MMC)
If you have ADATs and a MMC-compatible ADAT synchronizer like the MIDI Timepiece AV or Digital Timepiece, you can control everything from your computer screen with Digital Performer's transport controls and cueing features (like Markers, the playback wiper, etc.)
Similarly, if you have Tascam recorders and a MOTU Digital Timepiece (or other MMC-compatible Tascam synchronizer), can control all of your Tascam decks (in ABS time) in a similar fashion from Digital Performer.
See the MIDI Machine Control chapter in your MIDI Timepiece AV or Digital Timepiece manual for details on how to set this up.
MIDI I/O VIA THE 828MKII MIDI PORTS
Once you've followed the procedure for enabling the 828mkII's MIDI features as explained in "Software installation for Mac OS X" on page 35, the 828mkII MIDI ports will appear as a input source and output destination in Digital Performer's MIDI I/O menus. The 828mkII MIDI ports are not supported under Mac OS 9.
PROCESSING LIVE INPUTS WITH PLUG-INS
If you patch a live input (such as MIDI synthesizer) through a plug-in effect in Digital Performer, you might hear a slight delay. There are several ways to reduce this delay. For details, see chapter 11, "Reducing Monitoring Latency" (page 91).
USING A FOOT SWITCH
Use a foot switch connected to the 828mkII to trigger recording punch-in and punch-out, or any other feature in Digital Performer that is assigned to a computer keystroke. By default, the foot switch triggers the 3 key on the computer keypad (which toggles Digital Performer's record button.) To trigger a different set of keystrokes with the foot switch, visit the MOTU FireWire Audio Console. (See “Enable Pedal” on page 45.)
EXCHANGING PROJECTS WITH AUDIODESK
Digital Performer (Version 2.6 or later) can exchange files with AudioDesk 1.0. For example, you can transfer a file from Digital Performer to AudioDesk, and back again. Just use Save As in Digital Performer's File menu and choose the AudioDesk file format. To open AudioDesk files in Digital Performer, just use the Open command. (No conversion is required beforehand in AudioDesk.)
If you have an earlier version of Digital Performer (2.5 or earlier), you can open your Digital Performer files in AudioDesk (with the Open command in the File menu), but Digital Performer 2.5 or earlier cannot open AudioDesk files.
SOUND MANAGER AND DIGITAL PERFORMER (OS 9 ONLY)
Digital Performer includes a Mac OS 9 MOTU Audio System plug-in called AudioTap that allows you to route any Sound Manager audio into Digital Performer's mixing environment. From there, you can route it to your 828mkII interface via any of Digital Performer's extensive audio routing features. For details, consult your Digital Performer documentation.
CHAPTER 9 AudioDesk
OVERVIEW
This chapter provides a brief overview of AudioDesk's basic I/O and synchronization operation with the 828 hardware. For complete information about all of AudioDesk's powerful workstation features, see the AudioDesk manual included with your MOTU 828 system. This chapter covers both DP3 with Mac OS 9 and DP4 with Mac OS X.
Setting up your system 65
The 828mkII settings....66
Be sure you have enough voices.... 67
24-bit operation 68
Fine-tuning I/O timing 68
Synchronization 69
MIDI Machine Control (MMC) 70
MIDI I/O via the 828mkII MIDI ports....70
Processing live inputs through plug-ins 70
Using a foot switch 70
Exchanging projects with Digital performer ..... 70
AudioDesk and MIDI sequencing 71
SETTING UP YOUR SYSTEM
As described in chapter 4, “Installing the 828mkII Macintosh Software” (page 35), the MOTU FireWire Audio software installer will properly install everything for you, including AudioDesk.
If you will be using AudioDesk's MIDI Machine Control (MMC) or MIDI Time Code sync features, and you are using Mac OS 9, FreeMIDI must be installed. (You can install FreeMIDI from the MOTU FireWire installer CD.) Under Mac OS X, the CoreMIDI driver is automatically installed for you as part of the “Easy Install” package.
If you are using a MIDI Timepiece AV or Digital Timepiece for synchronization, be sure they are present in Audio MIDI setup (or FreeMIDI Setup under Mac OS 9).
THE 828MKII SETTINGS
828mkII settings in Mac OS 9
In Mac OS 9, the 828mkII settings can be accessed by choosing MOTU Audio System options>Configure Hardware Driver from the Basics menu. This is where you choose the 828mkII as your audio input output device. Once you've done so, you should see the 828mkII settings as shown below in Figure 9-1.
![Configure Hardware Driver MOTU FireWire Audio Sample Rate: 44100 Clock Source: Internal Samples Per Buffer: 512 Auto Monitor (in Hardware Playthrough mode) Enable Pedal Down Set [3] Up Set none Interface: 828mkII Pedal (if any) is normally open Optical Input: ADAT Optical Output: ADAT Phones: Phones OK Cancel](/content/2026/05/834830/images/954bfc4024ef1e3bef1fb3d91c05a950b05ef7f8119316aa8c1347d9b45ef4d8.jpg)
Figure 9-1: The 828mkll settings.
828mkII settings in Mac OS X
In Mac OS X, choose the 828mkII as your audio input output device by choosing MOTU Audio System options>Configure Hardware Driver from the Setup menu. This window shows some of the 828mkII settings, such as sample rate and clock source, but to access all of the 828mkII settings, open the MOTU FireWire Audio Console, as shown in Figure 5-1 on page 42.
![Configure Hardware Driver CoreAudio MOTU 828mk2 PCI-424 Master Device: MOTU 828mk2 Sample Rate: 44100 Clock Modes: MOTU 828mk2 Internal Buffer Size: 512 Host Buffer Multiplier: 1 OK Cancel MOTU FireWire Audio General 828mk2 Sample Rate 96000 Clock Source Internal Optical Input ADAT Optical Output None Phones Phones Word Out System Clock + 2 MOTU FireWire Audio General 828mk2 Enable Pedal Pedal Down Set [3] Pedal Up Set none Launch console when hardware becomes available](/content/2026/05/834830/images/331112fd2986c84214de850830af9e68058937592134d6669ad4cead8326c3a0.jpg)
Figure 9-2: Under Mac OS X, choose Setup menu> Configure Audio System> Configure Hardware Driver to open the dialog shown above and access the 828mkII CoreAudio driver. To access the rest of the 828mkII settings, open the MOTU FireWire Audio Console.
For complete details about the 828mkII settings, see chapter 5, "MOTU FireWire Audio Console (Mac OS X)" (page 41) or chapter 6, "MOTU FireWire Control Panel (Mac OS 9)" (page 47). The following sections provide a brief explanation of each 828mkII setting for use with AudioDesk.
Sample rate
Choose the desired overall sample rate for the 828mkII system and AudioDesk. Newly recorded audio in AudioDesk will have this sample rate. Imported audio or soundbites in existing files that do not match this sample rate will be displayed in the Soundbites window with a red 'X' on its move handle to indicate that it cannot be played.
Clock Source
This setting is very important because it determines which audio clock the 828mkII will follow.
If you do not have any digital audio connections to your 828mkII (you are using the analog inputs and outputs only), and you will not be slaving AudioDesk to external SMPTE time code, choose Internal.
If you are slaving the 828mkII to the ADAT sync Input connector, choose ADAT 9-pin.
If you are slaving the 828mkII and AudioDesk to SMPTE time code via the 828mkII itself, choose SMPTE and follow the directions in “Syncing to SMPTE time code” on page 27.
If you have digital audio devices connected to the MOTU 828, or if you are not sure about the clock source of your setup, be sure to read “Making sync connections” on page 22 and “Clock Source” on page 42.
Buffer Size (OS X) / Samples Per Buffer (OS 9)
The Buffer Size setting (Samples Per Buffer under Mac OS 9) can be used to reduce the delay — or monitoring latency — that you hear when live audio is patched through your 828mkII hardware and AudioDesk. For example, you might have MIDI instruments, samplers, microphones, and so on connected to the analog inputs of the 828mkII. If so, you will often be mixing their live input with audio material recorded in AudioDesk. See chapter 12, “Reducing Monitoring Latency” (page 89) for complete details.
Optical input and output
To make a 828mkII optical input or output available in AudioDesk, choose the appropriate format (ADAT optical or TOSLink) from the optical input and/or output menu. If you won't be using the optical connectors, turn them off.
Phones
This 828mkII setting lets you choose what you'll hear from the headphone jack. For example, if you choose Main Outs, the headphones will duplicate the main outs. Or you can choose any other output pair. If you choose Phones, this setting makes the headphone jack serve as its own independent output pair. As a result, you'll see Phones 1-2 as an additional audio destination in AudioDesk's audio output menus.
BE SURE YOU HAVE ENOUGH VOICES
Go to the Setup menu (Basics menu under Mac OS 9) and choose MOTU Audio System Options>Configure Studio Size. Then check to make sure you have enough mono and stereo audio voices to cover the 20 channels of input and 22 channels of output provided by your 828mkII — although the number of channels may depend on how your 828mkII is configured:
■ 12 channels for analog I/O (including the headphone out)
■ 2 channels for RCA S/PDIF
■ Zero, 2 or 8 channels for optical, depending on whether you have optical turned off, or set to S/PDIF or ADAT optical
For example, if you are using analog only, you only need 12 channels. If you are using analog and RCA S/PDIF, you need 14 channels.
As another example, if you are using analog, RCA S/PDIF and ADAT optical, you need 22 channels (the maximum number of simultaneous output channels provided by the 828mkII).
WORKING WITH 828MKII INPUTS AND OUTPUTS
Once you've enabled the MOTU FireWire Audio driver as explained earlier in “The 828mkII settings” on page 66, 828mkII audio inputs and outputs will appear in AudioDesk's audio input and output menus. If you don't see the optical inputs and/or outputs, check the MOTU FireWire Audio Console to make sure they are turned on and set to the format you require. If you don't plan to use the optical input or output, turn it off to conserve computer bandwidth.
Phones 1-2
If you've chosen to treat the 828mkII headphones as an independent output, you'll see Phones 1-2 in AudioDesk's output menus. Audio tracks assigned to this output pair will be heard on the headphone jack only. For further explanation, see "Phones" on page 67.
Mix1 1-2
In AudioDesk's audio input menus, you'll see an 828mkII input called Mix1 1-2. This input source delivers the output of CueMix DSP "MIX1" (the first mix bus of the four on-board no-latency monitor mixes in the 828mkII) back to your computer. This input serves, for example, as a convenient way for you to record the 828mkII's MIX1 monitor mix back into AudioDesk (for reference and archiving purposes). Further, if you are sending audio from AudioDesk to the same output pair as MIX1, you can choose to either include or exclude the audio from the computer in the stream being sent back to AudioDesk. For details on how to do this, see “Mix1 Return Includes Computer” on page 100.
Warning: the Mix1 1-2 input can cause feedback loops! DO NOT assign this input to a track that shares the same 828mkII output pair as MIX1.
24-BIT OPERATION
Your 828mkII hardware fully supports AudioDesk's 24-bit recording capabilities, including both analog and digital 24-bit recording. If you would like to record and play back 24-bit audio files, go to the Setup menu (Basics menu under OS 9), choose MOTU Audio System options>Configure Sample Format, and choose 24-bit recording as the sample format. This setting is saved with the AudioDesk project.
FINE-TUNING I/O TIMING
The 828mkII has the ability to be sample accurate. This means that when you transfer audio between AudioDesk and an ADAT (or other ADAT-sync compatible recorder), for example, you can record the audio back and forth as many times as you want between them and it will remain exactly at its original sample location (unless you move it in AudioDesk, of course).
Occasionally, you may encounter a situation in which you observe a slight offset of one sample — or maybe a few — caused by inherent latencies in the devices you are using with the 828mkII. Usually, these offsets will be consistent, and you can compensate for them in AudioDesk. To do so, choose MOTU Audio System Options>Fine-tune Audio I/O Timing from the Setup menu (Basics menu under Mac OS 9) as shown in Figure 9-3.
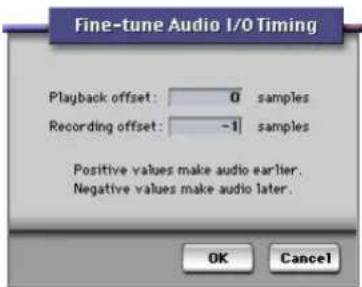
Figure 9-3: Fine-tuning the timing of audio playback and recording.
SYNCHRONIZATION
AudioDesk can run under its own transport control or slave to an external sync source, such as SMPTE time code or ADAT sync (sample address).
Running AudioDesk under its own transport control
If you do not need to synchronize AudioDesk with time code or another recording device, such as a tape deck, just leave the Slave to External Sync command in the Studio menu (Basics menu under OS 9) unchecked.
However, even though AudioDesk is not slaving to external sync, you still need to be concerned with the synchronization of the 828mkII's digital audio clock with other devices connected to it digitally (if any). For example, if you have a digital mixer connected to the 828mkII via an ADAT optical lightpipe cable, you need to make sure that their audio clocks are phase-locked. For details, see "Syncing optical devices" on page 29 and "Making sync connections" on page 22. If you don't have any digital audio devices connected to the 828mkII, digital audio phase-lock does not apply to you.
Resolving AudioDesk and the 828mkll to SMPTE time code
If you need to slave AudioDesk and the 828mkII to SMPTE time code, you can do so with or without a dedicated synchronizer.
Resolving directly to time code (with no synchronizer)
To resolve your AudioDesk/828mkII system directly to SMPTE time code with no additional synchronization devices, use the setup shown in "Syncing to SMPTE time code" on page 54.
Choose Receive Sync from the Setup menu (Basics menu under Mac OS 9) and choose the Sample accurate option. Then make sure that the Slave to External Sync command in the Studio menu (Basics menu under Mac OS 9) is checked. Make sure the Clock Source setting in the MOTU FireWire Audio Console window is set to SMPTE. Also, make sure that you've connected an LTC input signal the 828mkII SMPTE input.
Resolving to video and/or time code with a dedicated synchronizer
To resolve your AudioDesk/828mkII system to video and/or SMPTE time code using an additional synchronization device, use the setup shown in "Syncing to video and/or SMPTE time code using a synchronizer" on page 60.
Choose Receive Sync from the Setup menu (Basics menu under Mac OS 9) and choose the MTC (MIDI Time Code) option. Then make sure that the Slave to External Sync command in the Studio menu (Basics menu under Mac OS 9) is checked. To ensure that your audio tracks don't drift out of sync with your MIDI tracks — or time code, use a hardware synchronizer like the MIDI Timepiece AV or Digital Timepiece to resolve the 828mkII hardware as well, as shown in Figure 5-30 on page 62. A digital audio synchronizer is required for drift-free SMPTE/MIDI time code sync. Make sure the Clock Source setting in the MOTU FireWire Audio Console window has the appropriate setting for locking the 828mkII to the synchronizer. For example, in Figure 5-30 on page 62, word clock is being used to resolve the 828mkII, so the Clock Source setting is WordClock In.
If you have an ADAT sync compatible device, don't use SMPTE time code. Instead, use sample-accurate sync as described in the next section.
Sample-accurate sync to ADAT and Tascam
Together, AudioDesk and the 828mkII provide you with sample-accurate transfers with ADATs, Alesis recorders and any other devices that support standard ADAT sample address (ADAT Sync).
Similarly, with the help of a MOTU Digital Timepiece, AudioDesk and a 828mkII can perform sample-accurate transfers with Tascam digital recorders.
A sample-accurate transfer is one in which the original location of the audio is preserved in the transfer, down to the sample.
For details on how to set up sample-accurate sync, see “Sample-accurate sync” on page 24. Be sure to choose the Sample Accurate Sync option in AudioDesk’s Receive Sync dialog, and make sure that the Slave to External Sync command is checked, too.
To control the transports of everything together from AudioDesk, see the next section.
MIDI MACHINE CONTROL (MMC)
If you have ADATs and a MMC-compatible ADAT synchronizer like the MIDI Timepiece AV or Digital Timepiece, you can control everything from your computer screen with AudioDesk's transport controls and cueing features (like Markers, the playback wiper, etc.)
Similarly, if you have Tascam recorders and a MOTU Digital Timepiece (or other MMC-compatible Tascam synchronizer), can control all of your Tascam decks (in ABS time) in a similar fashion from AudioDesk.
See the MIDI Machine Control chapter in your MIDI Timepiece AV or Digital Timepiece manual for details on how to set this up.
MIDI I/O VIA THE 828MKII MIDI PORTS
Once you've followed the procedure for enabling the 828mkII's MIDI features as explained in "Software installation for Mac OS X" on page 35, the 828mkII MIDI ports will appear as a input source and output destination in AudioDesk's MIDI I/O menus. The 828mkII MIDI ports are not supported under Mac OS 9.
PROCESSING LIVE INPUTS THROUGH PLUG-INS
If you patch a live input (such as MIDI synthesizer) through a plug-in effect in AudioDesk, you might hear a slight delay. There are several ways to reduce this delay. For details, see chapter 11, “Reducing Monitoring Latency” (page 91).
USING A FOOT SWITCH
Use a foot switch connected to the 828mkII to trigger recording punch-in and punch-out, or any other feature in AudioDesk that is assigned to a computer keystroke. By default, the foot switch triggers the 3 key on the computer keypad (which toggles AudioDesk's record button.) To trigger a different set of keystrokes with the foot switch, visit the MOTU FireWire Audio Console. (See “Enable Pedal” on page 45.)
EXCHANGING PROJECTS WITH DIGITAL PERFORMER
AudioDesk 1.0 can exchange files with Digital Performer (Version 2.6 or later). For example, you can transfer a file from Digital Performer to AudioDesk, and back again. Just use Save As in Digital Performer's File menu and choose the AudioDesk file format. To open AudioDesk files in Digital Performer, just use the Open command. (No conversion is required beforehand in AudioDesk.)
If you have an earlier version of Digital Performer (2.5 or earlier), you can open your Digital Performer files in AudioDesk (with the Open command in the File menu), but Digital Performer 2.5 or earlier cannot open AudioDesk files.
AUDIODESK AND MIDI SEQUENCING
AudioDesk can play audio as a background application, allowing you to run a sequencer at the same time in the foreground. However, there is no way to continuously synchronize — or resolve — a sequencer with AudioDesk, so the two programs will eventually drift out of sync, even if you manage to start them at the same time. If you’d like to do integrated MIDI sequencing, your best bet is Digital Performer, which offers pretty much all of the same features as AudioDesk, along with powerful, state-of-the-art MIDI sequencing. Talk to your authorized MOTU dealer for details about upgrading from AudioDesk to Digital Performer.
CHAPTER 10 Other Mac OS X Audio Software
OVERVIEW
The 828mkII provides multichannel audio and MIDI input and output for all Mac OS X audio applications. This chapter covers third-party audio applications. For information about running Digital Performer or AudioDesk under Mac OS X, refer to chapter 8, “Digital Performer” (page 59) or chapter 9, “AudioDesk” (page 65).
Installing the 828mkII Mac OS X drivers....73
Preparing MIDI input and output 73
Run the MOTU FireWire Audio Console 73
Choosing the MOTU FireWire CoreAudio driver ..... 74
Audio Input and output names 75
Number of channels 76
Processing live inputs with plug-ins 77
Using a foot switch 77
Synchronization 77
INSTALLING THE 828MKII MAC OS X DRIVERS
Toinstall the 828mkII's Mac OS X audio and MIDI drivers, just run the installer on the MOTU FireWire Audio installer CD as detailed in chapter 4, "Installing the 828mkII Macintosh Software" (page 35).
PREPARING MIDI INPUT AND OUTPUT
If you will be using the 828mkII's MIDI input and output ports, be sure to follow the procedure in "Preparing MIDI input and output" on page 73.
RUN THE MOTU FIREWIRE AUDIO CONSOLE
Before you run your host audio software, launch the MOTU FireWire Audio Console to configure your 828mkII hardware. The MOTU FireWire Audio Console lets you configure your audio interface, and it lets you enable the desired inputs and outputs. Only enabled inputs and outputs will be available to your software, so this is an important step. For complete details see chapter 5, "MOTU FireWire Audio Console (Mac OS X)" (page 41).
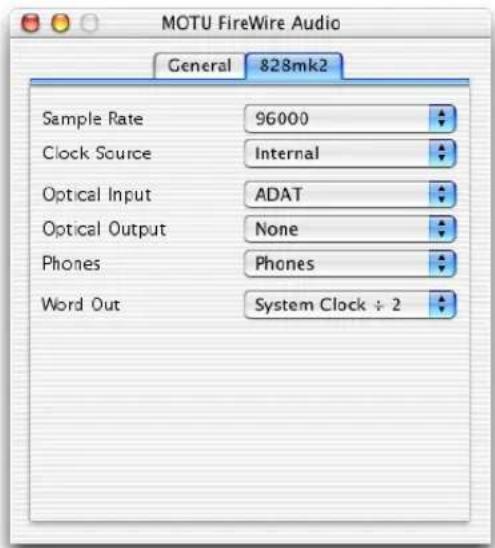
Figure 10-1: The MOTU FireWire Audio Console.
For complete details about the 828mkII settings, see chapter 6, “MOTU FireWire Control Panel (Mac OS 9)” (page 47). The following sections provide a brief explanation of each 828mkII setting for use with Cubase.
Sample rate
Choose the desired overall sample rate for the 828mkII system and your host audio software. Newly recorded audio will have this sample rate.
Clock Source
This setting is very important because it determines which audio clock the 828mkII will follow.
If you do not have any digital audio connections to your 828mkII (you are using the analog inputs and outputs only), and you will not be slaving your host software to external SMPTE time code, choose Internal.
If you are slaving the 828mkII to the ADAT sync Input connector, choose ADAT 9-pin.
If you have digital audio devices connected to the 828mkII, or if you are not sure about the clock source of your setup, be sure to read “Making sync connections” on page 22 and “Clock Source” on page 42.
Optical input and output
To make a 828mkII optical input or output available in your host software, choose the appropriate format (ADAT optical or TOSLink) from the optical input and/or output menu. If you won't be using the optical connectors, turn them off.
Phones
This 828mkII setting lets you choose what you'll hear from the headphone jack. For example, if you choose Main Outs, the headphones will duplicate the main outs. Or you can choose any other output pair. If you choose Phones, this setting makes the headphone jack serve as its own independent output pair. As a result, you'll see Phones 1-2 as an additional audio destination in your host audio software's audio output menus.
Once you've made the preparations described so far in this chapter, you're ready to run your audio software and enable the MOTU 828mkII CoreAudio driver. Check the audio system or audio hardware configuration window in your software. There will be a menu there that lets you choose among various drivers that may be in your system. Choose the MOTU 828mkII from this menu.
Cubase SX and Nuendo
Go to the Devices menu and choose Device Setup. Choose the 828mkII CoreAudio driver from the "ASIO Driver" menu as shown below. Activate the inputs and outputs within Cubase or Nuendo as usual. For information about the Audio Buffer Size setting, see "Adjusting buffer settings under Mac OS X" on page 91.

Figure 10-2: Enabling the 828mkll audio driver in Cubase SX.
Logic Audio
In Logic audio, go to the Preferences window, choose Audio Driver from the menu, and expand the CoreAudio item as shown below. For information about the I/O Buffer Size setting, see "Adjusting buffer settings under Mac OS X" on page 91.
![Preferences Audio Driver Core Audio Driver: MOTU 628mk2 System Memory Requirement: 20.0 MB U/O Buffer Size: 64 Volume Smoothing [ms] 50 64 Busches Max. Number of Audio Tracks 24 Universal Track Mode Max. Scrub Speed Normal Scrub Response Normal 20/24 Bit Recording Software Monitoring Process Buffer Range Large Larger Disk Buffer Balance Behavior Playback mode (less CPU load) DAE VS Direct TDM OK](/content/2026/05/834830/images/70caa06b071a09d7f5123f242cff652ad3f3a07d9b792392482cf0f5986625a7.jpg)
Figure 10-3: Enabling the 828mkll in Logic Audio.
Other audio software
For other audio applications, the procedure is similar to that shown above for Cubase and Logic. Consult your owner's manual for further information.
AUDIO INPUT AND OUTPUT NAMES
The 828mkII CoreAudio driver supplies text string labels for its inputs and outputs to clearly identify each one, but some applications do not display these labels. For example, in Cubase SX, the 828mkII outputs are numbered like this:

Figure 10-4: Some applications number the 828mkll inputs and outputs, but don't display which outputs they refer to.
Most programs will likely address this issue in future updates. In the meantime, here is how you can identify each input and output. Inputs are always listed in the same order as follows:
| Input Channels | List position Comment | ||
| Mic-Guitar 2 1-2 - | |||
| Analog 8 3-10 - | |||
| SPDIF 2 11-12 - | |||
| Mix1 | 2 13-14 | See “The ‘Mix1’ input pair” below. | |
| ADAT | 8 @ 44.1/48kHz | 15-22 | If the optical bank is set to TOSLink or None, then no ADAT inputs are displayed. |
| 4 @ 88.2/96kHz | 15-18 | ||
Outputs are similarly listed in the same order as follows:
| Output | Channels | List position Comment | |
| Main outs | 2 1-2 - | ||
| Analog 8 3-10 - | |||
| SPDIF | 2 11-12 | - | |
| Phones | 2 13-14 | If the phones are assigned to mirror another output pair (such as the main outs), they won't be listed separately. | |
| ADAT | 8 @ 44.1/48kHz | 15-22 | If the phones are mirroring, then subtract 2. If the optical bank is set to TOSLink or None, then no ADAT outputs are displayed. |
| 4 @ 88.2/96kHz | 15-18 | ||
As an example, Analog inputs 7-8 will always be listed as inputs 9-10. As another example, ADAT output channels 1-2 will be listed as channels 15-16, unless the phones are mirroring the main outs (or another output), in which case ADAT outputs 1-2 would be listed as channels 13-14.
The 'Mix1' input pair
The Mix1 input pair delivers the output of CueMix DSP “MIX1” (the first mix bus of the four on-board no-latency monitor mixes in the 828mkII) back to your computer. This input serves, for example, as a convenient way for you to record the 828mkII’s MIX1 monitor mix back into your host audio software (for reference and archiving purposes). Further, if you are sending audio from your host audio software to the same output pair as MIX1, you can choose to either include or exclude the audio from the computer in the stream being sent back to the computer. For details on how to do this, see “Mix1 Return Includes Computer” on page 100.
Warning: the Mix1 1-2 input can cause feedback loops! DO NOT assign this input to a track that shares the same 828mkII output pair as MIX1.
NUMBER OF CHANNELS
If your host audio software requires that you specify the number of audio voices or channels you will be using, be sure to choose enough channels to cover the 20 inputs and 22 outputs provided by your 828mkII — although the number of channels may depend on how your 828mkII is configured:
■ 12 channels for analog I/O (including the headphone out)
■2 channels for RCA S/PDIF
■ Zero, 2 or 8 channels for optical, depending on whether you have optical turned off, or set to S/PDIF or ADAT optical
For example, if you are using analog only, you only need 12 channels. If you are using analog and RCA S/PDIF, you need 14 channels.
As another example, if you are using analog, RCA S/PDIF and ADAT optical, you need 22 channels (the maximum number of simultaneous output channels provided by the 828mkII).
PROCESSING LIVE INPUTS WITH PLUG-INS
If you patch a live input (such as MIDI synthesizer) through a plug-in effect in your host software, you might hear a slight delay. There are several ways to reduce this delay. For details, see chapter 12, "Reducing Monitoring Latency" (page 89).
USING A FOOT SWITCH
Use a foot switch connected to the 828mkII to trigger recording punch-in and punch-out, or any other feature in your host audio software that is assigned to a computer keystroke. By default, the foot switch triggers the 3 key on the computer keypad. To trigger a different set of keystrokes with the foot switch, visit the MOTU FireWire Audio Console. (See “Enable Pedal” on page 45.)
SYNCHRONIZATION
As of Version 10.2.6, Mac OS X does not allow third-party applications to take advantage of the 828mkII's sample-accurate sync features or onboard SMPTE sync features. Refer to www.motu.com for further developments. However, if most applications that support external sync will be able to supports the 828mkII's word clock sync capabilities. Consult chapter 3, "Installing the 828mkII Hardware" (page 17) and use the synchronization diagrams in that chapter to synchronize your software and the 828mkII to the other components of your system.
CHAPTER 11 Cubase, Nuendo and OS 9 ASIO Software
OVERVIEW
This chapter explains how to use the 828mkII with Mac OS 9 ASIO-compatible audio software such as Cubase and Nuendo. For Mac OS X operation of Cubase, Nuendo, and all other third-party OS X audio software, see chapter 10, “Other Mac OS X Audio Software” (page 73).
The 828mkII includes an Mac OS 9 ASIO driver that provides multi-channel I/O and sample-accurate synchronization with Steinberg's Cubase family of digital audio sequencers, including Cubase VST and Nuendo.
ASIO support is required for 3rd party OS 9 software 79
Preparation 80
Run the MOTU FireWire Audio Console 80
Choosing the MOTU FireWire ASIO driver.... 81
The ASIO Control Panel button 82
Number of channels 82
ASIO Direct monitoring 82
Other System dialog settings 83
Activating 828mkll inputs 83
Assigning inputs.... 84
Assigning outputs 85
Changing 828mkll settings.... 86
Processing live inputs with plug-ins 86
Synchronization 86
MIDI Machine Control (MMC) 88
Using a foot switch 88
24-bit operation 88
Monitoring system performance 88
ASIO SUPPORT IS REQUIRED FOR 3RD PARTY OS 9 SOFTWARE
ASIO is an acronym for Audio Streaming Input and Output. The ASIO MOTU FireWire Audio driver allows the 828mkII to provide multi-channel audio input and output for any audio application that supports ASIO drivers.
For multi-channel operation with third-party Mac OS 9 audio software, the 828mkII requires ASIO compatibility. If your host audio program does not support ASIO, contact the developer.
Sample-accurate sync
The MOTU FireWire Audio ASIO driver supports sample-accurate sync (via the 828mkII's ADAT sync feature) for applications that support it.
Attention: Digital Performer users
Digital Performer supports ASIO, but it also accesses the 828mkII directly through the MOTU Audio System, so it is not necessary to use the ASIO driver with Digital Performer.
Attention: Cubase VST users
Cubase VST Version 5 is used for the examples in this chapter. However, there is no significant difference between the Version 5 examples shown and what you see in Version 4. The basic procedures are the same.
Attention: Mac OS 9 Nuendo users
The examples in this chapter show screen shots of Nuendo for Windows, but they are very similar to the Mac OS 9 version.
Attention: Other software users
The 828mkII ASIO driver also provides multi-channel I/O with any ASIO-compatible audio software. Cubase is used for the examples in this
chapter. However, the basic procedures are the same and can be easily applied to any ASIO-compatible software. Just follow the general descriptions at the beginning of each main section in this chapter. Consult your software documentation for details about each topic, if necessary.
PREPARATION
Before you run Cubase with your 828mkII, launch AudioDesk and play back the demo project to make sure that the 828mkII hardware software drivers are set up properly. The AudioDesk demo project is located on the 828mkII Installer CD. Drag it to your hard drive before opening it in AudioDesk, as your CD drive will be too slow to play the audio.
To make sure that everything is ready for Cubase, install Cubase first (if you haven't already done so), and then see these chapters before proceeding:
■ chapter 3, "Installing the 828mkII Hardware" (page 17).
■ chapter 4, "Installing the 828mkII Macintosh Software" (page 35)
■ chapter 9, "AudioDesk" (page 65)

Figure 11-1: The 828mkII installer puts the MOTU FireWire ASIO driver in the Cubase ASIO Drivers folder.
RUN THE MOTU FIREWIRE AUDIO CONSOLE
Before you run Cubase, launch the MOTU FireWire Audio Console to configure your 828mkII hardware. The MOTU FireWire Audio Console lets you configure your audio interface, and it lets you enable the desired inputs and outputs. Only enabled inputs and outputs will be available to Cubase, so this is an important step. For complete details regarding the MOTU FireWire Audio Console, see chapter 6, "MOTU FireWire Control Panel (Mac OS 9)" (page 47).
![MOTU FireWire Audio Sample Rate: 48000 Clock Source: Internal Samples Per Buffer: 512 Enable Sound Manager Driver Input: CueMix 1-2 Output: Phones 1-2 Enable Pedal Down Set [3] Up Set none Interface: 828mk2 Pedal (if any) is normally open. Optical Input: Off Optical Output: Off Phones: Phones Cancel OK](/content/2026/05/834830/images/06505f4d699ba1cf90479f9a056f1f183b7a574040d18f5693e9ec1f4c29fb84.jpg)
Figure 11-2: The MOTU FireWire Audio Control Panel gives you access to all of the settings in the 828mkll hardware, including the clock source, sample rate and optical I/O enable/disable.
For complete details about the 828mkII settings, see chapter 6, “MOTU FireWire Control Panel (Mac OS 9)” (page 47). The following sections provide a brief explanation of each 828mkII setting for use with Cubase.
Sample rate
Choose the desired overall sample rate for the 828mkII system and Cubase. Newly recorded audio in Cubase will have this sample rate.
Clock Source
This setting is very important because it determines which audio clock the 828mkII will follow.
If you do not have any digital audio connections to your 828mkII (you are using the analog inputs and outputs only), and you will not be slaving Cubase to external SMPTE time code, choose Internal.
If you are slaving the 828mkII to the ADAT sync Input connector, choose ADAT 9-pin.
If you are slaving the 828mkII and Cubase to SMPTE time code via the 828mkII itself, choose SMPTE and follow the directions in “Syncing to SMPTE time code” on page 27.
If you are using an ASIO host application other than Cubase or Nuendo, it must support the ASIO 2.0 sample-accurate positioning protocol in order to support the 828mkII's direct SMPTE sync (and sample-accurate sync) feature.
If you have digital audio devices connected to the 828mkII, or if you are not sure about the clock source of your setup, be sure to read “Making sync connections” on page 22 and “Clock Source” on page 42.
Samples Per Buffer
The Samples Per Buffer setting can be used to reduce the delay — or monitoring latency — that you hear when live audio is patched through your 828mkII hardware and Cubase. For example, you might have MIDI instruments, samplers, microphones, and so on connected to the analog inputs of the 828mkII. If so, you will often be mixing their live input with audio material recorded in Cubase. See chapter 12, “Reducing Monitoring Latency” (page 89) for complete details.
Optical input and output
To make a 828mkII optical input or output available in Cubase, choose the appropriate format (ADAT optical or TOSLink) from the optical input and/or output menu. If you won't be using the optical connectors, turn them off.
Phones
This 828mkII setting lets you choose what you'll hear from the headphone jack. For example, if you choose Main Outs, the headphones will duplicate the main outs. Or you can choose any other output pair. If you choose Phones, this setting makes the headphone jack serve as its own independent output pair. As a result, you'll see Phones 1-2 as an additional audio destination in Cubase's audio output menus.
CHOOSING THE MOTU FIREWIRE ASIO DRIVER
Once you've made the preparations described so far in this chapter, you're ready to run your audio software and enable the MOTU FireWire ASIO driver. Check the audio system or audio hardware configuration window in your software. There will be a menu there that lets you choose among various ASIO drivers that may be in your system. Choose the MOTU FireWire ASIO driver from this menu.
Cubase VST
To activate the 828mkII driver in Cubase VST, choose Audio Setup>System from the Options menu, and then choose MOTU FireWire from the ASIO device menu. Make the other settings in the dialog as need for your system and synchronization scenario.
Nuendo
To activate the 828mkII driver in Nuendo, go to the Device Setup window, click VST Multitrack and choose MOTU FireWire ASIO from the ASIO
Driver menu as shown below. Make the other settings in the dialog as need for your system and synchronization scenario.
Cubase VST
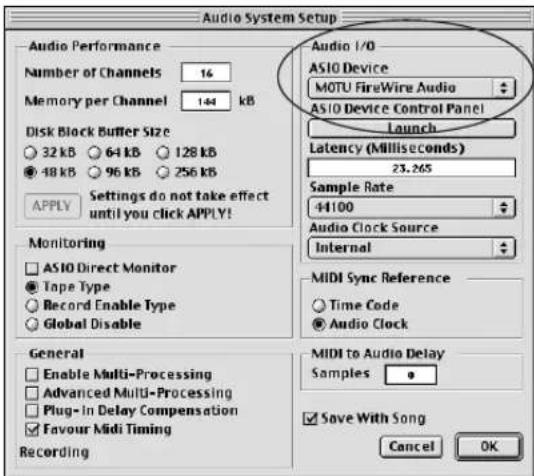
Nuendo
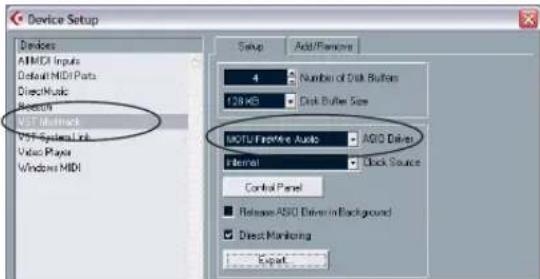
Figure 11-3: Activating the 828mkII FireWire ASIO driver in Nuendo and Cubase.
THE ASIO CONTROL PANEL BUTTON
The Mac version of Cubase VST does not allow the MOTU FireWire Audio Console to run at the same time as Cubase. Therefore, the ASIO Control Panel button in the System dialog as shown in
Figure 11-3 will not launch the MOTU FireWire Audio Console. In the meantime, you can access the MOTU FireWire Audio Console in one of two ways:
■ Quit Cubase, and then run the MOTU FireWire Audio Console from the Finder, OR
■ Temporarily switch to a different ASIO Device in the System dialog, and then run the MOTU FireWire Audio Console from the Finder
In either case, any changes you make to the MOTU FireWire Audio Console window will be reflected in Cubase when you reactivate the MOTU FireWire ASIO driver in Cubase.
NUMBER OF CHANNELS
In Cubase, be sure to choose enough channels in the System dialog (as shown above in Figure 11-3) to cover the 20 channels of input and 22 channels of output provided by your 828mkII — although the number of channels may depend on how your 828mkII is configured:
■ 12 channels for analog I/O (including the headphone out)
■2 channels for RCA S/PDIF
■ Zero, 2 or 8 channels for optical, depending on whether you have optical turned off, or set to S/PDIF or ADAT optical
For example, if you are using analog only, you only need 12 channels. If you are using analog and RCA S/PDIF, you need 14 channels.
As another example, if you are using analog, RCA S/PDIF and ADAT optical, you need 22 channels (the maximum number of simultaneous output channels provided by the 828mkII).
In Cubase, set the number of channels in the System dialog (as shown above in Figure 11-3).
ASIO DIRECT MONITORING
The ASIO Direct Monitoring option (Figure 11-3) allows you to monitor inputs directly in the 828mkII hardware with no drain on your computer and near zero latency. When you enable this option, Cubase uses the 828mkII's CueMix DSP monitoring features whenever you use Cubase's
monitoring features. For further information, see "Controlling CueMix DSP from within Cubase or Nuendo" on page 95.
OTHER SYSTEM DIALOG SETTINGS
Consult your Cubase or Nuendo documentation for details about the rest of the settings in this dialog.
ACTIVATING 828MKII INPUTS
Once you've chosen the MOTU FireWire ASIO driver in the Audio System dialog as explained earlier in "Choosing the MOTU FireWire ASIO driver" on page 81, choose VST Inputs from the Panels menu (or the Devices menu in Cubase SX) to see the 828mkII inputs. To activate them, click the Active light next to each input. If you don't see the optical inputs and/or outputs, check the MOTU FireWire Audio Console to make sure they are turned on and set to the format you require. If you don't plan to use the optical input or output, turn it off to conserve computer bandwidth.
The "Mix1 1-2" input
In Cubase's VST Inputs window, you'll see an 828mkII input called Mix1 1-2. This input source delivers the output of CueMix DSP "MIX1" (the first mix bus of the four on-board no-latency monitor mixes in the 828mkII) back to your computer. This input serves, for example, as a convenient way for you to record the 828mkII's MIX1 monitor mix back into Cubase (for reference and archiving purposes). Further, if you are sending audio from Cubase to the same output pair as MIX1, you can choose to either include or exclude the audio from the computer in the stream being sent back to Cubase. For details on how to do this, see "Mix1 Return Includes Computer" on page 100.
Warning: the Mix1 1-2 input can cause feedback loops! DO NOT assign this input to a track that shares the same 828mkII output pair as MIX1.
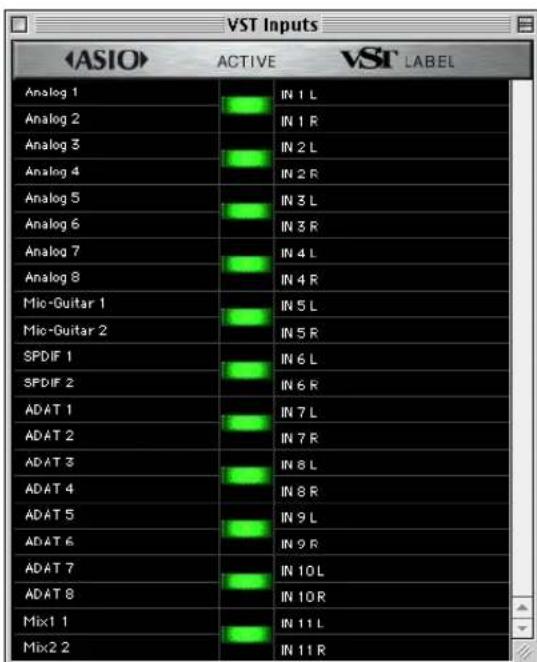
Figure 11-4: Activating 828mkll inputs in Cubase VST.
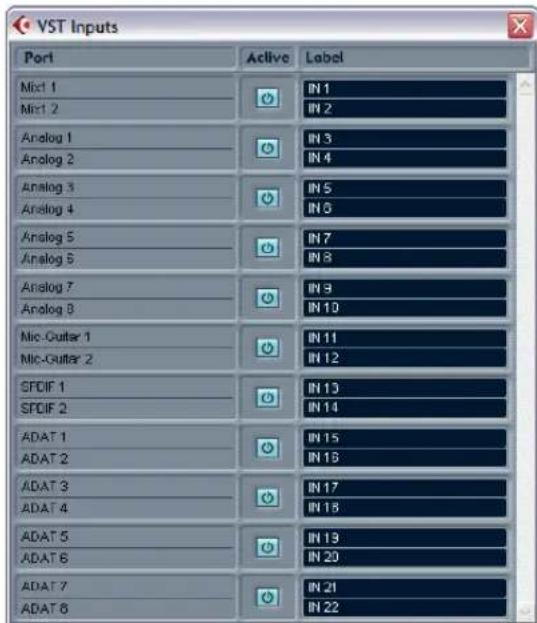
Figure 11-5: Activating 828mkll inputs in Nuendo.
ASSIGNING INPUTS
Once you've activated the 828mkII inputs as shown in the previous section, you can then assign them to Cubase or Nuendo audio channels in the channel mixers in the usual fashion.
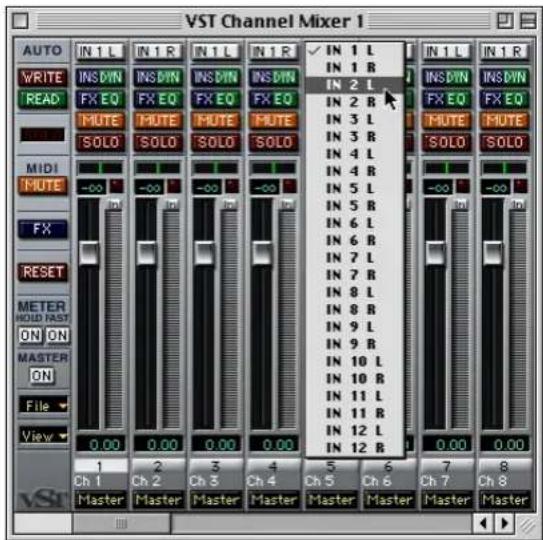

Figure 11-6: To assign an 828mkII input to a Cubase VST audio channel: command-click the input button at the top of the channel strip. For Nuendo or Cubase, consult your documentation.
ASSIGNING OUTPUTS
Once you've chosen the MOTU FireWire ASIO driver in the Audio System dialog as explained earlier in "Choosing the MOTU FireWire ASIO driver" on page 81, 828mkII outputs will be available in Cubase or Nuendo as output destinations. In Cubase VST, these outputs appear in the VST Master Mixer window as output
assignments for the master fader and busses, as shown below in Figure 11-7. In Nuendo, they appear in the VST Outputs window.
The "Phones 1-2" output
If you've chosen to treat the 828mkII headphones as an independent output, you'll see Phones 1-2 as an 828mkII output destination. Audio tracks
In Cubase VST, use the output buttons at the bottom of each channel strip, including the master fader, to assign 828mkll outputs to busses. You can then assign channels in the VST Master Mixer window to each bus as desired.
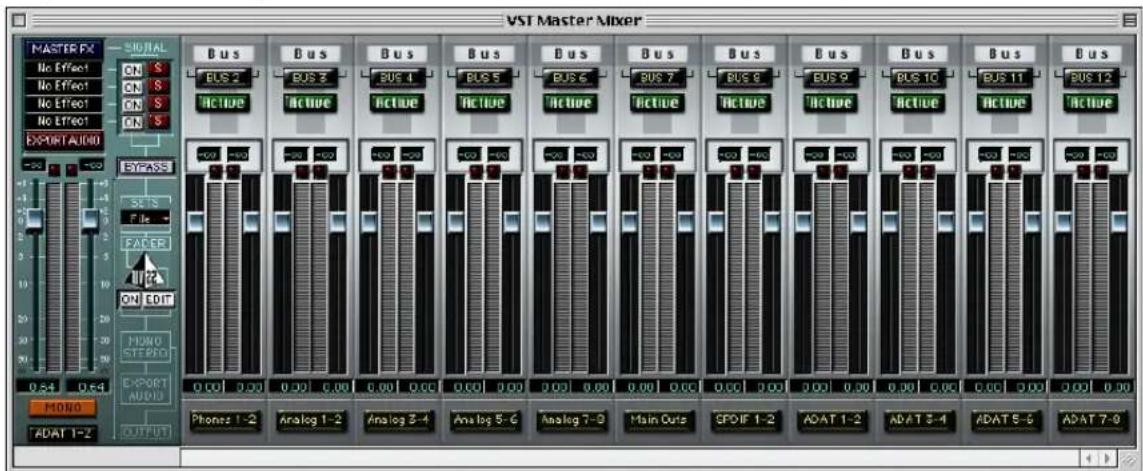
In Nuendo, access the 828mkll outputs via the busses in the VST Outputs window.

assigned to this output pair will be heard on the headphone jack only. For further explanation, see “Phones” on page 81.
CHANGING 828MKII SETTINGS
To change the 828mkII settings at any time, run the MOTU FireWire Audio Console. See “The ASIO Control Panel button” on page 82 for details. In Nuendo, go to the Device Setup window and click the ASIO Control Panel button, as shown in Figure 11-3 on page 82.
PROCESSING LIVE INPUTS WITH PLUG-INS
If you patch a live input (such as MIDI synthesizer) through a VST plug-in effect in Cubase, you might hear a slight delay. There are several ways to reduce this delay. For details, see chapter 12, “Reducing Monitoring Latency” (page 89).
SYNCHRONIZATION
Cubase or Nuendo can run under its own transport control or slave to SMPTE time code. It can also perform sample-accurate digital audio transfers with Alesis digital recorders and Tascam family digital recorders.
As you read through the following sections to decide what form of synchronization you might need with other devices in your studio, be sure to consult chapter 3, “Installing the 828mkII Hardware” (page 17) for the proper hardware connections. Use the synchronization diagrams in that chapter to be clear about how you will be synchronizing Cubase to the other components of your system.
Running Cubase or Nuendo under its own transport control
If you do not need to synchronize Cubase or Nuendo with time code or another recording device, such as a tape deck, just leave its SMPTE time code synchronization features disabled. However, even though Cubase or Nuendo is not slaving to SMPTE time code, you still need to be concerned with the synchronization of the 828mkII's digital audio clock with other devices connected to it digitally (if any). For example, if you have a digital mixer connected to an 828mkII interface via an ADAT optical lightpipe cable, you need to make sure that their audio clocks are phase-locked. For details, see “Syncing optical devices” on page 29 and “Making sync connections” on page 22. If you don't have any digital audio devices connected, digital audio phase-lock does not apply to you.
Resolving Cubase or Nuendo and the 828mkll to SMPTE time code
If you need to slave Cubase or Nuendo and the 828mkII to SMPTE time code, you can do so with or without a dedicated synchronizer.
Resolving directly to time code (with no synchronizer)
To resolve your 828mkII directly to SMPTE time code with no additional synchronization devices, use the setup shown in “Syncing to SMPTE time code” on page 27.
First, set up Cubase or Nuendo for sample-accurate sync as explained in "Sample-accurate sync to ADAT or Tascam" on page 87. Make sure the Clock Source setting in the MOTU FireWire Audio Console window is set to SMPTE. Also, make sure that you've connected an LTC input signal the 828mkII SMPTE input.
Resolving to video and/or time code with a dedicated synchronizer
To resolve your 828mkII to video and/or SMPTE time code using an additional synchronization device, use the setup shown in “Syncing to video and/or SMPTE time code using a synchronizer” on page 28.
Follow the instructions in your Cubase or Nuendo manual for slaving them to MIDI Time Code (MTC). To ensure that your audio tracks don't drift out of sync with your MIDI tracks — or time code, use a hardware synchronizer like the MIDI Timepiece AV or Digital Timepiece to resolve the 828mkII hardware as well, as explained in “Syncing to video and/or SMPTE time code using a synchronizer” on page 28. A digital audio synchronizer is required for drift-free SMPTE/MIDI time code sync. Make sure the Clock Source setting in the MOTU FireWire Audio Console window has the appropriate setting for locking the 828mkII to the synchronizer. For example, in Figure 3-15 on page 28, word clock is being used to resolve an 828mkII interface, so the Clock Source setting is Word Clock In.
If you have an ADAT sync or a Tascam sync compatible device, don't use SMPTE time code. Instead, use sample-accurate sync as described in the next section.
Sample-accurate sync to ADAT or Tascam
Cubase and Nuendo, along with the 828mkII and its ASIO 2 driver, provide you with sample-accurate transfers with ADATs, Alesis recorders and any other devices that support standard ADAT sample address (ADAT Sync).
Similarly, with the help of a MOTU Digital Timepiece universal A/V synchronizer, Cubase (or Nuendo) and an 828mkII can perform sample-accurate transfers with Tascam digital recorders.
A sample-accurate transfer is one in which the original location of the audio is preserved in the transfer, down to the sample.
For details on how to connect your hardware for sample-accurate sync, see "Sample-accurate sync" on page 24. Then, set up Cubase as follows: Before you begin, in Cubase's MIDI System Setup window, set OMS compatibility to No OMS. Cubase does not appear to be able to achieve sample-accurate sync when running under OMS.
1 Choose ADAT 9-pin as the Audio Clock Source setting. In Cubase VST, this setting is in the Audio System Setup window (Audio menu). In Nuendo, this setting is in the Device Setup window (Options menu).
2 Go to Cubase or Nuendo's Synchronization window, as shown below:
Cubase VST

Nuendo
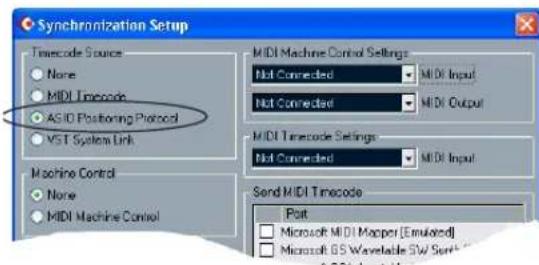
Figure 11-8: Setting up sample-accurate sync via ASIO 2.
3 If you are not using an MMC-compatible synchronizer (such as a MOTU MIDI Timepiece AV, Digital Timepiece or Alesis BRC), choose the settings shown above in Figure 11-8 that applies to you. In this scenario, transport control is handled by the ADAT (or other sample-accurate sync source).
4 If you are using an MMC-compatible synchronizer (such as a MOTU MIDI Timepiece AV, Digital Timepiece or Alesis BRC), set Cubase VST's Sync Source Timecode Base to ASIO 2.0 MMC or enable Nuendo's MIDI Machine Control option. In addition, choose the appropriate MIDI port for the MMC synchronizer from VST's Output menu or Nuendo's MIDI machine Control MIDI Output menu. If you're using a MIDI Timepiece AV, you can choose any of its MIDI ports in this menu. Doing so makes Cubase or Nuendo send the MMC control messages to the MTP AV (or other MMC device). In this scenario, transport control is handled by Cubase or Nuendo itself.
5 In Cubase VST's Controls window, enable SYNC. In Nuendo, enable (check) the Sync Online command in the Transport menu.

Figure 11-9: Enabling the SYNC button.
6 Begin playback from the sample-accurate sync source (ADAT, DA-88, etc.) Transport control is handled by the sample-accurate sync source.
MIDI MACHINE CONTROL (MMC)
If you have ADATs (or other ADAT Sync-compatible recorders) and a MMC-compatible ADAT synchronizer like the MIDI Timepiece AV and Digital Timepiece, you can control everything from your computer screen with Cubase's transport controls and cueing features (like the playback wiper, etc.)
Similarly, if you have Tascam digital recorders and a MOTU Digital Timepiece (or other MMC-compatible Tascam synchronizer), you can control all of your Tascam tape decks (in ABS time) in a similar fashion from Cubase. See "Sample-accurate sync to ADAT or Tascam" on page 87 for details on how to set this up.
USING A FOOT SWITCH
Use a foot switch connected to the 828mkII to trigger recording punch-in and punch-out, or any other feature in your host audio software that is assigned to a computer keystroke. By default, the foot switch triggers the 3 key on the computer keypad. To trigger a different set of keystrokes with the foot switch, visit the MOTU FireWire Audio Console. (See “Enable Pedal” on page 45.)
24-BIT OPERATION
Your 828mkII hardware fully supports Cubase and Nuendo's 24-bit recording capabilities. Simply enable 24-bit operation as instructed in your Cubase or Nuendo manual. The 828mkII always supplies a 24-bit data stream, and when you enable 24-bit operation in Cubase or Nuendo, it simply uses all 24-bits supplied by the 828mkII hardware.
MONITORING SYSTEM PERFORMANCE
Because it has so many inputs and outputs, the 828mkII may push the limits of your computer's processing power. Keep the VST Performance window open to keep tabs on the load on your CPU and disk buffers. If the meters get too high, you can reduce the load by reducing the number of inputs and outputs you are working with. Use the MOTU FireWire Audio Console to uncheck input check boxes and set output source menus to None.
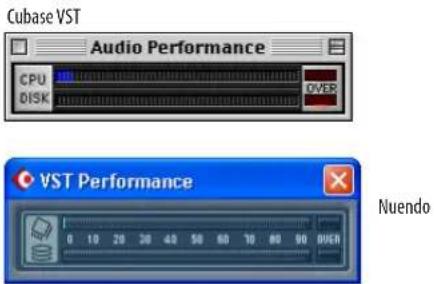
Figure 11-10: Keep the Audio Performance window open to keep tabs on your computer's processing power and hard disk performance.
CHAPTER 12 Reducing Monitoring Latency
OVERVIEW
Monitoring latency is that slight delay you hear when you run an input signal through your host audio software. For example, you might hear it when you drive a live mic input signal through a reverb plug-in running in your audio sequencer.
This delay is caused by the amount of time it takes for audio to make the entire round trip through your computer, from when it first enters an 828mkII input, passes through the 828mkII hardware into the computer, through your host audio software, and then back out to an 828mkII output.
If you don't need to process a live input with plug-ins, the easiest way to avoid monitoring latency is to use the 828mkII's CueMix DSP feature to patch the input directly to your monitor outs via the 828mkII audio hardware. This is just like bussing inputs to outputs in a digital mixer. For details, see “CueMix DSP hardware monitoring” on page 93.
If you do need to process a live input with plug-ins, or if you are playing virtual instruments live through your 828mkII audio hardware, you can significantly reduce latency — and even make it completely inaudible, regardless of what host audio application software you use. This chapter explains how.
It is important to note that monitoring delay has no effect on when audio data is recorded to disk or played back from disk. Actual recording and playback is extremely precise.
Monitoring live input....90
Adjusting the audio I/O buffer 90
Adjusting buffer settings under Mac OS X....91
Adjusting the buffer setting under Mac OS 9.....92
Lower latency versus higher CPU overhead ..... 92
Transport responsiveness....93
Effects processing and automated mixing .....93
CueMix DSP hardware monitoring 93
Two methods for controlling CueMix DSP....93
Using CueMix Console 93
Controlling CueMix DSP from your audio software .. 94
MONITORING LIVE INPUT
There are two ways to monitor live audio input with an 828mkII: 1) through the computer or 2) via CueMix™ DSP hardware monitoring. Figure 12-1 on page 90 shows method 1, which allows you to add effects processing such as reverb and guitar amp effects via plug-ins in your audio software. See the next section, “Adjusting the audio I/O buffer” for details about how to reduce — and possibly eliminate — the audible monitoring delay that the computer introduces.
Figure 12-2 shows how to use CueMix™ DSP hardware-based monitoring, which lets you hear what you are recording with no monitoring delay and no computer-based effects processing. (You can add effects later, after you've recorded the live input as a disk track.) See “CueMix DSP hardware monitoring” later in this chapter for details on how to use CueMix DSP with your audio software, or with the included CueMix Console software.
If the material you are recording is suitable, there is a third way to monitor live input: use both methods (Figure 12-1 and Figure 12-2) at the same time. For example, you could route vocals to both the computer (for a bit of reverb) and mix that processed signal on the main outs with dry vocals from CueMix DSP.
ADJUSTING THE AUDIO I/O BUFFER
A buffer is a small amount of computer memory used to hold data. For audio interfaces like the 828mkII, buffers are used for the process of

flowchart
graph TD
    A["Live input (from mic, guitar, etc.) enters the MOTU interface."] --> B["Mic signal goes immediately to the computer (dry, with no effects processing)."]
    B --> C["Mac"]
    C --> D["3. Mic signal is 'patched thru' back to the audio interface with reverb or other plug-in effects, if any."]
    D --> E["4. Mic signal (with plug-in processing, if any) is routed to the main outs (or other outputs that you've specified in the software)."]
Figure 12-1: There are two ways to monitor live audio inputs with an 828mkll: 1) through the computer or 2) via CueMix™ DSP hardware monitoring. This diagram shows method 1 (through the computer). When using this method, use your host software's buffer setting (or, under Mac OS 9, the 828mkll's 'Samples Per Buffer' setting in the MOTU FireWire Audio Console) to reduce the slight delay you hear when monitoring the live input, but don't lower it too much, or your computer might get sluggish.
transferring audio data in and out of the computer. The size of the buffers determines how much delay you hear when monitoring live inputs through your audio software: larger buffers produce more delay; smaller buffers produce less.
Adjusting buffer settings under Mac OS X
Under Mac OS X, audio I/O buffer size is handled by the host audio application (not the 828mkII CoreAudio driver). Most audio software applications provide an adjustable audio buffer setting that lets you control the amount of delay you'll hear when monitoring live inputs or processing them with software plug-ins. Below are a few examples.
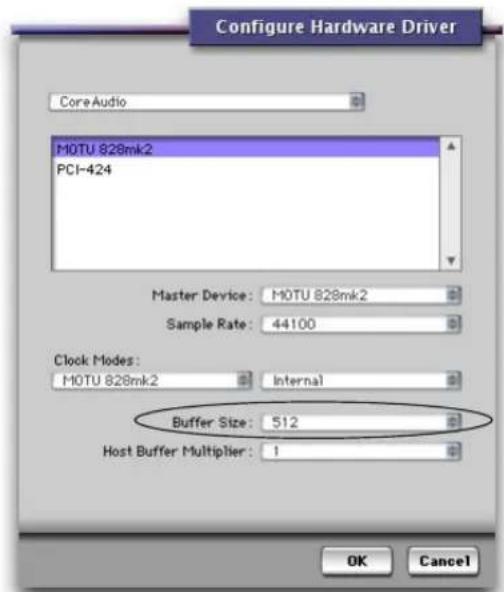
Figure 12-3: In Digital Performer and AudioDesk, choose Setup menu> Configure Audio System> Configure Hardware Driver to open the dialog shown above and access the Buffer Size setting. Refer to your Digital Performer or AudioDesk manual for information about the Host Buffer Multiplier setting.

Figure 12-2: This diagram shows the signal flow when using CueMix™ DSP no-latency monitoring. Notice that this method does not allow you to process the live input with plug-ins in your audio software while it is being monitored. You can, however, add effects later — after recording the live input as a disk track. CueMix™ DSP lets you hear what you are recording with no delay and no computer-based effects.
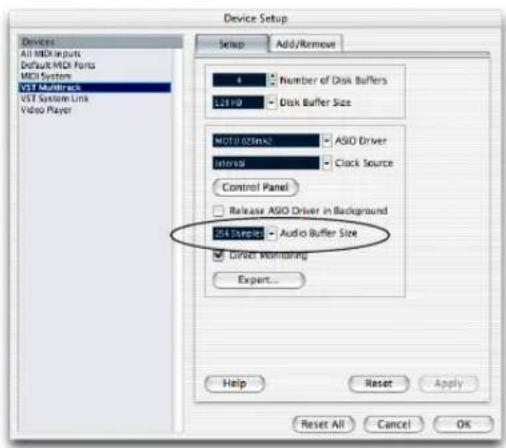
Figure 12-4: In Cubase SX or Nuendo, choose Devices menu> Device Setup and click VST Multitrack to access the window above and the Audio Buffer Size setting.
![Preferences Audio Driver Core Audio Driver MOTU 028.mk2 System Memory Requirement: 20.0 MB U/O Buffer Size 64 Volume Smoothing [ms] 50 64 Bytes Max. Number of Audio Tracks 24 Universal Track Mode Max. Scrub Speed Normal Scrub Response Normal 20/24 Bit Recording Software Monitoring Process Buffer Range Large Larger Disk Buffer Rawline behavior Playback mode (less CPU load) DAE VS Direct TDM OK](/content/2026/05/834830/images/26e15f300010e4b7dac3eaaa74a3482099ed05b5d4ec74849aa089958f576ba8.jpg)
Figure 12-5: In Logic Audio, go to the Audio Driver preferences to access the I/O buffer Size option shown above.
Adjusting the buffer setting under Mac OS 9 Under Mac OS 9, audio I/O buffer size adjustment is made in the MOTU FireWire Audio Console, as shown in Figure 12-6 via the Samples Per Buffer setting.
![MOTU FireWire Audio Sample Rate: 48000 Clock Source: Internal Samples Per Buffer: 512 Enable Sound Manager Driver Input: CueMix 1-2 Output: Phones 1-2 Enable Pedal Down Set [3] Up Set none Interface: 828mk2 Pedal (if any) is normally open. Optical Input: Off Optical Output: Off Phones: Phones Cancel OK](/content/2026/05/834830/images/1ae0488b97579a6df6db67885dcad0c55b5d5345268c05b94f51ddcd86ff1d20.jpg)
Figure 12-6: Lowering the 'Samples Per Buffer' setting in the MOTU FireWire Audio Console Window reduces patch thru latency. But doing so increases the processing load on your computer, so keep an eye on the Performance Monitor window in AudioDesk (or similar feature in your host audio software).
Lower latency versus higher CPU overhead The buffer setting has a large impact on the following things:
■ Patch thru latency
■ The load on your computer's CPU
■ Possible distortion at the smallest settings
■ How responsive the transport controls are in AudioDesk, Digital Performer or other audio software
The buffer setting presents you with a trade-off between the processing power of your computer and the delay of live audio as it is being patched through your software. If you reduce the size, you reduce patch thru latency, but significantly increase the overall processing load on your computer, leaving less CPU bandwidth for things like real-time effects processing. On the other hand, if you
increase the buffer size, you reduce the load on your computer, freeing up bandwidth for effects, mixing and other real-time operations.

Figure 12-7: When adjusting the buffer size to reduce monitoring latency, watch the 'processor' meter in Digital Performer or AudioDesk's Performance Monitor. If you hear distortion, or if the Performance meter is peaking, try raising the buffer size.
If you are at a point in your recording project where you are not currently working with live, patched-thru material (e.g. you're not recording vocals), or if you have a way of externally processing inputs, choose a higher buffer size. Depending on your computer's CPU speed, you might find that settings in the middle work best (256 to 1024).
Transport responsiveness
Buffer size also impacts how quickly your audio software will respond when you begin playback, although not by amounts that are very noticeable. Lowering the buffer size will make your software respond faster; raising the buffer size will make it a little bit slower, but barely enough to notice.
Effects processing and automated mixing
Reducing latency with the buffer size setting has another benefit: it lets you route live inputs through the real-time effects processing and mix automation of your audio software.
CUEMIX DSP HARDWARE MONITORING
The 828mkII has a more direct method of patching audio through the system. This method is called CueMix DSP. When enabled, CueMix activates hardware patch-thru in the 828mkII itself. CueMix DSP has two important benefits:
- First, it completely eliminates the patch thru delay (reducing it to a small number of samples — about the same amount as one of today's digital mixers).
■ Secondly, CueMix DSP imposes no strain on the computer.
The trade-off, however, is that CueMix DSP bypasses your host audio software. Instead, live audio inputs are patched directly through to outputs in the 828mkII itself and are mixed with disk tracks playing back from your audio software. This means that you cannot apply plug-ins, mix automation, or other real-time effects that your audio software provides. But for inputs that don't need these types of features, CueMix DSP is the way to go.
On the other hand, if you really need to use the mixing and processing provided by your audio software, you should not use CueMix DSP. Instead, reduce latency with the buffer setting (as explained earlier in this chapter).
TWO METHODS FOR CONTROLLING CUEMIX DSP
There are two ways to control CueMix DSP:
■ With CueMix Console
■ From within your host audio software (if it supports direct hardware monitoring)
You can even use both methods simultaneously.
Using CueMix Console
If your host audio software does not support direct hardware monitoring, you run CueMix Console side-by-side with your audio software and manage your monitor mix in CueMix Console.
CueMix Console allows you to create up to four separate 828mkII monitor mixes, or any other desired routing configurations. These routings are
independent of your host audio software. For complete details, see chapter 13, "CueMix Console" (page 97).
Controlling CueMix DSP from your audio software
Some audio applications allow you to control CueMix DSP monitoring from within the application (without the need to use CueMix Console). In most cases, this support consists of patching an 828mkII input directly to an output when you record-arm a track. Exactly how this is handled depends on the application.
The following applications are among those that support direct control over CueMix DSP:
■ Digital Performer (Mac OS 9 and X)
■ AudioDesk (Mac OS 9 and X)
■ ASIO-compatible audio software (Mac OS 9)
CueMix DSP routings that are made via host applications are made “under the hood”, which means that you won’t see them in CueMix Console. However, CueMix DSP connections made inside your host audio software dovetail with any other mixes you’ve set up in CueMix Console. For example, if your host application routes audio to an output pair that is already being used in CueMix Console for an entirely separate mix bus, both audio streams will simply be merged to the output.
Follow the directions below in the section that applies to you.
Controlling CueMix DSP from within AudioDesk or Digital Performer
To turn on CueMix DSP in AudioDesk and Digital Performer:
1 From the Setup menu (Basics menu under OS 9), choose MOTU Audio System options>Input Monitoring Mode.
2 Choose the Direct hardware playthrough option, as shown below in Figure 12-8.
3 From the Studio menu (Windows menu under OS 9), choose Audio Monitor, and enable Audio Patch Thru (the button with the headphone icon on it).


Figure 12-8: Enabling CueMix DSP in AudioDesk or Digital Performer.
Once enabled, CueMix DSP monitoring is tied with Digital Performer or AudioDesk's Audio Patch Thru feature: when you record-enable a track, the track's input is routed directly to its output (via CueMix DSP in the 828mkII hardware). For example, if you record-enable a track called guitar in your DP or AudioDesk project, and its audio input assignment is Analog in 2, and its audio output assignment is optical channels 7-8, CueMix DSP no-latency hardware monitoring will automatically be set up from analog in 2 to optical outputs 7-8.
Note to 828 users who have upgraded to an 828mkII: notice that the Auto Cuemix Update check box has been removed as a result of the 828mkII's more flexible and powerful CueMix DSP features. Auto CueMix Update is no longer needed
because you enjoy the benefits of CueMix DSP patch thru, plus separate, independent mixing under CueMix Console, thanks to the much more powerful CueMix DSP engine.
Using CueMix with Sound Manager (Mac OS 9 only) To enable CueMix DSP for a host application that is using the MOTU FireWire Sound Manager driver:
1 Open the Sound Control Panel, click the Input tab, and check the Play sound through output device option. Alternately, you can use the CueMix Console (described in chapter 13, "CueMix Console" (page 97)) to manually patch a live input to an output.
2 To control the overall level of the CueMix input, Use the CueMix Console.
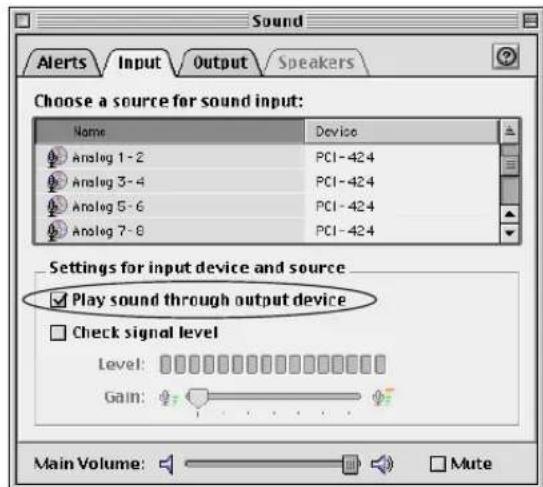
Controlling CueMix DSP from within Cubase or Nuendo To turn on CueMix in Cubase VST, enable the ASIO Direct Monitor check box in the Monitoring section of the Audio System Setup window (Figure 11-3 on
page 82). In Cubase SX or Nuendo, enable the Direct Monitoring check box in the Device Setup VST Multitrack tab (Figure 12-4 on page 92).
Other ASIO 2.0-compatible host software If your ASIO-compatible host audio software supports ASIO's direct monitoring feature, consult your software documentation to learn how to enable this feature. Once enabled, it should work similarly as described for Cubase (as explained in the previous section).
CHAPTER 13 CueMix Console
OVERVIEW
CueMix Console provides access to the flexible on-board mixing features of the 828mkII. CueMix lets you route any combination of inputs to any stereo output pair. These mixes can be set up entirely independently of your host audio software. CueMix allows you to set up four completely independent mix configurations with the 828mkII. You can also save and load mix configurations.
CueMix Console can be used independently of host audio software, or together with it. CueMix mixing dovetails with the direct monitoring (hardware patch thru) features of your host audio software, allowing you to seemlessly mix in both environments.
Advantages of CueMix monitoring....98
CueMix Console installation....98
Cuemix Console basic operation 98
Working with a mix 98
Shortcuts....99
Copying & pasting (duplicating) entire mixes ..... 99
Message center 99
Reference level and +6dB boost....99
Mix1 Return Includes Computer ....100
Show meter in dock icon (Mac OS X only) .....100
Phones menu 100
Saving and loading presets 100
Saving and loading presets to/from disk....100
CueMix Console examples ....101

Figure 13-1: CueMix Console is a virtual mixer that gives you control over the 828mkll's on-board mixing features.
ADVANTAGES OF CUEMIX MONITORING
CueMix Console provides several major advantages over monitoring live inputs through your host audio software:
- CueMix has no buffer latency. Thanks to the 828mkII's DSP chip, CueMix provides the same throughput performance as a digital mixer.
- CueMix imposes absolutely no processor drain on the computer's CPU.
■ CueMix routing can be maintained independently of individual software applications or projects.
■ CueMix routing can operate without the computer, allowing the 828mkII to operate as a portable, stand-alone mixer.
CueMix Console does not provide effects processing. For information about using your audio software's native plug-ins together with CueMix, see chapter 12, "Reducing Monitoring Latency" (page 89).
CUEMIX CONSOLE INSTALLATION
CueMix Console is installed with the rest of your 828mkII software.
The CueMix console is simple to operate, once you understand these basic concepts.
Four mixes
CueMix provides four separate mixes: Mix1, Mix2, Mix3 and Mix4. Each mix can have any number of inputs mixed down to any 828mkII output pair that you choose. For example, Mix1 could go to the headphones, Mix2 could go to the main outs, Mix3 could go to a piece of outboard gear connected to analog outputs 7-8, etc.
Many inputs to one output pair
It might be useful to think of each mix as some number of inputs all mixed down to a stereo output pair. CueMix Console lets you choose which inputs to include in the mix, and it lets you specify the level and pan for each input being fed into the mix.
Viewing one mix at a time
CueMix Console displays one mix at a time. To select which mix you are viewing, click its tab at the bottom of the window, as shown in Figure 13-1. The mix name appears in the tab. Double-click the name to change it.
Each mix is completely independent
Each mix has its own settings. Settings in one mix will not affect another. For example, if an input is used in one mix, it will still be available in other mixes. In addition, inputs can have a different volume, pan, mute and solo setting in each mix.
Some channel settings apply across all mixes
The settings at the top of the CueMix Console window (above the channel section) apply to all mixes. These settings include the +4/-10dB reference level and the +6dB software boost.
Widening the CueMix Console window
To view more input faders at once, drag the grow box (Figure 13-1) to the right.
WORKING WITH A MIX
Each mix has the following components:
■ A stereo output with master fader
Name
■ Master mute (to enable/disable the entire mix)
■ Any number of mono or stereo inputs
■ Pan, volume, mute and solo for each input
These elements are visually grouped together in the lightly shaded area in the lower half of the CueMix Console window.
Viewing a mix
To view a mix, click its tab at the bottom of the window, as shown in Figure 13-1. The mix name appears in the tab.
Naming a mix
Double-click the mix name in the tab.
Master mute
The master mute button (Figure 13-1) temporarily disables (silences) the mix.
Master fader
The master fader (Figure 13-1) controls the overall level of the mix (its volume on its stereo output). Use the individual input faders to the left to control individual input levels.
Output level meters
The OUT level meters show you the output for the mix's physical output, which may include audio from your host audio software. The clip indicators clear themselves after a few seconds.
Input section
The channel strips to the left of the master fader represent each input in your 828mkII. Use the input scroll bar to view additional inputs.
Input mute/solo
To add an input to a mix, or remove it, click its MUTE button. To solo it, use its SOLO button. To toggle these buttons for a stereo pair, hold down the command key while clicking either channel. The Solo indicator LED (Figure 13-1) lights up when any input is soloed (including inputs that may currently be scrolled off-screen).
Input volume and pan
Use the input fader and pan knob (Figure 13-1) to adjust these settings for the input in the mix. Again, all settings within the gray-shaded channel strip area belong to the mix currently being viewed. Note that an input can have different settings in different mixes.
To adjust the volume or panning for a stereo input pair, hold down the command key while dragging the fader or knob for either the left or right input.
SHORTCUTS
Hold down the following modifier keys as shortcuts:
Shortcut Result
| Shift key Applies your action to all inputs in the mix. |
| Command key Applies your action to the stereo input pair |
| Option key Applies your action to all busses |
| Double-click Returns the control to its default value (pan center, unity gain, etc.) |
COPYING & PASTING (DUPLICATING) ENTIRE MIXES
To copy and paste the settings from one mix to another:
1 Select the source mix (Figure 13-1) and choose Copy from the file menu (or press command-C).
2 Choose the destination mix and choose Paste from the file menu (or press command-V).
MESSAGE CENTER
The Message Center displays fly-over help for items in the CueMix Console window. It also displays messages regarding the overall operation of the 828mkII.
REFERENCE LEVEL AND +6DB BOOST
The reference level and +6dB boost settings at the very top of the CueMix Console window (Figure 13-1) affect each input globally, across all mixes and for audio being routed to the computer. For example, if you add 6dB of boost, your host software will receive the boost for that input as well.
Boost
This setting (Figure 13-1) adds 6 dB of gain to the input signal. This setting is applied globally for the input.
+4/-10 reference level
Click the reference button to toggle between these two standard reference levels. This setting is applied globally for the input.
MIX1 RETURN INCLUDES COMPUTER
The Mix1 return includes computer item in the CueMix Console File menu refers to the Mix1 bus that the 828mkII driver provides as an input to host audio software. This input source delivers the output of CueMix DSP “MIX1” (the first mix bus of the four on-board no-latency monitor mixes in the 828mkII) back to your computer. This input serves, for example, as a convenient way for you to record the 828mkII’s MIX1 monitor mix back into your host audio software (for reference and archiving purposes).
When the Mix1 return includes computer menu item is checked, any audio being sent from your audio software on the computer to the same output as Mix1 will be included in the Mix1 return bus. When it is unchecked, computer output is excluded.
This menu item is essentially a pre/post switch for the computer audio insert to the stream of audio going to Mix1's 828mkII output pair (and also back to the computer).
SHOW METER IN DOCK ICON (MAC OS X ONLY)
This CueMix Console File menu item, when checked, causes the CueMix Console dock icon to display a small level meter that mirrors the main output meter for the current mix being displayed in CueMix Console.
PHONES MENU
The Phones menu allows you to choose what you will hear on the headphone output, just like the Phones setting the MOTU FireWire Audio Console. However, this menu provides one extra option that is exclusive to CueMix Console: Follow Active Mix. This menu item, when checked, causes
the headphone output to mirror the output of the current mix being viewed in CueMix Console. For example, if you are currently viewing Mix3 (the Mix3 tab is active), the headphones will mirror the Mix3 output (whatever it is assigned to).
SAVING AND LOADING PRESETS
As explained earlier in “Save/Name Preset” on page 55, the 828mkII can store up to 16 presets in its on-board memory. A preset includes of all CueMix DSP settings for all for mix busses, but it excludes global settings like clock source and sample rate.
The Load Preset and Save Preset commands in the CueMix Console file menu let you name, save and load presets in the 828mkII.
SAVING AND LOADING PRESETS TO/FROM DISK
The Save and Load commands in the CueMix Console File menu allow you to save 828mkII presets to and from your hard drive. This allows you to save an unlimited number of 828mkII presets on disk. (Use the Load Preset and Save Preset commands to get presets from — and save them to — the 828mkII itself.) Click the Save button to save the current configuration; click the Load button to open an existing configuration that you have previously saved on disk.
CUEMIX CONSOLE EXAMPLES
Figure 13-2 below shows some examples of how you can use CueMix DSP:
■ Powered speakers are connected to the 828mkII main outs. Any input can be routed directly to the speakers.
■ Microphone input can be routed via CueMix DSP to the effects processor for live outboard processing during recording. The resulting signal can be recorded into the computer either wet, dry or both (via the effects processor return or the direct mic input).
■ The ADAT optical connection provides 8 channels of 24-bit digital I/O to the digital mixer (or 4 channels at 96kHz). Any device connected to the 828mkII can be routed to/from the mixer with no latency. Conversely, any mixer channel can be routed to any device connected to the 828mkII with no latency.
■ Another example of ADAT optical connectivity is to use Giga Studio, and use CueMix DSP to route Giga inputs directly to the powered monitors connected to the 828mkII for no-latency monitoring of your Giga tracks.

flowchart
graph TD
    A["828 micro"] --> B["video deck"]
    A --> C[" effects processor "]
    A --> D[" powered monitors "]
    A --> E[" digital display "]
    A --> F[" analog "]
    A --> G[" SMPTE "]
    style A fill:#f9f,stroke:#333
    style B fill:#ccf,stroke:#333
    style C fill:#cfc,stroke:#333
    style D fill:#fcc,stroke:#333
    style E fill:#cff,stroke:#333
    style F fill:#ffc,stroke:#333
    style G fill:#fcc,stroke:#333
    style_H[" digital display "] --> I[" video deck "]
    H --> J[" digital display "]
    H --> K[" digital display "]
    H --> L[" digital display "]
    H --> M[" digital display "]
    H --> N[" digital display "]
    H --> O[" digital display "]
    H --> P[" digital display "]
    H --> Q[" digital display "]
    H --> R[" digital display "]
    H --> S[" digital display "]
    H --> T[" digital display "]
    H --> U[" digital display "]
    H --> V[" digital display "]
    H --> W[" digital display "]
    H --> X[" digital display "]
    H --> Y[" digital display "]
    H --> Z[" digital display "]
    H --> AA[" digital display "]
    H --> AB[" digital display "]
    H --> AC[" digital display "]
    H --> AD[" digital display "]
    H --> AE[" digital display "]
    H --> AF[" digital display "]
    H --> AG[" digital display "]
    H --> AH[" digital display "]
    H --> AI[" digital display "]
    H --> AJ[" digital display "]
    H --> AK[" digital display "]
    H --> AL[" digital display "]
    H --> AM[" digital display "]
    H --> AN[" digital display "]
    H --> AO[" digital display "]
    H --> AP[" digital display "]
    H --> AQ[" digital display "]
    H --> AR[" digital display "]
    H --> AS[" digital display "]
    H --> AT[" digital display "]
    H --> AU[" digital display "]
    H --> AV[" digital display "]
    H --> AW[" digital display "]
    H --> AX[" digital display "]
    H --> AY[" digital display "]
    H --> AZ[" digital display "]
    H --> BA[" digital display "]
    H --> BB[" digital display "]
    H --> BC[" digital display "]
    H --> BD[" digital display "]
    H --> BE[" digital display "]
    H --> BF[" digital display "]
    H --> BG[" digital display "]
    H --> BH[" digital display "]
    H --> BI[" digital display "]
    H --> BJ[" digital display "]
    H --> BK[" digital display "]
    H --> BL[" digital display "]
    H --> BM[" digital display "]
    H --> BN[" digital display "]
    H --> BO[" digital display "]
    H --> BP[" digital display "]
    H --> BQ[" digital display "]
    H --> BR[" digital display "]
    H --> BS[" digital display "]
    H --> BT[" digital display "]
    H --> BU[" digital display "]
    H --> BV[" digital display "]
    H --> BW[" digital display "]
Figure 13-2: An example setup of a system that takes full advantage of CueMix DSP.
CHAPTER 14 MOTU SMPTE Console
OVERVIEW
The 828mkII can resolve to SMPTE time code, without a dedicated synchronizer. It can also serve as a SMPTE time code generator.
The MOTU SMPTE Console software provides a complete set of tools to resolve to SMPTE, and to generate SMPTE for striping, regenerating or slaving other devices to the computer.
The 828mkII provides a DSP-driven phase-lock engine with sophisticated filtering that provides fast lockup times and sub-frame accuracy.
Quarter-inch SMPTE jacks on the 828mkII rear panel provide dedicated time code (LTC) input and output.
| Clock/Address | 103 |
| Frame Rate | 104 |
| Reader section | 104 |
| Generator section | 105 |
CLOCK/ADDRESS
The Clock/Address menu provides the same global Clock Source setting as in the MOTU FireWire Audio Console (“Clock Source” on page 42), but it includes additional information: each setting shows both the clock and the address (time code or sample location), separated by a forward slash (/). For example, the word clock setting (Word Clock In / Internal) shows the clock source (Word Clock In) followed by the address (Internal). Notice that only the SMPTE setting supports SMPTE time code as the reference for address. The digital clock sources do not support the 828mkII’s on-board SMPTE time code sync.
Resolving to SMPTE time code
To resolve the 828mkII to SMPTE time code, choose the SMPTE / SMPTE setting in the Clock/Address menu. This means that the system will use SMPTE as the clock (time base) and SMPTE as the address. Be sure to specify the input that is
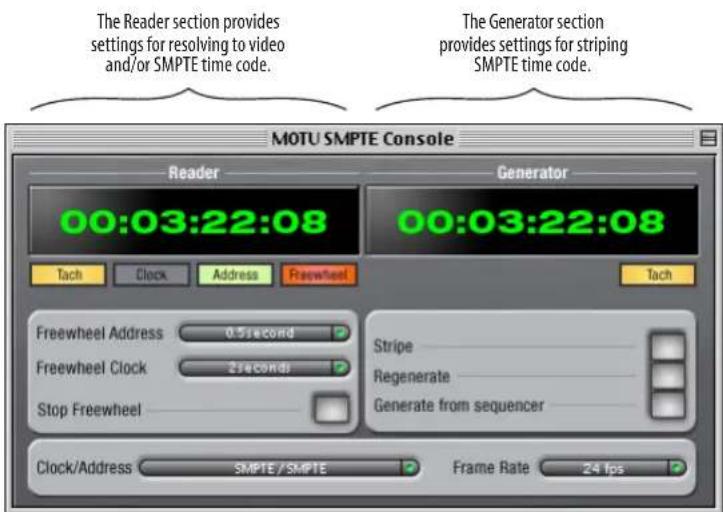
Figure 14-1: SMPTE Console gives you access to your 828mkll's on-board SMPTE time code synchronization features.
receiving the SMPTE time code by choosing it from SMPTE source menu. For further details on the hardware connections involved, see “Syncing to SMPTE time code” on page 27.
Resolving to video
To resolve the 828mkII to video, you need a synchronizer such as a MIDI Timepiece AV or a Digital Timepiece and feed word clock to the 828mkII. In this scenario, choose SMPTE / Word Clock In clock/address setting. The 828mkII uses word clock for the time base and SMPTE for address. For details, see “Syncing to video and/or SMPTE time code using a synchronizer” on page 28.
FRAME RATE
This setting should be made to match the SMPTE time code frame rate of the time code that the system will be receiving. The 828mkII can auto-detect and switch to the incoming frame rate, except that it cannot distinguish between 30 fps and 29.97 fps time code. So if you are working with either of these rates, make sure you choose the correct rate from this menu. The 828mkII driver updates the frame rate setting in Digital Performer and AudioDesk for you. For ASIO applications, however, you need to make sure that their frame rate it set properly.
READER SECTION
The Reader section (on the left-hand side of the window in Figure 14-1) provides settings for synchronizing the 828mkII to SMPTE time code.
Status lights
The four status lights (Tach, Clock, Address and Freewheel) give you feedback as follows.
Tach
The Tach light blinks once per second when the 828mkII has successfully achieved lockup to SMPTE time code and SMPTE frame locations are being read.
Clock
The Clock light glows continuously when the 828mkII has successfully achieved lockup to an external time base, such as SMPTE time code or word clock.
Address
The Address light glows continuously when the 828mkII has successfully achieved lockup to SMPTE time code.
Freewheel
The Freewheel light illuminates when the 828mkII is freewheeling address (time code), clock or both. For details about Freewheeling, see “Freewheel Address” and “Freewheel clock” below.
Freewheel Address
Freewheeling occurs when there is a glitch or drop-out in the incoming time code for some reason. The 828mkII can freewheel past the drop-out and then resume lockup again as soon as it receives readable time code. Choose the amount of time you would like the 828mkII to freewheel before it gives up and stops altogether.
The 828mkII cannot freewheel address without clock. Therefore, the Freewheel Address setting will always be lower than or equal to the Freewheel Clock setting, and both menus will update as needed, depending on what you choose.
Keep in mind that freewheeling causes the system to keep going for as long as the duration you choose from this menu, even when you stop time code intentionally. Therefore, if you are starting and stopping time code frequently (such as from the transports of a video deck), shorter freewheel times are better. On the other hand, if you are doing a one-pass transfer from tape that has bad time code, longer freewheel times will help you get past the problems in the time code.
The 'Infinite' freewheel setting
The Infinite freewheel setting in the Freewheel Address menu causes the 828mkII to freewheel indefinitely, until it receives readable time code again. To make it stop, click the Stop Freewheeling button.
Freewheel clock
Freewheeling occurs when there is glitch or drop-out in the incoming SMPTE time code for some reason. The 828mkII can freewheel past the drop-out and then resume lockup again as soon as it receives a stable, readable clock signal.
The 828mkII cannot freewheel address without clock. Therefore, the Freewheel Address setting will always be lower than or equal to the Freewheel Clock setting, and both menus will update as needed, depending on what you choose.
The 'Infinite' freewheel setting
The Infinite freewheel setting in the Freewheel Clock menu causes the 828mkII to freewheel indefinitely, until it receives readable time code again. To make it stop, click the Stop Freewheeling button.
Stop Freewheeling
The Stop Freewheeling button stops the system if it is currently freewheeling.
GENERATOR SECTION
The Generator section (on the right-hand side of the window in Figure 14-1) provides setting for generating SMPTE time code.
Tachlight
The Tach light blinks once per second when the 828mkII is generating SMPTE time code.
Stripe
Click this button to start or stop time code. To set the start time, click directly on the SMPTE time code display in the Generator section and type in the desired start time. Or drag vertically on the numbers.
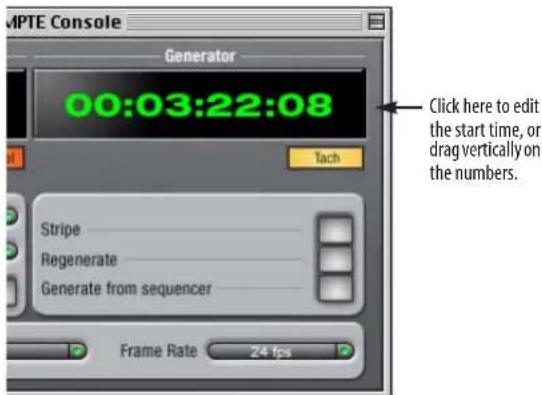
Figure 14-2: Setting the time code start time.
Regenerate
This option, when enabled, causes the generator to generate time code whenever the 828mkII is receiving either SMPTE time code or ADAT Sync (via its ADAT Sync In port).
Generate from sequencer
This option, when enabled, causes the generator to generate time code whenever you are running AudioDesk or Digital Performer. Time code begins at the time specified by the AudioDesk or Digital Performer main transport.
CHAPTER 15 Troubleshooting
Using Pro Tools, Sound Manager and -50 error (OS 9 only)
When using Sound Manager, Pro Tools software will only allow audio input via the Macintosh's Built-in hardware. Therefore, you cannot use the 828mkII as the input device to Pro Tools software. If the 828mkII driver is selected as the input device in the Sound Control Panel, Pro Tools will return a -50 error and not launch. You can, however, select Built-in as the input device and the 828mkII as the output device in the Sound Control Panel. After doing so, you can run Pro Tools and monitor your output through the MOTU 828mkII.
Sample accurate sync in AudioDesk and Digital Performer
When you first use sample accurate sync, be sure to go to the Receive Sync dialog in Digital Performer or AudioDesk and switch from “MTC” to “Sample-accurate.”
Cubase - MOTU 828mkII inputs and outputs are not visible in Cubase
You probably need to enable them in Cubase.
Can't authenticate AudioDesk
When installing software off the CD-ROM, the OK button does not become active until you have entered in your name and a valid keycode. Your name must contain at least 3 characters, and you must enter the keycode exactly as it appears in your AudioDesk manual (on the inside of the back cover).
MOTU Fire Wire Audio Console or Control Strip module settings are grayed out for no reason. Some settings cannot be accessed while the 828mkII is active. Quit all audio software that uses the 828mkII (including any Sound Manager applications, if any), and then the 828mkII settings should no longer be grayed out.
No input on an ADAT tape deck
If you are having trouble recording on your ADAT tape deck from the 828mkII, check the Digital input setting. After power cycling, tape decks often come up configured to record from their analog inputs. You won't be able to record from the 828mkII to a tape deck until it is switched to digital input. Tip: configure this in ClockWorks or AudioDesk if you want your decks to come up in the right mode when power cycled.
Clicks and pops under word clock sync
Many problems result from incorrect word clocking. It is essential that all digital devices in the system be word locked. Consult “Making sync connections” on page 22 for detailed information on how to word clock your gear. Whenever there is any weird noise or distortion, suspect incorrect word lock.
Clicks and pops under ADAT Sync
Sometimes, the ADAT sync cable seems to be plugged into the 828mkII, and it partially works. But it isn't really all the way in. This can cause clicks when slaved to ADAT 9-pin. Make sure the ADAT Sync cable plug is really seated firmly.
Clicks and pops due to hard drive problems
If you have checked your clock settings and you are still getting clicks and pops in your audio, you may have a drive related problem. Set your Clock Source to Internal and try recording just using the analog inputs and outputs of the 828mkII. If you encounter the same artifacts you may want try using another drive in your computer. Clicks and pops can also occur when the drive is severely fragmented, the disk drivers are outdated, or if you are using a SCSI accelerator that is not optimally configured for working with audio.
Connecting or powering gear during operation It is not recommended that you connect/ disconnect, or power on/off devices connected to the 828mkII while recording or playing back audio. Doing so may cause a brief glitch in the audio.
No optical inputs or outputs are available in host audio application
Check to make sure you have the desired optical inputs and/or outputs enabled in the MOTU FireWire Audio Console.
Monitoring - How to monitor inputs?
Please refer to the documentation for the audio application that you are using. If your application does not support input monitoring, you will need to use the 828mkII's hardware-based CueMix DSP monitoring feature. Please see chapter 12, "Reducing Monitoring Latency" (page 89).
Controlling monitoring latency
See chapter 12, “Reducing Monitoring Latency” (page 89).
CUSTOMER SUPPORT
We are happy to provide customer support to our registered users. If you haven't already done so, please take a moment to complete the registration card included with your 828mkII. When we receive your card, you'll be placed on our mailing list for free software updates and information about new products.
REPLACING DISKS
If your 828mkII software installer CD becomes damaged and fails to provide you with fresh, working copies of the software, our Customer Support Department will be glad to replace it. You can request a replacement disc by calling our business office at (617) 576-2760 and asking for the customer service department.
TECHNICAL SUPPORT
If you are unable, with your dealer's help, to solve problems you encounter with the 828mkII system, you may contact our technical support department in one of the following ways:
■ Tech support hotline: (617) 576-3066 (Monday through Friday, 9 am to 6 pm EST)
■ Tech support 24-hour fax line: (617) 354-3068
■ Tech support email: techsupport@motu.com
■ Web site: www.motu.com
Please provide the following information to help us solve your problem as quickly as possible:
■ The serial number of the 828mkII system. This is printed on a sticker placed on the bottom of the 828mkII rack unit. You must be able to supply this number to receive technical support.
■ A brief explanation of the problem, including the exact sequence of actions which cause it, and the contents of any error messages which appear on the screen.
■ The pages in the manual which refer to the parts of the 828mkII or AudioDesk with which you are having trouble.
■ The version or creation date of the system software you are using to run the Macintosh.
We're not able to solve every problem immediately, but a quick call to us may yield a suggestion for a problem which you might otherwise spend hours trying to track down.
If you have features or ideas you would like to see implemented, we'd like to hear from you. Please write to the 828mkII Development Team, MOTU Inc., 1280 Massachusetts Avenue, Cambridge, MA 02138.
+4/-10dB reference level 100
+6db 56
+6dB Boost 99
02R mixer 29
connecting 21
1394 connector 6, 11, 17
2408mk3
Word Clock In setting 43, 49
24-bit
AudioDesk 68
Digital Performer 62
optical 6, 10
recording 12
24i/o
Word Clock In setting 43, 49
4/10 56
828mkII
expansion 32
installing 17
rear panel overview 9
summary of features 9
A
Aardvark Aard Sync 31
Activity LEDs 5, 12
ADAT
sync 27, 28
ADAT 9-pin 11, 43, 49
ADAT lightpipe 29
ADAT optical 6, 10
clock source setting 43, 49
connecting 18
syncing with 43, 48
ADAT Sync 11
connector 6
sample-accurate 24, 25, 26
sync setting 43, 49
ADAT sync
sample-accurate 63, 70
All Notes Off 55
Analog activity lights 5, 12
Analog inputs/outputs 6
making connections to 18
Apple menu 37
ASIO 38,79
ASIO 2.0 option 88
MOTU 828 ASIO driver 37
ASIO Control Panel button 41, 47
Audio
bit resolution 42, 48
input/output timing 62, 68
MIDI Setup utility 36
AudioDesk 12, 35, 37, 39, 65
accessing 828 settings 41, 47
MMC control 25
optical input/output 67
sync settings 25, 26
B
Balanced analog 18
Boost 99
Buffer Size 50, 61, 67
Bus Mute 55
Bus Output 55
C
Calibrating audio input/output 62, 68
Clock LEDs 5, 12
Clock Source 54
Clock source 7, 22, 42, 48
AudioDesk 67
Coax 10
Condenser mic input 5
Configure Hardware Driver 41, 47
Configure interface 32
Connecting multiple 828mkII s 32
Control Panel (MOTU 828) 38, 41, 47
Control Strip 37
Control Strip module (828) 38, 41, 47
Controller
connecting 19
Converters 6
Copy bus mix 55
CoreAudio
defined 35
CoreMIDI
Audio MIDI Setup 36
benefits 36
Cubas
Audio Buffer Size 74
Mac OS X 74
synchronization 86
troubleshooting 107
using a foot switch 77, 88
CueMix Console 93, 97
CueMix DSP 93
CueMix DSP Mixer 53
CueMix Plus
output jacks 6, 19
Customer support 108
D
DAT
connecting 20
Digital mixer
connecting 21
Digital Performer 12, 59
accessing 828 settings 41, 47
clock source 60, 74, 81
MMC control 25
Optical input/output 61, 74, 81
sample rate 60, 74, 80
sync settings 25, 26
Digital Timepiece 25
Disable interface option 34
Disable option 34
Disc
replacing 108
Drivers
installing USB drivers 35, 37
E
Enable Sound Manager 51
Expansion 32
F
Factory Defaults 56
Fader View Time 54
Feedback loops 62, 68, 76, 83
Fine-tune Audio I/O Timing command 62, 68
FireWire 11
connecting 17
connector 6
Follow Active Mix 100
Foot pedal
connecting 19
Foot switch 11, 45, 51
3rd party software 77, 88
AudioDesk 70
configuring 7
connecting 19
Digital Performer 64
jack 6
Forget button 34
Freewheel
address 104
clock 105
infinite 105
Front panel 53
G
Gain 56
Generate from sequencer 105
Guitar
connecting 20
H
HD192
Word Clock In setting 43, 49
Headphone jack 5, 12
Headphones
connecting 20
controlling output 44, 51
I
Infinite freewheel 105
Init Current Mix 55
Inputs
analog 6
optical 6
S/PDIF (RCA) 6
Installation
hardware 17
software 37
Installer CD
replacing 108
Internal (sync setting) 42, 48
K
Keyboard controller
connecting 19
L
Latency 50, 61, 67, 81, 89, 92
Launch console when hardware becomes
available 45
LCD display 53
Lightpipe 29
Load Preset 55, 100
Logic Audio 75
M
Mac OS X 73
input and output names 75
Main Outs
volume 54
Main outs
jacks 6
making connections to 19
volume 5
Main volume 5
Mic inputs
connecting 20
phantom power 5
Mic preamps 5
Mic/line inputs 5, 18
MIDI Machine Control 23, 24, 63
MIDI Time Code sync 23
MIDI Timepiece AV 25
MIX BUS knob 56
Mix1 1-2 76
AudioDesk 68
Cubase 83
Digital Performer 61
Mix1 return includes computer 100
MMC 23, 24, 63
Monitoring 90
thru main outs 19
MOTU
Digital Timepiece 25
MIDI Timepiece AV 25
MOTU 324 Console 35
MOTU 828
ASIO driver 38
MOTU 828 Control Panel 38, 47
MOTU 828 Control Strip module 7, 38, 41, 47
MOTU Audio System
bit resolution 42, 48
Fine-tune Audio I/O Timing 62, 68
input/output timing 62, 68
MOTU FireWire Audio Console 7, 41
MOTU Folder 37
MOTU SMPTE Console 103
MTC sync 23
Mute 56
N
Neutrik jacks 5
Nuendo
Mac OS X 74
synchronization 86
0
Optical
choosing format (ADAT or
TOSlink) 44, 51
choosing format (ADAT/TOSlink) 7
connectors 6, 18
LEDs 5, 12
overview 10
sync 29
Optical In/Out 55
Optimization 92
Outputs
analog 6
optical 6
S/PDIF (TOSLink) 6
P
Packing list 15
Pair 56
Pan 56
PARAM knob 56
Paste Bus Mix 55
Patch thru
latency 50, 92
PCI-424 SMPTE setting 44, 50
Pedal 11, 45, 51
3rd party software 77, 88
AudioDesk 70
configuring 7
Digital Performer 64
jack 6
Pedal A 19
Pedal B/LRC 19
Performance 92
Phantom power 5, 18
Phase-lock 22
Phones 5, 44, 51, 76
AudioDesk 67
Digital Performer 61, 74, 81
Phones 1-2
AudioDesk 68
Cubase 85
Digital Performer 61
Phones Assign 55
Phones menu 100
Pro Tools 107
Problem-solving 107
Punch in/out 11
R
Reference level 100
Regenerate 105
Registration 15
S
S/PDIF 10
clock source setting 43, 48
lights 5, 12
optical 6, 10
RCA 6
sync 30
Sample rate 7, 42, 48
AudioDesk 67
Sample-accurate sync 11, 24, 25, 26, 87
Samplers
connecting 20
Samples Per Buffer 50, 92
Samples per buffer 50, 61, 67, 81
Save Preset 100
Save/Name Preset 55
SELECT knob 54
SETUP knob 54
Show meter in dock icon 100
SMPTE
synchronization 103
SMPTE sync 22, 23
Software
installation 37
Solo 56
Sound control panel
rate (bit resolution) 42, 48
Sound Manager
bit resolution 42, 48
enabling 51
grayed out 51
input/output timing 62, 68
Sound module
connecting 19
Stand-alone operation 53
Stop Freewheeling 105
Stripe button 105
Studio setup (example) 20
Sync
sample-accurate 24, 25, 26
Synchronization 22
AudioDesk 69
Cubase 86
Digital Performer 62
Nuendo 86
Synths
connecting 20
System requirements
minimum 15
recommended computer 12, 15
T
TACH light (SMPTE Console) 104
Tascam
Sync 27, 28
Technical support 108
Time code sync 103
TOSLink 6, 10
clock source setting 44, 49
connecting 18
Troubleshooting 107
feedback loop 62, 68, 76, 83
TRS connectors 18
U
Unbalanced analog 18
USB
installing drivers 35, 37
V
Video sync 22, 103
Volume
headphone 12
VOLUME knob 54
W
Word clock 6, 11, 22, 30
sync setting 43, 49
Word Clock In setting 43, 49
Word Out 45, 51
Y
Yamaha 02R
connecting 21
Yamaha 02R mixer 29
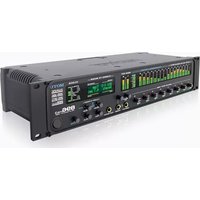

- User's Guide for Macintosh
- SAFETY PRECAUTIONS AND ELECTRICAL REQUIREMENTS
- WARNING: THE GREEN GROUNDING LUG EXTENDING FROM THE ADAPTER MUST BE CONNECTED TO A PERMANENT GROUND SUCH ASTO A PROPERLY GROUNDED OUTLET BOX. NOT ALL OUTLET BOXES ARE PROPERLY GROUNDED.
- IMPORTANT SAFEGUARDS
- ENVIRONMENT
- AVOID THE HAZARDS OF ELECTRICAL SHOCK AND FIRE
- INPUT
- Contents
- About the Mark of the Unicorn License Agreement and Limited Warranty on Software
- Reminder of the terms of your license
- Update Policy
- Copyright Notice
- Limited Warranty on Hardware
- Quick Reference: 828mkII Front Panel
- Quick Reference: 828mkII Rear Panel
- Quick Reference: MOTU FireWire Audio Console
- CHAPTER 1 About the 828mkll
- OVERVIEW
- THE 828MKII I/O REAR PANEL
- inputs and 22 outputs
- Analog
- Mic sends
- Main Outs
- Optical
- S/PDIF
- MIDI I/O
- On-board SMPTE synchronization
- ADAT sync: sample-accurate synchronization
- Word clock
- Punch in/out
- FireWire
- THE 828MKII FRONT PANEL
- Mic inputs with 48V phantom power
- Headphone output and main volume control
- CueMix™ DSP no-latency on-board mixing
- Backlit LCD display
- Metering section
- 16-BIT AND 24-BIT RECORDING
- AUDIODESK
- DIGITAL PERFORMER
- OTHER HOST AUDIO SOFTWARE
- A COMPUTER-BASED SYSTEM
- CHAPTER 2 Packing List and Macintosh System Requirements
- PACKING LIST
- MACINTOSH SYSTEM REQUIREMENTS
- PLEASE REGISTER TODAY!
- CHAPTER 3 Installing the 828mkII Hardware
- CONNECT THE 828MKII INTERFACE
- CONNECT AUDIO INPUTS AND OUTPUTS
- Quarter-inch analog
- Front-panel mic/guitar/instrument inputs
- Mic/guitar/instrument sends
- CONNECT MIDI GEAR
- One-way MIDI connections
- Connecting additional gear with MIDI THRUs
- CONNECT A FOOT SWITCH
- A TYPICAL 828MKII SETUP (NO MIXER)
- USING THE 828MKII WITH A MIXER
- MAKING SYNC CONNECTIONS
- Do you need to synchronize the 828mkII?
- Situations that require synchronization
- Synchronization is critical for clean digital I/O
- Be sure to choose a digital audio clock master
- DO YOU NEED A SYNCHRONIZER?
- You don't need a synchronizer if...
- Transport control from your computer
- Continuous sync to SMPTE / MTC
- Sample accurate locating
- Is your audio software sample-accurate?
- SAMPLE-ACCURATE ADAT SYNC
- Use this setup if you have:
- This setup provides:
- SAMPLE-ACCURATE ADAT SYNC WITH NO SYNCHRONIZER
- In AudioDesk or Digital Performer:
- SYNCING TO SMPTE TIME CODE
- SYNCING TO VIDEO AND/OR SMPTE TIME CODE USING A SYNCHRONIZER
- SYNCING OPTICAL DEVICES
- SYNCING S/PDIF DEVICES
- S/PDIF devices with no word clock
- S/PDIF devices with word clock
- SYNCING WORD CLOCK DEVICES
- Don't chain word clock
- Slaving to 2x and 1/2x word clock
- SYNCING LARGE SYSTEMS
- CONNECTING MULTIPLE MOTU FIREWIRE INTERFACES
- Multiple interfaces in the MOTU FireWire Audio Console
- Using multiple interfaces under Mac OS 9
- Using multiple interfaces under Mac OS X
- Connecting an 828
- Operating multiple FireWire interfaces at high sample rates
- Adding additional interfaces with a second FireWire bus
- Managing the IDs of multiple interfaces (Mac OS 9 only)
- CHAPTER 4 Installing the 828mkII Macintosh Software
- SOFTWARE INSTALLATION FOR MAC OS X
- What does the OS X installer do?
- The 828mkll CoreAudio driver
- CoreMIDI and Audio MIDI Setup
- Launching Audio MIDI Setup
- Connecting MIDI devices to the 828mkII
- SOFTWARE INSTALLATION FOR MAC OS 9
- What does the OS 9 installer do?
- MOTU FireWire Audio Control Panel
- MOTU FireWire Control strip module
- ASIO MOTU FireWire Audio driver
- CUEMIX CONSOLE
- MOTU SMPTE CONSOLE
- AUDIODESK WORKSTATION SOFTWARE
- CHAPTER 5 MOTU FireWire Audio Console (Mac OS X)
- ACCESSING THE 828MKII SETTINGS
- 828MKII SETTINGS
- Sample Rate
- Clock Source
- Internal
- Word Clock In
- ADAT 9-pin
- ADAT optical
- TOSLink
- SMPTE
- Optical input/output
- Phones
- Word Out
- Enable Pedal
- Launch console when hardware becomes available
- CHAPTER 6 MOTU FireWire Control Panel (Mac OS 9)
- Samples Per Buffer
- Enable Sound Manager driver
- IF 828MKII SETTINGS ARE GRAYED OUT
- CHAPTER 7 828mkII Front Panel Operation
- PUSH-BUTTON ROTARY ENCODERS
- MULTI-FUNCTION LCD DISPLAY
- Setup mode
- Mixer mode
- Parameter "zooming"
- VOLUME
- SETUP / SELECT
- Fader View Time
- Optical In / Optical Out
- Bus output
- Bus mute
- Phones Assign
- Init Current Mix
- Copy Bus Mix
- Paste Bus Mix
- Save/Name Preset
- Load preset
- All Notes Off
- Factory Defaults
- MIX BUS
- PARAM
- Mix parameters that apply across all mixes
- Working with stereo pairs
- CURSOR / VALUE
- CHAPTER 8 Digital Performer
- SETTING UP YOUR SYSTEM
- THE 828MKII SETTINGS
- 828mkll settings in Mac OS 9
- 828mkII settings in Mac OS X
- Buffer Size (OS X) / Samples Per Buffer (OS 9)
- Optical input and output
- BE SURE YOU HAVE ENOUGH VOICES
- WORKING WITH 828MKII INPUTS AND OUTPUTS
- Phones 1-2
- Mix1 1-2
- 24-BIT OPERATION
- FINE-TUNING I/O TIMING
- SYNCHRONIZATION
- Running DP under its own transport control
- Resolving DP and the 828mkII to SMPTE time code
- Resolving to video and/or time code with a dedicated synchronizer
- Sample-accurate sync to ADAT and Tascam
- MIDI MACHINE CONTROL (MMC)
- MIDI I/O VIA THE 828MKII MIDI PORTS
- PROCESSING LIVE INPUTS WITH PLUG-INS
- USING A FOOT SWITCH
- EXCHANGING PROJECTS WITH AUDIODESK
- SOUND MANAGER AND DIGITAL PERFORMER (OS 9 ONLY)
- CHAPTER 9 AudioDesk
- 828mkII settings in Mac OS 9
- Running AudioDesk under its own transport control
- Resolving AudioDesk and the 828mkll to SMPTE time code
- PROCESSING LIVE INPUTS THROUGH PLUG-INS
- EXCHANGING PROJECTS WITH DIGITAL PERFORMER
- AUDIODESK AND MIDI SEQUENCING
- CHAPTER 10 Other Mac OS X Audio Software
- INSTALLING THE 828MKII MAC OS X DRIVERS
- PREPARING MIDI INPUT AND OUTPUT
- RUN THE MOTU FIREWIRE AUDIO CONSOLE
- Cubase SX and Nuendo
- Logic Audio
- Other audio software
- AUDIO INPUT AND OUTPUT NAMES
- The 'Mix1' input pair
- NUMBER OF CHANNELS
- CHAPTER 11 Cubase, Nuendo and OS 9 ASIO Software
- ASIO SUPPORT IS REQUIRED FOR 3RD PARTY OS 9 SOFTWARE
- Sample-accurate sync
- Attention: Digital Performer users
- Attention: Cubase VST users
- Attention: Mac OS 9 Nuendo users
- Attention: Other software users
- PREPARATION
- CHOOSING THE MOTU FIREWIRE ASIO DRIVER
- Cubase VST
- Nuendo
- THE ASIO CONTROL PANEL BUTTON
- ASIO DIRECT MONITORING
- OTHER SYSTEM DIALOG SETTINGS
- ACTIVATING 828MKII INPUTS
- The "Mix1 1-2" input
- ASSIGNING INPUTS
- ASSIGNING OUTPUTS
- The "Phones 1-2" output
- CHANGING 828MKII SETTINGS
- Running Cubase or Nuendo under its own transport control
- Resolving Cubase or Nuendo and the 828mkll to SMPTE time code
- Resolving directly to time code (with no synchronizer)
- Sample-accurate sync to ADAT or Tascam
- MONITORING SYSTEM PERFORMANCE
- CHAPTER 12 Reducing Monitoring Latency
- MONITORING LIVE INPUT
- ADJUSTING THE AUDIO I/O BUFFER
- Adjusting buffer settings under Mac OS X
- Transport responsiveness
- Effects processing and automated mixing
- CUEMIX DSP HARDWARE MONITORING
- TWO METHODS FOR CONTROLLING CUEMIX DSP
- Using CueMix Console
- Controlling CueMix DSP from your audio software
- Controlling CueMix DSP from within AudioDesk or Digital Performer
- CHAPTER 13 CueMix Console
- ADVANTAGES OF CUEMIX MONITORING
- CUEMIX CONSOLE INSTALLATION
- Four mixes
- Many inputs to one output pair
- Viewing one mix at a time
- Each mix is completely independent
- Some channel settings apply across all mixes
- Widening the CueMix Console window
- WORKING WITH A MIX
- Viewing a mix
- Naming a mix
- Master mute
- Master fader
- Output level meters
- Input section
- Input mute/solo
- Input volume and pan
- SHORTCUTS
- COPYING & PASTING (DUPLICATING) ENTIRE MIXES
- MESSAGE CENTER
- REFERENCE LEVEL AND +6DB BOOST
- Boost
- +4/-10 reference level
- MIX1 RETURN INCLUDES COMPUTER
- SHOW METER IN DOCK ICON (MAC OS X ONLY)
- PHONES MENU
- SAVING AND LOADING PRESETS
- SAVING AND LOADING PRESETS TO/FROM DISK
- CUEMIX CONSOLE EXAMPLES
- CHAPTER 14 MOTU SMPTE Console
- CLOCK/ADDRESS
- Resolving to SMPTE time code
- Resolving to video
- FRAME RATE
- READER SECTION
- Status lights
- Tach
- Clock
- Address
- Freewheel
- Freewheel Address
- The 'Infinite' freewheel setting
- Freewheel clock
- Stop Freewheeling
- GENERATOR SECTION
- Tachlight
- Stripe
- Regenerate
- Generate from sequencer
- CHAPTER 15 Troubleshooting
- No optical inputs or outputs are available in host audio application
- Monitoring - How to monitor inputs?
- Controlling monitoring latency
- CUSTOMER SUPPORT
- REPLACING DISKS
- TECHNICAL SUPPORT
- A
- B
- C
- D
- E
- F
- G
- H
- I
- K
- L
- M
- N
- 0
- P
- R
- S
- T
- U
- V
- W
- Y
Brand : MOTU
Model : 828mkII FW
Category : DJ Equipment