
FastLane (USB) - MIDI Keyboard MOTU - Free user manual and instructions
Find the device manual for free FastLane (USB) MOTU in PDF.


| Product Type | USB MIDI Interface |
| USB Connectivity | USB 1.1 (Type A to Type B) |
| MIDI Ports | 2 MIDI IN, 2 MIDI OUT (5-pin DIN) |
| Power Supply | Bus-powered via USB cable |
| MIDI THRU Button | Yes, hardware bypass for direct MIDI routing |
| System Requirements | Mac with USB port, Mac OS 8.6, 9, or OS X (10.2 or later) |
| Included Items | FastLane interface, USB cable, driver CD, manual, registration card |
| Software Drivers | MOTU USB driver, FreeMIDI, OMS driver |
| MIDI Software Compatibility | All MOTU software, CoreMIDI apps (Mac OS X), FreeMIDI & OMS compatible (Mac OS 9) |
| Dimensions (approx.) | 4.5 x 2.5 x 1.0 inches |
| Weight (approx.) | 0.3 lbs |
Frequently Asked Questions - FastLane (USB) MOTU
User questions about FastLane (USB) MOTU
0 question about this device. Answer the ones you know or ask your own.
Ask a new question about this device
Download the instructions for your MIDI Keyboard in PDF format for free! Find your manual FastLane (USB) - MOTU and take your electronic device back in hand. On this page are published all the documents necessary for the use of your device. FastLane (USB) by MOTU.
USER MANUAL FastLane (USB) MOTU
Mark of the Unicorn License Agreement and Limited Warranty on Software
TO PERSONS WHO PURCHASE OR USE THIS PRODUCT: carefully read all the terms and conditions of this agreement before using this software package. Using this software package indicates your acceptance of the terms and conditions of this license agreement.
Mark of the Unicom, Inc. ("MOTU") owns both this program and its documentation. Both the program and the documentation are protected under applicable copyright laws. Your right to use the program and the documentation are limited to the terms and conditions described herein.
License
YOU MAY: (a) use the enclosed program on a single computer; (b) physically transfer the program from one computer to another provided that the program is used on only one computer at a time and that you remove any copies of the program from the computer from which the program is being transferred; (c) make copies of the program solely for backup purposes. You must reproduce and include the copyright notice on a label on any backup copy.
YOU MAY NOT: (a) distribute copies of the program or the documentation to others; (b) rent, lease or grant sublicenses or other rights to the program; (c) provide use of the program in a computer service business, network, time-sharing, multiple CPU or multiple user arrangement without the prior written consent of MOTU; (d) translate or otherwise alter the program or related documentation without the prior written consent of MOTU.
Term
Your license to use the program and documentation will automatically terminate if you fail to comply with the terms of this Agreement. If this license is terminated you agree to destroy all copies of the program and documentation.
Limited Warranty
MOTU warrants to the original licensee that the disk(s) on which the program is recorded be free from defects in materials and workmanship under normal use for a period of ninety (90) days from the date of purchase as evidenced by a copy of your receipt. If failure of the disk has resulted from accident, abuse or misapplication of the product, then MOTU shall have no responsibility to replace the disk(s) under this Limited Warranty. THIS LIMITED WARRANTY AND RIGHT OF REPLACEMENT IS IN LIEU OF, AND YOU HEREBY WAIVE, ANY AND ALL OTHER WARRANTIES, BOTH EXPRESS AND IMPLIED, INCLUDING BUT NOT LIMITED TO WARRANTIES OF MERCHANTABILITY AND FITNESS FOR A PARTICULAR PURPOSE. THE LIABILITY OF MOTU PURSUANT TO THIS LIMITED WARRANTY SHALL BE LIMITED TO THE REPLACEMENT OF THE DEFECTIVE DISK(S), AND IN NO EVENT SHALL MOTU BE LIABLE FOR INCIDENTAL OR CONSEQUENTIAL DAMAGES, INCLUDING BUT NOT LIMITED TO LOSS OF USE, LOSS OF PROFITS, LOSS OF DATA OR DATA BEING RENDERED INACCURATE, OR LOSSES SUSTAINED BY THIRD PARTIES EVEN IF MOTU HAS BEEN ADVISED OF THE POSSIBILITY OF SUCH DAMAGES. THIS WARRANTY GIVES YOU SPECIFIC LEGAL RIGHTS WHICH MAY VARY FROM STATE TO STATE. SOME STATES DO NOT ALLOW THE LIMITATION OR EXCLUSION OF LIABILITY FOR CONSEQUENTIAL DAMAGES, SO THE ABOVE LIMITATION MAY NOT APPLY TO YOU.
Update Policy
In order to be eligible to obtain updates of the program, you must complete and return the attached Mark of the Unicorn Purchaser Registration Card to MOTU.
General
This License Agreement shall be governed by the laws of the Commonwealth of Massachusetts and shall inure to the benefit of MOTU, its successors, administrators, heirs and assigns.
Copyright Notice
Copyright © 2005, 2004, 2003, 2002, 2001, 2000, 1999 by Mark of the Unicorn, Inc. All rights reserved. No part of this publication may be reproduced, transmitted, transcribed, stored in a retrieval system, or translated into any human or computer language, in any form or by any means whatsoever, without express written permission of Mark of the Unicorn, Inc., 1280 Massachusetts Avenue, Cambridge, MA, 02138, U.S.A.
Limited Warranty on Hardware
Mark of the Unicorn, Inc. and S&S Research ("MOTU/S&S") warrant this equipment against defects in materials and workmanship for a period of NINETY (90) DAYS from the date of original retail purchase. This warranty applies only to hardware products; MOTU software is licensed and warranted pursuant to separate written statements.
If you discover a defect, first write or call Mark of the Unicom at (617) 576-2760 to obtain a Return Merchandise Authorization Number. No service will be performed on any product returned without prior authorization. MOTU will, at its option, repair or replace the product at no charge to you, provided you return It during the warranty period, with transportation charges prepaid, to Mark of the Unicom, Inc., 1280 Massachusetts Avenue, MA 02138. You must use the product's original packing material for in shipment, and insure the shipment for the value of the product. Please include your name, address, telephone number, a description of the problem, and the original, dated bill of sale with the returned unit and print the Return Merchandise Authorization Number on the outside of the box below the shipping address.
This warranty does not apply if the equipment has been damaged by accident, abuse, misuse, or misapplication; has been modified without the written permission of MOTU, or if the product serial number has been removed or defaced.
ALL IMPLIED WARRANTIES, INCLUDING IMPLIED WARRANTIES OF MERCHANTABILITY AND FITNESS FOR A PARTICULAR PURPOSE, ARE LIMITED IN DURATION TO NINETY (90) DAYS FROM THE DATE OF THE ORIGINAL RETAIL PURCHASE OF THIS PRODUCT.
THE WARRANTY AND REMEDIES SET FORTH ABOVE ARE EXCLUSIVE AND IN LIEU OF ALL OTHERS, ORAL OR WRITTEN, EXPRESS OR IMPLIED. No MOTU/S&S dealer, agent, or employee is authorized to make any modification, extension, or addition to this warranty.
MOTU/S&S ARE NOT RESPONSIBLE FOR SPECIAL, INCIDENTAL, OR CONSEQUENTIAL DAMAGES RESULTING FROM ANY BREACH OF WARRANTY, OR UNDER ANY LEGAL THEORY, INCLUDING LOST PROFITS, DOWNTIME, GOODWILL, DAMAGE OR REPLACEMENT OF EQUIPMENT AND PROPERTY AND COST OF RECOVERING REPROGRAMMING, OR REPRODUCING ANY PROGRAM OR DATA STORED IN OR USED WITH MOTU/S&S PRODUCTS.
Some states do not allow the exclusion or limitation of implied warranties or liability for incidental or consequential damages, so the above limitation or exclusion may not apply to you. This warranty gives you specific legal rights, and you may have other rights which vary from state to state.
FastLane, MOTU and Mark of the Unicorn are trademarks of Mark of the Unicorn, Inc.
All other trademarks are property of their respective holders.
This equipment has been type tested and found to comply with the limits for a class B digital device, pursuant to Part 15 of the FCC Rules. These limits are designed to provide reasonable protection against harmful interference in a residential installation. This equipment generates, uses, and can radiate radio frequency energy and, if not installed and used in accordance with the instruction manual, may cause harmful interference to radio communications. However, there is no guarantee that interference will not occur in a particular installation. If this equipment does cause interference to radio or television equipment reception, which can be determined by turning the equipment off and on, the user is encouraged to try to correct the interference by any combination of the following measures:
- Relocate or reorient the receiving antenna
- Increase the separation between the equipment and the receiver
- Plug the equipment into an outlet on a circuit different from that to which the receiver is connected
If necessary, you can consult a dealer or experienced radio/television technician for additional assistance.
PLEASE NOTE: only equipment certified to comply with Class B (computer input/output devices, terminals, printers, etc.) should be attached to this equipment, and it must have shielded interface cables in order to comply with the Class B FCC limits on RF emissions.
WARNING: changes or modifications to this unit not expressly approved by the party responsible for compliance could void the user's authority to operate the equipment.

Packing List and System Requirements
THANK YOU FOR CHOOSING MOTU
Thank you for purchasing FastLane. Please read the important information in this booklet before using it.
PLEASE REGISTER TODAY
Please send in the registration card included with your FastLane interface. As a registered user, you will be eligible to receive on-line technical support email and announcements about product enhancements as soon as they become available. Only registered users receive these special update notices, so please, complete and mail this registration card!
Thank you for taking the time to register your new Mark of the Unicorn product!
SYSTEM REQUIREMENTS
FastLane-USB will run with any USB-equipped Macintosh running Mac OS 8.6, Mac OS 9 or Mac OS X (10.2 or later). If you are attempting to use FastLane with an older Macintosh model equipped with a USB adaptor card, contact MOTU for information about compatibility.
PACKING LIST
FastLane is shipped with the items listed below. If any of these items are not present when you first open the box, please immediately contact your dealer or Mark of the Unicorn.
■ FastLane-USB Interface
USB cable
■ CD with software drivers
■ This manual
■ Product registration card
MIDI CABLES NOT INCLUDED
To connect MIDI devices to FastLane-USB, you need MIDI cables, purchased separately.
MIDI SOFTWARE COMPATIBILITY
FastLane-USB is compatible with the following kinds of MIDI software:
■ All MOTU software products
■ All MIDI software under Mac OS X
■ All FreeMIDI- and OMS-compatible software running under Mac OS 8.6 or Mac OS 9
GETTING STARTED
Follow the directions in this booklet to successfully install and begin using FastLane-USB.
FAMILIARITY WITH MACINTOSH®
This manual assumes that your are familiar with using a Macintosh computer. If you are not, please review your Macintosh User's Guide before proceeding.
VISIT OUR WEB SITE FOR SOFTWARE UPDATES
Driver updates are posted on our web site as soon as they become available, so check our web site for the latest drivers: www.motu.com.
Installing FastLane-USB
CONNECTING A USB MACINTOSH
Using the USB cable included with FastLane-USB (or any standard USB cable), put the Type A plug into a Type A USB jack on the computer, the USB computer keyboard, or any other USB device connected to the computer that has an available Type A USB jack. The USB cable allows the Mac to communicate with all MIDI devices connected to FastLane.
If you have several FastLane-USB (or other MOTU) interfaces, see “Connecting multiple USB interfaces” on page 8.

flowchart
graph TD
    A["USB Plug"] --> B["Computer"]
    C["Type A jack"] --> B
    D["Use any available Type A jack"] --> B
Figure-1: You can plug the Type A connector into a Type A jack directly on the computer itself, a USB keyboard connected to the computer, or any other USB device already connected to the computer that has an available Type A USB jack.
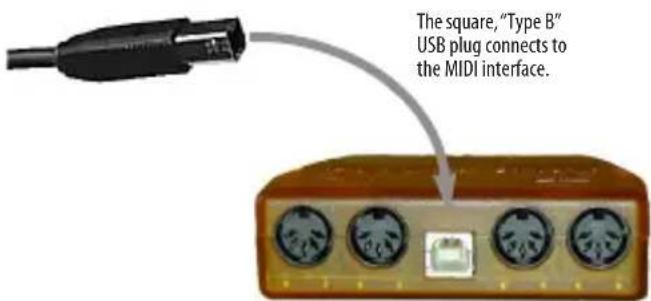
Figure-2: The square Type B plug goes into FastLane.
CONNECTING MIDI GEAR
Connect each MIDI device's MIDI IN jack to one of FastLane's two MIDI OUT jacks as shown by Connection 1 below. Conversely, connect the MIDI OUT jack on the MIDI device to one of FastLane's two MIDI IN jacks as shown by Connection 2.

flowchart
graph TD
    A["FastLane"] --> B["MIDI OUT"]
    A --> C["MIDI IN"]
    B --> D["MIDI cibles"]
    C --> D
    D --> E["MIDI Device"]
    D --> F["MIDI OUT"]
    style A fill:#f9f,stroke:#333
    style B fill:#ccf,stroke:#333
    style C fill:#ccf,stroke:#333
    style D fill:#cfc,stroke:#333
    style E fill:#ffc,stroke:#333
    style F fill:#ffc,stroke:#333
Figure-3: Connecting a MIDI device to FastLane-USB. If you are connecting a sound module or other device that does not need to transmit MIDI data, you only need to make Connection 1 shown above. Conversely, if the device is a MIDI controller such as a drum pad or guitar controller, you only need to make Connection 2.
One-way MIDI connections
MIDI devices that do not receive MIDI data, such as a dedicated keyboard controller, guitar controller, or drum pad, only need Connection 2 shown in Figure-3. Similarly, devices that never send data, such as a sound module, only need Connection 1. However, if you plan to use editor/librarian software with the sound module, or if you need to get system exclusive bulk dumps from it, make both connections. In general, make both connections for any device that needs to both send and receive MIDI data.
CONNECTING ADDITIONAL GEAR WITH MIDI THRUS
If you use up both MIDI OUTs on the FastLane, and you still have more gear to connect, run a MIDI cable from the MIDI THRU of a device already connected to the interface to the MIDI IN on the additional device as shown below in Figure-4. The two devices then share the same MIDI OUT port on FastLane. This means that they share the same set of 16 MIDI channels, so try to do this with devices that receive on only one MIDI channel (such as effects modules) so their receive channels don't conflict with one another.

flowchart
graph TD
    A["FastLane"] -->|MIDI OUT| B["MIDI Device"]
    A -->|MIDI cable| C["MIDI IN"]
    C -->|MIDI THRU| D["Additional device"]
    D -->|MIDI cable| E["MIDI IN"]
Figure-4: Connecting additional devices with MIDI THRU ports.
CONNECTING MULTIPLE USB INTERFACES
The USB (Universal Serial Bus) specification allows you to connect multiple MOTU interfaces to a single Macintosh. You can mix and match any combination of MOTU USB interfaces to suit your needs.
The USB (Universal Serial Bus) specification allows many USB devices — theoretically up to 127 — to be connected to a single computer. However, many USB devices, including all MOTU USB interfaces, reserve USB bandwidth, so the theoretical and practical limits for MOTU interfaces are considerably fewer. In theory, the maximum number of MOTU USB interfaces you can connect to one Macintosh is around 25 interfaces.
Practically speaking, regardless of how slow or fast your USB-equipped Macintosh is, you should be able to connect upwards of 10 or more MOTU USB MIDI interfaces to the Mac and still enjoy just as much performance from each one as if it were the only one connected. Just don't try to run your USB scanner or digital camera while playing back and recording MIDI!
For further details about USB, visit www.usb.org.
To connect multiple FastLanes (or other MOTU interfaces) to a Macintosh, you'll need an inexpensive device called a USB Hub (purchased separately from your computer peripherals dealer). A USB Hub has multiple Type A ports on it, usually between 4 and 7 ports, to which you connect multiple USB MIDI interfaces as shown below in Figure-5. Connect them to the hub in the standard fashion, as if you were connecting them directly to the computer. If needed, you can connect multiple hubs to each other to get enough USB ports for your multiple MOTU USB interfaces.
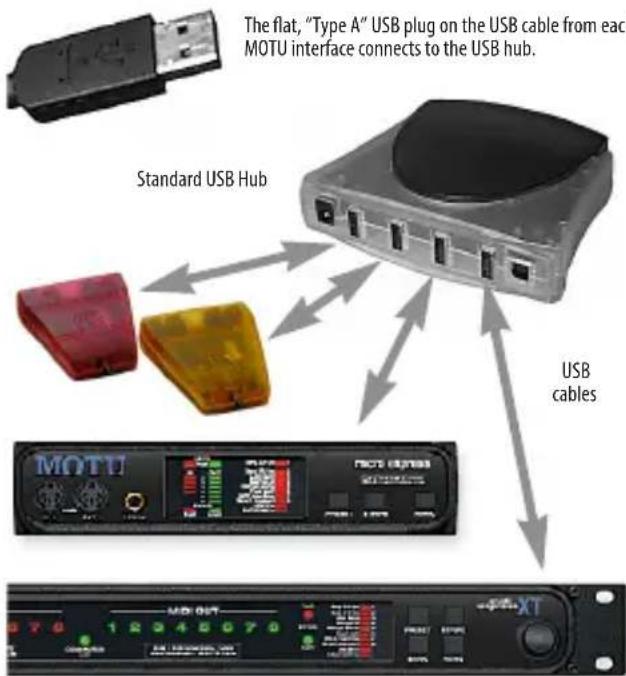
Figure-5: An inexpensive, standard USB hub, such as the mac hub4U ^TM shown above from Entrega, allows you to connect multiple MOTU USB MIDI interfaces. You can even mix and match different models of MOTU interfaces, using the combination that best suites your needs for synchronization, number of MIDI ports, etc.
Installing the MOTU USB Software
OVERVIEW
Mac OS X software installation & setup .... 9 Mac OS 9 software installation & setup.... 12
MAC OS X SOFTWARE INSTALLATION & SETUP Install the FastLane USB driver as follows:
1 Insert the MOTU USB MIDI installer disc.
2 Double-click the Mac OS X installer.
3 Follow the directions that the installer gives you.
What does the installer do?
The installer checks the computer to make sure it satisfies the minimum system requirements for your FastLane interface. If so, the installer proceeds with the driver installation.
CoreMIDI and Audio MIDI Setup
CoreMIDI is the “under-the-hood” portion of Mac OS X that handles MIDI services for MIDI hardware and software. CoreMIDI provides many universal MIDI system management features, including MIDI communication between your FastLane MIDI interface and all CoreMIDI compatible software.
Audio MIDI Setup is a utility included with Mac OS X that allows you to configure your FastLane MIDI interface for use with all CoreMIDI compatible applications. Audio MIDI Setup provides:
■ A “virtual” studio on your Mac that graphically represents your MIDI hardware setup and that is shared by all CoreMIDI-compatible programs
■ A simple, intuitive list of your MIDI devices whenever you need it in any CoreMIDI-compatible program
Launching Audio MIDI Setup
1 Make sure your FastLane MIDI interface is connected and turned on.
2 Launch the Audio MIDI Setup utility.
This can usually be found in /Applications/ Utilities. If not, just search for Audio MIDI Setup .
3 Confirm that the Fastlane-USB is present in the MIDI Devices tab of Audio MIDI Setup.
If the interface does not appear, or if it is grayed out, check your USB cable connection, make sure the THRU button on the front of the FastLane-USB is NOT pushed in (disengaged) and click Rescan MIDI.

Figure-6: A MOTU FastLane-USB interface as it appears in the MIDI tab of Audio MIDI Setup.
Creating a MIDI configuration
Once your FastLane MIDI interface appears in Audio MIDI Setup, you are ready to add devices, indicate how they are connected, and identify properties they may have for particular purposes. This information is shared with all CoreMIDI compatible applications.
Adding devices in Audio MIDI Setup
To add a device in Audio MIDI Setup:
1 ClickAdd Device.
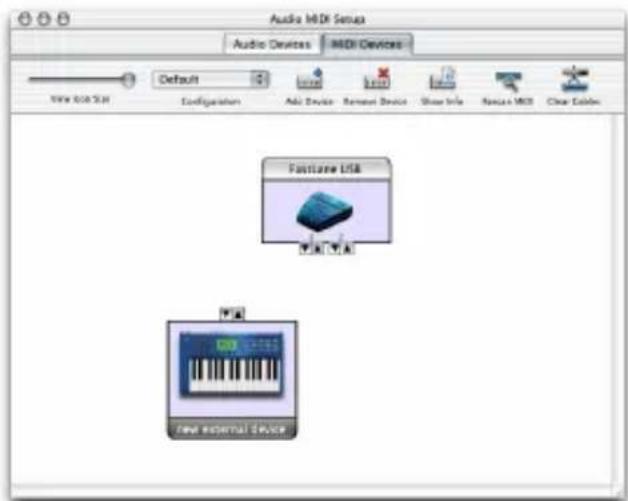
Figure-7: Adding a MIDI device.
2 Drag on its input and output arrows to draw connections to FastLane that match its physical connection.

flowchart
graph TD
    A["FastLane USB"] --> B["TNF SCARTED keyboard"]
    C["Audio Devices"] --> D["Default"]
Figure-8: Connecting the device to the FastLane interface.
3 Double-click the device to make settings, such as input and output channels, that further describe the device.

Figure-9: Device settings.
4 Repeat the above steps for each MIDI device connected to the interface.
5 When you are finished, quit Audio MIDI Setup.
Your configuration is automatically saved as the default configuration, and it is shared with all CoreMIDI-compatible software. You can use the Configuration menu to create, duplicate or delete alternative configurations.
MAC OS 9 SOFTWARE INSTALLATION & SETUP
FastLane requires several software drivers. Install them as follows:
1 Before you begin, use the Extensions Manager Control Panel (Apple menu) to switch to the “Base Set” of System Extensions and Control Panels.
This disables third-party extensions that may interfere with installation. You can switch back to your normal Extension Set after installation.
2 Insert the MOTU USB MIDI CD-ROM.
3 Run the Mac OS 9 installer and follow the directions that the installer gives you.
WHAT DOES THE MAC OS 9 INSTALLER DO?
The installer checks the computer to make sure it satisfies the minimum system requirements for FastLane. If so, the installer adds the following items to your Mac system:
Installer What it is/does
| MOTUUSB Driver | A system extension that allows the Macintosh to talk to FastLane. |
| MOTU Free-MIDI USB Driver | Goes in the FreeMIDI Folder inside your System Folder. |
| MOTU OMSUSB Driver | Goes in the OMS Folder inside your System Folder. |
| FreeMIDISystemExtension | This system extension is placed in your System Folder and serves as an integrated MIDI operating system for all FreeMIDI-compatible software. |
| FreeMIDI Folder This folder is placed in your System Folder and contains files that are required by Free-MIDI. | |
| FreeMIDIApplicationsFolder | This folder is placed on the top level of your hard disk. It contains several programs that help you configure FreeMIDI. |
FREEMIDI OR OMS?
FreeMIDI and OMS are industry standard MIDI System Extensions for Mac OS 9. They allow MIDI software to talk to FastLane and the devices connected to it.
FreeMIDI is included in the FastLane software installation. OMS is available as a free web download at www.opcode.com.
Which one should you use? If you are not sure, the table below can help you decide:
If you use this Choose this
| MOTU software only FreeMIDI only | |
| OMS-compatible software only OMS only | |
| Both MOTU and OMS-compatible software, running separately | FreeMIDI and OMS separately |
| Both MOTU and OMS-compatible software, running together | OMS, with FreeMIDI using OMS |
Regardless of what you decide, you'll need to configure FreeMIDI and/or OMS for your new FastLane interface. Refer to the section below that applies to you.
FreeMIDI....13
OMS 16
FreeMIDI and OMS separately....17
OMS, with FreeMIDI using OMS....18
FREEMIDI
For existing FreeMIDI users
If you're adding a new FastLane interface to a USB-equipped Mac that already has FreeMIDI installed, be sure to run the MOTU USB MIDI software installer as described earlier in this booklet to update FreeMIDI. Then simply run FreeMIDI Setup. Your new FastLane interface will automatically appear in your current FreeMIDI configuration. If it doesn't, make sure it's turned on and check cables.
For new FreeMIDI users
If you haven't previously installed and used FreeMIDI on your Macintosh, follow this simple procedure:
1 Make sure that FastLane is connected to the computer.
2 Locate the FreeMIDI Setup program on you hard drive. During installation, it is placed in the FreeMIDI Applications folder on the top level of your hard drive.
3 Double-click theFreeMIDI Setup application icon to launch the program.
4 If this is the very first time you've run a FreeMIDI program on this computer, and you happen to have OMS installed in the computer, you'll see the dialog below.

5 Since this is the procedure for using FreeMIDI, click the FreeMIDI button.
After the initial splash screen, the Welcome to FreeMIDI dialog box appears as shown below.

6 Click Continue. The About Quick Setup dialog appears.

7 Click Continue again and you'll see theQuick Setup window below. You should see your FastLane interface in the list on the right-hand side.
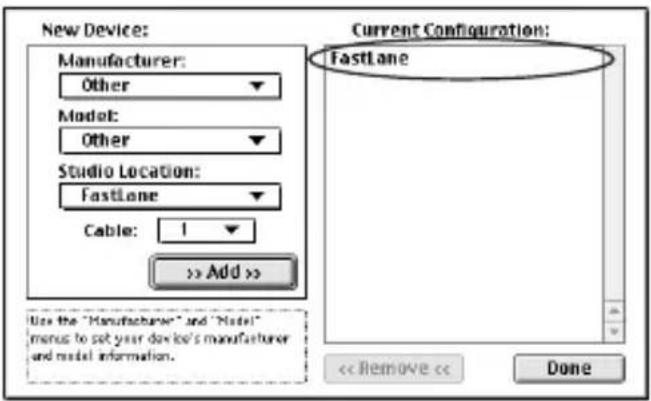
Figure-10: You should see FastLane by name in the list on the right.
8 If you are in a hurry, you can just click Done and proceed to the next section, "Saving the FreeMIDI Configuration".
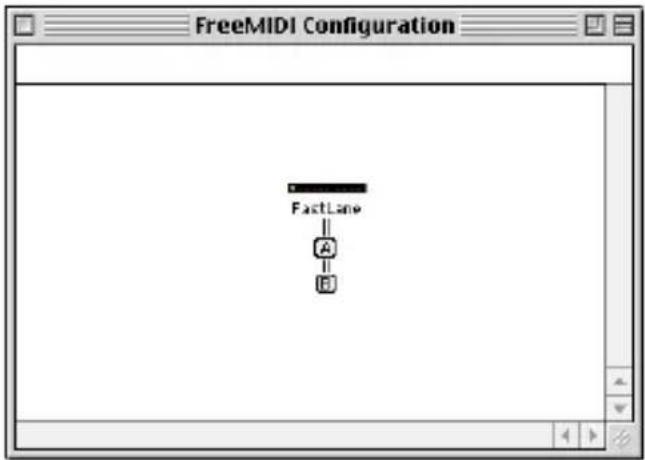
flowchart
graph TD
    A["FastLane"] --> B["A"]
    B --> C["B"]
Figure-11: An example of a bare-bones FreeMIDI Configuration. This is the minimum setup you need to use FastLane.
9 If, however, you would like your MOTU MIDI software programs to display the names of the MIDI devices connected to your MIDI interface, you can use the Quick Setup dialog in Figure-10 to identify them by their manufacturer and model names. If you can't find one of your devices by name in the pop-up menu lists, just use the "other" designation for now. You can rename the device later. When you are finished with the Quick Setup window, clickDone, and the FreeMIDI Configuration window appears, looking something like Figure-12 after you position the MIDI device icons as desired.

flowchart
graph TD
    A["K2500"] -->|A| B["A"]
    B -->|B| C["JY-2090"]
    D["FastLane"] -->|A| B
    E["14"] -->|A| B
Figure-12: A FreeMIDI Configuration window with MIDI devices. Click a device name to change it. The devices here appear by name in your MIDI software programs. To add a device, use the Create Device or Quick Setup commands in the Configuration menu. To delete a device, click it and press the delete key.
Saving the FreeMIDI Configuration
Once you have a FreeMIDI configuration, you'll want to save it to disk so that you don't have to configure FreeMIDI for your studio again.
To save your configuration:
1 Choose Save from the File menu. Alternately, you can type command-S on your Mac keyboard.
2 Use the suggested name "FreeMIDI
Configuration" or enter another name for your configuration, if you like. Use the directory pop-up menu to navigate to a disk and folder in which you wish to save this configuration. ClickSave or click Cancel to cancel the operation.
Quitting FreeMIDI Setup - and that's it!
Once you've saved your configuration file, you are now ready to use FastLane. You do not need keep FreeMIDI Setup open. The only time you need to open FreeMIDI Setup is when you would like to make changes to your FreeMIDI configuration. You can re-open FreeMIDI Setup at any time.
Learning more about FreeMIDI
This booklet only covered FreeMIDI bare essentials to get FastLane running. If you have Performer, Digital Performer, Mosaic, FreeStyle, or Unisyn, consult their manuals to learn more about the many other great FreeMIDI features that support these programs.
OMS
The software installation for FastLane (as described earlier) detects OMS if it is present in your system and places the MOTU USB OMS driver in the appropriate place. To activate FastLane in OMS, follow this simple procedure:
1 Launch OMS Setup.
2 If this is the first time you've run OMS Setup, follow the directions it gives you to successfully create a studio setup.
3 From the Studio menu, choose MIDI cards & interfaces.
You'll see the following alert.
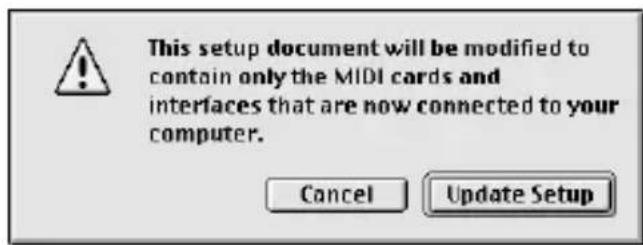
4 Click Update Setup.
You'll see the following dialog.

5 ClickSearch.
On a USB Macintosh, you don't need to check either of the serial port check boxes in this window because FastLane is not connected to a serial port.
FastLane will appear in your Studio Setup window, as demonstrated below.
If FastLane does not appear, check power and cables and try again.
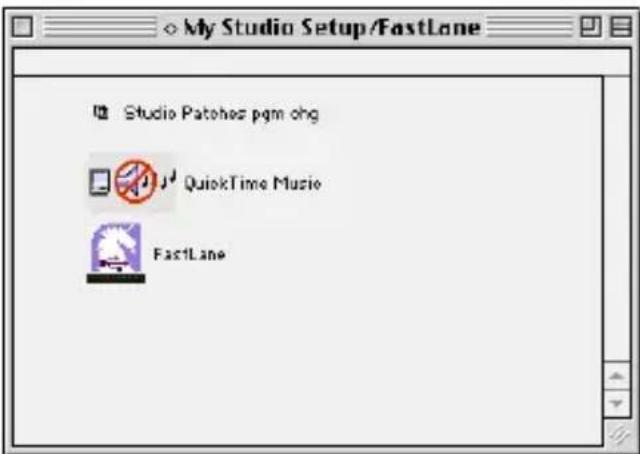
Figure-13: FastLane in the OMS studio setup window.
6 Save your OMS Setup.
7 Add devices to your OMS interface in OMS Setup.
Consult the on-line documentation included with OMS for further information about adding devices to FastLane in the Studio Setup window and other related tasks.
FREEMIDI AND OMS SEPARATELY
If you plan to use both FreeMIDI and OMS separately, set up OMS as you normally would (see OMS's included on-line documentation for assistance) and then follow this procedure for FreeMIDI:
1 Make sure that FastLane is properly connected to the computer.
2 Locate the FreeMIDI Setup program on you hard drive. During installation, it is placed in the FreeMIDI Applications folder on the top level of your hard drive.
3 Double-click theFreeMIDI Setup application icon to launch the program.
4 If this is the very first time you've run a FreeMIDI program on this computer, you'll be asked if you want to use FreeMIDI or OMS as shown below.
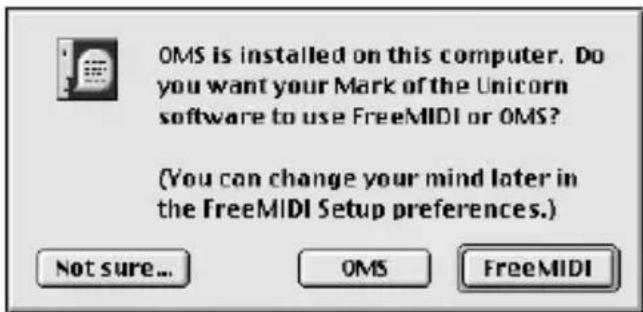
5 Since this is the procedure for using FreeMIDI separately from OMS, click FreeMIDI.
6 Proceed to Step 5 on page 13 and continue from there to complete the FreeMIDI setup.
Also be sure to choose the Allow other applications option in FreeMIDI preferences of FreeMIDI Setup as shown in Figure-14 on page 19. In OMS Setup, choose Edit menu>OMS MIDI Setup and make sure that the Run MIDI in background option is not checked, as shown below.

OMS, WITH FREEMIDI USING OMS
If you plan to use both FreeMIDI and OMS together, set up OMS as you normally would (see OMS's included on-line documentation for assistance) and then follow this procedure for FreeMIDI:
1 Make sure that FastLane is properly connected to the computer.
2 Locate the FreeMIDI Setup program on you hard drive. During installation, it is placed in the FreeMIDI Applications folder on the top level of your hard drive.
3 Double-click theFreeMIDI Setup application icon to launch the program.
4 If this is the very first time you've run a FreeMIDI program on this computer, you'll be asked if you want to use FreeMIDI or OMS as shown below.
5 Since this is the procedure for OMS with FreeMIDI using OMS, click the OMS button.
6 Go to "OMS" on page 16 and follow the procedure for using OMS.
If you don't see the dialog above when you run FreeMIDI Setup, refer to "Toggling FreeMIDI's use of OMS" below.
TOGGLING FREEMIDI'S USE OF OMS
If you have OMS, you can make FreeMIDI use it or stop using it as follows:
1 Launch FreeMIDI Setup.
2 Choose FreeMIDI Preferences from the File menu.
3 Check or uncheck the OMS option as shown below.
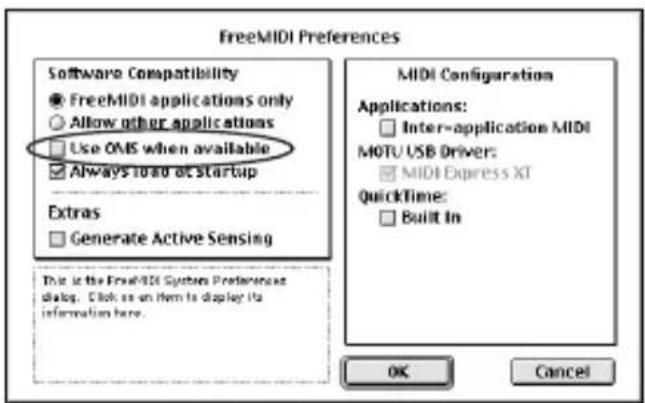
Figure-14: FreeMIDI preferences (in the File menu of FreeMIDI Setup).
HOW THE MOTU USB MIDI DRIVERS WORK
You don't need to know this, but just in case you're wondering how your FreeMIDI and OMS compatible software actually "talks" to FastLane, the diagram below illustrates how. The FreeMIDI and OMS drivers shown below belong in the FreeMIDI and OMS folders in the System Folder. (The installer puts them there.)
Figure-15: The USB drivers for FastLane establish communication between the interface hardware and your FreeMIDI and OMS compatible MIDI software.

flowchart
graph TD
    A["FreeMIDI compatible MIDI software"] --> B["FreeMIDI System Extension"]
    C["OMS-compatible MIDI software"] --> D["Open Music System"]
    B --> E["MOTU USB FreeMIDI Driver"]
    D --> F["MOTU USB OMS Driver"]
    E --> G["MOTU USB Driver"]
    F --> G
    G --> H["FastLane talks to the system extension."]
    style A fill:#f9f,stroke:#333
    style C fill:#f9f,stroke:#333
    style B fill:#ccf,stroke:#333
    style D fill:#ccf,stroke:#333
    style E fill:#cfc,stroke:#333
    style F fill:#cfc,stroke:#333
    style G fill:#fcc,stroke:#333
    note1["FreeMIDI and OMS talk to your MIDI programs."
The drivers talk to OMS and FreeMIDI."
The system extension talks to the OMS and FreeMIDI drivers."
The system extension talks to the system extension."
FastLane talks to the system extension.
THE MIDI THRU BUTTON
The MIDI THRU button on the front of the FastLane-USB, when pushed in, creates a direct connection from each MIDI IN connector to its corresponding MIDI OUT connector. For example, data received on MIDI IN A is routed directly to MIDI OUT A. Similarly, data received on MIDI IN B is routed directly to MIDI OUT B. This provides a direct connection from the MIDI device connected to the input to a different device connected to the output. For example, you could use your MIDI controller connected to MIDI IN A to play a MIDI sound module connected to MIDI OUT A, without the need to run any MIDI software on the computer.
When MIDI THRU is engaged, MIDI communication to and from the computer is temporarily disabled. The USB cable connection to the computer is still required, however, as it supplies power to the FastLane-USB. Therefore, MIDI THRU mode still requires the USB cable to be connected to the computer, and the computer must be turned on.



- Mark of the Unicorn License Agreement and Limited Warranty on Software
- License
- Term
- Limited Warranty
- Update Policy
- General
- Copyright Notice
- Limited Warranty on Hardware
- Packing List and System Requirements
- THANK YOU FOR CHOOSING MOTU
- PLEASE REGISTER TODAY
- SYSTEM REQUIREMENTS
- PACKING LIST
- MIDI CABLES NOT INCLUDED
- MIDI SOFTWARE COMPATIBILITY
- GETTING STARTED
- FAMILIARITY WITH MACINTOSH®
- VISIT OUR WEB SITE FOR SOFTWARE UPDATES
- Installing FastLane-USB
- CONNECTING A USB MACINTOSH
- CONNECTING MIDI GEAR
- One-way MIDI connections
- CONNECTING ADDITIONAL GEAR WITH MIDI THRUS
- CONNECTING MULTIPLE USB INTERFACES
- Installing the MOTU USB Software
- OVERVIEW
- What does the installer do?
- CoreMIDI and Audio MIDI Setup
- Launching Audio MIDI Setup
- Creating a MIDI configuration
- Adding devices in Audio MIDI Setup
- MAC OS 9 SOFTWARE INSTALLATION & SETUP
- WHAT DOES THE MAC OS 9 INSTALLER DO?
- FREEMIDI OR OMS?
- FREEMIDI
- For existing FreeMIDI users
- For new FreeMIDI users
- Saving the FreeMIDI Configuration
- Quitting FreeMIDI Setup - and that's it!
- Learning more about FreeMIDI
- OMS
- Click Update Setup.
- ClickSearch.
- FREEMIDI AND OMS SEPARATELY
- OMS, WITH FREEMIDI USING OMS
- TOGGLING FREEMIDI'S USE OF OMS
- HOW THE MOTU USB MIDI DRIVERS WORK
- THE MIDI THRU BUTTON
Brand : MOTU
Model : FastLane (USB)
Category : MIDI Keyboard