
SGX LT - Guitar amplifier ART - Free user manual and instructions
Find the device manual for free SGX LT ART in PDF.


| Product Type | Guitar Multi-Effects Processor with Preamp |
| Model | SGX LT |
| Brand | ART |
| Presets | 250 studio effect presets |
| Simultaneous Effects | Up to 3 |
| Preamp Type | Solid State with Clean and Dirt Channels |
| Inputs | Instrument Input (1/4", 470k ohms), Line Input (1/4", 1M ohms) |
| Outputs | Left & Right Line Out (1/4", 1.5k ohms), Headphone (1/4" stereo) |
| MIDI | MIDI In, Remappable MIDI Program Table (128 presets accessible via MIDI) |
| Remote Control | Footswitch jacks for Bypass/Increment and Channel Select |
| Effects Types | Plate, Room, Hall Reverb; Forward/Reverse Gated Reverb; Stereo Chorus, Flanging, Delays, Imaging, Slapback, Tapped Delay, Echoes |
| Frequency Response | Not specified; typical for digital processor |
| Dynamic Range | >85 dB typical |
| Equivalent Input Noise | -107 dBv |
| Power Requirements | 105-125 VAC, 60 Hz, 140 mA, 16.4 W (internal fuse) |
| Dimensions | 1.75" H x 19" W x 10" D (1U rack mount) |
| Weight | Approx. 8 lbs (3.6 kg) |
| Construction | All steel case |
| Warranty | 1 year limited (USA) |
| Designed and Manufactured | United States of America |
Frequently Asked Questions - SGX LT ART
User questions about SGX LT ART
0 question about this device. Answer the ones you know or ask your own.
Ask a new question about this device
Download the instructions for your Guitar amplifier in PDF format for free! Find your manual SGX LT - ART and take your electronic device back in hand. On this page are published all the documents necessary for the use of your device. SGX LT by ART.
USER MANUAL SGX LT ART
INSTRUMENT & SGX LT in the EFFECTS LOOP of an AMP 2
INSTALLATION 3
POWER 3
CONNECTIONS 3
INPUTS:
INSTRUMENT INPUT
LINE INPUT
OUTPUT 3
HEADPHONE OUTPUT 3
MIDI IN 4
BYPASS JACK 4
REMOTE JACK (CHANNEL SELECT) 4
INPUT LEVEL INDICATORS 5
CONTROL BUTTONS 6
CHANNEL SELECT/AUTO STORE 6
PRESET ▲ ▼ 6
BYPASS 6
MIDI 6
MPT EDIT MODE 7
MIX CONTROL 7
MISCELLANEOUS 7
PRESETS
BATTERY BACKUP 8
BYPASS PRESET 8
SOFTWARE LEVEL 8
USER REGISTRATION 8
FACTORY RESET 8
CUSTOMER SERVICE 8
APPENDIX A 9
MISCELLANEOUS NOTES 9
APPENDIX B 9
EXAMPLES 9
Editing the MPT with the SGX LT front panel controls 9
Editing the MPT with a keyboard or external controller ..... 10
Setting up a preset sequence including the BYPASS (Y9) preset . 10
Changing the MIDI channel 11
INCREMENT PRESET 11
Setting up five presets 12
Programming the REMOTE jack for the BYPASS function ..... 12
SPECIFICATIONS 12
APPENDIX C 13
APPENDIX D 14
HOOKUP DIAGRAMS 14
INSTRUMENT, MONO SYSTEM 14
INSTRUMENT, STEREO IMAGE SYSTEM 14
INSTRUMENT, EFFECT LOOP of PREAMP/MIXER 14
APPENDIX E 15
USING THE SGX LT WITH AN X-11 Foot Controller or X-15 ULTRAFOOT ..... 15
Editing the MPT with a keyboard or external controller ..... 15
WARRANTY 16
SERVICE INFORMATION 16
SGX LT PRESET LIST 17
TOP THIRTY PROGRAMS 17
REVERB GROUP PROGRAMS 17
CHORUS and FLANGE with REVERB PROGRAMS 18
GATED REVERB PROGRAMS 19
CHORUS and FLANGE PROGRAMS 19
TAPPED DELAY GROUP 20
IMAGE PROGRAMS 20
SLAPBACK DELAY PROGRAMS 20
REVERB WITH LONG PREDELAY GROUP PROGRAMS 20
PREDELAYED FLANGE GROUP PROGRAMS 21
THICK CHORUS GROUP PROGRAMS 21
ECHO GROUP PROGRAMS 21
BYPASS PROGRAM 21
INTRODUCTION
Thank you and congratulations on your new ART purchase. The SGX LT is one of the many dazzling results from ART's combination of digital and analog technology. Offering a level of processing resolution and the sound quality of processors that can cost thousands of dollars, the SGX LT boasts 16 bit architecture and one of the simplest user interfaces available today.
FEATURES:
* 250 Studio effect presets
* Up to three studio effects combinations per preset
* Solid State Preamp
* Separate Clean and Dirt Channels
* Power supply contained in unit
* Headphone jack
* One touch control-no programming necessary
* Remappable MIDI program table
* Remote footswitch jacks
* Plate, Room, and Hall reverbs
* Forward and Reverse Gated reverb
* Stereo Chorus and Flanging
* Stereo Delays and Imaging
* Slapback and Tapped Delay
* Stereo Echoes
* Designed and manufactured in the United States of America
The SGX LT has the capability of providing you with 250 of the finest studio multiple effects combinations. With the power to process up to three simultaneous effects at once, you may choose rich combinations of Chorus, Delay, Reverb, Flanging, Tapped Delays, Gated Reverbs, Reverse Reverb, Panning, and much more. Add a solid state preamp with clean and dirt channels and your performance is virtually doubled! ART designed a combination of powerful processing, monster presets, and ease of use into the SGX LT. We strongly suggest you read and refer to this manual while getting used to your new processor.
Record for your reference:
DATE OF PURCHASE
PURCHASED FROM
SERIAL NUMBER
SOFTWARE VERSION
422-5004-100
We have included this section for those of you who can't wait to experience the sounds of your new SGX LT. Follow the hookup directions for the setup you use and then start playing. After the initial thrill wears off (if that's possible!), and you want to get to know your SGX LT better, refer to the rest of this manual for details, hints, and examples. Till later....
Ready:
Additional application information can be found in Appendix A. MIDI programming examples can be found in Appendix B. Hookup diagrams can be found on page 14.
For all hookup combinations center the slider control. Most all presets were configured with the slider centered providing a fifty/fifty mix.
To start, set all the knobs to twelve o'clock. Leave the controls on your amp as you have always had them set. Plug into the Instrument Input jack on the front panel.
Add more gain to the Clean channel with the Clean Gain Control Add crunch to the Dirt channel with the Dirt Drive control. Switch between the Clean and Dirt Channel by pressing the Grey Channel Select button in the center of the front panel. Adjust the Distortion Level control to vary the Dirt channel's Distortion Level.
Set:
INSTRUMENT & GUITAR AMP
Plug your instrument into the Instrument Input jack located on the front panel. Connect a cable from your amp input to the Line Out Left Output jack. Turn the SGX LT on first and then turn on your guitar amp. TURN DOWN THE LEVEL OF YOUR AMP before you play! Adjust your front panel levels to your taste. Adjust your amplifier levels accordingly.
INSTRUMENT & SGX LT in the EFFECTS LOOP of an AMP
Plug your instrument into your amp as normal. Connect a cable from the SGX LT's Instrument Input to the amplifiers effect send. Now connect another cable from the effects return of your amp to the Left Output of the SGX LT. Turn the SGX LT on first then turn on your power amp. Adjust your playing level while the effects loop is out of the chain. Center all your front panel knobs. Engage the effects loop and set the input level to the SGX LT with the effect send control of the amp so the signal LED is lit all the time (with signal present of course). Set your front panel controls as you like.
GO! : >>
INSTALLATION
The SGX LT may be used in a variety of setups including: mixing consoles with effect send and return facilities, straight into guitar or power amps, and in the effects loop of an amplifier. Self contained in an all steel single high 19" rack mount case, the SGX LT is designed for continuous professional use. For touring rack applications, care should be taken to support the units rear if the rack might be subjected to mechanical shock like dropping. NOTE: The front panel may bend if no rear support is provided. Mounting location is not critical, but for greater reliability we recommend that you not place the unit on top of power amps, tube equipment, or other sources of heat.
POWER
This device is AC powered via a standard 3 conductor grounded power cable. Plug into any standard AC receptacle. We recommend the use of a surge protector to decrease the chance of equipment damage due to voltage surges or spikes on the line. For your own safety as well as the safety of others, do not remove the ground pin of the cable. Refer to the rear panel or the specifications for proper operating voltages.
CONNECTIONS
Audio connections to the SGX LT are made at the front and rear of the unit via professional 1/4" phone jacks. The MIDI connection is accomplished via a five pin "DIN" jack on the rear panel.
INPUTS :
There are two mono inputs available in the SGX LT. You can use both input jacks at the same time. However, the preamp output will be summed with the Line In input and then the combined inputs will be sent to the digital processor.
INSTRUMENT INPUT
The Instrument Input on the front panel is a single ended (unbalanced) configuration with an input impedance of 470K ohms. This input is a direct input to the SGX LT's solid state preamp. Plug in all types of instruments to this jack. You may also plug "line" level devices into this input.
LINE INPUT
The Line Input jack on the rear panel is a direct input to the digital processor. This input is a single ended (unbalanced) configuration with an input impedance of 1M ohm. The nominal operating level for this input is (-)10dB. Hook up high output instruments, recording devices, other outboard signal processors, and effects loop sends to this input.
OUTPUT
The LEFT and RIGHT outputs are single ended (unbalanced) with an impedance of 1.5K ohms, and can provide a stereo or mono output. When both outputs are used with one or both of the inputs, a stereo image is produced. If you do not want both output signals combined (such as only one delay time required), plug a dummy plug into the unused output. If you are only using one output use the Left output.
HEADPHONE OUTPUT
A headphone output is located on the rear panel. The headphone output is a standard 1/4" stereo jack. Any headphones may be used with this jack. Use the Output slider to set the final output level for your headphones.
MIDI IN
This jack receives the MIDI program change messages. It enables you to change the presets of the SGX LT from an external source such as an ART X-11 or X-15, a computer equipped with MIDI ports and associated software or a sequencer.
BYPASS JACK
The Bypass/Inc jack may be programmed to either bypass the SGX LT or access the Increment Preset Mode. A footswitch and any two conductor cable is intended to be used with this jack. A momentary (normally open) switch should be used. If the jack is programmed for the bypass feature, each time the footswitch is activated, (hot connected to ground) the SGX LT will be bypassed. The default setting for the Remote Jack is Bypass Mode.
This jack may also be programmed to increment up through a user selected set of presets. The maximum number of presets you may select for this function is one hundred twenty-eight. Only one hundred twenty-eight presets can be accessed at one time because that is the maximum amount of presets allowed for by the MIDI standard.
Example four and five in Appendix B show how to program the REMOTE jack for BYPASS or INCREMENT PRESET.
REMOTE JACK (CHANNEL SELECT)
The REMOTE jack switches the preamp between the clean and dirt channel. A footswitch and any two conductor cable is intended to be used with this jack. A momentary (normally open) switch should be used. Each time the footswitch is activated, (hot connected to ground) the channel switches.
To adjust the input gain of the clean channel use the Clean Gain control. The control range of input level is 0 to 11. When set at zero, no signal is allowed to enter the preamp so you will have no output. At eleven, maximum signal is achieved. Set this control so your Signal LED is lit while you're playing and the Clip LED lights with sharp attacks. Be careful not to set this control to high because you might clip the digital effects. Monitor the digital section by moving the Mix slider fully to the right and listen to the output. After you have set your input gain, set your Mix control.
CLEAN CONTOUR
Use this control to set low and high end frequency contours. With the control set left of 12 o'clock, low frequencies are boosted and higher frequencies are cut. At 12 o'clock, the control is "flat", no boost or cut to anything. To the right of 12 o'clock, high frequencies are boosted and low frequencies are cut. Frequency range is from 130Hz to 1.3KHz low to high.
DIRT DRIVE
To adjust the input drive of the dirt channel use the Dirt Drive control. The control range of input drive is 0 to 11. When set at zero, no signal is allowed to enter the dirt circuits so you will have no output. A little bit above zero will provide a warm overdrive sound. As you increase the control, distortion drive increases. At eleven, maximum signal and crunch is achieved. Set this control to get the right amount of overdrive or distortion in the dirt channel.
THRUST
Thrust is the bass frequency cut and boost filter control. A (+)12 dB boost in gain and a (-)12dB cut in gain are the maximum ranges. At zero, (12 o'clock) the filter is flat. the center frequency (the actual filter frequency) is 180 Hz.
MID VOICING
To control your midrange tone use the Mid Voicing control. A (+)12 dB boost in gain and a (-)12dB cut in gain are the maximum ranges. At zero, (12 o'clock) the filter is flat. the center frequency (the actual filter frequency) is 850Hz.
EDGE
High end frequencies are controlled with the Edge control. A (+)12 dB boost in gain and a (-)12dB cut in gain are the maximum ranges. At zero, (12 o'clock) the filter is flat. the center frequency (the actual filter frequency) is 4.00Khz.
DISTORTION LEVEL
The Distortion Level control sets the final level of the Dirt Channel. Set this control so your Signal LED is lit while you're playing and the Clip LED lights with sharp attacks. Be careful not to set this control to high because you might clip the digital effects. Monitor the digital section by moving the Mix slider fully to the right and listen to the output. After you have set your input gain, set your Mix control.
TELLTALES
OVERDRIVE ACTIVE INDICATOR
When this LED is on, it indicates the Dirt channel is active.
SEVEN SEGMENT DISPLAY
The Seven Segment Display keeps you constantly informed of your Preset or MIDI program number. Preset numbers are displayed from 01 to 99 and then, for presets over 99 a letter and number. Refer to the preset list at rear of this manual for preset "numbers". Bypass is indicated by two horizontal bars.
INPUT LEVEL INDICATORS
Front panel LED indicators show the status of the input signal level as it enters the digital processor. The Signal LED indicates the presence of audio signal. If the CLIP LED is lit, it indicates you are clipping the digital processor. For
maximum dynamic range the Signal LED should be on most of the time with the CLIP LED briefly flashing on transients only.
CHANNEL SELECT/AUTO STORE
Press this button to manually switch between the clean and dirt channel. When you change the preset's clean/dirt status with this button, the SGX LT remembers the last state the preamp was in. So, if the Clean channel was active in the preset when you first used it, and then you switched to the Dirt channel, the next time you call up that preset, the Dirt channel will be active. We call this "Auto Store" because the SGX LT remebers the last state of the preamp section.
PRESET ▲ ▼
The Preset UP and DOWN buttons (▲, ▼), shown as purple triangles facing up and down on the front panel are used to select PRESETs. Holding either button in will step you through all the Presetss at a moderate rate. You can step at a much quicker rate by first pressing and holding in the button indicating the direction you want to go, simultaneously press the other button. As long as both are pressed the presets will increment by tens rather than one at a time.
BYPASS
Pressing the BYPASS button kills the effects signal in the mix. The display will show [- -] in the preset window. Pressing BYPASS again returns the preset to active status.
NOTE: If the mix control is fully right (effect only), there will be no audio signal at the output.
Another way to bypass the unit is to program the REMOTE jack on the rear panel for BYPASS mode and use any footswitch and guitar cable.
MIDI
Pressing the MIDI button allows you to change two things. One, the MIDI channel the SGX LT receives information on and two, access to the MIDI Program Table.
You can set the SGX LT to receive MIDI information on one of 16 or all channels. The default setting is to receive info on all 16 channels. This is known as Omni Mode and is displayed as [Al.] in the Program Display window. To change the channel, refer to the example in Appendix B.
Presets may be accessed at the front panel or remotely via MIDI. When the SGX LT receives a MIDI PROGRAM number, it recalls a PRESET. If the SGX LT was in BYPASS, it will become active. The PRESET recalled is determined by a table that equates MIDI PROGRAM numbers to PRESET numbers. This table is called the MIDI PROGRAM TABLE (MPT). SGX LT's are shipped from the factory so that the MIDI PROGRAM numbers equal the PRESET numbers (MIDI program 0 = Preset 00). You can reassign any Preset number to any MIDI Program number. When you first power up your SGX LT, the first 128 presets are the default MIDI presets. You cannot access all the presets in the SGX LT at one time with MIDI. It's not our fault, MIDI only allows for a maximum number of 128 presets.
So, to access the presets above location 128, some simple programming of your SGX LT is required. The ability to reassign Preset numbers makes it much more practical when using MIDI in both simple and complex setups. To change the MPT, read the next section and refer to the examples in Appendix B. We will refer to
the MIDI PROGRAM number as the MIDI number. Any changes made to the MPT will be retained during power down by battery backup.
MPT EDIT MODE
The MPT may be edited from the front panel either alone or with a keyboard or MIDI controller that sends MIDI program change numbers.
To enter MPT edit mode, momentarily press the MIDI and BYPASS buttons simultaneously (Pressing MIDI first then BYPASS will have no effect on the current BYPASS state, pressing BYPASS first toggles the current BYPASS state). Press MIDI and BYPASS again to stop editing the MPT and return to normal front panel operation.
When MPT edit mode is entered, the LEFT decimal point will be blinking indicating that the display is showing a MIDI number. If BYPASS is then pressed, the RIGHT decimal point will blink and the display will be showing a PRESET. If MIDI is pressed the left decimal point will blink again indicating the return to the MIDI number in the display. Use the UP/DOWN buttons to change the numbers in the display. When a MIDI number message is received, the corresponding PRESET number in the table will be recalled.

MIDI
NUMBER
ZERO

PRESET
NUMBER
ZERO
NOTES:
1) Multiple MIDI numbers may have the same PRESET number assigned to them.
2) When you pass [9.9] a letter and a number appear. [A.0] is equal to 100, [b.0] is equal to 110, [C.0] is equal to 120. [C.7] is the last "number" and is equal to 127.
MIX CONTROL
The MIX slider controls the amount of dry and processed signal mixed together. When the control is fully towards the left (0%), only the dry signal is heard at the output(s). As the slider is moved to the right, processed signal is mixed in. At the center detent position a fifty/fifty mix is achieved. When the slider is full right (100%), only processed signal is heard at the output(s).
MISCELLANEOUS
PRESETS
Up to three different effects may be found in each of the SGX LT's presets. The presets reflect various combinations of effects as well as singular effects.
Presets are arranged in specific application groups to make it a little easier for you to find the right sound. These include reverb, chorusing, flanging and delay groups. Presets devoted to natural reverberation, cover a wide range from extremely short 0.2 second to 23 second decays. Predelay, high frequency damping, position, reverb density and reverb level are set for the most optimum sound in each preset.
Within each section of reverb are a variety of related effects, not just bigger or smaller versions of the same. Some of these effects would normally require multiple pieces of equipment to create. A variety of algorithms each with its own
unique characteristics are used to simulate a wide range of environments. Within the other presets are Gated Reverb effects, Reverse Reverb effects, Gated effects with regenerated delays, Flanging effects, Panning, Chorus effects, straight Echo effects, Delay based effects such as chorusing and flanging are combined with reverb and delay to create special effects reverb sounds. A list of all the presets can be found in the back of this manual.
BATTERY BACKUP
When power is terminated to the SGX LT, the edited MPT is retained via battery backed up memory. This as well as the last PRESET and the MIDI CHANNEL will be active when the unit is next powered up. Memory retention is expected to last four years. If you encounter memory loss, contact our customer service department.
BYPASS PRESET
PRESET Y9 is a non-sound preset. It is used as a MIDI bypass preset. Use Y9 when you don't want any effect to be in the signal chain for a particular keyboard preset. The MIDI PROGRAM NUMBER assigned to Y9 is (127) or [C.7] as it appears in the display.
SOFTWARE LEVEL
On power up, the SGX LT momentarily indicates its operating software level in the display. The software controls the SGX LT's functions as well as its sounds.
USER REGISTRATION
Be sure to fill out the USER REGISTRATION CARD in this manual and send it in to our Customer Service Department. This will ensure you of being notified of information regarding the SGX LT. Please don't forget to write in your serial number.
FACTORY RESET
Resetting the MPT
It is very unlikely you would want to reset the SGX LT's MPT. Normally you should just re-edit the MPT for new values.
Should you wish to set all the values back to their initial state, power down the unit. Hold in the Up/Down buttons (▲,▼) and while holding them in, power up the SGX LT.
Customer Service
You may contact ART's Customer Service Department between the hours of 9:00 AM and 4:00 PM Eastern Time Monday through Friday. The Customer Service Department will answer technical questions about ART products and provide information concerning service.
APPENDIX
A
MISCELLANEOUS NOTES
The presets found in the SGX LT cover a wide range of diversified reverb sounds and special effects. The following notes provide a starting point for you to use these presets to add that special if not essential sound to your own individual sound.
Though it is not mandatory it is strongly suggested you utilize the stereo capabilities of the SGX LT. Many of the reverb patches and delay effects rely heavily on stereo image or right left characteristics to achieve the brilliance and realism found in today's and yesterday's sound!
The most important application of all is to EXPERIMENT! Remember, there are over 250 effect combinations at your fingertips. What may be used for normal desirable effects can also be applied to create entirely new and different sounds. Your own ideas and expressions may be realized with just a few pushes of a button. Go ahead, have some FUN!
The reverb presets come in a variety of ways, shapes and sounds. Emphasis is placed on different room types, image, position of the perceived sound and the brightness or dullness of the sound.
The presets reflect a range of reverb effects with different combinations of these characteristics. Don't be afraid to cycle through a number of presets with the mix control fully wet so you can hear the actual image position or character of the preset. Above all don't be afraid to experiment.
APPENDIX
B
EXAMPLES
EXAMPLE 1:
Editing the MPT with the SGX LT front panel controls.
In this example, we will edit the MPT so when MIDI numbers 0 and 1 are received, presets 64 and A1 will be recalled. It is assumed the SGX LT's MPT has not been edited.
Press and hold MIDI, then BYPASS buttons, release both.
The display will show [0.0] with the decimal point blinking indicating that you are in MPT edit mode, this left decimal point means that the MIDI PROGRAM number is in the display.
*-Press and release BYPASS. The display shows [00.] indicating that MIDI number 0 recalls PRESET 0.
*-Press and hold UP until [64.] appears in the display. Now MIDI number 0 will recall PRESET 64.
*-Press and release MIDI. The display shows [0.0]
*-Press and release UP. The display shows [0.1]
*-Press and release BYPASS. The display shows [01.] indicating that MIDI number 1 recalls PRESET 2.
*-Press and hold UP until [A1.] appears in the display. Now MIDI number 1 will recall PRESET A1.
*-Press MIDI and BYPASS to exit MPT edit mode. The display shows [A1] indicating the last PRESET referenced is the current PRESET selected.
During the above example, anytime a MIDI number is changed or PRESET number is changed, the SGX LT recalls the corresponding PRESET. This allows you to listen to the PRESETS while the MPT is edited.
EXAMPLE 2:
Editing the MPT with a keyboard or external controller.
When used with a keyboard or other device such as the ART X-11 or X-15 ULTAFOOT capable of sending MIDI PROGRAM CHANGE messages, MPT editing is simplified. We will edit the MPT so when MIDI numbers 2 and 3, are received, presets 55 and Y4 will be recalled. It is assumed that the SGX LT has not had its MPT edited.
The keyboard or MIDI controller MIDI OUT must be connected to the SGX LT MIDI IN jack. The MIDI on the SGX LT must be set to the same channel the keyboard will be sending messages on, or the SGX LT MIDI must be set to [AL.] for OMNI mode.
Press and hold MIDI, then press BYPASS. The display will show [0.0] with the decimal point blinking indicating that you are in MPT edit mode, this left decimal point means that the MIDI PROGRAM number being displayed.
Select a patch on the keyboard so [0.2] appears in the display. This may not be sound 2 or patch 2 on the keyboard. Different companies number their presets in a variety of ways. The patch causing [0.2] to appear in the display is usually the first or second patch of the lowest numbered bank if the keyboard or controller has banks of patches.
*-Press and release BYPASS. The display shows [02.] to indicating MIDI number 2 recalls PRESET 2.
*-Press and hold UP until [55.] appears in the display. Now MIDI number 2 will recall PRESET 55.
-To program the rest of the entries, you do not need to switch back to the MIDI number. You can let the unit remain showing the PRESET number. (When you select your keyboard or foot controller preset, you automatically recall the existing SGX LT preset.)
*-Select the next patch on the keyboard. The display will show [03.] to indicate that it recalls PRESET 4.
*-Press and hold the UP button until [Y4.] appears in the display. Now the last patch number activated will recall PRESET Y4.
By using this method of editing, you select the desired patch on the keyboard or controller, and then select the desired PRESET on the SGX LT for that sound. You can do this while you are listening to the SGX LT. Exit MPT mode as in the previous example.
In the previous examples four of the MPT entries were edited, however, you may edit the entire MPT if desired. If you do not have access to a MIDI controller and you wish to change between PRESETS easily, you may want to edit the MPT for incrementing through a sequence of PRESETS. Example three illustrates how this is ne. do
EXAMPLE 3
Setting up a preset sequence including the BYPASS (Y9) preset.
If you need to change between presets quickly without scanning, this procedure will be to your advantage. As in the other examples, editing the MPT is the key. In this example we will edit the MPT to sequence through ten PRESETS. These PRESETS are in the order: 26, J4, F2, 69, E2, U2, 69, Y9, 82, 26. Notice that we repeated some presets and included the BYPASS preset (Y1). Remember, you can assign any preset to a MIDI number including using a preset at multiple locations. Using the BYPASS preset enables you to select no effect without having to bypass the unit from the front panel and then continuing on with an effect preset next in the chain.
*-Enter the MPT edit mode.
*-With the left decimal point blinking, use the up/down buttons to get a display of [1.0].
*-Press the BYPASS button, the decimal point now blinks on the right side.
*-Use the up button to select PRESET 26. The display will be [26].
*-Press the MIDI button and set the display for [1.1].
*-Press the BYPASS button and set the display for [J4.].
*-Continue this way until all the PRESETs are entered the last being 26.
*-DO NOT LEAVE THE MPT EDIT MODE
*-Press the MIDI button and go to [1.0]. As you increment up, you will recall the sequence of presets just entered.
This way of arranging presets is helpful when you have presets you need to get to quickly. Instead of scanning up and down through multitudes of presets, you need only scan through the ones you use the most. Make a table of the MIDI number and assigned Preset for quick reference since you can only view the MIDI program number.
NOTE: Start your sequence at MIDI program number ten or twenty. This will leave you room for programming presets for the Increment Preset feature.
EXAMPLE 4
Changing the MIDI channel
To select a specific MIDI channel, press the MIDI button and use the up/down buttons to select the desired channel. The right decimal point will be on whenever the display is showing MIDI. The channel number is held in memory when the unit is turned off.
INCREMENT PRESET
Increment Preset Mode (IP) allows you to program the REMOTE jack on the rear panel so that you may use a footswitch to increment through a desired set of presets.
Example four describes how to set IP to sequence through five presets. A maximum of one hundred twenty-eight presets may be sequenced. You must always start at MIDI Program number one when using IP for sequencing.
Example five shows how to program the REMOTE jack for normal bypass operation.
IP is accessed through the MIDI Program Table. To enter the MPT edit mode, press and hold the MIDI, then BYPASS buttons, release both. The display will show some number with the left decimal point blinking. Increment up (use the RAPID ACCESS mode!) until the display reads [1.P]. This indicates Increment Preset. You are now ready to program. Press the BYPASS button, the decimal point is now blinking
on the right. Set this number for the last entry number desired. In this example we'll set the number to [04.] for the sequence of FIVE presets desired. If you set the number to [00.], you will have programmed the jack for use as a bypass jack. Now press the MIDI button and increment down to the desired MIDI Program Number.
Note, when you pass [9.9] a letter and a number appear. [A.0] is equal to 100, [b.0] is equal to 110, [C.0] is equal to 120. [C.7] is the last "number" and is equal to 127. Press the BYPASS button and set the display for the desired PRESET number.
Program the sequence to be 64, A1, 55, Y4 and H1. If you have gone through Example 1, the first four presets have been set all ready. All you need to do is add the fifth preset.
After programming is completed press and hold the MIDI button then the BYPASS button to exit. Now, each time the footswitch is activated, you will change presets in the selected sequence. The sequence of presets will wrap-around to the beginning, at the end of the sequence.
EXAMPLE 5
Setting up five presets for Increment Preset Mode. Use preset numbers 64, A1, 55, 44 and H1.
*-Enter the MPT edit mode
*-With the left decimal point blinking, increment up (use RAPID ACCESS mode) until the display reads [1.P].
*-Press the BYPASS button
*-Adjust the display to read [04].
*-Press the MIDI button
*-Increment down (use HYPERSPEED) until the display reads [0.0].
*-Press the BYPASS button and set the display to read [64].
*-Press the MIDI button and set the display for [0.1].
*-Press the BYPASS button and set the display to read [A1].
*-Continue this until you reach and program [0.4] to be [H1].
*-Exit MPT edit mode
You have just programmed the SGX LT to sequence through five PRESETS when the REMOTE jack is activated.
EXAMPLE 6
Programming the REMOTE jack for the BYPASS function.
*-Enter MPT edit mode.
*-Increment up until the display reads [1.P].
*-Press the BYPASS button.
*-Set the display to read [00].
*-Exit MPT edit mode.
The FOOTSWITCH jack can now be used as an external BYPASS jack.
ART SGX LT SPECIFICATIONS
Presets.... 250
Dynamic Range ....>85dB Typical
Equivalent Input Noise....-107dBv
Operating Level....OBV max
Input Impedance....47K ohm
Output Impedance....1.5K ohm
Mechanical.....1.75"H X 19"W X 10"D, all steel case
Power Requirements.....105-125 Volts AC, 60Hz, Internal Fuse
140ma @ 117VAC, 16.4W
(Export unit configured for destination country.)
MIDI Receive Channel....1-16, OMNI (all), Off
MIDI Programs.....May be assigned to any Preset #
Connections......Stereo In/Out 1/4" phone, MIDI IN
ART retains a policy of constant product improvement. Specifications are subject to change without notice.
Designed and manufactured in the United States of America.
Applied Research & Technology, Inc.
215 Tremont Street
Rochester, New York 14608 (716) 436-2720 (716) 436-3942 (FAX)
APPENDIX
C
MIDI Implementation Chart
ART SGX LT model 422 Date: February 1992
20 BIT MULTIPLE EFFECTS PROCESSOR. Version: 1.00
| Function | Transmitted | Recognized | Remarks | |
| Basic Channel | Default Channel | X | 1-16 | note 1 |
| X | 1-16 | |||
| Mode | Default Messages Altered | X | Mode 1 | note 1 |
| X | X | |||
| X | X | |||
| Note Number | True Voice | X | X | |
| X | X | |||
| Velocity Note ON Note OFF | X | X | ||
| X | X | |||
| After Touch | Key's Ch's | X | X | |
| X | X | |||
| Pitch Bender | X | X | ||
| Control Change | X | X | ||
| Prog Change | True # | X | 0-127 | assignable to any preset |
| X | ||||
| System Exclusive | X | O | See: manual | |
| System :Song Pos | X | X | ||
| :Song Sel | X | X | ||
| Common :tune | X | X | ||
| System :Clock | X | X | ||
| Real Time:Commands | X | X | ||
| Aux :Local ON/OFF | X | X | ||
| Mes- :All Notes Off | X | X | ||
| sages:Active Sense | X | X | ||
| :Reset | X | X | ||
Notes
| 1: Factory default is channel 1, OMNI ON. Current setting is maintained in non-volatile RAM and does not change when the MUSGX LTIVERB SCX LT is powered on. | ||
| Mode 1: OMNI ON, POLY | Mode 2: OMNI ON, MONO | C: Yes |
| Mode 3: OMNI OFF, POLY | Mode 3: OMNI OFF, MONO | X: No |
APPENDIX
HOOKUP
D
DIAGRAMS
1) INSTRUMENT, MONO SYSTEM (MIX = 40%)
Instrument In, to Mono Line Out to Amp or Headphones

flowchart
graph LR
    A["INSTRUMENT"] --> B["SGX LT"]
    B --> C["COMBO AMP"]
    B --> D["H OUT"]
    D --> E["HEADPHONES"]
    B --> F["MIX"]
2) INSTRUMENT, STEREO IMAGE SYSTEM (MIX = 40%)
Instrument In, to Stereo Line Out to Two Amps

flowchart
graph LR
    A["INSTRUMENT"] --> B["SGX LT"]
    B --> C["I IN L OUT"]
    B --> D["R OUT"]
    C --> E["COMBO AMP"]
    D --> F["MIX"]
    F --> G["COMBO AMP"]
3) INSTRUMENT, EFFECT LOOP of PREAMP/MIXER (MIX = 100%)
Instrument into Preamp (SGX 2000) or Mixer
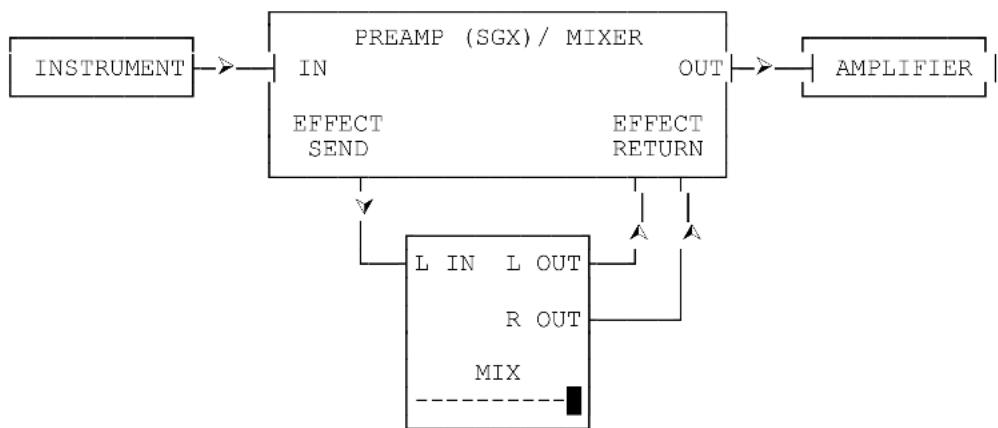
flowchart
graph TD
    A["INSTRUMENT"] --> B["PREAM (SGX) / MIXER"]
    B --> C["OUT"]
    C --> D["AMPLIFIER"]
    B --> E["EFFECT SEND"]
    B --> F["EFFECT RETURN"]
    E --> G["L IN L OUT"]
    F --> H["R OUT"]
    G --> I["MIX"]
    H --> I
    I --> G
SGX LT
APPENDIX
USING THE SGX LT WITH AN X-11 Foot Controller or X-15 ULTRAFOOT
E
Using the ART X-11 with the SGX LT is very simple. Connect a MIDI cable from the MIDI out of the X-11 to the MIDI in of the SGX LT. Select a preset on the X-11, the corresponding preset on the SGX LT will initially be one less than the X-11 (Preset 1 on the X-11 recalls preset 00 on the SGX LT). Reprogram the SGX LT as described in Appendix B or Example 2 reprinted below for your own sequence of presets.
You do not need to reprogram the X-15 ULTRAFOOT for use with the SGX LT. All programming and setup is done with the SGX LT. Only preset recall may be done with the X-15 and the SGX LT. The Expression pedals have no effect on the preset effect parameters. You may use the X-15's Bypass Jack and a guitar cable hooked up to the Remote jack of the SGX LT to bypass the SGX LT. Connect a MIDI cable from the MIDI out of the X-11 to the MIDI in of the SGX LT. Select a preset on the X-15, the corresponding preset on the SGX LT will initially be one less than the X-15 (Preset 1 on the X-15 recalls preset 00 on the SGX LT). Reprogram the SGX LT as described in Appendix B or Example 2 reprinted below for your own sequence of presets.
EXAMPLE 2:
Editing the MPT with a keyboard or external controller.
When used with a keyboard or other device such as the ART X-11 or X-15 ULTAFOOT capable of sending MIDI PROGRAM CHANGE messages, MPT editing is simplified. We will edit the MPT so when MIDI numbers 2 and 3, are received, presets 55 and Y4 will be recalled. It is assumed that the SGX LT has not had its MPT edited.
The keyboard or MIDI controller MIDI OUT must be connected to the SGX LT MIDI IN jack. The MIDI on the SGX LT must be set to the same channel the keyboard will be sending messages on, or the SGX LT MIDI must be set to [AL.] for OMNI mode.
Press and hold MIDI, then press BYPASS. The display will show [0.0] with the decimal point blinking indicating that you are in MPT edit mode, this left decimal point means that the MIDI PROGRAM number being displayed.
Select a patch on the keyboard so [0.2] appears in the display. This may not be sound 2 or patch 2 on the keyboard. Different companies number their presets in a variety of ways. The patch causing [0.2] to appear in the display is usually the first or second patch of the lowest numbered bank if the keyboard or controller has banks of patches.
*-Press and release BYPASS. The display shows [02.] to indicating MIDI number 2 recalls PRESET 2.
*-Press and hold UP until [55.] appears in the display. Now MIDI number 2 will recall PRESET 55.
-To program the rest of the entries, you do not need to switch back to the MIDI number. You can let the unit remain showing the PRESET number. (When you select your keyboard or foot controller preset, you automatically recall the existing SGX LT preset.)
*-Select the next patch on the keyboard. The display will show [03.] to indicate that it recalls PRESET 4.
*-Press and hold the UP button until [Y4.] appears in the display. Now the last patch number activated will recall PRESET Y4.
WARRANTY & SERVICE INFORMATION
LIMITED WARRANTY
Warranty service for this unit will be provided by Applied Research & Technology, Inc. in accordance with the following warrant statement.
Applied Research & Technology, Inc. warrants to the original purchaser that this product and the components thereof, will be free from defects in workmanship and materials for a period of one year from the date of purchase. Applied Research & Technology, Inc. (ART) will, without charge, repair or replace, at its option, defective product or component parts upon prepaid delivery to the factory service department or authorized service center, accompanied by proof of purchase date in the form of a valid sales receipt.
EXCLUSIONS: This warranty does not apply in the event of misuse or abuse of the product or as a result of unauthorized alterations or repairs. This warranty is void if the serial number is altered, defaced, or removed.
ART reserves the right to make changes in design or make additions to or improvements upon this product without any obligation to install the same on products previously manufactured.
ART shall not be liable for any consequential damages, including without limitation damages resulting from loss of use. Some states do not allow limitation of incidental or consequential damages, so the above limitation or exclusion may not apply to you. This warranty gives you specific rights and you may also have other rights which vary from state to state.
For units purchased outside The United States, service will be provided by an authorized distributor of Applied Research & Technology, Inc.
SERVICE
The following information is provided for the unlikely event your unit requires service.
1) Be sure the unit is the cause of the problem. Check to make sure the unit has power supplied, all cables are connected correctly and the cables themselves are in working condition.
2) If you find the unit to be at fault, write down a description of the problem including how and when the problem occurs.
3) Call the factory for a Return Authorization (RA) number.
4) Pack the unit in it's original carton or a reasonable substitute. The packing box is not recommended for a shipping carton. Put the packaged unit in another box for shipping. Print the RA number clearly under the address.
5) Include with your unit: a return shipping address (We cannot ship to a P.O. Box), a copy of your purchase receipt, a daytime phone number, and the description of the problem.
6) Ship the unit to: APPLIED RESEARCH & TECHNOLOGY, INC. 215 TREMONT STREET ROCHESTER, NY 14608 ATTN: REPAIR DEPARTMENT RA #
7) Contact our customer service department at (716) 436-2720 for your Return Authorization number or questions regarding repairs. Customer Service hours are 9:00 AM to 4:00 PM Eastern Time, Monday through Friday.
SGX LT PRESET LIST
TOP THIRTY PROGRAMS
| PROGRAM | PRESET | DISTORTION | DESCRIPTION | |
| NUMBER | NUMBER | ENABLE | OF PRESET | |
| 00 | (00) | D | regen delay 300ms & 600ms 9 repeats | |
| 01 | (01) | D | slow flange with reverb | |
| 02 | (02) | D | regen delay 250ms & 500 ms 7 repeats | |
| 03 | (03) | D | close room, short decay | |
| 04 | (04) | D | fast flange with reverb | |
| 05 | (05) | D | moderate flange with reverb | |
| 06 | (06) | - | fast ping-pong delay | |
| 07 | (07) | D | fast chorus with reverb | |
| 08 | (08) | D | inverted flanger with regen | |
| 09 | (09) | - | short reverb room | |
| 10 | (10) | D | reverse | reverb |
| 11 | (11) | D | fast flange, short reverb | |
| 12 | (12) | D | really big reverb space! | |
| 13 | (13) | - | moderate flange with short reverb | |
| 14 | (14) | D | medium flat gate | |
| 15 | (15) | - | bright open room | |
| 16 | (16) | - | small hall | |
| 17 | (17) | - | well-rugged walls | |
| 18 | (18) | - | doubler | |
| 19 | (19) | D | prodelayed flanger | |
| 20 | (20) | D | mono flanger (inverted) | |
| 21 | (21) | - | short two-tap delay with regen | |
| 22 | (22) | D | bottom flanger with regen | |
| 23 | (23) | D | thick slow chorus | |
| 24 | (24) | D | clean slow chorus | |
| 25 | (25) | - | long slow special flanger | |
| 26 | (26) | - | medium chorus with reverb | |
| 27 | (27) | - | flanger with low regen | |
| 28 | (28) | D | lead guitar echo | |
| 29 | (29) | D | full flanger | |
REVERB GROUP PROGRAMS
| PROGRAM NUMBER | PRESET NUMBER | DISTORTION ENABLE | DECAY TIME | (%) | DAMPING (ms) | PREDELAY | ||
| 30 | (30) | D | .2 sec | 2 | 9 | |||
| 31 | (31) | - | .3 | 5 | 13 | |||
| 32 | (32) | D | .3 | 3 | 0 | |||
| 33 | (33) | - | .5 | 3 | 0 | |||
| 34 | (34) | - | .5 | 1 | 10 | |||
| 35 | (35) | - | .6 | 4 | 15 | |||
| 36 | (36) | D | .6 | 3 | 11 | |||
| 37 | (37) | - | .7 | 4 | 0 | |||
| 38 | (38) | - | .8 | 3 | 17 | |||
| 39 | (39) | D | .8 | 1 | 27 | |||
| 40 | (40) | D | .9 | 3 | 27 | |||
| 41 | (41) | D | 1.0 | 7 | 19 | |||
| 42 | (42) | D | 1.0 | 1 | 11 | |||
| 43 | (43) | D | 1.2 | 4 | 0 | |||
| 44 | (44) | - | 1.2 | 1 | 21 | |||
| 45 | (45) | - | 1.1 | 2 | 0 | |||
| 46 | (46) | D | 1.3 | 1 | 11 | |||
| 47 | (47) | - | 1.4 | 9 | 15 | |||
| 48 | (48) | D | 1.5 | 0 | 0 | |||
| 49 | (49) | - | 1.5 | 3 | 0 | |||
| 50 | (50) | - | 1.7 | 4 | 15 | |||
| 51 | (51) | D | 1.8 | 2 | 0 | |||
| 52 | (52) | - | 1.8 | 0 | 0 | |||
| 53 | (53) | - | 2.0 | 2 | 0 | |||
| 54 | (54) | D | 2.1 | 2 | 27 | |||
| 55 | (55) | - | 2.1 | 4 | 0 | |||
| 56 | (56) | - | 2.2 | 3 | 0 | |||
| 57 | (57) | D | 2.3 | 2 | 0 | |||
| 58 | (58) | - | 2.3 | 4 | 0 | |||
| 59 | (59) | - | 2.4 | 6 | 0 | |||
| 60 | (60) | D | 2.5 | 4 | 17 | |||
REVERB GROUP PROGRAMS con't
| PROGRAM | PRRESET | DISTORTION | DECAY | DAMPING (ms) | PREDELAY | |||
| NUMBER | NUMBER | ENABLE | TIME | (%) | ||||
| 61 | (61) | D | 2.6 | 2 | 0 | |||
| 62 | (62) | - | 2.6 | 6 | 0 | |||
| 63 | (63) | D | 2.7 | 2 | 0 | |||
| 64 | (64) | - | 2.8 | 5 | 0 | |||
| 65 | (65) | - | 2.9 | 6 | 0 | |||
| 66 | (66) | - | 3.0 | 2 | 27 | |||
| 67 | (67) | D | 3.0 | 3 | 0 | |||
| 68 | (68) | - | 3.1 | 1 | 0 | |||
| 69 | (69) | D | 3.3 | 4 | 0 |
| 70 | (70) | D | 3.7 | 5 | 0 |
| 71 | (71) | D | 4.0 | 5 | 0 |
| 72 | (72) | - | 5.0 | 3 | 0 |
| 73 | (73) | D | 6.4 | 5 | 0 |
| 74 | (74) | D | 7.4 | 4 | 0 |
| 75 | (75) | D | 9.0 | 3 | 0 |
| 76 | (76) | - | 9.4 | 9 | 0 |
| 77 | (77) | - | 13.0 | 6 | 0 |
| 78 | (78) | D | 18.0 | 5 | 17 |
| 79 | (79) | D | 23.0 | 5 | 21 |
CHORUS and FLANGE with REVERB PROGRAMS
| PROGRAM NUMBER | PRESET | DISTORTION NUMBER | DESCRIPTION ENABLE | DECAY | NOTES | TIME | |
| 80 | (80) | - | medium chorus | 0.6 sec | |||
| 81 | (81) | D | 1.0 | ||||
| 82 | (82) | - | 1.5 | ||||
| 83 | (83) | D | 2.5 | ||||
| 84 | (84) | - | 3.5 | ||||
| 85 | (85) | - | medium FAST chorus | 0.6 | |||
| 86 | (86) | D | 1.0 | ||||
| 87 | (87) | - | 1.5 | ||||
| 88 | (88) | D | 2.5 | ||||
| 89 | (89) | - | 3.5 | ||||
| 90 | (90) | - | tremelo chorus | 0.6 | |||
| 91 | (91) | - | 1.0 | ||||
| 92 | (92) | D | 1.5 | ||||
| 93 | (93) | D | 2.5 | ||||
| 94 | (94) | - | 3.5 | ||||
| 95 | (95) | - | WIDE tremelo chorus | 0.6 | |||
| 96 | (96) | D | 1.0 | ||||
| 97 | (97) | - | 1.5 | ||||
| 98 | (98) | D | 2.5 | ||||
| 99 | (99) | - | 3.5 | ||||
| 100 | (A0) | - | WIDE | chorus | 0.6 | ||
| 101 | (A1) | D | 1.0 | ||||
| 102 | (A2) | - | 1.5 | ||||
| 103 | (A3) | - | 2.5 | ||||
| 104 | (A4) | D | 3.5 | ||||
| 105 | (A5) | - | delayed chorus and reverb 1.0 | med speed | |||
| 106 | (A6) | D | 1.5 | med speed | |||
| 107 | (A7) | D | 1.0 | fast, narrow | |||
| 108 | (A8) | - | 2.5 | fast, narrow | |||
| 109 | (A9) | - | 2.5 | slow, wide | |||
| 110 | (B0) | - | reverb + flange, fast | 0.6 | |||
| 111 | (B1) | D | 1.0 | ||||
| 112 | (B2) | D | 1.5 | ||||
| 113 | (B3) | - | 2.5 | ||||
| 114 | (B4) | D | 3.5 | ||||
| 115 | (B5) | - | reverb + flange, medium fast | 0.6 | |||
| 116 | (B6) | D | 1.0 | ||||
| 117 | (B7) | - | 1.5 | ||||
| 118 | (B8) | D | 2.5 | ||||
| 119 | (B9) | - | 3.5 | ||||
| 120 | (C0) | D | reverb + flange, medium | 0.6 | |||
| 121 | (C1) | - | 1.0 | ||||
| 122 | (C2) | D | 1.5 | ||||
CHORUS and FLANGE with REVERB PROGRAMS con't
| PROGRAM | PRESET | DISTORTION | DESCRIPTION | DECAY | NOTES | ||
| NUMBER | NUMBER | ENABLE | TIME | ||||
| 123 | (C3) | - | 2.5 | ||||
| 124 | (C4) | D | 3.5 | ||||
| 125 | (C5) | - | reverb + flange, medium slow | 0.6 | |||
| 126 | (C6) | D | 1.0 | ||||
| 127 | (C7) | - | 1.5 | ||||
| 128 | (C8) | D | 2.5 | ||||
| 129 | (C9) | - | 3.5 | ||||
| 130 | (D0) | - | reverb + flange, slow | 0.6 | |||
| 131 | (D1) | D | 1.0 | ||||
| 132 | (D2) | - | 1.5 | ||||
| 133 | (D3) | - | 2.5 | ||||
| 134 | (D4) | D | 3.5 | ||||
GATED REVERB PROGRAMS
| PROGRAM | PRESET | DISTORTION | DESCRIPTION | DECAY | NOTES | TIME | |
| NUMBER | NUMBER | ENABLE | |||||
| 135 | (D5) | D | sloped decay | 0.1 | hf decay varies | ||
| 136 | (D6) | - | 0.2 | ||||
| 137 | (D7) | D | 0.3 | ||||
| 138 | (D8) | - | 0.4 | ||||
| 139 | (D9) | D | 0.5 | ||||
| 140 | (E0) | - | 0.6 | ||||
| 141 | (E1) | D | 0.7 | ||||
| 142 | (E2) | - | flat decay | 0.1 | hf decay varies | ||
| 143 | (E3) | D | 0.2 | ||||
| 144 | (E4) | - | 0.3 | ||||
| 145 | (E5) | - | 0.4 | ||||
| 146 | (E6) | D | 0.5 | ||||
| 147 | (E7) | - | 0.6 | ||||
| 148 | (E8) | D | 0.7 | ||||
| 149 | (E9) | D | reverse decay | 0.1 | hf decay varies | ||
| 150 | (F0) | - | 0.2 | ||||
| 151 | (F1) | D | 0.3 | ||||
| 152 | (F2) | - | 0.4 | ||||
| 153 | (F3) | D | 0.5 | ||||
| 154 | (F4) | - | 0.6 | ||||
| 155 | (F5) | D | reverse (w/SLAP) | 0.1 | hf decay varies | ||
| 156 | (F6) | - | 0.2 | ||||
| 157 | (F7) | D | 0.3 | ||||
| 158 | (F8) | - | 0.4 | ||||
| 159 | (F9) | D | 0.5 | ||||
| 160 | (G0) | - | 0.6 | ||||
| 161 | (G1) | D | slope w/regen ddl | 0.2 | |||
| 162 | (G2) | - | 0.3 | ||||
| 163 | (G3) | - | 0.4 | ||||
| 164 | (G4) | - | flat w/regen ddl | 0.2 | |||
| 165 | (G5) | D | 0.3 | ||||
| 166 | (G6) | - | 0.4 | ||||
| 167 | (G7) | D | reverse w/regen ddl | 0.2 | |||
| 168 | (G8) | D | 0.3 | ||||
| 169 | (G9) | - | 0.4 |
CHORUS and FLANGE PROGRAMS
| PROGRAM NUMBER | PRESET NUMBER | DISTORTION ENABLE | DESCRIPTION | |
| 170 | (H0) | D | inverted mono flange | |
| 171 | (H1) | - | inverted mono flange no distortion | |
| 172 | (H2) | D | longer width flanger | |
| 173 | (H3) | - | mono flange with regen | |
| 174 | (H4) | D | medium speed flanger | |
| 175 | (H5) | D | slow speed flanger | |
| 176 | (H6) | - | long, slow, flange with some regen | |
| 177 | (H7) | D | same as H6 with distortion | |
| 178 | (H8) | - | medium speed | |
| 179 | (H9) | D | stereo flanger slow | |
| 180 | (J0) | - | st | ereo flanger slow |
CHORUS and FLANGE PROGRAMS con't
| PROGRAM | PRESET | DISTORTION | DESCRIPTION | |
| NUMBER | NUMBER | ENABLE | ||
| 181 | (J1) | - | medium speed | |
| 182 | (J2) | - | fat flanger medium speed | |
| 183 | (J3) | D | medium speed | |
| 184 | (J4) | - | slow speed wider width | |
| 185 | (J5) | D | stereo, wide width, slow sweep | |
| 186 | (J6) | - | short base, wide sweep chorus | |
| 187 | (J7) | D | short base, wide sweep with distortion | |
| 188 | (J8) | D | stereo, wide sweep chorus | |
| 189 | (J9) | D | stereo, faster sweep | |
| 190 | (L0) | - | long base, wide sweep | |
| 191 | (L1) | - | long base medium speed | |
| 192 | (L2) | - | lush thick chorus | |
| 193 | (L3) | D | lush thick distorted chorus | |
TAPPED DELAY GROUP
| PROGRAM | PRESET | DISTORTION | DESCRIPTION | ||
| NUMBER | NUMBER | ENABLE | |||
| 194 | (L4) | - | 3 tap delay, | 80ms, 70ms, 90ms, short regen, damped | |
| 195 | (L5) | D | 3 tap delay, | 100ms, 90ms, 110ms, short regen, damped | |
| 196 | (L6) | - | 3 tap delay, | 160ms, 140ms, 180ms, medium regen, damped | |
| 197 | (L7) | D | 2 tap delay, | 160ms, 80ms, short regen | |
| 198 | (L8) | - | 2 tap delay, | 240ms, 120ms, short regen | |
| 199 | (L9) | D | 2 tap delay, | 300ms, 150ms, medium regen | |
| 200 | (n0) | - | 2 tap delay, | 400ms, 200ms, long regen | |
| 201 | (n1) | D | 2 tap delay, | 500ms, 250ms, long regen (ping pong) | |
| 202 | (n2) | D | 2 tap delay, | 600ms, 300ms, long regen (ping pong) | |
IMAGE PROGRAMS
| PROGRAM | PRESET | DISTORTION | DESCRIPTION | |
| NUMBER | NUMBER | ENABLE | ||
| 203 | (n3) | - | This one is neutral and sums to mono well. | |
| 204 | (n4) | - | Wide left and right | |
| 205 | (n5) | D | Stereo spread |
| 206 | (n6) | - | Center |
| 207 | (n7) | D | Left/right |
| 208 | (n8) | - | Wide left/right after-image |
| 209 | (n9) | - | Split left to right |
| 210 | (o0) | D | Bounce split after-image |
SLAPBACK DELAY PROGRAMS
| PROGRAM | PRESST | DISTORTION | DELAY TIME | |
| NUMBER | NUMBER | ENABLE | LEFT/RIGHT | |
| 211 | (o1) | - | 20ms, 30ms | |
| 212 | (o2) | - | 40ms, 30ms | |
| 213 | (o3) | D | 40ms, 50ms | |
| 214 | (o4) | D | 70ms, 60ms | |
| 215 | (o5) | - | 80ms, 100ms | |
| 216 | (o6) | D | 120ms, 100ms | |
| 217 | (o7) | D | 120ms, 140ms | |
| 218 | (o8) | - | 160ms, 140ms | |
| 219 | (o9) | D | 160ms, 180ms | |
| 220 | (P0) | - | 220ms, 200ms | |
REVERB WITH LONG PREDELAY GROUP PROGRAMS
| PROGRAM NUMBER | PRESET NUMBER | DISTORTION ENABLE | DSCAY TIME | PREDELAY (ms) |
| 221 (P1) | - | 2.0 sec 75ms | ||
| 222 (P2) | D | 1.6 | 96 | |
| 223 (P3) | - | 1.6 | 150 | |
| 224 (P4) | D | 1.7 | 75 |
PREDELAYED FLANGE GROUP PROGRAMS
| PROGRAM NUMBER | PRESET NUMBER | DISTORTION ENABLE | DESCRIPTION | |
| 225 | (P5) | D | short, moderate sweep | |
| 226 | (P6) | D | medium, moderate sweep | |
| 227 | (P7) | D | long, moderate sweep | |
THICK CHORUS GROUP PROGRAMS
| PROGRAM NUMBER | PRESET NUMBER | DISTORTION ENABLE | DESCRIPTION | |
| 228 | (P8) | - | Thick | |
| 229 | (P9) | - | Thickerer! | |
ECHO GROUP PROGRAMS
| PROGRAM NUMBER | PRESET NUMBER | DISTORTION ENABLE | DELAY TIME (left/right) | REGHN (%) |
| 230 | (U0) | 20ms, 60ms | 50% | |
| 231 | (U1) | - | 25% | |
| 232 | (U2) | - | 0% | |
| 233 | (U3) | 60ms, 140ms | 50% | |
| 234 | (U4) | - | 25% | |
| 235 | (U5) | - | 0% | |
| 236 | (U6) | 120ms, 220ms | 50% | |
| 237 | (U7) | - | 25% | |
| 238 | (U8) | - | 0% | |
| 239 | (U9) | 170ms, 320ms | 50% | |
| 240 | (Y0) | - | 25% | |
| 241 | (Y1) | - | 0% | |
| 242 | (Y2) | 100ms mono | ||
| 243 | (Y3) | 200ms mono | ||
| 244 | (Y4) | 200ms mono | 50% | |
| 245 | (Y5) | 400ms mono | ||
| 246 | (Y6) | 400ms mono | 50% | |
| 247 | (Y7) | 600ms mono | ||
| 248 | (Y8) | 600ms mono | 50% |
BYPASS PROGRAM
| PROGRAM NUMBER | PRESET NUMBER | DISTORTION ENABLE | DESCRIPTION |
| 249 (Y9) | - | BYPASS |
- INTRODUCTION
- FEATURES:
- INSTRUMENT & GUITAR AMP
- INSTRUMENT & SGX LT in the EFFECTS LOOP of an AMP
- INSTALLATION
- POWER
- CONNECTIONS
- INPUTS :
- INSTRUMENT INPUT
- LINE INPUT
- OUTPUT
- HEADPHONE OUTPUT
- MIDI IN
- BYPASS JACK
- REMOTE JACK (CHANNEL SELECT)
- CLEAN CONTOUR
- DIRT DRIVE
- THRUST
- MID VOICING
- EDGE
- DISTORTION LEVEL
- TELLTALES
- OVERDRIVE ACTIVE INDICATOR
- SEVEN SEGMENT DISPLAY
- INPUT LEVEL INDICATORS
- CHANNEL SELECT/AUTO STORE
- PRESET ▲ ▼
- BYPASS
- MIDI
- MPT EDIT MODE
- NOTES:
- MIX CONTROL
- MISCELLANEOUS
- PRESETS
- BATTERY BACKUP
- BYPASS PRESET
- SOFTWARE LEVEL
- USER REGISTRATION
- FACTORY RESET
- Customer Service
- APPENDIX
- MISCELLANEOUS NOTES
- EXAMPLES
- EXAMPLE 1:
- EXAMPLE 2:
- EXAMPLE 3
- EXAMPLE 4
- INCREMENT PRESET
- EXAMPLE 5
- EXAMPLE 6
- ART SGX LT SPECIFICATIONS
- Notes
- HOOKUP
- WARRANTY & SERVICE INFORMATION
- LIMITED WARRANTY
- SERVICE
Brand : ART
Model : SGX LT
Category : Guitar amplifier