
CDR1 - Lighting Botex - Free user manual and instructions
Find the device manual for free CDR1 Botex in PDF.


| Product Type | DMX Recorder |
| Brand | Botex |
| Model | CDR1 |
| Dimensions (W x H x D) | 100 mm x 41.5 mm x 148.5 mm |
| Weight | 0.5 kg |
| Power Supply | 5 V / 300 mA via external adapter (included) |
| DMX Input | 3-pin XLR (male) |
| DMX Output | 3-pin XLR (female) |
| Storage Capacity | 12 chases, each up to 100 steps |
| Recording | Real-time DMX signal recording |
| Playback Modes | Manual, timer-controlled, endless loop |
| Adjustable Parameters | Speed (0.1 s to 30 s) and fade (0 to 100) |
| Sound Control | Built-in microphone with adjustable sensitivity (0-100) |
| Remote Control | Infrared remote with battery (included) |
| Mounting Options | Truss (omega bracket) or wall/ceiling mounting |
| Display | LED display (reversible, auto-off after 30 min) |
| Self Test | Full or sweep output test |
| Copy Function | Send chase to another unit via DMX |
| Protection Class | Indoor use only, IP20 (estimated) |
| Safety Features | Overvoltage protection via external PSU; no user-serviceable parts |
| Maintenance | Clean with dry cloth; avoid liquids and direct sunlight |
| Spare Parts | Contact service; no user-replaceable internal parts |
| General Information | Manual available as PDF; support at www.thomann.de |
Frequently Asked Questions - CDR1 Botex
User questions about CDR1 Botex
0 question about this device. Answer the ones you know or ask your own.
Ask a new question about this device
Download the instructions for your Lighting in PDF format for free! Find your manual CDR1 - Botex and take your electronic device back in hand. On this page are published all the documents necessary for the use of your device. CDR1 by Botex.
USER MANUAL CDR1 Botex
CDR1
DMX recorder
Musikhaus Thomann
Thomann GmbH
1.1 Further information.... 6
1.2 Notational conventions.... 7
1.3 Symbols and signal words.... 7
2 Safety instructions.... 9
3 Features.... 12
4 Installation and starting up.... 13
5 Connections and controls.... 16
6 Operating.... 21
6.1 Operating controls on the device.... 21
6.2 Remote control operation.... 27
7 Technical specifications.... 28
8 Plug and connection assignments.... 29
9 Protecting the environment.... 30

1 General notes
This manual contains important instructions for the safe operation of the unit. Read and follow the safety instructions and all other instructions. Keep the manual for future reference. Make sure that it is available to all those using the device. If you sell the unit please make sure that the buyer also receives this manual.
Our products are subject to a process of continuous development. Thus, they are subject to change.
1.1 Further information
On our website (www.thomann.de) you will find lots of further information and details on the following points:
| Download This manual is also available as PDF file for you to download. | |
| Keyword search | Use the search function in the electronic version to find the topics of interest for you quickly. |
| Online guides | Our online guides provide detailed information on technical basics and terms. |
| Personal consultation For personal consultation please contact our technical hotline. | |
| Service | If you have any problems with the device the customer service will gladly assist you. |
1.2 Notational conventions
This manual uses the following notational conventions:
Letterings The letterings for connectors and controls are marked by square brackets and italics.
Examples: [VOLUME] control, [Mono] button.
Displays Texts and values displayed on the device are marked by quotation marks and italics.
Examples: '24ch', 'OFF'.
1.3 Symbols and signal words
In this section you will find an overview of the meaning of symbols and signal words that are used in this manual.
Signal word Meaning
DANGER! This combination of symbol and signal word indicates an immediate dangerous situation that will result in death or serious injury if it is not avoided.
NOTICE! This combination of symbol and signal word indicates a possible dangerous situation that can result in material and environmental damage if it is not avoided.
Warning signs Type of danger

2 Safety instructions
Intended use
This unit is used to record and playback DMX signals. Use the device only as described in this user manual. Any other use or use under other operating conditions is considered to be improper and may result in personal injury or property damage. No liability will be assumed for damages resulting from improper use.
This device may be used only by persons with sufficient physical, sensorial, and intellectual abilities and having corresponding knowledge and experience. Other persons may use this device only if they are supervised or instructed by a person who is responsible for their safety.
Safety

DANGER!
Danger for children
Ensure that plastic bags, packaging, etc. are disposed of properly and are not within reach of babies and young children. Choking hazard!
Ensure that children do not detach any small parts (e.g. knobs or the like) from the unit. They could swallow the pieces and choke!
Never let children unattended use electrical devices.

NOTICE!
External power supply
The device is powered by an external power supply. Before connecting the external power supply, ensure that the input voltage (AC outlet) matches the voltage rating of the device and that the AC outlet is protected by a residual current circuit breaker. Failure to do so could result in damage to the device and possibly the user.
Unplug the external power supply before electrical storms occur and when the device is unused for long periods of time to reduce the risk of electric shock or fire.

NOTICE!
Risk of fire
Do not block areas of ventilation. Do not install the device near any direct heat source. Keep the device away from naked flames.

NOTICE!
Operating conditions
This device has been designed for indoor use only. To prevent damage, never expose the device to any liquid or moisture. Avoid direct sunlight, heavy dirt, and strong vibrations.
3 Features
■ DMX input for recording DMX sequences in real-time
DMX output
■ Data storage for 12 chases, each with up to 100 steps
■ Playback of DMX sequences on the DMX output either manually or timer controlled
■ Playback in endless loop possible
■ Speed and fading between recorded scenes adjustable
■ Sound-controlled operation via built-in microphone possible
■ Suitable for truss or wall mounting
Operation via buttons and display on the unit or the supplied infrared remote control
4 Installation and starting up
Unpack and carefully check that there is no transportation damage before using the unit. Keep the equipment packaging. To fully protect the device against vibration, dust and moisture during transportation or storage use the original packaging or your own packaging material suitable for transport or storage, respectively.
Create all connections while the device is off. Use the shortest possible high-quality cables for all connections. Take care when running the cables to prevent tripping hazards.
DMX connections
Connect the DMX input of the DMX recorder (R) to the DMX output of a DMX controller (C). Connect the output of the DMX recorder (R) to the first DMX device (1), such as a spotlight. Connect the output of the first DMX device (1) to the input of the second one and so on, to form a series connection. Make sure that the output of the last DMX device (n) in the chain is terminated by a resistor (110 Ω, ¼ W).

flowchart
graph TD
    A["DMX Out"] --> B["C"]
    B --> C["DMX In"]
    C --> D["R"]
    D --> E["DMX Out"]
    E --> F["DMX In"]
    F --> G["..."]
    G --> H["DMX Out"]
    H --> I["n"]
    I --> J["110 Ω, 1/4 W"]
    J --> K["3"]
    J --> L["2"]
DMX indicator
While both the device and the DMX controller are in operation, the [DMX] LED is flashing and thereby indicates that a DMX signal is being received on the input.
Inserting the battery into the remote control
Press the lock of the battery holder to the centre of the housing and pull out the battery holder like a drawer. Insert the battery. The battery is correct if the positive pole points to the housing base of the remote control. Slide the battery holder back into the remote until it clicks into place.

natural_image
Pure mechanical diagram showing a bracket and a circular component with directional arrows, no text or symbols present.When shipping, the battery is already installed in the remote and protected against discharge by a transparent plastic foil. Remove the plastic foil prior to first use.
5 Connections and controls

1 Control LEDs:
[Power]: Indicates that the unit is connected to the power supply.
[REC]: Flashes during recording.
[Play]: Flashes during playback.
[DMX]: Flashes when a DMX signal is received.
2, 3, 4.5 Function and control buttons
[MENU]: opens the main menu.
▼: decreases the displayed value by one.
▲: increases the displayed value by one.
[ENTER]: selects an option of the respective operating mode, confirms the set value.
6 [IR]
Infrared sensor for the signals from the included remote control.
7 Variable fastening element for wall or ceiling mounting.
8 Omega bracket for truss mounting.
9 Microphone for sound control.
10 [DC IN]
Micro USB port for connecting the plug-in power supply.
11 [DMX OUT]
Output for the DMX signal to other DMX-controlled devices.
12 [DMX IN]
Input for the DMX signal, for example from a DMX controller.
Remote control

21 [STANDBY] Switches the unit to standby mode or back on again.
22 ▼, ▶ Increases or decreases the currently displayed value.
23 [1/7] ... [6/12] Selecting a chase sequence within the selected group.
24 [Fade +/-] Setting the fading speed.
25 [Master +/-] Increases or decreases the value transmitted on all DMX channels by one.
26 [Speed +/-] Setting the programme speed.
| 27 [1-6], [7-12]Selects a group. | |
| 28 [REC]Starts recording. | |
| 29 ▶IIStarts / stops the playback of a chase sequence. |
6 Operating
Connect the device to the power supply to start operation.
6.1 Operating controls on the device
Record
Press [MENU] repeatedly until the display shows 'reC'. Confirm with [ENTER]. Use the arrow buttons to select a chase sequence to be recorded in the 'CS.01'... 'CS.12'. Start the recording with [ENTER]. The [REC] LED flashes, the display shows the number of the currently recorded step. In your DMX controller, configure the scene you want to record and press [ENTER]. Repeat this process until the chase sequence is completely recorded.
Press [MENU] to stop recording.
Play
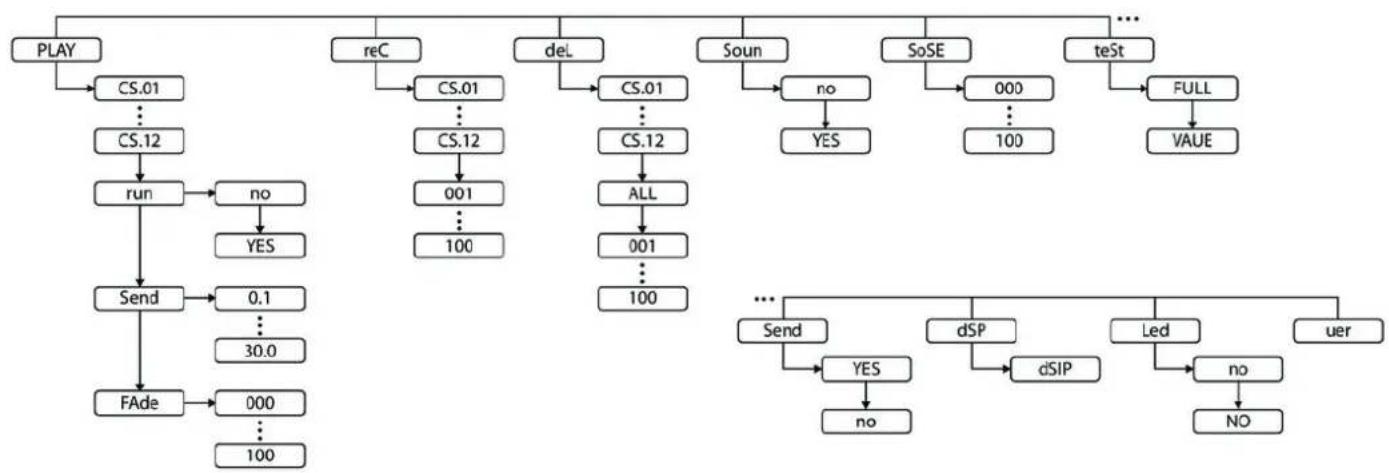
Press [MENU] repeatedly until the display shows 'PLAY'. Confirm with [ENTER]. Use the arrow buttons to select the chase sequence to be played back in the range 'CS.01' ... 'CS.12'. Confirm with [ENTER].
To start playback, use the arrow buttons to select the menu item 'run' and confirm with [ENTER]. If the selected chase sequence contains a recording, you can use the arrow button to select 'YES' (start playback) and 'no'.
To set the transition time between the individual steps, use the arrow buttons to select the menu item 'Send'. Use the arrow buttons to select a period between 0.1 s and 30 s. Confirm with [ENTER].
To set the fading time between the individual steps, use the arrow buttons to select the menu item 'FAde'. Use the arrow buttons to set a speed in the range '0'... '100'. Confirm with [ENTER].
Playback runs in an endless loop. To stop playback, press [ENTER], use the arrow buttons to select the option 'no', and confirm with [ENTER].
| Deleting recordings | Press [MENU] repeatedly until the display shows ‘deL’. Confirm with [ENTER]. Use the arrow buttons to select the chase sequence to be deleted in the range ‘CS.01’... ‘CS.12’. Confirm with [ENTER].Use the arrow keys to select whether the complete chase sequence is to be deleted (select ‘all’) or only one scene (select ‘001’... ‘100’) and confirm with [ENTER]. The selected chase sequence or scene is being deleted.Press [MENU] to return to the main menu. |
| Enabling sound-control | Press [MENU] repeatedly until the display shows ‘Soun’. Confirm with [ENTER].Use the arrow buttons to select whether playback is to be controlled via the built-in microphone (select ‘YES’) or not (select ‘no’) and confirm with [ENTER].Press [MENU] to return to the main menu. |
| Setting microphone sensitivity | Press [MENU] repeatedly until the display shows ‘SoSe’. Confirm with [ENTER].To adjust the sensitivity of the built-in microphone for the sound control, use the arrow buttons to set a value in the range ‘000’... ‘100’. Confirm with [ENTER].Press [MENU] to return to the main menu. |
Self test
Press [MENU] repeatedly until the display shows 'teSt'. Confirm with [ENTER].
Use the arrow buttons to select whether the value 255 is to be output during the test on all DMX channels (select 'FuLL') or successively all values from 0 to 255 and then from 255 to 0 (select 'UAue') and confirm with [ENTER].
The self test is started, the [Play] LED flashes.
Press [MENU] to end the self test and return to the main menu.
Send
This function allows you to copy the current chase sequence with all steps to a second unit, which is connected to the device via a DMX cable.
Press [MENU] repeatedly until the display shows 'Send'. Confirm with [ENTER].
Display reversal
Press [MENU] repeatedly until the display shows 'dISP'. Confirm with [ENTER].
Use the arrow buttons to select whether the display is to be shown reversed (select 'dSIP') or not (select 'dISP') and confirm with [ENTER].
Press [MENU] to return to the main menu.
Display mode
Press [MENU] repeatedly until the display shows 'Led'. Confirm with [ENTER].
Use the arrow buttons to select whether the display has to be turned off after 30 minutes without any keypress (select 'YES') or not (select 'no') and confirm with [ENTER].
Press [MENU] to return to the main menu.
Software version
Press [MENU] repeatedly until the display shows 'uer'. Confirm with [ENTER].
Confirm with [ENTER]. The software version of the device will appear on the display.
Press [MENU] to return to the main menu.
Menu overview
flowchart
graph TD
    A["PLAY"] --> B["CS.01"]
    B --> C["CS.12"]
    C --> D["run"]
    D --> E["no"]
    E --> F["YES"]
    F --> G["Send"]
    G --> H["0.1"]
    H --> I["30.0"]
    I --> J["FAde"]
    J --> K["000"]
    K --> L["..."]
    L --> M["100"]

    N["reC"] --> O["CS.01"]
    O --> P["CS.12"]
    P --> Q["001"]
    Q --> R["..."]
    R --> S["100"]

    T["deL"] --> U["CS.01"]
    U --> V["CS.12"]
    V --> W["ALL"]
    W --> X["001"]
    X --> Y["..."]
    Y --> Z["100"]

    AA["Soun"] --> AB["no"]
    AB --> AC["YES"]

    AD["SoSE"] --> AE["000"]
    AE --> AF["..."]
    AF --> AG["100"]

    AH["teSt"] --> AI["FULL"]
    AI --> AJ["VAUE"]

    AK["..."] --> AL["..."]
    AL --> AM["Send"]
    AM --> AN["YES"]
    AN --> AO["no"]

    AP["dSP"] --> AQ["dSIP"]
    AQ --> AR["Led"]
    AR --> AS["no"]
    AS --> AT["NO"]

    AU["uer"] --> AV["dSP"]
    AV --> AW["dSIP"]
    AW --> AX["Led"]
    AX --> AY["no"]
6.2 Remote control operation
Record
Press [REC]. The [REC] LED flashes. Use [1-6] , [7-12] to select a group, then use [1/7] [6/12] to select the chase sequence number to be recorded. The display shows 'CS.01'.
In your DMX controller, configure the scene you want to record and press one of the [1/7] ... [6/12] buttons. The display shows the number of the recorded step.
Press [MENU] to stop recording.
play
Press ▶II. Use [1–6], [7–12] to select a group, then use [1/7] ... [6/12] to select the chase sequence number to be played.
Use [Speed +/–] to set the playback speed and [Fade +/–] to set the fading time.
Use the arrow buttons to skip steps forward and backward during playback. You can pause or restart the current playback with ▶II.
7 Technical specifications
| Voltage supply | 5 V / 300 mA == |
| Dimensions (W × H × D) 100 mm × 41.5 mm × 148.5 mm | |
| Weight 0.5 kg | |
8 Plug and connection assignments
Introduction
This chapter will help you select the right cables and plugs to connect your valuable equipment so that a perfect light experience is guaranteed.
Please take our tips, because especially in 'Sound & Light' caution is indicated: Even if a plug fits into a socket, the result of an incorrect connection may be a destroyed DMX controller, a short circuit or 'just' a not working light show!
DMX connections
natural_image
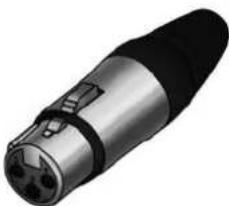
3D rendering of a metallic and black connector (no text or symbols visible)The unit offers a 3-pin XLR socket for DMX output and a 3-pin XLR plug for DMX input. Please refer to the drawing and table below for the pin assignment of a suitable XLR plug.
Pin Configuration
1 Ground, shielding
2 Signal inverted (DMX-, 'cold signal')
3 Signal (DMX+, 'hot signal')
9 Protecting the environment
Disposal of the packaging material

For the transport and protective packaging, environmentally friendly materials have been chosen that can be supplied to normal recycling.
Ensure that plastic bags, packaging, etc. are properly disposed of.
Do not just dispose these materials with your normal household waste, but make sure that they are fed to a recovery. Please follow the notes and markings on the packaging.
Disposal of batteries

Batteries must not be disposed of as domestic waste or thrown into fire. Dispose of the batteries according to national or local regulations regarding hazardous waste. To protect the environment, dispose of empty batteries at your retail store or at appropriate collection sites.
Disposal of your old device

This product is subject to the European Waste Electrical and Electronic Equipment Directive (WEEE). Do not dispose with your normal household waste.
Dispose this device through an approved waste disposal firm or through your local waste facility. When discarding the device, comply with the rules and regulations that apply in your country. If in doubt, consult your local waste disposal facility.
Notes
Notes
CDR1
DMX recorder
Notes


- General notes
- Further information
- Notational conventions
- Symbols and signal words
- Signal word Meaning
- Warning signs Type of danger
- Safety instructions
- Intended use
- Safety
- DANGER!
- Danger for children
- NOTICE!
- External power supply
- Risk of fire
- Operating conditions
- Features
- Installation and starting up
- DMX connections
- DMX indicator
- Inserting the battery into the remote control
- Control LEDs:
- 2, 3, 4.5 Function and control buttons
- [IR]
- Operating
- Operating controls on the device
- Record
- Play
- Self test
- Send
- Display reversal
- Display mode
- Software version
- Remote control operation
- Technical specifications
- Plug and connection assignments
- Introduction
- Pin Configuration
- Protecting the environment
- Disposal of your old device
Brand : Botex
Model : CDR1
Category : Lighting