
Continental V2.0 - Keyboard VOX - Free user manual and instructions
Find the device manual for free Continental V2.0 VOX in PDF.


| Product Type | Stage Keyboard |
| Models | Continental-61 (61 keys), Continental-73 (73 keys) |
| Keyboard Type | Semi-weighted waterfall keys, velocity sensitive |
| Sound Engines | Modeling tonewheel organ, transistor organ, electric piano; high-definition piano; analog modeling synth; PCM |
| Maximum Polyphony | 128 voices (organ), 100 voices (transistor organ), 50 voices (electric piano), 60 stereo notes (piano), 36 voices (analog synth), 64 stereo notes (PCM) - dynamic allocation |
| Preset Variations | 150 |
| Scenes | 16 (4 banks x 4 scenes), up to 100 sets saved to USB |
| Effects | Insert: CHORUS, PHASER, FLANGER, COMP, DRIVE, WAH; Master: 4 DELAY types, 5 REVERB types; 9-band EQ; VALVE DRIVE (Nutube) |
| Controllers | Bend lever, 9 touch sensors (drawbars, filter, EG, LFO, EQ), expression pedal, damper pedal, rotor speed footswitch |
| Connections | Output L/MONO, R (6.3mm); Output L, R (XLR); Headphones (6.3mm); MIDI IN/OUT; USB A (storage), USB B (MIDI); Pedal jacks (CONTROL, ROTOR SPEED, DAMPER) |
| Power Supply | AC adapter (DC 15V), 16 W power consumption |
| Dimensions (WxDxH) | 61-key: 939 x 350 x 86 mm; 73-key: 1103 x 350 x 86 mm |
| Weight | 61-key: 7.2 kg; 73-key: 8.4 kg |
| Included Accessories | AC adapter, power cord, Owner's Manual, V861 VOL/EXP pedal |
| Optional Accessories | Damper pedal KORG DS-1H, pedal switch KORG PS-1/PS-3, keyboard stand ST-Continental |
| Operating Temperature | +5 to +40°C (avoid condensation) |
| Maintenance | Wipe with clean, dry cloth; do not use benzene, thinner, or flammable polishes |
| Safety Precautions | Avoid direct sunlight, extreme temperatures/humidity, dust, vibration, magnetic fields; use only included AC adapter; keep liquids and metal objects away |
| Warranty | Manufacturer warranty applies; retain receipt as proof of purchase |
Frequently Asked Questions - Continental V2.0 VOX
User questions about Continental V2.0 VOX
0 question about this device. Answer the ones you know or ask your own.
Ask a new question about this device
Download the instructions for your Keyboard in PDF format for free! Find your manual Continental V2.0 - VOX and take your electronic device back in hand. On this page are published all the documents necessary for the use of your device. Continental V2.0 by VOX.
USER MANUAL Continental V2.0 VOX
ENGLISH
Continental
KEYBOARD
Owner's Manual
Table of Contents
Precautions 2
Data handling 3
About Nutube 3
About the Owner's Manual 3
Main Functions of Each Part ....4
Front panel 4
Rear Panel 5
Making Connections ....5
Placing the instrument on a dedicated stand ..... 5
-
Connecting the AC adapter 5
-
Connecting audio devices 6
-
Connecting the pedals 6
-
Connecting to a MIDI device or computer ..... 7
Turning the Power On/Off 7
-
Turning the power on 7
-
Turning the power off 7
Selecting and Playing Sounds 8
-
Selecting a sound 8
-
Selecting the scene 8
-
Using controllers 8
-
Applying effects 10
Saving a Scene 11
Saving a scene to the SCENE 1-4 buttons .... 11
Listening to the demo songs 11
Playing back the demo songs 11
Detailed Functions 12
-
Master control 12
-
Part select 12
-
ORGAN part 13
-
E. PIANO part 14
-
PIANO part 14
-
KEY/LAYER part 14
-
Touch controls 15
-
Scene select 17
9.EFFECTS controls 18
System Settings 20
-
Master tune 20
-
MIDI channel 20
-
Lower part MIDI channel 20
-
Local control 21
-
Velocity curve 21
-
Organ key trigger 21
-
Auto power off 21
-
VOX logo LED on/off 21
-
Wah pedal control 22
-
Calibrating the pedal 22
-
Touch sensor calibration .....22
-
Restoring the VOX Continental to factory-set default settings 22
-
Saving the scene data 23
-
Loading the scene data 23
Appendices 24
Troubleshooting 24
Error messages 24
Specifications 25
Thank you for purchasing the VOX Continental.
The VOX Continental features a standard assortment of vintage sounds including a VOX organ, tonewheel organ, electric piano and more, as well as a rich grand piano sound that uses large, non-looped sample files in full stereo across the keyboard. This stage keyboard also features carefully selected clavinet, brass, strings, analog modeling synthesizers and other sounds that are frequently used during onstage performance, which are accessible via an intuitive user interface.
Both a 61-key model and a 73-key model are available.
To help you get the most out of your new instrument, please read this manual carefully.
Precautions
Location
Using the unit in the following locations can result in a malfunction.
• In direct sunlight
- Locations of extreme temperature or humidity
• Excessively dusty or dirty locations
- Locations of excessive vibration
- Close to magnetic fields
Power supply
Please connect the designated AC adapter to an AC outlet of the correct voltage. Do not connect it to an AC outlet of voltage other than that for which your unit is intended.
Interference with other electrical devices
Radios and televisions placed nearby may experience reception interference. Operate this unit at a suitable distance from radios and televisions.
Handling
To avoid breakage, do not apply excessive force to the switches or controls.
Care
If the exterior becomes dirty, wipe it with a clean, dry cloth. Do not use liquid cleaners such as benzene or thinner, or cleaning compounds or flammable polishes.
Keep this manual
After reading this manual, please keep it for later reference.
Keeping foreign matter out of your equipment
Never set any container with liquid in it near this equipment. If liquid gets into the equipment, it could cause a breakdown, fire, or electrical shock.
Be careful not to let metal objects get into the equipment. If something does slip into the equipment, unplug the AC adapter from the wall outlet. Then contact your nearest Vox dealer or the store where the equipment was purchased.
DECLARATION OF CONFORMITY (for USA)
Responsible Party : KORG USA INC.
Address : 316 SOUTH SERVICE ROAD, MELVILLE, NY
Telephone : 1-631-390-6500
Equipment Type : Keyboard
Model: VOX CONTINENTAL-61, VOX CONTINENTAL-73
This device complies with Part 15 of FCC Rules.
Operation is subject to the following two conditions:
(1) This device may not cause harmful interference, and
(2) this device must accept any interference received, including interference that may cause undesired operation.
THE FCC REGULATION WARNING (for USA)
NOTE: This equipment has been tested and found to comply with the limits for a Class B digital device, pursuant to Part 15 of the FCC Rules. These limits are designed to provide reasonable protection against harmful interference in a residential installation. This equipment generates, uses, and can radiate radio frequency energy and, if not installed and used in accordance with the instructions, may cause harmful interference to radio communications. However, there is no guarantee that interference will not occur in a particular installation. If this equipment does cause harmful interference to radio or television reception, which can be determined by turning the equipment off and on, the user is encouraged to try to correct the interference by one or more of the following measures:
- Reorient or relocate the receiving antenna.
- Increase the separation between the equipment and receiver.
- Connect the equipment into an outlet on a circuit different from that to which the receiver is connected.
- Consult the dealer or an experienced radio/TV technician for help.
If items such as cables are included with this equipment, you must use those included items.
Unauthorized changes or modification to this system can void the user's authority to operate this equipment.

Notice regarding disposal (EU only)
When this “crossed-out wheeled bin” symbol is displayed on the product, owner's manual, battery, or battery package, it signifies that when you wish to dispose of this product, manual, package or battery you must do so in an approved manner. Do not discard this product, manual, package or battery along with ordinary household waste.
Disposing in the correct manner will prevent harm to human health and potential damage to the environment. Since the correct method of disposal will depend on the applicable laws and regulations in your locality, please contact your local administrative body for details. If the battery contains heavy metals in excess of the regulated amount, a chemical symbol is displayed below the “crossed-out wheeled bin” symbol on the battery or battery package.
Data handling
Incorrect operation or malfunction may cause the contents of memory to be lost, so we recommend that you save important data on USB storage devices. Please be aware that VOX will accept no responsibility for any damages which may result from loss of data.
About Nutube
Nutube is a new vacuum tube developed by KORG INC. and Noritake Itron Corporation and that utilizes technology from vacuum fluorescent displays.
As with conventional vacuum tubes, the Nutube is constructed with an anode, grid and filament, and operates as a complete triode tube. Furthermore, it generates the response and same rich harmonic characteristics of conventional vacuum tubes.

If a strong impact is applied to this unit, noise at the high-frequency range may be heard from the speakers, headphones, etc. This is due to the structure of the Nutube; it is not a malfunction.
About the Owner's Manual
The VOX Continental Owner's Manual is organized as follows:
- VOX Continental Owner's Manual (printed) (this document)
• VOX Continental MIDI Setting Guide (PDF)
• VOX Continental Voice Name List (PDF)
VOX Continental Owner's Manual (printed) (this document)
Explains how to use the VOX Continental. Read this manual first.
VOX Continental MIDI Setting Guide (PDF)
This guide explains the MIDI messages and other information that can be handled by the VOX Continental. Read this in order to use the VOX Continental with external MIDI devices, DAWs and so on.
VOX Continental Voice Name List (PDF)
This is a list of the factory-set default sounds and other data that are available on the VOX Continental.
Download the PDF from the following website. www.voxamps.com
Conventions in this manual
Symbols
Note, Tip
These symbols respectively indicate a caution, a supplementary note, or a tip.
Example screen displays
The parameter values shown in the example screens of this manual are only for explanatory purposes, and may not necessary match the values that appear in the screen of your instrument.
Main Functions of Each Part
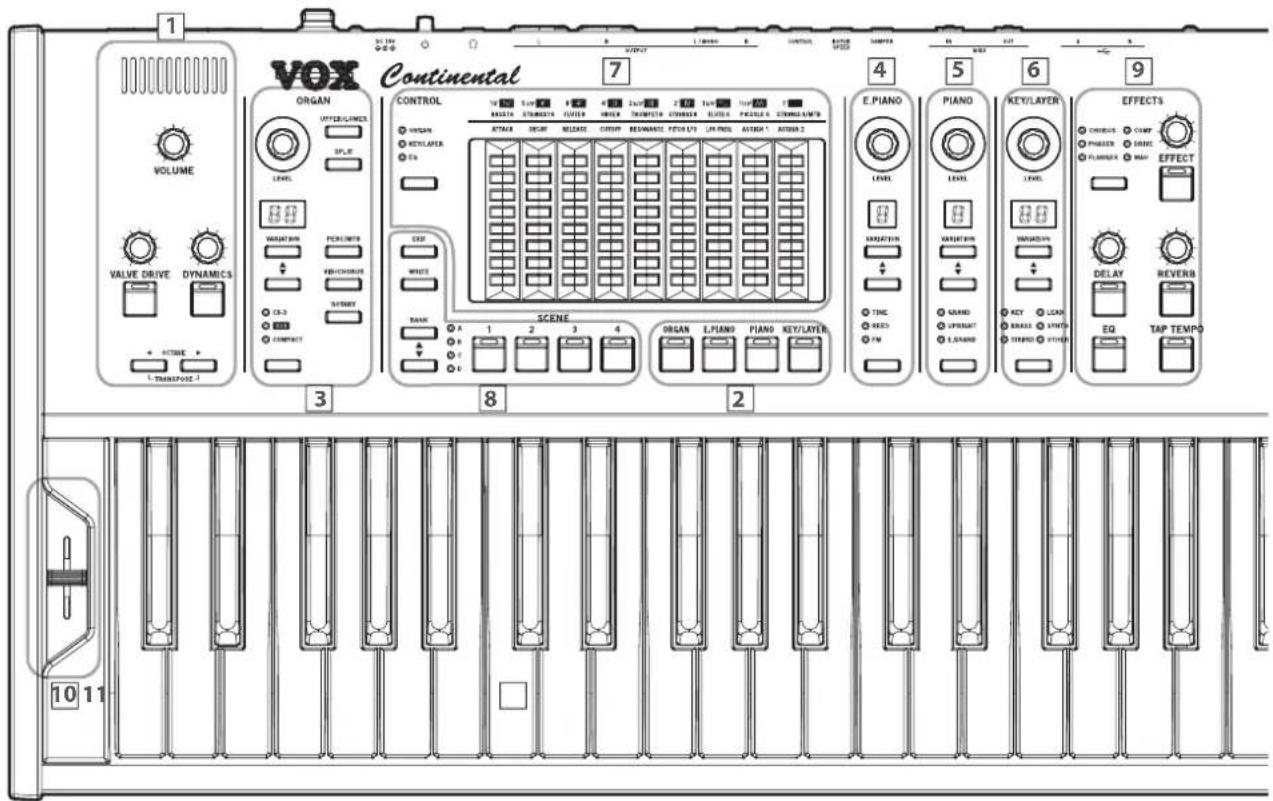
Front panel
1: Master control
These controls set the overall volume, vacuum tube (Nutube) drive volume, keyboard dynamics sensitivity, keyboard octave and so on. (See page 12)
2: Part select
Selects the sound part for performance (ORGAN, E.PIANO, PIANO, KEY/LAYER).
Up to two parts can be turned on and played at the same time. (See page 12)
3: ORGAN part
Selects the variation for the CX-3, VOX, or COMPACT organ sound. (See page 13)
You can also control the percussion, vibrato/chorus, and rotary speaker simulation.
There are two types of settings, one for UPPER (the upper part of the keyboard) and one for LOWER (the lower part of the keyboard). You can split the keyboard into upper and lower parts, or use an external MIDI keyboard to play the lower part of the VOX Continental.
The touch sensors can be used to control the drawbars.
4: E. PIANO part
Selects the typical tines and reeds for vintage electric piano, and the sound variations for the FM-type electric piano. (See page 14)
5: PIANO part
Selects the sound variations for the grand, upright, and electric grand piano sounds. The grand piano sound uses large, non-looping waveform samples in full stereo sound across the keyboard for both delicate and powerful, richly expressive sound. (See page 14)
6: KEY/LAYER part
Selects various types of sound variations, such as clavinet, brass, strings, synthesizer and so on. (See page 14)
You can use the touch sensors to control the amp EG, filter or LFO.
7: Touch controls
You can simultaneously control multiple settings by touching the nine touch sensors with LEDs.
These sensors control the organ drawbars, KEY/LAYER filter, EG, LFO and the overall EQ settings. (See page 15)
8: Scene select
Selects the scene. There are 16 scenes, which are used to store your favorite variations or effects and instantly recall them during live performance or other situations. (See page 17) The EXIT button is also used when making system settings.
9: EFFECTS controls
Sets the trio of effects including the EFFECT (chorus, phaser and so on), DELAY and REVERB, as well as the EQ (equalizer). (See page 18)
10: Bend lever
Used to switch between speeds for the organ rotary speaker simulation, turn the tremolo of the electric piano on/off, and bend the pitch of the KEY/LAYER variation up or down. (See page 9)
11: Keyboard
The keyboard of the VOX Continental is velocity sensitive, but aftertouch is not supported. This keyboard features waterfall keys, making it possible to perform glissandos, trills and so on like with a vintage tonewheel organ. (See page 9)
Rear Panel
1: Power
Turns the power on/off. Hold down the power button to shut the power off.
- "1. Connecting the AC adapter" (see page 5)
♦ "Turning the Power On/Off" (see page 7)
Power button
DC 15V jack
Cord hook
2: OUTPUT
Use these jacks to connect to an external audio device.
- "2. Connecting audio devices" (see page 6)
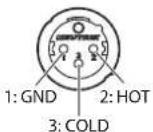
OUTPUT L/MONO, R jacks
(6.3 mm monaural phone jack, unbalanced)
OUTPUT L, R jacks
(XLR-3-32, balanced)
LIFT-GND switch
Headphones jack
(6.3 mm stereo phone jack)
3: PEDAL
You can control the sound of the VOX Continental using the foot pedals connected to each foot controller jack.
- "3. Connecting the pedals" (see page 6)

Do not operate the pedals that are connected to the ROTOR SPEED or DAMPER jacks while turning on the power or connecting a pedal. The pedal polarity and pedal position will be considered by the VOX Continental to be off when the pedal is connected.
CONTROL jack, ROTOR SPEED jack, DAMPER jack
4: MIDI
Connect this instrument to an external MIDI device in order to transmit or receive MIDI data.
The ORGAN part can be played by connecting an external MIDI keyboard and using it as LOWER (the lower part of the keyboard).
- "3. Lower part MIDI channel" (see page 20)
MIDI IN/OUT connectors
5: USB
USB A port
Connect an USB storage device such as a USB flash drive (commercially available) to save and load scene data.
• "13. Saving the scene data" (see page 23)
♦ "14. Loading the scene data" (see page 23)
USB B port
Connect the USB A port of a Windows PC or Mac to the VOX Continental to exchange MIDI data.
6: VOX logo
"8. VOX logo LED on/off" (see page 21)
Making Connections
Placing the instrument on a dedicated stand
When placing the VOX Continental on a dedicated keyboard stand (the ST-Continental), first unplug the AC adapter and cord from this instrument, and follow the instructions in the "ST-Continental Assembly Guide" included with the stand.
1. Connecting the AC adapter

Use only the included AC adapter. Using any other AC adapter may cause malfunctions.
1 Connect the DC plug of the included AC adapter to the DC 15V jack located on the rear panel of the VOX Continental.
2 Connect the power cord connector to the AC adapter.
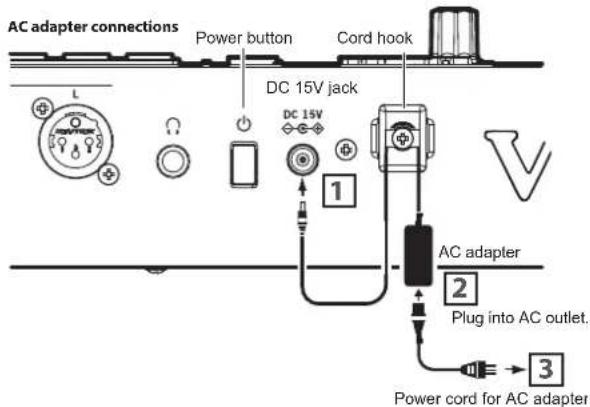

3 Plug the power cord into an AC outlet.
Use an AC outlet of the correct voltage.
4 Use the cord hook on this instrument to prevent the power plug of the AC adapter from getting pulled out accidentally or being damaged.

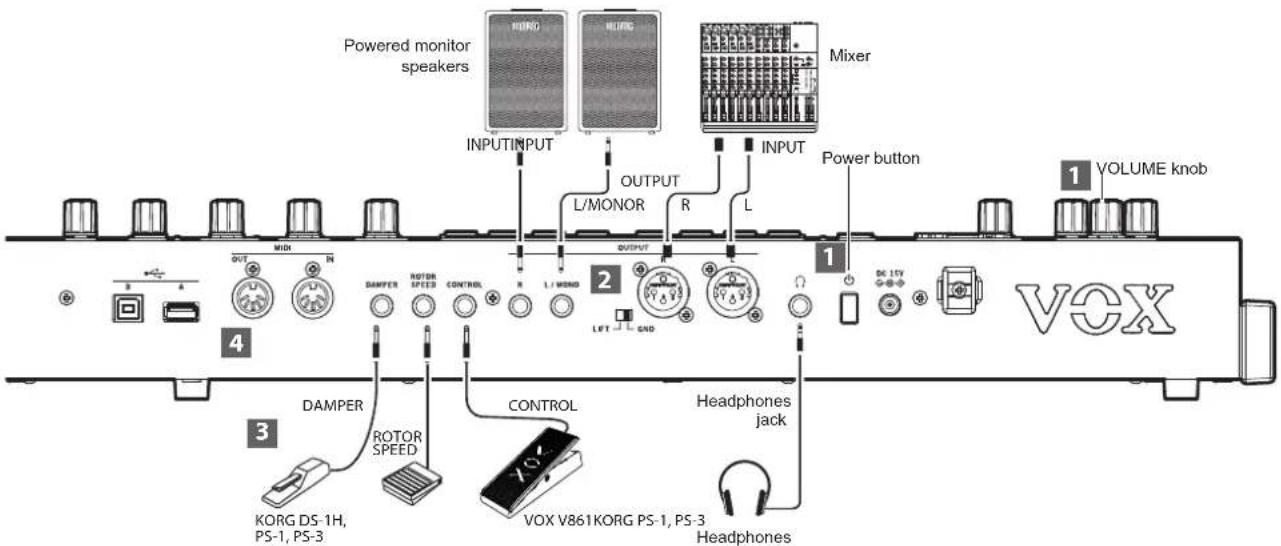
2. Connecting audio devices
The VOX Continental does not have built-in speakers. You will need to connect audio equipment such as powered monitor speakers or a stereo set, or use headphones in order to hear sound.
Connecting powered monitor speakers or a mixer

The audio outputs on the VOX Continental output at a higher signal level than ordinary home audio equipment like CD systems. For this reason, playing at an excessive volume may damage the connected speakers or audio equipment, so use caution with the volume level.
1 Turn down the volume on all of your connected equipment, and then turn off the power.
2 Connect the L/MONO and R jacks or the L and R (XLR) jacks from the OUTPUT of the VOX Continental to the audio input jacks of your powered monitor speakers or mixer.
The signals outputted from the OUTPUT L/MONO and R jacks are the same as those from the L and R (XLR) jacks. You can use both at the same time.
Note: If you're using a monaural connection, connect to the L/MONO jack.
Note: Setting the LIFT-GND switch
You may hear some noise as a result of a ground loop, depending on your power supply situation. This noise may be defeated in some cases by switching the LIFT-GND switch to the LIFT side.
Connecting the headphones
- Connect the 6.3 mm stereo phone plug of your headphones to the headphones jack on the VOX Continental.
The headphone jack of the VOX Continental will output the same signal as the OUTPUT jacks.
Use the VOLUME knob to adjust the headphone volume.
Note: The output from the OUTPUT jacks is not turned off even when headphones are connected to the headphone jack.
3. Connecting the pedals
You can control the sound of the VOX Continental using the foot pedals connected to each foot controller jack.
Note: The sensitivity of each pedal jack is set to a standard value when this instrument is shipped from the factory. If the pedal sensitivity does not respond appropriately for the pedals you are using, adjust the sensitivity.
(See "10. Calibrating the pedal", page 22)
Adjusting the volume (or wah) with the pedal
Connect the EXPRESSION jack of the included pedal to the CONTROL jack of the VOX Continental using the connection cable.
The volume can be adjusted depending on how hard you depress the pedal. On the ORGAN part variations, this controls the volume before the rotary speaker input. This recreates the effect of an expression pedal used with drawbar organs.
When the wah effect is used, this controls the amount of wah (default setting).
Note: This controls either the amount of wah or the volume, when using the wah effect.
(See "9. Wah pedal control", page 22)
Switching between rotary speeds with the pedal
- Connect the pedal switch (Korg PS-1 or PS-3, sold separately) into the ROTOR SPEED jack.
Pressing the pedal will switch the speed of the rotary speaker simulation for the ORGAN part.
Controlling the damper using the pedal
- Connect the damper pedal (Korg DS-1H, sold separately) or pedal switch (Korg PS-1 or PS-3, sold separately) to the DAMPER jack.
When you press the pedal, the notes you've pressed will be sustained so that they will continue even after you take your hands off the keyboard.
Tip: With the Korg DS-1H damper, you'll be able to take advantage of the "half-damper" effect, where the depth that you press the pedal will vary the amount of damper that's applied.
4. Connecting to a MIDI device or computer
An external MIDI keyboard or sequencer can be connected to the VOX Continental in order to control its sound generator; or the keyboard and touch sensors on the VOX Continental can be used to control an external MIDI sound generator.
For details on connecting via MIDI, refer to the "VOX Continental MIDI Setting Guide" (PDF).
Playing an external MIDI keyboard with LOWER (lower part of the keyboard) on the organ
There are two types of settings on the ORGAN part variations, one for UPPER (the upper part of the keyboard) and one for LOWER (the lower part of the keyboard). An external MIDI keyboard can be played as the LOWER part. (See page 20)
Turning the Power On/Off
1. Turning the power on
1 Turn the VOLUME knob on the VOX Continental all the way to the left so that the volume is down. Make sure that the volume on any external output devices that are connected (such as powered monitor speakers) is turned down and that the power is turned off.
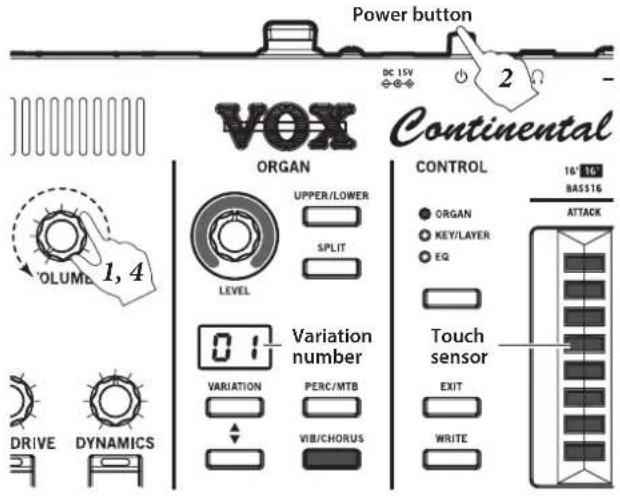
2 Press the power button on the VOX Continental.
All of the touch sensor LEDs will light, and the keyboard will be ready to play once a number is shown in the VARIATION display.
3 Turn on the power of the external output devices that are connected to the OUTPUT jacks of the VOX Continental, such as powered monitor speakers.
4 Adjust the VOLUME knobs on the VOX Continental and on your external equipment to set the volume to a suitable level.
2. Turning the power off
Scenes that have not been saved will be lost when the power is turned off, so be sure to save them beforehand. (See page 11)
1 Lower the volume on your powered monitor speakers or other external output device, and then turn off their power.
2 Turn the VOLUME knob on the VOX Continental all the way to the left.
3 Hold down the power button on the rear panel of the VOX Continental. When OFF is shown in the VARIATION displays of the PIANO and KEY/LAYER parts, release the power button.
The instrument is storing its settings while OFF is shown. Make sure that the AC adapter stays plugged in until OFF is no longer shown. Failure to do so may cause a malfunction.
When a set period of time has passed without playing the keys, turning the knobs or pressing the buttons on the VOX Continental, the power will turn off. This function is called "auto power off", and the factory-set default is 4 hours. This time can be adjusted. (See page 21)
Selecting and Playing Sounds
1. Selecting a sound
The VOX Continental features four sound parts, ORGAN, E. PIANO, PIANO and KEY/LAYER. You can select a variation for each part to play.
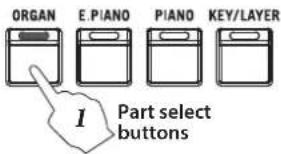
1 Press a part select button to turn on the part you wish to play. (the button will light)
Pressing down two part select buttons at the same time (the button will light) will allow you to play a layered sound with both parts (for
instance, piano and strings together).
2 Turn the LEVEL knobs to adjust the volume of each sound part.
Use the master control VOLUME knob to adjust the overall volume.
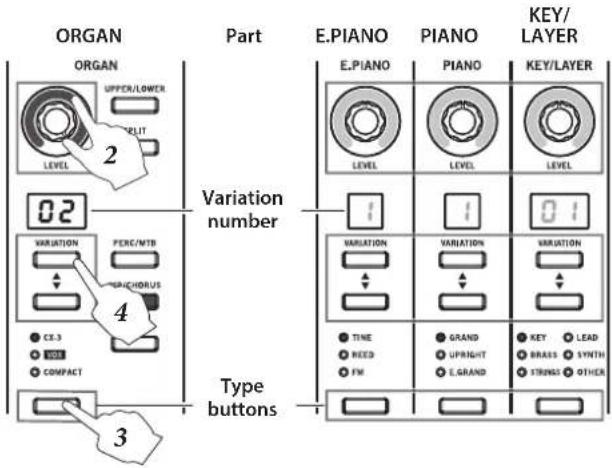
3 Press the type buttons for each sound part to select the sound type.
The LED on the respective button will light when the type is on.
For example, the types that can be selected for the ORGAN part are shown below.
CX-3: Tonewheel organ
VOX: transistor organ
COMPACT: transistor organ
See the pages listed below for other parts.
E. PIANO part (See page 14)
PIANO part (See page 14)
KEY/LAYER part (See page 14)
4 Press the VARIATION ▲, ▼ buttons to select the variation. The variation number will be shown in the VARIATION display.
Note: Changing parts or variations will have no effect on the settings in EFFECTS control, or on the octave or transpose settings.
2. Selecting the scene
Scenes are used to store your favorite variations or effect settings and instantly recall them. There are 16 scenes (4 scenes × 4 banks).
Tip: Each scene is already set by factory default, but you can overwrite them.
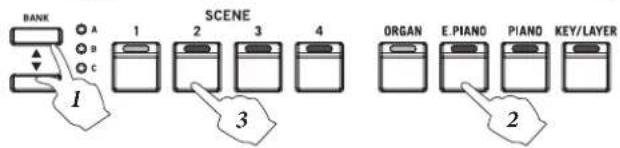
1 Press the BANK ▲, ▼ buttons to select a bank (from A to D). (The LEDs on banks A–D will light)
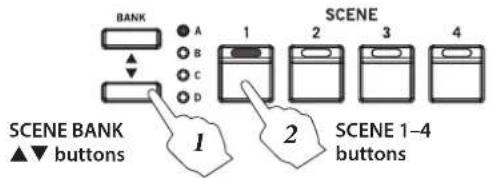
2 Press a button from SCENE 1-4 to select a scene (from 1 to 4).
The saved scene will be recalled, allowing you to play the sound.
Note: If you change the part variation, effect, octave and other settings, the currently selected SCENE button will blink. Press the blinking SCENE button to undo the changes and revert to the saved state.
Note: For details on how to save a scene, see page 11. Scenes do not contain EQ or other settings.
3. Using controllers
Touch sensors
On the ORGAN part, the touch sensors are used to adjust the drawbars. On the KEY/LAYER part, the touch sensors adjust the filter, EG and LFO.
The overall audio output characteristics are adjusted using the nine-band equalizer.
Adjusting the organ drawbars
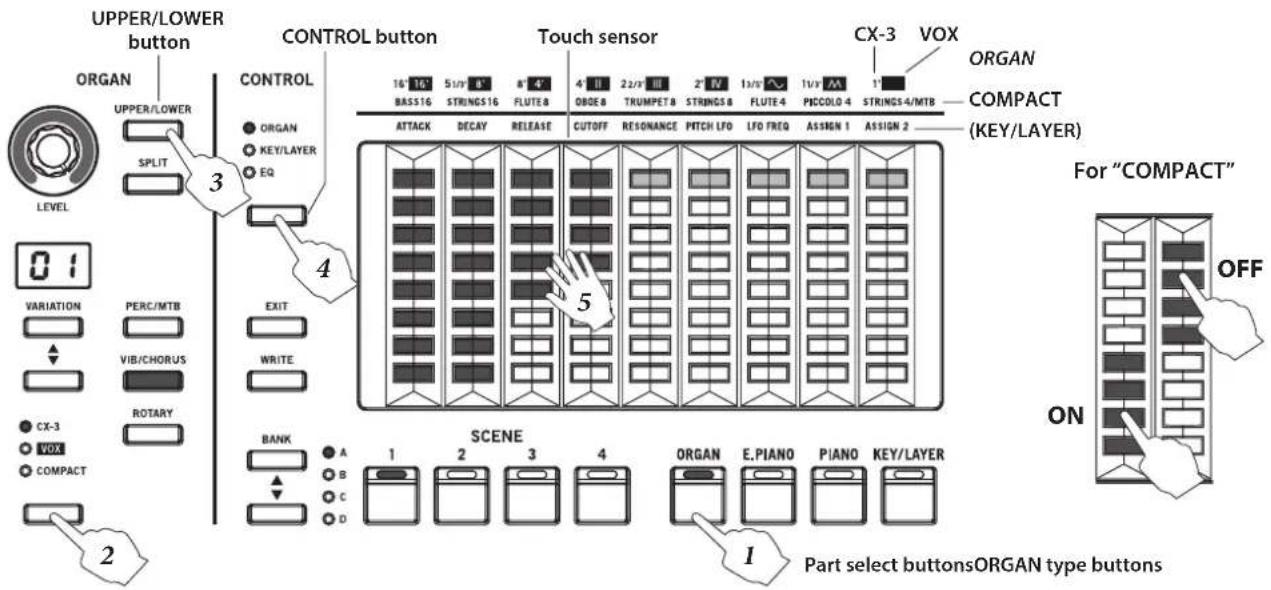
1 Turn the ORGAN part select button on.
2 Use the type button to select the ORGAN type.
Note: The drawbar operations will differ with each organ type. (See page 15)
Select the variation that will be the starting point for adjusting the drawbars, as necessary. Use the VARIATION ▲, ▼ buttons to select. The drawbar settings will switch to the settings that are saved for that variation.
3 Press the UPPER/LOWER button to switch between playing either UPPER (upper part of the keyboard) or LOWER (lower part of the keyboard).
The button will go dark for UPPER, and the button will light for LOWER.
Note: The UPPER/LOWER button can be used when the organ type is CX-3 or VOX.
Tip: Refer to page 20 for how to create a split or how to control an external MIDI keyboard as LOWER.
4 Select ORGAN using the CONTROL button.
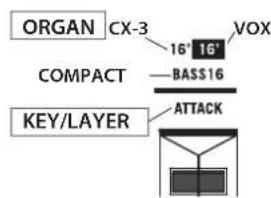
Tip: The drawbar names for each ORGAN type (CX-3, VOX and COMPACT) are shown above each touch sensor. (See the upper right side of the following diagram.)
5 Operate the drawbars by touching the touch sensors with your fingers. You can control more than one drawbar at the same time.
Tip: Sliding your finger up and down the LEDs will make it easier to turn them on/off.
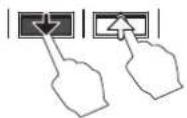
Tip: The sensors operate as on/off
switches for each tone when the organ type is set to COMPACT. Touch the bottom half of each bar to switch the tones on, and touch the top half to switch the tones off. (See the right side of the diagram shown below.)
Note: When switching to a different type or variation of the same part, the touch sensor settings you have changed will be switched to the settings for each variation. Also, when the power is turned off, the touch sensor settings will be erased.
Note: To save the touch sensor settings that you have adjusted for each sound, save the scene. (See page 11)
Note: The settings cannot be saved to the variations themselves.
Adjusting the KEY/LAYER filter, EG and LFO
1 Turn the KEY/LAYER part select button on.
2 Select the type using the KEY/LAYER type button.
Press the VARIATION ▲, ▼ buttons to select the variation to adjust.
3 Select KEY/LAYER using the CONTROL button.
4 Adjust the settings by touching the touch sensors with your fingers.
You can touch more than one sensor at the same time.
Tip: The function names (such as ATTACK, DECAY and so on) are shown above each touch sensor. The functions controlled by USER 1 and USER 2 will differ for each variation.
Note: To save the touch sensor settings that you have adjusted for each sound, save the scene. (See page 11)
Bend lever
You can make changes to the sound by pushing the bend lever up or down. The lever will move back to center position when released.
The functions that are changed by the bend lever will differ, depending on which part is on.
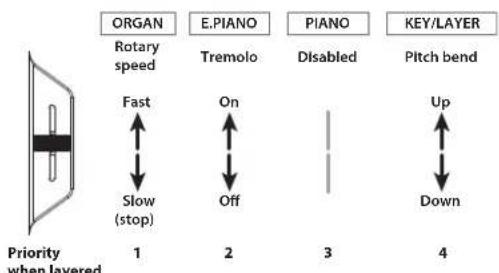
ORGAN part: Switches the rotary speaker simulation between slow (stop) and fast.
Switch the ROTARY button on (the button will light) to turn the rotary speaker simulation on.
E. PIANO part: This switches the tremolo effect on/off.
PIANO part: Disabled.
KEY/LAYER part: Bends the pitch up/down.
Note: When more than one part is on (layered mode), the functions are given priority as shown below.
- ORGAN, 2. E. PIANO, 3. PIANO, 4. KEY/LAYER
When the PIANO part and KEY/LAYER part are layered, the bend lever will be disabled.
Keyboard
The keyboard of the VOX Continental is velocity sensitive, but aftertouch is not supported. This keyboard features waterfall keys (the keys are slightly sloped towards the player, and feature smooth edges).
When playing sounds other than organ type sounds, your playing strength (velocity) can affect aspects of the sound such as the volume and the EG speed, allowing you to vary the character of the attack.
You can also use the DYNAMICS knob to instantly adjust how the volume and tone will be changed in response to how hard the keys are played (velocity) (See page 12).
For organ type sounds, you can set whether the tone will sound at the shallower part of the keyboard or at the deeper part of the keyboard. You can play glissandos, trills and so on like with a vintage tonewheel organ (See page 21). You can also split the keyboard into UPPER (upper part of the keyboard) and LOWER (lower part of the keyboard), or play in
Adjusting the organ drawbars
combination with an external MIDI keyboard to play the lower part of the VOX Continental.
The octave up/down (see page 12) and transposition (see page 12) of the keyboard can also be controlled.
CONTROL, ROTOR SPEED and DAMPER pedals
You can control the sound of the VOX Continental using commercially-available foot pedals.
(See "3. Connecting the pedals", page 6)
4. Applying effects
Effects can be applied to the sounds of each part, including the Nutube vacuum tube drive amount, three series of effects (EFFECT, DELAY and REVERB), and EQ. These effects apply to all sounds within each part.
Switching between variations on each part will have no effect on the settings. The settings for EFFECT, DELAY and REVERB are included in each scene. Switching the scene will change the effects as well. Note that VALVE DRIVE and EQ will not be changed.
A rotary speaker simulation and vibrato/chorus effect can also be applied separately to the ORGAN part sounds.
Applying EFFECT, DELAY and REVERB
One of six types of effects can be chosen for the EFFECT. By using effects, you can completely transform the original sounds by adding heavy distortion, vibrato and so on—it's completely up to how you set it. The DELAY will make the same sound play again after a specified interval. The REVERB will add reverberation to the sound, giving a feeling of spaciousness. One of four types of DELAY can be selected, and one of five types of REVERB can be selected for the effect.
1 Press the button corresponding to the effect you wish to apply. (The button will light up.)
For instance, if you want to use the PHASER effect, press the EFFECT type button.
To apply delay, press the DELAY button; and to apply reverb, press the REVERB button.
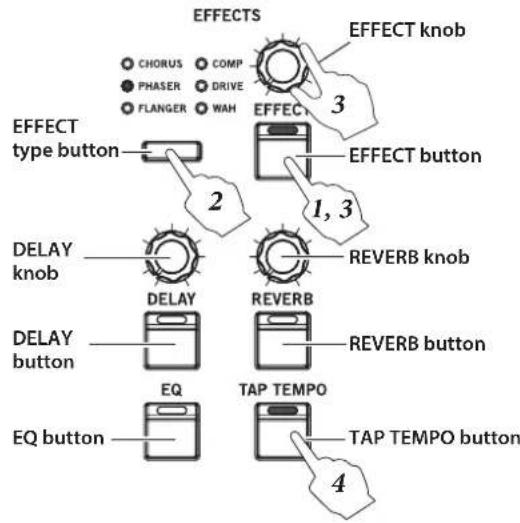
2 Select the effect type.
Press the type button to select the effect type.
Note: When you switch to a different effect, the factory default settings for that effect will be applied.
- To set the DELAY, follow these steps: (a) Press the EXIT button and the DELAY button. (b) Press the KEY/LAYER
▲, ▼ button to select the effect type. The type will be shown in the KEY/LAYER display. (c) Press the EXIT button to exit from type selection.
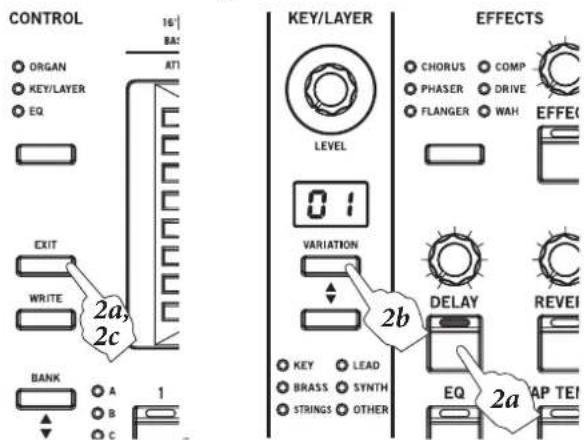
- To set the REVERB, follow these steps: (a) Press the EXIT button and the REVERB button. (b) Press the KEY/LAYER
▲, ▼ button to select the effect type. The type will be shown in the KEY/LAYER display. (c) Press the EXIT button to exit from type selection.
3 Turning the EFFECT, DELAY and REVERB knobs controls the depth of each effect.
Turning the knobs while pressing each effect button will adjust the feedback amount and so on.
The change in sound will differ, depending on the effect selected. (See page 18)
4 To set the LFO cycle, delay time, etc, press the TAP TEMPO button several times at the tempo you wish to set.
The change in sound will differ, depending on the effect selected.
Using the equalizer (EQ) to adjust the tonal character
Use the EQ to adjust the characteristics of the overall audio output. The tonal character of each frequency band can be adjusted to shape the sound, or to help create new sounds. You can also use the EQ to adjust the sound to match the characteristics of the live performance venue you are playing in, or the speakers you use.
1 Press the EQ button to turn it on. (The button will light up.)
2 Select EQ using the CONTROL button. (The LED will light up.)
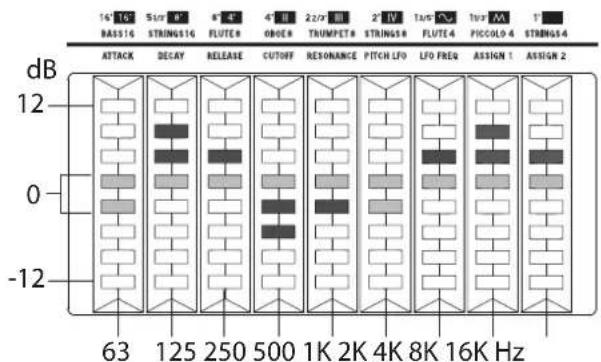
3 The nine-band graphic equalizer will display on the touch sensors.
4 Adjust the settings by touching the touch sensors. When a given band is at 0 [dB], the two LEDs in the center will dimly light.
Saving a Scene
Saving a scene to the SCENE 1-4 buttons
You can save the sound settings on the VOX Continental as scenes. There are a total of 16 scenes (4 scenes × 4 banks).
The settings that can be saved in a scene include the part select buttons, each sound part, the touch sensors, and EFFECT control (except for the EQ).
Note: The following settings are not saved in scenes. EQ, VOLUME knob, VALVE DRIVE knob and button, DYNAMICS knob and button, CONTROL button, bend lever
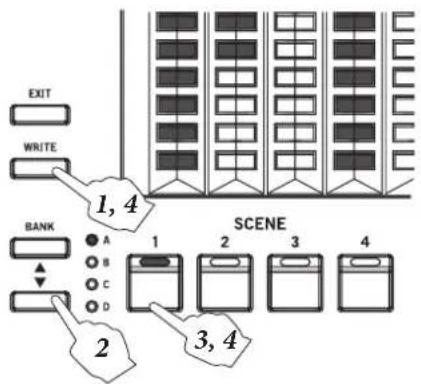
1 Press the WRITE button.
The SCENE 1-4 buttons will blink.
2 Press the BANK ▲,▼ buttons to select the bank where the scene will be saved.
The A-D LEDs will light.
3 Press a button from SCENE 1-4 to select the scene to be registered.
Only the SCENE button that you press will blink.
- If you press the EXIT button, the save operation will be cancelled.
4 Press the same SCENE 1-4 buttons again to save the sound in the bank and scene that you specified.
The button corresponding to the scene you saved (SCENE 1-4) will blink.
You can also press the WRITE button to save the scene.
flowchart
graph TD
    A["EXIT"] --> B["WRITE"]
    B --> C["BANK"]
    C --> D["1, 4"]
    C --> E["2"]
    C --> F["3, 4"]
    C --> G["4"]
    style A fill:#f9f,stroke:#333
    style B fill:#f9f,stroke:#333
    style C fill:#ccf,stroke:#333
    style D fill:#cfc,stroke:#333
    style E fill:#cfc,stroke:#333
    style F fill:#cfc,stroke:#333
    style G fill:#cfc,stroke:#333
Scenes can also be saved to USB storage devices (commercially available). (See page 23)
Listening to the demo songs
Playing back the demo songs
The VOX Continental comes with 16 demo songs that are appropriate for each sound on the keyboard.
Organ sounds: 4, electric piano sounds: 4, piano sounds: 4, keyboard/layer sounds: 4
1 Hold down both the BANK ▲ and ▼ buttons. Release the buttons once the demo song starts playing. The first song for the ORGAN part will play (the SCENE 1 and ORGAN buttons will blink).
2 Select the demo song for the sound you want to hear, by using the part select buttons (ORGAN, E. PIANO, PIANO or KEY/LAYER).
For instance, if you want to hear a demo song with the piano sound, press the PIANO part select button. The first song for PIANO sounds will play (the PIANO and SCENE 1 buttons will blink).
3 Select the four demo songs for each sound by using the SCENE 1-4 buttons (the button you press will blink).
When the song ends that is currently playing, the next song will automatically begin. All songs will play back endlessly, in order.
- Press a blinking SCENE button (indicating the song that is being played back) to restart playback of that song from the beginning.
- Press a different SCENE button to stop playback of the current song. The song corresponding to the SCENE button you press will start playing back.
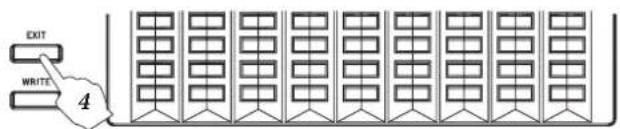
4 Press the EXIT button to return to normal play mode. If a demo song is being played back when you press EXIT, the song will stop.
Detailed Functions
1. Master control
1

VOLUME
1: VOLUME knob
This adjusts the volume of sound from the OUTPUT jacks and headphones jack.
2
4

DYNAMICS
VALVE DRIVE
3

5

6
TRANSPOSE
2: VALVE DRIVE knob
Adjusts the amount of drive for the vacuum tube circuit. Nutube technology creates a unique sound with presence by means of a vacuum tube, in addition to being rich in harmonics and featuring smooth distortion. This makes a wide variety of changes in sound possible, from a soft pressure to wild distortion.
3: VALVE DRIVE button
This switches the vacuum tube circuit on/off.
When this is turned on, the vacuum tube circuit is inserted into the signal path. Turning this off will completely detach the circuit from the signal path.
Note: The VALVE DRIVE settings are not saved in scenes. This will always be off when the power is turned on. Turning this button on will cause the valve drive to be applied, according to the position of the knob.
4: DYNAMICS knob
This adjusts how the volume and tone will be changed in response to how hard the keys are played (velocity) on this keyboard.
- Turning the knob to the left will cause the sound to play softer in response to the strength of the keys played. This is good for playing highly inflected passages from pianissimo (very soft) to fortissimo (very loud), such as solo piano or in band ensembles.
- Turning the knob to the right will cause the sound to play louder in response to the strength of the keys played. This is good for generally making your sound stand out when playing backing parts in a band ensemble, or when playing a solo.
- The sound will not change when the knob is in center position.
For layered and split sounds, the dynamics effect will be applied to both variations.
Note: The effect controlled may differ, depending on the variation.
Note: The effect will be applied to the velocity curve (see page 21) that is selected.
5: DYNAMICS button
This turns the dynamics effect of the DYNAMICS knob on or off.
Note: The DYNAMICS settings are not saved in scenes. This will always be off when the power is turned on. Turning this button on will cause the dynamics to be applied, according to the position of the knob.
6: OCTAVE ◀, ► buttons (TRANSPOSE button)
Octave up/down
This adjusts the octave of the pitch (how high the sound is) that actually sounds when you play the keyboard, in one-octave units. You can set the octave within a range of ±2 octaves.
- Press the ▶ button to raise the octave.
Press the ◀ button to lower the octave.
One octave up: ▶ button blinks slowly
Two octaves up: ▶ button blinks rapidly
One octave down: ◀ button blinks slowly
Two octaves down: ◀ button blinks rapidly
Note: Switching between variations on each part will have no effect on these settings.
Transposing
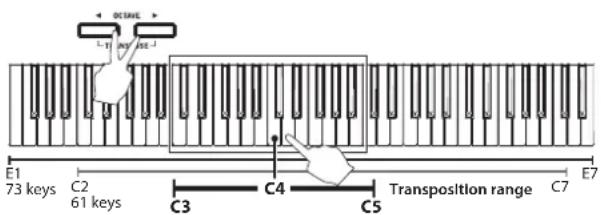
This adjusts the pitch (how high the sound is) that actually sounds when you play the keyboard, up or down in semitones. Use this feature when you want to play in the same key while hearing the sound in a different key. You can transpose the sound within a range of ±1 octave.
- While holding down both the OCTAVE ◀ and ▶ buttons, press a key from C3 to B3, or from C#4 to C5 on the keyboard.
The transpose amount (-12 to 0–12) will blink in the VARIATION display of the ORGAN part for a period of time. Minus numbers (-) are shown by a dot. The OCTAVE ◀, ► buttons will light when the keyboard is transposed.
- To cancel transposition, press both the OCTAVE ◀ and ▶ buttons together.
The OCTAVE ◀, ▶ buttons will go dark.
Note: Switching between variations on each part will have no effect on these settings.
2. Part select
1: ORGAN button
2: E. PIANO button
3: PIANO button
4: KEY/LAYER button
Selects the sound part for performance. There are four sound parts on the VOX Continental: organ, electric piano, acoustic piano and keyboard/layer.
- Press the part select button of the part you wish to play (the LED will light).
- Pressing both buttons together (the LEDs will
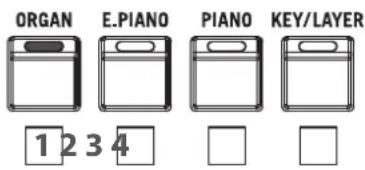
light) will make both sounds play at the same time (layered mode) when you play the keyboard.
3. ORGAN part
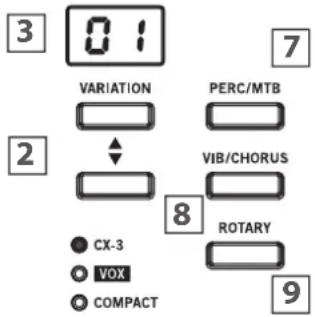

2: VARIATION ▲, ▼ buttons
3: VARIATION display
Select the variation for the organ that you selected using the ORGAN type button.
The variation number is shown in the VARIATION display. Note: When the ORGAN part is off, the VARIATION display will dimly light.
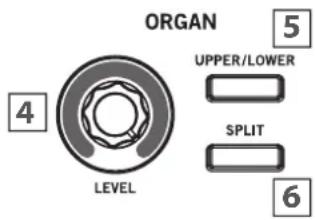
4: LEVEL knob
This sets the volume for the ORGAN part.
The volume level is shown by the LEDs surrounding the knob.
5: UPPER/LOWER button
There are two types of settings for the organ sounds, one for UPPER (the upper part of the keyboard) and one for LOWER (the lower part of the keyboard).
- Press the UPPER/LOWER button to switch between playing the keyboard and using the drawbars (touch sensors) for either UPPER (upper part of the keyboard) or LOWER (lower part of the keyboard).
UPPER/LOWER button
When lit:
Keyboard and drawbars operate the LOWER side.
When dark:
Keyboard and drawbars operate the UPPER side.
Note: The UPPER/LOWER button is enabled when the organ type is CX-3 or VOX.
Split off (when using the keyboard without splitting the sound)
Press the UPPER/LOWER button to switch between playing the entire keyboard and using the drawbars on either UPPER (the button goes dark) and LOWER (the button is lit).
Split on (when splitting the keyboard into UPPER and LOWER)
When split is on (see "6. SPLIT button" below), the higher notes will be assigned to the UPPER part, and the lower notes will be assigned to the LOWER part, with the dividing point being called the "split point".
During split mode, press the UPPER/LOWER button to switch between using the drawbars on either UPPER (the button goes dark) and LOWER (the button is lit). This has no effect on the keyboard itself.
Playing the VOX Continental with UPPER, and playing an external MIDI keyboard with LOWER
Turn the UPPER/LOWER button off, and set the VOX
Continental and the drawbars to UPPER.
To control the drawbars of an external MIDI keyboard, press the UPPER/LOWER button (the button will blink) while pressing the EXIT button.
The LOWER drawbars will display, and you will be able to control them.
Note: Refer to "3. Lower part MIDI channel" (see page 20) for the settings in order to play instrument with UPPER and play an external MIDI keyboard with LOWER.
6: SPLIT button
This splits (divides) the UPPER (upper part of the keyboard) and LOWER (lower part of the keyboard), assigning them to the higher notes and the lower notes on the keyboard.
Note: The SPLIT button is enabled when the organ type is CX-3 or VOX.
1 On the ORGAN part, select the organ type and variation.
2 Press the SPLIT button (the button will light).
The UPPER (upper part of the keyboard) will be assigned to the higher notes, and LOWER (lower part of the keyboard) will be assigned to the lower notes on the keyboard.
3 To set the split point (the note on the keyboard where the parts are divided), press a key while holding down the SPLIT button.
This note will be the lowest note of the new UPPER region.
7: PERC/MTB button
Turning on/off the percussion
This switches the percussion on/off.
Note: This is enabled when the organ type is CX-3.
When percussion is turned on, a pitched attack will be added to the sound, making it sound more dynamic. When playing legato, the attack sound will be added to only the first note played in a phrase.
Note: This effect will be added only to the UPPER region of the keyboard.
Turning MTB on/off
This switches the MTB (Multi-Tone Booster) on/off.
Note: This is enabled when the organ type is COMPACT.
When this is on, the tone stop settings will be disabled, and a sound ranging from full and mellow all the way up to a characteristic sharp sound can be created.
Refer to "3) Compact" (see page 16) for how to operate the touch sensors.
8: VIB/CHORUS button
This switches the vibrato/chorus effect on/off.
The effect will differ, depending on the organ type and variation.
Note: Only vibrato can be used with the VOX organ type.
9: ROTARY button
This switches the rotary speaker simulation on/off for the organ.
4. E. PIANO part
E.PIANO
1: E. PIANO type button, LEDs
This selects the electric piano type.
TINE: Vintage electric piano with tines REED: Vintage electric piano with reeds FM: FM electric piano
2: VARIATION ▲, ▼ buttons

VARIATION
TINE
REED
FM
3: VARIATION display
Select the variation for the electric piano you selected with the E. PIANO type button.
The variation number is shown in the VARIATION display.
Note: When the E. PIANO part is off, the VARIATION display will dimly light.
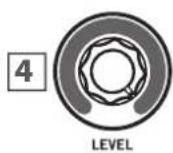
4: LEVEL knob
This sets the volume for the E. PIANO part.
The volume level is shown by the LEDs surrounding the knob.
5. PIANO part
PIANO
1: PIANO type button, LEDs
This selects the acoustic piano type.
GRAND: Grand piano
UPRIGHT: Upright piano
E. GRAND: Electric grand
VARIATION
GRAND
UPRIGHT
E.GRAND
2: VARIATION ▲, ▼ buttons
3: VARIATION display
Select the variation for the acoustic piano you selected with the PIANO type button.
The variation number is shown in the VARIATION display.
Note: When the PIANO part is off, the VARIATION display will dimly light.
4: LEVEL knob
This sets the volume for the PIANO part. The volume level is shown by the LEDs surrounding the knob.
6. KEY/LAYER part
KEY/LAYER
VARIATION
KEY
LEAD
BRASS
SYNTH
○ STRINGS
OTHER
1: KEY/LAYER type button, LEDs
Select the sound type for the keyboard/layer.
KEY: Clavinet, other keyboard instruments
BRASS: Brass, woodwind
STRINGS: Strings, Choir
LEAD: Lead sounds
SYNTH: Synthesizers
OTHER: Other sounds
2: VARIATION ▲, ▼ buttons
3: VARIATION display
Use the KEY/LAYER type button to select the variation for the sound you selected.
The variation number is shown in the VARIATION display.
Note: When the KEY/LAYER part is off, the VARIATION display will dimly light.
4: LEVEL knob
This sets the volume for the KEY/LAYER part.
The volume level is shown by the LEDs surrounding the knob.
7. Touch controls
Use the touch controls to control the organ drawbars, filter and attack time for the synthesizer, and the overall EQ settings for all parts.
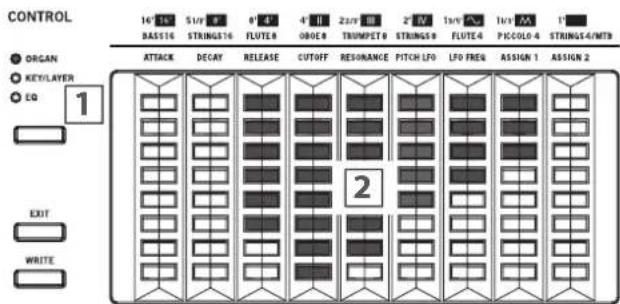
1: CONTROL button, LEDs
This selects the target settings to control using the touch sensors.
ORGAN: The touch sensors will operate as drawbars and switches for the organ sound.
KEY/LAYER: The touch sensors will control the sound of the KEY/LAYER part.
EQ: The touch sensors will control the nine-band equalizer. This setting affects the sound of all parts.
2: Touch sensors
Touch the touch sensors with your fingers to control the parameters that you have selected using the CONTROL button. You can control more than one sensor at the same time.
ORGAN
The touch sensor will operate differently depending on the type (CX-3, VOX or COMPACT).
The diagram at right shows the pitch and other information listed above the touch sensors for each organ type.
Refer to page 8 for how to use the touch sensors.
Note: The settings shown here are saved when a scene is saved.
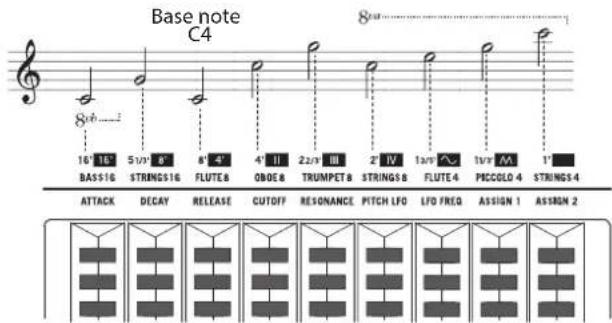
1) CX-3
The nine drawbars are used to create basic sounds for the CX-3. Each drawbar can be used to add overtones to the basic sounds.
The drawbar pitches are listed below.
16', 5-1/3', 8', 4', 2-2/3', 2', 1-3/5', 1-1/3', 1'
UPPER (the upper part of the keyboard) and LOWER (the lower part of the keyboard) each use their own drawbar settings. Switch between the two with the UPPER/LOWER button. (See "UPPER/LOWER button", page 13)
Note: When a drawbar is set to 0, the topmost LED will dimly light.
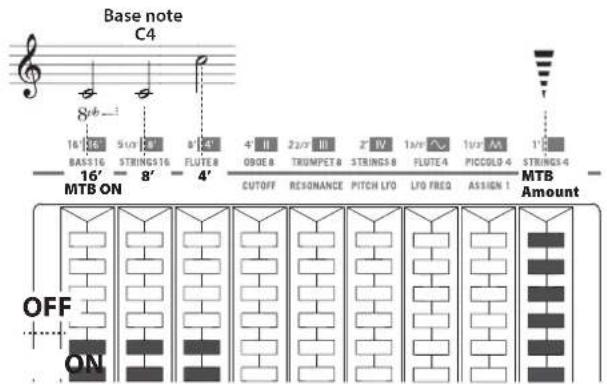
The following diagram shows the pitches for each drawbar when pressing C4 on the keyboard.
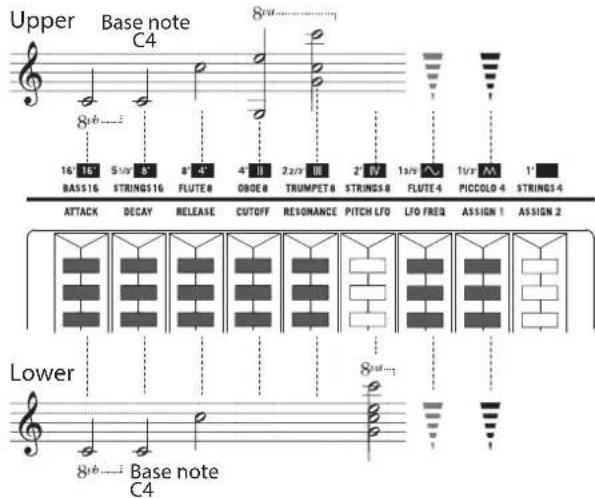
2) VOX
The VOX drawbars differ for UPPER and LOWER. Switch between the two with the UPPER/LOWER button.
(See "UPPER/LOWER button", page 13)
- On the upper part, use the five drawbars (16', 8', 4', II, III) to add overtones, and use the and drawbars on the right to adjust the overall tone. Is a sine wave or a soft sound, like a flute; and is a square wave or a bright sound, like a reed instrument.
- On the lower part, use the four drawbars (16', 8', 4', IV) to add overtones, and use the and drawbars on the right to adjust the overall tone.
Note: When the and drawbars are set to 0, they will not produce sound.
Note: When a drawbar is set to 0, the topmost LED will dimly light.
The following diagram shows the pitches for each drawbar when pressing C4 on the keyboard.
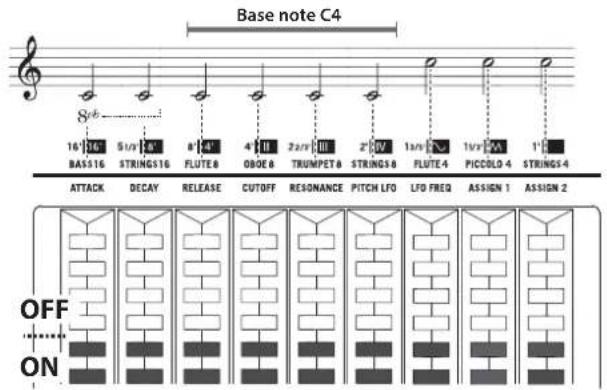
3) Compact
Turn the tone stops on or off.
For the tone stops, a type of instrument sound like the one shown on the panel will play at the specified octave. Add these tone stops to create your sound. The sounds and octaves are listed below.
• BASS 16, STRINGS 16, FLUTE 8, OBOE 8, TRUMPET 8, STRINGS 8, FLUTE 4, PICCOLO 4, STRINGS 4
1 Press the PERC/MTB button to turn MTB off. (The button will go dark.)
2 Touch one of the four LEDs on the lower side to turn them on (the four LEDs on the bottom will light).
Touch one of the four LEDs on the top side to turn them on (the four LEDs on the top will light).
The following diagram shows the pitches for each tone stop when pressing C4 on the keyboard.
When MTB is on, the tone stop settings will be disabled, and the Multi-Tone Booster will be applied to the sound.
1 Press the PERC/MTB button to turn MTB on. (The button will light.)
2 Use the three touch sensors on the left side to turn MTB 16', MTB 8', MTB 4' on or off.
The touch sensor on the right side (MTB Amount) adjusts the MTB level, or the amount of the MTB effect.
KEY/LAYER
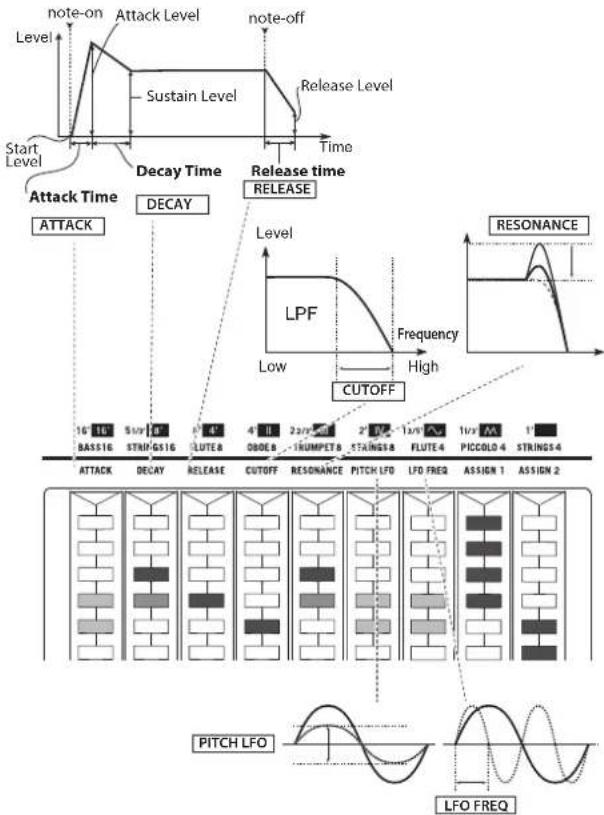
This controls the volume of the KEY/LAYER variation sound. Each sensor controls the following parameters.
Refer to page 9 for how to use the touch sensors.
Note: The settings shown here are saved when a scene is saved.
flowchart
graph TD
    A["Start Level"] --> B["Note-on"]
    B --> C["Sustain Level"]
    C --> D["Release Level"]
    D --> E["Decay Time"]
    E --> F["Release time"]
    F --> G["Level"]
    G --> H["LF P"]
    H --> I["Frequency"]
    I --> J["Resonance"]
    J --> K["CUTOFF"]
    K --> L["Pattern Diagram"]
    L --> M["PICT LFO"]
    M --> N["LFO FREQ"]
    N --> O["Pattern Diagram"]
    O --> P["PITCH LFO"]
    P --> Q["LFO FREQ"]
Amp EG
Adjusts the amp EG of the variation. This sets how the volume will change over time.
(1) ATTACK
Sets whether the sound will reach full volume right after a note is played, or whether the sound will gradually fade in.
(2) DECAY
Sets the decay of the sound following the attack time.
(3) RELEASE
Sets how long it takes for the sound to fade to silence after note-off (releasing a key).
Filter
(4) CUTOFF
This cuts off the frequency range that you specify, such as the high or low end of the sound.
For instance, you can use a low-pass filter to vary the brightness of the sound. Making the normal value smaller will produce a darker sound, and making the value larger will produce a brighter sound.
Note: The filter differs for each variation.
(5) RESONANCE
This emphasizes the frequencies around the cutoff frequency. When the value is 0, there is no emphasis, and frequencies beyond the cutoff will simply diminish smoothly.
At medium settings, the resonance will make the sound more nasal, or more extreme. At very high settings, the resonance will sound like a whistling pitch.
LFO
(6) PITCH LFO
Adjusts how much the LFO makes the pitch vibrate.
(7) LFO FREQ
This sets the LFO frequency.
Note: When the value is 0 dB, the two LEDs in the center will dimly light.
Assignable
(8) ASSIGN1
The assigned effect will differ for each sound.
(9) ASSIGN2
The assigned effect will differ for each sound.
Note: Some values are set as switches (when the top four LEDs are lit, the value is "on"; and when the bottom four LEDs are lit, the value is "off") or as sliders.
EQ frequency band and gain
The nine-band graphic EQ is placed in the latter part of the EFFECTS series, and applies to the VALVE DRIVE and stereo out.
All of the equalizer bands are peaking (parametric) equalizers. Turn the EQ button on.
63 Hz gain [dB] [-12.0...+12.0]
125 Hz gain [dB] [-12.0...+12.0]
250 Hz gain [dB] [-12.0...+12.0]
500 Hz gain [dB] [-12.0...+12.0]
1 KHz gain [dB] [-12.0...+12.0]
2 KHz gain [dB] [-12.0...+12.0]
4 KHz gain [dB] [-12.0...+12.0]
8 KHz gain [dB] [-12.0...+12.0]
16 KHz gain [dB] [-12.0...+12.0]
This sets the gain for each band.
Refer to page 19 for how to use the EQ.
Note: When the value is 0 dB, the two LEDs in the center will dimly light.
Note: Although the EQ on/off and the settings made here will not be saved in a scene, they will be saved when the power is turned off, and will be recalled when the instrument is turned on.
8. Scene select
Up to 16 sounds that are set on the VOX Continental can be saved, and you can recall those settings instantly. These are called "scenes".
Settings that are saved:
Part select button, each sound part, touch sensors, and EFFECT control (except for the EQ), octave and transpose settings
Settings that are not saved:
EQ, VOLUME knob, VALVE DRIVE knob and button, DYNAMICS knob and button, CONTROL button, bend lever
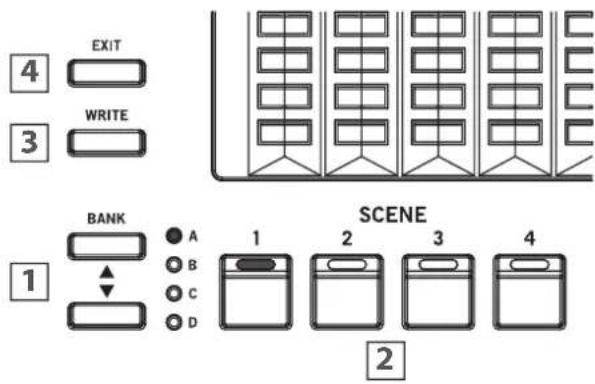
1: BANK ▲, ▼ buttons, LEDs
There are four scene banks, from A to D.
Press the BANK ▲, ▼ buttons to select a bank.
2: SCENE 1, 2, 3, 4 buttons
Press the BANK ▲, ▼ buttons to recall scenes 1–4 from the selected bank.
The sound will switch to the settings that are saved for that scene.
Note: If you change one of the settings listed above in "Settings that are saved", the currently selected SCENE button will blink. Press the blinking SCENE button to undo the changes and revert to the saved state.
3: WRITE button
This saves the current sound settings to a scene.
Refer to "Saving a Scene" (see page 11) for how to register a scene.
Note: When you turn the power on, the scene that you had selected before turning the power off will be recalled.
4: EXIT button
Use this button to cancel write operations, when making system settings such as master tuning or MIDI channels, or to escape the current operation. (See page 20)
9. EFFECTS controls
This configures the three series of effects and EQ.
For the variations of each sound part, normally you use EFFECT in creating the sound, DELAY and REVERB for overall spatial processing, and the nine-band EQ to adjust the overall tonal character. Use VALVE DRIVE to give the sound a heavier or driving feeling.
These effects apply to the variations of all parts.
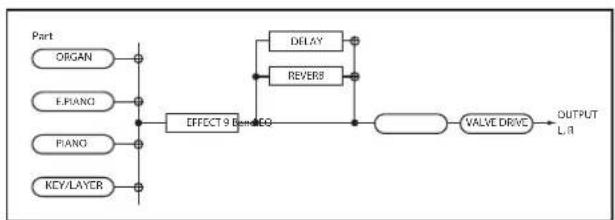
flowchart
graph LR
    A["ORGAN"] --> B["E-Piano"]
    C["PANO"] --> D["KEY/LAYER"]
    B --> E["EFFECT 9 and REVERB"]
    D --> E
    E --> F["VALVE DRIVE"]
    F --> G["OUTPUT L/R"]
    H["DELAY"] --> E
    I["REVERB"] --> E
Note: Switching between variations on each part will have no effect on the settings.
Note: The settings for EFFECT, DELAY and REVERB are included in each scene. The settings change along with each scene. Note that VALVE DRIVE and EQ will not change.
EFFECTS
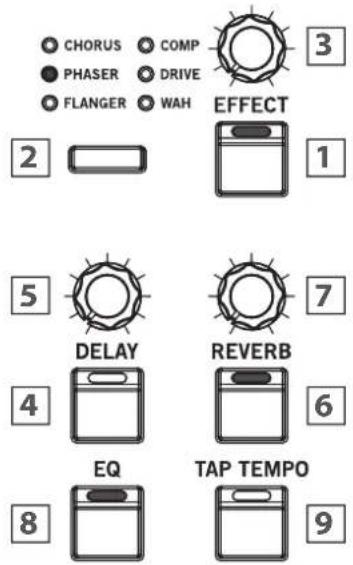
EFFECT
1: EFFECT button
Switches the effects on/off.
(The button will light when effects are on.)
2: EFFECT type button, LEDs
Select the effect type. The effect LED that you select will light up.
CHORUS: Varies the delay time on the input signal to create a thicker or warmer sound.
PHASER: Alters the phase of the sound to create a swelling effect. This is effective for electric pianos and other sounds.
FLANGER: Creates a thick swelling sound and a sense of motion in pitch. This is effective for sounds that contain many overtones.
COMP: A compressor effect that compresses the dynamic range of the input signal. Use compression to create a smoother sound with punch. This is effective for pianos and other sounds.
DRIVE: Creates a heavier, distorted sound.
WAH: Creates more shiny and muffled tones, by changing the frequency band to emphasize. You can control the effect using a pedal connected to the CONTROL jack.
Note: When you switch to a different effect, the factory default settings for that effect will be applied.
3: EFFECT knob
Adjusts the effect that you select using the EFFECT type button.
The way the sound changes will differ, depending on the effect type and variation.
- Turn the EFFECT knob to adjust the first function.
The depth of the LFO modulation will change. - Turn the EFFECT knob while pressing the EFFECT button to adjust the second function.
The speed of the LFO will change.
DELAY
The DELAY effect delays the sound, so that it plays after a certain interval (like an echo).
4: DELAY button
Switches the delay on/off. (The button will light when on.)
Selecting the delay type
- Hold down the EXIT button and press the DELAY button.
-
Press the KEY/LAYER ▲, ▼ buttons to switch the type. The delay type will be shown in the VARIATION display of the KEY/LAYER part.
-
DELAY: This is a simple stereo delay.
-
CROSS: This is a stereo delay that bounces back and forth from left to right.
-
TAPE: This effect models the analog tape echo found on popular devices. The effect recreates the changes in tone from sound distortion and vibration produced by the rotation of magnetic tape and the motor. This offers a warm echo sound.
-
MOD DLY: This effect adds a pitch shift-type effect similar to a chorus effect to a delay, creating a swelling, wobbly delay sound.
- Press the EXIT button to exit from type selection.
5: DELAY knob
Adjust the amount of delay.
The way the sound changes will differ, depending on the effect type and variation.
- Turn the DELAY knob to adjust the first function.
The depth of the delay will change. - Turn the DELAY knob while pressing the DELAY button to adjust the second function.
The amount of feedback will change.
* Note that you can adjust the delay time with the TAP TEMPO button.
REVERB
The REVERB effect adds reverberation to a sound, which simulates the feeling of being in a room, with sound reflecting off of the ceiling and walls.
6: REVERB button
This switches the reverb on/off.
(The button will light when on.)
Selecting the reverb type
- Hold down the EXIT button and press the REVERB button.
-
Press the KEY/LAYER ▲, ▼ buttons to switch the type. The reverb type will be shown in the VARIATION display of the KEY/LAYER part.
-
HALL1: This is a hall-type reverb that simulates the reverberations of a large concert hall or ensemble hall.
-
HALL2: This is a hall reverb with a more transparent sound than HALL1.
-
ROOM1: This reverb simulates the reverberations of a small room.
-
ROOM2: This is a reverb with somewhat brighter reverberations than ROOM1.
-
SPRING: This reverb simulates the spring reverb sound used in some guitar amps and organs.
- Press the EXIT button to exit from type selection.
7: REVERB knob
Adjust the amount of reverb.
The way the sound changes will differ, depending on the effect type and variation.
- Turn the REVERB knob to adjust the first function.
The depth of the reverb will change. - Turn the REVERB knob while pressing the REVERB button to adjust the second function.
This adjusts the reverb time and room size. For the SPRING reverb, this adjusts the reverb time and spring reverberation.
EQ (equalizer)
8: EQ button
This switches the EQ on/off. (The button will light when on.)
When the EQ is on, you can use the touch sensors to adjust the EQ when "EQ" is selected using the CONTROL button. (See "CONTROL button, LEDs", page 15)
All of the equalizer bands are peaking (parametric) equalizers.
Note: The EQ on/off settings are not saved in scenes.
TEMPO
9: TAP TEMPO button
This sets the tempo that is the basis for the LFO speed and so on for the effects.
- Press the TAP TEMPO button several times, at the tempo you wish to set. Adjusts the delay time and tremolo speed for sounds such as E. PIANO (TINE, REED, FM).
System Settings
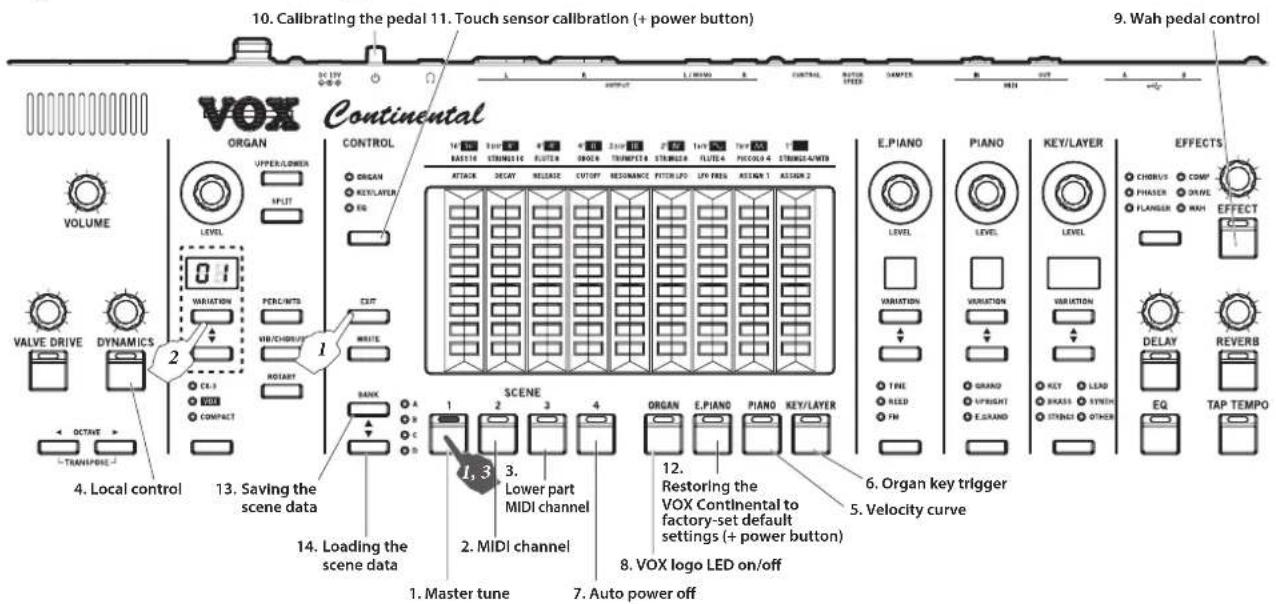
The settings that can be made here include overall settings for this instrument, including master tune, MIDI, controller functions and so on.
How to configure the settings
1 Press the button assigned to the function you wish to change, while holding down the EXIT button (see the diagram above).
The button to which the function is assigned will blink, and the value will be shown in the VARIATION display of the ORGAN part. All other VARIATION displays will go dark.
2 Set the desired value using the ORGAN part VARIATION ▲, ▼ buttons.
3 Push the button to which the function is assigned, and apply the settings.
- Push the EXIT button to cancel the settings.
Note: The steps to follow may differ from the above. Refer to each item for details.
1. Master tune
Sets the tuning for the entire keyboard.
Tuning can be set in cents (1 semitone=100 cents), within a range of ±50 cents (427.47... 440...452.89 Hz). When the value is 0, the frequency of A4 will be 440 Hz. (Default setting: 0)
1 Hold down the EXIT button and press the SCENE 1 button. (The SCENE 1 button blinks.)
2 Set the tuning using the ORGAN part VARIATION ▲, ▼ buttons.
For minus (−) values, a dot appears beside the number on the right side of the cent value in the VARIATION display.
- Press the VARIATION and ▲, ▼ buttons at the same time to reset the value to 0.
3 Push the SCENE 1 button to apply the settings.
- Push the EXIT button to cancel the settings.
2. MIDI channel
Specifies the MIDI channels on which this instrument will transmit and receive (from 1–16). (Default setting: 1)
1 Hold down the EXIT button and press the SCENE 2 button. (The SCENE 2 button blinks.)
2 Specify the MIDI transmission channel using the ORGAN part VARIATION ▲,▼ buttons.
3 Push the SCENE 2 button to apply the settings.
- Push the EXIT button to cancel the settings.
3. Lower part MIDI channel
Specifies the MIDI channels (1–16) when using an external MIDI keyboard as the VOX Continental's organ LOWER (the lower part of the keyboard). (Default setting: 2)
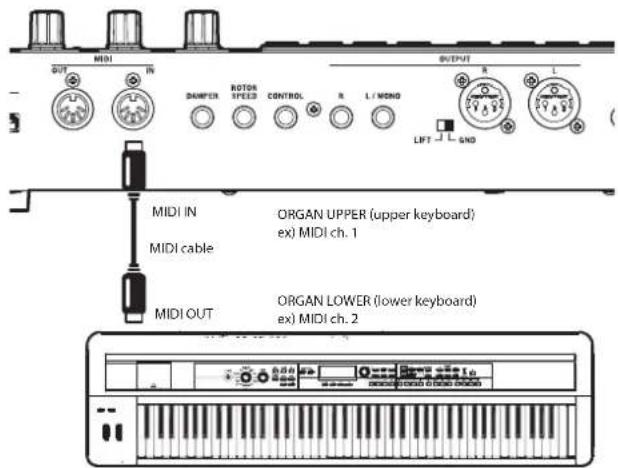
Connecting an external MIDI keyboard, and configuring the MIDI channels
1 Connect the MIDI OUT connector of the MIDI keyboard to be used for the lower part, to the MIDI IN connector of this instrument.
2 Set the MIDI transmission channel of the MIDI keyboard to be used for the lower part, to any MIDI channel besides the one set on the VOX Continental.
Lower part MIDI channel settings for this instrument
1 Hold down the EXIT button and press the SCENE 3 button. (The SCENE 3 button blinks.)
2 Using the ORGAN part VARIATION ▲,▼ buttons, match this instrument's receiving MIDI channel to the LOWER MIDI keyboard's MIDI transmission channel.
Note: The LOWER MIDI channel cannot be set to the same channel as the MIDI channel, shown in "2. MIDI channel" (see page 20).
3 Push the SCENE 3 button to apply the settings.
- Push the EXIT button to cancel the settings.
4. Local control
This setting prevents notes from being sounded in duplicate when this instrument is connected to a DAW and the performance data is echoed back from the sequencer. (Echo back occurs when the performance data transmitted when playing this instrument is re-transmitted back to this instrument from the DAW.) In this case, switch tooF (local control off). (Default setting: on)
1 Hold down the EXIT button and press the DYNAMICS button. (The DYNAMICS button blinks.)
2 Switch this setting on or off using the ORGAN part VARIATION▲, ▼ buttons.
oF: This instrument and its controllers will be internally disconnected from the sound generator. This prevents echo back.
on: Select this setting when you are using this instrument by itself.
3 Push the DYNAMICS button to apply the settings.
♦ Push the EXIT button to cancel the settings.
5. Velocity curve
This configures how the volume and tone will be changed in response to how hard the keys are played (velocity) on this keyboard. (Default setting: 4)
1 Hold down the EXIT button and press the part select PIANO button. (The PIANO button blinks.)
2 Set the velocity curve using the ORGAN part VARIATION ▲, ▼ buttons.
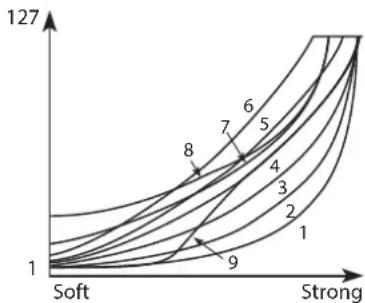
line
| Label | Value | |-------|-------| | 1 | 1 | | 2 | 2 | | 3 | 3 | | 4 | 4 | | 5 | 5 | | 6 | 6 | | 7 | 7 | | 8 | 8 | | 9 | 9 |1, 2, 3: These curves produce an effect when you play strongly.
4: This is the typical curve.
5, 6: These curves let you produce dynamic change without having to play very hard.
7: This curve provides a flat effect when playing softly.
8: This curve provides an even more flat effect when playing softly.
9: This curve produces an even softer response when playing softly compared to the typical curve #4.
3 Push the PLANO button to apply the settings.
- Push the EXIT button to cancel the settings.
6. Organ key trigger
This sets whether the organ sound plays when you play the keys lightly or play deep into the keys. Setting the sound to play when a key is lightly pressed will let you play the keyboard like a vintage tonewheel organ. (Default setting: Lo)
1 Hold down the EXIT button and press the KEY/LAYER part select button. (The KEY/LAYER button will blink.)
2 Set the trigger position using the ORGAN part VARIATION ▲, ▼ buttons.
h: The organ sound will play when the keys are pressed lightly.
Lo: The organ sound will play when the keys are pressed deeply.
3 Push the KEY/LAYER button to apply the settings.
- Push the EXIT button to cancel the settings.
7. Auto power off
When a set period of time has passed without playing the keys, turning the knobs or pressing the buttons on this instrument, the power is automatically turned off. This is called "auto power off". (Default setting: 4h)
1 Hold down the EXIT button and press the SCENE 4 button. (The SCENE 4 button blinks.)
2 Enable auto power off with the ORGAN part VARIATION ▲, ▼ buttons.
d (Disable): The auto power off function will be disabled. The power will not automatically turn off.
4h (4 hours): When the VOX Continental is left on for 4 hours without being operated or played, it will automatically turn off.
3 Push the SCENE 4 button to apply the settings.
- Push the EXIT button to cancel the settings.
8. VOX logo LED on/off
This turns the VOX logo LED on the rear panel on or off. (Default setting: On)
1 Hold down the EXIT button and press the part select ORGAN button. (The ORGAN button blinks.)
2 Use the ORGAN part VARIATION ▲, ▼ buttons to set whether the VOX logo LED lights up or not.
oF: off
on: on
3 Push the ORGAN button to apply the settings.
- Push the EXIT button to cancel the settings.
9. Wah pedal control
Use an expression pedal connected to the CONTROL jack to control the volume or the wah effect. (Default setting: Auto)
1 Hold down the EXIT button and press the EFFECT button. (The EFFECT button blinks.)
2 Set the desired function using the ORGAN part VARIATION ▲, ▼ buttons.
_U (Auto): When the effect is set to wah (WAH), the pedal will act as a wah pedal.
When other effects besides wah are selected, the pedal is used to control the volume.
EH (Expression): The pedal controls the volume.
3 Push the EFFECT button to apply the settings.
- Push the EXIT button to cancel the settings.
10. Calibrating the pedal
Adjust the polarity and variable range of each pedal connected to the DAMPER, ROTOR SPEED and CONTROL jacks.
1 Turn off the power on the VOX Continental, and connect all pedals that you wish to calibrate.
Refer topage 6 for how to connect the pedals.
2 Set the pedal to the minimum value.
Tilt the expression pedal all the way towards you (down). Lift your foot off damper pedal or the pedal switch.
3 While holding down the EXIT button, press the power button to turn on the power.
4 When the EXIT button and SCENE 1 button start to blink, release the buttons. (All other LEDs will go dark.)
Calibrating a pedal connected to the DAMPER jack
5 Press the damper pedal down all the way until it stops, and then lift your foot off the pedal.
Note: If a pedal is not connected to the DAMPER jack, press the blinking SCENE 1 button to skip this.
When calibration is finished, the SCENE 1 button will light.
Calibrating a pedal connected to the ROTOR SPEED jack
6 Check that the SCENE 2 button is blinking.
Note: If a pedal is not connected to the ROTOR SPEED jack, press the blinking SCENE 2 button to skip this.
7 Press the pedal switch down all the way until it stops, and then lift your foot off the pedal.
When calibration is finished, the SCENE 2 button will light.
Calibrating a pedal connected to the CONTROL jack
8 Check that the SCENE 3 button is blinking.
Note: If a pedal is not connected to the CONTROL jack, press the blinking SCENE 3 button to skip this.
9 Press the expression pedal upward all the way until it stops, and then bring the pedal all the way down (towards you).
When calibration is finished, the SCENE 3 button will light.
10 When all pedals have been calibrated, you will be able to play the keyboard again after several seconds.
11. Touch sensor calibration
Calibrate the sensitivity of the touch sensors.
Use these steps to adjust the sensitivity of the touch sensors depending on your playing environment, if they do not seem to operate as you like.
1 Turn off the VOX Continental.
2 While holding down the EXIT and CONTROL buttons, press the power button to turn on the VOX Continental. The LEDs of the touch sensor on the leftmost side will start to light up and down.
3 Trace your finger along the touch sensor to chase the LED lights as they move.
When the touch sensor that is lit is finished calibrating, the LEDs on the next touch sensor will start to light up and down.
4 In the same way, trace along the touch sensor to chase the LED lights as they move.
Do this until you have calibrated all the touch sensors from left to right.
When all touch sensors have been calibrated, you will be able to play.
12. Restoring the VOX Continental to factory-set default settings
The VOX Continental can be returned to its factory default settings.
This will reset (initialize) the scene data and system setting data. Any newly created scene data will be overwritten, and your data will be lost. If you want to keep your scene data, save the data to a USB storage device (commercially available). Also, all system settings (including calibration data) will be reset, and you will need to make your settings and perform calibration once more.
While resetting, do not turn off the power, play the keyboard, or move any buttons, knobs or controllers. Doing so may cause the reset operation to fail, and you may be unable to use the instrument.
1 Press the power button while holding down the EXIT and E. PIANO part select buttons.
The following characters will be shown in the VARIATION displays of the PIANO and KEY/LAYER parts.
After about five seconds, the VARIATION display and WRITE button will slowly blink.
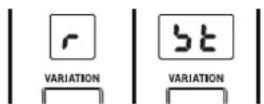
2 Press the WRITE button to reset the VOX Continental to factory default settings.
The following characters will blink in the VARIATION displays, and after several seconds the keyboard will be able to be played normally.
- Push any button except for the WRITE button to cancel the reset operation.
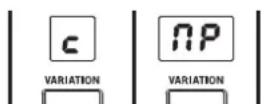
13. Saving the scene data
This saves the 16 scenes that have been saved on or written to the VOX Continental, to a USB storage device (commercially available) that is connected via the USB A port.
For instance, you can save the scenes that you created at home to a USB flash drive, and then load the data file into another VOX Continental at the studio or onstage to recreate your data. You can create, save and manage your data by project, so that you can recall the scenes you need at any time.
1 Plug a USB storage device into the USB A port of the VOX Continental.
Note: The USB A port on this instrument supports hot-plugging (meaning that the USB media/cable can be removed while the power is turned on).
2 Hold down the EXIT button and press the BANK ▲ button.
The characters will be shown in the VARIATION displays of the E. PIANO, PIANO and KEY/LAYER parts.
The BANK A LED will blink, and the value will be shown in the VARIATION display of the ORGAN part.
3 Set the file number using the ORGAN part VARIATION ▲, ▼ buttons.
A file number from 00 to 99 can be set.
If a file with the same file number is already saved in the USB storage device, a dot will be shown in the bottom right-hand corner of the number.
4 Push the BANK▲ button to save.
The BANK A LED will blink quickly while the data is saved, and will return to its previous state after saving is finished.
- Push the EXIT button to cancel the settings.
If a file with the same file number that you selected in step 3 already exists in the USB storage device, the word sure will blink in the VARIATION displays of the E.PIANO, PIANO and KEY/LAYER parts.
Press the BANK ▲ button to overwrite the file.
Storage media that can be used
USB storage devices, such as MS-DOS FAT16 or FAT32-formatted flash media or disks
Maximum usable storage capacity
FAT32: Up to 2 TB (2000 GB) FAT16: Up to 4 GB
When saving to storage media, the "VOX/Continental" directory will automatically be created in the media's root directory. This directory will be used exclusively by the VOX Continental.
When you save the scene data, a file named "CONTINENTAL_00.SCE" will be saved in this directory. The 00 digits will be replaced with the file number you set.
Note: If the media format is not MS-DOS, FAT16 or FAT32, an error message (Err) will be shown in the VARIATION displays of the PIANO and KEY/LAYER parts.
Press the EXIT button to escape, and format the storage media on your computer.
If there is very little free space remaining on the storage media and data cannot be saved, the message Err will be displayed. In this case, delete any unnecessary files from the storage media to free up disk space, or use a different storage media with more capacity.
When loading a .SCE file from storage media, only the .SCE files in the "VOX/CONTINENTAL" directory can be shown and selected for loading. Note that if you change the directory, folder hierarchy or filename using your computer, you will no longer be able to load the file. The VOX Continental recognizes filenames that look like "CONTINENTAL_xx.SCE". If you change the file name or extension on a computer or other device, the VOX Continental will recognize this as an undefined file, and will not be able to load it.
14. Loading the scene data
You can load scene data (16 scenes) back into the VOX Continental, which was previously saved to a USB storage device (commercially available).
Doing this will load scene data into memory. Any factory-set default data or scene data that you have edited and saved on this instrument will be overwritten, and the data will be lost. If you want to keep your scene data, save the data to a USB storage device.
1 Plug the USB storage device where you saved your scene data into the USB A port of this instrument.
Note: The USB A port on the VOX Continental supports hot-plugging (meaning that the USB media/cable can be removed while the power is turned on).
2 Hold down the EXIT button and press the BANK ▼ button.
The characters L o Rd will be shown in the VARIATION displays of the E. PIANO, PIANO and KEY/LAYER parts. The BANK D LED will blink, and a value will be shown in the VARIATION display of the ORGAN part (all other VARIATION displays will go dark).
3 Set the file number using the ORGAN part VARIATION ▲, ▼ buttons.
You can select a file number that is saved in the USB storage device.
Note: If there is no file that can be loaded, an error message (Err) will be shown in the VARIATION displays of the PIANO and KEY/LAYER parts.
4 Push the BANK ▼ button to load.
The characters will be shown in the VARIATION displays of the E. PIANO, PIANO and KEY/LAYER parts.
5 Push the BANK ▼ button to begin loading.
The BANK D LED will blink quickly while the data is loaded, and will return to its previous state after loading is finished.
- Push the EXIT button to cancel the settings.
Appendices
Troubleshooting
If this instrument is not operating as expected, check the following points.
Power does not turn on.
☐ Is the AC adapter plugged into the AC outlet? (See page 5)
Power does not turn off.
□ Hold down the power button for a while.
Power turns off automatically.
☐ Is the auto power off function enabled?
No sound is heard when the keys are played.
□ Have you correctly connected the VOX Continental to headphones or powered monitor speakers? (See page 6)
☐ Check that the power of the powered monitor speakers to which the instrument is connected is turned on, and that the volume is turned up so that you can hear it.
☐ The VOLUME knob should not be turned all the way to the left.
☐ The local control should be switched on.
☐ The LEVEL knobs for each part should not be turned all the way to the left.
☐ Check that the volume is not down on the pedals connected to the CONTROL jacks.
□ When you do not hear sound while playing some keys, you may be exceeding the VOX Continental's maximum polyphony.
☐ On the organ variation, make sure that all of the drawbars (tone stops) are not set to zero.
The sound will not stop.
☐ Are the settings for the damper pedal correct? Calibrate the pedals to make the instrument recognize the polarity and half-damper variable range of the pedal.
The sound seems to be doubled.
☐ If you are using an external MIDI device or a DAW, check whether the local control setting of the VOX Continental is turned off.
I hear noise.
☐ If a strong impact is applied to this unit, noise at the high-frequency range may be heard from the speakers, headphones, etc. This is due to the structure of the Nutube; it is not a malfunction.
☐ The effects used by some variations create noise-like effects. The resonance filter may also be used to make the sound resonate. In either of these cases, this is not a malfunction.
☐ When raising the volume using the DYNAMICS knob, each EQ gain, LEVEL knob and other controls, the levels may become excessive due to signal processing, which might result in a distorted or noisy sound. This is not a malfunction.
Adjust this by turning down the respective levels.
☐ When REVERB and DELAY are on, the sound may be distorted or noisy due to excessive input. This is not a malfunction.
Adjust the levels by lowering the LEVEL knob and REVERB knob on each sound part.
☐ Some noise may occur when you change the delay effect time using the TAP button. This is because the delay time is being abruptly changed and becomes non-continuous. This is not a malfunction.
The sound is distorted.
☐ Are the inputs of the mixer, powered monitor speakers and so on being overloaded? Use the VOLUME knob on the VOX Continental to adjust the output level, and use the volume faders on the mixer to adjust the input level gain.
Chords cannot be played on the keyboard.
☐ On some variations such as monophonic synthesizer sounds, you will not be able to play chords. This is not a malfunction.
The pitch doesn't sound right.
□ Is the transpose function set correctly?
□ Is the master tune system setting correct?
The equalizer isn't working, or I can't control it.
☐ Make sure that the EQ button in EFFECTS control is on.
☐ If you cannot control the EQ using the touch sensors, make sure that the CONTROL button is set to EQ.
The DYNAMICS, VALVE DRIVE or other effects don't work.
☐ Check that the DYNAMICS, VALVE DRIVE, EFFECT, DELAY and REVERB buttons are not turned off (dark).
The controllers don't work.
☐ When playing in layered mode, the sound parts that can be controlled using the bend lever are prioritized. The bend lever can be used to control only the #1 priority sound. When layering the PIANO and KEY/LAYER parts, the bend lever will have no effect.
☐ The bend lever cannot be used on the variations for the PIANO part.
☐ Have you selected the function you want to control using the touch sensors, by using the CONTROL button? (See page 8)
☐ If you cannot control the tonal character of the EQ using the touch sensors, make sure that the EQ button is on.
(See page 10)
☐ For the E. PIANO and PIANO parts, the touch sensors can only be used to control the EQ for all sounds.
The scene that I edited is not there.
☐ You may have switched to another scene or turned off the power before saving your scene.
The damper pedal, expression pedal and foot switch connected to the pedal jacks don't work as intended.
☐ Are you using the correct settings when connecting the pedals? Calibrate the pedals to adjust the pedal polarity and variable range. (See page 22)
I can't control the LOWER part of an organ with an external MIDI keyboard.
□ Are the MIDI cables connected correctly?
Did you match the external MIDI device's MIDI channel for transmitting the data, and this instrument's LOWER MIDI channel? (See page 20)
Error messages
If an unexpected error occurs when you are using the VOX Continental, the error message will be shown in the VARIATION displays of the PIANO and KEY/LAYER parts. All other VARIATION displays will go dark.
If you see this message, please contact customer service.
Press the EXIT button to turn off the error message.
Specifications
Operating temperature +5 to +40°C (avoid condensation)
| Keyboard | Continental-61 | 61-key: Semi-weighted waterfall keys, velocity sensitive C2 to C7 (variable within the range of [C0...C5] [C4...C9]) | |
| Continental-73-73 Key: Semi-weighted waterfall keys, velocity sensitive E1 to E7 (variable within the range of [E-1..I-5]-[E3..I-9]) | |||
| Sound generator Maximum polyphony Modeling tonewheel org | an sound generator 128 voices | ||
| Modeling transistor organ sound generator 100 voices | |||
| Modeling electric piano sound generator 50 voices | |||
| High-definition piano sound generator 60 dual stereo notes (equivalent to 240 voices max.) | |||
| Modeling analog synthesizer sound generator 36 voices | |||
| PCM sound generator 64 stereo notes (equivalent to 128 voices max.) | |||
| * The actual polyphony will vary depending on the synthesis types and effects being used.* The quoted maximum numbers of voices apply when 100% of the voice processing power is devoted to a single engine. Dynamic voice allocation between synthesis types: exclusive system intelligently allocates resources as necessary. | |||
| PCM memory capacity | Approx. 10.5 GB (when converted to 48 kHz 16-bit linear PCM) | ||
| ORGAN part | 3 types (CX-3, VOX, COMPACT), drawbars, percussion on/off, split function, vibrato/chorus on/off, rotary speaker on/off | ||
| E. PIANO part | 3 types (TNE, REED, FM) | ||
| PIANO part | 3 types (GRAND, UPRIGHT, E. GRAND) | ||
| KEY/LAYER part | 6 types (KEY, BRASS, STRINGS, LEAD, SYNTI, OTIER) | ||
| Preset variations | 150 | ||
| Scenes | 16 (4 x 4): Max. of 100 sets can be saved to USB device | ||
| Effects | Insert effects | EFFECT | CHORUS, PHASER, FLANGER, COMP, DRIVE, WAH (controllable via pedal) |
| Master effects | DELAY | 1. DELAY, 2. CROSS, 3. TAPE, 4. MOD DLY | |
| REVERB | 1. HALL1, 2. HALL2, 3. ROOM1, 4. ROOM2, 5. SPRING | ||
| EQ | 9-band stereo input/output | ||
| VALVE DRIVE | Vacuum tube Nutube 6P1 | ||
| DYNAMICS | Controls how the volume and sound respond to changes in keyboard touch. | ||
| Controllers | Bend lever | ORGAN: Rotary Slow/Fast, E. PIANO: Tremolo on/off, KEY/LAYER: Pitch bend | |
| Touch sensors (electrostatic capacitance type) | ORGAN: drawbars, KEY/LAYER: sound controls, EQ: 9 band graphic equalizer | ||
| Audio characteristics | Frequency characteristics | 20 [Hz] - 22 [kHz] ±1.0 [dB]; 10 [kΩ] load | |
| THD+N | 20 [Hz] - 22 [kHz] (Standard) 10 [kΩ] load 0.005% | ||
| S/N ratio | 105 [dB] (standard) | ||
| Audio output | OUTPUT L/MONO, R | 6.3 mm monaural phone jack, unbalanced | |
| Output impedance: 1.1 [kΩ] (when outputting in stereo) 600 [Ω] (L/Mono jack, when outputting in mono) | |||
| Maximum level: +16.0 [dBu] | |||
| Load impedance: 10 [kΩ] or more | |||
| OUTPUT L, R | XLR-3-32 type (balanced) + LIFT - CND switch | ||
| Output impedance: 350 [Ω] (when outputting in stereo) | |||
| Maximum level: +16.0 [dBu] | |||
| Load impedance: 10 [kΩ] or more | |||
| Headphones | 6.3 mm stereo phone jack | ||
| Output impedance: 50 [Ω] | |||
| Maximum level: 150 mW+150 mW @32 [Ω] | |||
| Control inputs | DAMPER | Compatible with Korg DS-11 damper pedal (supports half-damper), PS-1 and PS-3 pedal switches | |
| ROTOR SPEED | Compatible with PS-1 and PS-3 pedal switches | ||
| CONTROL | V861 VOL/EXP PEDAL volume/expression pedal | ||
| Other sounds | MIDI | IN, OUT | |
| USB | USB A (type A) | Saving/loading scene data | |
| USB B (type B) | MIDI Interfaces 1 (16 ch) in, 1 (16 ch) out | ||
| Compatible with USB standard ver 2.0, high speed (up to 480 Mbos) | |||
| Main specifications | Power | AC adaptor connector (DC 15V, ◇ ◇ ◇), power button | |
| Dimensions (width x depth x height) | Continental-61 | 939 x 350 x 86 mm / 36.97" x 13.78" x 3.39" | |
| Continental-73 | 1,103 x 350 x 86 mm / 43.43" x 13.78" x 3.39" | ||
| Weight | Continental-61 | 7.2 kg / 15.87 lbs | |
| Continental-73 | 8.4 kg / 18.52 lbs | ||
| Power consumption | 16 W | ||
| Included items | AC adaptor, power cord, Owner's Manual, V861 VOL/EXP PEDAL | ||
* The specifications and external features of this product are subject to change without notice, for the purpose of product improvement.
Accessories
| Damper pedal KORG DS-1H | |
| Pedal switch KORG PS-1, PS-3 | |
| Keyboard stand 5T-Continental |
* All product and company names are the registered trademarks of their respective companies.
IMPORTANT NOTICE TO CONSUMERS
This product has been manufactured according to strict specifications and voltage requirements that are applicable in the country in which it is intended that this product should be used. If you have purchased this product via the internet, through mail order, and/or via a telephone sale, you must verify that this product is intended to be used in the country in which you reside.
WARNING: Use of this product in any country other than that for which it is intended could be dangerous and could invalidate the manufacturer's or distributor's warranty.
Please also retain your receipt as proof of purchase otherwise your product may be disqualified from the manufacturer's or distributor's warranty.
- ENGLISH
- Continental
- KEYBOARD
- Owner's Manual
- Table of Contents
- Main Functions of Each Part ....4
- Making Connections ....5
- Turning the Power On/Off 7
- Selecting and Playing Sounds 8
- Saving a Scene 11
- Listening to the demo songs 11
- Detailed Functions 12
- System Settings 20
- Appendices 24
- Specifications 25
- Precautions
- Location
- Power supply
- Interference with other electrical devices
- Handling
- Care
- Keep this manual
- Keeping foreign matter out of your equipment
- DECLARATION OF CONFORMITY (for USA)
- THE FCC REGULATION WARNING (for USA)
- Notice regarding disposal (EU only)
- Data handling
- About Nutube
- About the Owner's Manual
- VOX Continental Owner's Manual (printed) (this document)
- VOX Continental MIDI Setting Guide (PDF)
- VOX Continental Voice Name List (PDF)
- Conventions in this manual
- Example screen displays
- Main Functions of Each Part
- Front panel
- 1: Master control
- 2: Part select
- 3: ORGAN part
- 4: E. PIANO part
- 5: PIANO part
- 6: KEY/LAYER part
- 7: Touch controls
- 8: Scene select
- 9: EFFECTS controls
- 10: Bend lever
- 11: Keyboard
- Rear Panel
- 1: Power
- Power button
- DC 15V jack
- Cord hook
- 2: OUTPUT
- OUTPUT L/MONO, R jacks
- OUTPUT L, R jacks
- LIFT-GND switch
- Headphones jack
- 3: PEDAL
- CONTROL jack, ROTOR SPEED jack, DAMPER jack
- 4: MIDI
- MIDI IN/OUT connectors
- 5: USB
- USB A port
- USB B port
- 6: VOX logo
- Making Connections
- Placing the instrument on a dedicated stand
- Connecting the AC adapter
- Connecting audio devices
- Connecting powered monitor speakers or a mixer
- Connecting the headphones
- Connecting the pedals
- Adjusting the volume (or wah) with the pedal
- Switching between rotary speeds with the pedal
- Controlling the damper using the pedal
- Connecting to a MIDI device or computer
- Playing an external MIDI keyboard with LOWER (lower part of the keyboard) on the organ
- Turning the Power On/Off
- Turning the power on
- Turning the power off
- Selecting and Playing Sounds
- Selecting a sound
- Selecting the scene
- Using controllers
- Touch sensors
- Adjusting the organ drawbars
- Adjusting the KEY/LAYER filter, EG and LFO
- Bend lever
- CONTROL, ROTOR SPEED and DAMPER pedals
- Applying effects
- Applying EFFECT, DELAY and REVERB
- Using the equalizer (EQ) to adjust the tonal character
- Saving a Scene
- Saving a scene to the SCENE 1-4 buttons
- Listening to the demo songs
- Playing back the demo songs
- Detailed Functions
- Master control
- 1: VOLUME knob
- 2: VALVE DRIVE knob
- 3: VALVE DRIVE button
- 4: DYNAMICS knob
- 5: DYNAMICS button
- 6: OCTAVE ◀, ► buttons (TRANSPOSE button)
- Octave up/down
- Transposing
- Part select
- 1: ORGAN button
- 2: E. PIANO button
- 3: PIANO button
- 4: KEY/LAYER button
- ORGAN part
- 2: VARIATION ▲, ▼ buttons
- 3: VARIATION display
- 4: LEVEL knob
- 5: UPPER/LOWER button
- Split off (when using the keyboard without splitting the sound)
- Split on (when splitting the keyboard into UPPER and LOWER)
- Playing the VOX Continental with UPPER, and playing an external MIDI keyboard with LOWER
- 6: SPLIT button
- 7: PERC/MTB button
- Turning on/off the percussion
- Turning MTB on/off
- 8: VIB/CHORUS button
- 9: ROTARY button
- E. PIANO part
- 1: E. PIANO type button, LEDs
- PIANO part
- 1: PIANO type button, LEDs
- KEY/LAYER part
- 1: KEY/LAYER type button, LEDs
- Touch controls
- 1: CONTROL button, LEDs
- 2: Touch sensors
- ORGAN
- 1) CX-3
- 2) VOX
- 3) Compact
- KEY/LAYER
- Amp EG
- ATTACK
- DECAY
- RELEASE
- Filter
- CUTOFF
- RESONANCE
- LFO
- PITCH LFO
- LFO FREQ
- Assignable
- ASSIGN1
- ASSIGN2
- EQ frequency band and gain
- Scene select
- Settings that are saved:
- Settings that are not saved:
- 1: BANK ▲, ▼ buttons, LEDs
- 2: SCENE 1, 2, 3, 4 buttons
- 3: WRITE button
- 4: EXIT button
- EFFECTS controls
- EFFECT
- 1: EFFECT button
- 2: EFFECT type button, LEDs
- 3: EFFECT knob
- DELAY
- 4: DELAY button
- Selecting the delay type
- 5: DELAY knob
- REVERB
- 6: REVERB button
- Selecting the reverb type
- 7: REVERB knob
- EQ (equalizer)
- 8: EQ button
- TEMPO
- 9: TAP TEMPO button
- System Settings
- How to configure the settings
- Master tune
- MIDI channel
- Lower part MIDI channel
- Connecting an external MIDI keyboard, and configuring the MIDI channels
- Lower part MIDI channel settings for this instrument
- Local control
- Velocity curve
- Organ key trigger
- Auto power off
- VOX logo LED on/off
- Wah pedal control
- Calibrating the pedal
- Calibrating a pedal connected to the DAMPER jack
- Calibrating a pedal connected to the ROTOR SPEED jack
- Calibrating a pedal connected to the CONTROL jack
- Touch sensor calibration
- Restoring the VOX Continental to factory-set default settings
- Saving the scene data
- Storage media that can be used
- Maximum usable storage capacity
- Loading the scene data
- Appendices
- Troubleshooting
- Power does not turn on.
- Power does not turn off.
- Power turns off automatically.
- No sound is heard when the keys are played.
- The sound will not stop.
- The sound seems to be doubled.
- I hear noise.
- The sound is distorted.
- Chords cannot be played on the keyboard.
- The pitch doesn't sound right.
- The equalizer isn't working, or I can't control it.
- The DYNAMICS, VALVE DRIVE or other effects don't work.
- The controllers don't work.
- The scene that I edited is not there.
- The damper pedal, expression pedal and foot switch connected to the pedal jacks don't work as intended.
- I can't control the LOWER part of an organ with an external MIDI keyboard.
- Error messages
- Specifications
- IMPORTANT NOTICE TO CONSUMERS
Brand : VOX
Model : Continental V2.0
Category : Keyboard