
VZ-PRO - Processor ViewZ - Free user manual and instructions
Find the device manual for free VZ-PRO ViewZ in PDF.


| Product Type | Video Wall Processor |
| Brand | ViewZ |
| Model | VZ-PRO |
| Input Interfaces (Standard) | HDMI (up to 1080p@60) |
| Output Interfaces (Standard) | HDMI (up to 1080p@30) |
| Optional Input Cards | 4K HDMI, DVI, VGA, SDI, IP Decoder (H.264) |
| Optional Output Cards | HDMI 4-port, 2-port; DVI 4-port |
| Max Input Resolution | 1920x1080p@60 (standard), 3840x2160p@30 (4K optional) |
| Video Wall Functions | Splicing, roaming, cross-screen, zoom, PIP, POP, overlay, subtitle |
| Preset Scenes | Yes, with scheduled switching |
| User Management | Multi-level with custom permissions |
| Control Software | WTRemote (Windows 7+) |
| Network | Gigabit Ethernet (RJ-45) |
| Power Supply | AC 100-240V, 50/60Hz |
| Operating Temperature | 32°F to 122°F (0°C to 50°C) |
| Operating Humidity | 5% to 95% RH (non-condensing) |
| Cooling | Intelligent fan speed adjustment |
| Warranty | 3 years limited (ViewZ USA) |
Frequently Asked Questions - VZ-PRO ViewZ
User questions about VZ-PRO ViewZ
0 question about this device. Answer the ones you know or ask your own.
Ask a new question about this device
Download the instructions for your Processor in PDF format for free! Find your manual VZ-PRO - ViewZ and take your electronic device back in hand. On this page are published all the documents necessary for the use of your device. VZ-PRO by ViewZ.
USER MANUAL VZ-PRO ViewZ
ViewZ®
www.viewzusa.com
Please read this manual thoroughly before use, and keep it handy for future reference.
CONTENTS
Safety Instruction 3
- Mark Indication & Substance 4
- Warning 4
- Caution 5
- Operational Temperature & Humidity 5
Installation 6
- Package & Features 6
- Interface 10
Setup 12
- Connection between Videowall Controller and Control Software.... 13
- Synchroize Videowall Monitors with Control Software.... 15
- Control Software Operation.... 18
Trouble Shooting 67
Warranty 69
SAFETY INSTRUCTION
Important Safety Instruction
- Read all warnings and manuals before operation.
- Follow all instructions to ensure longevity of product.
- Do not place the VZ-PRO Controller near water.
- Clean only with non-static electronic dry cloth.
- Do not block any ventilation openings. Install in accordance with the manufacturer's instructions.
- Do not install near any heat sources such as radiators, heat registers, stoves, or other heat generating devices.
- Do not override the safety purpose of the polarized or grounding-type plug.
- A polarized plug has two blades with one wider than the other.
- A grounding type plug has two blades and a third grounding prong.
- The wide blade and the third prong are provided for your safety.
- If the provided plug does not fit into your outlet, consult with electrician for replacement of the outlet.
- Protect the power cord from being walked on or pinched particularly at plugs, convenience receptacles and the point where it connects to the monitor.
- Only use attachment/accessories specified by the manufacturer.
- Use only with the cart, stand, tripod, bracket or table specified by the manufacturer or sold with the monitor. When a cart is used, use caution when moving the cart & monitor in combination to avoid injuries.
- Unplug the VZ-PRO Controller during lightning storms or when unused for long periods of time.
- Refer all servicing to qualified service personnel. Servicing is required when the VZ-PRO Controller has been damaged in any way.
The monitor shall not be exposed to dripping or splashing and objects containing liquids, such as vases shall not be placed near the monitor.
The VZ-PRO Controller should be installed with enough distance (e.g. 10cm) from the wall for sufficient ventilation.
SAFETY INSTRUCTION
Important Safety Instruction
Mark Indication and Substance



CAUTION : TO REDUCE THE RISK OF ELECTRICAL SHOCK, DO NOT REMOVE COVER (OR BACK). NO USER SERVICEABLE PARTS INSIDE. REFER SERVICING TO QUALIFIED SERVICE PERSONNEL

This symbol is intended to alert the user to the presence of uninsulated & dangerous voltage within the monitor's enclosure that may be of sufficient magnitude to constitute a risk of electric shock to persons.

This symbol is intended to alert the user to the presence of important operating and maintenance (servicing) instructions in the literature accompanying the monitor.
Warning
- Do not use damaged or loose cables and plug.
- Do not pull the plug out by the wire nor touch the plug with wet hands.
- Use only a properly grounded plug and receptacle.
- Do not connect too many extension cords or plugs to one outlet.
- Do not excessively bend the plug and wire.
- Do not disconnect the power cord while it's still plugged into the monitor.
- Do not place any heavy objects on the power cord. Damage to the cord may cause shock or fire.
- Never open the monitor. There are no user-serviceable parts inside and opening will void warranty.
- Removing covers may expose you to dangerous shock hazards or other risks.
- Keep any heating devices away from the power cable and VZ-PRO Controller.
- Do not place the VZ-PRO controller near water.
- Do not insert objects of any kind into the monitor's open slots, as they may touch dangerous voltage points.
- Please follow the laws and regulations of your municipality to dispose the VZ-PRO Controller properly.
- Do not use the monitor in high temperature, humid, dusty or oily areas.
- Do not install the monitor where it will be exposed to continual vibration.
- Keep the plastic packaging out of children's reach.
- If any damage is detected upon first opening the box, contact agency from which you bought the VZ-PRO Controller directly.
- If the VZ-PRO Controller does not operate normally – in particular, if there is any unusual sound or smell coming from the VZ-PRO Controller – unplug it immediately and contact an authorized dealer or the service center.
SAFETY INSTRUCTION
Important Safety Instruction
Caution
- If the connector between the plug and the pin is dusty or dirty, clean it properly using a dry cloth.
• Make sure to unplug the power cord before cleaning the VZ-PRO Controller. - Do not drop the VZ-PRO Controller when moving it.
- Place the VZ-PRO Controller in a location with low humidity and minimum dust.
- Do not place the monitor on an unstable or small surface area.
- Disconnect the plug from the outlet during storms or lightning or if it has not been used for a long time.
- Do not try to move the VZ-PRO Controller by pulling on the power cord.
- Do not cover the vents on the VZ-PRO controller.
- When moving the VZ-PRO Controller, turn off and unplug the power cord. Make sure that all cables, including HDMI cable and cables connected to other devices, are disconnected before moving it.
- Place the VZ-PRO Controller out of children's reach, as they could damage it by hanging onto it.
Caution - Equipment Grounding Requirements
- Make sure that the power supply and chassis of the spliced processor (here in after, referred to as the equipment) are well grounded.
• Make sure the power supply and housing of the large screen connected to the device are well grounded. - Port damage due to the Non-grounded or improper grounded equipment, the videowall monitor (or large screen) and videowall controller will not be covered by warranty.
Available Temperature & Humidity
- Operating Temperature: 32°F 122°F / -30°C 50°C
- Operating Humidity: 5 95% RH
INSTALLATION
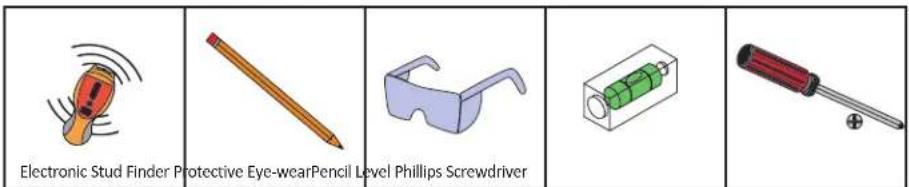
Installation Tools
The following tools may be required depending on your installation.
Assembly Components - provided
Your ViewZ PRO series is shipped with all proper installation hardware and components. If there are parts missing and/or damaged, please stop the installation and contact ViewZ USA at (888)-998-4399.

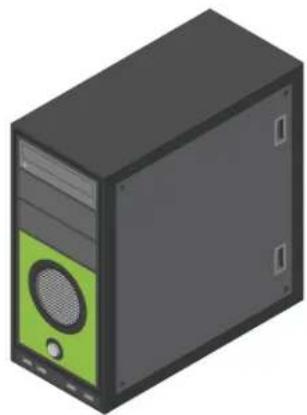
VZ-PRO-ST Controller (Qty 1) 110V
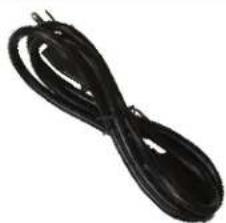
Power Cable (Qty 1) Software USB (Qty 1)
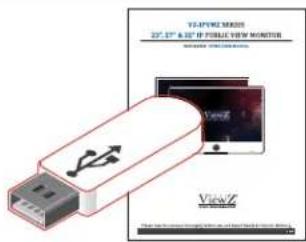
includes User Manual
SYSTEM REQUIREMENTS
Local Videowall Control PC H/W Requirement
- Hardware Specification on local videowall control PC
- Processor: Intel i3 4th Gen. or Higher | RAM: DDR4 8G or Higher
HDD: SSD 128/256GB or Higher
Network: General TCP/IP network with Gigabit LAN - OS Specification
- OS: Windows 7 or later

Caution
The media contents (images & videos) will not be saved into the local videowall control PC or VZ-PRO-ST Controller.
BASIC FEATURES
VZ-PRO Architecture
- The designed FPGA system provides stable image processing capabilities for 24/7 operation.
- The VZ-PRO Controller adopts a modular design, which can be flexibly matched with a variety of input and output cards, which can be upgraded, expanded, and maintained;

Video Interface Signals
- The standard VZ-PRO Controller comes with HDMI input & output cards to accept upto 1080p resolution. Optional 4K HDMI, DVI, SDI, VGA and IP decoder card are available at factory option. Please refer to page 11 for details.
BASIC FEATURES
Video Wall Functions
- Achieve display functions of multiple signal sources on the wall, splicing, roaming, cross-screen, zoom-in, picture-in-picture, pictureout-picture, screen overlay, etc.
- Support all signals in the full screen range to open window roaming, superimposing, zooming, no window position, size, scale restriction.
- Support single-screen with multi-window.
- Support special effect subtitle function, the font, color, size, scroll speed and direction of subtitles, background color, background transparency can be flexibly selected
- Support ultra-high-resolution static pictures, pictures support multiple picture formats, support multi-window static layouts, quick and easy replacement, and make the big screen pictures more colorful
- Support the presets (scene/layout) in advance & switching scene/layout based on the specific interval time.
- Support multi-level user management, so each user can set different operation permissions
Other Functions
- Intelligent fan speed adjustment function, which can automatically adjust the fan speed according to equipment configuration and temperature conditions in various areas to achieve green energy saving and environmental protection
- Support output port mapping technology. There is no need for one-to-one correspondence between the connection cables between the VZ-PRO Controller and ViewZ videowall monitors. It is only necessary to ensure a valid connection. Port mapping settings are completed in the control software, which greatly simplifies the installation process and shortens the installation time.
CONNECT EXTERNAL EQUIPMENTS
Interface Input Ports - PRO-ST
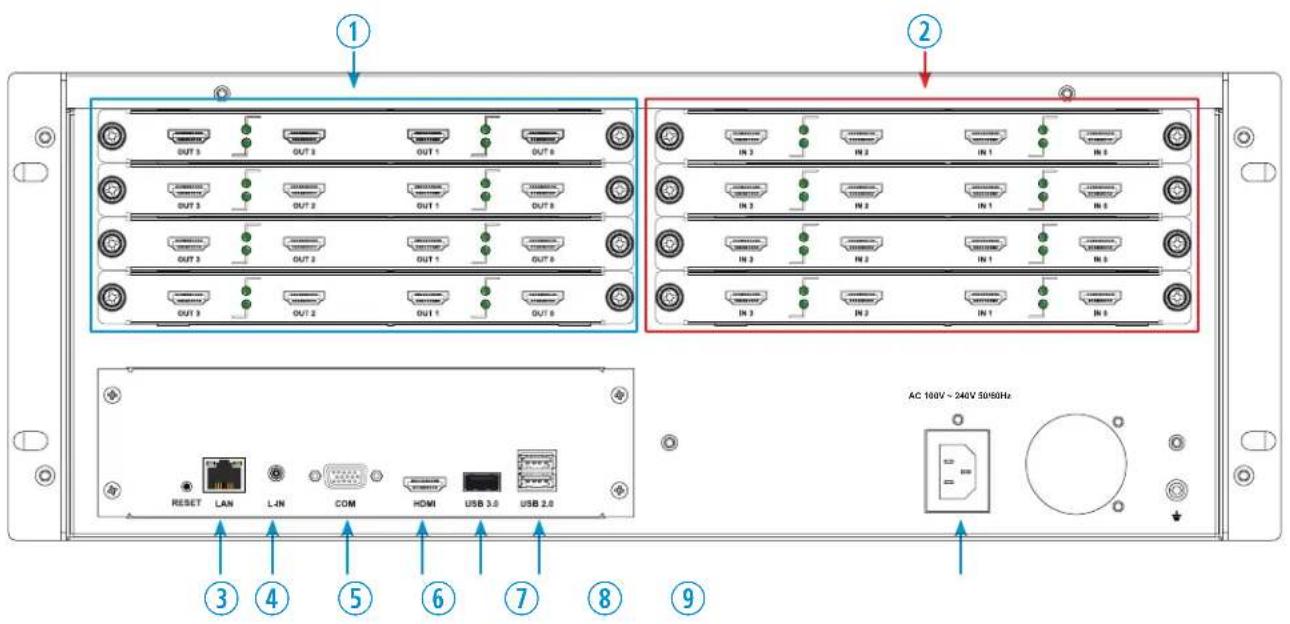
- HDMI OUT - Output for Videowall Monitors
- HDMI IN - External Input Sources
- ETHERNET 10/100 (RJ 45)
- N/A
- RS232 (RJ-45) IN - Serial Control / IR Receiver
-
N/A
-
USB 3.0 IN
- USB 2.0 IN x 2 - Firmware Update
- AC 100 - 240V IN
Power On - Connect All Cables
- Connect a power from the Controller to the AC outlet.
- Connect all of input source cables to the Controller.
- Connect all of output cables to the videowall monitors.
- Turn on the power of Controller.
CONNECT EXTERNAL EQUIPMENTS
Available Input Cards (Optional)
| P/N | INTERFACE | PORT | MAX RESOLUTION / SUPPORTED FRAME RATE |
| VZ-H2K-IN4 | HDMI | 4 | 1920x1080p@ 60 |
| VZ-H4K-IN1 | HDMI | 1 | 3840x2160p@ 30 |
| VZ-D2K-IN4 | DVI | 4 | 1920x1080p@ 60 |
| VZ-V2K-IN4 | VGA 4 | 1920x1080p@ 60 | |
| VZ-S2K-IN4 | SDI 4 | 1920x1080p@ 60 | |
| VZ-I2K-IN2 | RJ45 2 | H.264/MPEG4, IP decoder for 1080p @30 upto 8 ch |
Available Output Cards (Optional)
| P/N | INTERFACE | PORT | MAX RESOLUTION / SUPPORTED FRAME RATE |
| VZ-H2K-OUT4 | HDMI | 4 | 1920x1080p@ 30 |
| VZ-H2K-OUT2 | HDMI | 2 | 1920x1080p@ 60 |
| VZ-D2K-OUT4 | DVI | 4 | 1920x1080p@ 30 |
INSTALL CONTROL SOFTWARE
Setup WTRemote and IP Setting Software
1. Prepare the Local-Control PC with Window OS
- Before installation, ViewZ recommends using a clean PC. If you are using lots of program on the computer (which will be using for Local-Control PC), there might be an issue.
1.1. Install WTRemote Videowall Controller SW
- When you have the VZ-PRO-ST/MX product package, use a USB to install the SW into the computer. Please run the "WTRemote_V1.0.X.X_setup.exe" program and install it.


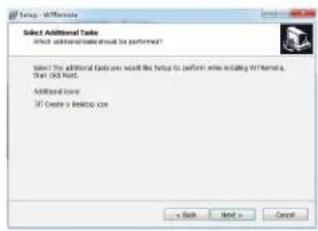
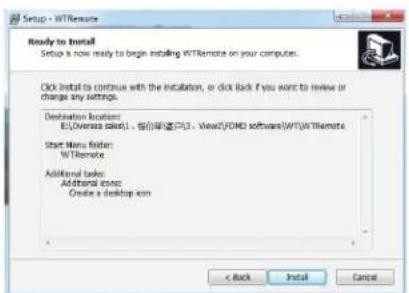
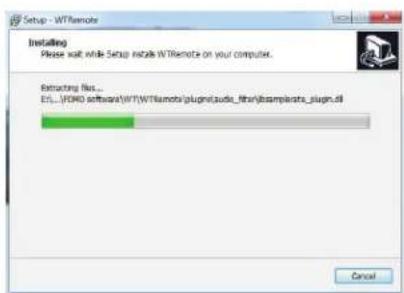


Caution
Before login, you should also check the IP address of your PC (which WTRemote program was installed). No DHCP connection is allowed.
SETUP VIDEOWALL & CONNECTION
Setup the Connection between VZ-PRO Controller and Control Software
1.2. Connect VZ-PRO Vdeo Wall Controller via SW
• After the installation and launching, you will see the below interface.
- You can also launch the program - run 'WTRemote' icon on desktop.

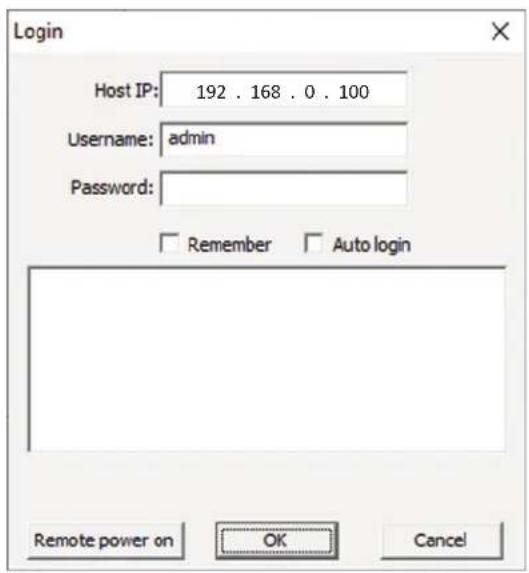
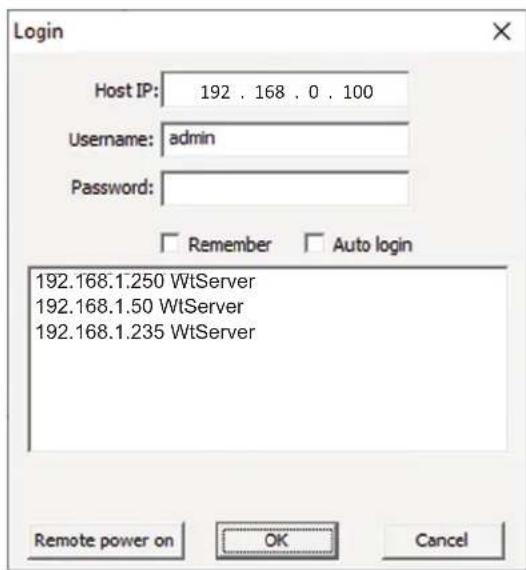
- If your Local-Control PC successfully connected to the VZ-PRO Controller, the VZ-PRO Controller IP address will be listed on the window (like the above picture). Please select that device and login.

Caution
The default IP address of VZ-PRO controller is '192.168.0.100'
The default Username & Password is 'admin' & empty.
CONTROLLER IP ADDRESS
Change IP Address
1.3. IP Setting Software
- If you want to configure the IP address of VZ-PRO Controller, please use the IP address setting software.
-
On the network system, you should use the proper IP address for VZ-PRO Controller.
-
Launch IP setting software - 'SearchNvsDemo' (it will be loaded on the desktop after this installation) to setup the IP address of VZ-PRO controller, if you have multiple VZ-PRO controllers in the network.
-
On the desktop of PC (which WTRemote program was installed) and find 'IP Setting SW'icon & double click it.

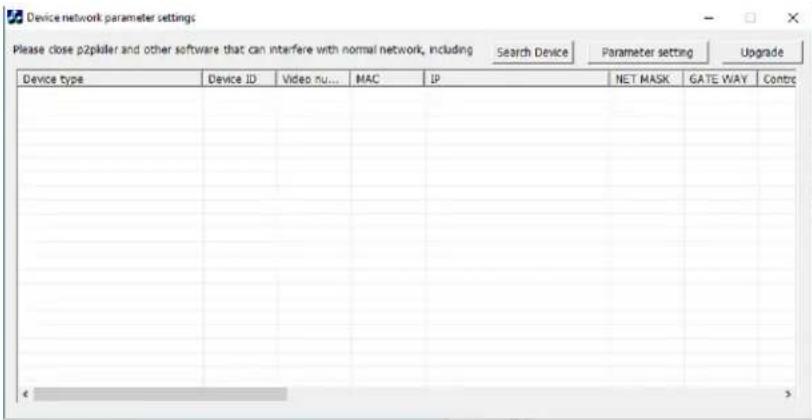
- Then, the Device Network Parameter Settings window will pop up.

- Click the Search Device button on the top.
- Then, you can see the info of connected VZ-PRO Controller and click Parameter Setting button to modify the info.
- You can put the IP address/Subnet Mask/Gateway info and click OK to save/update the info.
- If connection is failed, you cannot see the listed VZ-PRO Controller. In this case, please check the cable, router setup or network administrator.
CONTROLLER SETUP
Videowall Monitor Setup
2. Synchronize Monitors with Control Software
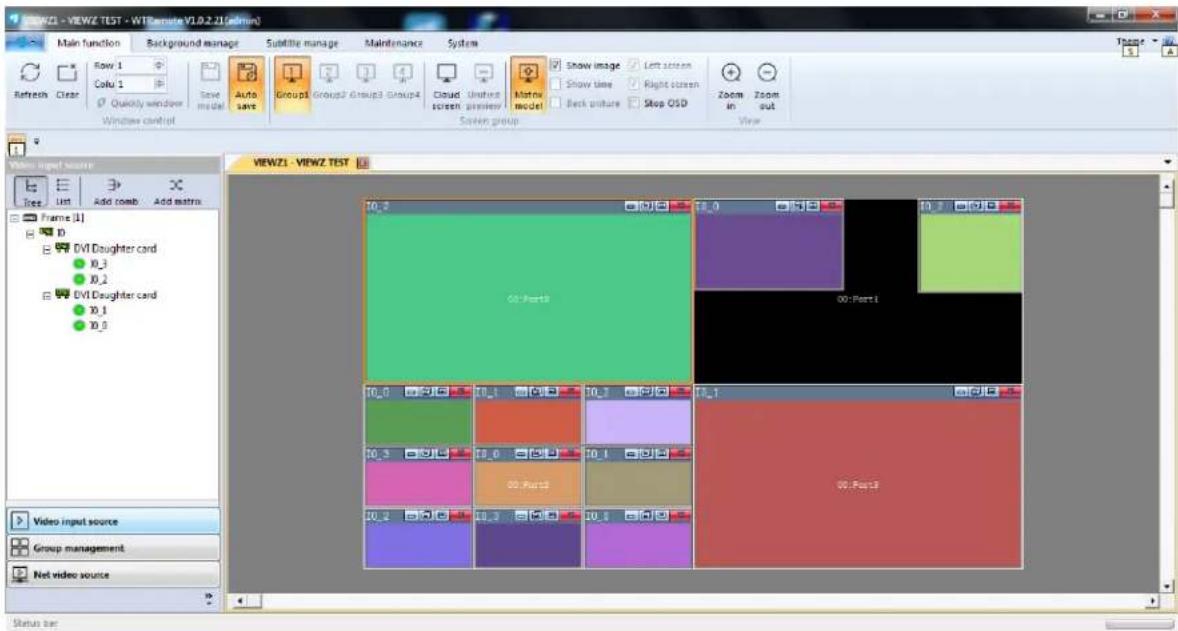
• After login, you can see the below window and click 'Maintenance' tab to setup the number of monitors.

CONTROLLER SETUP
Videowall Monitor Setup
2.1. Synchronize Monitors with Control Software - Logical & Physical Setup
- On Maintenance, click 'Screen Set' button, then 'Screen Set' window will popup.
-
On Screen Set, check the 'Enable Screen Group' and follow the next step;
-
Type the group 'Name' & Select the 'Screen Resolution' - each output card resolution.
- Select the 'Physical Screen' ROW/COL number - physical screen number means actual monitor number.
- Select the 'Logical Screen' ROW/COL number - logical screen number means how many windows will be assigned in each monitor. This function will assign the max 9 input source per each monitor.



Videowall Monitor Setup
2.1. Synchronize Monitors with Control Software - Logical & Physical Setup
- Click the 'Port Set' button. Then, the 'Screen Port Set' window will pop up
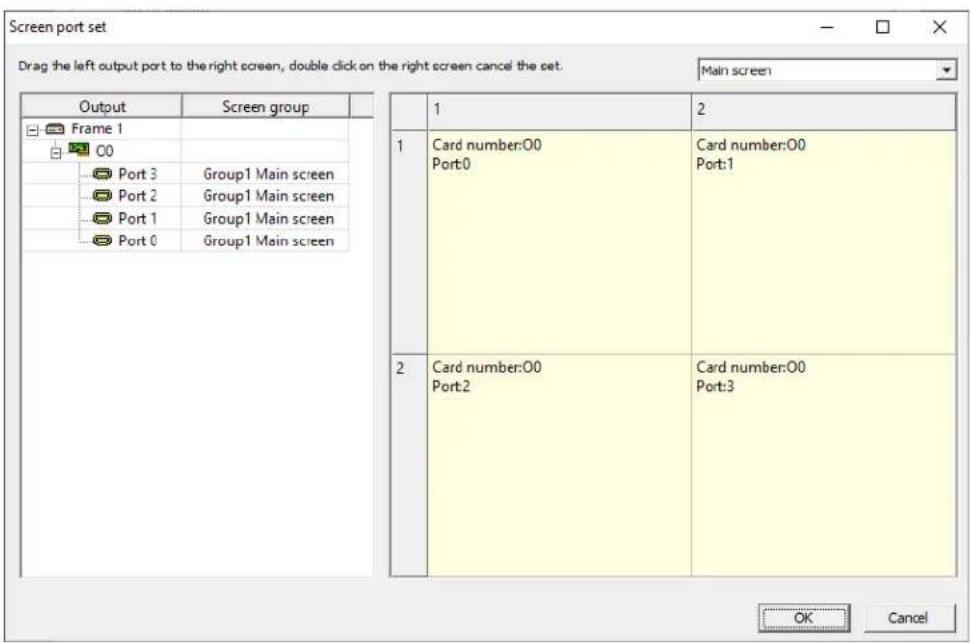
- On 'Screen Port Setting' window, please follow the next step;
- Check the left-tree menu which should show connected port
- Check the right display-box layout based on the arranged monitor
- Drag & drop the menu list (left-tree structure) to the monitor layout window (right-side array) one by one
- On the right window, if every monitor has matched port #, please click 'OK' button to save this setup

Caution
If cable connection or matching port number (with monitor) is failed, the related function will not work correctly.
CONTROL OPERATION
WTRemote - Videowall Controller Software Interface
3. Interface
- The videowall controller software is composed by 3 parts - Main Navigation, Screen Layout and Quick Menu.
- MAIN NAVIGATION (top area) has "Main Function", "Background Manage", "Subtitle Manage", "Maintenance" and "System".
- QUICK MENU has "Video Input Source", "Group Management" and "Net Video Source".
- SCREEN LAYOUT will dsiplay current display setup on monitors.

① MAIN NAVIGATION ② QUICK MENU ③ SCREEN LAYOUT
- After launching the videowall controller software and login, the video/image input source will be listed on the QUICK MENU /Video Input Source panel.
- When you select a monitor from the SCREEN LAYOUT, the selected monitor will have the colored border line.
- If you successfully setup the connection between monitors and CMS SW, you can drag & drop the video/image input source to the monitor to display those by real time. Also, you can customize the size of input source - position, zoom in, zoom out, or remove on the virtual screen - SCREEN LAYOUT windows.
CONTROL OPERATION
Main Function / Additional Sub Screen
3.1. Setup the Additional Sub Screen
- VZ-PRO-ST supports the synchronous display of the monitor sub-screen, and you can set up to display the video window of the main video wall on one or more display units.
![graph TD A["Sub Screen"] --> B["Main Video Wall"] B --> C["Main Video Wall"] C --> D["Main Video Wall"] D --> E["Main Video Wall"] E --> F["Main Video Wall"] F --> G["Main Video Wall"] G --> H["Main Video Wall"] H --> I["Main Video Wall"] I --> J["Main Video Wall"] J --> K["Click 'Screen Set'"]](/content/2026/05/834181/images/3d4731ba7c79f6d0eb6e242d1d99e10f79c4dbb3e6b0fec7a2885e1c55cbef25.jpg)
CONTROL OPERATION
Additional Sub Screen
3.1. Setup the Additional Sub Screen
- On Screen Set, check at Enable Backdisplay Screen and select necessary numbers. Recommend to select a resolution of 1920*1080_30. Then click Port Set to get the following window.
- Check 'Enable backdisplay screen'
Choose the 'Screen resolution' & select 'Physical screen' number (you can make n*n based on your output card)
- Click 'Port set'


- Select 'Display backscreen'
CONTROL OPERATION
Additional Sub Screen
3.1. Setup the Additional Sub Screen
- Assign a port number to be Backdisplay Screen.
- Click OK

CONTROL OPERATION
Additional Independent Screen
3.2. Setup the Independent Screen
- VZ-PRO-ST supports to add more display units other than the main video wall to display any of single input source.
- On Screen Set, check at Left Enable Independent Screen or Right Independent Screen and select necessary numbers. Recommend to select a resolution of 1920*1080_30. Then click Port Set to get the following window.

- Check 'Enable left / right independent screen' - you can select either one or both.
Choose the 'Screen resolution' & select 'Physical screen' number (you can make n*n based on your output card) - Click 'Port set'
- Select 'Left or Right independent screen'

CONTROL OPERATION
Additional Independent Screen
3.2. Setup the Independent Screen
- When you choose left or right indendent screen, you can assign a port to the one screen.
- Click OK

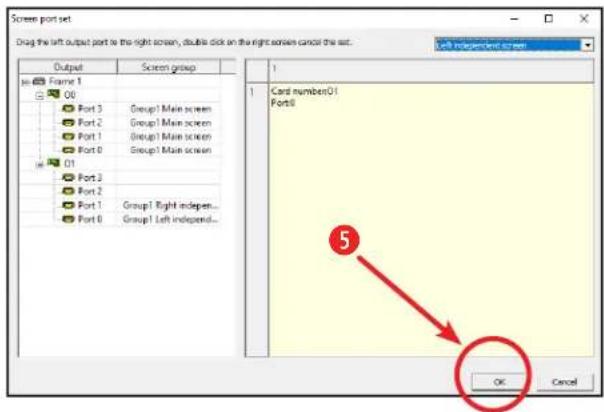
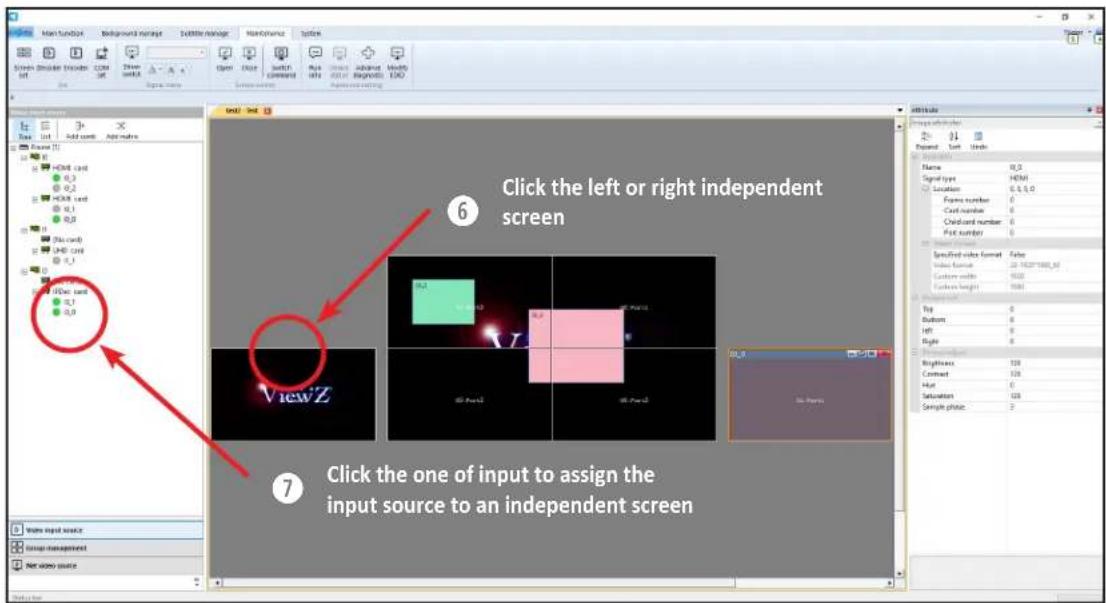
- On the main screen, click the left or right screen
- Click the input port to apply it to an independent screen.

Caution
On Left / Right independent screen setup, you cannot adjust the position & size of output. You can only assign an output to a screen.
CONTROL OPERATION
Main Function / Screen Group
3.3. Create & Setup Multiple Screen Groups
- The Main Function is consist of 'Window control', 'Screen Group' and 'View'.
- Before operation of videowall controller software, you need to set the Screen Group.
- If your monitors are installed at different location and you want to controll all of them via 1 controller, you need to make different Screen Group on this controller.

• In this case, you need to setup multiple Screen Groups
• Each group should have different group name and be checked about 'Enable screen group.'
• Refer other setting at page 37.


Caution
If there is only one set of monitors & all monitors are installed at 1 location in the field, this screen grouping process is not necessary.
The multiple screen group is only available on VZ-PRO-MX series.
CONTROL OPERATION
Screen Group
3.3. Create & Setup Multiple Screen Groups
• After the setup of multiple groups, you can see the activated groups based on group number.

- On the MAIN NAVIGATION, click the Group # (which you desired) and drag & drop into the SCREEN LAYOUT area. Then, you can see both Groups at atime
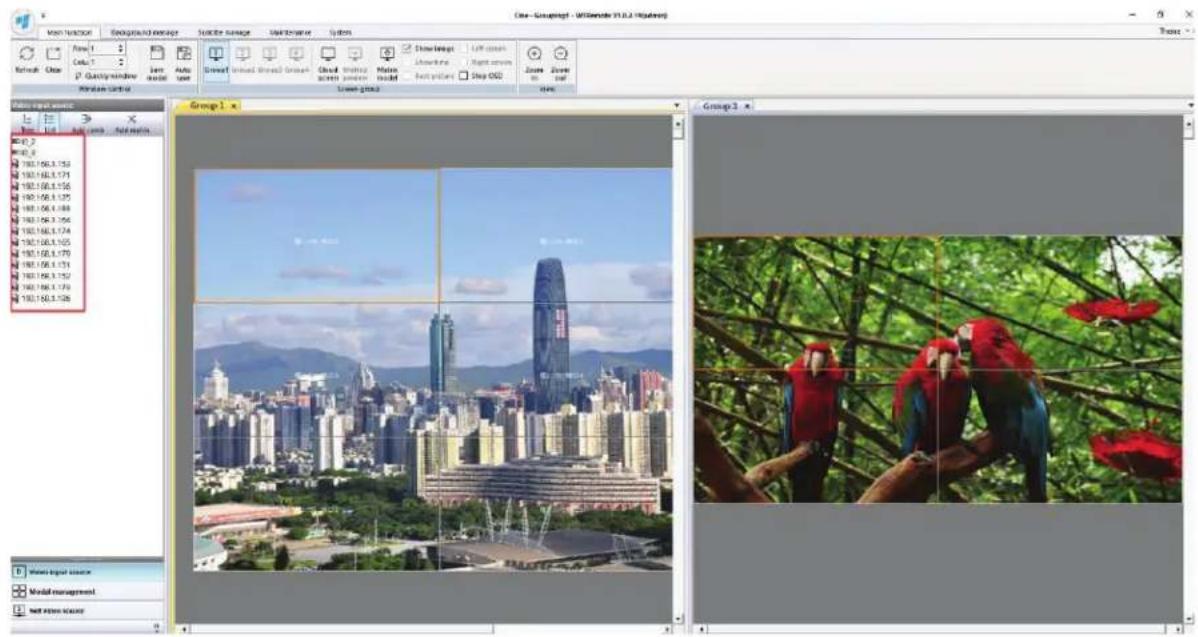
These images are the background image. These are not the actual input source image/video.
CONTROL OPERATION
Matrix Mode
3.4. Enable / Disable Matrix Mode
- If this mode is activated, you cannot edit the current windows - size & position.
- Enable/Disable matrix mode is simply operated by clicking the Matrix Model button.
- Also, you can still add the current input source from quick menu/video input source.
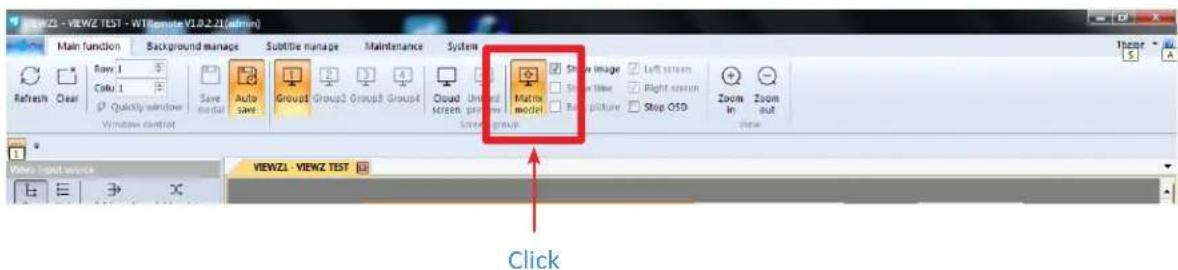


Caution
This mode requires additional switch device.
CONTROL OPERATION
Video Input Source
3.5. Video Input Source
- The VZ-PRO Controller can accept direct input signal and IP video input source. The direct (local) input signal means one-to-one connection between monitor and controller output port - you can use DVI, VGA, HDMI (default) or IP Video input source.
![Video input source Tree List Add comb Add matrix Frame [1] ID DVI Daughter card ID_3 ID_2 DVI Daughter card ID_1 ID_0 Video input source Video management Video source](/content/2026/05/834181/images/b4b74895ef5b1bea9ab9470ee9ec2db613fbe5fa50c36e611890613e63511a31.jpg)
- On the Video input source panel, you can see icons - Tree, list, Add Comb and Add matrix.
- Add comb: this function makes multiple different input source to combine into 1 signal. Normally, this function is using for the conjunction of multi-screen graphic cards which has multiple output (including high definition signals).
- Add matrix: this function let the VZ-PRO Controller link with the additional matrix switcher. Then, the matrix switcher can control all input sources.
- Tree: it will show all input source ports and status.
- List: it will show all effective input sources.
CONTROL OPERATION
CMS SW - Video Input Source Tree
3.5.1. Video Input Source - Tree
- On the Video input source panel, click the 'Tree' icon and click icon. Then, you can see the expanded tree structure with all input card ports

Click to expand tree structure
- If VZ-PRO Controller has live-input signal, the system (of controller) will automatically detect the input source signal. It means if the source signal input is wrong. This tree panel shows a gray circle If the source signal input is correct, the tree panel will show a green circle . Please see below pictures.

CONTROL OPERATION
Video Input Source
3.5.2. Video Input Source - List
- If you click the 'List' icon, then the Video Input Source panel will show all input sources.
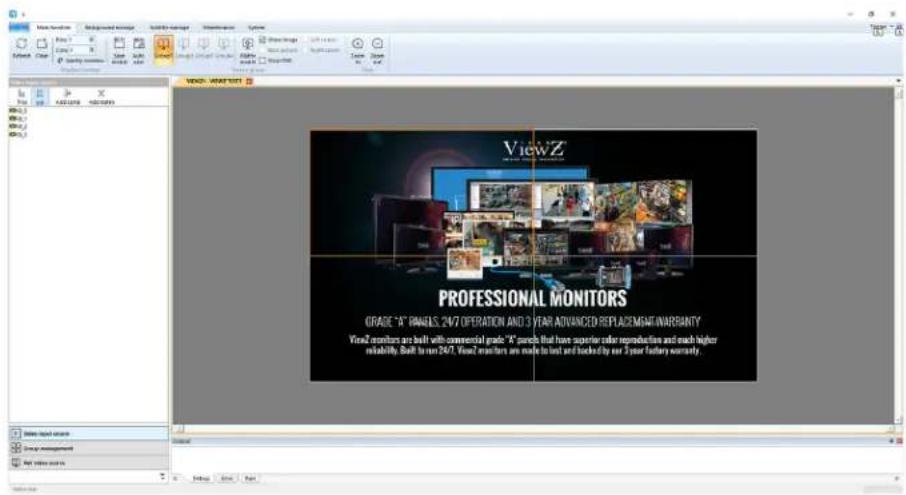
3.5.3. Video Input Source - Add comb
- This function let the VZ-PRO Controller combine multiple input sources into 1 signal source. That is, if you have different input source signals (like HDMI, DVI & VGA) and you want all input source to display at a screen, you need to use this function to prevent error. To process this function, please follow the below step.
- Click 'Add comb' button. Then, the combination input setting will be displayed.
- Enter the name of combined signal on the 'Name' field of pop-up window
- Based on the array of input signals, select the template for the combined input signal
- Choose the signal port number which needs to be combined
- Set the Frame #, Card # and Portt #
After the setup of combining, you will see the icon 📁 at the Video Input Source list. If you double-click this icon, you can see the combined source list.
CONTROL OPERATION
Display Input Source
4. Video Input Source - Display
• After all setup, you can now put the input source into the monitors.
4.1. Screen Display - Insert Input Source
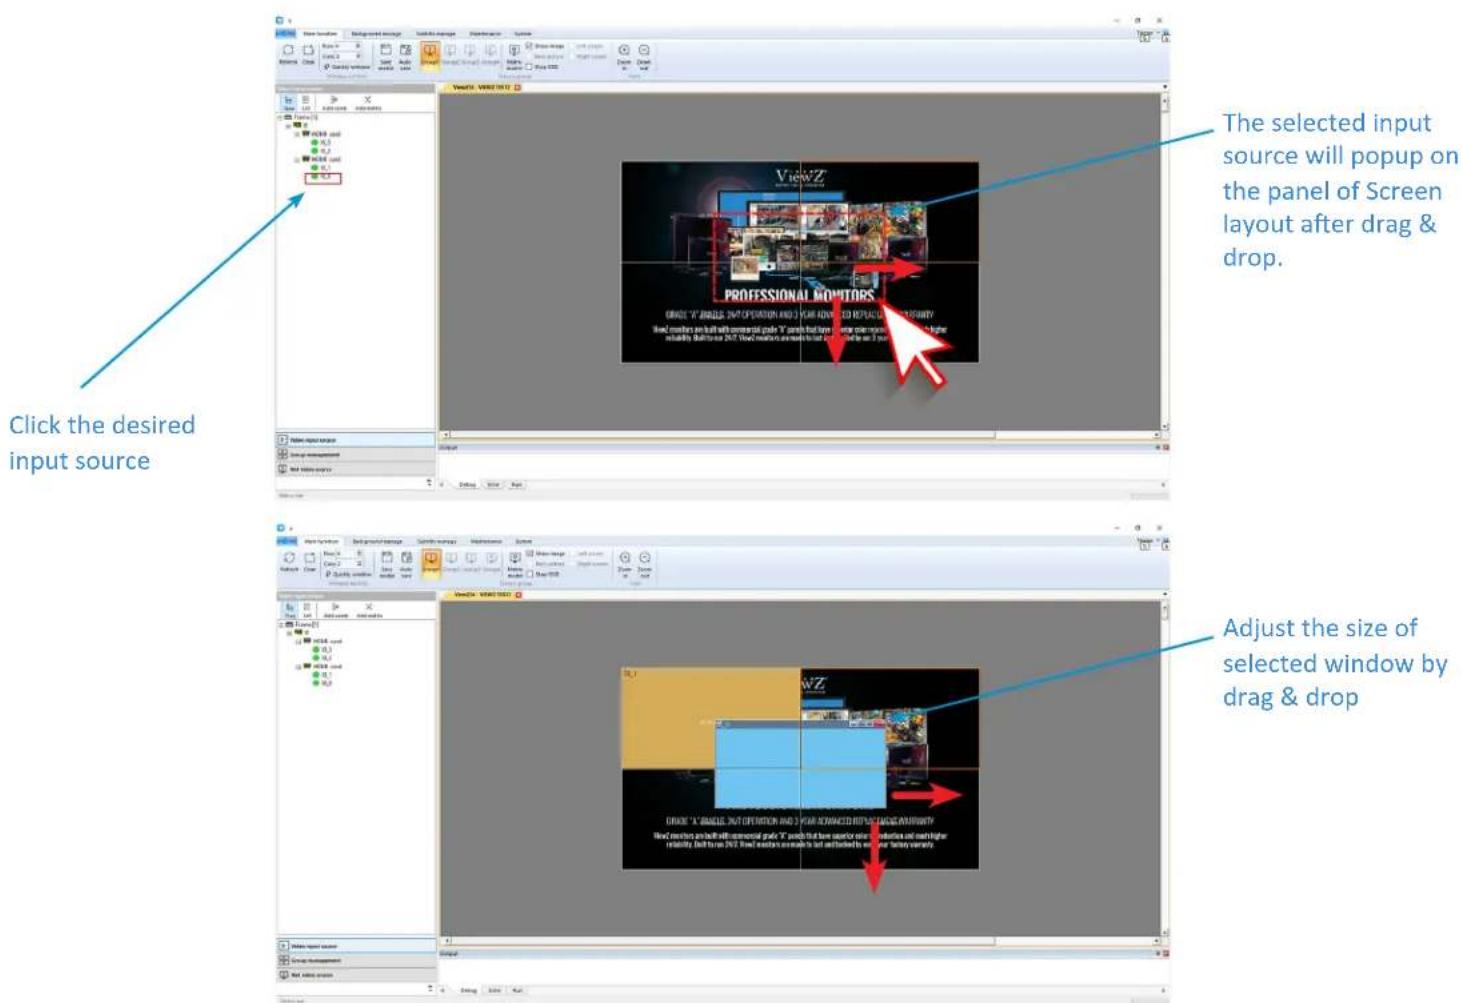
- To display the full screen with 1 input source, you need to click the desired input source on the Video input source panel and drag & drop the desired size on the SCREEN LAYOUT area. Then, the window will be popup on SCREEN LAYOUT area.
- Adjust the pop-up window (on the SCREEN LAYOUT panel) by drag & drop the selected window.
CONTROL OPERATION
Splicing Display Windows
4.2. Screen Display - Split the Single Screen
- You can divide one screen as multiple input windows (Maximum 9 windows per monitor). Also, you can divide a screen (composed of many monitors) as multiple areas.
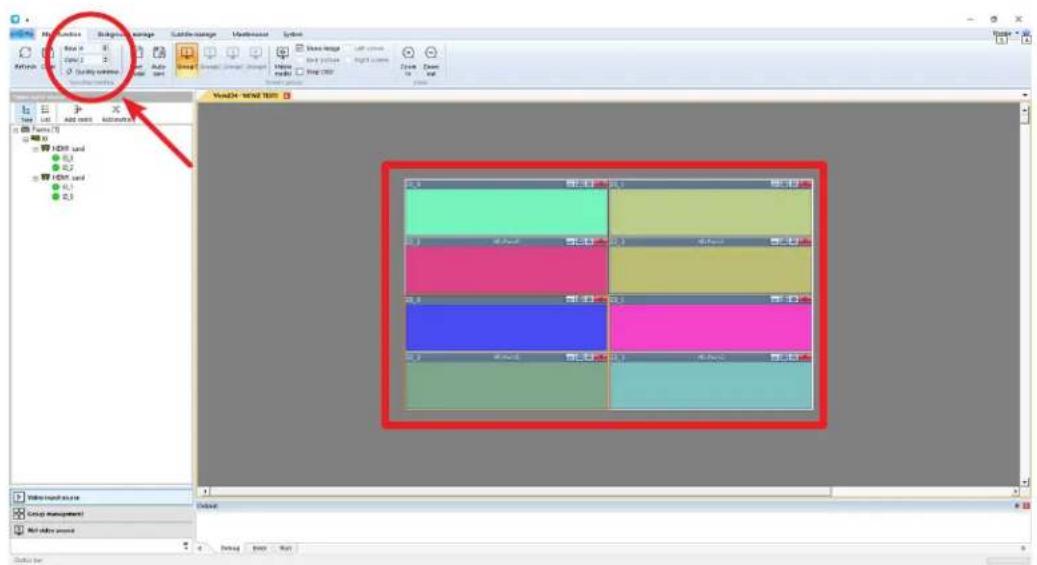
• There are two way to split the screen
- On MAIN NAVIGATION/Window control/Quickly Window, you can setup the number of row and column which you desired for a single screen ( composed of 1 monitor or multiple monitor ), split the single screen into multiple logical windows (screens), and then choose the logical window (screen) to open the input sources.
CONTROL OPERATION
Splicing Display Windows
4.2. Screen Display - Split the Single Screen
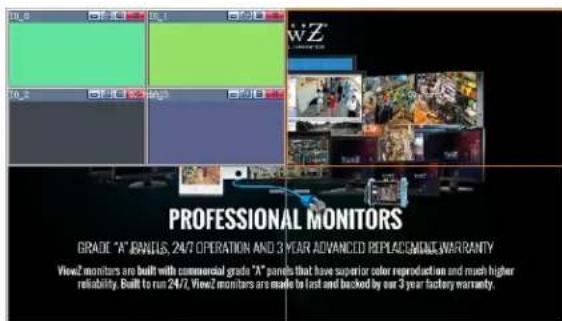
- On SCREEN LAYOUT window, choose the screen window which you want to split. After the selection, do right-click. Then, you can see the select the screen that needs to use the single-screen split quick template, right-click the mouse button as shown below.
- Select the template you want to apply, such as one, four, nine, sixteen & sixty screen.

Choose one of them based on your desire and then you need to choose video input on Select Video Source window for divided screens. Choose the input source from the left list, click the arrow and click 'OK' to be applied.

You can select the source - one by one. Or you can drag & drop multiple sources at a time.
CONTROL OPERATION
Screen Layout Area Operation
4.2.1. Screen Display - Setup One Screen for Multiple Monitors
- You can use lots of monitors as one screen.


- Go to Main Function tab and find MAIN NAVIGATION/Window control/Quickly Window, you can setup the number of row and column which you desired. In here, type/select 1 / 1 for row & column.
- Select the input source
CONTROL OPERATION
Screen Layout Area Operation
4.3. Screen Display - Positioning of Screen (Input Source)
- You can setup the position of input source window wherever you want in the screen area.
- On SCREEN LAYOUT, click & drag the selected input source window. You can also increase or decrease the size of window.

Drag & drop the window for resizing

- To make up the full screen by using input source, click the right-top corner icon or you can double click this window to fit 1 monitor.


Click the enlarge icon on top-right corner
CONTROL OPERATION
Screen Layout Area Operation
4.4. Screen Display - Layer (Input Source Window) Order
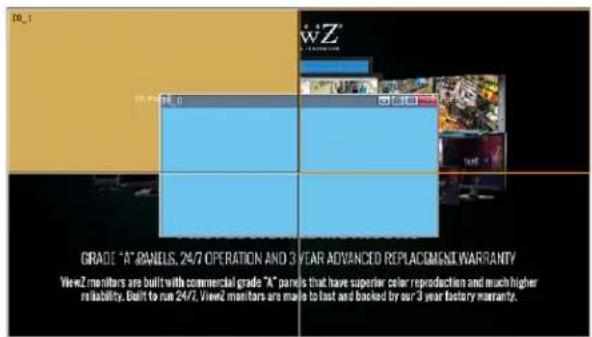
- When multiple input source windows are stacked, click one of them with the left mouse button, to directly put this source on top
- When multiple input source windows are stacked, right-click one of input source windows (which you want) and select the corresponding operation to adjust the layer(window) order - move down, move up, front and back.

Right-Click the desired window and choose 'Move up or Front / Move down or Back' to make the order
4.5. Screen Display - Close the Input Source Window
- To close an input source window, select the input source window and click the 'X' icon to close it.
- To close all input source window, right-click on the blank area of SCREEN LAYOUT and select Clear Screen

Click 'X' icon on the selected window

Right-click the desired window and select 'Clear Screen' to close the selected window
CONTROL OPERATION
Screen Layout Area Operation
4.6. Screen Display - Image Attribute
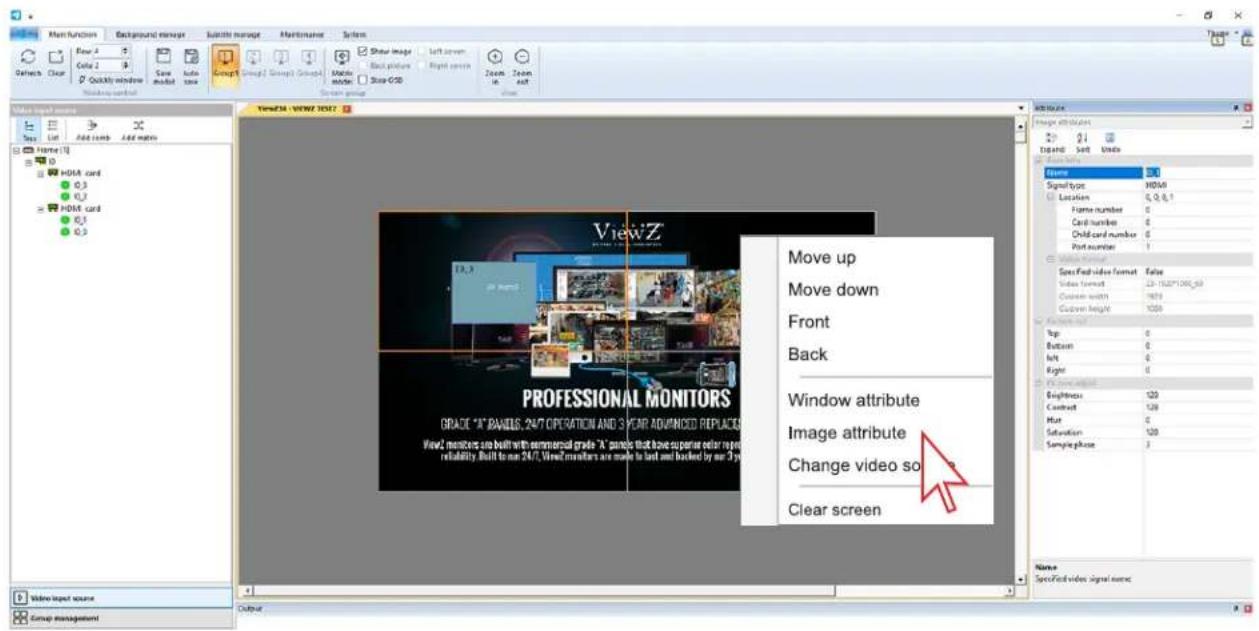
- The image attributes will show the information of the video input source, cropping, adjustment and input signal (name, type, interface location, and video format of the input signal).
-
If you want to see or adjust the image attribute:
-
The displayed input source window in the SCREEN LAYOUT, In the video input source, select the video signal whose image properties need to be adjusted, right-click, and select "Image Properties".
- The Image Attribute box will pop up on the right side of the control software interface. You can view and adjust the video signal in the Image Attribute, when you need to adjust.
To close the image property box, click the close button in the top-right corner of the image property box.
CONTROL OPERATION
Screen Layout Area Operation
4.7. Screen Display - Naming for Input Source
- You can give specific name for each video input source.
- Select the desired input source on the Video Input Source window and right click. And go to the Image Attribute window (on the right side).
- Change the video input source name in the Base Info/Name column, such as "Computer 1". After changing and click other place, the CMS SW will automatically change & save the modified name, as shown below.
![Main function Background manage Subtitle Refresh Clear Row 4 Col: 2 Quickly window Save model Auto save Group Window control Video Input source Tree List Add comp Add matrix Frame [1] 10 HDMI card 10_3 10_2 HDMI card 10_1 10_0 Video input source](/content/2026/05/834181/images/ffb08f37b3b719b5b20d9793e2ad13585418afe4ea29192e4a3f999817ecbcdd.jpg)

CONTROL OPERATION
Screen Layout Area Operation
4.7.1. Screen Display - Display Source Name on Screen layout area
- Input source name displayed on the top-left corner of input source window.
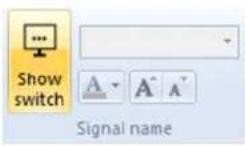
- You can click Show Switch icon to display the name or not.
- After click, you can edit the name / font size / font color & typeface at that window.

CONTROL OPERATION
Screen Layout Area Operation
4.8. Screen Display - Crop the Input Source
- The Picture Cut (crop) function is useful for specific usage. The Picture Cut can cut the left, right, top, and bottom parts of the input source image separately.
This function is useful when taking out the black edge of the video/image source or partially enlarging the signal source. - Select the desired part and enter the cutting value (pixel value). Or you can adjust the size by drag & drop the input source window on SCREEN LAYOUT area.


Regular display with 4 inputs
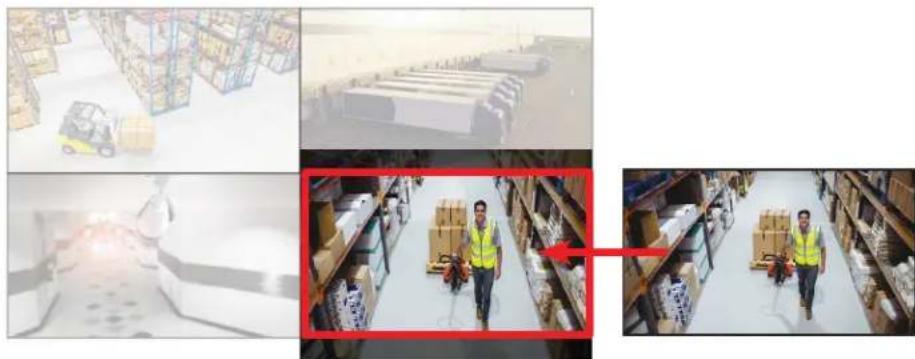
If you type the '50' the Top / Bottom of Picture cut, the selected image will be cut off 50 pixel at top/bottom.
CONTROL OPERATION
Screen Layout Area Operation
4.9. Screen Display - Adjust the Input Source
- Based on the type of video signal, the input source adjustment will be different.
- The color of the video source, including brightness, contrast, hue, and saturation, can be adjusted

- The brightness, sampling phase, horizontal and vertical offset of VGA input source can be also adjusted.
- If the VGA input source is noisy, the displayed image will be shaken. In this case, you need to adjust the value of sampling phase to fix this issue.
- If the VGA input source shows the black edge on the left and right sides, or shifted to one side, you can fix this by using of horizontal offset.
- If the VGA input source shows the black edge on the up and down sides, or offset to one side, you can fix this by using of vertical offset.
• After you applied the adjustment, the control software will save the adjusted parameters automatically. - Based on the input source type, there is a limitation for this adjustment.
CONTROL OPERATION
Group Management
5. Group - Save
- The Group management function is to save the plan which is convenient for the next usage.
• After the layout arrangement and input source adjustment is completed, you can save the current setup. - On the Main Function/Window Control, click the Save Modal button & enter the name of the current setup in the dialog box. If you do not need to keep the current setup, it is okay to skip this. If not, please process this step. You can overwrite the current setup to the existing one or add the new setup.
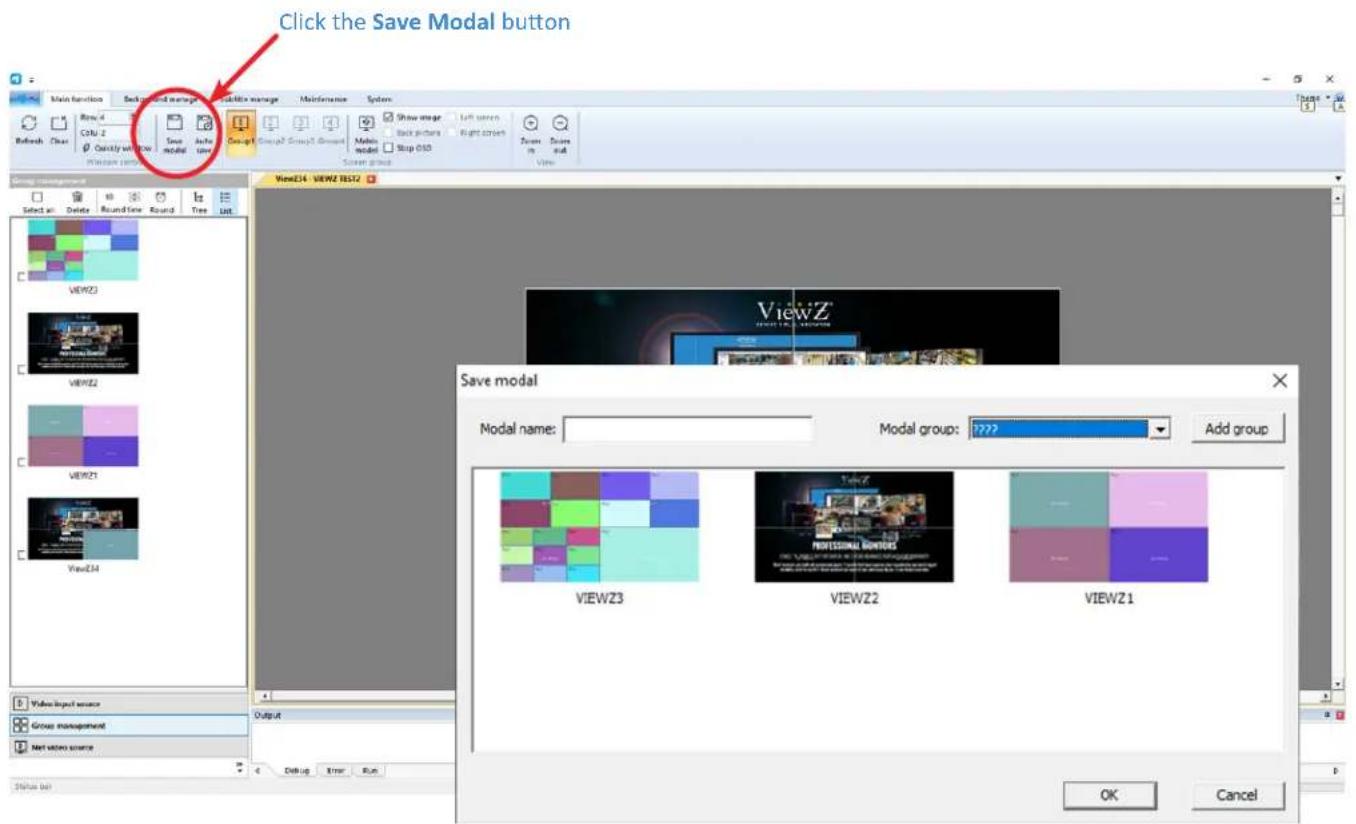
Make a new group or Add the current layout into the existing group
- The Group management function is to save the plan which is convenient for the next usage.
- After the layout arrangement and input source adjustment is completed, in the "Main function" tab, click the "Save Modal" button, and enter the name of the plan in the "Save Modal" window. If you do not need to group the plans, you can skip the plan group option.
- Click OK to save the plan directly. If you need to group the plans, you can select the already added plan group, and then click OK to save the plan to the corresponding group, or you can directly click OK to save the plan before adding a new group and move the saved plan to the corresponding plan group.
CONTROL OPERATION
Group Management
5. Group
- The grouping is necessary when you need to display the different layout video/image on the monitors. So, if you want to add groups, please follow next setp.
5.1. Group - Add
- On the Main Function/Window Control/Save Modal window, click Add Group and then Modal Group Atribute window will popup.
- Enter the new group name into the Modal Group Name.
- Set the play time based on your desire. You can setup the manual, everyday, specific date, weekday & time schedule. Also, you can setup the display time per group.
- The Switch Modal Time is the interval time between groups
- If you have a plan to display different group by order, click the icon (in the top-right corner) and load the desired group into the list.

CONTROL OPERATION
Group Management
5.1. Group - Add
-
After loading groups, the loaded group will be displayed in the right window of Modal group attribute. You can delete the group and change the order of display.
-
Click the OK button to save & exit. You can confirm this at the management tree. You can also start to run or wait until the scheduled time.
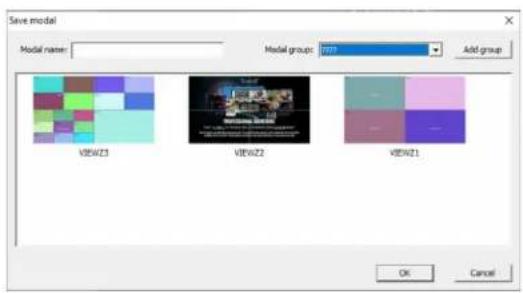
Save Modal window to make a new group or added the current layout into the existing group. Click 'Add group' to make the new one.
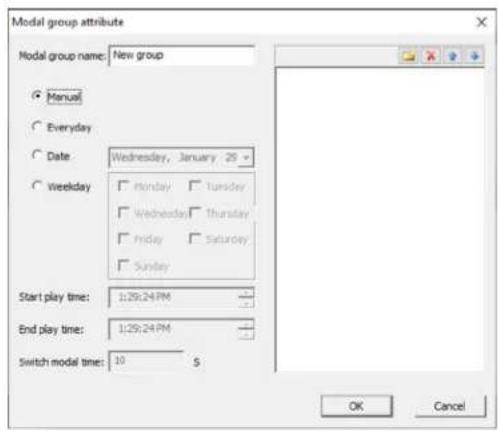
After setup, click 'OK'
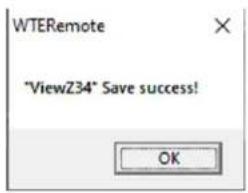

Try to save it again, then you can see the saved Group name on the list
CONTROL OPERATION
Group Management
5.2. Group - Automatic Save
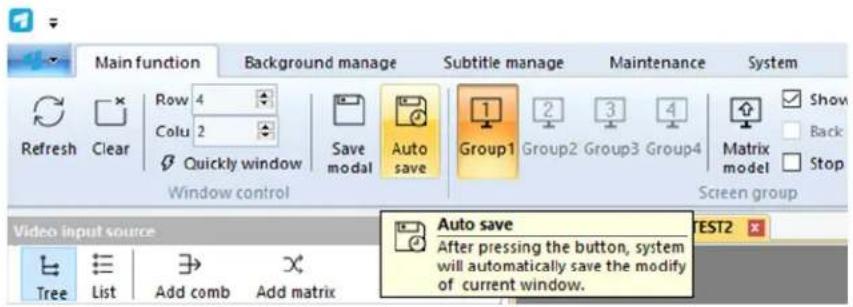
- On the MAIN NAVIGATION/Main Function/Window Control, click the Auto Save butto. During the adjustment of current group, the control software will automatically save the current setup when this button is activated.
- If Auto Save button is activated, the control software will automatically retrieve the previous setup when restarting the system.
- If you do not need to use this function, please deactivate this function - blue background button means 'Activated'
CONTROL OPERATION
Group Management
5.3. Group - Switch
- There are two ways to switch group (plan) display. One is manual and another is automatic switching.
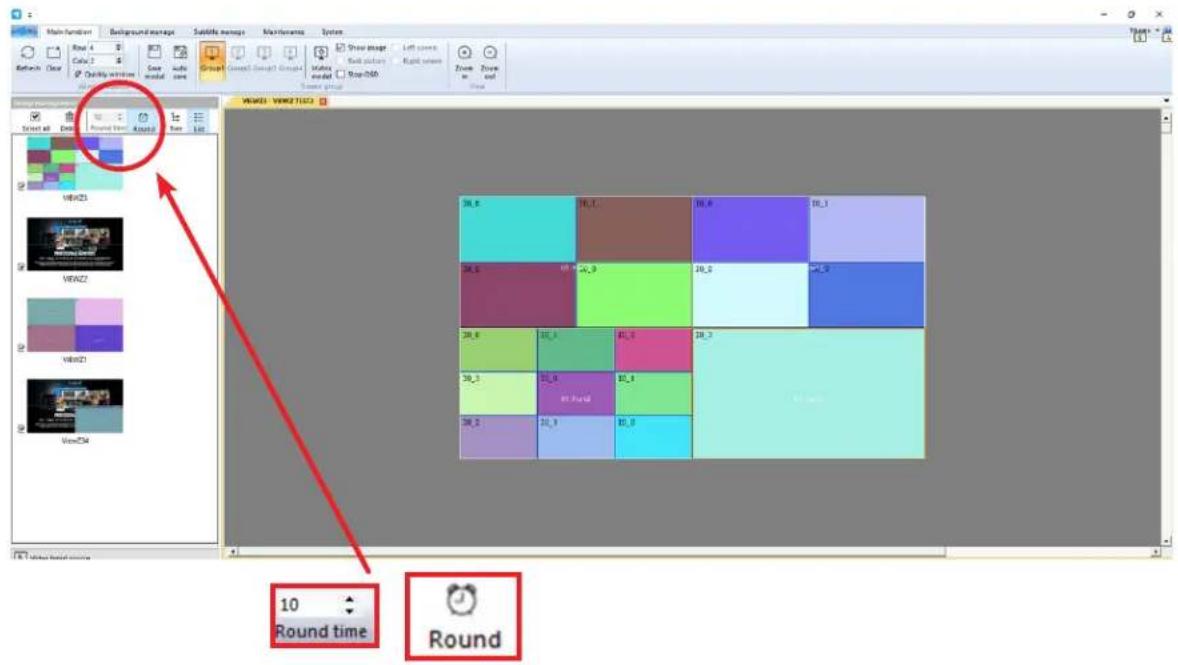
- Manual Switch: You can see the preview pictures of all saved plans in the Quick Menu/Group Management. Click the preview picture to switch to the group (plan).
- Automatic Switch: On the Group Mangement list, you can see the preview picture of saved plans.
Select the plan which you want to be loaded on the monitors.
Set the round time (the unit of decimal is second). 10 Round time
Click the Round button to start, click again to stop.

Round
CONTROL OPERATION
Network Input Source
6. Network Input Source
• Network Input Source is divided into two categories: IP camera and PC input sources.
- PC input sources include network desktop, network media server, streaming video and general output of computer video signals.
• Built-in IP decoder of the VZ-PRO Controller, the network signal will be decoded and displayed on the monitors.

Caution
- This function works when the optional IP decoder card (VZ-IP-IN2) to capture the IP camera signals up to 8 IP sources.
6.1. Network Input Source - Decorder Setup
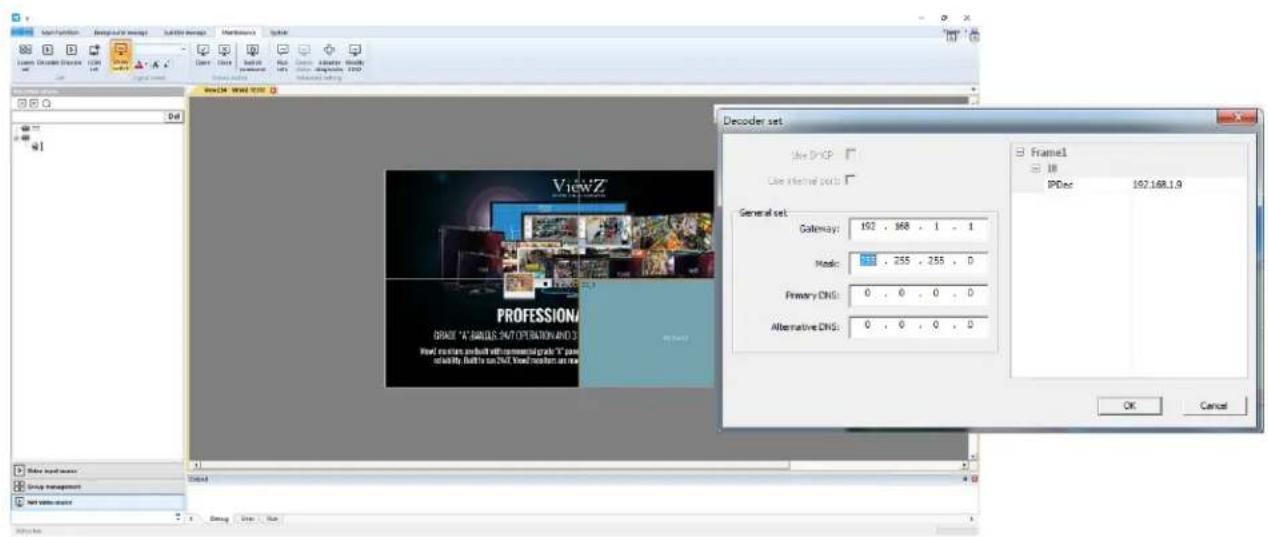
- To use the IP decoder card, you need to setup an IP address for each IP input-source. The decoder IP address setting method is as follows:
- On the MAIN NAVIGATION, go Maintenance/Decoder button to pop up the decoder setting window
- Type the IP/Gateway/Subnet Mask & DNS based on your network preference.
• After setup of the IP address, click OK to complete the setup
CONTROL OPERATION
Network Input Source
6.2. Network Input Source - Display Setup
- To setup the display of IP signal, you need to setup an IP address in 'Encoder Set' window. The decoder IP address setting method is as follows:
- On the MAIN NAVIGATION, go Maintenance/Encoder button to pop up the encoder setting window
- Type the IP/Gateway/Subnet Mask & DNS based on your network preference.
- Type the Name as you prefer and choose the Display Type / Group (layout)
- Display Type has options - Synchronous Echo, Cloud Screen, Signal Preview and Disable. Please select Synchronous Echo mode and then click OK to save & exit.

- On the MAIN NAVIGATION, go Main Function/Screen Group and click to check Show image.
- Double-click to open the newtwork input source, then the image/video will be synchronized with the SCREEN LAYOUT input-windows. (see the figure below)

CONTROL OPERATION
Network Input Source
6.3. Network Input Source - IP Camera Input
- You can access IP camera via IP address or RTSP streams (with H.264 encoding format) of DVR, NVR, streaming media server, encoder and other devices.
6.3.1. Network Input Source - IP Camera Input/Add Group
- If you have many IP cameras and display on the monitors, you need to make grouping of them.
-
In this case, you have to add groups manually. The specific steps are as follows::
-
On the QUICK MENU, click Net Video Source to enter the network video plan tab. Click the Add Camera button above the tab to pop up the Add IP Camera window.
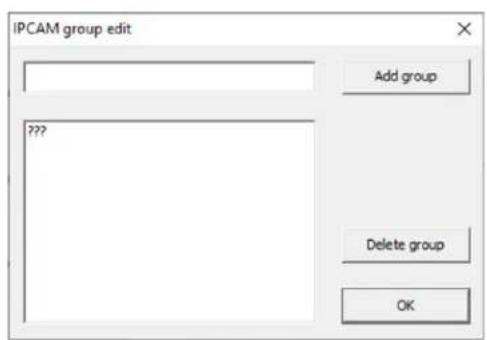
- On pop-up window, click Add Group to pop up the IPCAM Group Edit window.
- Enter the group name in the IPCAM Group Edit window.
- On IPCAM Group Edit windo, click Add Group button and then you can see the listed group name (which you typed). If you need to delete a group, you just select it and click Delete group button.
- Click OK, after necessary groups are added or deleted, to save & exit the window.
- Exit the IPCAM Group Edit window. Then, click Close to exit from Add IP Camera window.

CONTROL OPERATION
Network Input Source
6.3.1. Network Input Source - Add Camera
• Automatic discovery
- On QUICK MENU/Net Video Source, click the Auto Discovery (magnifier icon) button at the top area.
- The Input Username & Password window will pop up and type those to add cameras.
- The desired IP cameras should be located on the same network segment and the ONVIF protocol should be already turned on.
- Then, the cameras will be automatically listed under No Group (the software's default)

- If you want to move the auto-discovered cameras to different groups, select the desired camera (on the list) and right-click to select Move to Group to choose the corresponding group
- The name of the auto-discovered camera will be shown as IP address of the camera. If you want to change the camera name, right-click the camera and select Edit. The Add IP Camera window will pop up and then change the Name, then click Add to finish editing.
CONTROL OPERATION
Network Input Source
6.3.1. Network Input Source - Add Camera
- Manual Add
If the Automatic discovery process cannot find the desired camera or you want to add the RTSP streaming forwarded by the NVR, DVR, or streaming server, you should manually add the camera or RTSP streaming. The steps are as follows;
- On QUICK MENU/Net Video Source, click Add Camera ('+' icon on top) button to open the Add IP Camera window
- Select the Group, enter the Camera name (the default is IP address), and choose the Transport Mode (RTP / UDP; RTP over RTSP (TCP)
- Type the Main/Sub Media Stream URL/Width/Height - Most of camera manufacturer has their own address & size. If you do not know about this, please contact camera manufacturers.
- Select the Authentication Method & type the Username and Password - if the camera has the username & password to access it. If the camera does not have the account password, select Anonymous Access mode.
- Click Save button to add the IP camera to the list of Network Video Source and then click Close to exit.
- If you need to add multiple cameras, just change the Name & Information and click the Save button before closing.


Caution
- The camera should be based on the standard Onvif protocol
CONTROL OPERATION
Background
6.4. Background Mangement
- The Background Management function can edit and change the background of SCREEN LAYOUT.
-
It is easy to setup quickly. The steps are as follows:
-
On MAIN NAVIGATION/Background Manage, click Start Edit button to edit the background picture.
- Click Clear Picture, if Screen layout already has a background image.
- Click Add Picture, to add a new picture to the background.
- Click Full screen button in the top-right corner of the added picture.
- Click End Edit to setup the added picture and exit. If the position of each display unit picture is disordered after the background image setup, please check the screen setup or the switching mode activation.
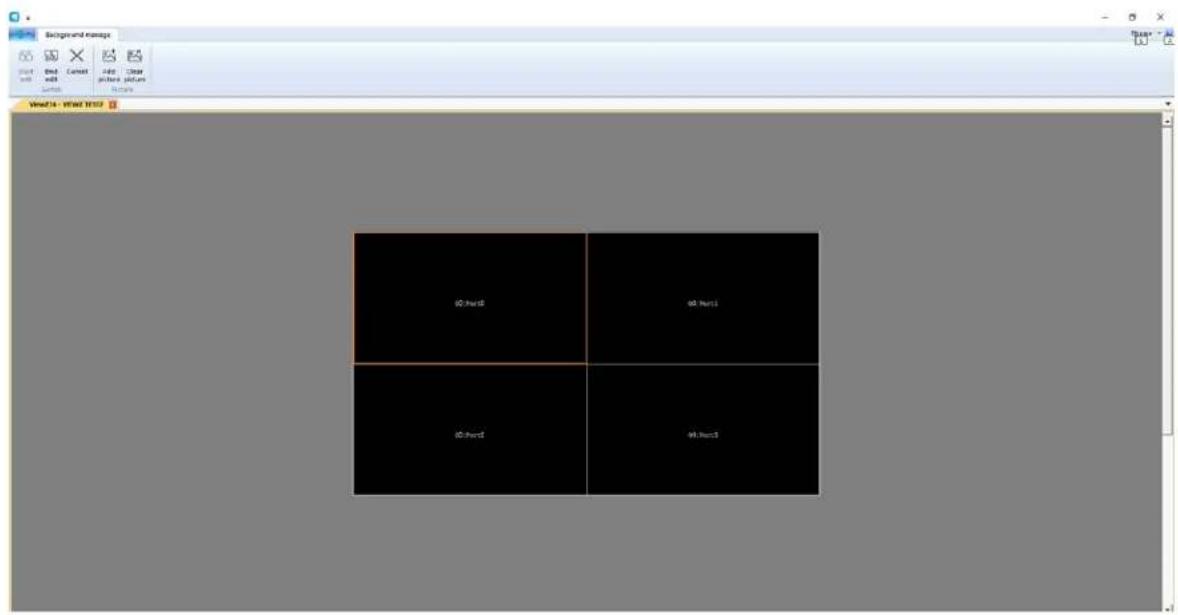
Click 'Start Edit' button to set the background image.
Caution
- You cannot process any other operation before ending this background editing mode.
CONTROL OPERATION
Background
6.4. Background Mangement

Click the Add Picture icon to find the background image
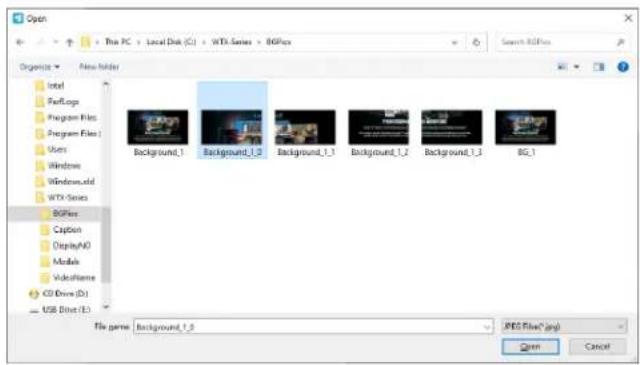
Find the proper background image on the browser. Select & click 'Open' to load the background image.

The background image will be basically loaded into the 1 monitor area. Double-click the background image window, then it will fit into the full screen.

Click 'End Edit' button to apply the background image.

Caution
- On MAIN NAVIGATION/Main Function, confirm the Back Picture box is checked.
- On MAIN NAVIGATION/Main Function, if you uncheck the Back Picture box, then the background image will be hiding.
CONTROL OPERATION
Subtitle
6.5. Subtitle Mangement - New Caption
• To create a caption, please follow the process:
- On MAIN NAVIGATION/Subtitle Manage, click Start Edit button and then you can use this function.
- After entering the Subtitle Manage mode, please press & hold the left mouse button and draw the subtitle display area on the Screen layout - the drawing area will be colored as gray box.
- Release the left mouse button to confirm the subtitle displayed area. Then, control software will show the Edit Subtitle Content window to make/edit the subtitle content, subtitle label (name), font-family, font-size, scroll direction & etc.
- Click OK to save the created/edited a subtitle.
- On MAIN NAVIGATION/Subtitle Manage, click End Edit button to exit subtitle editing mode.

By using the mouse, drag & drop a rectangle at the SCREEN LAYOUT area - which you want to display the subtitle. You can select a monitor or multiple monitors to display the subtitle

Caution
- You cannot process any other operation before ending this subtitle editing mode.
CONTROL OPERATION
Subtitle
6.5. Subtitle Mangement - Import the Existing Caption
- On MAIN NAVIGATION/Subtitle Manage, click Start Edit button and then you can use this function.
- Click the Import button to open the file interface, then select the saved subtitle file, and click Open to load it. The caption file has 'cap' extension.


You can load the saved caption file.
CONTROL OPERATION
Subtitle
6.5. Subtitle Mangement - Adjust Font, Size, Color, Scroll Direction & Scroll Speed
- On MAIN NAVIGATION/Subtitle Manage, click Start Edit button and then you can use this function.
- When you create a new caption, you will see the 'Edit Subtitle Content' window. You just need to type the info whatever you want to display.

6.6. Subtitle Mangement - Delete the Caption
- On Subtitle Editing Mode, click the close button. The top-right corner of the subtitle window to delete selected subtitle.
- On MAIN NAVIGATION/Subtitle Manage, click Start Edit button and then click on the screen.
CONTROL OPERATION
Subtitle
6.5. Subtitle Mangement - Adjust Font, Size, Color, Scroll Direction & Scroll Speed
- On MAIN NAVIGATION/Subtitle Manage, click Start Edit button.
- On Subtitle Editing Mode/Attribute, click the font, font-color, font-background color and font size to adjust.
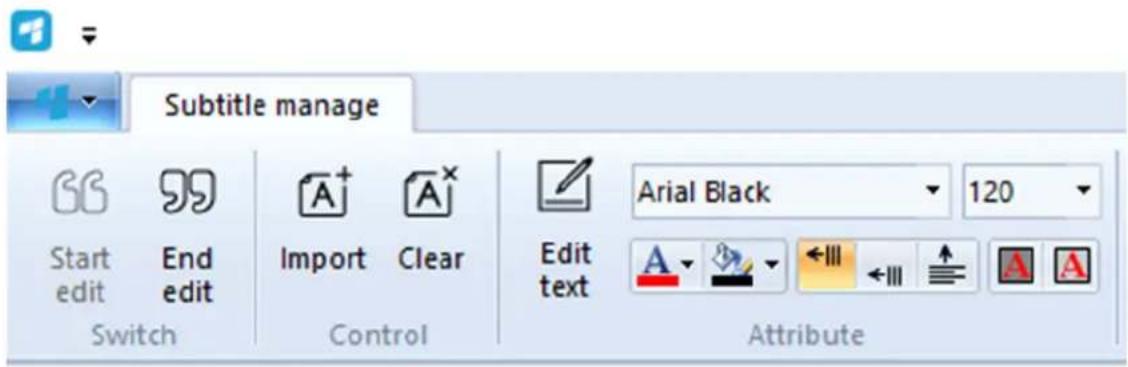
- On Subtitle Editing Mode/Attribute, click the subtitles scroll

button to scroll subtitle from right to left.
- On Subtitle Editing Mode/Attribute, click the subtitles scroll

button to scroll subtitle from bottom to top.
- On Subtitle Editing Mode/Attribute, click the corresponding speed icon in the Roll Speed panel to adjust the subtitle scroll speed, as shown in the figure:


Caution
- You cannot process any other operation before ending this subtitle editing mode.
CONTROL OPERATION
Maintenance
6.6. Maintenance
- Maintenance mode setup the Input/Output ports, Input Source Name, Power On/Off Remote Control via RS232 and the VZ-PRO Controller Operating Status.

6.6.1. Maintenance - Screen Set & Backdisplay Screen
- About the Screen Set, please refer to page 14, 2. Synchronize Monitors with Control Software. The Screen Set mainly described about Screen Group setup.
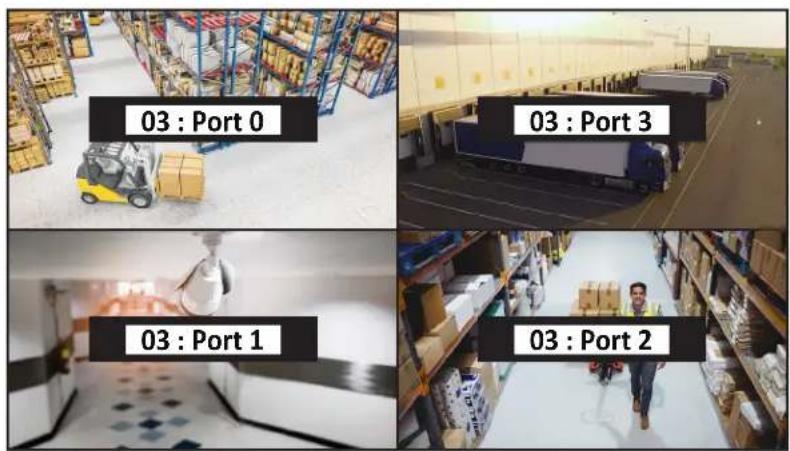
- On MAIN NAVIGATION/Maintenance, click Screen Set button and then Screen Set window will popup. In this window, you can see the Backdisplay Screen setup. The Backdisplay Screen means a group of monitors which connected to the output port. The Backdisplay Screen monitors is adjusted by the actual monitor number.
- The next step will show how to synchronize between the Backdisplay Screen setup and actual monitors (We will show one Screen Set as an example):

CONTROL OPERATION
Maintenance
6.6.1. Maintenance - Screen Set & Backdisplay Screen
- On the Screen Set window of MAIN NAVIGATION/Maintenance, click enable Screen Group and set the physical screens and logical screens.
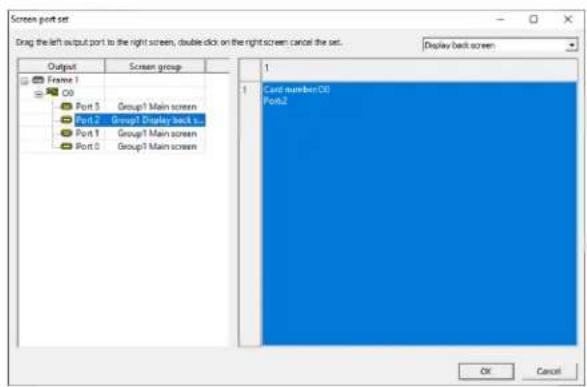
ex. If you have total 4 monitors (2x2), you decide to use 3 monitors (as the Main Group screens) and 1 monitor (as a Backdisplay Screen). Then, you need to type Physical Screens Row - 3 & Col - 1 and Logical Screens Row - 1 & Col - 1.
- After input Physical & Logical Screens number, click the Port-set button (on the top-right corner)
- On the Screen Port Set window, select Main Screen on the top-right corner selection window.
- Drag & drop the left output port (labeled as Main Screen) to the right window - each section means a single monitor.
- Select Display Back Screen on the top-right corner selection window.
- Drag & drop the left output port (labeled as Display Back Screen) to the right window.
- Click OK to complete the setup.

6.6.2. Maintenance - Two Videowall Monitors (two sets located at different location)
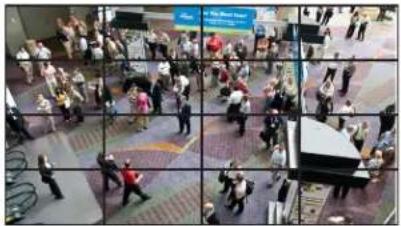
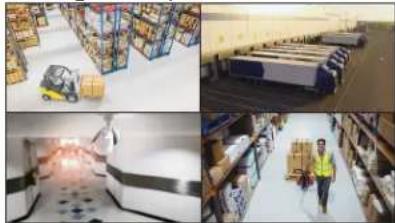
- The Left & Right Independent Screen function is to show the same display on two location / two monitor groups.
- The two monitor groups share the same display.
Left Independent Screen

Location A
Right Independent Screen
Location B
- Connect the isolated monitor set to the VZ-PRO Controller and then setup this monitor group as a single screen mode.
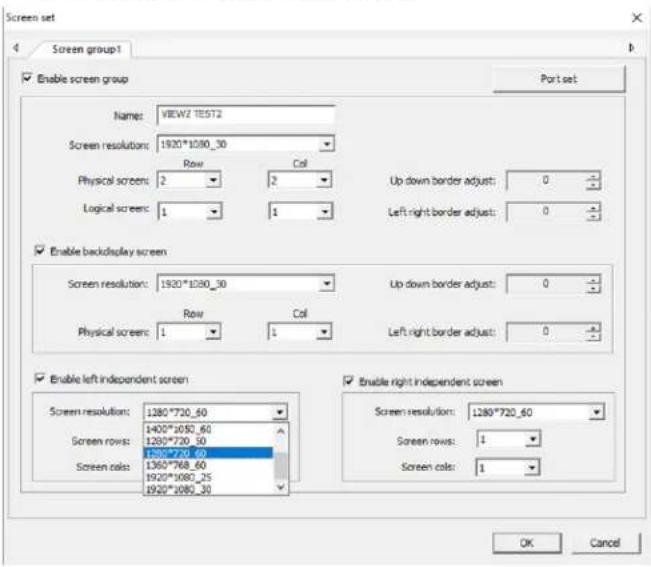
- On the Screen Set window of MAIN NAVIGATION/Maintenance, check up the Enable Left Independent Screen & Enable Right Independent Screen
- Choose the Screen Resolution and Row / Column numbers based on the actual monitor array.
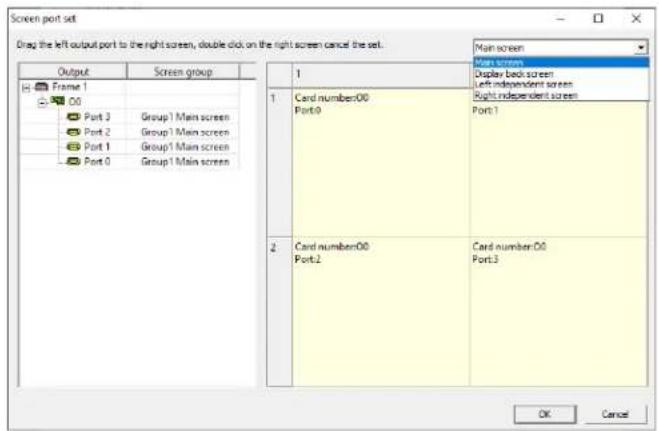
- Click the Port Set button. Then, the Screen Port Set window will popup.
- On Screen Port Set window, choose one of Left / Right Independent Screen (on top-right corner).
-
Then, choose the desired input source from the left tree and drag&drop into the right panel area. And repeat same work for Left or Right Independent Screen.
-
Click OK to complete the setup.
CONTROL OPERATION
Maintenance
6.7. Maintenance - Decode & Encode
- About the Decode and Encode, please refer to page 41 - Decoder setting and page 42 - Preview display setting.
6.8. Maintenance - Pocket Format
- The center management platform send COMMANDS to the VZ-PRO Controller or the VZ-PRO Controller send responses to the center management platform.
The data will collect all data pocket, the data pocket format start with \$ and end with ^ character.
OP means operate commands, one char.
SCAR means the screens group numbers, one char.
| $ OP SCAR DATA^ |
Serial data format is UTF-8 hex characters.
6.9. Maintenance - Com port Setup
- Set the Port and Baud rate as the picture below

Parity check: Noparity
Databits:8
Stop bit:1
CONTROL OPERATION
Maintenance
6.10. Maintenance - Serial COMMAND
- On Quick Menu, click Group Management. And use below code for Serial Command.
| Group Management - Central Command | |
| OP | 1 |
| SCR | 1 byte - range from 1 to 4, specify the sequence number of the screen packet |
| DATA | None |
| Example | Call the screen group 1 - 11Call the screen group 2 -12^Call the screen group 3 - 13Call the screen group 4 -14^ |
| Group Management - Device Response | |
| OP | 2 |
| DATA | Multiple plan names separated by spaces (UTF8 format). E.g: Plan 1 Plan 1 |
| Switch Group - Central Command | |
| OP | 3 |
| SCR | 1 byte - range from 1 to 4, specify the sequence number of the screen packet |
| DATA | Group Name - UTF8 format |
| Example | Call the screen group 1 -plan 5: 31plan 5Call the screen group 2 -ab:32ab^Call the screen group 3 -123ab: 33123abCall the screen group 4 -plan6a:34plan6a^Plan 1: 24 33 31 31 5EPlan 2: 24 33 31 32 5EPlan 3: 24 33 31 33 5E |
| Switch Group - Device Response | |
| OP | 4 |
| DATA | OK or Error |
CONTROL OPERATION
Maintenance
6.10. Maintenance - Serial COMMAND
| Switch the Video Source - Central Command | |
| OP | 5 |
| SCR | 1 byte - range from 1 to 4, specify the sequence number of the screen packet |
| DATA | [Screen Type][Number][Video Source Number]For the DATA, the [ ] cannot omitScreen type: 0 = main screen, 2 = Left independent screen, 3 = right independent screenNumber: You can find it at the 'Window Attribute' panel. |
 | |
| Video Source Number: According to the Frame number(f), Card number(c),Child card number(s) and Port number(p) to calculate, please refer to the picture below: | |
| Calculate method : video source number=c*256+p | |
| Example | Replace the video source 259 to Number 1 on the main screen 51[0][1][259]Replace the video source 544 to Number 1 on the left independent screen51[2][1][544]^Replace the video source 359 to Number 1 on the right independent screen 51[3][1][359]Replace the video source 259 to Number 2 on the main screen52[0][2][259]^ |
Switch the Video Source - Device Response
- On Group Management/Signal Name, click Show switch button to choose showing the source name or not - on the Screen Layout. Also, you can setup the source name format, colors and etc.


- Source Name Edit :
- Select the input source name from the QUICK MENU tree
- Right click & choose Image Attribute
- Then, the Image Attribute information window will popup on the right
- Edit the source information as you want
CONTROL OPERATION
Maintenance
6.12. Maintenance - Screen Switch
- On Screen Control Command, you can setup the power on/off commands for monitors.
- Type the Open and Close commands to control monitor power on/off remotely.

6.12. Maintenance - Advanced Setting
- On MAIN NAVIGATION/Maintenance/Advanced Setting, this function is using for check the VZ-PRO video wall controller working states.
- Modify EDID - you can set the screens drive board resolution.

CONTROL OPERATION
System
7. System
- On MAIN NAVIGATION/System, you can control connection between monitor and VZ-PRO controller, setup the password, power on/off and etc.

- Connect / Disconnect : you can simply click Connect or Disconnect icon to connect between the VZ-PRO Controller and the monitors.
• Power control : Remotely control the power on/off of monitors - License : Load the proper license to the VZ-PRO Controller. If you expand your VZ-PRO Controller input/output, then you need to load the proper license file.
- User Manage : Create an user and assign the role to control this control software.
- Modify Password: Setup the password for the user
• Language : Select the User Interface language
• Server IP SET : Assign the IP address of VZ-PRO Controller - Restore Factory Default : Reset the VZ-PRO Controller setting

User Management Window

EDID set window
CONTROL OPERATION
System
7.1. System - Load License
- When you add input/output card, you need to load & reactivate the license.
- On MAIN NAVIGATION/System, click 'Import License' button to load a license file.

- When you click the 'Import License' button, you can see the popup of file browser. Please find a file (which name is 'xxxxx.lic' and click 'Open' button to load it.
- If you successfully load the license file, the system will show the 'Success' message popup.
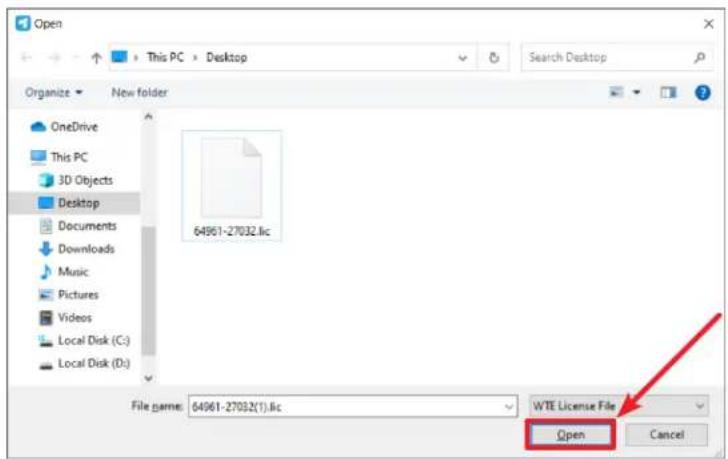
Popup the file browser and find 'XXXX.lic' file

When the system successfully load the license file, you will see this popup window.
TROUBLESHOOTING GUIDE
- Check the following before calling for service.
- If the same problems continue after checking, contact the reseller you purchased the controller from.
| At start | Use this troubleshooting guide to help fix issues you have. If symptom persists, follow the instructions below. After following the instructions below, please contact your reseller or call us at 1-888-99-VIEWZ. |
| The source layer creation fails in a simple scenario, and nothing is displayed on the screen | Click the reset button (on the back of controller) or check the input source |
| Power light is off | Check if the power cable is plugged in firmly |
| Big screen black | Check if the corresponding video connection of the device is reliable |
| Board stuck abnormally | Power off and restart, if you can't solve the problem, please contact your supplier |
| Video input source detection is invalid | Check the video input card is securely installed or the video input format is supported |
| Unable to start | Please reset the power and check it.If the controller is still not recovered, please contact your supplier. |
| Videowall Control SW cannot connect VZ-PRO Controller | Please check the network address, both VZ-PRO Controller and Local Videowall Control PC, is located in the same network.Ex. both devices should have like 192.168.0.XXX & 192.168.0.XXPlease check the cable connection. |
Caution
- Before contacting us, please find out the product name/model and serial number.
NOTE
WARRANTY
ViewZ USA LIMITED 3 YEAR WARRANTY
What and Who is Covered by this Limited Warranty and for How Long
ViewZ USA warrants this product to be free from defects in material and workmanship for 3 years to the original owner of this product. The limited warranty is valid only for the original purchaser of the product.
What ViewZ USA Will Do
At the sole discretion of ViewZ USA, ViewZ USA will repair or replace any product or product part that is defective. If ViewZ USA chooses to replace a defective product or part, a replacement product or part will be shipped to you at no charge, but you must pay any labor costs.
What is Not Covered; Limitations
ViewZ USA disclaims any liability for damage to mounts, adapters, displays, projectors, other property, or personal injury resulting, in whole or in part, from improper installation, modification, use or misuse of its products.
ViewZ USA disclaims all other warranties, express or implied, including warranties of merchantability and fitness for a particular purpose. ViewZ USA is not responsible for incidental or consequential damages, including but not limited to, inability to use its products or labor costs for removing and replacing defective products or parts. Some states do not allow the exclusion or limitation of incidental or consequential damage, so the above limitation or exclusion many not apply to you.
What Customers Must Do for Limited Warranty Service
If you discover a problem that you think may be covered by the warranty you MUST REPORT it in writing to the address below within thirty (30) days. Proof of purchase (an original sales receipt) from the original consumer purchaser must accompany all warranty claims. Warranty claims must also include a description of the problem, the purchaser's name, address, and telephone number. General inquiries can be addressed to ViewZ USA Customer Service at 1-888-998-4399. Warranty claims will not be accepted over the phone or by fax.
ViewZ USA
Attn: Warranty Claim
177 W. Orangethorpe Ave.
Placentia, CA 92870
How State Law Applies
This warranty gives you specific legal rights, and you may also have other rights which vary from state to state.
Disclaimer
ViewZ USA intends to make this manual accurate and complete. However, ViewZ USA makes no claim that the information contained herein covers all details, conditions or variations, nor does it provide for every possible contingency in connection with the installation or use of this monitor. The information contained in this document is subject to change without notice or obligation of any kind. ViewZ USA makes no representation of warranty, expressed or implied, regarding the information contained herein. ViewZ USA assumes no responsibility for accuracy, completeness or sufficiency of the information contained in this document.
Contact Us
NORTH AMERICA
177 W. Orangethorpe Ave.
Placentia, CA 92870
USA and Canada
rma@viewzusa.com
Phone: 1-888-998-4399
Fax: 1-714-996-1138
© ViewZ USA
- CONTENTS
- SAFETY INSTRUCTION 3
- INSTALLATION 6
- SETUP 12
- TROUBLE SHOOTING 67
- WARRANTY 69
- SAFETY INSTRUCTION
- IMPORTANT SAFETY INSTRUCTION
- MARK INDICATION AND SUBSTANCE
- WARNING
- CAUTION
- CAUTION - EQUIPMENT GROUNDING REQUIREMENTS
- AVAILABLE TEMPERATURE & HUMIDITY
- INSTALLATION
- INSTALLATION TOOLS
- ASSEMBLY COMPONENTS - PROVIDED
- SYSTEM REQUIREMENTS
- LOCAL VIDEOWALL CONTROL PC H/W REQUIREMENT
- BASIC FEATURES
- VZ-PRO ARCHITECTURE
- VIDEO INTERFACE SIGNALS
- VIDEO WALL FUNCTIONS
- OTHER FUNCTIONS
- CONNECT EXTERNAL EQUIPMENTS
- POWER ON - CONNECT ALL CABLES
- INSTALL CONTROL SOFTWARE
- SETUP WTREMOTE AND IP SETTING SOFTWARE
- PREPARE THE LOCAL-CONTROL PC WITH WINDOW OS
- INSTALL WTREMOTE VIDEOWALL CONTROLLER SW
- SETUP VIDEOWALL & CONNECTION
- SETUP THE CONNECTION BETWEEN VZ-PRO CONTROLLER AND CONTROL SOFTWARE
- CONNECT VZ-PRO VDEO WALL CONTROLLER VIA SW
- CONTROLLER IP ADDRESS
- CHANGE IP ADDRESS
- IP SETTING SOFTWARE
- CONTROLLER SETUP
- VIDEOWALL MONITOR SETUP
- SYNCHRONIZE MONITORS WITH CONTROL SOFTWARE
- SYNCHRONIZE MONITORS WITH CONTROL SOFTWARE - LOGICAL & PHYSICAL SETUP
- CONTROL OPERATION
- WTREMOTE - VIDEOWALL CONTROLLER SOFTWARE INTERFACE
- INTERFACE
- MAIN FUNCTION / ADDITIONAL SUB SCREEN
- SETUP THE ADDITIONAL SUB SCREEN
- ADDITIONAL SUB SCREEN
- ADDITIONAL INDEPENDENT SCREEN
- SETUP THE INDEPENDENT SCREEN
- MAIN FUNCTION / SCREEN GROUP
- CREATE & SETUP MULTIPLE SCREEN GROUPS
- SCREEN GROUP
- MATRIX MODE
- ENABLE / DISABLE MATRIX MODE
- VIDEO INPUT SOURCE
- CMS SW - VIDEO INPUT SOURCE TREE
- VIDEO INPUT SOURCE - TREE
- VIDEO INPUT SOURCE - LIST
- VIDEO INPUT SOURCE - ADD COMB
- DISPLAY INPUT SOURCE
- VIDEO INPUT SOURCE - DISPLAY
- SCREEN DISPLAY - INSERT INPUT SOURCE
- SPLICING DISPLAY WINDOWS
- SCREEN DISPLAY - SPLIT THE SINGLE SCREEN
- SCREEN LAYOUT AREA OPERATION
- SCREEN DISPLAY - SETUP ONE SCREEN FOR MULTIPLE MONITORS
- SCREEN DISPLAY - POSITIONING OF SCREEN (INPUT SOURCE)
- SCREEN DISPLAY - LAYER (INPUT SOURCE WINDOW) ORDER
- SCREEN DISPLAY - CLOSE THE INPUT SOURCE WINDOW
- SCREEN DISPLAY - IMAGE ATTRIBUTE
- SCREEN DISPLAY - NAMING FOR INPUT SOURCE
- SCREEN DISPLAY - DISPLAY SOURCE NAME ON SCREEN LAYOUT AREA
- SCREEN DISPLAY - CROP THE INPUT SOURCE
- SCREEN DISPLAY - ADJUST THE INPUT SOURCE
- GROUP MANAGEMENT
- GROUP - SAVE
- GROUP
- GROUP - ADD
- GROUP - AUTOMATIC SAVE
- GROUP - SWITCH
- NETWORK INPUT SOURCE
- NETWORK INPUT SOURCE - DECORDER SETUP
- NETWORK INPUT SOURCE - DISPLAY SETUP
- NETWORK INPUT SOURCE - IP CAMERA INPUT
- NETWORK INPUT SOURCE - IP CAMERA INPUT/ADD GROUP
- NETWORK INPUT SOURCE - ADD CAMERA
- MANUAL ADD
- BACKGROUND
- BACKGROUND MANGEMENT
- SUBTITLE
- SUBTITLE MANGEMENT - NEW CAPTION
- SUBTITLE MANGEMENT - IMPORT THE EXISTING CAPTION
- SUBTITLE MANGEMENT - ADJUST FONT, SIZE, COLOR, SCROLL DIRECTION & SCROLL SPEED
- SUBTITLE MANGEMENT - DELETE THE CAPTION
- MAINTENANCE
- MAINTENANCE - SCREEN SET & BACKDISPLAY SCREEN
- MAINTENANCE - TWO VIDEOWALL MONITORS (TWO SETS LOCATED AT DIFFERENT LOCATION)
- MAINTENANCE - DECODE & ENCODE
- MAINTENANCE - POCKET FORMAT
- MAINTENANCE - COM PORT SETUP
- MAINTENANCE - SERIAL COMMAND
- MAINTENANCE - SCREEN SWITCH
- MAINTENANCE - ADVANCED SETTING
- SYSTEM
- SYSTEM - LOAD LICENSE
- TROUBLESHOOTING GUIDE
- NOTE
- WARRANTY
- VIEWZ USA LIMITED 3 YEAR WARRANTY
- WHAT AND WHO IS COVERED BY THIS LIMITED WARRANTY AND FOR HOW LONG
- WHAT VIEWZ USA WILL DO
- WHAT IS NOT COVERED; LIMITATIONS
- WHAT CUSTOMERS MUST DO FOR LIMITED WARRANTY SERVICE
- HOW STATE LAW APPLIES
- DISCLAIMER
- CONTACT US
- NORTH AMERICA
Brand : ViewZ
Model : VZ-PRO
Category : Processor