
TIH36 - Cooker Thor - Free user manual and instructions
Find the device manual for free TIH36 Thor in PDF.


| Product Type | Dual Fuel Range (Gas Cooktop + Electric Oven) |
| Model | TIH36 (36 inch width) |
| Overall Dimensions (H x W x D) | 39 3/4 in x 36 in x 27 1/2 in |
| Oven Capacity | Main oven: approx. 5.0 cu ft; Secondary oven: not applicable |
| Weight | Approximately 250 lbs (113 kg) |
| Fuel Type | Natural Gas (convertible to LP with kit) |
| Electrical Requirements | 240V, 60Hz, 50A dedicated circuit; NEMA 14-50R receptacle |
| Gas Supply Pressure (Natural Gas) | 5 in WC (manifold); 10 in WC (maximum) |
| Cooktop Burners | 6 burners: 4 x 2000 BTU, 2 x 5000 BTU (typical for 36" model) |
| Oven Functions | Bake, Broil, Convection Bake, Convection Roast, Convection Defrost, Dehydration |
| Oven Temperature Range | 150°F to 500°F (66°C to 260°C) |
| Broiler Type | Infrared electric broiler (3500W) |
| Oven Heating Elements | Top: 850W; Bottom: 3000W (main oven) |
| Ignition System | Electronic spark ignition for all burners |
| Anti-Tip Device | Included; must be installed to prevent tipping |
| Oven Door | Removable for cleaning; with safety stops |
| Oven Light | Replaceable bulb (type TBD) |
| Cleaning | Manual cleaning; removable burner caps, porcelain interior |
| Warranty | 2 years parts and labor |
| Certifications | CSA, ANSI Z21.1 |
Frequently Asked Questions - TIH36 Thor
User questions about TIH36 Thor
0 question about this device. Answer the ones you know or ask your own.
Ask a new question about this device
Download the instructions for your Cooker in PDF format for free! Find your manual TIH36 - Thor and take your electronic device back in hand. On this page are published all the documents necessary for the use of your device. TIH36 by Thor.
USER MANUAL TIH36 Thor
natural_image
Exterior view of a modern stainless steel THOR oven with multiple gas stove handles and open doors (no visible text or symbols)Safety and Warnings
Table of Contents
- Warnings ....4
- Welcome 6
- Before You Start ....7
- Safety and Warnings 8
Safety Symbols 8
Electrical Shock Hazard 9
Tipping Hazard 9
Explosion Hazard....11
Fire Hazard 11
Poisoning Hazard....12
Hot Surface Hazard 12
Other Safety Tips....14
- Dual Range Overview....16
48 inch dual range sample 16
Cooktop Equipment 18
- Installation Instructions....19
On the next figure, item A is:....19
7. Dimensions and Clearances ...... 21
8. Positioning of Range 23
Top Hood and Cabinet Specifications ....27
- Important Notes to the Installer 29
Important Note to the Consumer 29
Important Safety Instructions to the Installer....29
Model and Serial Number Location ....31
- Electrical Installation 32
Power Supply Cord Kit....32
Access to Terminal Block....33
Electrical Shock Hazard 33
Electrical Connection....34
Electric Power Supply Requirements 35
Electrical Grounding Instructions....39
- Gas Supply Requirement......40
Connect Range to Gas Supply 40
After installation: 41
- First Use....42
Before you start 42
Conditioning the oven....42
Positioning the shelves....43
- Cooktop Safety Guidelines 45
Surface Burner Ignition 46
Simmer and Boil 46
Flame Size....47
Safety and Warnings
Power Failure 47
Cooktop....47
Burner Grates....48
Oven Burner Use 49
Broil Burner Use 49
Oven Cooking Safety Guidelines 50
- Oven Function 51
Natural Airflow Bake 51
Convection Bake....51
Convection Roast 51
Convection Defrost ....52
Defrosting....52
Convection Dehydration 52
- Broiler Operation....53
Preheating....53
To Broil 53
Setting Broil....53
Broiling guidelines....54
- For the models with Griddle ....55
Before Using the Griddle....55
Use of the griddle....55
- Cleaning Instructions .... 56
Do's 56
Don'ts 56
Cleaning Burner Caps and Brass Flame Spreaders 57
Cleaning the Control Panel, Door Handle, Control Housing....57
Cleaning Side Racks 57
Cleaning Oven Shelves 57
Cleaning Broiling Pan and Grid....58
Cleaning Bake and Broil Burners....58
Cleaning Porcelain Surfaces 58
Cleaning Oven Window....58
Cleaning Oven Door Gasket 58
Cleaning Stainless Steel Surfaces 59
-
Replacing Burner Parts....60
-
Removing and Replacing Oven Door 61
Removing Oven Door 62
Replacing Oven Door....63
Replacing Oven Light Bulb....64
- Procedure for Checking the Dual Burner Clicking Problem 66
Step 1 ...... Error! Bookmark not defined.
Step 2 ...... Error! Bookmark not defined.
Step 3 ...... Error! Bookmark not defined.
Step 4 ...... Error! Bookmark not defined.
- Troubleshooting Guide 68
Cooktop 68
Oven 70
Safety and Warnings
- Warranty and Service 72
Warranties and Duration 72
Thor Group will pay for: 72
Thor Group will not pay for:....73
-
Warranty and Product Registration 74
-
Door Handle Installation....742
1. Warnings
These are the most critical warnings summarized below.
WARNING
- If the instructions in this manual are not followed exactly, a fire or explosion may result, causing property damage, personal injury or death.
- Do not store or use gasoline or other flammable substances and liquids near this or other appliance,
- Never use this appliance as a space heater to warm a room.
- Installation of this appliance must be done by a qualified service agency or gas supplier.
Using a dual gas detector highly recommended
This is a dual fuel stove that can run on Propane or Methane. Both fuels have added a hydrogen sulfide, which smell like rotten eggs, to make it easier to detect. However, some individuals may not be able to detect the smell. Because fuel gas leaks cannot always be detected by smell, the use of a gas detector is highly recommended,
Inexpensive dual fuel gas detectors are available commercially today.
• Gas suppliers recommend that you use a gas detector approved by UL or CSA.
- For more information, contact your gas supplier.
- If a gas leak is detected, follow the "What to do if you smell gas" instructions below
What to do if you smell natural methane or propane gas
- Do not light any appliance
- Do not touch an electrical switch
- Immediately call the gas supplier from a neighbor's phone
- Open a window and leave the area
- Follow the gas supplier's instructions
- If you cannot reach the gas supplier, call the fire department
Important Food Safety Warnings
- According to the United States Department of Agriculture: DO NOT hold foods at temperatures between 40°F to 140°F more than 2 hours. Cooking raw foods below 275°F is not recommended.
Suffocation Warning / Carbon Monoxide Poisoning
- Never cover any slots, holes or passages in the oven bottom or cover an entire rack with materials such as aluminum foil. Doing so blocks air flow through the oven and may cause carbon monoxide poisoning.
• Aluminum foil lining may also trap heat, causing a fire hazard.
2. Welcome
Thank you for purchasing your HRG dual fuel indoor range. We appreciate your business and we recommend that you read this entire User's Manual before operating your new appliance for the first time.
This manual contains instructions on how to properly install and set up your new range, as well as insights into the unique features that our product offers. Please keep this manual for future reference, as it contains answers to questions that you might have as you begin to cook.
Thank you,
Thor Group
This manual applies to the following models' series:
HRD3001U
HRD3604U
HRD4801U
HRD3031U-A
HRD3002U
HRD3605U
HRD4802U
HRD4804U-A
HRD3004U
HRD3606U
HRD4803U
HRD3618U-A
HRD3031U
HRD3618U
HRD4804U
HRD3088U
HRD3620U
HRD4806U
3. Before You Start
√ Make sure that the anti-tip device of the range has been properly installed.
√ Find the model and serial numbers on the CSA label in the bottom right-hand corner of the backboard. Note these numbers down for future reference in the space provided in section "Warranty and service."
√ Read this guide, taking special note of the "Safety and Warnings" section.
√ Remove all the packaging from the oven(s) and cooktop. Recycle items that you can. If any adhesive residue is left on surfaces, remove this using dish washing liquid on a soft cloth. Do not use any harsh or abrasive cleaners.
√ Make sure you follow the instructions under "First Use" before using your range for cooking.

WARNING
Follow the instructions below to reduce the risk of fire, electrical shock, injury, or property damage, follow the important safety instructions listed below:
4. Safety and Warnings
Safety Symbols
| Symbol | Definition |
 | This symbol will alert you to potential personal or property safety hazards. Obey all safety rules to avoid any property damage, personal injury or death |
 WARNING WARNING | WARNING which indicates a potentially hazardous situation, which could result in serious injury or death |
 CAUTION CAUTION | CAUTION indicates a moderate hazardous situation, which could result in minor or moderate injury |
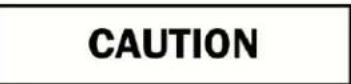 | CAUTION – when used without the safety alert symbol, indicates a potentially hazardous situation, which, if not avoided, could result in property damage |
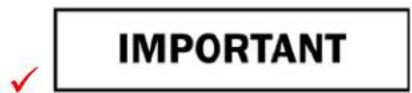
 | IMPORTANT used for installation, operation and maintenance information that are not related to safety. |
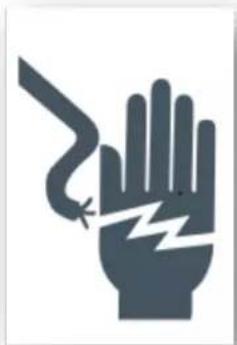
Electrical Shock Hazard
√ Before removing a faulty oven light bulb, make sure you turn OFF the power to the range at the main fuse or circuit breaker panel. If you don't know how to do this, contact an electrician.
√ Do not remove the back panel/kick plate. Due to electrical wires behind it, the kick strip grate should only be removed by a qualified technician.
natural_image
Illustration of a hand with a lightning bolt symbol indicating electrical hazard (no text or labels)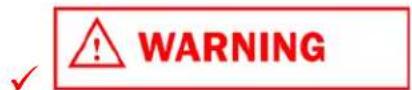
This appliance is equipped with a three-prong grounding plug for your protection against shock hazard and should be plugged directly into a properly grounded power outlet. Do not under any circumstances cut or remove the grounding prong from this plug.
Proper Installation – The range, when installed, must be electrically grounded in accordance with local codes or, in the absence of local codes, with the National Electrical Code, ANSI/NFPA 70. In Canada, the range must be electrically grounded in accordance with Canadian Electrical Code. Be sure the range is properly installed and grounded by a qualified technician.
Failure to follow this advice may result in death or electrical shock.
Tipping Hazard
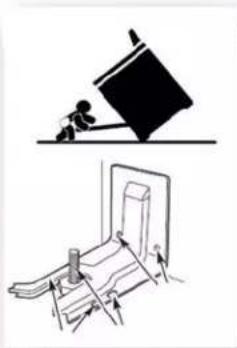
A child or adult can tip the range over and be killed. Verify that the anti-tip bracket is securely installed.
√ Ensure the anti-tip bracket is engaged when the range is moved.
√ Do not operate the range without the anti-tip brackets in place. Failure to follow the instructions in this manual can result in death or serious burns to children and adults.
√ Check the below for the proper installation and use of anti-tip brackets.
√ Even after the safety device is installed, do not step, lean or sit on the oven door or place any heavy objects on it. Doing so may result in personal injury.
natural_image
Illustration of a person using a tool to lift a large block, with motion arrows indicating movement (no text or symbols)Make sure anti-tip device is installed as follows:
Safety and warnings
- Slide the range forward.
- Install the anti-tip device as described in the instruction sheet
- Safely tilt the front section of the range and slide the range slowly back against the wall.
- The rear pins should slide under the bracket.
- Do not use the appliance until it has been secured.
Failure to follow this advice may result in serious injury.
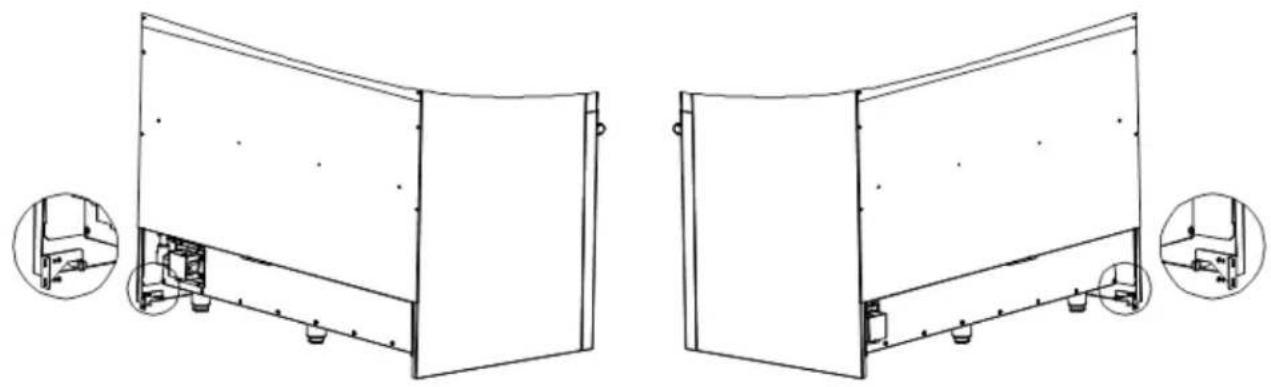
- Find the two anti-tip brackets and screws placed in the plastic bag with manual.
- Fasten the two anti-tip brackets to the wall with the screws, two screws for each bracket.
- Slide range completely back, make sure the fore-end of the brackets withhold the two screws on side panel of range
natural_image
Technical line drawing of two views of a mechanical device with mounting brackets and internal components (no text or symbols)Explosion Hazard
√ If you smell gas, do not use the appliance. Open a window or door to let the gas escape, then follow the instructions on the inside front cover of this manual.
√ Do not use water on grease fires. A violent steam explosion may result.
√ Turn all burners off, then smother fire or flame with a dry chemical or foam-type extinguisher. Do not try to smother with flammable blankets.
Do not heat unopened food containers such as cans. Build-up of pressure may cause container to burst and result in injury.
Failure to follow this advice may result in injury or death
natural_image
Abstract orange lightning bolt pattern on white background (no text or symbols)Fire Hazard

Never use your appliance as a space heater. Persons could be injured or a fire could start.
√ Keep the area around the appliance free from combustible materials (e.g. wall coverings, curtains, drapes), gasoline and other flammable vapors and liquids.
√ Clean the stove and burners regularly. Do not let cooking grease or other flammable materials accumulate on the surfaces or near the appliance.
√ Do not hang any articles (e.g. dish towels) off the oven handle. Some fabrics may ignite or melt from the heat.
√ Never leave the cooktop burners unattended when in use. Boil over causes smoking and greasy spillovers that may ignite.
√ Never spray an aerosol cleaner on or around the appliance while burners are lit. Be sure all the controls are turned off and the appliance is cool. The aerosol gas and chemicals in such cleaners could, in the presence of heat, ignite or cause metal parts to corrode.
√ Do not store flammables near cooktop. Flammable materials should not be stored in an oven or near the cooktop. An accident could cause a serious fire.

natural_image
Orange flame icon on white background (no text or symbols)Poisoning Hazard
√ Never cover any slots, holes or passages in the oven bottom or cover an entire rack or the oven floor with materials such as aluminum foil. Doing so blocks airflow through the oven and may cause carbon monoxide poisoning. Aluminum foil linings may also trap heat, creating a fire hazard.
√ Clean the appliance with caution. If a wet sponge or cloth is used to wipe spills on a hot cooking area, be careful to avoid a steam burn. Some cleaners can produce noxious fumes if applied to a hot surface. Follow the directions of the cleaner manufacturer.
√ Never use this appliance as a space heater to heat or warm the room. Doing so may result in carbon monoxide poisoning.
Failure to follow this advice may result in poisoning or death.

Hot Surface Hazard
Accessible parts may become hot during use.
Do not touch burners, areas near burners, the grill, griddle, grease drippans, heating elements or interior surfaces of the oven. These may be hot enough to cause burns even though they are dark in color. During and after use, do not touch, or let clothing or other flammable materials contact these parts and surfaces until they have had sufficient time to cool. Other parts and surfaces of the appliance may become hot enough to cause burns - among these areas are the grates, back trim and oven vents at the back of the cooktop, front edge, surfaces adjacent to the cooktop, and the oven door.

natural_image
Silhouette of a hand reaching toward grass on a surface (no text or symbols)Use only dry potholders. Moist or damp potholders on hot surfaces may result in burns from steam. Do not let potholder touch heating elements. Do not use a towel or other bulky cloth.
√ Let hot grease cool before attempting to handle it.
√ Glazed cooking utensils Only certain types of glass, glass/ceramic, ceramic, earthenware, or other glazed utensils are suitable for range-top service without breaking due to the sudden change in temperature.
√ Utensil handles should be turned inward and not extend over adjacent surface units – To reduce the risk of burns, ignition of flammable materials, and spillage due to unintentional
contact with the utensil, the handle of a utensil should be positioned so that it is turned inward, and does not extend over adjacent surface units.

TO REDUCE THE RISK OF BURNS, DO NOT MOVE THE RANGE WHILE HOT. TO REDUCE THE RISK OF INJURY DUE TO TIPPING OF THE APPLIANCE, VERIFY THE REINSTALLATION OF THE RANGE INTO THE ANTI-TIP DEVICE PROVIDED, AND EXTEND LEVELING FEET AFTER RETURNING THE RANGE TO THE ORIGINAL INSTALLED POSITION.
Failure to follow this advice could result in burns and scalds.
Other Safety Tips
√ Read all the instructions before using the appliance. Use the appliance only for its intended purpose as described in these instructions.
√ Be sure your stove is properly installed and grounded by a qualified technician.
√ All servicing should be referred to a qualified technician.
√ Always disconnect power to appliance before any type of servicing
√ Do not operate the appliance if it is damaged or not working properly. If you received a damaged product, contact your dealer or installer immediately.
√ Know how to turn off power in emergency
Be sure to have the installer show you where and how to turn off the power supply to the range (i.e. location of the main fuse or circuit breaker panel) and where and how to turn off the gas supply to the range in an emergency.
√ Do not leave children alone near stove
Children should not be left alone or unattended in the area where the appliance is in use. They should never be allowed to play with the appliance or to sit or stand on any part of the appliance.
CAUTION
Do not store toys or candy over the stove
For safety reasons, do not store items of interest to children in cabinets above a range or at the back of the range – children climbing on the range to reach items could be seriously injured.
√ Don't wear lose clothing that could catch fire
Loose-fitting or hanging garments should never be worn while using the appliance.
√ Do not repair or replace parts yourself (unless recommended)
Do not repair or replace any part of the appliance unless specifically recommended in the manual. All other servicing should be referred to a qualified technician. Technicians must disconnect the appliance from the power supply before any servicing.
WARNING
√ Careful opening oven door
Use care when opening the oven door by allowing warm air or steam escape before removing or replacing food.
√ Keep oven vent ducts unobstructed. NEVER cover any slots, holes or passages in the oven bottom or cover an entire rack with materials such as aluminum foil. Doing so blocks air flow through the oven and may cause carbon monoxide poisoning. Aluminum foil linings may also trap heat, causing a fire hazard
√ Do not touch hot oven shelves
Protect your hands from burning by making sure the oven is cool before sliding oven shelves into oven. If a shelf must be removed while the oven is hot, do not let oven mitts or potholder contact the base of the oven or hot heating elements in the oven.
√ Protect oven gasket
Do not clean the oven gasket or use any oven-
cleaning products on it. It is essential for a good seal,
which ensures that the oven operates efficiently.
Care should be taken not to rub, damage or move it.
√ Protect glass oven doors
Do not use harsh/abrasive cleaners, scourers or sharp metal scrapers to clean the oven door glass because they scratch the surface, which may result in the glass shattering.
√ Never step on oven door or place a heavy object (like a Turkey) on it
√ Check for gas leaks
When the appliance installed, check for gas leaks according to instructions before use.
√ Ventilation hood is mandatory
This appliance should not be operated without a properly sized and operational ventilation hood.
√ Use proper gas conversion kit
This stove only uses natural gas. For LP gas, please use conversion kit. Please have a certified technician install the unit and kit. If planning to resell unit,
Safety and warnings
please indicate whether it is natural gas or has LP kit installed.
√ Do not reach for items over the stove when it is lit
Be careful when reaching for items stored in cabinets above the appliance.
√ Read all instructions before using the product to ensure proper and safe operation. Install or locate the product only in accordance with the provided Installation Instructions.
√ Do not attempt to adjust, repair, service or replace any part of your appliance unless it is specifically recommended in this guide.
√ Do not use the range as a space heater.
√ Have the technician show you the location of the gas shut off valve and how to shut it off in an emergency.
√ Do not use abrasive or caustic cleaners or detergents on this appliance. They may cause permanent damage to the surface.
√ When cooking, set the burner controls so that the flame heats only the bottom of the pot and does not overlap at the sides.
√ Pots and pans that conduct heat slowly, i.e. glass pots, should be used in conjunction with burner flames at a low or medium setting.
√ Turn off all controls and wait for appliance parts to cool down before touching them. Do not touch the burner grates or surrounding areas until cool.
√ Do not use water on grease fires.
√ Clean appliance with caution.
√ Always turn pot handles to the side or back of the range. Do not turn handles towards the area where they are easily burned. Handles should not extend over the adjacent burners.
√ Use the range only for cooking tasks as outlined in this manual. When using the range, do not touch the grates, burner caps, burner bases, or any other parts in proximity to the flame. These components may be hot enough to cause burns.
√ Use dry pot holders. Moist or damp pot holders on hot surfaces may result in burns from steam
√ Do not use a towel or other bulky cloth.
√ Do not heat unopened food containers.
Buildup of pressure may cause the container to explode and result in injury.
√ During and after use, do not touch interior surfaces of the oven until cool
√ Do not let a pot holder touch hot surface areas
√ Any opening in the wall behind the appliance and in the floor under the appliance shall be sealed.
5. Dual Range Overview
48-inch dual range sample
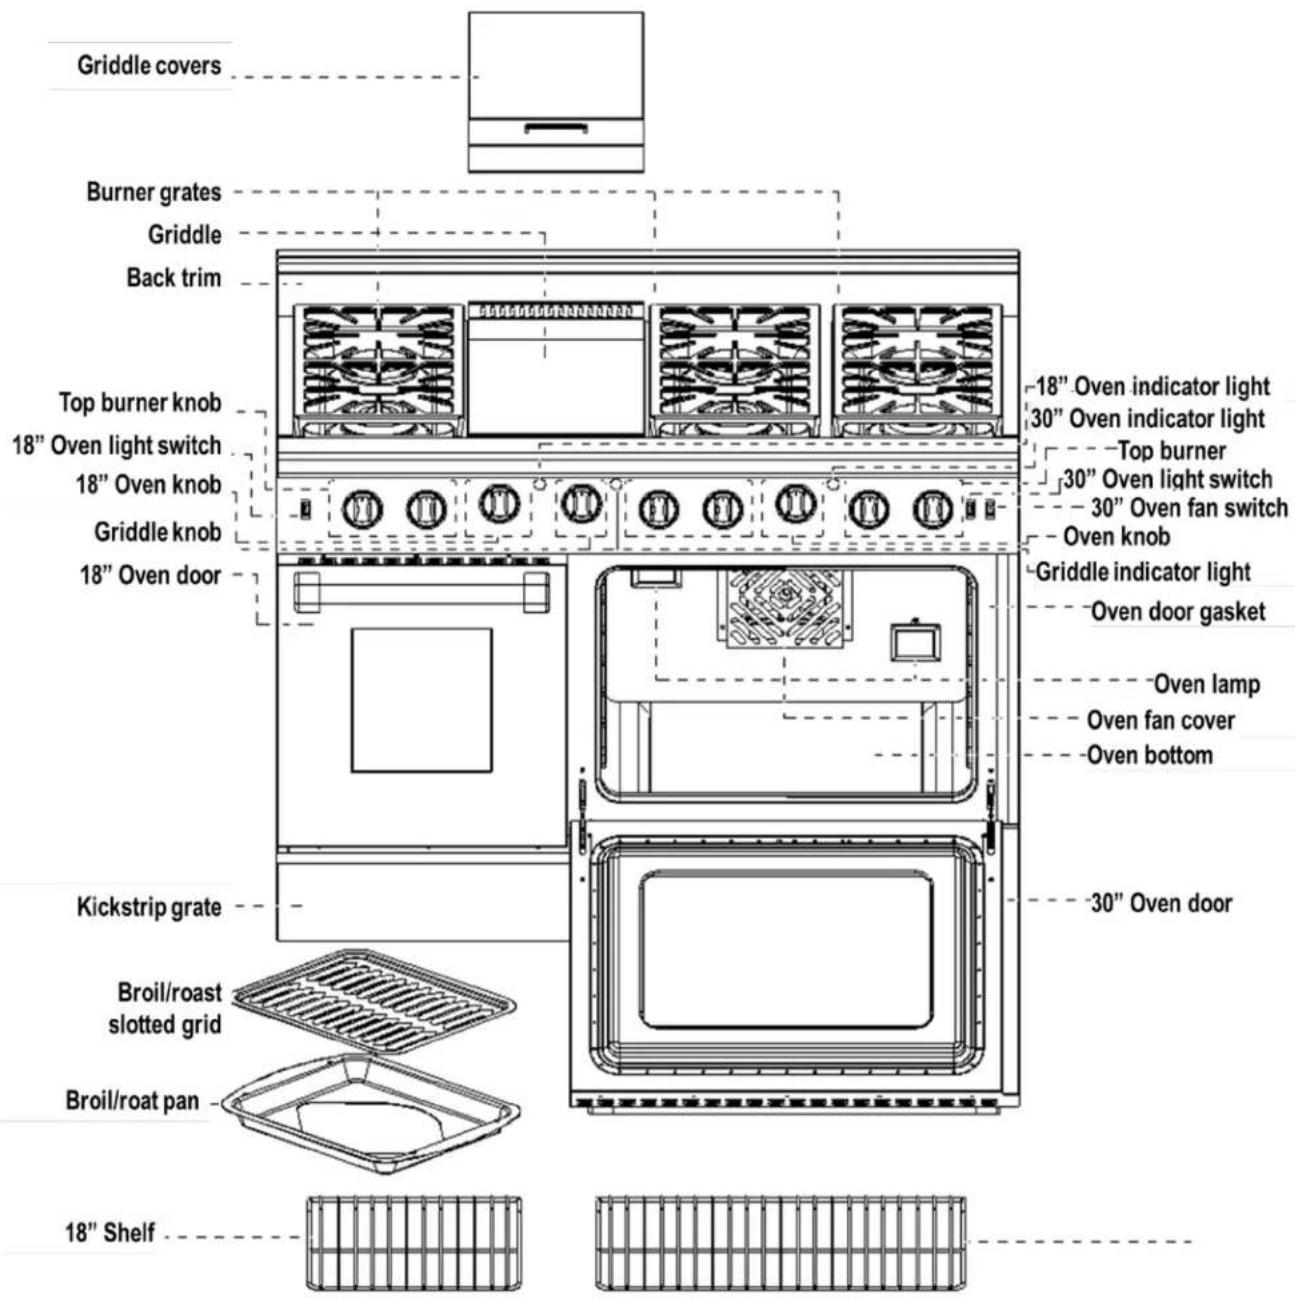
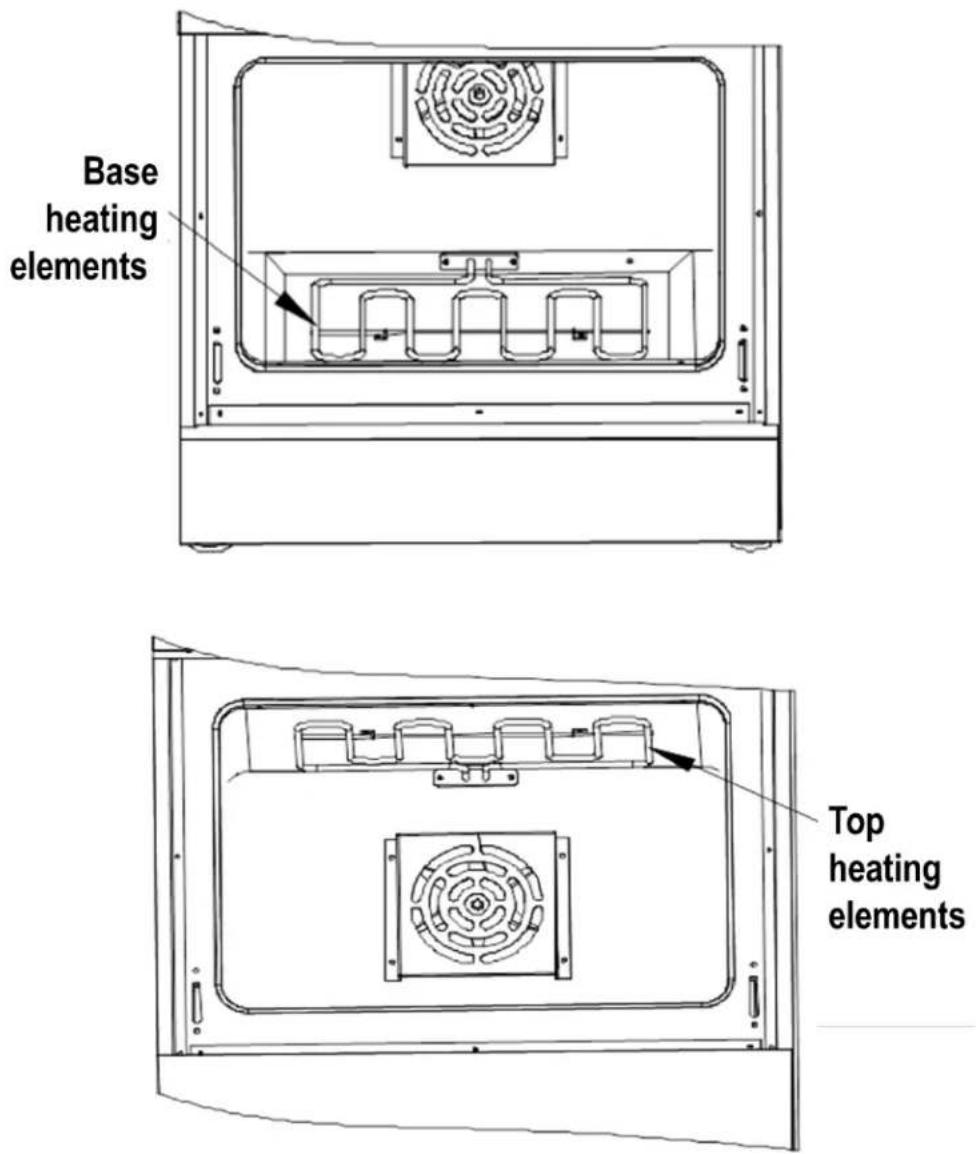
• Electric Broiler (Top) Heating Element: 1@3 500 W.
- Oven Electric Heating Element: 1@850 W(Top) & 3 000 W (Base), apply to 30-inch and 36-inch oven.
• 1@2 500 W (Base), apply to 48-inch dual fuel range which has 18-inch oven.
Cooktop Equipment
Dual fuel range cooktop burner equipment as below:
| Model | 1 2000 BTU | 1 5000 BTU | 1 8000 BTU | Griddle(1 5000 BTU) |
| HRD3001U | 4 | No | ||
| HRD3002U | 2 | 2 | No | |
| HRD3004U | 4 | No | ||
| HRD3031U | 2 | 2 | No | |
| HRD3088U | 2 | 1 | 1 | No |
| HRD3604U | 6 | No | ||
| HRD3605U | 6 | No | ||
| HRD3606U | 1 | 2 | 3 | No |
| HRD3618U | 3 | 2 | 1 | No |
| HRD3620U | 3 | 3 | No | |
| HRD4801U | 6 | 1 | ||
| HRD4802U | 6 | 1 | ||
| HRD4803U | 2 | 2 | 2 | 1 |
| HRD4804U | 3 | 3 | 1 | |
| HRD4806U | 3 | 3 | 1 | |
| HRD3031U-A | 2 | 2 | No | |
| HRD3618U-A | 3 | 2 | 1 | No |
| HRD4804U-A | 3 | 3 | 1 |
6. Installation Instructions
IMPORTANT
Save the next two pages for the local electrical inspector's use

WARNING
- A child or adult can tip the range and be killed.
- Install the anti-tip device to the structure and/or the range.
- Engage the range to the anti-tip device.
- Re-engage the anti-tip device if the range is moved.
- See installation instructions for details.
- Failure to do so can result in death or serious burns to children or adults.
- Check that anti-tip device is secured with two screws on the side panel of range.
To eliminate the risk of burns or fire by reaching over heated surface units, cabinet storage space located above the surface units should be avoided. If cabinet storage is to be provided, the risk can be reduced by installing a range hood that projects horizontally a minimum of 5 inches beyond the bottom of the cabinets.
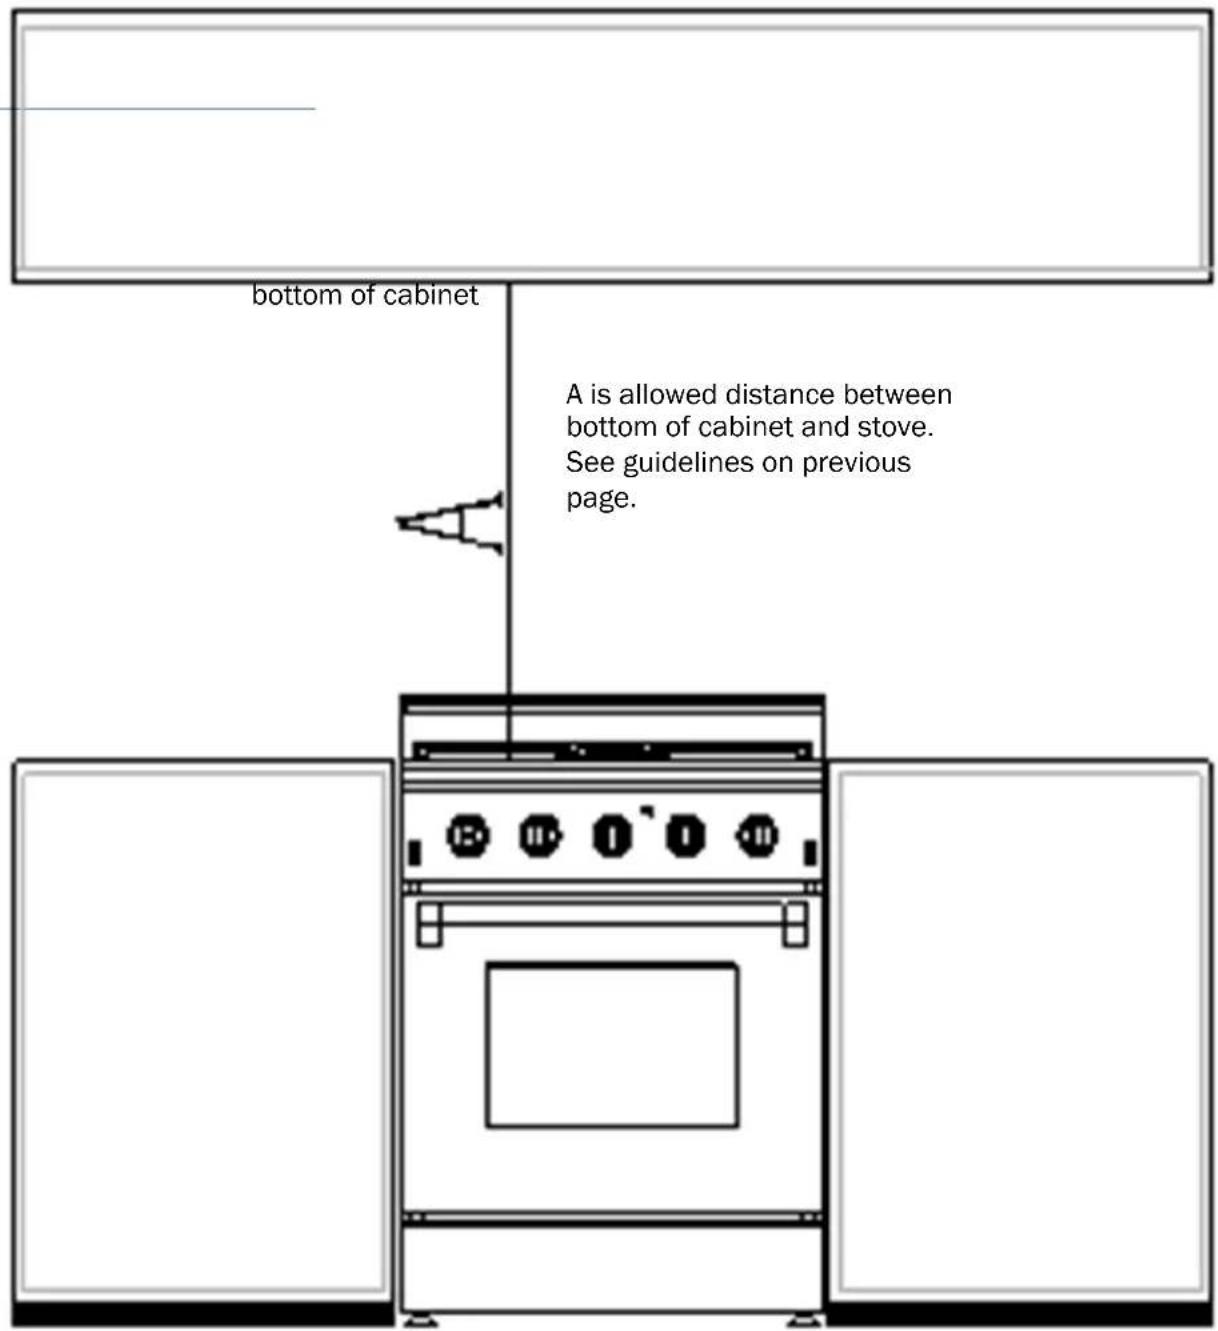
On the next figure, item A is:
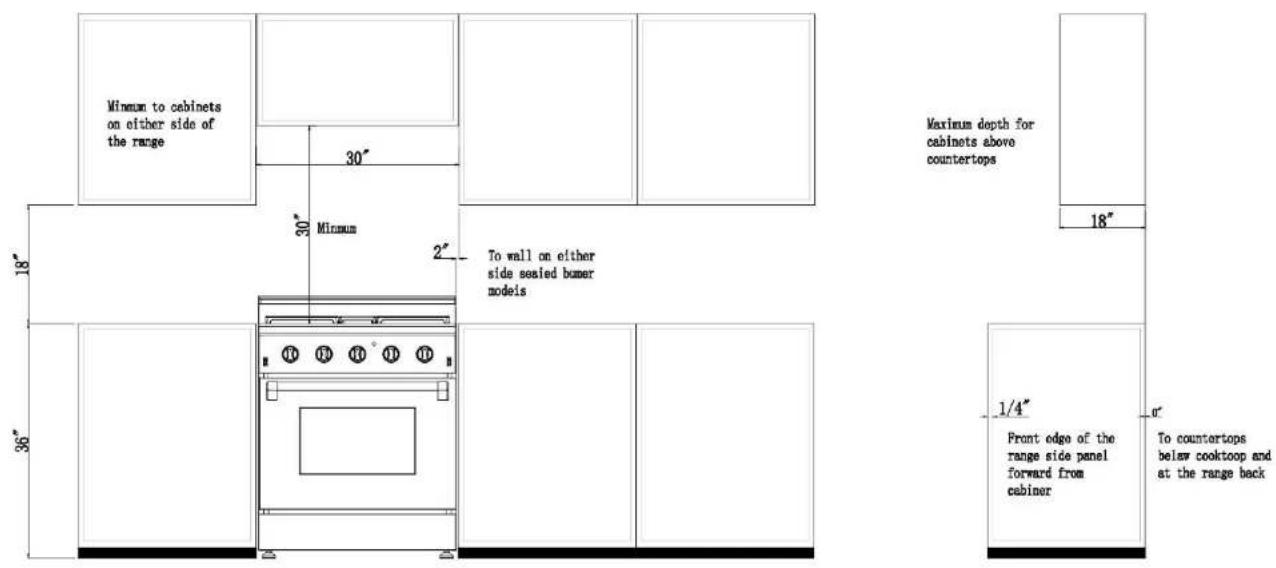
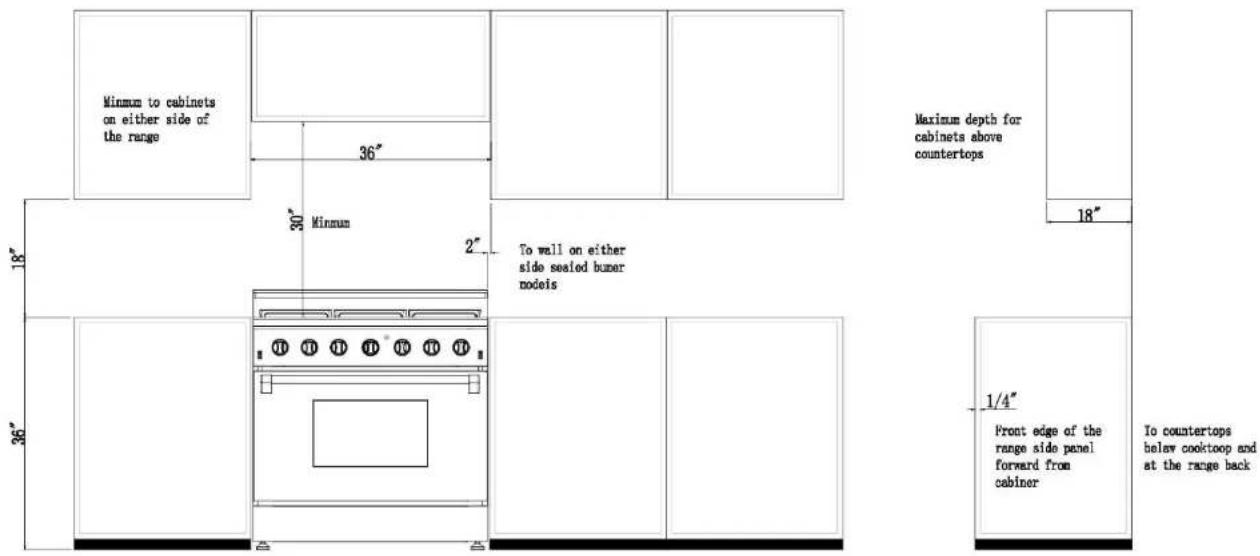
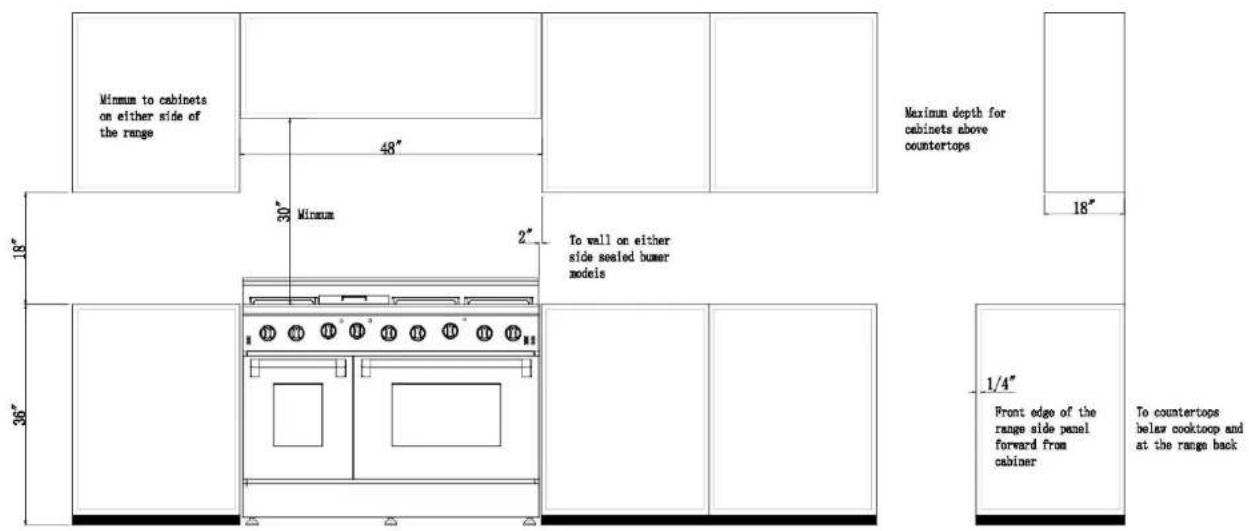
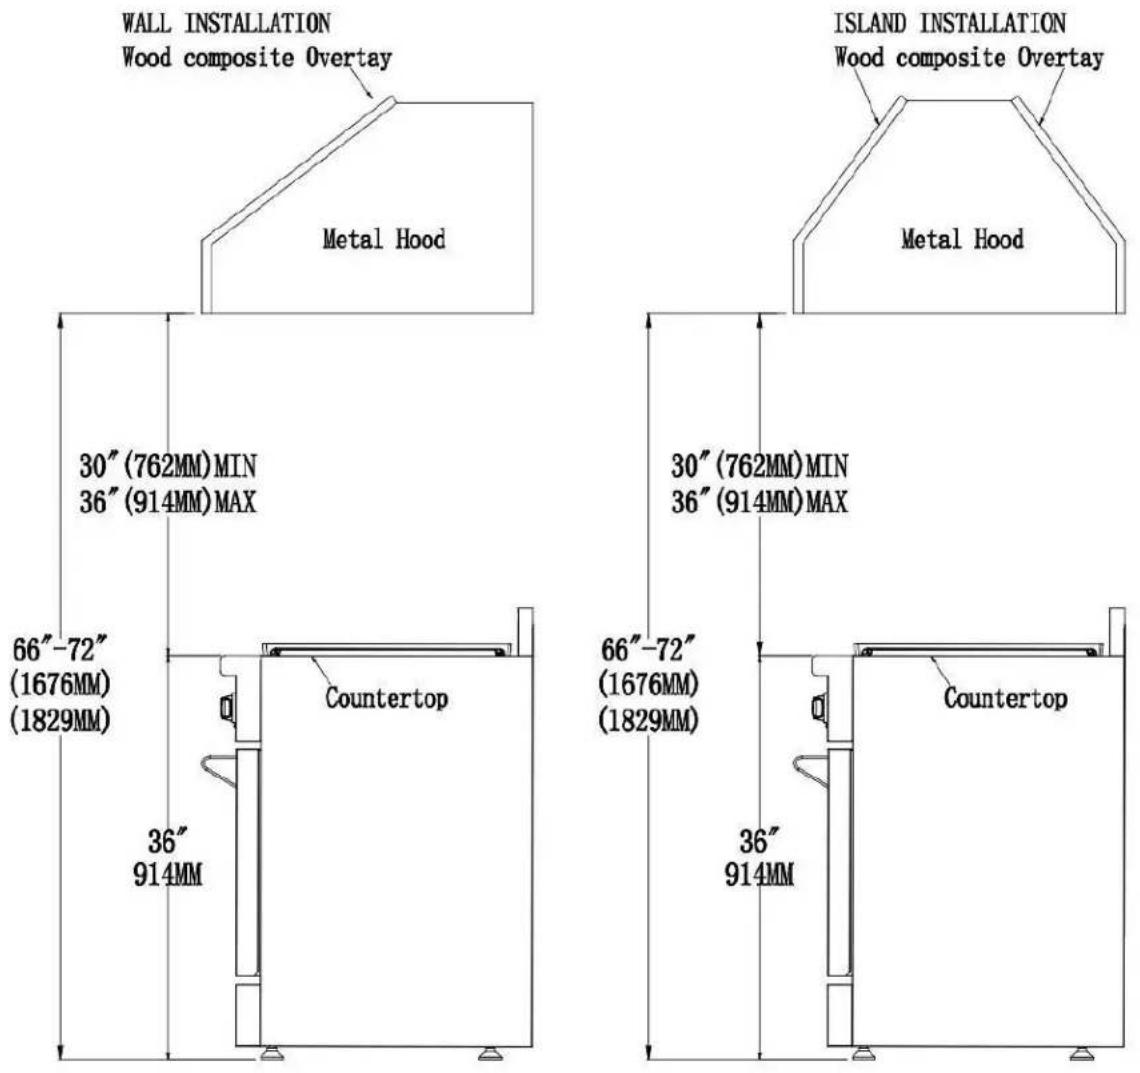
A = 30 inches minimum clearance between the top of the cooking surface and the bottom of an unprotected wood or metal cabinet; or
A = 24 inches minimum when bottom of wood or metal cabinet is protected by not less than 1/4-inch-thick flame-retardant millboard covered with not less than No. 28 MSG sheet steel, 0.015-inch-thick stainless steel, 0.024-inch-thick aluminum, or 0.020-inch-thick copper.
A = 40 inches minimum clearance between the top of the cooking surface and the bottom of an unprotected wood or metal cabinet, if your used one of the four model dual fuel range -HRD3620U, HRD3604U, HRD4801U and HRD4802U.
Safety and warnings
7. Dimensions and Clearances
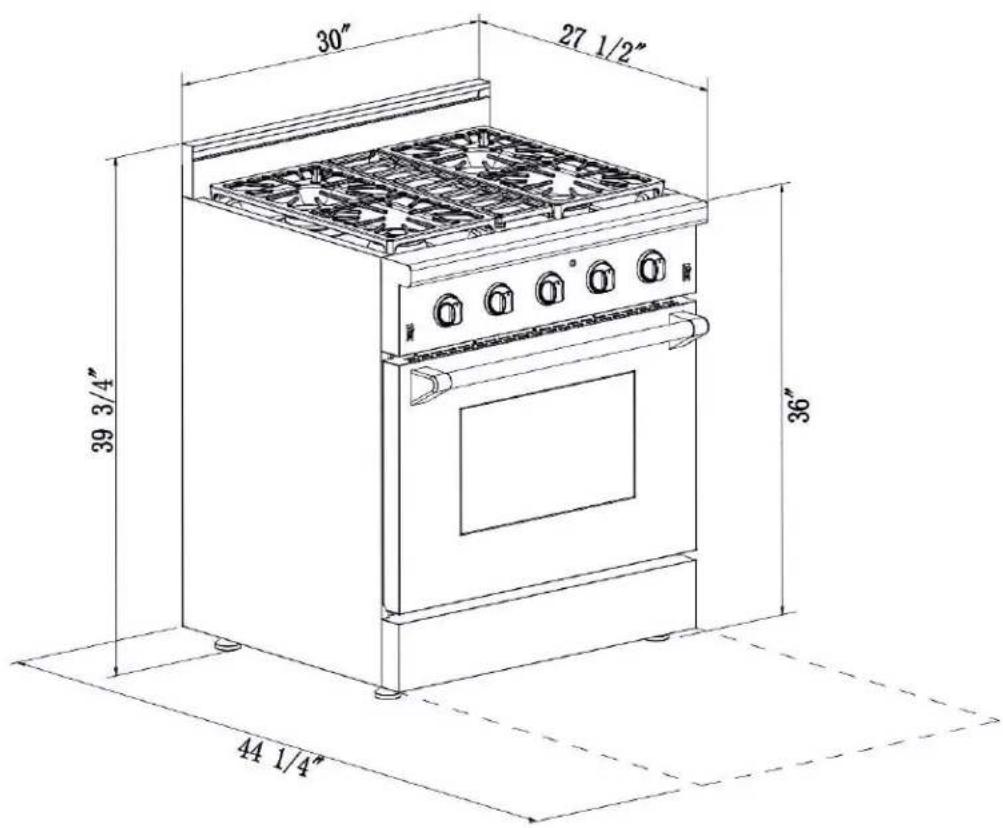
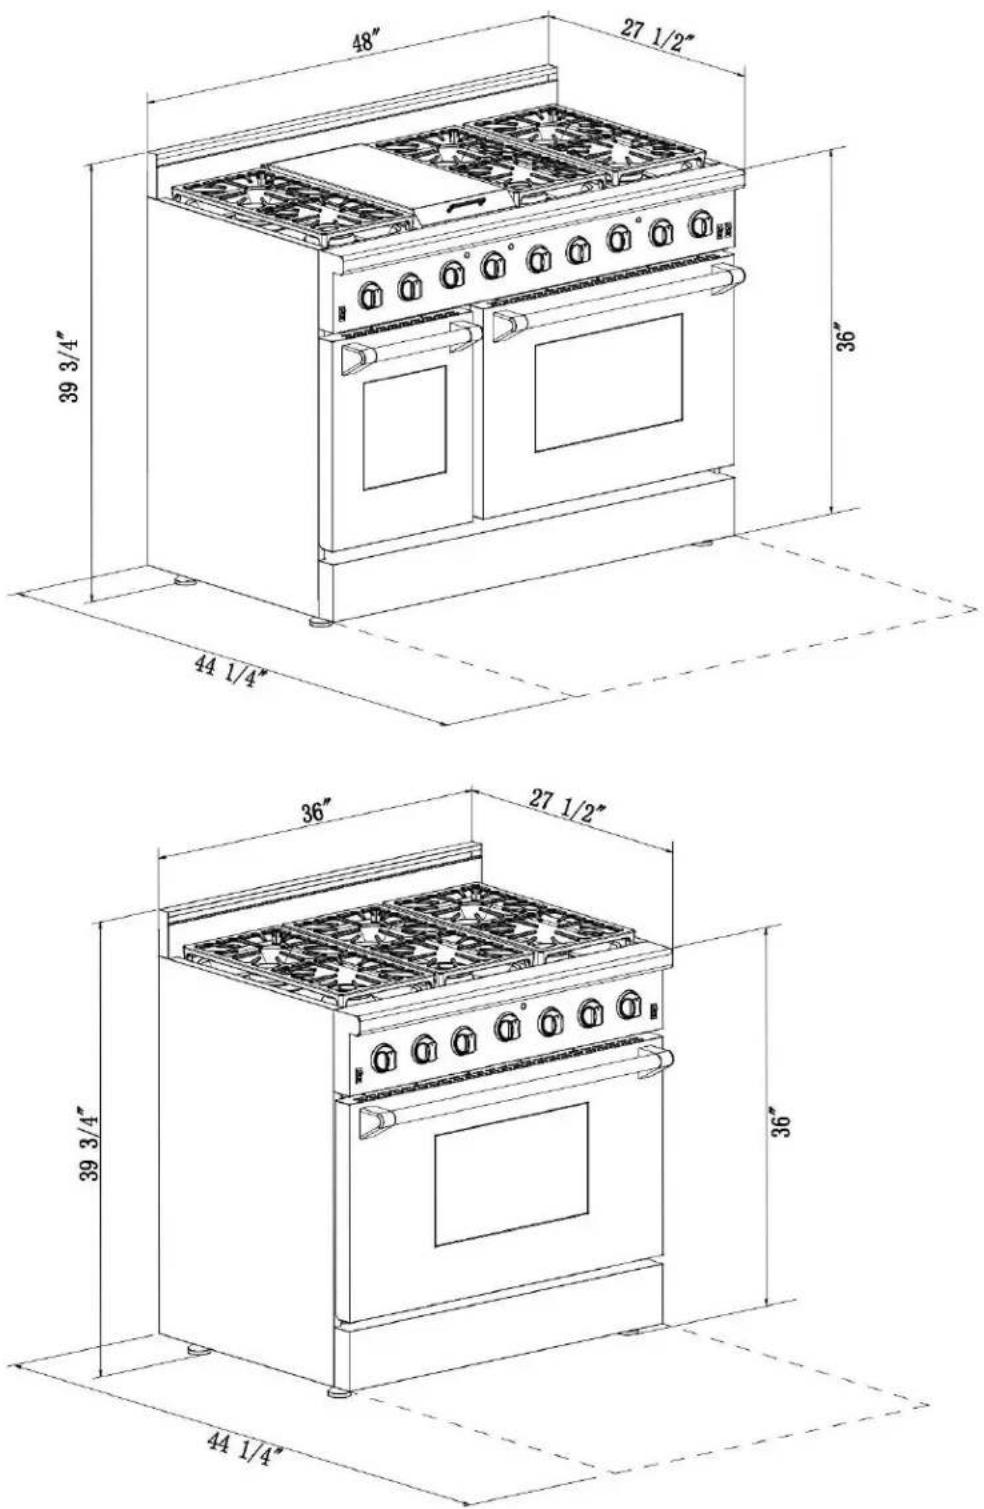
√ The depth of the range is 27 12 (69.8 cm) overall.
√ The range may be installed flush to the rear wall.
8. Positioning of Range
√ You may install a non-combustible material, such as tile, on the rear wall above the range and up the vent hood.
√ It is not necessary to install non-combustible materials behind the range below the counter top height.
√ DO NOT INSTALL CLOSER THAN 12 MM FROM ANY ADJACENT SURFACE.
√ The minimum distance from the side of the range above the counter top to combustible sidewalls must be at least 18 inches.
√ The maximum depth of cabinets installed above cooking tops be 13 in (330mm).
Safety and warnings
Safety and warnings
Safety and warnings
Top Hood and Cabinet Specifications
| Condition | Minimum clearance allowed |
| Clearance between the top of the cooking surface and the bottom wood or metal cabinet that is protected by not less than:1/4-inch-thick flame-retardant millboard covered with not less than:No. 28 MSG sheet steel or0.015-inch-thick stainless steel or0.024-inch-thick aluminum or0.020-inch-thick copper | 24” |
| Duel fuel ranges clearance between the top of the cooking surface and the bottom of an unprotected wood or metal cabinet. | 40” |
...
9. Important Notes to the Installer
- Read all instructions contained in these installation instructions before installing range.
- Remove all packing material from the oven compartments before connecting the electrical supply to the range
- Anti-tip brackets MUST be installed
- Observe all governing codes and ordinances.
- Be sure to leave these instructions with the consumer.
Important Note to the Consumer
Keep these instructions with your owner's guide for future reference.
Important Safety Instructions to the Installer
IMPORTANT
- Installation of this range must conform with local codes or, in the absence of local codes, with the National Fuel Gas Code ANSI Z223.1-latest edition.
- This range has been designed certified by the American Gas Association. As with any appliance using gas and generating heat, there are certain safety precautions you should follow. You will find them in the Use and Care Guide, read it carefully.
- Air curtain or other overhead hoods, which operate by blowing a downward air flow on to a range, shall not be used in conjunction with gas ranges other than when the hood and range have been designed, tested and listen by an independent test laboratory for use in combination with each other.
- Be sure your range is installed and grounded properly by a qualified installer or service technician.
- This range must be electrically grounded in accordance with local codes or, in their absence, with the National Electrical Code ANSI/NFPA No. 70—latest edition
-
The installation of appliances designed for manufactured (mobile) home installation must conform with Manufactured Home Construction and Safety Standard, title 24CFR, part 3280 [Formerly the Federal Standard for Mobile Home Construction and Safety, title 24, HUD (part 280)] or when such standard is not applicable, the Standard for Manufactured Home Installation 1982 (Manufactured Home Sites, Communities and Setups), ANSI Z225.1/NFPA 501Alatest edition, or with local codes.
-
Make sure the wall coverings around the range can withstand the heat generated by the range.
- Before installing the range in an area covered with linoleum or any other synthetic floor covering, make sure the floor covering can withstand heat at least 90^ F/32°C above room temperature without shrinking, warping or discoloring. Do not install the range over carpeting unless you place an insulating pad or sheet of 1/4" (6.4 mm) thick plywood between the range and carpeting.
- Do not obstruct the flow of combustion air at the oven vent nor around the base or beneath the lower front panel of the range. Avoid touching the vent openings or nearby surfaces as they may become hot while the oven is in operation. This range requires fresh air for proper burner combustion.
- Never leave children alone or unattended in the area where an appliance is in use. As children grow, teach them the proper, safe use of all appliances. Never leave the oven door open when the range is unattended.
- Stepping, leaning or sitting on the door(s) or drawer of this range can result in serious injuries and can also cause damage to the range.
- Do not store items of interest to children in the cabinets above the range. Children could be seriously burned climbing on the range to reach items.
- To eliminate the need to reach over the surface units, cabinet storage space above the units should be avoided.
- Adjust surface burner flame size so it does not extend beyond the edge of the cooking utensil.
- Excessive flame is hazardous.
- • Do not use the oven as a storage space. This creates a potentially hazardous situation.
- • Never use your range for warming or heating the room. Prolonged use of the range without adequate ventilation can be dangerous.
- • Do not store or use gasoline or other flammable vapors and liquids near this or any other appliance. Explosions or fires could result.
- • In the event of an electrical power outage, the surface burners can be lit manually. To light a surface burner, hold a lit match to the burner head and slowly turn the Surface Control knob to Lite. Use caution when lighting surface burners manually.
Model and Serial Number Location
Find the model and serial numbers on the CSA label in the bottom right-hand corner of the backboard. Note these numbers down for future reference in the space provided in section Warranty and service'.
10. Electrical Installation
Power Supply Cord Kit
Electrical Requirements, Connection & Grounding Guidelines
** The Plug is not included in the package. Please purchase this plug from your local appliance store.
**
This appliance is manufactured ready to be installed with a 4-wire cord set.
A 3-Pole, 4-Conductor Cord Kit with NEMA Type 14-50R, 50 Amperes dedicated circuit and marked for use with ranges is recommended by the manufacturer for Thor Kitchen Dual Fuel Ranges.

natural_image
Simple line drawing of a three-pin electrical socket (no text or symbols)4-wire receptacle (14-50R)
HRD3088U and HRD3606U require a minimum of 30 Amperes with 220
Volts; HRD4803U requires a minimum of 40 Amperes with 220 Volts.
We recommend A 3-Pole, 4-Conductor Cord Kit with NEMA Type 14-50R.

WARNING
Risk of fire or electrical shock exists if an incorrect size range cord kit is used, the Installation Instructions are not followed, or the strain relief bracket is discarded.
Terminal on end of wires must be either closed loop or open spade lug with upturned ends. Cord must have strain-relief clamp.
CAUTION
Do not loosen the nuts which secure the factory-installed range wiring to terminal block while connecting range. Electrical failure or loss of electrical connection may occur.
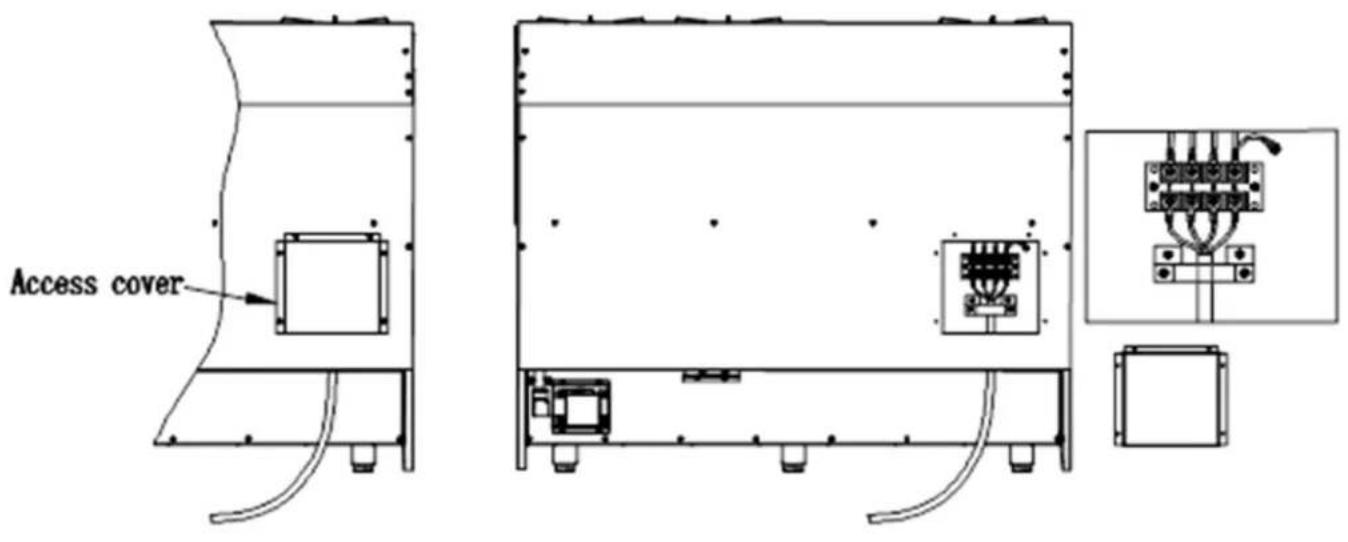
Access to Terminal Block

WARNING
Electrical Shock Hazard
• Electrical ground is required on this appliance.
- Do not connect to the electrical supply until appliance is permanently grounded.
- Disconnect power to the circuit breaker or fuse box before making the electrical connection.
- This appliance must be connected to a grounded, metallic, permanent wiring system, or a grounding connector should be connected to the grounding terminal or wire lead on the appliance. Failure to do any of the above could result in a fire, personal injury or electrical shock. See below for more information on electrical grounding.
Electrical Connection
Four Conductor Wire Connection to Range
- Remove the screws at the lower end of the rear access cover and take it down to expose range terminal connection block.
- Remove the screws to lose the cable clamp and pass through the four-conductor wire from the bottom of the range.
- Loose the screws on the terminal block and connect the wire to terminals, after then, tighten the screws of cable clamp and terminal block, please make sure that match the wire and terminals by color.
- Put back the terminal cover and tighten the screws.
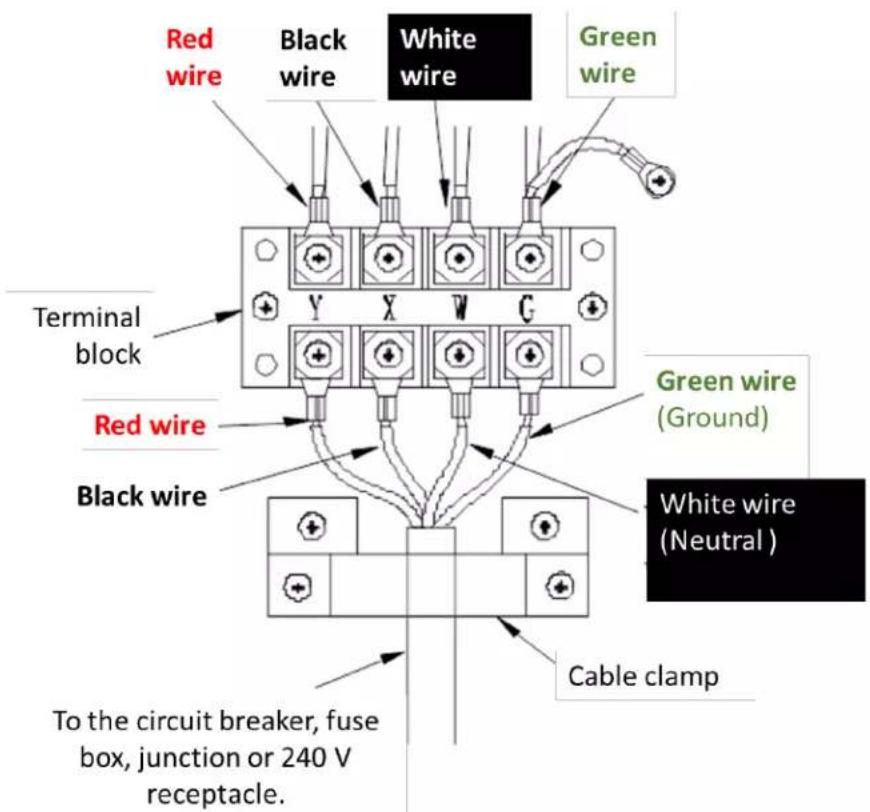
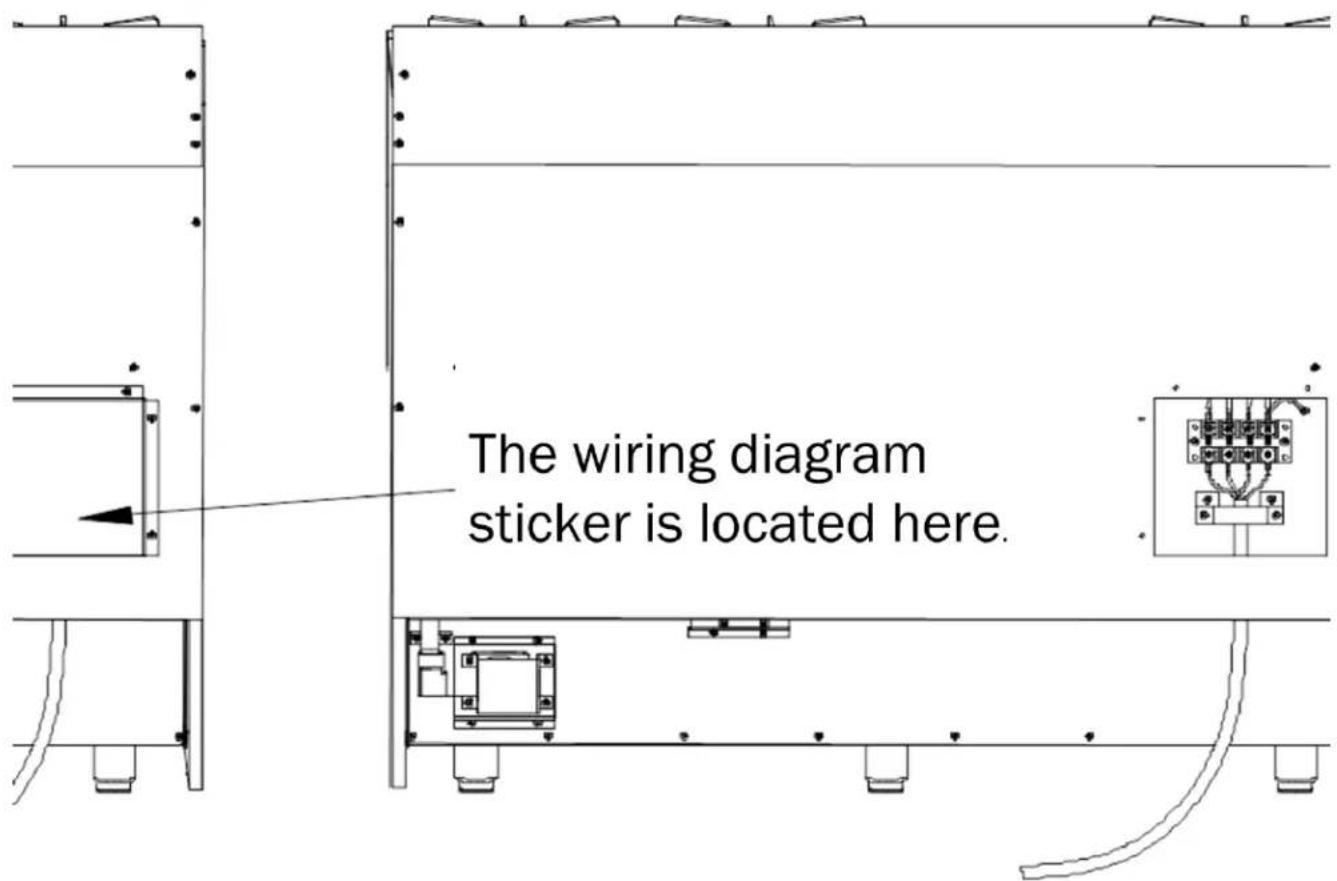
The wiring diagram for the terminal connection block is on the access cover.
Electric Power Supply Requirements
Your range must be electrically grounded in accordance with local codes or, in the absence of local codes, in accordance with the National Electrical Code (ANSI/NFPA 70, latest edition).
In Canada, electrical grounding must be in accordance with the current CSA C22.1 Canadian Electrical Code Part 1 and/or local codes. A copy of this standard may be obtained from: National Fire Protection Association, 1 Batterymarch Park, Quincy, Massachusetts 02269-9101.
The power supply must be the correct polarity. Reverse polarity will result in continuous sparking of the electrodes, even after flame ignition. If there is any doubt as to whether the supply has the correct polarity or grounded, have it checked by a qualified electrician.
Use 120V, 60Hz, and properly grounded branch circuit protected by a 15-amp or 20-amp circuit breaker or time delay fuse.
HRG3080U Back Panel Layout
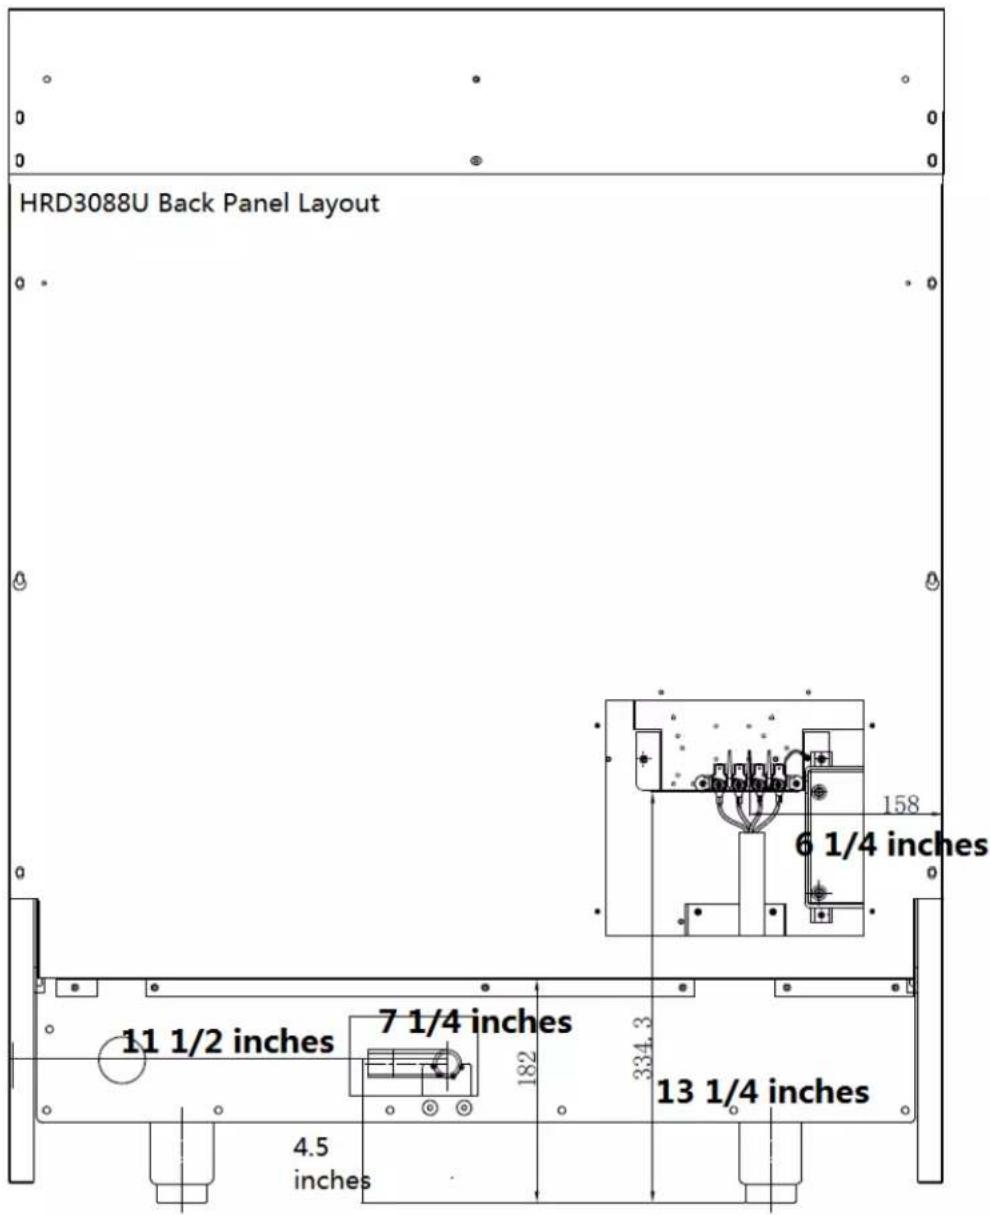
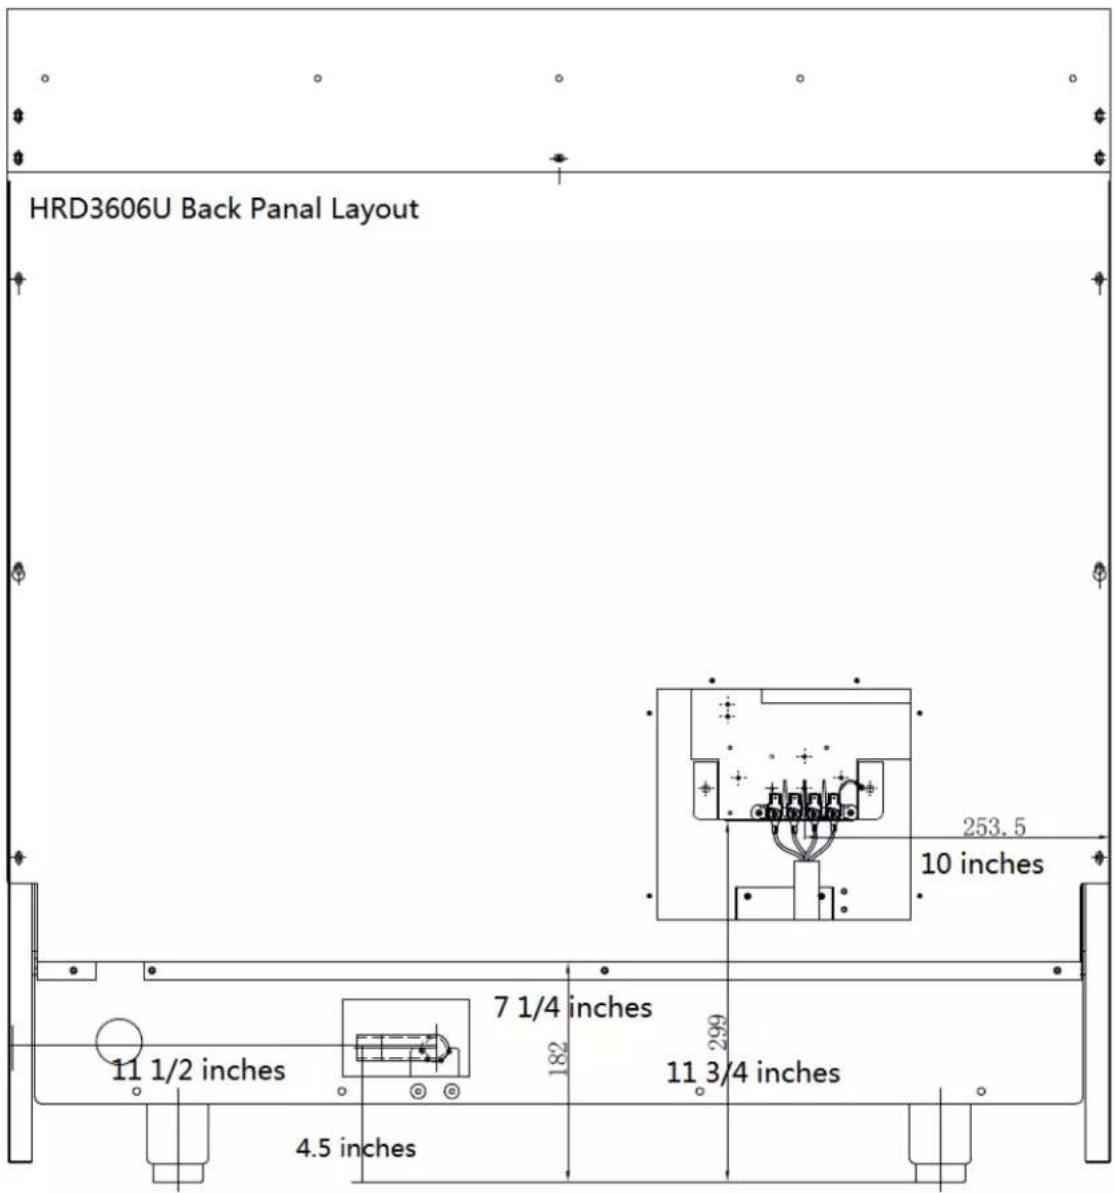
HRD3606U Back Panel Layout
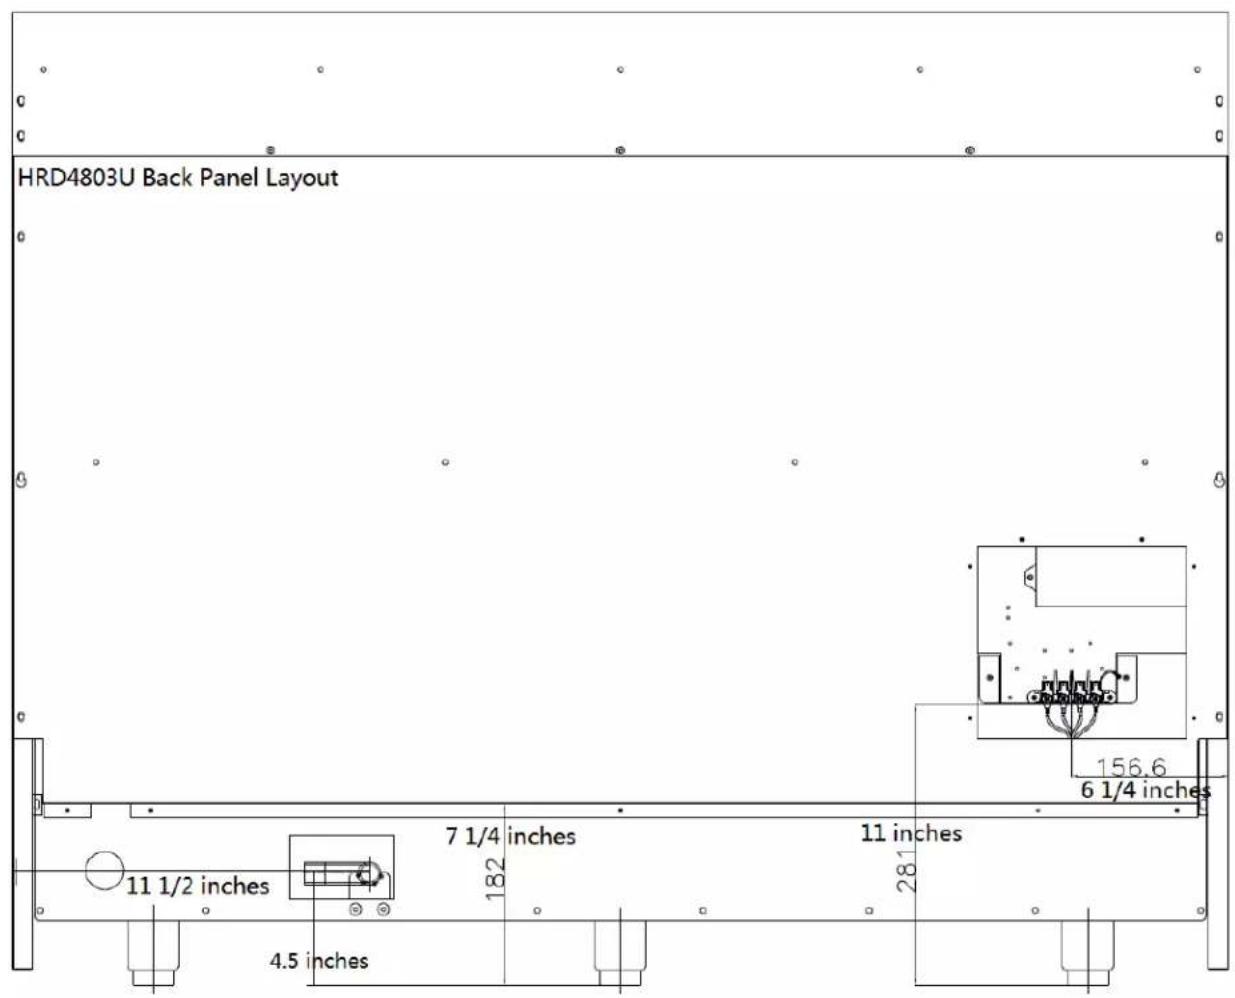
HRD4803U Back Panel Layout
Electrical Grounding Instructions

WARNING
This indoor gas cooking appliance is equipped with a three-prong (grounding) plug for your protection against shock hazard and should be plugged directly into a properly grounded three-pronged receptacle.
Where a standard two-prong wall receptacle is encountered, it is the responsibility and obligation of the customer to have it replaced with a properly grounded three-prong wall receptacle.
Do not cut or remove the grounding prong from the power cord.
Before connecting plug to the cord, disconnect the electrical supply.
CAUTION
Label all wires prior to disconnection when servicing controls. Wiring errors can cause improper and dangerous operation. Verify proper operation after servicing.
11. Gas Supply Requirement
Installation of this range must conform with local codes, or in the absence of local codes, with national Fuel Gas Code, ANSIZ223.1 / NFPA 54. In Canada, installation must conform to the current natural Gas Installation /code, CAN 1-1.1-M81 and with local codes where applicable. This range has been design-certified according to ANSIZ21.1a, latest edition.
| LP Gas in.w.c. | Natural Gas in.w.c. | |
| Maximum gas supply pressure | 13.0 | 10.0 |
| Appliance regular is set at | 10.0 | 5.0 |
√ Keep appliance area clear and free from combustible materials, gasoline, and other flammable vapors.
√ Do not obstruct the flow of combustion air into the range and ventilation air away from the range.
√ Ventilation: it is a must that the unit be set under a powered, vented exhaust hood of sufficient size and capacity.
√ Before installing the range, you must locate and secure the included anti-tip bracket to the wall for your range.
√ The use of cabinets for storage above the appliance may result in a potential burn hazard. Combustible items may ignite; metallic items may become hot and cause burns. If a cabinet storage is to be provided, the risk can be reduced by installing a range hood that projects horizontally a minimum of 5" (12.7cm) beyond the bottom of the cabinets.
Connect Range to Gas Supply
- Install a manual gas line shut-off valve in the gas line in an easily accessed location outside the range in the gas piping external to the appliance for the purpose of turning on or shutting off gas to the appliance.
Install male 12 -inch flare union adapter to 12 -inch NPT internal thread elbow at inlet of regulator. On models equipped with standard twin burners, install the male pipe thread end of the 12 -inch flare union adapter to the 12 -inch NPT internal thread at inlet of pressure regulator. Use a wrench on the regulator fitting to avoid damage.
- Install male 12 -inch or 34 -inch (not on HRD dual fuel range) flare union adapter to the NPT internal thread of the manual shut-off valve, taking care to secure the shut-off valve to keep it from turning.
- The gas supply pressure for checking the regulator setting is 6 in.w.c. (Nature Gas) and 11 inch.w.c. (LP gas) connect flexible gas line connector to the regulator on the range. Position range to permit
connection at the shut-off valve.
- When all connections have been made, make sure all range controls are in the position and turn on main gas supply valve.
- Leak testing of the appliance shall be conducted according to the manufacture's instructions. Use some soap water (50% water and 50% soap) or a leak detector at all joints and connections to check for leaks in the system. Do not use a flame to check for gas leaks.
- The appliance must be isolated from the building's gas supply piping system by closing its individual manual shut-off valve during any pressure testing of the gas supply piping system at test pressure equal to or less than 12 psig(3.5kPa).
After installation:
-
Check ignition of cooktop burners.
-
Check ignition of oven burner.
-
Visually check tubular burner (oven burner) re-ignition to be sure both rows of burner ports are relighting each time.
-
Check for gas leaks at all gas connections (using a gas detector, never a flame).
-
Check oven bake, and convection bake function.
12. First Use
Before you start
- Make sure that the anti-tip of the range has been properly installed.
- Find the model and serial numbers on the CSA label. Note these numbers down for future reference in the space provided in section "Warranty and service".
- Read this guide, taking special note of the "Safety and warnings" section.
- Remove all the packaging from the oven(s) and cooktop. Recycle items that you can. If any adhesive residue is left on surfaces, remove this using dish washing liquid on a soft cloth. Do not use any harsh or abrasive cleaners.
- Make sure you follow the instructions under 'First use' before using your range for cooking.
Conditioning the oven
Conditioning will burn off any manufacturing residues and ensure that you get the best results right from the start.
Follow these steps to condition your new stove's oven:
- Insert all the shelves. See "Positioning the shelves" for instructions.
- Turn on the ventilation hood above your range on high.
- Heat the empty oven at the highest temperature for:
- 30 minutes using BAKE
- 30 minutes using BROIL (some ovens only).
There will be a distinctive smell while you are conditioning the oven. This is normal, but make sure the kitchen is well ventilated during the conditioning.
Once cooled, wipe out the oven with a damp cloth and mild detergent, and dry thoroughly.
- Position the shelves
Positioning the shelves
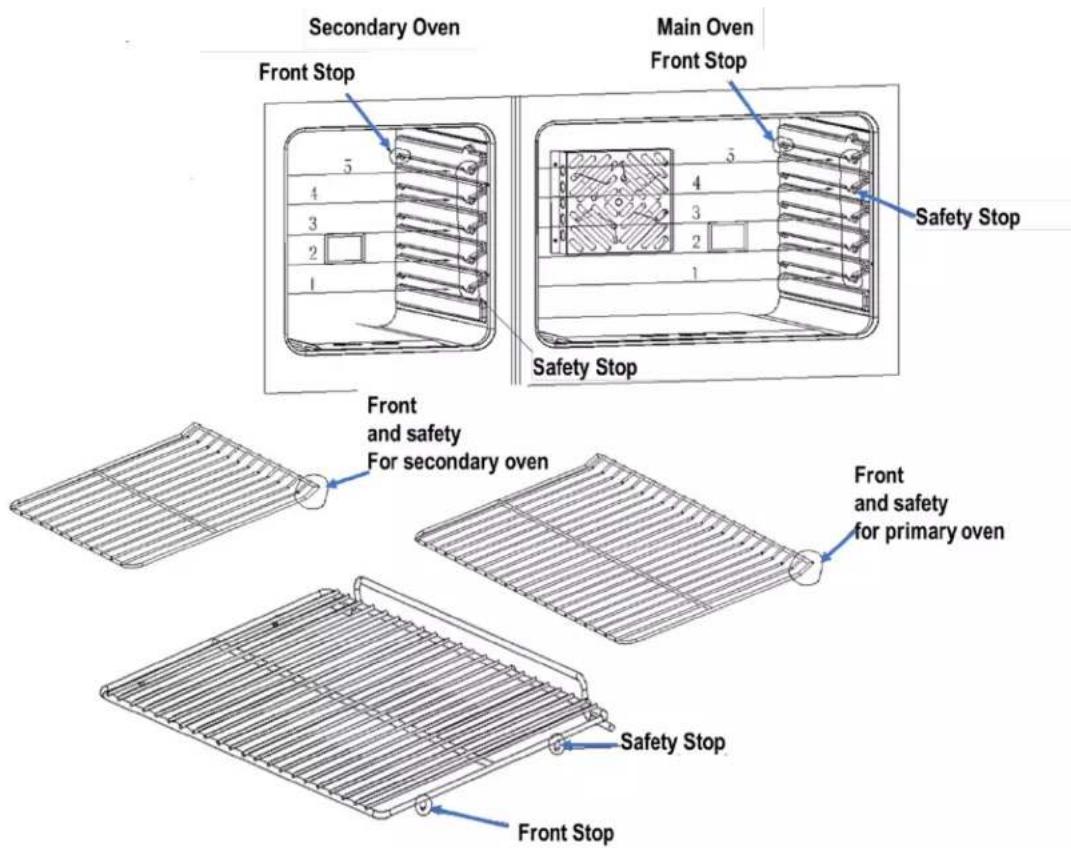
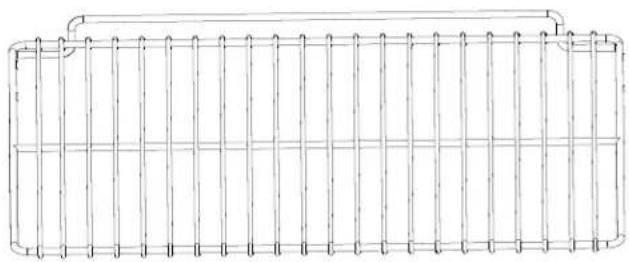
- Both the sides panel and shelves have safety stops to keep them from sliding out of the oven when pulled forward.
- Shelves also have a stop that prevents the shelves from hitting the back of the oven.
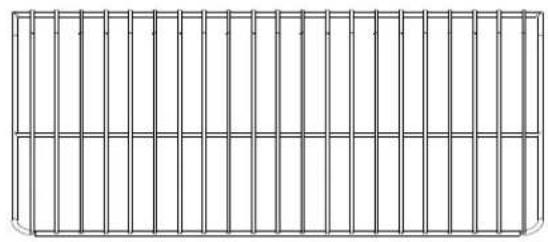
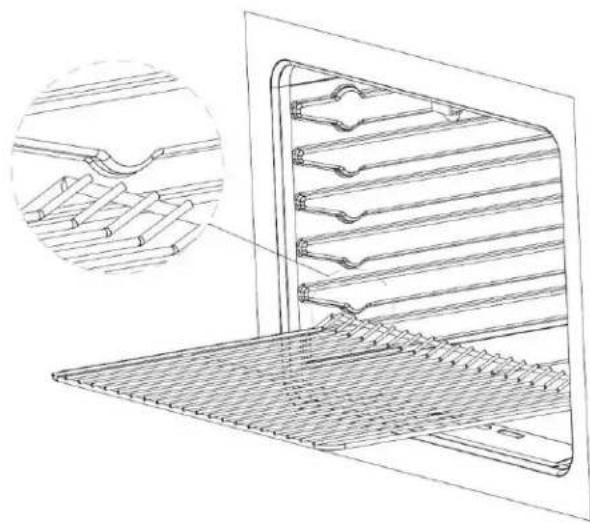
This is how to properly position the shelves:
natural_image
Pure electrical circuit lines without any symbols- Hold the front of both sides of the shelf firmly to keep it in horizontal position.
natural_image
Line drawing of a rectangular grid structure with vertical lines and a horizontal bar at the top (no text or symbols)- Put the shelf on the slot horizontally.
natural_image
Technical line drawing of a mechanical component with layered structure and an inset showing detailed detail (no text or symbols)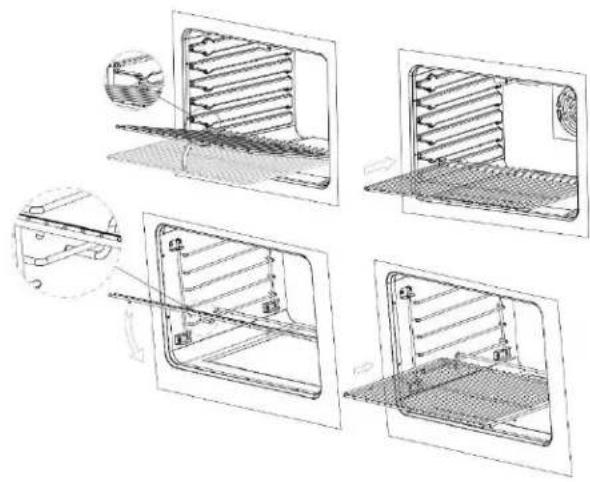
natural_image
Technical line drawings of a microwave oven with internal structure and mounting bracket (no text or symbols)- Lift the front about 15 degrees upward until the tag of the shelf clears the safety stop of the side rack. Then lower the shelf horizontally and slide all the way into the oven. Other shelves can be installed this way.
13. Cooktop Safety Guidelines
- There are dual ring burners have the same low turn-down setting (SIM) for gentle simmering (680 BTU/hr.). Use the SIM setting for melting chocolate and butter, cooking rice and delicate sauces, simmering soups and stews, and keeping cooked food hot.
√ Never leave the cooktop unattended when in use. Boil over causes smoking and greasy spills that may ignite.
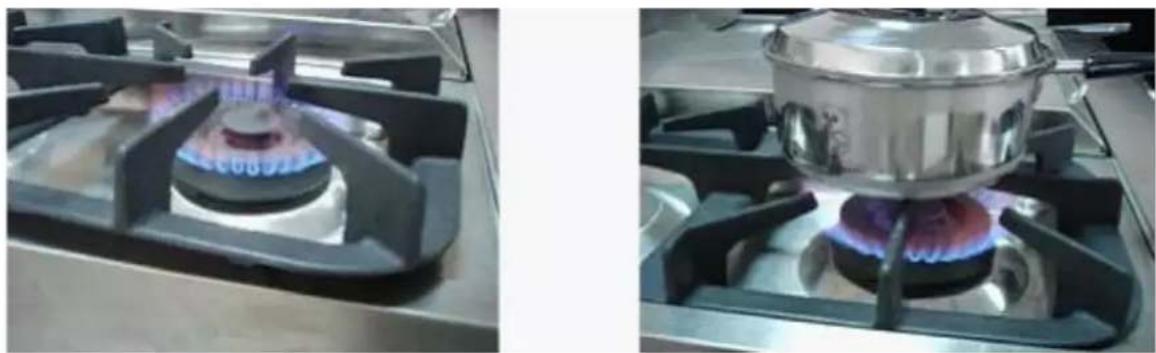
√ Never allow flames to extend beyond cookware or curl up on sides. This could discolor and damage the pot and you may get burned touching the hot handle.
√ Turn handles so that they don't extend over the edge of the range or on a burner that is on.
√ Take care when deep-frying. Oil or fat can overheat very quickly, particularly on a high setting.
√ Make sure that all burner parts are properly in place. Incorrectly or incompletely assembled burners may produce dangerous flames. See “Replacing the burner parts” in “Care and cleaning.”
√ Keep the burners clean, especially after a spill or boil over, make sure you clean the affected burners before using them again. Food residue may clog the igniter and the notches of the flame spreader, stopping the burner from functioning correctly. See “Care and cleaning” for instructions.
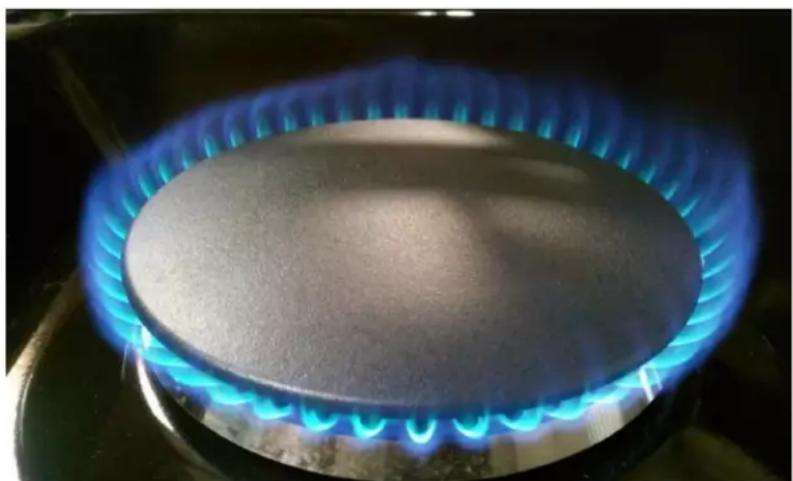
√ Burner flames should be blue with no yellow tipping, and burn without fluttering all around the burner cap. If not, see “Troubleshooting” for advice.
natural_image
Close-up of a gas stove burner with blue flame outlines (no text or symbols visible)Surface Burner Ignition
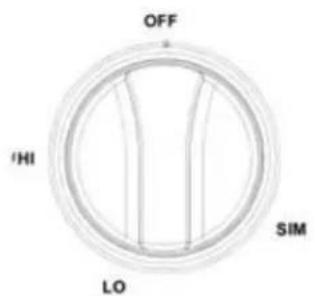
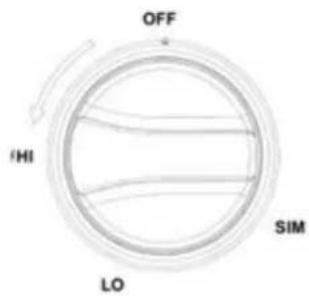
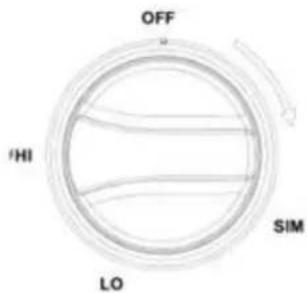
Turn On
Turn Off
To light the top burners, push and turn the appropriate control knob counter clockwise to the "HI" position. You will hear a clicking noise – the sound of the electric spark igniting the burner. Once burner ignition has been achieved, turn the burner control knob to adjust the desired heat setting.

CAUTION
When one burner is turned to the "HI" position, the burner igniters will spark. Do not attempt to disassemble or clean around any burner while another burner is on. Do not touch any burner cap, burner base, or igniter while the igniters are sparking.
Simmer and Boil
A smaller flame will give the best simmer results. Small flames offer precise cooking performance for delicate foods, keeping food warm, melting chocolate or butter, and other foods that need to cook over low heat for a long time.
Dual burners have SIM low turn-down setting for gentle simmering and have a capacity of 620 BTU/hr. Use the SIM setting for melting chocolate and butter, cooking rice and delicate sauces, simmering soups and stews, and keeping cooked food hot.
The highest flame settings provide the maximum heat that is available on your range. This setting should be used for heavy cooking loads such as water boiling or pasta cooking.
Flame Size
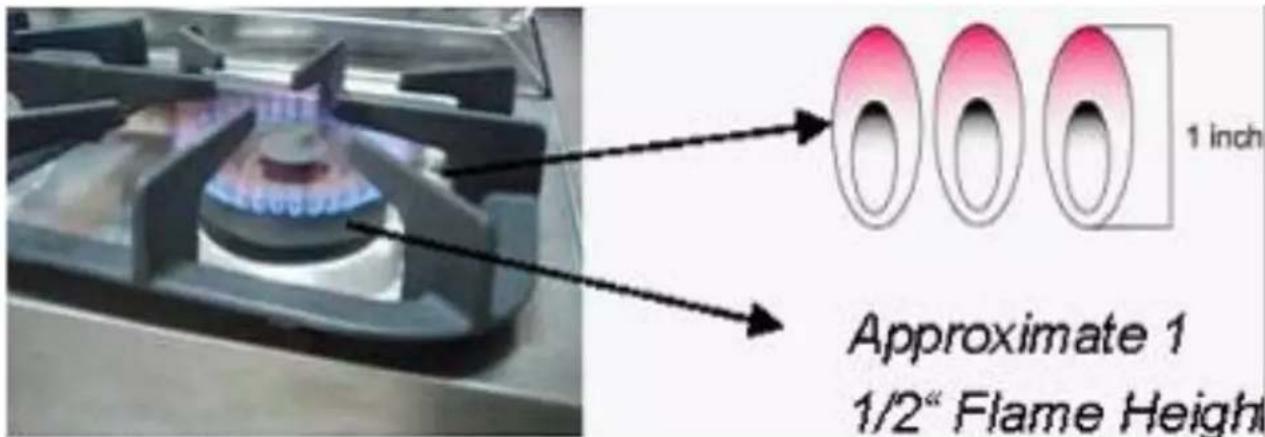
When you select the flame size, watch the flame when you turn the knob.
Any flame larger than the bottom of the cookware is wasted.
The flame should be steady and blue in color. Foreign material in the gas line may cause an orange flame during initial operation.
Power Failure
If the gas does not ignite within four seconds, turn off the valve and allow at least five minutes for any gas to dissipate. Repeat the lighting procedure.
Do not attempt to during power failure.
Cooktop
The burners should be cleaned after each use. To prevent the cooktop from discoloring or staining, wipe up acidic or sugary spills as soon as the cooktop has cooled.
The sealed burners of your range are not connected to your cooktop and are designed to be removed. Boil overs or spills will not seep underneath the cooktop.
Burner Grates
The grates must be properly positioned before cooking. Improper installation of the grates may result in scratching of the cooktop and/or poor combustion.
natural_image
Two photos showing a gas stove with flames and a cooking pot on top (no visible text or symbols)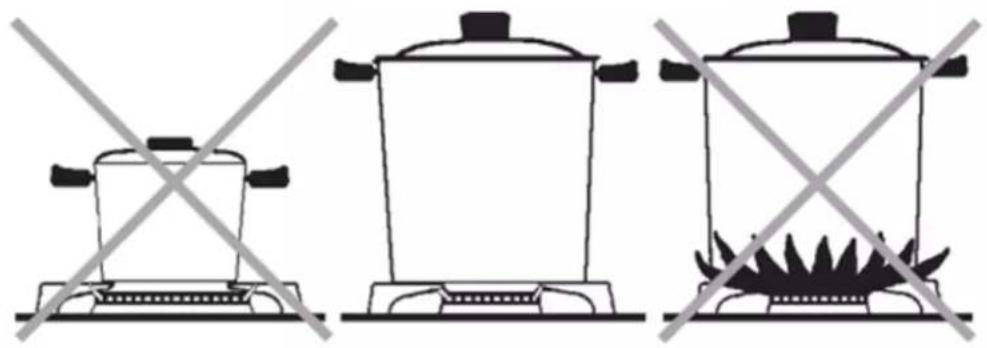
natural_image
Three identical cooking pots with crossed-out diagonal lines indicating heating or resistance (no text or symbols)Oven Burner Use
Turn On
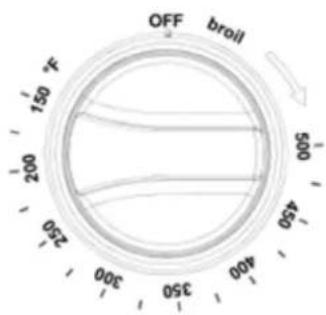
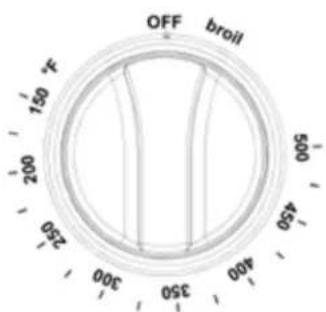
Turn Off
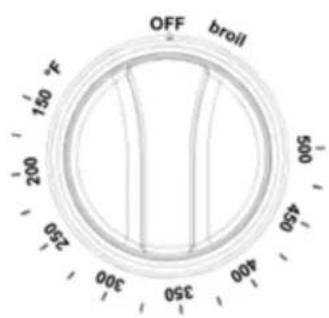
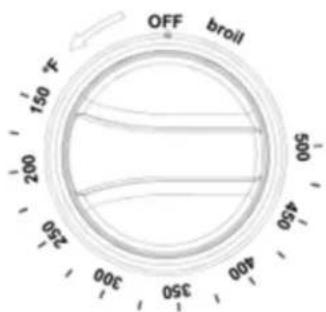
To light the oven burner, push and turn the appropriate control knob counter clockwise to the (150°F\~500°F) position. You will hear a clicking noise, which is the sound of the electric spark igniting the burner. Once burner ignition has been achieved, turn the burner control knob to adjust the desired heat setting.
Broil Burner Use
To light the broiler burner, push and turn the appropriate control knob clockwise to the broil position. You will hear a clicking noise which is the sound of the electric spark igniting the burner. Keep pressing about 4 seconds until the burner ignition has been achieved.
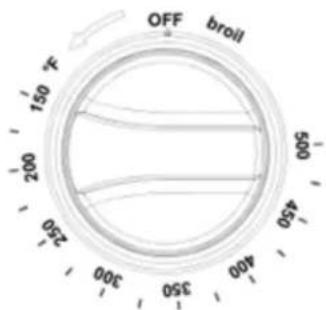
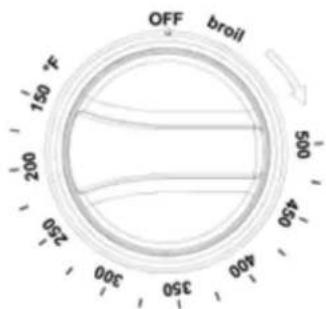
Turn Off
Oven Cooking Safety Guidelines
Do not block the ducts on the rear of the range when cooking in the oven. It is important that the flow of moist warm air from the oven and fresh air into the oven burner never be interrupted. Avoid touching the vent opening or nearby surfaces during oven or broiler operation because they are hot. Do not pace plastics, paper or other items that could melt or burn near the oven vent.
√ Use all the oven modes with the oven door closed.
√ Never use aluminum foil to cover the oven shelves or to line the floor of the oven. The trapped heat can irreversibly damage the enamel and may even cause a fire.
Do not place water, ice, or any dish or tray directly on the oven floor, as this will irreversibly damage the enamel.
√ Do not cover the slotted grid of the broil/ roast pan with aluminum foil. This will catch the grease and could cause fire.
√ Do not use plastic wrap or wax paper in the oven.
√ For food safety reasons, do not leave food in the oven for longer than two hours before and after cooking or defrosting. This is to avoid contamination by organisms which may cause food poisoning. Take care during warmer weather.

WARNING
According to the United States Department of Agriculture: DO NOT hold foods at temperatures between 40^ F to 140^ F more than 2 hours. Cooking raw foods below 275^ F is not recommended.

WARNING
Never cover any slots, holes or passages in the oven bottom or cover an entire rack with materials such as aluminum foil. Doing so blocks air flow through the oven and may cause carbon monoxide poisoning. Aluminum foil lining may also trap heat, causing a fire hazard.
14. Oven Function
Natural Airflow Bake
Natural airflow bake occurs when heat is transferred into the oven from the bake burners in the bottom of the oven cavity. Heat is then circulated by natural airflow. This is a traditional bake setting.
Convection Bake
The oven convection fan circulates and distributes the heat in the oven for faster even cooking. Convection cooking allows you to bake more items on multiple racks.
To bake using the convection fan:
- Position the oven bottom cover and the oven shelves before using oven.
- Remove any unused shelves and baking utensils from the oven.
- Preheat the oven to the temperature stated in the recipe. Depending on the temperature and the size of the oven, preheating will take around 15-20 minutes.
- Arrange pans and food items evenly on the shelves. Make sure pans do not touch each other or the sides of the oven. When baking a single item, always center the item on the oven shelf. If baking on multiple shelves, make sure you stagger items on the shelves so that one is never directly above another.
- When baking using convection, either reduce the temperature stated in the recipe and leave the baking time unchanged, or reduce the baking time by several minutes and leave the temperature unchanged. For foods with a baking time of over an hour, reducing both the temperature and time slightly may give the best results.
- Dark metal baking pans or those with a dull finish absorb heat faster than shiny pans, and are excellent for pies and breads, or anything that needs browning or a crisper crust.
- A shiny finish may work best for foods that require lighter, delicate browning (e.g. cakes and cookies), as it reflects some heat and gives a less intense baking surface.
- Avoid opening the oven door frequently during baking.
Convection Roast
For best results use the broiler pan. The pan is used to catch grease spills and has a cover to prevent grease splatter.
The convection fan circulates heated air over and the around the food being roasted, sealing juices quickly for a moist and tender product while, at the same time, creating a rich golden-brown exterior.
Use the broil/roast pan and slotted grid supplied with the range when roasting to elevate the meat on a metal roasting rack. This allows hot air to circulate around the meat, browning it more evenly like a rotisserie. A suitable roasting rack can be purchased through your HRG distributer or by calling Customer Care.
When roasting larger items like a whole turkey, use only the pan and grid for greater stability.
Convection Defrost
With temperature control off, a motorized fan in the rear of the oven circulates air. The fan accelerates natural defrosting of the food without heat. To avoid illness and food waste, do not allow defrost food to remain in the oven for more than two hours without being cooked.
Defrosting
To thaw uncooked frozen food, set the oven temperature to 100-150^ F. Once thawed, cook the food immediately and do not refreeze.
To prevent liquid from thawing food dripping on the oven floor, be sure any uncooked food is tightly wrapped in foil and/or placed in a heat proof container.
Convection Dehydration
With the temperature control on 175^ F, warm air is radiated from the bake burners on the bottom of the oven cavity and is circulated by a motorized fan in the rear of the oven.
The food dries by evaporation. Drying foods inhibits microbial growth and retains certain enzymes.
15. Broiler Operation

CAUTION
Door must be closed during broiler operation.
Broiling is a method of cooking tender cuts of meat directly under the infrared broiler in the oven. Broiling in the oven is accomplished with the oven door closed. It is normal and necessary for some smoke to be present to give the food a broiled flavor.
If you open the oven door to check the food, have it open for as short a time as possible. This is to prevent the control panel from overheating and prevents melted knobs.
Use both the broil/roast pan and slotted grid supplied. The grid helps to reduce smoking and splatter by letting grease drip into the bottom of the pan, away from intense heat. To prevent food sticking, spray the grid with a light coating of non-stick cooking spray.
Preheating
Preheating is suggested when searing rare steaks (Remove the broiler pan before preheating with the infrared broiler. Foods will stick to hot metal). To preheat, turn the "Oven" selector knob to the "Broil" position. Wait for the burner to become hot, approximately 2 minutes. Preheating is not necessary when broiling meat well-done.
To Broil
Broil one side until the food is browned; turn and cook on the second side. Season and serve. Always pull the rack out to the "stop" position before turning or removing food.
Setting Broil
The “Oven” selector knob controls the Broil feature. When broiling, heat radiates downward from the oven broiler for even coverage. The Broil feature temperature is 500。F (260°C).
The broil pan and insert used together allow dripping grease to drain and be kept away from the high heat of the oven broiler. DO NOT use the broil pan without the insert.
DO NOT cover the broil pan insert with foil. The exposed grease could catch fire.
To set the oven to Broil:
- Place the broiler pan insert on the broiler pan. Then place the food on the broiler pan insert.
- Arrange the interior oven rack and place the broiler pan on the rack. Be sure to center the broiler pan and position directly under the broil burner. If preheating the broil burner first, position the broiler pan after the broil burner is preheated.
- Turn selector knob to Broil.
The oven indicator light will remain on until the selector knob is turned to the off position or the temperature control cycles off.
Broiling guidelines
Choose a suitable shelf position. To ensure that meat is cooked through rather than just browned on the outside, broil thick pieces of meat and poultry on shelf positions 2 or 3. Use shelf position 4 for thinner items that need less cooking time like steaks, chops, or hamburger patties.
When finishing off meals by browning the top under the broiler, use metal or glass-ceramic bakeware. Do not use heatproof glass or earthenware, as these cannot withstand the intense heat of the broiler.
Center the item in the oven, so that it is directly under the broiler.
16. For the models with Griddle
Before Using the Griddle
- Clean the griddle thoroughly with warm, soapy water to remove dust or any protective coating.
- Rinse with clean water and wipe off to dry with soft, clean, lint-free cloth.
- A stainless-steel cover when the griddle is not being used is provided. Please note that the cover must be removed before turning the griddle on.
- Make sure the grease tray is under the front edge of the griddle. Position the tray under the griddle overhang to catch grease or food residue.
Use of the griddle
- Push and turn the control knob counter-clockwise to the preferred cooking temperature.
- Preheat the griddle for 10-12 minutes.
- When the griddle is preheated to the desired temperature, the indicator light will turn on.
- Butter or cooking oil can may be added.

CAUTION
√ The surface of the griddle is hot after use. Please allow sufficient time for the griddle to cool prior to cleaning.
√ When using the appliance or the first time. The oven and broiler burners should be turned on to burn off the manufacturing oils. Turn the oven on to 450^ F ( 230^ C) for 20 to 30 minutes. Then turn the oven control knob to “Broil” for the same length of time. It is recommended to turn on the ventilator above the range at this time.
√ Must disconnect the electrical supply before servicing or cleaning the appliance. Failure to follow this advice may result in injury or death.
17. Cleaning Instructions
Do's
√ Read these cleaning instructions and the “Safety and warnings” section before you start cleaning your range.
√ Before cleaning or removing any part, make sure that everything on the range has been turned off.
√ Unless suggested otherwise in the following chart, allow any part to cool to a safe temperature before cleaning. If you do need to handle a warm or hot part (e.g. grill or griddle), take extreme care. Wear long protective mitts to avoid burns from steam or hot surfaces.
√ Try using any cleaner on a small area first, to ensure it does not stain.
√ See the pages following this chart for instructions on removing and replacing various parts of the range for cleaning or maintenance.
√ To help you identify any parts, see illustrations in section ‘Introduction’ and after this cleaning chart.
Don'ts
√ Do not use aerosol cleaners until the range has completely cooled. The propellant substance in these cleaners could catch fire in the presence of heat.
√ Do not let soiling or grease accumulate anywhere in or on the range. This will make future cleaning more difficult and may present a fire hazard.
√ Do not use any abrasive or harsh cleaners, cloths, scouring pads or steel wool. These will scratch your range and damage its appearance.
√ Do not use a steam cleaner to clean any part of the range.
√ Do not lift the black grill and griddle frames off the cooktop.
Cleaning Burner Caps and Brass Flame Spreaders

CAUTION
Check that the burner is turned OFF and allow it to cool before cleaning any part of the range.
To avoid electrical shock or burns, turn off controls before cleaning.
- Lift off the burner cap and brass flame spreader. Wash them in hot soapy water, rinse, and dry.
- Use a stiff nylon brush or straight-ended paper clip to clear the notches of a flame spreader. Replace the flame spreader and burner cap correctly.
- Do not use harsh or abrasive cleaning detergents, waxes, polishes, or commercial cooktop cleaners to clean the cooktop.
- Use only a sponge, soft cloth, fibrous or plastic brush, and nylon pad for cleaning.
- Always dry components completely before using the cooktop.
Cleaning the Control Panel, Door Handle, Control Housing
- Clean the control panel, door handle and control housing with a solution of mild detergent and warm water.
- Do not use abrasive cleaners or scrubbers; they may permanently damage the finish.
- Dry the components with a soft, lint-free cloth.
Cleaning Side Racks
- Pre-soak any stubborn, burnt-on soiling, then clean with a solution of mild detergent and hot water and wipe dry with a microfiber cloth.
- Alternatively, clean these in the dishwasher.
Cleaning Oven Shelves
- To remove stubborn or "baked-on" material, scrub with a dampened, soap-filled, non-metal, non-abrasive pad, then wipe dry.
-
Apply a chrome cleaner with a damp sponge or cloth following manufacturer's instructions.
-
Wipe and dry.
Cleaning Broiling Pan and Grid
- Pre-soak any stubborn soiling in a solution of mild detergent and hot water.
- Wash by hand or in a dishwasher.
Cleaning Bake and Broil Burners
Do not clean these parts. They self-clean during normal use.
Cleaning Porcelain Surfaces
Clean oven interior and inner door liners with a solution of mild detergents and hot water. Rinse and dry with a soft, lint-free cloth. Do not use abrasives or commercial oven cleaners.
Cleaning Oven Window
- Clean all glass surfaces with a solution of mild detergent and hot water. Use a mild glass cleaner to remove fingerprint or smears.
- Dry completely with a soft, lint-free cloth.
Cleaning Oven Door Gasket
Avoid cleaning this part. If you need to remove large food particles off it, proceed as follows:
- Dampen a sponge with clean hot water.
- Gently wipe off the soiling, but do not rub.
- Press a dry towel gently on the gasket to dry.
Do not use any cleaning detergents on the gasket. The gasket is essential for a good seal.
CAUTION: Do not scratch, displace, or damage it.
Cleaning Stainless Steel Surfaces
√ Do not use any cleaning product with chlorine bleach.
√ Do not use a steel wool pad; it will scratch the surface.
-
Use a hot, damp cloth with a mild detergent.
-
Use a clean, hot, damp cloth to remove soap. Dry with a dry, clean cloth.
18. Replacing Burner Parts
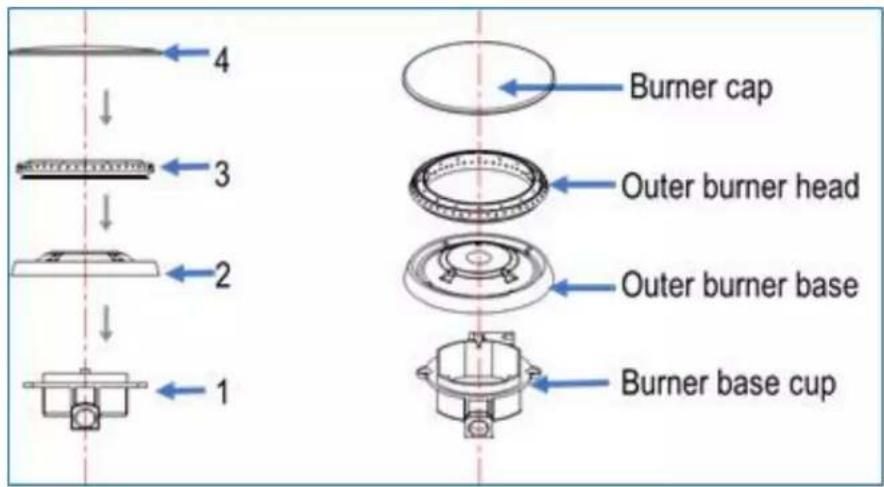
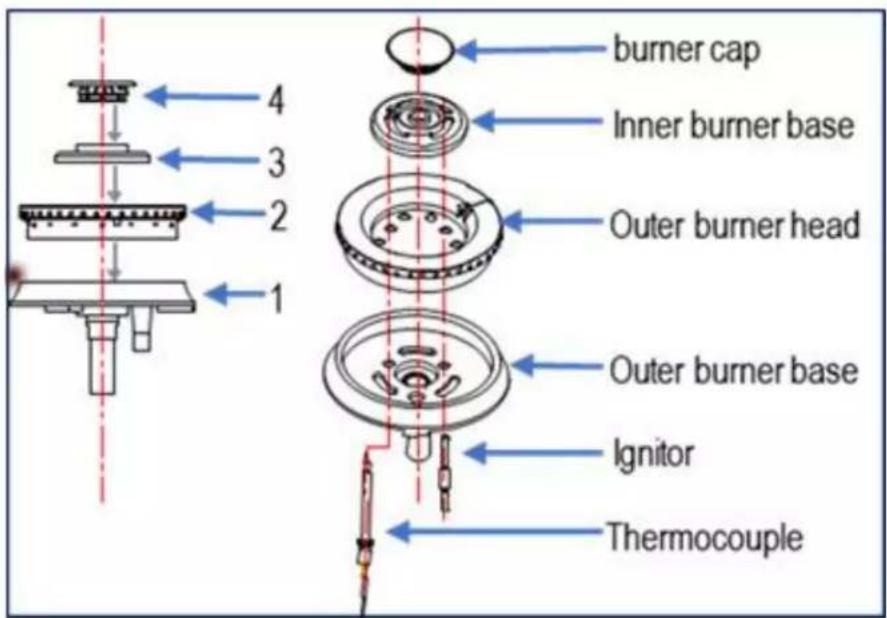
This diagram shows how to replace the burner parts. When replacing the burners, make sure that the two locating pins on the bottom of the brass flame spreader are properly aligned with the locating pin holes on the top of the simmer ring.
Incorrect alignment will produce a potentially dangerous flame and poor burner performance such as sparking/clicking
19. Removing and Replacing Oven Door

CAUTION
Do not lift the oven door by its handle. Doing so may damage the door.
Make sure the oven and the door are cool before you begin to remove the door.
IMPORTANT
Before removing the door, make sure there is a large enough clear, protected surface in the kitchen to rest the door on.
The oven door is heavy!
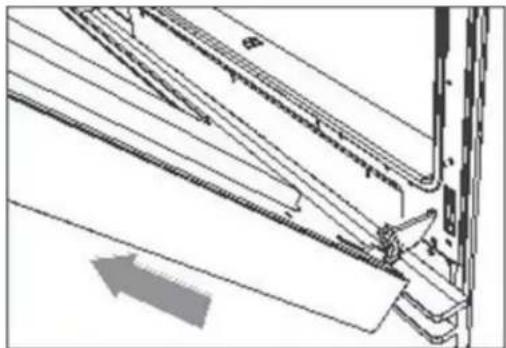
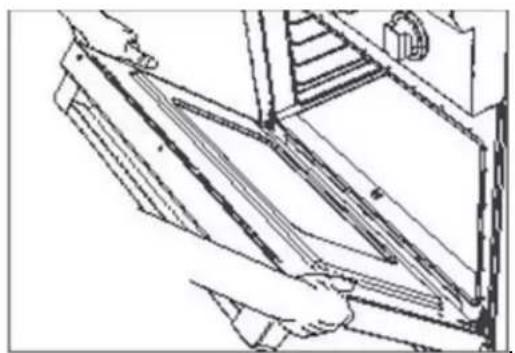
Removing Oven Door
- Open the door very carefully
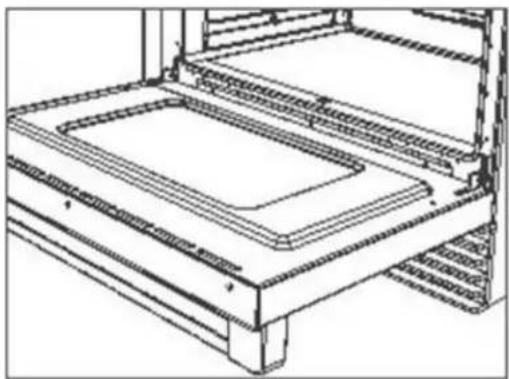
natural_image
Technical line drawing of a mechanical assembly or housing with no visible text or symbols- Open the levers fully on both sides.
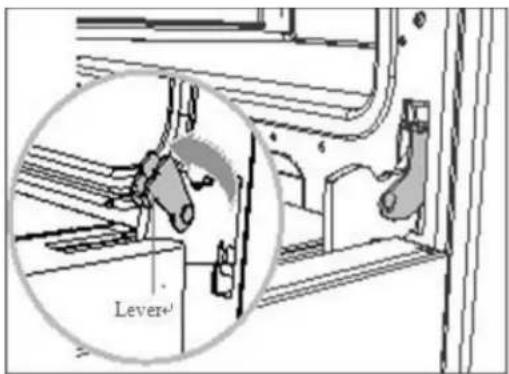
- Holding the door firmly on both sides
natural_image
Technical line drawing of a mechanical assembly with no visible text or symbols- Disengage the hinges and remove the gently close it about halfway. door, place on a protected surface.
natural_image
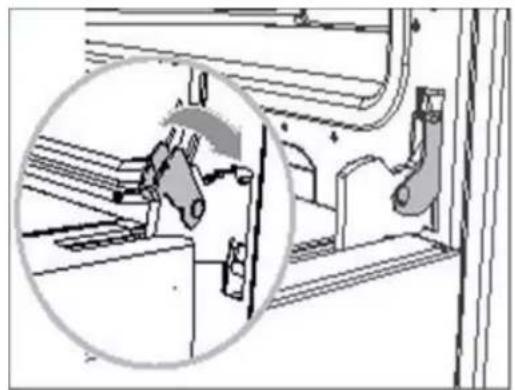
Technical line drawing of a mechanical assembly with stairs and components (no text or symbols)Replacing Oven Door
- Hold the door firmly in an approximately open position
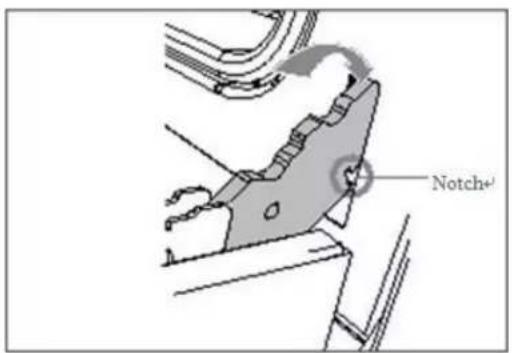
- Insert the hinge tongues into the slots making sure that the notches on both sides drop into place as shown.
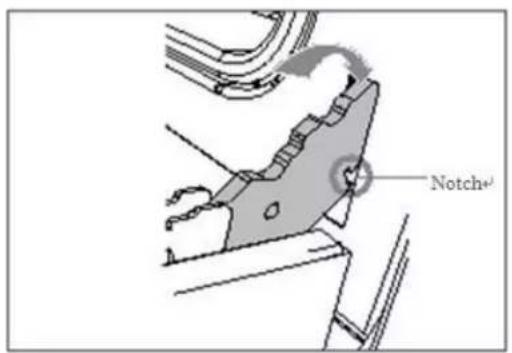
- Open the door fully as shown,
natural_image
Technical diagram showing mechanical assembly with a magnified inset view of a component (no text or symbols)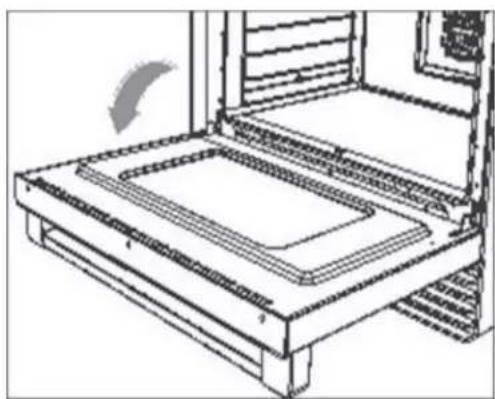
natural_image
Line drawing of a mechanical device with a curved arrow indicating rotation (no text or symbols)- Fully close the levers on the left and right hinges, as shown, then close the door.
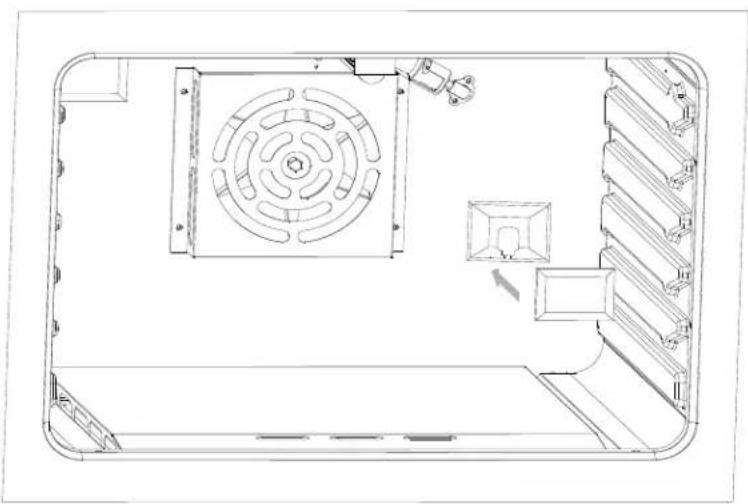
Replacing Oven Light Bulb
natural_image
Top-down schematic of a device layout with no visible text, numbers, or symbols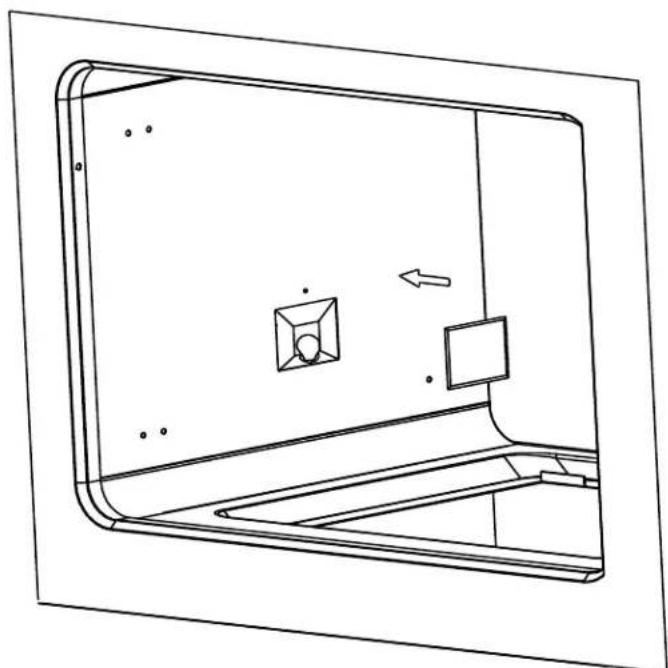
natural_image
Technical line drawing of a device casing with internal components and an arrow indicating direction (no text or symbols)When replace bulbs, release the glass cover on the lamp holder first, and then remove the bulb to replace new light bulb.
20. Procedure for Checking the Dual Burner Clicking Problem
Here's the procedure to have Customer/Servicer check the condition for our current burner design. The procedure helps the electrode to sense the flame correctly:
Step 1
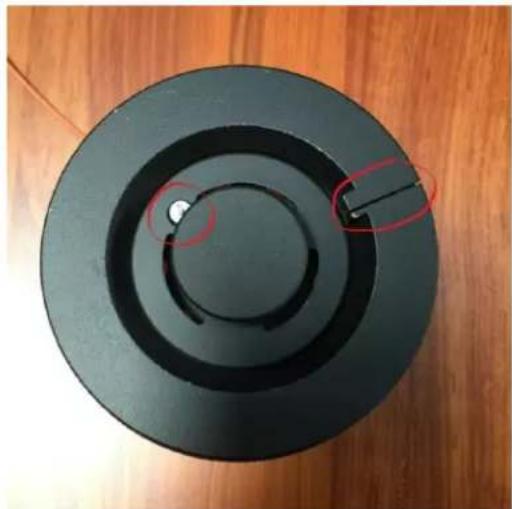
Make sure the Burner Design is correct. Our current design for the burner is has the electrode on the left side (10 o'clock) and cross-over on the right side (2 o'clock).
There are four parts for the dual burners.
They are burner cap, flame ring base, flame ring and burner base.
natural_image
Top-down view of a black circular mechanical component with concentric rings and a small protrusion, placed on a wooden surface (no text or symbols visible)Step 2
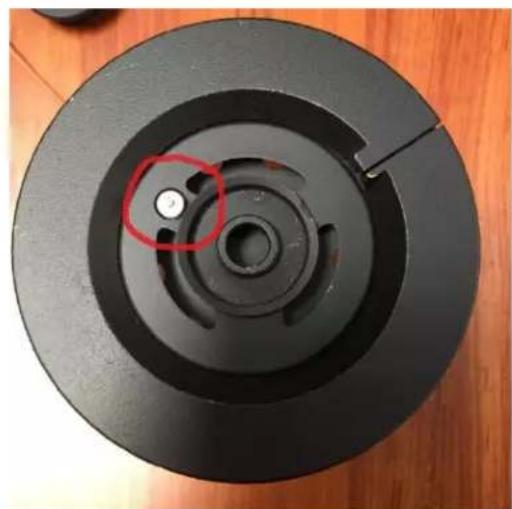
Make sure the electrode is going through the hole on the flame ring and it is vertical to the surface of flame ring base.
natural_image
Top-down view of a black circular mechanical component with a red circle highlighting a small feature, placed on a wooden surface (no text or symbols visible)Step 3
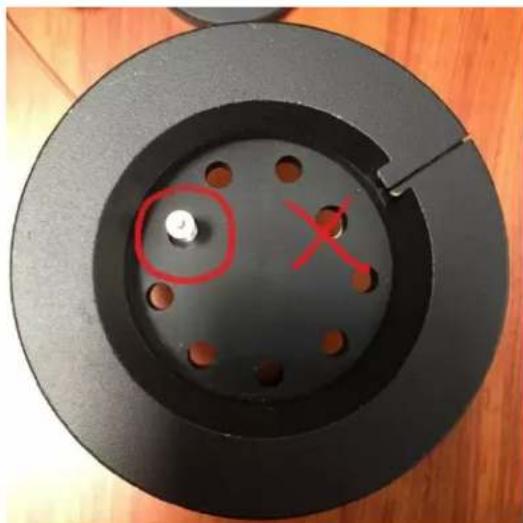
For the flame ring base part. make sure that the electrode will go through the hole on the 10 o'clock position. Make sure the electrode is not going through the hole next to the cross-over.
natural_image
Top-down view of a black circular mechanical component with holes and a central hole, marked with red circles and a red X (no text or symbols)Step 4
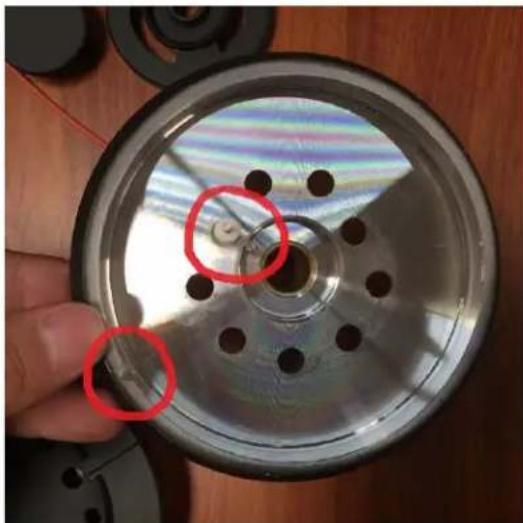
Make sure the electrode is vertical to the surface of the burner base. Please be notified that there's a slot at the 8 o'clock position of the burner base. This slot helps to locate the burner base.
natural_image
Close-up of a metallic mechanical component with red circles highlighting features, no visible text or symbols.21. Troubleshooting Guide
If you can't find an answer to your problem in the chart below, or if the problem cannot be fixed, you will need technical help. Contact your Authorized Service Center or Customer Care.
| Problem | Probable causes | What to do |
| Cooktop |  CAUTIONAlways be sure the stove is cool and burners OFF before proceeding. CAUTIONAlways be sure the stove is cool and burners OFF before proceeding. | |
| Some burners will not light. Flames do not burn all around the burner cap. | Burner parts or igniters may be wet, dirty, or misaligned. | Check that the burner parts are clean, dry, and correctly assembled. Check that the igniters are clean and dry. See “Cleaning Instructions”. |
| Burner flames very large and yellow. | Burner bezel ports are clogged.Burner ports or burner caps are not positioned properly.Cooktop is being operated with the wrong type of gas.Regulator is not installed, is faulty, or is set for the wrong type of gas. | Clean burner bezel ring ports with straightened paper clip, needle, or wire.Remove and carefully re-install burner bezel and caps.Ensure that the type of cooktop matches the natural gas supply.Check installation, replace regulator, or set regulator for proper gas. |
| Sparking but no flame ignition. | Gas shut-off valve is in the OFF position. | Turn shut-off valve to the ON position. |
| Igniters spark continuously after flame ignition. | Power supply polarity is reversed. Igniters are wet or dirty. | Have polarity corrected. Dry or clean igniters. |
| Burner flame goes out at low setting. | Low gas supply pressure. Air intake holes around knobs are obstructed. | Contact gas company. Remove obstruction. |
| The flames have suddenly gone out. | A draft or a spill has extinguished the flame. | No action required. The burner will detect this and automatically relight. However, if there has been a large spill, we recommend turning the burners off and cleaning the burners and sump area after the stove has cooled. See “Cleaning Instructions”. |
CAUTION
Troubleshooting Guide
| Problem | Probable causes | What to do |
| If there is a Power Failure, can I still use the cooktop burners? | Power outage in your area. | The cooktop burners can still be used. To light them:1.Holding a lighted match to the flame spreader, push in on the control knob and turn counterclockwise to LITE.2.When the flame is burning all the way around the burner, you may adjust the heat.IMPORTANTIf the flame is blown out during a power failure, turn the knob immediately to OFF, as the burner will not automatically relight, and gas may escape. |
Troubleshooting Guide
| Problem | Possible causes | What to do |
| Oven | ||
| The oven doesn’t work (no heating). | No power supply (oven light and halos do not come on either).No gas supply (gas ovens). | Check that the circuit breaker hasn’t tripped and there is no power outage in your area. If there is a power outage, you cannot use the oven until power has been restored.The supply to the house may not be working or there may be an outage. Contact your local gas supplier. |
| One of the oven lights does not come on, but the oven works. | The light bulb is loose.The light bulb has blown. | If the bulb is loose, tighten itIf the bulb has blown, replace it according to the instructions in section “Replace Oven Light Bulb” |
| Condensation around oven (e.g. on control panel or top of oven door.) | Food has high moisture content or local climate (temperature, humidity) is contributing to condensation. | Condensation is normal. You can wipe the drops off the control panel. If there is frequent or excessive condensation, make sure that cabinetry around the range is moisture-proofed. |
| Steam coming from oven vents at the back of the range. | Moisture from food evaporating during cooking. | This is normal, especially if you are cooking large quantities of food in the oven using a CONVECTION mode. |
| The convection fan does not come on in a CONVECTION mode. | Technical fault. | Contact your Authorized Service Center or Customer Care. |
| Oven will not heat | Oven settings are not corrected | Follow mode selection and clock settings as specified in Oven Operation section of the manual. |
| Foods over-cooked or under-cooked | Incorrect cooking time or temperature. | Adjust time, temperature, or rack position. |
| “Cracking” or “Popping” sound. | This is the sound of metal heating and cooling. | This is normal. |
| There is a power failure – can I still use the oven? | Power outage in your home or neighborhood. | The oven cannot be used until power is restored. |
Troubleshooting Guide
| Problem | Possible causes | What to do |
| The oven is not cooking evenly | Large item like a turkey being cooked. | If you are cooking a large item, be prepared to turn it round during cooking.If two shelves are used, check that space has been left for the heat to circulate. When a baking tray is put into the oven, make sure that it is placed centrally on the shelf.Check that the door seal is not damaged.A dish of water when placed on the shelf should be the same depth all over. (For example, if it is deeper at the back, then the back of the range should be raised up or the front lowered.) If the range is not level, arrange for your supplier to level it for you. |
| Oven not coming on | Power supply interrupted | Is the power on?If not, there may be something wrong with the power supply.Is the range supply on at the circuit breaker? |
| Oven temperature getting hotter as the range gets older | Thermostat | If turning the temperature down using the oven control knob has not worked, or has only worked for a short time, then you may need a new thermostat. This should be fitted by a qualified service person |
22. Warranty and Service
This product has been manufactured by Thor Group, 13831 Oaks Avenue Chino, CA 91710.
Thor Group disclaims all express warranties except for the following:
This warranty applies to products purchased and located in the United States. Products purchased or located outside this area are excluded.
The warranty does not apply to damage resulting from abuse, accident, natural disaster, loss of electrical power to the product for any reason, alteration, outdoor use, improper installation, and improper operation, repair or service of the product by anyone other than an authorized Thor Group, service agency or representative.
Warranties and Duration
Full warranty for Parts and Labor: 2 years
Implied warranties terminate upon expiration of the limited warranty. Some states do not allow limitations on how long implied warranty lasts, so the above limitation may not apply to your implied warranty.
Thor Group will pay for:
All repair labor and cost of replacement parts found to be defective due to material and workmanship. Service must be provided by a Thor Group Authorized Service Agency during normal working hours.
For a Service Agency nearest you, please call 877-288-8099.
Thor Group will not pay for:
This limited warranty does not cover:
- Service to instruct you on how to use your range to correct house wiring, replace or repair house fuses. Service to correct the installation of your range.
- Repairs when your range is used for other than normal, single-family household use or when it is used in a manner that is contrary to published user or operator instructions and/or installation instructions.
- Cosmetic damage, including chips, dents, scratches or other damage to the finish of your range, unless such damage results from defects in materials or workmanship and is reported to Thor Group within 30 days from the date of purchase.
- Costs associated with the removal from your home of your range for repairs. This range is designed to be repaired in the home and only in-home service is covered by this warranty.
- Damage resulting from misuse, alteration, accident, abuse, fire, flood, acts of God, improper installation, installation not in accordance with electrical, or use of consumables or cleaning products not approved by Thor Group.
- Service to repair or replace consumable parts. Consumable parts are not included in the warranty coverage.
- The removal and re-installation of your range if it is installed in an inaccessible location or is not installed in accordance with published installation instructions.
- This warranty is void if the factory applied serial number has been altered or removed from your range.
- Repairs to parts or systems resulting from unauthorized modifications made to the appliance.
- Expenses for travel and transportation for product service if your range is located on a remote area where service by an authorized Thor Group service provider is not available.
The warranty applies to appliances purchased and used for personal, family or household purposes only. It does not cover appliances used for commercial applications. Should the appliance be sold by the original purchaser during the warranty period, the warranty shall extend to the new owner until the expiration date of the original purchaser's warranty period.
23. Warranty and Product Registration
Thor Group is not responsible for incidental or consequential damages. Under no circumstances will Thor Group's liability exceed the cost that you paid for the product. Some states do not allow the exclusion or limitation of incidental or consequential damages, so the above limitations or exclusion may not apply to you.
This warranty gives you specific legal rights, and you may also have other rights that vary from state to state. Whenever you call our customer service at 877-288-8099 (Thor Kitchen RANGE) for technical information and parts sales in the United States or to request service for your appliance, please have your complete model number and serial number ready. The model and serial number can be found on the product data plate. Please enter the information requested in the spaces provided.
Model No. ____ Serial No. ____
Date of Purchase ____ Purchaser ____
Dealer ____ Suburb ____
Town ____ Country ____
Note: You must provide proof of purchased or installation date for in-warranty service.
Oven Door Handle Installation
Your HRG range might have a KD handle that needs to be installed. Please Follow up the following procedures for the oven door handle installation
- Check your Installation Kits for Door Handles
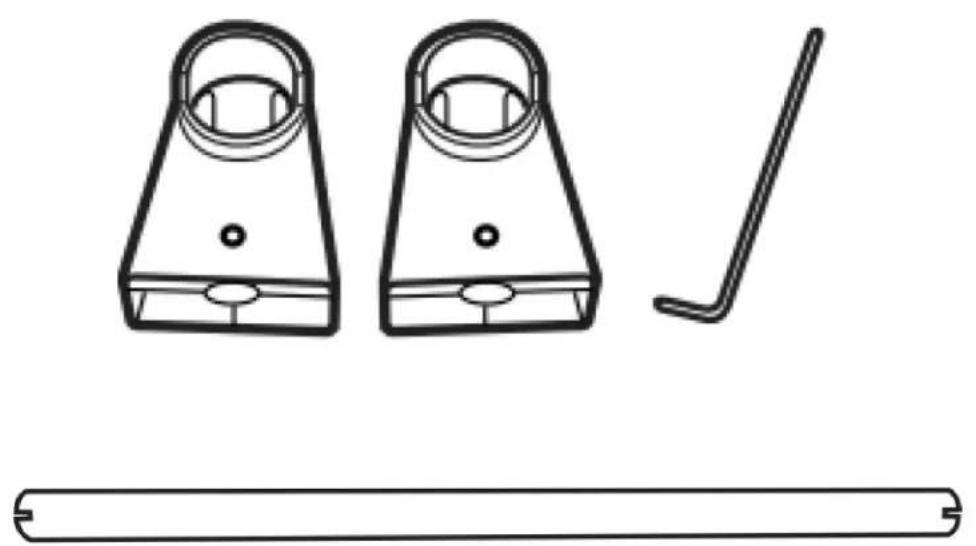
2 * Handle Holders, 1 * Installation Wrench, 1 * Handle (18". 30" or 36")
- Put a silicone pad into both sides of the handle holders;

natural_image
Simple black outline of a circular shape with two curved notches (no text or symbols)- Find the notch on both sides of the handle and connect the handle to the handle holders.
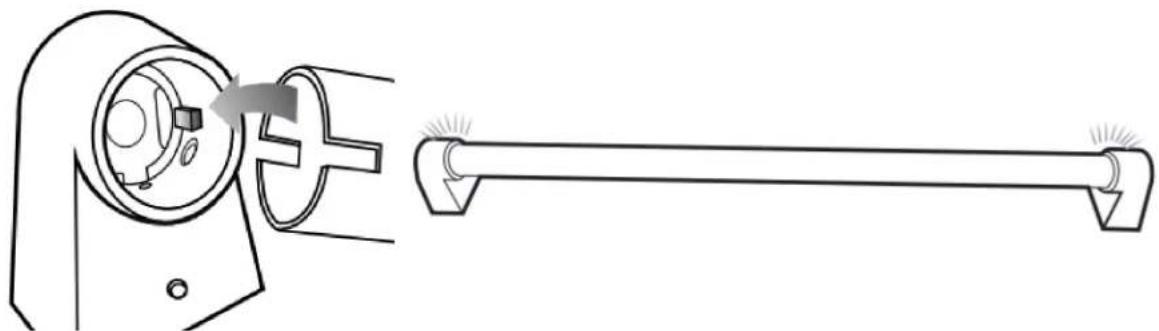
natural_image
Technical line drawing of a mechanical device with a lever and adjustment knob (no text or symbols)- Lay the door handle against to the oven door and fit it on the connection part;
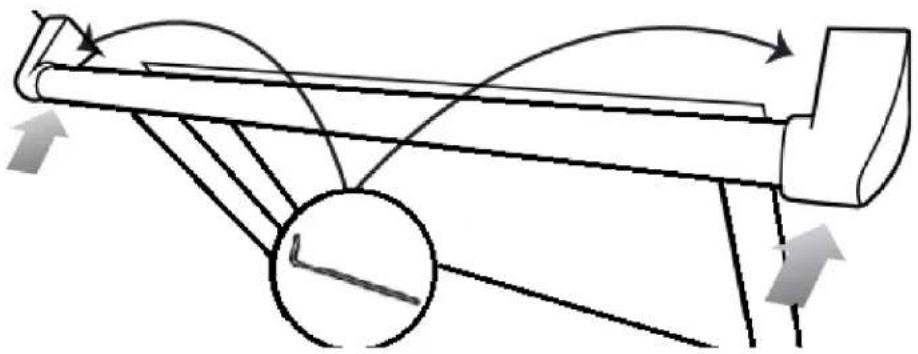
natural_image
Diagram of a mechanical linkage or lever system with directional arrows indicating motion (no text or symbols present)- Use the wrench to get the door handle holder tight;
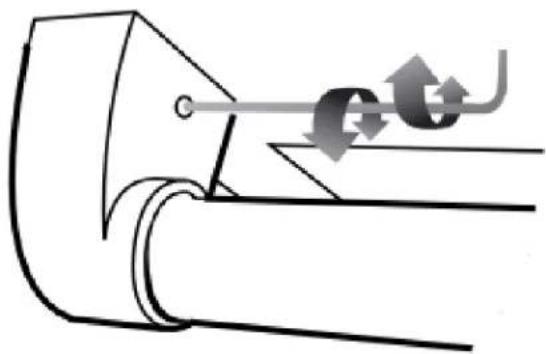
natural_image
Pure mechanical diagram showing a lever and roller assembly without any text, numbers, or symbols- Check if the oven door is level and stable.

Customer Service # 877-288-8099 service@thorgroup.us
- Safety and Warnings
- Table of Contents
- Warnings
- WARNING
- Using a dual gas detector highly recommended
- What to do if you smell natural methane or propane gas
- Important Food Safety Warnings
- Suffocation Warning / Carbon Monoxide Poisoning
- Welcome
- Before You Start
- Safety and Warnings
- Electrical Shock Hazard
- Tipping Hazard
- Explosion Hazard
- Fire Hazard
- Poisoning Hazard
- Hot Surface Hazard
- Other Safety Tips
- CAUTION
- Dual Range Overview
- Cooktop Equipment
- Installation Instructions
- IMPORTANT
- On the next figure, item A is:
- Dimensions and Clearances
- Positioning of Range
- Important Notes to the Installer
- Important Note to the Consumer
- Important Safety Instructions to the Installer
- Model and Serial Number Location
- Electrical Installation
- Power Supply Cord Kit
- Access to Terminal Block
- Electrical Connection
- Four Conductor Wire Connection to Range
- Electric Power Supply Requirements
- Electrical Grounding Instructions
- Gas Supply Requirement
- Connect Range to Gas Supply
- After installation:
- First Use
- Before you start
- Conditioning the oven
- Positioning the shelves
- Cooktop Safety Guidelines
- Surface Burner Ignition
- Simmer and Boil
- Flame Size
- Power Failure
- Cooktop
- Burner Grates
- Oven Burner Use
- Broil Burner Use
- Oven Cooking Safety Guidelines
- Oven Function
- Natural Airflow Bake
- Convection Bake
- Convection Roast
- Convection Defrost
- Defrosting
- Convection Dehydration
- Broiler Operation
- Preheating
- To Broil
- Setting Broil
- To set the oven to Broil:
- Broiling guidelines
- For the models with Griddle
- Before Using the Griddle
- Use of the griddle
- Cleaning Instructions
- Do's
- Don'ts
- Cleaning Burner Caps and Brass Flame Spreaders
- Cleaning the Control Panel, Door Handle, Control Housing
- Cleaning Side Racks
- Cleaning Oven Shelves
- Cleaning Broiling Pan and Grid
- Cleaning Bake and Broil Burners
- Cleaning Porcelain Surfaces
- Cleaning Oven Window
- Cleaning Oven Door Gasket
- Cleaning Stainless Steel Surfaces
- Replacing Burner Parts
- Removing and Replacing Oven Door
- Removing Oven Door
- Replacing Oven Door
- Replacing Oven Light Bulb
- Procedure for Checking the Dual Burner Clicking Problem
- Step 1
- Step 2
- Step 3
- Step 4
- Troubleshooting Guide
- Troubleshooting Guide
- Warranty and Service
- Warranties and Duration
- Thor Group will pay for:
- Thor Group will not pay for:
- Warranty and Product Registration
- Oven Door Handle Installation
Brand : Thor
Model : TIH36
Category : Cooker