GM1A-RX - Interface de remplacement radio voiture PAC - Free user manual and instructions
Find the device manual for free GM1A-RX PAC in PDF.


| Product Type | Car Audio Interface Module |
| Compatible Vehicles | Select GM vehicles (1998-2007) |
| Dimensions (W x H x D) | 2.5 x 1.5 x 0.7 inches |
| Weight | 0.12 lbs |
| Power Supply | 12V DC, 0.5A |
| Operating Temperature | -20°C to 85°C |
| Primary Function | Retains factory chime, door lock, and accessory power after radio removal |
| Input/Output | 8-pin harness, 4-pin speaker output, 2-pin accessory |
| Installation Type | Plug-and-play, no cutting required |
| Cable Length | 6 inches harness |
| Compatible Radios | Aftermarket single-DIN and double-DIN |
| Additional Features | Retains RAP (Retained Accessory Power), lock/unlock signals |
| Material | ABS plastic casing |
| Certification | FCC, CE, RoHS |
| Warranty | 1 year limited warranty |
| Cleaning | Wipe with dry cloth, avoid liquids |
| Safety Notes | Disconnect battery before installation |
| Reparability | Non-serviceable; replace entire module if faulty |
Frequently Asked Questions - GM1A-RX PAC
User questions about GM1A-RX PAC
0 question about this device. Answer the ones you know or ask your own.
Ask a new question about this device
Download the instructions for your Interface de remplacement radio voiture in PDF format for free! Find your manual GM1A-RX - PAC and take your electronic device back in hand. On this page are published all the documents necessary for the use of your device. GM1A-RX by PAC.
USER MANUAL GM1A-RX PAC
Introduction and Features
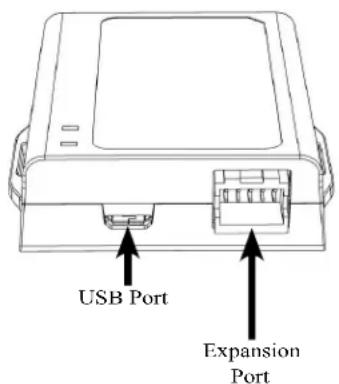
The GM1A-RX interface allows the replacement of a factory radio in select General Motors vehicles with the Class II Data-Bus. Using this interface will retain factory features such as warning chimes and the factory Bose amplifier when the original radio is removed. The GM1A-RX provides data bus driven outputs such as retained accessory power (RAP), vehicle speed signal (VSS), illumination, reverse trigger and parking brake. The GM1A-RX also provides an SWI Direct output for adding an optional PAC Steering Wheel Control (SWC) retention interface (SWI-RC or SWI-CP2). Rear Seat Controls (RSC) if equipped will also be retained with the SWI interface. You can also add multiple camera inputs to your aftermarket radio with Data-Bus controlled automatic activation (front camera only) by connecting a VS41 into the expansion port on the GM1A-RX.
Important Notes
- Does not retain OnStar.
- Does not provide RSE audio to aftermarket radio.
- Compatible in both Premium (Y91 / UQA) and Standard systems.
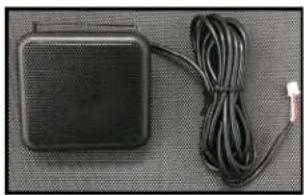
- The included chime speaker should be used when: The vehicle has a standard Bose system (UQ7), the vehicle does not have a factory amplifier at all, or if you are connecting an aftermarket amplifier to the cabin speakers.
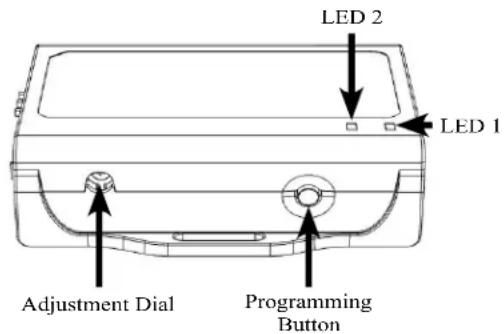
- The Programming Button and Adjustment Dial on the side of the interface have multiple functions. Please see Page 2 for more details.
- When used in conjunction with the add on camera controller (VS41) the GM1A-RX will only provide Data-Bus controlled automatic activation for the front camera. Please refer to the vehicle specific VS41 instructions for more detail.
- Fade is adjusted using the RadioPRO app, available at https://aampglobal.com/RadioProApp. The GM1A-RX module needs to be connected to the vehicle, and the PC, to adjust chime volume.
- In vehicles with Premium Bose (Y91 / UQA), dynamic fade is only supported by the GM1A-RT and GM1A-RST.
Module Layout

Installation Steps
- Wire your aftermarket radio to the GM1A-RX's harness according to the wiring connections chart on the next page.
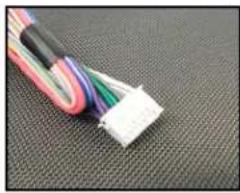
- Plug Interface Connectors 1 and 2 into the appropriate port on the GM1A-RX interface (using the illustration above or the label on the bottom of the interface).
- Plug Interface connector 3 into the LOC-1 module. Connection will be dependent upon whether or not the vehicle has a factory amplified system. Plug this connector into the appropriate port on the included line output converter (Part # LOC-1; using the illustration on the next page or the text stamped into the housing). Improper connection will result in either very over-driven audio in amplified systems or very low audio in non-amplified systems. If this occurs, disconnect the harness from the LOC-1 Module, and connect it into the port on the opposite side of the LOC-1, the other connector on LOC-1 will be let unused.
- If you are also installing an optional SWC interface with the GM1A-RX, connect the SWI Direct Connector to the SWC interface.
- Remove the factory radio and plug in the GM1A-RX's vehicle harness into the factory vehicle harness.
- If necessary, program the SWC interface. Please see next section for more details.
- If the vehicle has a standard Bose system, does not have a factory amplifier at all, or if you are connecting an aftermarket amplifier to the cabin speakers, connect the chime speaker to the chime connector on the interface and install the chime speaker in a place free of obstructions where it can be easily heard (usually low in the dash facing downward).
Installation Steps (cont.)

Interface Connector 1 Interface Connector 2 Interface Connector 3


Line Output
Converter LOC-1)
Non-AMPFited

Vehicle Connector 1
Chime Speaker
Wiring Connections
| Yellow 12v+ | |
| Red | Accessory Output(10 amp) |
| Black Ground | |
| Blue / White Remote On Input | |
| Orange Not Used | |
| Orange / White II | lumination Output (+) |
| Purple / White R | reverse Output (+) |
| Light Green Par | king Brake Output (-) |
| Pink | Vehicle Speed SignalOutput (VSS) |
| Purple Rear | R + input |
| Purple / Black R | ear R - input |
| Green Rear | L + input |
| Green / Black Rear | L - input |
| Gray Front | R + input |
| Gray / Black Front | R - input |
| White Front | L + input |
| White / Black | Front L - input |
Steering Wheel Control Output Connector
- The GM1A-RX provides a SWC output connector labeled "Connect to PAC Steering Wheel Control Interface" (Fig. A). For ease of installation, all necessary connections have been made for you.
- You can use either a PAC SWI-RC or an SWI-CP2 (sold separately).
a. When using an SWI-RC, the loop on the output connector should remain intact. Set the SWI-RC to version two and program the buttons according to the SWI-RC instructions.
b. When using an SWI-CP2, use the DIP switch settings provided for the GM1A-RX in the ControlPRO application. The steering wheel controls will be preconfigured for the vehicle and radio but can be customized using the ControlPRO application. The loop on the output connector should remain intact.
Fig. A

VS41 Wiring
The VS41 can be connected to the GM1A-RX and used to switch multiple cameras. Please refer to the document labeled "Instructions for wiring the VS41 into 2003-2006 Chevy / GMC Trucks and SUVs" which can be found on www.pac-audio.com under the VS41 product page.
Adjustable Settings
These products have settings that are adjustable through our RadioPRO PC app or through the push-button on the module. Some settings are only adjustable through the PC app. Some of these settings require the module to be connected to the vehicle. Below is a breakdown of these settings.
| SETTING | AVAILABLE ON PC APP | AVAILABLE ON MODULE | |
| CONNECTED TO CAR | NOT CONNECTED TO CAR | ||
| Chime volume (excluding Premium Bose Y91/UQA) | YES | NO | YES |
| Factory amplifier settings: Bass, Mid, Treble, Gain, and Fade (Premium Bose Y91/UQA only) | YES | NO | GAIN ONLY |
| OnStar volume (RST or RT products only) | YES | NO | YES |
| Read product version | YES | YES | N/A |
| Update firmware | YES | YES | N/A |
| Camera settings (VS41 required) | YES | YES | NO |
Related Downloads
• RadioPRO PC App - http://aampglobal.com/RadioProApp
- Latest instruction manuals - search part number on pac-audio.com, and look on "Downloads" tab
Programming Button and Adjustment Dial Functions
You can press and hold the programming button on the side of the interface to access different programming modes. Once the LED is lit to the mode you desire (see below for modes), immediately release the programming button to access that mode.
PLEASE NOTE:
- This process must be done with the interface in the vehicle and the key in the ignition position.
- The chime speaker must be connected unless there is a Premium Bose (Y91 / UQA) system present. If this is the case then the cabin speakers must be connected to the Premium Bose amplifier.
- If there is a Premium Bose system (Y91 / UQA), and you are also installing an amplifier on the cabin speakers, make sure that the chime speaker is connected before proceeding. See the RadioPRO app section on Page 4 for more details.
A. 2 Chimes and LED1 flash amber: SWC re-calibration (this mode is available in the Corvette only). This allows you to re-calibrate the analog SWC in the event they fall out of the expected range and do not function properly. If data control SWC are detected by the interface, this mode will be automatically skipped.
B. 3 Chimes and both LEDs flash green: Chime volume adjustment This allows you to adjust the volume of the chimes generated by the interface using the adjustment dial on the side (this mode is not available in vehicles equipped with Premium Bose (Y91 / UQA) amps). If a Premium Bose amp is detected by the interface, this mode will be skipped as the factory amp is what generates the chimes. Please see the vehicles owner's manual for adjustment of chime volume in vehicles with Premium Bose (Y91 / UQA).
C. 4 Chimes and LED 1 flash red: Master reset. LED 1 will flash red and you will hear four chimes. This does a master reset of the interface and restores the following settings to factory defaults:
- SWC Calibration
- Camera Settings
- Infotainment Settings
- Interface User Options
Testing and Verification
- Turn the ignition on. LED 1 will illuminate red and the +12v accessory output will turn on.
- Turn on the radio and check chimes, volume, and balance. Note: Premium Bose Systems (UQA / Y91) will not fade from the aftermarket radio. If you want to adjust the fader you must use the RadioPRO app, available for download at https://aampglobal.com/RadioProApp. Please see the RadioPRO app section on the next page for more details.
- In vehicles equipped with Premium Bose (Y91 / UQA): If the overall volume is too low, use the adjustment dial on the side of the interface to set it to the desired level. The best way to do this is to turn the volume on the radio to 3/4 volume, then turn the adjustment dial on the GM1A-RX clockwise until some distortion is heard, then counter-clockwise a little.
- Chime Volume: If the chime volume is too low, adjust it using either the procedure outlined in the previous section, or by using the RadioPRO app. Please see the RadioPRO app section on the next page for more details.
- If an SWI interface was also installed, verify that all SWC buttons are functioning properly. If you are installing the GM1A-RX into a Corvette, and are experiencing erratic SWC behavior, you may need to follow the SWC re-calibration procedure in the next section.
- Turn off vehicle and remove key. RAP will keep the accessory output on for 10 minutes or until any door is opened.
- LED 1 and the accessory output will turn off when RAP turns off.
SWC Re-calibration Procedure (Corvette Only)
Please Note: This is only necessary if after installation, the SWC are acting erratic or unresponsive in the Corvette.
- Turn the key to the ignition position.
- Press and hold the programming button until LED 1 turns amber and you hear two chimes. When this happens, release the programming button.
-
Within 7 seconds, press and hold the button that is to be learned on the steering wheel. The LED will turn off when the button is pressed and begin blinking when the value has been learned. Once the LED begins blinking, release the button.
-
Repeat step 3 for each additional function on the steering wheel.
-
If you come to a button in the list that your vehicle does not have, skip it by pressing the programming button on the interface. Any buttons not learned during this process will not function.
-
Once programming is completed, the LED will flash indicating end of programming.
-
Test the interface for proper functionality. Whenever a SWC is pressed LED 1 on the interface should blink green. If any function does not work, repeat the programming steps.
| Button Programming Order |
| Volume Up |
| Volume Down |
| Seek Up |
| Seek Down |
| Preset |
| Answer / Voice |
| Hang Up |
| Preset Up |
Rear Seat Entertainment (RSE); If equipped
The factory RSE system will function independently from the aftermarket radio. The unit will power up and pass audio through the headphones as long as the vehicle's ignition is on. Audio from the RSE cannot be passed to the aftermarket radio when using the GM1A-RX. If you wish to pass audio to the aftermarket radio you must use GM1A-RT or GM1A-RST.
RadioPRO App
Download the RadioPRO PC App at https://aampglobal.com/RadioProApp.
Use of the RadioPRO App allows you to do the following:
- Configure User Interface Options such as:
- Chime Volume
- Camera Settings
- Update Product Firmware
- Read Firmware/Hardware Versions
• Factory amplifier settings (Bass, Mid, Treble, Gain, Fader and Balance)
PLEASE NOTE:
The interface must be connected to the vehicle when using the following features of the RadioPRO App:
• Factory Amplifier Settings
- Chime Volume
The interface does not need to be connected to the vehicle when using the following features of the RadioPRO App:
• Interface User Options
- Camera Settings
- Firmware Updates
- Reading firmware/hardware versions
Infotainment/Factory Amplifier Adjustments
The RadioPRO app will also allow you to adjust the settings of the factory amplifier (UQA / Y91 Premium systems only). You can adjust Amp Gain, Fader, Balance, Bass, Mid and Treble. Restoring factory settings on the module will default all values back to default.


Product Updates (Firmware)
Firmware Updates
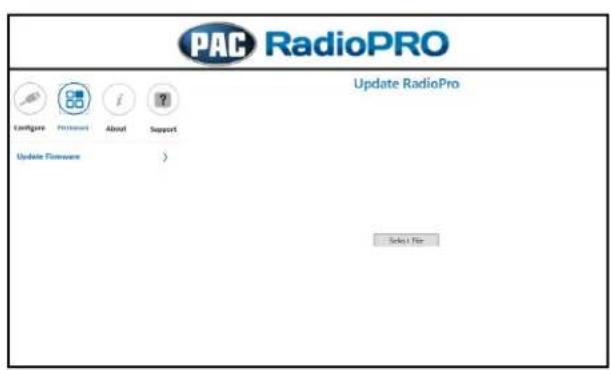
The RadioPRO app will also allow you to update the interface with new firmware as it becomes available. The GM1A-RX can be updated with new firmware as it becomes available. Please visit www.PAC-audio.com/firmware for available updates.
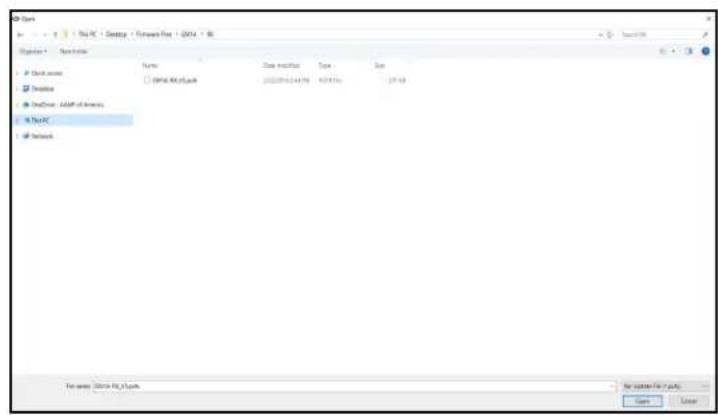
Connect the interface to your PC and select "Firmware", then "Update Firmware". Now select "Select File". Finally, browse to the place where you saved the file and select it. This will begin the updating process. Once finished, disconnect the interface from the PC and test operation.
Technical Support
Email: support@PAC-audio.com
Phone: 866-931-8021
International: 727-572-9255 ext 230
- INTRODUCTION AND FEATURES
- IMPORTANT NOTES
- MODULE LAYOUT
- INSTALLATION STEPS
- INSTALLATION STEPS (CONT.)
- STEERING WHEEL CONTROL OUTPUT CONNECTOR
- VS41 WIRING
- ADJUSTABLE SETTINGS
- PROGRAMMING BUTTON AND ADJUSTMENT DIAL FUNCTIONS
- PLEASE NOTE
- TESTING AND VERIFICATION
- SWC RE-CALIBRATION PROCEDURE (CORVETTE ONLY)
- REAR SEAT ENTERTAINMENT (RSE); IF EQUIPPED
- RADIOPRO APP
- USE OF THE RADIOPRO APP ALLOWS YOU TO DO THE FOLLOWING
- INFOTAINMENT/FACTORY AMPLIFIER ADJUSTMENTS
- PRODUCT UPDATES (FIRMWARE)
- FIRMWARE UPDATES
- TECHNICAL SUPPORT
Brand : PAC
Model : GM1A-RX
Category : Interface de remplacement radio voiture