
DVB-T2 PVR MPEG4 - Digital decoder BUSH - Free user manual and instructions
Find the device manual for free DVB-T2 PVR MPEG4 BUSH in PDF.


| Product Type | Digital Terrestrial Decoder |
| Brand | Bush |
| Model | DVB-T2 PVR MPEG4 |
| Standards Supported | DVB-T2, DVB-T, MPEG-4, H.264 |
| PVR Function | USB recording and time shift |
| Video Outputs | HDMI, Composite (RCA) |
| Audio Outputs | HDMI, Digital Coaxial, Analog Stereo |
| USB Ports | 1 x USB 2.0 for recording/playback |
| RF Input | F-type connector (75 Ohm) |
| Power Supply | DC 5V, 1.5A (adapter included) |
| Power Consumption | < 5 W (typical) |
| Dimensions (W x D x H) | 120 x 80 x 30 mm |
| Weight | 200 g |
| Electronic Program Guide (EPG) | Yes, 7 days |
| Parental Control | Yes (channel and programme lock) |
| Subtitle Support | DVB subtitles, Teletext |
| Languages | Multiple OSD languages |
| Remote Control | Infrared, CR2025 battery |
| Maintenance | Clean with soft dry cloth; disconnect power before cleaning |
| Safety | Do not expose to moisture or extreme temperatures; use only supplied adapter |
| Spare Parts / Reparability | Remote and adapter available; no user-serviceable parts inside; refer to qualified service |
Frequently Asked Questions - DVB-T2 PVR MPEG4 BUSH
User questions about DVB-T2 PVR MPEG4 BUSH
0 question about this device. Answer the ones you know or ask your own.
Ask a new question about this device
Download the instructions for your Digital decoder in PDF format for free! Find your manual DVB-T2 PVR MPEG4 - BUSH and take your electronic device back in hand. On this page are published all the documents necessary for the use of your device. DVB-T2 PVR MPEG4 by BUSH.
USER MANUAL DVB-T2 PVR MPEG4 BUSH
natural_image
Close-up of a black electronic device casing with ventilation grilles and a handle (no visible text or symbols)
You'll soon be enjoying your new set-top box.
It all begins here, with your instructions. Don't worry, there's nothing too technical coming up. Just simple, step-by-step guidance to get you up and running quickly. Sound good? Then let's get started.
Help and Guidance
We're here to help you get the most from your set-top box. Should you require any guidance, a simple solution can often be found online at:
www.argos-support.co.uk
If you still require further assistance, call one of our experts on 0345 604 0105
Contents
1 Safety information
Power Safety 6
Hard Disk Safety 7
Safe Use of the Equipment 7
2 Getting to know your set-top box
Ready? Let's begin 12
Accessories 12
Overview of the Remote Control 13
Overview of the Set-Top Box 14
3 Connections
Connecting the Set-Top Box to a TV Set 18
Power Connection 19
First Time Installation 20
Auto Power Down 21
4 Standard features
Changing Channels 24
Adjusting the Volume 24
On-Screen Information 24
Instant Recording 24
Menu System 25
Internet Portal 25
5 Advanced features
Managing Stations: Channel List 28
Electronic Programme Guide (EPG) 30
Configuring Timers 31
Recordings Library 32
Time Shifting (Pause Live Recording) 34
Media Browser 34
Digital Teletext 36
Settings 37
Configuration 38
Language 40
Installation 41
First Time Installation 42
IP Settings 42
6 Other information
Technical specifications 46
7 Product support
Troubleshooting 50
OSD Warning Messages 51
Hard Disk 52
Help and assistance 53
Disposal 54
Guarantee 55
This page is left intentionally blank
1Safe

natural_image
Abstract geometric pattern composed of gray triangles on a white background (no text or symbols)
Safety information
Important - Please read these instructions fully before installing or operating
Power Safety
Power source
• Always use the provided AC adaptor.
- Operate only from the power source specified on the AC adaptor.
- The power adaptor may become hot during normal operation. This is not a malfunction.
- Please make sure that the adaptor is not covered while in operation. Leave a space of 15 cm (minimum) around the AC adaptor.
- The rating information and safety caution of the AC adaptor are provided on the adaptor.
WARNING: When the set-top box is not in use for a long time, disconnect it from the power.
Power Cord
- Do not place the unit, a piece of furniture, etc., on the power cord, or pinch the cord.
- Handle the power cord by the plug. Do not pull out the plug by tugging the cord.
- Never touch the power cord when your hands are wet as this could cause a short circuit or electric shock.
- Never make a knot in the cord or tie it with other cords.
- The power cords should be routed in such a way that they are not likely to be stepped on.
- A damaged power cord can cause fire or give you an electrical shock.
- Check the power cord once in a while. When you find it damaged, ask closest service agent for help.
- Please do not place the set in a place subject to direct sun light, excessive dust or mechanical shock or in a location near heat sources.
-
The device should be placed on a solid and safe base.
-
Do not place the apparatus on a soft surface such as a rug that might block the ventilation holes on the bottom.
- The selected location should not have a high humidity. Condensation, that may arise in a kitchen for example, may cause a malfunction or damage the device.
• Heating or other thermal radiation under the set also may cause malfunction or damage the device. - The hot air, which arises during operation, should be ventilated with sufficient air circulation. Please do not put the device into closed areas and do not cover it.
- Please avoid contact of the device with water or humidity. Do not put into operation near bath, swimming pools.
• Take care to provide good air circulation. Place the device in a location with adequate ventilation to prevent heat build-up in the device. - Should any solid object or liquid fall into the cabinet, unplug the device and have it checked by qualified personnel before operating it any further.
- The device should not be exposed to dripping or splashing and no objects filled with liquids, such as vases, shall be placed on the device.
Batteries
Batteries shall not be exposed to excessive heat, for example sunshine or fire.
Connection to a Television Distribution System (Cable TV etc.) from Tuner
Device connected to the protective earthing of the building installation through the mains connection or through other apparatus with a connection to protective earthing and to a television distribution system using coaxial cable, may in some circumstances create a fire hazard.
Connection to a cable distribution system has therefore to be provided through a device providing electrical isolation below a certain frequency range (galvanic isolator, see EN 60728-11).

Safety information
Important - Please read these instructions fully before installing or operating
Hard Disk Safety
This Recorder has a built in hard disk (abbreviated as HDD) for recording and playback. Beware of the following points when setting up and using the Recorder. Failure to observe precautions may cause damage to the HDD itself or its content, failure of the disk to operate, or recording of noise.
- Do not subject the Recorder to any vibration or impact.
- Do not place the Recorder in a cramped location which might block the ventilation port on the back of the Recorder.
- Do not place the Recorder in a location with severe temperature variation.
- If the Recorder is set up in a location with severe temperature variation, dew may form on and inside the Recorder. If the Recorder is used with internal dew formation present, this may cause HDD damage or malfunction. We recommend keeping variation in room temperature within 10 °C per hour.
- Do not place the Recorder in a location with high humidity.
- Place the Recorder horizontally, never at an incline.
- Do not place a magnetic device (magnet etc.) close to the recorder.
- When the power is on, do not unplug the AC adaptor from the AC outlet, turn off the breaker for the area where the Recorder is set up, or move the Recorder.
- When moving the Recorder, first turn off the power and then unplug the power cord from the AC outlet.
Note: If a message indicating an HDD error is displayed (such as ERROR IN HDD. CANNOT OPERATE.) and the HDD has malfunctioned, you cannot replace the HDD by yourself. If you disassemble the Recorder, the warranty will become void. Also, recovery of data is impossible.
Safe Use of the Equipment
This equipment has been designed and manufactured to meet international safety standards but, like any electrical equipment, care must be taken if you are to obtain the best results and to ensure its safety.
DO read the operating instructions before you attempt to use the equipment.
DO ensure that all electrical connections (including the mains plug, extension leads and inter-connections between the pieces of equipment) are properly made and in accordance with the manufacturer's instructions. Switch off and remove the mains plug before making or changing connections.
DO consult your dealer if you are ever in doubt about the installation, operation or safety of your equipment.
DO be careful with glass panels or doors on equipment.
DO route the mains lead so that it is not likely to be walked on, crushed, chafed, or subjected to excessive wear and tear or heat.
DON'T remove any fixed cover as this may expose dangerous voltages.
DON'T obstruct the ventilation openings of the equipment with items such as newspapers, tablecloths, curtains, etc. Overheating will cause damage and shorten the life of the equipment.
DON'T allow electrical equipment to be exposed to dripping or splashing, or objects filled with liquids, such as vases, to be placed on the equipment.
DON'T place hot objects or naked flame sources such as lighted candles or nightlights on, or close to equipment. High temperatures can melt plastic and lead to fires.
DON'T use makeshift stands and NEVER fix legs with wood screws - to ensure complete safety always fit the manufacturer's approved stand or legs with the fixings provided according to the instructions.


Safety information
Important - Please read these instructions fully before installing or operating
DON'T use equipment such as personal stereos or radios so that you are distracted from the requirements of traffic safety. It is illegal to watch television whilst driving.
DON'T listen to headphones at high volume, as such use can permanently damage your hearing.
DON'T leave equipment switched on when it is unattended unless it is specifically stated that it is designed for unattended operation or has a stand-by mode.
Switch on the equipment and make sure that your family know how to do this. Special arrangements may need to be made for infirm or handicapped people.
DON'T continue to operate the equipment if you are in any doubt about it working normally, or if it is damaged in any way - switch off, remove the mains plug and consult your dealer.
ABOVE ALL
- NEVER let anyone especially children push anything into holes, slots or any other opening in the case - this could result in a fatal electrical shock;
- NEVER guess or take chances with electrical equipment of any kind
• It is better to be safe than sorry!

Safety information
Important - Please read these instructions fully before installing or operating
This page is left intentionally blank

This page is left intentionally blank
Getting to know your set-top box
2

Getting to know your set-top box
You'll be up and running in no time
Ready? Let's begin...
Please read these instructions carefully. They contain important information which will help you get the best from your set-top box and ensure safe and correct installation and operation.
If you require any further assistance, our technical experts are happy to help. For full details, refer to the product support section at the end of these instructions.
Accessories
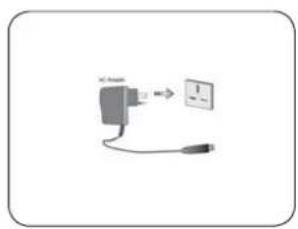
natural_image
Simple line drawing of a plug connected to a wall socket (no text or symbols)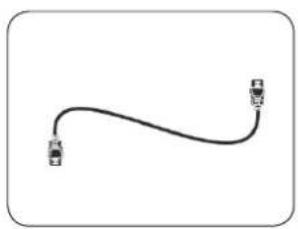
natural_image
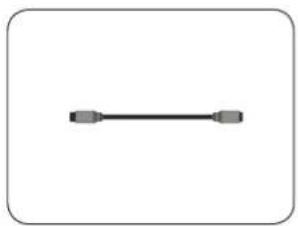
Simple line drawing of a cable or wire with two connectors (no text or symbols)Power adaptor HDMI cable

natural_image
Front view of a black remote control with buttons and a yellow display (no visible text or symbols)Remote control
natural_image
Simple horizontal line with rounded ends, no text or symbols presentRF cable
natural_image
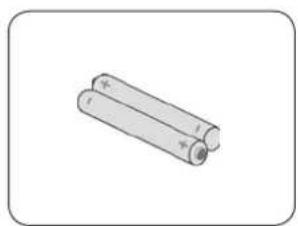
Simple line drawing of two cylindrical batteries (no text or symbols)Batteries User guide

natural_image
Simple line drawing of an open book with no text or symbols visible
natural_image
Simple line drawing of an open book with no text or symbols visibleQuick start guide
Fig 1.
If you require any technical guidance or find that your TV is not operating as intended, a simple solution can often be found in the Troubleshooting section of these instructions.
Getting to know your set-top box
You'll be up and running in no time
Overview of the Remote Control

Fig 2.

Getting to know your set-top box
You'll be up and running in no time
Overview of the Set-Top Box
Front view

Rear view
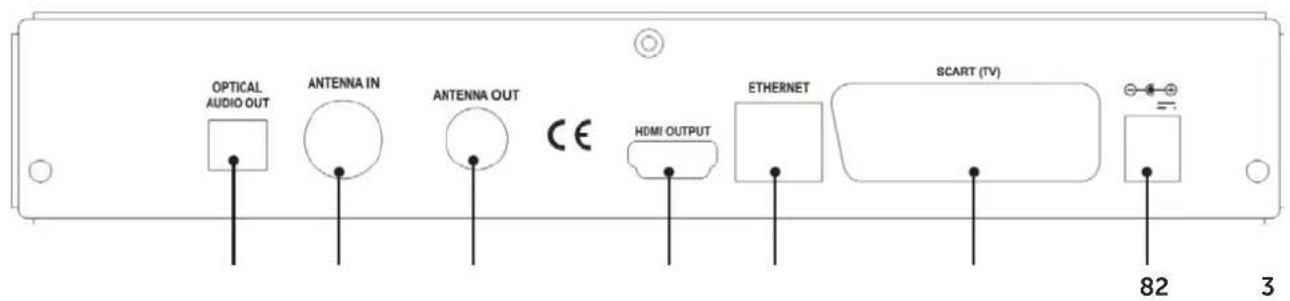
Fig 4.
- USB INPUT: To connect external USB storage devices.
- OPTICAL AUDIO OUT: You can use this connector to output the digital audio to an external device. See your audio system instruction book for further information.
-
ANTENNA IN: Aerial input.
-
ANTENNA OUT: To watch channels on the TV.
- HDMI IN: HDMI connection.
- LAN: Ethernet Input.
- SCART OUT: If your TV has a scart connector, you can connect the box to your TV using a scart cable.
- POWER CABLE: DC IN (12V).
Make sure that you connect all cables and connections before you plug the unit into the mains supply. After you connect the unit to the mains supply, the LED light located on the front panel will be red (Standby mode).
If you require any technical guidance or find that your TV is not operating as intended, a simple solution can often be found in the Troubleshooting section of these instructions,
Getting to know your set-top box
You'll be up and running in no time

This page is left intentionally blank
This page is left intentionally blank
Connections
3

Connections
Bringing it all together
Connecting the Set-Top Box to a TV Set
You can connect the set-top box to your TV by using the scart socket or HDMI input. Use a scart or HDMI cable to connect the set-top box to your TV.
The set-top box gives RGB or CVBS output from scart or high definition quality from HDMI output.
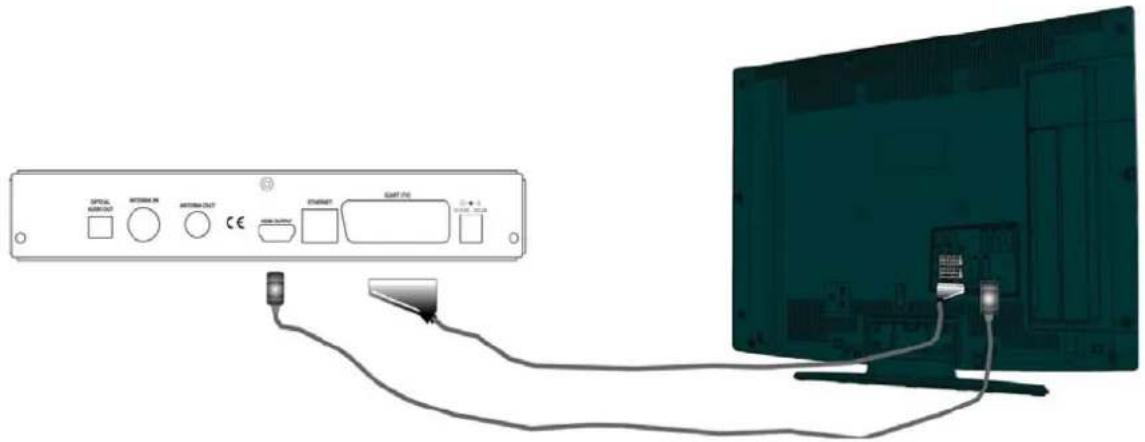
Fig 5.
Antenna Connection
This illustration shows how to connect an antenna.
Use ANTENNA IN to connect to an antenna system.
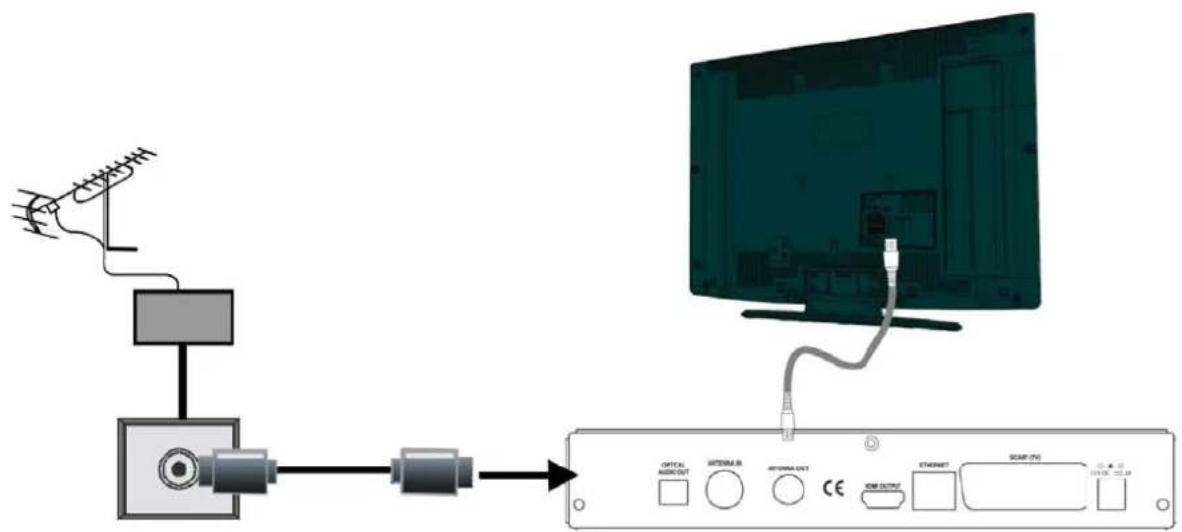
Fig 6.
If you require any technical guidance or find that your TV is not operating as intended, a simple solution can often be found in the Troubleshooting section of these instructions,
Connections
Bringing it all together
Power Connection
IMPORTANT: The set-top box is designed to operate on 12 V DC. For this, an adaptor is used which gives 12 V voltage. Connect this adaptor to a system that supplies 220-240V AC,50Hz.
After unpacking, allow the set-top box to reach the ambient room temperature before you connect the set to the mains.

Fig 7.
Inserting Batteries in the Remote Control
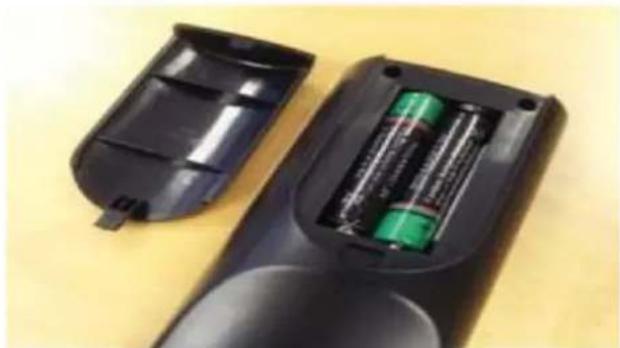
- Remove the battery cover located on the back of the remote control by gently pulling backwards from the indicated part.
- Insert two AAA/R3 (2 X 1.5Volt) or equivalent type batteries inside. Place the batteries in the correct direction observing the polarity symbols (+/-) and replace the battery cover..
natural_image
Two open black remote control enclosures with green batteries, placed on a yellow surface (no text or symbols visible)Fig 8.
While using the remote control, you should direct it towards the front panel of the receiver. Remote range is approximately 7m/23ft.
If your receiver no longer responds to the remote control. it is probable that the batteries are exhausted. If so you can still use the local buttons of the receiver. You can replace batteries after they are exhausted.
Note : Remove the batteries from the remote control when it is not to be used for a long period. Otherwise it can be damaged due to batteries leaking.
Power On-Off
Connect all cables before plugging into the mains.
After plugging in the AC adaptor for the set top box to the mains supply, a red light will be seen on the front panel (Standby mode).
When the set top box is first powered up please wait until the box is initialized before activating the receiver as booting of software will take some time. Please wait until unit is initialized. This may take almost a minute.
This product conforms with the latest European Union Power Consumption Regulations and features a low power standby mode. The product enters into the low power standby mode approximately 30 seconds after the standby button is pressed to turn off the unit.
Until low power mode is activated, a clock will be displayed at the display and light will be OFF. When the low power mode is activated, the display will be shut down and light will be red.
When you press the standby button during low power mode, it may take a minute until the product is initialised. However, if you press the standby button before the low power mode is activated, the unit will be initialized in a couple of seconds (Active standby mode).
When the box is on mode, a channel number will be displayed on the display and light will be OFF.
Although it is not recommended for environmental reasons, you may disable low power mode in your product using the setup -configuration menu. If low power mode is disabled, only the clock is displayed in standby mode.

Connections
Bringing it all together
First Time Installation
IMPORTANT: Ensure that the aerial is connected before switching on the set top box for the first time.
When the set top box is operated for the first time, installation wizard will guide you through the process. First, TV Type selection on-screen menu will be displayed:
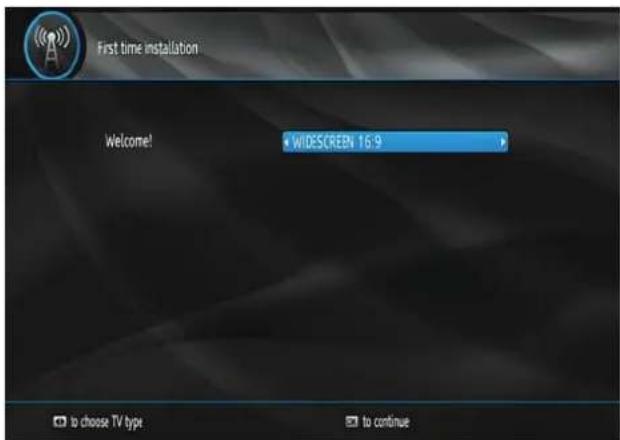
Fig 9.
By pressing the ◀/▶buttons select the TV type you want to set and press OK button. Afterwards, "Select HDMI resolution" OSD will appear on the screen. Select your desired resolution by pressing the ◀/▶button and press the OK button.

Fig 10.
Then "Do you want to start an automatic channel scan?" pop-up menu is displayed. Auto search can be started by selecting the "Yes" button. The box will automatically find the channels and store them.

Fig 11.
To start installation process, select Yes by using the ◀/▶ buttons and then press the OK button.
The box will start to search available stations. The progress bar will move along the line. You should allow the set top box to complete the search to store all available stations.
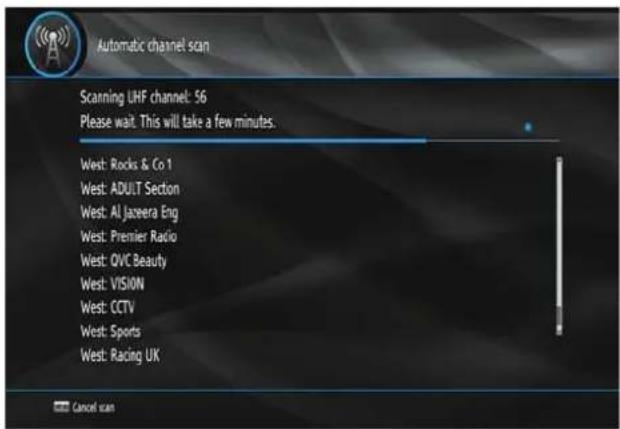
Fig 12.
Note: You can press the MENU button to cancel.
Connections
Bringing it all together
Auto Power Down:
This box will automatically switched from active mode into standby mode, after less than three hours in active mode, following the last user interaction and/or a channel change with an alert message two minutes before going in to standby mode. The Automatic power-down can be set as disabled, 2 hours, 3 hours, 4 hours, 6 hours or 8 hours from the configuration menu.
Important Note : If there is any ongoing programme recording or if any EPG programme recordings and/or manual recordings are set to a nearby time, the unit does not switch to low power mode and remains in active standby mode until recording tasks have been finished. In low power mode, the unit initializes a couple of minutes before the actual time of the incoming recording task.
Important Note : The unit initializes from time to time to receive updates from the EPG broadcast in order to synchronize EPG recording tasks properly. After getting updates, the unit switches to low power mode automatically. This takes a short while and it is not a malfunction.

This page is left intentionally blank
Standard features
4
Standard features
Simple everyday use
Changing Channels
You can change channels with the following methods.
- You can press the numeric buttons (0–9) to directly enter the channel number. You can press numeric buttons consecutively to enter two or more digits.
- Press the P +/ P - buttons to move up or down to the next available channel.
Note: You can press OK button to display the channel list.
Adjusting the Volume
Volume Up / Down
You can increase or decrease the volume by using the V+ / V- buttons.
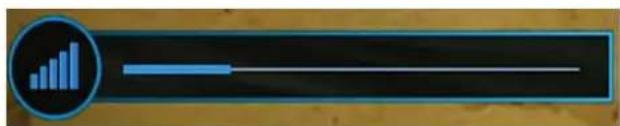
Fig 13.
The volume level selected will remain set, even when the receiver is turned off and on again, until you change volume again.
The audio volume adjustment for the receiver is independent of the volume control on your TV set.
IMPORTANT: You should be careful that both volume controls are kept within reasonable levels so that when switching on, or when first turning on your TV set, the sound level is not too high.
Mute
You can press ✿ mute the sound of your set top box. The sound will be muted once this button is pressed.

To cancel mute, you can press 🎨 button again or use the V+/V - buttons.
On-Screen Information
You can press the INFO button to display on-screen information. Details of the station and current programme will be displayed on the information screen.
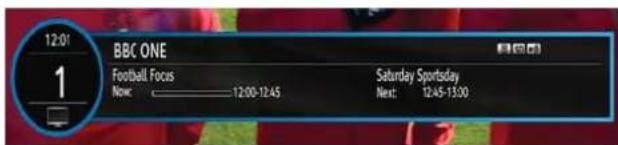
Fig 14.
The information screen will then display the current event name, next event name, starting and ending time, duration bar, programme mode and the channel number and name.
Instant Recording
Press ● (RECORD) button to start recording an event instantly while watching a programme. The following OSD appears on the screen:
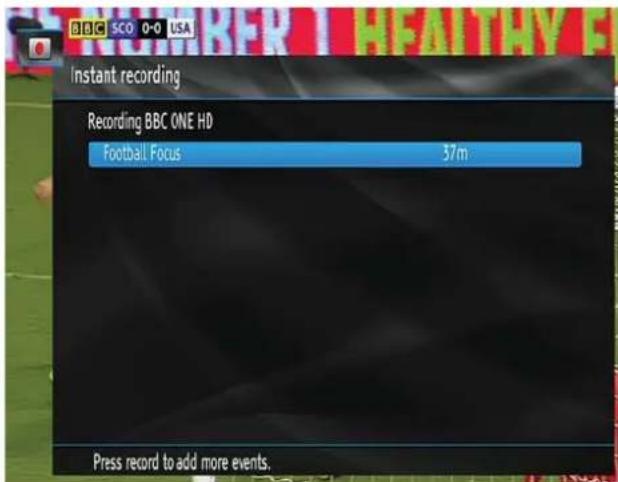
Fig 15.
Record OSD will then be displayed for a short time and the current event will be recorded.
Standard features
Simple everyday use
Press the ■ (STOP) button to cancel instant recording.
The following OSD will be displayed:
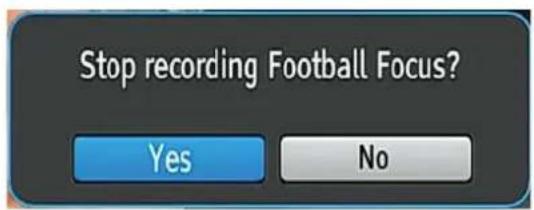
Fig 16.
Select Yes by using the ◀/▶ or OK buttons to cancel instant recording.
Note: When two recordings are active, you can only watch channels which are on the same multiplexes.
No upper limit is defined to schedule recordings for events by Instant Recording.
Menu System
Viewing the Main Menu
Press the MENU button to view main menu.
You can move between menus using the navigation
(◀ ▶ /▲) buttons on the remote control.
You can enter, select or confirm a menu option by using the OK button.
In some sub-menus, you can use the BACK button to return to a previous menu screen.
To exit from a menu screen, you can press the MENU button.
The following items are located in the main menu screen:
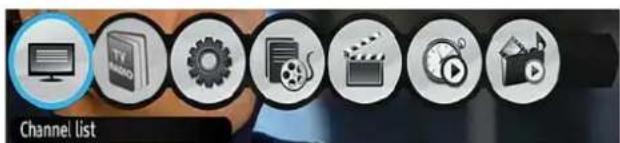
Fig 17.
Internet Portal
You can access internet portal using your set-top box. To do this, an active internet connection is required.
After the connection is established, you can select
Internet Portal option from the main menu to activate the portal. You can access several applications using this portal.
Use navigation buttons to make selections.
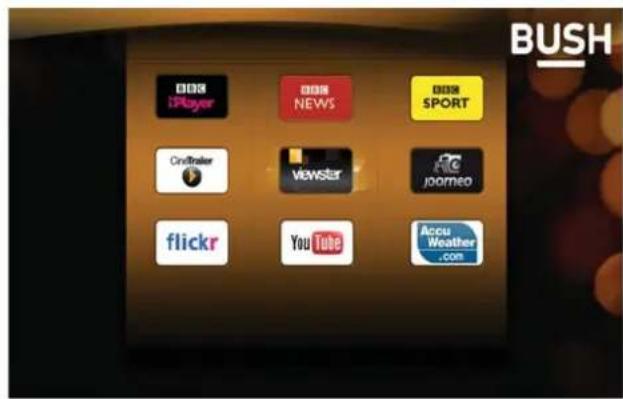
Fig 18.

This page is left intentionally blank
Advanced features
5
Advanced features
Getting the most from your TV
Managing Stations: Channel List
The set top box keeps all stored stations in the Channel List.
Press the MENU button to view main menu. Select the Channel List item by using the ▼ / ▲buttons. Press OK to view the menu contents.
Note: You can also press the OK button to view channel list.
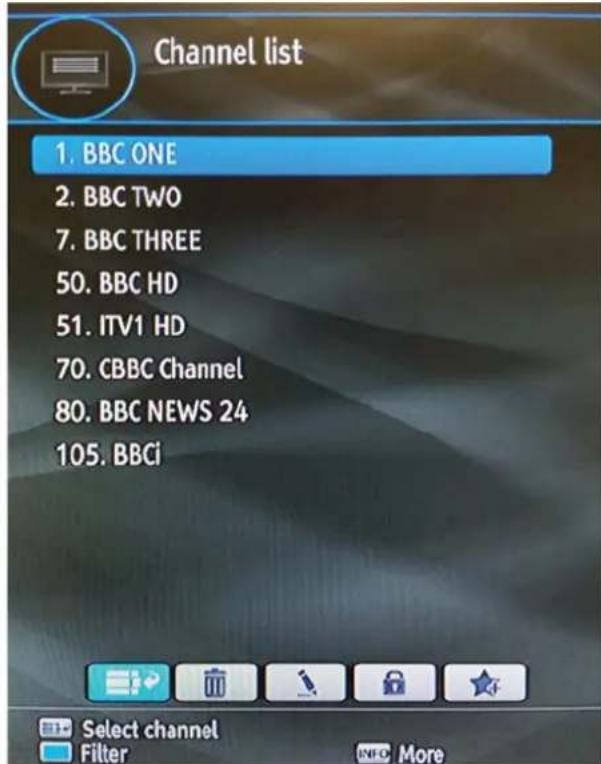
Fig 19.
Operating the Channel List
Press the ▼ buttons to select the channel that will be processed.
Press the ◀ / ▶ buttons to select a function on Channel List menu.
Press the P +/ P - buttons to page up or down.
Press the BLUE button to view filtering options.
Press the YELLOW button to tag/untag a channel.
Press the GREEN button to tag all channels.
Press the INFO button to view more information.
Press the MENU button to exit.
Selecting a Specific Channel
Select option should be highlighted by using the ◀▶ buttons.
To watch a specific channel, you should highlight the desired channel using the ▼ / ▲buttons and press the OK button. The selected channel will be displayed.
If the selected channel is password protected, the parental lock password will be required.
Deleting Channels
Select the channel that you want to delete and select Delete option using the ◀ / ▶ buttons. Press the OK button to continue.
A message will be displayed to confirm your decision. Select YES to delete the selected channel or select NO to cancel. Press the OK button to continue.
Deleting Multiple Channels:
- Select Delete and highlight the channel you want to delete.
- Press the YELLOW key. The channel will be marked. Move to the next channel you want to delete.
- Mark the other channels you want to delete like the same way and press OK.
- You will see a confirmation menu. Select YES in the menu. The selected channels will be deleted.
To mark all the channels in the channel list at once you can use the GREEN key.
Note: A channel currently being watched cannot be deleted.
Renaming Channels
Select the channel that you want to rename and select Edit Name option using the ◀/▶buttons. Press the OK button to continue.
Advanced features
Getting the most from your TV
Pressing the ◀ buttons moves to the previous/next character. Pressing the ▼ buttons toggle the current character (i.e., 'b' character becomes 'a' by pressing ▼ and 'c' by pressing ▲
Pressing the numeric buttons (0-9) replaces the highlighted character with the characters printed above the button one by one as the button is pressed.
Press the MENU button to cancel editing.
When finished, press the OK button to save the new name.
Adding Locks to Channels
- Select the channel that you want to lock and select Lock option using the ◀/▶ buttons.
- Press the OK button to continue.
- You will be asked to enter parental control PIN code.Enter the PIN number.
- Press the OK button to lock/unlock the channel. Lock symbol will be displayed next to the selected channel. You can repeat the same action to cancel the lock.
Note: Default PIN code is 0000 and it can be changed using the Configuration Menu.
Locking Multiple Channels:
- Select Lock item and highlight the channel you want to lock. Press the YELLOW key. The channel will be marked.
- Move to the next channel you want to lock and press the YELLOW key.
- Mark the other channels you want to lock the same way and press OK.
- Enter the pin code in the menu displayed and press OK.
The selected channels will be locked.
To mark all the channels in the channel list at once you can use the GREEN key.
Setting Favourites
Select Favourites by using the ◀ / ▶ buttons and press the OK button.
You can set various channels as favourites so that only the favourite channels are navigated.

Fig 20.
Select a list by pressing the ◀ / ▶ buttons. Then, select a channel by using the ▼ / ▲ buttons. Press the OK button to add selected channel to the favourites list.
A star icon indicates that the selected channel is on the favourites list.
You can press the OK button again to remove the selected channel from the list.
Button Functions:
OK: Adds/removes a station.
BLUE: Displays filtering options.
YELLOW: Tags/untags a channel.
GREEN: Tags/untags all.

Advanced features
Getting the most from your TV
Electronic Programme Guide (EPG)
You can view the electronic programme guide (EPG) to view information about available programmes. The set-top box gets channel & programme information weekly by means of 8 day EPG. Select Programme Guide from the main menu by using the ▼/▲buttons. Press OK to continue.
HINT: You can also press the GUIDE button to view the EPG menu.
Press the ▼ / ▲ buttons to navigate through channels.
Press the ◀ buttons to navigate through the programme list.
Please note that event information is updated automatically. If there are no event information data available for channels, EPG will be displayed with blanks.
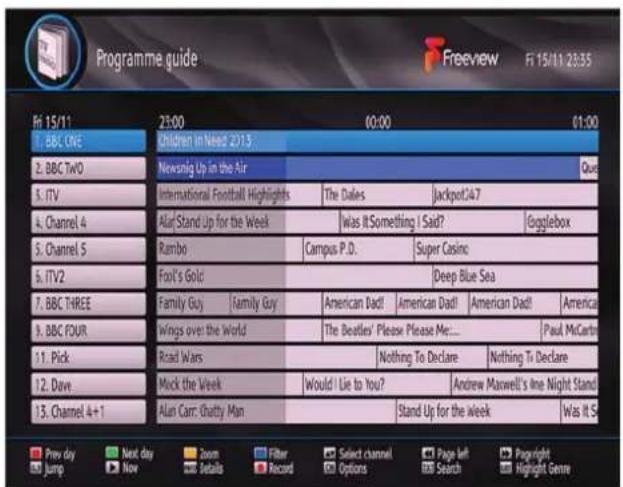
Fig 21.
Red button (Prev Day): Displays the programmes of previous day.
Green button (Next day): Displays the programmes of the next day.
Yellow button (Zoom): Expands programme information.
Blue button (Filter): Views filtering options.
INFO (Details): Displays the programmes in detail.
●: Records the selected programme.
Numeric buttons (Jump): Jumps to the preferred channel directly via numeric buttons.
OK (Options): Displays programme options including Select Channel option.
44: Scrolls page left.
Scrolls page right.
Text (Search): Displays "Guide Search" menu.
(Now): Shows the current programme.
Event Options
In EPG menu, press the OK button to enter the Event Options menu.
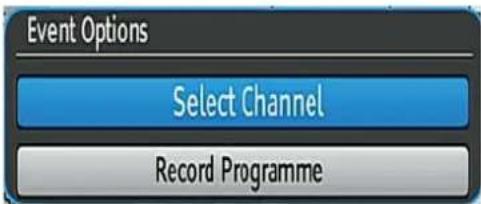
Fig 22.
Select Channel
Highlight it and press the OK to switch to the selected programme.
Record Programme
Highlight it and press the OK button to set the programme to recording.
Record Series/Delete Series
In the EPG menu, after you have selected a programme, press the OK button and select the
Record Series option and press the OK button again. The selected programme will then be set for series recording.
With this feature, you can record a programme and all of its following parts within 8 days. The information belonging to the selected programme will be saved from the software and following parts of the selected programme which are not included in the period of 8 days, will be automatically added day by day. The letter "s" denotes that these recordings are series records.
Advanced features
Getting the most from your TV
To cancel an already set series recording, highlight that programme and press the OK button and select the option Delete Series. The recordings will be cancelled.
Note: Series programme information should be broadcasted by the broadcaster.
Split Record
When you select a programme to be recorded, if there is another part of the programme available, it will also be set to record automatically. The programme's following episode is also underlined in the picture. To do this, you have to press only the RECORD button once. The programme you selected will be framed red.
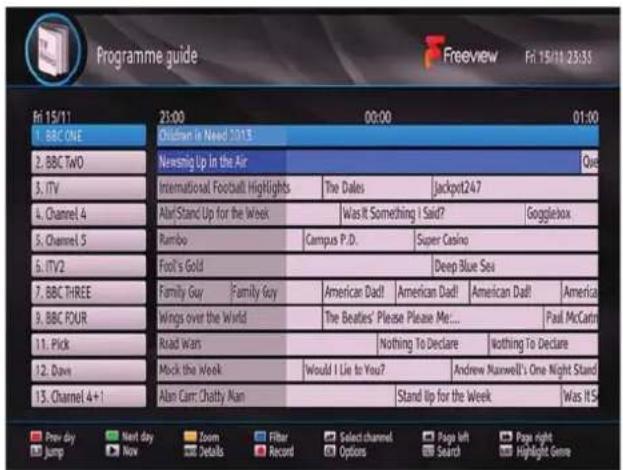
Fig 23.
Note: Split programme information should be broadcasted by the broadcaster.
Configuring Timers
Select Timers from the main menu and press the OK button.
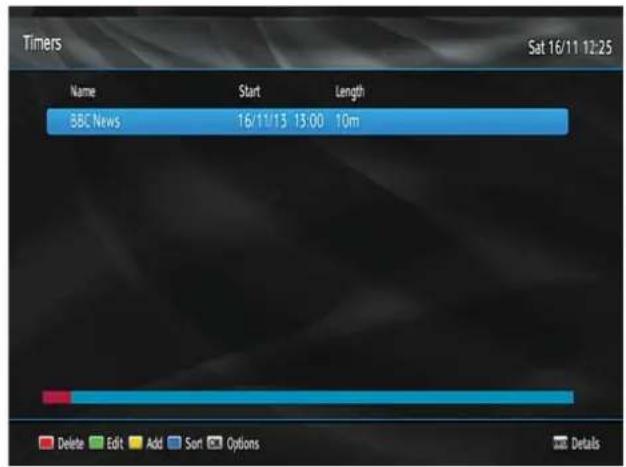
Fig 24.
To add a timer, press the YELLOW button on the remote control. The Add Timer window appears.

Fig 25.
Channel: the ◀ / ▶buttons will navigate the user through the TV or Radio list.
Record Type: Displays recording type.
Date: Starting date is entered using the ◀ / ▶buttons or the numeric buttons.


Advanced features
Getting the most from your TV
Start: Starting time is entered using the ◀/▶ buttons or the numeric buttons.
End: Ending time is entered using the ◀ / ▶ buttons or the numeric buttons.
Duration: Duration between Start and End time.
Repeat: Sets the repeating preference.
Playback: Sets playback control.
Change/Delete: permits or prohibits any modifications for other users.
You can save the adjustments by pressing the GREEN button or cancel the process by pressing the RED button.
You can edit the timers list using the GREEN button and delete with the RED button. You can sort recorded programme by pressing the BLUE button. You can also press the OK button to display other options.
Recordings Library
To view the list of recordings, press the MENU button to display the main menu and use the ◀ buttons to highlight the Recordings Library and press the OK button. The recordings Library will then be displayed with available recordings which are kept in a list.

Fig 26.
Red bar: Indicates the used space of the recordings on the hard disk.
Green bar: Displays the approximate capacity required for the timers currently set.
RED button (Delete): Erases the selected recording.
GREEN button (Edit): Makes changes on the selected recording.
YELLOW button (Tag): Tag/untag a recorded programme.
BLUE button (Sort): Changes the order of the recordings. You can select from a wide range of sorting options.
OK button: Displays playing options:
▶ (Resume): Resumes the playback.
Note: Viewing main menu and menu items will not be available during the playback.
INFO (Details): Displays the short extended programmes in detail.
Play Options
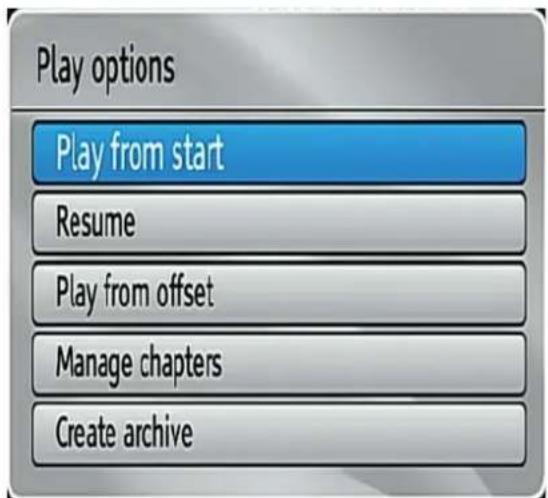
Fig 27.
Play from start: Plays the recording from the beginning.
Resume: Begins playing from the last stopped position.
Resume: Resumes the recording.
Play from offset: Begins playing, from the time which is entered.
Advanced features
Getting the most from your TV
Manage chapters : It will display any marked chapters (To set chapter marks, press the Menu button during playback and enter the Chapter Options menu) and begin with playback from the selected chapter.
Create archive (Archive management): To use this feature, you should tag the files to be archived first by using the YELLOW button. When all the desired recordings are tagged, press the OK button to display Play Options and then select Create Archive. When finished, press the Play button to start archiving.
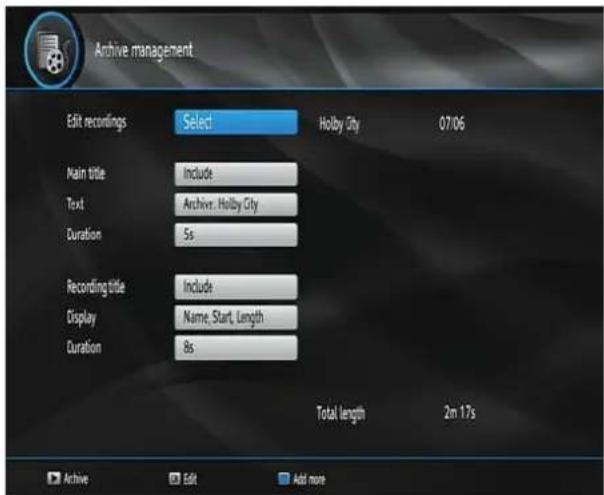
Fig 28.
Edit Recordings
Press the OK button when Edit Recordings is highlighted. Then select the recordings that are to be archived.
When finished, press the OK button and the following menu will be displayed:
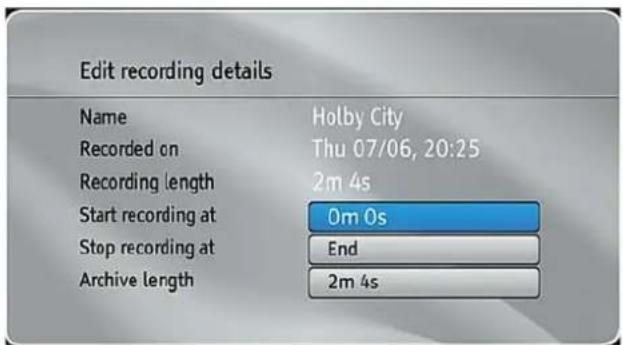
Fig 29.
In this menu, only the Start recording at and Stop recording at options are active. If you have already split the recording, you can select any chapter. If it is not split in chapters, the beginning and ending time of the recording will automatically be the beginning and ending time of the archiving.
Main Title
If you want to display a main title, select Include. If not, select Skip.
Text
After you have selected the Include option in the Main Title menu, you can edit the main title.
Duration
Set the duration of the appearance of the main title on the screen.
Recording Title
If you want to display a recording title, select Include. If not, select Skip.
Display
You can add name, start date/time or length information to your archived file by using display option.
Duration
Set the duration of the appearance of the Edit recording title menu main title on the screen. Displaying Chapter Options.
During playback of a recording, if you press the MENU button, the Chapter Options menu will be displayed.

Advanced features
Getting the most from your TV
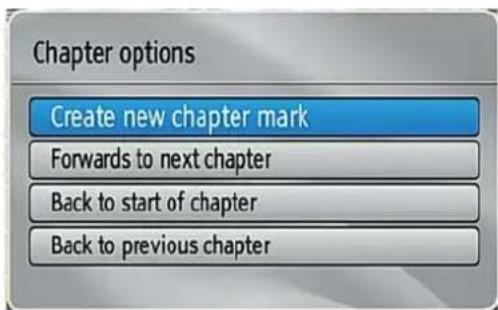
Fig 30.
Create New Chapter Mark: You can set a chapter mark anywhere you want.
Forwards to Next Chapter: Goes to the next chapter if there is more than one chapter available.
Back to Start Of Chapter: Goes to the beginning of the current chapter. This is the last played chapter.
Back to Previous Chapter: Goes back to the previous chapter if there is more than one chapter available.
Time Shifting (Pause Live Recording)
Pause Live Recording is a feature that enables you to pause a live broadcast. The live broadcasting can be stopped any time.
Press ☐ PAUSE button to timeshift the broadcasting. In the INFO banner the timeshift will commence.
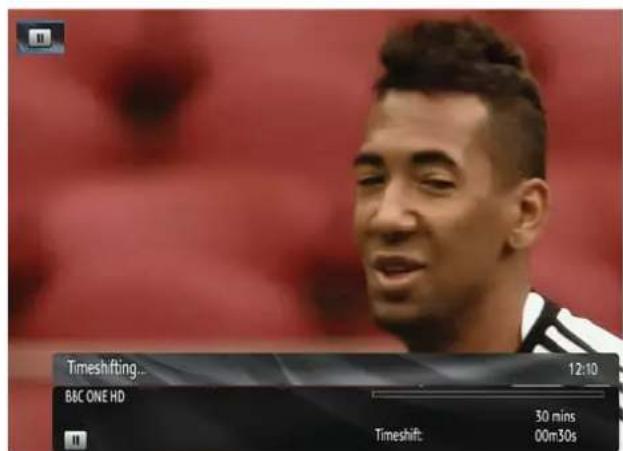
Fig 31.
The duration of Timeshift can be adjusted from Recordings in the Configuration menu.
To stop the timeshift press PLAY, PAUSE or OK button. The paused recording can be watched in different speeds using the << or keys. To cease the timeshifting press STOP button.
Media Browser
To display the Media Browser, select Media Browser in the main menu using the ◀ / ▶buttons and press OK.
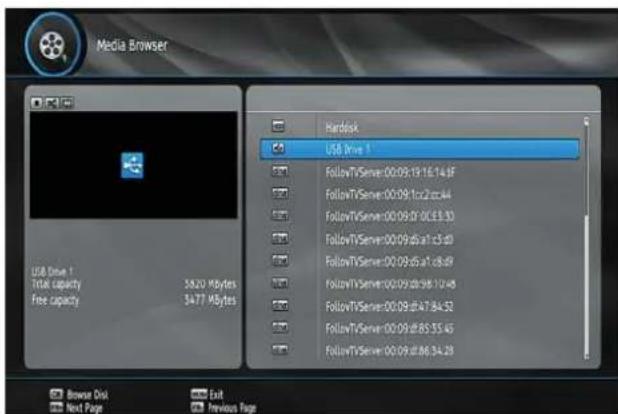
Fig 32.
Note: Available media servers, connected to the same network will be dispayed too. Press the ▼/▲buttons to select one and press OK to browse the selected media server.
Viewing USB Disk Contents
You can play music, video and picture files from a USB memory stick, but only music and picture can be played from an external Hard Disk Drive.
Note: Some USB compliant devices may not be supported.
If the USB stick is not recognized after power off/on or First Time Installation, first, unplug the USB device and power off/on the set-top box. Plug the USB device in again.
Advanced features
Getting the most from your TV
Playing Video Files
Select USB Drive option from the main media browser screen and press OK button. Select the folder (if available). All media files will be displayed.

Fig 33.
Jump (Numeric buttons): Jumps to the selected file using the numeric buttons.
OK / PLAY(▶) buttons: Opens the Play Options menu.
Blue Button (File Operations): Displays options of Delete, Rename, Move to HDD, Copy to HDD. Press BACK to exit.
Next page / Previous Page: Jumps to previous or next page.
Back: Goes back to main folder.
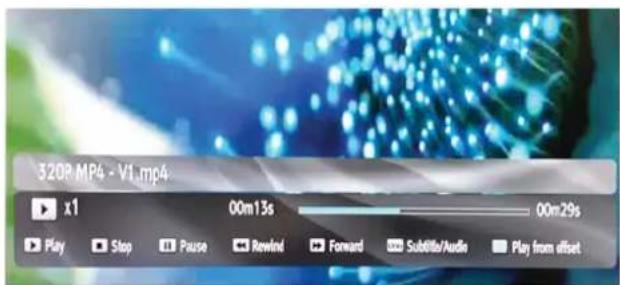
Fig 34.
Play (▶ button): Play files.
Pause (■button) : Pauses the playback.
Stop (■ button) : Stop the playing file.
Rewind (button) : Goes backward.
Fast Foward (▶button): Goes forward.
GREEN : Jumps to the selected time.
LANG : Set subtitle or audio.
Playing MP3 Files
Select USB Drive option from the main media browser screen and press the OK button. Select the folder (if available). All media files will be displayed. Select a music file and press OK to play.
Playing JPEG Files
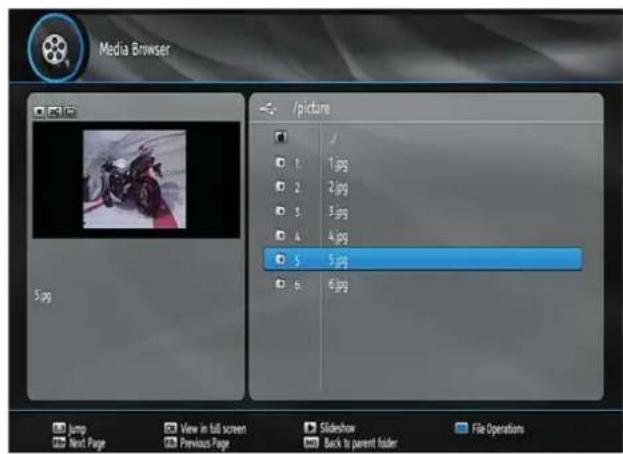
Fig 35.
OK: Shows the selected image in full screen.
Slideshow (▶ button): Starts slideshow.
Jump (Numeric buttons): Jumps to the selected file using the numeric buttons.
Next page / Previous Page: Jumps to previous or next page.
Back: Goes back to main folder
BLUE (File Operations): Displays options of Delete, Rename, Move to HDD, Copy to HDD. Press BACK to exit.

Advanced features
Getting the most from your TV
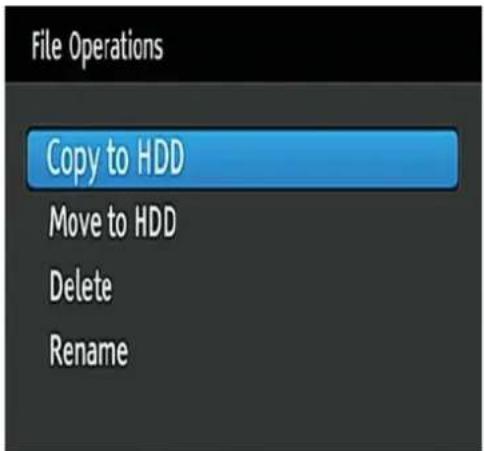
Fig 36.
Slideshow Options
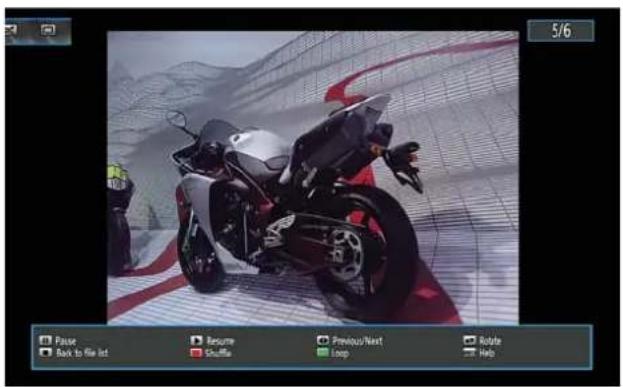
Fig 37.
Pause: Pauses slideshow
Play (▶button): Resumes the slideshow.
Stop (■button): Back to the file list.
Rotate (▼ / ▲buttons): Rotate the picture using up/down buttons.
Previous/Next (◀ buttons): Jumps to previous or next file.
Info: Shows/hides the info bar.
RED: Activates Shuffle mode.
GREEN: Activates Loop mode.
Digital Teletext
- Press the TEXT button. The digital teletext information appears.
- Operate it with the coloured buttons, cursor buttons and OK button.
The operation method may differ depending on the contents of the digital teletext.
Follow the instructions displayed on digital teletext screen.
When 'Press OK button' or similar message appears on the screen, press the OK button.
When the TEXT button is pressed, the TV returns to television broadcasting.
With digital terrestrial broadcasting (DVB-T), in addition to digital teletext broadcasting together with the normal broadcasting, there are also channels with just digital teletext broadcasting.
The aspect ratio (picture shape) when watching a channel with just digital teletext broadcasting is the same as the aspect ratio of the picture viewed previously.
When you press the TEXT button again, the digital teletext screen will be displayed.
Many digital terrestrial television channels broadcast pages of information on the programmes, the weather, news and other topics.
This digital teletext can be displayed by your set top box. Indeed, some channels broadcast teletext information entirely.
When such a channel is selected, it will usually display the opening page of information automatically, after a short break.
Some channels mostly have digital teletext pages broadcast along with the television programme.
Advanced features
Getting the most from your TV
Settings
Select Settings from the main menu by using the <▼▶ buttons and press the OK button to display.
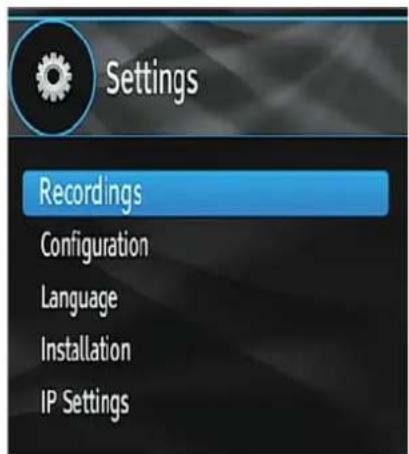
Fig 38.
Recordings
To configure the playback/recording options select the Recordings option from the configuration menu.
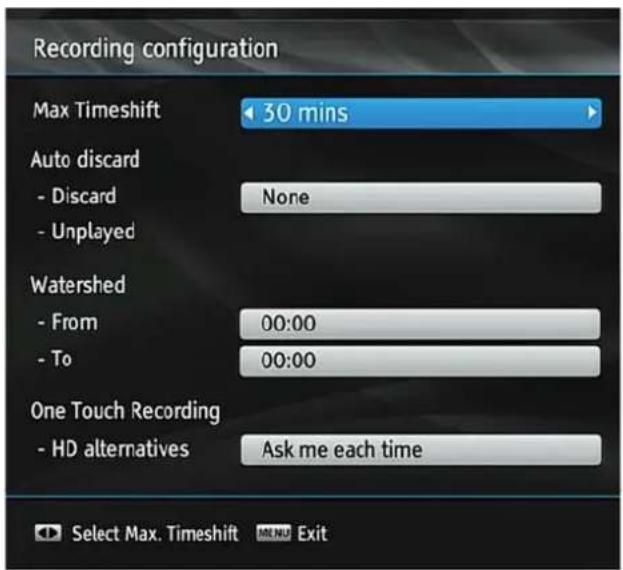
Fig 39.
Max Time Shift
Select the maximum time allowed for timeshifting. See Time Shifting section for more information on timeshifting
Auto Discard
Discard: When the HDD is full and a timer is set to record, the unit will automatically discard previous recordings based on this setting. The options are as follows:
- None: The unit will not discard any recordings and the timer will not record the requested programme.
- Oldest: Starting with the oldest, recordings will be deleted to make space for the requested timer.
- Longest: Starting with the longest, recordings will be deleted to make space for the requested timer.
- Shortest: Starting with the shortest, recordings will be deleted to make space for the requested timer.
- Unplayed: If this option is set to EXCLUDED any unplayed recordings will NOT be deleted. If this option is set to INCLUDED, unplayed recordings WILL be deleted.
- Watershed: Use these settings to change the watershed time period. Press MENU button to exit.
Any recording which is made during the watershed period will have Playback set to Disallowed when it appears in the library. You can only play the recording if you enter the PIN.
One Touch Recording :
HD alternatives: You can adjust this setting to suit your preference.

Advanced features
Getting the most from your TV
Configuration
You can configure the main settings of your set top box using the configuration screen.
Select Configuration from Setup & Retune menu and press OK to continue.
You can press BACK button to exit.

Fig 40.
Active channels
You can select broadcasts to be listed in the channel list. To display specific types of broadcast, you should use Active channel list setting.
Select Active Channels by using the ▼ / ▲ buttons.
You can select a broadcast type option from the list by using the ◀ / ▶buttons. Available modes are: TV Only, Radio Only, Text Only, Favourites or Show All (if available).
Press the MENU button to save the recent changes and exit.
Scan Encrypted
When this setting is on, search process will locate the encrypted channels as well. If it is set as Off, encrypted channels will not be located in automatic search or manual search.
Use the ▼ / ▲ buttons to highlight Scan Encrypted and the ◀ buttons to select YES or NO.
Output Settings

Fig 41.
TV Type
Digital terrestrial television channels can be broadcast in a widescreen format which must be output differently to normal and widescreen TV sets.
This function defines the screen format of the connected TV to enable broadcasts' being displayed correctly.
Select 4:3 if you have a standard TV set with 4:3 aspect ratio.
Select 16:9 if you have a widescreen TV.
Note: This function also enables you to change the TV Type that you have previously selected during the first time installation.
TV Out
The set top box can output RGB and CVBS signal via the TV SCART connector located on the rear panel.
Some devices might not support the RGB format.
Receiver Upgrade
Advanced features
Getting the most from your TV
To ensure that your set-top box always has the most up to date information, you can use this setting. For the proper operation, please ensure that the box is set to standby mode.
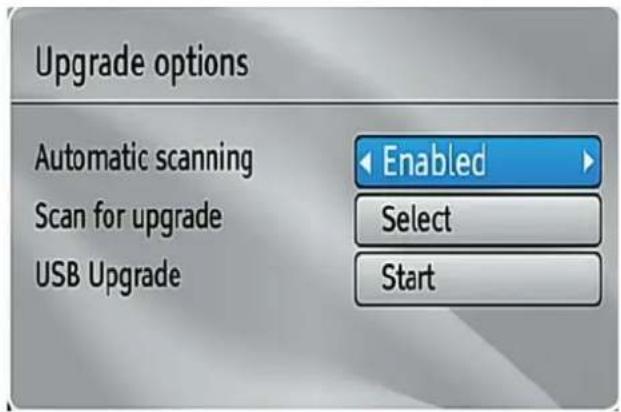
Fig 42.
The set-top box automatically powers up at 3.00 A.M. every day and searches for any new software that may be broadcast. If found, the box will download new software automatically. This operation will normally take approximately 30 minutes.
You can enable or disable automatic upgrade by setting Automatic Scanning option.
You can manually search for new software by selecting Scan for upgrade.
You can also update your set-top box by using the USB upgrade option.
Parental Settings
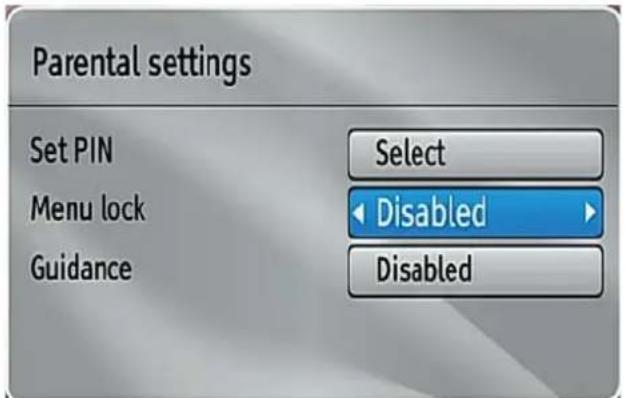
Fig 43.
This setting configures menu locking.
Select the Menu Locking option by using the ▼▲ buttons.
Press OK button to enter the menu.
To display parental lock menu options, PIN number should be entered. Factory default PIN number is 0000. After coding the correct PIN number, parental settings menu will be displayed:
Set Pin
Press OK to display the "Set PIN" window. Use numeric buttons to enter the new pin number. You will need to input your new pin a second time for verification purposes.
The factory default pin number is 0000. If you change the pin number make sure you write it down and keep it safe.
Menu Lock
Menu lock setting enables or disables the menu access. You can disable access to the installation menu or the whole menu system.
Guidance
Guidance setting enables or disables the menu access.
Low Power
If you enable low power option, low power mode will be activated. In low power mode the power consumption is less than 0.5W (in standby). If you disable low power option the power consumption will be high in standby mode .However the opening time will be shorter and aerial RF loop_through is operative in stand-by when the Low Power is set to NO.
Auto Standby
Use the ▼/ ▲buttons to select Auto Sleep.
Use the ◀ / ▶ buttons to set the Auto Sleep to Disabled, 2 Hours, 3 Hours, 4 Hours, 6 Hours or 8 Hours.
After the timeout value is reached, the box will switch off.

Advanced features
Getting the most from your TV
About
Select About and press the OK button to display system information.
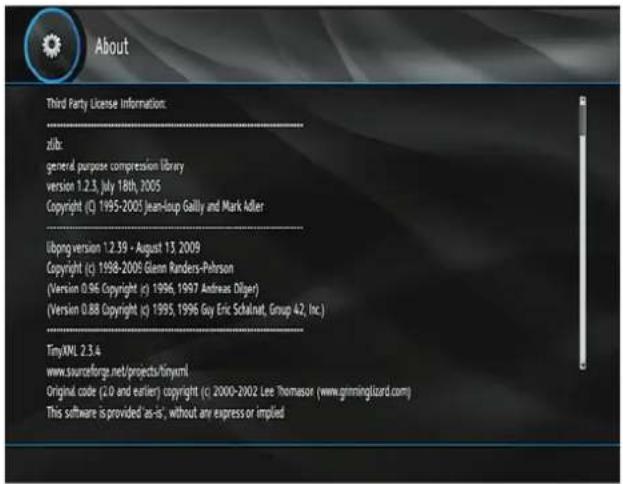
Fig 44.
Audio Description
This function enables or disables the audio description feature by pressing the ◀ buttons. Audio description refers to an additional narration track for blind and visually impaired viewers of visual media, including television and movies. The description narrator talks through the presentation, describing what is happening on the screen during the natural pauses in the audio (and sometimes during dialogue, if deemed necessary). You can use this feature only if the broadcaster supports this feature.
Available Langs.
You can see available languages in this section.
Preferred Language (Optional)
Use the ◀ buttons to change the preferred audio description language.
This setting can be used, only if it is available.
Relative Volume (Optional)
Using this option, the Audio Description volume level can be increased or decreased relatively, according to the general volume.
Language
- You can operate the TV's language settings using this menu.
- Select Language from the Setup menu and press OK to continue.
Menu: shows the language of the system.
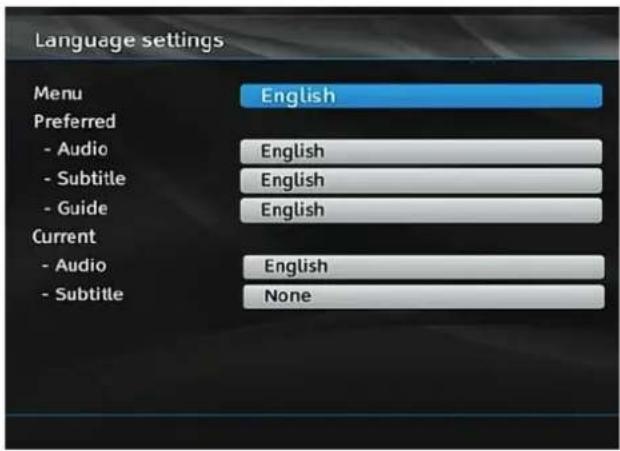
Fig 45.
Preferred
These settings will be used if available. Otherwise current settings will be used.
• Audio: Sets the preferred audio language.
- Subtitle: Sets the subtitle language. Selected language will be seen in subtitles.
• Guide: Sets guide language.
Current (\*)
(*) These settings can be changed if only the broadcaster supports it. Otherwise, the settings will not be available to be changed.
• Audio: Changes the audio language for the current channel.
- Subtitle: Sets the subtitle language for the current channel.
Advanced features
Getting the most from your TV
Installation
The Installation menu will help you to return your set top box in order to store new services or stations.
Select Installation from the Setup menu by using the
▼ / ▲ buttons and press OK to continue.
Installation menu includes the following items:

Fig 46.
Automatic Channel Scan / Retune
Select Automatic Channel Scan / Retune by using the ▼ / ▲ buttons and press the OK button.
The following message will be displayed on the screen:

Fig 47.
Highlight Yes or No using the ▼ / ▲buttons and press the OK button to confirm.
• If Yes is selected, automatic search starts.
- Selecting No cancels automatic search.
After the scanning is completed, your set top box will store all the available channels.
Manual Channel Scan
This feature can be used for direct broadcast entry.
Select Manual Channel Scan by using the ▼▲ buttons and press the OK button.
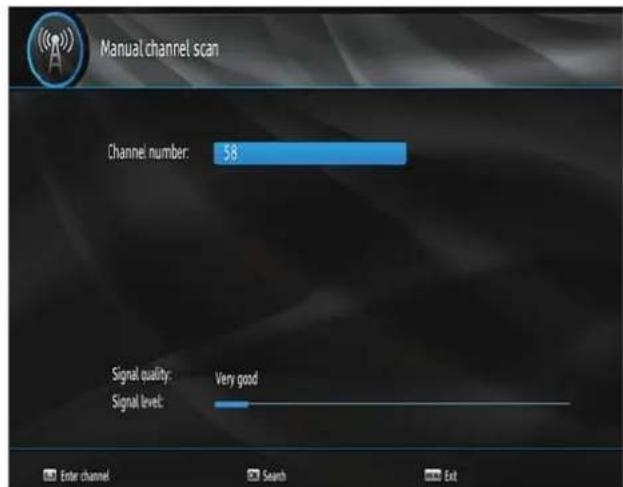
Fig 48.
In manual channel scan, the number of the multiplex is entered manually and only that multiplex is searched for the channels.
For each valid channel number, signal level and signal quality are shown on the screen.
In both manual and auto search, any existing channel in the database is not re-stored to avoid duplicates of that channel.
Format Disk
If you want to format the internal hard disk, you can use the Format Disk option. ALL the data stored on the hard disk will be lost in such a case.
- Press OK when the Format Disk option is highlighted. A menu appears, requiring you to enter the pin number. If you have not changed the pin number, the factory default is 0000.
• After you enter the correct PIN code, a pop-up menu appears on the screen to ensure that the hard disk should be formatted. - Select YES and press OK to format the hard disk, or select NO and press OK to cancel.

Advanced features
Getting the most from your TV
First Time Installation
- If you want to load default settings of your set top box, you can perform first time installation.
- Select First Time Installation by using the ▼/▲ buttons and press the OK button.
• The following message will be displayed:
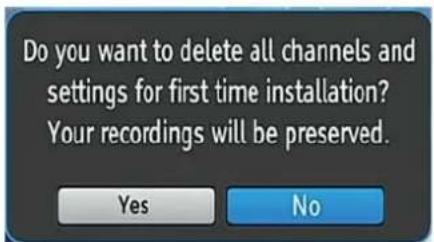
Fig 49.
- Highlight No by using the /▶buttons to cancel installation.
- Highlight Yes by using the ▶ / ▶ buttons and press OK button to start first time installation.
• After you select Yes, factory settings will be loaded. - The Installation wizard will guide you through the installation process. See the section, First Time Installation (page 20) for more information on this process.
IP Settings
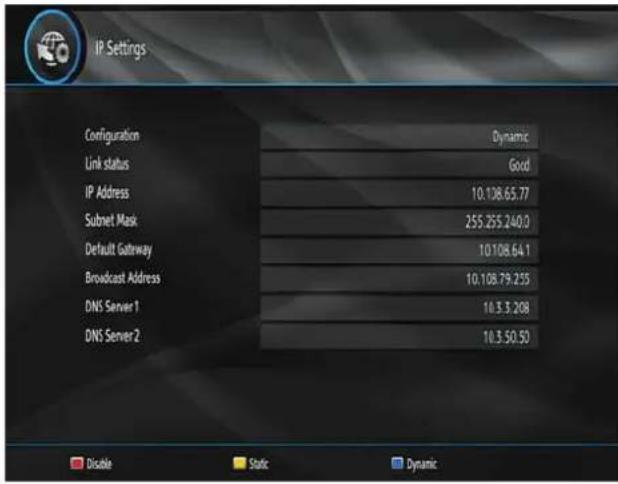
Fig 50.
You can configure your receiver's IP settings by using this menu screen.
• Use the YELLOW button to set static IP settings.
- Use the BLUE button to configure dynamic IP settings.
• Use the RED button to disable IP configuration.
In order for the ethernet host to work correctly with your internet connection it needs to have a unique IP address. In most cases all of the parameters can be provided by the DHCP server in their router. In this case you should use the Dynamic option.
In the unlikely event that you do not have a DHCP server in your router, or if you prefer to assign your own IP address, then the Static option can be used. You will need to enter a unique IP address along with the default gateway and DNS server. In most domestic networks the default gateway and DNS server will both be the IP address of the router. Available MAC address will be displayed on MAC address line.
Advanced features
Getting the most from your TV
This page is left intentionally blank

This page is left intentionally blank
Other information
6
Other information
Helpful technical information
Technical Specifications
General characteristics
| Power supply for set-top box | 12 V DC 2 Amp |
| Preferred DC adaptor 220 - 240 V AC, 50 -60 Hz | |
| Input frequency 470 MHz - 862 MHz | |
| Frequency band UHF | |
| Maximum power consumption | 17.5 W |
| Standby power consumption | 0.5 W |
| Operating temperature 5°C to +40°C | |
| Storage temperature -15°C to +55°C | |
| Humidity 25 to 75 % rel | |
| Physical dimensions 231 x 137 x 43 mm | |
| Weight 0.9 kg | |
Hardware Configuration
| Main processor BCM7230 | |
| Flash memory 128 Mb | |
| DDRRAM | 512 Mb |
Digital Capabilities
| Transmission standards | MPEG2, MPEG4 HD DVB-T-2 |
| Frequency band UHF |
Demodulation
| COFDM | with 2K/8K FFT mode |
| FEC | for all DVB modes (automatically found) |
| 16QAM, 64QAM, 256QAM with 1k, 2k, 4k, 8k, 16k, 32k FFT mode | |
Video
All MPEG-4 (part 10) MP@ML Video Decoder
| Aspect ratio | 4:3, 16:9 with pan vector |
| RGB analogue outputs | BM ≥ 5 MHz at 0.5 to5 MHz sweep signal |
| CVBS analogue output | |
Profiles
MPEG-4 H.264/AVC HP@L 4.0, MP@L 4.00 (HD)
• H.264/AVC MP@L 3.2, HP@L 3.2 (SD)
• MPEG-2 MP@HL, MP@ML (SD)
Audio
MPEG Layer 1 and 2
| Sampling frequencies supported | 32 kHz, 44.1 kHz or 48 kHz |
Output can be programmed as STEREO, LEFT only or RIGHT only (on both outputs). This is useful for dual mono channels in order to select the correct sound track, which is stored for every channel.
| Wide dynamic range | 16-bit resolution |
Remote Control
| Operating distance | 7m max. |
| Batteries | 2 x 1.5V micro (R-03/AAA) |
Tuners
| 1 x RF In | IEC-type, female (75Ohm) |
| 1 x RF Out (loop through) | IEC-type, male (75Ohm) |
Hard Disk
| Hard disk capacity | 320 GB, 500 GB, 1 TB |
Front Panel
| Display | Seven segment display |
| Remote control keys | On / Off, Down, Up |
Other information
Helpful technical information
Audio
| Output | 2 Vrms,0 dBfs / Z = 10 kohm |
Digital Audio
| Output Optical SPDIF |
A/V & Data In/Out
| Scart TV scart | |
| RGB Video Output TV scart | |
| Analog Audio Output TV scart | |
| Digital Audio Output Optical output | |
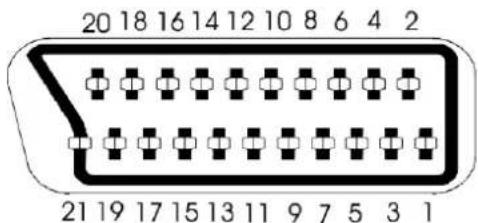
Fig 51.
File Extensions Supported By The Media Browser
| Media Extension | |
| Picture jpeg, jpg, jpe, jfif | |
| Video ts, avi, mp4, wmv, mkv | |
| Audio mp3 | |
| Subtitle srt, sub |

This page is left intentionally blank
Product support
7

Product support
Help is always at hand
Troubleshooting
The LED indicator does not glow
Power Adaptor is not connected or low power is disabled.
Check that the AC adaptor is plugged into the power socket and the set-top box is in low power standby mode.
Low power setting can be modified under the configuration menu.
No picture or sound
No signal or weak signal.
Changes in the settings have not taken effect
The set top box was unplugged without first switching to standby mode.
Make sure that the box is in standby mode before unplugging it from the mains.
The remote control is not working
- The set top box is in standby. Press the STANDBY button.
- Remote control is out of range. Check that the remote control range is clear.
- The batteries are exhausted. Replace the batteries with new ones.
Product support
Help is always at hand
OSD Warning Messages
No Signal
When the box receives no signal (e.g. the antenna cable is disconnected), NO DIGITAL SIGNAL AVAILABLE message will be displayed on the screen.
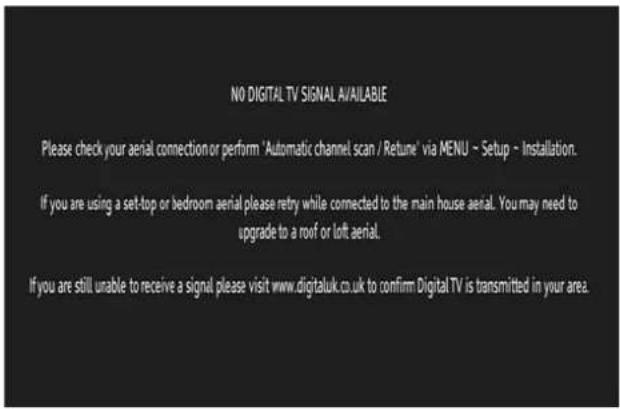
Fig 52.
No Channels Have Been Added Yet
When there are no channels stored in the box, Channel List menu will not be displayed and channel navigation will not be available.
In such cases, the following error message will be displayed.
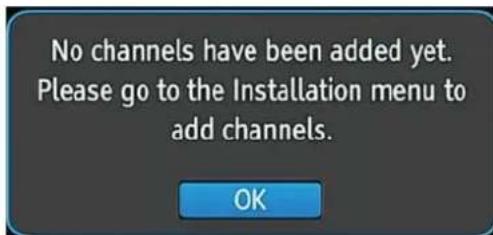
Fig 53.


Product support
Help is always at hand
Hard Disk
Recording Format
HDD recording is done using the variable bit rate format (VBR) for more efficient recording. The following phenomena may occur.
With the variable bit rate format, the remaining amount which can be recorded may increase or decrease relative to the display of the remaining amount of HDD space.
When the display indicates that the remaining amount of HDD space is low, first delete unnecessary programmes, and then record with an extra margin in the amount of remaining space. There is an option in the configuration menu to discard the recordings.
You can choose between three options:
Deleting:
1 - Oldest recordings
2 - Largest recordings
3 - Shortest recordings
When the HDD is out of space, it will operate regarding one of these options and delete the recordings.
Even if you delete a programme, the remaining amount may not increase by the amount of deleted time. When recording new video, record with an extra margin in the amount of remaining space.
Unrecordable Material
In the unlikely event that there is some problem like loss of recorded video or audio content due to an HDD malfunction, please be aware beforehand that we will bear no responsibility to compensate for the content which could not be recorded or edited, for the loss of recorded or edited video, or for other related direct or indirect damages.
If a power failure occurs
- The content being recorded or timer recorded may be damaged if power failure occurs.
- The content being played back may be damaged.
Hard Disk Operation (Recording / Playback / Time Shift Recording)
If the Recorder is used in a cold location (a location at low temperature), the drive will only allow live viewing after power is turned on until the HDD is ready. During this time, the Recorder will not allow Time Shift Viewing, recording, display of recording lists or playback of recorded programmes. Please wait until the HDD is ready.
Product support
Help is always at hand
Help and assistance
If you require any technical guidance or find that your set-top box is not operating as intended, a simple solution can often be found in the Troubleshooting section of these instructions or online at www.argos-support.co.uk
If you still require further assistance, call one of our experts on 0345 604 0105*. To help give us give you a fast and efficient service please have the following information ready:
Model Ref.
Serial number
Date of purchase
You can find these on the rating plate - a small information panel (usually a sticker or metal plate) on the rear of your TV
This will be shown on your receipt
Local call rates applies*
Lines open 8am-7pm Monday to Saturday and 10am-4pm Sunday.
*Calls to Argos enquiry lines may attract a charge and set up fee from residential lines depending on your call plan/tariff. Mobile and other providers costs may vary, see www.bt.com/pricing for details.
For security and training purposes, telephone calls to and from customer service centres may be recorded and monitored. Calls from Republic of Ireland will attract international call charges.


Product support
Help is always at hand
Disposal
Instructions for waste disposal:
- Packaging and packaging aids are recyclable and should principally be recycled. Packaging materials, such as foil bags, must be kept away from children.
- Batteries, including those which are heavy metal-free, should not be disposed of with household waste. Please dispose of used batteries in an environmentally friendly manner. Find out about the legal regulations which apply in your area.
- Don't try to recharge batteries. Danger of explosion.
- Replace batteries only with the same or equivalent type.
Information for Users in European Union Countries

- The mark shown on the right is in compliance with the Waste Electrical and Electronic Equipment Directive 2012/19/EU (WEEE).
- The mark indicates the requirement NOT to dispose the equipment including any spent or discarded batteries as unsorted municipal waste, but use the return and collection systems available. If the batteries or accumulators included with this equipment display the chemical symbol Hg, Cd, or Pb, then it means that the battery has a heavy metal content of more than 0.0005% Mercury, or more than 0.002% Cadmium or more than, 0.004% Lead.
Product support
Help is always at hand
BUSH
Call us now and activate your 12 month guarantee
Thank you for choosing Bush. Your new product is guaranteed against faults and breakdowns for 12 months. Don't forget to register it with us today so we can provide you with our best possible after-sales service and useful updates.
www.bushregistration.co.uk
FREEPHONE*
0800 597 8548
Lines are open 8am - 8pm, 365 days a year. *Calls may be recorded and monitored.
Your Bush Guarantee
This product is guaranteed for twelve months from the date of original purchase. Any defect that arises due to faulty materials or workmanship will be repaired free of charge (or if applicable the product will be replaced or the purchase price refunded) where possible during this period by the dealer from who your purchased the unit.
The guarantee is subject to the following provisions:
- The guarantee does not cover accidental damage, misuse, cabinet parts, knobs or consumable items.
- The product must be correctly installed and operated in accordance with the instructions contained in the manual.
- It must be used solely for domestic purposes. The guarantee will be rendered invalid if the product is
re-sold or has been damaged by inexpert repair.
- Specifications are subject to change without notice.
- Bush disclaim any liability for loss or damage arising from the breakdown of the product.
- This guarantee is in addition to and does not diminish your statutory or legal rights.
Important Data Protection Information
If you provide us with information about another person, you confirm that they have appointed you to act for them, to consent to the processing of their personal data including sensitive personal data and that you have informed them of our identity and the purposes (as set out in the Important Data Privacy notice displayed overleaf) for which their personal data will be processed.
You are entitled to ask for a copy of the information we hold about you (for which we may charge a small fee) and to have any inaccuracies in your information corrected.
For quality control and training purposes, we may monitor or record your communications with us.
If your personal details change, if you change your mind about any of your marketing preferences or if you have any queries about how we use your information, please let us know by contacting our Data Protection Officer, Domestic & General, Leicester House 17 Leicester Street, Bedworth, Warwickshire CV12 8JP.
Guarantor Argos Limited - 189 - 499 Avebury Blvd. - Milton Keynes - MK9 2NW

BUSH
Contact:
www.argos-support.co.uk
Helpline: 0345 604 0105
- Help and Guidance
- Contents
- Safety information
- Getting to know your set-top box
- Connections
- Standard features
- Advanced features
- Other information
- Product support
- 1Safe
- Safety information
- Important - Please read these instructions fully before installing or operating
- Power Safety
- Power source
- Power Cord
- Batteries
- Connection to a Television Distribution System (Cable TV etc.) from Tuner
- Hard Disk Safety
- Safe Use of the Equipment
- ABOVE ALL
- Getting to know your set-top box
- 2
- Ready? Let's begin...
- Accessories
- Overview of the Remote Control
- Overview of the Set-Top Box
- Connections
- 3
- Connecting the Set-Top Box to a TV Set
- Antenna Connection
- Bringing it all together
- Power Connection
- Inserting Batteries in the Remote Control
- Power On-Off
- First Time Installation
- Auto Power Down:
- Standard features
- 4
- Changing Channels
- Adjusting the Volume
- Mute
- On-Screen Information
- Instant Recording
- Simple everyday use
- Menu System
- Viewing the Main Menu
- Internet Portal
- Advanced features
- 5
- Managing Stations: Channel List
- Operating the Channel List
- Selecting a Specific Channel
- Deleting Channels
- Deleting Multiple Channels:
- Renaming Channels
- Getting the most from your TV
- Adding Locks to Channels
- Locking Multiple Channels:
- Setting Favourites
- Button Functions:
- Electronic Programme Guide (EPG)
- Event Options
- Select Channel
- Record Programme
- Record Series/Delete Series
- Split Record
- Configuring Timers
- Recordings Library
- Play Options
- Edit Recordings
- Main Title
- Text
- Duration
- Recording Title
- Display
- Time Shifting (Pause Live Recording)
- Media Browser
- Viewing USB Disk Contents
- Playing Video Files
- Playing MP3 Files
- Digital Teletext
- Settings
- Recordings
- Max Time Shift
- Auto Discard
- One Touch Recording :
- Configuration
- Active channels
- Scan Encrypted
- TV Type
- TV Out
- Receiver Upgrade
- Set Pin
- Menu Lock
- Guidance
- Low Power
- Auto Standby
- About
- Audio Description
- Available Langs.
- Preferred Language (Optional)
- Relative Volume (Optional)
- Language
- Preferred
- Current (\*)
- Installation
- Automatic Channel Scan / Retune
- Manual Channel Scan
- Format Disk
- IP Settings
- Other information
- 6
- Helpful technical information
- Technical Specifications
- Video
- Profiles
- Audio
- Product support
- 7
- Troubleshooting
- The remote control is not working
- OSD Warning Messages
- No Signal
- No Channels Have Been Added Yet
- Hard Disk
- Recording Format
- Unrecordable Material
- If a power failure occurs
- Hard Disk Operation (Recording / Playback / Time Shift Recording)
- Help and assistance
- Disposal
- Instructions for waste disposal:
- Information for Users in European Union Countries
- BUSH
- Call us now and activate your 12 month guarantee
- www.bushregistration.co.uk
- Your Bush Guarantee
- The guarantee is subject to the following provisions:
- Important Data Protection Information
Brand : BUSH
Model : DVB-T2 PVR MPEG4
Category : Digital decoder