
QRN-1620S - VCR Hanwha - Free user manual and instructions
Find the device manual for free QRN-1620S Hanwha in PDF.


| Product Type | Digital Video Recorder (DVR) |
| Model | QRN-1620S |
| Brand | Hanwha |
| Video Input | 16 channel, supports up to 4K camera resolution |
| Video Output | HDMI 4K output |
| Audio | Audio recording and playback |
| Recording Modes | Normal, Event, Scheduled, ARB |
| Storage | Internal HDD (SATA), supports HDD overwrite |
| Backup | USB, external HDD |
| Network | Ethernet, ONVIF Profile S, RTP/RTSP, P2P support |
| Remote Access | Windows Network Viewer, smartphone app (Wisenet mobile) |
| Search Modes | Time, Event, Smart, Text, Backup, ARB |
| Alarm | Input/Output, event push notification to smartphone |
| Install Wizard | Easy Setup and Quick Setup |
| HDD Monitoring | SMART status display |
| Power Supply | 100-240V AC, 50/60Hz (typical for DVR) |
| Dimensions (approx.) | Standard 19-inch rack mount, about 440 x 88 x 320 mm |
| Weight (approx.) | About 5 kg without HDD |
| Operating Temperature | 0°C to 40°C |
| Compliance | EU RoHS, WEEE |
Frequently Asked Questions - QRN-1620S Hanwha
User questions about QRN-1620S Hanwha
0 question about this device. Answer the ones you know or ask your own.
Ask a new question about this device
Download the instructions for your VCR in PDF format for free! Find your manual QRN-1620S - Hanwha and take your electronic device back in hand. On this page are published all the documents necessary for the use of your device. QRN-1620S by Hanwha.
USER MANUAL QRN-1620S Hanwha
The product records video and audio from cameras to a hard disk, and enables playback from the hard disk. It also provides remote monitoring environment for video and audio over the network using a remote computer.
- User-friendly UI
• Supports a range of 4K camera resolutions
• Outputs a 4K high definition image using HDMI - Record and play video
• Record and play audio
• Supports ONVIF Profile S standard and RTP / RTSP protocols - Display the HDD operation status by HDD SMART
- HDD overwrite enabled
- Backup using USB protocols and external HDD
• Simultaneous play of 4, 8 channels - Various Search Modes (Time, Event, Smart, Text, Backup, ARB)
• Supports ARB (configuration feature for saving period by channel) - Various Recording Modes (Normal, Event. Scheduled Recording)
- Alarm Input / Output
- Remote Monitoring function by Windows Network Viewer
• Live monitoring of the network camera
• Installation Wizard Function (Easy Setup, Quick Setup)
• Supports the smartphone remote monitoring feature by P2P support - Provides smartphone event alarm (sending real-time event messages)
IMPORTANT
- Please check 'Manuals' from our website, before connecting to the Supply https://www.hanwha-security.com/cn/data-center/download-data/video-recorder/
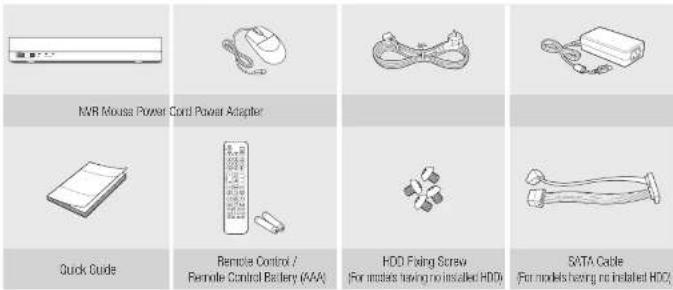
Package Contents

The actual parts may differ from the images.
■Accessories and quantities may vary by sales region.
- For some regions, HDD is not pre-installed. The quantities of HDD fixing screws and SATA cable vary depending on the number of fixed HDD.
QRN-420S/QRN-820S
QRN-1620S


SATA Cable
HDD Installation

- If you are adding a new or previously used HDD to this product in addition to the HDD(s) originally installed, format the new HDD manually in the set before use.
To learn how to format, see "Device/Format" in the Wisanet Recorder User Manual.
QRN-420S/QRN-820S

■ The images below are based on the QRN-B2OS model.

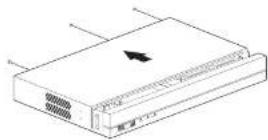
After unscrewing, push back and remove the cover.

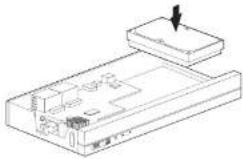
Connect the SATA/power cables of the HDD to the connectors on the mainboard.

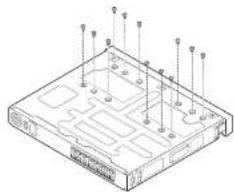
Using the screws, fix the HDD to the bottom of the set.


Check for any problems in the connection terminal and the wiring in the product, close the cover and fix it with screws.
■ Be careful not to damage the cables when you close the cover.


Close the cover, and tighten a setscrew in the back.

QRN-1620S

After unscrewing, push back and remove the cover.

Connect the SATA/power cables of the HDD to the connectors on the mainboard.

natural_image
Isometric line drawing of a rectangular electronic device with mounting holes and a central arrow indicating direction (no text or symbols)
natural_image
Isometric line drawing of a computer chassis with two monitors and ventilation grilles (no text or symbols)
Using the screws, fix the HDD to the bottom of the set.

Check for any problems in the connection terminal and the wiring in the product, close the cover and fix it with screws.
natural_image
Isometric line drawing of a computer drive chassis with mounting holes and ventilation slots (no text or labels)- Be careful not to damage the cables when you close the cover.


close the cover, and tighten a setscrew in the back.

natural_image
Isometric line drawing of a rectangular electronic device with mounting holes and a central arrow indicator (no text or symbols)Install Wizard Setup
1 Select the language
Select your preferred language.

2 Network Settings
- DHCP server : If the DHCP server is set to enable, an IP is automatically assigned to the camera.
• Network 1 (Camera) : Connects to the camera and receives the video feed from the camera.
• Network 2 (All): Network for a remote viewer (SSM, Smart Viewer, Webviewer)
• Network 1 / Network 2 Setup
- IP Type : Choose the network connection method.
- IP Address, Subnet Mask, Gateway, DNS
※ For more details on network settings, refer to the User manual.
▶ To use a simple intranet, click
- Switch Mode: Set the camera registration method. This function is only available for products with PoE
support. For products with PoE support, see "NVR products supporting each feature". (Page 4)
- PnP Mode : Camera connected to the PoE port of the product will be registered automatically on each channel in the order of the port number.
- Manual Setup Mode: Automatically scans and registers camera connected to the product's PoE and camera with separate switch.

3 Recorder ID/PW Setup
Sets the administrator's password.

※ Click < ☐ > to view the basic guide for setting a password. Refer to the password setup rules.
4 Camera ID/PW Setup
4-1. Set a camera password in factory reset. The initial password for the camera must be entered.
4-2. If ID/PW is already set in the camera, register the ID/PW and click

※ Click <①> to view the basic guide for setting a password. Refer to the password setup rules.
※ When the password is in factory reset, it can be changed and managed in a batch.
※ Up to 3 sets of camera ID with password and password can be registered.
※ You cannot change the password for cameras registered with ONVIF and RTSP.
5 Date/Time Setup
Set the date, time, time zone, and DST, and then click the

6 Resolution Setup
To set the recommended resolution, click
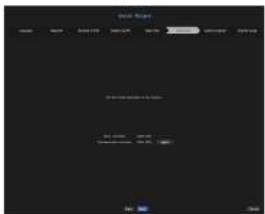
7 Camera Register
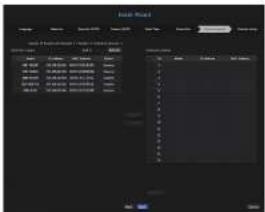
Registers the searched network cameras.
Select a camera to register from the searched camera list and click the
Select a camera to register from the list and click the
After completing camera register, click
8 Channel Setup
You can view the camera videos registered to each channel in split mode along with thumbnail information. To change the camera video position, select a video and drag and drop it to the desired location.

Click the
Record Setup
You can set resolution, IPS, and quality of recordings by channel, and by recording type of standard / event.
You can check frame rates and data transfer amount of Full Frame and Key Frame recordings for each channel, and set the transfer limit for recordings.
Menu > Record > Record Setup

- CH: Click < 01 > to display the channel information table.
Apply to CH: If you select
After selecting channels that the settings will be applied to. click on
- Standard, Event : Configures Standard recording and Event recording.
- FULL : Records all frames fed by the camera.
I frame : Records only key frames fed by the camera.
Actual recording rate may differ from camera settings. In general, 1 to 2 frames per second are recorded.
- OFF: No recording is made.
Frame
- FULL : Shows the amount of data for all the scene recordings.
- I-frame : Shows the amount of data for the main scene recordings.
- Limit: Set the amount of data allowed for input for each channel.
- Event: When an event occurs, you can set which point you will start or stop recording.
- Pre: When an event occurs, recording will be started regardless of the time set.
If you set it to five seconds, recording will start at five seconds before an event occurs.
- Post: When an event occurs, recording will continue after the time set.
If you set it to five seconds, recording will continue for a further five seconds after an event is finished.
- Audio: Specify whether to record the sound received from the camera or not.
- If a channel's data transfer exceeds defined allowed limit, then it may affect to other channels, and may force switching to
- A channel displayed in yellow indicates that the recorded data is not being transferred from the camera and that the recording is being performed temporarily using another profile on the camera.
Check the channel information to see the spoiled profile to the channel listed in yellow. A channel displayed in orange indicates that the amount of inputted data is greater than the permitted data amount. In this case, it is impossible to record all of the incoming frames. Instead, only part of the frames (1 or 2 frames per second) can be recorded. To resolve this issue, you must set the permitted data amount to be greater than the amount of inputted data.
Set up and run the layout
The layout set on the live screen can also be used for time search and can be searched and played according to the channel order and channel combination set by the user.

- For more information on how to set each step, refer to the "User Manual."

live channel layout Setup
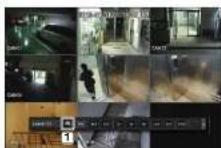


- Open the channel layout setup page.
2 Click
③ Specify the layout name of the selected channel (ex. Parking lot).
4 Select the channels you want to add to the layout (ex. 1, 2, 3, 4, etc.).
5 Decide the split mode to apply (ex. 4 split).
6 Click
7 Select the layout you want to move, and it will be moved immediately (ex. It moves to Parking lot.).

flowchart
graph TD
    A["Parking lot"] --> B["Parking lot"]
    A --> C["Elevator lot"]
    A --> D["Start"]
    B --> E["Image 1"]
    B --> F["Image 2"]
    C --> G["Image 3"]
    C --> H["Image 4"]
    D --> I["Image 5"]

Search/Play

① In live mode, right-click and select
2-1 Browse

1 The default value is
2 Select a channel by the selected group.
3 When moving the time bar, you can see the preview screen in the picture of 4).
5 Press the
2-2 Audio Play

① These are the various functions required for play. Hover over it to view the tooltip.
Refer to the information to adjust the play controls
iEx.: Skip Backwardt.
2 You can set the specific functions in 1 through playback settings (Ex. Skip play: 10 minutes, 30 minutes, 1 hour, 24 hours, etc.).
3) Displays the functions that operate during split mode and other plays.
3 Backup
Right-click the live screen and select

1 Select a layout
2) Select a channel.
③ Set the time, device, and format for backup.
4 Click the
5 Click the
Using the basic guide
View shortcut menu
By right-clicking the live screen, you can use various functions provided by the recorder. If you hover over the icon, the definition of terms for each function is briefly displayed.
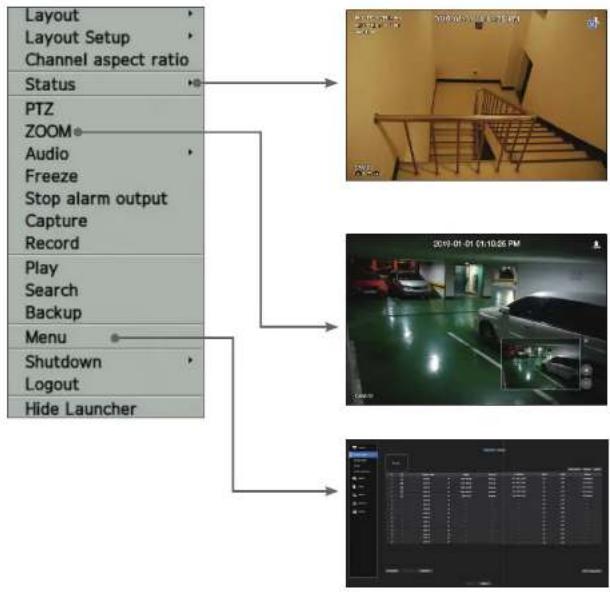
flowchart
graph TD
    A["Layout Setup"] --> B["Status"]
    C["PTZ"] --> D["ZOOM"]
    D --> E["Audio"]
    E --> F["Freeze"]
    F --> G["Stop alarm output"]
    G --> H["Capture"]
    H --> I["Record"]
    J["Play"] --> K["Search"]
    L["Backup"] --> M["Menu"]
    N["Shutdown"] --> O["Logout"]
    P["Hide Launcher"] --> Q["Output"]
    R["Image 2019-01-01 01:10:25 PM"] --> S["Car with Camera"]
    T["Image 2019-01-01 01:10:25 PM"] --> U["Video Window"]
Live launcher

① Sets the live layout.
2 You can set the supported split mode. The end sequence ( ) can be viewed sequentially for a specific time in each split mode.
3 Sets additional functions such as alarm control and audio in live.
Using product information
You can check the product information/manual/firmware information/FAQ/HDD compatibility let on the homepage or mobile web of your smartphone.

flowchart
graph TD
    A["http://hanwha-security.com"] --> B["Video Recorder"]
    B --> C["Search Query"]
    C --> D["User Interface"]
    D --> E["Search Query"]
    E --> F["Search Query"]
    F --> G["Search Query"]
    G --> H["Search Query"]
    H --> I["Search Query"]
    I --> J["Search Query"]
    J --> K["Search Query"]
    K --> L["Search Query"]
    L --> M["Search Query"]
    M --> N["Search Query"]
    N --> O["Search Query"]
    O --> P["Search Query"]
    P --> Q["Search Query"]
    Q --> R["Search Query"]
    R --> S["Search Query"]
    S --> T["Search Query"]
    T --> U["Search Query"]
    U --> V["Search Query"]
    V --> W["Search Query"]
    W --> X["Search Query"]
    X --> Y["Search Query"]
    Y --> Z["Search Query"]
    Z --> AA["Search Query"]
    AA --> AB["Search Query"]
    AB --> AC["Search Query"]
    AC --> AD["Search Query"]
    AD --> AE["Search Query"]
    AE --> AF["Search Query"]
    AF --> AG["Search Query"]
    AG --> AH["Search Query"]
    AH --> AI["Search Query"]
    AI --> AJ["Search Query"]
    AJ --> AK["Search Query"]
    AK --> AL["Search Query"]
    AL --> AM["Search Query"]
    AM --> AN["Search Query"]
    AN --> AO["Search Query"]
    AO --> AP["Search Query"]
    AP --> AQ["Search Query"]
    AQ --> AR["Search Query"]
    AR --> AS["Search Query"]
    AS --> AT["Search Query"]
    AT --> AU["Search Query"]
    AU --> AV["Search Query"]
    AV --> AW["Search Query"]
    AW --> AX["Search Query"]
    AX --> AY["Search Query"]
    AY --> AZ["Search Query"]
    AZ --> BA["Search Query"]
    BA --> BB["Search Query"]
    BB --> BC["Search Query"]
    BC --> BD["Search Query"]
    BD --> BE["Search Query"]
    BE --> BF["Search Query"]
    BF --> BG["Search Query"]
    BG --> BH["Search Query"]
    BH --> BI["Search Query"]
    BI --> BJ["Search Query"]
    BJ --> BK["Search Query"]
    BK --> BL["Search Query"]
    BL --> BM["Search Query"]
    BM --> BN["Search Query"]
    BN --> BO["Search Query"]
    BO --> BP["Search Query"]
    BP --> BQ["Search Query"]
    BQ --> BR["Search Query"]
    BR --> BS["Search Query"]
    BS --> BT["Search Query"]
    BT --> BU["Search Query"]
    BU --> BV["Search Query"]
    BV --> BW["Search Query"]
    BW --> BX["Search Query"]
    BX --> BY["Search Query"]
    BY --> BZ["Search Query"]
    BZ --> CA["Search Query"]
    CA --> CB["Search Query"]
    CB --> CC["Search Query"]
    CC --> CD["Search Query"]
    CD --> CE["Search Query"]
    CE --> CF["Search Query"]
    CF --> CG["Search Query"]
    CG --> CH["Search Query"]
    CH --> CI["Search Query"]
    CI --> CJ["Search Query"]
    CJ --> CK["Search Query"]
    CK --> CR["Search Query"]
    CR --> CS["Search Query"]
    CS --> CT["Search Query"]
    CT --> CU["Search Query"]
    CU --> CV["Search Query"]
    CV --> CW["Search Query"]
    CW --> CX["Search Query"]
    CX --> CY["Search Query"]
    CY --> CZ["Search Query"]
    CZ --> DA["Search Query"]
    DA --> DB["Search Query"]
    DB --> DC["Search Query"]
    DC --> DD["Search Query"]
    DD --> DE["Search Query"]
    DE --> DF["Search Query"]
    DF --> DG["Search Query"]
    DG --> DH["Search Query"]
    DH --> DI["Search Query"]
    DI --> DJ["Search Query"]
    DJ --> DK["Search Query"]
    DK --> DL["Search Query"]
    DL --> DM["Search Query"]
    DM --> DN["Search Query"]
    DN --> DO
Using P2P Service
This function is available only for products that support P2P. To find products that support P2P, see "Supported Products by Function" in the Wisenet recorder manual.
In case of using the P2P service, the recorder can be connected directly to the mobile web viewer.
① Check
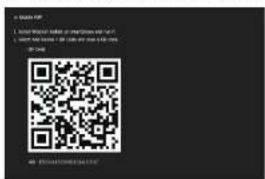
2 If the connection is successful, search for WisaNet mobile on your smartphone and install and run it.
- You can scan the OR code on the recorder by selecting Add device> OR code.
3 If you scan the QR code, the device ID shown in the recorder is automatically reflected as the mobile viewer ID. You can use the mobile viewer immediately by entering the ID/password of the recorder.

flowchart
graph LR
    A["Mobile Device"] --> B["QR code scanning"]
    B --> C["QR code verification"]
    C --> D["Add Device"]
    D --> E["Add Device Help"]
④ From now on, when you run the WiseNet mobile application saved to your smartphone, you can easily monitor with your smartphone as you are automatically connected to the recorder.
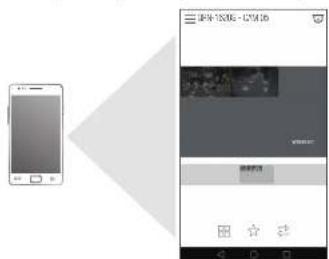

- The F2P service period expires in 3 years. If you want to extend it after expiration, contact your vendor.
- Only motion and video loss events are forwarded to the event push.
Connecting to a network using a router
If you want to add 1-3 PCs and recorders in an environment using xDSL/Cable modem, you can use the router with only one Internet line.
This guide is an installation guide for network beginners.
Follow the instructions to set up your router, local PC, and recorder.
Connecting the cable

flowchart
graph TD
    A["Internet"] --> B["Cable/ADSL/VDSL"]
    C["Local PC"] --> B
    B --> D["IP Router"]
    D --> E["Recorder"]
    E --> D
Connecting a router with PC

■Refer to the router's user manual.
Connecting a recorder and a router
Move to
and set the 1
※ The
※ At least the third number of the recorder

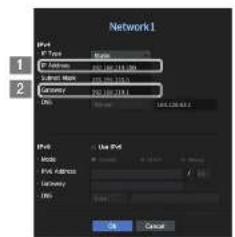
Checking the recorder connection from the PC
Enter the IP set in the recorder menu in the local PC address bar to go to the web viewer screen of the recorder.


System Requirements
The following lists the minimum suggested hardware and operating system requirements needed to run the Web Viewer.
• Recommended browser : Chrome
• Supported browsers : Chrome, Edge, and Safari
- Supported OS: Works on all of the Windows, Linux, and OS X environments given the platform-independent nature of the web.
- Tested environments: Tested and certified to run on Windows® 10 with Google Chrome™ version 76 and Intel® Core™ I7-7700 processor 3.60 GHz with NVIDIA® GeForce® GTX™ 1050 or Intel™ HD Graphics 630.
- Performance restrictions: The performance of users' CPU/GPU may impact the video playback performance of the web viewer.
Router and Internet Connection setup
Since each router has a different connection method, check the settings for each router.
Port forwarding on the router setup
Set up the router's port forwarding to connect to a PC or a recorder connected to the router's local LAN from outside. The recorder uses the
※ If only
※ If only
※ Refer to the router's user manual.
Accessing using DDNS address in the dynamic IP environment
In the dynamic IP environment such as xDSL/Cable modem, the router's WAN IP can be changed, so we provide CONS (Dynamic Domain Name Server) service so that you can always access the recorder with only the DONS address even in the dynamic IP environment.
- Wisenet DDNS Setup
Since you will be accessing the recorder remotely, set up a Wisenet DCNS account first using a PC.

3 Click the
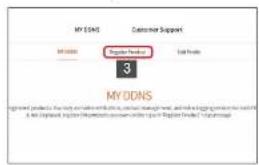
- After registration, your product will appear in the list.

Open a browser, go to dchs.harwha-security.com, and click
1 Click
2 Log in after completing account registration.

4 Create a name for your recorder (product ID).
5 Select the type of recorder and model name.
6 Click

- Connect using DDNS address
Go to
1 Select
2 Enter the
- Enter the
in
3 When the DDNS setup is finished, select

5 You can connect to the recorder by connecting to the 6 The web viewer screen of the recorder appears.
address window, http://ddns.hanwha-security.com/record TEST
You can also click <--> in Item
to the recorder.
4 Connect to


All settings are complete.
If you remember your DDNS address and ID / password, you can access the recorder from any PC with an Internet connection.
For more information, refer to the user manual.
MEMO
MEMO

Harwina Techwin cares for the environment at all product manufacturing stages, and is taking measures to provide customers with more environmentally friendly products.
The Eco mark represents Hanwha Techwin's devotion to creating environmentally friendly products, and indicates that the product satisfies the EU RoHS Directive.
Correct Disposal of This Product (Waste Electrical & Electronic Equipment)
Applicable in the European Union and other European countries with separate collectors on systems:
This marking on the product accessories or literature indicates that the product and its electronic accessories (e.g. charger, road, USB) solely should not be deposited of wells or other household waste at the end of their working life. To present possible harm to the environment or human health from uncontrolled waste disposal, please separate these items from other types of waste and recycle them responsibly to promote the sustainable waste of material resources.
Household areas should contact either the retailer where they purchased this product in their local government or use, or details of where and how they can take those items for environmentally are recycling.
Business users should contact their supplier and check the terms and conditions of the purchase contract. This product and its electronic accessories should not be mixed with other commercial waste for disposal.

Correct disposal of batteries in this product
Replicable in the European Union and other European countries with separate battery return systems.
It is marking on the box, very normal or packaging instructions that the batteries in this product should not be diagnosed with other thin sealed water as the end of their working site. Where formed the domestic protocols hig, Ctr for publicable had the very constant mercury, such an or hard store the reference levels in FC Directive 2006/66. In batteries are not properly dislocated of, those substances can cause from human health or the environment. To protect natural resources and to promote maximal house, please separate batteries from other types of waste and recycle them through your total free battery return system.
Head Office
6, Pangyo-ro 319 beon-gil, Bundang-gu, Seongnam-si,
Gyeonggi-do, 463-400 Rep. of KOREA
Tel: +82.70.7147.8753 Fax: +82.31.8018.3740
www.hanwha-security.com
Hanwha Techwin America
500 Frank W. Burr Blvd. Suite 43 Teaneck, NJ 07666
Toll Free +1.877.213.1222 Direct +1.201.325.6920
Fax +1.201.373.0124
www.hanwhasecurity.com
Hanwha Techwin Europe
Heriot House, Heriot Road, Chertsey, Surrey, KT16 9DT, United Kingdom
Tel +44.1372.235663 Fax +44.1932.57.8101
www.hanwha-security.eu

Hanwha
Techwin



- IMPORTANT
- Package Contents
- HDD Installation
- QRN-420S/QRN-820S
- QRN-1620S
- Install Wizard Setup
- Select the language
- Network Settings
- Recorder ID/PW Setup
- Camera ID/PW Setup
- Date/Time Setup
- Resolution Setup
- Camera Register
- Channel Setup
- Record Setup
- Set up and run the layout
- 2-1 Browse
- 2-2 Audio Play
- Backup
- Using the basic guide
- View shortcut menu
- Live launcher
- Using product information
- Using P2P Service
- Connecting to a network using a router
- Connecting a recorder and a router
- Checking the recorder connection from the PC
- System Requirements
- Router and Internet Connection setup
- Port forwarding on the router setup
- Accessing using DDNS address in the dynamic IP environment
- - Wisenet DDNS Setup
- - Connect using DDNS address
- All settings are complete.
- MEMO
- Correct Disposal of This Product (Waste Electrical & Electronic Equipment)
- Correct disposal of batteries in this product
- Head Office
- Hanwha Techwin America
- Hanwha Techwin Europe
Brand : Hanwha
Model : QRN-1620S
Category : VCR