
CD5232ST - Wall socket JUNG - Free user manual and instructions
Find the device manual for free CD5232ST JUNG in PDF.


| Product Type | Wall Socket |
| Brand | JUNG |
| Model | CD5232ST |
| Rated Voltage | 250 V AC |
| Rated Current | 16 A |
| Socket Type | Type F (Schuko) with earth contact |
| Material | Thermoplastic, white |
| Dimensions (H x W x D) | 80 mm x 80 mm x 45 mm |
| Weight | 0.1 kg |
| Ingress Protection | IP20 |
| Operating Temperature | -20 °C to +40 °C |
| Connection Type | Screw terminals for conductors up to 2.5 mm² |
| Standards | VDE certified, CE |
| Child Protection | Integrated shutters |
| Mounting | Flush mounting in standard junction box |
| Cleaning Instructions | Wipe with a dry, soft cloth; do not use abrasive cleaners |
| Warranty | 5 years manufacturer warranty |
| Compatibility | Compatible with standard 55 mm frame systems |
| Safety Features | Overload and short-circuit protection via upstream circuit breaker |
| Colour | White (similar to RAL 9010) |
Frequently Asked Questions - CD5232ST JUNG
User questions about CD5232ST JUNG
0 question about this device. Answer the ones you know or ask your own.
Ask a new question about this device
Download the instructions for your Wall socket in PDF format for free! Find your manual CD5232ST - JUNG and take your electronic device back in hand. On this page are published all the documents necessary for the use of your device. CD5232ST by JUNG.
USER MANUAL CD5232ST JUNG
Centre plate with timer function "standard"
Art. No.: .. 5232 ST ..
Operating instructions
1 Safety instructions
Electrical equipment may only be installed and fitted by electrically skilled persons.
Serious injuries, fire or property damage possible. Please read and follow manual fully.
Danger of electric shock. Always disconnect before carrying out work on the devise or load. At the same time, take into account all circuit breakers that supply dangerous voltage to the device or load.
Danger of electric shock. Device is not suitable for disconnection from supply voltage.
These instructions are an integral part of the product, and must remain with the end customer.
2 Device components
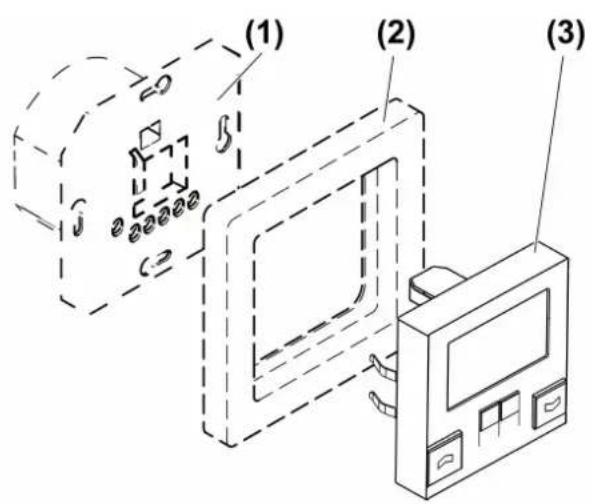
Figure 1: Device components
(1) Venetian blind control
(2) Frame
(3) Cover
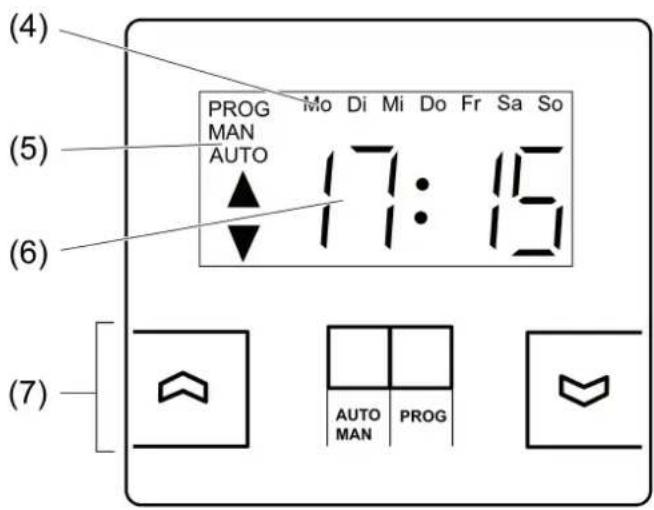
Figure 2: Display and buttons
(4) Current weekday
(5) Operating mode: Manual or Automatic
(6) Current time of day
(7) Buttons
3 Function
Intended use
- Manual and time-controlled operation of electrically-driven Venetian blinds, shutters and awnings
- Operation on control of the Venetian blind control system
Product characteristics
- Each Up and Down travelling time can be saved for weekdays and for the weekend
- Travelling times programmed at the factory
- Current time of day can be saved as travelling time
- Automatic and manual operation
- Operation via 4 buttons
- Indication of the current time
- Programming without flush-mounted insert possible
- Power reserve > 6 hours
Behaviour after a mains voltage failure
Voltage failure less than 6 hours
- Time and switching times are retained
- Missed travelling times are not performed later
Voltage failure greater than 6 hours
- Time flashes and the manual operating mode is active.
- Time and weekday must be set again
- The travelling times are reset to default setting
Travelling times with the default setting
| Movement direction Weekdays | Time | |
| up Mo - Fr 7:00 | ||
| Down Mo - Fr 20:00 | ||
| up Sa - Su 9:00 | ||
| Down Sa - Su 20:00 |
4 Operation
Moving the Venetian blind
■ Press ▲ or ▼ button between one and three seconds.
The Venetian blind moves in the desired direction to the end position or stops when the button is pressed again.
In automatic operation, the Up and Down travelling time programmed for this day is displayed for about 4 seconds during manual operation.
Adjusting the slats
■ Press the ▲ or ▼ button for less than one second.
The slat position changes in the desired direction for as long as the button is pressed.
Changing between automatic and manual operation
■ Press AUTO/MAN button for longer than 1 second.
The cover changes the operating mode.
i In manual operation, no automatic moves are executed.
Setting time and programming travelling times
flowchart
graph TD
    A["START Prag"] --> B["PROG"]
    B --> C["-12:00"]
    C --> D["PROG"]
    D --> E["15:00"]
    E --> F["PROG"]
    F --> G["End"]
    G --> H["PROG"]
    H --> I["PROG"]
    I --> J["PROG"]
    J --> K["PROG"]
    K --> L["PROG"]
    L --> M["PROG"]
    M --> N["PROG"]
    N --> O["PROG"]
    O --> P["PROG"]
    P --> Q["PROG"]
    Q --> R["PROG"]
    R --> S["PROG"]
    S --> T["PROG"]
    T --> U["PROG"]
    U --> V["PROG"]
    V --> W["PROG"]
    W --> X["PROG"]
    X --> Y["PROG"]
    Y --> Z["PROG"]
    Z --> AA["PROG"]
    AA --> AB["PROG"]
    AB --> AC["PROG"]
    AC --> AD["PROG"]
    AD --> AE["PROG"]
    AE --> AF["PROG"]
    AF --> AG["PROG"]
    AG --> AH["PROG"]
    AH --> AI["PROG"]
    AI --> AJ["PROG"]
    AJ --> AK["PROG"]
    AK --> AL["PROG"]
    AL --> AM["PROG"]
    AM --> AN["PROG"]
    AN --> AO["PROG"]
    AO --> AP["PROG"]
    AP --> AQ["PROG"]
    AQ --> AR["PROG"]
    AR --> AS["PROG"]
    AS --> AT["PROG"]
    AT --> AU["PROG"]
    AU --> AV["PROG"]
    AV --> AW["PROG"]
    AW --> AX["PROG"]
    AX --> AY["PROG"]
    AY --> AZ["PROG"]
    AZ --> BA["PROG"]
    BA --> BB["PROG"]
    BB --> BC["PROG"]
    BC --> BD["PROG"]
    BD --> BE["PROG"]
    BE --> BF["PROG"]
    BF --> BG["PROG"]
    BG --> BH["PROG"]
    BH --> BI["PROG"]
    BI --> BJ["PROG"]
    BJ --> BK["PROG"]
    BK --> BL["PROG"]
    BL --> BM["PROG"]
    BM --> BN["PROG"]
    BN --> BO["PROG"]
    BO --> BP["PROG"]
    BP --> BQ["PROG"]
    BQ --> BR["PROG"]
    BR --> BS["PROG"]
    BS --> BT["PROG"]
    BT --> BU["PROG"]
    BU --> BV["PROG"]
    BV --> BW["PROG"]
    BW --> BX["PROG"]
    BX --> BY["PROG"]
    BY --> BZ["PROG"]
    BZ --> CA["PROG"]
    CA --> CB["PROG"]
    CB --> CC["PROG"]
    CC --> CD["PROG"]
    CD --> CE["PROG"]
    CE --> CF["PROG"]
    CF --> CG["PROG"]
    CG --> CH["PROG"]
    CH --> CI["PROG"]
    CI --> CJ["PROG"]
    CJ --> CK["PROG"]
    CK --> CR["PROG"]
    CR --> CS["PROG"]
    CS --> CT["PROG"]
    CT --> CU["PROG"]
    CU --> CV["PROG"]
    CV --> CW["PROG"]
    CW --> CX["PROG"]
    CX --> CY["PROG"]
    CY --> CZ["PROG"]
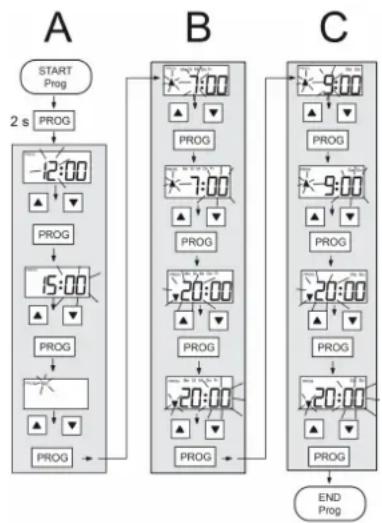
Figure 3: Programming steps
After the start of programming, the following steps are passed through in succession (figure 3).
A: Enter current time and day.
B: Enter Up and Down travelling time for Mon-Fri.
C: Enter up and down travelling time for Sat-Sun.
■ Press the PROG button for longer than 2 seconds.
The programming is started. The value to be changed flashes.
■ Press ▲ or ▼ button to change times.
■ Press Prog button to save the entered value and to recall the next value (figure 3).
i A long press when setting the minutes causes an adjustment in steps of 5.
To cancel the programming, press the PROG button for longer than 2 seconds or do not press any button for 2 minutes.
At 0:00 no travelling times are ever executed. To delete a travelling time, it must be set to 0:00.
Saving current time of day as travelling time
The current time of day can be applied as the travelling time for the current weekday and desired travel direction at any time.
■ Press ▲ or ▼ long.
The blind/shutter starts.
■ Additionally, press the PROG button until the time/travelling time display goes out.
The current time of day is now saved as the travelling time for the current weekday.
5 Information for electrically skilled persons
5.1 Fitting and electrical connection

DANGER!
Electrical shock when live parts are touched.
Electrical shocks can be fatal.
Before carrying out work on the device or load, disengage all the corresponding circuit breakers. Cover up live parts in the working environment.
Fitting the device
The Venetian blind control is mounted and connected properly (see instructions for the relevant Venetian blind control).
■ Mount cover (3) with frame (2) onto the Venetian blind control (1) (Fig 1).
■ Switch on mains voltage.
5.2 Commissioning
Making basic settings
The cover is attached to the insert.
■ Switch on mains voltage.
- Executing reset: Press AUTO/MAN and PROG buttons simultaneously for about 3 seconds until the display goes out.
The travelling times are set to the default setting.
The time switches to 12:00 and the display flashes.
The manual operating mode is active.
■ Set time and weekday and program travelling times (see Setting time and programming travelling times).
i After about 30 minutes, the storage capacitor is fully charged and the programming can take place even when removed.
6 Appendix
6.1 Technical data
Ambient temperature 0 ... +45 °C Storage/transport temperature -10 ... +60 °C Accuracy per month ± 1 min Switch-over time for direction change approx. 1 s Moving time approx. 120 s
Data according to EN 60730-1
Action 1.B
Degree of soiling 2
Meas. surge vol. 4000 V
SELV limit value DC 12 V
6.2 Warranty
We reserve the right to make technical and formal changes to the product in the interest of technical progress.
We provide a warranty as provided for by law.
Please send the device with a description of the defect to our central customer service office.
ALBRECHT JUNG GMBH & CO. KG
Volmestraße 1
58579 Schalksmühle
Telefon: +49.23 55.8 06-0
Telefax: +49.23 55.8 06-2 04
kundencenter@jung.de
www.jung.de
Service Center
Kupferstr. 17-19
44532 Lünen
Germany

- Safety instructions
- Device components
- Function
- Intended use
- Product characteristics
- Behaviour after a mains voltage failure
- Operation
- Moving the Venetian blind
- Adjusting the slats
- Changing between automatic and manual operation
- Setting time and programming travelling times
- Saving current time of day as travelling time
- Information for electrically skilled persons
- Fitting and electrical connection
- DANGER!
- Fitting the device
- Commissioning
- Making basic settings
- Appendix
- Technical data
- Warranty
- ALBRECHT JUNG GMBH & CO. KG
- Service Center
Brand : JUNG
Model : CD5232ST
Category : Wall socket