USER MANUAL Xacti VPC-S7EX SANYO
natural_image
Illustration of a silver digital camera with lens and control buttons (no text or symbols)
Important note
This manual explains how to safely operate the VPC-S7EX and VPC-S7. Any information regarding only one of these products will be labeled as such.
Please read these instructions carefully before using the camera.
Make sure to read and understand the separate booklet "SAFETY MANUAL".
Keep this manual in a safe place for later reference.
Warning
TO PREVENT THE RISK OF FIRE OR ELECTRIC SHOCK, DO NOT EXPOSE THIS APPLIANCE TO RAIN OR MOISTURE
■FOR AMERICAN USERS
The following advisory is included in accordance with the laws of the State of California (USA):
WARNING:
This product contains chemicals, including lead, known to the State of California to cause cancer, birth defects or other reproductive harm. Wash hands after handling.
- This equipment has been tested and found to comply with the limits for a Class B digital device, pursuant to Part 15 of the FCC Rules. These limits are designed to provide reasonable protection against harmful interference in a residential installation. This equipment generates, uses and can radiate radio frequency energy and, if not installed and used in accordance with the instructions, may cause harmful interference to radio communications. However, there is no guarantee that interference will not occur in a particular installation. If this equipment does cause harmful interference to radio or television reception, which can be determined by turning the equipment off and on, the user is encouraged to try to correct the interference by one or more of the following measures:
Reorient or relocate the receiving antenna.
Increase the separation between the equipment and receiver.
Connect the equipment into an outlet on a circuit different from that to which the receiver is connected.
Consult the dealer or an experienced radio/TV technician for help.
- Changes or modifications not expressly approved by the party responsible for compliance could void the user's authority to operate the equipment.
Model number: VPC-S7
Trade Name: SANYO
Responsible party: SANYO FISHER COMPANY
Address: 21605 Plummer Street, Chatsworth, California 91311
Telephone No.: (818) 998-7322
This device complies with Part 15 of the FCC Rules. Operation is subject to the following two conditions:
(1) this device may not cause harmful interference, and
i English
■FOR CANADIAN USERS
- This Class B digital apparatus complies with Canadian ICES-003.
■ FOR EU USERS
natural_image
Symbol of a trash bin crossed with no text or labels, accompanied by a black rectangular block below (no readable text or symbols)
Note:
- This symbol mark and recycle system apply only to EU countries and do not apply to countries in other areas of the world.
Your SANYO product is designed and manufactured with high quality materials and components which can be recycled and reused.
This symbol means that electrical and electronic equipment, at their end-of-life, should be disposed of separately from your household waste.
Please dispose of this equipment at your local community waste collection/recycling centre.
In the European Union there are separate collection systems for used electrical and electronic products.
Please help us to conserve the environment we live in!
■Symbols used in this manual
HINT Points giving some extended instructions or special points to pay attention to.
CAUTION Points that require special attention.
(page xx) Refer to the page indicated for detailed information.
You may find the answers to questions or problems concerning camera operation in the sections “COMMONLY ASKED QUESTIONS” (page 114) and “TROUBLESHOOTING” (page 120).
SHOOT, PLAYBACK AND SAVE
Install the battery
1 Open the battery/card compartment cover, and insert the batteries.
- The battery/card compartment cover is located on the bottom of the camera.
• The Shooting Screen appears.
iii English
Shooting
• The shooting mode menu appears.
Single-shot
• The shooting mode is indicated by an icon in the upper left area of the monitor.
Single-shot mode:
A still image is captured.
Sequential shots mode:
Shooting begins. Release the shutter button to discontinue shooting.
Video clip recording mode:
Recording begins. To stop recording, press the shutter button again.
:Single-shot mode
Sequential shots mode
:Video clip recording mode
Playback
■Still image playback
• The display switches to the Playback Screen.
■Video clip playback
• The display switches to the Playback Screen.
Playback of the selected video clip begins.
If the playback button [▶] is pressed again, the display changes to the Shooting Screen.
Playback button [▶]
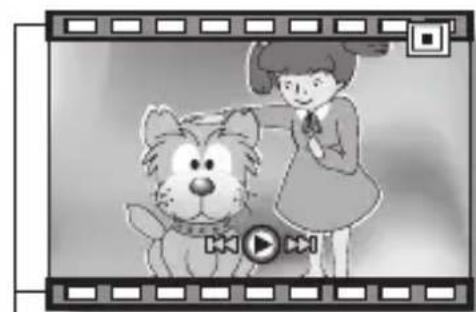
natural_image
Illustration of a girl standing beside a cartoon lion, framed within a filmstrip border (no text or symbols)
Video clip pattern
When you are finished taking pictures...
Press the ON/OFF button to turn the camera off.
v English
CONTENTS
CONTENTS 1
QUICK SEARCH BY OPERATION 3
CHECKING THE INCLUDED ACCESSORIES 7
GETTING THE MOST OUT OF YOUR CAMERA 10
SYSTEM MAP 12
SETUP
PARTS NAMES 13
INSTALLING THE BATTERIES AND CARD 15
TURNING THE CAMERA ON AND OFF 18
DATE AND TIME SETTING 20
■ BASIC OPERATION
BEFORE TAKING PICTURES 23
CAPTURING AND PLAYING BACK STILL IMAGES 32
SHOOTING SEQUENTIAL SHOTS 41
VIDEO CLIP RECORDING AND PLAYBACK 42
USING THE SCENE FUNCTION 46
USING THE ZOOM 51
FLASH SETTING 52
SELF-TIMER 54
FOCUS RANGE 56
■ SHOOTING
ACCESSING THE RECORDING MENU 58
TOUCH SENSOR (TOUCH FOCUS) SETTING 61
RESOLUTION/VIDEO SIZE SETTING 62
FOCUS AREA SETTING 65
ISO SENSITIVITY 67
WHITE BALANCE 68
EXPOSURE CORRECTION 69
DATE IMPRINT 70
1 English
■ PLAYBACK
DISPLAYING THE PLAYBACK MENU 71
IMAGE PROTECT 73
ROTATE IMAGE 75
CHANGING IMAGE SIZE (RESIZE) 76
COPY DATA 77
PRINT SETTINGS 79
SLIDESHOW PLAYBACK 84
DISPLAYING IMAGE PROPERTIES (INFORMATION SCREEN) .....85
OPTION
DISPLAYING THE OPTION MENU 86
SOUNDS 89
POST-VIEW SETTING 91
SCREEN LANGUAGE 92
TV SYSTEM SETTING 93
AUTO POWER OFF FUNCTION 94
FILE No. RESET FUNCTION 95
INITIALIZING THE CARD MEMORY AND INTERNAL MEMORY .....98
RESETTING THE CAMERA SETTINGS ....100
CHECKING THE REMAINING INTERNAL MEMORY AND CARD MEMORY ....101
CHECKING THE REMAINING BATTERY CHARGE 103
■ OTHER DEVICES AND CONNECTIONS
CONNECTING TO A TV 105
DIRECT PRINTING 106
■ APPENDICES
COMMONLY ASKED QUESTIONS 114
TROUBLESHOOTING 120
SPECIFICATIONS 126
HINTS FOR TAKING PICTURES 133
QUICK SEARCH BY OPERATION
Your camera has an abundance of convenient features and functions. From creating precisely the photo you want, to viewing images using various techniques, you can locate the exact operation for your purposes in the following table.
Shooting/recording Basic operation Convenient functions Additional functions Getting started shooting“Recording a video clip” on page 42“Shooting single shots” on page 32“SHOOTING SEQUENTIAL SHOTS” on page 41 Change the setting to sequential shots“How to use the best shot feature” on page 49Log the date and time of your photos“DATE AND TIME SETTING” on page 20Zoom in on the subject“USING THE ZOOM” on page 51Close-up photography“FOCUS RANGE” (macro mode) on page 56 For more accurate focus“FOCUS RANGE” (manual focus) on page 56Set the focus to a narrow range“FOCUS AREA SETTING” on page 65Check the focus status“Zoom jump playback” on page 38 Optimize the photo quality“RESOLUTION/VIDEO SIZE SETTING” on page 62 Capture fast-moving subjects“USING THE SCENE FUNCTION” (sports mode) on page 46 Shoot in dark conditions“EXPOSURE CORRECTION” on page 69“FLASH SETTING” on page 52“USING THE SCENE FUNCTION” (night view mode/fireworks mode/lamp mode) on page 46 Increase the camera’s sensitivity“ISO SENSITIVITY” on page 67 Photographing people“USING THE SCENE FUNCTION” (portrait mode/night view mode/face chaser mode) on page 46“FLASH SETTING” (red-eye reduction) on page 52 Photographing landscapes“USING THE SCENE FUNCTION” (landscape mode) on page 46 Take a self-photo“SELF-TIMER” on page 54 Make images lighter or darker“EXPOSURE CORRECTION” on page 69 Adjust the camera’s sensitivity“ISO SENSITIVITY” on page 67 Change the color of the images“USING THE SCENE FUNCTION” (monochrome/sepia) on page 46 Make white appear natural“WHITE BALANCE” on page 68
QUICK SEARCH BY OPERATION
Playback Basic operation Convenient functions Additional functions Getting started viewing images• “Playing back the video clip” on page 43 Adjust the playback volume• “SOUNDS” on page 89 • “Viewing still images” on page 34 Search for image data• “9-image display playback” on page 35• “Quick scroll playback” on page 36Magnify an image• “Magnifying (zooming in) the image” on page 37 Check the focus status• “Zoom jump playback” on page 38Change the angle of view• “ROTATEIMA page 75 Slideshow playback• “SLIDESHOW PLAYBACK” on page 84 Adjust the monitor brightness• “Adjust the monitor brightness” on page 30 Playback on a TV• “CONNECTING TO A TV” (for playback) on page 105 Set the TV system• “TV SYSTEM SETTING” on page 93
Data managing/processing Basic operation Convenient functions Additional functions Copy files from the internal memory to the card, or vice versa• “COPY DATA” on page 77 Delete files• “Erasing files” on page 39 Protect images from accidental erasure• “IMAGE PROTECT” on page 73Format a card• “INITIALIZING THE CARD MEMORY AND INTERNAL MEMORY” on page 98 Specify the number of prints and date imprint• “PRINT SETTINGS” on page 79 View the settings that were in effect when the image/audio data was recorded• “DISPLAYING IMAGE PROPERTIES (INFORMATION SCREEN)” on page 85
CHECKING THE INCLUDED ACCESSORIES
\- Handstrap: 1 • SANYO Software Pack
(CD-ROM): 1

natural_image
Simple line drawing of a keychain with a loop handle (no text or symbols)

• AA alkaline batteries: 2 (batteries made exclusively to be used as included accessories)
• Dedicated USB interface cable: 1

natural_image
Two cylindrical rolled-up batteries, no text or symbols visible

natural_image
Illustration of a USB cable with connector port (no text or symbols)
• Dedicated AV interface cable: 1
\- "SAFETY MANUAL" (safety precautions booklet) Please read this booklet carefully before using the digital camera.

natural_image
Illustration of a coiled cable with two connectors and a central connector (no text or symbols)

\- Quick Guide

natural_image
Illustration of two overlapping credit cards with card designs (no text or symbols)
7 English
Attaching the handstrap

natural_image
Three-step diagram showing cable installation of a device from left to right, with no text or symbols present.
CHECKING THE INCLUDED ACCESSORIES
The types of card that can be inserted into and used with this camera are:
- SD Memory Card
- Multi Media Card
What "card" means in this manual
- In this manual, SD Memory Cards and Multi Media Cards that can be used in this digital camera are referred to as “card”.
- The cards in the illustrations in this manual are SD Memory Cards, but all installation and removal procedures are the same for both SD Memory Cards and Multi Media Cards.
GETTING THE MOST OUT OF YOUR CAMERA
It's loaded with lots of functions that are possible only in a digital camera, including a super-quick focus, an easy-to-understand guidance display on a large screen, a more extensive scene function, and more.
You'll never miss a photo opportunity, thanks to the quick focus: Touch focus (see page 61)
Just touch the shutter button lightly, and the touch sensor automatically focuses the image (touch focus).

GETTING THE MOST OUT OF YOUR CAMERA
■Abundant scene functions
You can select from a variety of preset settings (aperture, shutter speed, etc.) for specific shooting conditions.

■Speedy mode-switching
Switch the shooting mode from still images to video clips to sequential shots with a single button operation.

11 English
SYSTEM MAP
The included accessories can be used to connect your camera to a computer, printer or TV. By connecting the camera to your computer, you can, for example, copy your photos to the computer's hard disk. You can connect it to a printer for direct printing of your photos. Or take the card to a photo shop to have your photos printed there.

flowchart
graph TD
    A["Camera"] --> B["Dedicated USB interface cable"]
    A --> C["Dedicated AV interface cable"]
    B --> D["Computer"]
    C --> E["Printer"]
    D --> F["Internet"]
    E --> G["TV"]
    H["Commercially available SD Memory Card/Multi Media Card"] --> I["Card reader"]
    H --> J["DPOF-compatible printer"]
    H --> K["Photo shop"]
PARTS NAMES
Front

Bottom

Rear

INSTALLING THE BATTERIES AND CARD
Your camera has an internal memory, which means that you can take photos even when no card is installed. By using a card, however, you will be able to take many more photos.
The card can be used after it has been formatted with the camera (page 98).
1 Open the battery/card compartment cover.
\- While gently pressing the battery/card compartment cover, slide it open.
Battery/card
compartment cover

natural_image
Diagram of a microwave oven with internal components and a black arrow indicating rotation (no text or symbols)
2 Insert the batteries.
\- Make sure that the batteries' polarities (+ and ⊖) are correct.

15 English
3 Insert the card.
\- Firmly insert the card until it clicks into place.

4 Close the battery/card compartment cover.
When removing the card...
• To remove the card, press it down, and then release. The card will protrude slightly, and you can then pull it out.
Keep your finger on the card until it is completely inserted or released.
\- If you remove your finger too soon, the card may spring out and become lost or hit someone in the eye.

INSTALLING THE BATTERIES AND CARD
CAUTION
Be careful when removing the card.
- Do not attempt to forcibly remove the card.
- Never remove the card when the camera is connected to a computer or printer, or when the self-timer indicator is flashing quickly. In doing so, you risk losing the data stored in the card.
Manganese batteries cannot be used.
\- Not only do manganese batteries have a short battery life, but there is the danger of their overheating and causing damage to the digital camera.
Other batteries
- If you wish to use batteries other than the alkaline batteries (LR6), we recommend the following.
- AA-size nickel metal hydride (NiMH) rechargeable batteries (SANYO HR-3UTG) × 2
- AA-size Ni-Cd batteries (SANYO N-3UV) × 2
When installing the batteries, make sure that they are oriented correctly.
Do not open the battery/card compartmnet cover when the camera is turned on.
\- If the battery/card compartment cover is opened while the power is on, important data may be lost. Sanyo Electric shall not be held responsible for any losses that result from failure to comply with this warning.
HINT
Shooting without a card installed
\- When a card is installed, images are recorded to and played back from the card. When no card is installed, images are recorded to and played back from the camera's internal memory. When the camera is turned on with no card installed, the internal memory icon is shown on the monitor to let you know that the images you capture will be saved to the camera's internal memory.
About the internal backup battery
\- This camera's internal battery serves to maintain the date and time settings, as well as the shooting settings. The backup battery will be fully charged when the batteries are kept in the camera continuously for about 2 days. In the fully charged state, the backup battery will maintain the camera settings for about 7 days.
When not using the camera for a long time, remove the batteries.
\- A small amount of power is still used even if the camera is turned off, and it is therefore recommended that the batteries be removed from the camera if it is not going to be used for a long time. Note that when the batteries are removed for a long period, the time and date settings may be cleared. Before using your camera again, be sure to confirm that the camera settings are correct.
TURNING THE CAMERA ON AND OFF
Turning on the camera
In the shooting mode
• The camera turns on.
• The camera turns on in the shooting mode that was active before it was last turned off.
In the playback mode
• The Playback Screen appears on the monitor (pages 34 and 43).

Turning off the camera
• The camera turns off.
- When the playback button [▶] or ON/OFF button is pressed, the camera turns off.
TURNING THE CAMERA ON AND OFF
About the auto power off function
In order to preserve battery power when, for example, the camera has accidentally been left on, the camera is furnished with an “auto power off” function by which the camera automatically turns off after a certain period of inactivity (about 1 minute during shooting or about 3 minutes during playback [factory default settings]).
- If the auto power save function has operated to turn the camera off, press the ON/OFF button to turn it back on.
- You can change the setting for the time elapsed before the camera automatically turns off (page 94).
- When the camera is connected to a computer or printer using the dedicated USB interface cable, the auto power save function is disabled, and the camera turns off after about 12 hours.
HINT
If the Ⓛ? icon appears...
\- When a picture is taken, the date and time it was captured is recorded with it. When the date and time cannot be recorded with the image because the date and time have not yet been set (page 20), the 🔊? icon appears. To have the date and time recorded with images, please make this setting before capturing images.
DATE AND TIME SETTING
The camera will record the date and time an image is captured so that you can display them during playback. Therefore, before capturing images, make sure the correct date and time are set.
Example: To set the clock to 7:30 p.m. on December 24, 2006
• The Recording Menu appears (page 58).

• The Option Menu appears.
• The Clock Set Screen appears.
• The current date and time settings are shown.
- Follow the procedures below to enable or disable the date display during playback, to set the display format for the date, and to set the date and time.
• To return to the Option Menu, press the MENU button.


DATE AND TIME SETTING
4 Set the date and time.
① Press the [▲] or [▼] button to change the year indication.
- Repeat these steps to select the month indication and day indication, and set the date to December 24, 2006.
② Press the SET button or the [▶] button to select the time indication.
③ Press the [▲] or [▼] button to change the time setting.
④ Press the [▶] button to select the Y/M/D indication.
⑤ Press the [▲] or [▼] button to change the displayed date order.


\- Press the [▼] button to change the displayed date order as follows:

flowchart
graph LR
    A["→ Y / M / D → M / D / Y → D / M / Y → DISP OFF"] --> B[" "]
\- Press the [▲] button to change it in the reverse order.
21 English
- The date and time setting is completed, and you are returned to the Option Menu.
- The Option Menu is canceled when the MENU button is pressed.
HINT
\- Under normal conditions, while the batteries are being replaced, an internal battery will maintain the date and time settings. However, there is a small chance the settings may be lost. (The backup will last for about 7 days.) It is recommended to check that the date and time settings are still correct after replacing the batteries and before shooting or recording of any type (follow steps 1 to 3).
To correct the date and time settings
\- In step 4, select the indication that you want to change, and follow the procedure to change the indication.
BEFORE TAKING PICTURES
How to hold the camera
Hold the camera securely, keeping your elbows close to your body and making sure the camera is stable.
Correct hold Incorrect hold

natural_image
Line drawing of a person holding a camera (no text or symbols)

natural_image
Line drawing of a person holding a camera (no text or symbols)
A finger is blocking the lens or flash.
Make sure that the lens and flash are not blocked by your fingers or the handstrap.
HINT
- Images captured in the still image shooting mode can be rotated when they are played back (page 75).
- When the optical zoom is used or when the autofocus is operating, the image may appear to waver, but this is not a malfunction.
About the touch sensor (touch focus)
With the touch sensor, the image is focused simply by a light finger-touch on the shutter button (focus lock). With the subject in focus, just gently press the shutter button to take the picture for a perfectly focused image.
At the same time, the touch sensor is temporarily deactivated whenever the Recording Menu (page 58) is displayed, thereby facilitating operation of these screens.
Furthermore, you can also deactivate the touch sensor so that the autofocus operates only when you press the shutter button halfway (page 61).

natural_image
Line drawing of a digital camera with a face on screen and a hand adjusting the lens (no text or symbols)
BEFORE TAKING PICTURES
Using the autofocus
The autofocus will work in almost all situations; however, there are certain conditions that may cause the autofocus function to not work properly. If the autofocus function is not working properly, set the focus range to capture images (page 56).
■Conditions that may cause incorrect focus
The following examples are some of the situations where the autofocus function may not work.
\- Subjects with low contrast, very bright subjects at the center of the image or dark subjects or locations
Use the focus-lock function to lock the focus on an object with contrast at the same distance as the desired subject.

natural_image
Illustration of a cartoon-style car with smoke and explosion effects (no text or symbols)
\- Subjects without vertical lines
Use the focus-lock function to lock the focus while framing the subject vertically, then re-orient the camera to compose a horizontally framed image.

natural_image
Simple line drawing of a potted tree with horizontal striped background (no text or symbols)
The following examples are some of the situations where the autofocus function may work, but not as desired.
- When both near and far objects are present
Use the focus-lock function to lock the focus on an object at the same distance as the desired subject, then reposition the camera to compose the picture.

natural_image
Illustration of a panda sitting in a cage with vertical bars (no text or symbols)
- Fast-moving subjects
Use the focus-lock function to lock the focus on an object at the same distance as the desired subject, then reposition the camera to compose the picture.

natural_image
Illustration of a soccer player kicking a ball (no text or symbols)
BEFORE TAKING PICTURES
Switching between the shooting mode and playback mode
1 Press the ON/OFF button to turn the camera on.
2 Press the playback button [▶].
• Each time the playback button is pressed, the camera switches between the shooting mode and the playback mode.


natural_image
Illustration of a woman wearing a beret and coat, with date stamp '2006.12.24' (no text or symbols on the figure itself)
HINT
To turn the camera on in the playback mode
\- Press the playback button [▶] for at least 1 second, and the camera will turn on in the playback mode.
27 English
How to switch the shooting mode
Your camera can capture single still photos (single-shot mode), record video clips (video clip recording mode), and also capture a series of still photos (sequential shots mode).
• The screen to set the shooting mode and the self-timer appears.
• The selected shooting mode is set.
- An icon in the upper left area of the monitor indicates the active shooting mode setting.

BEFORE TAKING PICTURES
Switching the display mode
In the shooting mode, you can select the either the “settings display mode” which allows you to confirm the shooting settings on the monitor while you shoot, or the “normal display mode” in which the setting indications are turned off, providing a full view of the subject.
• Each time the SET button is pressed, the camera switches between the settings display mode and the normal display mode.


natural_image
Illustration of a woman wearing a beret and coat, with no visible text or symbols
Adjust the monitor brightness
The brightness of the monitor is adjustable. Adjust the brightness to the optimum readability in the ambient light.
1 Press the ON/OFF button to turn the camera on.
2 Press the MENU button for at least 1 second.
• The monitor brightness menu appears.
3 Press the [▲] and [▼] buttons to adjust the brightness.
\- When set to AUTO, the illumination sensor (page 14) detects the ambient brightness and automatically adjusts the brightness of the monitor accordingly.
4 Press the MENU button.
• The monitor brightness is set, and the monitor brightness menu is canceled.

HINT
\- You can also adjust the monitor brightness by selecting "BRIGHTNESS" from the Option Menu (page 88).
BEFORE TAKING PICTURES
Hints for taking pictures
Muting the camera sounds
\- The operation sounds that are generated, for example, when the shutter button, MENU button or SET button is pressed, can be muted (page 89).
Where is the image data saved?
- All the image and sound data is recorded in the camera's internal memory or on the card installed in the camera.
- When a card is installed in the camera, the data is recorded on the card. If no card is installed, the data is recorded in the camera's internal memory.
Taking pictures in backlight conditions...
\- When taking pictures with the light coming from behind the subject, due to the characteristics of the CCD, light lines or ghost patterns (flare phenomenon) may appear in the captured image. In this situation, it is recommended that you avoid taking pictures with the subject lit from behind.
Switching the guidance display ON/OFF
\- Press the [◀] button. Each time the [◀] button is pressed, the guidance display switches between ON and OFF.

CAPTURING AND PLAYING BACK STILL IMAGES
There are two modes for capturing still images. In the normal still image mode, one image is captured each time the shutter button is pressed. In the sequential shots mode, when you press the shutter button, several successive images are captured. For more information about taking sequential shots, please see page 41.
Shooting single shots
1 Set the camera to the single-shot mode (page 28).
\- If the touch sensor (page 61) has been set to ON, when the shutter button is touched, the autofocus operates and the image is focused (focus lock).

\- Engage the autofocus by pressing the shutter button halfway.


CAPTURING AND PLAYING BACK STILL IMAGES
- Press the shutter button gently, taking care not to move the camera.
- The image that was captured appears on the monitor as long as the shutter button is kept pressed (post view).

\- The captured image is recorded.
HINT
When the focus mode (page 65) is set to the 9-point focus mode 9-AF...
- A target mark [] on the monitor shows the area the camera is focusing on.
- The camera automatically determines the correct focus by measuring from 9 different focus points within the shooting area. If the target mark is at a position that is different from the point you wish to focus on, you can refocus, for example, by changing the shooting angle.
- The large target mark appears when the camera focuses on a wide area in the center of the screen.
About the focus indicator
\- A green focus indicator appears when the subject is successfully focused, or a red focus indicator when the camera was not able to focus the subject.
The shutter speed and aperture are displayed
\- The shutter speed and aperture settings are also displayed on the monitor. You can use them as a reference when shooting.
If the motion alert icon appears...
- During still image shooting, if the
shutter speed is slow and the possibility that the image may be blurred due to camera shake becomes high, the motion alert icon may appear on the monitor. In this case, use a tripod to stabilize the camera when shooting, or set the flash operation mode to automatic (page 52).
- When shooting with the fireworks 📄 scene function, the motion alert icon always appears, but this is normal.

Motion alert icon

Viewing still images
The steps for viewing both single shots and sequential shots are the same.
5
- If the playback button [▶] was pressed to turn the camera on, however, press the playback button [▶] for at least 1 second.
• The image most recently captured appears on the monitor.
6
View other images.
\- Press the [◀] or [▶] button to display the previous or next image.
To display the previous image:
Press [◀].
To display the next image: Press [▶].
\- To return to Shooting Screen, press the playback button [▶].
\- When the playback button [▶] or ON/OFF button is pressed, the camera turns off.

When you are finished viewing images...
\- Press the ON/OFF button to turn the camera off.
HINT
For still images with voice memo (page 48)...
\- When the shutter button is pressed, the voice memo is played back.
CAPTURING AND PLAYING BACK STILL IMAGES
9-image display playback
1 Press the playback button [▶].
2 Press [W] ([☐]) on the zoom switch.
• The 9-image display appears.
3 Select the image to play back.
\- Press the arrow buttons to move the orange frame to the desired image, and press the SET button. Instead of pressing the SET button, you can press [T] ([○]) on the zoom switch to show the image full screen.

A convenient way to quick-search when there are many images.
1 Access the 9-image display screen (page 35).
2 Press [W] ([☐]) on the zoom switch.
- The Quick Scroll Playback Screen appears.
- Press the [◀] or [▶] button to display the previous or following image.
- You can press the [▲] or [▼] button to move back or forward 9 files at a time.

\- The selected image is shown full-screen.
CAPTURING AND PLAYING BACK STILL IMAGES
Magnifying (zooming in) the image
1 Display the image that you want to magnify.
2 Press [T] ([○]) on the zoom switch.
• Magnification is enabled.
- The image is magnified, and the central portion of image is displayed.
- Press the arrow buttons to view different parts of the magnified image.
To magnify:
Magnification increases with each press of [T] ([○]) on the zoom switch.
To return to normal size:
Magnification decreases with each press of [W] ([☐]) on the zoom switch.
\- Press the SET button to return to the normal (100%) view.

HINT
The magnified portion of the image can be saved as a separate image.
\- Press the shutter button. The magnified portion is saved as a new still image.
Zoom jump playback
You can magnify a portion of a still image to check the accuracy of the focus.
1 Display a still image to view using zoom jump playback.
• The image is magnified.
- If the magnified view appears to be in focus, then the overall image will be in focus.
• The displayed area is further magnified.
To magnify further: Magnification increases with each press of [T] ([○]) on the zoom switch.
To go back:
Magnification decreases with each press of [W] ([☐]) on the zoom switch.
\- Press the SET button again to return to the normal size (100%) screen.


CAPTURING AND PLAYING BACK STILL IMAGES
Erasing files
You can erase files that are stored on the card if you no longer need them. You can erase the files one at a time, or all at once.
1 To erase data from the card, perform the delete procedure with the card installed in the camera. To erase data from the camera's internal memory, remove the card before performing the delete procedure.
2 Set the camera to the playback mode, and press the [▲] button.
• The Delete Screen appears.
ALL FILES:
Erases all the data.
1 FILE:
Erases one file at a time.

3 Delete the files.
① Use the [◀] and [▶] buttons to view the images and check if it is OK to delete all the files.
② Press the [▲] or [▼] button to select "ALL FILES".
③ Press the SET button.
\- The Delete Confirmation Screen appears. To erase the files, select "YES", and press the SET button. When the file delete is completed, "No image" is shown.
CAUTION
About protected images
\- Files that are protected from accidental erase cannot be erased. To erase protected files, set the protect setting for the file to off (page 73), and then follow the file delete procedure.
SHOOTING SEQUENTIAL SHOTS
When the shutter button is pressed, still images are captured in succession.
1
Set the camera to the sequential shots mode (page 28).
\- If the resolution is set to 10M , the setting changes automatically to 7M .
2
\- Shooting sequential shots begins.
Sequential shots icon

Resolution Max. no. of shots 7M Approx. 6 shots 4M Approx. 3 shots 2M Approx. 7 shots 0.3M Approx. 37 shots
\* The maximum number of sequential shots will differ depending on the subject.
\- Note that if the shutter button is released during shooting, shooting stops immediately.
HINT
About the focus when shooting sequential shots
- When sequential shots are captured, the autofocus operates when the focus lock is activated, fixing the focus.
- Shooting sequential shots at a resolution of 10M is not possible. If the resolution is set to 10M , it automatically changes to 7M .
Can the self-timer and/or flash be used?
- The self-timer and flash do not operate when shooting sequential shots.
- The following scene functions cannot be set.

VIDEO CLIP RECORDING AND PLAYBACK
Recording a video clip
1 Set the camera to the video clip recording mode (page 28).
2 Press the shutter button.
• Video clip recording begins. During recording, the length of the video clip and the remaining recording time available are shown on the monitor.
- It is not necessary to continue pressing the shutter button while shooting.
3 End the recording.
\- Press the shutter button again to stop recording and save the video clip.

VIDEO CLIP RECORDING AND PLAYBACK
Playing back the video clip
- If the playback button [▶] was pressed to turn the camera on, however, press the playback button [▶] for at least 1 second.
• The video clip just recorded appears on the monitor.
• Video clips are indicated by a video clip pattern along the top and bottom of the screen.
• Video clip playback begins.
• To stop playback, press the [▼] button.

Outline of playback operation
To do this... Do this Stop playback During playback, press the [▼] button Pause During playback, press the SET button.During accelerated or slow playback, press the [▲] button. To extract a still image While playback is paused, press the shutter button. To play back one image at a time (single-frame step) During forward playback While playback is paused, press the [▶] button. During reverse playback While playback is paused, press the [◀] button. Slow playback During forward playback While playback is paused, press and hold the [▶] button. During reverse playback While playback is paused, press and hold the [◀] button. To accelerate playback Forward playback During forward playback, press the [▶] button.* The playback speed changes each time the [▶] button is pressed, as follows:Normal playback → 2x → 5x → 10x → 15xPress the [◀] button to resume normal playback speed. Reverse playback During forward playback, press the [◀] button.* The playback speed changes each time the [◀] button is pressed, as follows:15x ← 10x ← 5xPress the [▶] button to resume normal playback speed. Return to normal playback speed Press the SET button. Adjusting the volume Louder: During playback, press [T] on the zoom switch.Softer: During playback, press [W] on the zoom switch.
VIDEO CLIP RECORDING AND PLAYBACK
When you are finished viewing video clips...
\- Press the ON/OFF button to turn the camera off.
CAUTION
If no audio is heard...
\- The audio is not played back when the video clip is played back in the frame-by-frame, slow playback, fast playback or reverse playback mode.
CAUTION
The data for a video clip is very large.
\- Therefore, be aware that if the video clip is uploaded to a computer to be played back, the computer may not be able to play back the video fast enough, making it appear jerky. (The video will always be displayed properly on the monitor.)
If video clip recording stops even when there is card memory remaining...
\- Depending on the card you are using, recording may stop even if there is remaining memory in the card.
\- For video clip recording, it is recommended that a high-speed memory card be used.
USING THE SCENE FUNCTION
You can select from a variety of preset settings (aperture, shutter speed, etc.) for specific shooting conditions.
1 Set the camera to the shooting mode (page 27), and press the SCENE button.
\- The screen to select the settings suitable for the scene (shooting conditions) appears.

Scene setting Features Shooting mode setting AUTOAuto The camera makes the optimum settings. ○ ○ ○ Sports Capture a split-second image of a fast-moving subject. ○ ○ ○ Portrait Enhance the three-dimensional feel of the subject by blurring the background. ○ ○ ○ Landscape For beautiful shots of distant scenery. ○ × ○ Night view Photograph the subject while keeping the background night scenery. ○ × ○ Fireworks For capturing fireworks at night. ○ × ○ Lamp Photograph in low-light conditions ○ × ○
USING THE SCENE FUNCTION
Scene setting Features Shooting mode setting Shoot a still image and add a voice memo. ○ × × Minimize the effects of camera shake. ○ ○ × Four successive still images are captured as the exposure changes. ○ × × The subject's face is kept in focus and the exposure adjusted as the image is captured. ○ ○* ○* Create black-and-white photos. ○ ○ ○ Create sepia-tone photos. ○ ○ ○ Accentuates the light and dark areas in the image. ○ ○ ○ Accentuates the colors in the image. ○ ○ ○
○: Available ×: Not available
: Disabled during recording
• This completes the scene select setting.
• The display returns to the Shooting Screen.
- The scene function setting is shown on the monitor.

Scene function setting
(AUTO is not displayed)
47 English
Capture a still image with a voice memo
With the still-image-plus-audio 📁 scene function, you can add an audio track (about 10 seconds maximum) to a captured still image. This audio track is called a “voice memo”.
1 On the screen to select the scene function settings (page 46), select 📄, and press the SET button.
2 Press the shutter button to take the picture, then speak into the microphone.
- During recording, be careful not to obstruct the microphone with your fingers, for example.
- Audio recording begins. During recording, the length of the audio track and the remaining recording time available are shown on the monitor.
- The maximum recording time for a voice memo is about 10 seconds.
- To end the recording before 10 seconds has elapsed, press the shutter button.

USING THE SCENE FUNCTION
How to use the best shot feature
1 Set the camera to the single-shot mode; on the screen to select the scene function settings, select the best shot icon 📁 (page 46); and press the SET button.
\- If the resolution is set to 10M , the setting changes automatically to 7M and the images are captured.
- While the settings change, four still images are shot in sequence.
• After the images are captured, the four still images are displayed on the monitor.

- For a full-size view of the selected image, press the SET button.
- With the full-size view active, you can use the [◀] and [▶] buttons to view the previous or next image.
How to use the face chaser feature
To attain the best possible face shots, the camera automatically focuses on the face and adjusts the exposure.
1 On the screen to select the scene function settings (page 46), select the face chaser icon [icon], and press the SET button.
2 Aim the camera lens at the subject.
- The camera searches for the subject's face. When it detects the face, an orange frame appears.
- Do not touch the shutter button while the camera is searching. The camera cannot search when the autofocus is activated.

3 The focus locks on the subject (page 32).
• The camera focuses on the subject and the exposure is adjusted.
- When the face is in focus, the orange frame changes to green.
4 Press the shutter button.
• The image is captured.
HINT
\- When the focus mode is set to AF seeker AFO, the scene function setting automatically changes to auto AUTO.
USING THE ZOOM
Your camera has two zoom functions: optical zoom and digital zoom.
1
Set the camera to the shooting mode (page 27), and point the camera lens at the subject.
2
Press the zoom switch to compose the desired image.
[T]: Zoom in on the subject.
[W]: Zoom out.
- When the zoom switch is pressed, the zoom bar appears on the monitor.
- When the optical zoom factor is at maximum, zooming stops temporarily. When [T] on the zoom switch is pressed again, the mode changes to the digital zoom mode and zooming continues.
3
Take the picture.


When optical zoom only is enabled

When digital zoom only is enabled

HINT
Can't access the digital zoom?
\- The digital zoom cannot be used when the resolution is set to 10M, the face chaser [icon] scene function is active, or the focus mode is set to AF seeker AF.
Can't access the optical zoom?
\- When the focus range is set to pan PF or during video clip recording, the optical zoom cannot be used.
FLASH SETTING
The flash is used not only for taking pictures where there is insufficient light, but also when the subject is in shade or in backlight conditions. Your camera's flash has four modes of operation (auto mode, forced flash mode, flash off mode and red-eye reduction mode). Select the flash mode that is appropriate for the surrounding conditions. The flash can be enabled only when taking single-shot still images.
1
Set the camera to the single-shot mode (page 28), and press the [▲] (⚡) button.
• The flash menu appears.
A: The camera will detect the subject brightness and use the flash only when required. In a backlight situation, if only the center of the image is very dark, the flash will operate to compensate (auto).
The flash will operate with every image captured regardless of the conditions. Use this setting under backlight conditions, when the subject is in shade, under fluorescent lighting conditions, etc. (forced flash).
: The flash will not operate even in dark situations. Use this setting when capturing an image in a location where flash photography is prohibited, or when shooting a night landscape scene (flash off).
The digital camera will detect the subject brightness and use the flash only when required. At this time the flash will operate in a manner that reduces the red reflection (“red-eye”) in the subject’s eyes (red-eye reduction).

FLASH SETTING
2 Press the [▲] or [▼] button to select the desired flash mode, and press the SET button.
3 Press the shutter button.
\- The picture is snapped and the flash operates according to the selected mode.
HINT
When auto is selected...
\- The ⚡A icon indicating the flash setting is not shown on the Shooting Screen.
When auto or red-eye reduction is selected...
\- When the subject is in focus, if the camera determines that the flash is necessary, a ⏻A or ⏻icon appearing on the monitor indicates that the flash will operate.
SELF-TIMER
Self-timer photography is available in the single-shot mode.
1 Set the camera to the single-shot mode (page 28), and press the [▶] () button.
• The self-timer menu appears.
_2 : The image is captured about 2 seconds after the shutter button is pressed.
10: The image is captured about 10 seconds after the shutter button is pressed.
• The self-timer is set, and you are returned to the Shooting Screen.

Self-timer menu
SELF-TIMER
HINT
\- The countdown time until shutter release is shown graphically on the monitor.

pie
| Category | Value |
|---|---|
| On | 7M |
| (on) | 0.5 p.m. |
| F3.1 1/37 | 1 |
To pause or cancel the self-timer function...
\- If the shutter button is pressed again before the shutter is released, the self-timer countdown temporarily stops. Press the shutter button one more time to restart the self-timer.
\- To cancel self-timer photography, set the self-timer setting to off 📄.
\- After the self-timer picture is snapped, the self-timer is automatically reset to off.
When 10 is selected...
\- When the shutter button is pressed, the self-timer indicator flashes for approximately 10 seconds, after which shooting begins.
\- About 3 seconds before shooting, the self-timer indicator flashes faster.

FOCUS RANGE
1
Set the camera to the shooting mode (page 27), and press the [▼] (♥) button.
• The focus range menu appears.
PF: The focus operates within the ranges shown below (pan).
2
Press the [▲] or [▼] button to select the desired focus range, and press the SET button.
\- The specified focus range is set, and the camera returns to the Shooting Screen.
HINT
\- In the single-shot mode and sequential shots mode, when the focus range is set to macro 📋, the zoom is automatically set to one step from the wide end. When the focus range is set to pan PF, the zoom is automatically set to the Wide end.
FOCUS RANGE
How to use the manual focus
\- The focus distance adjustment bar appears.
\- The focus distance is set, and you are returned to the Shooting Screen.

HINT
About the focus range
- The focus distance indication shows the distance between the lens surface and the subject.
- In some cases there may be a slight variance between the distance (numerical figure) you set in the manual focus mode and the actual distance. Use the monitor to confirm the focus and compose the photo.
About zoom movement when using the manual focus
- If the focus distance is set to 50 cm (19.69 in.) or less, the zoom changes to the largest setting that is suitable for that focus distance.
- When the focus distance is set to 50 cm (19.69 in.) or less, the zoom will function only within the range at which the image is focused.
Detailed shooting settings are accessed from the Recording Menu.
1 Set the camera to a shooting mode (page 28).
• The Recording Menu corresponding to the shooting mode set in step 1 appears.
• The Recording Menu can be canceled by pressing the MENU button.


\- ⑦ is displayed when you press the [▲] or [▼] button to scroll.
① Touch sensor menu (page 61)
[1] : Set the shutter button touch sensor to ON.
: Set the shutter button touch sensor to OFF.
② Resolution menu/video size menu (page 62)
10M: Shoot at 3,680 × 2,760 pixels (single-shot mode only
7M: Shoot at 3,072 × 2,304 pixels
4M: Shoot at 2,288 × 1,712 pixels
2M: Shoot at 1,600 × 1,200 pixels
0.3M: Shoot at 640 × 480 pixels
WEB: Shoot at 320 × 240 pixels
TV: Shoot at 640 × 480 pixels
☐: Make an audio recording (page 63)
③ Focus mode menu (page 65)
9-AF: 9-point focus mode
S-AF: Spot focus mode
AFO: The focus follows the focus-locked subject.
④ ISO sensitivity menu (page 67)
ISO-A: Sets the ISO sensitivity automatically (corresponds to ISO50 to 200).
50: Corresponds to ISO50
100: Corresponds to ISO100
200: Corresponds to ISO200
400: Corresponds to ISO400
800: Corresponds to ISO800
⑤ White balance menu (page 68)
AWB: The camera will determine the setting automatically.
☀️: For photography in fair weather (sunny) conditions
: In overcast conditions
: Under fluorescent lighting
: Under incandescent lighting
☐: For setting the most accurate white balance
⑥ Exposure correction menu (page 69)
\- Change the brightness of the image.
⑦ Date imprint menu (page 70)
\- Imprint the capture date on still images.
\- When you specify multiple functions that cannot be simultaneously enabled, the function which was last set becomes the active setting, and the other settings accordingly change automatically.
TOUCH SENSOR (TOUCH FOCUS) SETTING
The touch sensor function, by which the autofocus is activated by a finger-touch on the shutter button, can be set to ON or OFF. When the touch sensor function is set to OFF, the autofocus is activated when you press the shutter button halfway; then gently press the shutter button to snap the picture.
• The sensor menu appears.
: The touch sensor function is set to ON.
: The touch sensor function is set to OFF.
\- The selected touch sensor function is set.
CAUTION
- When the camera is attached to a tripod, the touch sensor sensibility may be diminished. This happens because the touch sensor works by detecting changes in the capacitance when the camera is touched with bare hands. The touch sensor sensibility will also be diminished, for example, if you hold the camera with gloved hands.
- When the camera is used near inverter-type fluorescent lights, the touch sensor sensitivity may be diminished.
RESOLUTION/VIDEO SIZE SETTING
By setting the image resolution (pixels) to a higher setting, image detail is enhanced for a smoother, finer picture. However, the file size also becomes large and uses more memory. Select the resolution setting that suits your purpose.
\- The resolution menu or video size menu appears.
RESOLUTION/VIDEO SIZE SETTING
Record and play back an audio file
In the video clip recording mode, your camera can make audio recordings. The audio recordings are monaural.
■Record an audio file
1 Display the Recording Menu for the video clip recording mode (page 58).
2 Select the audio recording icon from the video size menu, and press the SET button.
3 Press the MENU button.
• The recording mode is enabled.
4 Press the shutter button.
- Audio recording begins. During recording, the length of the audio track and the remaining recording time available are shown on the monitor.
- It is not necessary to continue pressing the shutter button while recording.
• Take care not to cover the microphone with your fingers.

5 End the recording.
\- Press the shutter button again to stop recording.
1 Display the desired audio data.
• A musical note graphic appears on the screen.

2 Play back the recording.
To do this... Do this Forward playback Press the SET button. Stop playback During playback, press the [▼] button Pause During playback, press the SET button.During fast forward or fast reverse, press the [▲] button. Fast forward During forward playback, press the [►] button.* The speed changes each time the [►] button is pressed, as follows:Normal playback → 2x → 5x → 10x → 15xPress the [◄] button to resume normal speed. Fast reverse During forward playback, press the [◄] button.* The speed changes each time the [◄] button is pressed, as follows:15x ← 10x ← 5xPress the [►] button to resume normal speed. Return to normal playback speed Press the SET button. Adjusting the volume Louder: During playback, press [T] on the zoom switch.Softer: During playback, press [W] on the zoom switch.
HINT
\- During 5x or faster accelerated playback, the audio is not played back.
FOCUS AREA SETTING
You can choose from different types of autofocus:
9-point range finder focus:
The correct focus is determined from 9 different focus points within the shooting area visible on the monitor. When the image is focused, a target mark [] appears.
Spot focus:
The camera focuses on the subject in the center of the monitor.
AF seeker:
Once the focus is locked on a subject (page 32), it follows the subject. The focus point automatically changes to remain continuously focused on a moving subject.
\- The focus mode menu appears.
9-AF: 9-point range finder focus is selected (page 33).
S-AF : Spot focus is selected.
AFO: AF seeker is selected.
\- When the S-AF or AFO setting is selected, the focus mark appears in the center of the monitor.
\- The focus area is set.

Focus mark
HINT
When spot focus is selected...
\- The focus mark + appears in the center of the monitor.
When AF seeker is selected...
- The focus mark + appears in the center of the monitor.
- When the focus-lock is activated, the seeker mark appears on the focused subject.
- During focus-lock, even if the focused subject moves, the seeker mark automatically follows the subject.
- If the camera loses the focus-lock on the subject, the seeker mark disappears.
- In dark environments, the seeker mark may follow the subject more slowly.
- When the AFO setting is selected, the digital zoom is not available.
- When the focus mode is set to AF seeker AFO, the scene function setting automatically changes to auto AUTO.

Seeker mark
ISO SENSITIVITY
With the initial settings, the ISO sensitivity is automatically set according to the brightness of the subject. However, the ISO sensitivity can be set to a fixed setting.
• The ISO sensitivity menu appears.
ISO-A: Sets the ISO sensitivity automatically (equivalent to ISO50 to 400 [video clip recording mode: ISO450 to 3,600]).
50: Sets the sensitivity to ISO50 equivalent (video clip recording mode: ISO450).
100: Sets the sensitivity to ISO100 equivalent (video clip recording mode: ISO900).
200: Sets the sensitivity to ISO200 equivalent (video clip recording mode: ISO1,800).
400: Sets the sensitivity to ISO400 equivalent (video clip recording mode: ISO3,600).
800: Sets the sensitivity to ISO800 equivalent (video clip recording mode: ISO7,200).
• The ISO sensitivity is set.
HINT
\- By setting a higher ISO sensitivity, you can set higher shutter speeds and capture images in darker locations, but noise in the captured images may increase.
CAUTION
Does the image appear to flicker when recording a video clip?
\- If recording a video clip under fluorescent lights with the ISO sensitivity set to 400 or higher, a noticeable flicker may appear in the image.
67 English
WHITE BALANCE
This camera automatically adjusts the white balance under most lighting conditions. However, if you want to specify the lighting conditions or change the overall tone of the image, the white balance can be manually set.
• The white balance menu appears.
AWB: The camera will make the white balance adjustment automatically based on the natural and artificial light conditions. This is the setting used in the auto mode.
☀️: For shooting outside on a sunny day.
☐: For shooting outside on a cloudy day.
☐: For shooting inside under fluorescent lighting.
☐: For shooting inside under incandescent lighting.
☐: For more accurate adjustment or when the light source cannot be specified (one-push).
Select the ☐ icon from the white balance menu, fill the entire screen with a plain white paper, and press the SET button to set the white balance. To use any of the other white balance settings, proceed to step 3.
\- This completes the white balance setting.
HINT
To cancel the white balance setting
\- Perform steps 1 and 2, select AWB, and then press the MENU button.
EXPOSURE CORRECTION
When capturing images, you can make the image lighter or darker.
1 Point the camera lens at the subject, and display the Recording Menu (page 58).
2 Select "EXPOSURE" and press the SET button.
• The screen to adjust the exposure appears.
3 Use the [▲] and [▼] buttons to select the desired exposure numerical value, and press the SET button.
\- The specified exposure is set, and you are returned to the Recording Menu.
HINT
\- The exposure correction setting returns to ± 0 after the camera is turned off.
DATE IMPRINT
You can choose to have the date the image was captured imprinted on the image.
1 Display the Recording Menu (page 58).
2 Select "INSERT DATE ON IMAGE", and press the SET button.
- The date imprint menu appears.
ON: The date of the capture is imprinted on the image.
OFF: The date of the capture is not imprinted on the image.
3 Press the [▲] or [▼] button to select the desired setting, and press the SET button.
\- The date imprint mode is set, and you are returned to the Recording Menu.
HINT
About the capture date and date imprinting
\- When an image is edited, the date of the image file changes to the date and time the image was edited. However, the imprinted capture date remains unchanged.
Is the sequential shots speed slow?
\- When the date imprint mode is set to "ON", the sequential shots speed may become slower.
If the imprinted date is shown as [----] ...
\- The date and time settings have not yet been completed. Set the camera to the correct date and time (page 20).
The Playback Menu is used to adjust your camera's playback settings.
1
• The display changes to the Playback Screen.
2
• The Playback Menu appears.
- The Playback Menu is canceled when the MENU button is pressed.
Playback button [▶]

natural_image
Diagram of a digital camera module showing front, back, and screen views with adjustment knobs (no text or labels)
MENU button

PROTECT
ROTATE
RESIZE
FILE COPY
PRINT INSTRUCTIONS
SLIDESHOW

① [Protect] (page 73)
\- Protect data from accidental erasure (write protect).
② [Rotate image] (page 75)
\- Rotate still images.
③ [Resize] (page 76)
\- Reduce the resolution of a still image.
④ [File copy] (page 77)
\- Copy files from the card to the internal memory, or vice versa.
⑤ [Print instructions] (page 79)
\- Specify the print settings.
⑥ [Slideshow] (page 84)
\- Play back the images in a slideshow format.
IMAGE PROTECT
Prevent accidental erasure of data.
1 Display the data that you want to protect from accidental erasure, and display the Playback Menu (page 71).
2 Select "PROTECT" and press the SET button.
\- The screen to set the protect setting appears.

3 Select "YES" and press the SET button.
• The protect mode is set for the data.
- The protect mark [icon] indicates that the data is locked.

CAUTION
\- Even if the protect mode is set for certain data files, they will be erased if the card is reformatted (page 98).
HINT
To select a different image in steps 2 and 3...
\- Press the [◀] or [▶] button.
To cancel the protect mode for an image...
\- Display the desired data and repeat steps 1 to 3.
ROTATE IMAGE
Captured still images can be rotated to the correct orientation for viewing.
1 Display the image you wish to rotate, and display the Playback Menu (page 71).
2 Select "ROTATE" and press the SET button.
\- The screen to rotate the image appears.
3 Select "YES" and press the SET button.
• Each time the SET button is pressed, the image is rotated another 90 degrees.

HINT
- On the 9-image display playback, rotated images are shown in their original orientation.
- An image for which the protect (locked) mode has been set cannot be rotated.
CHANGING IMAGE SIZE (RESIZE)
The size of a still image that has already been captured at a resolution higher than 2M can be changed to 1,600 × 1,200 pixels or 640 × 480 pixels. The resized image is saved as a separate image.
1 Display the still image whose size you want to change, and display the Playback Menu (page 71).
2 Select "RESIZE" and press the SET button.
\- The screen to change the still image resolution appears.

3 Select the new image size.
2 M (1600 × 1200): The saved image will be 1,600 × 1,200 pixels.
0.3 M (640 × 480): The saved image will be 640 × 480 pixels.
EXIT: Return to the Playback Menu.
4 Press the SET button.
\- Resizing begins.
HINT
Why can't the image be resized?
\- An image can be resized only to a smaller (or the same) size, not to a larger size.
COPY DATA
Images recorded in the camera's internal memory can be copied to the card, and likewise from the card to the internal memory.
1 Insert the card in the camera (page 15).
2 Display the Playback Menu (page 71).
3 Select "FILE COPY" and press the SET button.
\- The screen to copy files appears.
4 Select the copy direction.
INT MEM CARD:
Copy image data from the internal memory to the card.
CARD → INT MEM:
Copy image data from the card to the internal memory.

\* If no card is set in the camera, you cannot copy data.
\- The screen to select the type of copy appears.
- The copy source image is shown in the background on the screen.
COPY SINGLE:
Copy the data for one image.
COPY ALL:
Copy all the data from the copy source to the copy destination.
EXIT:
You are returned to the screen to copy files (step 3).

flowchart
graph TD
    A["INT MEM"] --> B["CARD"]
    B --> C["COPY SINGLE"]
    C --> D["COPY ALL"]
    D --> E["EXIT"]
    E --> F["SET OK"]
6 Select the desired type of copy.
① Press the [◀] or [▶] button to display the image you wish to copy.
② Press the [▲] or [▼] button to select "COPY SINGLE".
① Press the [▲] or [▼] button to select "COPY ALL".
• The files are copied.
PRINT SETTINGS
In addition to using your printer to print out still images captured with your camera, as with conventional film, you can have prints made at shops offering digital print services. Moreover, this camera is DPOF-compatible, so you can use the camera to specify the number of prints, or whether or not the date is displayed on the print.
Display the screen to set the print settings
\- The screen to set the print settings appears.
EACH IMAGE:
The print settings are specified for each individual image.
ALL IMAGES:
The specified print settings apply to all the still images on the card.
ALL CLEAR:
Clear all the print settings.

HINT
\- DPOF (Digital Print Order Format) is a print order format. You can connect your camera to a DPOF-compatible printer to produce your prints. You can also set the print settings (page 111) for the desired images, and then have the reserved images printed automatically.
About the finished prints
- Images that have been rotated will be printed in their original orientation.
- The quality of the print output will differ depending on the print service and printer used.
CAUTION
\- It is not possible to set the print settings when there are 10,000 or more files saved on the card.
PRINT SETTINGS
Specifying date imprinting and number of prints
You can specify print settings for each individual image (EACH IMAGE), or apply the print settings to all the images on the card (ALL IMAGES).
1 Display the screen to set the print settings (page 79).
2 Select EACH IMAGE or ALL IMAGES.
EACH IMAGE:
The set print settings are applied only to the image currently displayed.
ALL IMAGES:
The set print settings are applied to all the still images.

• The Date/Copies Print Screen appears.
- If "EACH IMAGE" was selected, press the [◀] or [▶] button to display the desired image to print.
- The print settings for the currently displayed image are shown in the upper left area of the monitor. You can press the [◀] or [▶] button to confirm the print settings for each image.

4 Specify the number of prints and whether the date is imprinted.
\- Please specify the number of prints before setting the date imprint setting. The date imprint setting cannot be set until the number of prints has been entered.
CAUTION
\- Do not specify dated prints for images that were captured with the date imprint function (page 70) set to ON, or else the date will appear on the photo print twice.
PRINT SETTINGS
Clearing all the print settings
Delete the print settings for all images.
1 Display the screen to set the print settings (page 79).
2 Select "ALL CLEAR".

3 Press the SET button.
• The Confirm All Clear Screen appears.
YES: Clear the print settings for all images.
EXIT: Cancel the clear procedure and return to the screen to set the print settings.
4 Select "YES", and press the SET button.
\- All the print settings are cleared and you are returned to the Playback Menu.
SLIDESHOW PLAYBACK
• The screen to set the slideshow appears.
TIME: Adjust the transition speed (the period that an image is displayed before it changes to the next image).
EFFECT: Select a transition effect as an image changes to the next image.
BGM: Specify the settings for playing background music during slideshow playback.
START: Begin slideshow playback.

HINT
\- Audio data is not played during slideshow playback.
On the Information Screen you can check what the settings were when an image was captured.
1 Display the desired image.
• The Information Screen appears.
- If the MENU button is pressed again, the Information Screen is canceled.
① Resolution setting
② Resolution
③ Scene function setting
④ Image number
⑤ Protect setting
⑥ Voice memo setting
⑦ File size
⑧ Aperture value
⑨ Shutter speed
⑩ Exposure correction setting
⑪ Video size setting/audio file indicator
⑫ Resolution and frame rate
⑬ File format
⑭ Playback time
⑮ Remaining battery power


The Option Menu is used to adjust various camera settings.
• Recording Menu, see page 58
- Playback Menu, see page 71
• The Option Menu appears.

To return to the Shooting Screen or Playback Screen
→ Press the MENU button.
To return to the Recording Menu or the Playback Menu
→ With the option tab 📁 selected, press the [▲] or [▼] button.

① [Date and time setting] (page 20)
\- Set the camera's internal clock.
② [Sounds] (page 89)
\- Adjust the sounds produced by the camera.
③ [Post-view] (page 91)
\- Specify how long a still image is displayed on the monitor after it is captured.
④ [LCD brightness] (page 30)
\- Adjust the brightness of the monitor.
⑤ [a]language] (page 92)
\- Select the language in which the monitor messages are displayed.
⑥ [TV system setting] (page 93)
\- Select the type of TV signal that is output from the camera's USB/AV terminal.
⑦ [Auto power off] (page 94)
\- Specify the time elapsed before the auto power off function operates to turn the camera off.
⑧ [File number reset] (page 95)
\- Set the file number reset function to ON or OFF.
⑨ [Format] (page 98)
\- Reformat the camera's internal memory or the card installed in the camera.
⑩ [Reset camera settings] (page 100)
\- Reset the camera to the factory-preset settings.
\- ⑦ through ⑩ are displayed when you press the [▲] or [▼] button to scroll.
SOUNDS
Set the sounds that are produced by the camera.
• The screen to set the sounds appears.
OPERATION VOL:
Volume setting for all camera buttons.
TURN ON/OFF:
Mute or enable the sound that is produced when the camera is turned on or off.
SHUTTER:
Select the sound that is produced when the shutter button is pressed.
KEY SW:
Select the sound that is produced when a camera button (SET button, MENU button, etc.) is pressed.
AUDIO GUIDE:
Mute or enable the camera's audio help guide.
PLAY VOLUME:
Adjust the volume for playing back video clips and audio files.

POST-VIEW SETTING
Specify the duration that the captured image appears on the monitor (post-view) after the shutter button is pressed.
2 Select "POST VIEW" and press the SET button.
• The Post View Menu appears.
1sec:
The post-view image is displayed for 1 second.
2sec:
The post-view image is displayed for 2 seconds.
OFF:
The post-view image is not displayed.

• This completes the post-view setting.
SCREEN LANGUAGE
You can set the monitor of your camera to display the messages in any one of several languages.
1 Display the Option Menu (page 86).
2 Select "LANGUAGE" and press the SET button.
• The screen to select the display language appears.

3 Select the desired language, and press the SET button.
• The selected display language is set.
TV SYSTEM SETTING
Specify the type of image signal that is output from your camera's USB/AV terminal.
• The TV System Menu appears.
NTSC:
Outputs NTSC video signals.
PAL:
Outputs PAL video signals.

\- The selected TV system is set.
HINT
If no image appears on the TV...
\- If the TV system setting is not correct for the connected equipment, no image will appear on the TV.
AUTO POWER OFF FUNCTION
Your camera has an “auto power off” function whereby the power automatically turns off after a specified period of inactivity. The auto power off function works to conserve the battery power when the camera is not being used, or to prevent the batteries from dying if the camera has accidentally been left on. You can specify the elapsed time (standby time) before the auto power off function operates to turn the camera off.
\- The screen to set the standby time appears.
RECORDING:
Set the standby time for the shooting mode.
PLAYBACK:
Set the standby time for the playback mode.

• The Standby Time Menu appears.
- The auto power off function is set.
- To return to the Option Menu, press the MENU button.

FILE No. RESET FUNCTION
If a newly formatted (page 98) card is used, the file name (image number) of the captured image automatically begins from 0001. If the card is subsequently reformatted, or if a different reformatted card is used, the file names again begin from 0001. This is because the file number reset function is set to "ON", and consequently it results in more than one card containing images with the same numbers. By setting the file number reset function to "OFF", even if the card is reformatted or the card is replaced with another card, the consecutive numbering of file names continues from the last number recorded by the camera.
File name (image number) Card A 0001 , 0002...... 0012, 0013 Replace card↓ Card B 0001 , 0002...... 0012, 0013
File name (image number) Card A 0001 , 0002...... 0012, 0013 :Replace card↓ Card B 0014 , 0015......0025, 0026
\- If Card B already has image data in it when it replaces Card A, file names are assigned as follows.
When the highest image number on Card B (before replacing) is lower than the highest image number on Card A: the file name of the next recorded image continues from last file name recorded on Card A.

flowchart
graph TD
    A["Card A 0001, 0002......0012, 0013"] --> B["Replace card"]
    B --> C["Card B 0001, 0002, 0014, 0015...... 0025, 0026"]
    C --> D["Previously recorded images"]
When the highest image number on Card B (before replacing) is higher than the highest image number on Card A: the file name of the next recorded image continues from last file name recorded on Card B.

flowchart
graph TD
    A["Card A 0001, 0002......0012, 0013"] --> B["Replace card"]
    B --> C["Card B 0020, 0021, 0022, 0023...... 0025, 0026"]
    C --> D["Previously recorded images"]
HINT
What about the internal memory?
\- The file number reset function works the same for the internal memory.
FILE No. RESET FUNCTION
\- The File Number Reset Menu appears.
ON:
The file number reset function is "ON".
OFF:
The file number reset function is "OFF".

\- The file number reset function was set to OFF.
HINT
\- Until the file number reset function is turned “ON”, consecutive file names are assigned. It is recommended that the file number reset function be returned to “ON” at the end of each photography session.
INITIALIZING THE CARD MEMORY AND INTERNAL MEMORY
A card must be formatted with this camera:
• After purchasing, when used for the first time, or
- If it was formatted using a personal computer or another digital camera.
The card cannot be reformatted if the lock switch is set to the “LOCK” position. Proceed with the reformat procedure after setting the lock switch to the unlocked position.
1 To reformat a card, install it in the camera. To reformat the camera's internal memory, remove the card from the camera.
2 Display the Option Menu (page 86).
3 Select "FORMAT" and press the SET button.
- The screen to select the type of format appears.
- Follow steps 4 to 6.
A normal formatting is executed.
The entire card is scanned and reformatted. It is not possible to select this when there is no card installed, when a MultiMedia card is installed, or when the remaining battery charge is low.
- The screen to confirm formatting appears.
- Follow steps 5 and 6.


INITIALIZING THE CARD MEMORY AND INTERNAL MEMORY
\- The screen to confirm formatting appears.
5 Select "YES".
- Formatting begins.
- During formatting, “Formatting” and “do not power off” are shown on the monitor.
CAUTION
\- Please do not turn off the camera or insert/remove the card while the card is being formatted.
\- When the card or internal memory is initialized, all the recorded data is erased. Protected data is also erased, so before reformatting a card, any data you want to keep should be copied to your personal computer's hard disk or other storage medium.
- If a card is reformatted or the data is erased from the card using the camera or a computer, the card's control data may be merely modified and the data itself may not be completely erased from the card.
- In some cases it may be possible to recover the data from a reformatted card using special software for that purpose. However, if the camera is used to execute a full format, it will be impossible to recover the data even by the use of data recovery software.
- If you are disposing of a card, it is recommended that you physically destroy it. If you are transferring the card to someone else to use, it is recommended that you use the camera's full format function to reformat the card, or use commercially available software for erasing card data. Managing data is the responsibility of the user.
HINT
\- In step 5, select "EXIT", and press the SET button.
RESETTING THE CAMERA SETTINGS
Reset the camera to the factory-preset settings.
• The Reset Settings Menu appears.
YES:
Reset to the factory-preset settings.
NO:
Do not change the settings, and return to the Option Menu.

\- The camera settings are reset to the factory-preset settings.
HINT
\- Note that the following settings do not change with this procedure:
Date and time setting
Language setting
TV system setting
File No. reset setting
CHECKING THE REMAINING INTERNAL MEMORY AND CARD MEMORY
You can check the possible number of images, audio recording time and video clip recording time remaining on the card. For a table showing the maximum number of images and recording time for the internal memory and for a specific card, please see “Possible Number of Images/Video Recording Time/Audio Recording Time” on page 131.
Set the shooting mode to the single-shot or sequential shots mode (page 28).
Set the shooting mode to the video clip recording mode (page 28).
- The remaining recording time is shown on the monitor.
- The remaining number of images and video recording time will differ depending on the resolution and video size settings.
Remaining number of images


1 Set the camera to the audio recording mode (page 63).
\- The remaining audio recording time is shown.
Remaining recording time

HINT
- When the remaining number of images or the remaining video recording time is "0", you cannot capture any more images. To capture more images, either install a new card, or save the images to a computer and then erase them (page 39) from the card.
- When the remaining number of images or the remaining video recording time is "0", it may be possible to capture a few more images by changing the resolution setting or video clip mode setting (page 62).
- The maximum number of images is 9,999, and the maximum video/audio recording time is 99:59:59. Note that if a large-capacity card is used, the remaining number of images or recording time may not be correctly displayed.
CHECKING THE REMAINING BATTERY CHARGE
When using batteries, the remaining battery charge can be checked on the monitor. Make sure to check this indicator before capturing an image. For an indication of the possible length of time for battery operation, see page 130.
- The battery remaining charge indicator appears in the lower right corner of the monitor.
- Due to the battery characteristics, when the ambient temperature is low, may appear early for an incorrect indication of the remaining charge.
Also, depending on the conditions of use of the camera or the ambient conditions (temperature, etc.), the indicated remaining charge may change. Therefore, this indication can only be used as a general approximation of the remaining charge.

Battery remaining charge indicator
Battery remaining charge indicator Battery remaining charge No indication, or Approx. full.(appears only in certain operation modes.) Power is low. It will soon be impossible to capture or play back images. If this icon flashes when the shutter button is pressed, images cannot be captured. Recharge the batteries.
HINT
- If any data is present, you can also check the remaining battery charge on the Information Screen (page 85).
- Battery life may differ even among batteries of the same type.
- Depending on the usage of the camera (such as the number of times the flash is used, etc.) or the ambient temperature (temperatures below 10^ [50°F]) the number of images that can be saved on a fully charged batteries will vary greatly.
- It is recommended that you prepare extra batteries when taking pictures at a wedding or while traveling, for example, so you don't miss capturing images of important moments due to the battery power running out. The same is recommended for taking photos in cold environments. (In a ski area, for example, the batteries can be kept warm in your pocket until ready to use.)
CONNECTING TO A TV
Connect the supplied AV interface cable from the USB/AV terminal on the digital camera to the AUDIO and VIDEO input terminals on the TV.

Playback
- After connecting the digital camera to the television, set the TV input switch to VIDEO input.
- When an AV interface cable is connected, no image appears on the camera's monitor.
- The playback method is the same as when viewing images on the camera's monitor.
- The same playback procedure as when playing back with the camera is used to play back voice memos and audio recordings as well.
Voice memo playback: see page 34
Audio playback: see page 64
CAUTION
Insert and pull out the cable carefully
- When connecting the cables, make sure that the cable plugs are correctly oriented and that they match the shapes of the terminal sockets on the devices. Push the plugs in straight when connecting them. If undue force is used to connect a cable, it may permanently damage the connector pins in the terminal socket.
- Do not use excessive force when connecting and disconnecting cables.
DIRECT PRINTING
Your camera supports the PictBridge function. By connecting the camera directly to a PictBridge-enabled printer, the camera's monitor can be used to select images and initiate printing (PictBridge printing).
Print preparations
1 Turn the printer on, use the supplied USB interface cable to connect the camera to the printer.
- Connect the camera's USB/AV terminal to the printer's USB connector.
- The USB Connection Screen appears on the camera's monitor.

DIRECT PRINTING
• The screen to select the images to print appears.

CAUTION
Caution when connecting a printer
- If the power to the printer is turned off while it is connected, the camera may not operate correctly. If the camera does not operate correctly, disconnect the USB interface cable, turn off the camera, and then reconnect the cable.
- During PictBridge printing, the camera's button operation response is slower.
- If the camera is powered by batteries for printing, make sure that the remaining battery charge is sufficient.
Insert and pull out the cable carefully
- When connecting the cables, make sure that the cable plugs are correctly oriented and that they match the shapes of the terminal sockets on the devices. Push the plugs in straight when connecting them. If undue force is used to connect a cable, it may permanently damage the connector pins in the terminal socket.
- Do not use excessive force when connecting and disconnecting cables.
To select one image and print it (print selected image)
Procedure to select one still image and print it.
1 Complete the printing setup (page 106).
• Display the image you wish to print.

DIRECT PRINTING
3
Specify the number of prints or date-imprinted prints.
\- Press the [▲] or [▼] button to specify the number of prints.
- Press the [▲] or [▼] button until the desired number of prints is displayed.
\- Press [W] on the zoom switch to add a check mark (✓next to 📊).

4
Press the SET button.
\- Printing begins.
HINT
To cancel printing
① During printing, press the [▼] button.
• The Confirm Cancel Printing Screen appears.
② Select "YES", and press the SET button.
\- If "EXIT" is selected and the SET button is pressed, printing resumes.
CAUTION
\- Do not specify dated prints for images that were captured with the date imprint function (page 70) set to ON, or else the date will appear on the photo print twice.
To print all the images (all images)
Print all of the images.
1 Complete the printing setup (page 106).
• The PictBridge Menu appears.
• The Print All Images Screen appears.

4 Specify the number of prints or date-imprinted prints.
\- Press the [▲] or [▼] button to specify the number of prints.
- Press the [▲] or [▼] button until the desired number of prints is displayed.
\- Press [W] on the zoom switch to add a check mark (✓ next to ⏻).

\- Printing begins.
CAUTION
Printing is not possible if there are more than 999 still images in the card or internal memory.
\- Delete unwanted images before printing.
DIRECT PRINTING
To print the images that are set to print (print reserved images)
Procedure to print all the images that are set to print.
1 Make the print settings (page 79), and complete the printing setup (page 106).
2 Press the MENU button.
• The PictBridge Menu appears.

3 Select "DPOF", and press the SET button.
• The Print Scheduled Images Screen appears.
\- An image that is set to print (page 79) is displayed.

4 Press the SET button.
\- Printing begins.
\- Printing begins about 1 minute after the SET button is pressed.
HINT
\- In step 2, if you press the [◀] or [▶] button, you can confirm the images that are set to print and their DPOF settings.
CAUTION
\- Reserved images printing is not possible if a printer is used that does not support your camera's DPOF function.
\- Multi-prints are not possible.
111 English
To change the printer settings and print images (change printer settings)
Images are printed according to settings specified by the camera, such as paper type, size, layout, printing quality, etc.
1 Complete the printing setup (page 106).
• The PictBridge Menu appears.
\- The Printer Settings Menu appears.
DATE STAMP:
Print the date the photo was taken.
Specify the type of paper used for printing.
PAPER SIZE:
Specify the size of paper used for printing.
LAYOUT:
Specify how the images are to be arranged on the paper.
QUALITY:
Select the print quality for the images.

Printer Settings tab
DIRECT PRINTING
4 Adjust the printer settings.
① Use the arrow buttons to select a printer setting parameter, and press the SET button.
\- The screen to set the selected parameter appears.
② Press the [▲] or [▼] button to adjust the setting, and press the SET button.
\- The selected parameter is set, and you are returned to the Printer Settings Menu.
\- Follow the same procedure to adjust the other parameters, as desired.
\- The contents of the settings that can be made for each parameter will differ depending on the printer.
HINT
- The parameters that are displayed on the Printer Settings Menu will differ depending on the printer that is connected.
- To use printer functions which do not appear on your camera's Printer Settings Menu, select "☐ VALUES".
- If a function set by the camera is not available in the printer, the camera's printer settings will automatically change to “☐ VALUES”.
COMMONLY ASKED QUESTIONS
If you have a question about the camera operation, you might find the answer in this compilation of commonly asked questions.
Question Answer Action Power Why doesn’t the power turn on? Due to cold temperatures, the batteries temporarily lost their power. Place the camera in your pocket to warm it up before using it. Why are the batteries consumed so quickly? The ambient temperature is very low. Keep the batteries in an environment of 10 to 40°C (50 to 104°F). The battery life has expired. Replace with new batteries. Why does the icon appear? The remaining battery power is low. Replace the batteries with new ones. Shooting Why doesn’t the touch sensor work? You are wearing gloves. Remove the glove from the hand pressing the shutter button. Why doesn’t the flash operate? The camera has determined that the image is bright enough and the flash is not necessary. Not a malfunction. Capture the image; the camera will determine when the flash is necessary.
COMMONLY ASKED QUESTIONS
Question Answer Action Shooting Are the settings retained even after the camera is turned off? — All settings escept the self-timer and the exposure correction are retained even after the camera is turned off. Which resolution setting should I use? — Select the resolution setting according to the intended use:10M 7M 4M:Appropriate for printing letter-size or larger, and for printing a close-up of part of a photo (trimming).2M: For printing standard photo (photo service) sizes.0.3M: For photos displayed on a web page, or sent as e-mail attachments. What is the difference between the digital zoom and the optical zoom? — Because shooting with the optical zoom uses the optics of a physical lens, you can shoot without losing minute details in the image. The digital zoom, on the other hand, works by magnifying a portion of the image that hits the CCD sensor and may produce a coarser image. Shooting How can I get the distant view into focus? — Set the scene function to the landscape mode when photographing. Or, set the focus range setting to manual focus MF, and set the distance to ∞. Monitor When used in cold weather, why does the image seem to leave traces as it moves? Condition due to the liquid crystals. Not a malfunction. Spots that appear in the monitor only appear in the monitor and will not be recorded with the images. Why does the displayed image contain some red, blue and green dots, or why are black spots visible?
COMMONLY ASKED QUESTIONS
Question Answer Action Viewing images Why is the image too bright? The subject was too bright. When capturing an image, devise a way to compensate for a bright subject, for example, by changing the shooting angle. Why is the image out of focus? The focus is not locked properly. Hold the camera correctly, and when the image is locked in focus, gently press the shutter button all the way to capture the image. Why doesn’t the zoom jump playback work? Zoom jump playback does not work for an image that was created from a magnified portion of a zoom jump image, or for video clips. Not a malfunction. Why is there no image (☐ is shown)? This may happen when trying to play back images stored on a card from a different digital camera. Play back images that were recorded on a card using this camera. Why do vertical stripes appear? If a bright subject is shot in the video clip recording mode, vertical stripes may appear on the monitor or in the image. Not a malfunction. Viewing images Why isn't the magnified image clear? Due to the characteristics of the camera, magnified images appear less clear. Not a malfunction. Why isn't the captured image clear? The image was captured using the digital zoom. Not a malfunction. Zoom in only within the optical zoom range when shooting. Can I play back image data that I edited using my computer? — We cannot guarantee the accurate playback of data that has been edited using a computer. Printing Why does a message appear during PictBridge printing? There is a problem with the printer. Please refer to the instruction manual for your printer. Misc. Why does the “Card full” or “Internal memory full” message appear? There is no more available memory on the card or in the camera's internal memory. Erase unnecessary data, or use a card that has more memory available. Why does the “Card is protected” message appear? The lock switch on the card is in the locked (protect) position. Move the lock switch to the unlocked position.
COMMONLY ASKED QUESTIONS
Question Answer Action Misc. Why can’t the camera be operated? A temporary internal circuitry problem may be the cause. Remove the batteries from the camera, wait a few minutes, then reinstall the batteries and try again. Why does the “System error” message appear? A problem has occurred within the camera or card. Check the following items:1 Remove the card and then install it again.2 Remove the batteries and then install them again.3 Install a different card.If “System error” still appears after performing the above steps, then take the camera to the dealer for service.
TROUBLESHOOTING
Before taking your camera to the repair shop, check the following table for a possible solution to the problem.
CAMERA
Problem Cause Use Action Reference page Power No power. The batteries are dead. Insert new batteries. 15 The batteries have not been inserted correctly. Reinsert the batteries, making sure to orient them correctly. The battery/ card compartment cover is not completely closed. Close the battery/card compartment cover completely. The camera turns off by itself. The power save function is operating. Not a malfunction. 19 Shooting An image is not captured when the shutter button is pressed. The power is not turned on. If the auto auto power off function was activated, turn the camera on before shooting. If the camera was turned off, press the ON/OFF button to turn it on. 19
TROUBLESHOOTING
Problem Cause Action Reference page Shooting An image is not captured when the shutter button is pressed. The maximum number of images that can be captured or the maximum video clip recording time has been reached. Install a new card. 15 Erase the images that are not necessary.Save the images to separate media, then erase all the images from the card. 39, 98 The operation buttons (arrow buttons, MENU button, etc.) do not work. A finger is touching the shutter button, and the focus lock is active. Remove your finger from the shutter button, and then use the operation buttons. — The flash does not operate. The flash off mode is selected. Set the flash to automatic flash mode or forced flash mode. 52 The batteries are dead. Insert new batteries. 15 The digital zoom does not work. The resolution is set to 10M . Set the resolution to 7M or lower. 62 The “Battery depleted” message appears. The batteries are consumed. Insert new batteries. 15 Shooting When zooming in or out, the zoom movement stops momentarily. The optical zoom has moved to the maximum magnification position. Not a malfunction. Release the zoom switch, and press it again. 51 There is noise in the captured image. The ISO sensitivity setting is too high. Set the ISO sensitivity to a lower setting. 67 When recording a video clip under fluorescent lights, a noticeable flicker appears in the image. This occurs when the shutter speed is too fast. Set the ISO sensitivity to 200 or less. 67 Monitor No playback image appears. The playback mode is not active. Press the playback button [▶]. 27 Viewing images The image is too dark. The flash was blocked by a finger or other object. Hold the camera correctly, and make sure the flash is not obstructed. 23 The subject was too far away. Capture the image in the range of operation of the flash. 129
TROUBLESHOOTING
Problem Cause Use Action Reference page Viewing images The image is too dark. The subject was lit from behind. Use the forced flash mode. 52 Use the exposure correction function. 69 There is not enough light. Adjust the ISO sensitivity setting. 67 The image is too bright. The forced flash mode is selected. Select a different flash mode. 52 The subject was too bright. Use the exposure correction function. 69 The ISO sensitivity setting is incorrect. Set the ISO sensitivity to ISO-A. 67 The image is not in focus. The subject is too close to the camera. Select the correct focus setting for your needs. 32, 56 The focus setting is not correct. The camera moved when the shutter button was pressed. Hold the camera correctly and press the shutter button correctly. 23, 32 The focus is not locked properly. The lens is dirty. Clean the lens. — Problem Cause Action Reference page Viewing images The colors of the images captured indoors are not correct. This is due to ambient lighting. Capture the image using the forced flash mode. 52 The white balance setting is incorrect. Set the white balance setting correctly. 68 A part of the image is missing. The handstrap or a finger was blocking the lens. Hold the camera correctly, and make sure the lens is not obstructed. 23 “No image” is shown. There is no image stored in the installed card or the internal memory. Play back after capturing images. 32, 34 Image editing You cannot edit or rotate an image. The protect mode is set. Cancel the protect mode. 73 Misc. The “Image is protected” message appears and the data cannot be erased. You have attempted to erase data that is protected from accidental erasure. Set the protect setting for the data to UNLOCK. 73 The recording capacity is less than that indicated in the section “Possible Number of Images/Video Recording Time/Audio Recording Time”. The recording capacity is less than the value specified for the card. Depending on the card, the capacity may be less than the specified value. Please refer to the instructions that accompanied the card. 131
TROUBLESHOOTING
Notes regarding the scene function
The macro focus range setting is not available. The resolution cannot be set to 4M or more.The flash is disabled even when shooting single shots. The macro focus range setting is not available. The macro and manual focus MF focus range settings are not available.The flash is disabled even when shooting single shots.The AF seeker AF focus mode setting is not available. The pan PF, macro and manual focus MF focus range settings are not available.The AF seeker AF focus mode setting is not available. The 10M resolution setting is not available.
SPECIFICATIONS
Camera
Type CCD digital camera (recording and playback) Image file format Still images: JPEG format (DCF, DPOF, Exif 2.2 compliant)Note: Designed mainly by the Japan Electronics and Information Technology Industries Association (JEITA), DCF (Design rule for camera file system) is standard for digital still camera image files to provide interoperability between digital photography devices for the images stored on removable memory cards. However, it is not guaranteed that all devices will support the DCF standard.Video clips: QuickTime Movie (Photo-JPEG)Audio recordings: WAVE format (monaural) Data storage media Internal memory: Approx. 23 MBExternal memory: SD Memory Card(equivalent to a 4 GB SDHC memory card),Multi Media Card Camera effective number of pixels Approx. 7.1 million pixels Image sensor 1/2.5-inch (1 cm) CCDVirtual number of pixels: Approx. 7.38 million pixels, interlace scan, primary color filter
SPECIFICATIONS
Recording resolution 10M: 3,680 × 2,760 pixels (single-shot still images only)7M: 3,072 × 2,304 pixels (single-shot still images and sequential shots only)4M: 2,288 × 1,712 pixels (single-shot still images and sequential shots only)2M: 1,600 × 1,200 pixels (single-shot still images and sequential shots only)0.3M: 640 × 480 pixels (single-shot still images and sequential shots only)TV: 640 × 480 pixels, 30 frames/second (video clip recording only)WEB: 320 × 240 pixels, 15 frames/second (video clip recording only) White balance Full-auto TTL, manual setting possible Lens 3.0× optical zoom lens f=6.3 mm to 18.9 mm(35 mm film camera conversion 38 mm to 114 mm)Autofocus, 5 groups, 6 elements (6 with aspheric surfaces) Aperture Open F=3.1 (Wide) to 5.9 (Tele) Exposure control type Programmable AEExposure correction available from the Recording Menu (0±1.8EV in 0.3EV steps) Light-measuring modes Multi-section measuring
Range Normal photography: 10 cm (3.94 in.) to∞(Wide), 60 cm (23.62 in.) to∞(Tele)Macro photography: 5 cm (1.97 in.) to 80 cm(31.50 in.) (Wide), 60 cm (23.62 in.) to 80 cm(31.50 in.) (Tele) Digital zoom For shooting: 1x to 4x (except resolution 10M)For playback: 1x to 57.5x (varies withresolution) Shutter speed Single-shot mode: 1/2 to 1/2,000 sec.(Maximum approx. 2 seconds when thescene function is set to fireworks etc.)(During flash: 1/30 to 1/2,000 sec.)Sequential shots mode:1/2 to 1/2,000 sec.Video clip recording mode:1/30 to 1/10,000 sec. Sensitivity Single-shot mode de/sequential shots mode:Auto (equivalent to ISO50 to 400)/equivalentto ISO50, ISO100, ISO200, ISO400, andISO800 (switchable from Recording Menu)Video clip recording mode:Auto (equivalent to ISO450 to 3,600)/equivalent to ISO450, ISO900, ISO1,800,ISO3,600 and ISO7,200 (switchable fromRecording Menu) Monitor 2.5-inch (6.4 cm) TFT color LCDApprox. 115,000 pixels(Frame coverage: Approx. 100%)Brightness adjustment: 5-step, auto
SPECIFICATIONS
Flash working range GN = 6 Approx. 40 cm (15.75 in.) to 3.8 m (8.53 ft.) (Wide) Approx. 60 cm (23.62 in.) to 2.0 m (4.59 ft.) (Tele) Flash modes Auto-flash, forced flash, flash off, red-eye reduction Focus TTL-type AF (9-point range finder/spot focus/ AF seeker), manual focus (14 steps) Self-timer Approx. 2-second delay, 10-second delay Ambient environment Temperature 0 to 40°C (32 to 104°F) (operation), -20 to 60°C (-4 to 140°F) (storage) Humidity 30 to 90% (operating, no condensation) 10 to 90% (storage, no condensation) Power supply Batteries AA- -size alkaline batteries × 2 The following batteries can also be used: AA-size Ni-Cd batteries (SANYO N-3UV) × 2 AA-size nickel metal hydride rechargeable batteries (SANYO HR-3UTG) × 2 * AA-size manganese batteries cannot be used. Dimensions (at narrowest part, not including grip or lens protrusion) 92.2 (W) × 60.3 (H) × 22.0 (D) mm 3.63" (W) × 2.37" (H) × 0.87" (D) Weight Approx. 121 g (4.27 oz.) (without batteries and card)
Camera connectors
USB/AV(communication/audio and video output) terminal Dedicated regrouped jack Audio output 880 mVrms (-1.1 dBs), 2.2 kΩ or less, monaural Video output 1.0 Vp-p, 75 Ω unbalanced, sync negative, composite video, NTSC color TV system/PAL TV system (switchable from the Option Menu) USB USB 2.0 Full Speed
Battery life
Alkaline batteries (supplied) Nickel metal hydride batteries sold separately: (HR-3UTG) Possible No. of Images* 260 images 490 images Maximum playback time** 670 min. 700 min.
\* According to the CIPA standard (when using a Matsushita Electric Industrial Co., Ltd. 64MB SD Memory Card).
\*\* With continuous playback when using the monitor.
NOTE
- Approximate time until batteries run out, based on test conditions at room temperature (25°C [77°F]).
- The battery operation time may vary depending on the conditions of the batteries and the conditions of use. Especially when used at temperatures below 10^ (50°F), the battery operation time is drastically reduced.
Possible Number of Images/Video Recording Time/Audio Recording Time
The table shows the possible number of captured images and the possible recording time for the camera's internal memory and for the commercially available 512 MB and 4 GB SD Memory Cards.
Shooting mode setting Resolution setting Internal memory SD Memory Card 512 MB 4 GB Single-shot mode/Sequential shots mode 10M^* 7 images 148 images 1,190 images 7M 10 images 213 images 1,700 images 4M 18 images 382 images 3,020 images 2M 36 images 754 images 5,900 images 0.3M 187 images 3,860 images 9,990 images Video clip recording mode TV 16 sec. 5 min. 40 sec. 44 min. 57 sec. WEB 1 min. 14 sec. 25 min. 47 sec. 3 hr. 26 min. Audio file mode — 49 min. 49 sec. 17 hr. 11 min. 99 hr. 59 min.
\* Available only for single-shot still image shooting.
- Up to 9 hours of continuous audio recording is possible.
- The values were determined using an SD Memory Card by Sandisk.
- Even with cards of the same capacity, the amount of data that can actually be stored may differ depending on the card brand, etc.
- The continuous shooting time for each video clip will differ depending, for example, on the card capacity, environmental conditions (temperature and shooting conditions, etc.).
Others
Apple, Macintosh and QuickTime are trademarks or registered trademarks of Apple Computer Inc.
Windows and Windows XP are registered trademarks of Microsoft Corporation.
SDHC is a trademark.

All other company and product names are registered trademarks or trademarks of their respective owners.
CAUTION
- It is forbidden to copy this manual, whole or in part, without prior written permission.
- All images and illustrations given in this manual are for explanation purposes and may differ slightly from that of the actual product. Also, actual specifications are subject to change without prior notice and therefore may differ from the contents of this manual.
- Sanyo Electric shall not be held responsible for any problems resulting from the use of this camera.
- Sanyo Electric declines all responsibility for damages due to improper use of the camera, failure to adhere to the instructions given in this manual, or repairs or changes done by those other than a technician authorized by the manufacturer.
- Sanyo Electric shall not be held responsible for any damage caused by optional devices or consumable items used with the camera other than those supplied with the camera or those specified by Sanyo Electric.
- Sanyo Electric shall not be held responsible for any losses or loss of revenue resulting from the loss of data caused by the malfunction, or the repairing of a malfunction, of the camera.
- The images captured with this camera will differ in quality from pictures taken with a standard film camera.
HINTS FOR TAKING PICTURES
Taking great pictures in difficult surroundings is easier than you might think. By keeping a few points in mind and choosing the correct settings, you can create photos that you'll be proud to display and share.
Basic photography
If images are blurred even when the autofocus is used
Your camera employs an autofocus function. When you snap a picture using the autofocus, the camera automatically adjusts the settings so that the image will be in focus. If you are getting blurred images even when using the autofocus, one or more of the following might be the reason.
■How the autofocus works
The autofocus is activated when the shutter button is lightly touched. Press the shutter button slightly, and the target mark will appear on the monitor to indicate that the autofocus has been activated. Next, continue to gently press the shutter button all the way to snap the picture. This two-step method is the way to ensure that your photos are perfectly focused.
■Reasons for unfocused images
① The shutter button was pressed before the image was focused.
② After the image was focused, the subject moved.
\- Even if camera focuses the subject once, if the distance between the camera and the subject is changed, the subject may become out of focus.
③ The focus setting is not set for the correct distance.
\- If you shoot a close-up subject with the camera set to the normal focus mode, or if you shoot a subject at normal distance with the camera set to the macro (close-up) mode, the image will not be in focus.
■Preventing blurred images
① Confirm that the camera is set to the correct focus mode for your subject.
② Hold the camera correctly, and lightly touch the shutter button.
③ Wait for the target mark to appear in the monitor, and holding the camera steady, gently continue to press the shutter button all the way down.
Following these steps for a gentle but firm pressing of the shutter button will ensure that you get beautifully focused photos.
Photographing a moving subject
Situation: You would like to snap an action shot of a moving child or pet. The autofocus is activated, but because the subject is moving, the image may be blurred. In particular, when the distance between the camera and the subject is changing, it is difficult to lock the focus on the subject. Here are some hints for successfully capturing images of moving subjects.
■Reasons for unfocused images
When the shutter button is touched lightly, the camera's autofocus works by determining the distance between the camera and the subject. Once the subject is in focus, if it then moves before the picture is snapped, the image may be out of focus. This often happens when you once lock the focus on a subject and then wait for the right moment to snap the picture. And, conversely, a blurred image may result if you press the shutter button all the way in one step in an attempt to quickly capture an action scene, thus failing to activate the autofocus in time.
■ Preventing blurred images (How to use the manual focus [page 57])
In addition to the autofocus, a manual focus mode is also incorporated in your camera. In the autofocus mode, the distance between the camera and the subject is automatically determined when you press the shutter button halfway. In contrast to this, with the manual focus mode, you manually set the focus by specifying the correct distance between the camera and the subject before taking the picture.
■How to photograph a moving subject
① Set the camera's focus mode to the manual focus. Set the focus distance to the correct distance between the camera and the subject.
② When the subject is at the set focus distance, gently press the shutter button all the way down.
HINTS FOR TAKING PICTURES
Shooting with the scene function
Shooting portraits (portrait mode 📄)
Points:
- Choose a background that doesn't detract from your subject.
- Move in close to your subject.
- Pay attention to lighting and how it affects your subject.
NOTE
- If the background is distracting, it will not show your subject to his best advantage. Move in closer to your subject or zoom in so that the background does not compete with the subject.
- In portrait photography your subject is clearly the central figure, so try techniques that allow the subject to stand out.
- If light is coming from behind your subject (backlit), his face will appear dark. You can get a better picture by using the flash, for example, or changing the exposure setting.
Photographing moving subjects (sports mode 📁)
Points:
- Match the camera's movement with that of the subject.
- Set the zoom to the Wide end (wide-angle).
- Don't be too hesitant to press the shutter button, or you'll miss the action.
NOTE
- Tips to not missing those great action shots: Make sure you're holding the camera correctly. Keep the subject in the lens at all times, moving the camera with him while waiting for the right shot. Move your whole body—not just your arms—with the camera while shooting.
- Blurred images are more likely when the zoom is set to the Tele end than the Wide end. Set the zoom as close as possible to the Wide end.
- Learn to press the shutter button quickly yet smoothly the instant your photo chance occurs.
Night photography (night view mode 📁\*)
Points:
- Avoid camera shake.
- Increase the ISO sensitivity.
NOTE
- Camera shutter speed during night photography is considerable slower, so there is a much greater chance that your photographed images will be blurry. Use a tripod whenever possible, or if a tripod is not available, you can lean against a wall or pillar to help stabilize the camera.
- You can photograph your subject with the night scene in the background by using the flash. Be careful not to shoot too close to the subject, however, or your subject's face will appear too bright.
- After the flash operates, keep the camera and the subjects motionless for about 2 seconds.
Photographing scenery (landscape mode 📄)
Points:
- Shoot using a high resolution.
- For zoom photography, use the optical zoom.
- Pay attention to picture composition.
NOTE
- When shooting with a wide-angle setting, or if you intend to enlarge the photo, the higher the resolution, the better.
- To zoom in on distant scenery, it's better to use the optical zoom. Using the digital zoom produces a coarser image. Hold the camera securely, keeping your elbows close to your body and making sure the camera is stable. Using a tripod or other means of stabilizing the camera will increase the likelihood of getting a clear photo.
- Don't forget to pay attention to picture composition; note perspective and be aware of how the placement of objects affects the scene.
SANYO
SANYO Electric Co., Ltd.




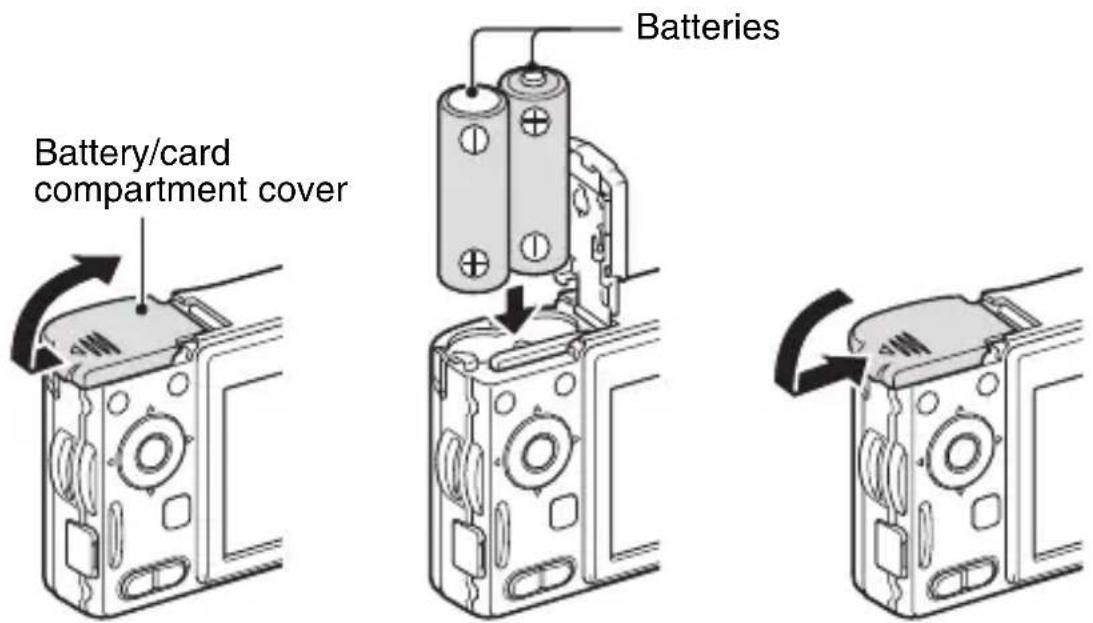
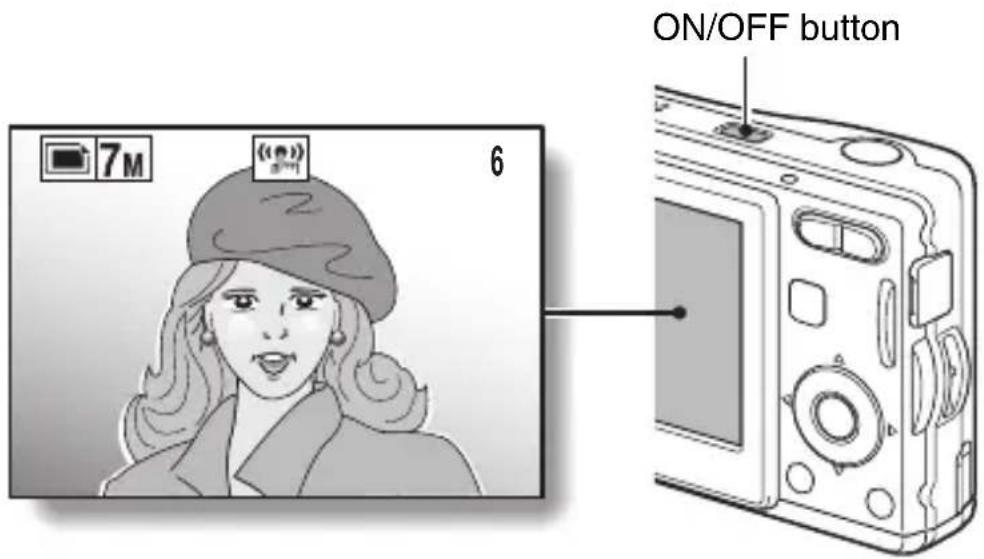
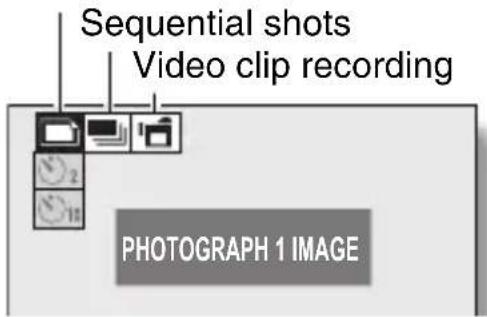
![Shutter button [◀] or [▶] button](/content/2026/05/831065/images/2f856a33003729541f3f2ba9100fc0a87c3945f1f655b51a4e83235531aa25be.jpg)
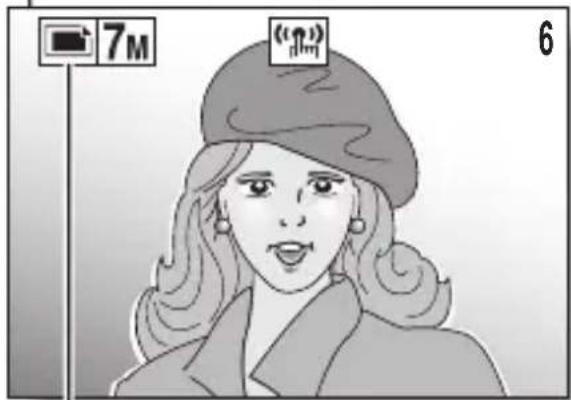
![SET button [◀] or [▶] button](/content/2026/05/831065/images/b3e00104c4382a46d1bcfe1dbdaa32243043e8a27cfc8785a04318106cf5e5f9.jpg)