
PM-FCP - Uncategorized VIEWSONIC - Free user manual and instructions
Find the device manual for free PM-FCP VIEWSONIC in PDF.


| Product Type | Suspended Ceiling Tile Adapter |
| Compatible Tile Size | 24 x 24 inches or 24 x 48 inches |
| Maximum Load Capacity | 50 lbs (22.7 kg) |
| Minimum Ceiling Structural Capacity | 250 lbs |
| Mounting Options | Truss, concrete, wood joist |
| Included Hardware | Braided cables (4), quick locks (4), pipe clamps (4), eye lag screws (4), concrete anchors (4), M8 screws, KEP nuts, M5 screw, rubber caps |
| Optional Accessories | EMT conduit pipe (3/4 inch) for added rigidity |
| Adjustability | Lateral sliding adjustment via M8 screws; cable tension adjustment via quick locks |
| Electrical Box Support | Yes, cutout in tile for electrical box installation |
| Material | Steel |
| Color | Black |
| Installation Tools Required | Phillips head screwdriver, wire cutters, ladder, drill with masonry bit (for concrete), wrench |
| Number of Installers Recommended | At least two qualified personnel |
| Indoor Use Only | Yes |
| Warranty | Limited Lifetime Warranty (Premier Mounts) |
| Maintenance | Clean with dry cloth; check hardware tightness periodically |
| Safety Features | Includes quick locks with release pin, overload protection via cable tensioning |
| Repairability | Replaceable cables and hardware; contact ViewSonic for parts |
| Compliance | Installation per local codes and regulations |
Frequently Asked Questions - PM-FCP VIEWSONIC
User questions about PM-FCP VIEWSONIC
0 question about this device. Answer the ones you know or ask your own.
Ask a new question about this device
Download the instructions for your Uncategorized in PDF format for free! Find your manual PM-FCP - VIEWSONIC and take your electronic device back in hand. On this page are published all the documents necessary for the use of your device. PM-FCP by VIEWSONIC.
USER MANUAL PM-FCP VIEWSONIC
natural_image
Three colorful bird figurines perched on a branch, no text or symbols visibleINSTALLATION INSTRUCTIONS
natural_image
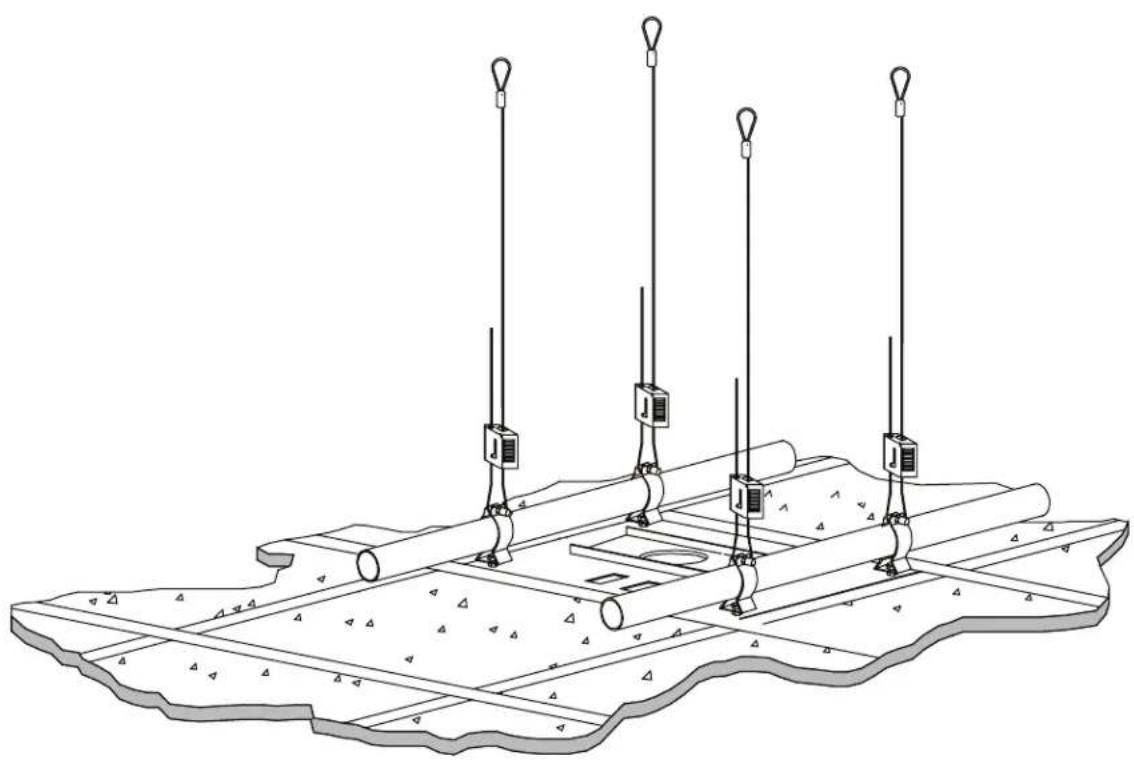
Technical line drawing of a mechanical or electrical assembly with multiple vertical rods and mounting base (no text or symbols)PM-FCP
Suspended Ceiling Tile Adapter
ViewSonic Corporation
10 Point Dr Ste. 200
Brea, CA 92821 USA
USA and Canada
Phone: 888-881-8781
salesinfo@viewsonic.com

Table of Contents
Warning Statements 2
Parts List 3
Installation Tools 3
Ceiling Tile ....Removal.... 4
Ceiling Anchoring 5
PM-FCP Installation 6
Attaching Pipe....Clamps....7
Attaching EMT Conduit....Pipe....(Optional)....
Quick Lock ....Installation.... 8
Electrical Box ....Installation....
PM-FCP Adjustments 10
Securing the Pipe to the PM-FCP
Technical Specifications....11
Warranty 12
Warning Statements

PRIOR TO THE INSTALLATION OF THIS PRODUCT, THE INSTALLATION INSTRUCTIONS SHOULD BE READ AND COMPLETELY UNDERSTOOD. THE INSTALLATION INSTRUCTIONS MUST BE READ TO PREVENT PERSONAL INJURY AND PROPERTY DAMAGE. KEEP THESE INSTALLATION INSTRUCTIONS IN AN EASILY ACCESSIBLE LOCATION FOR FUTURE REFERENCE.

VIEWSONIC DOES NOT WARRANT AGAINST DAMAGE CAUSED BY THE USE OF ANY VIEWSONIC PRODUCT FOR PURPOSES OTHER THAN THOSE FOR WHICH IT WAS DESIGNED OR DAMAGE CAUSED BY UNAUTHORIZED ATTACHMENTS OR MODIFICATIONS, AND IS NOT RESPONSIBLE FOR ANY DAMAGES, CLAIMS, DEMANDS, SUITS, ACTIONS OR CAUSES OF ACTION OF WHATEVER KIND RESULTING FROM, ARISING OUT OF OR IN ANY MANNER RELATING TO ANY SUCH USE, ATTACHMENTS OR MODIFICATIONS.

THE SURFACE MUST BE CAPABLE OF SUPPORTING 250LBS. IF NOT, THE SURFACE STRUCTURE MUST BE REINFORCED. DO NOT HAND OR ATTACH MORE THAN 50LBS. TO THIS PRODUCT. PROPER INSTALLATION PROCEDURE BY A QUALIFIED SERVICE TECHNICIAN, AS OUTLINED IN THE INSTALLATION INSTRUCTIONS, MUST BE ADHERED TO. FAILURE TO DO SO COULD RESULT IN SERIOUS PERSONAL INJURY, OR EVEN DEATH.

SAFETY MEASURES MUST BE PRACTICED AT ALL TIMES DURING THE ASSEMBLY OF THIS PRODUCT. USE PROPER SAFETY GEAR AND TOOLS FOR THE ASSEMBLY PROCEDURE TO PREVENT PERSONAL INJURY.

At least two qualified people should perform the assembly procedure. Injury and/or damage can result from dropping or mishandling the product.

If mounting to studs, make sure that the mounting screws are anchored into the center of the studs. Use of an edge-to-edge stud finder is recommended.

Be aware of the mounting environment. If drilling and/or cutting into the mounting surface, always make sure that there are no electrical wires in the surface. Cutting/drilling into an electrical line may cause serious injury.

This product is intended for indoor use only. Use of this product outdoors could lead to product failure and personal injury.

Do not install near sources of high heat. Do not install on a structure that is prone to vibration, movement or chance of impact

Contact ViewSonic with any questions
(888) 881-8781
salesinfo@viewsonic.com
Parts List

NOTE
This ceiling adapter is shipped with all proper installation hardware and components. Make sure that none of these parts are missing and/or damaged before beginning installation. If there are parts missing and/or damaged, please stop the installation and contact ViewSonic (888-881-8781).
| PM-FCP(Qty 1) | Braided Cable (Qty 4 Strands) | Quick Locks (Qty 4) |
| 1⁄4" x 3" Eye Lag Screws (Qty 4) | Pipe Clamp (Qty 4) | 1/4-20 KEP Nut (Qty 4) |
| M8 Flat Washers (Qty 4) M8 x 20mm Phillips Head Screws (Qty 4) M5 x 16mm Phillips Head Screw (Qty 1) | ||
| EMT Conduit Pipe (Optional - Qty 2) Commercially Available | Rubber Caps (Qty 4) | 1⁄4" x 2.4" Concrete Anchors (Qty 4) |
Installation Tools
Phillips Head Screwdriver Wire Cutters Ladder
Ceiling Tile Removal

NOTE
Read all cautions and warnings before continuing.

NOTE
Observe the room and the ceiling; find the proper location for the PM-FCP placement and lightly mark the bottom of the tile.
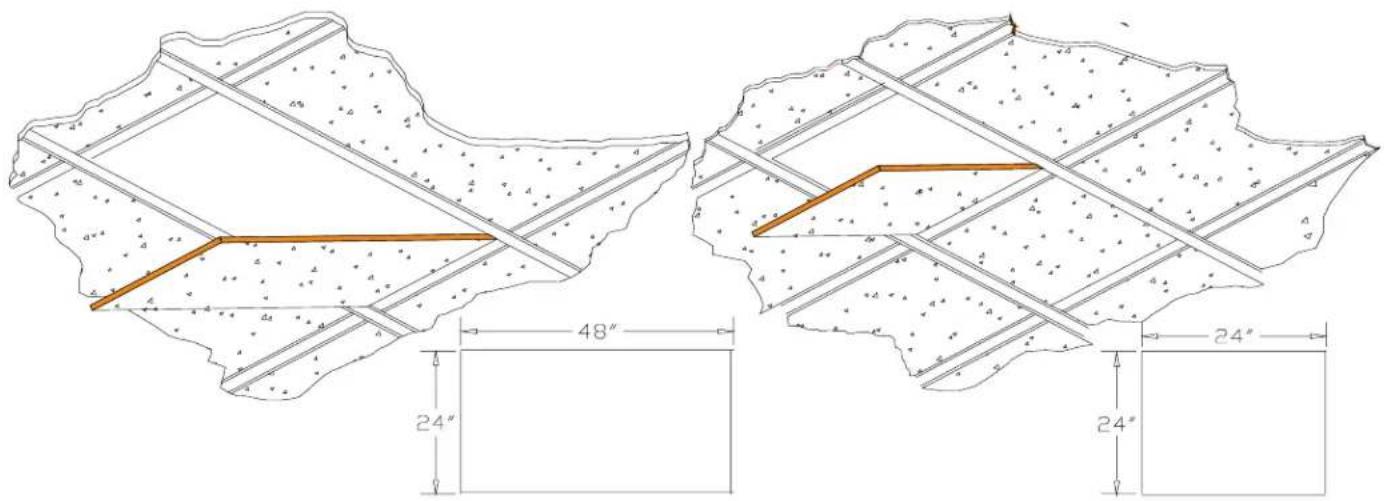
Step 1. Carefully remove the 24" x 24" or, depending on your ceiling configuration, the 24" x 48" suspended ceiling tiles.
Ceiling Anchoring

WARNING
THE PM-FCP MUST SECURED USING THE SUPPLIED QUICK LOCKS AND BRAIDED CABLES.
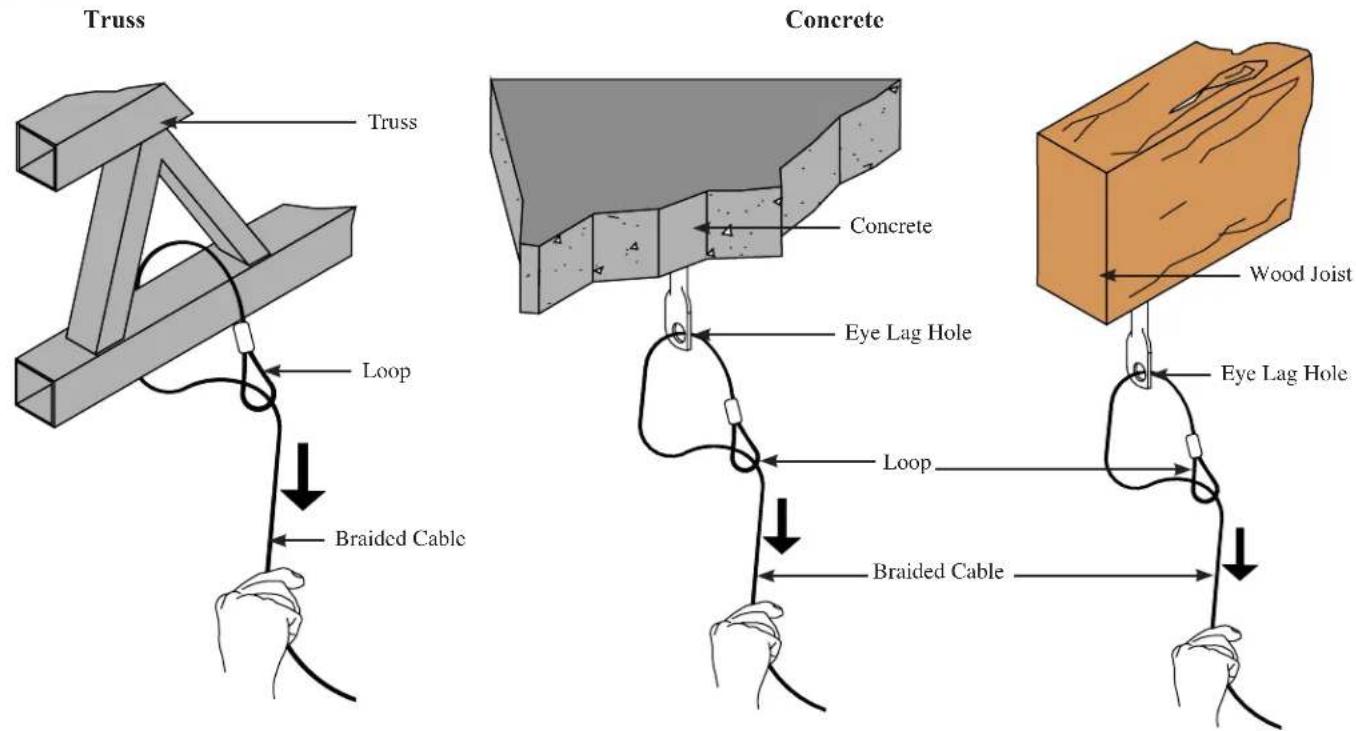
Truss ceiling
Step 1. Loop the braided cable around the truss.
Step 2. Run the open end through the loop.
Step 3. Pull the open end down until the braided cable tightens around the truss.
Concrete
Step 1. Determine the mounting location.
Step 2. Use a 1/4" masonry drill bit to pre-drill the mounting holes.
Step 3. Place the concrete anchor into the pre-drilled hole and gently tap into place using a rubber mallet or hammer.
Wood Joist
Step 1. Secure the four (4) 14 " eye lag screws to the wood joist in the ceiling.
Step 2. Make sure eye lag screws are properly secured to the joist before securing the wire to the cable locks on the plate.
Step 3. Run the open end through the hole in the eye lag screw.
Step 4. Run the open end through the loop.
Step 5. Pull the open end down until the braided cable tightens around the eye lag screw.
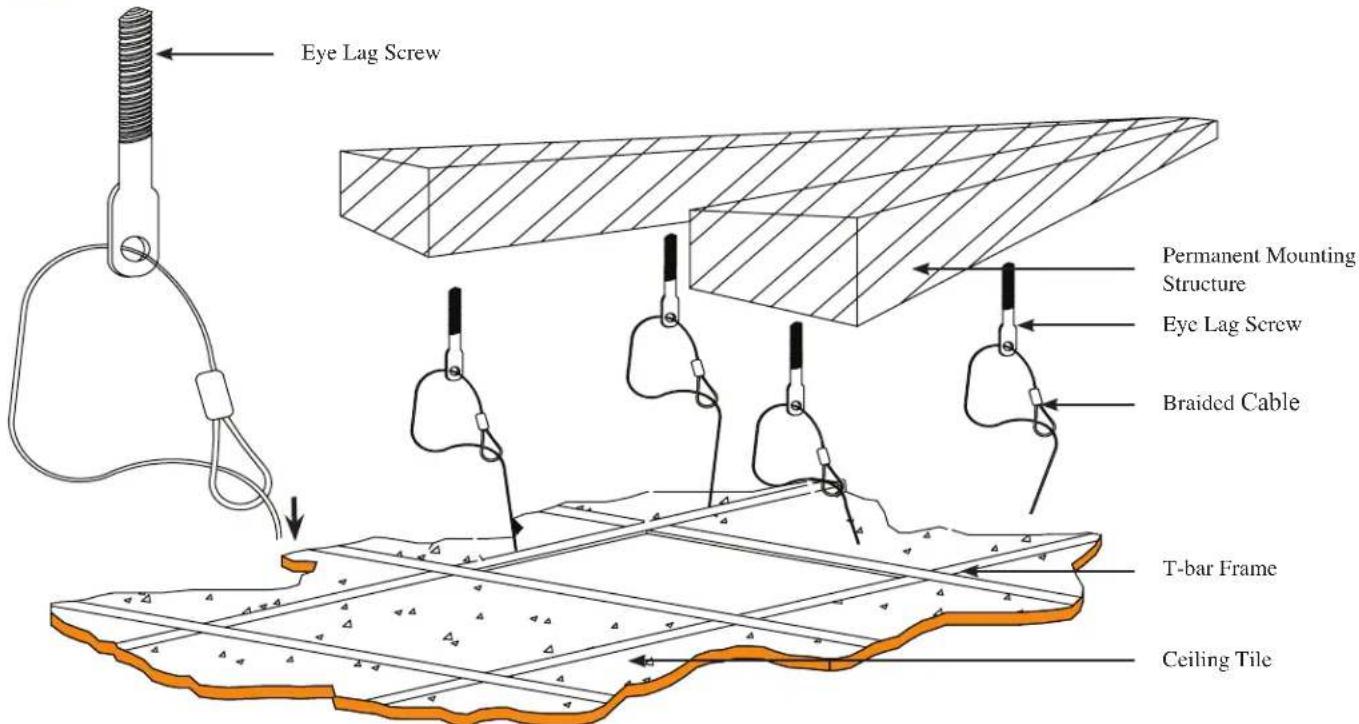
Step 1. Attach the braided cable, using the directions on page 5, in the appropriate manner for your mounting configuration.
Step 2. Let the four (4) strands of braided cable hang down off to one side of the opening in the ceiling.
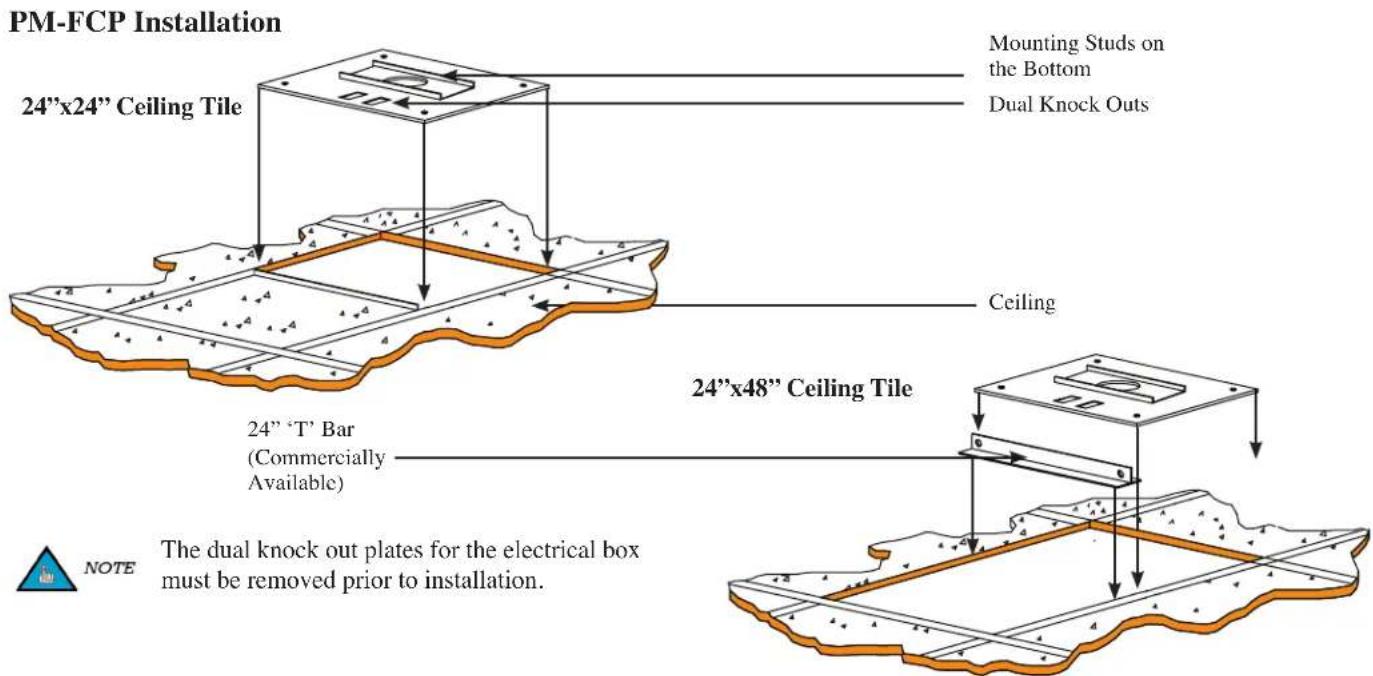
Step 1. Install the PM-FCP plate securely onto the T-bar framework with the mounting studs face down (according to your installation configuration).

In the event that you are using the PM-FCP in an opening that is 24" x 48", a 24" piece of T-bar (commercially available) must be used to support the mount and ceiling tile. The T-bar (commercially available) will run from side to side and help support the PM-FCP and 24" x 24" replacement ceiling tile (commercially available).
Attaching the Pipe Clamps
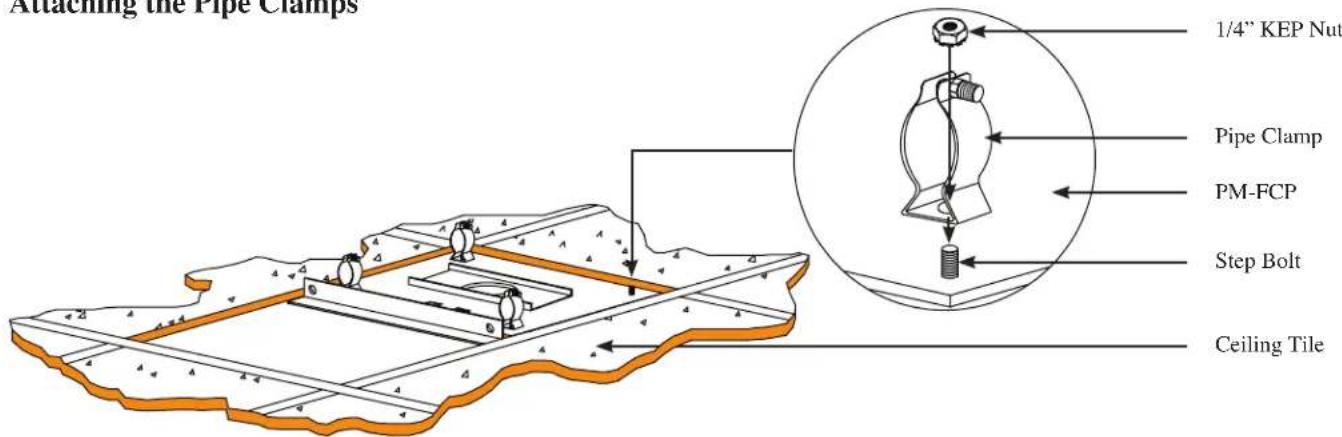
Step 1. Locate the pre-installed step bolts that are on the PM-FCP.
Step 2. Remove the four (4) black rubber caps from the step bolts.
Step 3. Lower the pipe clamp onto the step bolt.
Step 4. Secure the pipe clamp to the PM-FCP using a 1/4" KEP nut (see above).
Step 5. Tighten all hardware with a wrench (commercially available).
Step 6. Re-attach the four (4) black rubber caps onto the step bolts.
Step 7. Repeat steps 1 through 3 for the remaining pipe clamp installation.
Attaching the EMT Conduit Pipe (Optional)
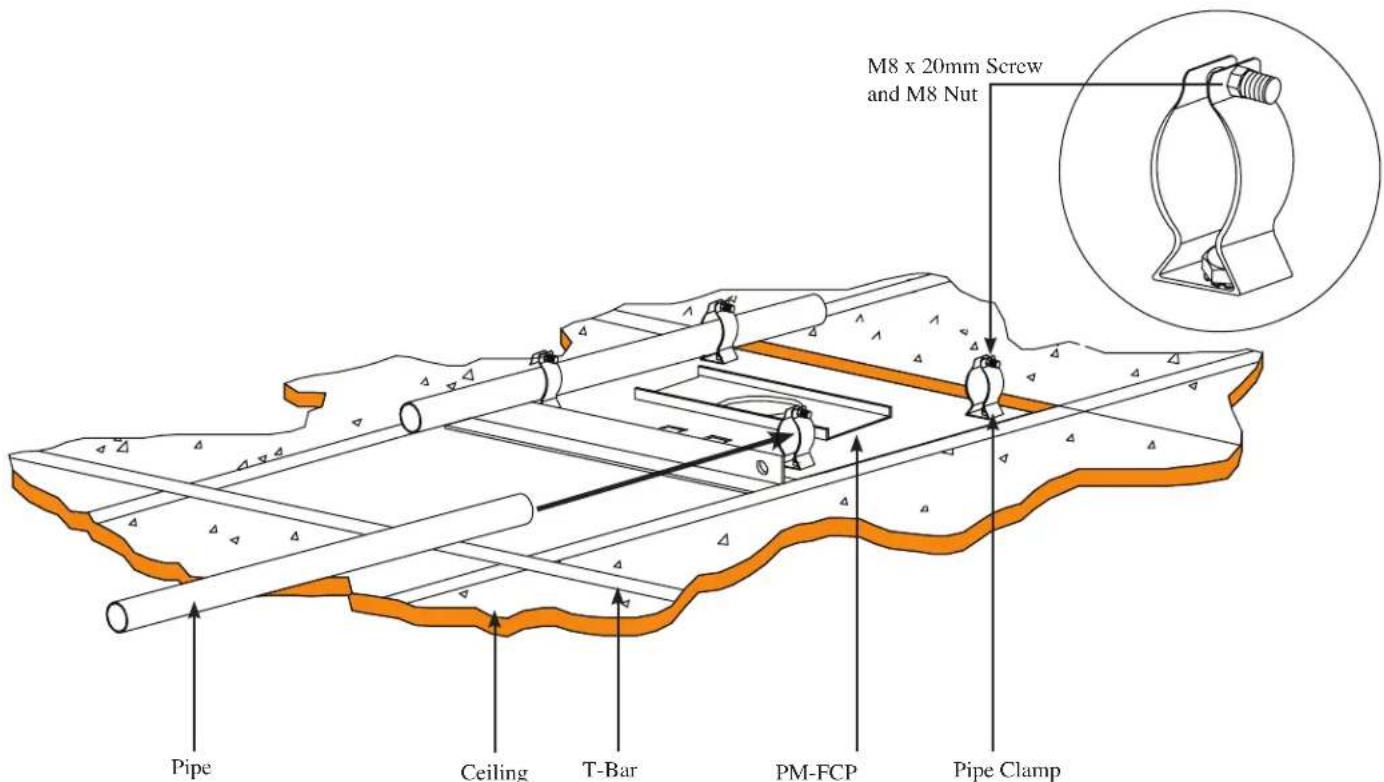
Step 1. For added security, slide two (2) 3/4" EMT conduit pipe (commercially available) through the pipe clamps.
Step 2. Once the EMT conduit pipe (commercially available) is installed, use a screwdriver to tighten the four (4) M8 x 20mm Phillips head screws and four (4) M8 nuts.

NOTE
The EMT conduit pipe must cross over two sections of the T-bar framework on both sides of the pipe clamps.
Quick Lock Installation

CAUTION Re-check all hardware and installation for proper tightness and security and replace the tile.
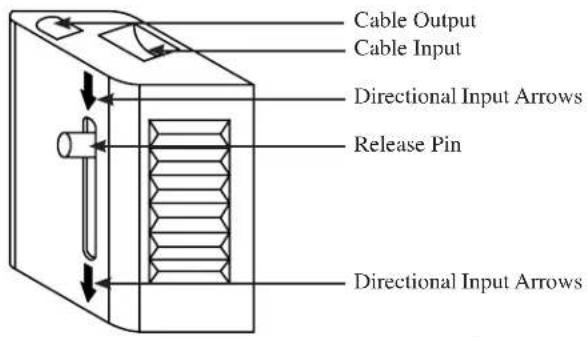

Feed braided cable into the cable lock (see directional input arrows). To release the braided cable, slide the release pin to disengage the braided cable.
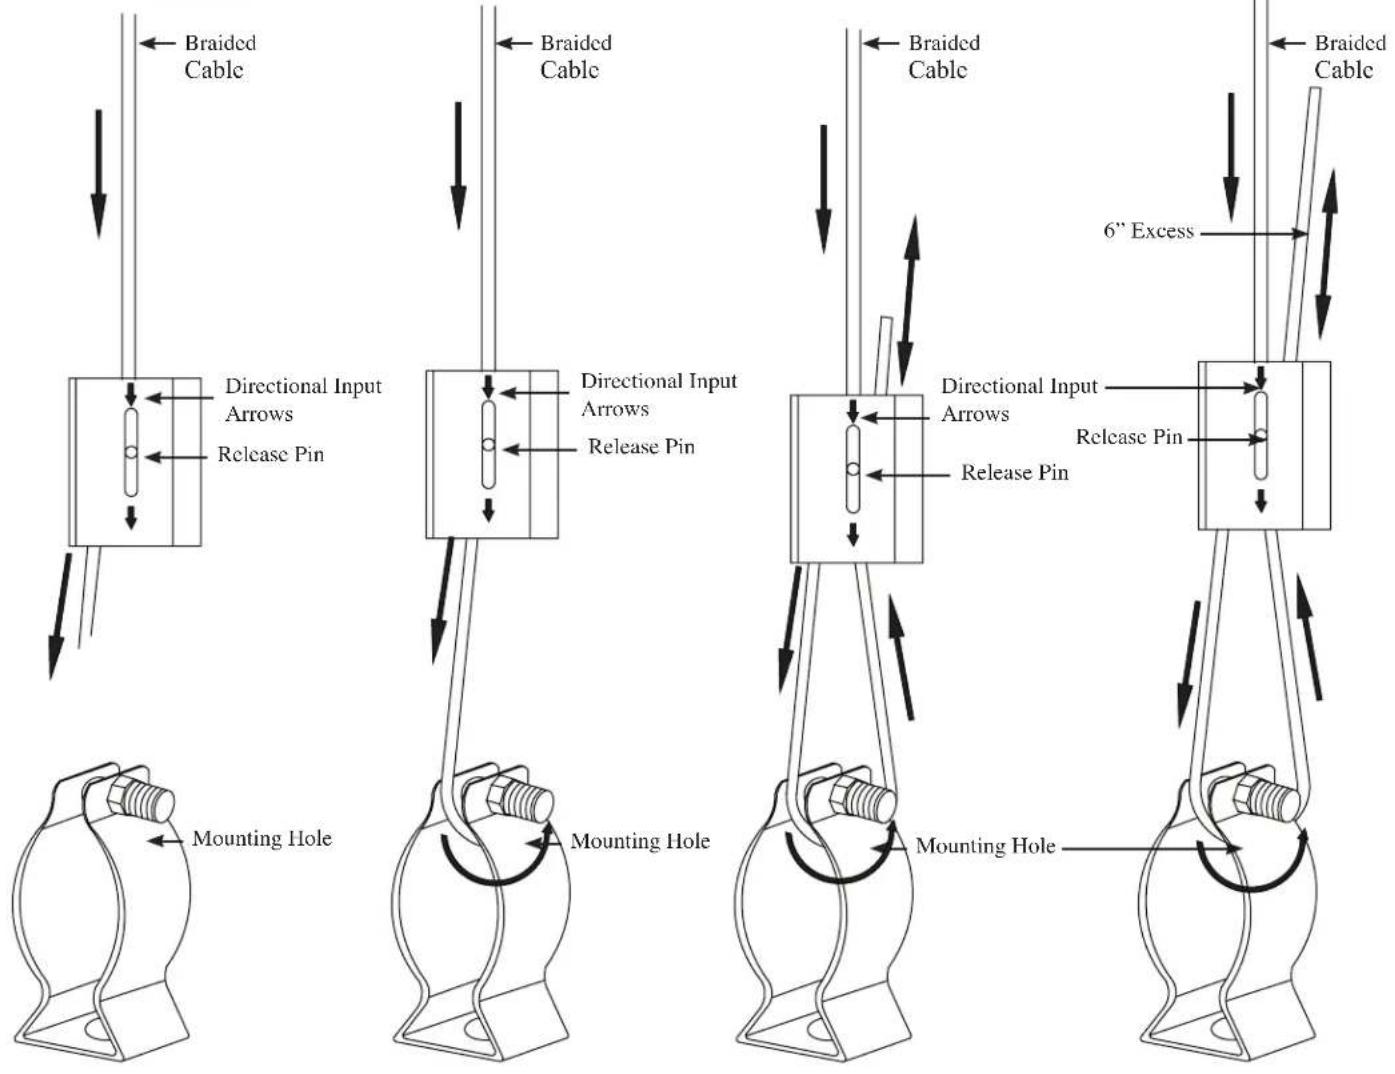
Step 1. Once the braided cables have been attached to the upper mounting structure (wood joist, concrete or ceiling truss), it is now time to attach the braided cable to the PM-FCP.
Step 2. Thread each braided cable through the Quick Lock (see previous page).
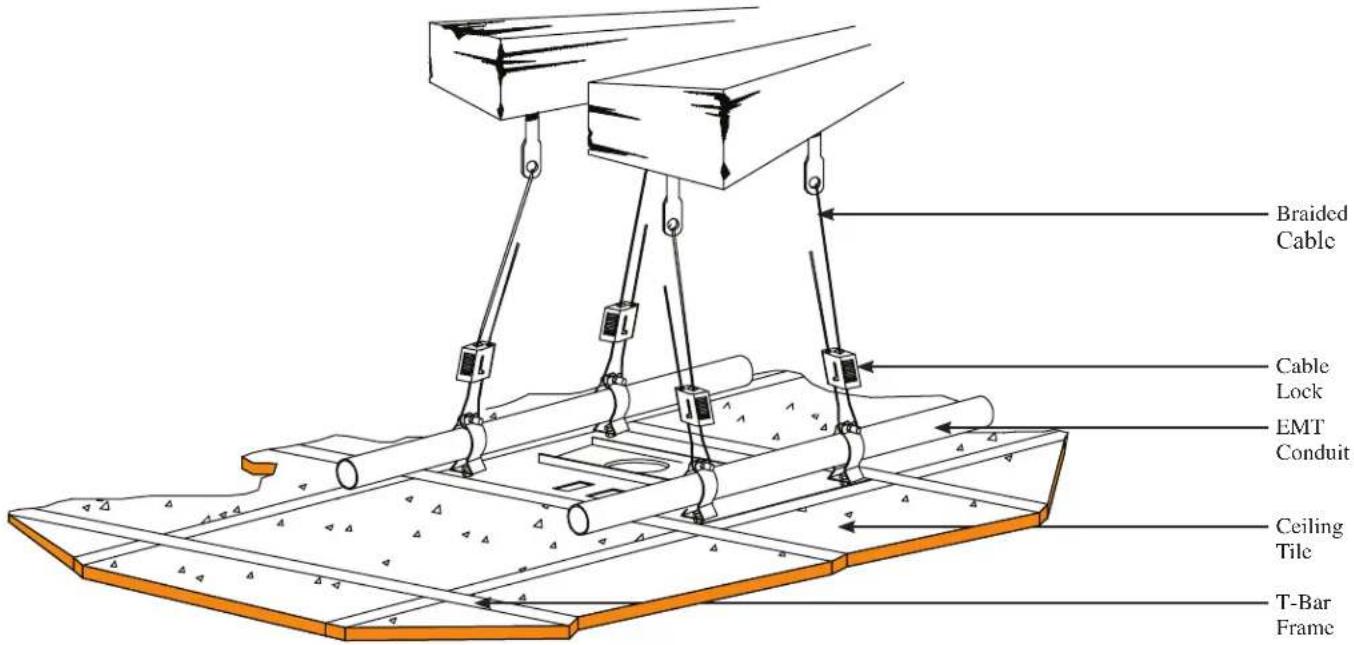
Step 3. Loop the braided cables through the space between the EMT conduit pipe and the top of the pipe clamp (see previous page).
Step 4. When adjusting the tension of the weight-bearing side of the Quick Lock, the cable must be pulled through the Quick Lock until the desired tension is attained. Once attained, pull the braided cable through the other side of the Quick Lock (see previous page).
Step 5. Once the tension has been adjusted, be sure that there is at least 6" of excess braided cable on the non-weight bearing side of the Quick Lock.
Step 6. Use cable cutters to remove any remaining braided cable (optional).
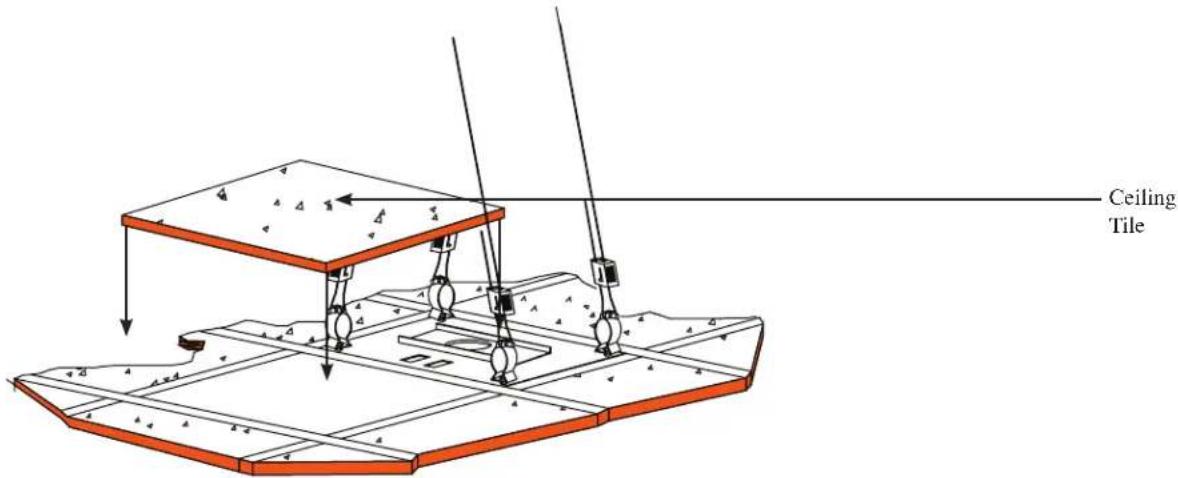

If you chose to use the optional EMT conduit pipe, the ceiling tiles where the EMT conduit pipe crosses over must be installed prior to installing the EMT conduit pipe.
Step 7. Reinstall the ceiling tile.
Electrical Box Installation

NOTE
Electrical installation should be done in accordance to local codes and regulations.
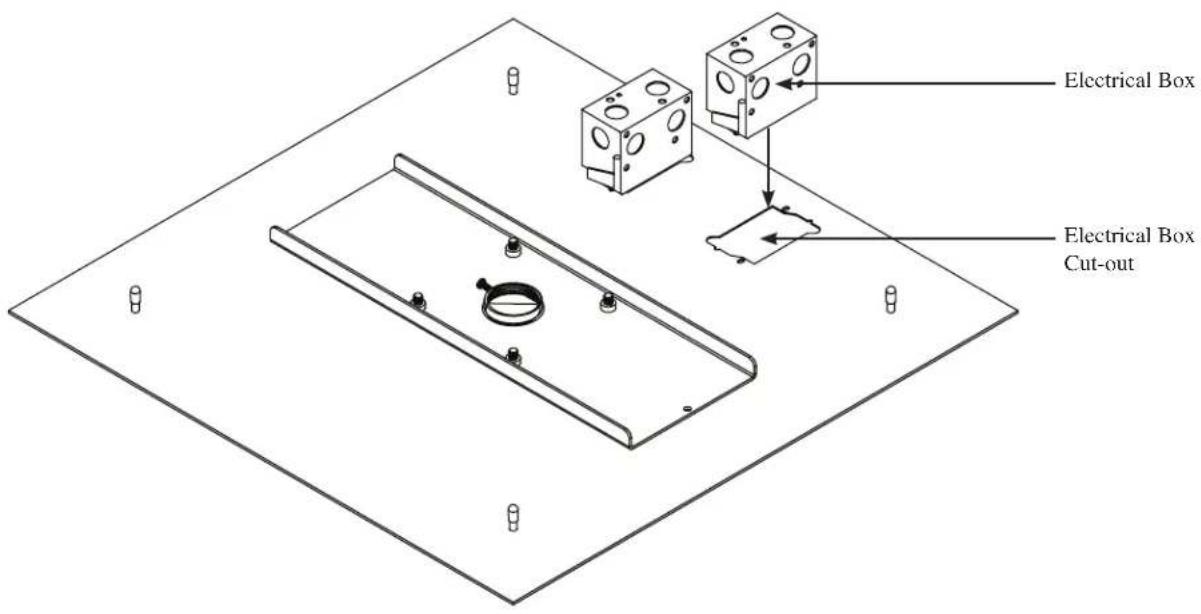
Step 1. Cut the tile where the electrical base box is going to be secured.
Step 2. Using (commercially available) hardware depending on electrical installation environment, install the electrical box and secure it to the plate.
Step 3. Make all electrical connections at this time.
PM-FCP Adjustments
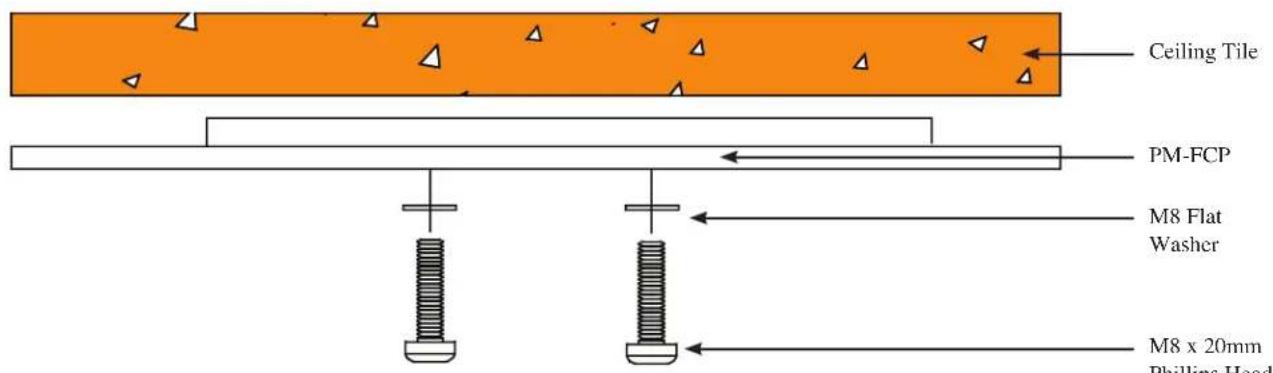
Step 1. Loosen the M8 x 20mm screws and M8 flat washers. This will allow you to slide the base box laterally.

NOTE
Please refer to the purchased base box for further operating instructions.
Securing Pipe to the PM-FCP
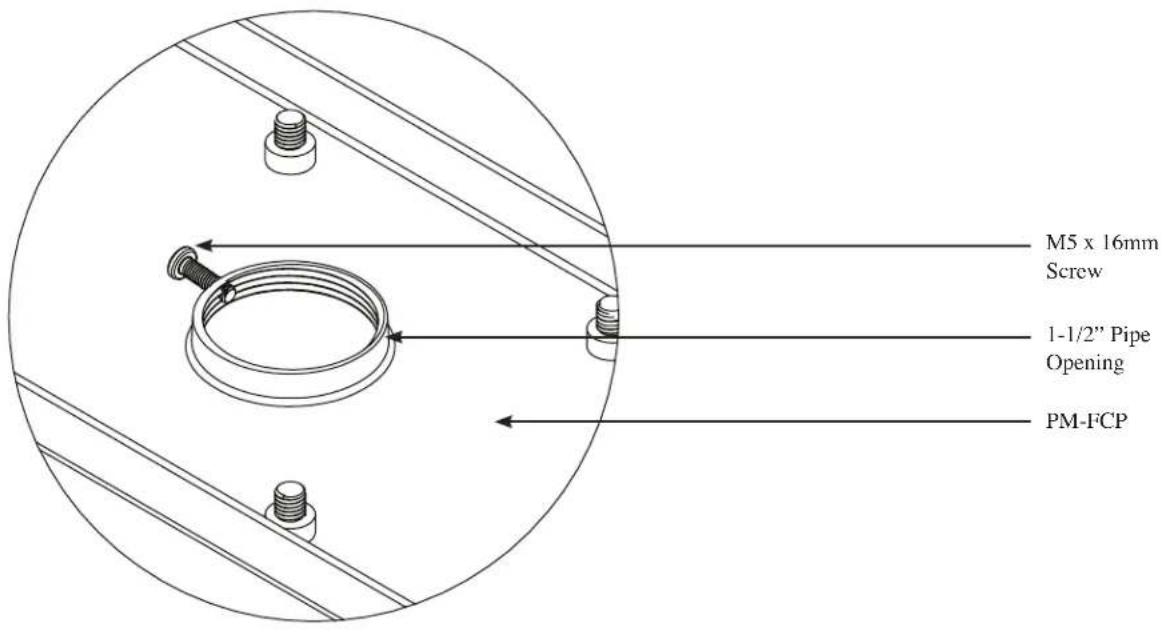
Step 1. Secure the 1 12 (NPT) pipe to the ceiling plate and tighten by using one (1) M5 x 16 Phillips head screw (supplied) to the plate.

CAUTION
The M5 x 16 Phillip head screw must be used to stabilize the 1 12 (NPT) pipe.
Technical Specifications
All measurements are in inches (mm).
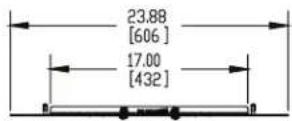
![23.875 [606] 4.500 [114] 23.875 [606] 4.50 [114] 8.750 [222] 10.594 [269] 1.5' NPT PIPE THREADS](/content/2026/05/831031/images/5fa9f9eff6cf581ddcad9a04155f1cc69c18e3489476c3ef84162bcd82f43006.jpg)
![1.00 [25] .85 [22]](/content/2026/05/831031/images/61a399b4e5a826a301920a2f0e5292e6ffdf89cc94666a10c17a3c50fba4ecaf.jpg)
Warranty
PREMIER MOUNTS LIMITED LIFETIME WARRANTY
What and Who is Covered by this Limited Warranty and for How Long
Premier Mounts warrants this product to be free from defects in material and workmanship for the lifetime of the original owner of this product. The limited warranty is valid only for the original purchaser of the product.
What Premier Mounts Will Do
At the sole option of Premier Mounts, Premier Mounts will repair or replace any product or product part that is defective. If Premier Mounts chooses to replace a defective product or part, a replacement product or part will be shipped to you at no charge, but you must pay any labor costs.
What is Not Covered; Limitations
PREMIER MOUNTS DISCLAIMS ANY LIABILITY FOR DAMAGE TO MOUNTS, ADAPTERS, DISPLAYS, PROJECTORS, OTHER PROPERTY, OR PERSONAL INJURY RESULTING, IN WHOLE OR IN PART, FROM IMPROPER INSTALLATION, MODIFICATION, USE OR MISUSE OF ITS PRODUCTS.
PREMIER MOUNTS DISCLAIMS ALL OTHER WARRANTIES, EXPRESS OR IMPLIED, INCLUDING WARRANTIES OF MERCHANTABILITY AND FITNESS FOR A PARTICULAR PURPOSE. PREMIER MOUNTS IS NOT RESPONSIBLE FOR INCIDENTAL OR CONSEQUENTIAL DAMAGES, INCLUDING BUT NOT LIMITED TO, INABILITY TO USE ITS PRODUCTS OR LABOR COSTS FOR REMOVING AND REPLACING DEFECTIVE PRODUCTS OR PARTS. SOME STATES DO NOT ALLOW THE EXCLUSION OR LIMITATION OF INCIDENTAL OR CONSEQUENTIAL DAMAGES, SO THE ABOVE LIMITATION OR EXCLUSION MAY NOT APPLY TO YOU.
What Customers Must Do for Limited Warranty Service
If you discover a problem that you think may be covered by the warranty you MUST REPORT it in writing to the address below within thirty (30) days. Proof of purchase (an original sales receipt) from the original consumer purchaser must accompany all warranty claims. Warranty claims must also include a description of the problem, the purchaser's name, address, and telephone number. General inquiries can be addressed to Premier Mounts Customer Service at 1-800-368-9700. Warranty claims will not be accepted over the phone or by fax.
Premier Mounts
Attn: Warranty Claim
1321 South State College Blvd.
Fullerton, CA 92831
How State Law Applies
THIS WARRANTY GIVES YOU SPECIFIC LEGAL RIGHTS, AND YOU MAY ALSO HAVE OTHER RIGHTS WHICH VARY FROM STATE TO STATE.

- PM-FCP
- Warning Statements
- Parts List
- Installation Tools
- Ceiling Tile Removal
- Ceiling Anchoring
- WARNING
- Truss ceiling
- Concrete
- Wood Joist
- Attaching the Pipe Clamps
- Attaching the EMT Conduit Pipe (Optional)
- Quick Lock Installation
- Electrical Box Installation
- PM-FCP Adjustments
- Securing Pipe to the PM-FCP
- Technical Specifications
- Warranty
- PREMIER MOUNTS LIMITED LIFETIME WARRANTY
- What and Who is Covered by this Limited Warranty and for How Long
- What Premier Mounts Will Do
- What is Not Covered; Limitations
- What Customers Must Do for Limited Warranty Service
- How State Law Applies
Brand : VIEWSONIC
Model : PM-FCP
Category : Uncategorized