
Chariot Cheetah XT 1 - Stroller THULE - Free user manual and instructions
Find the device manual for free Chariot Cheetah XT 1 THULE in PDF.


| Product Type | Child Carrier / Stroller (convertible with Thule conversion kits) |
| Brand | Thule |
| Model | Chariot Cheetah XT 1 |
| Suitable Age | 6 months to 4 years |
| Maximum Child Weight | 22 kg (49 lbs) |
| Maximum Total Load | 34 kg (75 lbs) including child and cargo |
| Product Weight | 9 kg (19 lbs) |
| Folded Dimensions (L x W x H) | 107 x 61 x 27 cm (42 x 24 x 11 in) |
| Unfolded Length | 111 cm (43.7 in) |
| Wheel Size | 20 inches (aluminum) |
| Recommended Tire Pressure | 30-35 psi (2.1-2.5 bar) |
| Handlebar | Adjustable height (two positions) |
| Parking Brake | Foot-operated, rear axle |
| Cover | Two-in-one weather cover with roll-up window and sunshade |
| Seatbelt | 5-point harness with adjustable shoulder height |
| Storage Compartments | Large mesh pocket, small pocket, two front mesh pockets (max cargo 4 kg) |
| Safety Wrist Strap | Included |
| Conversion Kits (sold separately) | Strolling, Jogging, Bicycle Trailer, Cross-Country Skiing & Hiking |
| Accessories (compatible) | Cup holder, hydration cage, infant sling, cargo rack, etc. |
| Cleaning | Mild soap and water; no solvents |
| Storage | Dry area, out of direct sunlight; hang if possible |
| Spare Parts | Only Thule approved parts should be used |
| Service | Annual inspection by authorized service provider recommended |
| Warranty | Contact Thule for details |
Frequently Asked Questions - Chariot Cheetah XT 1 THULE
User questions about Chariot Cheetah XT 1 THULE
0 question about this device. Answer the ones you know or ask your own.
Ask a new question about this device
Download the instructions for your Stroller in PDF format for free! Find your manual Chariot Cheetah XT 1 - THULE and take your electronic device back in hand. On this page are published all the documents necessary for the use of your device. Chariot Cheetah XT 1 by THULE.
USER MANUAL Chariot Cheetah XT 1 THULE
natural_image
Line drawing of a wheeled cart with a handle and wheels, no text or symbols presentCONTENTS
1 INTRODUCTION
1.0 Thank You 03
1.1 Manual Intended Use 04
1.2 Carrier Intended Use 04
1.3 Specifications 04
2 PARTS DESCRIP TION
2.0 Included in the box 05
3 SAFETY
3.0 Safety Introduction 06
3.1 Symbols and Instructions 06
3.2 General Safety Instructions 06
4 GETTING STARTED
4.0 Unpacking Your Carrier 08
4.1 Included Components 08
4.2 Unfolding the Carrier 09
4.3 Folding the Carrier 09
4.4 Installing the Wheels 10
4.5 Removing the Wheels 10
4.6 Installing the Handlebar 11
4.7 Installing a Thule Conversion Kit 11
5 USE & FEATURES
5.0 Setting the Parking Brake 12
5.1 Using the Two-in One Cover 13
5.2 Child Placement and Seatbelt 14
5.3 Using the Safety Wrist Strap 15
5.4 Using the Sunshade 15
5.5 Storage 16
6 ADDITIONAL INFORMATION
6.0 Accessories 17
6.1 Service and Care 17
6.2 Storage 18
6.3 Wear and Tear 18
1 INTRODUCTION
Thank you for choosing a Thule Chariot Cheetah. Your new carrier offers superior quality, safety features and comfort.
PLEASE NOTE:
All Thule child carriers are designed with the end consumer in mind and their desire for maximum flexibility & performance; in order to achieve this, the purchase of conversion kit(s) is required allowing you to choose the activity you desire while also eliminating the need to purchase several dedicated child carriers. The four Thule Conversion Kits available for sale from your local dealer are:

Thule Strolling Kit Thule Jogging Kit Thule Bicycle Trailer Kit Thule Cross-Country Skiing
& Hiking Kit
Thule Canada Inc. retains all rights to this Owner's Manual. No text, details, or illustrations from this manual may be reproduced, distributed, or become the subject of unauthorized use for commercial purposes, nor may they be made available to others.
Additional Manuals for using this carrier may be downloaded from www.thule.com. Great care has been taken in assembling this manual. Nevertheless, should you discover any errors, we would be grateful if you could bring them to our attention.
1.1 MANUAL INTENDED USE Who is this Manual intended for?
This Manual is intended for the purchaser and user of the carrier, who is also responsible for keeping it in proper condition, carrying out maintenance as prescribed and performing repairs.
When using this carrier with the Thule Bicycle Trailer Kit, please also follow the owner's manual of the bicycle used for towing and the specifications there regarding the maximum allowable full load for the bicycle.
1.2 CARRIER INTENDED USE Use as intended
The carrier is intended for use within the performance ranges specified for the carrying of children in daylight hours, on sidewalks, light traffic public roads, and smooth paths.
Luggage may also be carried in the storage bags intended for that purpose, provided the children in the carrier are not put at risk.
If the child carrier is used in conditions of poor visibility, at dusk or in the hours of darkness, it is highly recommended to be fitted with a safety approved working light set.
As part of the recommended use, you should also follow this Owner's Manual and comply with the prescribed maintenance requirements.
Use not recommended
Any use that goes beyond the above is not recommended.
Use not recommended is primarily the conveying of people together with animals, use of this carrier on rough off-road terrain, use for commercial purposes, overloading, excessive speed and improper repair of defects or modifications.
The manufacturer is not liable for damages arising from use that is not recommended – this is at the risk of the user.
1.3 SPECIFICATIONS
| [S] | Thule Chariot Cheetah XT 1 | Thule Chariot Cheetah XT 2 |
 | ||
 | 22 kg49 lbs | 22 kg x249 lbs x2 |
 | 6 m - 4 y 6 m - 4 y | |
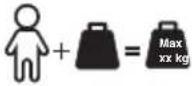 | 34 kg75 lbs | 45 kg100 lbs |
 | 111 cm43.7 inch | 111 cm43.7 inch |
 | 9 kg/ 19 lb | 10 kg/ 22 lb |
 | 107 x 61 x 27 cm42 x 24 x 11 in | 107 x 80 x 27 cm42 x 31 x 11 in |
2
PARTS DESCRIPTION
INCLUDED
A. Cheetah 1 or 2 chassis
B. Adjustable Height Handlebar
C. 2 - 20" Aluminum wheels
D. 2 in 1 weather cover
E. Thule Strolling Kit
F. Thule Bicycle Trailer Kit

3
SAFETY
The safe use of this child carrier is vital to the enjoyment of it. For that reason it is extremely important that you familiarize yourself with the safety instructions in this manual and follow them whenever you use this child carrier.
3.1 SYMBOLS AND INSTRUCTIONS
This owner's manual uses warnings and notices throughout to emphasize safety and optimal use information.

WARNING
Warnings provide instructions critical to the safe use and operation of this Thule child carrier. Failure to follow these instructions could result in an accident, potentially causing serious injury or death to you and/or your passenger(s).
NOTICE
Notices provide additional instructions to make using the product easier.
3.2 GENERAL SAFETY INSTRUCTIONS
- Important – Keep these instructions for future reference.
- Your child's safety may be affected if you do not follow these instructions.
• Never leave the child unattended.
• Always use the restraint system. - Put on the park brake whenever you park this child carrier.
- Do not carry extra children or bags on this child carrier.
- This child carrier will become unstable if the manufacturer's recommended load is exceeded.
- Do not use with children who exceed the weight limitations.
- When using this child carrier with only one child, the child should be seated in the right side.
- The user of this child carrier must be aware of exposure hazards such as wind chill and heat exhaustion, either by less active children in prolonged exposure in colder temperatures, or by extended periods in warmer temperatures without adequate
ventilation or hydration.
- Do not allow any of the child's body, cloting, shoe laces, or toys to come into contact with moving parts.
- Care must be taken when folding and unfolding this child carrier to prevent finger entrapment. Ensure children are clear of any moving parts, otherwise they may be injured.
- Do not install a car seat or any other seating device not approved by Thule Canada Inc. on this child carrier.
- Only use Thule Canada Inc. approved rack products otherwise this child carrier will become unstable if any other parcel bag or rack is used.
- It is unsafe to use any accessory products which are not approved by Thule Canada Inc.
- Do not use any cleaning solvents on this child carrier, clean only with mild soap and water.
• Make no modifications to this child carrier. - Only replacement parts supplied or recommended by the manufacturer/distributor shall be used.
- Do not use this child carrier on stairs or escalators.
- Do not use this child carrier around or near an open fire or exposed flame.
- A reflector that complies with local regulations shall be visible on the rear of this child carrier when it is used for cycling.
- Before each ride, ensure the attached child carrier does not interfere with braking, pedaling, or steering of the bicycle.
- Never ride a bicycle at night without adequate lighting. Obey all local legal requirements for lighting.
- Cycle trailers pulled by an EPAC can be restricted by law. Obey all local legal requirements.
- Be aware of the negative influence of the trailer on the braking distance of the cycle when the trailer is attached.

WARNING
This product is not suitable for skating.

WARNING
This product is not suitable for running unless a Thule Jogging Kit is attached.

WARNING
Do not let your child play with this product.
4
GETTING STARTED
4.0 UNPACKING YOUR CARRIER

natural_image
Diagram of a mechanical component with a black arrow indicating a force or direction, no text or symbols present.A. Open the box flaps and remove the staples. (See image 1)
B. Remove the handlebar from inside the box.
C. Lay the box on its side on a clean, sturdy surface.
D. Slide the carrier and wheels out of the box.
E. Remove and discard all packaging materials.
4.1 INCLUDED COMPONENTS
Verify that your carrier was packaged with the following items:
- Cheetah Chassis
- Two-in-One Cover (on Chassis)
- Handlebar
- Two 20 inch Wheels
• The Owner's Manual
NOTICE
Store your carrier and its components in a safe dry place so that when they are needed, they are in the best possible condition.
4.2 UNFOLDING THE CARRIER

natural_image
Line drawing of a car seatbelt mechanism with hand placement and directional arrows indicating movement (no text or symbols)
natural_image
Technical line drawing of a car seat assembly with no visible text or symbolsA. With one hand on the upper frame and the other hand on the carrier axle, pull the two halves apart. (See image 1)
B. With one hand on the upper frame and the other hand on the folding bar, pull the back frame rearward until the auto-lock disc engages. Repeat for the other side of the carrier. (See image 2)
C. Verify that the carrier's frame is locked by giving the left and right back frame a push forwards.

4.3 FOLDING THE CARRIER

natural_image
Line drawing of a person using a tool to adjust or install a vehicle component (no text or symbols visible)A. With one hand, pull or release the auto-lock disc on one side of the back frame. With the other hand, push forwards on the bracket. Repeat for the back frame on the other side of the carrier. (See image 3)
B. With one hand on the upper frame and the other hand on the carrier axle, push the two halves together.
WARNING
Care must be taken when folding and unfolding this child carrier to prevent finger entrapment. To avoid injury ensure that your child is kept away when unfolding and folding this product.
4.4 INSTALLING THE WHEELS
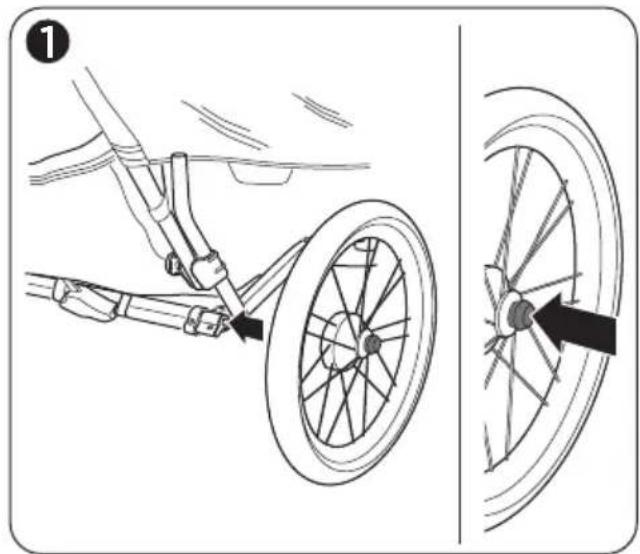
A. Press and hold the wheel release butto on the wheel. (See image 1)
B. Insert the wheel axle into the carrier axle.
C. Release the wheel release button.
D. Press the wheel fully into the carrier axle.
E. Verify that the wheel is securely attached to the carrier by giving it a sharp pull.
F. Repeat for the other wheel.
G. Using a tire pressure gauge check the air pressure in each tire. The minimum recommended tire pressure is 30 psi (2.1 bar) and the maximum is 35 psi (2.5 bar).
H. If air pressure is too low in either one of the tires fill them up using a bicycle tire pump

4.5 REMOVING THE WHEELS

A. Press and hold the wheel release button on a wheel. (See image 2)
B. Pull the wheel out of the carrier axle.
C. Repeat for the other wheel.
4.6 INSTALLING THE HANDLEBAR


natural_image
Illustration of two hands performing a pull-up or lifting operation on a textured surface (no text or symbols)A. With one hand on each side of the handlebar, press and hold the spring buttons on both ends of the handlebar. (See image 1)
B. Slide both ends of the handlebar into the upper frame of the carrier. Allow the spring buttons to click into place. (See image 2)
D. Verify that the handlebar is securely attached to the carrier by giving it a sharp pull - it should not pull out.
E. To remove the handlebar; press both of the spring pins through the upper frame and pull the handlebar out.

WARNING
Before each journey make sure that both of the spring pins in the handlebar are fully engaged. Any load attached to the handle affects the stability of the child carrier.
4.7 INSTALL A THULE CONVERSION KIT
A. Select a Thule conversion kit from the following:
- Thule Strolling Kit
- Thule Jogging Kit
• Thule Bicycle Trailer Kit
• Thule Cross-Country Skiing & Hiking Kit
B. Install and use the selected kit according to the instructions included with the Thule Conversion Kits.
NOTICE
The HeightRight™ adjustable handlebar has two positions; high and low. Remove the handlebar and turn it over to change between these two positions.
5
USE & FEATURES
natural_image
Mechanical assembly diagram showing a hand operating a bicycle wheel with a belt and lever mechanism (no text or symbols)A. Push in on the red foot pedal on the carrier axle to engage the parking brake. (See image 1)
B. After engaging the brake always verify that the parking brake is working - the carrier should not roll forwards or backwards.
C. Pull out on the red foot pedal on the carrier axle to release the parking brake. (See image 2)

natural_image
Mechanical diagram showing a lever mechanism with a curved guide and a black arrow indicating motion (no text or symbols)
WARNING
Never leave your child unattended in this child carrier.
The park brake should always be engaged during the loading and unloading of children.
NOTICE
No adjustments of the parking brake are required.

natural_image
Line drawing of a wheeled cart with wheels and a roller, no text or symbols present
natural_image
Line drawing of a two-wheeled cart with wheels and a handle, showing motion arrows (no text or symbols)5.1 USING THE TWO-IN ONE COVER
A. To improve the air flow inside the carrier; roll up the plastic window. Use the elastic rings at the top of the cover to keep the window up. (See image 1)
B. To keep the elements out of the carrier; unroll the plastic window. Use the velcro at the bottom of the cover to keep the window closed.
C. To open the cover; undo the velcro on the front corner of each carrier's cover.
D. To close the cover; pull down the front of the cover and attach each corner using the velcro. (See image 2)
E. To remove the cover from the carrier; remove the handlebar, remove the Accessory Cross Bar, open the cover, and slide the top of the cover up, off of the upper frame.
F. To put the cover back on the carrier; remove the handlebar, remove the Accessory Cross Bar and slide the holes at the top of the cover back over the upper frame.

WARNING
The user of this child carrier must be aware of exposure hazards such as wind chill and heat exhaustion, either by less active children in prolonged exposure in colder temperatures, or by extended periods in warmer temperatures without adequate ventilation or hydration.

WARNING
When this child carrier is used as a cycle trailer, the weather cover should be closed to prevent debris from entering the carrier

5.2 CHILD PLACEMENT AND SEATBELT
A. Engage the parking brake.
B. Open the two-in-one cover.
C. Loosen all of the belt adjustments.
D. Undo the crotch strap buckle on the shoulder harness by pressing the red release button.
E. Seat your child(ren).
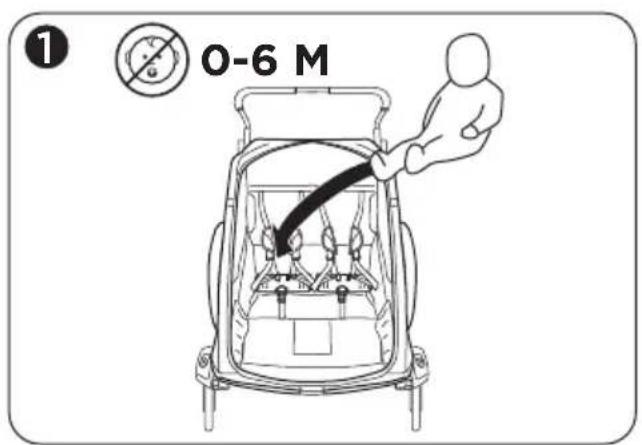
F. Slide the shoulder belt height adjustment located on the vertical web straps, in the seat back, to the same height as your child(ren)'s shoulders. (See image 1)
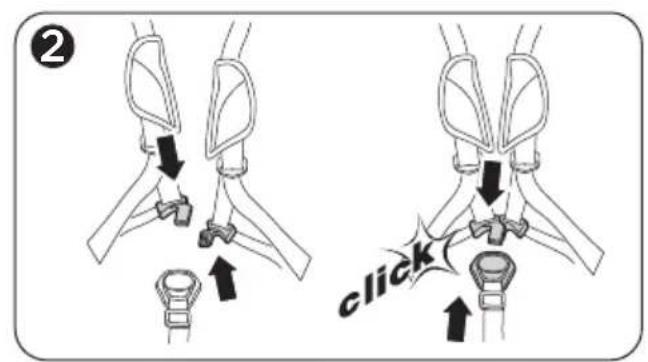
G. Lift up the crotch strap and connect the two shoulder strap buckles together and then insert them together into the crotch buckle. (See image 2)
H. Adjust the harness system using the shoulder length adjustments until the crotch strap buckle is positioned above their lower chest. (See image 3)
I. Snugly tighten the two shoulder straps by pulling downward on the shoulder strap loose ends. Ensure that there is no looseness in the harness system at the child's waist and shoulders. Ensure the shoulder pads are positioned on top of the child's shoulders and next to their neck.
WARNING
This seat unit is not suitable for children under 6 months. Use a harness as soon as your child can sit unaided.
Do not add a pad thicker than 10 mm.
Check that the seat unit attachment devices are correctly engaged before use.
Avoid serious injury from child falling or sliding out. Always use seat belt.
NOTICE
When seating a single child in a Thule Chariot Cheetah 2 always seat the child in the right side.
5.3 USING THE SAFETY WRIST STRAP
natural_image
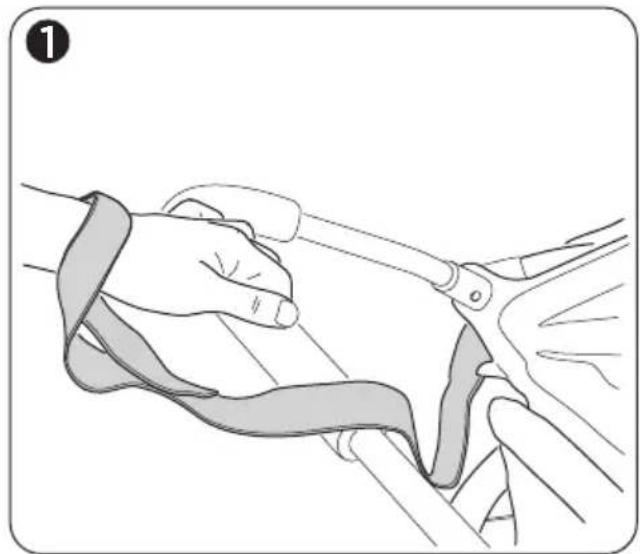
Illustration of a hand holding a ribbon, with no visible text or symbolsA. Loop the free end of the safety wrist strap around your wrist to prevent the child carrier from becoming separated from you. (See image 1)
B. When not in use stow the free end of the safety wrist strap inside the large mesh pocket.

WARNING
Failure to use the safety wrist strap could cause the carrier to become separated from you resulting in an accident in which your passenger(s) could suffer serious injury or death.
5.4 USING THE SUNSHADE
natural_image
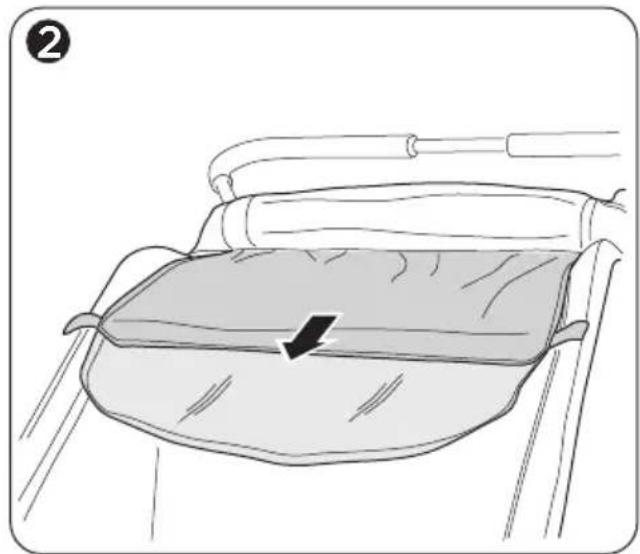
Illustration of a bed with a pillow and seat, showing a black arrow indicating compression or force (no text or symbols)A. To shade inside the carrier; roll the sunscreen down. Use the velcro at the bottom of the sunscreen to keep it closed. (See image 2)
B. To let more light inside the carrier; roll the sunscreen up. Use the elastic rings at the top of the sunscreen to keep it up.
5.5 STORAGE

natural_image
Illustration of a wheelchair-mounted device and its cable being handled, showing motion and assembly (no text or symbols)Your carrier is equipped with the following storage compartments:
• One large mesh pocket on the upper back (See image 1)
• One small pocket inside large mesh pocket
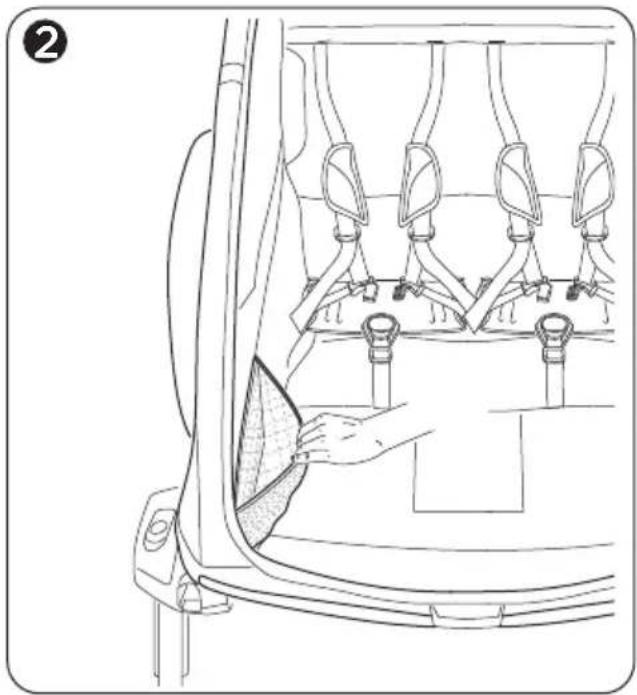
- Two small mesh pockets inside the carrier at the front (See image 2)
NOTICE
The maximum load capacity of the cargo bag is 4 kg (8.8 pounds).
The cargo rack accessory allows the carrier to carry an additional 2.3 kg (5 pounds) above the child compartment.
natural_image
Line drawing of a car interior showing a hand cleaning the seat area with no text or symbolsWARNING
Do not carry extra children or bags on this child carrier. This child carrier will become unstable if the manufacturer's recommended load is exceeded.
6
ADDITIONAL INFORMATION
6.0 ACCESSORIES
There are numerous accessories that are compatible with your Chariot:
- Hydration Cage
- Cup Holder
- Jogging Brake
- Axle-Mount ezHitch Partial
• Shimano Internal Hub Hitch Adapter
• SRAM Internal Hub Hitch Adapter - Cargo Rack
- Infant Sling
• All-Season Bunting Bag - Baby Supporter
- Storage Cover
- Rain Cover
- Console
Contact your local dealer or visit our website: www.thule.com for more information.
6.1 SERVICE AND CARE
Regularly inspect your child carrier, Thule Conversion Kit(s) and accessories for damage and signs of wear.
Metal Components
Check for any dents or cracks. Do not use the child carrier if any metal components are cracked or damaged.
Fasteners
Regularly examine the child carrier to see if any of the fasteners are bent, broken, missing or loose. Tighten any loose fasteners and replace any damaged or missing fasteners.
Fabric
Examine the fabric regularly for tears, worn spots or any other signs of damage. Any holes in the fabric could allow a child's hand to come into contact with the wheels or road surface.
Wheels
Clean the wheel axles and apply grease or oil to all exposed moving parts. Have the wheels inspected and serviced at least once a year. It is highly recommended that you take your child carrier into an authorized service provider once a year to keep it in the best possible condition.
Regularly clean the child carrier with warm water and a mild soapy solution. Never use harsh cleansers or solvents.
6.2 STORAGE
Store your child carrier, Thule Conversion Kit(s) and accessories in a dry area out of direct sunlight. If possible, hang the child carrier up off of the ground. Before storing your child carrier, it should be dry to prevent the growth of mold or bacteria. Do not store the wheels in contact with the windows. Do not store the child carrier coupled to a bicycle for long periods of time.n.
6.3 WEAR AND TEAR
This child carrier is very durable and allows you to transport your child(ren) for long periods of time. It is subject to wear and tear over time depending on several factors.
Use and Milage
The more often this child carrier is used and the farther it goes the more it will wear.
Service and Care
Keeping this child carrier clean and well maintained is an important factor in keeping it in good condition.
Storage
Storing this child carrier properly will reduce the amount of wear, especially to the fabric.
Type of Use
Hard cornering, fast acceleration and braking all contribute to premature wear of various components especially brakes and tires.
Weather
Various weather conditions affect individual components differently. Direct sunlight prematurely wears the fabric, windows and rubber wheels. Salt in the air or on the road affects the wheel rims and fabric floor. Dirt and mud can get into moving parts and contribute to wear as well. Premature wear of a component is not necessarily a sign of a defective product. The way this child carrier is used and cared for will greatly affect how well it performs.
Only replacement parts supplied or recommended by the manufacturer/distributor shall be used.

WARNING
The proper service and care of this child carrier affects the performance and safety of it.
- CONTENTS
- INTRODUCTION
- PARTS DESCRIP TION
- SAFETY
- GETTING STARTED
- USE & FEATURES
- ADDITIONAL INFORMATION
- PLEASE NOTE:
- MANUAL INTENDED USE Who is this Manual intended for?
- CARRIER INTENDED USE Use as intended
- Use not recommended
- SPECIFICATIONS
- 2
- PARTS DESCRIPTION
- INCLUDED
- 3
- SAFETY
- SYMBOLS AND INSTRUCTIONS
- WARNING
- NOTICE
- GENERAL SAFETY INSTRUCTIONS
- 4
- GETTING STARTED
- UNPACKING YOUR CARRIER
- INCLUDED COMPONENTS
- UNFOLDING THE CARRIER
- FOLDING THE CARRIER
- INSTALLING THE WHEELS
- REMOVING THE WHEELS
- INSTALLING THE HANDLEBAR
- INSTALL A THULE CONVERSION KIT
- 5
- USE & FEATURES
- USING THE TWO-IN ONE COVER
- CHILD PLACEMENT AND SEATBELT
- USING THE SAFETY WRIST STRAP
- USING THE SUNSHADE
- STORAGE
- 6
- ADDITIONAL INFORMATION
- ACCESSORIES
- SERVICE AND CARE
- Fasteners
- Fabric
- Wheels
- STORAGE
- WEAR AND TEAR
- Use and Milage
- Service and Care
- Storage
- Type of Use
- Weather
Brand : THULE
Model : Chariot Cheetah XT 1
Category : Stroller