
FX9.9 Touch - Elliptical bike TAURUS - Free user manual and instructions
Find the device manual for free FX9.9 Touch TAURUS in PDF.


| Product Type | Elliptical Bike |
| Brand | Taurus |
| Model | FX9.9 Touch |
| Dimensions (L x W x H) | 160 x 70 x 170 cm |
| Product Weight | 80 kg |
| Maximum User Weight | 150 kg |
| Power Supply | 220-240V AC, 50/60 Hz |
| Display Type | 7-inch Touch Screen |
| Display Metrics | Time, Distance, Speed, Calories, Heart Rate, Pulse |
| Resistance System | Magnetic, 24 Levels |
| Flywheel Weight | 15 kg |
| Stride Length | 51 cm |
| Pedal Size | Adjustable with Anti-Slip Surface |
| Programs | 12 Preset Programs, 1 User Program |
| Heart Rate Monitor | Hand Pulse Sensors & Chest Strap Compatible (Optional) |
| Connectivity | Bluetooth, USB Charging Port |
| Additional Features | Water Bottle Holder, Transport Wheels, Leveling Feet |
| Maintenance | Lubricate moving parts monthly; clean with dry cloth |
| Safety | Emergency Stop, Magnetic Brake, Stable Frame |
| Spare Parts Availability | Pedals, Belts, Handlebars, Console, Power Cord |
| Warranty | 2 Years (Motor & Frame), 1 Year (Parts) |
Frequently Asked Questions - FX9.9 Touch TAURUS
User questions about FX9.9 Touch TAURUS
0 question about this device. Answer the ones you know or ask your own.
Ask a new question about this device
Download the instructions for your Elliptical bike in PDF format for free! Find your manual FX9.9 Touch - TAURUS and take your electronic device back in hand. On this page are published all the documents necessary for the use of your device. FX9.9 Touch by TAURUS.
USER MANUAL FX9.9 Touch TAURUS
Assembly and Operating Instructions
natural_image
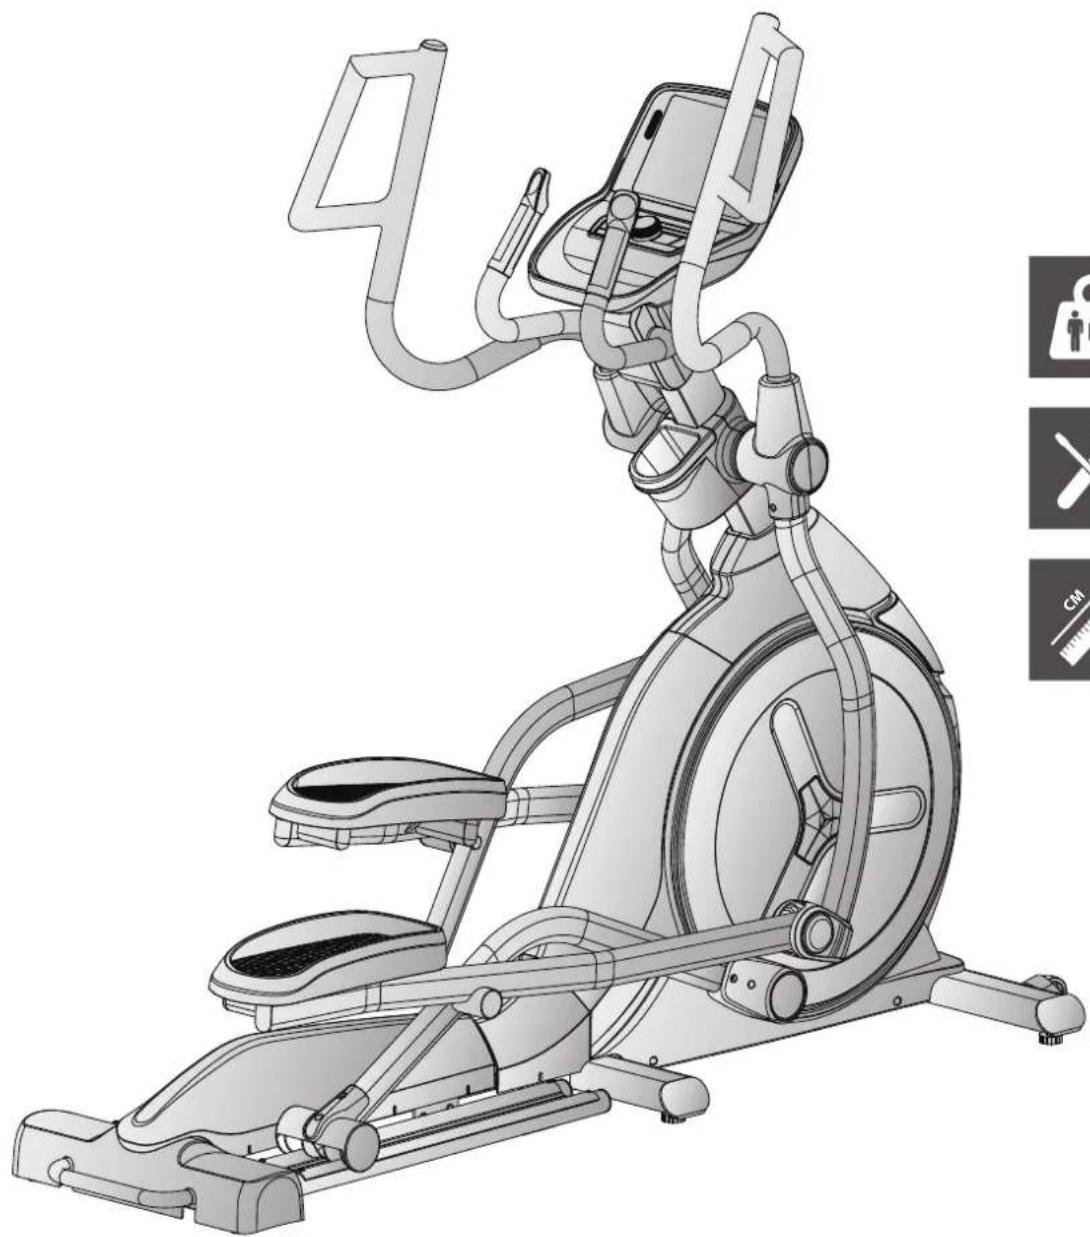
Technical line drawing of an stationary exercise machine with adjustable arms and legs (no text or symbols)Art. No. TF-FX99-TFT
TFFX99TFT.01.05
Content
1 GENERAL INFORMATION 7
1.1 Technical Data 7
1.2 Personal Safety 8
1.3 Electrical Safety 9
1.4 Set-Up Place 9
2 ASSEMBLY 10
2.1 General Instructions 10
2.2 Scope of Delivery 11
2.3 Assembly 12
3 OPERATING INSTRUCTIONS 21
3.1 Console Display 21
3.2 Button Functions 22
3.3 Programmes 23
3.3.1 Quick Start 23
3.3.2 Target programmes 23
3.3.3 Pre-set programmes 23
3.3.4 User-defined programmes 28
3.3.5 Heart rate-oriented programmes 29
3.3.6 Watt programme 30
3.4 Fitness Test 31
3.5 Media 32
3.6 Bluetooth and Fitness Apps 33
4 STORAGE AND TRANSPORT 34
4.1 General Instructions 34
4.2 Transportation Wheels 34
5 TROUBLESHOOTING, CARE AND MAINTENANCE 35
5.1 General Instructions 35
5.2 Faults and Fault Diagnosis 35
5.3 Maintenance and inspection calendar 36
6 DISPOSAL 36
7 RECOMMENDED ACCESSORIES 37
8 ORDERING SPARE PARTS 38
8.1 Serial Number and Model Name 38
8.2 Parts List 39
8.3 Exploded Drawing 44
9 WARRANTY
45
10 CONTACT 47
Dear customer,
Thank you for choosing a high-quality equipment of the brand Taurus ^® . Taurus ^® offers sports and fitness equipment for the sophisticated home sport and the equipment of fitness studios and business customers. With Taurus ^® fitness equipment, the focus is on what sport is all about: maximum performance! Therefore, the equipment is developed in close consultation with athletes and sports scientists. Because athletes know best what makes perfect fitness equipment.
Further information can be found at www.sport-tiedje.com.
Intended Use
The equipment may only be used for its intended purpose.
The equipment is suitable for home use and semi-professional use (e.g. hospitals, clubs, hotels, schools, etc.). The equipment is not suitable for commercial or professional use (e.g. fitness studio).
Legal Notice
Sport-Tiedje GmbH
Europe's No. 1 for home fitness
International Headquarters
Flensburger Straße 55
24837 Schleswig
Germany
Management:
Christian Grau
Sebastian Campmann
Dr. Bernhard Schenkel
No. HRB 1000 SL
Local Court Flensburg
European VAT Number: DE813211547
Disclaimer
©2011 Taurus® is a registered brand of the company Sport Tiedje GmbH. All rights reserved. Any use of this trademark without the explicit written permission of Sport-Tiedje is prohibited.
Product and manual are subject to change. Technical data can be changed without advance notice.
ABOUT THIS MANUAL
Please carefully read the entire manual before installation and first use. The manual will help you to quickly set up the system and explains how to safely use it. Make sure that all persons exercising with the equipment (especially children and persons with physical, sensory, mental or motor disabilities) are informed about this manual and its contents in advance. In case of doubt, responsible persons must supervise the use of the equipment.
Due to ongoing changes and software optimisations, the manual may have to be updated. If you notice any discrepancies during assembly or use, please refer to the manual uploaded to the webshop. The latest manual is always available there.
This equipment has been manufactured according to the latest safety knowledge. As far as possible, potential safety hazards which could cause injury have been eliminated. Make sure to carefully follow

the instructions and that all parts are securely in place. If required, read through the instructions again to correct any mistakes.
Please pay close attention to the safety and maintenance instructions given here. The contract partner cannot be held liable for damage to health, accidents or damage to the equipment when it is not used in accordance with these instructions.
The following safety instructions may appear in this manual:
ATTENTION
This notice indicates potentially hazardous situations which, if not avoided, may result in property damage.
CAUTION
This notice indicates potentially hazardous situations which, if not avoided, may result in slight or minor injuries!
WARNING
This notice indicates potentially hazardous situations which, if not avoided, may result in death or serious injuries!
DANGER
This notice indicates potentially hazardous situations which, if not avoided, will result in death or serious injuries!
i NOTICE
This notice indicates further useful information.
Retain these instructions in a safe place for future reference, maintenance or when ordering replacement parts.
1.1 Technical Data
TFT Display:
- Training time in min.
- Speed in km/h
- Traning distance in km
- Calories in kcal
- Resistance level
- Incline in %
- Heart rate (using the hand pulse sensors or a chest strap)
- RPM (Rotations per minute)
- Watts
Brake system: Electro-magnetic induction brake
Resistance levels: 32
Wattage
Adjustable range in the watt programme: 10-350 W
Min. and max. Watt at 60 RPM: 50-400 W
Min. and max. Watt at 100 RPM: 148-765W
User memory: 4
Training programmes in total: 43
Quick-Start Programmes: 1
Target programmes: 3
Heart rate programmes: 3
Pre-set programmes: 32
User defined programmes: 4 (one per user)
Wattprogrammes: 1
Fitness Test: 1
Stride length: max. 56 cm
Stride height: 14 cm
Transfer ratio: 1:8.75
Flywheel mass: 10 kg
Weight and dimensions:
Packed dimensiosn (LxWxH): 125 cm x 65 cm x 95 cm
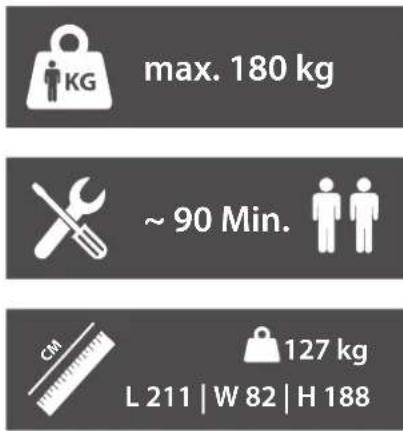
Assembled dimensions (LxWxH): 211 cm x 82 cm x 188 cm
Article weight (gross, incl. packaging): 150.6 kg
Article weight (net, without packaging): 127 kg
Maximum user weight: 180kg
1.2 Personal Safety
DANGER
+ Before you start using the equipment, you should consult your physician that this type of exercise is suitable for you from a health perspective. Particularly affected are persons who: have a hereditary disposition to high blood pressure or heart disease, are over the age of 45, smoke, have high cholesterol values, are overweight and/or have not exercised regularly in the past year. If you are under medical treatment that affects your heart rate, medical advice is absolutely essential.
+ Note that excessive training can seriously endanger your health. Please also note that heart rate monitoring systems can be inaccurate. If you notice any signs of weakness, nausea, dizziness, pain, shortness of breath, or other abnormal symptoms, stop exercising immediately and seek advice from your doctor if necessary.
WARNING
- This equipment may not be used by children under the age of 14.
- Children should not be allowed unsupervised access to the equipment.
+ Persons with disabilities must have a medical license and must be under strict observation when using the equipment.
+ The equipment is strictly for use by one person at a time.
- If your equipment provides a safety key, the clip of the safety key must be attached to your clothing before starting your training. In the event of a fall, the EMERGENCY STOP of the equipment can be initiated.
- Keep your hands, feet and other body parts, hair, clothing, jewellery and other objects well clear of moving parts.
- During use, wear suitable sports clothing rather than loose or baggy clothing. When wearing sports shoes, make sure they have suitable soles, preferably made of rubber or other non-slip materials. Shoes with heels, leather soles, studs or spikes are unsuitable. Never exercise barefoot.
CAUTION
- If your equipment needs to be connected to the power supply with a mains cable, make sure that the cable is not a potential tripping hazard.
- Make sure that nobody is within the range of motion of the equipment during training so as not to endanger you or other persons.
ATTENTION
+ Do not insert any objects of any kind into the openings of the device.
1.3 Electrical Safety

DANGER
+ In order to reduce the risk of an electric shock, always unplug the equipment from the mains socket immediately after your workout, before assembly or dismantling, and before maintenance or cleaning. Do not pull on the cable.

WARNING
+ Do not leave the equipment unattended while the mains cable is plugged into the mains socket. During your absence, the mains cable must be removed from the mains socket to prevent improper use by third parties or children.
+ If the mains cable or plug is damaged or defective, contact your contract partner. Until repair, the equipment must not be used.
ATTENTION

+ The equipment requires a mains connection of 220-230 V with 50 Hz mains voltage.
+ The equipment may only be connected directly to an earthed socket using the supplied mains cable. Extension cables must conform to VDE guidelines. Always completely unwind the mains cable.
+ The socket must be protected by a fuse with a minimum fuse rating of "16 A, slow blow".
+ Do not make any changes to the mains cable or the mains plug.
+ Keep the mains cable away from water, heat, oil and sharp edges. Do not route the mains cable underneath the equipment or under a carpet or rug, and do not place any objects on top of it.
+ If your purchased item is equipped with a TFT console, software updates must be carried out regularly. Follow the instructions on the console to perform the update(s).
+ The software systems on gym equipment with TFT consoles are set up only for the pre-installed apps. Do not install any additional apps.

NOTICE
+ The pre-installed apps on TFT consoles are produced and provided by external manufacturers. Sport-Tiedje does not take any responsibility for the availability, functionality or contents of these apps.
1.4 Set-Up Place
WARNING
+ Do not place the equipment in main corridors or escape routes.
CAUTION
- Choose a location in which to place the equipment such that there is enough free space/clearance to the front, the rear and to the sides of the equipment.
- The training room should be well ventilated during training and not be exposed to any draughts.
- Choose the place in which to set up the equipment such that there is enough free space/clearance to the front, the rear and to the sides of the equipment.
- The set-up and mounting surface of the equipment should be flat, loadable and solid.
ATTENTION
- The device may only be used in one building, in sufficiently tempered and dry rooms (ambient temperatures between 10°C and 35°C). The equipment should not be used outdoors or in rooms with high humidity (over 70%) like swimming pools.
- A floor protective mat/equipment underlay can help to protect high-quality floor coverings (parquet, laminate, cork, carpets) from dents and sweat and can help to level out slight unevenness.
2 ASSEMBLY
2.1 General Instructions
DANGER
+ Do not leave any tools, packaging materials such as foils or small parts lying around, as otherwise there is a danger of suffocation for children. Keep children away from the equipment during assembly.
WARNING
+ Pay attention to the instructions attached to the equipment in order to reduce the risk of injuries.
CAUTION
+ Ensure to have sufficient room for movement in each direction during assembly.
+ The assembly of the equipment must be carried out by at least two adults. If in doubt, seek the help of a third technically skilled person.
ATTENTION
+ To prevent damage to the equipment and the floor, assemble the equipment on a mat or packaging board.
i NOTICE
- In order to make the assembly as simple as possible, some screws and nuts to be used can already be pre-assembled.
- Ideally, assemble the equipment at its later set-up place.
2.2 Scope of Delivery
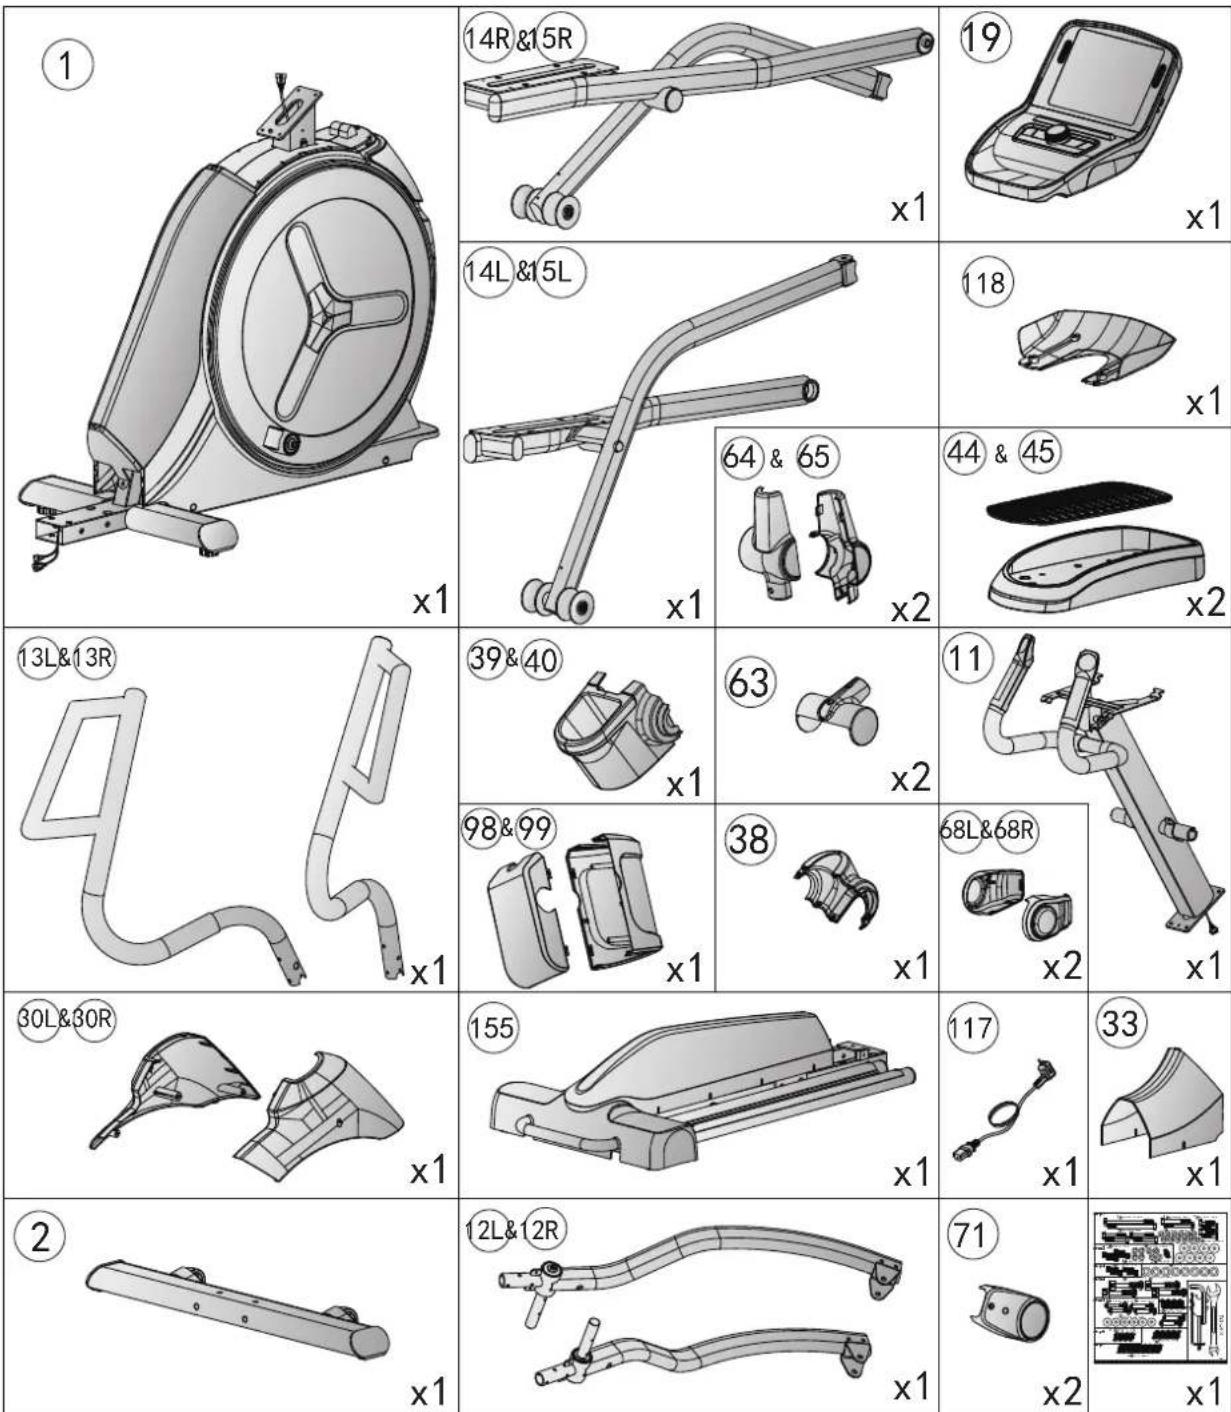
The scope of delivery consist of the following parts. At the beginning, check whether all parts and tools belonging to the device are included in the scope of delivery and whether damage has occurred. In the event of complaints, the contractual partner must be contacted directly.

CAUTION
If parts of the scope of delivery are missing or damaged, the assembly must not be carried out.
2.3 Assembly
Before assembly, take a close look at the individual assembly steps shown and carry out the assembly in the order given.
i NOTICE
First loosely screw all parts together and check that they fit properly. Tighten the screws using the tool only when you are instructed to do so.
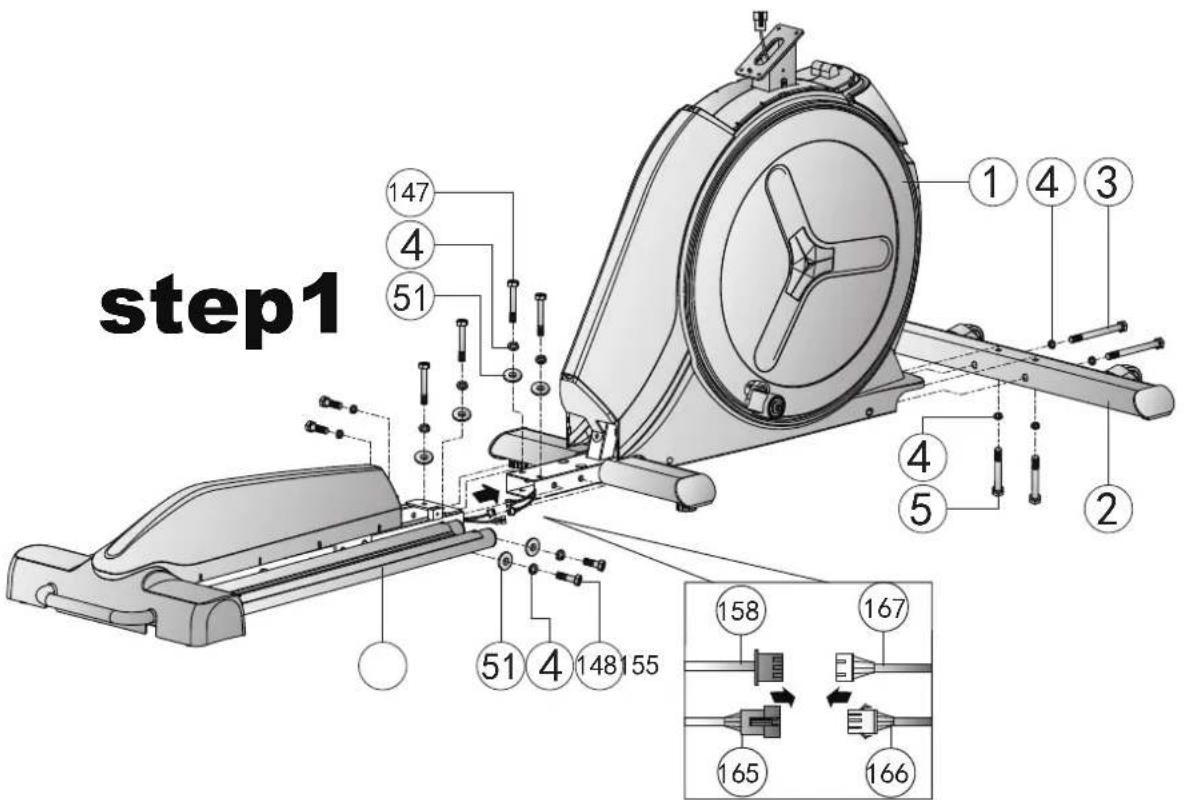
Step 1: Assembling the front and rear feet
- Screw the frontal foot (2) to the main frame (1) with two hexagonal screws (3), two hexagonal screws (5) and four spring washers (4). Only hand tighten the screws in place.
- Connect the incline cable (158) and the control cable (167) together.
- Connect both incline control cables (165 & 166) together.
ATTENTION
In the following step please pay attention that you don't clamp the cables between the frames.
- Screw the rear foot with the rails (155) to the main frame (1) with eight washers (51), eight spring washers (4), four hexagonal screws (147), four hexagonal screws (148) and hand tighten the screws in place.
| 3 | M8*1.25*120L | x2 |
| 5 | M8*1.25*70L | x2 |
| 147 | M8*1.25*55L | x4 |
| 148 | M8*1.25*35L | x4 |
| 4 | D15.4*D8.2*2T | x12 |
| 51 | D25*D8.5*2T | x8 |
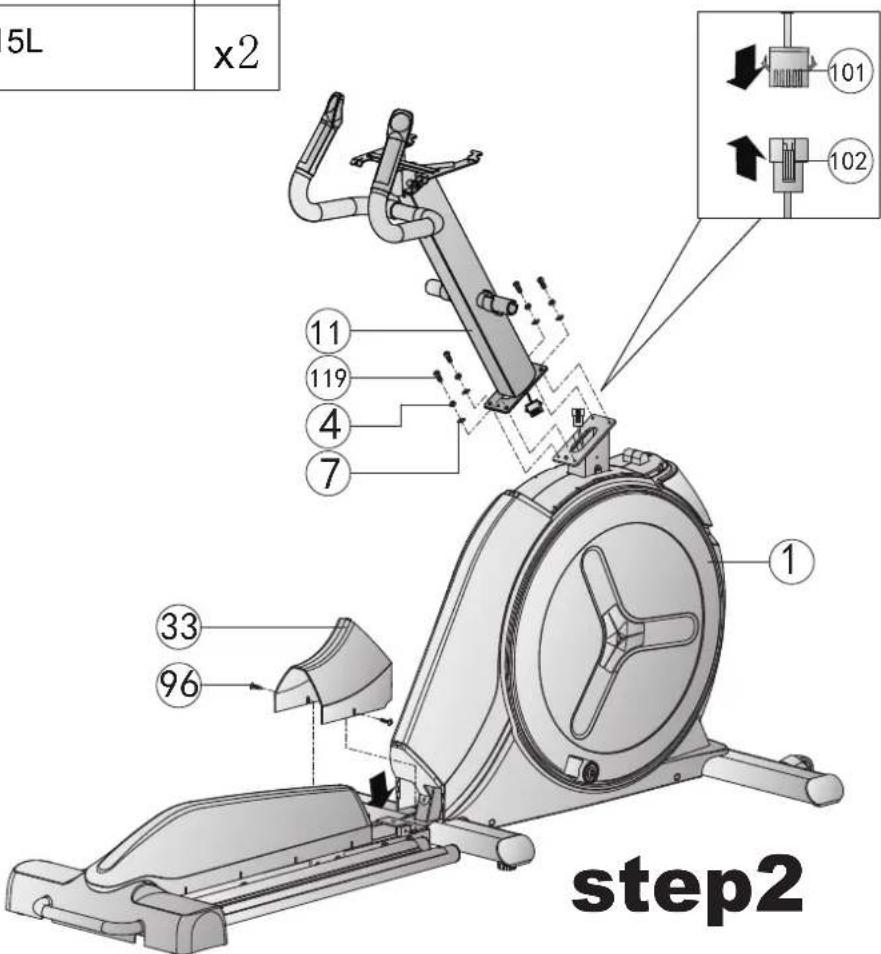
Step 2: Assembling the console mast
- Connect the console cable in the mast (101) with the console cable in the main frame (102).
- Connect the signal cable in the mast (178) with the signal cable in the main frame (179).
ATTENTION
In the following step please pay attention that you don't clamp the cables between the frames.
-
Screw the console mast (11) to the main frame (1) with four washers (7), four spring washers (4), four screws (119) and hand tighten the screws in place.
-
Screw the rear cover (33) to the frame with two screws (96) and hand tighten the screws in place.
| 119 | M8*1.25*25L | x4 | |
| 4 | D15.4*D8.2*2T | x4 | |
| 7 | D16xD8.5x1.2T | x4 | |
| 96 | ST4.2*15L | x2 |
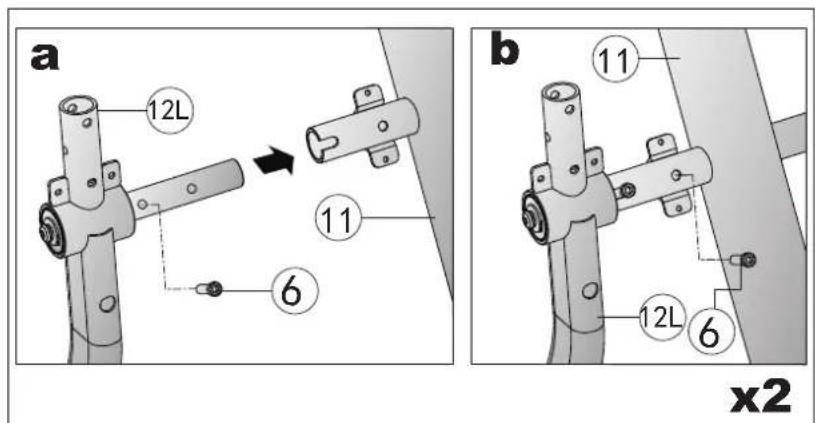
Step 3: Mounting the arms
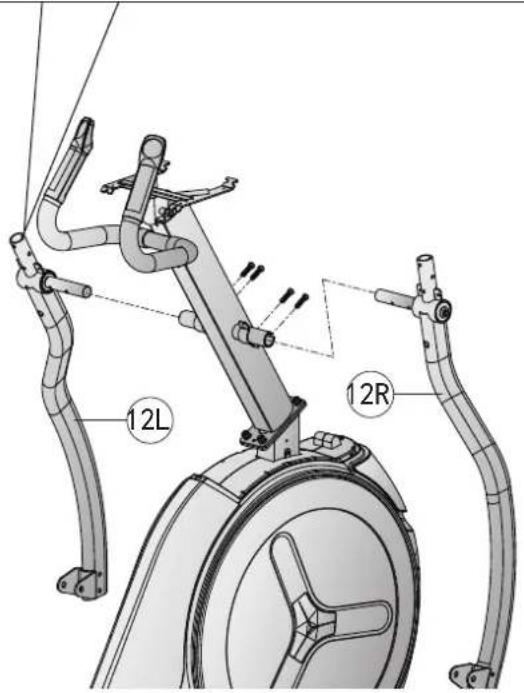
- Screw the left arm (12L) onto the console mast (11) with two Allen screws (6).
- Screw the right arm (12R) onto the console mast (11) with two Allen screws (6). Only hand tighten the screws in place.

step3
Step 4: Mounting the pedals
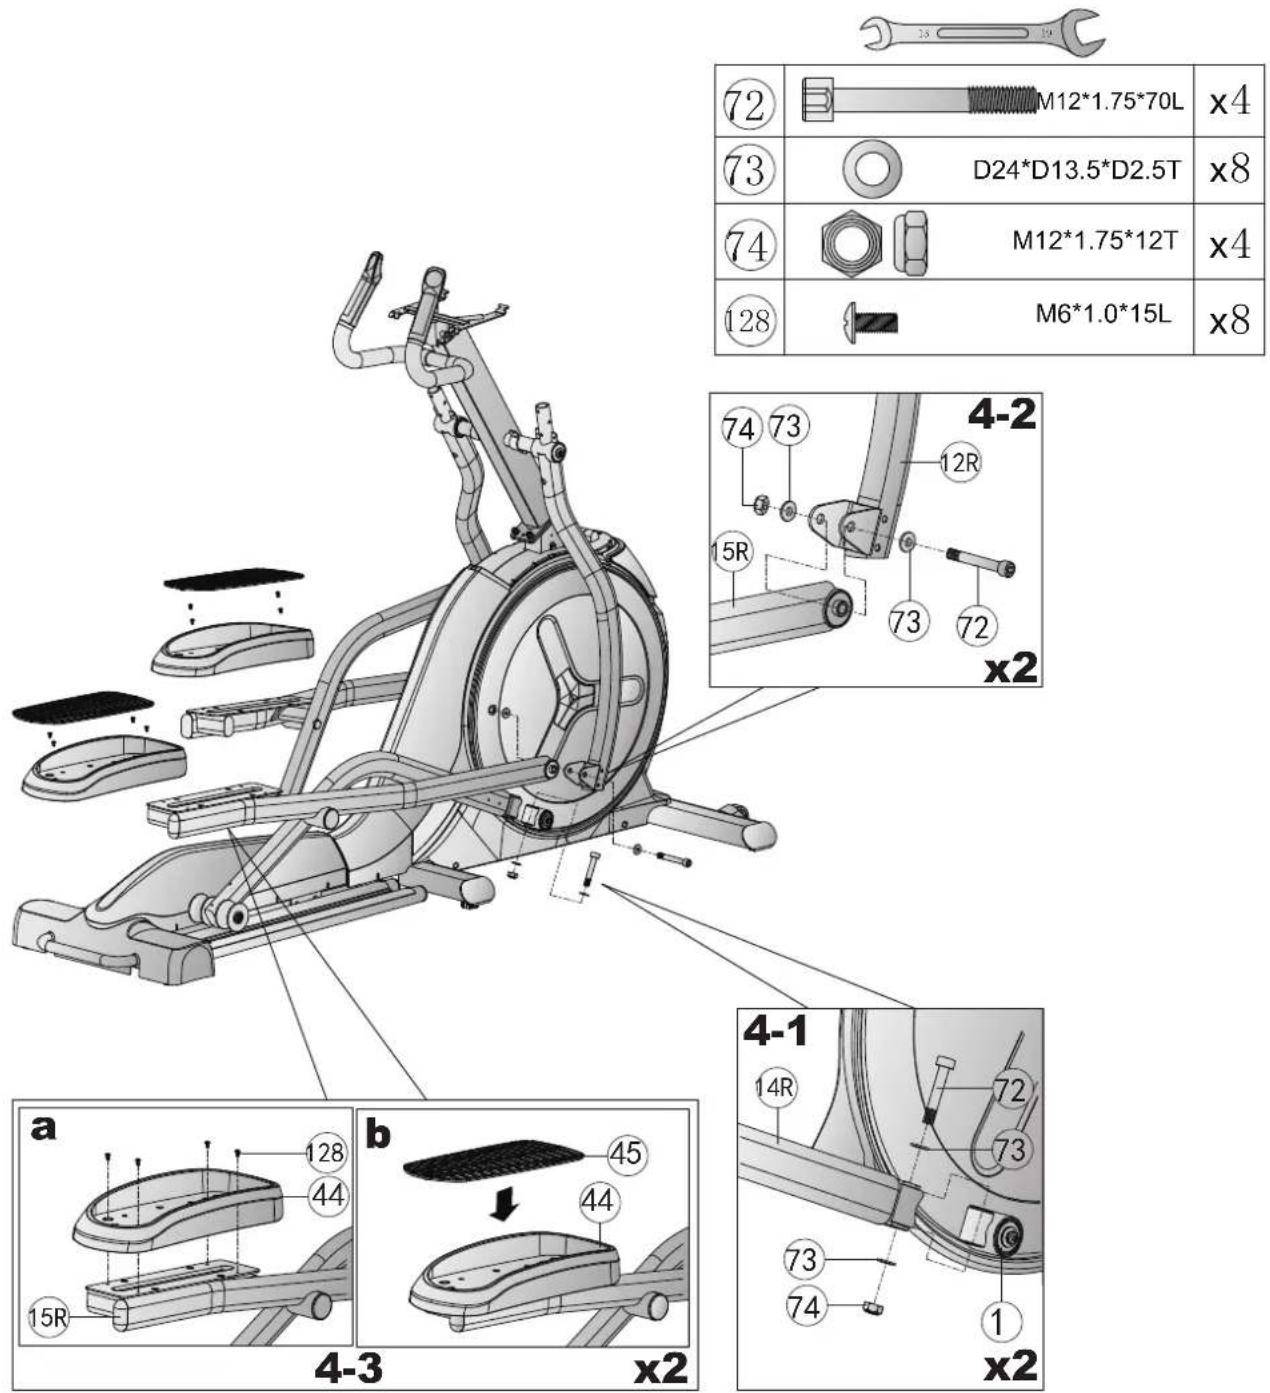
- Mount the right and left pedal poles (14R/14L) on their respective sides of the main frame (1), each with two washers (73), one Allen screw (72) and one locking nut (74) (see fig. 4-1).
- Mount the right and left pedal mounts (15R/15L) on their respective arm (12R/12L), each with two washers (73), one Allen screw (72) and one locking nut (74) (see fig. 4-2).
- Mount the right and left pedals (44) onto the pedal mounts (15R/15L), each with four screws (128) and place the pedal mats (45) on both pedals (44) (see fig. 4-3).
- Only hand tighten the screws in place.
Step 5: Mounting the handles
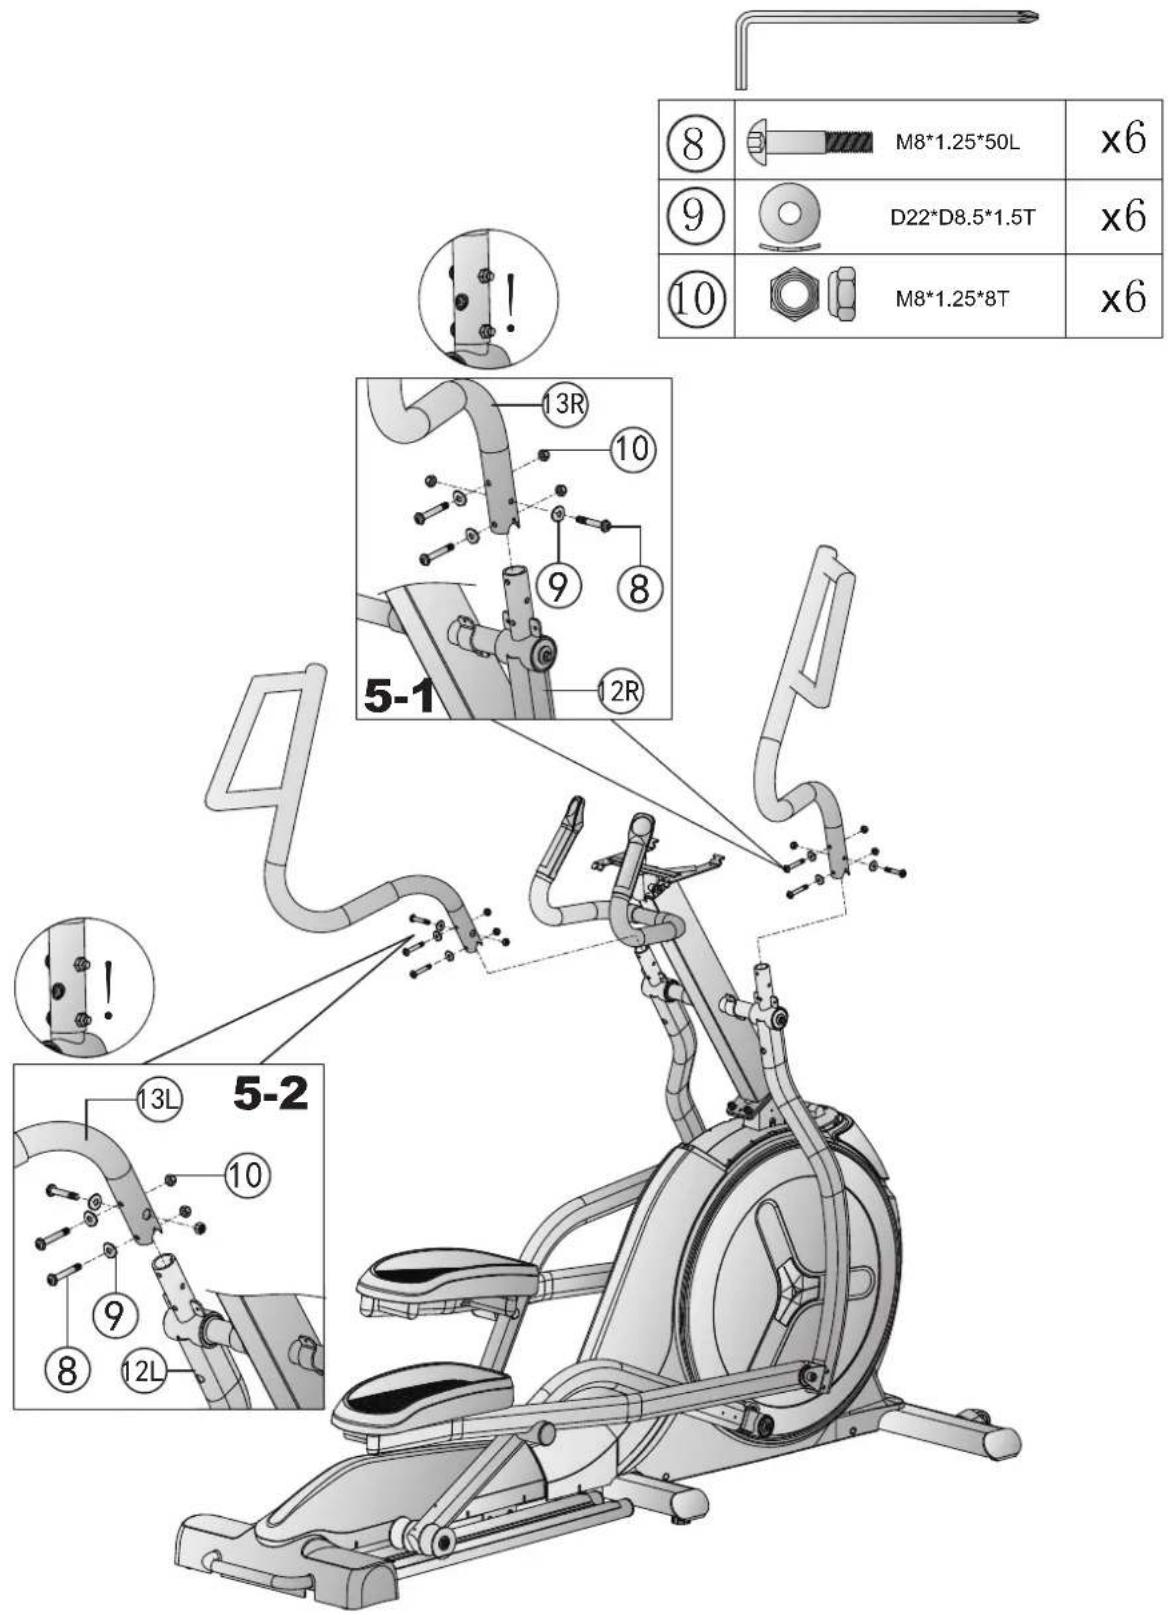
Screw the right and left handles (13R/13L) onto the respective arm (12R/12L), each with three curved washers (9), three Allen screws (8) and three locking nuts (10) (see figs. 5-1 & 5-2). Only hand tighten the screws in place.
Step 6: Mounting the console
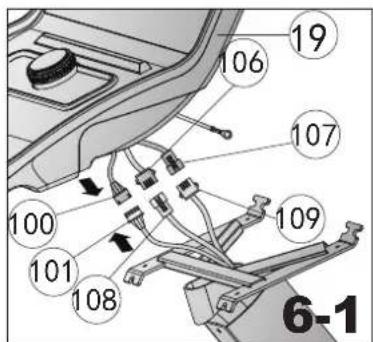
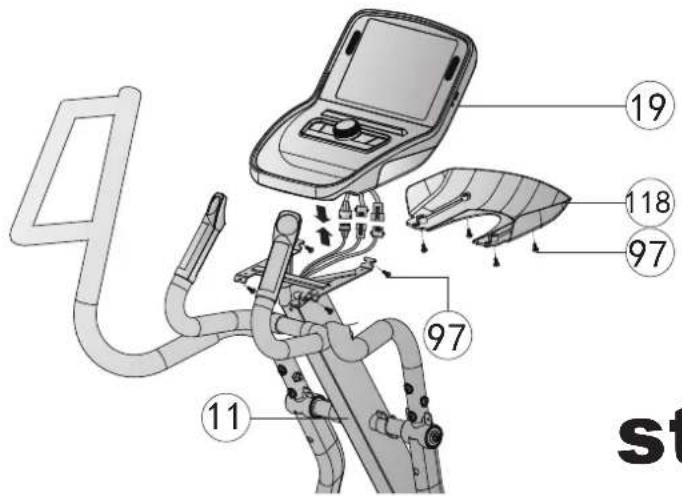
- Connect the console cable from the console (100) with the console cable from the console mast (101) (see fig. 6-1).
- Connect the first hot-key cable from the console (106) with the first hot-key cable from the console mast (108) and the second hot-key cable from the console (107) with the second hot-key cable from the console mast (109) (see fig. 6-1).
- Connect the signal cable from the console (177) with the signal cable from the console mast (178) (see fig. 6-1).
ATTENTION
Pay attention to not pinch the cables during the next steps.
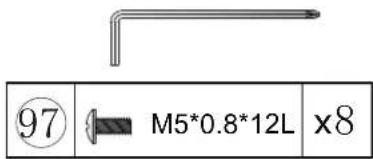
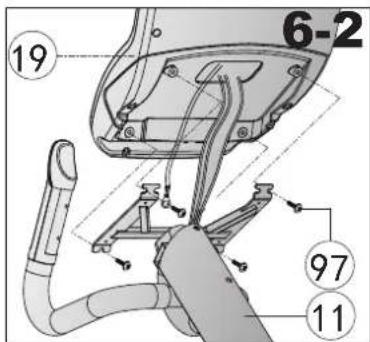
- Guide the ground cable through the console braket on the console mast (11) and mount the console (19) to the console mast (11) with four screws (97) (see fig. 6-2).
- Use one of the screws (97) to fix the ground cable (see fig. 6-2) and hand-tighten the screws.
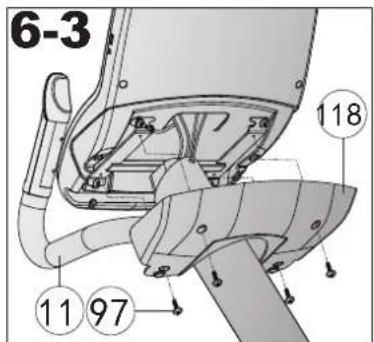
- Screw the cover (118) onto the console mast (11) with four screws (97) (see fig. 6-3) and hand tighten the screws in place.
step6
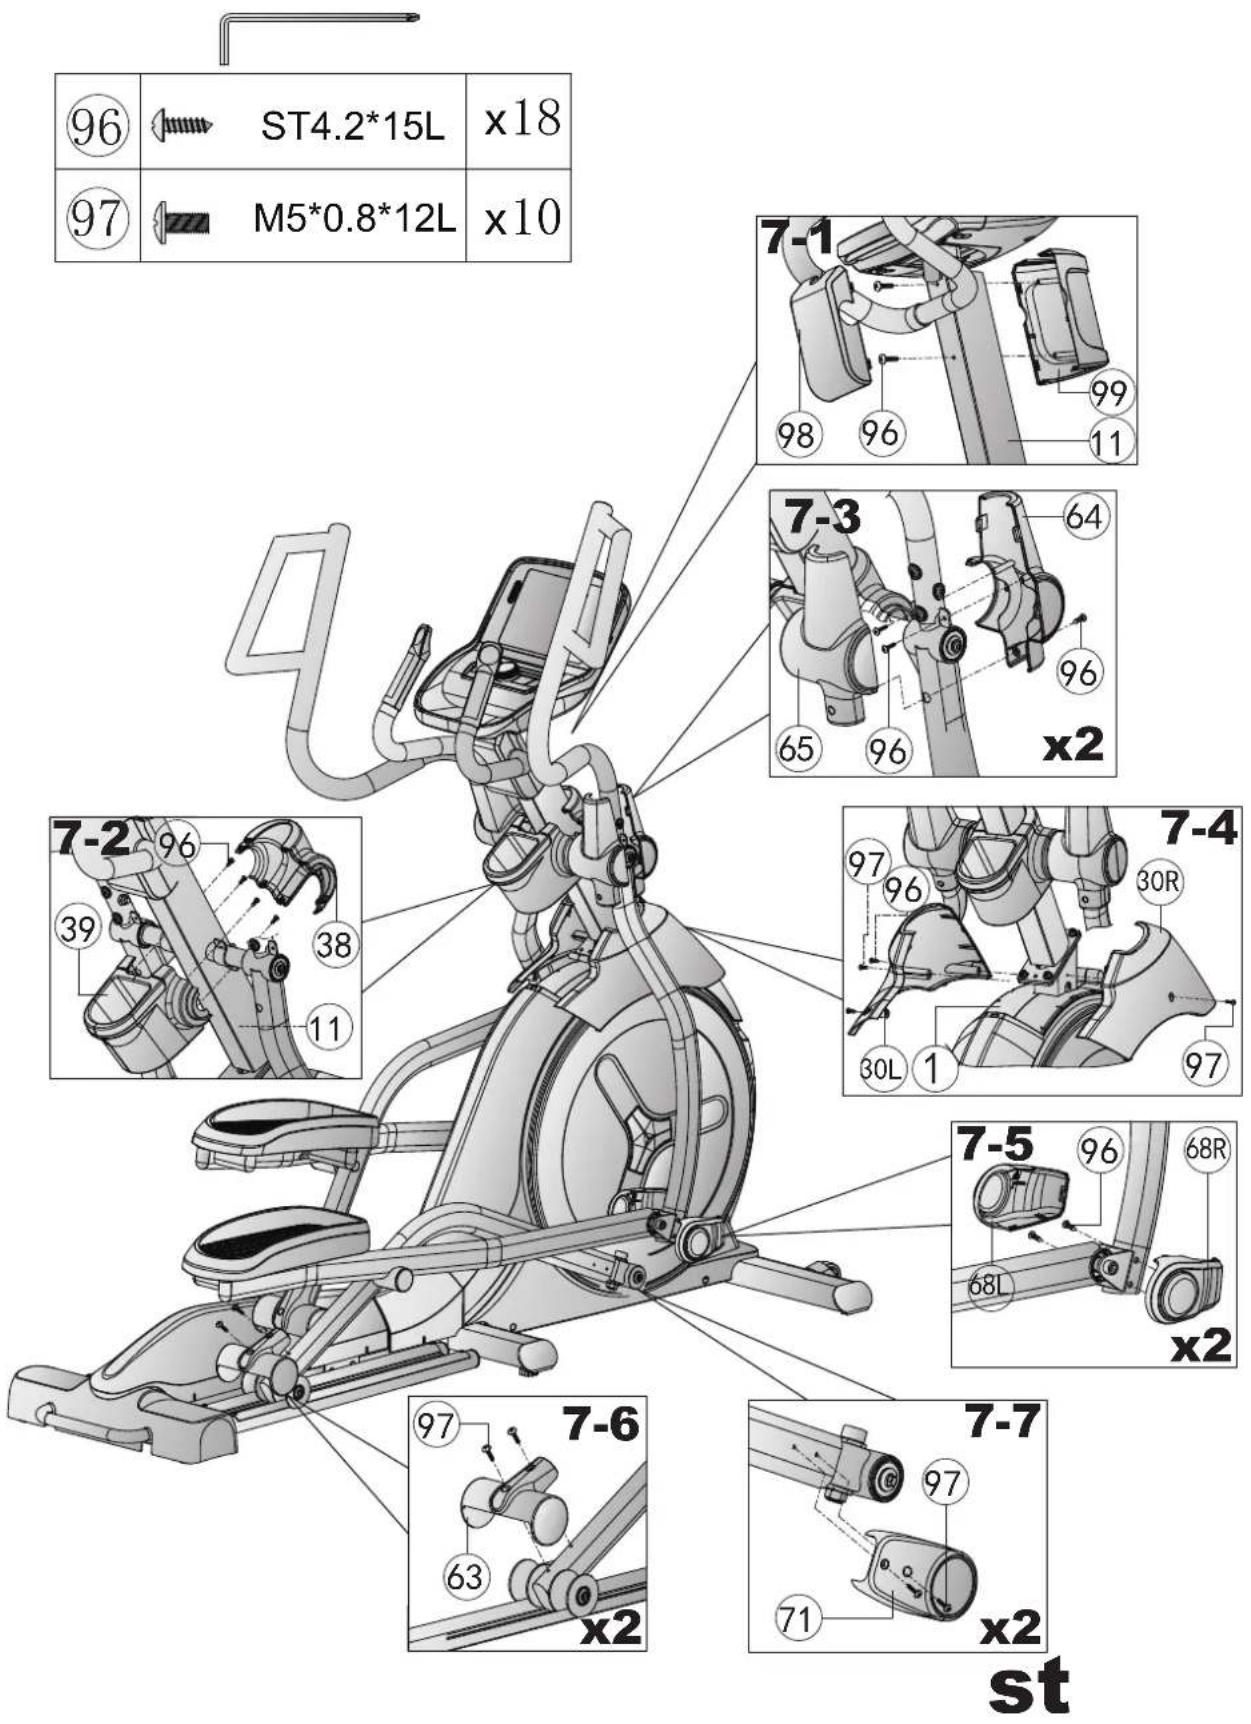
Step 7: Mounting the covers
- Screw the front cover (99) under the console (19) onto the console mast (11) with two screws (96) and hand tighten the screws in place. Clip the rear cover (98) onto the front cover (99) (see fig. 7-1).
- Screw the rear part of the water bottle holder (39) onto the console mast (11) with four screws (96) and hand tighten the screws in place. Clip the front cover of the water bottle holder (38) to the rear part (39) (see fig. 7-2).
- Screw the front covers of the arms (64) onto both arms (12R/12L), each with two screws (96) (see fig. 7-3) and hand tighten the screws in place.
- Clip the rear cover for the arms (65) onto the front cover (64) and screw it onto the arms (12R/12L), each with one screw (96) (see fig. 7-3).
- Screw the left protective cover (30L) onto the main frame (1) with two screws (96) and one screw (97) and hand tighten the screws in place.
- Clip the right protective cover (30R) onto the left protective cover (30L) and screw it onto the main frame (1) with one screw (97) (see fig. 7-4).
- Screw the outer cover of the pedal mount (68R) onto the outer side of the pedal mount (15R/15L), each with two screws (96) and hand tighten the screws in place. Clip the inner cover (68L) onto the outer cover (68R) (see fig. 7-5).
- Screw the wheel covers (63) on both sides of the crosstrainer, each with two screws (97) (see fig. 7-6) and hand tighten the screws in place.
- Screw the axial covers (71) on both sides of the crosstrainer, each with two screws (97) (see fig. 7-7) and hand tighten the screws in place.
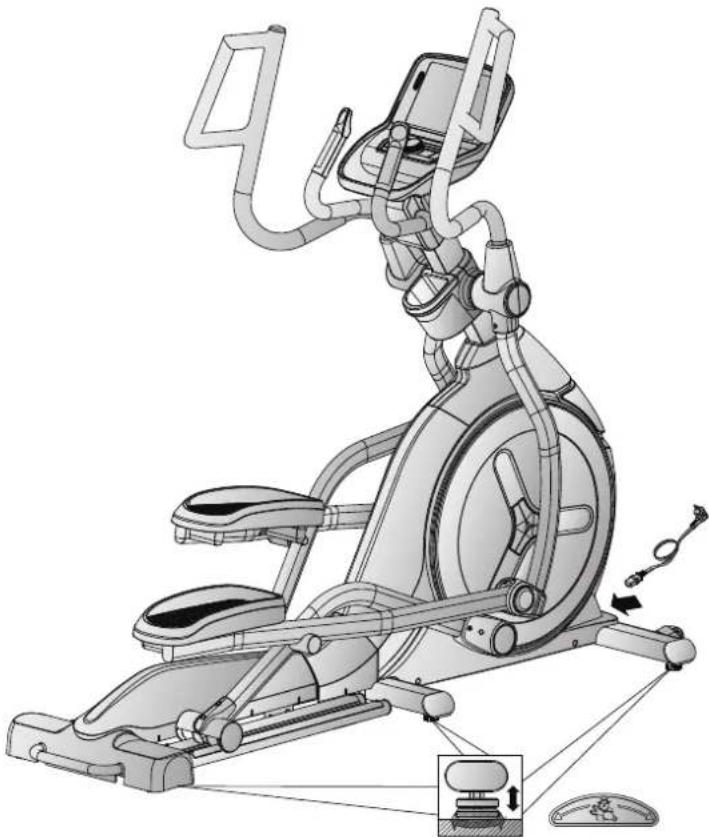
Step 8: Adjusting the feet
The crosstrainer can be stabilised on un-even surfaces with the adjustable feet.
- Lift up the crosstrainer on one side to gain access to the adjustable feet underneath the frame.
- Turn the screw clockwise to unscrew the foot, lifting the crosstraining at that point.
- Turn the screw anti-clockwise to lower the crosstrainer at that point.
Step 9: Connecting the crosstrainer to the mains supply
ATTENTION
The crosstrainer should not be plugged into a power board, as it cannot be guaranteed that the crosstrainer will be supplied with sufficient power. This could also lead to technical errors occurring.
First connect the power cord (117) to the crosstrainer and then plug it into the wall socket, making sure the electrical prerequisites covered in the chapter about electrical safety are met.
natural_image
Technical illustration of an stationary exercise machine with adjustable arms and legs, showing motion arrows (no text or symbols)IMPORTANT NOTE
To ensure that your equipment has the latest software version, please perform an update before using it for the first time. Proceed as follows:
- Tap "Settings" in the lower right corner of the screen.
- Tap "Wireless" and connect your equipment to the Internet.
- Return to the settings.
- Tap "System and Apps" and go to updates.
- Tap "Update", to update the software.
Do not use or switch off the equipment during the update.
Check whether another update is available and carry it out as described above at regular intervals. If a new version is available, the display shows a white icon. Otherwise the icon will be grey.
i NOTICE
Familiarise yourself with all the functions and setting options of the device before starting training. Have the proper use of this product explained to you by a specialist.
3.1 Console Display
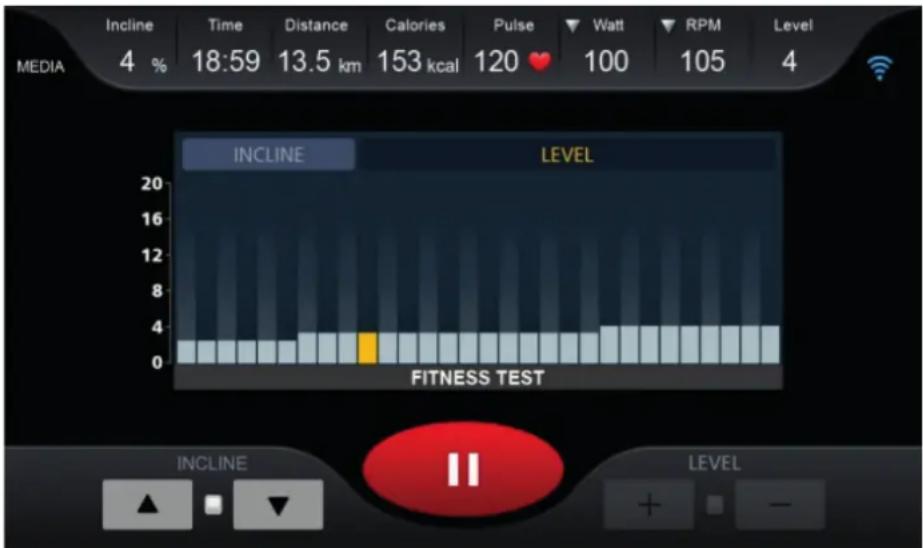
bar
| Metric | Value | |---|---| | INCLINE | 3 | | TIME | 3 | | Distance | 3 | | Calories | 12 | | Pulse | 120 | | Watt | 100 | | RPM | 105 | | Level | 4 |DISPLAY DESCRIPTION
| Level | + Display of the current resistance level+ Display range: 1–32 |
| Time | + Display of the training time in minutes+ Display range: 00:00–999:59 |
| Distance | + Display of the training distance in km+ Display range: 0.0–99.9 |
| Calories | + Display of the calories in kcal+ Display range: 0–9999 |
| Puls | + Display of current heart rate+ Display range: 40–220 |
| Mets/Watt | + Display of the MET or Watt valueDefinition: MET or metabolic equivalent is used to measure the average metabolic rate for a person. MET describes the quantity of oxygen that an average person needs when in rest.1 MET = 3.5 ml/kg/min (The body consumes 3.5 milliliters of oxygen per kilogram per minute) is the amount of oxygen that the body needs when in rest.The more intensively the body works, the more oxygen is consumed and the higher the MET level. If you train at a level of seven METS, then you are working approximately 7 times harder than when in rest. Furthermore, you need 7 times as much oxygen than when in rest.+ Training between three to six METs is seen as moderate physical activity.+ Training at more than six METs is seen as strong physical activity. |
| Speed /RPM | + Display of the current speed or the rotations per minute |
3.2 Button Functions
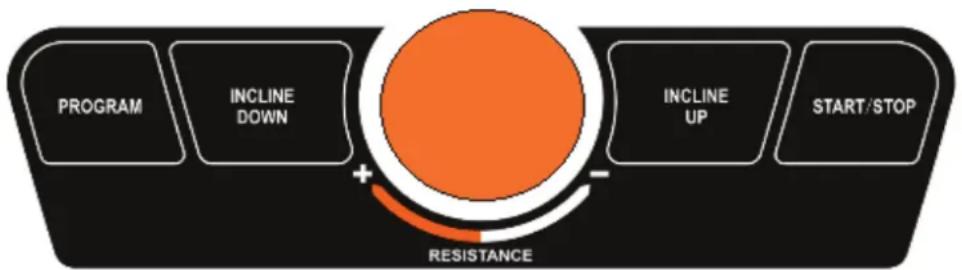
flowchart
graph LR
    A["PROGRAM"] --> B["INCLINEDOWN"]
    B --> C["+ RESISTANCE"]
    C --> D["INCLINEDUP"]
    D --> E["START/STOP"]
| BUTTON DESCRIPTION | |
| Encoder | + Turn to increase or decrease setting values or the resistance level+ Press to confirm the settings+ Change between RPM and SPEED |
| FITNESS TEST | + Press in main menu to get straight to the fitness test |
| PROGRAM +Press in main menu to get to the pre-set programmes | |
| START/STOP | + Start or pause the programme+ Continue after pausing the programme |
3.3 Programmes
This equipment offers many different programmes. This includes: a quick start programme, target programmes, pre-set programmes, user-defined programmes, heart rate-oriented programmes and one fitness test.
3.3.1 Quick Start
When you are in the main menu, simply press START to start a training session via quick start. Alternatively you can also tap on „QUICK START“ in the main menu.
3.3.2 Target programmes
- Tap on „GOAL“ in the main menu.
- Choose either time, distance or calories as your target unit.
NOTICE
You can only choose one unit.
- Set a value for your desired target unit.
- Press START to start the programme.
The resistance level and incline can be adjusted manually during your training.
- Press the STOP button to pause your training.
The resistance level is set to 0.
5.1. Press STOP on the display to end your training and an overview of the collected training data will be displayed.
5.2. Press START to continue with your training.
3.3.3 Pre-set programmes
- Tap on „PROGRAM“ in the main menu.
- Enter your gender, age, weight and the desired training time and press Next.
- Choose one of the pre-set programmes.
- Press START to start the programme.
The resistance level and incline can be adjusted manually during your training.
- Press the STOP button to pause your training.
The resistance level is set to 0.
5.1. Press STOP on the display to end your training and an overview of the collected training data will be displayed.
5.2. Press START to continue with your training.
| Programme | Setting time / 30 = time for each section | ||||||||||||||
| 1 | 23 | 4567 | 8910 | 1112 | 1314 | 15 | |||||||||
| P1 | LEVEL 2 | 24 | 4334 | 3542 | 2553 | ||||||||||
| INCLINE 1 | 12 | 2333 | 1223 | 3222 | |||||||||||
| P2 | LEVEL 2 | 25 | 6446 | 4642 | 2442 | ||||||||||
| INCLINE 1 | 12 | 2333 | 2234 | 4222 | |||||||||||
| P3 | LEVEL 2 | 25 | 6445 | 4542 | 2332 | ||||||||||
| INCLINE 1 | 12 | 2223 | 1222 | 2221 | |||||||||||
| P4 | LEVEL 3 | 36 | 6775 | 8596 | 6443 | ||||||||||
| INCLINE 2 | 22 | 2333 | 2246 | 6222 | |||||||||||
| P5 | LEVEL 3 | 36 | 6775 | 8676 | 6443 | ||||||||||
| INCLINE 1 | 12 | 2443 | 2245 | 5221 | |||||||||||
| P6 | LEVEL 5 | 511 | 1199 | 7812 | 1088 | 776 | |||||||||
| INCLINE 2 | 22 | 2662 | 3422 | 2221 | |||||||||||
| P7 | LEVEL 5 | 59 | 91010 | 7710 | 7557 | 75 | |||||||||
| INCLINE 4 | 45 | 6666 | 9910 | 7766 | 3 | ||||||||||
| P8 | LEVEL 5 | 57 | 7991 | 1011 | 9556 | 65 | |||||||||
| INCLINE 3 | 35 | 6444 | 3443 | 3332 | |||||||||||
| P9 | LEVEL 5 | 57 | 7888 | 9896 | 6665 | ||||||||||
| INCLINE 3 | 35 | 6334 | 2342 | 2332 | |||||||||||
| P10 | LEVEL 5 | 56 | 6886 | 6889 | 9666 | ||||||||||
| INCLINE 4 | 44 | 4336 | 7886 | 6333 | |||||||||||
| P11 | LEVEL 7 | 711 | 7711 | 7711 | 7711 | 7711 | |||||||||
| INCLINE 4 | 45 | 6666 | 9910 | 8866 | 3 | ||||||||||
| P12 | LEVEL 7 | 710 | 1010 | 1212 | 1215 | 1515 | 171720 | 20 | |||||||
| INCLINE 3 | 35 | 6667 | 8910 | 1086 | 63 | ||||||||||
| P13 | LEVEL 7 | 77 | 1010 | 1012 | 1215 | 1515 | 1717 | 17 | |||||||
| INCLINE 3 | 34 | 4662 | 3795 | 5222 | |||||||||||
| P14 | LEVEL 7 | 77 | 1010 | 1015 | 1515 | 1720 | 2020 | 20 | |||||||
| INCLINE 3 | 35 | 6444 | 3432 | 2224 | |||||||||||
| P15 | LEVEL 7 | 77 | 71212 | 1212 | 1215 | 1515 | 1515 | 17 | |||||||
| INCLINE 4 | 43 | 8444 | 3423 | 3225 | |||||||||||
| P16 | LEVEL 7 | 77 | 1010 | 1215 | 1720 | 201715 | 1210 | 10 | |||||||
| INCLINE 3 | 59 | 10998 | 843 | 3322 | 4 | ||||||||||
| P17 | LEVEL 8 | 1116 | 2121 | 1388 | 1116 | 2121 | 388 | ||||||||
| INCLINE 1 | 1446 | 666 | 1446 | 6444 | |||||||||||
| Programme | Setting time / 30 = time for each section | ||||||||||||||||||||||||
| 16 | 17 | 18 | 19 | 20 | 21 | 22 | 23 | 24 | 25 | 26 | 27 | 28 | 29 | 30 | |||||||||||
| P1 | LEVEL | 3 | 2 | 2 | 4 | 4 | 5 | 5 | 6 | 5 | 6 | 3 | 3 | 3 | |||||||||||
| INCLINE | 2 | 3 | 3 | 5 | 5 | 3 | 3 | 4 | 2 | 2 | 3 | ||||||||||||||
| P2 | LEVEL | 2 | 2 | 2 | 4 | 4 | 6 | 6 | 8 | 7 | 8 | 6 | 2 | 2 | 3 | ||||||||||
| INCLINE | 2 | 3 | 3 | 5 | 5 | 4 | 4 | 4 | 3 | 4 | 4 | 3 | 3 | 1 | 1 | ||||||||||
| P3 | LEVEL | 2 | 2 | 2 | 4 | 4 | 5 | 5 | 5 | 6 | 5 | 6 | 3 | 3 | 3 | ||||||||||
| INCLINE | 1 | 3 | 3 | 5 | 5 | 3 | 3 | 4 | 2 | 3 | 3 | ||||||||||||||
| P4 | LEVEL | 3 | 4 | 4 | 2 | 2 | 6 | 6 | 8 | 6 | 3 | 2 | 6 | 6 | 2 | 2 | |||||||||
| INCLINE | 2 | 3 | 3 | 4 | 4 | 6 | 6 | 2 | 3 | 7 | 9 | 5 | 5 | 2 | 2 | ||||||||||
| P5 | LEVEL | 3 | 2 | 2 | 5 | 5 | 5 | 5 | 4 | 4 | 6 | 4 | 2 | 2 | 3 | ||||||||||
| INCLINE | 1 | 3 | 3 | 5 | 5 | 6 | 6 | 7 | 8 | 9 | 10 | 10 | 8 | 2 | 2 | ||||||||||
| P6 | LEVEL | 6 | 7 | 7 | 5 | 5 | 7 | 7 | 9 | 11 | 11 | 10 | 11 | 9 | 9 | 5 | 5 | ||||||||
| INCLINE | 1 | 4 | 4 | 3 | 3 | 4 | 4 | 4 | 3 | 4 | 2 | 3 | 3 | 2 | 2 | ||||||||||
| P7 | LEVEL | 5 | 6 | 6 | 8 | 8 | 7 | 7 | 7 | 6 | 7 | 6 | 5 | 5 | 5 | ||||||||||
| INCLINE | 3 | 4 | 4 | 2 | 2 | 4 | 4 | 6 | 8 | 7 | 8 | 6 | 6 | 2 | 2 | ||||||||||
| P8 | LEVEL | 5 | 6 | 6 | 8 | 8 | 7 | 7 | 7 | 6 | 7 | 6 | 5 | 5 | 5 | ||||||||||
| INCLINE | 2 | 4 | 4 | 2 | 2 | 4 | 4 | 6 | 8 | 7 | 8 | 6 | 6 | 2 | 2 | ||||||||||
| P9 | LEVEL | 5 | 6 | 6 | 7 | 7 | 7 | 7 | 6 | 8 | 8 | 9 | 6 | 6 | 6 | 6 | |||||||||
| INCLINE | 2 | 3 | 3 | 5 | 5 | 4 | 4 | 4 | 3 | 4 | 3 | 2 | 2 | 2 | |||||||||||
| P10 | LEVEL | 6 | 7 | 7 | 6 | 6 | 7 | 7 | 7 | 6 | 7 | 5 | 6 | 6 | 5 | 5 | |||||||||
| INCLINE | 3 | 3 | 3 | 2 | 2 | 5 | 5 | 7 | 3 | 5 | 6 | 7 | 7 | 2 | 2 | ||||||||||
| P11 | LEVEL | 7 | 7 | 1 | 1 | 7 | 7 | 1 | 1 | 7 | 7 | 1 | 1 | 7 | 7 | 1 | 1 | ||||||||
| INCLINE | 3 | 3 | 3 | 4 | 4 | 4 | 4 | 3 | 5 | 5 | 6 | 3 | 3 | 3 | |||||||||||
| P12 | LEVEL | 20 | 20 | 17 | 17 | 17 | 15 | 15 | 15 | 12 | 12 | 10 | 10 | 10 | 10 | 7 | 7 | ||||||||
| INCLINE | 3 | 5 | 5 | 3 | 3 | 4 | 4 | 4 | 3 | 4 | 2 | 5 | 5 | 2 | 2 | ||||||||||
| P13 | LEVEL | 20 | 20 | 20 | 20 | 20 | 22 | 22 | 20 | 20 | 20 | 20 | 17 | 17 | 17 | 15 | 15 | 15 | |||||||
| INCLINE | 2 | 1 | 1 | 2 | 2 | 4 | 4 | 5 | 2 | 2 | 4 | 6 | 6 | 3 | 3 | ||||||||||
| P14 | LEVEL | 20 | 20 | 20 | 20 | 20 | 17 | 17 | 15 | 15 | 15 | 15 | 10 | 10 | 10 | 7 | 7 | ||||||||
| INCLINE | 4 | 2 | 2 | 5 | 5 | 4 | 4 | 2 | 4 | 2 | 4 | 2 | 2 | 4 | |||||||||||
| P15 | LEVEL | 17 | 17 | 17 | 17 | 17 | 20 | 20 | 20 | 20 | 20 | 20 | 20 | 15 | 15 | 15 | 15 | ||||||||
| INCLINE | 5 | 1 | 1 | 2 | 2 | 3 | 3 | 2 | 2 | 3 | 4 | 4 | 2 | 2 | |||||||||||
| P16 | LEVEL | 10 | 10 | 12 | 15 | 17 | 20 | 20 | 17 | 15 | 12 | 10 | 10 | 7 | 7 | ||||||||||
| INCLINE | 4 | 1 | 1 | 2 | 2 | 2 | 3 | 1 | 2 | 2 | 1 | 1 | 2 | ||||||||||||
| P17 | LEVEL | 11 | 16 | 21 | 21 | 13 | 8 | 8 | 11 | 16 | 21 | 21 | 13 | 8 | 8 | 11 | |||||||||
| INCLINE | 4 | 3 | 3 | 5 | 5 | 4 | 4 | 2 | 2 | 3 | 4 | 2 | 2 | 3 | |||||||||||
| Programme | Setting time / 30 = time for each section | |||||||||||||||
| 1 | 2 3 | 4 5 6 7 | 8 9 10 | 11 12 | 13 14 | 15 | ||||||||||
| P18 | LEVEL 8 | 11 1 | 8 18 21 | 8 11 1 | 3 18 2 | 8 11 | 13 18 21 | |||||||||
| INCLINE 1 | 1 4 | 4 4 4 6 | 1 4 4 6 | 6 8 8 4 | ||||||||||||
| P19 | LEVEL 8 | 21 1 | 8 13 11 | 8 8 21 | 18 13 | 11 8 8 | 21 18 | |||||||||
| INCLINE 1 | 1 2 | 2 4 4 5 | 1 2 2 4 | 4 3 3 3 | ||||||||||||
| P20 | LEVEL 13 | 21 2 | 13 21 | 21 13 | 21 21 | 3 21 2 | 1 13 21 | 21 | ||||||||
| INCLINE 1 | 1 2 | 2 4 4 5 | 2 2 4 6 | 6 3 3 2 | ||||||||||||
| P21 | LEVEL 13 | 21 1 | 8 21 13 | 21 13 | 21 13 | 21 13 2 | 1 13 21 | 13 | ||||||||
| INCLINE 2 | 2 3 | 8 4 4 4 | 3 4 2 5 | 5 2 2 5 | ||||||||||||
| P22 | LEVEL 8 | 8 11 | 11 16 | 16 16 | 18 18 2 | 1 23 21 | 18 18 | 18 | ||||||||
| INCLINE 1 | 1 2 | 2 3 3 3 | 2 2 3 4 | 4 2 2 3 | ||||||||||||
| P23 | LEVEL 14 | 14 2 | 8 23 20 | 20 23 | 20 23 | 20 23 2 | 3 17 17 | 14 | ||||||||
| INCLINE 1 | 1 2 | 2 2 2 3 | 1 2 2 1 | 1 2 2 1 | ||||||||||||
| P24 | LEVEL 17 | 17 2 | 6 26 23 | 25 23 | 26 23 | 27 26 2 | 6 20 20 | 20 | ||||||||
| INCLINE 1 | 1 2 | 2 3 3 3 | 2 2 4 6 | 6 2 2 1 | ||||||||||||
| P25 | LEVEL 20 | 20 2 | 6 26 25 | 25 23 | 26 26 | 25 26 2 | 6 23 28 | 17 | ||||||||
| INCLINE 1 | 1 3 | 8 4 4 3 | 2 2 4 5 | 5 2 2 1 | ||||||||||||
| P26 | LEVEL 14 | 14 2 | 6 26 26 | 26 23 | 23 26 | 25 23 2 | 3 20 20 | 17 | ||||||||
| INCLINE 1 | 1 4 | 4 6 6 2 | 3 4 2 2 | 2 2 2 1 | ||||||||||||
| P27 | LEVEL 14 | 14 2 | 6 26 25 | 25 20 | 20 25 | 20 17 1 | 7 20 20 | 14 | ||||||||
| INCLINE 4 | 4 5 | 6 6 6 7 | 9 9 10 | 10 10 | 6 6 3 | |||||||||||
| P28 | LEVEL 21 | 21 1 | 6 15 24 | 27 27 | 26 27 | 27 24 2 | 1 18 18 | 15 | ||||||||
| INCLINE 3 | 3 5 | 6 4 4 4 | 3 4 4 3 | 3 3 3 2 | ||||||||||||
| P29 | LEVEL 15 | 24 2 | 7 27 18 | 21 18 | 21 24 | 27 18 1 | 8 18 18 | 15 | ||||||||
| INCLINE 3 | 3 5 | 6 4 4 2 | 2 3 4 2 | 2 3 3 2 | ||||||||||||
| P30 | LEVEL 18 | 24 1 | 8 18 24 | 24 21 | 21 24 | 18 27 2 | 7 18 21 | 18 | ||||||||
| INCLINE 4 | 4 1 | 3 3 6 | 7 8 8 7 | 7 3 3 3 | ||||||||||||
| P31 | LEVEL 18 | 18 2 | 4 24 27 | 27 27 | 28 24 | 26 24 2 | 7 21 21 | 15 | ||||||||
| INCLINE 1 | 3 6 | 6 6 5 6 | 9 9 10 | 10 10 | 8 6 4 | |||||||||||
| P32 | LEVEL 15 | 21 2 | 4 21 24 | 24 27 | 32 27 | 21 18 1 | 5 18 18 | 21 | ||||||||
| INCLINE 3 | 3 5 | 6 6 6 7 | 8 9 10 | 10 10 | 7 6 3 | |||||||||||
| P18 | LEVEL | 8 | 11 | 13 | 18 | 21 | 8 | 1 | 13 | 18 | 21 | 13 | 18 | 21 | ||
| INCLINE | 4 | 5 | 5 | 10 | 10 | 8 | 8 | 10 | 8 | 10 | 10 | 5 | 5 | 2 | 1 | |
| P19 | LEVEL | 13 | 1 | 8 | 8 | 2 | 18 | 13 | 11 | 8 | 8 | 21 | 18 | 3 | 11 | 8 |
| INCLINE | 3 | 1 | 3 | 3 | 4 | 4 | 3 | 2 | 2 | 4 | 5 | 5 | 2 | |||
| P20 | LEVEL | 13 | 2 | 1 | 13 | 21 | 21 | 13 | 21 | 21 | 13 | 21 | 21 | 21 | ||
| INCLINE | 2 | 1 | 3 | 3 | 4 | 4 | 3 | 2 | 2 | 4 | 5 | 5 | 2 | |||
| P21 | LEVEL | 21 | 13 | 21 | 13 | 21 | 13 | 21 | 13 | 21 | 13 | 21 | 13 | 21 | ||
| INCLINE | 5 | 5 | 5 | 4 | 6 | 6 | 2 | 3 | 4 | 2 | 2 | 2 | 2 | |||
| P22 | LEVEL | 18 | 18 | 18 | 21 | 23 | 21 | 18 | 18 | 16 | 16 | 15 | 11 | 11 | 8 | 8 |
| INCLINE | 3 | 5 | 5 | 4 | 3 | 4 | 3 | 4 | 5 | 6 | 3 | 3 | 3 | |||
| P23 | LEVEL | 14 | 17 | 17 | 23 | 23 | 26 | 26 | 26 | 27 | 23 | 25 | 23 | 26 | 20 | 12 |
| INCLINE | 1 | 5 | 5 | 6 | 5 | 6 | 9 | 9 | 10 | 10 | 8 | 6 | 3 | |||
| P24 | LEVEL | 20 | 14 | 14 | 26 | 26 | 26 | 26 | 23 | 23 | 26 | 25 | 26 | 23 | 20 | 20 |
| INCLINE | 1 | 5 | 5 | 4 | 6 | 6 | 2 | 3 | 4 | 2 | 2 | 2 | 2 | |||
| P25 | LEVEL | 17 | 20 | 20 | 14 | 14 | 23 | 26 | 26 | 25 | 26 | 25 | 23 | 20 | 17 | 17 |
| INCLINE | 1 | 3 | 3 | 5 | 5 | 4 | 4 | 3 | 4 | 4 | 3 | 3 | 3 | |||
| P26 | LEVEL | 17 | 14 | 14 | 14 | 23 | 23 | 23 | 20 | 20 | 26 | 20 | 14 | 14 | 17 | 17 |
| INCLINE | 1 | 3 | 3 | 5 | 5 | 6 | 7 | 8 | 9 | 10 | 10 | 8 | 6 | 2 | ||
| P27 | LEVEL | 14 | 20 | 20 | 23 | 23 | 26 | 26 | 26 | 26 | 26 | 28 | 26 | 26 | 26 | 17 |
| INCLINE | 3 | 2 | 2 | 5 | 5 | 5 | 4 | 4 | 6 | 4 | 2 | 2 | 3 | 3 | ||
| P28 | LEVEL | 15 | 24 | 24 | 18 | 18 | 21 | 21 | 21 | 18 | 21 | 15 | 24 | 24 | 15 | 15 |
| INCLINE | 2 | 2 | 2 | 5 | 5 | 4 | 4 | 2 | 4 | 2 | 2 | 1 | 1 | |||
| P29 | LEVEL | 15 | 21 | 21 | 18 | 18 | 21 | 18 | 24 | 21 | 15 | 15 | 24 | 24 | 18 | 18 |
| INCLINE | 2 | 3 | 3 | 4 | 4 | 4 | 3 | 4 | 5 | 5 | 2 | 2 | 1 | |||
| P30 | LEVEL | 15 | 18 | 18 | 21 | 21 | 18 | 18 | 21 | 18 | 24 | 21 | 15 | 15 | 15 | 12 |
| INCLINE | 3 | 5 | 5 | 3 | 3 | 4 | 4 | 3 | 4 | 2 | 5 | 5 | 2 | |||
| P31 | LEVEL | 15 | 21 | 21 | 24 | 24 | 27 | 27 | 27 | 28 | 28 | 29 | 27 | 27 | 27 | 18 |
| INCLINE | 3 | 2 | 2 | 5 | 5 | 5 | 4 | 4 | 6 | 4 | 2 | 2 | 3 | |||
| P32 | LEVEL | 21 | 18 | 18 | 30 | 30 | 29 | 30 | 29 | 30 | 29 | 29 | 29 | 29 | 18 | 18 |
| INCLINE | 3 | 1 | 1 | 2 | 2 | 4 | 5 | 2 | 2 | 4 | 6 | 6 | 3 | |||
3.3.4 User-defined programmes
- Tap on „USER PROGRAM“ in the main menu.
- Choose one of the four user profiles (U1-U4).
i NOTICE
The chosen user profile will be displayed on the upper border of the screen. The name of the user profile can be changed. To do this, simply tap on the user profile and type in the desired name.
- Enter your gender, age, weight and the desired training time.
- Set the desired speed and incline for all the 30 segments.
- Press START to start the programme.
The resistance level and incline can be adjusted manually during your training.
- Press the STOP button to pause your training.
The resistance level is set to 0.
6.1. Press STOP on the display to end your training and an overview of the collected training data will be displayed.
6.2. Press START to continue with your training.
3.3.5 Heart rate-oriented programmes

WARNING
Your training equipment is not a medical device. The heart rate measurement of this equipment may be inaccurate. Various factors can affect the accuracy of the heart rate measurement. The heart rate measurement serves only as a training aid.
There are three different heart rate-oriented programmes. Either choose one of the pre-set target heart rates (60% or 80% of your maximum heart rate) or choose „Target HR“ to set a target heart rate yourself. Your maximum heart rate is calculated depending on your age. We recommend a chest strap for these programmes.
- Tap on „HRC“ in the main menu.
- Enter your gender, age, weight and the desired training time.
- Choose either 60%, 80% or Target HR.
3.1. If you have chosen Target HR you will be able to set the target value yourself (between 72-168). - Press the START-button to start the programme.
- Put your hands around the hand pulse sensors or use a chest stap.

NOTICE
In case the console does not receive a signal for 15 seconds the programme will be stopped.
- Press the STOP-button to pause your training.
The resistance level is set to 0.
6.1. Press STOP on the display to end your training and an overview of the collected training data will be displayed.
6.2. Press the START-button to continue with your training.
3.3.6 Watt programme
- Tap "WATT MODE" in the main menu.
- Set your desired target wattage and training time.
i NOTICE
You can set a wattage value between 10 and 350 watts (in increments of 10). The default value is 120.
You can enter the training time between 5 and 999 minutes. The default value is 20 minutes.
- To start the programme, press START.
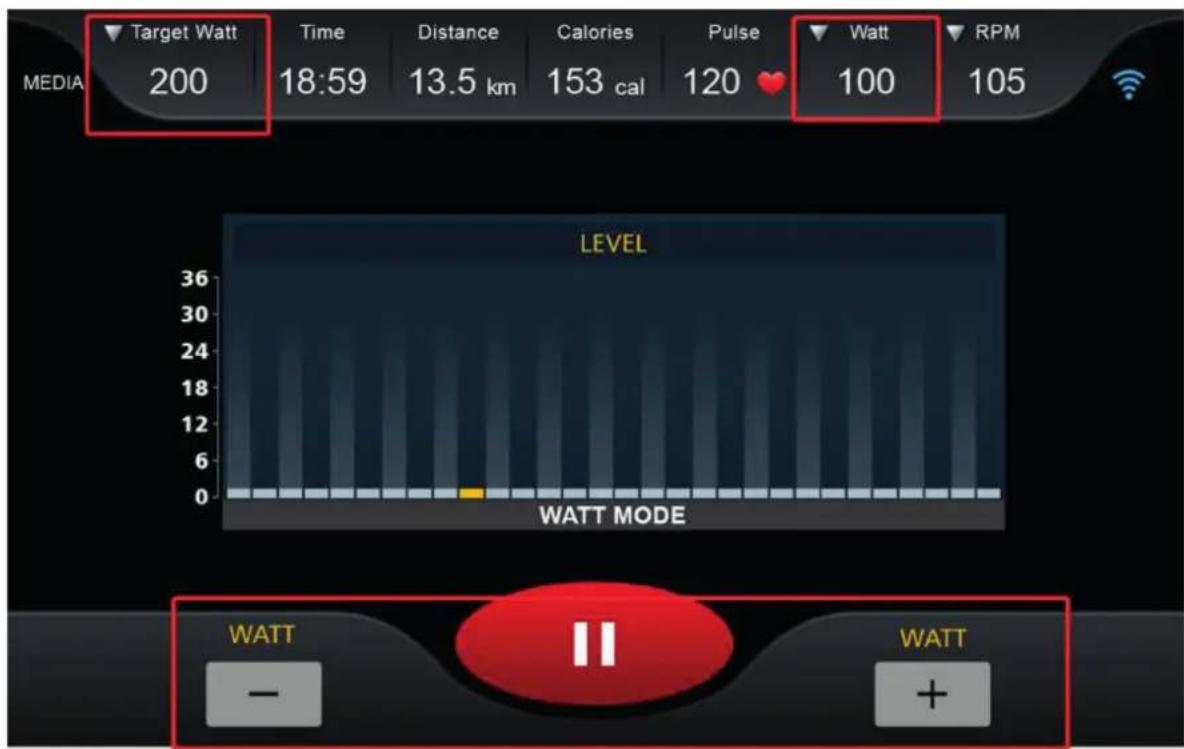
The upper left corner of the screen shows the target wattage.
The upper right corner of the screen shows the current wattage.
The target wattage can be adjusted in increments of 5 during the programme by tapping WATT - /WATT +.
The resistance cannot be adjusted manually, but is automatically adjusted according to the target wattage and RPM.
- To pause the programme, press STOP.
- To end the programme, press STOP once again.
bar
| Metric | Value | | :--- | :--- | | Target Watt | 200 | | Time | 18:59 | | Distance | 13.5 km | | Calories | 153 cal | | Pulse | 120 | | Watt | 100 | | RPM | 105 | LEVEL WATT MODE WATT II WATT - +3.4 Fitness Test
The fitness test consists of two phases. One is the warm up phase and the other is the actual fitness test. We recommend a chest strap for this test.
i NOTICE
The RPM must be between 45 - 65 during the test, otherwise an error message will be displayed. If the RPM does not reach the specified amount within 5 seconds, the test will be stopped.
- Tap on „FITNESS TEST“ in the main menu.
- Enter your gender, age and weight.
- Press START to start the fitness test.
The warm up phase will start.
i NOTICE
We recommend to use this phase if you have not done a warm up beforehand. Otherwise the warm up phase can be skipped by tapping on „SKIP WARM UP“.
- Put your hands around the hand pulse sensors or use a chest strap.
i NOTICE
In case the console does not receive a signal for 15 seconds the programme will be stopped. If your heart rate gets to high the console will display „OVER PULSE“. In this case, please interrupt your test immediately.
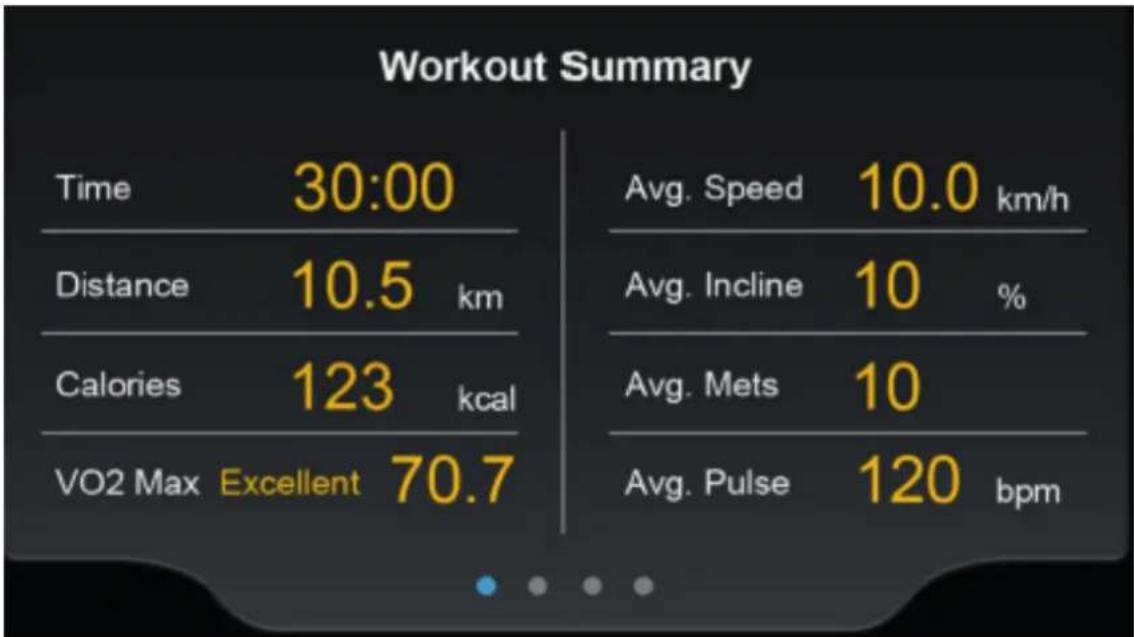
Upon completion of the test an overview of the collected training data will be displayed.
3.5 Media
Here you will find many different apps like YouTube, Twitter, Facebook or Instagram.
IMPORTANT NOTE
To ensure the pre-installed apps are working correctly, they must be updated regularly. If needed, the respective app will notify you to do so. To update the app, you need a google account. A google email is sufficient. Just follow the instructions on the screen to perform the update.
Please note: The system is set up only for the pre-installed apps. Do not install any additional apps as their proper functionality can not be guaranteed. The installation of other apps might cause technical issues.
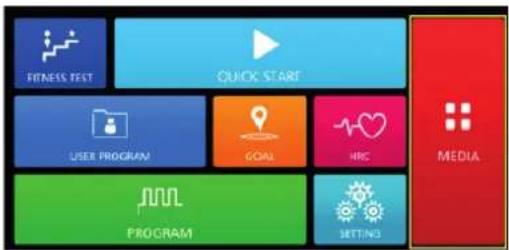
This menu can be opened in two ways:
flowchart
graph TD
    A["FITNESS TEST"] --> B["QUICK START"]
    C["USER PROGRAM"] --> D["GOA"]
    E["HRC"] --> F["HRC"]
    G["PROGRAM"] --> H["SETTING"]
    I["MEDIA"] --> J["Programming"]
    style A fill:#4CAF50,stroke:#333
    style C fill:#2196F3,stroke:#333
    style E fill:#2196F3,stroke:#333
    style G fill:#2196F3,stroke:#333
    style I fill:#FFD700,stroke:#333
    style J fill:#FFD700,stroke:#333
bar
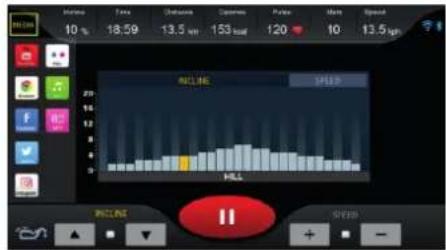
| Date | Price ($) | | :--- | :--- | | Oct-05 | 18.59 | | Nov-05 | 13.5 | | Dec-05 | 153 | | Jan-06 | 120 | | Feb-06 | 10 | | Mar-06 | 13.5 | | Apr-06 | 13.5 | | May-06 | 13.5 | | Jun-06 | 13.5 | | Jul-06 | 13.5 | | Aug-06 | 13.5 | | Sep-06 | 13.5 | | Oct-06 | 13.5 | | Nov-06 | 13.5 | | Dec-06 | 13.5 |- Via the main menu by tapping on "MEDIA" or 2. Via the training interface (in the upper left corner of the screen).
i NOTICE
You can show and hide the training interface by tapping on the round icon on the right edge of the screen. To adjust the volume simply tap on the speaker icon.
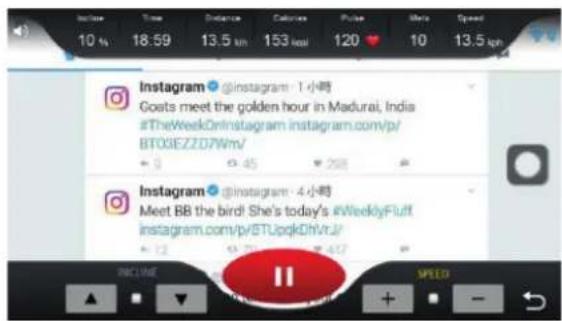
You can transmit music and video data from your USB stick to the console. To do this insert your USB stick into the corresponding slot on the side of the console.
Supported formats:
Music:. wav, .wma, .aac, .ogg, .mp3 und .flac. Video: .mp4 und .avi.
Settings
Under "SETTINGS" in the main menu, you can make your system settings. This includes:
Language, screen brightness and volume.
Bluetooth: You can connect your mobile device and bluetooth speakers with the console.
Wireless: Here you can connect the console with the internet.
3.6 Bluetooth and Fitness Apps
This console is equipped with a bluetooth interface. Please take note that your mobile device needs to be compatible with the bluetooth interface of the treadmill (bluetooth 4.0).
To use training apps you will have to activate the bluetooth function on your mobile device (tablet or smart phone) and start the fitness app. Select your fitness equipment. Please follow the instructions given in the app. You will find the name of your fitness equipment on a small sticker on the back of the console.
You will find the fitness apps in the app stores of Google or Apple. There you will find the apps "Kinomap" or "Zwift". Please note that these apps are produced by an external manufacturer. Sport-Tiedje does not take any responsibility regarding the availability, functionality or contents of these programmes.


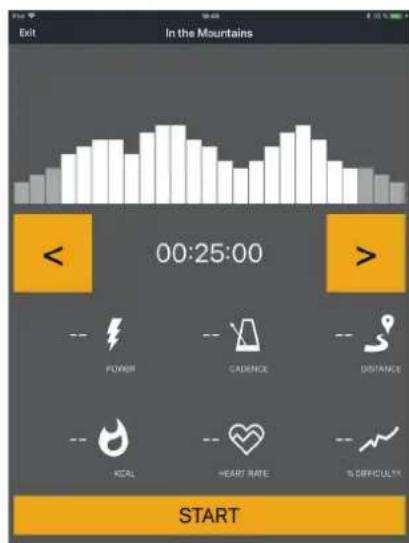
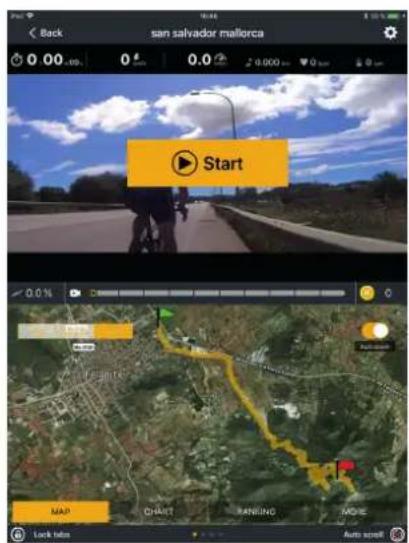
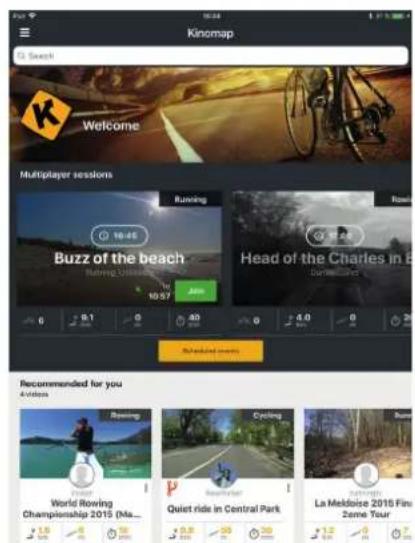
Example: Kinomap
4.1 General Instructions

WARNING
+ The storage location should be chosen so that improper use by third parties or children can be prevented.
+ If your equipment does not have transportation wheels, the equipment must be disassembled before transportation.
ATTENTION
+ Make sure that the equipment is protected from moisture, dust and dirt in the selected storage location. The storage location should be dry and well ventilated and have a constant ambient temperature between 10°C and 35°C.
4.2 Transportation Wheels
ATTENTION
If you want to transport your equipment over particularly sensitive and soft floor coverings, such as parquet, planks or laminate, lay out the transport route with cardboard or similar to avoid possible floor damage.
-
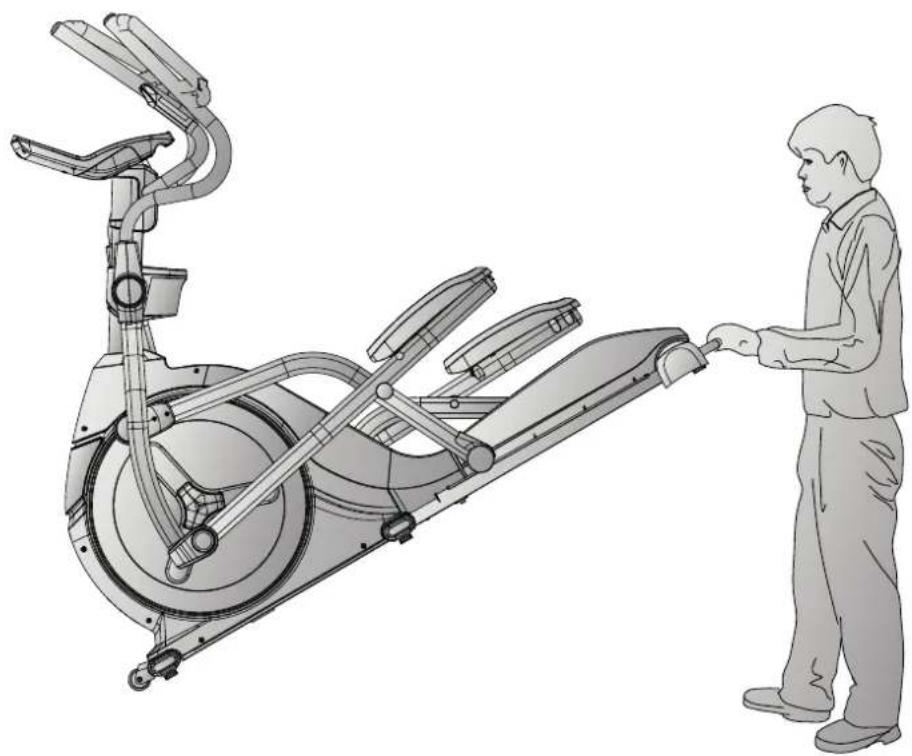
Stand behind the equipment and lift it until the weight is transferred to the transportation wheels. After that, you easily can move the equipment to a new position. For long transport distances the equipment should be disassembled and safely packed.
-
Select the new location by following the instructions in the section 1.4 of this manual.
natural_image
Illustration of a person using an stationary exercise bike (no text or symbols visible)5.1 General Instructions

WARNING
+ Do not make any improper changes to the equipment.

CAUTION
+ Damaged or worn components may affect your safety and the life of the equipment. Therefore, immediately replace damaged or worn components. In such a case, contact the contract partner. The equipment must not be used until it has been repaired. If necessary, use only original spare parts.
ATTENTION

In addition to the instructions and recommendations for maintenance and care given here, additional service and/or repair work may be necessary; this must only be carried out by authorised service technicians.
5.2 Faults and Fault Diagnosis
The equipment undergoes regular quality controls during production. Nevertheless, faults or malfunctions may occur. Frequently, individual parts are responsible for these disturbances, an exchange is usually sufficient. Please refer to the following overview for the most common errors and how to correct them. If the equipment still does not function properly, contact your contract partner.
| Fault Cause Solution | ||
| The drive disc is wobbling or producing noises | Drive disc is loose Tighten the nut | |
| Display doesn't function | Cables not properly connected | Check all cable connections |
| Pedals are squeaking Pedals are loose Tighten the screws in the pedals | ||
| Squeaking noises | Screws have loosened | Check that all the screws are tightened |
| Rails are squeaking | The rails and/or wheels are dirty or the rails are dry | Clean the rails and wheelsRe-lubricate the rails with fat-free silicon |
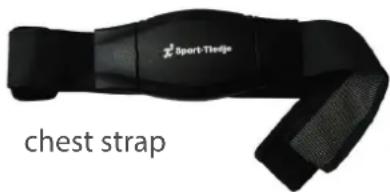
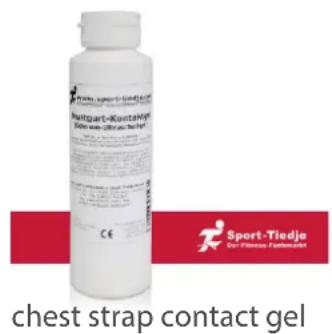
| No pulse displayed | + Source of interference in the room+ Chest strap is not compatible+ Position of the chest strap is incorrect+ Batteries are empty | + Eliminate the source of interference (e.g. Mobile, Speakers, etc.)+ Use a compatible chest strap (see recommended accessories)+ Re-position the chest strap and/or moisten the electrode(s)+ Change the batteries |
5.3 Maintenance and inspection calendar
To avoid damages from sweat, the crosstrainer must be cleaned with a damp towel (no solvents!) after each training session.
The following routine tasks must be performed at the specified intervals:
| Part Weekly Monthly Quarterly | |||
| Display of the console C I | |||
| Slide rails* C | |||
| Lubrication of slide rails and moving parts* I | |||
| Plastic covers C I | |||
| Screws and cable connections I | |||
| Check pedals for tightness I | |||
| Legend: C = clean; I = inspect | |||
*Make sure to always clean the slide rails and moving parts before re-lubricating.
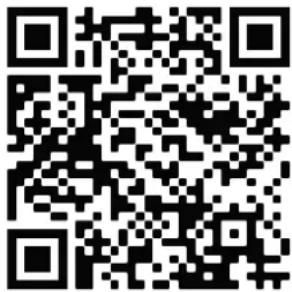
By scanning the QR code with the camera function or QR code scanner app of your smartphone/
tablet, a video on general maintenance of a crosstrainer opens on YouTube. The video serves to illustrate the maintenance points described in this manual.
Please note that the video may not be available in your language or with appropriate subtitles.
If you cannot scan QR codes, you can access all Sport-Tiedje videos on YouTube by first opening YouTube and entering "Sport-Tiedje" in the search field.

6 DISPOSAL
At the end of its operational life, this equipment cannot be disposed of in normal household waste. Instead, it must be disposed of via an electricals recycling centre. Further information can be obtained from your local authority's recycling service.
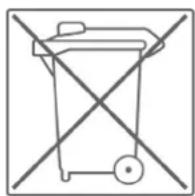
The materials can be recycled as per their symbols. Through the reuse, recycling of materials or other forms of recovery of old equipment, you make an important contribution to the protection of the environment.
7 RECOMMENDED ACCESSORIES
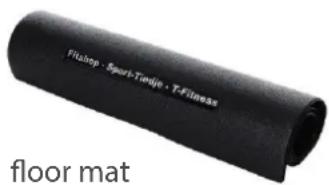
To make your training experience even more efficient and pleasant, we recommend that you add suiting accessories to your fitness equipment. This could be a floor mat, for example, which makes your fitness equipment stand more securely and also protects the floor from falling sweat, but it could also be additional handrails on some treadmills or silicone spray to keep moving parts in good shape.
If you have purchased a fitness machine with pulse training and want to train your heart rate, we strongly recommend that you use a compatible chest strap, as this ensures optimum transmission of the heart rate. You may want to buy additional grips or weights for multi gyms.
Our range of accessories offers the highest quality and makes training even better. If you would like to find out more about compatible accessories, please go to the detail page of the product in our webshop (the easiest way is to enter the article number in the search field above) and go to the recommended accessories on this page. Alternatively, you can use the QR code provided. Of course, you can also contact our customer service: by telephone, e-mail, in one of our branches or via our social media channels. We will be happy to advise you!
natural_image
Two blue and black athletic bandings with 'cardiostrong' branding, no visible text or symbols on the covers.
towels
8.1 Serial Number and Model Name
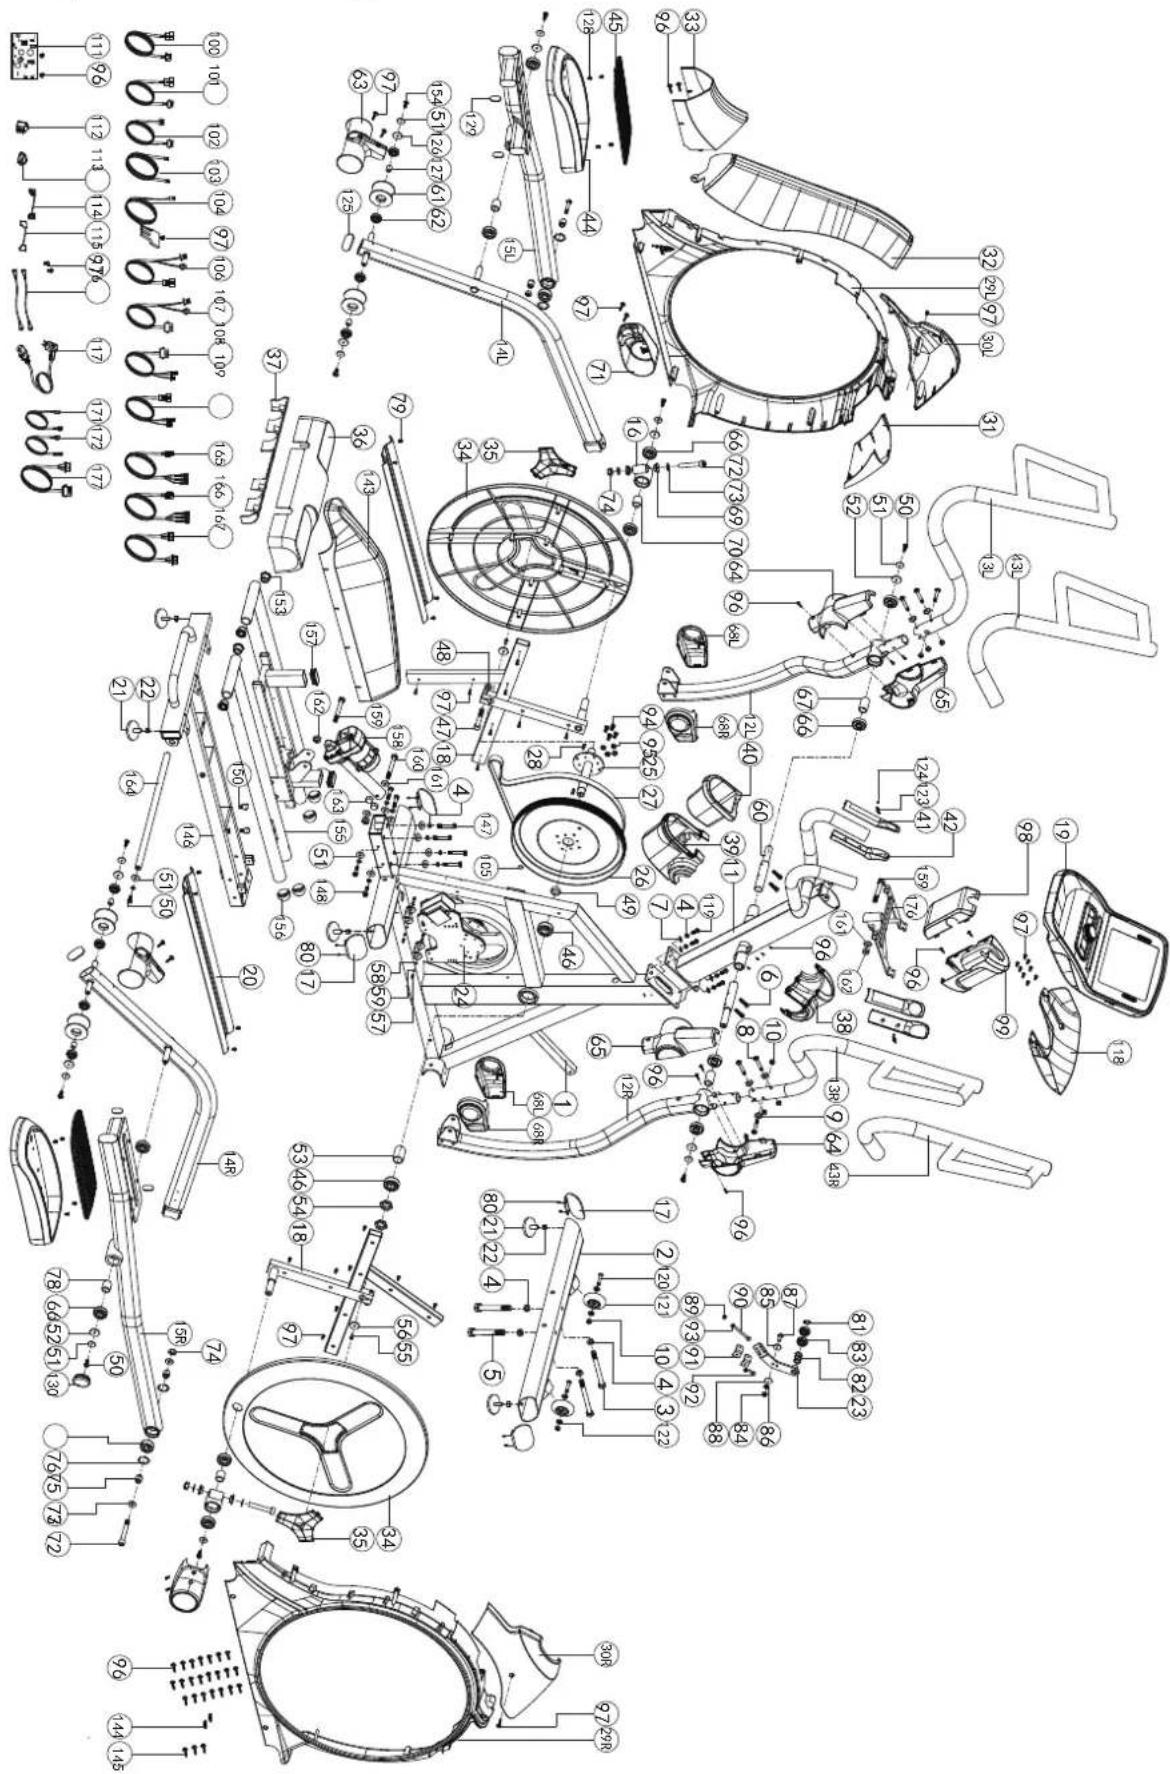
In order to provide you with the best possible service, please have the model name, article number, serial number, exploded drawing and parts list ready. The corresponding contact options can be found in chapter 10 of this operating manual.
i NOTICE
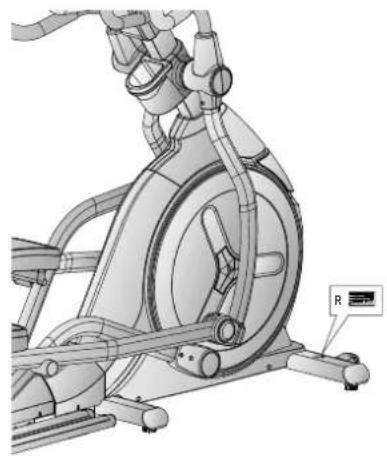
The serial number of your equipment is unique. It's located on a white sticker. The exact position of this sticker is shown in the following illustration.
natural_image
Technical illustration of an exercise machine with visible components and a labeled sensor (no text or symbols present)Enter the serial number in the appropriate field.
Serial number:
Brand / Category:
Taurus / Cross-Elliptical Trainer
Model Name:
FX9.9 Touch
Article Number:
TF-FX99-TFT
8.2 Parts List
No. Name Supplier Part No. Specification Qty.
| 1 | main frame | 747S3-3-1000-J0 1 | ||
| 2 | front stabilizer | 747S0-3-2100-J1 1 | ||
| 3 | hex bolt | 50108-5-0120-F5 | M8*1.25*120L | 2 |
| 4 | spring washer | 55108-2-1520-FA | D15.4xD8.2x2T | 16 |
| 5 | hex bolt | 50108-5-0070-F4 | M8*1.25*70L | 2 |
| 6 | allen bolt | 54008-5-0020-F0 | M8*1.25*20L | 4 |
| 7 | flat washer | 55108-1-1612-FA | D16*D8.5*1.2T | 4 |
| 8 | allen bolt | 50308-5-0050-F3 | M8*1.25*50L | 6 |
| 9 | curved washer | 55108-3-2215-FA | D22xD8.5x1.5T | 6 |
| 10 | anti-loose nut | 55208-1-2008-FA | M8*1.25*8T | 8 |
| 11 | handlebar post welding | 747A2-3-2000-J1 1 | ||
| 12L | supporting tube for left movable handlebar | 747S0-3-3710-J0 1 | ||
| 12R | supporting tube for right movable handlebar | 747S0-3-3711-J0 1 | ||
| 13L | left handlebar welding set | 747S0-3-2430-J1 1 | ||
| 13R | right handlebar welding set | 747S0-3-2450-J1 1 | ||
| 14L | left pedal bottom tube welding set | 747S0-3-3810-J2 1 | ||
| 14R | right pedal bottom tube welding set | 747S0-3-3811-J2 1 | ||
| 15L | bracket for left pedal | 747S0-3-6000-J3 1 | ||
| 15R | bracket for right pedal | 747S0-3-6025-J3 1 | ||
| 16 | pedal bottom bracket welding set | 747S0-3-3804-J3 2 | ||
| 17 | foot tube sealing piece | 747S0-6-2108-J0 | 104*63*4T | 4 |
| 18 | crank welding set | 747S0-3-2700-J3 2 | ||
| 19 | computer | 747S3-6-2501-B0 | AC00512 | 1 |
| 20 | sliding beam guiding plate | 747A2-6-5171-00 | 126.9*720L*2.3T | 2 |
| 21 | adjustable wheel | 26000-6-1095-B0 | D38*M10*1.5 | 6 |
| 22 | allen nut | 55210-2-2008-NA | M10*1.5*8T | 6 |
| 23 | fixing plate for idle wheel | 747S0-3-1600-00 1 | ||
| 24 | electric magnetic system | 747S0-3-3102-01 | D265*153*50 | 1 |
| 25 | crank axle welding set | 747S0-3-2903-01 1 | ||
| 26 | pulley Wheel | 58008-6-1036-D0 | D350*29.9*3T | 1 |
| 27 | multi-groove Belt | 58004-6-1110-00 | 520 PJ8 | 1 |
| 28 | C key | 75000-6-3107-01 | 8*7*20L | 2 |
| 29L | left chain | 747S0-6-4501-B0 | 734.4*878.2*98.1 | 1 |
| 29R | right chain | 747S0-6-4502-B0 | 734*878.2*105.2 | 1 |
| 30L | left front chain cover | 747S0-6-4529-B1 | 459.7*225.5*87.2 | 1 |
| 30R | right front chain cover | 747S0-6-4530-B1 | 459.7*225.5*93.8 | 1 |
| 31 | front decorative cover | 747S0-6-4523-B20 | 168.9*175.2*170.8 | 1 |
| 32 | upper decorative cover | 747S0-6-4520-B0 | 639*313.7*176.5 | 1 |
| 33 | rear decorative cover | 747A2-6-4521-B0 | 217.5*177.1*144.6 | 1 |
| 34 | round chain | 747S0-6-4506-B0 | D632.9*36.7 | 2 |
| 35 | side cap | 747S0-6-4582-C0 | 148*130.3*16.1 | 2 |
| 36 | cover for rear stabilizer | 747S0-6-4542-B1 | 566.9*109.3*144.3 | 1 |
| 37 | inside cover for rear stabilizer | 747S0-6-4543-B0 | 503.5*59*44.6 | 1 |
| 38 | water bottle holder(front)(black) | 747S0-6-2091-B0 | 195*159*71.8 | 1 |
| 39 | water bottle holder(rear)(black) | 747S0-6-2092-B0 | 195*167.1*159.4 | 1 |
| 40 | water bottle holder | 747S0-6-2074-B0 | 113*138.3*120.5 | 1 |
| 41 | upper handle pulse cover | 747S0-6-2517-B0 | 184.5*20.8*50 | 2 |
| 42 | lower handle pulse cover | 747S0-6-2518-B0 | 184.5*35.2*50 | 2 |
| 43L | left dipped foam | 58015-6-1386-B0 | D38*4T | 1 |
| 43R | right dipped foam | 58015-6-1387-B0 | D38*4T | 1 |
| 44 | pedal | 58029-6-1147-B0 | 434.2*210.7*84 | 2 |
| 45 | pedal pad | 75000-6-3896-B0 | 379*168.5*5T | 2 |
| 46 | bearing | 58006-6-1057-00 | #6205ZZ,NBK | 2 |
| 47 | allen bolt | 54010-8-0065-F6 | M10*1.5*65L | 2 |
| 48 | hex nut | 55210-A-2008-FA | M10*1.5*8T | 4 |
| 49 | spacer | 75000-6-2781-01 | D29.5*D25.2*9T | 1 |
| 50 | hex bolt | 50108-2-0020-U0 | M8x1.25x20 | 8 |
| 51 | flat washer | 55108-1-2520-FA | D25*D8.5*2T | 16 |
| 52 | buffer | 739S0-6-1081-B0 | D27*D8.2*2.5T | 6 |
| 53 | sleeve | 747S0-6-2707-00 | D30*D25.2*45L | 1 |
| 54 | fixing nut | 75000-6-2807-N0 | M25*1.5*32*6T | 2 |
| 55 | allen screw | 54006-5-0010-F0 | M6*1.0*10L | 2 |
| 56 | flat washer | 55106-1-2820-FA | D28*D6.5*2T | 2 |
| 57 | allen screw | 54006-5-0015-D0 | M6*1.0*15L | 4 |
| 58 | flat washer | 55106-1-1310-NA | D13*D6.5*1.0T | 4 |
| 59 | spring washer | 55106-2-1013-NA | D10.5*D6.1*1.3T | 4 |
| 60 | movable axle | 747S0-6-3771-00 | D25*180.5L | 2 |
| 61 | moving wheel | 73800-6-3886-B3 | D70*43 | 4 |
| 62 | bearing | 58006-6-1032-00 | 6002 ZZ | 8 |
| 63 | moving wheel cover | 747S0-6-3897-B0 | 162*136.2*87 | 2 |
| 64 | front handlebar protective cover(black) | 747S0-6-3780-B0 | 240.5*127.8*59 | 2 |
| 65 | rear handlebar protective cover(black) | 747S0-6-3781-B0 | 240.5*127.8*50 | 2 |
| 66 | bearing | 58006-6-1017-00 | #6004ZZ | 12 |
| 67 | sleeve(2) | 747S0-6-2788-00 | D25.4*D20.2*44L | 2 |
| 68L | front foot cover (left)(black) | 747S0-6-3775-B0 | 152.3*91.1*46.7 | 2 |
| 68R | front foot cover (right)(black) | 747S0-6-3776-B0 | 152.3*91.1*60 | 2 |
| 69 | bushing | 58002-6-1028-UC2 | D29*D12.1*9T | 4 |
| 70 | liner | 747S0-6-2973-00 | D25.4*D20.2*26L | 2 |
| 71 | front pedal axle cover | 747S0-6-3880-B0 | 182.4*95.7*67.6 | 2 |
| 72 | allen screw | 50412-8-0070-F4 | M12*1.75*70L | 4 |
| 73 | flat washer | 55112-1-2425-FA | D24*D13.5*2.5T | 8 |
| 74 | anti-loose nut | 55212-1-2012-FA | M12*1.75*12T | 4 |
| 75 | bearing | 58006-6-1031-00 | #2203-2RS | 2 |
| 76 | c-clip | 55540-3-0018-D0 | S-40(1.8T) | 2 |
| 77 | bushing | 58002-6-1092-01 | D19*D17*D12*20T | 4 |
| 78 | sleeve | 747S0-6-5202-01 | D25.4*D20.2*31L | 2 |
| 79 | cross screw | 52606-2-0015-N0 | M6*1*15L | 8 |
| 80 | cross screw | 52842-2-0015-F0 | ST4.2*15L | 8 |
| 81 | c-clip | 55517-1-0010-00 | S-17(1T) | 1 |
| 82 | waved washer | 55117-5-2203--DA | D17*D22*0.3T | 3 |
| 83 | bearing | 58006-6-1026-01 | 6203-2RS | 2 |
| 84 | anti-loose nut | 55208-1-2008-NA | M8*1.25*8T | 1 |
| 85 | flat washer | 55108-1-2830-NA | D28*D8.5*3T | 1 |
| 86 | hex nut | 55208-2-2006-NA | M8*1.25*6T | 1 |
| 87 | hex bolt | 50108-5-0030-C4 | M8*1.25*30L | 1 |
| 88 | plastic washer | 55110-1-5010-BF | D50*D10*1.0T | 1 |
| 89 | anti-loose nut | 55206-1-2006-CA | M6x1.0x6T | 1 |
| 90 | hex bolt | 50106-2-0075-N0 | M6*75L | 1 |
| 91 | fixing plate | 815G0-6-1673-N0 | 20*27*4T | 2 |
| 92 | hex bolt | 50106-5-0015-C0 | M6x1.0x15L | 1 |
| 93 | hex nut | 55206-2-2005-NA | M6*1*5T | 3 |
| 94 | hex bolt | 50108-5-0020-C0 | M8x1.25x20L | 4 |
| 95 | anti-loose nut | 55208-1-2008-CA | M8*1.25*8T | 4 |
| 96 | cross screw | 52842-2-0015-F0 | ST4.2*15L | 39 |
| 97 | cross screw | 52605-5-0012-F0 | M5*0.8*12L | 47 |
| 98 | computer bracket(front) | 747S0-6-2592-B0 | 196.4*109.5*49.1 | 1 |
| 99 | computer bracket(rear) | 747S0-6-2593-B0 | 196.3*109.5*96.4 | 1 |
| 100 | upper computer cable | 734S5-6-2572-00 | 300L | 1 |
| 101 | middle computer cable | 734S5-6-2587-00 | 1000L | 1 |
| 102 | lower computer cable | 747S3-6-2573-00 | 800L | 1 |
| 103 | system connect cable | 820S0-6-3177-00 | 350L | 1 |
| 104 | sensor cable | 815G0-6-2576-00 | 450L | 1 |
| 105 | round magnet | 742G0-6-2574-00 1 | ||
| 106 | quick key upper cable(1) | 734S5-6-2542-00 | 400L | 1 |
| 107 | quick key upper cable(2) | 734S5-6-2539-00 | 400L | 1 |
| 108 | quick key lower cable(1) | 734S5-6-2544-00 | 850L | 1 |
| 109 | quick key lower cable(1) | 734S5-6-2536-00 | 850L | 1 |
| 111 | control board | 747S3-6-2597-00 | PA-AE00530 | 1 |
| 112 | switching mode power supplier | 261D8-6-2411-00 1 | ||
| 113 | socket | 26100-6-2413-00 1 | ||
| 114 | live wire (1) | 26200-6-1789-00 | 220L | 1 |
| 115 | neutral wire(2) | 26200-6-1792-00 | 220L | 1 |
| 116 | grounding cable(2) | 734S0-6-3486-00 | 200L | 3 |
| 117 | electric cable | 26100-6-1775-02 | 1700L | 1 |
| 118 | computer back cover | 747S0-6-2529-B0 | 337.6*225.5*58.4 | 1 |
| 119 | allen bolt | 54008-5-0025-F0 | M8*1.25*25L | 4 |
| 120 | allen bolt | 50308-5-0040-F3 | M8*1.25*40L | 2 |
| 121 | transporting wheel | 84302-6-2175-00 | D70.5*23 | 2 |
| 122 | bushing | 58002-6-1099-00 | D22.2*D8.2*7T | 4 |
| 123 | cross screw | 54203-2-0030-F0 | M3*0.5*30L | 4 |
| 124 | cross screw | 54203-2-0012-F0 | M3*0.5*12L | 2 |
| 125 | oval square | 55315-3-3060-B8 | 30*60*15 | 2 |
| 126 | buffer | 747S0-6-1081-B0 | D21*D8.2*2.5T | 4 |
| 127 | spacer | 747S0-6-3892-00 | D19*D15.2*25.5L | 4 |
| 128 | cross screw | 52606-2-0015-F0 | M6*1*15L | 8 |
| 129 | oval square | 55328-3-2550-B1 | 25*50*28L | 4 |
| 130 | round cap | 55350-1-0015-B8 | D50.8*15 | 2 |
| 131 | flat washer | 55105-1-1510-DA | D15*D5.2*1.0T | 4 |
| 132 | flat washer | 55126-1-3420-FA | D34*D26*2T | 1 |
| 133 | flat washer | 55108-1-1812-FA | D18*D8.5*1.2T | 4 |
| 143 | rear cover | 747A2-6-4514-B1 | 766.7*169.6*144.3 | 1 |
| 144 | pin | 71600-6-4586-60 | D6*26.5*7.7 | 2 |
| 145 | cross screw | 52804-2-0012-F0 | ST4*1.41*12L | 3 |
| 146 | rear stabilizer welding set | 747A2-3-2112-J2 1 | ||
| 147 | hex bolt | 50108-5-0055-F3 | M8*1.25*55L | 4 |
| 148 | hex bolt | 50108-5-0035-F3 | M8*1.25*35L | 4 |
| 149 | buffer | 55305-5-3535-B9 | 35*35*25T(M8*1.25) | 2 |
| 150 | buffer | 708S0-6-1081-B0 | 20*90*1.7T | 2 |
| 153 | bushing | 58002-6-1051-B0 | D19.15x(D25.6x32)xL(17+3) | 2+4 |
| 154 | allen bolt | 50308-5-0020-UF0 | M8*1.25*20L | 4 |
| 155 | slide beam welding set | 747A2-3-5100-J4 1 | ||
| 156 | ball cap | 55338-1-0031-B8 | D38*31L | 4 |
| 157 | square cap | 55312-2-2550-B8 | 25*50*12L | 2 |
| 158 | incline | 747A2-6-5172-00 | JS17-B | 1 |
| 159 | hex bolt | 50110-2-0145-F6 | M10*1.5*145L | 1 |
| 160 | hex bolt | 50110-2-0075-F3 | M10*1.5*75L | 1+1 |
| 161 | flat washer | 55110-1-2020-FA | D20*D11*2T | 2+1 |
| 162 | anti-loose nut | 55210-1-2010-FA | M10*1.5*10T | 2+1 |
| 163 | bolt cover | 19100-6-3172-B0 | D35*8 | 3 |
| 164 | circumgyrate axle | 747A2-6-2751-00 | D19*490.5L | 1 |
| 165 | incline control cable(1) | 747S3-6-3481-00 | 500L | 1 |
| 166 | incline control cable(2) | 747S3-6-3482-00 | 1200L | 1 |
| 167 | VR control cable | 747S3-6-3475-00 | 1200L | 1 |
| 168 | handpulse upper cable | 734S5-6-2585-00 1 | ||
| 171 | neutral wire | 747S3-6-3479-00 | 300L | 1 |
| 172 | live wire | 747S3-6-3480-00 | 300L | 1 |
| 176 | computer Fixing Plate | 747A2-3-2725-J2 1 | ||
| / | allen spanner | 58030-6-1031-D1 | M6 | 1 |
| / open | sanner | 58030-6-1039-C1 | 188*6.5T | 1 |
| / spanner | 58030-6-1005-N2 121*D6 1 | |||
| allen spanner 58030-6-1033-N0 M10 1 |
8.3 Exploded Drawing
Training equipment from Taurus ^® is subject to strict quality control. However, if a fitness equipment purchased from us does not work perfectly, we take it very seriously and ask you to contact our customer service as indicated. We are happy to help you by phone via our service hotline.
Error Descriptions
Your fitness equipment is developed for long-term, high-quality training. However, should a problem arise, please first read the operating instructions. For further assistance, please contact your contract partner or call our service hotline. To ensure your problem is solved as quickly as possible, please describe the defect as exactly as possible.
In addition to the statutory warranty, we provide a warranty for every fitness equipment purchased from us according to the following provisions.
Your statutory rights are not affected.
Warrantee
The warrantee is the first/original buyer and/or any person who received a newly purchased product as a gift from the original buyer.
Warranty period
The warranty periods, shown on our web shop, begin on delivery of the fitness equipment. The respective warranty periods for your equipment can be found on its product website.
Repair Costs
According to our choice, there will either be a repair, a replacement of individual damaged parts or a complete replacement. Spare parts, that have to be mounted while assembling the equipment, have to be replaced by the warrantee personally and are not a part of repair. After the expiration of the warranty period for repair costs, a pure parts warranty applies, which does not include the repair, installation and delivery costs.
The terms of use are defined as follows:
- Home use: solely for private use in private households up to 3 hours per day
- Semi-professional use: up to 6 hours per day (e. g. rehabilitation centres, hotels, clubs, company gyms)
- Professional use: more than 6 hours per day (e.g. commercial gyms)
Warranty Service
Within the warranty period, equipment which develops faults as a result of material or manufacturing defects, will be repaired or replaced at our discretion. Ownership of equipment or parts of equipment which have been replaced is transferred to us. The warranty period is not extended nor does a new warranty period begin following repair or replacement under the warranty.
Warranty Conditions
For the warranty to be valid, the following steps must be taken:
Please contact our customer service by email or phone. If the product under warranty has to be sent in for repair, the seller bears costs. After expiry of the warranty, the buyer bears the costs of transport and insurance. If the fault is covered by our warranty, you will receive a new or repaired equipment in return.
Warranty claims are invalid in case of damage resulting from:
- misuse or improper handling
- environmental influences (moisture, heat, electrical surge, dust, etc.)
- failure to follow the current safety measures for the equipment
- failure to follow the operating instructions
- use of force (e. g. hitting, kicking, falling)
- interventions which were not carried out by one of our authorized service centres
- unauthorised repair attempts
Proof of Purchase and Serial Number
Please make sure that you are able to provide the appropriate receipt when claiming on your warranty. So that we can clearly identify the model of your equipment, and for the purposes of our quality control, you will need to give the serial number of your equipment, when contacting the service team. Where possible please have your serial number and your customer number ready when you call our service hotline. It will help us to deal with your request swiftly.
If you cannot find the serial number on your fitness equipment, our service team is at your disposal to offer further information.
Service outside of the Warranty Period
We are also happy to issue an individual cost estimate if there is a problem with your fitness equipment after the warranty has expired, or in cases which do not fall under the terms of the warranty, e. g. normal wear and tear. Please contact our customer service team to find a quick and cost-effective solution to your problem. In such a case you will be responsible for the delivery costs.
Communication
Many problems can be solved just by speaking to us as your specialist supplier. We know how important it is to you as a user of the fitness equipment to have problems solved quickly and simply, so you can enjoy working out with minimal interruption. For that reason, we also want to resolve your queries quickly and in a straightforward manner. Thus, please always keep your customer number and the serial number of the faulty equipment handy.
DE DK FR
| TECHNICAL SUPPORT TECHNICAL SUPPORT & SERVICE TECHNICAL SUPPORT & SERVICE | ||
| 80 90 16 50+49 4621 4210-945info@fitshop.dkMo - Fr 08:00 - 18:00Sa 09:00 - 18:00 | +33 (0) 172 770033+49 4621 4210-933service-france@fitshop.frMo - Fr 08:00 - 18:00Sa 09:00 - 18:00 | |
| SERVICE | PL | BE |
| 0800 20 20277(Freecall)info@sport-tiedje.deMo - Fr 08:00 - 21:00Sa 09:00 - 21:00So 10:00 - 18:00 | TECHNICAL SUPPORT & SERVICE TECHNICAL SUPPORT & SERVICE22 307 43 21+49 4621 42 10-948info@fitshop.plMo - Fr 08:00 - 18:00Sa 09:00 - 18:00 | 02 732 46 77+49 4621 42 10-932info@fitshop.beMo - Fr 08:00 - 18:00Sa 09:00 - 18:00 |
| UK | NL | INT |
| TECHNICAL SUPPORT+44 141 876 3986support@powerhousefitness.co.ukSERVICE+44 141 876 3972Mo - Fr 9am - 5pm | TECHNICAL SUPPORT & SERVICE+31 172 619961info@fitshop.nlMa - Do 09:00 - 17:00Vr 09:00 - 21:00Za 10:00 - 17:00 | TECHNICAL SUPPORT & SERVICE+49 4621 4210-944service-int@sport-tiedjeMo - Fr 8am - 6pmSat 9am - 6pm |
| AT | CH | |
| TECHNICAL SUPPORT & SERVICE0800 20 20277(Freecall)+49 4621 42 10-0info@sport-tiedje.atMo - Fr 08:00 - 18:00Sa 09:00 - 18:00 | TECHNICAL SUPPORT & SERVICE0800 202 027+49 4621 42 10-0info@sport-tiedje.chMo - Fr 08:00 - 18:00Sa 09:00 - 18:00 |
Please find a detailed overview including address and opening hours for all stores of the Sport-Tiedje Group in Germany and abroad on the following website:
www.sport-tiedje.com/en/stores
WE LIVE FITNESS
WEBSHOP AND SOCIAL MEDIA
Sport-Tiedje is Europe's largest specialist store for home fitness equipment with currently 80 stores and one of the world's most renowned online mail order companies for fitness equipment. Private customers order via the 25 web shops in the respective national language or have their desired equipment assembled on site. In addition, the company supplies fitness studios, hotels, sports clubs, companies and physio practices with professional equipment for endurance and strength training.
Sport-Tiedje offers a wide range of fitness equipment from renowned manufacturers, high-quality in-house developments and comprehensive services, such as a build-up service and sports scientific advice before and after the purchase. The company employs numerous sports scientists, fitness trainers and competitive athletes.
Visit us also on our social media platforms or our blog!
flowchart
graph TD
    A["www.sport-tiedje.co.uk\nwww.sport-tiedje.de/blog"] --> B["www.facebook.com/SportTiedje"]
    B --> C["www.instagram.com/sporttiedje"]
    C --> D["www.youtube.com/user/sporttiedje"]
    D --> E["TAURUS"]
    E --> F["cardiostrong"]
    F --> G["BODYCRAFT"]
    G --> H["cardiojump"]
    H --> I["DAWWIN FITNESS GERMANY"]
Notes
Notes
TAURUS®
- Content
- GENERAL INFORMATION 7
- ASSEMBLY 10
- OPERATING INSTRUCTIONS 21
- STORAGE AND TRANSPORT 34
- TROUBLESHOOTING, CARE AND MAINTENANCE 35
- DISPOSAL 36
- Dear customer,
- Intended Use
- Legal Notice
- Disclaimer
- ABOUT THIS MANUAL
- ATTENTION
- CAUTION
- WARNING
- DANGER
- i NOTICE
- Technical Data
- TFT Display:
- Weight and dimensions:
- Personal Safety
- Electrical Safety
- NOTICE
- Set-Up Place
- ASSEMBLY
- General Instructions
- Scope of Delivery
- Assembly
- Step 1: Assembling the front and rear feet
- Step 2: Assembling the console mast
- Step 3: Mounting the arms
- Step 4: Mounting the pedals
- Step 5: Mounting the handles
- Step 6: Mounting the console
- Step 7: Mounting the covers
- Step 8: Adjusting the feet
- Step 9: Connecting the crosstrainer to the mains supply
- IMPORTANT NOTE
- Console Display
- Button Functions
- Programmes
- Quick Start
- Target programmes
- Pre-set programmes
- User-defined programmes
- Heart rate-oriented programmes
- Watt programme
- Fitness Test
- Media
- Supported formats:
- Settings
- Bluetooth and Fitness Apps
- General Instructions
- Transportation Wheels
- General Instructions
- Faults and Fault Diagnosis
- Maintenance and inspection calendar
- DISPOSAL
- RECOMMENDED ACCESSORIES
- Serial Number and Model Name
- Serial number:
- Brand / Category:
- Model Name:
- Article Number:
- Parts List
- Error Descriptions
- Warrantee
- Warranty period
- Repair Costs
- The terms of use are defined as follows:
- Warranty Service
- Warranty Conditions
- Warranty claims are invalid in case of damage resulting from:
- Proof of Purchase and Serial Number
- Service outside of the Warranty Period
- Communication
- WE LIVE FITNESS
- WEBSHOP AND SOCIAL MEDIA
- TAURUS®
Brand : TAURUS
Model : FX9.9 Touch
Category : Elliptical bike