DSU12 - Vacuum Cleaner Viper - Free user manual and instructions
Find the device manual for free DSU12 Viper in PDF.


| Product Type | Dry Vacuum Cleaner (Commercial) |
| Brand | Viper |
| Model | DSU12 |
| Capacity | 12 L |
| Voltage | 220-240 V |
| Frequency | 50/60 Hz |
| Power | 880 W |
| Vacuum Pressure | 2200 mmH2O |
| Air Flow | 1834 L/min |
| Noise Level | 73 dBA |
| Weight | 5.4 kg |
| Dimensions (L x W x H) | 371 x 357 x 355 mm |
| Filter System | HEPA filter, motor pre-filter cotton, main filter basket, exhaust filter sponge |
| Dust Bag | HEPA dust bag (included) |
| Accessories Included | Crevisse tool, dusting brush, upholstery tool, combination tool, straight iron tube, suction hose, suction tube with handle |
| ECO Mode | Yes (ECO switch for energy-saving mode) |
| Intended Use | Hotels, schools, offices, hospitals, commercial and household cleaning |
| Safety Features | Do not vacuum water, hot materials, or flammable substances; check power cord before use |
| Maintenance | Check and replace pre-filter, dust bag, main filter, and exhaust filter regularly; clean main filter basket |
| Warranty | 12 months against component defects |
Frequently Asked Questions - DSU12 Viper
User questions about DSU12 Viper
0 question about this device. Answer the ones you know or ask your own.
Ask a new question about this device
Download the instructions for your Vacuum Cleaner in PDF format for free! Find your manual DSU12 - Viper and take your electronic device back in hand. On this page are published all the documents necessary for the use of your device. DSU12 by Viper.
USER MANUAL DSU12 Viper
8L/10L/12L/15L Dry Vacuum Cleaner
8L/10L/12L/15L
OWNER'S MANUAL
natural_image
Line drawings of two vacuum cleaner units with wheels and ventilation slots (no text or symbols)Manufacturer / Výrobce / Hersteller / Fabrikant / Fabricante / Κατασκευαστής / Gyártó / Proizvođač / Fabbricante / Gamintojas / Ražotājs / Produsent / Fabrikant / Fabricante / Producent / Producător / производитель / Tillverkaren / Výrobca / Proizvajalec/ Üre ci rma:
Nil sk A/S, Kornmarksvej 1
DK-2605 Broendby, DENMARK
Product / Produkt / Producto, Toode, Produit, Tuote/ Продукт / Проїв / Termék / Proizvod / Prodo o / Produktas / Produkts / Ar kel / Produtos / Produs / Izdelek / Ürün
DSU8, -10, -12, -15, VP100, ZEF8, -10
Descrip on / Popis / Beschreibung / Beskrivelse / Descripción / Kirjeldus / La descrip on / Kuvaus / Описание / Перурафń / Leirás / Opis / Descrizione / Aprašymas / Apraksts / Beschrijving / Descrição / Descriere / Beskrivning / Popis / Açıklama
VAC - Commercial - Dry
220-240V 50/60Hz, IPX0

We, Nil sk hereby declare under our sole responsibility, that the above men oned product(s) is/are in conformity with the following direc ves and standards.

Authorized signatory:
Lars Gjødsbøl, Execu ve Vice President Global Products & Services
July 13, 2018

UK Declaration of Conformity
We,
Nilfisk Ltd
Nilfisk House, Bowerbank Way Gilwilly Industrial Estate
Penrith Cumbria
CA11 9BQ UK
Hereby declare under our sole responsibility that the
Products: VAC - Commercial - Dry
Description: 220-240V 50-60Hz, IPX0
Type: DSU8, -10, -12, -15, ZEF8, -10
Are in compliance with the following standards:
EN 60335-1:2012+A11:2014+A13:2017
EN 60335-2-69:2012
EN 55014-1:2017+A11:2020
EN 55014-2:2015
EN 61000-3-2:2014
EN 61000-3-3:2013
EN 60312-1:2017
EN 63000:2018
Following the provisions of:
Supply of Machinery (Safety) Regulations 2008/1597
Electromagnetic Compatibility Regulations 2016/1091
The Restriction of the Use of Certain Hazardous Substances in Electrical and Electronic Equipment Regulations 2012/3032
Ecodesign for Energy-Related Products and Energy Information (Amendment) (EU Exit) Regulations 2019 - 2019/539
Penrith, 11-1-2021

Stewart Dennett GM/MD

natural_image
Technical line drawing of a vacuum cleaner (no text or symbols present)
natural_image
Technical line drawing of two different vacuum cleaner designs (no text or symbols)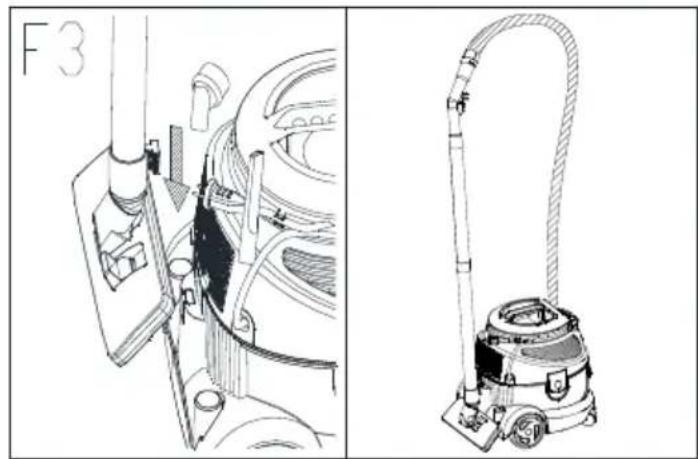
natural_image
Technical line drawing of a vacuum cleaner assembly (no text or symbols present)


natural_image
Line drawing of a multi-tiered vacuum cleaner with visible wheels and control buttons (no text or symbols)

Product Specification Parameter/ (F 10)
| Model No. | Capacity (L) | Votage (V) | Frequency (Hz) | Power (W) | Vacuum (mmH2O) | Air Flow (ltr/min) | Noise (dBA) | Weight (Kg) | Size (LxWxH)mm |
| D S U 8 | 8 | 220~240 | 50/60 | 880 | 2200 | 1834 | 72 | 5.0 | 340x325x325 |
| D S U 10 | 1 0 | 220~240 | 50/60 | 880 | 2200 | 1834 | 72 | 5.2 | 340x325x340 |
| D S U 12 | 1 2 | 220~240 | 50/60 | 880 2200 | 1834 | 73 | 5.4 | 371x357x355 | |
| D S U 15 | 1 5 | 220~240 | 50/60 | 880 2200 | 1834 | 73 | 5.6 | 371x357x370 | |
Instruc on:
• This machine is widely used in hotels, schools, marketplace, o ce, hospital, commercial and household cleaning etc.
- This manual should be read thoroughly before opera on.
- Please use the recommended accessories when operating the machine.
Before opera ng this machine:
• Make sure that all the safety func ons are normal, and ensure that the actual opera on voltage is in accordance with the required voltage rate.
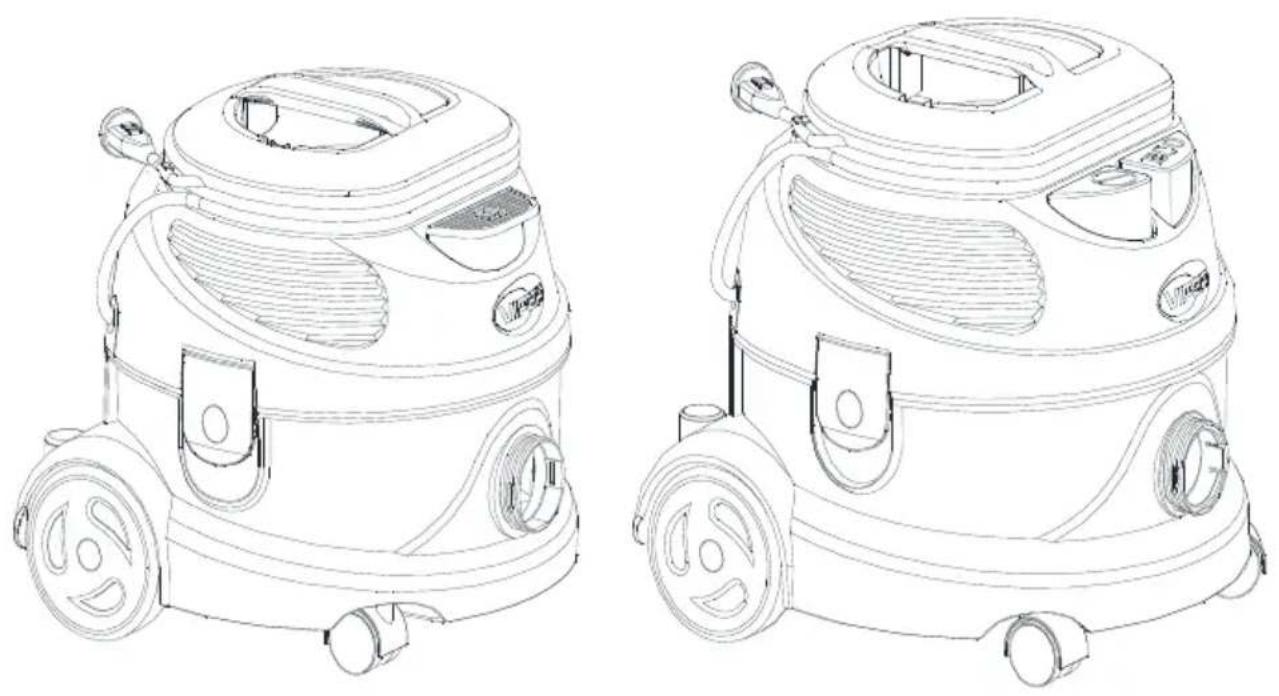
Descrip on of the construc on of the device. For parts diagrams of construc on, refer to "F1" Diagram on page 3.
- Power cord 2. Cable hook
3.Latch 4. 4.3inch back big wheel
5.Omni-direc onal wheel 6.Handle 7.ECO switch 8. Power switch 9.LOGO 10.Serial number label 11.Exhaust cover 12.Exhaust Iter sponge 13.HEPA Iter 14.Accessory parts storage column 15.Combina on tool storage posi on 16.Machine head assembly 17.Motor pre Iter co on
18.Main Iter basket 19.HEPA dust bag 20.Dust tank assembly 21.Machine hose connector 22.Suc on hose 23.Suc on tube
opera on handle 24.Suc on force regulator 25.Nozzle transfer switch
26.Combina on tool 27.Straight iron tube 28.Upholstery tool 29.Dus ng tool 30.Crevice tool
Remark: the parts or accessories are subject to change without prior no ce, please forgive.
Opera ng instruc ons
- Please use the recommended dust bag. Insert the latex ring of dust bag into the suc on port of dust tank, and place dust bag atly in the dust tank.
- Put the main Iter basket placed in the dust tank with dust bag. (Note: the placement of main Iter basket has its direc on, the side with the le er "Back" needs toward the back of machine.)
- Place the machine head, then lock two side latch of machine head.
- Connect machine connector of the corrugated hose assembly screw with the dust tank thread.
- Plug power cord into outlet, press the red switch to start the machine for opera on. (Note: DSU8/DSU10 has only red power switch, DSU12/DSU15 contains the red power switch and the ECO energy-saving switch, power saving mode and maximum power mode can be changed by gently touched the ECO switch for easy transforma on.)
Dry Vacuum Cleaner English
- When stopping the machine, only press the red power switch one me.
- The crevice tool can be used for cleaning narrow and hard to reach areas, the dusting brush and upholstery tool can be used for cleaning curtains and upholstered furniture.
Warranty
This product has been designed to provide trouble free operation for a number of years with the correct maintenance, The machine comes with a 12 month manufactures warranty against component defects.
In the unlikely event that your VIPER product develops a fault please contact the place of purchase or your nearest authorised VIPER dealer.
- Incorrect or improper operation of the machine.
- Parts damaged by improper use or neglect..
- Machine structure damaged by improper use or neglect..
Care and Maintenance
- A er using, place the machine in dry and ven lated place.
- Before using this product please check the condition of the pre filter, dust bag and main filter and replace as required.
Please check the exhaust filter on a regular basis at least once a month depending on the usage.
- Remove the suc on hose and check the hose whether has any obstruc on or is damaged;
- If during use the machine suffers from a lack of suction in the first place please check that the dust bag is not full failing that please check the main filter basket, motor pre filter and exhaust filter;
- A er use, bea ng or using brush cleaning the main Iter basket.
- A er cleaning the main lter basket, they must be completely dry when re-used.
Warning

As with all electrical equipment care and attention must be exercised at all times during its use, in addition to ensuring that routine and preventative maintenance is carried out periodically in order to ensure its safe operation. Failure to carry out maintenance as necessary, including the replacement of parts to the correct standard could render this equipment unsafe and the manufacturer can accept no responsibility or liability in this respect.
This machine is not suitable for hazardous materials such as hazardous dust flammable or explosive material. It is the customers responsibility to carry
English Dry Vacuum Cleaner
out a thorough risk assessment before using this product.
▶ Do not Clean hot materials, do not clean the fireplace、roaster and other contains similar hot object source.
▶ Do not vacuum water, liquid and other ammable gasses.
▶ If the power cord or plug has any damage, do not use this machine, before using the machine check the power cord and plug is not damaged or shows signs of ageing, If any damage is found to the power cord or plug, please contact the nearest authorised service center.
- Don't touch the power cord and plug when your hand is wet, when you need to remove the plug, the right way is by holding the plug then pull the plug, do not just pull the wire. Before carrying out any maintenance on the machine you should turn off the power and remove the plug from the socket.
This machine is only to be used by persons who have been trained and have read this manual.
Storage
- Storage mode of cleaner accessories (crevice tool, dus ng tool, upholstery tool) can be referred to picture
F3.
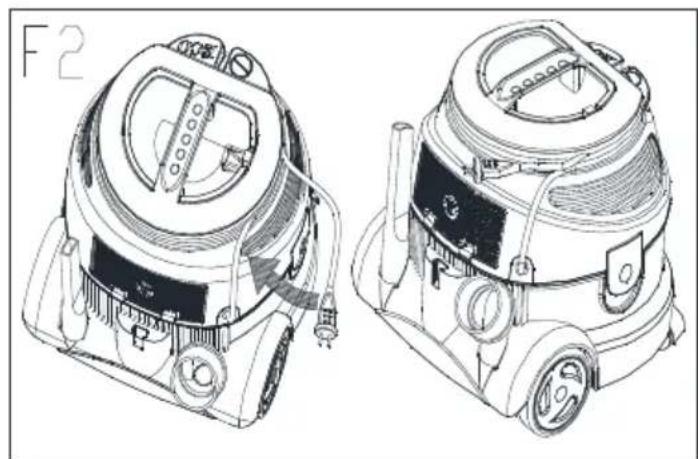
- Two kinds of storage power cord
mode can be referred to pictures F2.
- Machine stacking storage can be referred to picture F7.
- The right carrying machine way with accessories storage can be referred pictures F4, improper carrying way with accessories storage can refer to pictures F5
Circuit connec on diagram:
DSU8/DSU10 circuit connec on diagram can be referred to F8.
DSU12/DSU15 circuit connec on diagram can be referred to F9.
Product speci ca on parameter
For speci ca on parameter referred to "F10".

Company informa on
www.vipercleaning.eu
info-eu@vipercleaning.com

- OWNER'S MANUAL
- Instruc on:
- Before opera ng this machine:
- Descrip on of the construc on of the device. For parts diagrams of construc on, refer to "F1" Diagram on page 3.
- Opera ng instruc ons
- Dry Vacuum Cleaner English
- Warranty
- Care and Maintenance
- Warning
- English Dry Vacuum Cleaner
- Storage
- F3.
- Circuit connec on diagram:
- Product speci ca on parameter
Brand : Viper
Model : DSU12
Category : Vacuum Cleaner