
YAM 200 T (2023) - Boat YAMAHA - Free user manual and instructions
Find the device manual for free YAM 200 T (2023) YAMAHA in PDF.


| Product Type | Boat |
| Brand | Yamaha |
| Model | YAM 200 T (2023) |
| Length (LOA) | Approx. 6.0 m (19.7 ft) |
| Beam | Approx. 2.3 m (7.5 ft) |
| Draft | Approx. 0.5 m (1.6 ft) |
| Dry Weight | Approx. 1,200 kg (2,645 lbs) |
| Maximum Power | 200 HP |
| Fuel Type | Gasoline |
| Fuel Capacity | Approx. 150 L (40 gal) |
| Passenger Capacity | 8 persons |
| Hull Material | Fiberglass |
| Engine Type | Outboard |
| Steering System | Hydraulic or mechanical |
| Safety Equipment | Life jackets, fire extinguisher, emergency kill switch |
| Maintenance Frequency | Every 100 hours or annually |
| Warranty | 3 years limited |
| Spare Parts Availability | Through Yamaha dealers |
| Manual Language | English (original) |
Frequently Asked Questions - YAM 200 T (2023) YAMAHA
User questions about YAM 200 T (2023) YAMAHA
0 question about this device. Answer the ones you know or ask your own.
Ask a new question about this device
Download the instructions for your Boat in PDF format for free! Find your manual YAM 200 T (2023) - YAMAHA and take your electronic device back in hand. On this page are published all the documents necessary for the use of your device. YAM 200 T (2023) by YAMAHA.
USER MANUAL YAM 200 T (2023) YAMAHA
Read this manual carefully before operating this flatable boat.
YAM 200 T
YAM 240 T
YAM 240 Air
YAM 275 Air
YAM 310 Air V
YAM 275 S
YAM 310 S
YAM 340 S
YAM 380 S
YAM 270 TAf
YAM 310 TAf
YAM 350 TAf
To the owner
Thank you for selecting a Yamaha inflatable boat. This manual contains information needed for proper operation, maintenance and care. A thorough understanding of these simple instructions will help you obtain maximum enjoyment from your new Yamaha. If you have any question about the operation or maintenance of your inflatable boat, please consult a Yamaha dealer.
In this Owner's Manual particularly important information is distinguished in the following ways.

This is the safety alert symbol. It is used to alert you to potential personal injury hazards. Obey all safety messages that follow this symbol to avoid possible injury or death.
WARNING
A WARNING indicates a hazardous situation which, if not avoided, could result in death or serious injury.
NOTICE
A NOTICE indicates special precautions that must be taken to avoid damage to the inflatable boat or other property.
TIP (IMPORTANT):
A TIP provides key information to make procedures easier or clearer.
Yamaha continually seeks advancements in product design and quality. Therefore, while this manual contains the most current product information available at the time of printing, there may be minor discrepancies between your machine and this manual. If there is any question concerning this manual, please consult your Yamaha dealer. To ensure long product life, Yamaha recommends that you use the product and maintenance by correctly following the instructions in the owner's manual. Any damage resulting from neglect of these instructions is not covered by warranty.
Some countries have laws or regulations restricting users from taking the product out of the country where it was purchased, and it may be impossible to register the product in the destination country. Additionally, the warranty may not apply in certain regions. When planning to take the product to another country, consult the dealer where the product was purchased for further information.
If the product was purchased used, please consult your closest dealer for customer re-registration, and to be eligible for the specified services.
TIP:
The YAM-310 S and the standard accessories are used as a base for the explanations and illustrations in this manual. Therefore some items may not apply to every model.
NOTICE
The marine environment is fragile; always use your boat with the utmost respect for the environment.
YAM
OWNER'S MANUAL
©2022 by Yamaha Motor Europe, N.V.
1st Edition, March 2022
All rights reserved.
Any reprinting or unauthorized use without the written permission of
Yamaha Motor Europe, N.V.
is expressly prohibited.
Printed in Spain
Our boats comply with ISO standard 6185, established by the International Standards Organization, and with European Directive 2013/53/EU.
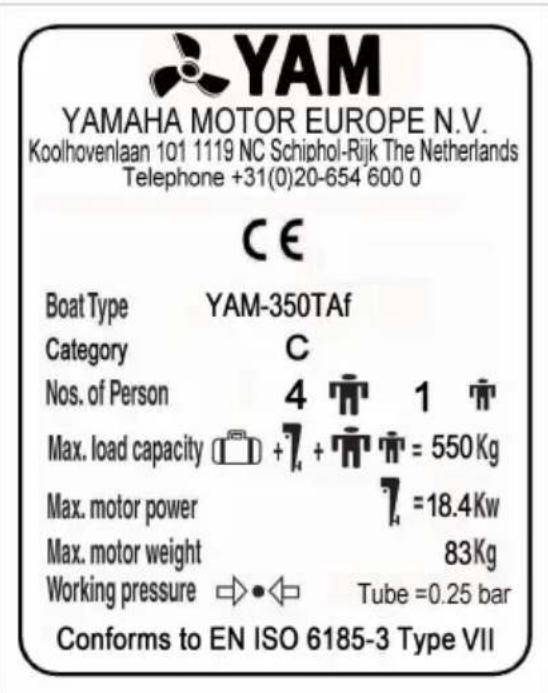
MANUFACTURER'S BUILDER PLATE
The indications on the manufacturer's plate on the transom are important:
They give information about limitations imposed by local or national regulations.
However, these indications are not a complete list: the safety requirements (the boat's mandatory safety equipment, maximum authorized distance you can navigate from a shelter, etc.) may change according to the country. Always refer to local regulations to be informed on additional requirements.
*Boat Type: Commercial name of the model.
*Inflation pressure of buoyancy tubes. Other parts of the boat may have different inflation pressures.
*Maximum number of passengers allowed on board the boat in the case of adapted equipment (adults + possibly 1 child) as per ISO standards
*Maximum load capacity of the boat allowed by the constructor expressed in kilograms (people + engine and its fuel tank filled to the top + diverse loads, etc.), defined as per the current version of standard ISO 14945
*Maximum engine weight allowed by the constructor for the boat expressed in kilograms.
*Maximum engine power allowed by the constructor for the boat expressed in kilowatts.
*CE: Sign of the European certification.
*ISO Category compliance. This boat complies with the current standard EN ISO 6185. The engine rating defines its category.
| ISO CATEGORY | 12 | 3 | |
| Motor rating in kW | 0 - 4.5 kW | 4.5 - 15 kW | >15 kW |
| Motor rating in Hp | 0 - 6 Hp | 6 - 20 Hp | >20 Hp |
*Small plate with the Hull Identification Number (generally fixed on the external side of the transom).
*Design category (for overall length > 2.5 m). In Europe, your boat has been designed to navigate under different categories:
| Category | B | C | D |
| Navigation | “offshore” "inshore" | "sheltered waters" | |
| Wind speed (Beaufort scale) | Up to and including 8 | Up to and including 6 | Up to and including 4 |
| Wave significant height (m)* | Up to and including 4 | Up to and including 2 | Up to and including 0.5 |
*It represents the average height of the upper third of the waves, which approximately corresponds to the wave height estimated by an experienced observer.
Table of contents
General description....3
Specifications....4
General description....8
Mounting and Operating Instructions....9
Pack content....9
Assembly and Disassembly 10
Inflation - Deflation....13
Operating Instructions....14
Important information....18
Warranty 18
Company and Address....19
Environmental & Safety considerations.... 19
YAM 270 TAF Inflatable tender 2.70 m, rigid aluminium hull with V-shaped keel
YAM 310 TAf Inflatable tender 3.10 m, rigid aluminium hull with V-shaped keel
YAM 350 TAF Inflatable tender 3.50 m, rigid aluminium hull with V-shaped keel
| Specifications / Models | 200 T | 240 T |
| Overall length | 1.97 m | 2.40 m |
| Beam | 1.31 m | 1.48 m |
| Tube diameter (cm) | 35 cm | 39 cm |
| Max. Persons | 1 + 1 (adult + child) | 3 |
| Max. Engine Power (recommended by Yamaha) | 1.9 kW / 2.5 hp 3.7 | kW / 5 hp |
| Max. Engine Weight | 24 kg 40 kg | |
| No. of air chambers | 2 | 3 |
| Stowed Dimensions (cm) | 102 x 58 x 29 cm | 107 x 58 x 32 cm |
| No. of packages | 1 | 1 |
| Floor Material / Type | PVC floor with slats wooden | PVC floor with slats wooden |
| Transom | Black PVC covered | |
| Weight (hull) | 16.65 kg | 24kg |
| Max. Load Capacity | 250 kg | 400 kg |
| Seat | 1 | 1 |
| D-towing ring | 2 | 2 |
| lifting eyebolts for davits | No No | |
| Front carrying handles | No No | |
| Rear carrying handles | 2 | 2 |
| Storage locker with latch | N/A N/A | |
| Options | - | - |
Equipment included
| Straps for fuel tank | No | No |
| Valise with carrying handles | Yes | Yes |
| Repair kit | Yes | Yes |
| Foot pump | Yes (Low pressure) | Yes (Low pressure) |
| Paddles | 2 pcs. 2 pcs. | |
| Air pressure gauge | No No | |
| Mooring / towing rope | 1 | 1 |
| Specifications / Models | 275 S | 310 S 340 S | 380 S | |
| Overall length | 2.70 m 3.08 m | 3.39 m 3.80 m | ||
| Beam | 1.52 m 1.54 m | 1.70 m | 1.70 m | |
| Tube diameter (cm) | 42.5 cm | 42 cm 43.5 cm | 43.5 cm | |
| Max. Persons | 3 + 1 (adults + child) | 4 5 6 | ||
| Max. Engine Power (recommended by Yamaha) | 7.4 kW / 10 hp | 11.1 kW / 15 hp | 4.7 kW / 20 hp | 4 kW / 25 hp |
| Max. Engine Weight | 55 kg | 60 kg 60 kg | 83 kg | |
| No. of air chambers | 3 + 1 (keel) 3 + | 1 (keel) | 3 + 1 (keel) 3 + | 1 (keel) |
| Stowed Dimensions (cm) | 112 x 58 x 33 cm | 112 x 66 x 34 cm | 127 x 72 x 38 cm | 127 x 80 x 38 cm |
| No. of packages | 1 1 1 1 | |||
| Floor Material / Type | Flat aluminium panels (bow panel wood) | Flat aluminium panels (bow panel wood) | Flat aluminium panels (bow panel wood) | Flat aluminium panels (bow panel wood) |
| Transom | Black PVC covered | |||
| Weight (hull) | 44.2 kg 50.2 | kg 60 kg | 71.75 kg | |
| Max. Load Capacity | 480 kg | 600 kg | 750 kg | 820 kg |
| Seat | 1 | 1 1 1 | ||
| D-towing ring | 2 | 2 2 2 | ||
| lifting eyebolts for davits | 2 | 2 2 2 | ||
| Front carrying handles | 1 1 1 1 | |||
| Rear carrying handles | 2 | 2 2 2 | ||
| Storage locker with latch | N/A | N/A | N/A | N/A |
| Options | Extra Seat | Extra Seat | Extra Seat | Extra Seat |
Equipment included
| Straps for fuel tank | Yes | Yes | Yes | Yes |
| Valise with carrying handles | Yes | Yes | Yes | Yes |
| Repair kit | Yes | Yes | Yes | Yes |
| Foot pump | Yes (Normal) | Yes (Normal) | Yes (Normal) | Yes (Normal) |
| Paddles | 2 pcs. 2 pcs. | 2 pcs. | 2 pcs. | |
| Air pressure gauge | Yes | Yes | Yes | Yes |
| Mooring / towing rope | 1 1 1 1 |
| Specifications / Models | 240 Air 270 Air 310 Air V | ||
| Overall length | 2.40 m 2.70 m | 3.10 m | |
| Beam | 1.34 m 1.52 m | 1.56 m | |
| Tube diameter (cm) | 36.5 cm | 42.5 cm 43.5 cm | |
| Max. Persons | 2 + 1 (adults + child) | 3 + 1 (adults + child) | 3 + 1 (adults + child) |
| Max. Engine Power(recommended by Yamaha) | 3.7 kW / 5 hp | 7.4 kW / 10 hp 7.4 kW / 10 hp | |
| Max. Engine Weight | 40 kg | 55 kg | 55 kg |
| No. of air chambers | 3 + 2 (floor + keel) | 3 + 2 (floor + keel) | 3 + 2 (floor) |
| Stowed Dimensions (cm) | 106 x 58 x 32 cm | 12 x 60 x 32 cm 113 x 65 x 35 cm | |
| No. of packages | 1 1 1 | ||
| Floor Material / Type | Inflatable floor Inflatable floor Inflatable V-floor | ||
| Transom | Black PVC covered | ||
| Weight (hull) | 25.6 kg 29.2kg | 31.46 kg | |
| Max. Load Capacity | 400 kg 480 kg | 620 kg | |
| Seat | 1 1 1 | ||
| D-towing ring | 2 2 2 | ||
| lifting eyebolts for davits | 2 2 2 | ||
| Front carrying handles | 1 1 1 | ||
| Rear carrying handles | 2 2 2 | ||
| Storage locker with latch | N/A | N/A | N/A |
| Options | - | Extra Seat | Extra Seat |
Equipment included
| Straps for fuel tank | Yes | Yes | Yes |
| Valise with carrying handles | Yes | Yes | Yes |
| Repair kit | Yes | Yes | Yes |
| Foot pump | Yes (High Pressure) | Yes (High Pressure) | Yes (High Pressure) |
| Paddles | 2 pcs. | 2 pcs. | 2 pcs. |
| Air pressure gauge | Yes | Yes | Yes |
| Mooring / towing rope | 1 1 1 | ||
| Specifications / Models | 270 TAf | 310 TAf | 350 TAf |
| Overall length | 2.65 m | 3.07 m 3.53 m | |
| Beam | 1.59 m | 1.59 m | 1.56 m |
| Tube diameter (cm) | 42 cm | 42 cm | 41 cm |
| Max. Persons | 3 + 1 (adults + child) | 4 + 1 (adults + child) | 4 + 1 (adults + child) |
| Max. Engine Power (recommended by Yamaha) | 5.9 kw / 8hp | 14.7 kw / 20hp | 18.4 kw / 25hp |
| Max. Engine Weight | 55 kg | 84 kg | 99 kg |
| No. of air chambers | 3 3 3 | ||
| Stowed Dimensions (cm) | 252 x 110 x 46 cm | 287 x 110 x 52 cm | 332 x 110 x 58 cm |
| No. of packages | 1 1 1 | ||
| Floor Material / Type | Aluminium | Aluminium | Aluminium |
| Transom | Black PVC covered | ||
| Weight (hull) | 48 kg | 57.8 kg | 78 kg |
| Max. Load Capacity | 425 kg 495 kg | 550 kg | |
| Seat | 1 1 1 | ||
| D-towing ring | 2 2 2 | ||
| lifting eyebolts for davits | 3 3 3 | ||
| Front carrying handles | 1 1 1 | ||
| Rear carrying handles | 2 2 2 | ||
| Storage locker with latch | N/A | 1 | 1 |
| Options | Extra Seat | Extra Seat, Console | Extra Seat, Console |
Equipment included
| Straps for fuel tank | Yes Yes Yes | ||
| Valise with carrying handles | Yes Yes Yes | ||
| Repair kit | Yes Yes Yes | ||
| Foot pump | Yes (Normal) Yes (Normal) Yes (Normal) | ||
| Paddles | 2 pcs. 2 pcs. | 2 pcs. | |
| Air pressure gauge | Yes Yes Yes | ||
| Mooring / towing rope | 1 1 1 | ||

IDENTIFICATION OF COMPONENTS
FUNCTIONSCONTROLS
- Transom plate
- Motor mounting plate ..... Reinforcement of the transom plate to which the outboard engine is attached
- Manufacturer's plate
- Oarlock.... Holds the oar in place while rowing
- Oar clips.... For storing the oars
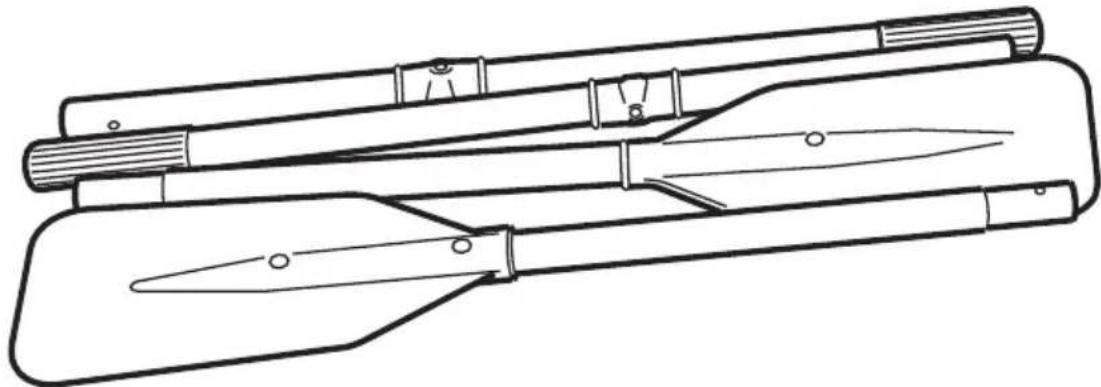
- Oars.... Boat propulsion (x2)
- Carrying handles
- Hand hold..... Enables passengers to hold on to the boat while boating
- Deck.... Bottom of the boat (slatted PVC, inflated PVC or aluminum depending on the type)
- Towing ring..... Towing attachment points (x2)
- Mooring yoke .... Mooring line attachment point
- Rope..... For mooring
- PVC tube
- Assist handle ..... Enables passengers to hold on to the boat while boating
- Inflation/deflation valve
- Bench..... Sit here to row
- Drain plug..... Water drain plug
- Hoisting ring ..... Davit arm attachment points (x4)
- Fabric Lifting handles
![[6] [2] [3] [1] [7] [9] [4] [5] [8] [10] [Valve ASSEMBLY]](/content/2026/05/830072/images/4dbc87c578c4a917edf0b498fdd41e2f2b450291d368d8bd3ce7d483189fdec2.jpg)
Components included with each boat:
Description
| [8 ] Oars |
| [9] Air Pump |
| [10] Manometer |
| [3] Side Joiners |
| [1] Valve Assemblies |
| [2] Floor Boards * |
| [7] Seat |
| [4] Repair Kit |
| Tube Cement Patch |
| Material Umbrella |
| Valve key |
| [5] Quick Start Guide |
| [6] Carrying Bag |
* Floor panels quantity are depending of boat size.
Model
| 200 T | 240 T | 240 Air275 Air310 Air V | 275 S310 S | 340 S380 S | 270 TAF310 TAF350 TAF |
| 2 | 2 | 2 | 2 | 2 | 2 |
| 1 | 1 | 1 | 1 | 1 | 1 |
| - | - | 1 | 1 | 1 | 1 |
| - | - | - | 2 | 4 | - |
| 2 | 3 | 5 | 4 | 4 | 3 |
| 1set | 1set | 1set | 1set | 1set | - |
| 1 | 1 | 1 | 1 | 1 | 1 |
| 1 | 1 | 1 | 1 | 1 | 1 |
| 1 | 1 | 1 | 1 | 1 | 1 |
| 2 | 2 | 2 | 2 | 2 | 2 |
| 1 | 1 | 1 | 1 | 1 | 1 |
| 1 | 1 | 1 | 1 | 1 | 1 |
| 1 | 1 | 1 | 1 | 2 | 1 |
-
Find a large enough flat surface to assemble and inflate the boat and remove any sharp objects from this surface.
-
Unfold and spread the boat out flat.
YAM inflatable
A - Inflatable Tube Valve
B - Keel Valve
(Only on S and AIR models)

Location of Valves
-
Attach the valves in their proper place. Check that the cap gasket is in place. Attach the valve retainer to each valve.
-
When using the boat for the first time, fully inflate the boat by attaching the air pump to each of the valves, one at a time, and pump air equally to maintain a balance of pressure between the chambers until fully filled. When the boat is fully inflated, unscrew the valves and allow approximately 1/2 of the air to escape. Screw in the valves, and continue with assembly. (not for TA/TAf models)
-
If the boat has already been earlier inflated, attach foot pump to each valve, one at a time, and:
a. For T and AIR models, add air to each chamber to full capacity.
b. For S models, add air to each chamber to 1/2 the capacity of each chamber, mount the floor including the side joiners and pump to full capacity.
-
Fully inflate the boat by attaching the air pump to each of the valves, while maintaining a balance of air between the air chambers. DO NOT inflate any chamber to full capacity at one time. Install the valve caps.
-
Inflate the keel and install the valve caps.
SIDE JOINER ASSEMBLY for S models
- Slide oar (a) under bottom of boat to raise the floor boards (b) from the floor. Mount the side joiner (c). Repeat this procedure on the opposite side of the boat.
- Install the seat.
- Fully inflate the boat by attaching the foot pump to each of the valves, while maintaining a balance of air between air chambers. DO NOT inflate any chamber to full capacity at one time. Install the valve caps.
- Inflate keel and install the valve caps.
- Use the manometer provided to reach the right pressure.
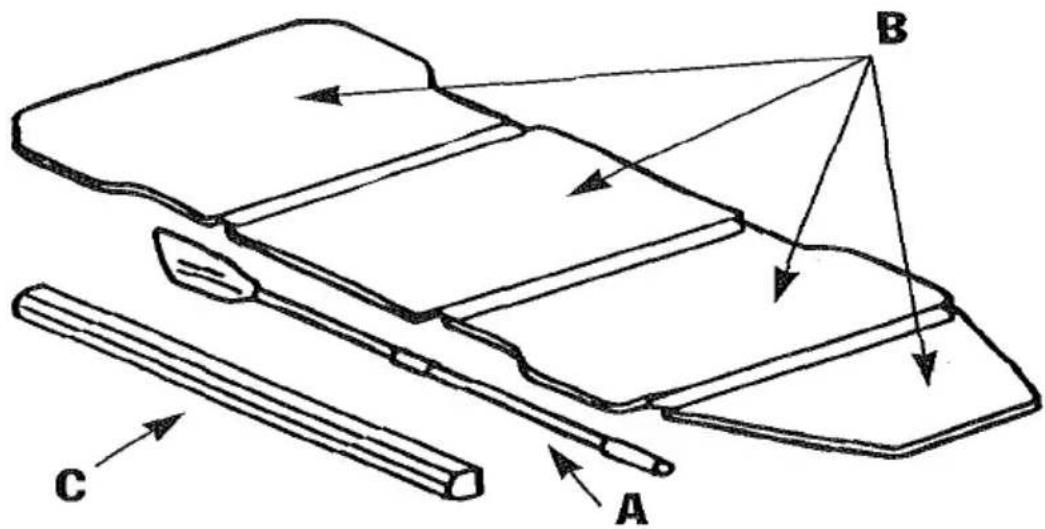
Side Joiners for more than 3 pcs panels floor
NOTICE When installing the side joiners (2 short and 2 long) they must be installed as following: Start with one long and one short joiner on one side and with one short and one long on the other side (asymmetric).

FLOOR ASSEMBLY for AIR models
- When installing the inflatable floor, make sure the valve on the floor is upright and in the bow area. All corners of the floor should fit along the sides and underneath the transom bottom.
- Pump floor capacity (until pump nozzle releases).
- Use the manometer provided to reach the right pressure.
FLOOR ASSEMBLY for S models
NOTICE When installing floor panels, identifying numbers of panels must face up.
INSTRUCTIONS for more than 3 pcs PANELS FLOOR:
- Insert# 1 wood floor panel in bow of boat.
- Insert# 4 aluminium floor panel into transom of the boat.
- Insert# 2 aluminium floor panel into# 1 floor panel.
- Insert # 3 floor panel into # 2 and # 4 floor panels and press down until flat.

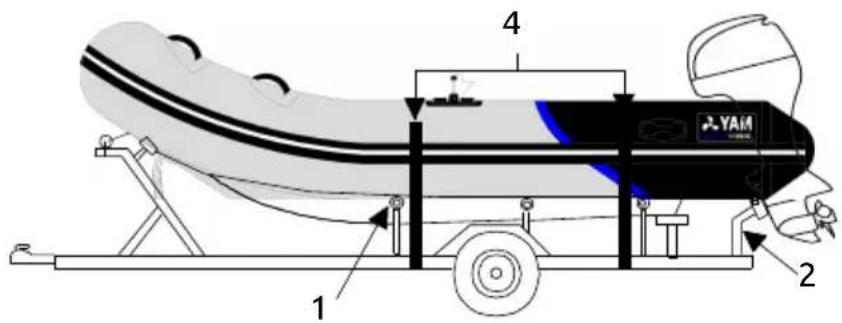
HANDLING TAF models (aluminium floor)
- Adjust the rollers (or supports) (1) of the trailer to fit the shape of the boat.
- Haul the boat onto the trailer using the rings.
- The bottom of the transom must rest on the trailer bunks.
- Place the motor in the down or trailing lock position so that it can rest on the support provided on the trailer (2).
- Check that the boat lies flat and is properly secured.
- Remove/secure all loose equipment.
- Tie down the straps and ensure the buoyancy tubes are protected against chafing (4).
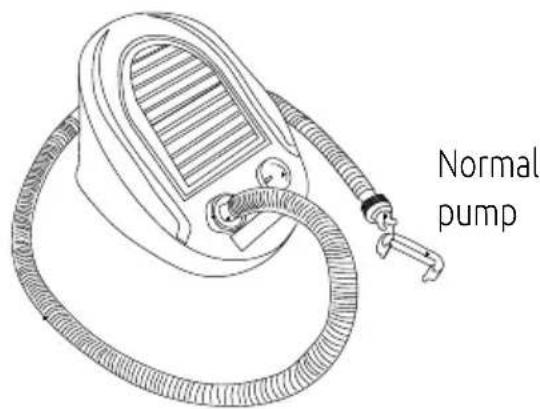
- Inflate boat with the foot pump supplied.
![the root pump supplied. [1] [2] [3] [4] [3] [2] [1]](/content/2026/05/830072/images/5ffc8cb2b020851189759f1382aaaf2ad60720066f185c5cfa52e3c7274fc3e4.jpg)
[1] Connecting hose
[2] Inflation orifice "Normal use" - "IN"
[3] Deflation orifice- "OUT"
[4] Inflation orifice "High Pressure Use" (Only for AIR boats)
NOTICE When using the foot pump, the boat can never be overinflated. If using an electric inflator, finish the inflation procedure with the foot pump provided to obtain the correct inflation pressure.
The correct inflation pressure is mentioned around the vales. Depending on climate and operating conditions, the pressure may require monitoring during boat use to ensure correct inflation is maintained.
NOTICE For AIR Models the correct inflation pressure of the inflatable floors is also mentioned around the vales.
A boat inflated for 2 to 3 days may lose pressure and may require reinflation to the correct operating pressure
When inflating or deflating, maintain a balance of air between the air chambers to prevent damage to the air chamber bulkheads.
For deflating proceed in the following way:
- Remove the protection caps from the valves.
- Press the valve-pin down with a finger and turn it to the righthand side.
- Release the air contained in each chamber.
High pressure pump

OPERATION: ROWING
- Inflatable boat comes standard with oars, thole-pins and a rowing seat. Insure seat is properly installed.
- Install the oars in the thole-pins and attach the thole-pin cap screws.
NOTICE DO NOT use oars as levers; they are breakable!
- Local water conditions must be taken into account before operating a boat with oars or a small outboard motor. Boat power may not be strong enough to overcome currents in tidal inlets, open seas, small channels or shallows of shoal water regions.
DO NOT OVERPOWER! Overpowering can result in severe handling and/or stability problems.
USE AN EMERGENCY SWITCH with a lanyard. This switch will stop the engine if, for any reason, the operator pulls the cord. When operating the boat, every one should be seated on the floor, NOT on the side tubes or the rowing seat, in order to prevent falling overboard.
When operating the motor-powered boat alone, do not sit on the side or the row seat, but as far forward as practical. Rapid acceleration should be avoided to prevent falling overboard backwards.
- Regular checks should be made on the motor attachment screws. Loose screws will cause erratic boat operation and possibly the loss of your outboard motor!
- Read the manual carefully before assembling or operating the boat.
- On board loads should be monitored to avoid chafing or puncturing of boat skin.
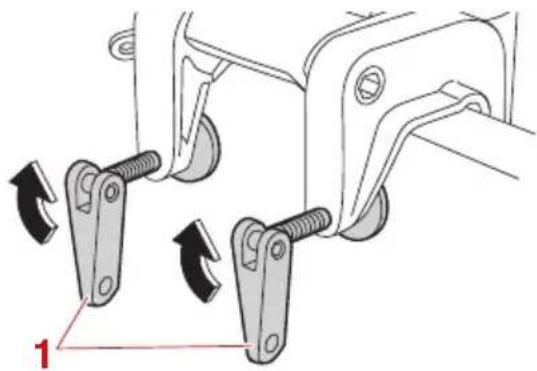
- Clamp screw
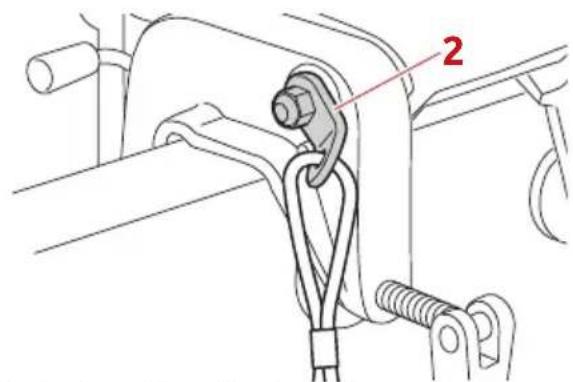
- Restraint cable attachment
TOWING - ANCHORING - MOORING
- When the inflatable boat is towed by another boat, the inflatable MUST BE EMPTY. The towing line should be secured to the "D" rings on each side of the inflatable. The towed inflatable must be observed continuously.
- Anchoring and mooring lines should be secured to the bow "D" ring.
![[D] [D]](/content/2026/05/830072/images/38f7743065eba9d52037c0a214c736b48f787d57151a916c42ada9b909eb8f78.jpg)
![[D] YAM](/content/2026/05/830072/images/3908eab09045ab9a306438e9a066cd74cb09b7eb31099aac21adb0341767e337.jpg)
BEACHING
- It is recommended that the boat be NOT powered onto the beach, dragged across rocks, sand, gravel or pavement as damage to the boat skin may result.
- If the boat is to be temporarily left on a beach, a part of the boat should be left in the water to dissipate internal heat caused by exposure to sunlight. This to avoid increasing air pressure.
- Cover the boat to block direct exposure to sunlight if the boat is to be removed from the water for an extended period of time.
USE IN HIGHER ALTITUDES
- If the boat is inflated at sea level (low altitude) and transported to a high altitude (i.e., for use in a mountain lake), the air pressure must be reduced at the higher altitude to prevent overinflation.

LOADING
WARNING
- DO NOT EXCEED THE WEIGHT CARRYING CAPACITY AS INDICATED ON THE BOAT'S IDENTIFICATION PLATE.
- Each person in the boat should wear a life jacket (personal flotation device).
- Oars or paddles, and a repair kit should be carried on board for emergencies.
- All loads placed in the boat should be distributed uniformly to provide proper boat trim when underway.
- Distribute the load correctly, for example, fixing the fuel tank in the front can help offset the weight of the outboard.
- When using a tiller, its recommended that the captain stay on the starboard side.

- The boat reacts more roughly when lightly loaded. Be particularly careful when you accelerate or change direction.
Operation instructions
STORAGE
- After use, the boat and all components should be washed with a mild soap and rinsed with fresh water. Dry all parts before storage in the carrying bag. This will help prevent mould or mildew.
- Wooden components should be inspected for damage or deterioration to the finish. Surface scratches or abrasions should be refinished with a marine grade varnish.
- To keep the boat looking as new, store the boat in a cool and dry space and avoid excessive exposure to direct sunlight.
- To avoid damaging the boat during storage, do not place heavy objects on boat.
- Engine, follow the information in the specific Owner's Manual, chapter "Maintenance".

IMPORTANT: Waxes or cleaners containing alcohol SHOULD NOT be used on the boat fabric. Alcohol will prematurely dry out the boat fabric.
CLEANING PROCEDURES
All fabric surfaces can be cleaned with soap and water.
IMPORTANT: DO NOT use a vinyl preserving agent on fabric surfaces. Chemicals in such agents will dry out the fabric.
FUELLING

WARNING
FOLLOW THIS LIST:
- Fuel during daylight
• turn off engine and all other systems
• observe "No Smoking" while fuelling - check for right quality of fuel
- tie boat tightly to the pier
- keep fire-extinguisher at hand
• passengers: off the boat
- fuel nozzle: in contact with filler pipe to prevent static sparks
- avoid spillage
• fill less than rated capacity of tank, allow for fuel expansion
- close filler cap, also inspecting the seal in the cap
• run bilge blower for at least 4 minutes before starting the engine
- if fuel enters bilge, have it removed by a professional, do not pump overboard.
IMPORTANT: Follow engine manufacturer's recommendations for types of fuel and oil.
Yamaha Motor Europe guarantees that each new inflatable boat is free from defects in materials or workmanship for a period of two (2) years from the date of purchase, but only when the sales has been made in a country to which distribution is authorized by us. The inflatable must be returned, prepaid and with proof of the date of purchase and serial number to any authorized Yamaha dealer.
NOTICE After inspection, if we find that the product was defective in material or workmanship, we shall, at our option, repair or replace it without charge. We are not responsible for normal wear and tear or for defects caused by accidents, abuse, alteration, modification, misuse or improper care.
There are no other express warranties beyond the terms of this limited warranty. In no event shall any implied warranties, including merchantability and fitness for a particular purpose, extend beyond the duration of the express warranty contained herein. Yamaha Motor Europe will not be liable for incidental or consequential damages.
FOR FURTHER TROUBLESHOOTING AND REPAIR
We offer several options to help you troubleshoot and/or repair your product. Please read through the options listed below.

Spare Parts and Accessories
You can find them in our dealer network or in our website at www.yamaha-motor.eu.

Contact Us
Visit our website at www.yamaha-motor.eu and find the phone and/or email of the closest Yamaha authorized dealer to find an answer to your question regarding your YAM inflatable boat.


Authorized Service Dealers
Yamaha has over 1.000 authorized service dealers in Europe where you can purchase spare parts, accessories or get your products repaired. Please visit our Authorized Service Dealer page locator at our website www.yamaha-motor.eu to find a service provider in your area.
Environmental & Safety considerations
ENVIRONMENTAL CONSIDERATIONS
FUEL & OIL SPILLAGE
Extreme precautions are required with fuel and oil tanks to ensure that there is no spillage into the boat or the water which would be very dangerous and damaging to the environment.
WASTE DISPOSAL
Bag all refuse and keep with you on board; dispose of ashore as appropriate
WAKE / WASH
Care must be taken with waves generated by the boat when close to other boats and sensitive areas of coastline or riverside. Reduce speed in congested waterways.
EXCESSIVE NOISE
Many areas regulate noise limits. Even if there are no laws, courtesy demand that boats are operated quietly.
WATER HAZARDS
- Wrecks, reefs, rocky shores, sand bars, and shallows should be avoided or approached with caution.
- When boating in unfamiliar waters, obtain information on local water hazards before launching.
AIR CHAMBER FAILURE
- Should an air chamber fail, shift the weight to the opposite side.
- Secure the leaking chamber as necessary (by tying up or holding up) and immediately proceed to the nearest shore.
IMPORTANT: DO NOT use a compressed air source (i.e., automotive tyre air compressor) to inflate boats. Overinflation through the use of compressed air may result in ruptured tubes and/or bulkheads.
SAFETY TIPS
- Always use fresh fuel. Old fuel may deteriorate (form gum) which will affect performance or stop engine.
- Inspect filters regularly and replace when dirty, even when in doubt.
- Calculate 1/3 of the tank for the trip out, 1/3 for the trip in, and 1/3 for reserve


YAMAHA
- TO THE OWNER
- WARNING
- NOTICE
- TIP (IMPORTANT)
- TIP
- YAM
- MANUFACTURER'S BUILDER PLATE
- TABLE OF CONTENTS
- GENERAL DESCRIPTION....3
- MOUNTING AND OPERATING INSTRUCTIONS....9
- IMPORTANT INFORMATION....18
- IDENTIFICATION OF COMPONENTS
- FUNCTIONSCONTROLS
- SIDE JOINER ASSEMBLY FOR S MODELS
- FLOOR ASSEMBLY FOR AIR MODELS
- FLOOR ASSEMBLY FOR S MODELS
- INSTRUCTIONS FOR MORE THAN 3 PCS PANELS FLOOR
- HANDLING TAF MODELS (ALUMINIUM FLOOR)
- OPERATION: ROWING
- NOTICE DO NOT USE OARS AS LEVERS; THEY ARE BREAKABLE
- TOWING - ANCHORING - MOORING
- BEACHING
- USE IN HIGHER ALTITUDES
- OPERATION INSTRUCTIONS
- STORAGE
- CLEANING PROCEDURES
- FUELLING
- FOLLOW THIS LIST
- FOR FURTHER TROUBLESHOOTING AND REPAIR
- SPARE PARTS AND ACCESSORIES
- CONTACT US
- AUTHORIZED SERVICE DEALERS
- ENVIRONMENTAL & SAFETY CONSIDERATIONS
- ENVIRONMENTAL CONSIDERATIONS
- FUEL & OIL SPILLAGE
- WASTE DISPOSAL
- WAKE / WASH
- EXCESSIVE NOISE
- WATER HAZARDS
- AIR CHAMBER FAILURE
- SAFETY TIPS
Brand : YAMAHA
Model : YAM 200 T (2023)
Category : Boat